TENDA TECHNOLOGY HG305-GP N300 Wireless VoIP GPON Router User Manual
SHENZHEN TENDA TECHNOLOGY CO., LTD. N300 Wireless VoIP GPON Router Users Manual
Users Manual
3. Configure the Router
Step 1: Log in to the web UI of the router
1. Start a web browser, enter 192.168.1.1 in the address bar, and press Enter on the keyboard.
2. Enter the login username and password (admin for both by default), and click Login.
Step 2: Perform the registration process
1. Choose Network > Remote Management > Authentication Methods to enter the configuration page.
2. Select an authentication method based on the information provided by your internet service provider
(ISP), and enter the required parameters.
3. Click Submit button on the bottom of the page.
Step 3: Create a WAN connection
1. Choose Network > WAN > WAN Connection to enter the configuration page.
2. IP Version: Select your IP version. Take IPv4 as an example.
3. Type: Select your connection type. Take PPPoE as an example.
4. Connection Name: Select Create WAN Connection.
5. Service List: Select a service type from the drop-down list. Take INTERNET as an example.
6. VLAN Type: Select a VLAN type. Take Tag as an example.
7. VLAN ID: Enter the VLAN ID provided by your ISP.
8. 802.1p: Specify a priority for the WAN service based on the information provided by your ISP.
9. Username: Enter the PPPoE user name provided by your ISP.
10. Password: Enter the PPPoE password provided by your ISP.
11. Click Create button on the bottom of the page.
* If other parameters on this page are provided by your ISP, configure them according to your needs.
Step 4: Configure the WiFi settings
1. Choose Network > WLAN > SSID Settings to enter the configuration page.
2. Change the WiFi name (SSID Name).
3. Choose Network > WLAN > Security to enter the configuration page.
4. Change the WPA Passphrase (WiFi password).
5. Click Submit button on the bottom of the page.
FAQ
Q1: I cannot access the web UI of the router after I enter 192.168.1.1 in the address bar.
What should I do?
A1: Try the following solutions one by one to troubleshoot the problem:
Verify that the Ethernet cable is connected properly and the corresponding LED lights are in normal status.
Check the IP address settings of your computer. Verify it is set to Obtain an IP address automatically.
Connect your computer to another LAN port of the router.
Clear the cache of your web browser.
Try entering 192.168.1.1 in the address bar of another browser to log in.
Try login on another computer.
Hold down the Reset button for about 5 seconds to reset the router to factory default. Then enter
192.168.1.1 in the address bar of a web browser to login again.
Q4: I forget the login password. What should I do?
A4: Hold down the Reset button on this device for about 5 seconds to restore it to factory default.
Then try login with the default user name and password (admin for both).
Caution:
Adapter Model: BN063-A12012E
Manufacture: SHENZHEN HEWEISHUN NETWORK TECHNOLOGY CO.,LTD.
Input: 100-240 V AC 50/60 Hz 0.4 A
Output: 12 V DC 1 A
: DC Voltage
RECYCLING
© 2017 Shenzhen Tenda Technology Co., Ltd. All rights reserved.
Tenda is a registered trademark legally held by Shenzhen Tenda Technology Co., Ltd.
Other brand and product names mentioned herein are trademarks or registered trademarks of
their respective holders. Specifications are subject to change without notice.
6-8 Floor, Tower E3, NO.1001, Zhongshanyuan Road, Nanshan District, Shenzhen, China. 518052
Canada Hotline: 1-888-998-8966 HongKong Hotline: 00852-81931998 Skype: Tendasz
Website: http://www.tendacn.com E-mail: support@tenda.com.cn
Logout HG305-G
Status Network Security Application Administration Maintenance
WAN
Binding
LAN Address Setting
Prefix Management
WLAN
Remote Management
ITMS
Certificate
Authentication
Methods
QoS
SNTP
Routing
Authentication Methods
SN
LOID SNAuthentication
Password
Submit Cancel
Login
Username
Password
admin
.....
Login
Create Cancel
Status Network Security Application Administration Maintenance
WAN
4in6 Tunnel Settings
ARP Setting
DHCP Release First
Binding
LAN Address Setting
Prefix Management
WLAN
Remote Management
QoS
SNTP
Routing
IP Version IP v4
Type PPPoE
Connection Name Create WAN Connection
Port Binding LAN1 LAN2 LAN3 LAN4
SSID1 SSID2 SSID3 SSID4
Enable DHCP Server
Enable NAT
Service List INTERNET
VLAN Type Tag
VLAN ID
802.1p 0
Enable DSCP
DSCP
MTU 1492
Username
Password
Enable PPPoE Proxy
Allow MaxUserNum 4
Enable Pass Through
Authentication Type Auto
Connection Trigger Always On
Idle Timeout 1200 sec
WAN Connection
Status Network Security Application Administration Maintenance
WAN
Binding
LAN Address Setting
Prefix Management
WLAN
Basic
SSID Settings
Security
Remote Management
QoS
SNTP
Routing
Choose SSID SSID1
Broadcast Disable
SSID Enable
Maximum Clients 32 (1~32)
SSID Name SSID1 (1~32 Char)
Submit Cancel
Status Network Security Application Administration Maintenance
WAN
Binding
LAN Address Setting
Prefix Management
WLAN
Basic
SSID Settings
Security
Remote Management
QoS
SNTP
Routing
Choose SSID SSID1
Authentication Type WPA/WPA2-PSK
WPA Passphrase !@#$%12345 (8 ~ 63 characters)
WPA Encryption Algorithm TKIP+AES
Submit Cancel
WP S WL AN Re set
USB
Please read this installation guide before you start. You can visit our website
at www.tendacn.com for more information about the router.
Packing List
Installation Guide
N300 Wireless VoIP GPON Router
Model: HG305-G
GPON Router * 1
Power Adapter * 1
Ethernet Cable * 1
Phone Cable * 1
Installation Guide * 1
1. Get to Know the Router
Top Panel
LED Indicator Color Status Description
POWER Green
Solid on The ONU is connected to a power supply properly.
Off The ONU is not powered on, or not connected to
a power supply.
INET Green
Solid on
Blinking
Off
The Ethernet connection is established successfully.
The ONU is transmitting or receiving data.
The ONU does not obtain a correct IP address, or
Ethernet connection does not exist.
PON Green
Solid on
Blinking
Off
The ONU is succeeded in being activated.
The ONU is being activated.
The ONU is failed to be activated.
LOS Red
Blinking
Off
The receiving optical power of the ONU is lower
than the sensitivity of the optical receiver.
The ONU is receiving optical power properly.
LAN1/2/3/4 Green
Solid on
Blinking
Off
The LAN port is connected to a device properly, but
no data is being transmitted.
The LAN port is transmitting or receiving data.
The LAN port is not connected to a device properly.
TEL1/2 Green
Solid on
Blinking
Off
The soft switch is succeeded in being registered by
the ONU, but no traffic is being transmitted.
The traffic is being transmitted.
The soft switch is failed to be registered by the ONU.
WLAN Green
Solid on
Blinking
Off
The wireless function is enabled, and no data is
being transmitted.
The ONU is transmitting or receiving data in
wireless manner.
The wireless function is disabled.
WPS Green
Solid on
Blinking
Off
The WPS negotiation is successful.
The ONU is performing WPS negotiation.
The WPS feature is disabled, or the WPS
negotiation fails.
USB Green
Solid on
Blinking
Off
The USB port is connected to a device properly,
and works in Host manner. But no data is being
transmitted.
The USB port is transmitting or receiving data.
The USB port is not connected to a device.
Rear Panel
Button/Port Description
ON/OFF
POWER
LAN1/2/3/4
PON
TEL1/2
Power button. Used to turn on/off the ONU.
Power jack. Used to connect to a power receptacle using the
included power adapter for power supply.
LAN ports. Used to connect to a computer, set-top box, router,
switch, and so on.
SC/APC optical fiber port. Used to connect to the internet.
POTS ports. Used to connect to a telephone or fax machine.
Side Panel
TEL2 TEL1 PON LAN4 LAN3 LAN2 L AN1 POWER ON/OFF
Button/Port Description
WPS
WLAN
Reset
USB
WPS button. Press it to perform WPS negotiation.
WiFi button. Press it to enable/disable WiFi.
Reset button. Hold it down for 5 seconds to restore the factory
settings of the router. Restoring the router to factory settings
clears all settings of the router. You need to configure the
router again for internet access.
USB port. Used to connect to a USB flash disk for resources sharing.
Environment Requirements
Operating temperature: 0 °C~40 °C Operating humidity: 10%~90% RH non-condensing
Anti-static Precaution
Electrostatic adsorption occurs if dust falls onto the router, which may disable the router to
work properly. To prevent this problem, keep the air in the ambient environment clean and
regularly perform dedusting.
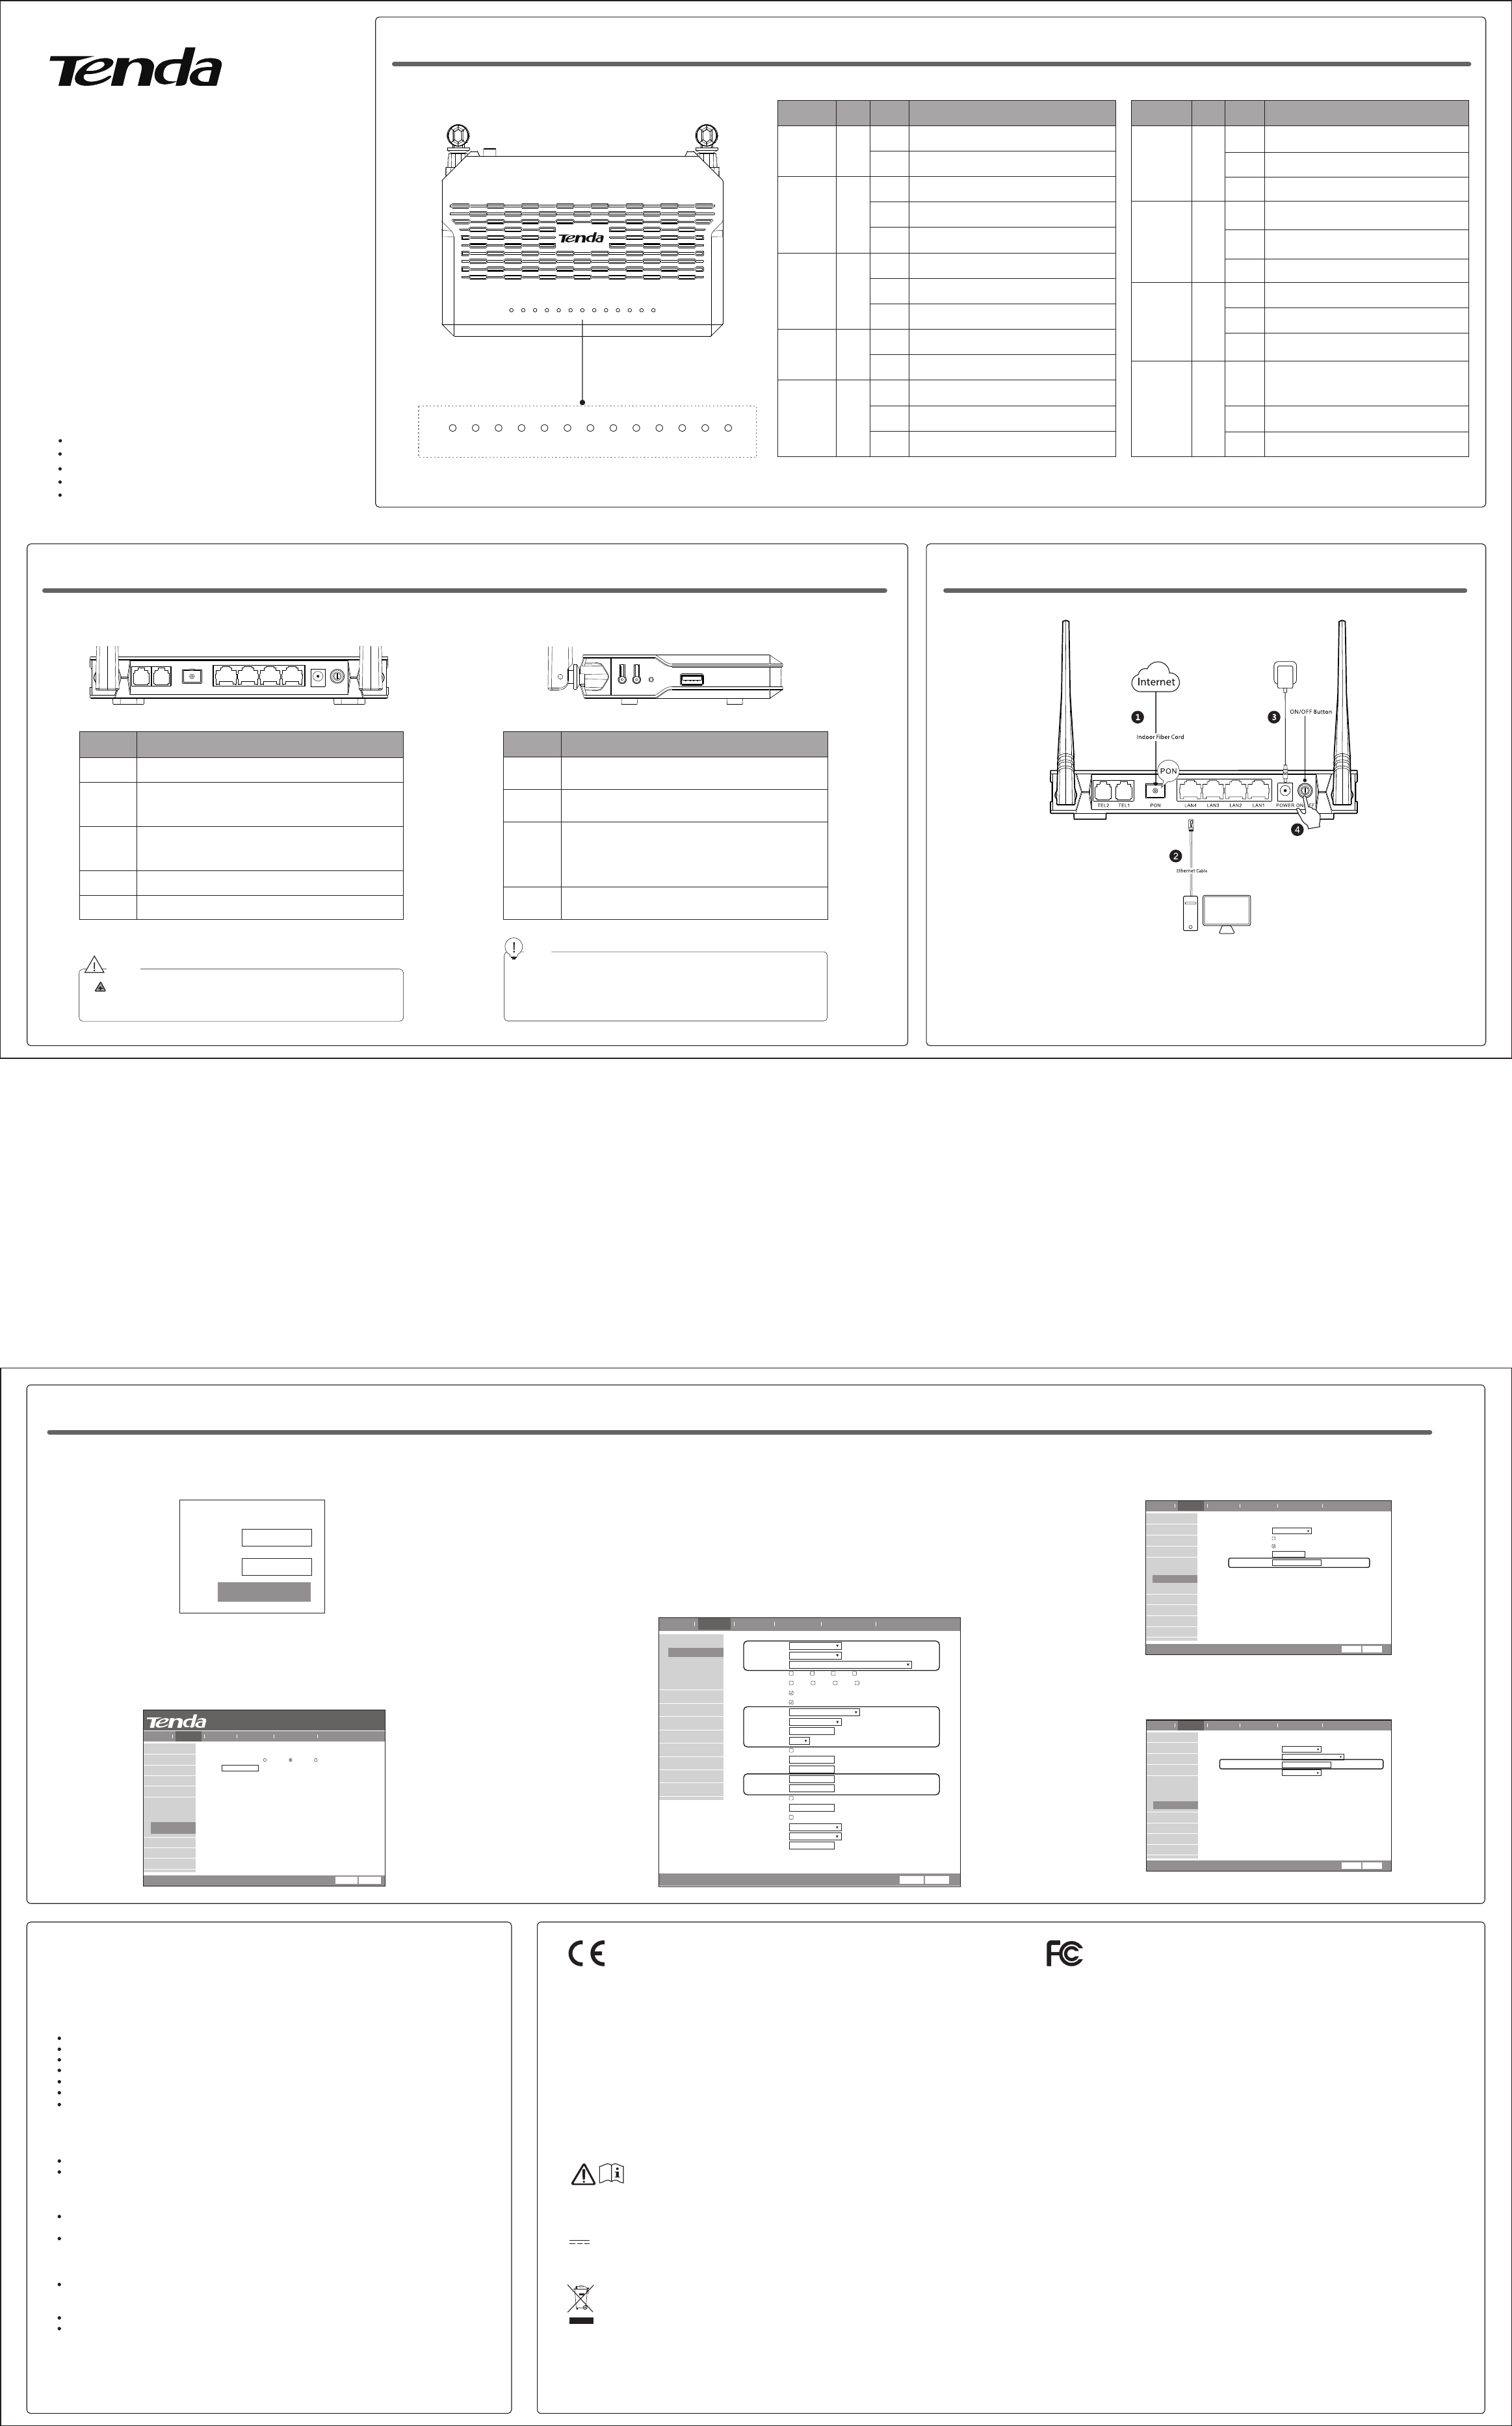
2. Connect the Router
Step 1: Connect the PON port to the internet using an indoor fiber cord.
Step 2: Connect a computer to one of the LAN ports of the router.
Step 3: Connect the router to a power receptacle using the included power adapter.
Step 4: Turn on the router.
Q2: The router (ONU) cannot be registered. What should I do?
A2: Try the following solutions one by one to troubleshoot the problem:
Verify that the fiber cord is connected to the router properly.
Check the status of the LOS LED indicator. If it stays blinking, check whether the optical module input
power is within its normal range of -8~-28 dBm which is displayed on the Status > Network Information >
GPON Information page of the web UI. If not, verify that the fiber terminal is clean, and the fiber is not
bent excessively.
Check the status of the PON LED indicator. If it is off, check whether you select correct authentication
method, and the authentication information you entered is correct.
If the problem persists, contact your ISP.
Q3: The registration is successful but I cannot access the internet. What should I do?
A3: Try the following solutions one by one to troubleshoot the problem:
Check whether the GPON router obtains valid IP address, DNS, and gateway information which is
displayed on the Status > Network Information > IPv4/IPv6 Connection page of the web UI. If not,
verify that the WAN connection you create is correct and valid.
Verify that the IP address of your computer is set to “Obtain an IP address automatically”.
If your problem still persists, contact your ISP.
Tips
LED Indicator Color Status Description
1. Get to Know the Router
CE Mark Warning
This is a Class B product. In a domestic environment, this product may cause radio interference, in which case the
user may be required to take adequate measures.
This equipment should be installed and operated with minimum distance 20cm between the radiator & your body.
NOTE: (1) The manufacturer is not responsible for any radio or TV interference caused by unauthorized modifications
to this equipment. (2) To avoid unnecessary radiation interference, it is recommended to use a shielded RJ45 cable.
Declaration of Conformity
Hereby, SHENZHEN TENDA TECHNOLOGY CO. LTD. declares that the radio equipment type HG305-G is in compliance
with Directive 2014/53/EU.
The full text of the EU declaration of conformity is available at the following internet address:
http://www.tendacn.com/en/service/page/ce.html
Operate Frequency: 2.4GHz-2.4835GHz
EIRP Power (Max.): 18dBm
Software Version: V1.0.0.0
This product bears the selective sorting symbol for Waste electrical and electronic equipment (WEEE). This means
that this product must be handled pursuant to European directive 2012/19/EU in order to be recycled or dismantled
to minimize its impact on the environment.
User has the choice to give his product to a competent recycling organization or to the retailer when he buys a new
electrical or electronic equipment.
POWER L AN2
INET PO N LOS LAN 1 LAN3 LA N4 TE L1 T EL2 W LAN WPS U SB
POWER LAN2
INET PON LOS LAN1 LAN3 LAN4 TEL1 TEL2 WLAN WPS USB
Caution, laser
NOTE
DO NOT look directly at the PON port when the router is powered on, neither the terminal of
the indoor fiber cord, to prevent any harm to your eyes.
---End.
FCC Statement
This device is restricted to be used in the indoor.
This device complies with Part 15 of the FCC Rules. Operation is subject to the following two conditions: (1)
This device may not cause harmful interference, and (2) this device must accept any interference received,
including interference that may cause undesired operation.
This equipment has been tested and found to comply with the limits for a Class B digital device, pursuant to
Part 15 of the FCC Rules. These limits are designed to provide reasonable protection against harmful
interference in a residential installation. This equipment generates, uses and can radiate radio frequency
energy and, if not installed and used in accordance with the instructions, may cause harmful interference to
radio communications. However, there is no guarantee that interference will not occur in a particular
installation. If this equipment does cause harmful interference to radio or television reception, which can be
determined by turning the equipment off and on, the user is encouraged to try to correct the interference by
one of the following measures:
— Reorient or relocate the receiving antenna.
— Increase the separation between the equipment and receiver.
— Connect the equipment into an outlet on a circuit different from that to which the receiver is connected.
— Consult the dealer or an experienced radio/TV technician for help.
FCC Caution:
Any changes or modifications not expressly approved by the party responsible for compliance could void the
user's authority to operate this equipment.
This transmitter must not be co-located or operating in conjunction with any other antenna or transmitter.
Radiation Exposure Statement
This equipment complies with FCC radiation exposure limits set forth for an uncontrolled environment. This
equipment should be installed and operated with minimum distance 20cm between the radiator & your body.
NOTE: (1) The manufacturer is not responsible for any radio or TV interference caused by unauthorized
modifications to this equipment. (2) To avoid unnecessary radiation interference, it is recommended to use a
shielded RJ45 cable.
SHENZHEN TENDA TECHNOLOGY CO.,LTD