TOKWA PRECISION TECHNOLOGY CP00 CAR RADIO User Manual 1
SHENZHEN TOKWA PRECISION TECHNOLOGY CO., LTD. CAR RADIO 1
UserManual.wiki
>
TOKWA PRECISION TECHNOLOGY
>
CP00 User Manual
Users Manual
Navigation menu
Upload a User Manual
Namespaces
Wiki Guide
HTML
PDF
Info
Views
User Manual
Discussion / Help
Navigation
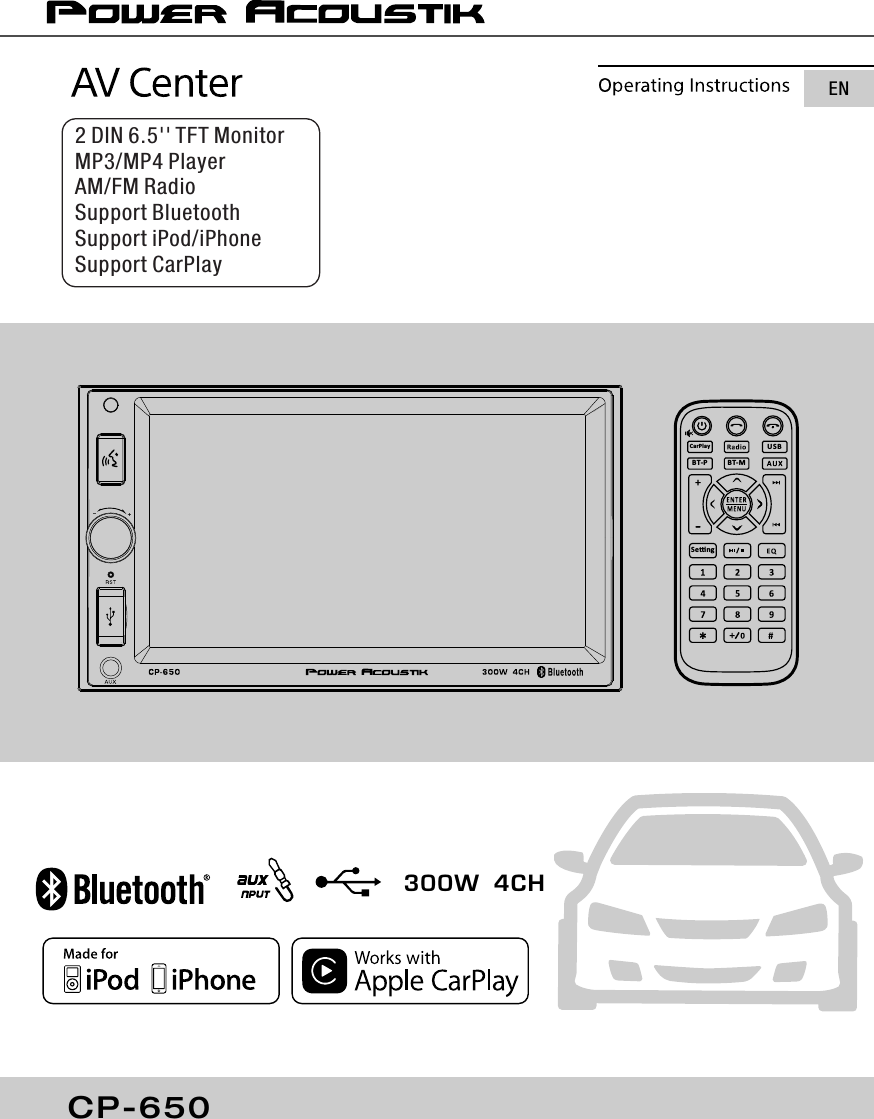

![CarPlay is a smarter, safer way to use your iPhone in the car. CarPlay takes the things you want to do with iPhone while driving and displays them on the screen of the product.You can get directions, make calls, send and receive messages, and listen to the music from iPhone while driving. You can also use Siri voice control to make it easier to operate iPhone. For details about CarPlay, visit https://ssl.apple.com/ios/carplay/.Operation buttons and available Apps on the home screen for CarPlay15CarPlay Description Apple CarPlay OperationCompatible iPhone devicesYou can use CarPlay with the following iPhone models:• iPhone 6s Plus• iPhone 6s• iPhone 6 Plus • iPhone 6• iPhone 5s• iPhone 5c• iPhone 5• iPhone 7 Plus• iPhone 7iPhone /iPodNOTE:By connecting your iPod /iPhone to this unit with an optional accessory connection cable , you can supply power to your iPod/iPhone as well as charge it while playing music. However, the power of this unit must be on.If you start playback after connecting the iPod, the music that has been played by the iPod isplayed first. iPhone connectionConnect iPhone using USB cable via USB terminal:When iPhone compatible with CarPlay is connected to the USB (Black) terminal, the Bluetooth smartphone currently connected is disconnected.You can use the Apps of the connected iPhone.The items displayed and the language used on the screen differ among the connected devices. To enter CarPlay mode, touch Apple CarPlayicon in the main menu screen.312Main Menu1 • Displays the home screen of CarPlay.• Touch and hold to activates Siri.2 Application buttonsStarts the application.3 [Main Menu]Exits the CarPlay screen and displays the Home](https://usermanual.wiki/TOKWA-PRECISION-TECHNOLOGY/CP00/User-Guide-3711587-Page-15.png)
![TROUBLESHOOTING Symptom Cause RemedyGeneralPower does not turn on.(No sound is produced.)Fuse is blownReplace with fuse of the same amperage. If the fuse blows again, consult your store of purchaseConsult your local retailer.In correct wiringNo sound output when operating the unit with amplifiers or power antenna attached.Power antennal lead is shorted to ground excessive current is required or remote on the amplifiers or power antenna.1. Turn off the unit.2. Remove all wires attached to the power antenna lead. Check each wire for a possible short to ground using an ohm meter.3. Turn on the unit.4. Reconnect each amplifier remote wire to the power antenna lead one by one. If the amplifiers turn off before all wires are attached, use an external replay to provide remote-on voltage (excessive current required).Nothing happens when buttons are pressed.Display is not Accurate.The microprocessorhas malfunctioneddue to noise, etc.Turn off the power, Then press the [no open] button and remove the DCP. Press the reset button for about 2 seconds with a thin rod.Panel or main unitConnectors are dirtyWipe the dirt off with a soft cloth moistened with cleaning alcohol.General 19](https://usermanual.wiki/TOKWA-PRECISION-TECHNOLOGY/CP00/User-Guide-3711587-Page-19.png)