TRENDNET TEW429UB 11g Wireless USB 2.0 Adapter w/ Hotspot Detector User Manual UG TEW 429UB b1
TRENDNET, INC. 11g Wireless USB 2.0 Adapter w/ Hotspot Detector UG TEW 429UB b1
TRENDNET >
Users Manual
Copyright
This publication, including all photographs, illustrations and software, is protected under interna-
tional copyright laws, with all rights reserved. Neither this manual, nor any of the material contained
herein, may be reproduced without written consent of the author.
Copyright 2005
Version 1.0 (July, 2005)
Disclaimer
The information in this document is subject to change without notice. The manufacturer makes no
representations or warranties with respect to the contents hereof and specifically disclaims any
implied warranties of merchantability or fitness for any particular purpose. The manufacturer
reserves the right to revise this publication and to make changes from time to time in the content
hereof without obligation of the manufacturer to notify any person of such revision or changes.
Trademark recognition
All product names used in this manual are the properties of their respective owners and are
acknowledged.
Federal Communication Commission Interference Statement
This equipment has been tested and found to comply with the limits for a Class B digital device,
pursuant to Part 15 of the FCC Rules. These limits are designed to provide reasonable protection
against harmful interference in a residential installation. This equipment generates, uses and can
radiate radio frequency energy and, if not installed and used in accordance with the instructions,
may cause harmful interference to radio communications. However, there is no guarantee that
interference will not occur in a particular installation. If this equipment does cause harmful interference
to radio or television reception, which can be determined by turning the equipment off and on, the
user is encouraged to try to correct the interference by one of the following measures:
• Reorient or relocate the receiving antenna.
• Increase the separation between the equipment and receiver.
• Connect the equipment into an outlet on a circuit different from that
• to which the receiver is connected.
• Consult the dealer or an experienced radio/TV technician for help.
FCC Caution: Any changes or modifications not expressly approved by the party responsible for
compliance could void the user's authority to operate this equipment.
This device complies with Part 15 of the FCC Rules. Operation is subject to the following two
conditions: (1) This device may not cause harmful interference, and (2) this device must accept any
interference received, including interference that may cause undesired operation

IMPORTANT NOTE: FCC Radiation Exposure Statement
This device complies with FCC RF Exposure limits set forth for an uncontrolled environment,
under 47 CFR 2.1093 paragraph (d)(2).
This transmitter must not be co-located or operated in conjunction with any other antenna or
transmitter.
This device was tested for typical by stander conditions that may occur during use. To comply
with FCC RF exposure requirements a minimum separation distance of 1.5 cm must be main-
tained between the user’s body and the device, including the antenna.
TRENDware declares that TEW-429UB, (FCC ID: S92ZTEW429UB) is limited in CH1~CH11 for
2.4 GHz by specified firmware controlled in U.S.A.
FCC Radiation Exposure Statement
This equipment complies with FCC radiation exposure limits set forth for an uncontrolled environ-
ment.
This device complies with FCC RF Exposure limits set forth for an uncontrolled environment,
under 47 CFR 2.1093 paragraph (d) (2).
This transmitter must not be co-located or operated in conjunction with any other antenna or
transmitter.
This equipment has been SAR-evaluated for use in laptops (notebooks) with side slot configuration.
Maximum Averagre SAR (1g) is 0.910W/kg.
Glossary ....................................................................................................31
Table of Contents
Getting Started with the TEW-429UB .......................................................... 1
Overview of the Wireless Client Utility .......................................................................... 2
Working with Profiles .................................................................................................... 3
Creating a Profile ..................................................................................................... 3
Modifying Profiles ..................................................................................................... 6
Checking for Available Access Points ........................................................................ 10
Disabling the Wireless Client Utility ............................................................................ 11
HotSpot Detector Hardware ....................................................................... 13
Charging TEW-429UB ................................................................................................ 13
Identifying Components .............................................................................................. 13
LCD Icons .............................................................................................................. 13
Finding a HotSpot .................................................................................................. 14
Accessing a HotSpot .............................................................................................. 14
Exploring the Wireless Client Utility Screens ............................................ 15
The Network Screen ................................................................................................... 15
Wireless Setting ..................................................................................................... 16
TCP/IP Setting ....................................................................................................... 17
Link Information ...................................................................................................... 17
The Profile Screen ...................................................................................................... 18
Profile List .............................................................................................................. 19
The SiteSurvey Screen ............................................................................................... 20
Available Networks ................................................................................................. 20
Detailed Info. Screen .............................................................................................. 21
The Options Screen .................................................................................................... 21
Options ................................................................................................................... 22
The Version Screen .................................................................................................... 22
Configuring Wireless Security ................................................................... 23
Configuring Security ................................................................................................... 23
Configuring WEP .................................................................................................... 23
Configuring WPA & WPA2 ..................................................................................... 26
Configuring WPA-PSK & WPA2-PSK (to be supported) ........................................ 26
Configuring 802.1x ................................................................................................. 27
Configuring 802.1x – PEAP .................................................................................... 27
Configuring 802.1x – PEAP-TLS ............................................................................ 29
iv --
Appendix ............................................................................................................33
Maintenance ................................................................................................................33
Checking the Wireless Client Utility Version ............................................................33
Uninstalling the Wireless Client Utility .....................................................................34
Upgrading the Wireless Client Utility .......................................................................34
Troubleshooting ...............................................................................................................
.................................................................................................................................35
Problems Starting the 802.11g Wireless Client Utility Program
Problems with the Link Status .................................................................................35
Problems with Security Settings
Specifications ..............................................................................................................36
Wi-Fi Radio: ............................................................................................................36

1
Getting Started with the TEW-429UB
Congratulations on purchasing the TEW-429UB! The quick start guide included with your
TEW-429UB tells you how to install the Wireless Client Utility and how to operate the Hotspot
Detector features of the TEW-429UB.
This manual provides information for setting up and configuring the TEW-429UB. This manual is
intended for both home users and professionals. It is not required to read some of the more
technical information in this manual to operate and enjoy the TEW-429UB. It is included for your
reference only.
The following conventions are used in this manual:
LIKE NOTES AND TIPS, THE IMPORTANT SYMBOL INDICATES INFORMATION THAT
CAN IMPROVE NETWORKING. THIS INFORMATION SHOULD NOT BE OVERLOOKED.
THE NOTE SYMBOL INDICATES ADDITIONAL INFORMATION ON THE TOPIC AT
HAND.
THE TIP SYMBOL INDICATES HELPFULL INFORMATION AND TIPS TO IMPROVE
YOUR NETWORK EXPERIENCE.
THE CAUTION SYMBOL ALERTS YOU TO SITUATIONS THAT MAY DEGRADE
YOUR NETWORKING EXPERIENCE OR COMPROMISE YOUR SECURITY.
NOTE
2
Overview of the Wireless Client Utility
The Wireless Client Utility is included on the CD that shipped with the TEW-429UB. Install the utility
as described in the Quick Start Guide before attaching the TEW-429UB to your computer.
IMPORTANT
BE SURE TO INSTALL THE WIRELESS CLIENT UTILITY BEFORE YOU ATTACH
THE TEW-429UB TO YOUR COMPUTER. ATTACHING THE TEW-429UB
BEFORE THE UTILITY IS INSTALLED COULD CAUSE THE INSTALLATION TO FAIL.
When the TEW-429UB is installed, it is configured to automatically
load when you start your computer. The utility icon displays in the
system tray at the bottom-right corner of your screen.
Double-click the TEW-429UB icon in the system tray, the following
Network screen opens:
3
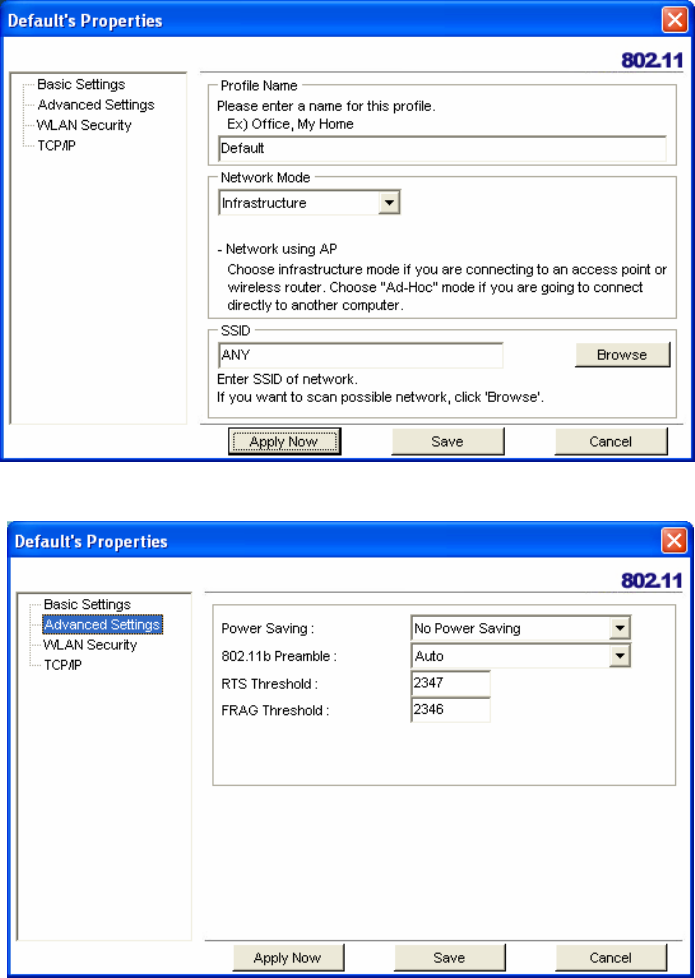
The Link Information pane provides information on your current connection. This same pane is
shows at the bottom of all screens so you are always aware of your connection status.
A profile is a record of the configuration you use to connect to a particular access point. Without
profiles, you would have to reconfigure the TEW-429UB each time you change access points.
Using the Profile screen you can configure the TEW-429UB to access your home network and your
office network. Each configuration is saved as a profile. Then when you go from the office to your
home you just select the appropriate profile.
CREATING A PROFILE
1. Click Profile
WHEN THE TEW-429UB IS NOT CONNECTED TO YOUR COMPUTER, MOST
SETTINGS IN THE WIRELESS CLIENT UTILITY ARE UNAVAILABLE. SETTINGS OR
BUTTONS THAT ARE NOT AVAILABLE ARE GRAYED OUT.
Working with Profiles
NOTE
YOU CAN CHANGE PROFILES WITHOUT REBOOTING YOUR COMPUTER. (PERHAPS
WHEN WALKING FROM ONE ACCESS POINT TO ANOTHER WITHIN YOUR OFFICE.) IF
YOU USE WINDOWS CONTROL PANEL TO CONFIGURE YOUR CONNECTIONS, YOU
MUST REBOOT THE COMPUTER WHEN CHANGING ACCESS POINTS.
NOTE
4
2. Click Add. The Wireless Client Utility Profile Wizard opens.
3. Type a descriptive name for the profile such as Office or CoffeeShop.
4. Click the drop-down arrow at Network Mode and select Infrastructure or Ad-Hoc. Choose
Infrastructure when connecting to an access point or wireless router. You will need to know the
SSID of the access point.
Choose Ad-Hoc when connecting directly to another computer without using an access point.
You can type anything for the SSID as long as the same SSID is used on the computer you are
connecting to.
5. In the SSID pane click Browse. The utility performs a site survey and displays the results.
The SSID (Service Set IDentifier) is the name assigned to a wireless Wi-Fi network. All devices
must use this case-sensitive name, which is a text string up to 32 bytes long, in order to
communicate.
5
6. Select the SSID you want to connect to and click Add to Profile.
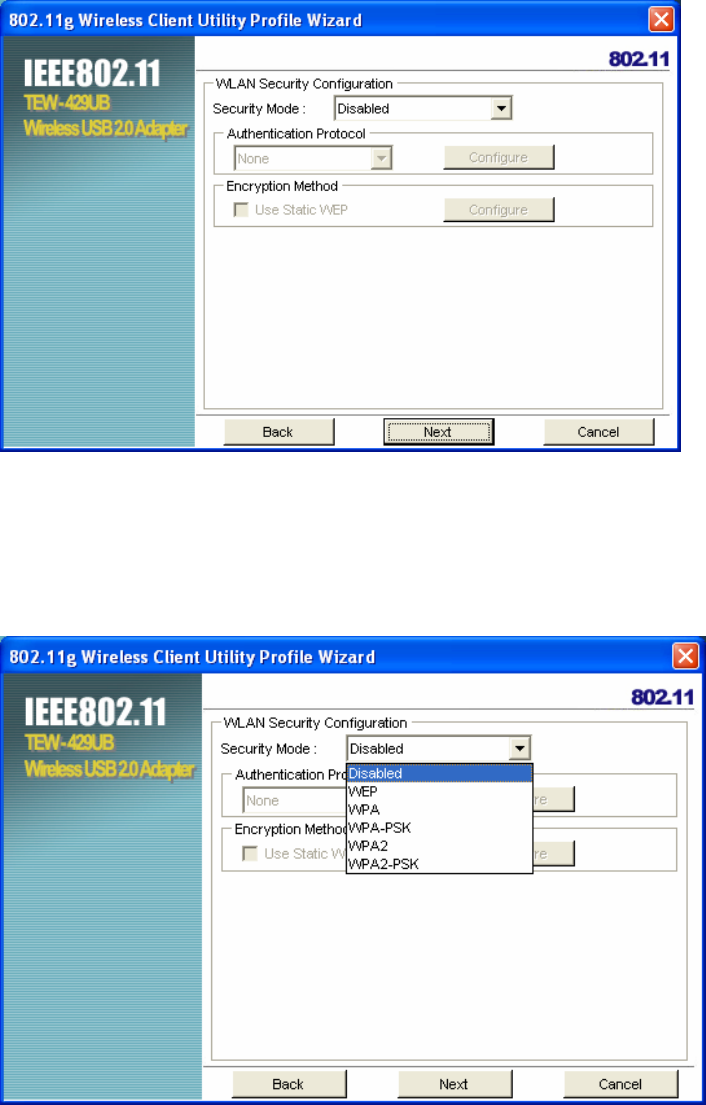
7. Click Next. The WLAN Security Configuration screen appears.
This screen reflects the security settings detected in the access point you want to connect to.
Security settings vary in complexity and you may have to consult your network administrator for
this information. See “Configuring Wireless Security” for more information.
8. Select the Security Mode from the drop-down list and then select the appropriate settings for the
security mode.
6
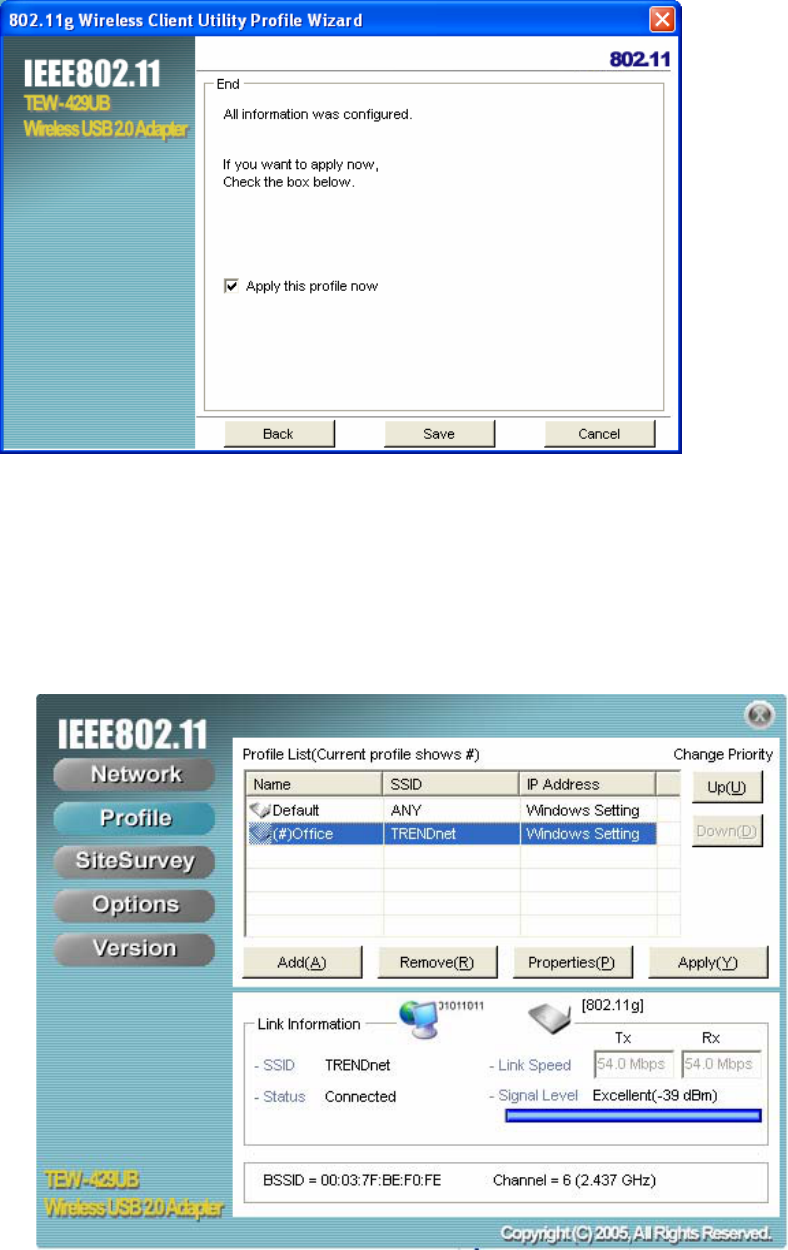
9. Click Next
10. Click Save to complete the wizard and save the new profile. (If you do not want to activate the
profile, uncheck the Apply this profile now checkbox.)
MODIFYING PROFILES
You may need to modify settings for a profile. For example, if you purchase a new router, or if your
office administrator provides you with new security settings. Refer to the following to modify a profile.
1. Open the Wireless Client Utility and click Profile.
7
2. Select the profile you want to modify and click Properties, the following window appears
3. Make the changes you want to the Basic Settings and click Advanced Settings.
Unless you have a thorough understanding of wireless networking, it is recommended that
you leave these settings at the defaults.
8
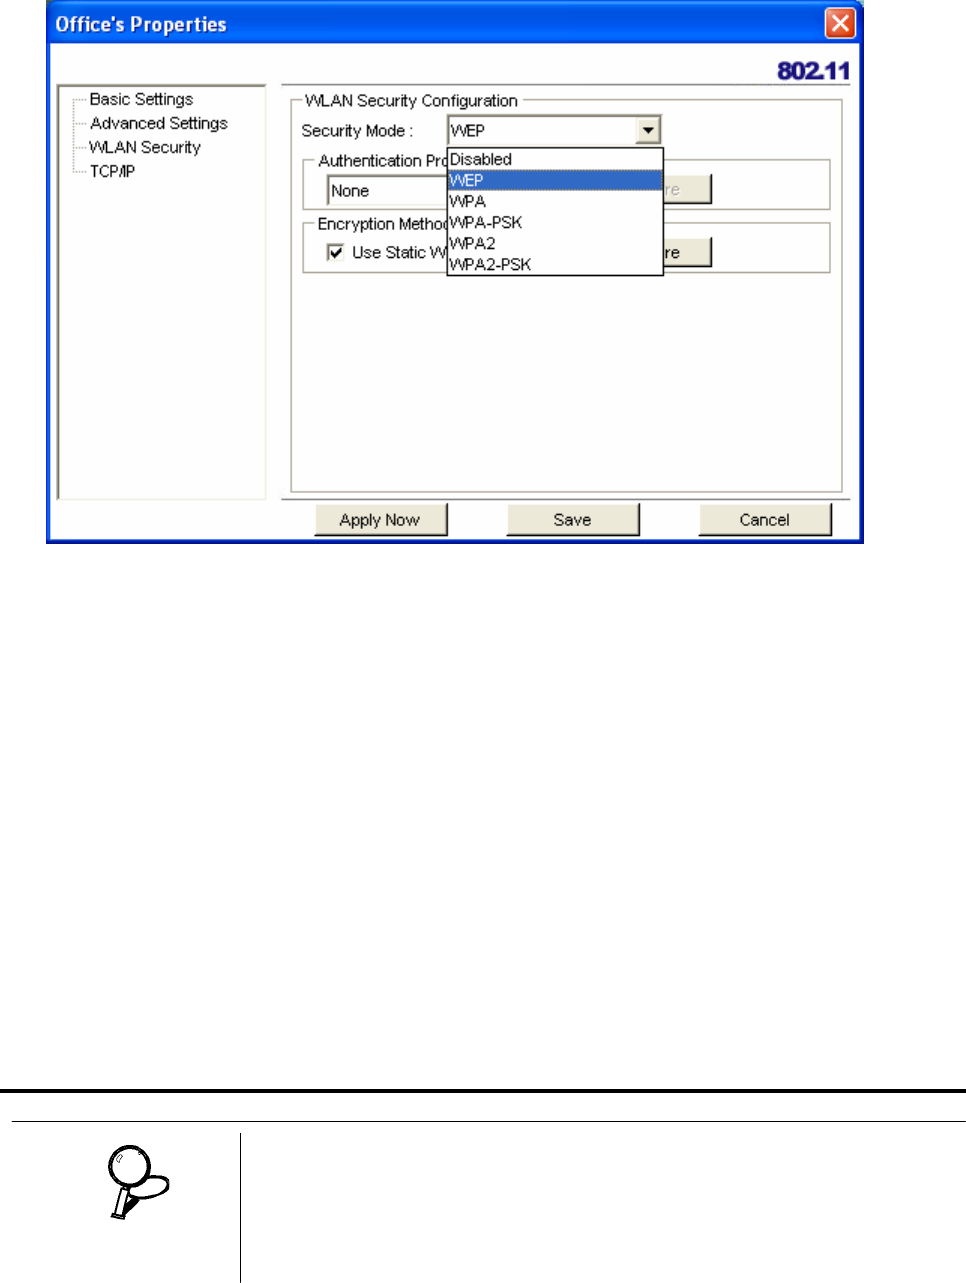
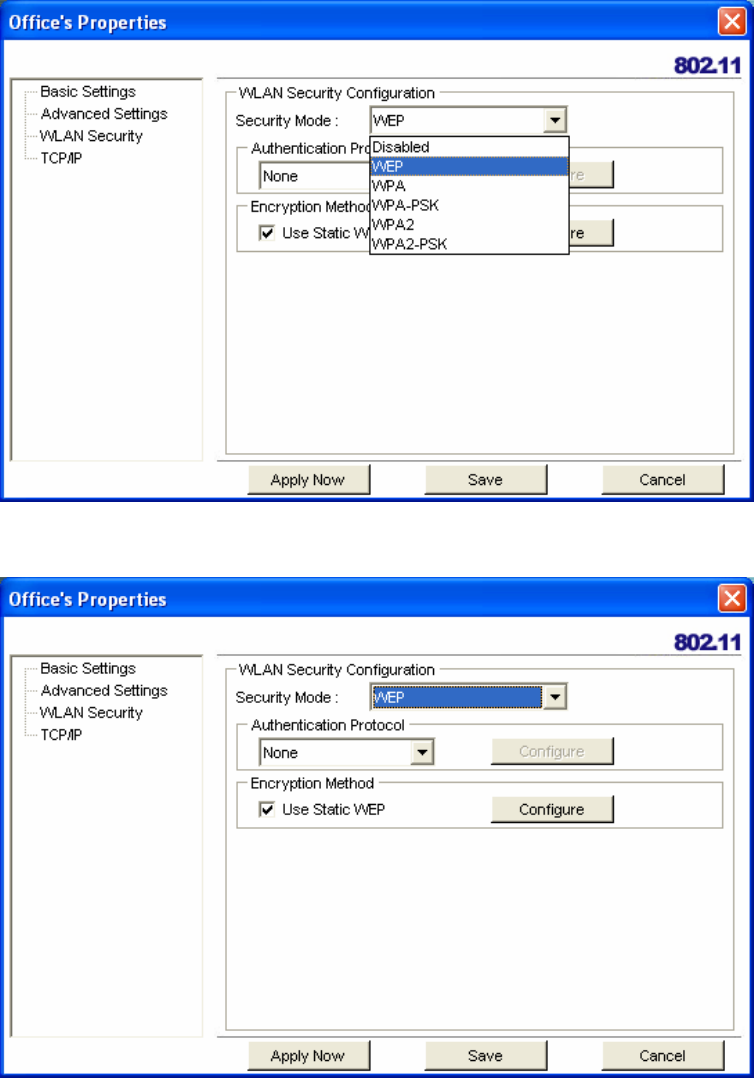
4. Click WLAN Security.
Click the drop-down arrow at Security Mode to choose from the following settings:
Disabled (No Encryption)
All data sent between the access point and the client is left unencrypted and may be viewed by
other wireless devices.
WEP (Wired Equivalent Privacy)
Encrypts all traffic sent between the access point and the client using a shared key. When using
WEP encryption, only access points and PCs using the same WEP Key can communicate with
each other
WPA/WPA2
WPA encrypts all traffic between the access point and the client using either TKIP or AES
encryption. Depending on the authentication protocol selected, each client must authenticate
using their own unique username, password, and security certificate.
WPA-PSK/WPA2-PSK
WPA-PSK or WPA2-PSK is a compromise between WPA/WPA2 and WEP. Like WEP, it uses a
pre-shared key that every user of the network must have in order to send and receive data. Like
WPA, it uses either TKIP or AES.
IT IS RECOMMEDED THAT YOU USE WPA/WPA2 OR WPA-PSK/WPA2-PSK
WHENEVER POSSIBLE. WPA (WI-FI PROTECTED ACCESS) PROVIDES STRON-
GER ENCRYPTION THAN THE EARLIER WEP (WIRED EQUIVALENT PRIVACY)
METHOD. WPA2 PROVIDES EVEN STRONGER ENCRYPTION, AUTHENTICATION
A
ND KEY MANAGEMENT.
IMPORTANT
9
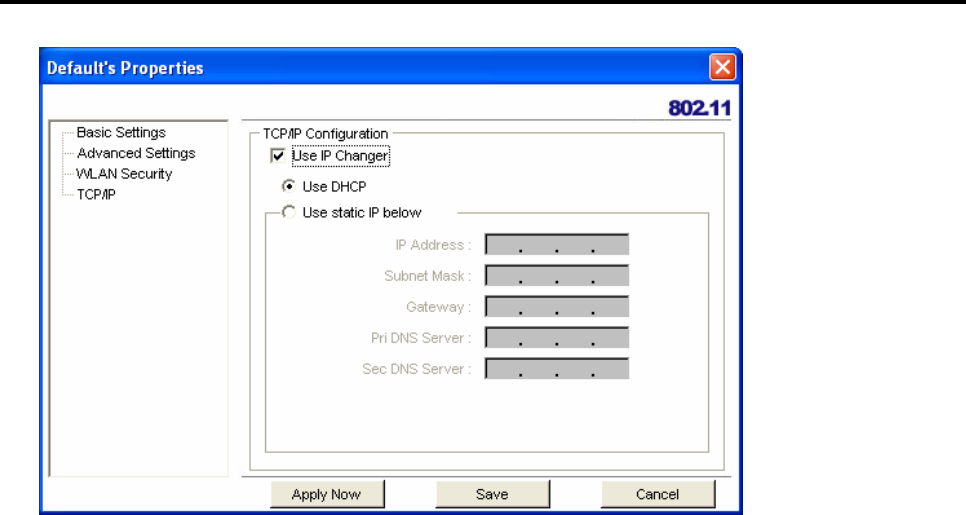
5. Make the changes you want and click TCP/IP Config.
Select the Use IP Changer checkbox. This allows you to bypass your existing wireless TCP/ IP
settings and configure TCP/IP settings for each profile.
Use DHCP
DHCP (Dynamic Host Configuration Protocol) automatically assign IP addresses. Check this
radio button if your router is set to DHCP.
Use static IP below
Check this radio button if you have to enter a static IP address.
10
Checking for Available Access Points
The number of access points or hot spots for public use is constantly increasing in major cities.
Many Web sites report on the locations of hot spots. Check the following Web sites for updated
information for your location.
• http://intel.jiwire.com
• www.hotspot-locations.com
• www.hotspotlist.com
• www.wififreespot.com
• www.wifinder.com
• www.wi-fizone.org
If you think you are in the vicinity of an access point, you can use the SiteSurvey screen to list the ones
available.
To scan for access points using the TEW-429UB, refer to the following.
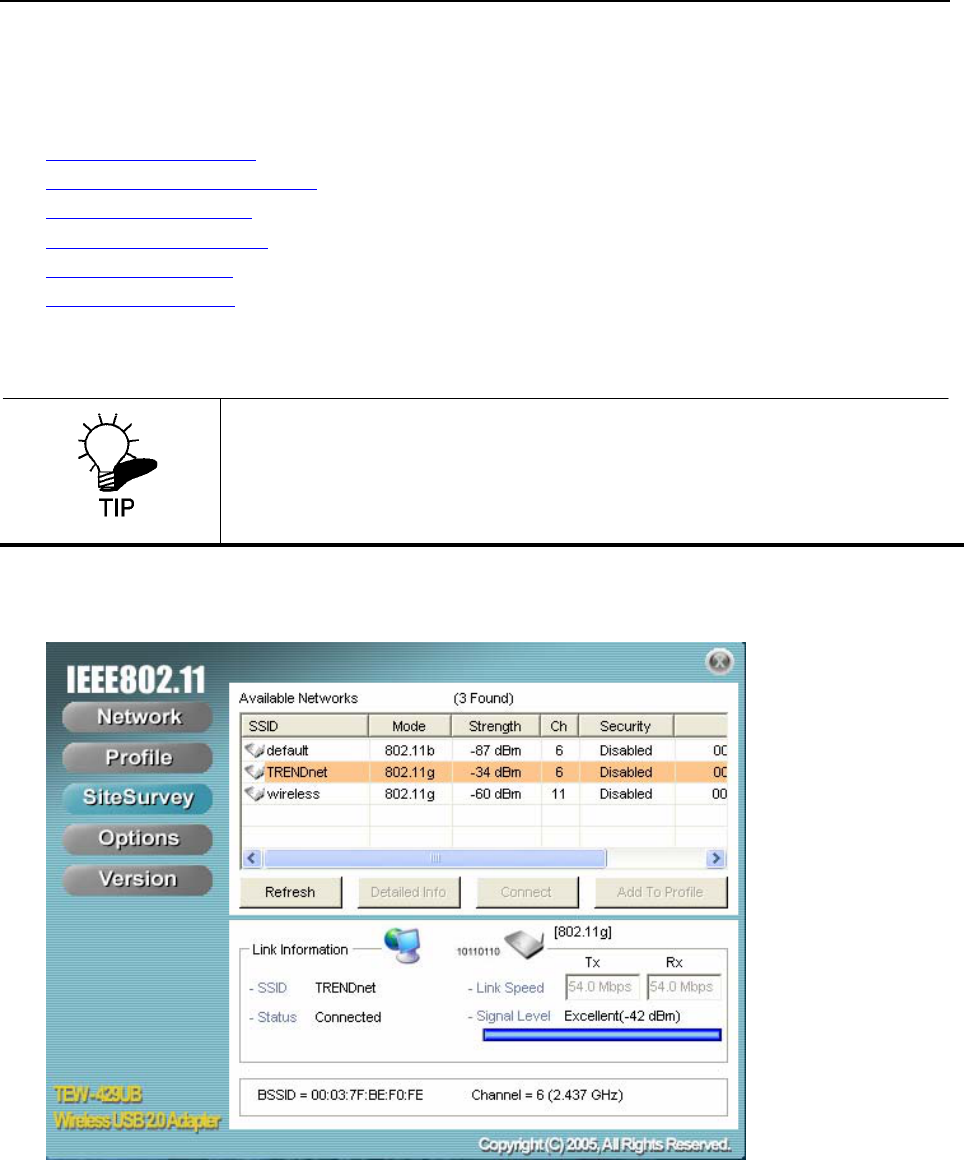
1. Open the Wireless Client Utility and click SiteSurvey.
2. Available wireless networks are listed. Click Refresh anytime to update the list.
Remember, you do not have to turn on your computer to find access points.
You can use the hot spot finder functionality of the WHF-432/230 to locate
access points while you are walking around. See the Quick Start Guide for
details.
11
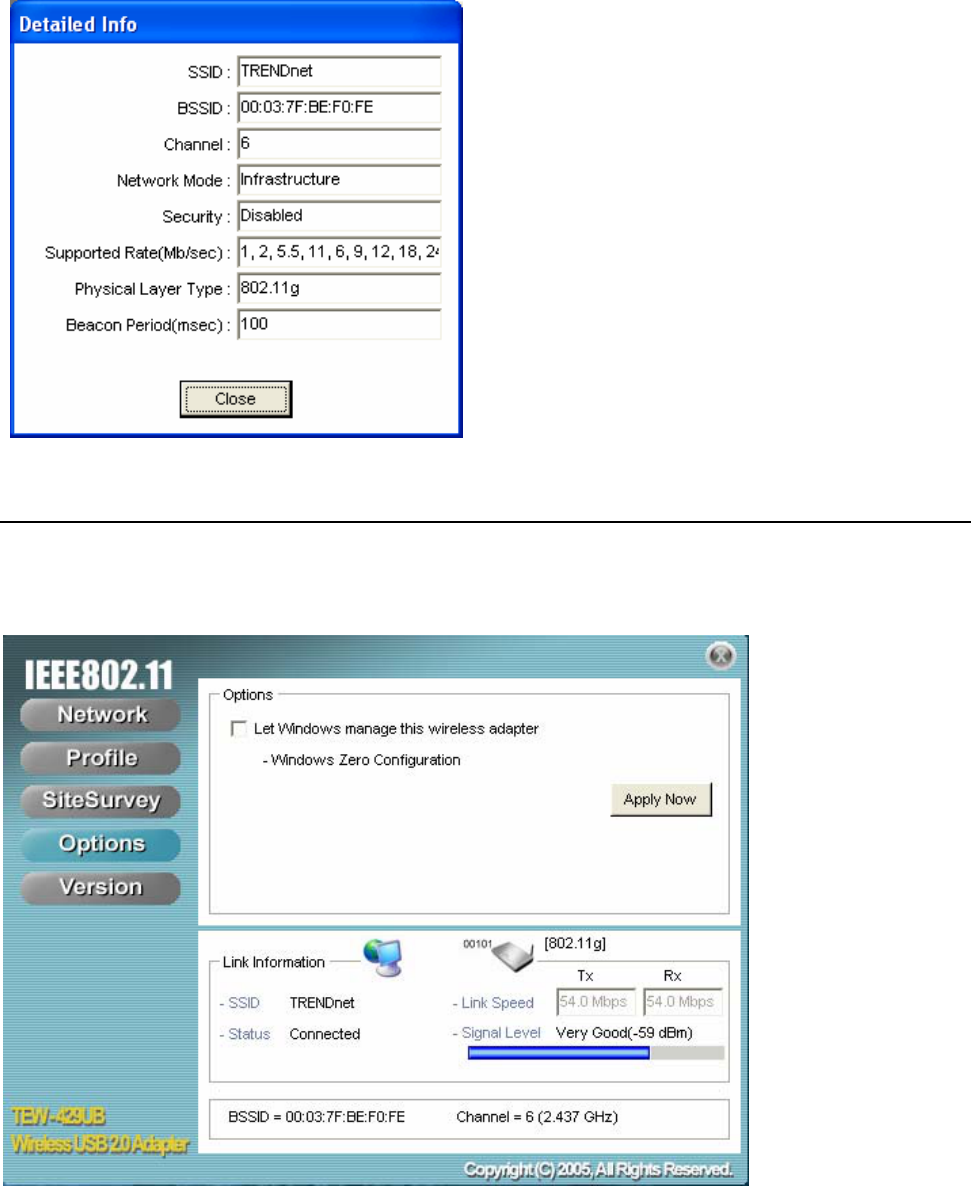
3. Select the network you want and click Connect. Or click Add To Profile if you want to connect
later.
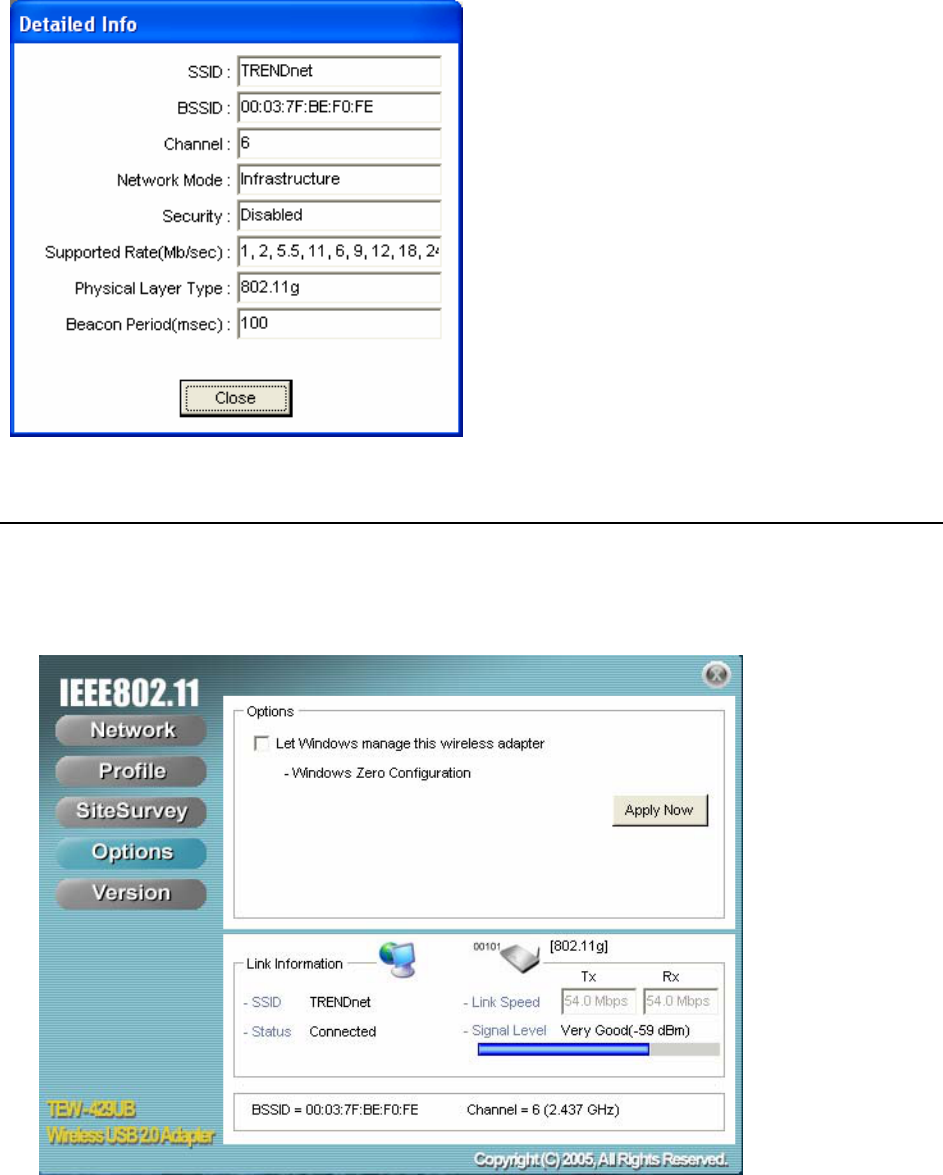
For details about any of the listed access points, select it from the list and click Detailed Info to
see the following screen. (You can also double-click an access point to view the Detailed Info
screen.
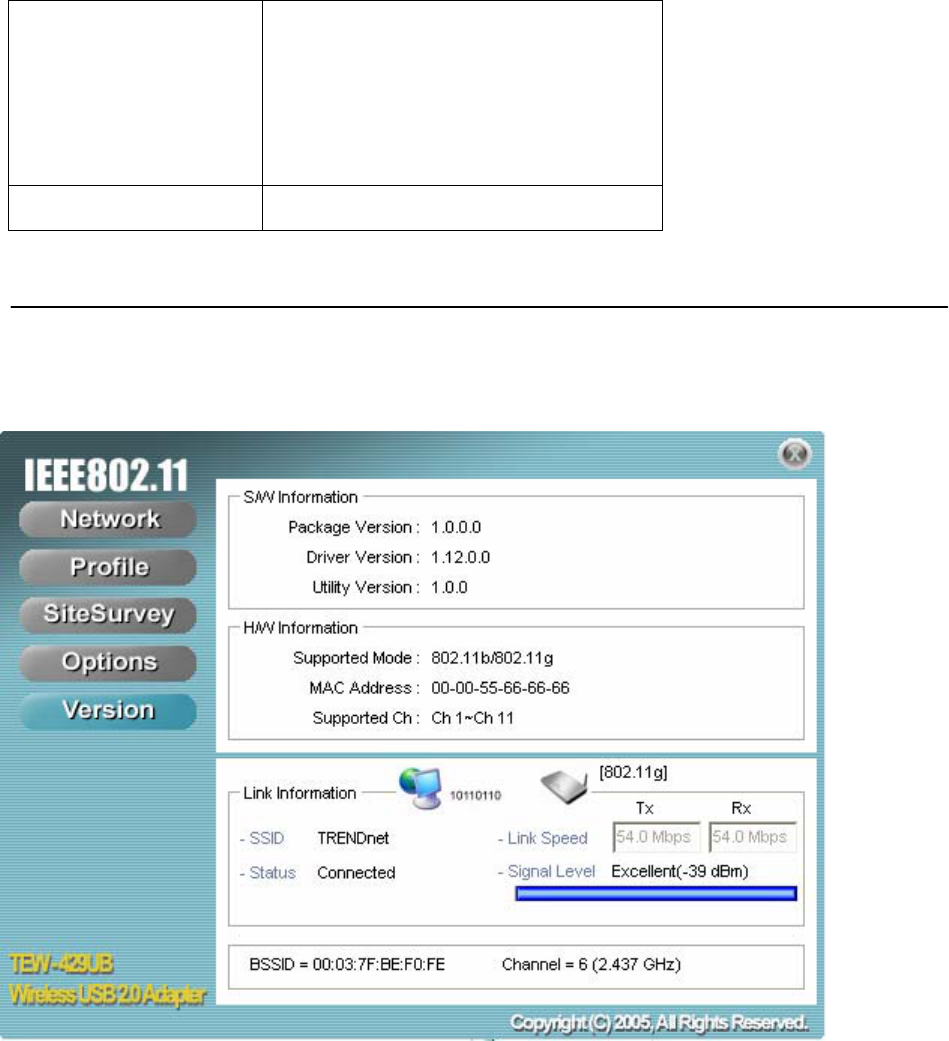
Disabling the Wireless Client Utility
You may need to have Windows manage your wireless network settings. In that case, you should
disable the Wireless Client Utility. To disable the Wireless Client Utility refer to the following.
1. Open the Wireless Client Utility and click Options.
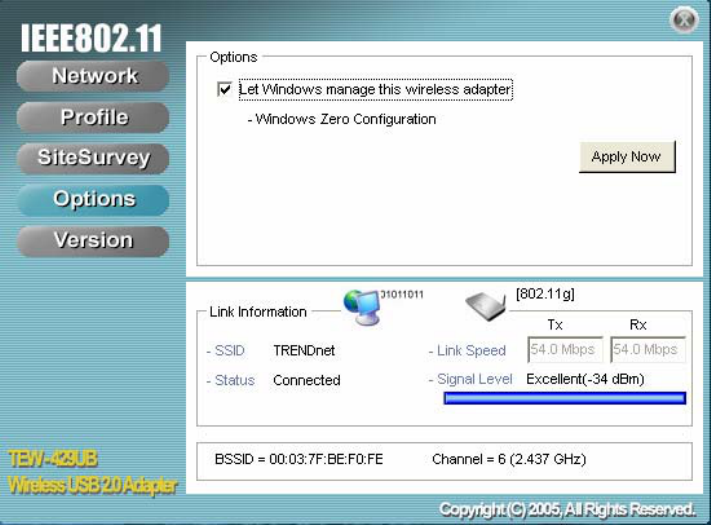
12
2. Select the Let Windows manage this wireless adapter check box and click Apply Now.
13
HotSpot Detector
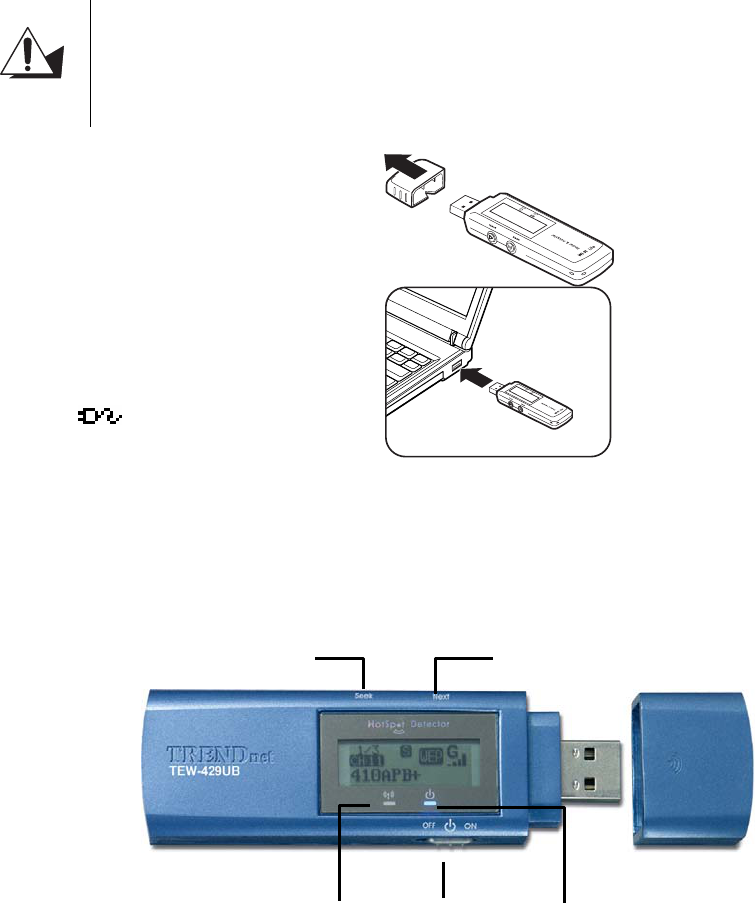
This section explains the hardware section of the TEW-429UB.
Charging the TEW-429UB
The TEW-429UB is powered by a rechargeable battery. The battery must be charged before first
use as follows.
CAUTION
Most notebook computer USB connectors are horizontal.
The TEW-429UB should be connected with the display
facing up. If the USB connector on your computer is
vertical, connect the TEW-429UB carefully to avoid
damaging the connectors.
1. Remove the cap from the
TEW-429UB.
2. With the display facing up,
insert the TEW-429UB into a
USB connector on your
computer.
The icon on the LCD
screen indicating the battery
is charging.
Identifying Components
The illustration below shows the buttons and LEDs on the TEW-429UB.
Next
Power
Seek
Seek LED Power LED
14
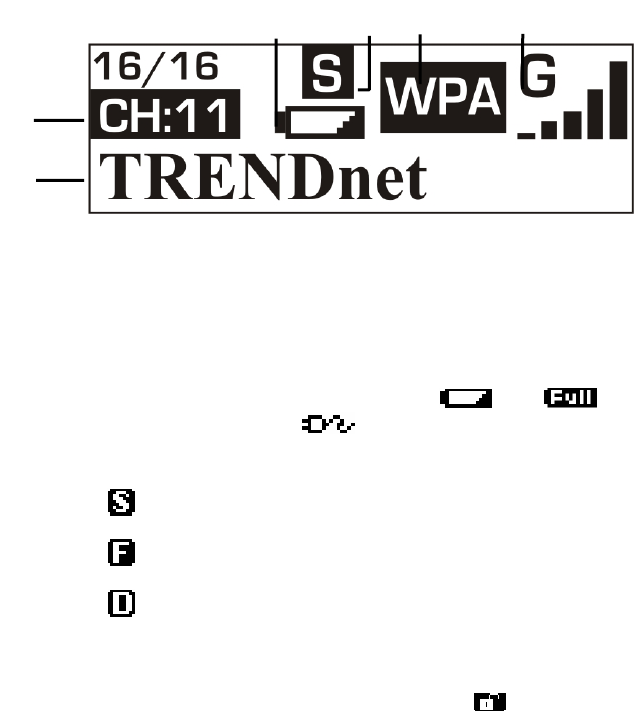
LCD Icons
The illustration below shows the icons in the LCD. All the icons will not necessarily appear
together as shown here.
Fully charged and Recharging icons would appear during charging process only.
Finding a Hot Spot
Refer to the following to find a hot spot.
3. Switch Power to ON.
The TEW-429UB boots and searches for hot spots.
4. Press Next to scroll the available hot spots.
Accessing a Hot Spot
5. Connect the TEW-429UB to your computer and open the Wireless Client Utility.
6. Open the SiteSurvey screen and select the hot spot you want to access.
1 SSID: Displays the SSID of the current connection. Scrolls
horizontally for longer names.
2 Channel: Displays the channel number of the current
connection.
3 Found: Displays the number of connections found. Up to 16
connections can be monitored.
4 Power: Indicates the battery status: low;
fully charged; recharging.
Press and hold the Seek button to scroll through
the three modes: [S]; [F]; and [D].
Scan results are ranked in order of signal
strength.
Only lists open hot spots ranked in order of
signal strength.
5 Scan mode:
Continually refreshes details of the selected hot
spot. Allows you to lock on and monitor the
signal strength as you move around.
6 Security Displays the security settings of the network:
[WEP]/[WPA] security enabled; security
disabled.
7 Signal
Strength
Displays the signal strength (five levels) and
radio band: [G]/[B] 802.11g/b.
7
3
2
6 4 5
1
15
7. Click Connect to access the hot spot.

16
Exploring the Wireless Client Utility Screens
The Network Screen
The Wireless Client Utility is included on the CD that shipped with the TEW-429UB. Install the utility
as described in the Quick Start Guide before attaching the TEW-429UB to your computer.
IMPORTANT
BE SURE TO INSTALL THE WIRELESS CLIENT UTILITY BEFORE YOU ATTACH
THE TEW-429UB TO YOUR COMPUTER. ATTACHING THE TEW-429UB
BEFORE THE UTILITY IS INSTALLED COULD CAUSE THE INSTALLATION TO FAIL.
When the TEW-429UB is installed, it is configured to automatically load when you start your
computer. The utility icon displays in the system tray at the bottom-right corner of your screen.
Double-click the TEW-429UB icon in the system tray, the following Network screen opens:
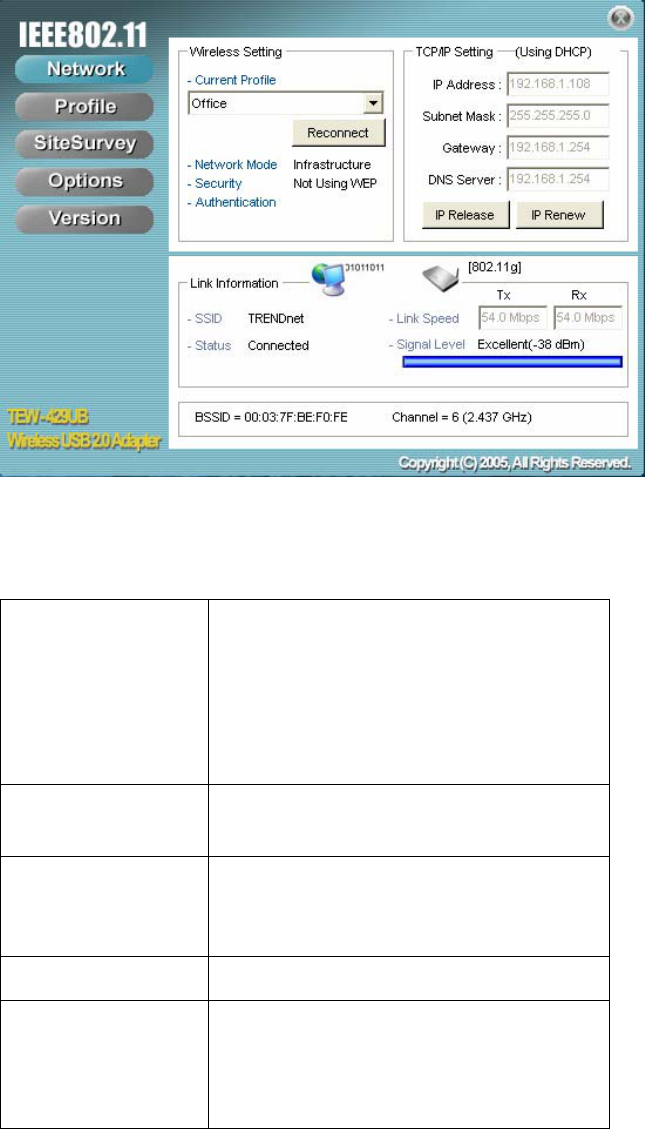
WIRELESS SETTING
The Wireless Setting pane settings are described below
Current Profile Shows the current profile you have
selected. If you have not added a pro-
file, only Default shows. The settings
shown in the Network screen are for
the current profile. Click the drop-
down arrow to select another profile.
Reconnect (button) Press to reconnect to the current access
point.
Network Mode Shows the current network mode.
Infrastructure or ad-hoc mode. (See
Note below for more information.)
Security Shows the security status.
Authentication Shows the authentication required. No
authentication is required if this field is
blank.

18 -- Exploring the Wireless Client Utility
WIRELESS SYSTEMS WORK IN INFRASTRUCTURE MODE OR PEER-TO-PEER
MODE. IN INFRASTRUCTURE MODE, WIRELESS DEVICES COMMUNICATE TO A
WIRED LAN VIA ACCESS POINTS. IN AD-HOC MODE (ALSO KNOWN AS PEER-
TO-PEER MODE), WIRELESS DEVICES COMMUNICATE WITH EACH OTHER
DIRECTLY AND DO NOT USE AN ACCESS POINT.
TCP/IP SETTING
The TCP/IP Setting pane settings are described below.
IP Address Shows the current network IP address.
Subnet Mask Shows the current subnet mask status.
Gateway Shows the current gateway.
DNS Server Shows the current network DNS
address.
IP Release (button) Click to release the current TCP/IP set-
tings.
IP Renew (button) Click to renew the TCP/IP settings.
LINK INFORMATION
The Link Information pane settings are described below.The Link Information pane shows the
network status.
SSID Shows the current SSID (Service Set
IDentifier). This is the name assigned
to a wireless Wi-Fi network. All
devices must use this case-sensitive
name in order to communicate.
Status Shows the current connection status.
Link Speed Shows the speed of the current connec-
tion. Tx is the transmit speed; Rx the
receive speed.
Signal Level Shows the signal strength of the cur-
rent connection. (See Tip below for
more information.)
BSSID Shows the ID of the current BSS. (See
Note below for more information.)
Channel Shows the network channel.
Exploring the Wireless Client Utility Screens -- 19
THE LINK INFORMATION PANEL IS SHOWN IN ALL SCREENS SO YOU CAN ALWAYS
SEE THE STATUS OF YOUR CURRENT CONNECTION. Monitor this set-
ting as you move around to attain a suitable signal.
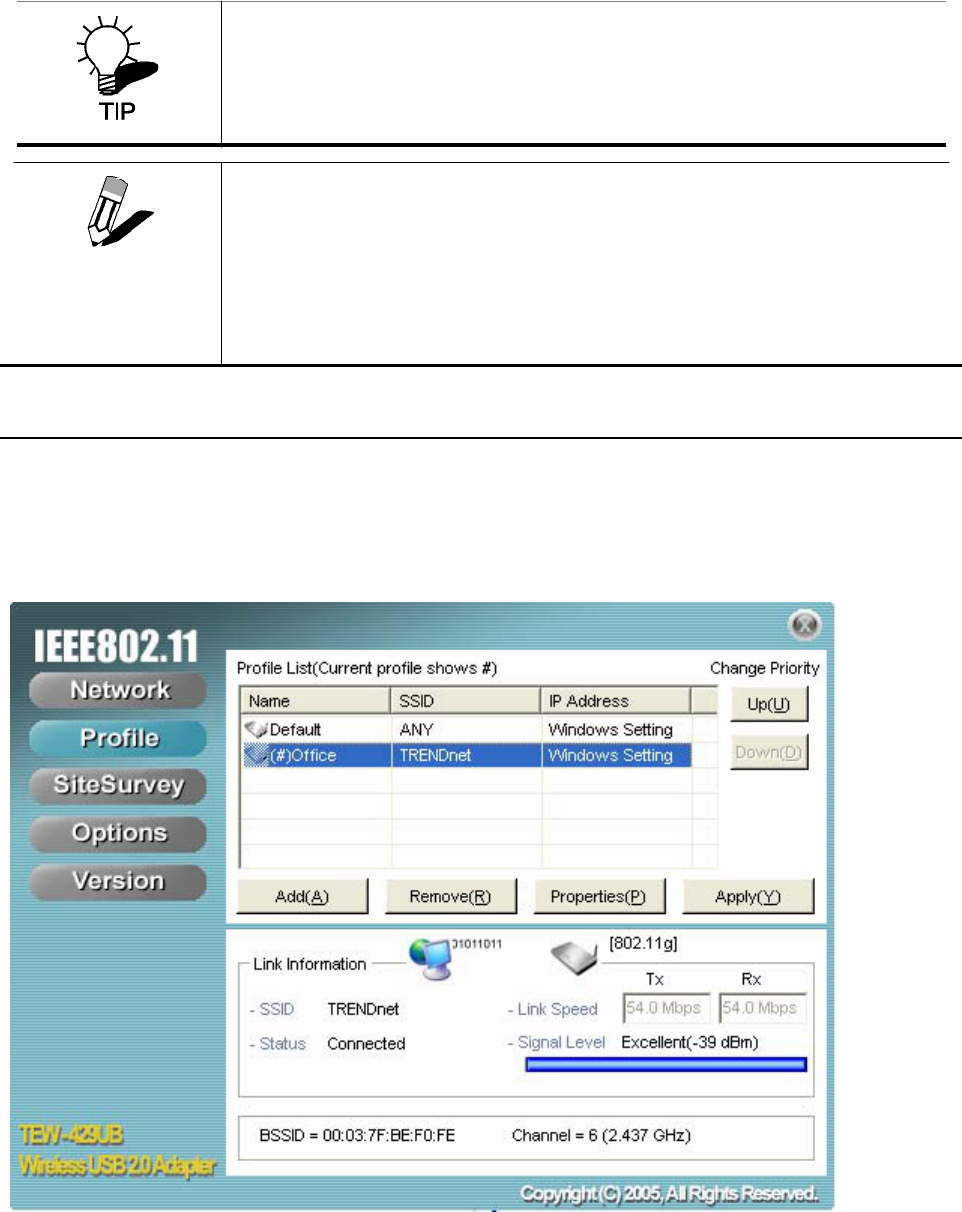
The Profile Screen
A profile is a record of the configuration you use to connect to a particular access point. Without
profiles, you would have to reconfigure the TEW-429UB each time you change access points. Using
the Profile screen you can configure the TEW-429UB to access you home network and your office
network. Each configuration is saved as a profile.
WIRELESS SYSTEMS WORK IN INFRASTRUCTURE MODE OR PEER-TO-PEER
MODE. IN INFRASTRUCTURE MODE, WIRELESS DEVICES COMMUNICATE TO A
WIRED LAN VIA ACCESS POINTS. EACH ACCESS POINT AND ITS WIRELESS
DEVICES ARE KNOWN AS A BASIC SERVICE SET (BSS). IN AD-HOC MODE (ALSO
KNOWN AS PEER-TO-PEER MODE), WIRELESS DEVICES COMMUNICATE WITH
EACH OTHER DIRECTLY AND DO NOT USE AN ACCESS POINT. THIS IS AN
INDEPENDENT BSS (IBSS).
NOTE

20
PROFILE LIST
The Profile List pane settings are described below.
Name Shows the name of the profile that you
assigned. If only default displays, no
profiles have been added.
SSID Shows the name (usually the equip-
ment vendor's name) assigned to a
wireless Wi-Fi network. (The keyword
“ANY” means any available network.)
IP Address Shows the IP address.
Add (button) Click to add a profile.
Remove (button) Click to remove the selected profile.
Properties (button) Click to view properties for the
selected profile.
Apply (button) Click to apply changes after modifying
settings.
Up (button)
Down (button)
Use the Up/Down buttons to move the
selected network to the top of the list or
to the bottom. When in the Network
screen, the TEW-429UB attempts to
connect to the network at the top of this
list first.
21
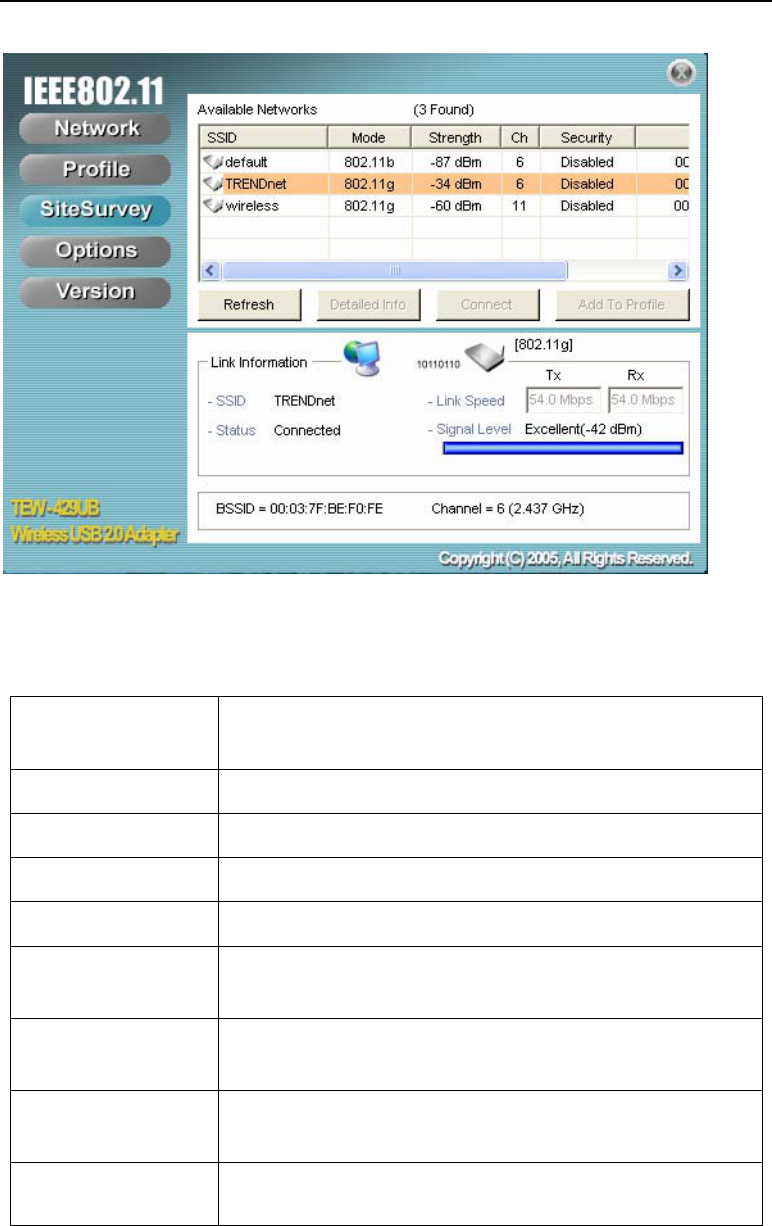
The SiteSurvey Screen
Use the SiteSurvey screen to scan for available networks in your vicinity.
AVAILABLE NETWORKS
The Available Networks pane settings are described below.
SSID Shows the name (usually the equipment vendor's
name) assigned to a wireless Wi-Fi network.
Mode Shows the signal type (802.11b/g).
Strength Shows the signal strength.
Ch Shows the network channel.
Security Shows the security status.
Refresh (button) Click to refresh the list of currently available net-
works.
Detailed Info (but-
ton) Click to view properties for the selected network. (See
Detailed Info. Screen below.)
Connect (button) Click to connect to the selected network. (The net-
work is not added to the profile list.)
Add To Profile (but-
ton) Click to add the network to the profile list.
22 -- Exploring the Wireless Client Utility
DETAILED INFO. SCREEN
For details about any of the listed access points, select it from the list and click Detailed Info to see
the following screen. (You can also double-click an access point to view the Detailed Info screen.
The Options Screen
By default, the Wireless Client Utility configures your wireless settings. Use this screen to disable the
Wireless Client Utility.
22
OPTIONS
The Options pane settings are described below.
Let Windows manage
this wireless adapter
(tick box)
When you check the Let Windows
manage this wireless adapter check-
box, Windows Zero Configuration
manages your wireless settings. The
Wireless Client Utility still shows the
link status of the adapter.
Apply Now (button) Click to execute the changes.
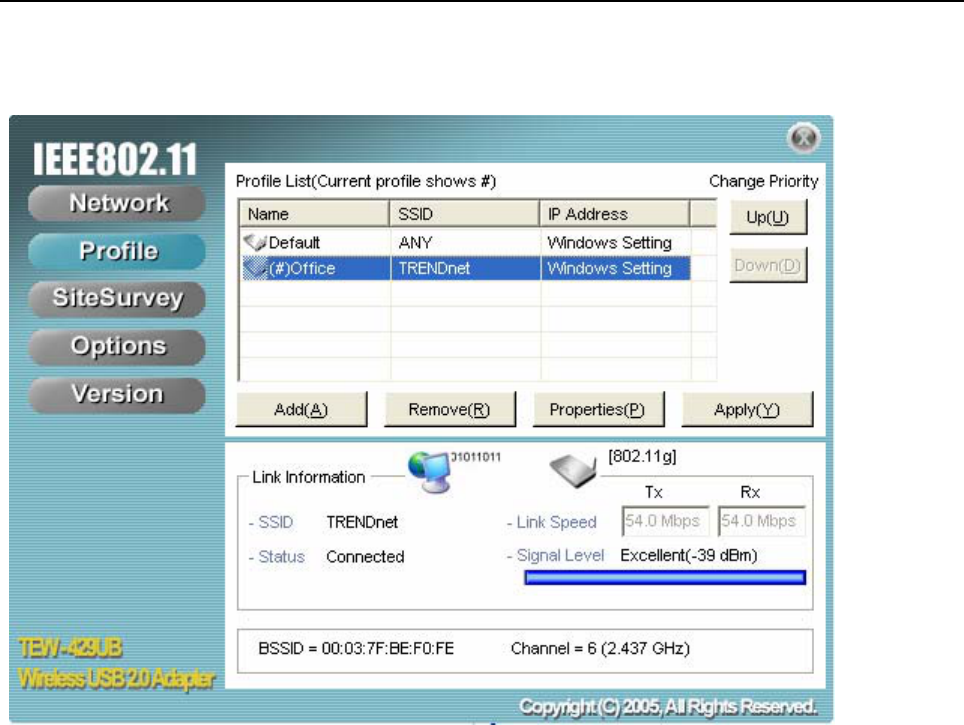
The Version Screen
This screen displays the software and hardware information of the adapter. You cannot make
changes to this screen.
23
Configuring Wireless Security
This chapter covers the configuration of security options in the 802.11 Wireless Client Utility.
Configuring Security
When you create a profile you need to configure the security settings with the information provided
by the administrator. You modify security settings by selecting the profile and clicking Properties.
CONFIGURING WEP
Refer to the following to modify WEP settings.
24
1. In the Properties window, click WLAN Security.
2. Click the drop-down arrow at Security Mode and choose WEP.
3. Click the Use Static WEP checkbox.
25
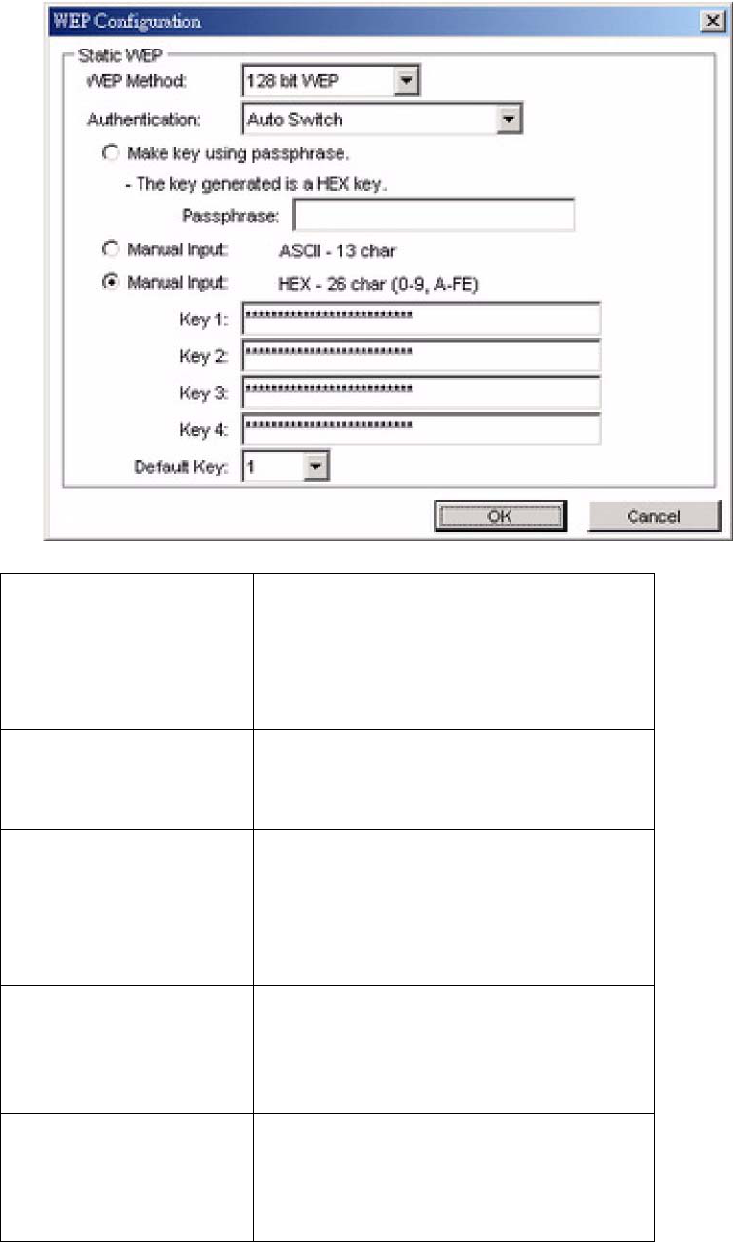
4. Click Configure. The WEP Configuration screen appears.
WEP Method Select the encryption to match your
access point: 64, 128, or 256-bit. The
encryption level must match the
encryption level used by your access
point.
Authentication Options are Auto, Open System, and
Shared. For most installations choose
Auto.
Make Key using Pass-
Phrase A WEP Key is automatically generated
as you type in any PassPhrase of your
choice. Use this feature when you
have used a PassPhrase to generate
your WEP key on your access point.
Manual Input (ASCII) Generate your own WEP Key (4 keys
maximum) using ASCII characters (5
characters for 64-bit, 13 characters for
128-bit)
Manual Input (HEX) Generate your own WEP Key using
hexadecimal characters (10 characters
for 64-bit, 26 characters for 128-bit).
26
Default Key Four keys are used for decryption; you have to choose a
default key from them for encryption.
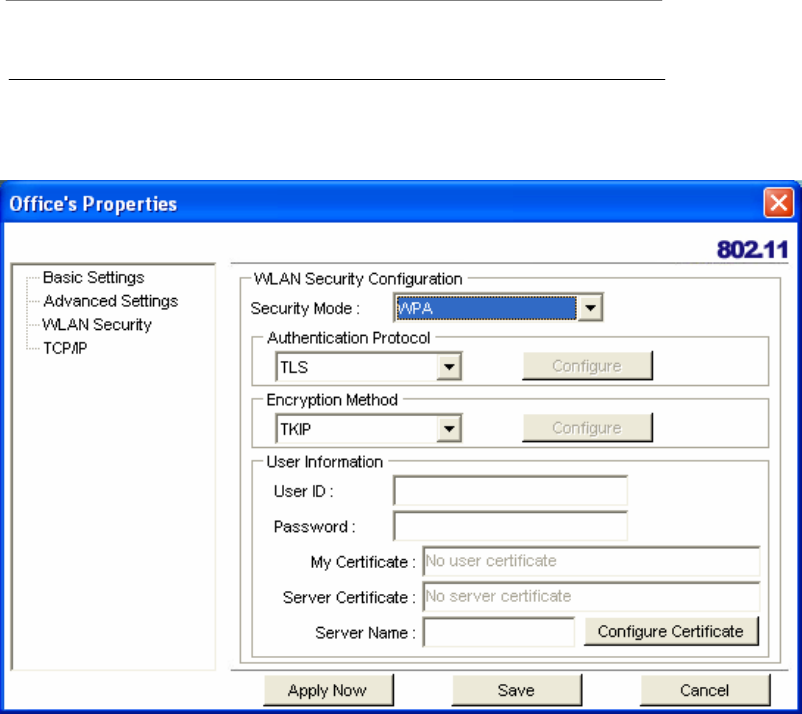
CONFIGURING WPA & WPA2
Refer to the following to configure WPA & WPA2.
1. Click the drop-down arrow at Security Mode and choose WPA or WPA2.
2. Click the drop-down arrow at Encryption Method and choose TKIP or AES.
To configure 802.1x for WPA or WPA2, see “Configuring 802.1x ” on page 33.
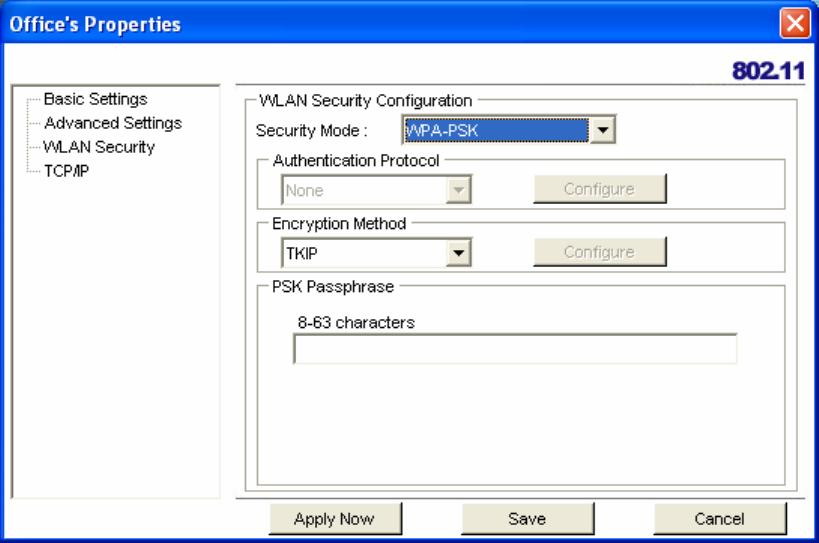
CONFIGURING WPA-PSK & WPA2-PSK (TO BE SUPPORTED)
Refer to the following to configure WPA-PSK & WPA2-PSK.
27
1. Click the drop-down arrow at Security Mode and choose WPA-PSK or WPA2-PSK.
2. Click the drop-down arrow at Encryption Method and choose TKIP or AES. (Most access
points use TKIP for WPA-PSK & WPA2-PSK.)
3. At PSK Pass Phrase enter the same pass phrase used to configure the WPA-PSK or
WPA2-PSK on your access point.
CONFIGURING 802.1 X
You need to know if your access point supports 802.1x and then apply the configuration here.
1. Choose the EAP method under Authentication protocol.
2. Options for User Information depend on the EAP method chosen.
CONFIGURING 802.1 X – PEAP
Refer to the following to configure PEAP.
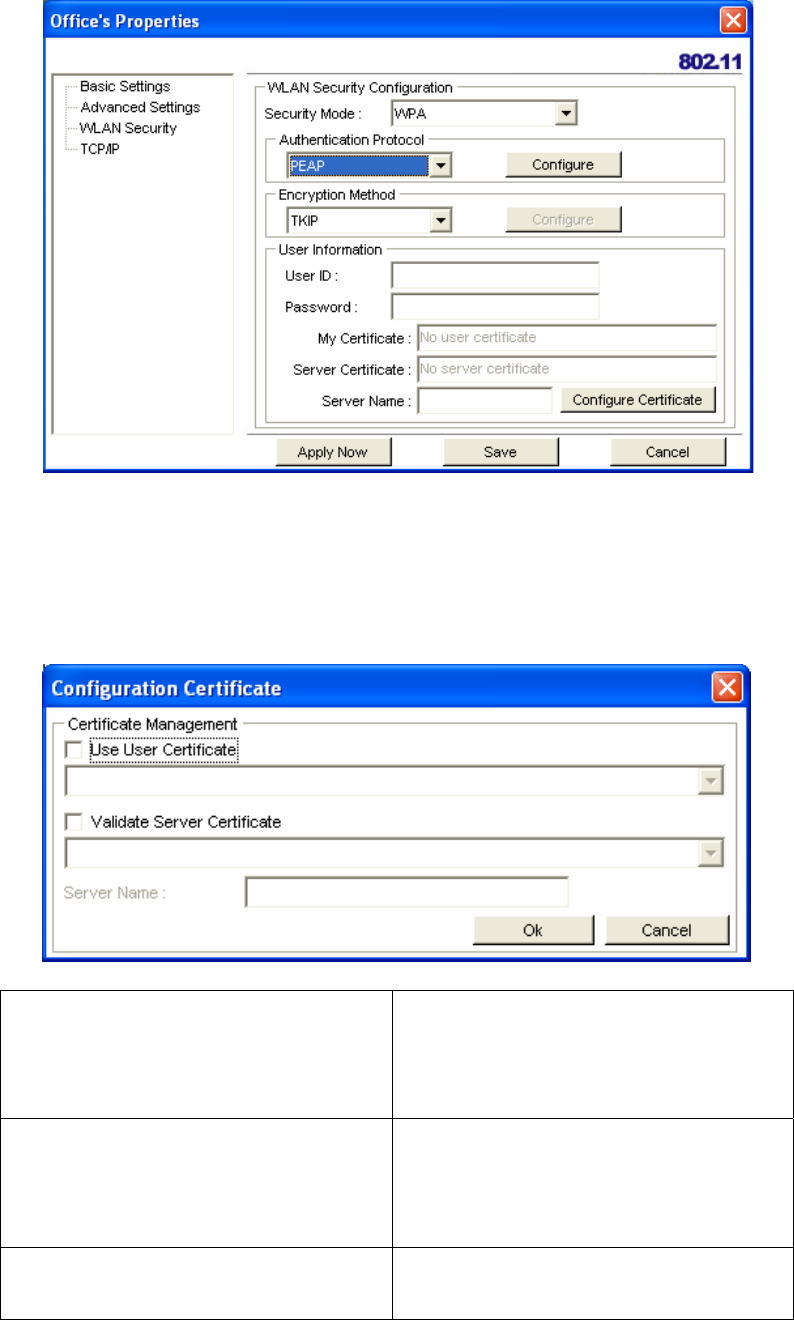
28
1. At WPA or WPA2 security mode, click Configure button next to Authentication Protocol.
2. Select Inner PEAP protocol.
3. Click Save to finish and return to the previous screen.
4. Type in a unique User ID and Password under User Information.
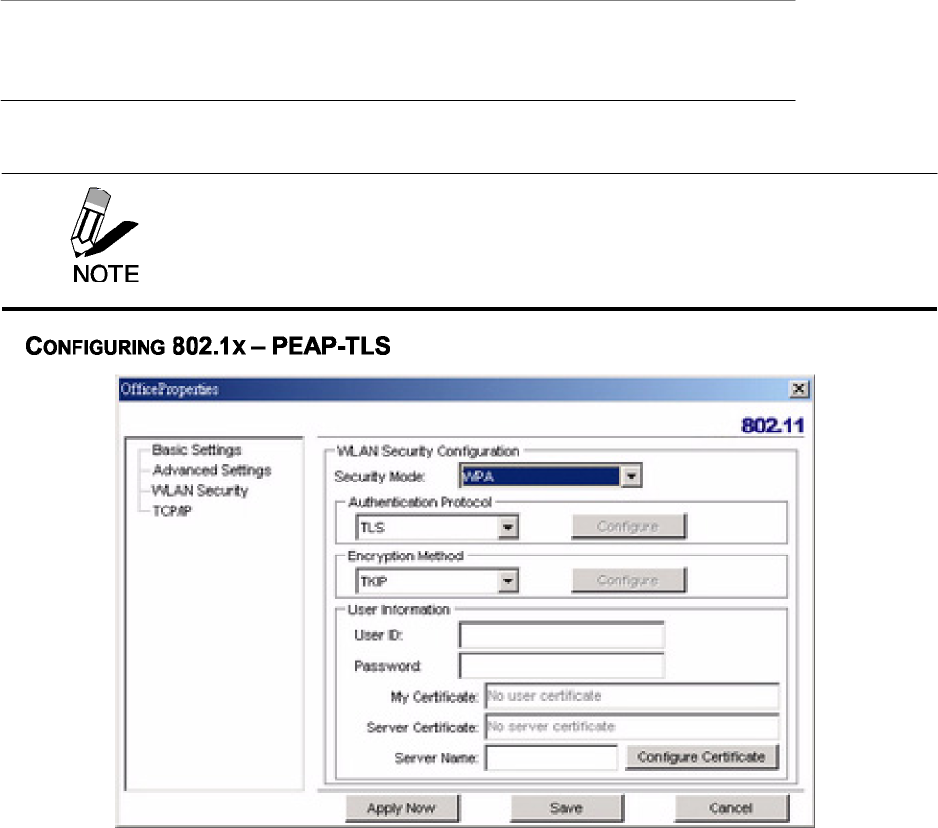
5. If your network uses a user server certificate click Configure Certificate (see Note below).
The following window appears:
Use user certificate Check this box if your network
requires user certification and then
select the certificate from the drop-
down menu.
Validate server certificate Check this box if your network
requires user certification and then
select the certificate authority from the
drop-down menu.
Server name: Type in the name of the server that is
used for 802.1 x authentication.
29
Server name should match exactly Check this box if the server name has
to exactly match the name in the certif-
icate.
6. Click OK to apply the settings.
1. At Security Mode select WPA or WPA2 from the drop-down menu.
2. At Authentication Protocol select TLS from the drop-down menu.
3. Click the Configure button and select the Inner TLS protocol.
4. Type in a unique User ID and Password under User Information.
Server Certificates require a wired connection to the network so you can
obtain the certificate(s) from the certificate authority. Your network
administrator can provide on certificate management.
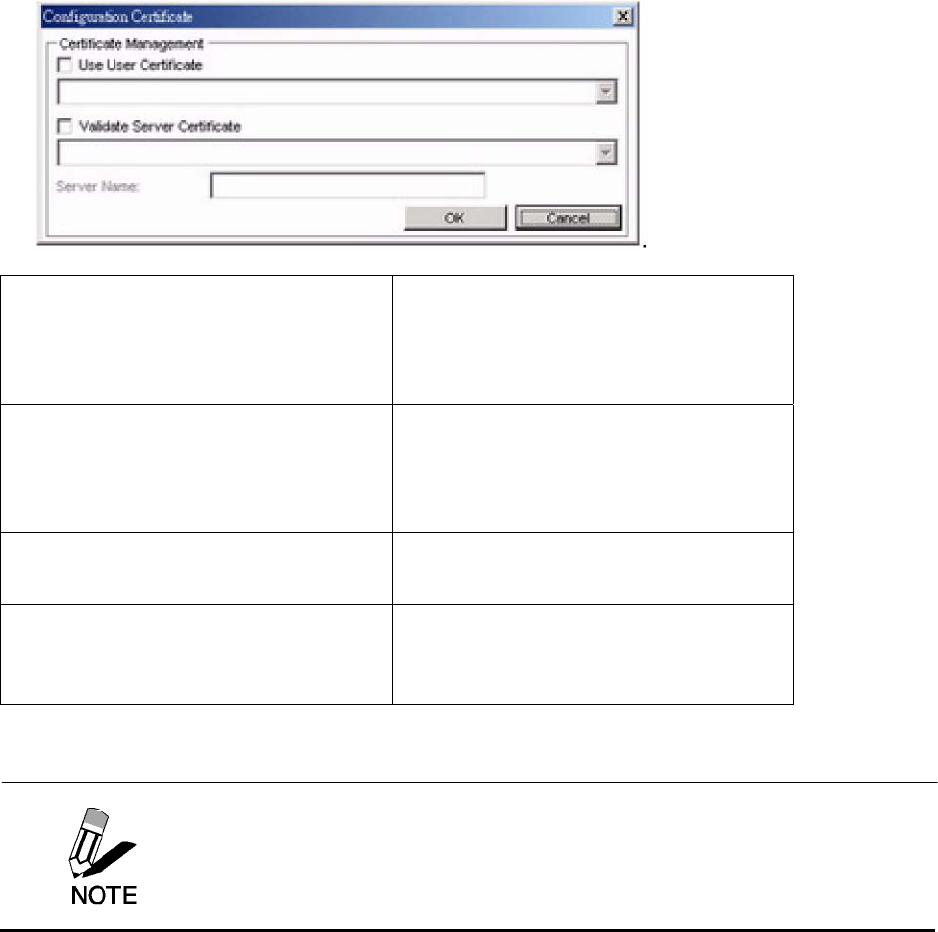
30
5. TLS requires both server and user certification. Click Configure Certificate (see Note
below). The following window appears:
Use user certificate Check this box if your network
requires user certification and then
select the certificate from the drop-
down menu.
Validate server certificate Check this box if your network
requires user certification and then
select the certificate authority from the
drop-down menu.
Server name: Type in the name of the server that is
used for 802.1 x authentication.
Server name should match exactly Check this box if the server name has
to exactly match the name in the certif-
icate.
6. Click OK to apply the settings.
Server Certificates require a wired connection to the network so you can
obtain the certificate(s) from the certificate authority. Your network
administrator can provide on certificate management.
31
Glossary
For unfamiliar terms used below, look for entries elsewhere in the glossary.
AD-HOC (IBSS)
Ad-hoc mode does not require an AP or a wired network. A network that transmits wireless
from computer to computer without the use of a base station (access point).
Two or more wireless stations communicate directly to each other. An ad-hoc network may
sometimes be referred to as an Independent Basic Service Set (IBSS).
CHANNEL
A radio frequency used by a wireless device is called a channel.
EAP AUTHENTICATION
EAP (Extensible Authentication Protocol) is an authentication protocol that runs on top of the
IEEE802.1x transport mechanism in order to support multiple types of user authentication. By
using EAP to interact with an EAP-compatible RADIUS server, an access point helps a wireless
station and a RADIUS server perform authentication.
ENCRYPTION
The reversible transformation of data from the original to a difficult-to-interpret format. Encryp-
tion is a mechanism for protecting confidentiality, integrity, and authenticity of data. It uses an
encryption algorithm and one or more encryption keys.
FRAGMENTATION THRESHOLD
This is the maximum data fragment size that can be sent before the packet is fragmented into
smaller packets.
IEEE 802.1X
The IEEE 802.1x standard outlines enhanced security methods for both the authentication of
wireless stations and encryption key management. Authentication can be done using an exter-
nal RADIUS server.
INFRASTRUCTURE (BSS)
When a number of wireless stations are connected using a single AP, you have a Basic Ser-
vice Set (BSS).
ROAMING
In an infrastructure network, wireless stations are able to switch from one BSS to another as
they move between the coverage areas. During this period, the wireless stations maintain
uninterrupted connection to the network. This is roaming. As the wireless station moves from
place to place, it is responsible for choosing the most appropriate AP depending on the signal
strength, network utilization among other factors.
32
SSID
The SSID (Service Set Identity) is a unique name shared among all wireless devices in a wireless
network. Wireless devices must have the same SSID to communicate with each other.
TEMPORAL KEY INTEGRITY PROTOCOL (TKIP)
Temporal Key Integrity Protocol (TKIP) uses 128-bit keys that are dynamically generated and
distributed by the authentication server.
USER AUTHENTICATION
WPA applies IEEE 802.1x and Extensible Authentication Protocol (EAP) to authenticate wireless
clients using an external RADIUS database. If you do not have an external RADIUS server, use
WPA-PSK/WPA2-PSK (WPA -Pre-Shared Key) that only requires a single (identical) password
entered into each access point, wireless gateway and wireless client. As long as the passwords
match, clients will be granted access to a WLAN.
WEP
WEP (Wired Equivalent Privacy) encryption scrambles all data packets transmitted between the
TEW-429UB and the AP or other wireless stations to keep network communications private. Both
the wireless stations and the access points must use the same WEP key for data encryption and
decryption.
WPA/WPA2
Wi-Fi Protected Access (WPA) and WPA2 (future upgrade) is a subset of the IEEE 802.11 i
security specification draft. Key differences between WPA and WEP are user authentication and
improved data encryption. WPA2 is a wireless security standard that defines stronger
encryption, authentication and key management than WPA.

33
Appendix.
Maintenance
Installing a newer version of the Wireless Client Utility may improve the performance of the
TEW-429UB. Before installing the new version, you must uninstall the old one.
CHECKING THE WIRELESS CLIENT UTILITY VERSION
To check the current Wireless Client Utility, open the utility on the Version screen. In the S/W
Information pane, note the Utility Version number.
IMPORTANT
If you need to contact technical support, you will need to provide the S/W
Information. Be sure to check the screen in the utility that is installed on
your computer and not the screen shown in this manual.
34
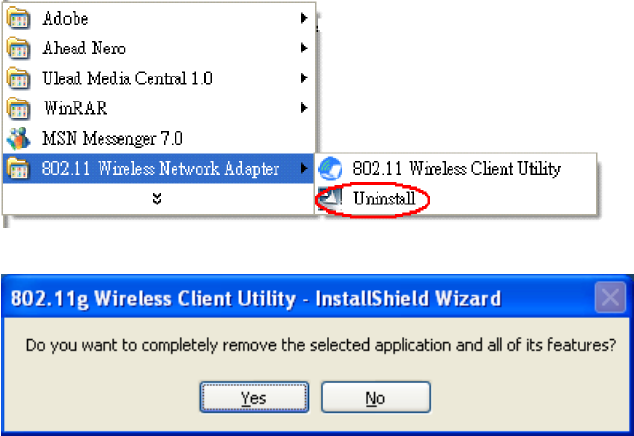
UNINSTALLING THE WIRELESS CLIENT UTILITY
Refer to the following to uninstall (remove) the Wireless Client Utility from your computer.
1. Click Start -> All Programs (Windows 2000 Programs) -> 802.11 Wireless Network
Adapter -> Uninstall.
2. When prompted, click Yes to remove the driver and utility software.
3. Click Finish to complete the uninstallation.
4. Reboot your computer if prompted.
UPGRADING THE WIRELESS CLIENT UTILITY
Contact your dealer or technical support for details on downloading the current Wireless Client
Utility. Refer to the following to upgrade the Wireless Client Utility.
1. Double-click the Setup.exe file that you downloaded. The installation wizard screen opens.
2. Click Next to continue.
3. Click Next in the Choose Destination Location screen.
4. Click Install to begin the installation.
5. Click Finish to exit the wizard and complete the installation.

35
Troubleshooting
PROBLEMS STARTING THE 802.11g WIRELESS CLIENT UTILITY PROGRAM
PROBLEM CORRECTIVE ACTION
Make sure the WHF-430/230 power switch is turned off and properly inserted into
the USB port and then restart your computer.
Perform a hardware scan by clicking Start, Settings, Control Panel and then
double-click Add/Remove Hardware. (Steps may vary depending on Windows
version).
Follow the on-screen instructions to search for the WHF-430/230 (Wireless 802.11
USB Network Adapter) and install the driver.
Check for possible hardware conflicts. In Windows, click Start, Settings, Control
Panel, System, Hardware and then click Device Manager. Verify the status of the
WHF-430/230 (Wireless 802.11 USB Network Adapter) under Network Adapter.
(Steps may vary depending on the Windows version).
Windows does not
auto-detect the
WHF-430/230.
Install the WHF-430/230 in another computer. If the error persists, there may be a
hardware problem. In this case, please contact your local dealer for support.
PROBLEMS WITH THE LINK STATUS
PROBLEM CORRECTIVE ACTION
The link quality and/or
signal strength is poor all
the time from the status
bar.
Search and connect to another AP with a better link quality using the Site
Survey screen.
Change the channel used by your AP.
Move your computer closer to the AP or the peer computer(s) within the
transmission range.
There may be too much radio interference (for example microwave or
another AP using the same channel) around your wireless network.
Relocate or reduce the radio interference.
PROBLEMS WITH SECURITY SETTINGS
“Disconnected” (meaning
authentication failure)
Shown in the Status Bar
Make sure your AP/Router has the same setting as your client adapter and
follow AP/Router’s security settings.
LED PWR and LINK are
on but cannot receive or
sending data and connect
to network
Make sure your AP/Router has the same setting as your client adapter and
follow AP/Router’s security settings.
Problems Communicating With Other Computers
PROBLEM CORRECTIVE ACTION
The WHF-430/230
computer cannot
communicate with the
other computer.
Make sure you are connected to the network.

36
Infrastructure Make sure that the AP and the associated computers are turned on and
working properly.
Make sure the WHF-430/230 computer and the associated AP use the
same SSID.
Change the AP and the associated wireless clients to use another radio
channel if interference is high.
Make sure that the computer and the AP share the same security option
and key. Verify the settings in the Profile Security Settings screen.
Ad-Hoc (IBSS) Verify that the peer computer(s) is turned on.
Make sure the WHF-430/230 computer and the peer computer(s) are
using the same SSID and channel.
Make sure that the computer and the peer computer(s) share the same
security option and key.
Change the wireless clients to use another radio channel if interference is
high.
Specifications
Wi-Fi Radio
802.11 b 802.11
g
802.11 a
Fre
q
uenc
y
2.412~2.484 GHz 2.412~2.484 GHz 4.920~5.825 GHz
Modulation DBPSK, DQPSK,
CCK (DSSS) OFDM with BPSK, SPSK,
16/64 QAM sub-carrier OFDM with BPSK, SPSK,
16/64 QAM sub-carrier
Data Rate 11, 5.5, 2, 1 Mbps 54, 48, 36, 24, 18, 12, 9, 6
Mbps 54, 48, 36, 24, 18, 12, 9, 6
Mbps
Output Power
(Typical) 18 dBm @ 11 Mbps 15 dBm @ 54 Mbps 13 dBm @ 54 Mbps
Receiving
Sensitivity
(Typical)
-87 dBm @ 11 Mbps -72 dBm @ 54 Mbps -71 dBm @ 54 Mbps
Limited Warranty
TRENDware warrants its products against defects in material and workmanship, under normal use and service,
for the following lengths of time from the date of purchase.
Wireless Products – 3 Years Warranty
If a product does not operate as warranted above during the applicable warranty period, TRENDware shall, at its
option and expense, repair the defective product or part, deliver to customer an equivalent product or part to
replace the defective item, or refund to customer the purchase price paid for the defective product. All products
that are replaced will become the property of TRENDware. Replacement products may be new or
reconditioned.
TRENDware shall not be responsible for any software, firmware, information, or memory data of customer
contained in, stored on, or integrated with any products returned to TRENDware pursuant to any warranty.
There are no user serviceable parts inside the product. Do not remove or attempt to service the product by any
unauthorized service center. This warranty is voided if (i) the product has been modified or repaired by any
unauthorized service center, (ii) the product was subject to accident, abuse, or improper use (iii) the product was
subject to conditions more severe than those specified in the manual.
Warranty service may be obtained by contacting TRENDware office within the applicable warranty period for a
Return Material Authorization (RMA) number, accompanied by a copy of the dated proof of the purchase.
Products returned to TRENDware must be pre-authorized by TRENDware with RMA number marked on the
outside of the package, and sent prepaid, insured and packaged appropriately for safe shipment.
WARRANTIES EXCLUSIVE: IF THE TRENDWARE PRODUCT DOES NOT OPERATE AS WARRANTED
ABOVE, THE CUSTOMER’S SOLE REMEDY SHALL BE, AT TRENDWARE’S OPTION, REPAIR OR
REPLACEMENT. THE FOREGOING WARRANTIES AND REMEDIES ARE EXCLUSIVE AND ARE IN LIEU
OF ALL OTHER WARRANTIES, EXPRESSED OR IMPLIED, EITHER IN FACT OR BY OPERATION OF LAW,
STATUTORY OR OTHERWISE, INCLUDING WARRANTIES OF MERCHANTABILITY AND FITNESS FOR A
PARTICULAR PURPOSE. TRENDWARE NEITHER ASSUMES NOR AUTHORIZES ANY OTHER PERSON
TO ASSUME FOR IT ANY OTHER LIABILITY IN CONNECTION WITH THE SALE, INSTALLATION
MAINTENANCE OR USE OF TRENDWARE’S PRODUCTS.
TRENDWARE SHALL NOT BE LIABLE UNDER THIS WARRANTY IF ITS TESTING AND EXAMINATION
DISCLOSE THAT THE ALLEGED DEFECT IN THE PRODUCT DOES NOT EXIST OR WAS CAUSED BY
CUSTOMER’S OR ANY THIRD PERSON’S MISUSE, NEGLECT, IMPROPER INSTALLATION OR TESTING,
UNAUTHORIZED ATTEMPTS TO REPAIR OR MODIFY, OR ANY OTHER CAUSE BEYOND THE RANGE OF
THE INTENDED USE, OR BY ACCIDENT, FIRE, LIGHTNING, OR OTHER HAZARD.
LIMITATION OF LIABILITY: TO THE FULL EXTENT ALLOWED BY LAW TRENDWARE ALSO EXCLUDES
FOR ITSELF AND ITS SUPPLIERS ANY LIABILITY, WHETHER BASED IN CONTRACT OR TORT
(INCLUDING NEGLIGENCE), FOR INCIDENTAL, CONSEQUENTIAL, INDIRECT, SPECIAL, OR PUNITIVE
DAMAGES OF ANY KIND, OR FOR LOSS OF REVENUE OR PROFITS, LOSS OF BUSINESS, LOSS OF
INFORMATION OR DATE, OR OTHER FINANCIAL LOSS ARISING OUT OF OR IN CONNECTION WITH THE
SALE, INSTALLATION, MAINTENANCE, USE, PERFORMANCE, FAILURE, OR INTERRUPTION OF THE
POSSIBILITY OF SUCH DAMAGES, AND LIMITS ITS LIABILITY TO REPAIR, REPLACEMENT, OR REFUND
OF THE PURCHASE PRICE PAID, AT TRENDWARE’S OPTION. THIS DISCLAIMER OF LIABILITY FOR
DAMAGES WILL NOT BE AFFECTED IF ANY REMEDY PROVIDED HEREIN SHALL FAIL OF ITS
ESSENTIAL PURPOSE.
Governing Law: This Limited Warranty shall be governed by the laws of the state of California.
AC/DC Power Adapter, Battery, Cooling Fan, and Power Supply carry 1 Year Warranty

38