TRENDnet Mira_Appx Mira App
User Manual: TRENDnet .trendnet.com - /TRENDnet_Mira/UG/
Open the PDF directly: View PDF ![]() .
.
Page Count: 55

Mira
i
Mira
ii
LegalInformation
ByinstallingtheMiraapplication,youareagreeingtoTRENDnet’s
termsofuseandprivacypolicy.
SymbolConventions
Thesymbolsthatmaybefoundinthisdocumentaredefinedasfollows.
Symbol Description
DangerIndicatesahazardoussituationwhich,ifnotavoided,willorcould
resultindeathorseriousinjury.
Caution
Indicatesapotentiallyhazardoussituationwhich,ifnotavoided,
couldresultinequipmentdamage,dataloss,performance
degradation,orunexpectedresults.
NoteProvidesadditionalinformationtoemphasizeorsupplement
importantpointsofthemaintext.

Mira
iii
Contents
Chapter1Introduction.................................................................................................................1
Chapter2SelectCountryorRegion..............................................................................................2
Chapter3Registration..................................................................................................................3
3.1RegisterbyMobilePhoneNumber......................................................................................3
3.2RegisterbyEmailAddress.....................................................................................................3
Chapter4DeviceManagement....................................................................................................5
4.1ActivateanInactiveDevice...................................................................................................5
4.2AddDeviceforManagement................................................................................................6
4.2.1AddanOnlineDevice.................................................................................................7
4.2.2AddaDevicebyScanningDeviceQRCode...............................................................8
4.2.3AddaDevicebyIP/Domain.......................................................................................9
4.2.4AddaDevicebyaDomain.......................................................................................10
4.3ConnectOfflineDevicetoNetwork....................................................................................12
4.4UnbindDevicefromItsOriginalAccount...........................................................................13
4.5DeviceSettings....................................................................................................................13
4.5.1EditInformationofCamerasLinkedtoAddedDevice............................................13
4.5.2SetVideoandImageEncryption..............................................................................14
4.5.3SetDDNS...................................................................................................................15
4.5.4ChangeDevice'sVerificationCode..........................................................................16
4.5.5RemotelyConfigureDevice.....................................................................................17
4.6UpgradeDeviceFirmware...................................................................................................25
Chapter5FavoritesManagement..............................................................................................26
5.1AddCamerastoFavoritesonDeviceListPage..................................................................26
5.2AddCamerastoFavoritesduringLiveView.......................................................................26
5.3RemoveCamerasfromFavorites........................................................................................27
Chapter6ShareDevice..............................................................................................................28
6.1ShareaSingleDevice..........................................................................................................28
6.2ShareMultipleDevicesinaBatch......................................................................................30
6.3SilencedModeforDevicesSharedbyOthers....................................................................31

Mira
iv
Chapter7LiveView....................................................................................................................32
7.1StartandStopLiveView.....................................................................................................32
7.2SetWindowDivision...........................................................................................................33
7.3DigitalZoom........................................................................................................................33
7.4PTZControl..........................................................................................................................34
7.4.1PanandTiltaCamera..............................................................................................34
7.4.2SetaPreset...............................................................................................................34
7.4.3AdjustPTZSpeed......................................................................................................35
7.4.4OtherFunctions........................................................................................................35
7.5CapturingandRecording.....................................................................................................36
7.6SetImageQualityforDeviceAddedbyIP/Domain...........................................................37
7.8SetImageQualityforMiraDevice......................................................................................39
Chapter8Playback.....................................................................................................................40
8.1StartandStopPlayback......................................................................................................40
8.2CapturingandRecording.....................................................................................................41
8.3SetPlaybackQualityforDeviceAddedbyIP/Domain......................................................41
8.4DownloadVideoSegment..................................................................................................43
8.5AdjustPlaybackSpeed........................................................................................................44
Chapter9OtherFunctions.........................................................................................................45
9.1PicturesandVideos.............................................................................................................45
9.2FingerprintAuthentication.................................................................................................45
Chapter10SystemSettings........................................................................................................46
10.1EnablePushNotification...................................................................................................46
10.2SaveDeviceParameters....................................................................................................46
10.3Auto‐receiveAlarmafterPower‐on.................................................................................46
10.4GenerateaQRCodewithDeviceInformation.................................................................47
10.6ViewTrafficStatistics........................................................................................................47
10.7GenerateaQRCodewithWi‐FiInformation...................................................................47
10.8FloatingLiveView.............................................................................................................48
10.9ResumeLatestLiveView...................................................................................................48
10.10TabletMode....................................................................................................................48

Mira
v
10.11Display/HideChannel‐Zero.............................................................................................49
10.12Auto‐DownloadUpgradeFile.........................................................................................49

Mira
1
Chapter1Introduction
TheMira,isdesignedforthephonesortabletsbasedonAndroid4.1orlateroriOS8.0orlater.
WiththeMobileClient,youcanremotelycontroldevicesviaWi‐Fiormobilenetworks.Youcan
alsoshareyourdevicestootheraccountswiththesharingfeature.
TheMobileClientprovidesaccesstotheMiraservice,whichisacloudservice,tomanageyour
devices.
Note
NetworktrafficchargesmaybeproducedduringtheuseoftheMobileClient.Fordetails,referto
thelocalISP.
SystemRequirement
Android4.1orlaterversions.
iOS8.0orlaterversions.
Conventions
Inthefollowingchapters,wesimplifyMiraappas"MobileClient",devicessuchasNVRand
networkcameraas"device",anddeviceswhichsupportbeingaddedtoMiraserviceas"Mira
Device".

Mira
2
Chapter2SelectCountryorRegion
ThefirsttimeyouruntheMobileClient,youshouldselecttheregionwhereyourdevicesare
located.Otherwise,theliveview,playbackandalarmnotificationofthedeviceswillfail.
Note
● Thecountryortheregioncannotbechangedonceyouhaveselected.
● Youshouldselectacorrectcountryorregion.Oritmayaffectsubsequentoperations.
AfterrunningtheMobileClient,tapSelectCountryorRegiontoselectacountryorregion.

Mira
3
Chapter3Registration
Youcanregisteranaccountbyyourmobilephonenumberoryouremailaddress.Witha
registeredaccount,youcanlogintotheMobileClientsrunningondifferentmobilephonesor
tablets,whichprovidesconvenienceformanagingyourdevices.
3.1RegisterbyMobilePhoneNumber
Youcanregisteranaccountbyyourmobilephonenumber.
Steps
1.TapLoginontheHomepagetoentertheLoginpage.
2.TapRegistertoentertheRegisterpage.
3.TapTermsofUseandPrivacyPolicytoreadtherelevantcontentandthentapAgreeto
continue.
4.EnteryourmobilephonenumberandthentapGetSecurityCodetoreceivethesecuritycode
foridentityverification.
5.EnterthesecuritycodeyoureceivedandtapNexttocontinue.
6.Createapassword.
Note
Wehighlyrecommendyoutocreateastrongpasswordofyourownchoosing(usingaminimum
of8characters,includingatleastthreekindsoffollowingcategories:uppercaseletters,lower
caseletters,numbers,andspecialcharacters)inordertoincreasethesecurityofyourproduct.
Andwerecommendyouchangeyourpasswordregularly,especiallyinthehighsecuritysystem,
changingthepasswordmonthlyorweeklycanbetterprotectyourproduct.
7.TapFinish.
3.2RegisterbyEmailAddress
Youcanregisteranaccountbyyouremailaddress.
Steps
1.TapLoginontheHomepagetoentertheLoginpage.
2.TapRegistertoentertheRegisterpage.
3.TapTermsofUseandPrivacyPolicytoreadtherelevantcontentandthentapAgreeto
continue.
4.EnteryouremailaddressandthentapGetSecurityCodetogetthesecuritycodeforidentity
verification.
5.EnterthesecuritycodeyoureceivedandthentapNexttocontinue.

Mira
4
6.Createapassword.
Note
Wehighlyrecommendyoutocreateastrongpasswordofyourownchoosing(usingaminimum
of8characters,includingatleastthreekindsoffollowingcategories:uppercaseletters,lower
caseletters,numbers,andspecialcharacters)inordertoincreasethesecurityofyourproduct.
Andwerecommendyouchangeyourpasswordregularly,especiallyinthehighsecuritysystem,
changingthepasswordmonthlyorweeklycanbetterprotectyourproduct.
7.TapFinish.

Mira
5
Chapter4DeviceManagement
YoucanadddevicestotheMobileClient,andconfiguredevicefunctionssuchasvideoandimage
encryption.
4.1ActivateanInactiveDevice
Whenaddingadevice,ifthedeviceisnotactivated,awindowwillpopuptoaskyoutoactivate
thedevice.
BeforeYouStart
ThedeviceandthephoneortabletrunningtheMobileClientshouldbeinthesameLAN.
Steps
Note
Fortheaccesscontroldevice,youshouldactivateitviaotherclients(e.g.,Miraclientsoftware).
1.Addadevice.
Note
SeeAddDeviceforManagementfordetails.
2.OntheActivateDevicepage,tapSetDevicePassword.
3.Createapassword.
Mira
6
Figure4‐1ActivateDevice
Caution
Thepasswordstrengthofthedevicecanbeautomaticallychecked.Wehighlyrecommendyou
changethepasswordofyourownchoosing(usingaminimumof8characters,includingatleast
threekindsoffollowingcategories:uppercaseletters,lowercaseletters,numbers,andspecial
characters)inordertoincreasethesecurityofyourproduct.Andwerecommendyouchange
yourpasswordregularly,especiallyinthehighsecuritysystem,changingthepasswordmonthly
orweeklycanbetterprotectyourproduct.
Properconfigurationofallpasswordsandothersecuritysettingsistheresponsibilityofthe
installerand/orend‐user.
4.TapActivatetoactivatethedevice.
5.EnableDHCPormanuallyconfigurenetworkifyouentertheNetworkConfigurationpage.
4.2AddDeviceforManagement
YouneedtoadddevicestotheMobileClientfirstsothatsubsequentoperationssuchasliveview
andplaybackcanbeavailable.Ifyouwanttoreceivealarmeventinformationfromadevice,you
shouldadditbyscanningQRcodeoradomain.
Note
● Fordetailsaboutmanagingalarmeventinformation,seeAlarmNotification.
Mira
7
4.2.1AddanOnlineDevice
TheMobileClientcandetecttheonlinedevicesinthesamelocalareanetworkwithyourphoneor
tablet,andyoucanaddthedetectedonlinedevicestotheMobileClient.
BeforeYouStart
Makesurethedevicesareconnectedtothesamelocalareanetworkwiththephoneortablet.
Steps
1.Onthedevicelistpage,tap →OnlineDevicetoentertheOnlineDevicepage.
Alldetectedonlinedeviceswillbeinthelist.
2.Selectadeviceforadding.
Figure4‐2OnlineDevice
Note
● Fornetworkcameras,makesurethedeviceMulticastDiscoveryfunctionisenabledsothat
theonlinenetworkcameracanbeautomaticallydetectedviaprivatemulticastprotocolin
theLAN.Fordetails,seeUserManualofthenetworkcamera.
● Fortheinactivedevice(excludingtheaccesscontroldevice),tapActivetocreateapassword
foritbeforeyoucanaddthedeviceproperly.Formoreinformationaboutthedevice
activation,seeActivateanInactiveDevice.
3.Optional:Editthenetworkinformation.
1)Tap .
2)ChangethedeviceIPaddresstothesameLANasyourphone'sbyeithereditingtheIP
addressmanuallyorenablingthedeviceDHCPfunction.
3)Tap andinputtheadminpasswordofthedevicetosavethesettings.
4.TapAdd.
5.Entertherequiredinformation,includingdevicealias,usernameandthepassword.
6.Tap .
7.Optional:Deletethedevice.
– Onthedevicelist,ifthelistisinlistmode,swipethedevicenametotheleftandtap →
DeleteDevice.
– Onthedevicelist,ifthelistisinthumbnailmode,tapthedevicenameortap ,andthen
tapDeleteDevice.

Mira
8
4.2.2AddaDevicebyScanningDeviceQRCode
Youcanaddthedevicebyscanningthedevice'sQRcode.
Steps
Note
Ifaddinganaccesscontroldevice,youshouldactivatethedeviceandsetthedevicenetwork
informationviaotherclients(e.g.,Miraclientsoftware)beforeaddingittothisclient.
1.Onthedevicelistpage,tap →ScanQRCodetoentertheScanQRCodepage.
2.ScantheQRcode.
– ScanthedeviceQRcodebyaligningtheQRCodewiththescanningframe.
Note
● Usually,theQRcodeisprintedonthelabel,whichisonthebackcoverofthedevice.
● Tap toenabletheflashlightifthescanningenvironmentistoodark.
– IftherearedeviceQRcodesinphotoalbumofthephoneortablet,tap toextractQR
codefromlocalalbum.
3.Optional:Performthefollowingoperationsifthefollowingsituationsoccur.
– IfthesystemfailstorecognizetheQRcode,tap toaddthedevicemanually.SeeAdda
DevicebyMiraDomainorAddaDevicebyIP/Domainfordetails.
– Ifthedevicehasbeenaddedtoanotheraccount,youshouldunbindthedevicefromthe
accountfirst.SeeUnbindDevicefromItsOriginalAccountfordetails.
– Ifthedeviceisoffline,youshouldconnectanetworkforthedevice.Fordetails,seeConnect
OfflineDevicetoNetworkfordetails.
– Ifthedeviceisnotactivated,theActivateDevicepagewillpopup(excludingtheaccess
controldevice).Youshouldactivatethedevice.Fordetails,seeActivateanInactiveDevice
fordetails.
– IftheMiraserviceisdisabledforthedevice,youshouldenablethefunction(excludingthe
accesscontroldevice).Fordetails,seeEnableMiraServiceWhenAddingDeviceonMobile
Clientfordetails.
4.TapAddontheResultpage.
5.Enterthedeviceverificationcode.
Thedevicewillbeaddedsuccessfully.
Note
● Thedefaultdeviceverificationcodeisusuallyonthedevicelabel.Ifnoverificationcode
found,enterthedeviceverificationcodeyoucreatedwhenenablingMiraservice.
● FordetailsaboutenablingMiraservice,seeEnableMiraServiceforDevice.
6.Optional:TapConfigureDDNStoconfigureDDNS.

Mira
9
Note
● SeeSetDDNSfordetails.
● AfterDDNSbeingenabled,thedevicewillbeaccessedviaIPaddressinpriority,sothat
remoteconfigurationofthedevicewillbesupportedandthestreamingspeedwillbefaster
thanstreamingviaMiraservice.
● Ifyouskipthisstep,thedevicewillbeaccessedviaMiraservice.
7.TapFinish.
8.Optional:Deletethedevice.
– Onthedevicelist,ifthelistisinlistmode,swipethedevicenametotheleftandtap →
DeleteDevice.
– Onthedevicelist,ifthelistisinthumbnailmode,tapthedevicenameortap ,andthen
tapDeleteDevice.
4.2.3AddaDevicebyIP/Domain
YoucanaddthedevicebyfixedIPaddressordomainname.Thestreamingspeedofdevicesadded
byIP/domainisfasterthanthoseaddedbyMiradomain.
BeforeYouStart
● Ifyouwanttoaddtheaccesscontroldevice,activateitbeforeadding.Seetheusermanualof
theaccesscontroldevicefordetails.
● YoushouldactivateitviaotherclientssuchasMiraclientsoftware.Makesurethedeviceis
poweredon.
Steps
Note
TheMobileClientdoesn'tsupportreceivingalarmeventinformationfromdevicesaddedby
IP/domain.FordetailsaboutmanagingeventinformationontheMobileClient,seeAlarm
Notification
1.Tap andselectManualAdding.
2.SelectIP/Domainastheaddingtype.
3.Entertherequiredinformation,suchasalias,address,username,cameraNo.anddevice
password.
Address
DeviceIPaddressordomainname.
CameraNo.
Thenumberofthecamera(s)underthedevicecanbeobtainedafterthedeviceis
successfullyadded.
4.Tap toaddthedevice.

Mira
10
Note
● Ifthedeviceisoffline,youshouldconnectthedevicetoanetwork.Fordetails,seeConnect
OfflineDevicetoNetwork.
● Ifthedeviceisnotactivated,theActivateDevicepagewillbepoppedup(excludetheaccess
controldevice).Youshouldactivatethedevice.Fordetails,seeActivateanInactiveDevice.
5.Optional:Performthefollowingoperationsafteraddingthedevice.
EditDevice
Information
OntheDeviceInformationpage,tap toeditthebasicinformation
ofthedevice.
StarLiveView TapStartLiveViewtoviewtheliveviewofthedevice.
DeleteaDevice Tap andthentapDelete todeletethedevice.
ConfigureDevice
Parameters
Tap andthentapRemoteConfigurationtoremotelyconfigure
deviceparameterssuchasbasicinformation,timesettings,recording
schedule,etc.SeeRemotelyConfigureDevicefordetails.
RemoteController Tap andthentapRemoteControllertoremotelycontrolthe
device.SeeUseMobileClientasDevice'sRemoteControllerfor
details.
4.2.4AddaDevicebyaDomain
FordeviceswhichsupportMiraservice(acloudservice),youcanaddthemmanuallybyMira
domain.
BeforeYouStart
● Makesurethedeviceispoweredon.
● Ifaddingaccesscontroldevice,youshouldactivatethedeviceandsetthedevicenetwork
informationviaotherclients(e.g.,Miraclientsoftware)beforeaddingittothisclient.
Steps
1.Onthedevicelistpage,tap →ManualAddingtoentertheAddDevicepage.
2.SelectMiraDomainastheaddingtype.
3.EnterthedeviceserialNo.manually.
Note
● Bydefault,thedeviceserialNo.isonthedevicelabel.
● Forthevideointercomdevices,whenenteringtheserialNo.oftheindoorstation,the
correspondingdoorstationwillalsobeaddedtotheMobileClientautomatically.
● Anindoorstationcanbelinkedtomultipledoorstations.

Mira
11
4.Tap tosearchthedevice.
Note
● Ifthedevicehasbeenaddedtoanotheraccount,youshouldunbindthedevicefromthe
accountfirst.SeeUnbindDevicefromItsOriginalAccountfordetails.
● Ifthedeviceisoffline,youshouldconnectanetworkforthedevice.Fordetails,seeConnect
OfflineDevicetoNetworkfordetails.
● Ifthedeviceisnotactivated,theActivateDevicepagewillpopup(excludingtheaccess
controldevice).Youshouldactivatethedevice.Fordetails,seeActivateanInactiveDevice
fordetails.
● IfMiraserviceisdisabledforthedevice,youshouldenablethefunction(excludingtheaccess
controldevice).Fordetails,seeEnableMiraServiceWhenAddingDeviceonMobileClient
fordetails.
5.TapAddontheResultpage.
6.Enterthedeviceverificationcode.
Thedevicewillbeaddedsuccessfully.
Note
● Thedefaultdeviceverificationcodeisusuallyonthedevicelabel.Ifnoverificationcode
found,enterthedeviceverificationcodeyoucreatedwhenenablingMiraservice.
● FordetailsaboutenablingMiraservice,seeEnableMiraServiceforDevice.
7.Optional:TapConfigureDDNStoconfigureDDNS.
Note
● SeeSetDDNSfordetails.
● AfterDDNSbeingenabled,thedevicewillbeaccessedviaIPaddressinpriority,sothat
remoteconfigurationofthedevicewillbesupported,andthestreamingspeedwillbefaster
thanstreamingviaMiraservice.
● Ifyouskipthisstep,thedevicewillbeaccessedviaMiraservice.
8.TapFinish.
9.Optional:Deletethedevice.
– Onthedevicelist,ifthelistisinlistmode,swipethedevicenametotheleftandtap →
DeleteDevice.
– Onthedevicelist,ifthelistisinthumbnailmode,tapthedevicenameortap ,andthen
tapDeleteDevice.

Mira
12
4.3ConnectOfflineDevicetoNetwork
WhenaddingadevicetotheMobileClient,ifthedeviceisoffline,youshouldconnectthedevice
toanetworkfirst.TheMobileClientprovidesthefollowingfourmethodsforconnectingoffline
devicestonetworks.
Note
Foraccesscontroldevice,youshouldconnectittoanetworkviaotherClients(e.g.,Miraclient
software).
ConnectingtoWiredNetwork
Usingthismethodifarouterisavailableforthedevicetoconnectto.
Note
Makesurethedeviceispoweredon.
ConnectingtoWirelessNetwork
Usethismethodifawirelessnetworkisavailableforthedevicetoconnectto."Device"here
excludeswirelessdoorbell,wirelesssecuritycontrolpanel,andMiniTrooper(akindofbattery
camera).
Note
● MakesureyourphonehasconnectedtoaWi‐Finetworkbeforeusingthemethod.
● Thedeviceshouldsupportconnectingtowirelessnetwork.
ConnectingtoNetworkbyWi‐FiConfiguration
Youcanusethismethodtoconnectwirelessdoorbelltothenetworkbyusingthedoorbelltoscan
theQRcodegeneratedbytheMobileClient.
TapConnecttoaNetworkontheResultpageandthenfollowtheinstructionsonthesubsequent
pagestoconnectthedevicetothenetwork.
ConnectingtoNetworkbyAccessPoint
IntheMobileClient,AccessPoint(AP)referstoanetworkinghardwaredevice(e.g.,wireless
doorbellorwirelesssecuritycontrolpanel),whichcanprovideaWi‐Finetworkforthephoneto
connectto.
Note
YoushouldhaveturnedonWLANinthephone'soperationsystem.
TapConnecttoaNetworkontheResultpage,selectWirelessConnectionastheconnectiontype,
andthenfollowtheinstructionsonthesubsequentpagestocompletetheconnectionprocess.

Mira
13
4.4UnbindDevicefromItsOriginalAccount
WhenaddingadevicebyscanningQRcodeorMiradomain,iftheresultshowsthatthedevicehas
beenaddedtoanotheraccount,youshouldunbinditfromtheaccountbeforeyoucanadditto
youraccount.
BeforeYouStart
MakesurethedeviceandthephonerunningtheMobileClientareinthesamelocalareanetwork.
Steps
1.AddthedevicebyscanningQRcodeorMiradomain.
SeeAddaDevicebyScanningDeviceQRCodeorAddaDevicebyMiraDomainfordetails.
2.OntheResultpage,tapUnbindDevicetostartunbindthedevicefromitsaccount.
3.Optional:Ifthenetworkexceptionoccurs,performthefollowingoperations.
TapConnecttoWi‐FitoconnectthephonetotheWi‐Finetworkandmakesurethedeviceisin
thesamelocalareanetworkwiththephone.TapOryoucanunbindthedevicefromitsaccount
inlocalGUItounbindthedevicevialocalGUI.
Note
UnbindingthedevicevialocalGUIshouldbesupportedbythedevice.
4.OntheUnbindDevicepage,enterthedevicepasswordandtheverificationcodedisplayedon
theimage.
5.TapFinish.
4.5DeviceSettings
OnSettingspage,youcanviewandeditadevice'sbasicinformation,deletethedevice,and
configureotherfunctionssuchasvideoandimageencryption,changingdeviceverificationcode,
transferringthedevicetoanotheruser,etc.
4.5.1EditInformationofCamerasLinkedtoAddedDevice
ForcameraslinkedtoNVR,youcanedittheirnames,andhideorshowtheminthedevicelist.
Steps
1.EntertheSettingspageofaNVR.
– Onthedevicelistpage,ifthepageisinlistmode,swipethedevicenametotheleftandtap
.
– Onthedevicelistpage,ifthepageisinthumbnailmode,tapthedevicenameortap .
– OntheLiveViewpage.Tap andthentapSettings.

Mira
14
Note
FordetailsabouthowtoentertheLiveViewpage,seeStartandStopLiveView.
2.TapLinkedCameratoentertheLinkedCamerapage.
EditCameraName Tap toeditthecameraname,andthentap tosavethe
settings.
Hide/ShowCamera Tap or tohideorshowthecameraonthedevicelist
respectively.
4.5.2SetVideoandImageEncryption
Forsecurityreasons,youcansetthevideoandimageencryptionfunctiontoencryptthevideosor
thepictures.
Steps
Note
● Ifyousetthevideoandimageencryptionfunction,thedevice'slivevideo,recordedvideo,
andpicturesineventinformationwillbeencrypted.Youshouldenterthedeviceverification
codethefirsttimeyouenteringthesepages.
● IfyoulogintotheMobileClientwiththesameaccountonanotherphone,youshouldenter
thedeviceverificationcodeagaintoviewthelivevideo,therecordedvideo,andpicturesin
eventinformation.
1.EntertheSettingspage.
Onthedevicelistpage,ifthepageisinthelistmode,swipethedevicenametoleftandtap .On
thedevicelistpage,ifthepageisinthethumbnailmode,tapthedevicenameortap .Enter
theLiveViewpage,tap andtapSettings.
2.SettheVideoandImageEncryptionswitchtoONtoenablethefunction.
3.Optional:Changetheencryptionpassword(deviceverificationcode).
1)TapChangePassword.
2)TapEditinthepop‐upwindowtoentertheChangePasswordpage.
3)Followtheinstructionsonthepagetochangethedeviceverificationcode.

Mira
15
4.5.3SetDDNS
ForadeviceaddedviaMiraDomainorScanningQRcode,ifDDNSisenabled,thedevice'sstreams
willbeaccessedviaIPaddressinpriority.Inthiscase,youcanremotelyconfiguredeviceandthe
speedofstreamingwillbefasterthanthatofstreamingviaMiraservice.
Steps
1.EntertheSettingspageofthedevice.
– Onthedevicelistpage,ifthepageisinlistmode,swipethedevice'snametotheleftandtap
.
– Onthedevicelistpage,ifthepageisinthumbnailmode,tapthedevice'snameortap .
– OntheLiveViewpage.Tap andthentapSettings.
Note
FordetailsabouthowtoentertheLiveViewpage,seeStartandStopLiveView
2.OntheSettingspage,tapConfigureDDNStoentertheConfigureDDNSpage.
3.Settherequiredinformation.
DeviceDomainName
Thedefaultdevicedomainnameistheserialnumberofthedevice.Ifyouwanttoeditit,the
editeddomainnameshouldcontain1to64characters,includingnumbers,lowercaseletters,
anddashes.Anditshouldstartwithalowercaseletterandcannotendwithadash.
PortMappingMode
Fordetailsaboutsettingportmapping,tapHowtoSetPortMapping.
Note
Theenteredportnumbershouldbefrom1to65535.
UserName
Enterthedeviceusername.
Password
Enterthedevicepassword.
4.Tap .

Mira
16
4.5.4ChangeDevice'sVerificationCode
Thedeviceverificationcodeisusedforverifyinguseridentity,aswellasencryptingadevice's
videos(includinglivevideosandrecordedvideofiles)andcapturedpictures.Youcanchangethe
deviceverificationcodeforthenetworkcameraandMiniTrooper(akindofcamerapoweredby
battery).
Steps
Note
Fordetailsabouthowtoencryptadevice'svideosandcapturedpictures,seeSetVideoand
ImageEncryption.
1.EntertheSettingspageofthedevice.
– Onthedevicelistpage,ifthepageisinthelistmode,swipethedevicenametotheleftand
tap .
– Onthedevicelistpage,ifthepageisinthumbnailmode,tapthedevicenameortap .
– OntheLiveViewpage,tap andthentapSettings.
Note
FordetailsabouthowtoentertheLiveViewpage,seeStartandStopLiveView.
2.TapChangeVerificationCode,andthentapEditonthepop‐upWindowtoentertheChange
VerificationCodepage.
3.Entertheoldverificationcode,andthentapNext.
4.Createanewverificationcode,andthenconfirmit.
Note
IfyouhaveenabledtheVideoandImageEncryptionfunction,newpicturesandvideoswillbe
encryptedbythenewverificationcode.However,theearlierencryptedpicturesandvideosstill
usetheoldverificationcode.
Mira
17
4.5.5RemotelyConfigureDevice
Afteraddingadevice,youcansettheparametersofthedevice,includingbasicinformation,time
settings,recordingschedule,etc.
Note
RemoteconfigurationisonlyavailableforAndroidV4.2orlaterversions.
ViewandEditBasicInformation
Youcanviewandeditthebasicinformationofadevice.
BeforeYouStart
AddadevicetotheMobileClient.SeeAddDeviceforManagementfordetails.
Steps
1.EntertheSettingspage.
– Onthedevicelistpage,ifthepageisinlistmode,swipethedevicenametotheleftandtap
.
– Onthedevicelistpage,ifthepageisinthumbnailmode,tapthedevicenameortap .
– OntheLiveViewpage,tap andthentapSettings.
Note
FordetailsabouthowtoentertheLiveViewpage,seeStartandStopLiveView.
2.EntertheRemoteConfigurationpage.
– ForadeviceaddedviaIP/Domain,tap →RemoteConfiguration.
Note
FordetailsaboutaddingdeviceviaIP/Domain,seeAddaDevicebyIP/Domain.
– Foradeviceaddedviaothermethods,tapRemoteConfigurationontheSettingspage.
Note
YoushouldhaveconfiguredDDNSforthedevicefirst.SeeSetDDNS.
3.TapBasicInformationtoentertheBasicInformationpage.
4.Tap toentertheEditDevicepage.
5.Editthebasicinformationofthedevice.
6.Tap tosavethesettings.

Mira
18
SetRecordingSchedule
Youcansetarecordingscheduleforachannelofaspecificdevice.
Steps
1.EntertheSettingspage.
– Onthedevicelistpage,ifthepageisinlistmode,swipethedevicenametotheleftandtap
.
– Onthedevicelistpage,ifthepageisinthumbnailmode,tapthedevicenameortap .
– OntheLiveViewpage,tap andthentapSettings.
Note
FordetailsabouthowtoentertheLiveViewpage,seeStartandStopLiveView.
2.EntertheRemoteConfigurationpage.
– ForadeviceaddedviaIP/Domain,tap →RemoteConfiguration.
Note
FordetailsaboutaddingdeviceviaIP/Domain,seeAddaDevicebyIP/Domain.
– Foradeviceaddedviaothermethods,tapRemoteConfigurationontheSettingspage.
Note
YoushouldhaveconfiguredDDNSforthedevicefirst.SeeSetDDNS.
3.TapRecordingScheduletoentertheRecordingSchedulepage.
4.Selectachannelifthedevicehasmultiplechannels.
5.SettheswitchtoONtoenablerecordingschedule.
6.Setarecordingscheduleforadayintheweek.
1)Tapadayintheweektoentertheschedulesettingspage.
2)Tapatimeperiodtosettherecordingtype,starttime,andendtime.
Continuous
Thevideowillberecordedautomaticallyaccordingtothetimeoftheschedule.
MotionDetection
Thevideowillberecordedwhenthemotionisdetected.
Alarm
Thevideowillberecordedwhenthealarmistriggeredviatheexternalalarminput
channels.
MotionDetectionorAlarm
Thevideowillberecordedwhentheexternalalarmistriggeredorthemotionisdetected.
MotionDetectionandAlarm
Thevideowillberecordedwhenthemotionandalarmaretriggeredatthesametime.

Mira
19
Event
Thevideowillberecordedwhenanyeventisdetected.
Note
Youcanalsosettherecordingtypetodetailedeventtype,whichshouldbesupportedby
thedevice.Fordetails,refertotheusermanualofthedevice.
3)TapOKtosavethesettingsofthetimeperiod.
4)Setothertimeperiodsintheday.
Note
Upto8timeperiodscanbeconfiguredforeachday.Andthetimeperiodscannotbe
overlappedwitheachother.
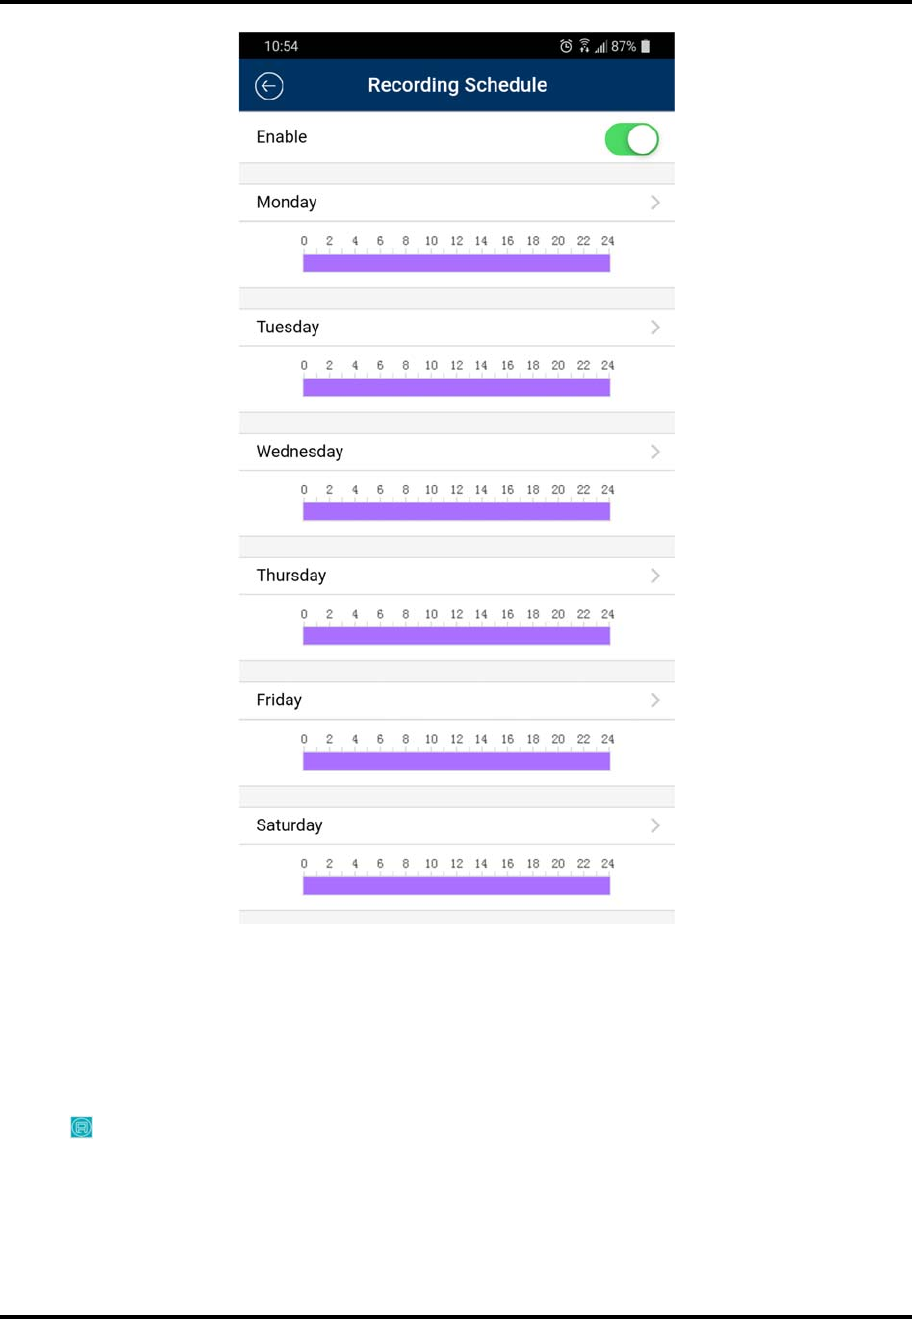
Mira
20
7.Optional:Performthefollowingoperationsaftersavingthetimeperiodsinoneday.
CopytoOtherDays TapCopyto tocopyallthetimeperiodssettingstotheotherdaysin
theweek.
DeleteAll TapDeleteAlltoclearalltheconfiguredtimeperiods.
8.Tap tosavethesettings.

Mira
21
ConfigureTimeSettings
YoucanselectthetimezoneandsetthetimesynchronizationmodetoManualorNTPmodefor
theaddeddevice.
Steps
1.EntertheSettingspageofthedevice.
– Onthedevicelistpage,ifthepageisinlistmode,swipethedevicenametotheleftandtap
.
– Onthedevicelistpage,ifthepageisinthumbnailmode,tapthedevicenameortap .
– OntheLiveViewpage,tap andthentapSettings.
Note
FordetailsabouthowtoentertheLiveViewpage,seeStartandStopLiveView.
2.EntertheRemoteConfigurationpage.
– ForadeviceaddedviaIP/Domain,tap →RemoteConfiguration.
Note
FordetailsaboutaddingdevicesviaIP/Domain,seeAddaDevicebyIP/Domain.
– Foradeviceaddedviaothermethods,tapRemoteConfigurationontheSettingspage.
Note
YoushouldhaveconfiguredDDNSforthedevicefirst.SeeSetDDNS.
3.TapTimeConfigurationtoentertheTimeConfigurationpage.
4.Selectthetimezoneinwhichthedevicelocates.
Thedevicetimewillbeadjustedautomatically.
5.Selectthetimesynchronizationmode.
– SelectNTPSynchronization.Andthensettheintervalforsynchronizingthedevicetimewith
theNTPserver.
NTPSynchronization
SynchronizetimeataspecificintervalwiththeNTPserver.
Note
FordetailsaboutsettingtheNTPserverdetails,refertotheusermanualofthedevice.
–
– SelectManualSynchronization.AndthentapSynchronizewithPhonetosynchronizethe
devicetimewiththeOS(OperationSystem)timeofyourphoneortablet.
6.Tap tosavethesettings.

Mira
22
ChangeDevicePassword
YoucanchangethepasswordofadeviceviatheMobileClient.
Steps
1.EntertheSettingspageofthedevice.
– Onthedevicelistpage,ifthepageisinlistmode,swipethedevice'snametotheleftandtap
.
– Onthedevicelistpage,ifthepageisinthumbnailmode,tapthedevice'snameortap .
– OntheLiveViewpage,tap andthentapSettings.
Note
FordetailsabouthowtoentertheLiveViewpage,seeStartandStopLiveView.
2.EntertheRemoteConfigurationpage.
– ForadeviceaddedviaIP/Domain,tap →RemoteConfiguration.
Note
FordetailsaboutaddingdeviceviaIP/Domain,seeAddaDevicebyIP/Domain.
– Foradeviceaddedviaothermethods,tapRemoteConfigurationontheSettingspage.
Note
YoushouldhaveconfiguredDDNSforthedevicefirst.SeeSetDDNS.
3.TapChangePasswordtoentertheChangePasswordpage.
4.Entertheoldpasswordofthedevice
5.Createanewpassword.
Caution
Thepasswordstrengthofthedevicecanbeautomaticallychecked.Wehighlyrecommendyou
changethepasswordofyourownchoosing(usingaminimumof8characters,includingatleast
threekindsoffollowingcategories:uppercaseletters,lowercaseletters,numbers,andspecial
characters)inordertoincreasethesecurityofyourproduct.Andwerecommendyouchange
yourpasswordregularly,especiallyinthehighsecuritysystem,changingthepasswordmonthly
orweeklycanbetterprotectyourproduct.
Properconfigurationofallpasswordsandothersecuritysettingsistheresponsibilityofthe
installerand/orend‐user.
6.Confirmthepassword.
7.Tap tosavethechanges.

Mira
23
ConfigureNormalEvent
Youcanenableadevice'snormaleventsuchasmotiondetection,videotamperingalarm,video
lossalarm,forthechannelsofthedevice.
Steps
1.EntertheSettingspage.
– Onthedevicelistpage,ifthepageisinlistmode,swipethedevicenametotheleftandtap
.
– Onthedevicelistpage,ifthepageisinthumbnailmode,tapthedevicenameortap .
– OntheLiveViewpage,tap andthentapSettings.
Note
FordetailsabouthowtoentertheLiveViewpage,seeStartandStopLiveView.
2.EntertheRemoteConfigurationpage.
– ForadeviceaddedviaIP/Domain,tap →RemoteConfiguration.
Note
FordetailsaboutaddingdeviceviaIP/Domain,seeAddaDevicebyIP/Domain
– Foradeviceaddedviaothermethods,tapRemoteConfigurationontheSettingspage.
Note
YoushouldhaveconfiguredDDNSforthedevicefirst.SeeSetDDNS.
3.TapNormalEventtoentertheNormalEventpage.
4.Optional:Selectachannelifthedevicehasmultiplechannels.
5.Settheswitch(es)toONtoenabletheevent(s).
ConfigureSmartEvent
Youcanenablethesmarteventforthechannelsofadevice,includingaudioexceptiondetection,
facedetection,andintrusiondetection,etc.
Steps
Note
Thesupportedeventtypesofsmarteventvaryaccordingtodifferentdevices.
1.EntertheSettingspage.
– Onthedevicelistpage,ifthepageisinlistmode,swipethedevicenametotheleftandtap
.
– Onthedevicelistpage,ifthepageisinthumbnailmode,tapthedevicenameortap .
– OntheLiveViewpage,tap andthentapSettings.

Mira
24
Note
FordetailsabouthowtoentertheLiveViewpage,seeStartandStopLiveView.
2.EntertheRemoteConfigurationpage.
– ForadeviceaddedviaIP/Domain,tap →RemoteConfiguration.
Note
FordetailsaboutaddingdeviceviaIP/Domain,seeAddaDevicebyIP/Domain.
– Foradeviceaddedviaothermethods,tapRemoteConfigurationontheSettingspage.
Note
YoushouldhaveconfiguredDDNSforthedevicefirst.SeeSetDDNSfordetails.
3.TapSmartEventtoentertheSmartEventpage.
4.Optional:Selectachannelifthedevicehasmultiplechannels.
5.Settheswitch(es)toONtoenableevent(s).
EnableTemperatureMeasurement
YoucanenablethetemperaturemeasurementfunctionforthethermalcameraontheMobile
Client.
Steps
Note
Thisfunctionisonlyavailabletothethermalcamera.
1.EntertheSettingspage.
– Onthedevicelistpage,ifthepageisinlistmode,slidethedevicenametotheleftandtap
.
– Onthedevicelistpage,ifthepageisinthumbnailmode,tapthedevicenameortap .
– OntheLiveViewpage,tap andthentapSettings.
Note
FordetailsabouthowtoentertheLiveViewpage,seeStartandStopLiveView.
2.EntertheRemoteConfigurationpage.
– ForadeviceaddedviaIP/Domain,tap →RemoteConfiguration.
Note
FordetailsaboutaddingdeviceviaIP/Domain,seeAddaDevicebyIP/Domain.
– Foradeviceaddedviaothermethods,tapRemoteConfigurationontheSettingspage.

Mira
25
Note
YoushouldhaveconfiguredDDNSforthedevicefirst.SeeSetDDNS.
3.TapTemperatureMeasurementtoentertheTemperatureMeasurementpage.
4.Optional:Selectacameraifcamera(s)arelinkedtothedevice.
5.SettheswitchtoONtoenabletemperaturemeasurement.
4.6UpgradeDeviceFirmware
ForadeviceaddedviaIP/Domain,itsnewversioncanbedetectedbytheMobileClient.Once
detected,youcanupgradethedevicetoitslatestversion.
Steps
1.EntertheDeviceInformationpage.
– Onthedevicelistpage,ifthepageisinthelistmode,swipethedevicenametotheleftand
tap .
– Onthedevicelistpage,Ifthepageisinthumbnailmode,tapthedevicenameortap .
– OntheLiveViewpage.Tap andthentapSettings.
Note
FordetailsabouthowtoentertheLiveViewpage,seeStartandStopLiveView.
2.Tap →DeviceVersiontoentertheDeviceVersionpage.
3.TapUpgradeandthentapUPGRADEonthepop‐upwindow.
TheMobileClientwilldownloadtheupgradefilefirstandthenstartupgradingthedevice.
Note
YoucanalsoenabletheMobileClienttoautomaticallydownloadtheupgradefileinWi‐Fi
networksonceanewdeviceversionisdetected.Fordetails,seeAuto‐DownloadUpgradeFile.

Mira
26
Chapter5FavoritesManagement
Youcanaddthefrequently‐usedcamera(s)tothefavoritessothatyoucanaccessthem
conveniently.
5.1AddCamerastoFavoritesonDeviceListPage
Onthedevicelistpage,youcanaddthefrequently‐usedcamera(s)tothefavoritessothatyoucan
accessthemconveniently.
Steps
1.Onthedevicelistpage,tap .
2.TapAddtoFavorites.
3.SelectdevicesandcamerasontheSelectCamerapage.
4.TapOK.
5.CreateanamefortheFavoritesandthentapOK.
Note
● Upto32favoritescanbeadded.
● Thefavoritesnameshouldbenomorethan32characters.
TheaddedFavoriteswillbedisplayedonthedevicelistpage.
6.Optional:TaptheFavoritesnameonthedevicelistpagetoviewthecameras'livevideos.
5.2AddCamerastoFavoritesduringLiveView
Ontheliveviewpage,youcanaddfrequently‐usedcamerastoFavoritessothatyoucanaccess
themconveniently
Steps
1.EntertheLiveViewpage.
Note
FordetailsabouthowtoentertheLiveViewpage,seeStartandStopLiveView
2.Tap andtapAddtoFavorites.
3.Addcamerastofavorites.
– Createanewfavoritesinthepop‐upwindowandtapOK.
1. Addtoexistingfavorites.TapAddtoExistingFavoritesinthepop‐upwindow.
2. SelectaFavoritesfolderinthelist.
–

Mira
27
Note
● Upto32Favoritescanbeadded.
Thefavoritesnameshouldbenomorethan32characters.
4.Optional:TaptheFavoritesonthedevicelistpagetoviewthecameras'livevideos.
5.3RemoveCamerasfromFavorites
Youcandeletecamerasinthefavorites.
Steps
1.EntertheEditFavoritespage.
Onthedevicelistpage,ifthepageisinlistmode,swipetheFavoritesnametotheleftandtap
.Onthedevicelistpage,ifthepageisinthumbnailmode,tapoftheFavorites.
2.Tapacamerathatneedtobedeleted.
3.TapConfirminthepop‐upwindowtodeletethecamera.

Mira
28
Chapter6ShareDevice
Youcansharedevicestootherusers.Afterthat,theycanaccessthedevicesaccordingtothe
permissionsyouconfiguredforthem.Youcanalsoreceivedevicessharedbyotherusers.
6.1ShareaSingleDevice
Youcanselectadeviceandthenshareittoaspecifiedaccount,andatthesametimeyoucan
determinethepermission(s)thattherecipienthastoaccessthedevice.Forexample,ifyoudonot
grantthetwo‐wayaudiopermissiontotherecipient,therecipientwillhavenoaccesstotwo‐way
audiofunctionalityoftheshareddevice.
Steps
1.SelectthedeviceandthenentertheRecipientpage.
Option1 1. Tap todisplaythedevicelistpageinlistmode.
2. Swipethetargetdevice'snametotheleft,andthentap .
Option2 1. EntertheLiveViewpage.
Note
FordetailsabouthowtoentertheLiveViewpage,seeStartand
StopLiveView.
2. Selectaliveviewwindowandthentap .
3. TapShare.
Option3 Forsecuritycontrolpanel,tapthedeviceondevicelistpagetoenter
thedevicedetailspageandthentap .
2.Settheaccountthatyouwanttosharedevicewith.
ManuallyAdda
Recipient
1. Entertheemailaddressorthemobilephonenumberboundwith
therecipient'saccountintheSearchbox.
2. Ifmatchedhistoryaccount(s)exists,selectahistoryaccount.
Ifnomatchedhistoryaccount(s)found,tapAddRecipientto
entertheAddRecipientpage.
3. (Optional)Enteraremarkfortherecipient,suchashisorher
name.

Mira
29
Note
Onlyyoucanviewtheremarkcontentwhiletheaccountyou
sharedwithcannot.
4. Tap toselecttherecipient'saccountandaddittothehistory
accountlist.
5. TapNext.
AddRecipientby
ScanningQRCode
1. Tap ontheRecipientpagetoscantheQRcodeofthetarget
account.
Theaccountwillbelistedontheaccountlist.
Note
GotoMore→AccountManagement→MyQRCodetogettheQR
codeofyouraccount.
2. Selecttheaccountfromthehistoryaccountlistandthentap
Next.
3.Optional:Ifyouaresharingadevicelinkedwithmultiplecameras,selectthecamera(s)that
needtobeshared.
4.Configurepermissionsfortheto‐be‐shareddevice(s).
– CheckAllPermissionsontheSharingDetailspagetoselectallthepermissions.
– TapthedevicedisplayedontheSharingDetailspage,andthenselectpermission(s)andtap
.
Example
Forexample,ifyouselectLiveViewandRemotePlayback,therecipientwillhavethe
permissionstoviewlivevideoandplaybackthevideofootageofthedevice.
5.TapFinish.
Amessageaboutthesharingwillappearontherecipient'sMobileClient.Heorshecantapthe
message,andthenacceptorrejecttheshareddevice.
6.Optional:Deletetherecipientaccountandallthesharinginformation.
1)GotoMore→ManageSharingSettings.
2)TaptheaccountandthentapDelete.

Mira
30
6.2ShareMultipleDevicesinaBatch
IfanotheruseroftheMobileClientneedstousemultipledevicesofyours,youcansharethemin
abatchtohimorherwiththeleastoperationeffort,andatthesametimedeterminethe
permission(s)thattherecipienthastoaccesseachdevice.Forexample,ifyoudonotgrantthe
two‐wayaudiopermissionofadevicetotherecipient,therecipientwillhavenoaccesstothe
two‐wayaudiofunctionalityofthedevice.
Steps
1.OntheMorepage,tapMore→ManageSharingSettingstoentertheManageSharingSettings
page.
2.EntertheRecipientpage.
– Forthefirsttimesharing,tap
– Forotheroccasions,tapShareDevice.
3.Settheaccountthatyouwanttosharedevice(s)with.
ManuallyAdda
Recipient
1. Entertheemailaddressorthemobilephonenumberboundwith
therecipient'saccountintheSearchbox.
2. Ifmatchedhistoryaccount(s)exists,selectahistoryaccount.
Ifnomatchedhistoryaccount(s)found,tapAddRecipientto
entertheAddRecipientpage.
3. (Optional)Enteraremarkfortherecipient,suchashisorher
name.
Note
Onlyyoucanviewtheremarkcontentwhiletheaccountyou
sharedwithcannot.
4. Tap toselecttherecipient'saccountandaddittothehistory
accountlist.
5. TapNext.
AddRecipientby
ScanningQRCode
1. Tap ontheRecipientpagetoscantheQRcodeofthetarget
account.
Theaccountwillbelistedontheaccountlist.
Note
GotoMore→AccountManagement→MyQRCodetogettheQR
codeofyouraccount.
2. Selecttheaccountfromthehistoryaccountlistandthentap
Next.
4.Selectdevice(s).

Mira
31
Note
Fordeviceslinkedwithmultiplecameras,youcanselectcamera(s)forsharing.
5.Configurepermissionsfortheto‐be‐shareddevice(s).
– CheckAllPermissionsontheSharingDetailspagetoselectallthepermissions.
– TapthedevicedisplayedontheSharingDetailspage,andthenselectpermission(s)andtap
.
Example
Forexample,ifyouselectLiveViewandRemotePlayback,therecipientwillhavethe
permissionstoviewlivevideoandplaybackthevideofootageofthedevice.
6.TapFinishtofinishsharing.
Amessageaboutthesharingwillappearontherecipient'sMobileClient.Heorshecantapthe
message,andthenacceptorrejecttheshareddevice.
7.Optional:TaptheaccountonthehistoryaccountlistandthentapDeletetodeletethe
recipient'saccountandallthesharinginformation.
6.3SilencedModeforDevicesSharedbyOthers
YoucanenableSilencedmodeforthedevicessharedbyothersifyoudon'twanttobedisturbed
bythedevices'alarmnotifications.Whenenabled,allthealarmnotificationstriggeredbythe
device(s)willbesilenced.Andyoucanstillchecktheinformationofallthesilencedalarm
notificationsfromthedevicesonthenotificationlist.
EntertheSettingspageofthedeviceinoneofthefollowingways,andthenenabletheSilenced
mode.
● Onthedevicelistpage,ifthepageisinthelistmode,swipethedevicenametotheleftandtap
.
● Onthedevicelistpage,ifthepageisinthumbnailmode,tapthedevicenameortap .
● Onthedevice'sLiveViewpage,tap andthentapSettings.
Note
FordetailsabouthowtoentertheLiveViewpage,seeStartandStopLiveView.

Mira
32
Chapter7LiveView
Youcanviewlivevideoofthedevices'connectedcameras.Andsomebasicoperationsare
supportedduringliveview,includingpicturecapturing,manualrecording,PTZcontrol,etc.
7.1StartandStopLiveView
Liveviewshowsyouthelivevideogettingfromcameras.Performthefollowingtasktostartand
stopliveview.
Steps
1.EntertheLiveViewpagetostartliveview.
– Onthedevicelistpage,ifthedevicelistisdisplayedinthumbnailmode,tapthedevice
thumbnailtoentertheLiveViewpage.
Note
Youcantap or onthedevicelistpagetoswitchbetweenthelistmodeandthe
thumbnailmode.
– Onthedevicelistpage,ifthedevicelistisdisplayedinlistmode,andtheFloatingLiveView
functionisenabled,taponeormoredevicestoopenthefloatingwindows.Andthentapthe
floatingwindowtoentertheLiveViewpage.
Note
● FordetailsaboutenablingordisablingtheFloatingLiveViewfunction,seeFloatingLive
View.
● Upto256camerascanbeselected.
– Onthedevicelistpage,ifthedevicelistisdisplayedinlistmode,andtheFloatingLiveView
functionisdisabled,tapthedevicetoentertheLiveViewpage.
● IftheVideoandImageEncryptionfunctionisdisabled,thelivevideowillstartplaying
automatically.
● IftheVideoandImageEncryptionfunctionisenabled,youshouldenterthedevice
verificationcodebeforethelivevideostartingplaying.
Note
○ FordetailsaboutVideoandImageEncryptionfunction,seeSetVideoandImage
Encryption.
○ Thedefaultdeviceverificationcodeisusuallyonthedevicelabel.Ifnoverificationcode
found,enterthedeviceverificationcodeyoucreatedwhenenablingMiraservice.
○ Thelivevideofromthevideointercomdevicelasts5minutes.
○ Upto6userscanviewthelivevideoofasamedoorstationsimultaneously.Iftheupper‐
Mira
33
limitisreached,otheruserscanonlyusetheaudiofunctionofthedoorstation.
2.Optional:Performthefollowingoperations.
ViewFullScreenLive
Video
Rotatethephonetoviewlivevideoinfullscreenmode.
SwitchCamera Swipetheliveviewpagetotheleftorrighttoswitchcameraand
viewitslivevideo.
ReselectDevicefor
LiveView
1. Tap togobacktothedevicelist.
2. ReselectcamerasandthentapOK.
Note
Youcanselectupto256cameras.
SwitchtoPlayback Tap →Playbacktoswitchtoplayback.
Note
Fordetailsaboutplayback,seePlayback.
3.Stopliveviewofacamera.
1)Pressandholdawindowunderliveview.
2)Dragthewindowupwardstotheappearing atthetopofthepage.
7.2SetWindowDivision
Youcanadjustwindowdivisionindifferentscenarios.
Tap , , , or tosetthewindowdivisionmodeto1‐window,4‐window,9‐
window,12‐window,or16‐windowrespectively.
Iftheaddedcameranumberismorethanthewindowdivisionnumber,youcanswipetotheleft
orrighttochangethewindowdivisiongrouponthecurrentpage.
7.3DigitalZoom
Digitalzoomadoptsencodingtechnologytoenlargetheimagewhichwillresultinimagequality
damage.Youcanzoominorzoomoutthelivevideoimageasdesired.
Tap tozoominorzoomouttheimage.
Orspreadtwofingersaparttozoomin,andpinchthemtogethertozoomout.
Mira
34
7.4PTZControl
PTZisanabbreviationfor"Pan,Tilt,andZoom".WiththePTZControlfunctionalityprovidedby
theMobileClient,youcanmakethecameraspanandtilttotherequiredpositions,andzoominor
outthelivevideoimages.Forsomenetworkcameras,youcanalsoenableauto‐trackingtomake
thecamerapan,tilt,andzoomtotrackthedetectedmovingobjects.
Note
PTZcontrolshouldbesupportedbythecamera.
7.4.1PanandTiltaCamera
TheMobileClientallowsyoutopanandtiltacamera'sview.
Steps
1.StartliveviewofacamerasupportsPTZcontrol.
Note
Fordetailsabouthowtostartliveview,seeStartandStopLiveView.
2.SelectaliveviewwindowontheLiveViewpage.
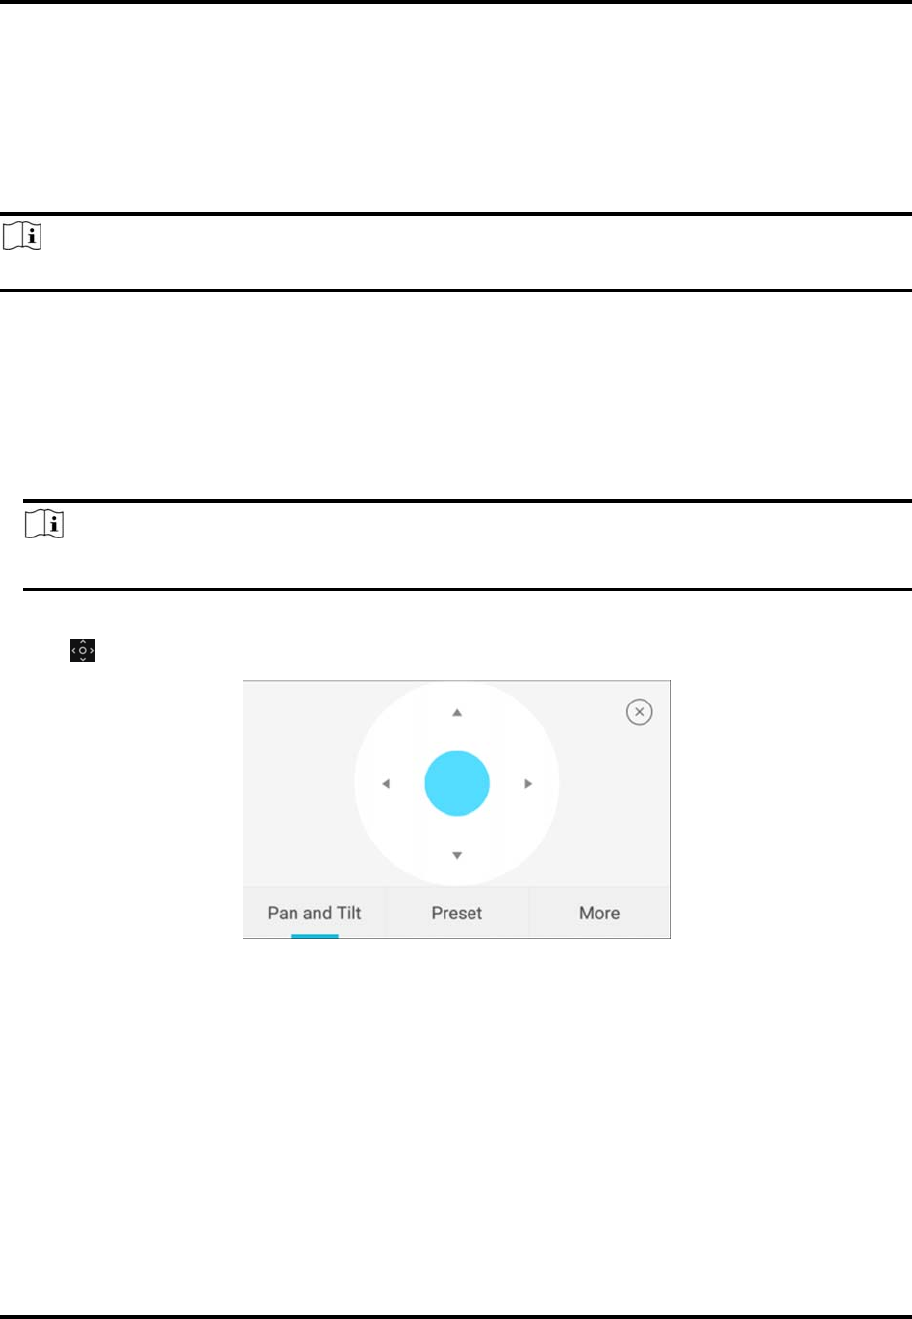
3.Tap toopenthePTZControlpanel.
4.TapPanandTilt.
5.DragthecirclebuttonatthecenterofthePTZControlpaneltopanandtiltthecamera.
7.4.2SetaPreset
Apresetisapredefinedimagepositionwhichcontainsconfigurationparametersforpan,tilt,
zoom,focusandotherparameters.Youcanalsosetavirtualpresetafterenablingdigitalzoom.
Afteryousetapreset,youcancallthepresetandthenthecamerawillmovetotheprogrammed
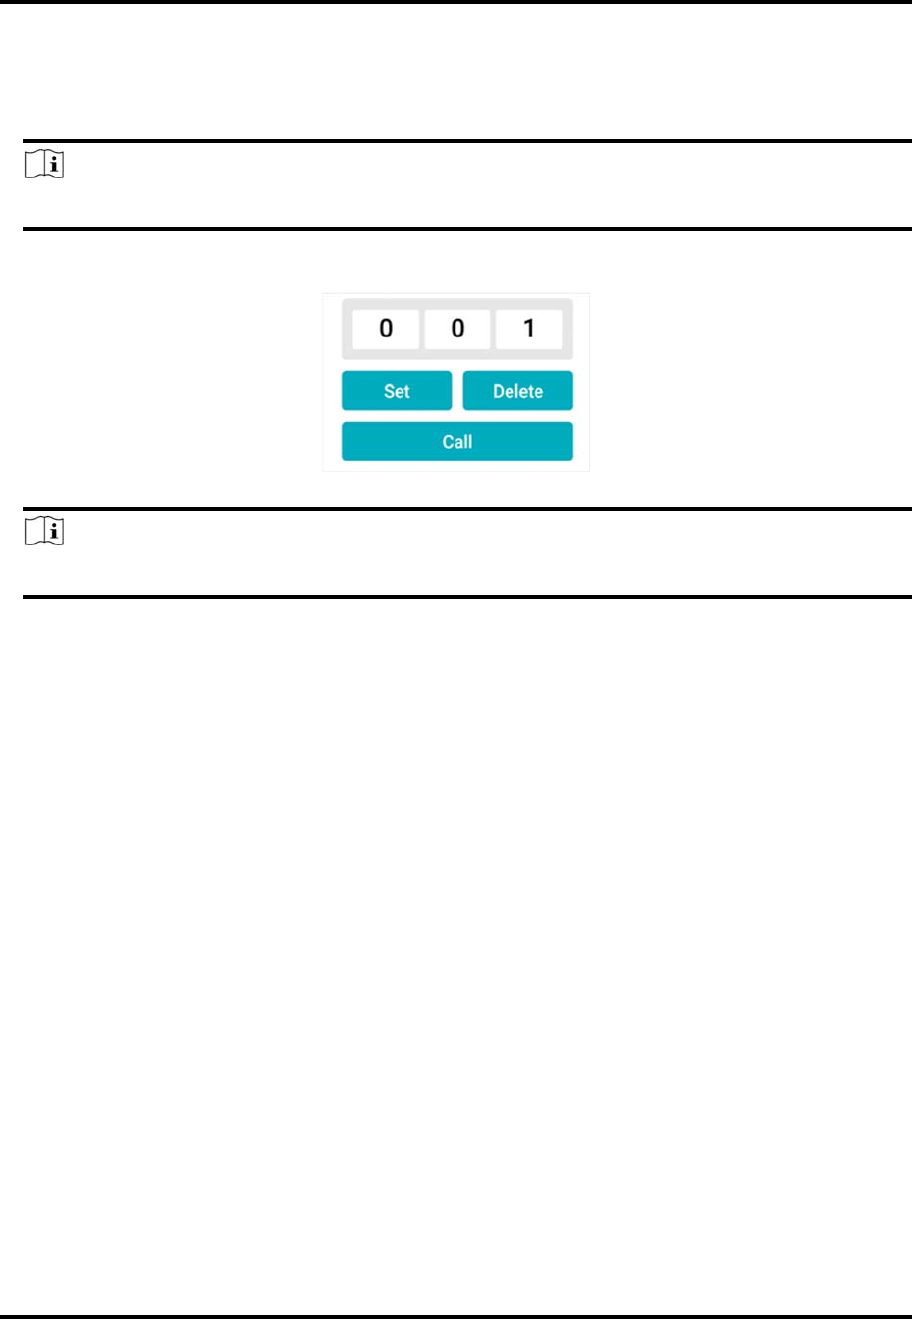
Mira
35
position.
Steps
1.Panandtiltacameratomovethecameradirectiontoadesiredposition.
Note
SeePanandTiltaCamerafordetails.
2.InthePTZControlpanel,tapAddPresettoopenthefollowingwindow.
3.SwipethenumberupordowntosetthepresetNo.
Note
ThepresetNo.shouldbebetween1and256.
4.TapSettocompletesettingthepreset.
5.TapCalltocallthepreset.
6.Optional:TapDeletetodeletethepreset.
7.4.3AdjustPTZSpeed
YoucanadjustthePTZspeed.
Steps
1.StartliveviewofacamerawhichsupportsPTZcontrol.
2.TaptoopenthePTZcontrolpanel.
3.TapMore→toopenthePTZspeedpanel.
4.DragtheslidertoadjustthePTZspeed.
7.4.4OtherFunctions
ThePTZControlpanelsprovideotherfunctionssuchasPTZspeedadjustment,auto‐scan,focus
control,iriscontrol,andauto‐tracking.
TapMoreonthePTZControlpaneltoviewthefunctions.

Mira
36
Icon Description
Start/stoptheauto‐scan,whichmeansto
makethespeeddomepan,tilt,and(or)zoom
byapredefinedroute.
Note
● Youcandefinetherouteonthedevice.For
details,seetheusermanualofthedevice.
● Thefunctionshouldbesupportedbythe
device.
Zoomcontrol: Zoom+/ Zoom‐
Focuscontrol: Focus+/ Focus‐
Iriscontrol: Iris+/ Iris‐
AdjustPTZspeed.
Enable/Disableauto‐tracking.Afterenabled,
whenthecameradetectsamovingobject,the
camerawillpan,tilt,andzoomtotrackthe
objectuntiltheobjectmovesoutofthefield
ofviewofthecamera.
Note
Thefunctionshouldbesupportedbythe
device.
7.5CapturingandRecording
Duringliveview,youcancapturepicturesofthelivevideoandrecordvideofootage.
Steps
1.Startliveviewofacamera.
Note
SeeStartandStopLiveViewfordetails.

Mira
37
2.Captureapictureorrecordvideofootage.
CapturePicture Tap tocaptureapicture.
RecordVideo
Footage
Tap tostartrecordingvideofootage,tapagaintostop.
ThecapturedpicturesandrecordedvideoswillbesavedinMore→PicturesandVideos.For
detailsaboutmanagingpicturesandvideos,seePicturesandVideos.
7.6SetImageQualityforDeviceAddedbyIP/Domain
FordevicesaddedviaIP/Domain,youcansetitsimagequalitytoFluentorClear.Youcanalso
customizeimagequalityforthedevices.
Steps
Note
● Ifyouchangetheimagequality,theliveviewandrecordingofthedevicemaybeaffected
duetothenewsettings.
● Inmulti‐windowmode,youcanonlysettheimagequalitytoFluent,orcustomizetheimage
qualityandthestreamtypecanonlybeSubStream.
1.StartliveviewofadeviceaddedviaIP/Domain.
Note
SeeStartandStopLiveViewfordetails.
2.Tap ontheliveviewpagetoenterthequalityswitchingpanel.
Note
Theiconvarywiththeactualvideoquality.
3.Settheimagequalityasdesired.
– TapCleartosettheimagequalityasClear.
– TapFluenttosettheimagequalityasFluent.
– TapCustomtoopentheCustomSettingswindow,andthenconfiguretheparametersandtap
Confirmtoconfirmthecustomsettings.

Mira
38
Note
● Thefollowingtableshowstherecommendedframerateandbitrateconfigurationfor
differentresolutionatH.264,H.264+andH.265videocompressionbyMotoXPro(CPU:
Snapdragon805,Android5.0.2).
Resolution 1‐ch 2‐ch 4‐ch RecommendedConfiguration
H.264(SoftwareDecoding)
1080P √ √ Framerate:25fps;Bitrate:4Mbps
720P √ √ √ Framerate:25fps;Bitrate:2Mbps
4CIF √ √ √ Framerate:25fps;Bitrate:
512Kbps
H.264(HardwareDecoding)
1080P √ √ √ Framerate:25fps;Bitrate:4Mbps
720P √ √ √ Framerate:25fps;Bitrate:2Mbps
4CIF √ √ √ Framerate:25fps;Bitrate:
512Kbps
H.264+(SoftwareDecoding)
1080P √ √ Framerate:25fps;Bitrate:4Mbps
720P √ √ √ Framerate:25fps;Bitrate:2Mbps
H.264+(HardwareDecoding)
1080P √ √ √ Framerate:25fps;Bitrate:4Mbps
720P √ √ √ Framerate:25fps;Bitrate:4Mbps
H.265(SoftwareDecoding.Hardwaredecodingisnotsupported.)
1080P √ √ Framerate:25fps;Bitrate:2Mbps
720P √ √ √ Framerate:25fps;Bitrate:4Mbps
Mira
39
Resolution 1‐ch 2‐ch 4‐ch RecommendedConfiguration
4CIF √ √ √ Framerate:25fps;Bitrate:
256Mbps
7.8SetImageQualityforMiraDevice
Usuallythreepre‐definedimagequalitiesareprovidedintheMobileClientforMiradevice:Basic,
Standard,andHighDefinition.
Steps
Note
Theprovidedimagequalitytypesmayvarywithdifferentdevices.
1.StartliveviewofaMiradevice.
Note
SeeStartandStopLiveViewfordetails.
2.Tap toenterthequalityswitchingpanel.
Note
Theiconmayvarywiththeactualimagequality.
3.Setimagequality.
Basic
Basicimagequality.
Note
Basicisthedefaultimagequality.
Standard
Standardimagequality(theimagequalityishigherthanthatofBasicandlowerthanthatof
HD).
HD
Highdefinitionimagequality(theimagequalityisthehighestofthethree).

Mira
40
Chapter8Playback
Youcansearchtherecordedvideofilesstoredintheaddeddeviceforremoteplayback.
8.1StartandStopPlayback
Youcansearchthecamera'srecordedvideofilesinaselectedtimeperiodandthenstartplayback.
Steps
1.Onthedevicelistpage,tap attheupper‐leftcornertoentertheSelectItem(s)page.
2.Setthedateandtimeforplayback.
PlaybackDate
Selectadate.
Note
Thedateduringwhichvideofileswererecordedismarkedwithayellowdot.
PlaybackTime
Setthestarttimepointfortheplaybackintheselecteddate.
3.Selectcamera(s).
Note
Youcanselectupto4cameras.
4.TapStartPlayback toenterthePlaybackpage.
5.Optional:Performthefollowingoperations.
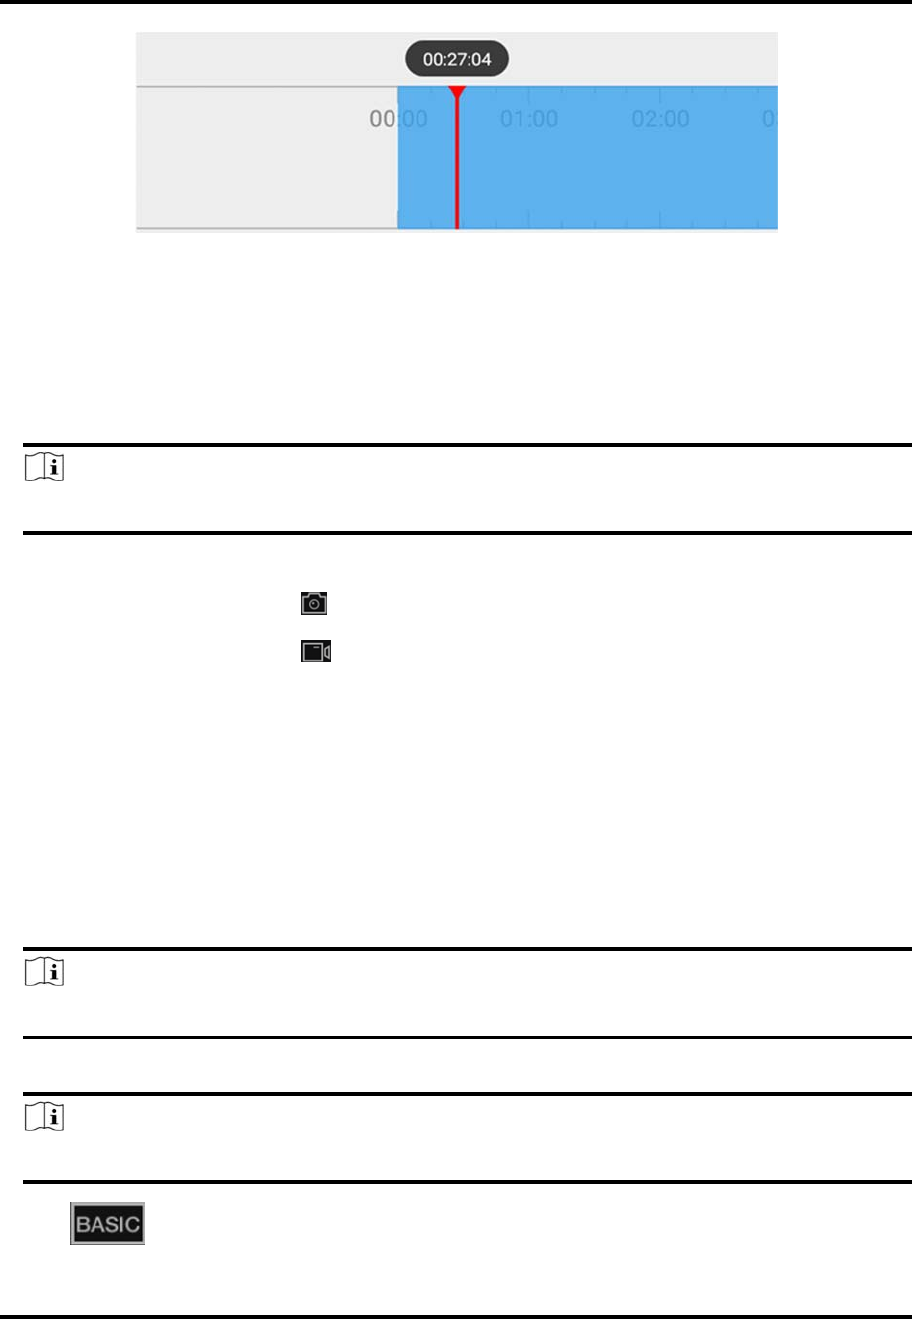
AdjustPlaybackTime Slidethetimelinetoadjusttheplaybacktime.
Note
representscontinuousrecordingandrepresents
event‐triggeredrecording.
Scaleupanddown
Timeline
Spreadtwofingersaparttoscaleupthetimelineorpinchthem
togethertoscaledown.
Mira
41
8.2CapturingandRecording
Duringplayback,youcancapturepicturesandrecordvideofootage.
Steps
1.Startplayback.
Note
SeeStartandStopPlaybackfordetails.
2.Captureapictureorrecordvideofootage.
CaptureaPicture Tap tocapturea picture.
ReccordVideo
Footage
Tap tostartrecordingvideofootage,tapagaintostop.
ThecapturedpicturesandrecordedvideoswillbesavedinMore→PicturesandVideos.For
detailsaboutmanagingpicturesandvideos,seePicturesandVideos.
8.3SetPlaybackQualityforDeviceAddedbyIP/Domain
FordevicesaddedbyIP/Domain,youcansettheimagequalityofplaybackforthem.
Steps
Note
FordetailsaboutaddingdevicebyIP/Domain,seeAddaDevicebyIP/Domain.
1.SelectadeviceaddedbyIP/Domainonthedevicelistandthenstartplayback.
Note
Fordetailsaboutstartingplayback,seeStartandStopPlayback.
2.Tap ontheplaybackpagetoenterthequalityswitchingpanel.

Mira
42
Note
Theiconmayvarywiththeactualvideoquality.
3.Settheimagequalityasdesired.
– TapCleartotaptheimagequalitytoClear.
– TapCustomtoopentheCustomSettingswindow,andthenconfiguretheparameters
(Resolution,FrameRate,andBitrate)andtapConfirmtoconfirmthecustomsettings.
Note
● Theimageeffectisrelatedtotheperformanceofyournetworkandphoneortablet.Ifthe
imageisnotfluentorthescreenappearsblurred,reducetheresolution,framerateand
bitrateofthecameraincustommode.
● Thefollowingtableshowstherecommendedframerateandbitrateconfigurationfor
differentresolutionatH.264,H.264+andH.265videocompressionbyMotoXPro(CPU:
Snapdragon805,Android5.0.2).
Resolution 1‐ch 2‐ch 4‐ch RecommendedConfiguration
H.264(SoftwareDecoding)
1080P √ √ Framerate:25fps;Bitrate:4Mbps
720P √ √ √ Framerate:25fps;Bitrate:2Mbps
4CIF √ √ √ Framerate:25fps;Bitrate:
512Kbps
H.264(HardwareDecoding)
1080P √ √ √ Framerate:25fps;Bitrate:4Mbps
720P √ √ √ Framerate:25fps;Bitrate:2Mbps
4CIF √ √ √ Framerate:25fps;Bitrate:
512Kbps
H.264+(SoftwareDecoding)
1080P √ √ Framerate:25fps;Bitrate:4Mbps
720P √ √ √ Framerate:25fps;Bitrate:2Mbps
H.264+(HardwareDecoding)
1080P √ √ √ Framerate:25fps;Bitrate:4Mbps
720P √ √ √ Framerate:25fps;Bitrate:4Mbps
H.265(SoftwareDecoding.Hardwaredecodingisnotsupported.)
1080P √ √ Framerate:25fps;Bitrate:2Mbps
Mira
43
Resolution 1‐ch 2‐ch 4‐ch RecommendedConfiguration
720P √ √ √ Framerate:25fps;Bitrate:4Mbps
4CIF √ √ √ Framerate:25fps;Bitrate:
256Mbps
8.4DownloadVideoSegment
DuringplaybackofthecameraslinkedtoaDVRorNVR,youcandownloadaspecificvideo
segmentasevidenceifitcontainsimportantinformationaboutincidentssuchasviolentcrimesin
caseoftheneedforsettlingdisputesorlegalcases.
Steps
Note
Thefunctionshouldbesupportedbythedevice.
1.Startplayback.
2.Tap ifimportantinformationoccursontheimage.
Bydefault,thevideosegmentwhichlasts130seconds(from10secondsbeforethetapping,to
120secondsafterthat)willbeautomaticallyselectedfordownload.Forexample,ifyoutap
whenthevideofootageisplayedto00:00:30,thesegmentfrom00:00:20to00:02:30willbe
selected.
Note
Inspecialoccasionswhen130‐secondsdurationisnotavailabletobeselectedfollowingthe
above‐mentionedrule,thesegmentwillextendafterwordsorbackwardsuntilthesegment
durationreaches130seconds.Forexample,ifyoustartdownloadingfromtheverybeginningof
thevideofootage,theselectedsegmentwillbefrom00:00:00to00:02:10.
3.Optional:Dragtheslider(s)tolessenthedurationofthesegmentfordownload.
Note
Thedurationshouldnotbeshorterthan10seconds.
4.Optional:TapthePlayicontopreviewtheselectedsegment.

Mira
44
Note
Ifthesegmentisencrypted,youshouldenterthedeviceverificationcodebeforeyoucan
previewit.Fordetailsaboutvideoencryption,seeSetVideoandImageEncryption.
5.TapDownloadtostartdownloading.
Note
Downloadatthebackgroundissupported.ThedownloadcontinuesifyouexittheDownload
pageortheMobileClient.
6.Optional:GotoMore→PicturesandVideostoviewthedownloadedvideosegment.
8.5AdjustPlaybackSpeed
ForthecameraslinkedtoaDVRorNVR,youcanadjusttheplaybackspeedforthemasrequired.
Note
Thefunctionshouldbesupportedbythedevice.
Duringplayaback,youcanswipethetoolbaratthebottomtoviewthehiddenicons,andthentap
tosettheplaybackspeedto1/8X,1/4X,1/2X,1X,2X,4X,and8X.Xherereferstotheoriginal
playbackspeed.

Mira
45
Chapter9OtherFunctions
ThissectionintroducesotherfunctionsprovidedbytheMobileClient,includingfingerprint
authentication,andmanagementoftherecorded(orclipped)videoandcapturedpictures.
9.1PicturesandVideos
InPictureandVideoManagementmodule,youcanviewandmangetherecorded(orclipped)
videofootageandthecapturedpictures.
TapMore→PicturesandVideostoenterthePicturesandVideospageandthenyoucanperform
thefollowingoperations.
● PlayVideoFile
● :Tapavideofileandthentap toplayit.
● DeleteaVideoFileorPicture
● :Tapavideofileorapicture,andthentap todeleteit.
● ShareaPictureorVideoFiletoAnotherApplication
● :Tapavideofileorapicture,andthentap toshareittoanotherapplication.
● BatchDeleteVideoFilesand(or)Pictures
● :TapEditandselectvideofilesand(or)pictures,andthentap todeletethem.
● BatchSharePicturesand(or)VideoFilestoAnotherApplication
● :TapEditandselectpicturesand(or)videofiles,andthentap toshareittoanother
application.
9.2FingerprintAuthentication
Forinformationsecurity,theMobileClientprovidesthefunctionoffingerprintauthentication,
whichrequiresyoutoverifyyouridentitybeforeyoucanaccessit.
Note
● Thephoneoperationsystemshouldsupportfingerprintauthentication.
● Youshouldhaveenabledfingerprintauthenticationonthephoneoperationsystem,oryouwill
failtoenablethefunctionontheclientsoftware.
TapMore→AccountManagementtoentertheAccountManagementpageandthenenablethe
function.

Mira
46
Chapter10SystemSettings
ThissectionintroducessystemsettingsoftheMobileClient,includinghardwaredecoding,floating
liveview,resuminglatestliveview,etc.
10.1EnablePushNotification
Ifpushnotificationisenabled,theMobileClientwillpushalarmnotificationsrelatedtotheadded
devicestoyou.
Note
Fordetailsaboutalarmnotifications,seeAlarmNotificationfordetails.
TapMore→SettingstoentertheSettingspage,andthenenablethefunction.
10.2SaveDeviceParameters
Ifthefunctionisenabled,theMobileClientwillrememberthedeviceparametersyouset.Take
videoandimageencryptionforanexample,youonlyneedtoenterthedeviceverificationcode
foroncetoviewtheencryptedliveview,playback,orpicture.
Note
● Fordetailsaboutvideoandimageencryption,seeSetVideoandImageEncryption.
● FordetailsaboutsettingdeviceparametersviatheMobileClient,seeDeviceSettings.
TapMore→SettingstoentertheSettingspage,andthenenablethefunction.
10.3Auto‐receiveAlarmafterPower‐on
Ifyouenablethisfunction,theMobileClientwillrunautomaticallyandreceivealarmevent
informationwhenthephoneortabletispoweredon.
TapMore→SettingstoentertheSettingspageandthenenablethefunction.
Note
Thepowerconsumptionofthephoneortabletmayincrease.

Mira
47
10.4GenerateaQRCodewithDeviceInformation
FordevicesaddedviaIP/domain,theMobileClientallowsyoutogenerateaQRcodecontaining
theinformationofupto32devices.TheQRcodecanbeusedtoquicklyaddmultipledevices.For
example,ifuserAhasgeneratedaQRcodecontainingtheinformationof10devices,userBcan
scantheQRcodetobatchaddthe10devicestohisorheraccount.
Steps
Note
OnlydevicesaddedbyIP/domainsupportthisfunction.
1.TapMore→SettingstoentertheSettingspage.
2.TapGenerateQRCode.
3.TapGenerateQRCodeintheIP/DomainfieldtoentertheSelectDevicepage.
4.Selectdevice(s).
5.TapGenerateQRCode.
TheQRcodepicturewillbegenerated.
6.TapSavetosavethepicturetothephotoalbumofyourphoneortablet.
10.6ViewTrafficStatistics
TheMobileClientautomaticallycalculatesthenetworktrafficconsumedduringliveviewand
playback.YoucancheckthemobilenetworktrafficandWi‐Finetworktrafficseparately.
TapMore→SettingstoentertheSettingspage,andthentapTrafficStatistics.
10.7GenerateaQRCodewithWi‐FiInformation
YoucangenerateaQRcodewithWi‐Fiinformation,andthenuseanetworktoscantheQRcode
toconnectthedevicetotheWi‐Finetwork.Thecameraneedstobeaddedthroughonlinedevice
tousethisfeature.
Steps
Note
ConnectingdevicetoaWi‐FinetworkbyscanningQRcodeshouldbesupportedbythedevice.
1.TapMore→SettingstoentertheSettingspage.
2.TapWi‐FiSettingstoentertheWi‐FiSettingspage.
3.Settherequiredinformation.
Wi‐FiName
EntertheSSIDoftheWi‐Finetwork.

Mira
48
Password
EnterthepasswordoftheWi‐Finetwork.
Encryption
Selecttheencryptiontypeastheoneyousetfortherouter.
Note
IfyouselectNONEastheencryptiontype,thepasswordoftheWi‐Finetworkisnotrequired.
4.TapGeneratetogenerateaQRcodefortheWi‐Finetwork.
Whattodonext
UseanetworkcameraorwirelessdoorbelltoscantheQRcodetoconnectthedevicetotheWi‐Fi
network.
10.8FloatingLiveView
Ifyouenablethisfunction,floatingliveviewwindow(s)willbedisplayedonthedevicelistpage
whenyouselectoneormoredevice(s).Youcanpreviewthelivevideo(s)inthefloatingwindow(s).
Note
● Ifyouselectmorethan16cameras,thenumberoftheselectedcameraswillbedisplayed.
● Upto256camerascanbedisplayedasfloatingwindows.
TapMore→SettingstoentertheSettingspageandthenenablethefunction.
10.9ResumeLatestLiveView
Ifyouenablethefunction,thelatestliveviewwillberesumedeachtimeyouentertheMobile
Client.Thewindowdivisionmode,andtheliveviewwindows'sequence(ifinmultiple‐window
mode)willalsoberestored.
TapMore→SettingstoentertheSettingspage,andthenenablethefunction.
10.10TabletMode
IftheMobileClientisinstalledonatablet,youcanenabletabletmodesothattheinterfaceswill
bedisplayedinlandscapemodebydefault.
TapMore→SettingstoentertheSettingspageandthenenablethefunction.

Mira
49
10.11Display/HideChannel‐Zero
Channel‐zero,knownasvirtualchannel,canshowthevideosfromallchannelsofthedevice,
reducingthebandwidthwhilesimultaneouslypreviewingfrommulti‐channel.Itcanacquireimage
informationandsavebandwidthfortransmissionthroughencodingandconfiguringoutput
images.
TapMore→SettingsandthenenabletheMobileClienttodisplaychannel‐zero.
10.12Auto‐DownloadUpgradeFile
IfyouenableAuto‐DonwloadUpgradeFile,theMobileClientwillautomaticallydownloadthe
upgradefileinWi‐Finetworks,whichhelpsspeedupthedeviceupgradeprocess.
Note
Fordetailsaboutupgradingdevice,seeUpgradeDeviceFirmware.
TapMore→SettingstoentertheSettingspageandthenenablethefunction.

UD16975N
