TTE Technology 50D1400 LCD TV User Manual 50D1400 MS6488 v2
TTE Technology, Inc. LCD TV 50D1400 MS6488 v2
User Manual
MODEL: 50D1400
Homepage
12
13
APPS............................................................................................................................
............................................................................................
...................................................................................................
TV.................................................................... .............................................................
GOLIVE........................................................................................................................
15
15
15
16
17
17
18
Picture........................................................................................................................
Sound ........................................................................................................................
Channel......................................................................................................................
Time...........................................................................................................................
Settings.......................................................................................................................
Lock............................................................................................................................
8
8
9
9
Choose Your Connections
Network Connections
Network Settings
Chapter 4:System Settings Menu
Chapter 5:Special Function
Chapter 6:Other Function
21
Troubleshooting .................................................................................................................................
....................................................................................................................Problems and Solutions
19
20
.......................................................................................................................................
Multimedia
14
11
4 pcs of type M6 screws are required for installing the
wall mount bracket to your TV.
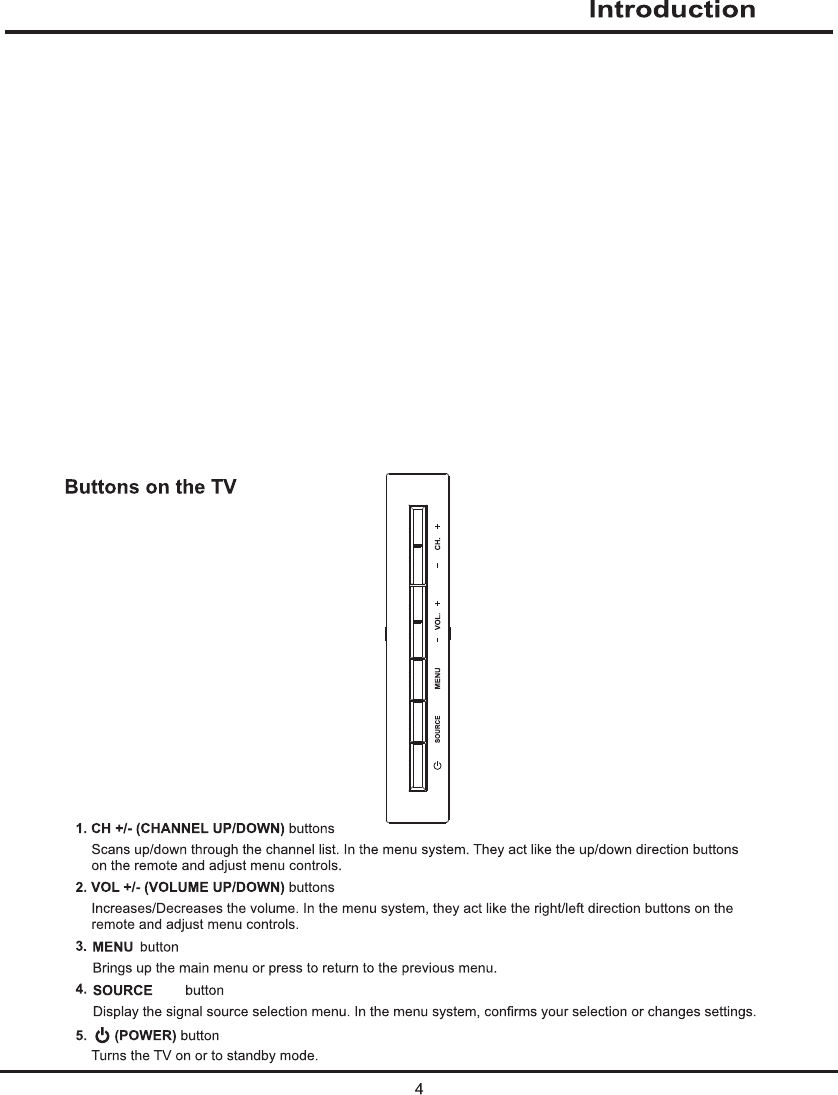
/OK
/OK
FCC lnformation
This equipment has been tested and found to comply with the limits for aClass B digital
device, pursuant to Part 15 of the FCC Rules. These limits are designedto provide
reasonable protection against harmful interference in a residential installation.
This equipment generates uses and can radiate radio frequency energy and, if not
installed and used in accordance with the instructions, may cause harmful
interference to radio communications. However, there is no guarantee that
interference will not occur in a particular installation. If this equipment does cause
harmful interference to radio or television reception, which can be determined by
turning the equipment off and on, the user is encouraged to try to correct the
interference by one or more of the following measures:
Reorient or relocate the receiving antenna.
Increase the separation between the equipment and receiver.
Connect the equipment into an outlet on a circuit different from that to which
.detcennoc si reviecer eht
Consult the dealer or an experienced radio/TV technician for help.
This device complies with Part 15 of the FCC Rules. Operation is subject to the
following two conditions:
(1) This device may not cause harmful interference,and
(2) This device must accept any interference received, including interference that
may cause undesired operation.
Warning: Changes or modifications not expressly approved by the party responsible
for compliance could void the user's authority to operate the equipment.This equipment
complies with FCC radiation exposure limits set forth for an uncontrolled environment.
This equipment should be installed and operated with minimum distance 20cm between
the radiator & your body.
mini
PR
PB
Y
L
R
IN
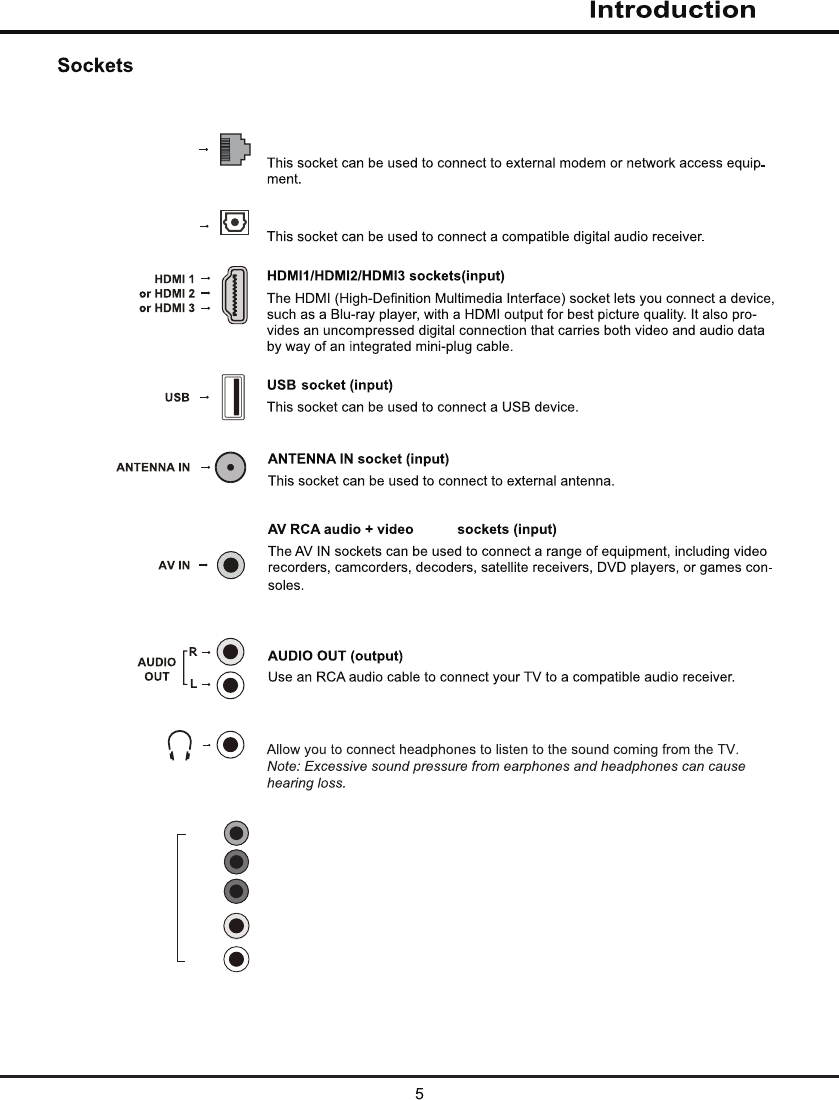
IN Sockets(input)
sockets(output)
LAN
LAN
The IN can recognize if the device you’re connnecting to sockets.
The sockets provide excellent picture quality because the video is separated
into three separate parts.
The L and R socket be used to connect a range of equipment,including video
recorders,camcorders,satellite receivers,DVD players,or games consoles.
The socket provides composite Video&Audio connection.
YPBPR
YPBPR
YPBPR
OPTICAL OUT
OPTICAL OUT
EARPHONE socket(output)
6
Introduction
Remote Control Functions
Most of your television's functions are available via the menus that appear on the screen. The remote control(s)
supplied with your set can be used to navigate through the menus and to all the general settings.
Notes:
- Figures and illustrations in this operation manual are provided for reference only and may differ from actual product
appearance.
- The remote control(s) supplied with your set may differ depending on the model. Refer to corresponding remote
control functions below according to your actual remote control(s).
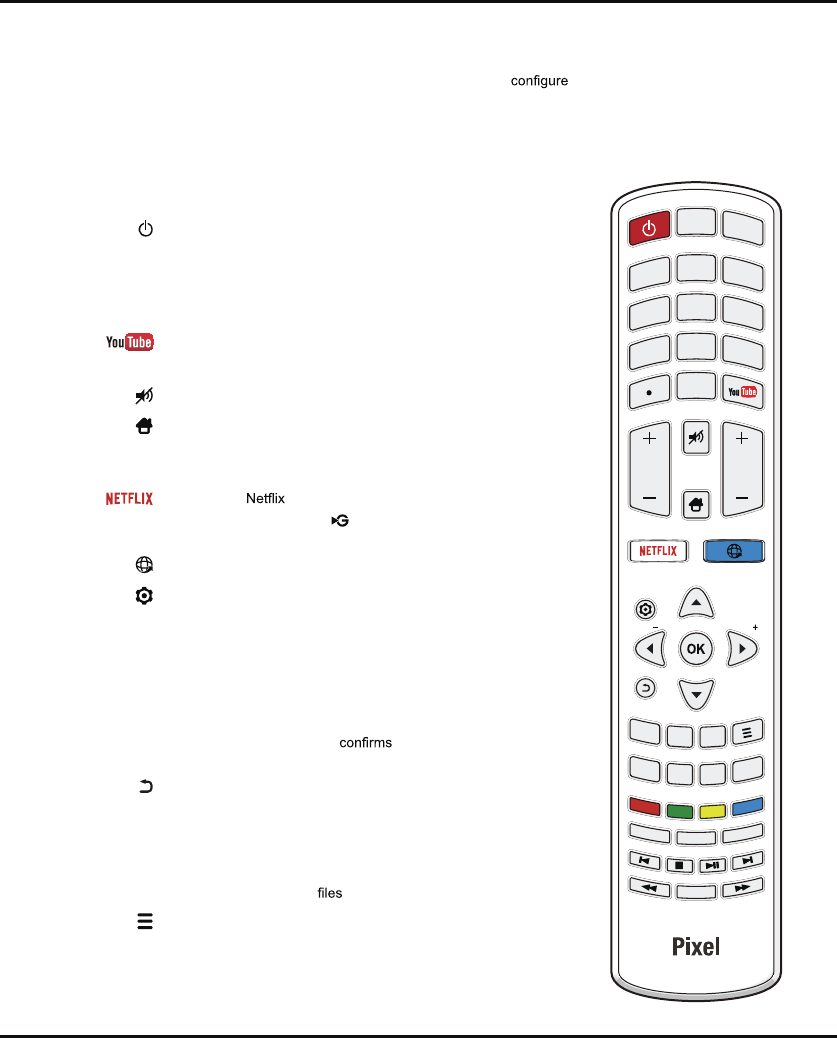
(POWER button) Turns the TV on or standby.
TV Accesses the TV mode.
SOURCE Brings up the SOURCE menu.
0-9 (Numeric buttons) Enters channel numbers.
Goes to the YouTube homepage.
VOL +/- (VOLUME UP/DOWN) Increases or decreases the TV's volume.
(MUTE button) Turns the volume off or on.
(HOME button) Goes to the smart TV homepage.
CH +/- (CHANNEL UP/DOWN) Scans up or down through the current
channel list.
Goes to the homepage.
Note: This button may be for some models and goes to the
Golive homepage.
Goes to the browser homepage.
(SETTING button) Brings up the main menu or press to return to
the previous menu.
Zoom -/+ Press to select the desired screen format.
Note: This function is not available in USB mode.
▲▼◄► (Up, down, left and right direction buttons) Highlights different
items in the menu system and adjusts the menu controls.
OK When in the menu system, your selection or changes
settings.
(BACK button) In menu mode, goes back to the previous menu or
interface; in TV mode, goes back to the last viewed channel.
EXIT Exits the menu system.
INFO Displays the status information of the current program or source.
USB Goes to the multimedia in USB.
(OPTION button) Shortcut to Freeze, PVR Disk, PVR (only
available in DTV mode), Football Mode, HDMI 2.0 (only available
in HDMI mode), Channel List, and Settings.
EXIT
SLEEP
PICTURE
CH LIST
MTS
SOUND
ZOOMZOOM
VOL CH
0
8
9
6
3
5
2
GUIDE
INFO
USB
FAV
SOURCE
4
1
TV
CC
RC311S
7
7
Introduction
EXIT
SLEEP
PICTURE
CH LIST
MTS
SOUND
ZOOMZOOM
GUIDE
INFO
USB
FAV
CC
RC311S
Notes about using the remote control
• Aim the remote control towards the TV remote sensor window. The remote control will not function properly if there
are obstructions between the TV and the remote control.
• To ensure good performance, replace the batteries immediately if the remote control is not functioning normally
because the battery is running down.
• Never mix battery types or combine used batteries with new ones.
• When the batteries are low, battery acid may leak and damage the remote control. Once the batteries are low,
replace the batteries as soon as possible.
• If the remote control is not to be used for a long time, remove the batteries to avoid the leakage of battery acid.
• Keep the remote control in dark, dry places. Batteries shall not be exposed to excessive heat such as sunshine,
or the like.
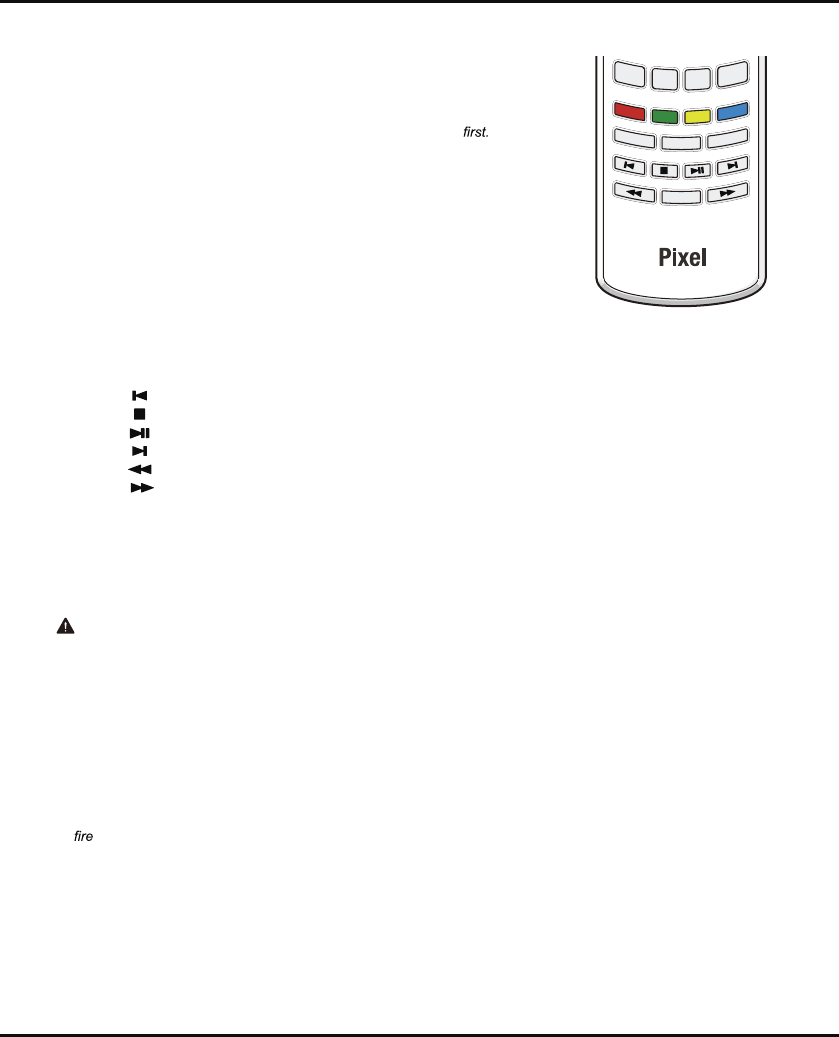
SLEEP Repeatedly press to set the TV to turn off after a given amount of
time. To cancel the sleep timer, press until Off appears.
GUIDE Toggles the Electronic Programme Guide between on and off.
Note: This function is not available in this model.
FAV Brings up your favorite channel list.
Note: You should set your favourite channel(s) For details,
refer to Channel Edit.
CH LIST Displays the channel list menu.
Colored
buttons (RED/GREEN/YELLOW/BLUE) Performs the corresponding
function indicated at the bottom of the screen.
PICTURE Selects picture mode.
SOUND Selects sound mode.
CC Brings up the closed caption menu.
MTS Toggles through the MTS (multichannel television sound) settings.
Note: MTS is only available in TV mode and the options available
may vary depending on the channel’s signal.
(Previous) Goes to the previous chapter.
(Stop) Stops viewing.
(Play/Pause) Starts, pauses or resumes viewing.
(Next) Goes to the next chapter.
Searches backward.
Searches forward.
Note: The above six buttons can be used for playing music,
pictures and videos in the USB menu.
8
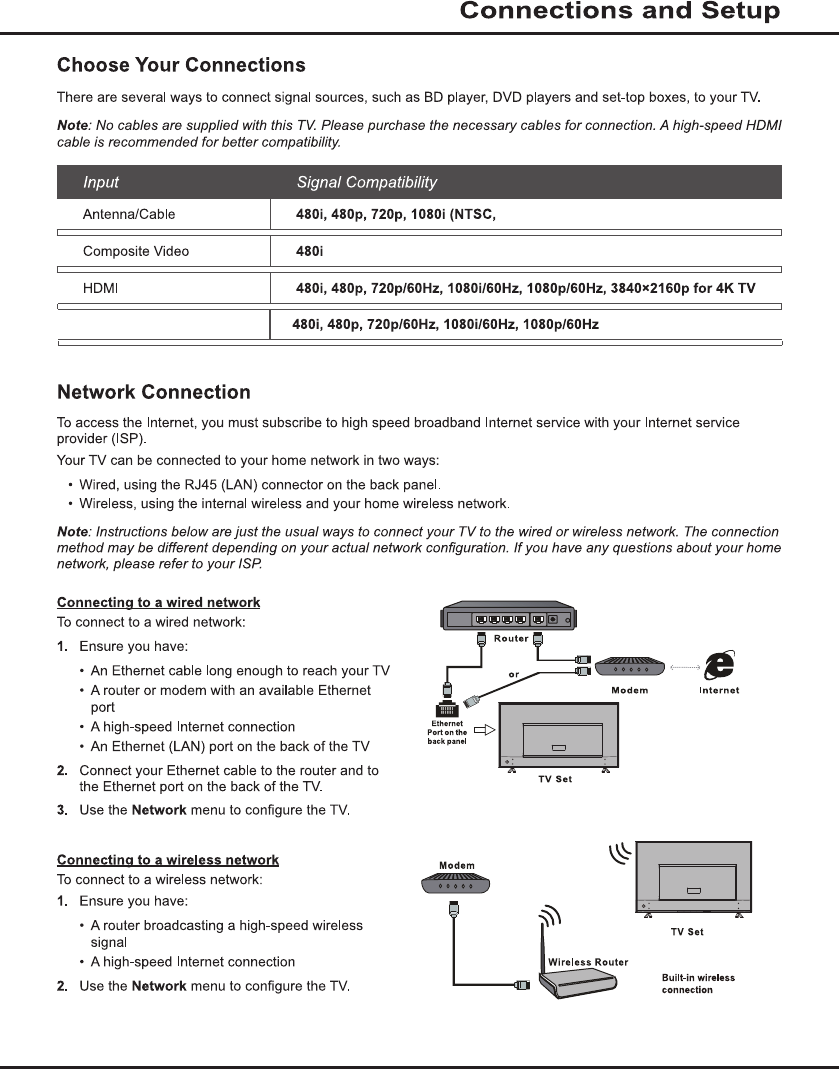
9
ATSC)
YPBPR

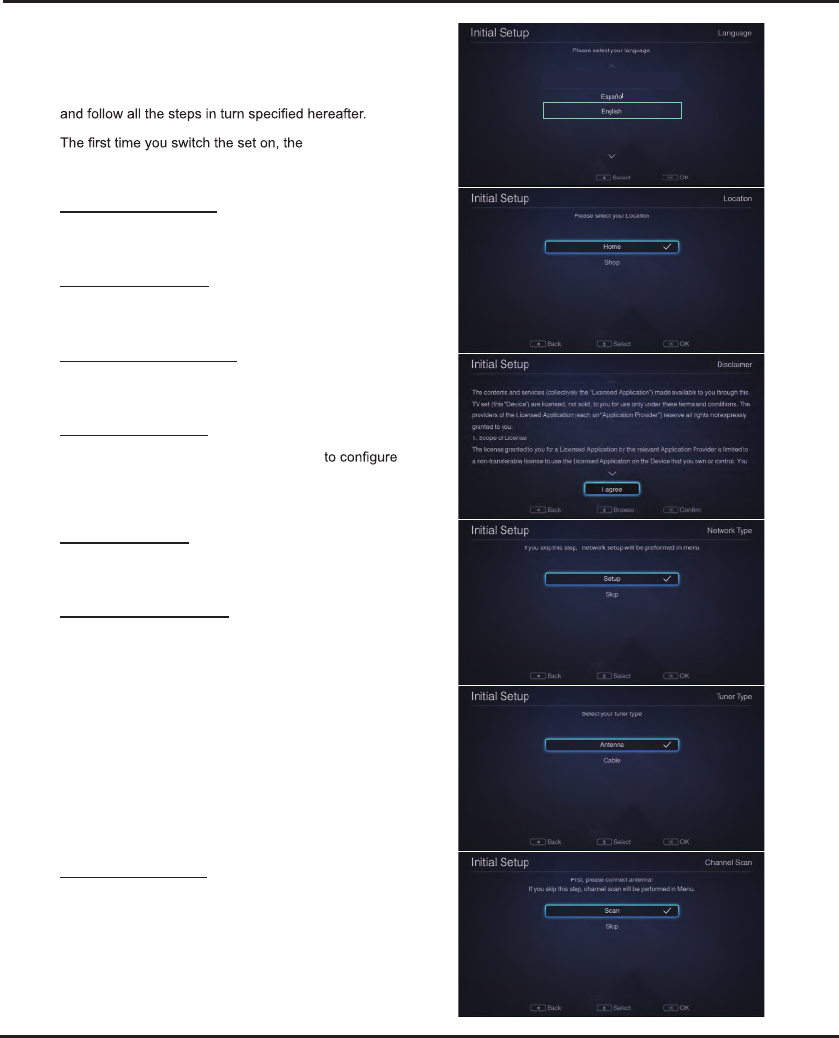
Network Settings
After you connect your home network to the TV, follow
TV.
Press the button on the remote and then
select TV > Settings > Network. Your TV set supports
both wired and wireless network connection.
Note: For wired network connection, you need to insert
Wired: Press OK to enter. You can set IP address either
DHCP or Static.
- Set IP Address DHCP: Press OK to get the IP address.
- Set IP Address Static: Press OK to enter and
then input info about IP, NetMask,
Gateway, and DNS.
input characters, press ▲/▼/◄/► to select numbers,
and press Return after choose.
.
Wireless: Press OK to enter. You can search for all
available wireless networks and select one from them,
or manually input info about the SSID of your network.
You can also check the status of your wireless network.
- Wireless On: Choose Bass station
to search for
After the searching is complete, select an accessible
wireless network to connect. For some wireless
network, you need to input the right password to
access.
-Wireless input: Choose Bass station to enter and then
press ▲/▼ to choose other (Hidden Wireless)
-Wireless Status : Press OK to display the info about the
status of your wireless network.
Netflix Setting: Press OK to enter. You can deactivate
the ESN (electronic serial number) of this TV set.
Note: For some models, the option is
not available.
- Deactivate: Press OK to enter, press ◄/► and then
press OK to deactivate the current Netflix account on
the TV.
Connections and Setup
10
Network
Wired
Wireless
Select Return
Configuration:DHCP
IP 0.0.0.0
Netmask 0.0.0.0
Select Return
Wireless:On
Base Station
MAC Address
Return
Gateway 0.0.0.0
DNS 0.0.0.0
OK
Base Station
office-2.4G
Return
Disconnect Refresh View Detail
Select
Configuration:Static
IP 0.0.0.0
Netmask 0.0.0.0
Select Return
Gateway 0.0.0.0
DNS 0.0.0.0
OK
Select
To
all available wireless networks. This may take a few
seconds.
CH Return
Connections and Setup
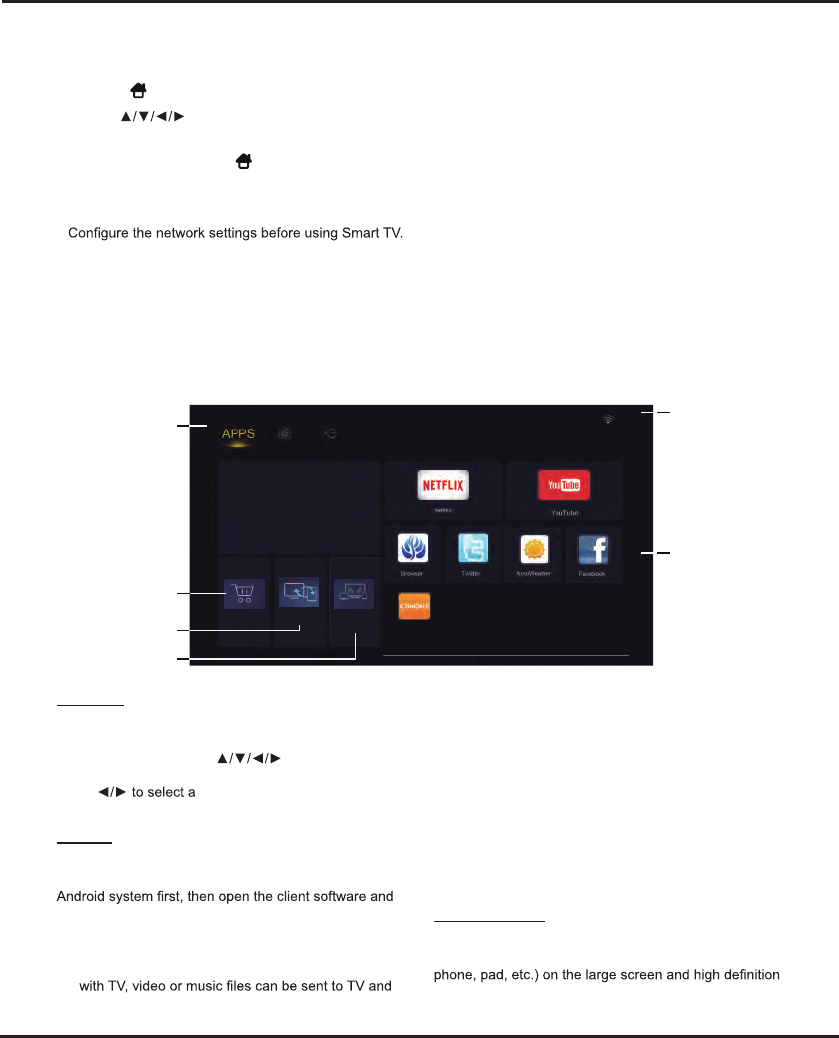
Initial Setup
Initial setup involves selecting all the settings required to
be able to search for and store all the channels you can
receive. Make sure that the television is switched on
Initial Setup
menu appears, which guides you through the initial
setup process. Press OK to enter.
Step 1 Select Language
Press ▲/▼ to select your preferred language for the
menu system, and then press OK to enter the next step.
Step 2 Select Location
Press ▲/▼ to select your location: Home or Shop and
then press OK to enter the next step.
Step 3 Agree to Disclaimer
Press ▲/▼ to select I agree and then press OK to enter
the next step.
Step 4 Set up Network
Press ▲/▼ to select Setup and press OK
the network. For details, refer to Network Settings on
page 9. You can also select Skip to skip this step
and perform network settings later.
Step 5 Select Tuner
Press ▲/▼ to select Antenna or Cable and press OK
to enter the next step.
Step 6 Scan for Channels
Press ▲/▼ to select Scan and press OK to start the
search automatically. All available TV channels are
stored. This operation takes a few minutes. The display
shows the progress of the search and the number of
programs found. You can also select Skip to skip this
step and perform channel scan later.
Note: To prevent the channel setup process from being
interrupted, wait for the message indicating that the
setup is complete.
During the setup, user can follow the hint available
at the bottom of the screen to return to the last step
by pressing ◄, or press EXIT to interrupt the search
halfway.
Initial Setup Complete
After initial setup is complete, press OK to exit. The
channels are arranged in a preset order. If you wish to
skip channels, or organize channels, press SETTING to
display the main menu, select Channel > Channel Edit
and press OK to enter.
11
Homepage
-Remote Control: A smart phone can be used as
a remote control unit to operate TV after they are
connected with TV via wireless network.
-Help: Brief introduction about the features and
usage of functions under nScreen.
-About: Brief info about the client software.
Note: To use the function, both the smart TV and smart
phone should be connected to the same wireless
network. Some smart phones and Android systems
won't be supported.
Wireless Display
You can use the screen mirroring function and enjoy
sharing the content of your device (computer, smart
TV. Operate according to the on-screen instructions.
App Store
Many useful and entertaining apps are available for
using. After entering the App Store, you will see the
recommendations. Press to select, press
OK to enter. You can also search for apps by category.
Press category on the top, and the
press OK.
nScreen
Please download and install the client software my
nScreen for my nScreen to your smart phone with
operate according to the prompt on the smart phone
and the TV screen.
The options are as follows:
-Media Sharing: After a smart phone is connected
played on it.
Note: Figures and illustrations in this User Manual are provided for reference only and may differ from actual product
appearance. And for some models, certain options are not available.
You can select all the features from homepage.
1. Press to display homepage.
2. Press to select icons from the screen list.
3. Press OK to enter each option.
4. To exit the menu, press .
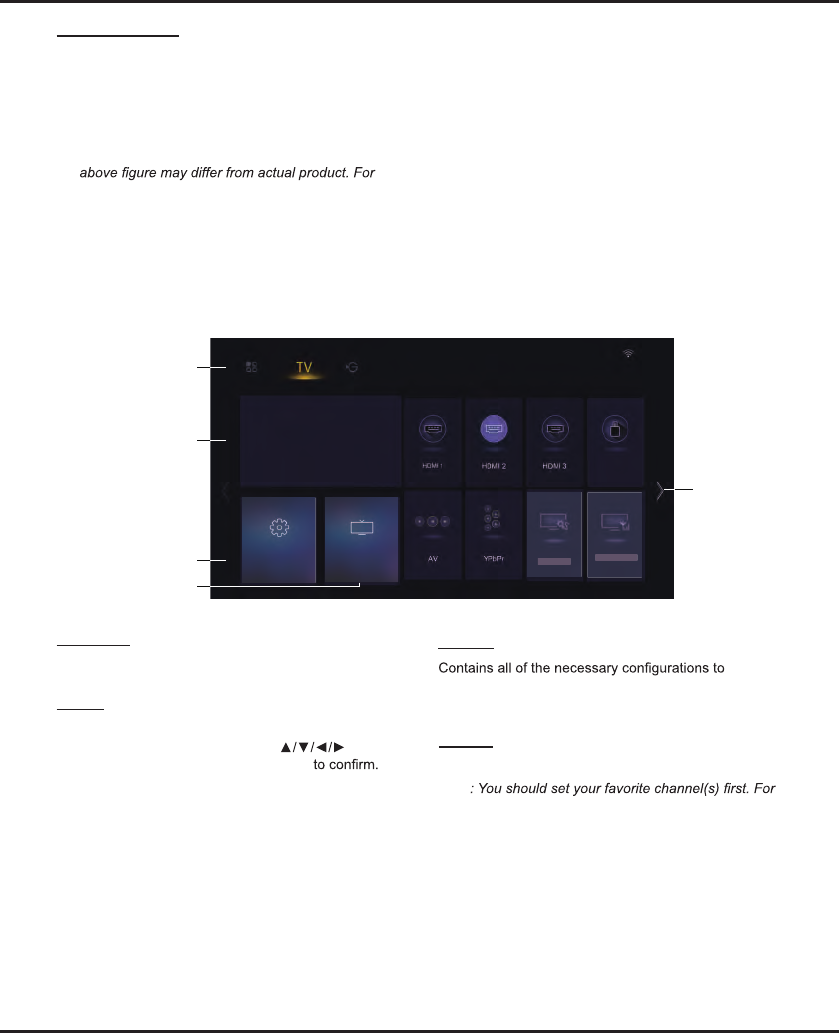
Homepage contains 3 parts: APPS, TV and GOLIVE. Use ◄/► to switch among the 3 parts.
WARNING:
•
• Slow responses and/or interruptions may occur, depending on your network conditions.
• If you experience a problem using an application, please contact the content provider.
• According to circumstances of the contents provider, an application’s updates or the application itself may be
discontinued.
• Depending on your country’s regulations, some applications may have limited service or not be supported.
Using Homepage - APPS
APPS/ TV/ GOLIVE:
Use ◄/► to focus
on each item.
App Store
Wireless Display
nScreen
Status:
Network Status
Pre-installed Apps
Chapter 3
12
Wireless
Display
APP Store nScreen Crackle
-You may need a webcam to achieve some of
the above functions. Webcam is not a standard
accessory, you may need to buy separately. Some
external devices like webcam, smart phone, game
handle and external wireless adapter may not be
supported.
Pre-installed Apps
These are recommended apps. Highlight an app and
press OK to open it.
Notes:
-The pre-installed apps or items cannot be deleted.
And the apps (regardless of order) listed in the
some models, certain apps are not available.
Homepage
Using Homepage - TV
Note: Some options may not be available for certain signal sources. Some options may appear on the next page, you
can press ◄/►to switch.
APPS/ TV/ GOLIVE:
Use ◄/► to focus
on each item.
TV Window
Settings
Favorite
Source
Settings
customize your TV settings. For details, refer to Chapter
4: System Settings Menu.
Favorite
Displays the list of your favorite channels.
Note
details, refer to Channel Edit on page 15.
TV window
Displays the current selected TV broadcast program.
Source
Include HDMI1, HDMI2, HDMI3, AV, YPBPR, Multimedia,
Cable TV and Antenna TV. Press to select
your desired source, and then press OK
Note: The available source might differ depending on
the model.
Multimedia
Cable TV
Cable TV
Antenna TV
Antenna TV
Settings Favorite
13
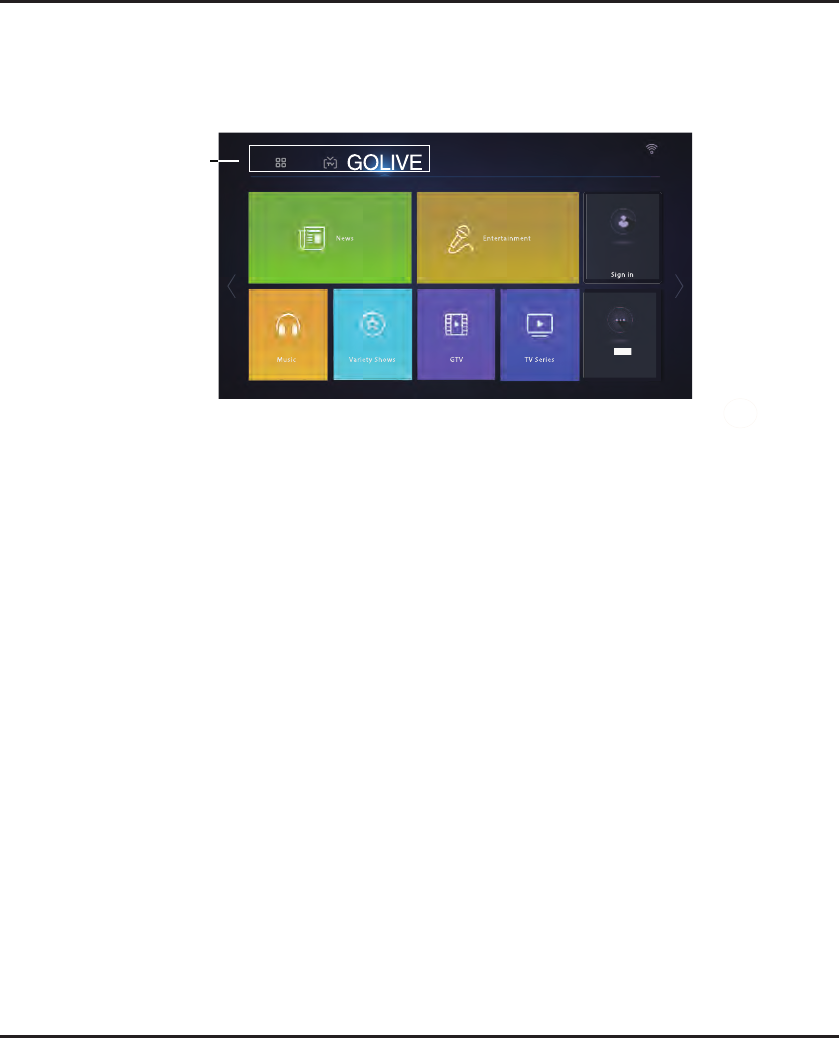
Using Homepage - GOLIVE
GoLive is a revolutionary international video entertainment platform that delivers a diverse selection of content from
all over the world to virtually any connected TV, phone, tablet, or box. Our unique technology ensures an optimized
viewing experience that is adapted to suit a range of Internet speeds, broadcasting high-quality streams of the
programs and events you want on whatever device you choose, whichever country you are in.
APPS/ TV/ GOLIVE:
Use ◄/► to focus
on each item.
Note: The information displayed will be updated periodically.
14
More
Homepage
More
System Settings Menu
Using Menu System
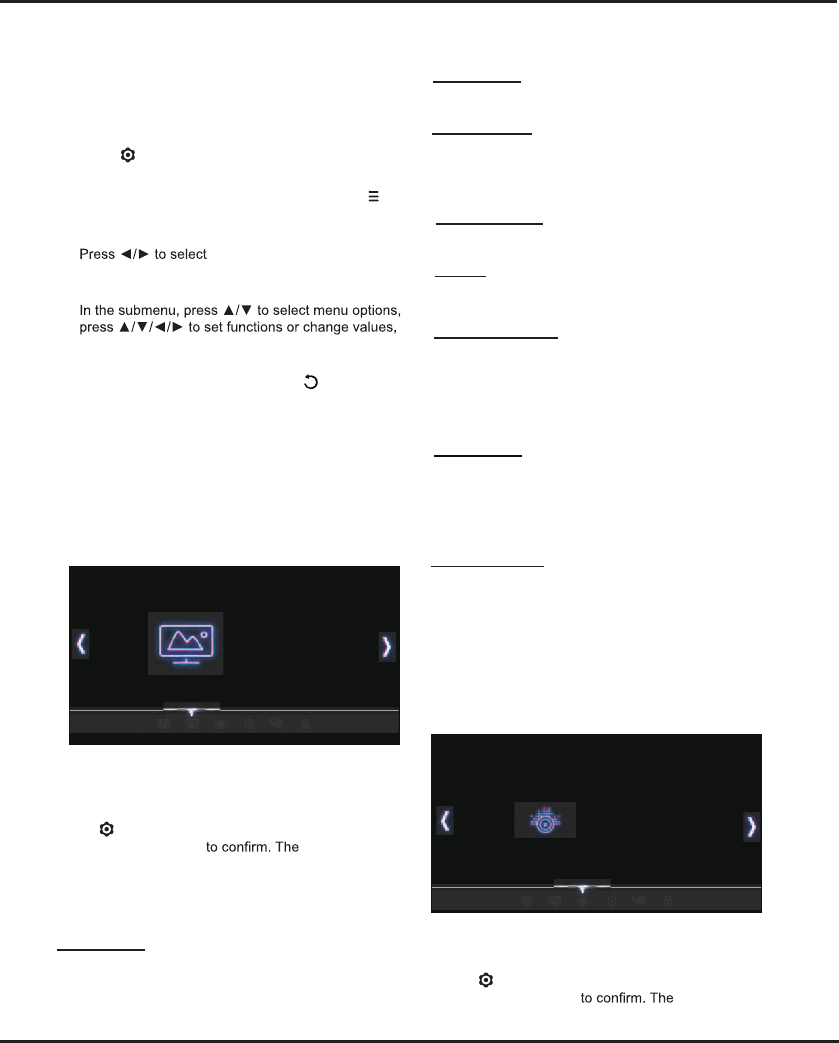
This section explores the system settings menu of your
TV. Each menu is outlined and detailed to help you get
the most from your TV. Please note that some function
might be unavailable in certain input source. To access
the menu system:
1. Press on remote control to display the
main menu.
Note: If you are using RC311S, you can press
on the remote control and select Settings and then
press OK.
2. CHANNEL , PICTURE, SOUND,
TIME, or then press OK to enter
the submenu.
3.
press OK to open the corresponding submenu or
activate a setting.
4. To return the previous menu, press
To close the menu, press EXIT.
Note: Figures and illustrations in this User Manual are
provided for reference only and may differ from actual
product appearance. And for some models, certain
options are not available.
Picture
This menu allows you to adjust each option to obtain the
best picture settings according to your preference, the
type of program of you are watching and the ambient
lighting.
Press to display the main menu and select
Picture, then press OK Picture options
are as follows:
Note: Some options may be not available for certain
signal sources.
Picture Mode
Press OK to enter, and then press ◄/► to select a
picture mode: Dynamic, Standard, Movie or User.
Note: Picture Mode may be automatically set to User if
you make any adjustment to the following picture options.
Chapter 4
15
Gamma Sets the shape of the Gamma curve. Use lower
Gamma values for bright ambient lighting, and higher
values when it is dark.
Color Temperature Adjusts the color temperature of the
picture. Press ▲/▼ to select the color settings: Cool for
a more blue palette of picture colors; Warm for a more red
palette of picture colors.
Note:For some models, the Color Temperature option is
not available.
:
Noise Reduction: Improves the quality of the picture
in the case of poor reception. Press to select
off , Low, Middle, High, Auto.
Sound
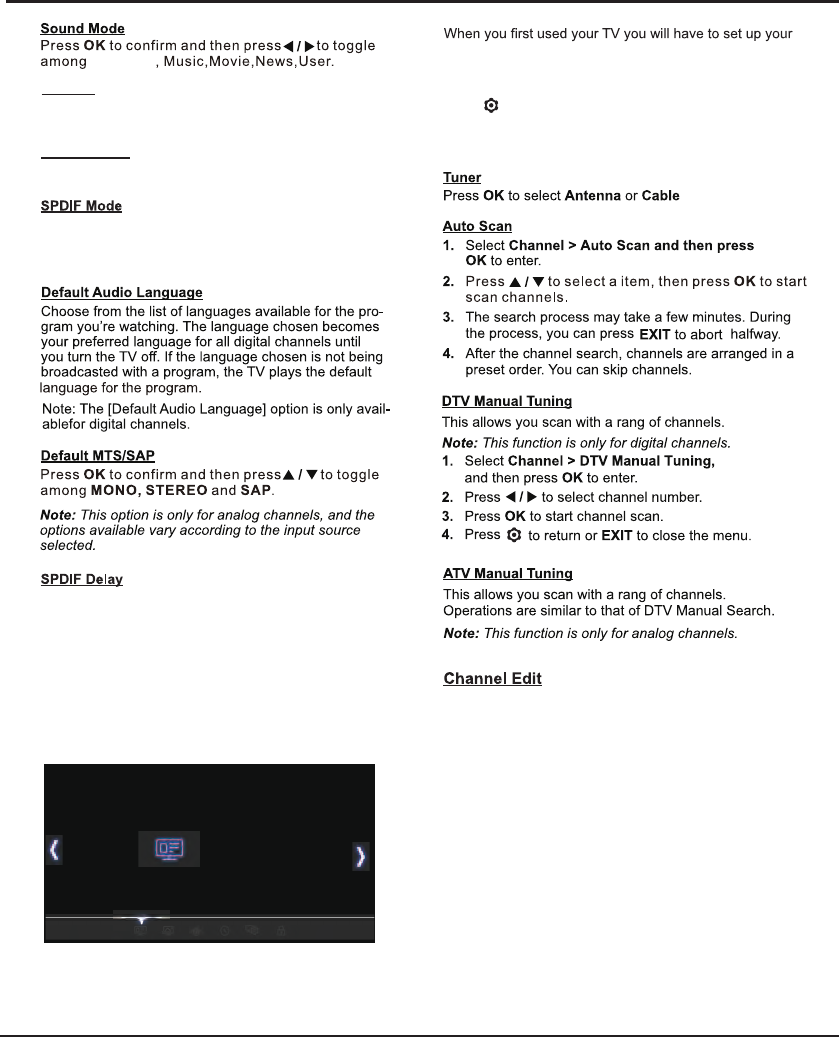
This menu allows you to adjust each option to obtain the
best sound settings to optimize audio output.
Press to display the main menu and select
Sound, then press OK Sound options
are as follows:
Picture Mode Standard
Content Type
Color Extender
Motion Enhance
Gamma
Color Temperture
Aspect Ration
Noise Reduction
Dynamic Contrast
Content Type Press OK to enter,and then press ▲/▼ to
select Video,PC and Game.
Color Extender Press OK to enter, and then press ▲/▼
to select ON, Off or xvYCC. Using xvYCC source, the TV
system will into this option automatically. The signal will be
in a primal form and then the PQ system will not change.
Motion Enhance Press OK to enter,and then press ▲/▼
to select Off,Low,Middle and High.
Sound Mode Standard
Blance
Auto Volume
SPDIF Mode
Default Audio Language
Default MTS/SAP
SPDIF Delay
SOUND
PICTURE
SETTINGS, LOCK,
▲/▼
Dynamic Contrast: Adjusts the contrast automatically.
Press ◄/► to select On or Off.
Aspect Ratio
Press OK to enter, and press ▲/▼ to scroll through
the picture mode settings: AUTO, 4:3, 16:9, Just Scan.
Note: Some options may not be available for certain
signal sources.
System Settings Menu
This option is used to control the type of audio stream
sent to the Digital Audio Output (SPDIF) socket. Press
to select Auto or PCM.
This option is used to synchronize the sound with the
picture. If the sound is slower/quicker than the action
of the picture, you can press ◄/► to turn down/up the
numerical value.
Channel
TV for DTV/ATV channels using the Initial Setup menu.
If you did not do this or if your setup has changed, you
can do this from this menu.
Press to display the main menu and select
Channel, then press OK to confirm. The Channel
options are as follows:
Balance
Press ◄/► to balance the sound between the left and
right speakers.
16
1. Select Channel > Channel Edit and press OK to
display Channel Edit menu.
2. Press ▲/▼ to select the channel as your desired,
then press the RED button on the remote
control to set your favorite channel or the green
3. Press Return to return or EXIT to close the menu.
Turner Antenna
Auto Scan
DTV Manual Tuning
ATV Manual Tuning
Chanel Edit
CHANNEL
OK
Standard
Auto Volume
Press ◄/► to select On/Off.
System Settings Menu
Time
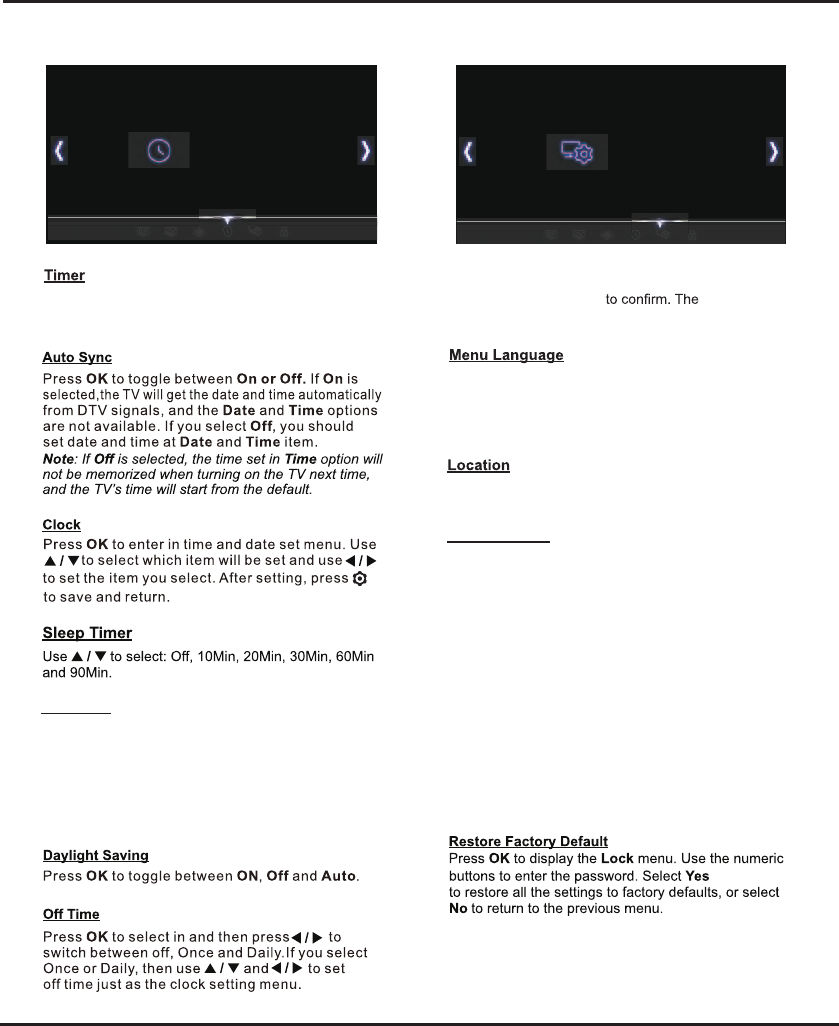
Press MENU to display the main menu and select
Settings, then press OK options
are as follows:
Press OK
to enter and then to select
English or Español.
Note: For some models, the Spanish option is not
available.
Sets the location of your TV. Press OK to select Home
or Shop.
17
This menu allows you to set the time zone on your TV
set, to program an automatic turn-off or wake-up timer.
Press OK to enter. The options are as follows:
Auto Sync On
Clock
Sleep Timer
Time Zone
Daylight Saving
Off Time
TIME
01:18
Menu Language English
Location
Restore Factory Default
Network
T-Link
Software Upgrade
Settings
Netflix Setting
Note: The options available vary according to the
value of Time Zone Mode. Region 1 to Region 5
represent Fernando de Noronha, Northeast, South
and Southeast, North, and West respectively.
SETTINGS
Closed Caption
▲/▼ to choose
Closed Caption
Many programs are encoded with closed captioning
information, which allows you to display the audio portion
of a program as text on the TV screen.
Note: Closed captioning is not available on all
channels.
The options are as follows:
Enable Caption: Press ▲/▼ to select a mode: CC Off,
CC On or On When Mute.
• CC Off: No captioning information displayed.
• CC On: Captioning information always appears, when
available.
• On When Mute: Displays captioning information, when
available, whenever the TV’s sound is mutedby pressing
MUTE button. The captioning informationis not displayed
when the sound is not muted.
Press ▲/▼ to select the local zone (Newfoundland,
Atlantic,Eastern,Central,Mountain,Pacific,Alaska,
Hawaii,Samoa.).
Time Zone
Settings
Note: The default password is“0000”.And “0812” is the super
pass word.If you forget your password,enter it to override
any existing ones.
System Settings Menu
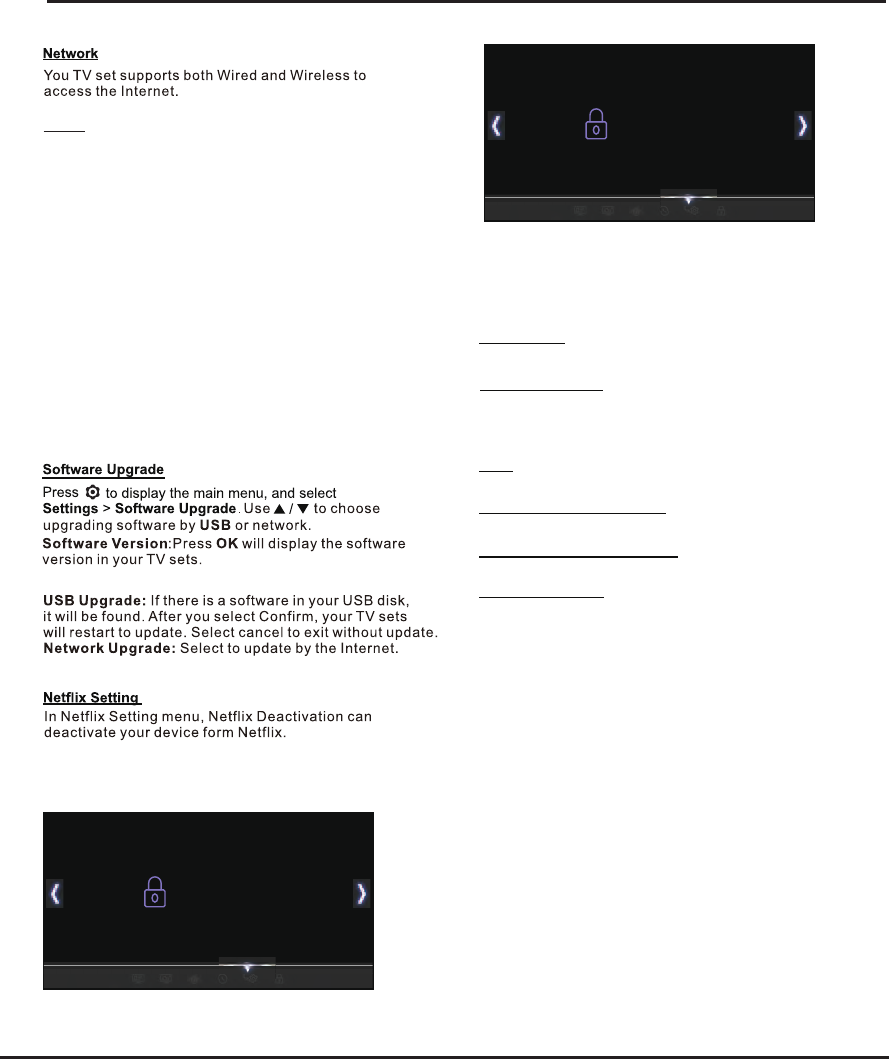
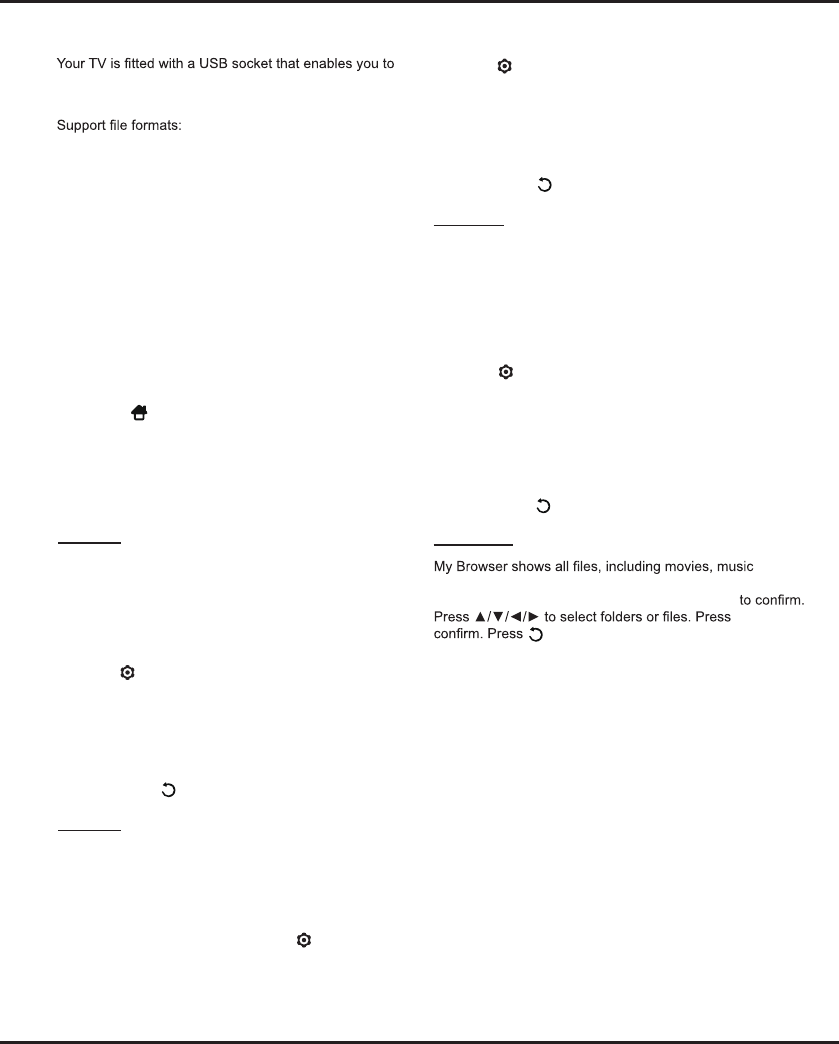
Lock
This menu can control the special function for TV
channels.
18
Lock System
LOCK
This option allows you to change the password. Press
OK to enter, then press the numeric button to enter the
old password, and then the new password twice.
Change Password
T-Link
This enables the TV set and your CEC devices (e.g.
DVD) to turn on/off or auto standby synchronously.
Press OK to enter. The options are as follows:
- T-Link
Enables the T-Link function. Select On to enable this
function.
Note: The options TV Auto Power and Auto Standby below
are only available when T-Link is set to On.
- TV Auto Power
Enables the TV to automatically power on when you power
on CEC device (e.g. DVD) with the device’s remote. Select
On to enable this function.
- Auto Standby
Enables all CEC devices to automatically go to the standby
mode when you turn off the TV with the TV remote. Select
On to enable this function.
Lock System
LOCK
Off
Change Password
USA
Canda
Region Rating Table Setting
Region Rating Table Reset
Block Unrated TV
Lock System
Press OK to enter and choose On and Off.
USA
Press OK to enter and choose TV Ratings and MPAA.
Region Rating Table Setting
Press OK to enter and set the region rating table.
Region Rating Table Reset
Press OK to reset region rating table.
Block Unrated TV
Press OK to enter and choose On and Off.
Note: The default password is“0000”.And “0812” is the super
pass word.If you forget your password,enter it to override
any existing ones.
Special Function
the control menu and then press ▲/▼ to go to the
previous or next music and press OK to play it.
3. Press to show or hide a control menu
at the bottom of the screen. Press ◄/► to select
buttons on the control menu, and press OK to
confirm. The control menu includes Play/Pause,
FB., FF., Previous, Next, Sound, Mode, Info, and
Return.
4. To exit the current music and return to the previous
menu, press
My Picture
1. Select > My Picture, and press OK
confirm. Press ▲/▼/◄/► to select a disk and press
OK.
2. Press ▲/▼/◄/► to highlight one piece of picture
and press OK to display it. When the picture slide
shows, press ▲/▼ to switch to the previous or next
picture.
3. Press to show or hide a control menu
at the bottom of the screen. Press ◄/► to select
buttons on the control menu, and press OK to
confirm. The control menu includes Play/Pause,
Previous, Next, Rotate, Zoom, Volume (only
available when Music is turned on), Picture, Music,
Mode, and Return.
4. To exit the current picture and return to the previous
menu, press
My Browser
and pictures available in your connected USB device.
Select > My Browser, and press OKOK to
to return to the previous menu.
view photos, listen to music or watch videos stored on a
USB storage device.
Picture: JPEG/PNG/BMP
Music: MP3/AC3/HE-AAC/LPCM/WMA
Video coding format: H.264/H.265/MPEG 2/MPEG 4/
VC1
Notes:
- Some USB keys and USB products like digital
cameras or mobile phones are not fully compatible
with USB 2.0 standard so it may not work with the
TV multimedia player.
1. Connect a USB device containing photo, music and/
or movie files to the USB port on the back or side
panel of the TV.
2. Press , press ▲/▼/◄/► to select TV >
Multimedia and then press OK. Or press
USB on the remote control.
The menu contains four submenus:
My Movie, My
Music, My
Picture, and My Browser.
My Movie
1. Select > My Movie, and press OK to confirm.
Press ▲/▼/◄/► to select a disk and press OK.
2. Press ▲/▼/◄/► to highlight one piece of video and
press OK to play it. When the video is playing, press
the VOL+/- button to adjust the volume, press ▲/▼
to go to the previous or next video.
3. Press to show or hide a control menu
at the bottom of the screen. Press ◄/► to select
buttons on the control menu, and press OK to
confirm. The control menu includes Play/Pause,
FB., FF., Previous, Next, Mode, Picture, Zoom,
Info, Volume, Sound, and Return.
4. To exit the current video and return to the previous
menu, press .
My Music
1. Select Multimedia
> My Music, and press OK
confirm. Press ▲/▼/◄/► to select a disk and press OK.
2. Press ▲/▼/◄/► to highlight one piece of music and
press OK to play it. The list of music is displayed on
the left. When the music is playing, press the VOL+/-
button to adjust the volume, press to hide
Chapter 5
Multimedia
Multimedia
Multimedia
Multimedia
Multimedia
.
.
19
20
Other Information
5. The video from a mobile hard disk (USB) is
playing with no sound.
-The audio format of the video in your mobile hard
disk is not supported by the TV player.
6. Some videos fail to play.
-The formats of the videos may not be supported
by the TV, especially videos shot by certain kinds
of cameras, generally with their private protocol of
formats, which are not compatible with your TV.
7. Video stops playing midway.
-Mistakes may occur when videos are copied or
compressed, so they may automatically stop playing
during playback.
8. What should I pay attention to, when I do SW
updating?
-No power cuts when SW updating;
-Avoid any operations with your remote control when
SW updating;
-Depending on your internet connection speed, the
software updating process may take some time.
9. There are no distinct changes of TV interface
after SW updating.
-Under certain conditions, SW updating may not only
update or add new functions but also improve the
performance of the TV set, without distinct changes
of interface. Also, there may be no changes to the
user interface at all.
10. What should I do when SW updating process
stops due to a sudden power-off?
-If you do SW updating by USB, do not pluck the
USB from your TV, and restart your TV to continue
SW updating; If you do SW updating by Network,
also restart your TV and check if it is well functioned.
11. With a USB device being inserted into the TV in
advance, I am prompted that no USB devices are
detected after I access Media, why?
-There may be something wrong with your mobile
hard disk(s), damaged or with low voltage. You could
increase power supply by inserting the two plugs
on one end on the USB wire into TV's USB port
simultaneously.
12. External device cannot be recognized.
-Some external devices (e.g. webcam, smart phone,
tablet, game handle, and external wireless adapter)
may not be compatible with the TV and cannot be
supported for certain functions (nScreen, wireless
display, gesture control, face recognition, if any).
Please try a similar device. If it does not work,
contact your local dealer.
1. Fail to link to the network.
-Check if your TV is connected with the network;
-Reboot your TV;
-if access of your router is supported. Refer to the
operation manual of your router, and activate its
DHCP function after linking the network to your TV.
-Make sure your TV is connected to a router, and
make sure your router is powered on. Check that
your router/modem has an internet connection, and
that your Ethernet cables/wireless connection is OK.
Test your connection with a computer to make sure it
is OK. Should the problem persist, contact customer
service.
2. How to use the wireless USB adapter?
-When connecting to wireless network, inserted the
wireless USB adapter into your TV's USB port, it will
work together with your wireless router. For details,
please refer to Network Connection.
3. The video could not be played smoothly.
-
the supported formats of this TV set.
-Videos downloaded from internet, or online videos.
a. It may be caused by the lower bandwidth of your
network. A high network speed is required to
handle online videos.
b. Peak internet usage times may affect the
bandwidth.
c. Check if any other computers on the same
network are also operating, as they may be using
up bandwidth. Especially if they are downloading
or displaying on-line videos.
d. The video may not be smooth itself, it is not the
problem of your TV or network. may consider
some content inappropriate for unsupervised
viewing by children aged 8-13. Violence
aggression will be limited and moderate; may
include physical, fantasy, or supernatural violence.
Other Content Guidelines: May contain infrequent
mild profanity, or mildly suggestive language.
Could also contain brief scenes of nudity.
4. When two mobile hard disks are connected
with the TV at the same time, they will not be
recognized some times.
-All mobile hard disks consume a lot of power,
which may result in power supply problems. We
recommend inserting only one hard disk, or a low
power consumption mobile hard disk.
Problems & Solutions
Note: Problems & solutions 1 to 2 are for the TV models which have network functions, so users of non-connected
TV models can disregard them.
Chapter 6
21
Other Information
Troubleshooting
Most problems you encounter with your TV can be corrected by consulting the following troubleshooting list.
Snowy dots and interference
If the antenna is located in the fringe area of a television
signal where the signal is weak, the picture may be
marred by dots. When the signal is extremely weak,
it may be necessary to install a special antenna to
improve the reception.
1. Adjust the position and orientation of the indoor/
outdoor antenna.
2. Check the connection of antenna.
3. Fine tune the channel.
4. Try another channel. Broadcasting failure may
happen.
Ignition
Black spots or horizontal streaks appear, or the picture
from car ignition system, neon lamps, electric drills, or
other electrical appliance.
Ghost
Ghosts are caused by the television signal following
from tall buildings, hills, or other objects. Changing the
direction or position of the antenna may improve the
reception.
Radio frequency interference
This interference produces moving ripples or diagonal
streaks, and in some case, loss of contrast in the
picture. Find out and remove the radio interference
source.
* To bring you better visual experience, please remove
all labels from TV front panel and screen before use.
No picture, no sound
1. Check if the fuse or circuit breaker is working.
2. Plug another electrical device into the outlet to make
sure it is working or turned on.
3. Power plug is in a bad contact with the outlet.
4. Check the signal source.
No color
1. Change the color system.
2. Adjust the saturation.
3. Try another channel. Black-white program may be
received.
Remote control does not work
1. Change the batteries.
2. Batteries are not installed correctly.
No picture, normal sound
1. Adjust the brightness and contrast.
2. Broadcasting failure may happen.
Normal picture, no sound
1. Press the VOLUME UP button to increase volume.
2. Volume is set to mute, press the MUTE button to
restore sound.
3. Change the sound system.
4. Broadcasting failure may happen.
Unorderly ripples on the picture
It is usually caused by local interference, such as cars,
daylight lamps and hair driers. Adjust the antenna to
minimize the interference.
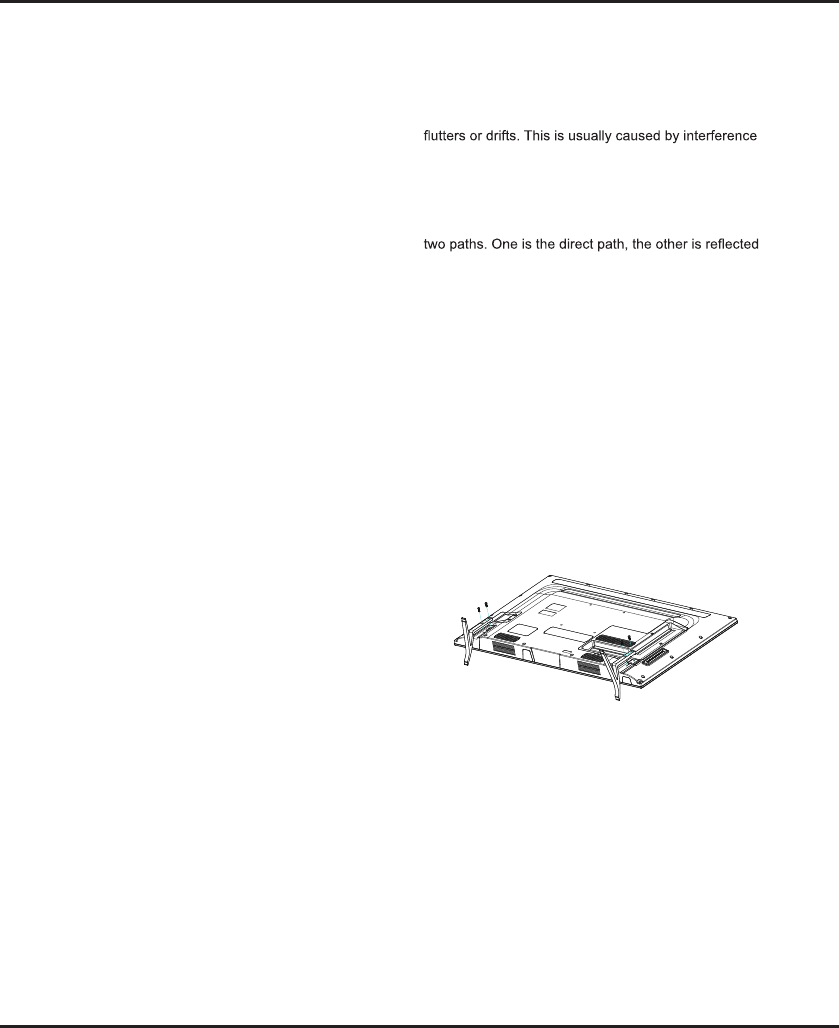
Base Installation
To fix the double support base on the unit by screw,
the installation is completed.
72-50D14A-E88Z1