TTI Tech GMRS-1545CH handheld GMRS TX User Manual gmrs1545 manual
TTI Tech Co., Ltd. handheld GMRS TX gmrs1545 manual
UserManual.wiki
>
TTI Tech
>
GMRS 1545CH User Manual
users manual
Navigation menu
Upload a User Manual
Namespaces
Wiki Guide
HTML
PDF
Info
Views
User Manual
Discussion / Help
Navigation
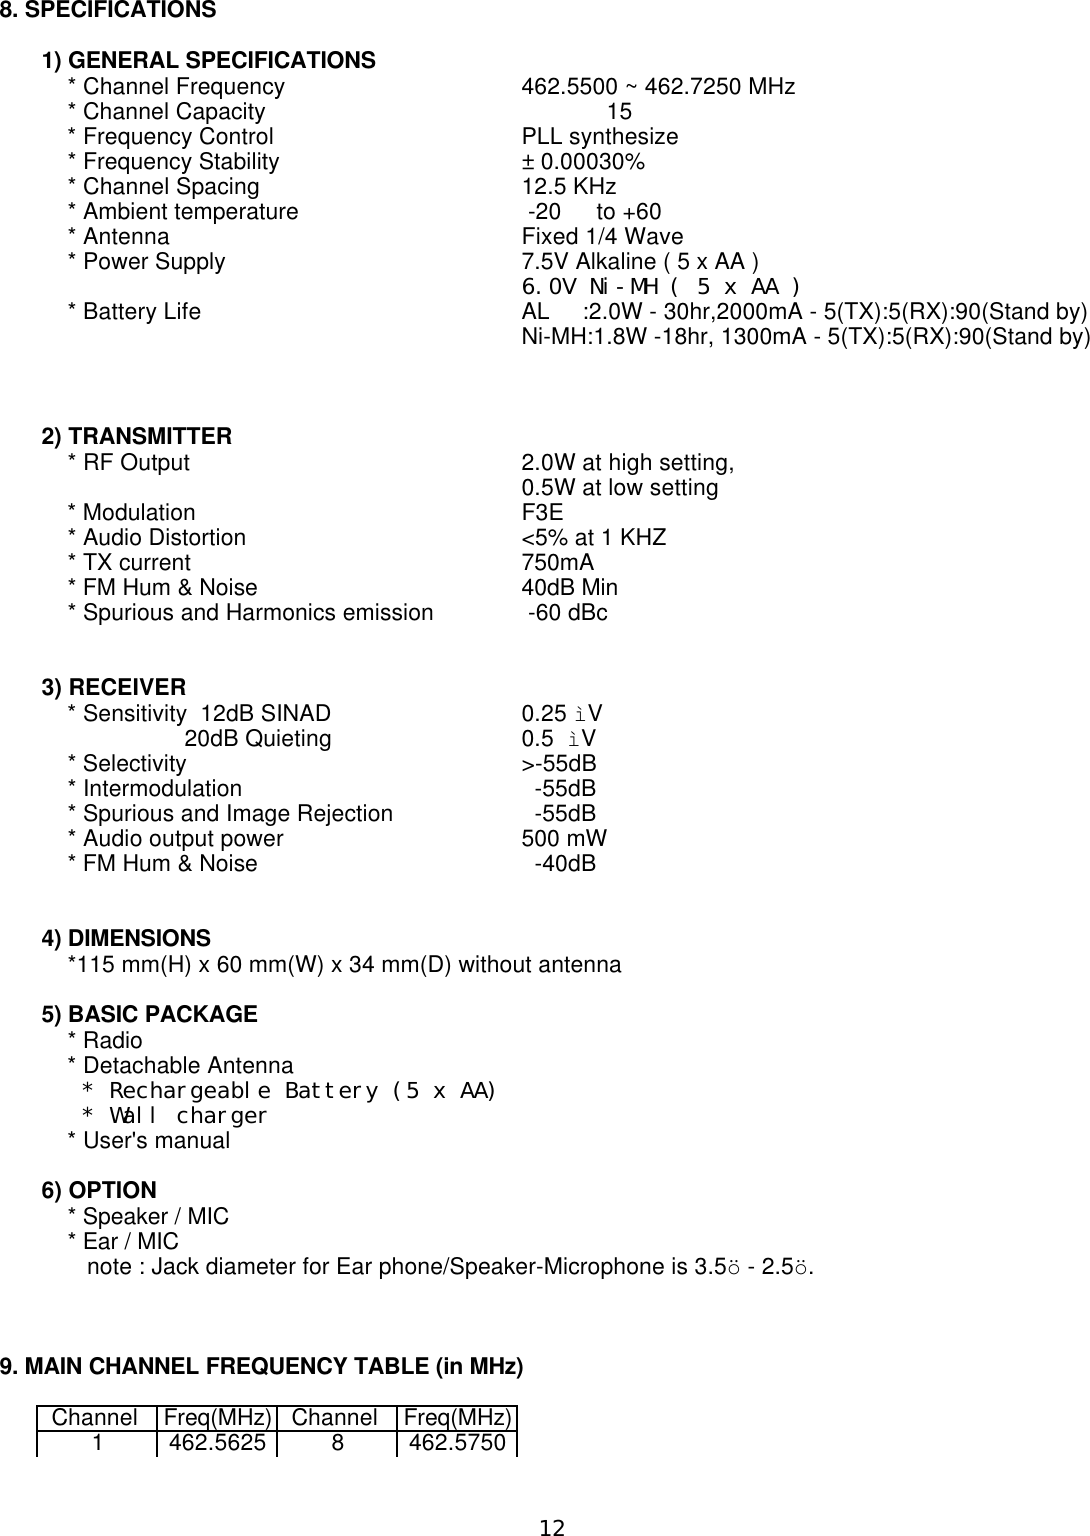
![* Install five "AA" size Alkaline batteries or rechargeable batteries. Note : Carefully observe the polarity of the batteries before installing. * Replace the cover.2) Antenna The antenna is detachable type.You can replace it to external antenna. Keep the Antenna at 1inch away from your head and body.3. Basic Operation1) On/Off & Volume control Switch Radio ON : Press the power button at least for 2 seconds.You will hear confirming melody to indicated the unit is on. Radio Off : Press the power button at least for 2 seconds. Volume setting : Press up[] or down[] button to adjust a level that is most comfortable for you while monitor is active.2) Setting the Channel and tone code(CTCSS) GMRS-1545 has 15 main channels and 38 sub-channels. * 15 Frequency channels * 38 CTCSS Code ( indicated by CTC icon on the LCD ) To select the channel * Turn the radio on * Press MODE button once, [XX] digit will blink on the LCD. XX is a channel * Press up[] or down[] button to choose the channel. * Press the PTT button or MODE button to confirm. To set the tone codes(CTCSS) * Press MODE button once more,[XX 00 up to 38] will appear and CTC icon and tone code digit will blink on the LCD. " 00 " means no CTCSS code. * Press up[] or down[] button to choose the desired sub-channel to use. * Press the PTT button or MODE button to confirm.3) VOX (Voice Operated Switching) This option enables you to have hands-free conversation. You do not have to operate the PTT button each time when you want to transmit. You can also choose the VOX sensitivity to suit your environment of operation. (Ex ; noisy road,motor bike,factory etc.) To set the VOX mode. * Press the MODE button until the [ Uo oF or xx ] appears. xx is a vox level * VOX icon will be appeared on the LCD. To set the VOX level * Press the up[] button or down [] button to set the VOX level from 1 to 5. "oF" is disable the VOX function. " 01 " is least sensitive. " 05 " is most sensitive. * Press the PTT button or MODE button to confirm.4) Beep tone7](https://usermanual.wiki/TTI-Tech/GMRS-1545CH/User-Guide-142997-Page-7.png)
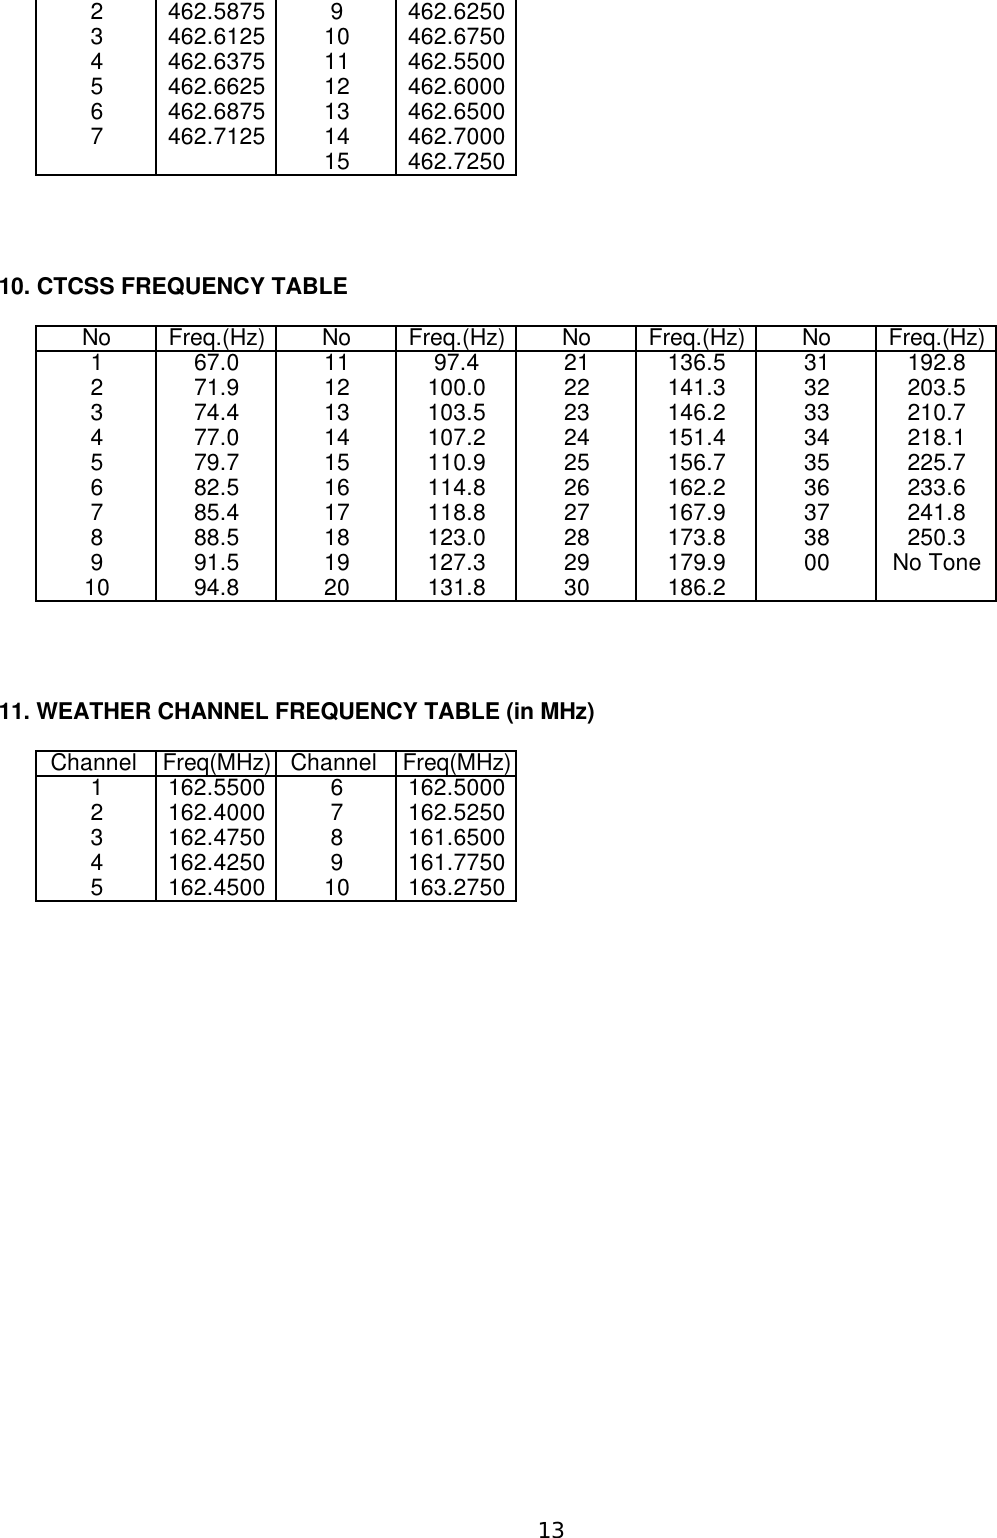
![To set the beep tone * Press the Mode button until [bP on or oF] and the BELL icon blink on the LCD. * Press the up[] button or down [] button. * Press the PTT button or MODE button to confirm. 5) Weather alert setting Alert setting is available in GMRS mode only. To set the Weather alert receiving mode * Press the MODE button until the [ AL on or oF ] blinks. * Press the up[] button or down [] button to set the alert function. * While the alert is ON,weather icon will blink both in GMRS and weather mode. * Weather icon will stop the blinking on the LCD when the alert is OFF.** While the unit is in GMRS mode,if the alert signal is received,the unit will set to Weather Radio mode automatically and warning beep tone will generate.** While the unit is in Weather mode,if the alert signal is received,the unit will generate the warning beep tone.6) Vibrator Call The unit will vibrate when receive the call from other party. To set the vibrator Call * Press the Mode button until [Ub on or oF] and the VIB icon blink on the LCD. * Press the up[] button or down [] button. * Press the PTT button or MODE button to confirm.7) Setting the Transmit Power HI/LO * HI : 2.0W TX power * LO : 500mW TX power To set the TX output power * Press the MODE button until the [ Po LO or HI ] appears. * Press the up[] button or down [] button to set the TX power * Press the PTT button or MODE button to confirm. * HI or LO will appear on the LCD. ** If the battery is in low condition,the TX Power will be switched to LO automatically. eventhough the TX power is set to HI.8) Roger tone This feature will give the tone signal to other parties when transmitting finished (when PTT button is released.) To activate or disable the Roger tone * Press the Mode button until [rb on or oF] and the roger icon blink on the LCD. * Press the up[] button or down [] button. * Press the PTT button or MODE button to confirm.9) Setting the DW(dual watch) To set the DW mode * Press the MODE button until the [ oF or 01 up to 15] and DW icon blink on the LCD.8](https://usermanual.wiki/TTI-Tech/GMRS-1545CH/User-Guide-142997-Page-8.png)
![* DW icon will appear on the LCD. To set the dual watch(DW) channel * Press the up[] button or down [] button to choose the channel. " oF " means no DW mode. " 01 up to 15 " means the channel that is dual-watched. * Press the PTT button or MODE button to confirm.10) Call Ringer Selection Mode This feature provides 5 user selectable call ringer signal. To set your favorite call ringer signal. * Press the MODE button until the [ C 01 or up to 05 ] appears on the LCD. * Press the up[] button or down [] button to select the call melody type. * Press the PTT button to confirm. * To activate the call , click the "PTT" button twice quickly.11) Transmitting * Press and hold the PTT button (The "TX" LED will light with red color) * Speak slowly and clearly * To stop the transmission,release the PTT button * If there are no more receiving signal for 5 seconds,the unit will go into power save mode and then the "TX" LED will blink with green color.12) Receiving The coding feature reduce the possibility of interference and provide enhanced communication.You can only listen to a call that has correct matching code. Important ; Before transmitting or receiving to the other parties ; * Correct channel is selected ( 1 to 15 ) and * Correct code is set ( 00 to 38 )13) Channel Scanning This feature allows you to monitor all activated channels while scanning. To activate the Scan * Press the Scan button * Radio will begin scanning.. * When in scan mode,the display will show each scanning channel. * After an activated channel is scaned and received signal and then if there is no more signal,the scan will resume automatically. To disable the Scan * Press the SCAN button, the unit will stop the scanning. * SCAN icon indicator will disappear from the LCD * The unit will return to home channel.14) Emergency Channel The emergency function is to set the emergency channel immediately. Press the EMG button,the emergency channel will display on the LCD EMG icon will appear on the LCD Press the EMG button again,the ubit will return to home channel.15) Call * Click the PTT button twice quickly.(The "TX" LED will light with red color.)9](https://usermanual.wiki/TTI-Tech/GMRS-1545CH/User-Guide-142997-Page-9.png)
![To adjust the Volume level * Press the up[] button or down [] button. To set the Weather Radio channel * Press the MODE button once, the [ XX ] will blink. XX is a channel. * Press the up[] button or down [] button to find a broadcast channel. ( Refer to area service channel.One or two channel is available) To return to GMRS mode * Press the MODE button for over 2 seconds,the unit will return to GMRS mode.5. Calibration the Electronic Compass * When the compass is used for the first time. * When the compass is used in a different location other than where previously calibrated.* When the magnetic distortion occurs. To calibrate the Electronic Compass * While EMG button hold down,Power ON (2sec hold down) * "CAL" will appear on the LCD * Turn the unit one cycle (360) at least 5 seconds per circle to complete on the flat level in outside. * Press the PTT button.Calibration is now complete. * The calibration data will store in the unit.You do not need to calibrate everytime.6.Compass modeWhile the unitr is power on, the compass works everytime. The compass detects when outsidemagnetic interference is compromising accuracy by blinking the compass icon on the LCD.Distortion occurs when there has been a significant change in the surrounding magneticfields,such as when you are driving underneath an overpass or over a bridge.7. INFORMATION1) Radio * Never operate radio very close or touching to exposed parts of the human body. * Do not shock or vibrate the radio to keep the best condition. * Do not leave this radio under the direct ray of light(the sun) or high humid area. * Do not operate the radio in explosive atmosphere. * Never hold the antenna,while transmit,to get a good performance.2) Battery * Alkaline Batteries(5x AA size) - not supplied * Rechargeable Ni-MH battery cell (supplied). * Charging time ; 10~12 hours * Please do not overcharge the battery to conserve the battery lifetime. * Never attempt to charge alkaline batteries.This will damage the radio. * Use approved battery charger only.If not,the radio will be damaged. * Avoid overcharging the rechargeable batteries,do not charge more than 20 hours. * Keep that battery contacts clean.3) Operating temperature The radio will work correctly under the temperature condition from -20 to +60.11](https://usermanual.wiki/TTI-Tech/GMRS-1545CH/User-Guide-142997-Page-11.png)