TTI Tech GMRS-1545CH handheld GMRS TX User Manual gmrs1545 manual
TTI Tech Co., Ltd. handheld GMRS TX gmrs1545 manual
TTI Tech >
users manual
INDEX
page
1. INTRODUCTION
1) Product Description
3
2) Package Contents
3
3) Features
3
4) Front side Overview
4
Instruction Manual
* 38 CTCSS Sub Tone
* Electronic Compass
& Calibration mode
* Vibrator Call
* VOX mode
* Scanning
* Monitor
* Key Pad Lock
* Dual Watch
* TX Power HI/LO
* RSSI
* Auto Power Save Mode
* NOAA Weather Band
(10CH)
* Weather Alert
* Battery Status Indicator
* Emergency Channel
* Back Light LCD Display
* Choice of Battery
- Rechargeable Battery
- Standard Alkaline
GMRS-1545
General Mobile Radio Service
462MHz,15CH
1
5) Rear side Overview
5
6) Function and Feature Display
6
7) Mode (Function) key sequence - short press
7
8) Mode (Weather ) key sequence - Long Press
7
9) Electronic Compass Calibration
7
2. INSTALLATION
1) Installation of the batteries
7
2) Antenna
7
3. BASIC OPRATION
1) On/Off & Volume control Switch
8
2) Setting the Channel and tone code(CTCSS)
8
3) VOX(Voice Operated Switching)
8
4) Beep Tone
8
5) Weather Alert
9
6) Vibrator
9
7) Setting the Transmit Power HI/LO
9
8) Roger Tone
9
9) Setting the DW(dual watch)
10
10) Call Ringer Selection Mode
10
11) Transmitting
10
12) Receiving
10
13) Channel Scanning
10
14) Emergency Channel
11
15) Call
11
16) Monitoring the channel
11
17) Keypad Lock
11
18) Backlight
11
19) Battery status indicator
12
20) External DC socket
12
21) External Speaker/Mic
12
4. Weather Radio
1) Weather Radio setting
12
5. Calibrat the Electronic Compass
12
6.Calibration mode
13
7. INFORMATION
1) Radio
13
2) Battery
13
8. SPECIFICATIONS
13
9. MAIN CHANNEL FREQUENCY TABLE
13
10. CTCSS TONE CODE TABLE
14
11. WEATHER CHANNEL FREQUENCY TABLE
14
1. INTRODUCTION
1) Product Description
GMRS-1545 General Mobile Radio Service has been designed to enable you to use
for general purpose. This is a battery powered 462 MHz transceiver.
The controls are easy to use and GMRS-1545 correspond to FRS for channel 1 to 7.
Also it has a 38 CTCSS feature to get the clear communication without interference.
GMRS-1545 has 10 NOAA weather channel and weather alert feature.
GMRS-1545 is equipped with Electronic Compass and Vibrator Call feature.
2) Package Contents
When you open the package,you should have;
* GMRS-1545 Radio Unit
2
* Antenna
* Wall charger
* Rechargeable Battery ( AA x 5)
* User’s Manual
3) Features
* CTCSS(38 Frequency)
* Electronic Compass
* Calibration mode for Compass
* Vibrator Call
* VOX(Voice Operated Switching)
* Scanning
* Monitor
* Keypad Lock
* Dual Watch
* TX Power HI/LO
* AUto Squelch
* RSSI(Received Signal Strength Indicator)
* PSC(Auto Power Saving Control)
* NOAA Weather Band(10CH)
* Weather Alert
* Battery Status Indicator
* Emergency channel
* LCD Back lighting
* Transmitting LED
* Call Signal (5 ringer signal)
* Beep ON/OFF
* Roger beep ON/OFF
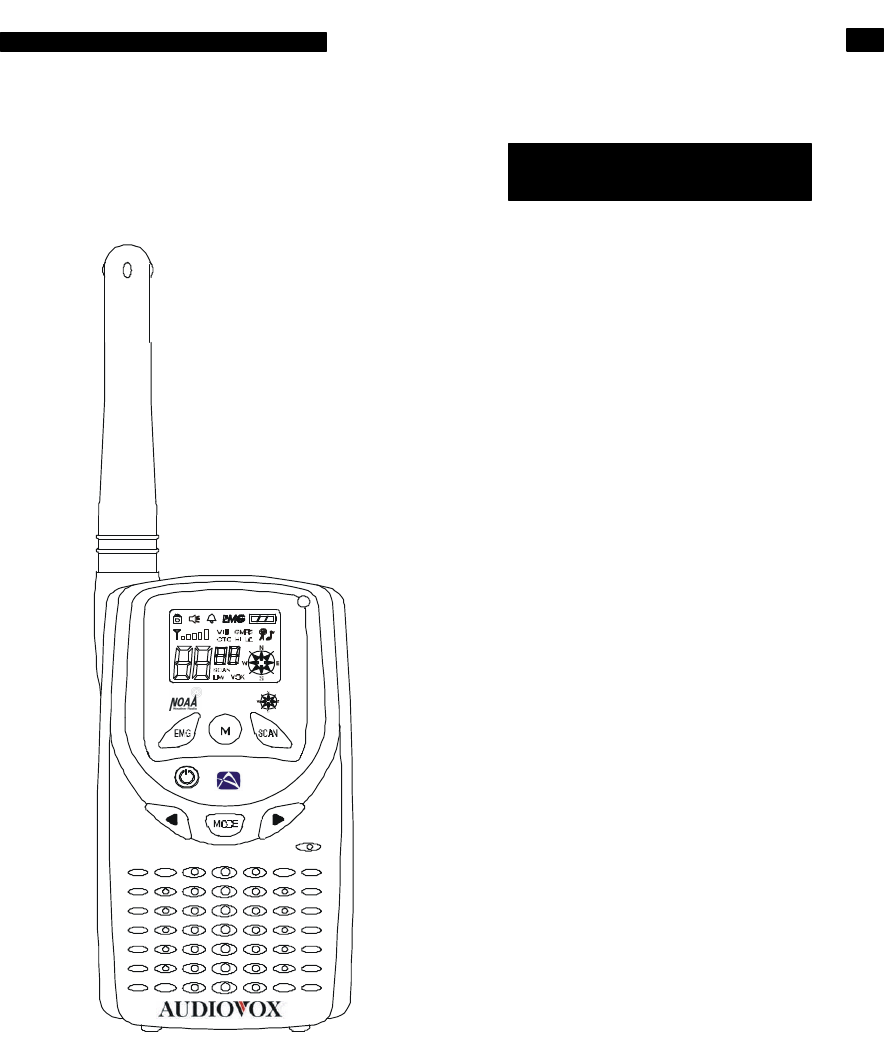
4) Front side Overview
1
2
3
4
13
16
15
17
18
3
1
External Speaker/Microphone Jack
9
Built-in Speaker
(External Charger jack)
10
Desk top charger terminal
2
Transmit LED indicator
11
Channel & Volume DOWN button
3
Liquid Crystal Display
12
Power ON/OFF button
4
SCAN button
13
Emergency Channel button
5
Monitopr/Lamp button
14
Battery Cover
6
Channel & Volume UP button
15
Belt Clip
7
Built-in Microphone
16
Push-To-Talk(PTT) button
8
MODE button
17
Latch of belt clip
18
Detachable Antenna
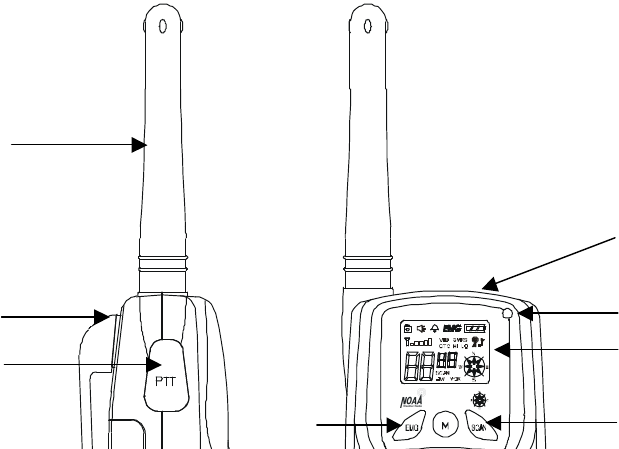
5) Rear side Overview
4
5
6
7
8
9
10
11
12
13
14
15
4
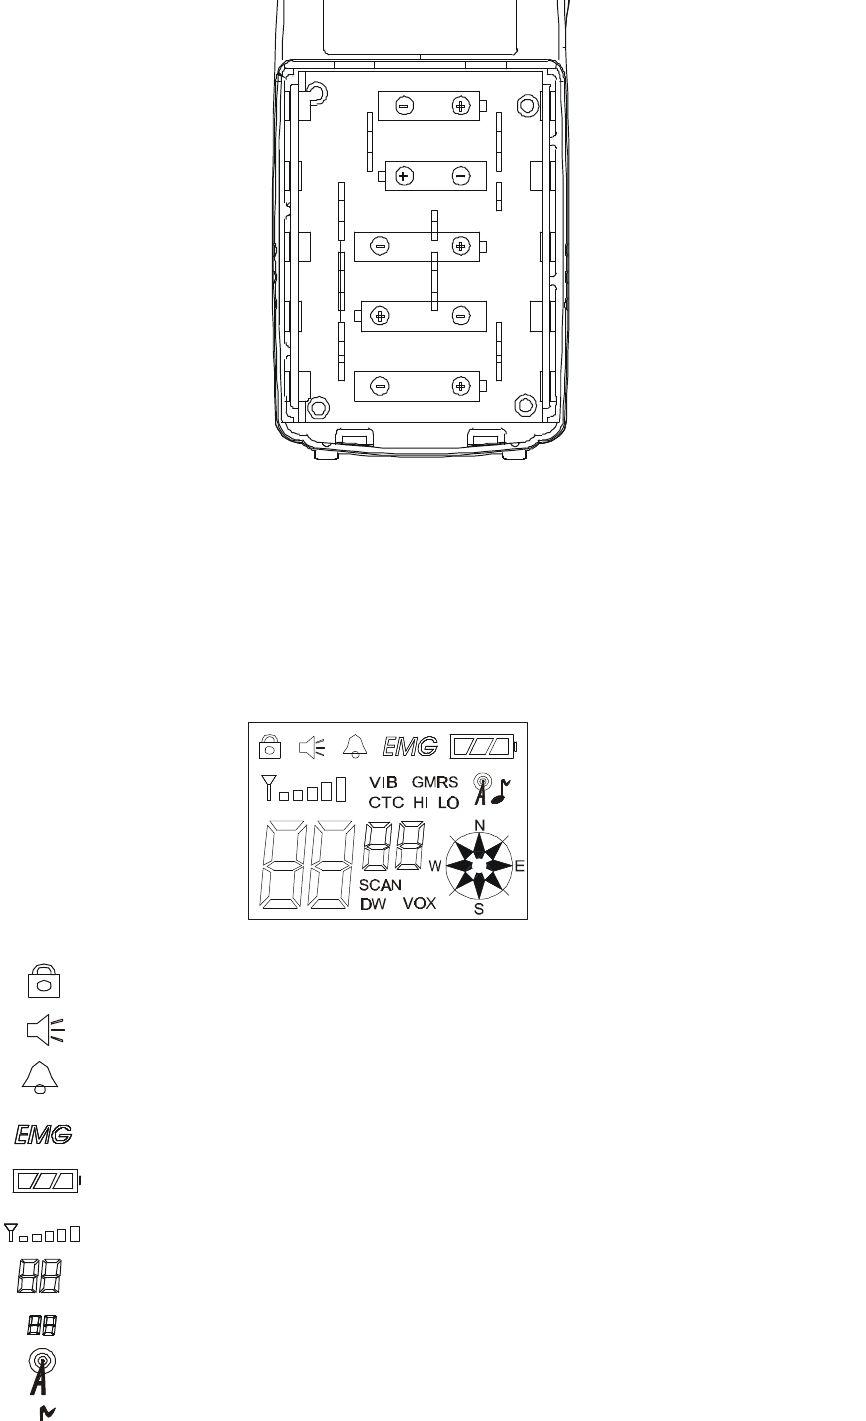
6) Function and Feature Display
Battery indicator : Indicates the battery status.
Receive signal indicator
Monitor indicator
Key lock indicator : Indicates that the key lock function is in
Beep ON/OFF indicator : Indicates that the key tone is in use.
Channel readout : Shows the current channel number
CTCSS tone code number
Weather Radio Indicator
Emergency Channel
indicator
5

7) Mode (Function) key sequence - short press
* 1'st press -- Channel
* 2'nd press -- CTCSS
* 3’rd press -- VOX ON/OFF and sensitivity select
* 4'th press -- Beep tone ON/OFF
* 5'th press -- Weather Alert ON/OFF
* 6’th press -- Vibrator ON/OFF select
* 7'th press -- Tx power Hi / Low select
* 8’th press -- Roger tone ON/OFF
* 9’th press -- Dual watch channel select
*10'th press -- Call Ringer setting
8) Mode (Weather ) key sequence - Long Press
* 1’st press – Weather Channel select
9) Electronic Compass Calibration
* While EMG button hold down,Power ON (2sec hold down)
2. INSTALLATION
Your GMRS-1545 is designed to operate both in five "AA" size rechargeable battery (supplied)
or Alkaline Batteries(not supplied).
Cautions
Never attempt to charge Alkaline or Dry Cell Batteries. When recharging the rechargeable batteries,
use only recommended one.Use of other batteries will cause demage to your GMRS-1545 transceiver.
Other type of batteries may burst causing personal injury.
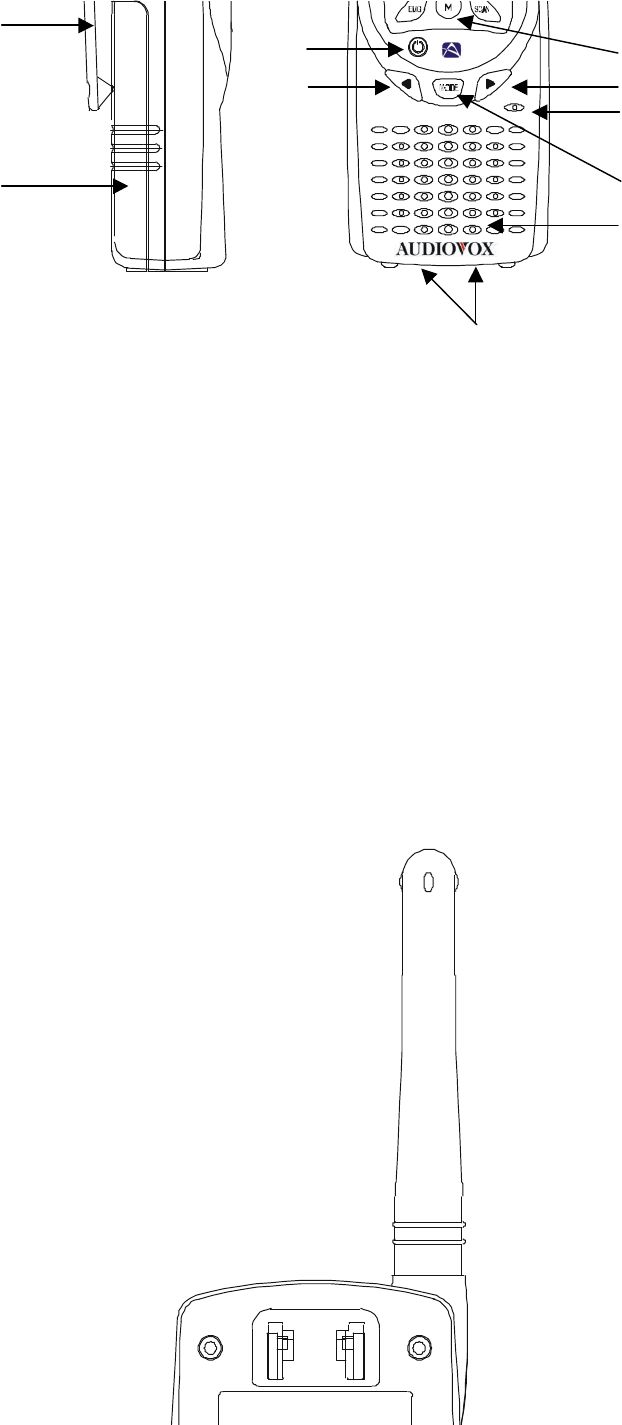
1) Installation of the batteries
* Ensure that the GMRS-1545 sets to power off.
* Hold the radio and battery cover with the back facing you.
* Press and slide the battery cover.
Scan indicator : Indicates that scan is
CTCSS indicator: Indicates that the CTCSS function is in use.
VOX (Voice Activated Transmit) Indicator
Roger ON/OFF indicator : Indicates that the key tone is in use.
CTC
HI
SCAN
DW
LO
VOX
TX power High setting Indicator
Dual Watch enable Indicator
TX power Low setting Indicator
VIB
Electronic Compass Indicator
Vibrator Call Indicator
6
* Install five "AA" size Alkaline batteries or rechargeable batteries.
Note : Carefully observe the polarity of the batteries before installing.
* Replace the cover.
2) Antenna
The antenna is detachable type.You can replace it to external antenna.
Keep the Antenna at 1inch away from your head and body.
3. Basic Operation
1) On/Off & Volume control Switch
Radio ON : Press the power button at least for 2 seconds.You will hear confirming
melody to indicated the unit is on.
Radio Off : Press the power button at least for 2 seconds.
Volume setting : Press up[
] or down[
] button to adjust a level that is most comfortable
for you while monitor is active.
2) Setting the Channel and tone code(CTCSS)
GMRS-1545 has 15 main channels and 38 sub-channels.
* 15 Frequency channels
* 38 CTCSS Code ( indicated by
CTC
icon on the LCD )
To select the channel
* Turn the radio on
* Press
MODE
button once, [
XX
] digit will blink on the LCD. XX is a channel
* Press up[
] or down[
] button to choose the channel.
* Press the PTT button or MODE button to confirm.
To set the tone codes(CTCSS)
* Press
MODE
button once more,[
XX
00
up to
38
] will appear and CTC icon
and tone code digit will blink on the LCD. "
00 "
means no CTCSS code.
* Press up[
] or down[
] button to choose the desired sub-channel to use.
* Press the PTT button or MODE button to confirm.
3) VOX (Voice Operated Switching)
This option enables you to have hands-free conversation. You do not have to operate
the PTT button each time when you want to transmit.
You can also choose the VOX sensitivity to suit your environment of operation.
(Ex ; noisy road,motor bike,factory etc.)
To set the VOX mode.
* Press the MODE button until the [
Uo
oF
or
xx ]
appears
. xx
is a vox level
*
VOX
icon will be appeared on the LCD.
To set the VOX level
* Press the up[
] button or down [
] button to set the VOX level from 1 to 5.
"oF"
is disable the VOX function.
" 01 "
is least sensitive.
" 05 "
is most sensitive.
* Press the PTT button or MODE button to confirm.
4) Beep tone
7
To set the beep tone
* Press the Mode button until [
bP on
or
oF
] and the
BELL
icon blink on the LCD.
* Press the up[
] button or down [
] button.
* Press the PTT button or MODE button to confirm.
5) Weather alert setting
Alert setting is available in
GMRS
mode only.
To set the Weather alert receiving mode
* Press the
MODE
button until the [
AL on
or
oF
] blinks.
* Press the up[
] button or down [
] button to set the alert function.
* While the alert is ON,
weather icon
will blink both in GMRS and weather mode.
*
Weather icon
will stop the blinking on the LCD when the alert is OFF.
** While the unit is in GMRS mode,if the alert signal is received,the unit will set to
Weather Radio mode automatically and warning beep tone will generate.
** While the unit is in Weather mode,if the alert signal is received,the unit will generate
the warning beep tone.
6) Vibrator Call
The unit will vibrate when receive the call from other party.
To set the vibrator Call
* Press the Mode button until [
Ub on
or
oF
] and the
VIB
icon blink on the LCD.
* Press the up[
] button or down [
] button.
* Press the PTT button or MODE button to confirm.
7) Setting the Transmit Power HI/LO
* HI : 2.0W TX power
* LO : 500mW TX power
To set the TX output power
* Press the MODE button until the [
Po
LO
or
HI
] appears.
* Press the up[
] button or down [
] button to set the TX power
* Press the PTT button or MODE button to confirm.
*
HI
or
LO
will appear on the LCD.
** If the battery is in low condition,the TX Power will be switched to LO automatically.
eventhough the TX power is set to HI.
8) Roger tone
This feature will give the tone signal to other parties when transmitting finished
(when PTT button is released.)
To activate or disable the Roger tone
* Press the Mode button until [
rb on
or
oF
] and the
roger
icon blink on the LCD.
* Press the up[
] button or down [
] button.
* Press the PTT button or MODE button to confirm.
9
) Setting the DW(dual watch)
To set the DW mode
* Press the MODE button until the [
o
F
or
01
up to
15]
and
DW icon
blink on the LCD
.
8
*
DW
icon will appear on the LCD.
To set the dual watch(DW) channel
* Press the up[
] button or down [
] button to choose the channel.
"
oF
" means no DW mode.
"
01
up to
15
" means the channel that is dual-watched.
* Press the PTT button or MODE button to confirm.
10) Call Ringer Selection Mode
This feature provides 5 user selectable call ringer signal.
To set your favorite call ringer signal.
* Press the MODE button until the [
C
01
or up to
0
5
] appears on the LCD.
* Press the up[
] button or down [
] button to select the call melody type.
* Press the PTT button to confirm.
* To activate the call , click the "
PTT
" button twice quickly.
11) Transmitting
* Press and hold the PTT button (The "TX" LED will light with red color)
* Speak slowly and clearly
* To stop the transmission,release the PTT button
* If there are no more receiving signal for 5 seconds,the unit will go into
power save mode and then the "TX" LED will blink with green color.
12) Receiving
The coding feature reduce the possibility of interference and provide enhanced
communication.You can only listen to a call that has correct matching code.
Important ;
Before transmitting or receiving to the other parties ;
* Correct channel is selected ( 1 to 15 ) and
* Correct code is set ( 00 to 38 )
13) Channel Scanning
This feature allows you to monitor all activated channels while scanning.
To activate the Scan
* Press the
Scan
button
* Radio will begin scanning..
* When in scan mode,the display will show each scanning channel.
* After an activated channel is scaned and received signal and then if there is no
more signal,the scan will resume automatically.
To disable the Scan
* Press the
SCAN
button, the unit will stop the scanning.
*
SCAN
icon indicator will disappear from the LCD
* The unit will return to home channel.
14) Emergency Channel
The emergency function is to set the emergency channel immediately.
Press the
EMG
button,the emergency channel will display on the LCD
EMG
icon will appear on the LCD
Press the
EMG
button again,the ubit will return to home channel.
15) Call
* Click the PTT button twice quickly.(The "TX" LED will light with red color.)
9

16) Monitoring the channel
It is used for listening the week signal or to hear all activities on the channel by
manually overriding channel sub tone code setting.
To activate the Monitor feature
* Press and hold the
"M"
(monitor) button for over two seconds.
* When you hear the sound,release the
"M" (monitor)
button.
(The
monitor
icon will appear on the LCD.)
To disable the Monitor feature
* Press and hold the
"M" (monitor)
button for over two seconds.
(The
monitor
icon will disappear on the LCD.)
17) Keypad Lock
The lock function is to avoid the accidental changes to channel with other radio
settings.All buttons will be locked except the Power,PTT,EMG and monitor button.
To lock the keypad
* Press and hold down the
SCAN
button for over 2 seconds.
* Keypad will lock.(
LOCK
icon will appear on the LCD)
To unlock the keypad
* Press and hold down the
SCAN
button for over 2 seconds.
* Keypad will unlock. (
LOCK
icon will disappear on the LCD)
18) Backlight
To activate the Backlight
* Press and hold the
"M" (monitor)
button in a moment.
To disable the Backlight
* Press and hold the
"M" (monitor)
button in a moment once again.
19) Battery status indicator
The icon will blink when the radio is in low battery power.
Charge the rechargeable battery or replace the batteries.
* Full battery - three segments are displayed.
* Low battery - one segment is displayed.
* Low battery warning - Battery indicator will brinking.
20) External charger socket
MIC socket can be used for the charging purpose.
It should use the recommended rechargeable battery and wall charger.
21) External Speaker - Mic
Use the approved accessories only to have the optimum performance.
* Speaker/Mic unit
* Ear/Mic unit
4. Weather Radio
GMRS-1545 has 10 NOAA channel and Weather alert receiving feature.
1) Weather Radio setting
* Press the
MODE
button for over 2 seconds.
*
Weather
icon will appear on the LCD.
10
To adjust the Volume level
* Press the up[
] button or down [
] button.
To set the Weather Radio channel
* Press the
MODE
button once, the [
XX
] will blink. XX is a channel.
* Press the up[
] button or down [
] button to find a broadcast channel.
( Refer to area service channel.One or two channel is available)
To return to GMRS mode
* Press the
MODE
button for over 2 seconds,the unit will return to GMRS mode.
5. Calibration the Electronic Compass
*
When the compass is used for the first time.
*
When the compass is used in a different location other than where previously calibrated.
* When the magnetic distortion occurs.
To calibrate the Electronic Compass
* While
EMG
button hold down,Power ON (2sec hold down)
* "CAL" will appear on the LCD
* Turn the unit one cycle (360) at least 5 seconds per circle to complete on the flat level in outside.
* Press the PTT button.Calibration is now complete.
* The calibration data will store in the unit.You do not need to calibrate everytime.
6.Compass mode
While the unitr is power on, the compass works everytime. The compass detects when outside
magnetic interference is compromising accuracy by blinking the compass icon on the LCD.
Distortion occurs when there has been a significant change in the surrounding magnetic
fields,such as when you are driving underneath an overpass or over a bridge.
7. INFORMATION
1) Radio
* Never operate radio very close or touching to exposed parts of the human body.
* Do not shock or vibrate the radio to keep the best condition.
* Do not leave this radio under the direct ray of light(the sun) or high humid area.
* Do not operate the radio in explosive atmosphere.
* Never hold the antenna,while transmit,to get a good performance.
2) Battery
* Alkaline Batteries(5x AA size) - not supplied
* Rechargeable Ni-MH battery cell (supplied).
* Charging time ; 10~12 hours
* Please do not overcharge the battery to conserve the battery lifetime.
* Never attempt to charge alkaline batteries.This will damage the radio.
* Use approved battery charger only.If not,the radio will be damaged.
* Avoid overcharging the rechargeable batteries,do not charge more than 20 hours.
* Keep that battery contacts clean.
3) Operating temperature
The radio will work correctly under the temperature condition from -20
to +60
.
11

8. SPECIFICATIONS
1) GENERAL SPECIFICATIONS
* Channel Frequency
462.5500 ~ 462.7250 MHz
* Channel Capacity
15
* Frequency Control
PLL synthesize
* Frequency Stability
± 0.00030%
* Channel Spacing
12.5 KHz
* Ambient temperature
-20
to +60
* Antenna
Fixed 1/4 Wave
* Power Supply
7.5V Alkaline ( 5 x AA )
6.0V Ni-MH ( 5 x AA )
* Battery Life
AL :2.0W - 30hr,2000mA - 5(TX):5(RX):90(Stand by)
Ni-MH:1.8W -18hr, 1300mA - 5(TX):5(RX):90(Stand by)
2) TRANSMITTER
* RF Output
2.0W at high setting,
0.5W at low setting
* Modulation
F3E
* Audio Distortion
<5% at 1 KHZ
* TX current
750mA
* FM Hum & Noise
40dB Min
* Spurious and Harmonics emission
-60 dBc
3) RECEIVER
* Sensitivity 12dB SINAD
0.25
ì
V
20dB Quieting
0.5
ì
V
* Selectivity
>-55dB
* Intermodulation
-55dB
* Spurious and Image Rejection
-55dB
* Audio output power
500 mW
* FM Hum & Noise
-40dB
4) DIMENSIONS
*115 mm(H) x 60 mm(W) x 34 mm(D) without antenna
5) BASIC PACKAGE
* Radio
* Detachable Antenna
* Rechargeable Battery (5 x AA)
* Wall charger
* User's manual
6) OPTION
* Speaker / MIC
* Ear / MIC
note : Jack diameter for Ear phone/Speaker-Microphone is 3.5
ö
- 2.5
ö
.
9. MAIN CHANNEL FREQUENCY TABLE (in MHz)
Channel
Freq(MHz)
Channel
Freq(MHz)
1
462.5625
8
462.5750
12

2
462.5875
9
462.6250
3
462.6125
10
462.6750
4
462.6375
11
462.5500
5
462.6625
12
462.6000
6
462.6875
13
462.6500
7
462.7125
14
462.7000
15
462.7250
10. CTCSS FREQUENCY TABLE
No
Freq.(Hz)
No
Freq.(Hz)
No
Freq.(Hz)
No
Freq.(Hz)
1
67.0
11
97.4
21
136.5
31
192.8
2
71.9
12
100.0
22
141.3
32
203.5
3
74.4
13
103.5
23
146.2
33
210.7
4
77.0
14
107.2
24
151.4
34
218.1
5
79.7
15
110.9
25
156.7
35
225.7
6
82.5
16
114.8
26
162.2
36
233.6
7
85.4
17
118.8
27
167.9
37
241.8
8
88.5
18
123.0
28
173.8
38
250.3
9
91.5
19
127.3
29
179.9
00
No Tone
10
94.8
20
131.8
30
186.2
11. WEATHER CHANNEL FREQUENCY TABLE (in MHz)
Channel
Freq(MHz)
Channel
Freq(MHz)
1
162.5500
6
162.5000
2
162.4000
7
162.5250
3
162.4750
8
161.6500
4
162.4250
9
161.7750
5
162.4500
10
163.2750
13