TYSON BIORESEARCH HT100 Blood Glucose Meter User Manual HT100 B Manual LAY FDA AF004 0027000N 180117

TYSON BIORESEARCH, INC. Blood Glucose Meter HT100 B Manual LAY FDA AF004 0027000N 180117

Contents

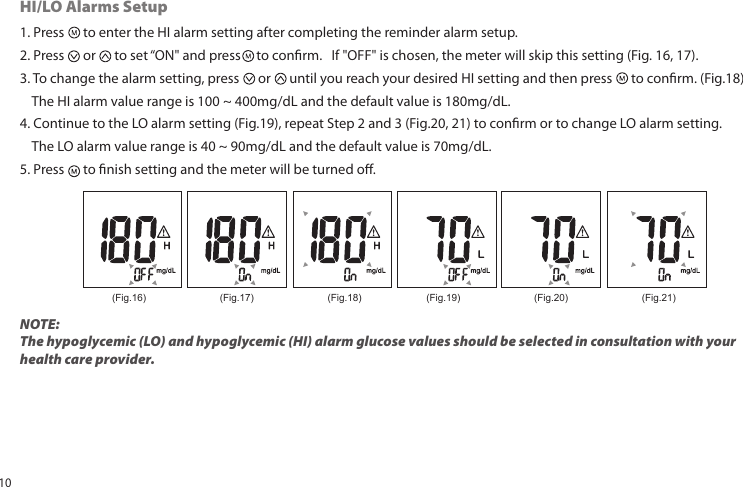
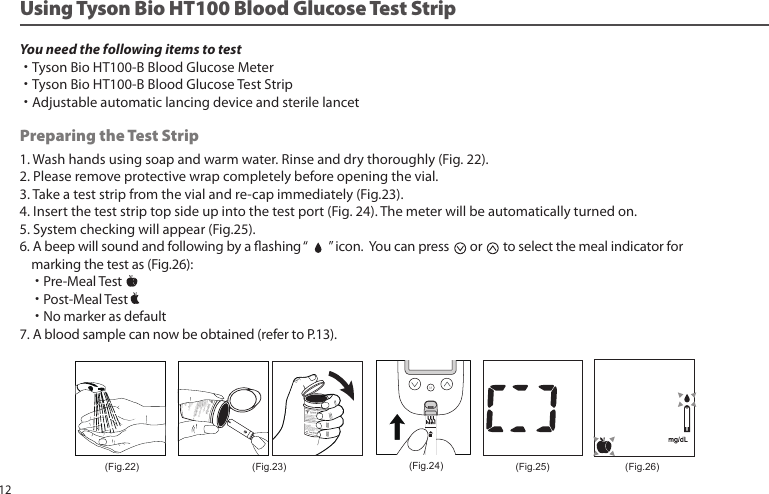
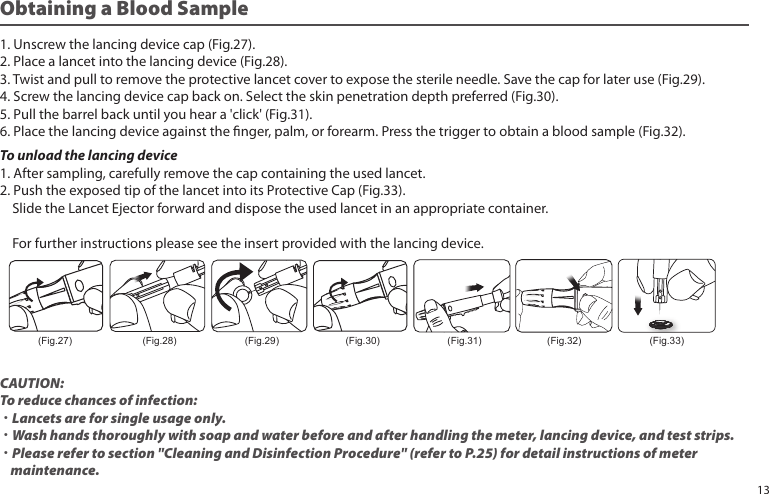
Users Manual_HT100_B

The Tyson Bio HT100-B Blood Glucose Test Strips give accurate results when the following limitations are observed.˙Use only capillary whole blood from nger, palm, and forearm.˙Do not use for testing neonatal blood.˙Altitude higher than 10745 feet may cause inaccurate results.˙Severe dehydration and excessive water loss may lead to inaccurate blood glucose test results.    Consult your physician immediately if you believe you are suering from severe dehydration.˙For single-patient use only and should not be shared.˙Should not be used to test critically ill patients.˙Inaccurate results may occur in severely hypotensive individuals or patients in shock.˙Inaccurate low results may occur for individuals experiencing a hyperglycemic-hyperosmolar state, with or without ketosis.˙For In vitro diagnostic only.˙For over the counter use.˙Alternative site testing should be performed only during steady-state (when glucose is not changing rapidly).˙Alternative site measurements should never be used to calibrate continuous glucose monitors (CGMs).˙Alternative site measurements should never be used for insulin dosing calculations.LimitationsWarning•This device is not intended for use in healthcare or assisted-use settings such as hospitals, physician     oces, or long-term care facilities because it has not been cleared by FDA for use in these settings,     including for routine assisted testing or as part of glycemic control procedures.•Use of this device on multiple patients may lead to transmission of Human Immunodeciency Virus (HIV),     Hepatitis C Virus (HCV), Hepatitis B Virus (HBV), or other bloodborne pathogens.
LimitationsIntroduction                                                                                                              Important Safety InstructionsAbout Tyson Bio HT100-B Blood Glucose Monitoring System About Tyson Bio HT100-B Blood Glucose MeterAbout Tyson Bio HT100-B Blood Glucose Meter DisplayAbout Tyson Bio HT100-B Blood Glucose Test Strip SettingUp Tyson Bio HT100-B Blood Glucose Meter     Installing/Replacing Batteries     Date/Time Setup     Reminder Alarms Setup     HI/LO Alarms SetupImportant InformationUsing Tyson Bio HT100-B Code-Calibration Blood Glucose Test StripObtaining a Blood SampleApplying a Blood SampleHI and LO ReadingsAvailable Alternate Sites Testing0102030405060708080910111213141516Table of Content
1717181920212122252728303233343435Table of ContentControl Solution     Performing a Control Solution Test     Control Solution ResultsMemory Features     View Day Average Results     Exiting the Memory Mode     Transfer Test Results to a Computer     Bluetooth Data Transfer (HT100-B Only)Cleaning and Disinfection ProcedureCare and StorageDisplay MessagesError MessagesTrouble ShootingSpecicationsMeter StorageIcon DescriptionService and Warranty
Introduction Thank you for choosing Tyson Bio HT100-B Blood Glucose Monitoring System to monitor your blood glucose (sugar) level.It is accurate, easy to use, and quick in response time. This User Manual contains all information needed to operate andmaintain Tyson Bio HT100-B Blood Glucose Monitoring System. Please read carefully before use.Tyson Bio HT100-B Blood Glucose meter can be used with:˙Tyson Bio HT100-B Blood Glucose Test StripIntended Use StatementThe Tyson Bio HT100-B Blood Glucose Monitoring System is intended for the quantitative measurement of glucose in freshcapillary whole blood samples drawn from the ngertips, forearm, or palm. Alterative site testing should be performedonly during steady-state (when glucose is not changing rapidly). Testing is done outside the body (In Vitro diagnostic use).It is intended for self-testing by people with diabetes at home as an aid to monitor the eectiveness of diabetes control. Itshould only be used by a single patient and it should not be shared. It is not indicated for the diagnosis of or screening fordiabetes or for neonatal use.The Tyson Bio HT100-B Blood Glucose Monitoring System is comprised of the Tyson Bio HT100-B Blood Glucose Meter andTyson Bio HT100-B Blood Glucose Test Strip.01
Important Safety Instructions˙All parts of the system should be considered potentially infectious and are capable of transmitting blood-borne    pathogens between patients and healthcare professionals.˙The meter and lancing device are for single person use. Do NOT share them with anyone including other family         members!˙All parts of the kit are considered biohazardous and can potentially transmit infectious diseases, even after you     have performed cleaning and disinfection. ˙Cleaning Solution and Disinfecting Solution: Clorox Bleach Germicidal Wipes (Clorox Professional Products Company. EPAReg. No. 67619-12).Reference:˙˙“ FDA Public Health Notication: Use of Fingerstick Devices on More than One Person Poses Risk for Transmitting    Bloodborne Pathogens: Initial Communication” (2010)https://www.fda.gov/MedicalDevices/Safety/AlertsandNotices/    ucm234889.htm˙“ CDC Clinical Reminder: Use of Fingerstick Devices on More than One Person Poses Risk for Transmitting Blood-borne    Pathogens” (2010) http://www.cdc.gov/injectionsafety/Fingerstick-DevicesBGM.html˙“ CDC: Infection Prevention during Blood Glucose Monitoring and Insulin Administration” (2010) https://www.cdc.gov/    injectionsafety/blood-glucose-monitoring.html02
Note:  25-strips & 50-strips are sold separately.About Tyson Bio HT100-B Blood Glucose Monitoring SystemThe complete kit contains:˙HT100-B Blood Glucose Meter˙HT100-B Blood Glucose Test Strip (10 strips)˙HT100-B Control Solution Level 2˙Adjustable Automatic Lancing Device˙10 Sterile Lancets˙User Manual˙Quick Reference Guide˙Test Strip Package Insert˙Control Solution Package Insert˙Log Book˙Carrying case03
  1. Data Port              To connect interface cable for data transferring  2. Display                 To display results in numbers and icons   3.      Button             Press and hold to enter reminder alarm and HI/LO alarm setup                                          To adjust numbers and to toggle settings                                         To browse test results and averages in memory  4.      Button              Press and hold to enter buzzer setup                                         To adjust numbers & to toggle settings                                         To browse test results and averages in memory  5.      Button              Press and hold to enter the year/date/time setting                                        To browse Control Solution test results                                        To turn the meter ON/OFF  6. Strip Ejector        Push to eject the test strip  7. Test Port               The test strip is inserted here  8. Battery Cover     To slide open and close  9. Meter Label        Manufacturer information10. Serial Numbers    The meter manufacturer serialsAbout Tyson Bio HT100-B Blood Glucose Meter04
Note: The mg/dL is the standard unit in the United States. Meters used in the United States must be set to read in mg/dL".About Tyson Bio HT100-B Blood Glucose Meter Display   1. Memory Icon       Memory mode   2. Year/Date       Display year/date   3. Control Solution Icon       Control Solution test mode and Control Solution test result   4. Alarm Icon       Reminder alarm   5. Test Result       Result display   6. Buzzer Icon       When buzzer is ON             7. Meal Indicator Icon       Pre-meal and post-meal   8. 14 day Average       14 day average result   9. Time       Time display10. Blood Drop Icon       Flashes when the meter is ready to accept your        blood sample to test11. Warning Icon       Appears when a result is out of range12. Test Strip Icon       Appears when the meter is ready for a test13. Temperature Icon       Appears when the meter exceeds normal operating         temperatures14. Measurement Units       To identify test result units (mg/dL)15. Battery Icon       Appears when battery power is low16. Bluetooth icon       When Bluetooth is on1823456714151613121110905
About Tyson Bio HT100-B Blood Glucose Test Strip                      Tyson Bio HT100-B Blood Glucose Test Strip is only for Tyson Bio HT100-B Blood Glucose Meter.Use each strip ONCE ONLY! A test strip consists of the following parts:1. Target Area      Where a blood drop or control solution to be applied2. Conrmation Window    To conrm sucient blood sample and control solution3. Contact Bar    To be inserted into the test port and to activate the meter (top side up)123top side06
Blood Glucose Test StripsHT100Control Solution RangeStore at 39 ~ 86°F(4 ~ 30°C), 10~90% RH.Do not refrigerate. Do not store test strips outside this vial. Re-cap immediately. WARNING: Always close cap tightly.For testing of glucose in capillary whole blood.Use within 1 months after first opening.Do not use past the expiration date.Use Tyson Bio HT100 meter only !Test Strips      Tyson Bioresearch, Inc.5F, No. 16 , 18 , 20 , 22 , Kedong 3rd RD. , Zhunan Township , Miaoli County 35053 , Taiwan (R.O.C.)Tel : +886-37-585998Customer ServiceU.S.A. +1-800-948-389430˚C4˚CLevel 1:                  ~                  mg/dLLevel 2:                  ~                  mg/dLLevel 3:                  ~                  mg/dLTyson Bio HT100-B Blood Glucose Test StripTest Strip Vial Label Test Strip VialBlood Glucose Test StripsHT100-BControl Solution RangeStore at 39 ~ 86°F(4 ~ 30°C), 10~90% RH.Do not refrigerate. Do not store test strips outside this vial. Re-cap immediately. WARNING: Always close cap tightly.For testing of glucose in capillary whole blood.HT100-BUse within 1 months after first opening.Do not use past the expiration date.Use Tyson Bio HT100-B meter only !AL001-0119000N (01)  Rev. date: 12/2016Test Strips      Tyson Bioresearch, Inc.5F, No. 16 , 18 , 20 , 22 , Kedong 3rd RD. , Zhunan Township , Miaoli County 35053 , Taiwan (R.O.C.)Tel : +886-37-585998Customer ServiceU.S.A. +1-800-948-389430˚C4˚CLevel 1:                  ~                  mg/dLLevel 2:                  ~                  mg/dLLevel 3:                  ~                  mg/dL07
Installing/Replacing Batteries1. Slide and remove the battery cover (Fig.1).2. Install batteries with the + and – ends matching indication marks    on the battery compartment (Fig.2).3. Slide battery cover back into place (Fig.3).Date/Time Setup1. When the meter is o, press and hold      for 4 seconds to enter this setting mode.2. Press      or      to select “24hr” or “12hr”.  3. Press      to conrm (Fig.4).4. The numbers of “year” will appear and ash. Press      or      to adjust and Press      to conrm (Fig.5).5. The number of “month” will appear and ash. Press      or      to adjust and press      to conrm (Fig.6).6. The numbers of “date” will appear and ash. Press      or      to adjust and press      to conrm (Fig.7).7. The numbers of “hour” will appear and ash. Press      or      to adjust and press      to conrm (Fig.8).3232Setting Up Tyson Bio HT100-B Blood Glucose Meter ˙Make sure the batteries are properly installed˙The default is set to January 1st, 0:00˙Please follow instructions to properly setup the meter(Fig.2)(Fig.1) (Fig.3)(Fig.4) (Fig.5) (Fig.6) (Fig.7) (Fig.8)08
Tyson Bio HT100-B meter provides 4 reminder alarms.  All reminder alarms are OFF as default.  Please follow these steps to setup reminder alarms.1. When the meter is OFF, press and hold       for 4 seconds or longer to enter setting.2. The rst reminder alarm will appear on the display (Fig.12).3. Press      or      to select “ON” or “OFF”. 4. If “OFF” is chosen and      pressed, the meter will proceed to the next reminder alarm setting.  If “ON” is chosen (Fig.13) and              pressed, the number of “hour” will start ashing (Fig.14).  Press      or      to adjust and press      to conrm.5. The numbers of “minutes” will ash (Fig.15).  Press       or      to adjust and press       to conrm.  The meter will go to the next     reminder alarm setting.6. Repeat steps 3 to 5 to set the rest of reminder alarms.  8. The numbers of “minute” will appear and ash.  Press       or       to       adjust.  Press      to conrm (Fig.9).  9. The set date and time will now be displayed on screen       (Fig.10, Fig.11).  Press      to turn o the meter.10. The meter date/time setting is complete.(Fig.9) (Fig.10) (Fig.11)Reminder Alarms Setup(Fig.12) (Fig.13) (Fig.14) (Fig.15) 09
HI/LO Alarms Setup1. Press      to enter the HI alarm setting after completing the reminder alarm setup.2. Press      or      to set “ON" and press     to conrm.   If "OFF" is chosen, the meter will skip this setting (Fig. 16, 17).3. To change the alarm setting, press      or      until you reach your desired HI setting and then press      to conrm. (Fig.18)    The HI alarm value range is 100 ~ 400mg/dL and the default value is 180mg/dL.4. Continue to the LO alarm setting (Fig.19), repeat Step 2 and 3 (Fig.20, 21) to conrm or to change LO alarm setting.     The LO alarm value range is 40 ~ 90mg/dL and the default value is 70mg/dL.5. Press      to nish setting and the meter will be turned o.NOTE: The hypoglycemic (LO) and hypoglycemic (HI) alarm glucose values should be selected in consultation with your health care provider.(Fig.16) (Fig.17) (Fig.18) (Fig.19) (Fig.20) (Fig.21)10
Before Testing˙Always keep test strips in the original vial. The vial contains drying agents to protect the test strips from moisture.˙Tightly close the vial cap immediately after removing a test strip.˙Use each strip immediately after removing it from the vial.˙Use each test strip ONCE ONLY.˙Do not use the test strips or Control Solution beyond the expiration date printed on the package. This may cause    inaccurate results.˙Do not use the test strips or Control Solution if the package is damaged.˙Store your test strips and the Control Solutions between 39°F ~ 86°F (4°C ~ 30°C)    Temperature beyond this range can damage test strips and lead to inaccurate results.˙Any change of medications based on the Tyson Bio HT100-B Blood Glucose Monitoring System results without advices of        a doctor is NOT RECOMMENDED.˙The lancing device is intended only for single user and should NOT be shared.˙Users should wash hands thoroughly with soap and water after handling the meter, lancing device, or test strips.˙Only Tyson Bio HT100-B Test Strip and Control Solution can be used with the Tyson Bio HT100-B Blood Glucose Meter.Important Information11
Preparing the Test StripYou need the following items to test˙Tyson Bio HT100-B Blood Glucose Meter˙Tyson Bio HT100-B Blood Glucose Test Strip˙Adjustable automatic lancing device and sterile lancet1. Wash hands using soap and warm water. Rinse and dry thoroughly (Fig. 22).2. Please remove protective wrap completely before opening the vial.3. Take a test strip from the vial and re-cap immediately (Fig.23).4. Insert the test strip top side up into the test port (Fig. 24). The meter will be automatically turned on.5. System checking will appear (Fig.25).6. A beep will sound and following by a ashing “       ” icon.  You can press       or       to select the meal indicator for     marking the test as (Fig.26):    ˙Pre-Meal Test     ˙Post-Meal Test     ˙No marker as default7. A blood sample can now be obtained (refer to P.13).(Fig.25)(Fig.22) (Fig.23) (Fig.26)(Fig.24)Using Tyson Bio HT100 Blood Glucose Test Strip12
Obtaining a Blood Sample1. Unscrew the lancing device cap (Fig.27).2. Place a lancet into the lancing device (Fig.28).3. Twist and pull to remove the protective lancet cover to expose the sterile needle. Save the cap for later use (Fig.29).4. Screw the lancing device cap back on. Select the skin penetration depth preferred (Fig.30).5. Pull the barrel back until you hear a 'click' (Fig.31).6. Place the lancing device against the nger, palm, or forearm. Press the trigger to obtain a blood sample (Fig.32).To unload the lancing device1. After sampling, carefully remove the cap containing the used lancet.2. Push the exposed tip of the lancet into its Protective Cap (Fig.33).    Slide the Lancet Ejector forward and dispose the used lancet in an appropriate container.    For further instructions please see the insert provided with the lancing device.CAUTION:To reduce chances of infection:˙Lancets are for single usage only.˙Wash hands thoroughly with soap and water before and after handling the meter, lancing device, and test strips.˙Please refer to section "Cleaning and Disinfection Procedure" (refer to P.25) for detail instructions of meter     maintenance.(Fig.27) (Fig.28) (Fig.29) (Fig.30) (Fig.31) (Fig.32) (Fig.33)13
Applying a Blood SampleSAMPLE MAY BE OBTAINED FROM FINGER, PLAM, OR FOREARM1. Introduce the tip of the test strip to the drop of blood. Blood sample will be automatically drawn into the test strip    (Fig.34) Discard the rst drop of blood sample to prevent contamination.2. Hold the tip of the test strip touching the blood drop until the meter beeps.3. The meter will start to countdown as soon as the blood has completely lled the conrmation window of the test strip.    If applying an insucient blood sample, the error code (E-7) will appear on the display (Fig. 35).4. The test result will appear on the display in 5 seconds (Fig.36). All results will be automatically stored into the meter    memory (Fig.37).5. The meter will automatically turn o after 2 minutes.6. After completing the test, push the strip ejector (Fig.38) or use a tissue paper to remove the test strip.Normal Glucose ValuesBefore a meal (fasting) : <100 mg/dL2 h after a meal: < 140mg/dL.These ranges were cited from the American Diabetes Association, Classication and Diagnosis of Diabetes, 2017.Diabetes Care 40(Suppl. 1):S11–S24Warning: ˙DO NOT point the test strip at anyone when ejecting.˙Used lancets and test strips are considered bio-hazardous.  Dispose of used lancets and test strips in a clinical waste container(Fig.34)SufficientBloodInsufficientBlood(Fig.35) (Fig.36) (Fig.37) (Fig.38)14
HI and LO Readings ˙Tyson Bio HT100-B Blood Glucose Meter is designed to display test results between 20 ~ 600 mg/dL.˙If “HI” (Fig. 39) appears on the display, it indicates the reading is higher than 600 mg/dL.˙If “LO” (Fig. 40) appears on the display, it indicates the reading is lower than 20 mg/dL.We suggested the testing procedure should be reviewed and the test should be repeated using a new test strip to reconÿrmthe test result.(Fig.39) (Fig.40)15
Available Alternate Sites TestingPalm and ForearmTyson Bio HT100-B Blood Glucose Monitoring System provides you alternate sitestesting (AST). This system allows you to test on the palm and the forearm with theequivalent results to ngertip testing.Physiological dierences in the circulation between the nger and other test sites mayresult in dierences in blood glucose measurements. Changes in blood glucose may beobserved in nger blood samples sooner than blood samples from the alternate sites. Ifyou are testing for hypoglycemia (low blood glucose), we recommend that you test onyour ngertips.There are limitations for doing AST.Please consult your healthcareprofessional before you do AST.AST measurements should not be used tocalibrate continuous glucose monitors(CGMs).AST measurements should not be used forinsulin dose calculations.ForearmPalmAST ONLY in the following intervals:˙In a pre-meal or fasting state    (more than 2 hours since the last meal)˙Two hours or more after taking insulin˙Two hours or more after exerciseDO NOT use AST if:˙You think your blood glucose is low˙You are unaware of hypoglycemia˙Your AST results do not match the way you feel˙You are testing for hyperglycemia˙Your routine glucose results are often uctuating16
Control SolutionThe Control Solution is to ensure that Tyson Bio HT100-B Blood Glucose Monitoring System is working properly and you areperforming a test correctly.When to Perform a Control Solution Test1. Be sure of the Control Solution is at a room temperature between 59°F ~ 95°F (15°C ~ 35°C) before        testing.Control solution that is not at room temperature when tested may cause out of range results.2. Insert a Tyson Bio HT100-B test strip, top side up, contact bar end rst, into the test port. The meter will     be automatically turned ON (Fig.41).3. A beep will sound and the system checking will appear followed by a ashing “   ” icon (Fig.42).Performing a Control Solution Test (Fig.41)1. You use the meter for the rst time.2. You use a new vial of test strips.3. You suspect that the meter or test     strips are not working properly.4. Your test results are not consistent with how you feel.5. You think your test result is not accurate.6. You damage your meter. 7. An advice from your healthcare professional.Note: Please read the Control Solution package insert for more detail information.(Fig.42)17
4. Press and hold       for 2 seconds to change to the Control Solution test mode. "         " will appear on the display    (Fig.43). Press      again for 2 seconds and the meter will switch back to the normal testing mode.5. Discard the rst drop of the Control Solution. Squeeze a small drop on a clean nonabsorbent surface e.g. wax paper    Do not apply the Control Solution to the test strip directly from the bottle because contamination may occur (Fig.44)6. Introduce the tip of the test strip to the Control Solution drop. The Control Solution will be automatically drawn into    the strip. Hold until the meter beeps. The meter will now start to count down and the Control Solution test result will    appear on the LCD screen (Fig.45).Caution: Follow the above instructions when performing a Control Solution test in order to prevent contamination.(Fig.45)(Fig.44)The Tyson Bio HT100-B Blood Glucose Monitoring System is working properly only if the Control Solution test result is within the specied range printed on the test strip vial.  Please repeat the test when the test result is out of range.Out of range result may be caused by:˙Incorrect steps while performing the test˙The Control Solution temperature is lower than 59°F (15°C) or higher than 95°F (35°C)˙Expired or contaminated Control Solution˙Expired or contaminated test strips˙Meter malfunctionNote: ˙The result will not be included in any day average calculation when the Tyson Bio HT100-B Blood Glucose meter is        set in the Control Solution test mode.˙DO NOT use Tyson Bio HT100-B Blood Glucose meter if the problem persists. Please contact customer service         immediately.Control Solution Results (Fig.43)18
1. Press      to turn on the meter when the meter is o.2. Press      to view previous results.  ˙“ MEM” icon will be displayed on the top center area. ˙“ Year” will be display on the top left corner (Fig.46). ˙After 1 second “Month-Day” will then be displayed on the top left corner. ˙“ Time” will be displayed on the top right corner (Fig.47). ˙The most recent memory results will be displayed rst.3. You can press       or      to scroll forwards and backwards.4. Press       to exit and view the Control Solution test result (Fig.48).5. When the meter displays the last stored test result, press       so the meter will display day average results (Fig.49).Note:˙The meter stores 500 results in the memory.˙When the memory is full, the oldest result will be replaced by the most recent result.Memory Features (Fig.46) (Fig.47) (Fig.48) (Fig.49)19
1. Press       to turn on the meter.2. Press      button to view day average results.3. 7/14/30 day average results marked with a no meal/ pre-meal/ post-meal and will be displayed on screen in sequence    when      is pressed (Fig.50~ 57).4. When the meter displays 7 days with no meal status assigned, press      button and the meter will change to view    results in memory.View Day Average Results(Fig.50) (Fig.51) (Fig.52) (Fig.53)(Fig.54) (Fig.55) (Fig.56) (Fig.57)Note:1. The 7/14/30 day average is calculated from the test results obtained during the last consecutive 7/14/30 day      periods.2. A result with a temperature warning symbol will NOT be calculated in 7/14/30 day average.3. “LO” under 20 mg/dL and “HI” over 600 mg/dL readings will NOT be stored in the memory.20
1. When the meter displays a Control Solution test result, press       will turn the meter o.2. The meter will also be turned o automatically after 2 minutes following the last key pressed.To Record Your ResultsWe provide a log book for you to record. Please refer to the log book for details.Exiting the Memory ModeYou can use Tyson Bio PC Link to transfer test results to your personal computer. Obtain the required software and cable tobe ordered separately. For order information please call Customer Service or visit website of www.tysonbio.com1. Follow the instructions provided with software to install the software into your personal computer.2. Connect the interface cable to a serial port on your computer while the meter is o.3. Connect the other end of interface cable to the data port located on the side of the meter.4. The word "PC" will appear on the display indicates that the meter is now in the communication mode (Fig.58)Transfer Test Results to a Computer(Fig.58)21
Bluetooth Setup˙Press       to turn on the meter.     will appear when HT100-B has been detected (Fig. 59)˙Bluetooth is OFF by default.˙Please proceed the following steps.To Transfer Memory Data1. When the meter is switched ON, hold      for 4 seconds to enter Bluetooth mode.    will appear and ash on the meter when    meter is not connected with a mobile device (Fig. 60).2. Turn on BLE tool APP (with Blood Glucose Test) and Bluetooth on your mobile device.3. Click “Connect” and select the device shown (ex.      TBMTXXXXXXXX) in APP list.     stops blinking when     the meter & mobile device is connected.4. Press the button on APP to transfer data. The meter will display while data are biing transferred (Fig. 61)Bluetooth Data Transfer (HT100-B Only)(Fig.59) (Fig.60) (Fig.61)22
1. When the meter is switched o, press and hold        button for 4 seconds to enter setting.2. Press       to conrm Buzzer setting and enter Bluetooth function setting menu.3. Press      or       to select Bluetooth “ON” or “OFF” (Fig. 62).4. Select “ON” and press       to conrm and meter will be turned o.5. Insert a test strip to turn ON the meter (Fig. 63).       will blink when the meter is NOT connected with a mobile device.6. Turn on BLE tool APP (with Blood Glucose Test) and Bluetooth on your mobile device.Note: Please skip Step 1~4 if Bluetooth feature is already “ON”.7. Click “Connect” and select the device shown (ex.      TBMTXXXXXXXX) in APP list.      stops blinking when the meter &    mobile device is connected.8. Perform your blood glucose test. After testing your blood glucose, the test result will automatically transmit to the APP.          will disappear (Fig. 64).To Connect via Bluetooth before a Blood Glucose Testing(Fig.63) (Fig.64)(Fig.62)23
1. When the meter is switched o, press and hold        button for 4 seconds to enter setting.2. Press       to conrm Buzzer setting and enter Bluetooth function setting menu.3. Press       or      to select Bluetooth “ON” or “OFF” (Fig. 65).4. Select “ON” and press      to conrm and meter will be turned o.5. Insert a test strip to turn ON the meter (Fig. 66).      will blink when the meter is NOT connected with a mobile device.6. After testing your blood glucose, the test result is shown (Fig. 67). Bluetooth icon is still blinking.Note: Please skip Step 1~4 if Bluetooth feature is already “ON”.7. Turn on BLE tool APP (with Blood Glucose Test) and Bluetooth on your mobile device8. Click “Connect” and select the device shown (ex.       TBMTXXXXXXXX) in APP list.      stops blinking when the meter &    mobile device is connected.9. The test result will automatically transmit to the APP.      will disappear (Fig. 68).To Connect via Bluetooth after a Blood Glucose Testing(Fig.63) (Fig.64)(Fig.62) (Fig.64)24
Cleaning:Cleaning removes visible soil, organic material, and most importantly, blood products. Always clean before disinfecting.The meter should be cleaned whenever it is visibly dirty.Disinfection:Disinfection generally refers to the use of chemical and physical agents, such as chemicals, to destroy the potentialinactivity of a material.The meter should be disinfected periodically, such as twice per week.MaterialClorox Bleach Germicidal Wipes (Clorox Professional Products Company. EPA Reg. No. 67619-12). Signs of deterioration•Performance: The control solution measurements are out of range which is listed on the test strip label.•Physical: Polymer crazing (thin silver streaks appear), cracking, swelling, dissolving, softing, or becoming brittle,                      and the symbols are not clear in LCD display.If these signs of deterioration are noted, users should stop using meter and contact customer service.Customer Service     U.S.A.    +1-800-948-3894       24 hours a day, 7 days a week Taiwan     Taiwan  +886-37-585998         GMT+8, 8:30 ~ 17:30, Monday ~ FridayNote:Users should wash hands thoroughly with soap and water after handling the meter, lancing device, or test stripsshould be included.Cleaning and Disinfection Procedure25
Cleaning:˙The meter should be cleaned prior to disinfection.˙Switch the meter OFF.˙Cleaning solution and disinfecting solution: Clorox Bleach         Germicidal Wipes˙Use a new cleaning wipe.˙The meter is cleaned follow by the illustrations     (Step1~Step15).˙Wipe the entire surface of the meter to clean blood and     other body uids.˙Please avoid using alcohol or organic solvents in cleaning.˙Do not immerse the meter in water. Do not allow water or     cleaning uids into the meter, test port, and data port.Disinfection:˙Cleaning solution and disinfecting solution: Clorox Bleach     Germicidal Wipes˙ Use a new disinfection wipe.˙ The meter is cleaned follow by the illustrations     (Step1~Step15).˙ Wipe the entire surface of the meter to remove bloodborne     pathogens.˙ Dispose of the used wipe in a trash bin.˙ Allow exteriors to remain wet for the 1 minute contact     time.˙ Wipe surface using a towel and allow to air dry.Cleaning and Disinfection Procedure(Step 1) (Step 2) (Step 3) (Step 4)(Step 5) (Step 6) (Step 7) (Step 8)(Step 9) (Step 10) (Step 11) (Step 12)(Step 13) (Step 14) (Step 15)26
Care and StoragePlease handle the meter with care. Dropping the meter may result in damage.˙Do not expose the meter, test strips, and the Control Solution to extreme conditions such as high humidity, heat, freezing    cold, or dust.˙DO NOT STORE IN DIRECT SUNLIGHT OR AREAS WITH HIGH HUMIDITY AND/OR DUST.˙It is advised that you store all parts of Tyson Bio HT100-B Blood Glucose Monitoring System in the carrying case provided.27
Display MessagesThe system is ready to accept a blood sample. Apply a blood sample.      The result is HIGHER than the “HI” alert setting. The default setting is 180 mg/dL and it can be changed according to 《HI/LO Alarms Setup》The default setting is 70 mg/dL and it can be changed according to 《HI/LO Alarms Setup》      The result is LOWER than the “LO” alert setting.Display Description ActionTest result is HIGHER than 600 mg/dL. Repeat the test by using a new test strip.  If the same message displays again, the result is conrmed to be higher than the meter test range.  Please consult your healthcare professional immediately for further advice.Test result is LOWER than 20 mg/dL. Repeat the test by using a new test strip. If thesame message displays again, the result isconrmed to be lower than the meter test range.Please consult your healthcare professionalimmediately for further advice.28
The preset reminder alarm is ringing Press any button to turn o the alarm or wait for the alarm to be turned o automatically in 30 seconds.Temperature is TOO HIGH during the test procedure. Large variation may occur between results due to high or low temperature.  Move to an environment (50°F ~ 104°F or 10°C ~ 40°C) and wait for 30 minutes before re-testing.Battery power is LOW. Meter will only provide proximately 10 more measurements.Replace with 2 AAA batteries.1. An error message indicates that the hematocrit of      the blood sample is too low for HT100-B system to         perform a test.2.Use control solution to check the meter and test     strips.1.Follow the instructions and try again with a new test strip.     Please contact customer service if the problem persists.2.Follow the instructions to enter control solution mode, and     try again with a new test strip.Temperature is TOO LOW during the test procedure. Large variation may occur between results due to high or low temperature.  Move to an environment (50°F ~ 104°F or 10°C ~ 40°C) and wait for 30 minutes before re-testing.Display Description ActionAn error message indicates that the hematocrit of the hematocrit of the blood sample is too high for HT100-B system to perform a test.Follow the instructions and try again with a new test strip. Please contact customer service if the problem persists.29
Error MessagesTemperature is TOO HIGH to perform a test. Move to an environment between 50°F ~ 104°F or 10°C~ 40°C and wait for 30 minutes before re-testing.Temperature is TOO LOW to perform a test. Move to an environment between 50°F ~ 104°For 10°C ~ 40°C and wait for 30 minutes beforere-testing.Battery power is depleted for further usage. Replace with 2 AAA batteries immediatelyAn error message indicates a problem with the test strip or meter.Review the instructions and try again with a new test strip.Please contact customer service if the problem persists.An error message indicates a problem with the test strip.Review the instructions and try again with a new test strip.Please contact customer service if the problem persists.Display Description Action30
An error message indicates a problem with the meter.Remove batteries and wait for 1 minute. Reinstall batteries to see if meter is working properly. Please contact customerservice if the problem persists.An error message indicates a problem with the test strip.Review the instructions and try again with a new test strip.Please contact customer service if the problem persists.An error message indicates a problem with the meter.Remove batteries and wait for 1 minute. Reinstallbatteries to see if meter is working properly. Pleasecontact customer service if the problem persists.An error message indicates a problem with the test strip.Review the instructions and try again with a new test strip.Please contact customer service if the problem persists.An error message indicates a problem with the meter.Remove batteries and wait for 1 minute. Reinstallbatteries to see if meter is working properly. Pleasecontact customer service if the problem persists.An error message indicates insucientvolume of blood sample for the test.Follow the instructions and try again with a new test strip,then applying a sucient blood sample to the test strip.Please contact customer service if the problem persists.Display Description Action31
A test strip has not been inserted into the meter properly.Review the instructions and re-insert a test strip correctly.Defective test strip. Replace with a new test strip.A test strip remains in the test port for more than 2 minutes before testing.Review the instructions and re-insert a test strip correctly.LCD display on the meter is blank when trying to perform a test.Please contact customer services for assistance.The meter does not function after new batteries are installed.Remove batteries and wait for 1 minute.  Reinstall batteries to see if meter is working properly.Other problems which may occur ActionTrouble Shooting32
Operation Temperature 50°F ~ 104°F (10°C ~ 40°C)Operation Humidity 10 ~ 90% RHHematocrit 10 ~ 65%Test Sample Capillary Whole Blood(ngertip, palm, and forearm)Sample Volume 0.7 µLMeasuring Unit mg/dLMeasuring Range 20 ~ 600 mg/dLTest Time 5 seconds countdownMemory Capacity 500 most recent resultsAverage 7/14/30 days averageExternal Output USB interface and Bluetooth Power supply 2  AAA batteriesBattery Life Approximately 1000 testsDimension 106L x 66W x 20H mmWeight 65 g without batteriesSpecificationsNote: Please refer to the Test Strip Insert for the performance of system accuracy and precision.The Meter meets the electromagnetic compatibility requirements as per IEC 60601-1-2:2014 and EN 60601-1-2:2015. Caution: Do not use the meter close to the  electronic equipment which is a source of strong electromagnetic radiation, which may interfere with proper operation of meter.33
Meter StorageIcon DescriptionTemperature limitationBatch codeUse byDo not reuseSerial NumberManufacturerIn vitro diagnostic medical deviceConsult instructions for useSucient forCatalogue numberControlCautionBluetooth logo˙Transport and store at temperature -4°F ~ 122 °F (-20°C ~ 50°C), less than 90% RH.˙Precision instrument, do not drop or crush when being transported.34
Note: Please refer to the Test Strip Insert for the performance of system accuracy and precision.The Meter meets the electromagnetic compatibility requirements as per IEC 60601-1-2:2014 and EN 60601-1-2:2015. Caution: Do not use the meter close to the  electronic equipment which is a source of strong electromagnetic radiation, which may interfere with proper operation of meter.Service and WarrantyIMPORTANT˙Tyson Bio HT100-B Blood Glucose Glucose Meter, Tyson Bio HT100-B Test Strip and Tyson Bio HT100-B Control Solution are     in conformity with the CFR, Title 21 and IVDD 98/79/EC.˙Tyson Bio HT100-B Blood Glucose Monitoring System manufacturer warranty is valid only when used properly with in the       guidelines of this User Manual provided.˙The Lancing device and Lancets are in conformity with the CFR, Tiltle 21 and MDD 93/42/EEC.Manufacturer Warranty˙Tyson Bioresearch Inc. oers 3 years guarantee on this product. Our company shall repair or replace any Tyson Bio     HT100-B Blood Glucose Monitoring System found defective with a new one.˙This warranty does not apply to the performance of a Tyson Bio HT100-B Blood Glucose Monitoring System that has been     accidentally damaged, altered, misused, tampered with or abused in anyway. In no event shall our company be liable to     the purchaser or any other person for any incidental, consequential, or punitive damages arising from or in anyway     connected with the purchase or operation of Tyson Bio HT100-B Blood Glucose Monitoring System.˙For manufacturer warranty services, purchaser must contact Tyson Bioresearch, Inc. for help.35
NoticeFederal Communications Commission (FCC) Statement15.21You are cautioned that changes or modications not expressly approved by the part responsible for compliance could void the user’s authority to operate the equipment.15.105(b)This equipment has been tested and found to comply with the limits for a Class B digital device, pursuant to part 15 of the FCC rules. These limits are designed to provide reasonable protection against harmful interference in a residential installation. This equipment generates, uses and can radiate radio frequency energy and, if not installed and used in accordance with the instructions, may cause harmful interference to radio communications. However, there is no guarantee that interference will not occur in a particular installation. If this equipment does cause harmful interference to radio or television reception, which can be determined by turning the equipment o and on, the user is encouraged to try to correct the interference by one or more of the following measures:˙Reorient or relocate the receiving antenna.˙Increase the separation between the equipment and receiver.˙Connect the equipment into an outlet on a circuit dierent from that to which the receiver is connected.˙Consult the dealer or an experienced radio/TV technician for help.36
This device complies with Part 15 of the FCC Rules. Operation is subject to the following two conditions:1. This device may not cause harmful interference and2. This device must accept any interference received, including interference that may cause undesired operation of the     device.FCC RF Radiation Exposure Statement:1. This Transmitter must not be co-located or operating in conjunction with any other antenna or transmitter.2. This equipment complies with FCC RF radiation exposure limits set forth for an uncontrolled environment.37
Manufacturer of Blood Glucose Meter, Test Strip and Control SolutionWhen you call our customer service, please have all components of the product available.  This will allow us to answer your questions with speed and eciency.Manufacturer of Lancet and Lancing Device      Shandong Lianfa Medical Plastic Products Co., Ltd.      No.1 Shuangshan Sanjian Road 250200 Zhangqiu City, Jinan, Shandong PEOPLE’S REPUBLIC OF CHINA      SteriLance Medical (Suzhou) Inc.      No.68 Litanghe Road,Xiangcheng Suzhou, Jiangsu 215133 P.R.ChinaCustomer Service      U.S.A.      +1-800-948-3894      24 hours a day, 7 days a week      Taiwan    +886-37-585998        GMT+8, 8:30 ~ 17:30, Monday ~ FridayTyson Bioresearch, Inc.5F., No. 16, 18, 20, 22, Kedong 3rd Rd., Zhunan Township, Miaoli County 35053, Taiwan+886-37-585998        www.tysonbio.com38

Navigation menu