Tad Radio of Canada M10B MOBILE TWO-WAY RADIO User Manual 202AUT6 UsersManual
Tad Radio of Canada Inc MOBILE TWO-WAY RADIO 202AUT6 UsersManual
UserManual.wiki
>
Tad Radio of Canada
>
M10B User Manual
users manual
Navigation menu
Upload a User Manual
Namespaces
Wiki Guide
HTML
PDF
Info
Views
User Manual
Discussion / Help
Navigation
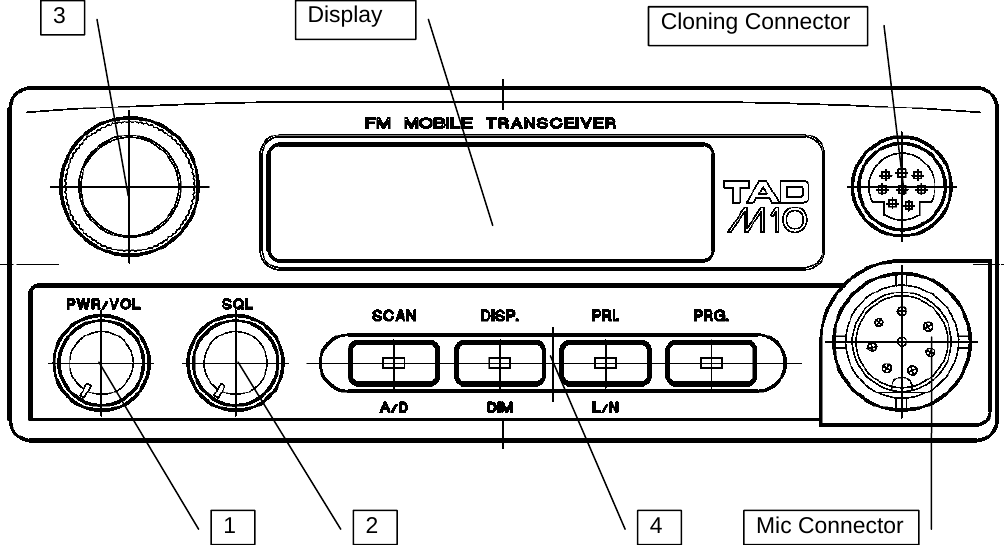
![FRONT PANEL CONTROLS Compliance Statement This device complies with part 15 of the FCC Rules. Operation is subject to the following two conditions: (1) this device may not cause harmful interference, and (2) this device must accept any interference received, including interference that may cause undesired operation. Warning Statement Changes or modifications not expressly approved by the manufacturer void the user’s authority to operate the equipment. Power SW and Volume [1] The radio is turned on and off pushing this control.(Push on, off) The audio level from the speaker increases as this control is rotated clock-wise. Squelch Control [2] This controls the receiver silencing circuitry. To correctly utilize this control, first select an unused channel, then rotate it counter-clockwise until noise is heard in the speaker and the ”BUSY” indicator shows in the display. Now rotate the control clockwise until the noise is squelched and the “BUSY” indicator goes out on the display. This is the most sensitive setting for this control. Rotating this control further clockwise decreases the sensitivity of the receiver. This is sometimes handy in noisy conditions. Channel selector knob [3] Use this control to select a channel. Panel Buttons [4] The four front panel buttons perform two functions each. The first one is performed when the button is pressed and then released after the first “beep”. The second function is performed when the buttons pressed and held in for 2-3 seconds and a second beep is heard. When the panel button is pressed and released after the first “beep”: The “SCAN” button toggles the radio in and out of the scan mode. The “SCAN” indicator, on the display, will be “on” when in the scan mode. The “DISP” button changes the display from channel number only, to channel number and an alphanumeric name (up to 7 characters), to channel number and frequency, to channel number and tone frequency, then back to channel number only. The “PRI” button toggles the radio in and out of the priority mode. The “PRI” indicator, on the display, will be on when in the priority mode. The “PRG” button puts the radio into the “User Programming Mode.” The “U PROG” indicator, on the display, will be “on” when in the user programming mode. When the panel button is pressed and held until the second “beep”: The “SCAN”(A/D) button adds or deletes the channel from the scan sequence. The "D” indicator is turned on when the channel is deleted from the scan sequence. (The channel will not be scanned if it is deleted from the scan sequence.) The “DISP” (DIM) button toggles the display back-lighting between dim and normal. The “PRI” (L/N) button toggles the receiver between “normal” and “low” sensitivity. (The “LOW” indicator is on when the receiver is least sensitive.) The “PRG” button causes the radio to enter the “PASS NUMBER” mode for dealer programming. (Works only if the internal “OPTION SWITCH” is set for this mode.) SCAN MODE When the “SCAN” indicator is “on” the radio will scan all the channels that have been entered into the scan sequence whenever the microphone is hung up. When the radio comes to a channel for](https://usermanual.wiki/Tad-Radio-of-Canada/M10B/User-Guide-644045-Page-1.png)