Tad Radio of Canada M10B MOBILE TWO-WAY RADIO User Manual 202AUT6 UsersManual
Tad Radio of Canada Inc MOBILE TWO-WAY RADIO 202AUT6 UsersManual
users manual
FRONT PANEL CONTROLS
Compliance Statement
This device complies with part 15 of the FCC Rules. Operation is subject to the following two
conditions: (1) this device may not cause harmful interference, and (2) this device must accept any
interference received, including interference that may cause undesired operation.
Warning Statement
Changes or modifications not expressly approved by the manufacturer void the user’s authority to
operate the equipment.
Power SW and Volume [1]
The radio is turned on and off pushing this control.(Push on, off) The audio level from the speaker
increases as this control is rotated clock-wise.
Squelch Control [2]
This controls the receiver silencing circuitry. To correctly utilize this control, first select an unused
channel, then rotate it counter-clockwise until noise is heard in the speaker and the ”BUSY” indicator
shows in the display. Now rotate the control clockwise until the noise is squelched and the “BUSY”
indicator goes out on the display. This is the most sensitive setting for this control. Rotating this
control further clockwise decreases the sensitivity of the receiver. This is sometimes handy in noisy
conditions.
Channel selector knob [3]
Use this control to select a channel.
Panel Buttons [4]
The four front panel buttons perform two functions each. The first one is performed when the button
is pressed and then released after the first “beep”. The second function is performed when the
buttons pressed and held in for 2-3 seconds and a second beep is heard.
When the panel button is pressed and released after the first “beep”:
The “SCAN” button toggles the radio in and out of the scan mode. The “SCAN” indicator, on the
display, will be “on” when in the scan mode.
The “DISP” button changes the display from channel number only, to channel number and an
alphanumeric name (up to 7 characters), to channel number and frequency, to channel
number and tone frequency, then back to channel number only.
The “PRI” button toggles the radio in and out of the priority mode. The “PRI” indicator, on the
display, will be on when in the priority mode.
The “PRG” button puts the radio into the “User Programming Mode.” The “U PROG” indicator,
on the display, will be “on” when in the user programming mode.
When the panel button is pressed and held until the second “beep”:
The “SCAN”(A/D) button adds or deletes the channel from the scan sequence. The "D”
indicator is turned on when the channel is deleted from the scan sequence. (The channel will
not be scanned if it is deleted from the scan sequence.)
The “DISP” (DIM) button toggles the display back-lighting between dim and normal.
The “PRI” (L/N) button toggles the receiver between “normal” and “low” sensitivity. (The “LOW”
indicator is on when the receiver is least sensitive.)
The “PRG” button causes the radio to enter the “PASS NUMBER” mode for dealer
programming. (Works only if the internal “OPTION SWITCH” is set for this mode.)
SCAN MODE
When the “SCAN” indicator is “on” the radio will scan all the channels that have been entered into
the scan sequence whenever the microphone is hung up. When the radio comes to a channel for
the duration of the “scan resume time” that has been programmed in the “User Programming”
mode or until the channel becomes clear.
PRIORITY MODE
When the “PRI” indicator is “on” the radio will continually sample the status of the priority channel.
If the priority channel becomes busy the radio will “beep” and stay on the priority channel until it
becomes clear. “Pr” plus the priority channel number will be displayed on the display. Taking the
microphone “off hook” while the priority channel is busy will also cause the radio to stay on the
priority channel. The priority channel can be selected from any of the channels programmed into
the radio by entering the “USER PROGRAMMING” mode.
USER PROGRAMMING MODE
The “User Programming” contains four separate modes.
1) Bank number select.(if available)
2) Priority channel select.
3) Monitor on/off select.
4) Scan delay select.
a) To enter “User Programming” pressing the “PRG” button.
b) Once in the “User Programming” mode, use the “PRI” button to select the desired mode.
c) In the “Priority channel select” mode, use the “Channel knob” to select a channel. In any of the
other three modes use the “DISP” button to select the proper function.
Bank: 1, 2, 3, or 4.
The “BANK” mode in “User Programming” lets the user select up to four different “BANKS” of
frequencies depending on how the dealer has set up the radio. This means that there can be up to,
4 times 99, or 396 frequencies installed in the radio. If there are no frequencies installed in a bank
it will display “CH ALL CLR”
Priority channel
Monitor on/off
Scan Delay: 0, 3, 6 or C.
“0” = No delay, the radio will resume scanning as soon as the channel clears.
“3” = 3 seconds delay, the radio will resume scanning after 3 seconds.
“6” = 6 seconds delay, the radio will resume scanning after 6 seconds.
“C” = The radio will resume scanning 3seconds after the channel has cleared.
Each “BANK” is separate from the others so you cannot scan frequencies that are in another
“BANK” however you can have separate Scanned channels, Priority channel and Scan resume
times etc. for each “BANK.”
SAFETY/WARNING INFORMATION
WARNING - DO NOT operate the radio when any person(s) (bystanders) outside the vehicle are within the
distance (1m)
Safety Training information:
Antennas used for this transmitter must not exceed an antenna gain of 3 dBd. The radio must be used in
vehicle-mount configurations with a maximum operating duty factor not exceeding 50 %, in typical
Push-to-Talk configurations.
This radio is restricted to occupational use, work related operations only where the radio operator must have
the knowledge to control the exposure conditions of its passengers and bystanders by maintaining the
minimum separation.
Failure to observe these restrictions will result in exceeding the FCC RF exposure limits.
Antenna Installation:
For rear deck trunk installation, the antenna must be located at least 1m away from rear-seat passengers in
order to comply with the FCC RF exposure requirements. For roof top installations, the antenna must be placed
in the center of the roof.
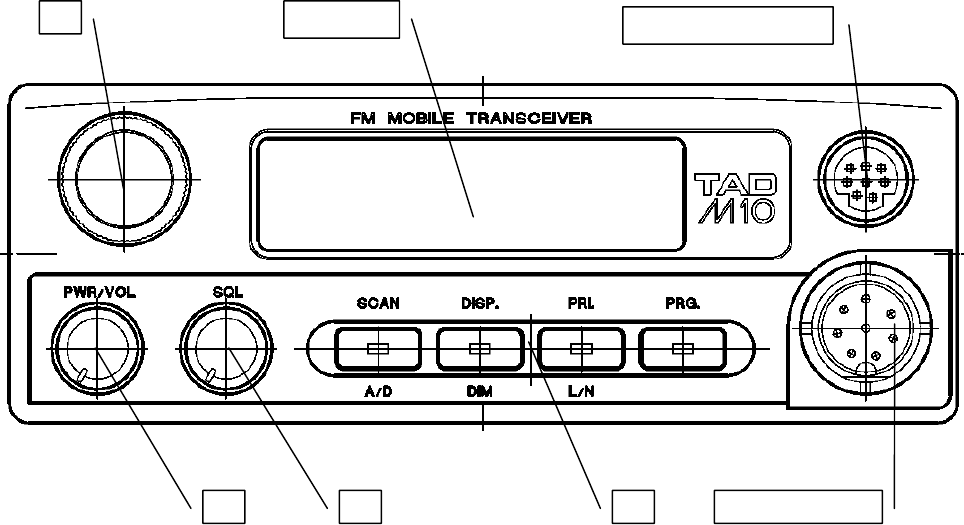
1 2
3 Cloning Connector
Display
4Mic Connector