Contents
- 1. Manual and Installation Guide
- 2. Installation Guide T2000
- 3. Operators Manual T2020
- 4. Operators Manual T2040
Operators Manual T2040
Operator’s Manual
T2040 Series II
T2040II
02/01 IPN: 409-20400-03

02/01 IPN: 409-20400-03
1
TAIT ELECTRONICS LIMITED
Software licence agreement
This legal document is an Agreement between you, (the “Licencee”) and Tait Electronics Limited (“Tait”). By opening this product pack-
age and/or using the product you agree to be bound by the terms of this Agreement. If you do not agree to the terms of this Agreement,
do not open the product package and immediately return the unopened product package to Tait. If you open the product package that
will be deemed to be acceptance of the terms of this licence agreement.
Licence
In consideration of the payment of the Licence Fee which forms part of the price you paid for products you acquired from Tait or its sub-
sidiary or agent (the “products”) and our willingness to be bound by the terms of this agreement, Tait grants to you as Licencee the non-
exclusive right to use the copy of a Tait software program included in the products, (the “Software”).
In particular the Licencee may use the program on a single machine and if the software is supplied on a diskette, the Licencee may:
(a) copy the program into any machine readable or printed form for backup purposes in support of your use of the program on the single machine
(Certain programs, however, may include mechanisms to limit or inhibit copying. They are marked “copy protected”), provided the copyright
notice must be reproduced and included on any such copy of the Software.
(b) Merge it into another program for your use on the single machine. (Any portion of this program merged into another program will continue to be
subject to the terms and conditions of this Agreement.);
The Licencee may not duplicate, modify, reverse compile or reverse assemble the Software in whole or part.
Title to software
This agreement does not constitute a contract of sale in relation to the Software supplied to the Licencee. Not withstanding the Licencee
may own the magnetic or other physical media on which the Software was originally supplied, or has subsequently been recorded or
fixed, it is a fundamental term of this Agreement that at all times title and ownership of the Software, whether on the original media or
otherwise, shall remain vested in Tait or third parties who have granted licences to Tait.
Term and termination
This Licence shall be effective until terminated in accordance with the provisions of this Agreement. The Licencee may terminate this
Licence at any time by destroying all copies of the Software and associated written materials. This Licence will be terminated automati-
cally and without notice from Tait in the event that the Licencee fails to comply with any term or condition of this Agreement. The Licen-
cee agrees to destroy all copies of the Software and associated written materials in the event of such termination.
Limited warranty
The Software is supplied by Tait and accepted by the Licencee “as is” without warranty of any kind either expressed or implied, including but not
being limited to any implied warranties as to merchantability or fitness for any particular purpose. The entire risk as to the quality and perfor-
mance of the Software vests in the Licencee. Should the Software prove to be defective, the Licencee (and not Licensor or any subsidiary or
agent of the Licensor) shall assume the entire cost of all necessary servicing, repair or correction. Tait does not warrant that the functions con-
tained in the Software will meet the Licences requirements or that the operation of the Software will be uninterrupted or error free. However Tait
warrants that the diskettes if any on which the Software is supplied to the Licencee shall be free from defects in material and workmanship under
normal use and service for a period of ninety (90) days from the date of delivery to the Licencee.
Exclusion of liability
Tait’s entire liability and the Licences exclusive remedy shall be:
1. The replacement of any diskette not meeting Tait “limited warranty” and which is returned to Tait or an authorized agent or subsidiary of Tait
with a copy of the Licences purchase receipt; or
2. If a diskette is supplied and if Tait is unable to deliver a replacement diskette which is free from defects in material or workmanship, the Licen-
cee may terminate this Agreement by returning the Software to Tait.
3. In no circumstances shall Tait be under any liability to the Licencee, or any other person whatsoever, for any direct or consequential damage
arising out of or in connection with any use or inability of using the Software.
4. Tait warrants the operation of the Software only with the operating system for which it was designed. Use of the Software with an operating sys-
tem other than that for which it was designed may not be supported by Tait, unless otherwise expressly agreed by Tait.
General
The Licencee confirms that it shall comply with the provisions of law in relation to the Software.
Law and jurisdiction
This Agreement shall be subject to and construed in accordance with New Zealand law and disputes between the parties concerning
the provisions hereof shall be determined by the New Zealand Courts of Law. Provided however Tait may at its election bring proceed-
ings for breach of the terms hereof or for the enforcement of any judgement in relation to a breach of the terms hereof in any jurisdiction
Tait considers fit for the purpose of ensuring compliance with the terms hereof or obtaining relief for breach of the terms hereof.
No Dealings
The Licencee may not sublicense, assign or transfer the licence or the program except as expressly provided in this Agreement. Any
attempt otherwise to sublicense, assign or transfer any of the rights, duties or obligations hereunder is void.
No Other Terms
The Licencee acknowledges that it has read this agreement, understand it and agree to be bound by its terms and conditions. The
Licencee further agrees that this is the complete and exclusive statement of the agreement between it and Tait in relation to the Software
which supersedes any proposal or prior agreement, oral or written and any other communications between the Licencee and Tait relat-
ing to the Software. (LS-589)
2
02/01 IPN: 409-20400-03

02/01 IPN: 409-20400-03
3
Contents
Introduction. . . . . . . . . . . . . . . . . . . . . . . . . . . . . . . . . . . . . . . . . . . . . . . . . . . 5
Safety Training Information . . . . . . . . . . . . . . . . . . . . . . . . . . . . . . . . . . . . . . . . . . . . . . 6
WARNING: . . . . . . . . . . . . . . . . . . . . . . . . . . . . . . . . . . . . . . . . . . . . . . . . . . . . . . . 6
T2040
II
Controls and Indicators. . . . . . . . . . . . . . . . . . . . . . . . . . . . . . . . . . 7
Keypad Functions . . . . . . . . . . . . . . . . . . . . . . . . . . . . . . . . . . . . . . . . . . . . . . . . . . . . . 7
Keypad Indicators . . . . . . . . . . . . . . . . . . . . . . . . . . . . . . . . . . . . . . . . . . . . . . . . . . . . . 8
Display Window Indicators . . . . . . . . . . . . . . . . . . . . . . . . . . . . . . . . . . . . . . . . . . . . . . . 8
Display Window Indicators . . . . . . . . . . . . . . . . . . . . . . . . . . . . . . . . . . . . . . . . . . . . . . . 8
Basic Operations . . . . . . . . . . . . . . . . . . . . . . . . . . . . . . . . . . . . . . . . . . . . . 10
Switching the Radio On and Off . . . . . . . . . . . . . . . . . . . . . . . . . . . . . . . . . . . . . . . . . 10
Volume Control . . . . . . . . . . . . . . . . . . . . . . . . . . . . . . . . . . . . . . . . . . . . . . . . . . . . . . 10
Checking Network Access . . . . . . . . . . . . . . . . . . . . . . . . . . . . . . . . . . . . . . . . . . . . . . 10
Making a Call . . . . . . . . . . . . . . . . . . . . . . . . . . . . . . . . . . . . . . . . . . . . . . . . . . . . . . . . 11
Call Setup and Transmission . . . . . . . . . . . . . . . . . . . . . . . . . . . . . . . . . . . . . . . . 11
Transmit Timer . . . . . . . . . . . . . . . . . . . . . . . . . . . . . . . . . . . . . . . . . . . . . . . . . . . 11
Requesting a Call from your Despatcher . . . . . . . . . . . . . . . . . . . . . . . . . . . . . . . 12
Unanswered Calls . . . . . . . . . . . . . . . . . . . . . . . . . . . . . . . . . . . . . . . . . . . . . . . . . 12
Returning an Unanswered Call . . . . . . . . . . . . . . . . . . . . . . . . . . . . . . . . . . . . . . . 12
Receiving a Call . . . . . . . . . . . . . . . . . . . . . . . . . . . . . . . . . . . . . . . . . . . . . . . . . . . . . . 13
Group Calls . . . . . . . . . . . . . . . . . . . . . . . . . . . . . . . . . . . . . . . . . . . . . . . . . . . . . . 13
Re-establishing a Call . . . . . . . . . . . . . . . . . . . . . . . . . . . . . . . . . . . . . . . . . . . . . . . . . 13
Last Incoming Caller . . . . . . . . . . . . . . . . . . . . . . . . . . . . . . . . . . . . . . . . . . . . . . . 14
Last Called Party . . . . . . . . . . . . . . . . . . . . . . . . . . . . . . . . . . . . . . . . . . . . . . . . . . 14
Emergency Operation . . . . . . . . . . . . . . . . . . . . . . . . . . . . . . . . . . . . . . . . . . . . . . . . . 14
Advanced User Operations . . . . . . . . . . . . . . . . . . . . . . . . . . . . . . . . . . . . . 15
Alphanumeric Entry Mode . . . . . . . . . . . . . . . . . . . . . . . . . . . . . . . . . . . . . . . . . . . . . . 15
Call Queuing . . . . . . . . . . . . . . . . . . . . . . . . . . . . . . . . . . . . . . . . . . . . . . . . . . . . . . . . 16
Changing Trunked Networks . . . . . . . . . . . . . . . . . . . . . . . . . . . . . . . . . . . . . . . . . . . . 16
Despatcher Operation . . . . . . . . . . . . . . . . . . . . . . . . . . . . . . . . . . . . . . . . . . . . . . . . . 17
Do Not Disturb . . . . . . . . . . . . . . . . . . . . . . . . . . . . . . . . . . . . . . . . . . . . . . . . . . . . . . . 17
Economy Mode . . . . . . . . . . . . . . . . . . . . . . . . . . . . . . . . . . . . . . . . . . . . . . . . . . . . . . 18
Short Data Messages (SDMs) . . . . . . . . . . . . . . . . . . . . . . . . . . . . . . . . . . . . . . . . . . . 18
Receiving an SDM . . . . . . . . . . . . . . . . . . . . . . . . . . . . . . . . . . . . . . . . . . . . . . . . 18
SDM Entry Mode . . . . . . . . . . . . . . . . . . . . . . . . . . . . . . . . . . . . . . . . . . . . . . . . . . 19
Using Alphanumeric Entry Mode . . . . . . . . . . . . . . . . . . . . . . . . . . . . . . . . . . . . . . 20
Sending an SDM . . . . . . . . . . . . . . . . . . . . . . . . . . . . . . . . . . . . . . . . . . . . . . . . . . 20
Exiting SDM Entry Mode . . . . . . . . . . . . . . . . . . . . . . . . . . . . . . . . . . . . . . . . . . . . 20
Status Calls . . . . . . . . . . . . . . . . . . . . . . . . . . . . . . . . . . . . . . . . . . . . . . . . . . . . . . . . . 21
Receiving a Status Call . . . . . . . . . . . . . . . . . . . . . . . . . . . . . . . . . . . . . . . . . . . . . 21
4
02/01 IPN: 409-20400-03
Making a Status Call . . . . . . . . . . . . . . . . . . . . . . . . . . . . . . . . . . . . . . . . . . . . . . . 21
Trunking Call Set up and Special Functions . . . . . . . . . . . . . . . . . . . . . . . 22
Most Common Trunking Call Setup . . . . . . . . . . . . . . . . . . . . . . . . . . . . . . . . . . . . . . . 22
MPT1343 . . . . . . . . . . . . . . . . . . . . . . . . . . . . . . . . . . . . . . . . . . . . . . . . . . . . . . . . 22
ANN Fleet Calls . . . . . . . . . . . . . . . . . . . . . . . . . . . . . . . . . . . . . . . . . . . . . . . . . . . 22
Preset Numbers and Conventional Channels . . . . . . . . . . . . . . . . . . . . . . . . . . . . 22
Most Common Special Trunking Functions . . . . . . . . . . . . . . . . . . . . . . . . . . . . . . 23
Optional Accessories for T2040
II
Radios . . . . . . . . . . . . . . . . . . . . . . . . . 24
Appendix . . . . . . . . . . . . . . . . . . . . . . . . . . . . . . . . . . . . . . . . . . . . . . . . . . . . 24
Maintenance . . . . . . . . . . . . . . . . . . . . . . . . . . . . . . . . . . . . . . . . . . . . . . . . . . . . . . . . . 24
Troubleshooting . . . . . . . . . . . . . . . . . . . . . . . . . . . . . . . . . . . . . . . . . . . . . . . . . . . . . . 24
02/01 IPN: 409-20400-03
5
Introduction
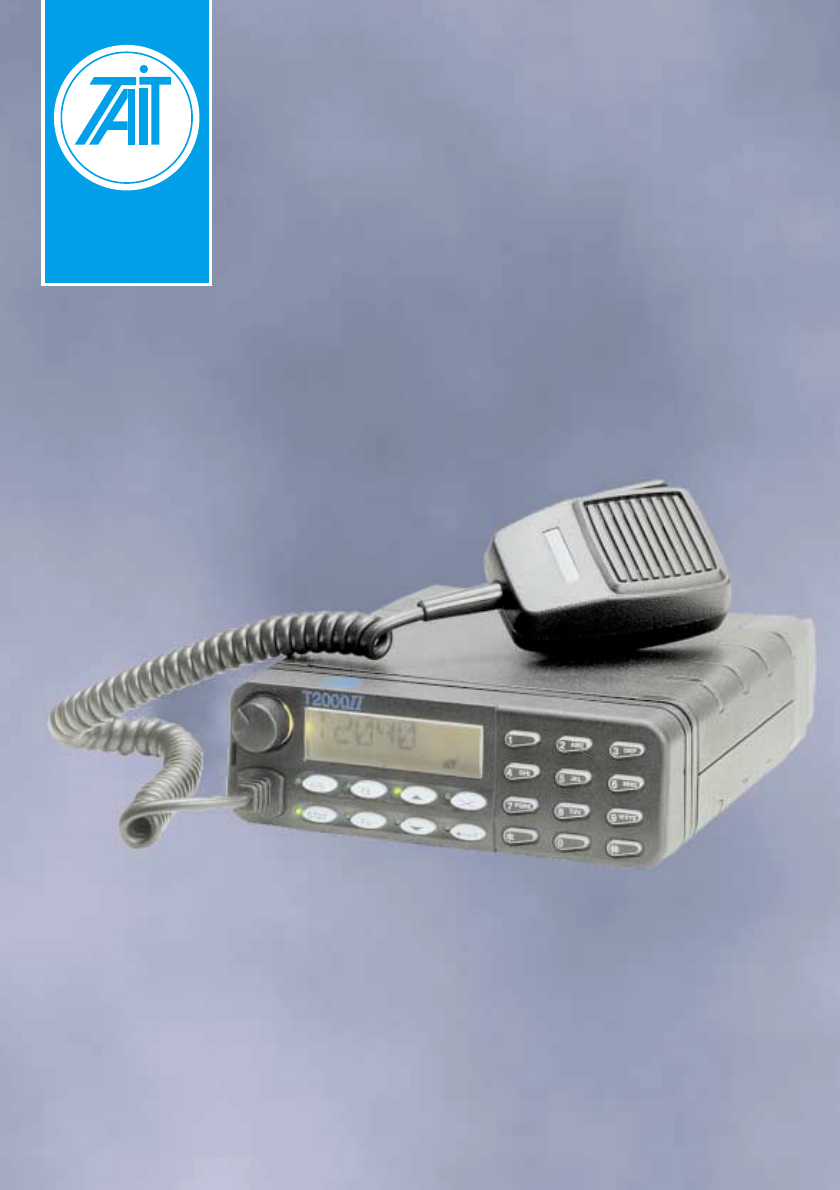
The Tait T2040
II
radio is a state-of-the-art mobile radio that provides outstanding communi-
cation flexibility in both conventional and trunked mobile radio systems. The T2040
II
is micro-
processor controlled which allows it to be configured to suit your personal needs and those of
your fleet, for greater communication effectiveness.
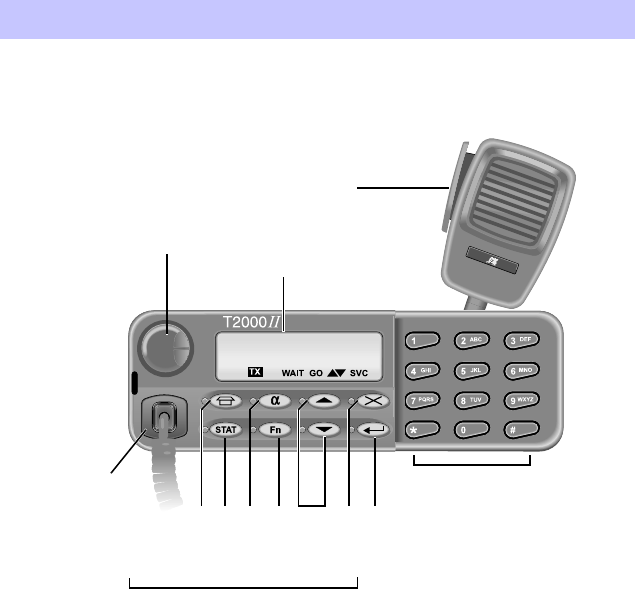
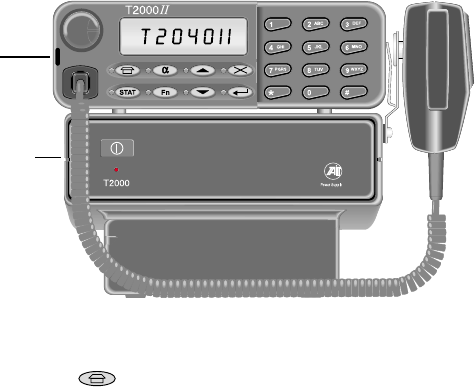
T2040
II
Control Head
PTT key
display window
alphanumeric keypad
on/off volume knob
function key
status key
despatcher key
alphanumeric key
function keypad
up/down keys
clear key
enter key
microphone
socket
6
02/01 IPN: 409-20400-03
Safety Training Information
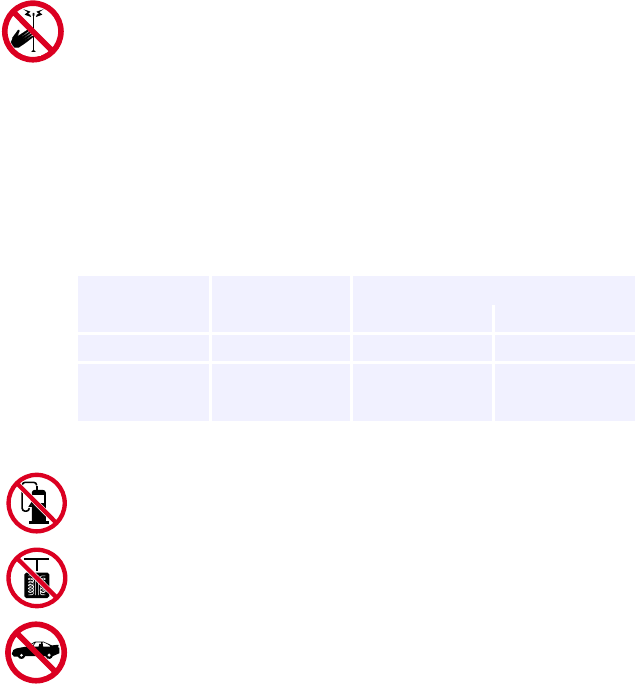
WARNING:
This product product generates Radio Frequency energy during transmis-
sions. It is classified as suitable for ‘Occupational Use Only’. It is not intend-
ed for general use in uncontrolled environments.
It must only be used with authorised accessories and antennas.
The operator must ensure that the minimum safe distance between persons
and the antenna is maintained during transmissions.
Do not exceed a duty cycle ratio of 50% transmit mode to standby or receive
modes. The radio is in transmit mode when the PTT button on the micro-
phone is pressed or the ‘TX’ indicator shows.
Safe distances from each antenna are as follows:
Switch the radio off at petrol filling stations.
Switch the radio off in the vicinity of explosive devices (such as in a quarry
that uses blasting techniques).
Use of a handheld microphone or a radio while driving could contravene the
legislation that applies in your country or state. Please check the vehicle
regulations in your own country.
Antenna Gain Minimum Safe Distance
Product (dBi) (metres) (inches)
T20X0-K27 4.5 0.82 32.4
T20X0-3XX 2.15 0.63 24.6
5.15 0.88 34.8
02/01 IPN: 409-20400-03
7
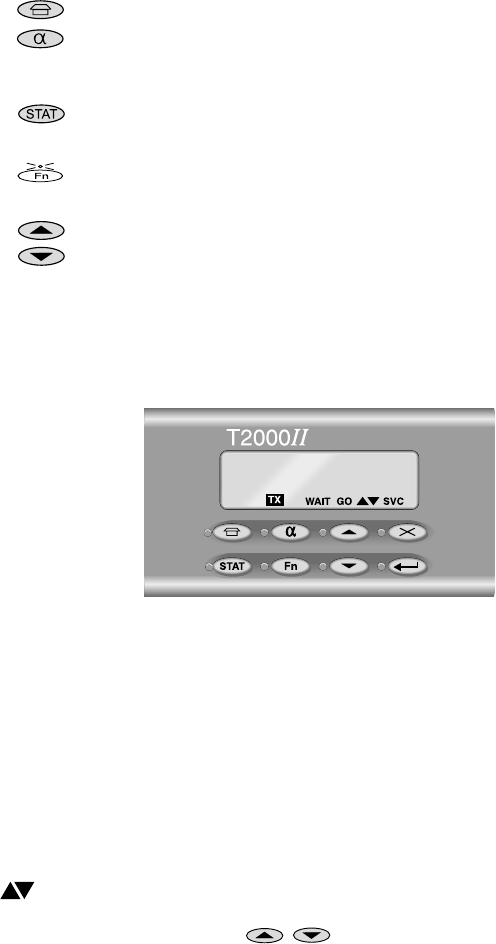
T2040II Controls and Indicators
The T2040
II
control head includes the following keys and indicators:
Keypad Functions
The keypad functions are as follows:
Despatcher
Short press
: accesses a preset number (usually your base
despatcher). This is a one touch dialling key.
Long press:
if call queuing is enabled, this changes the mode of
operation between call queuing and normal mode.
Long press:
if the radio is in despatcher mode, this changes the
display from call queuing to normal mode.
Status
Short press
: used to send status calls using alphanumeric label
mode, and to select preprogrammed status messages to indicate
your own present status (such as “EN ROUTE” or “AT LUNCH”).
Long press:
used to access short data message (SDM) entry
mode.
Alphanumeric Used to scroll and select or enter alphanumeric labels associated
with preset numbers preprogrammed into your radio. It can also
be used to view an alphanumeric status label of an incoming
status call and to enter and view SDMs.
Function
Long press:
toggles the level of the confidence tones from normal
to quiet. At each press, the radio sounds a sample tone at the new
level.
Short press:
may function as a one touch dialling key or it may
activate or disable an auxiliary device, such as a scrambler or an
external alert unit (e.g. car horn).
Up / Down Used to scroll through entries in the call queue, or a list of preset
number labels or status labels. Also used to scroll through an
SDM or to edit an SDM.
Clear Used to end calls, and to clear ‘call back’ numbers in the queue
and the ‘do not disturb’ facility. It also operates automatically after
a period of inactivity determined by the network, or when you put
the microphone back on hook.
Enter Used to initiate a call and to select items.
Star/Hash Used at the end of dialling sequences and for special operations.
0 to 9
[ABC] to [WXYZ] Used for dialling and for entering alphanumeric data for labels,
when the indicator beside the Alphanumeric key is illuminated.
8
02/01 IPN: 409-20400-03
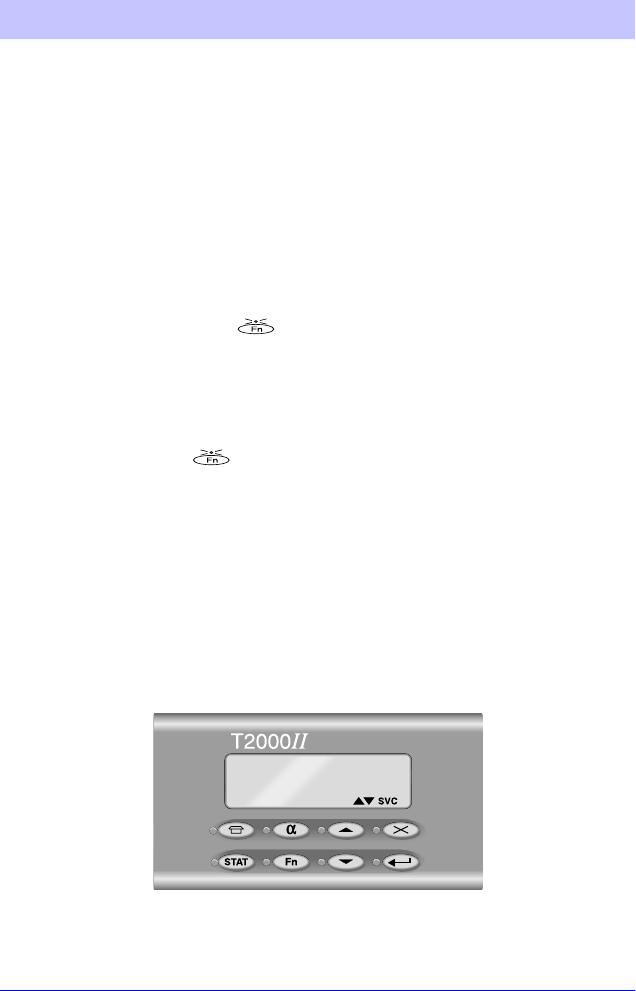
Keypad Indicators
Display Window Indicators
The LCD window provides you with direct visual access to information and messages about
the status of your calls and your radio.
Note:
Your T2040
II
has the ability to display messages in languages other than English.
This option is selected during programming.
Display Window Indicators
●
Indicates that your radio is queuing incoming calls.
●
Indicates that your radio is in alphanumeric entry or label selection mode. The
indicator flashes when there is an incoming status call with an associated alpha-
numeric label or when there is an incoming SDM.
●
Indicates that the displayed call is a status call or an SDM, or that your radio is at
present in status label selection mode or SDM entry mode.
●
Indicates that either the auxiliary device or mode that is controlled by the Function
key is currently active.
●
Indicates that these keys may be used to display another entry in the queue, to
scroll through a list of preset number labels or status labels, to scroll through an
SDM or to edit an SDM.
●
TX
Transmit
Your radio is transmitting. This indicator should appear each time you press
the PTT key.
WAIT
Wait
The network is in the process of setting up a call and is not yet ready for you
to begin speaking.
GO
Go
Your radio has established a call between you and another party and you
are now able to speak to them.
Scrolling
available
Your radio in alphanumeric preset number mode or in status label selection
mode and you are now able to scroll through a list of choices using the Up
and Down keys ( / ).
02/01 IPN: 409-20400-03
9
SVC
Service
This indicator has three functions:
On
: your radio has access to a network and is ready to make or accept calls.
Flashing
: your radio does not currently have access to a network. It is
attempting to find a site it is authorised to use, or it may be out of range of
a network signal.
Off
: your radio is in conventional mode.
10
02/01 IPN: 409-20400-03
Basic Operations
Switching the Radio On and Off
Switch the radio on by rotating the volume knob clockwise to about one third of its maximum
setting. You will feel a click as the knob leaves the ‘off’ position. The control head display then
shows a power-up message.
Switch the radio off by rotating the volume knob fully anticlockwise.
Your T2040
II
retains some settings when it is turned off. When you next turn it on, the radio
uses these settings.
Volume Control
A long press of the Function key ( ) toggles the confidence tone level between ‘normal’
and ‘quiet’. Press and hold the Function key for at least one second to hear a sample tone
from the speaker (similar tones are emitted by the radio during normal use1).
Repeat this action to hear the same tone at the alternative level (normal or quiet), and select
your preferred tone level. Adjust the volume knob for comfortable listening.
Note:
If the Function key ( ) is programmed to operate an auxiliary device, it may not
be able to change the tone level as well.
You may need to finally adjust the volume when you receive your first call.
Checking Network Access
Check that the SVC indicator appears in the bottom of the display window within a few seconds
of power-up.
This shows that your radio has logged on to the network. If the SVC indicator is flashing, you
may be out of the coverage area of your network. If this is not the case consult your Tait
dealer.
1The T2040
II
has either the MPT or ‘Tait-standard’ set of tones available. One set is selected during programming. This man-
ual refers only to the ‘Tait-standard’ tones.
02/01 IPN: 409-20400-03
11
Making a Call
There are four different ways of making a call using your T2040
II
:
1Enter the full number of the required party using the alphanumeric keypad and then
press either the Hash key ( ) or PTT key to send the call.
2Enter short dial preset numbers using the alphanumeric keypad and then press the
Hash key ( ) or PTT key to send the call.
3Use the Despatcher key ( ) or Function key ( ). These keys can be assigned
preprogrammed numbers and used for one touch calling. The Despatcher key ( )
is usually programmed to be your base despatcher.
4Press the Alphanumeric key ( ) to enter alphanumeric mode. Use the Up and
Down keys ( / ) to scroll through a list of labels, until the label of the required
party is shown in the display. Press the Hash key ( ) or PTT key to send the call.
(See
“Advanced User Operations”, on page 15 for more information on alphanumeric
dialling.)
Note:
The TX indicator illuminates each time you operate the PTT key.
Call Setup and Transmission
You may hear call set-up tones,
pip.. pip.. pip
.., and the WAIT indicator illuminates. When the
called unit rings, the tone changes to
buzz, buzz... buzz, buzz
.... If the network accepts your
call but cannot connect it immediately, you hear a similar tone to the call setup tone, but lower-
pitched,
pip.. pip.. pip.. pip
, and the WAIT indicator flashes.
When the called party answers, the WAIT indicator turns off, the tones stop and the GO indicator
illuminates. Proceed with the call as follows:
1Lift the microphone off its hook and hold it about 5 cm from your mouth.
2Squeeze the PTT key and speak clearly into the microphone. Release the PTT key
when you have finished talking.
3End the call by placing your microphone back onto its hook or by pressing the Clear key
().
The network may also end the call if neither you nor the other party transmits for a pre-
determined time.
Transmit Timer
Your T2040
II
is fitted with a preprogrammed timer to limit the maximum length of transmis-
sions. Your radio sounds five tones, beginning eight seconds before the call is automatically
‘cleared down’. You must release the PTT key before proceeding.

12
02/01 IPN: 409-20400-03
Requesting a Call from your Despatcher
Note:
Your radio needs to be programmed to call your despatcher for this function to
operate.
Press the Despatcher key ( ). If the call is accepted, you hear a single high-pitched tone,
peeeeee
, lasting three seconds. This places your call in the despatcher’s queue and the
despatcher will call you back as soon as possible.
If the call is not accepted, you hear a single low-pitched tone,
brrrrrrr
, and one of the ‘call fail’
messages is displayed.
Unanswered Calls
If you make a call and receive no reply from the called party within a short time, your radio
sounds tones and displays the following messages:
Returning an Unanswered Call
A call which you are unable to answer within a period determined by the network becomes an
‘unanswered call’. The ringing tone changes to a high pitched
chirp
. The DESPATCHER indicator
may illuminate and the number of unanswered calls is shown on the left of the display. The
calling party number shows on the right of the display, in the same way as a received call is
displayed. Any further calls are now queued.
1Press the PTT key to call the party shown on the display, or
2Use the Up and Down keys ( / ) to scroll through the call list and choose an
unanswered call. Press the PTT key to make the call.
3To clear an unanswered call from the queue of calls, without calling the party back,
scroll through the list of unanswered calls using the Up and Down keys ( / )
until that call is displayed, then press the Clear key ( ).
Message displayed Tone Called party Action
ENGAGED
broken low pitched
tone
The called party is engaged on
another call or does not accept
your call.
call again later
NOT HOME
single low pitched
tone
The called party’s radio is
turned off or out of range of the
system.
call again later
SYS BUSY
(system busy)
single low pitched
tone
The network is too busy to
handle the call request at this
time.
call again later
N/U
(number unobtainable)
single low pitched
tone
The dialled number you have
entered is not supported by the
network.
check the
number you
have dialled

02/01 IPN: 409-20400-03
13
Receiving a Call
When you receive an incoming call, your radio alerts you with a ringing tone like a telephone
and the identity of the calling party is displayed, as follows:
Depending on your network and how your T2040
II
is programmed, you can respond to the
call as follows:
1You can accept the call by lifting the microphone off its hook or momentarily pressing
the PTT key.
You then hear the call set-up tone,
pip.. pip.. pip..
, and the WAIT indicator illuminates
briefly before the ‘call ready’ GO indicator illuminates.
Alternatively, if you do not want to accept the call, press the Clear key ( ) and the
call is then cancelled.
2When your radio receives an incoming call, two short tones,
beep, beep
, sound from the
speaker and the GO indicator illuminates. Answer the call by lifting the microphone off
its hook. No further tones will be heard.
Group Calls
If the incoming call is a group call, you hear a single ring and then the caller broadcasts a
message to all members of your group. It is not normally necessary to reply.
Re-establishing a Call
When a call has been ended and no other function is active, your T2040
II
displays the identity
of the last party called. This enables you to easily re-establish a call.
Message displayed Example Explanation
Label VEHICLE7 The calling party is one of the preset numbers with a label
programmed in your radio.
Preset number 8The calling party is one of the preset numbers without a
label programmed in your radio.
Identity number 20-89 The calling party is in the same fleet as your radio but is
not preprogrammed.
System message OFLT Out Of Fleet: the calling party is not in the same fleet as
your radio and is not preprogrammed.
System message PHONE Call from the PSTN (Public Switched Telephone Network)
System message PABX Call from the PABX (Private Automatic Branch Exchange)
G + message Group call
E +message Emergency call

14
02/01 IPN: 409-20400-03
Last Incoming Caller
Re-establish a call to your last incoming caller as follows:
Note:
This option must be enabled during radio programming.
1When an incoming call that you have accepted is terminated, the call-back facility
stores the caller’s number in a special memory, so that you can return the call. As you
hang up, this is shown by the message “CBK”, together with the identity of the calling
party.
2Briefly squeeze the PTT key. You may hear call set-up tones,
pip.. pip.. pip
.., and the
WAIT indicator illuminates. When the called unit rings, the tone changes to
buzz, buzz
...
buzz, buzz
.... When the called party answers, the WAIT indicator turns off, the tones
stop and the GO indicator illuminates.
3Proceed with the conversation, or discard the incoming caller’s number by pressing the
Clear key ( ).
Last Called Party
Re-establish a call to your last called party as follows:
1Your T2040
II
remembers the last number you called (as opposed to the number of a
party who called you), and it is displayed when no other function is active.
2To redial this party, press the PTT key.
3You may hear the call set-up tones and you can proceed with the conversation after the
GO indicator illuminates.
Emergency Operation
Your T2040
II
can be set up to make an emergency call to a preprogrammed party (usually
your base or despatcher). This facility may be accessible via a switch fitted externally to the
radio.
1To make an emergency call, operate the hidden switch. This will cause no change to
the front panel indicators of the T2040
II
, but the radio calls the pre-programmed party.
The radio then adopts a transmit/receive cycle which allows the base or despatcher to
monitor activity in the vicinity of the radio.
2To remove the radio from emergency mode, turn the radio off and back on, without
operating the emergency switch.
02/01 IPN: 409-20400-03
15
Advanced User Operations
Many of the advanced operations detailed in this section must be enabled during program-
ming of the T2040
II
. Consult your Tait dealer to find out which of these features have been
enabled in your radio.
Alphanumeric Entry Mode
Your T2040
II
can be programmed with up to 100 preset numbers, each of which can be
accessed from the keypad using an alphanumeric label of up to eight characters. The label
may be a person’s name, a radio’s name, a group name or an acronym which helps you find
the appropriate preset number. Each preset number may contain a complete trunking call
setup message, including status calls.
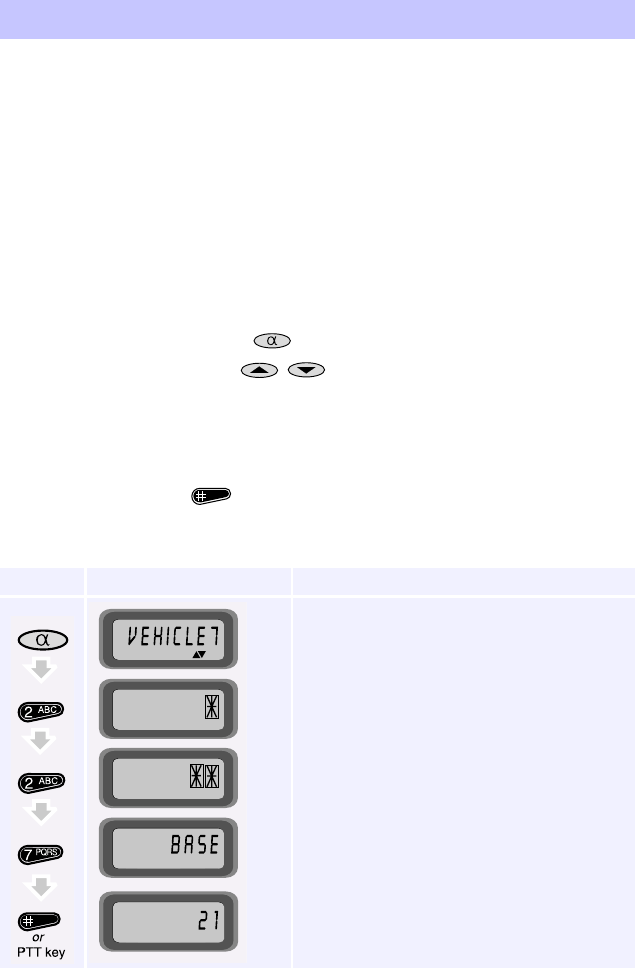
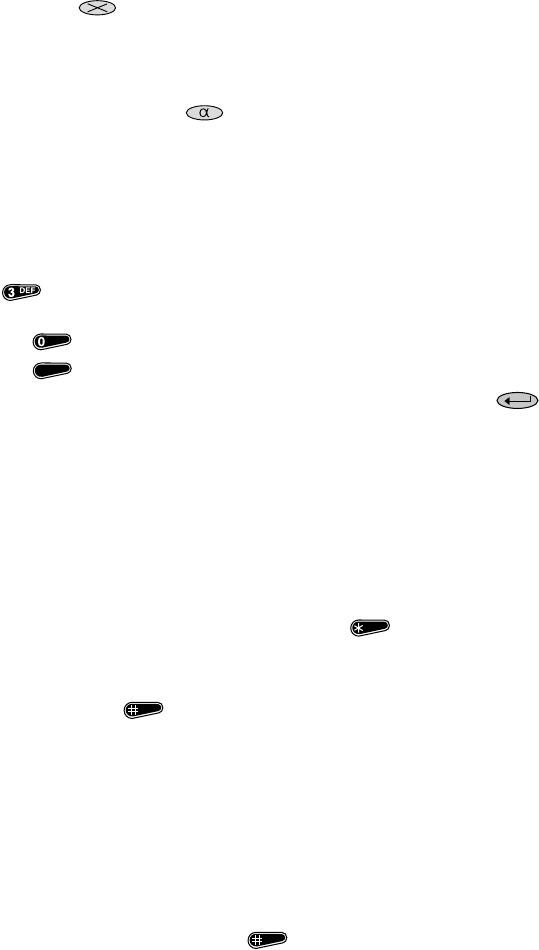
To select a preset number by its alphanumeric label, proceed as follows:
1Press the Alphanumeric key ( ) to enter alphanumeric entry mode.
2Use the Up and Down keys ( / ) to scroll through the list of labels and choose
one for the required preset number, or enter the label of the required preset number,
using the keypad.
A star appears in the display as you type each character, until the radio recognises the
label. The label is then displayed in full.
3Press the Hash key ( ) to make the call to the selected label.
Example:
You wish to call your BASE. The sequence of keystrokes and the corresponding
display characters that appear, is as follows:
Press key Characters displayed Explanation
Most recent selection displayed
Label not yet identified
Label not yet identified
New label identified
BASE is called and its number is displayed after
the call

16
02/01 IPN: 409-20400-03
Call Queuing
If you need to leave your T2040
II
unattended, incoming calls can be saved as ‘call-back’
messages for you to return later. All calls except group calls, PABX and PSTN calls can be
queued, as follows:
1Enter
-
--
-
48
6
66
6
using the keypad, or keep the Despatcher key ( ) pressed until the
DESPATCHER indicator illuminates.
Incoming calls from other radios are now queued by your radio. The display shows the
number of queued calls on the left and the identity of the calling party on the right, in
the same way as a received call is displayed. The most recent call is displayed until you
scroll through the queue.
2Press the PTT key to call the party shown on the display, or
3Use the Up and Down keys ( / ) to scroll through the calls and choose an
unanswered call from the queue. Press the PTT key to make the call.
4To clear a queued call from the queue without calling the party, select it and press the
Clear key ( ).
5To disable call queuing, enter
6
66
6
48
6
66
6
using the keypad, or keep the Despatcher key
( ) pressed until the DESPATCHER indicator turns off.
Incoming calls are now received normally. The call queue remains intact and you can
reinstate call queuing at any time.
Note:
With call queuing enabled, it is still possible to make calls by dialling any number, using
the keypad.
Changing Trunked Networks
The T2040
II
can operate in two completely separate trunking networks. To do this, the radio
must be programmed with the parameters of each network. You may wish to change networks
because you are out of reach of the current network (the SVC indicator is flashing) or you need
to have access to the second trunking network.
1Press
-
--
-
700
6
66
6
to display the name of the current trunked network.
2Press
-
--
-
701
6
66
6
to change to network 1 or
-
--
-
702
6
66
6
to change to network 2, or
3If your radio has preset labels programmed to change networks, press the Alphanu-
meric key ( ) and use the Up and Down keys ( / ) to find the name of
the new network. Briefly press the PTT key or the Hash key to ( ) initiate the
change.
The radio displays the name of the new network, followed by a power-up message.
4Check to see that the SVC indicator appears within a few seconds. If it keeps flashing,
you may be out of the coverage area of this network.
02/01 IPN: 409-20400-03
17
Despatcher Operation
The T2040
II
may be used for despatcher operation, mounted on top of its companion T2008
power supply, as shown below.
Note:
If your T2040
II
is to be used as a despatcher, this must be enabled during programming.
1The radio powers up in despatcher mode. To see the normal display give a long press
the Despatcher key ( ).
2To return to the despatcher display, give a long press the Despatcher key again.
The procedure for viewing and returning calls is identical to that outlined in “Call
Queuing”, on page 16.
Incoming despatcher calls are appended to the bottom of the call queue, whether the radio is
in normal or despatcher mode. Normal calls to your radio, group calls, PSTN calls and some
other calls are not queued, and request immediate despatcher attention.
If the despatcher’s call queue is empty when a call is received, the radio emits a continuous
tone,
chirp..... chirp
, which may be stopped by returning the call or by pressing any of the
radio’s keys.
It is still possible to make calls by dialling any number using the keypad.
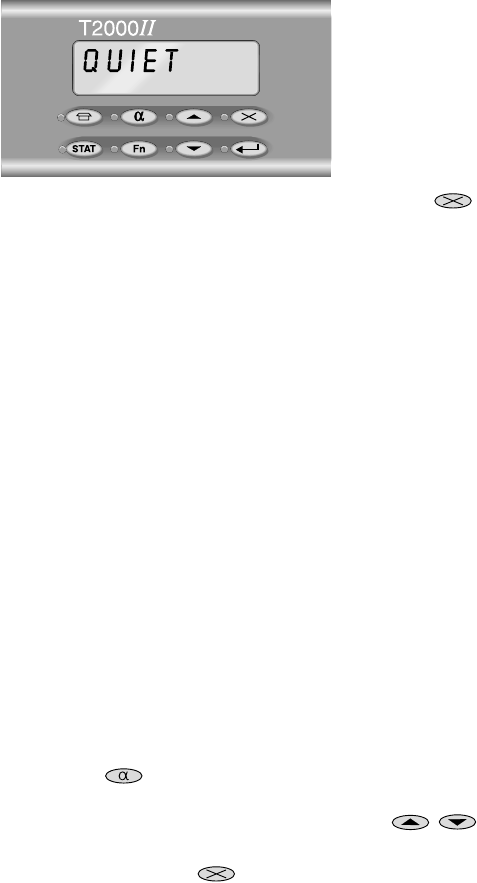
Do Not Disturb
If you do not want to accept any calls for a while, the radio can be placed into a ‘do not disturb’
mode. Note that it is not possible to have call queuing and ‘do not disturb’ active at the same
time. Enabling call queuing automatically clears the ‘do not disturb’ facility.
1To set ‘do not disturb’ on, enter
-
--
-
49
6
66
6
using the keypad. The radio displays the
message “QUIET”.
All calls are now rejected and the calling party is notified that you are currently not to
be disturbed. The calls will not be put in the call queue.
T2008 power supply
T2040
II
radio
18
02/01 IPN: 409-20400-03
2To clear ‘do not disturb’, enter
6
66
6
49
6
66
6
using the keypad, or press the Clear key ( ).
The “QUIET” message is removed, and the radio returns to the mode it was in previously.
Note:
With ‘do not disturb’ enabled, it is still possible to make calls by dialling numbers using
the keypad.
Economy Mode
The T2040
II
incorporates an economy mode, which is activated after a pre-determined period
of inactivity. Some internal circuitry and the back-lighting for the display, function and channel
keys is turned off, to conserve battery power.
To restore power:
1Operate any of the front panel controls or the PTT key.
2If the radio receives a call, the radio is restored to full activity.
Short Data Messages (SDMs)
Your T2040
II
radio can be used to receive and send Short Data Messages (SDMs). For
example, numeric reference codes and alphanumeric status text can be sent between
T2040
II
radios.
Receiving an SDM
An incoming SDM is put in the call queue and the message “M” appears on the left of the
display, with the callers identity on the right. The STATUS indicator illuminates and the ALPHA-
NUMERIC indicator flashes.
1Press the Alphanumeric key ( ) to view the message. If an SDM contains more
than eight characters (the amount that can be displayed at one time), the UP and DOWN
indicators illuminate, indicating that you can use the Up and Down keys ( / )
to scroll through the whole message.
2To clear the message, press the Clear key ( ).
3Press the Alphanumeric key again to return the radio to its previous state.
Note:
An SDM will be displayed only if your radio firmware supports short data messaging.
02/01 IPN: 409-20400-03
19
SDM Entry Mode
Give a long press of the Status key ( ) to enter SDM entry mode. The STATUS indicator
flashes intermittently and the last message sent is displayed, flashing. If you have not sent an
SDM before, a cursor flashes on the right-hand side of the display.
The SDM can comprise a maximum of 25 characters, including a combination of the following:
Enter the message as follows:
1Specify the characters to be sent using the radio’s alphanumeric keypad.
As you press each key, the corresponding
character is added to the right-hand side of
the display and the previously-entered
characters (if any) are moved one place to
the left. The flashing cursor remains at the
point of entry on the right-hand side of the
display, as shown.
2If you make a mistake while specifying the SDM, the following keys can be used to
correct the entry:
◆
When the UP indicator is illuminated, you can use the Up key ( ) to move the
cursor to the previous character (to the left) in the message. Press the key
repeatedly to move the cursor to the beginning of the message.
When the first character in the message is selected, the UP indicator turns off, to
indicate that there is no previous character to select. An audible tone is emitted to
confirm this, if the key is pressed.
◆
When the DOWN indicator is illuminated, you can use the Down key ( ) to move
the cursor to the next character (to the right) in the message. Press the key
repeatedly to move the cursor to the end of the message.
When the last character in the message is selected, the DOWN indicator turns off, to
indicate that there is no next character to select. An audible tone is emitted to
confirm this if the key is pressed.
◆
The currently selected character can be exchanged for a different character either
by:
- entering the required numeric character, if the character is a number, or
- specifying the required character and then pressing the Enter key ( ), for an
alphabetic character.
In both cases, the cursor is advanced to the next character in the message, or a
blank space is inserted if the character is the last in the message, and further
characters can be added.
◆
numbers (0 to 9) Entered using the alphanumeric keypad in the usual
way.
◆
alphabetic characters (A to Z)
dash (—)
character space ( )
Entered only while alphanumeric entry mode is active.
20
02/01 IPN: 409-20400-03
◆
The currently selected character can be deleted from the message by pressing the
Clear key ( ).
Using Alphanumeric Entry Mode
Alphabetic characters can be included in the SDM as follows:
1Press the Alphanumeric key ( ) to enter alphanumeric entry mode.
While alphanumeric entry mode is active, the ALPHANUMERIC indicator is illuminated
and the alphabetic characters marked on the keypad are now available for inclusion in
the SDM.
2Specify the required alphabetic character by using the alphanumeric keys, as follows:
◆
Pressing a key with three or more alphabetic characters toggles it between the
values shown on the keypad and a blank space. For example, a single press of the
key selects D, two presses selects E, three presses selects F and four
presses selects 3. A further press of the key selects a blank space.
◆
The key toggles between a 0 and a blank space.
◆
The key toggles between a 1, a dash and a blank space.
3Once the required character is displayed, select by pressing the Enter key ( ).
The selected character is then moved one place to the left, and the flashing cursor
remains at the point of entry, ready to accept the next character.
Alternatively, the displayed character can be selected by pressing a different Alphanu-
meric key. While this method is quicker that using the Enter key, it can be used only
when the next character does not require the use of the same key.
An alphabetic message can be edited in the same way as a numeric message.
Sending an SDM
1Once the SDM has been entered, press the Star key ( ).
2Enter the number of the party to whom you wish to send the message, either in the
same fleet, or inter-fleet.
3Press the Hash key ( ) to make the call.
The SDM is transmitted and SDM entry mode is exited. The STATUS indicator turns off
and the display shows the most-recently transmitted valid call. The SDM is stored and
is displayed next time SDM entry mode is activated.
Note:
An SDM will only be displayed on the receiving radio if that radio has firmware support-
ing short data messaging.
Exiting SDM Entry Mode
SDM entry mode can be exited manually and automatically under the following conditions:
1Manually, by pressing the Hash key ( ) to send a message (see “Sending an
SDM”.
1
02/01 IPN: 409-20400-03
21
2Manually, by giving a long press of the Status key ( ).
SDM entry mode is exited, the STATUS indicator turns off and the display shows the
most-recently transmitted valid call. Any unsent message is discarded.
3Automatically, if the ‘do not disturb’ function is not active and a call is received during
SDM entry. In this event, the radio exits from SDM entry mode to process the incoming
call. The ‘do not disturb’ function can be enabled if incoming calls are to be ignored.
4Automatically, upon a receipt of an incoming SDM.
5Manually, by pressing the Despatcher ( ) or the Function key ( ). If the
pressed key is programmed with a preset call message, the radio exits from SDM entry
mode to place the call. If the key is not programmed, the message “UNAVAIL” is
displayed, an audible tone is emitted and SDM entry mode is exited.
Status Calls
Status calls permit rapid exchange of simple messages without voice conversation. Your radio
can have messages such as “EN ROUTE” or “AT LUNCH” preprogrammed.
Receiving a Status Call
Incoming status calls are always put in the call queue. A status call in the queue is shown with
the status value (1-30) on the left of the display and the caller’s identity on the right. The
STATUS indicator also illuminates.
If the ALPHANUMERIC indicator is flashing, there is an alphanumeric label associated with the
displayed status call. Press the Alphanumeric key ( ) to view the status label. When the
Alphanumeric key ( ) is pressed again, the radio reverts to its previous state.
Making a Status Call
Status calls can be made by dialling (refer to “Short Data Messages (SDMs)”, on page 18) or
by using the alphanumeric labels that are associated with a status message.
Your radio can be programmed with up to 30 possible status numbers, which can be accessed
from the keypad using an alphanumeric label of up to eight characters. The label may be a
message, a job name or an acronym which helps you find the appropriate status message.
1Press the Status key ( ) and use the Up and Down keys ( / ) to scroll
through the list of labels.
2Press the Hash key ( ) to send the status message associated with that label to
your despatcher, or
3To send the selected status message to another party, press the Star key ( ) and
select the party to whom you wish to send the status call. This can be done either by
using alphanumeric entry mode (see page 15) or by entering the party’s call number,
using the keypad.
4Press the Hash key ( ) to make the call.

22
02/01 IPN: 409-20400-03
Trunking Call Set up and Special Functions
Some of the functions listed below may be unavailable on your network, and some may need
to be enabled during radio programming. For more information about the facilities available
on your radio, consult your Tait dealer.
Note:
The
6
66
6
terminator is not necessary if you press the PTT key instead.
Most Common Trunking Call Setup
MPT1343
ANN Fleet Calls
Note:
See your network operator for ANN call details.
Preset Numbers and Conventional Channels
Note:
Where preset numbers are the same as call setup numbers, leading zero’s have to be
dialled for the preset numbers, i.e. dial 23
6
66
6
for radio 23 and dial 023
6
66
6
for preset 23.
Dialling Code Call to Example
0PSTN Number 0 03 3583399
6
66
6
20...89 Radio in own fleet 23
6
66
6
200...899 Radio in own fleet 234
6
66
6
2001...6050 Radio in another fleet 3078 23
6
66
6
or 3078 234
6
66
6
200...327 Radio in another fleet 300 3078 23
6
66
6
90...99 Group in own fleet 92
6
66
6
900...999 Group in own fleet 923
6
66
6
Fleet Size Call to Example
Large Radio 234 in Fleet 1 (same prefix) 7 1 234
6
66
6
Radio 235 in Fleet 2 (other prefix 32) 7 32 2 235
6
66
6
Medium Radio 23 in Fleet 51 (same prefix) 7 51 23
6
66
6
Radio 23 in Fleet 52 (other prefix 126) 7 126 52 23
6
66
6
Small Radio 23 in Fleet 80 (same prefix) 7 (8 or 9) 80 23
6
66
6
Radio 23 in Fleet 81 (other prefix 3) 9 3 81 23
6
66
6
101...110 Conventional Channels 101
6
66
6
0...99 Preset Strings 9
6
66
6
or 009
6
66
6

02/01 IPN: 409-20400-03
23
Most Common Special Trunking Functions
1
“-
--
-...6
66
6” Functions:
2
“6
66
6...6
66
6” Functions:
Dialling Code Function Example
-
--
-
0
6
66
6
Request Base Despatcher Callback
-
--
-
0
6
66
6
-
--
-
0
-
--
-
nnn
6
66
6
Request another Despatcher Callback
-
--
-
0
-
--
-
234
6
66
6
-
--
-
0ss
-
--
-
nn
6
66
6
Status Call (ss = Status 01 to 30)
-
--
-
015
-
--
-
23
6
66
6
-
--
-
1
-
--
-
nn
6
66
6
Conference Call to Group nn
-
--
-
1
-
--
-
92
6
66
6
-
--
-
11
-
--
-
nn
6
66
6
Broadcast Call to Group nn
-
--
-
11
-
--
-
923
6
66
6
-
--
-
31
-
--
-
nn
6
66
6
Non-prescribed Data Calls
-
--
-
31
-
--
-
23
6
66
6
-
--
-
41
-
--
-
nn
6
66
6
Divert Own Calls to Radio nn
-
--
-
41
-
--
-
23
6
66
6
-
--
-
41
-
--
-
0nn...
6
66
6
-
--
-
44
-
--
-
nn
-
--
-
mm
6
66
6
Divert Own Calls to PSTN nn
Divert 3rd Party Calls nn to mm
-
--
-
41
-
--
-
00335...
6
66
6
-
--
-
44
-
--
-
23
-
--
-
21
6
66
6
-
--
-
48
6
66
6
Queue Incoming Calls
-
--
-
48
6
66
6
-
--
-
49
6
66
6
Do Not Disturb
-
--
-
49
6
66
6
-
--
-
700
6
66
6
Display name of the current network
-
--
-
700
6
66
6
-
--
-
70n
6
66
6
Change to network n (1 or 2)
-
--
-
701
6
66
6
-
--
-
8
-
--
-
nn
6
66
6
Priority Call to Radio nn
-
--
-
8
-
--
-
23
6
66
6
-
--
-
8
-
--
-
1
-
--
-
9n
6
66
6
Priority Conference Call to Group nn
-
--
-
9
-
--
-
1
-
--
-
923
6
66
6
-
--
-
9
-
--
-
nn
6
66
6
Emergency Call to Radio nn
-
--
-
9
-
--
-
23
6
66
6
-
--
-
9
-
--
-
1
-
--
-
9n
6
66
6
Emergency Conference Call to Group nn
-
--
-
9
-
--
-
1
-
--
-
92
6
66
6
--
----
--
nn
6
66
6
Abbreviated Dialled Codes (1 - 49)
--
----
--
3
6
66
6
Dialling Code Function Example
6
66
6
0
6
66
6
Cancel Base Despatcher Callback
6
66
6
0
6
66
6
6
66
6
0
-
--
-
nnn
6
66
6
Cancel another Despatcher Callback
6
66
6
0
-
--
-
234
6
66
6
6
66
6
41
6
66
6
Cancel Own Call Diversion
6
66
6
41
6
66
6
6
66
6
44
-
--
-
nn
6
66
6
Cancel 3rd Party Call Diversion
6
66
6
44
-
--
-
23
6
66
6
6
66
6
45
6
66
6
Cancel Incoming Call Diversions
6
66
6
45
6
66
6
6
66
6
48
6
66
6
Cancel Queuing of Incoming Calls
6
66
6
48
6
66
6
6
66
6
49
6
66
6
Cancel Do Not Disturb
6
66
6
49
6
66
6

24
02/01 IPN: 409-20400-03
Optional Accessories for T2040II Radios
The following accessories are available for use with your T2040
II
radio:
◆
T2008 desk-top mains power supply
◆
Remote speaker
◆
DTMF microphone
◆
Desk-top microphone
◆
Six metre remote mounting kit
◆
CTCSS kit
◆
Scrambler kit
◆
Handsfree microphone with remote or voice-activated PTT key
◆
Single or dual port Uart kits, allowing computer control of your T2040
II
◆
600
Ω
line interface kit
Consult your Tait dealer for more details.
Appendix
Maintenance
The T2040
II
requires no regular maintenance, other than ensuring that all cables and connec-
tions are secure, and that no damage has occurred to the antenna or wiring.
Troubleshooting
If the front panel indicators do not light up when the radio is turned on, it is likely that no power
is reaching the T2040
II
. Check the following:
◆
Is the power connector firmly plugged into the rear of the T2040
II
?
◆
Are the in-line fuses in good condition?
◆
Is the power cable securely connected to the vehicle battery or power supply?
If all appears to be in order, then contact your Tait dealer for further assistance.