Tait TEL0053 Handheld Transceiver User Manual User guide
Tait Limited Handheld Transceiver User guide
Tait >
User guide

1
2
3
F1 F2 F3
1 2
To make
the call,
short
press:
To make
the call,
short
press:
Tait Orca
Trunked
Portable Radio
User Guide
Call Information
(a) Return call
(b) Read status / message
(b) Delete call (automatic if return call)
Select from list: who to call, status call, radio setting, radio mode.
Select status from list of status labels:
Select Site (control channel) from list:
Handset mode: on/off
Transmit at low power: on/off
Keypad lock: on/off.
Dual Tone Multifrequency (DTMF) mode: on/off
Squelch: city/country
Queue incoming calls: on/off. Maximum 20 calls
Quiet. Do not disturb: on/off
Dynamic power control: on/off (MPT1327)
Tones. Beeps: on/off
Level. Beep volume: high/low
Keytone. Keypress beeps: on/off
Night use mode: on/off
Adjust contrast of display
Resuming normal signal hunting
Software Database
Calibration
Hardware
Long press for Menu or exit Menu. When in Menu,
short press to Select or to Toggle a function e.g. on / off
Menu scroll keys: Forwards and Backwards
Clear, Cancel or Back in Menu.
PTT
Press PTT to talk.
Release PTT to listen.
Function Keys
Use a short press or
a long press to
operate the function
keys 1, 2, and 3.
Function
Key 1
Function
Key 2
Function
Key 3 or
Action List
Handset
Mode
Action List
Status Labels
Radio Configuration
Write your settings
Making Calls
Press PTT
to talk.
Release
PTT to
listen.
External Function
Keys 1 and 2
Emergency Call Numbers
PTT Lock. PTT is locked.
Presets display alphabetically
16-way Selector
100% Synthetic Paper: Waterproof, Strong,
Chemical Resistant, Recyclable. Solvent based ink.
Scroll in list:
Select
version
from list:
Inactivity
seconds
=
Use a standard pencil or ballpoint pen. No solvent based pens. To erase pencil use a rubber eraser. To erase ballpoint pen, use a water moistened cloth.
Lockon.
Keylock is on.
CL = Call
SCL = Status
MCL = Message
Send a status label to a user or the despatcher (not a group)
Status Label
Batteries
Use Tait Orca 5000 NiCd/NiMH batteries or
Tait Orca Elan/Excel/Eclipse NiCd/NiMH
batteries. For more information on batteries,
refer to the Battery User Guide.
IMPORTANT
Do not put Tait Orca 5000 batteries into
older battery chargers. Tait Orca 5000
NiCd/NiMH batteries are ONLY for Tait Orca
battery chargers with software version
2.07+.
Phonetic
Alphabet
Alpha A
Bravo B
Charlie C
Delta D
Echo E
Foxtrot F
Golf G
Hotel H
India I
Juliet J
Kilo K
Lima L
Mike M
November N
Oscar O
Papa P
Quebec Q
Romeo R
Sierra S
Tango T
Uniform U
Victor V
Whisky W
X-ray X
Yankee Y
Zulu Z Radio Identification
Radio Configuration
Your Tait Orca radio has been configured
for your requirements by your authorised
Tait Dealer or your company administrator.
Therefore, some functions will vary in
operation or will not be available. The
configuration information can be written
onto this User Guide. For more information
on trunking call functions, contact your
Network Operator.
Parts
If any parts are damaged or missing, report this
to your authorised Tait dealer immediately.
Disabled
Tones – Beep on / off
Dynamic Power Control on / off
Preset Call #1
Preset Call #2
Select Site (control channel) – 5040 only
Clear
Do Not Disturb (DND) on / off
Adjust Contrast of Display
Backlighting on / off
Night Use Mode on / off
Handset Mode on / off
Transmit at Low Power on / off
Monitor on / off
Keypad Lock on / off
DTMF mode on / off – 5040 radio only
External
Note: Function keys use a toggle action (A/B)
Short press is less than 1 second
Long press is more than 1 second
Volume
F3
Group Information
network # group # radio #
Presets
Select Network from list:
Menu
5035
Install the
Antenna
Install the
Battery
IMPORTANT
Long condition
the battery.
Refer to the
Battery Charger
User Guide.
Getting Started
Handset mode
Illustration shows
the recommended
method for use in handset
mode. Use the lower
microphone to speak.
Normal mode
Illustration shows the
recommended method
for use in normal mode.
Use the upper
microphone to speak.
Preset call numbers with label
Menu scroll keys:
Backwards Forwards
Antenna
Function
Key 1
Press to
Talk (PTT)
or Send
(make call)
Normal Microphone
Function
Key 2
Function
Key 3 or Action List
Handset Microphone
Alphanumeric Keypad
Menu, Select,
Toggle (A/B) or
Send (make call)
16-way Selector
On/Off and Volume
Speaker
Clear, Cancel or
Back in Menu
LED
Access to trunking network
Battery 100% charged
Battery 60% charged
Battery Low
DTMF Mode on
Monitor Mode on
Scroll
Handset
Mode on
A call is in the Queue
Transmit at normal power
Transmit at low power
No access to trunking
network, or unauthorised site,
or out of signal range.
Signal strength indicator.
Also for contrast indication.
Send (make call)
Manual Dialling
(20 maximum)
Call
Timer
Max.1W
Printed in New Zealand
First Use of Radio
Make
a call
Dynamic Power Control MPT1327
Automatically reduces the transmit
power in high signal strength areas.
Backlighting
When you press a key, the backlighting
is turned on. Turns off after 1 to 10
seconds of no activity.
Night Use mode
If on, the keypad backlighting is turned
on when there is activity on the channel
or if a scan group is selected. Turns off
after 1 to 10 seconds of no activity.
Modes
Radio to radio
Conventional Mode
Group Types
uUser Selectable Group
uScan Group
uUser Selectable plus Scan Group
uPermanent Group
uDynamic Group
uManual Group Select
Group Calls
Broadcast Call – Group members can listen
but not respond.
Conference Call – Group members can
listen and respond.
A user can be assigned to some groups,
all groups or no groups.
Trunked – Permanent groups are set by
the trunking system. Persons are assigned
when the radio is configured.
Temporary Groups
A user can become a member of a group
temporarily by selecting the group or when
the despatcher assigns the user to a group.
Group Call Limitations
Sender has no indication of how many
group members have received the call.
No connection acknowledgment. Need the
recipient to acknowledge by voice.
Radios that are off, out of range, or engaged
will not receive.
Group Numbering Scheme
User’s have an individual ID plus
membership in none, some or all of the
Group IDs.
Groups
5040
Engaged. Recipient is busy.
System is busy.
Queued. Recipient has queued your call.
Wait. System is busy but will
connect you as soon as possible.
Recipient has turned radio off
Recipient is in Quiet mode (do not disturb)
Recipient is out of range
Unavailable. Call is not permitted.
Unobtainable. Number is not supported.
Go. Call accepted. Press PTT to Talk.
Release PTT to listen.
Accepted. Call has been accepted.
Quiet. Do not disturb
Callback. Return call by
pressing PTT or Menu.
Call is from PABX
Preset call number without label OR same
fleet but not set as a preset call on your radio
Call is from different fleet
Call is from PSTN
Enter Security
PIN using
keypad
(personal
identification
number).
Handset mode
LED slowly flashes red
and green. Handset
icon is displayed.
Monitor mode
In conventional mode,
listen to all traffic and
all groups on a channel.
Manual Group Select
Users can select the groups that they want
to be assigned to using the 16-way selector.
Group Select
The despatcher controls which groups the
user is assigned to. This feature can be
dependent or independent of the position
of the 16-way selector, so that group control
from the despatcher can be ignored or
accepted.
Use a standard pencil or ballpoint pen. No solvent based pens. To erase pencil use a rubber eraser. To erase ballpoint pen, use a water moistened cloth.
Radio Configuration
Write your settings
The selector
uses the
presets
numbered
1 to 16.
Short Press Long Press
M50TK-000-00-050 M50TK-000-00-050
Queue:
Call # of #
Conventional
Mode
Control or
Traffic Channel
Caller ID
Display
to unlock
Menu
Use the Menu
to make a call
Keypad
Dial the number
or
Select the
Destination
(5040 radios only)
Cancel =
16-way
Selector
The selector uses
the presets
numbered 1 to 16
Example:
Turn
on radio then
adjust speaker
volume.
Example:
To make
the call,
short
press:
To make
the call,
short
press:
Short
press Long
press Short
press
or
Cancel =
Short
press
Long press
Short press
Example:
To make
the call,
short
press:
Delete queued calls.
Short
press Long
press
Short
press
Long
press
Long
press
Long press
to unlock
Long press to unlock
Short
press
Example:
Select the
Status Label
to immediately send to despatcher
Enter radio
number e.g. 211
Select the
Destination
Example:
Short
press
Short
press
Short press
Short
Press Long
Press
00 03 3583399 #
20 to 89 23 #
200 to 899 234 #
2001 to 6050 3078 23 # or 3078 234 #
200 to 327 300 3078 23 #
90 to 99 92 #
900 to 999 923 #
0 #
#0 #
0 NNN #
#0 NNN #
0SS NN #
0PP NNN #
1 NN #
11 NN #
31 NN #
41 NN #
#41#
41 0NN... #
#41#
44 NN MM #
#44 NN #
48 #
#48 #
49 #
#49 #
700 #
701 #
8 NN #
8 1 9NN #
9 NN #
9 1 9N #
NN #
#45 #
Tip
Dial your own number
for a test
MPT1343 Common Call Setup
Dialling String Call To Example
PSTN number
Radio in same fleet as you
Radio in same fleet as you
Radio in another fleet with same prefix as you
Radio in another fleet with different prefix to you
Group in same fleet as you
Group in same fleet as you
It is important for your safety and the safety of others to comply
with the following safety precautions:
uWhen transmitting, hold the radio microphone 25–50mm (1–2 inches) from your mouth.
uWhen transmitting, keep the antenna at least 25mm (1 inch) from any part of your
body, especially your face and eyes.
uTurn off the radio where radio waves could interfere with electronic devices.
uTurn off the radio at fuel/gas stations.
uTurn off the radio in an area where detonators/explosives are being used.
uTurn off the radio before boarding/leaving an aircraft and whilst on board an aircraft.
uDo not use the radio whilst driving vehicles or operating machinery.
uDo not use earphones or headsets at high volume levels.
uDo not transmit in frequency band 406 to 406.1 MHz. This band is reserved for use by
distress beacons.
uDo not put the radio, battery or accessories in liquids as they will be damaged.
uDo not allow children to play with the radio; it is not a toy.
Hazardous Atmospheres
uA hazardous atmosphere has the potential for fire or explosion from dusts, gases, liquids
and solids.
uTurn off the radio in hazardous atmospheres as an explosion or fire could occur, unless
the radio is qualified for use in such environments.
uDo not replace batteries in hazardous atmospheres as an explosion or fire could occur,
even if the radio is qualified for use in such environments.
uDo not use damaged radios in hazardous atmospheres as an explosion or fire could
occur. If the radio was originally qualified for use in such environments, the radio is not
qualified if it has a cracked casing.
uDo not modify the configuration of a radio that is qualified as intrinsically safe for use
in hazardous atmospheres. If you do, it will not be qualified.
Exposure to Radio Frequency Energy
The Tait Orca 5000 series radio generates and radiates radio frequency (RF) electro-magnetic
energy (EME). The Tait Orca 5000 series radio and accessories have been designed to
comply with international standards and guidelines.
Electromagnetic Interference
Turn off your radio where radio waves could interfere with electronic devices. Some facilities
use equipment that is sensitive to Electromagnetic Interference such as: hospitals, medical
centres, aircraft and some industrial facilities. Do not use your radio in these areas unless
the radio is qualified for use in such areas.
Safety Precautions
N = Number
Trunking Call Functions
Request base despatcher to call you back
Cancel
Request another despatcher to call you back
Cancel
Status call. SS = status 01 to 30
Status label to despatcher. PP = preset 00–99
Conference call to group NN
Broadcast call to group NN
Non-prescribed data calls
Divert own calls to radio NN
Cancel
Divert own calls to PSTN NN
Cancel
Divert third party calls from NN to MM
Cancel
Queue incoming calls
Cancel
Quiet. Do not disturb
Cancel
Display the name of the current network
Change to network 1 to 4 (701 702 703 704)
Priority call to radio NN
Priority conference call to group NN
Emergency call to radio NN
Emergency conference call to group NN
Abbreviated dialling codes 1–49
Cancel call divert from other user
ANN Fleet Calls
Fleet Size Call To Example
Large Radio 234 in Fleet 1 with same prefix as you 7 1 234 #
Radio 235 in Fleet 2 with different prefix i.e. 32 7 32 2 235 #
Medium Radio 23 in Fleet 51 with same prefix as you 7 51 23 #
Radio 23 in Fleet 52 with different prefix i.e. 126 7 126 52 23 #
Small Radio 23 in Fleet 80 with same prefix as you 7 (8or9) 80 23 #
Radio 23 in Fleet 81 with different prefix to you i.e. 3 9 3 81 23 #
LMS Dialling
Call Type Call To Example
Own fleet Radio 213 in Fleet 34 in same fleet as you 213 #
Interfleet Radio 215 in Fleet 36 (another fleet) 36 215 #
Interprefix Radio 217 in Fleet 38 (another fleet) of Prefix 202 202 38 217 #
Preset Numbers
Dialling String To Example
0 then 0 to 99 # Preset strings (leading zero) 069 #
Conventional Channels
Dialling String To Example
101 to 110 # Conventional channels 106 #
Accessory Use
5040
radio only
Earphones,
Palm
and Lapel
Microphones
Battery
Charger
6-Way
Multi-Charger
Battery
Antennas
Accessory
Connector Kits
D-Clip
Leather Carry Cases
Belt Loop
Car Kit
Accessory
Adaptors
Headphones
Servicing and Programming Kits
Speaker
Microphones
Accessories
Contact your authorised Tait Dealer
Carry Case
Belt Loop
Installing
the D-clip
Note for Accessories
To use the belt loop,
the accessory needs
the D-clip fitting.
For example: a lapel
microphone.
Using the
radio, lapel
microphone
and carry
case
PABX extension
or PSTN number
Calls can be sent or
received from Private
Automatic Branch
Exchanges (PABX) and
Public Switched
Telephone Networks
(PSTN). Dial the code
and number then # or
Menu. See your fleet
manager for the code.
You don’t need to dial
the area code if in the
same area code region.
DTMF
Dial Tone Multi-
Frequency. International
standard. Uses tones to
dial direct to a landline,
such as for commun-
icating with telebanking
systems. Turn on DTMF
in the menu then make
the call. To send A, B, C
or D commands, press
the PTT key whilst
pressing 2, 5, 8 or 0.
Remove by
peeling
apart
Install the
Belt Loop
Installing the
Radio and
Carry Case
Removing the Radio
and Carry Case
Rotate
the Carry
Case by
180
degrees
Slide the Carry
Case upwards
Unfasten
the Clip and
remove the
Radio
Install
the clip
Install
the
Radio
Install
the
Carry
Case
uYour radio does not require routine maintenance. However, it is a
sophisticated electronic device and should be treated with care.
u Clean the radio, accessories and charger weekly using a clean dry lint-free
cloth. When cleaning, do not use solvents, detergents, alcohol, aerosol sprays
or petroleum-based products.
uClean the electrical contacts on the battery and charger weekly, using a clean
dry Q-tipTM/cotton bud.
uDo not put the radio and accessories in fluids.
uDo not drop the radio onto hard surfaces, place it down carefully.
uDo not use if the radio, antenna or accessories are damaged.
uRepairs and modifications must only be carried out by a Tait approved dealer.
Looking after your Radio
Troubleshooting
uIs the radio turned on?
uIs the correct channel selected?
uIs the battery installed in the radio?
uIs the battery charged?
uIs the antenna damaged?
uIs the battery charger working properly?
If the display is blank after
turning on the radio and the
radio turns itself off
automatically after a few
minutes, it is likely there is no
power.
Radio is incorrectly configured.
Contact your authorised Tait
dealer or your company
administrator.
Contact your authorised Tait
dealer or your company
administrator.
Checklist
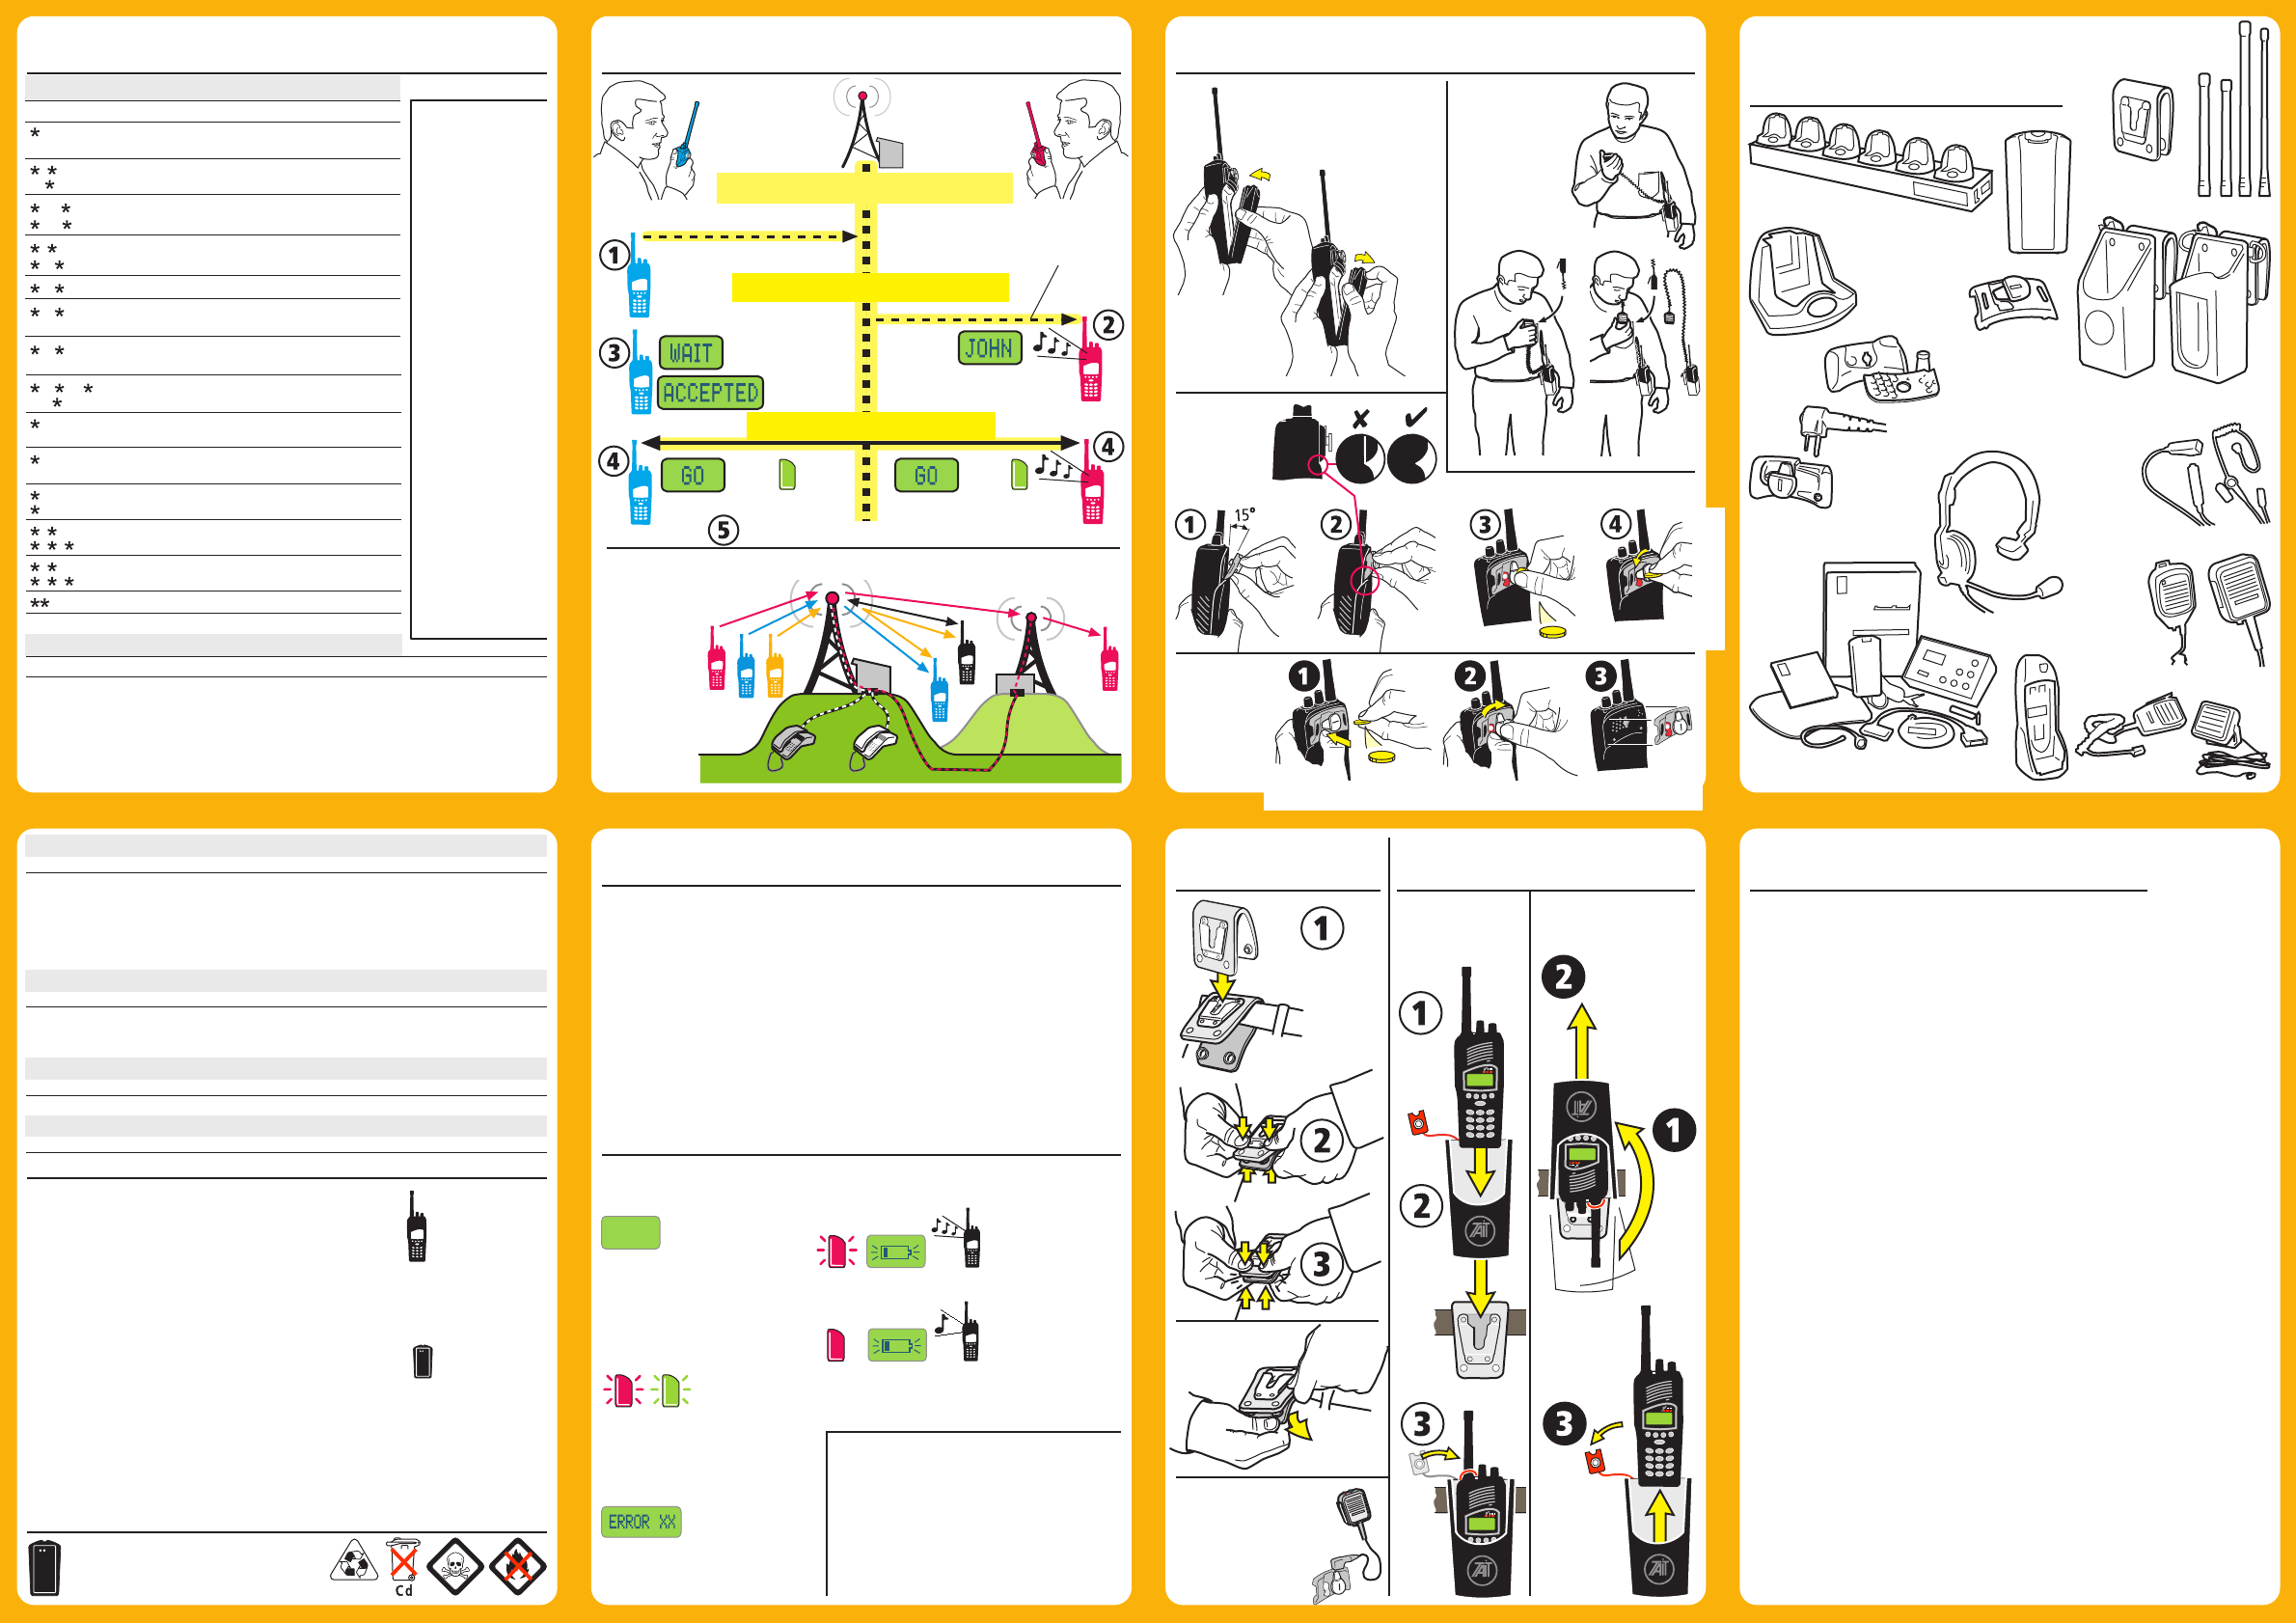
Trunking Mode
Trunking System Controller
Making
a Call Receiving
a Call
free Traffic Channel is selected
John
Sam
Press PTT to accept
call if FOACSU.
Sam
Traffic Channel is allocated
John
Control
Channel
Press PTT to talk. Release PTT to listen.
Dial or select number
Press PTT or # to make call
PABX PSTN
Trunking Site B
Telephone Landline
OACSU – on air-call setup
FOACSU – full off air-call setup
Call is
repeated by
transmitter or
landline
Group call
Radio to
radio
Radio to
or from
PABX/PSTN
Trunking Site A
Removing
the D-clip
Battery is low. Charge the battery.
Battery is too low to operate the radio.
Turn off the radio. Charge the battery.
Performance
To maintain the optimum performance of the radio:
uUse only the supplied antenna.
uUse only the radio and accessories for their design purpose.
uUse only accessories that are approved by Tait Electronics Ltd.
uAvoid high temperatures. If the temperature exceeds 80ºC (176ºF) the radio will make
two short high-pitched beeps and will not work. Temperatures above 90ºC (194ºF) cause
permanent damage to the radio.
To maintain the optimum performance of the battery:
uShort condition the battery weekly.
uLong condition the battery only for the following conditions: on first use, if performance
is poor, and after more than two weeks of storage.
uTurn the radio off when it is unattended for long periods.
uAvoid extreme temperatures as they damage the cell chemicals. The ideal temperature
range is 15º to 25ºC (59º to 77ºF).
uClean electrical contacts of the battery and charger weekly, using a clean dry Q-tipTM /
cotton bud.
uUse only Tait Orca 5000 series battery chargers with software version 2.07+.
Recycle
Recycle batteries that are of no use.
Contact your authorised Tait dealer for advice.
Trunking System
Installing
the Battery
Removing
the Battery
Common Trunking Functions
Dialling String Function