Taiyo A40827 R/C TRANSMITTER User Manual FALCON En cover p65
Taiyo Co., Ltd. R/C TRANSMITTER FALCON En cover p65
UserManual.wiki
>
Taiyo
>
A40827 User Manual
USERS MANUAL
Navigation menu
Upload a User Manual
Namespaces
Wiki Guide
HTML
PDF
Info
Views
User Manual
Discussion / Help
Navigation
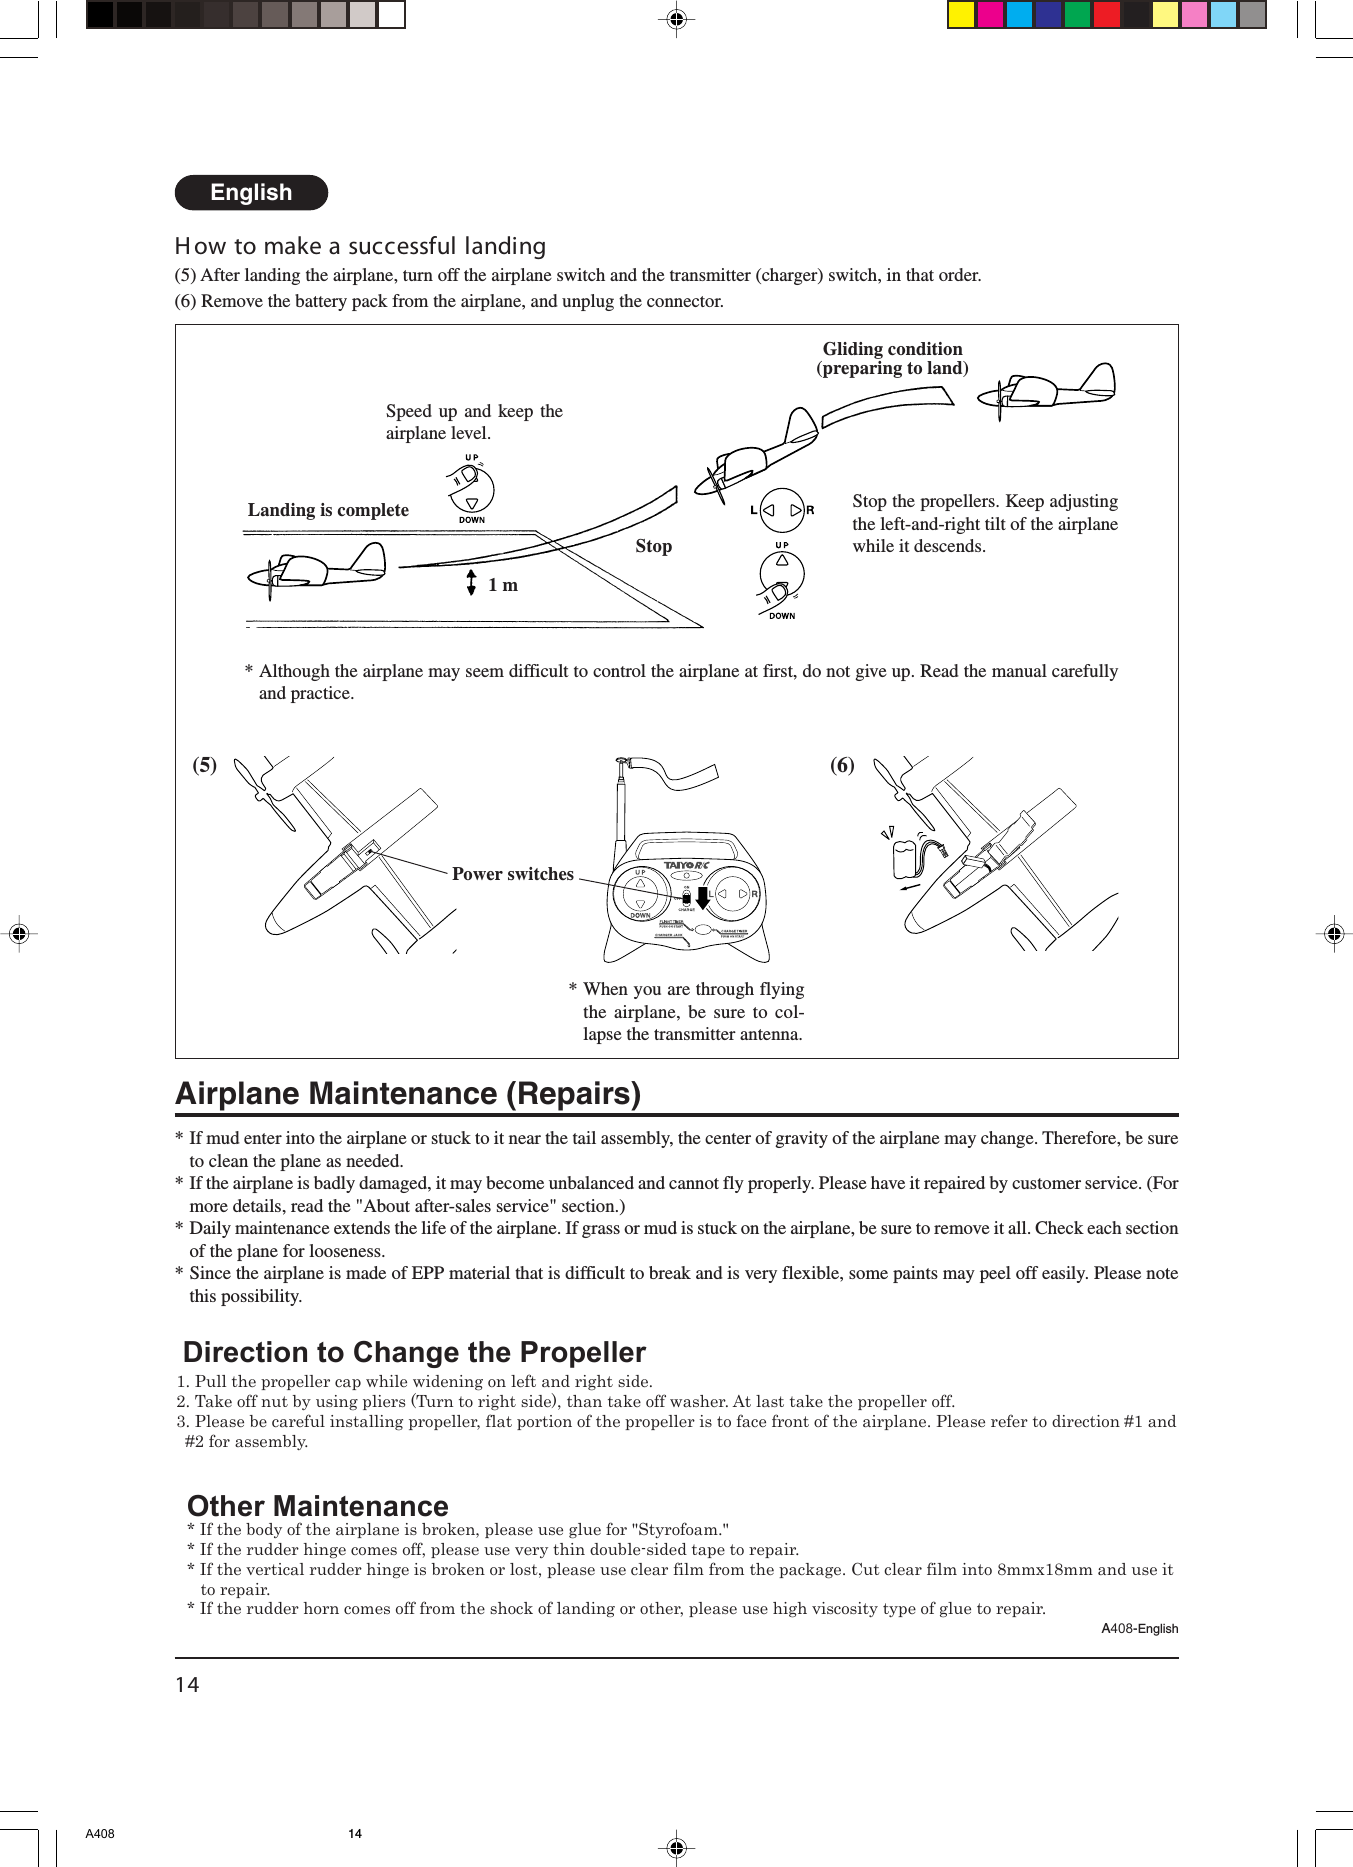
![English7IV How to Charge the Specialized 4.8V Ni-MH Battery Pack(1) Plug the specialized 4.8V Ni-MH battery pack connector into the connector jack on the lower part of the transmitter.(2) Move the power switch to the [CHARGE] side, and press the [CHARGE TIMER] button. A beep will be heard. The LED powerindicator lamp will flash to tell you that charging has started.(3) When charging is complete, two beeps will be heard. Then, the LED power indicator lamp will light, to tell you that charging iscomplete. Unplug the battery pack connector from the transmitter body.(4) Turn off the power to the transmitter (charger).BeepbeepBeepTo the customer:Be sure to move the main switch to the OFF position before moving the main switch to the ON or CHARGE position.The connector cannot be plugged in if the polarity and of the connector pins is reversed (the connector is keyed so that itonly goes in one way). Do not use force to plug in the connector. Check the orientation of the connector, and then plug it in.! CAUTION* This charger can only charge the specialized 4.8V Ni-MH battery pack. It cannot charge any other kinds of batteries.* Do not charge the battery pack near a fire or in any place exposed to high temperatures.* Do not leave the battery pack unattended while charging. This is so that you can stop charging if a problem occurs.* Never disassemble or modify the transmitter (charger).* After flying the airplane, be sure to remove the battery pack from the airplane and unplug the connector.* Never short-circuit the battery pack. A large current will flow and the battery pack will become very warm. It is very dangerous.* Recharging a battery pack that is already charged will make it too hot.* If the battery pack gets wet, stop using it immediately. The battery pack may be short-circuited inside, which may damageit. Wipe the battery pack until it is dry on the outside and then let it dry thoroughly in the shade before using it again.* When unplugging the connector, do not pull on the cord. Hold the connector itself to unplug it.* Never throw the battery pack into water or a fire. Do not disassemble it or try to solder it.* When the battery pack has been charged correctly, if the power in the battery pack results in reduced flying time, the batterymay have deteriorated. In this case, it may be difficult to recharge it. If this happens, replace the battery pack with a new one.* The battery pack can be recharged 200 - 300 times, in normal use.(1) (2) (3)A408 7](https://usermanual.wiki/Taiyo/A40827/User-Guide-394865-Page-7.png)
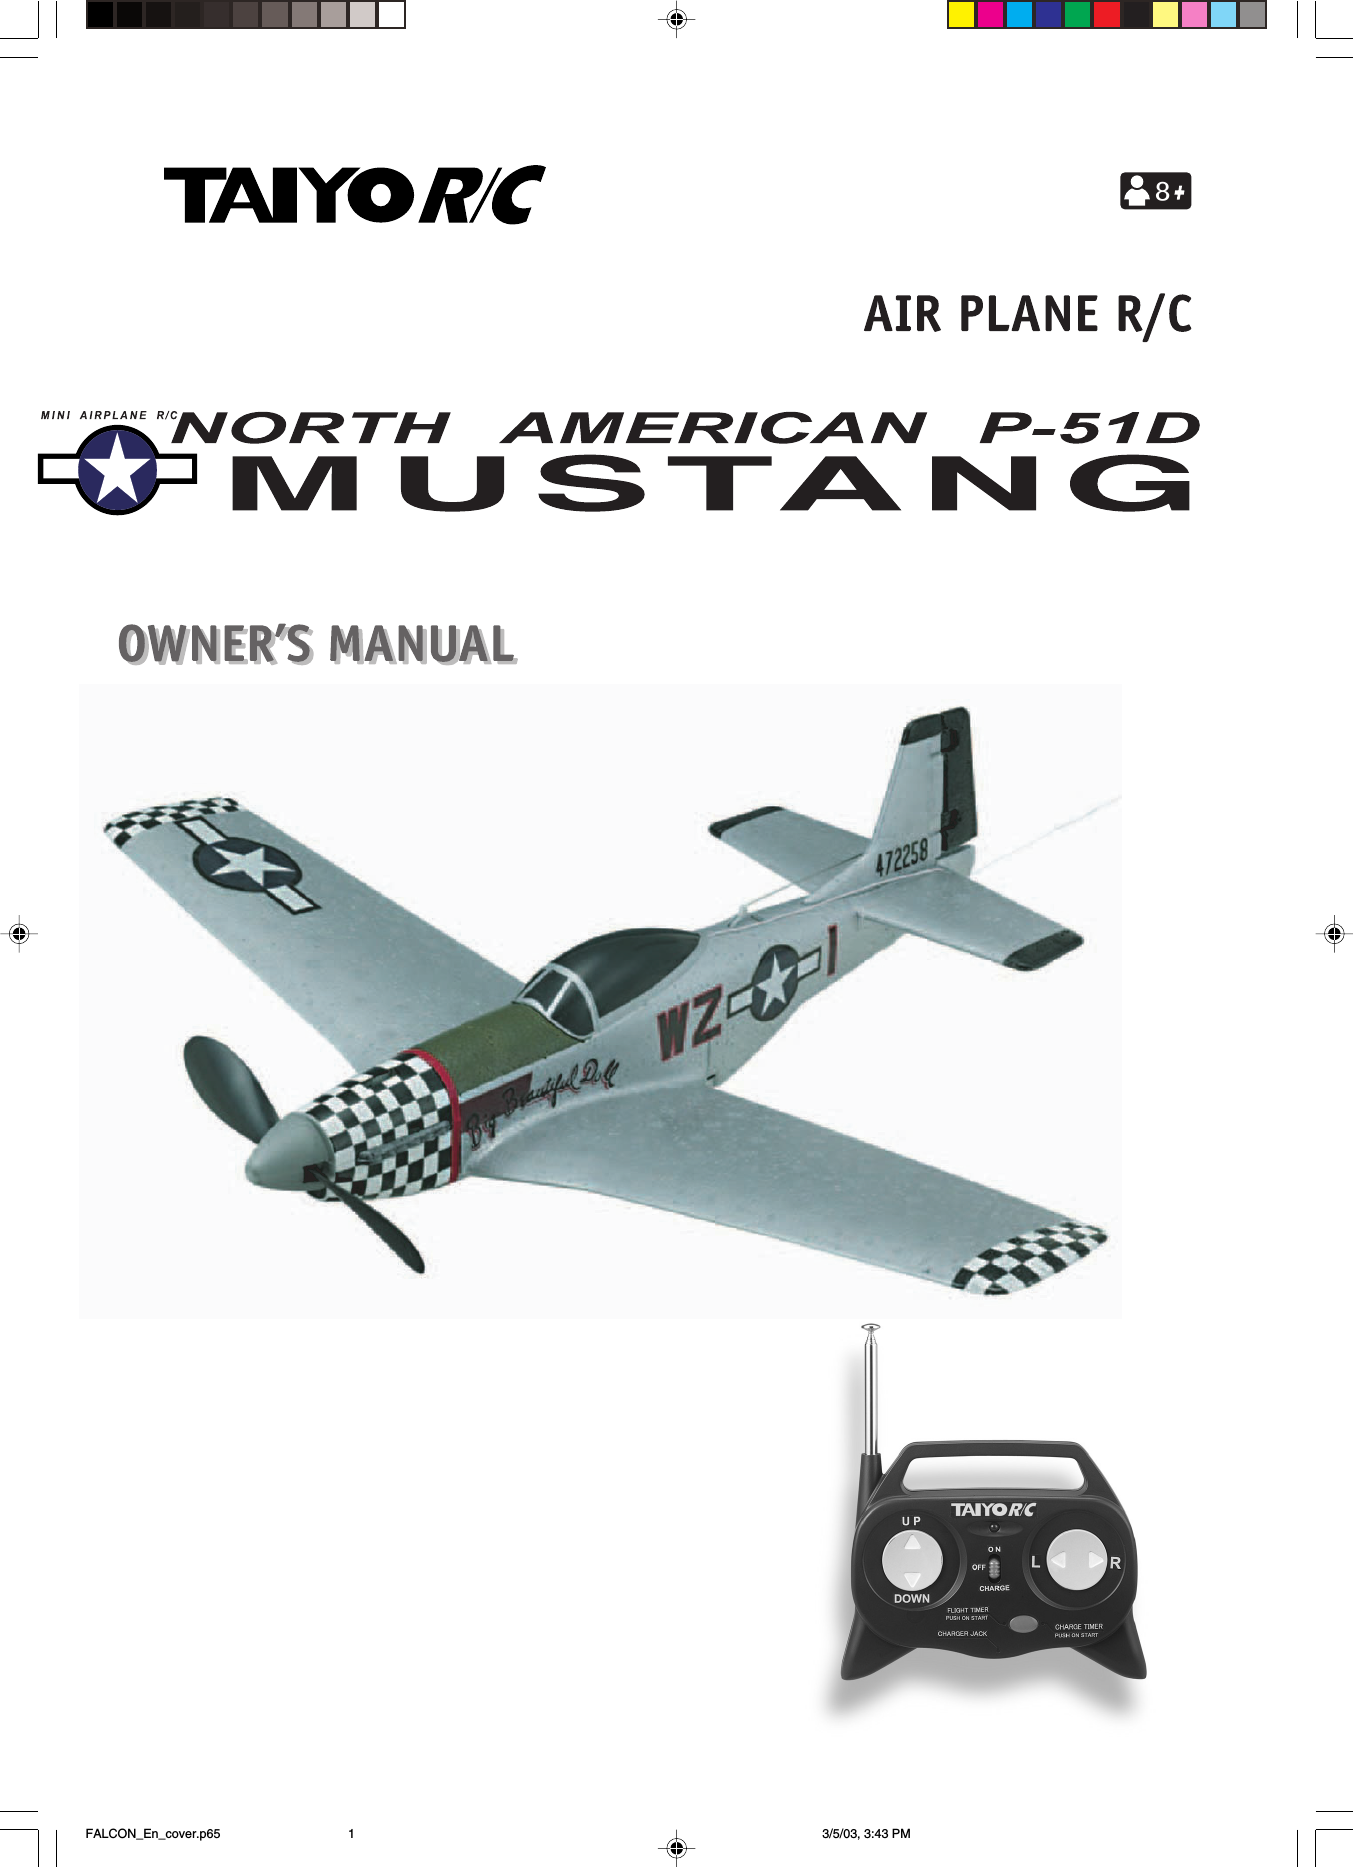
![English10Transmitter Functions<L button>When the L button isheld downThe airplane turns tothe left.Left turn(L button)<R button>When the R button isheld downThe airplane turns tothe right.Right turn(R button)<FLIGHT TIMER Button>When the [FLIGHT TIMER] button is pressed just before take-off, a beep will be heard and a countdown will be started. Whenthe flying time (battery life) is running short, two beeps will beheard to advise you to land the airplane. Try to land it safely. Thetotal flying time on one battery charge is about 1 minute and 30seconds. If the battery is run completely down, you can no longercontrol the airplane.! CAUTIONIf anyone is playing with a radio-controlled toy near you,check with each other about which frequencies are beingused. When you turn on the airplane switch, if the propel-lers start rotating, there is someone nearby using the samefrequency.<UP button>When the UP button isnot pressedStopWhen the UP button ispressed onceLow speedWhen the UP button ispressed a second timeMedium speedWhen the UP button isheld downHigh speed* When you release thebutton, the speed willreturn to the mediumspeed.<DOWN button>* If the airplane is fly-ing at medium speedWhen the DOWN but-ton is pressed onceLow speedWhen the DOWN buttonis pressed a second timeStopRelationship between speed andoperationMedium speed is for level flight, low speed fordescending and high speed for climbing.Climbing(high speed)Level flight(medium speed)Descending(low speed)A408 10](https://usermanual.wiki/Taiyo/A40827/User-Guide-394865-Page-10.png)
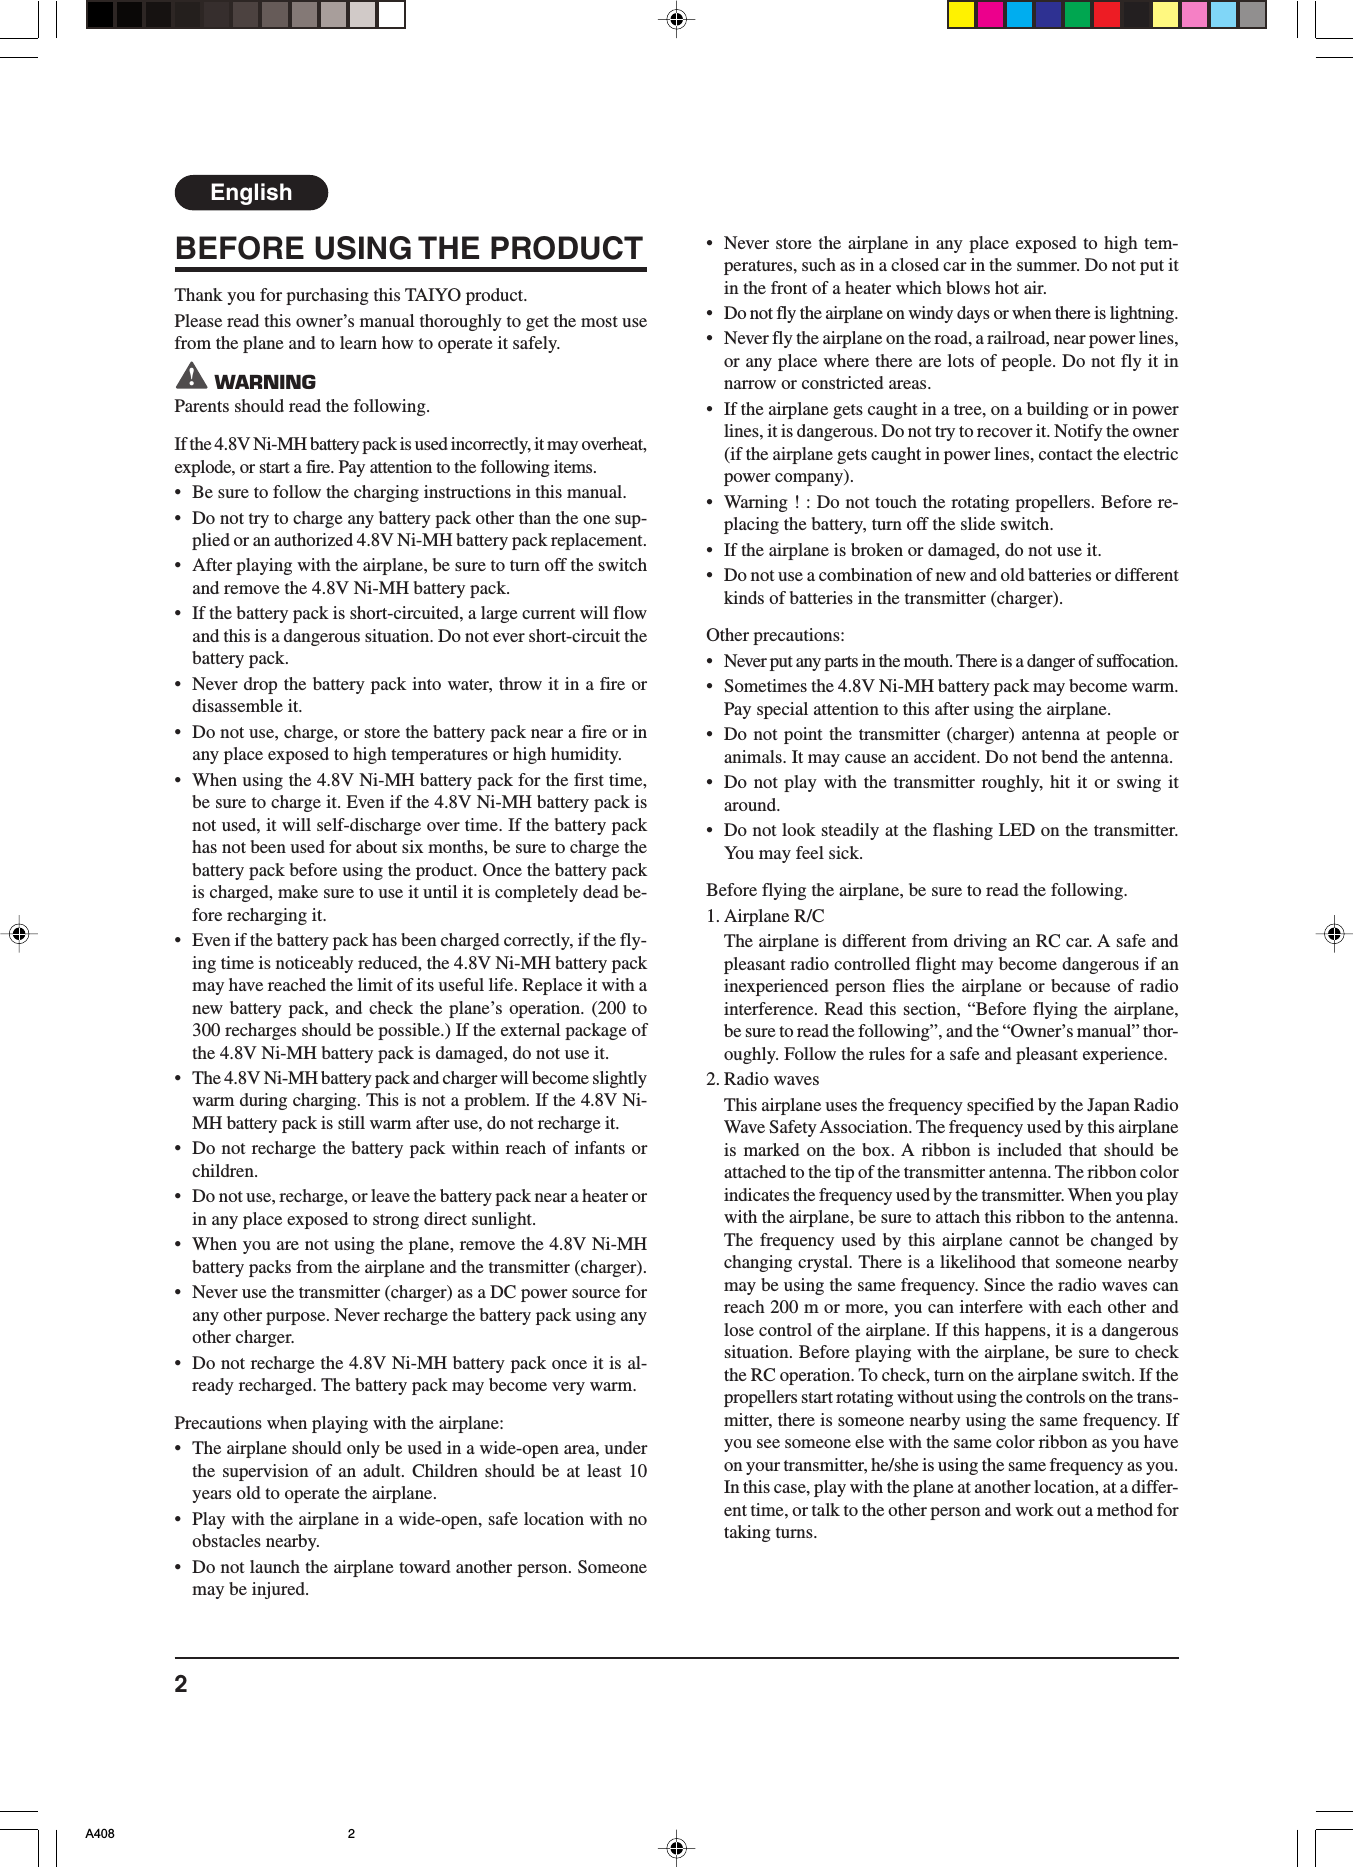
![English11Stay at least 150 maway from highbuildings or trees.Wind Launching theairplane fromyour handCenter of an open space! CAUTIONIf you throw the airplane too strongly, it will climb too fast, stall and then crash.If you throw it too weakly, it will lose altitude and crash.Launching the airplanefrom your handHigh speedAbout 5 m Mediumspeed Low speedAbout 2 mStopWindLanding* Although the airplane may seem difficult to control at first, do not give up.Read the manual carefully and practice.Lesson 1For a Person Flying the Airplane for the First TimeFirst of all, repeat the practice shown in the following drawing, until you get used to the movements the airplane will make.(1) Point the airplane into the wind. Hold down the [UP] button on the transmitter to make the motor run at high speed.(2) While maintaining high speed, throw the plane straight forward. When the airplane has climbed to about 5 m, release the [UP] buttonto change to medium speed. Fly the plane in level flight. Then, press the [DOWN] button once to reduce the speed (to low) and theairplane will descend.(3) When the airplane has descended to about 2 m above the ground, press the [DOWN] button once again to stop the propellers. Theairplane will land.(4) If the airplane is turning to the right, press the [L] button to turn it to the left. If the airplane is turning to the left, press the [R] buttonto turn it to the right. Aim the airplane into the wind while landing and try to keep it flying straight.How to launch the airplane from your handRun into the wind and throw the airplane straight forward into the wind.(1) Hold the airplane near its center of gravity, over your head.(2) Use the [UP] button on the transmitter to run the motor at high speed, and keep the airplane horizontal. Run into the wind and when youfeel the airplane becoming light, release it gently.A408 11](https://usermanual.wiki/Taiyo/A40827/User-Guide-394865-Page-11.png)
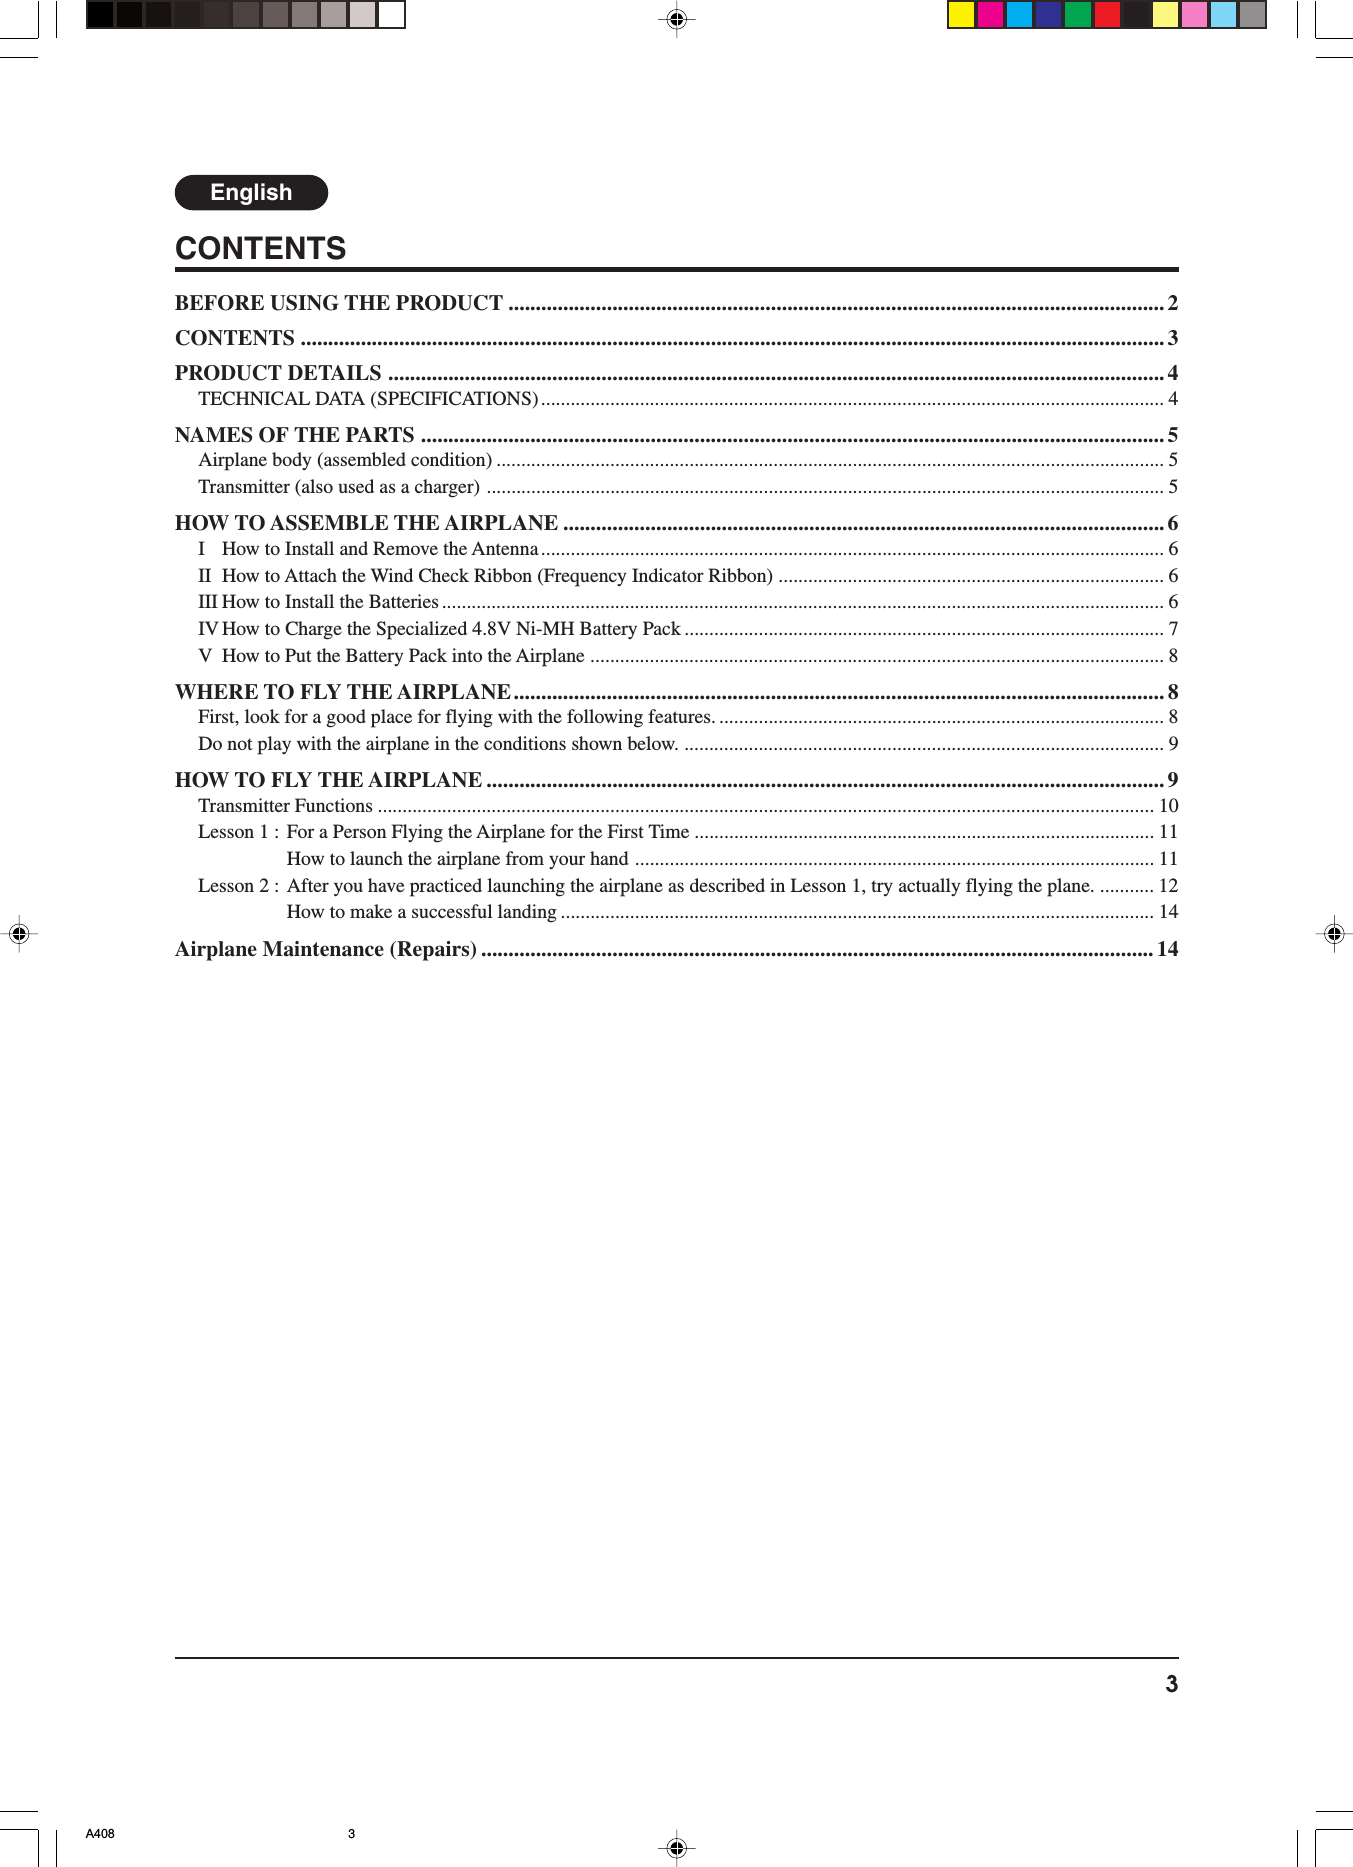
![English12Lesson 2After you have practiced launching the airplane as described in Lesson 1, try actually flyingthe plane.(1) Launch the airplane straight into the wind and make it climb. When the airplane has climbed to the desired level, release the [UP]button to return to medium speed. The airplane will then fly level.(2) When the plane is high enough, try to start turning the airplane slowly.(3) To prevent the airplane being carried away by the wind, try to fly it into the wind, relative to your position.(4) When you hear two beeps from the flight timer, start to prepare for a landing right away.(2)When a turning operation is performed,how does the airplane behave?The airplane will tilt and it will lose some altitude.* When a turn is complete, push the button to turnin the opposite direction. This will allow theairplane to stay level and fly stably.! CAUTIONBefore you become familiar with flying the airplane, do nottry and make it climb at a steep angle. Be careful not to usetoo much rudder.* Press the button repeatedly.! CAUTIONDo not hold down the [R or L] button. Press either onerepeatedly, at short intervals.Wind! CAUTIONIf the battery pack is not charged properly,the airplane may not climb high enough.High speed(1)High speedMedium speedStallCrash! CAUTIONIf you hold the [UP] button down too long,to keep the speed high, the nose of theairplane may go up and it will stall. Thismay cause the airplane to crash.A408 12](https://usermanual.wiki/Taiyo/A40827/User-Guide-394865-Page-12.png)
![English13(3) A tail windThe airplane will speed up and go quickly. Startyour turn well before the plane reaches the edgeof the flying area.A cross wind(When starting a turn with a tail wind)Since the airplane response to a turncommand using the [R or L] buttons isslow, a big turn will occur.A cross wind(When starting a turn with ahead wind)When you press the [R or L]button while flying into thewind, the airplane will turnrapidly. The turning radiuswill be quite small.A head windLook at the movement of the airplane carefully.Correct the rudder position, as necessary, to al-low the airplane to fly straight into the wind. Ifthe speed is increased too much, the plane willgain altitude too fast and stall.! CAUTIONBe careful not to allow the airplane to fly so far orhigh that you lose sight of it.Wind(4)WinddirectionIf the altitude is too low,point the airplane backdownwind to land it.4. When the plane is about 1 m above the ground, increase the speed a little, and lift thenose of the airplane a little, to make the belly level with the ground.5. Let the airplane coast a distance of several meters. When it touches the ground, thelanding is complete.2. When the plane islow enough, turnthe airplane and flyit downwind.1. While flying the airplane straight into the wind, gradually decrease thealtitude (This is to prevent the airplane from being carried away by thewind).3. Then, turn the airplane once againand fly it into the wind. This shouldmean that the airplane is making anapproach and is ready to land.A408 13](https://usermanual.wiki/Taiyo/A40827/User-Guide-394865-Page-13.png)