Taiyo A40827 R/C TRANSMITTER User Manual FALCON En cover p65
Taiyo Co., Ltd. R/C TRANSMITTER FALCON En cover p65
Taiyo >
USERS MANUAL
FALCON_En_cover.p65 3/5/03, 3:43 PM1
8
English
2
BEFORE USING THE PRODUCT
Thank you for purchasing this TAIYO product.
Please read this owner’s manual thoroughly to get the most use
from the plane and to learn how to operate it safely.
!
WARNING
Parents should read the following.
If the 4.8V Ni-MH battery pack is used incorrectly, it may overheat,
explode, or start a fire. Pay attention to the following items.
• Be sure to follow the charging instructions in this manual.
• Do not try to charge any battery pack other than the one sup-
plied or an authorized 4.8V Ni-MH battery pack replacement.
• After playing with the airplane, be sure to turn off the switch
and remove the 4.8V Ni-MH battery pack.
• If the battery pack is short-circuited, a large current will flow
and this is a dangerous situation. Do not ever short-circuit the
battery pack.
• Never drop the battery pack into water, throw it in a fire or
disassemble it.
• Do not use, charge, or store the battery pack near a fire or in
any place exposed to high temperatures or high humidity.
• When using the 4.8V Ni-MH battery pack for the first time,
be sure to charge it. Even if the 4.8V Ni-MH battery pack is
not used, it will self-discharge over time. If the battery pack
has not been used for about six months, be sure to charge the
battery pack before using the product. Once the battery pack
is charged, make sure to use it until it is completely dead be-
fore recharging it.
• Even if the battery pack has been charged correctly, if the fly-
ing time is noticeably reduced, the 4.8V Ni-MH battery pack
may have reached the limit of its useful life. Replace it with a
new battery pack, and check the plane’s operation. (200 to
300 recharges should be possible.) If the external package of
the 4.8V Ni-MH battery pack is damaged, do not use it.
• The 4.8V Ni-MH battery pack and charger will become slightly
warm during charging. This is not a problem. If the 4.8V Ni-
MH battery pack is still warm after use, do not recharge it.
• Do not recharge the battery pack within reach of infants or
children.
• Do not use, recharge, or leave the battery pack near a heater or
in any place exposed to strong direct sunlight.
• When you are not using the plane, remove the 4.8V Ni-MH
battery packs from the airplane and the transmitter (charger).
• Never use the transmitter (charger) as a DC power source for
any other purpose. Never recharge the battery pack using any
other charger.
• Do not recharge the 4.8V Ni-MH battery pack once it is al-
ready recharged. The battery pack may become very warm.
Precautions when playing with the airplane:
• The airplane should only be used in a wide-open area, under
the supervision of an adult. Children should be at least 10
years old to operate the airplane.
• Play with the airplane in a wide-open, safe location with no
obstacles nearby.
• Do not launch the airplane toward another person. Someone
may be injured.
• Never store the airplane in any place exposed to high tem-
peratures, such as in a closed car in the summer. Do not put it
in the front of a heater which blows hot air.
• Do not fly the airplane on windy days or when there is lightning.
• Never fly the airplane on the road, a railroad, near power lines,
or any place where there are lots of people. Do not fly it in
narrow or constricted areas.
• If the airplane gets caught in a tree, on a building or in power
lines, it is dangerous. Do not try to recover it. Notify the owner
(if the airplane gets caught in power lines, contact the electric
power company).
• Warning ! : Do not touch the rotating propellers. Before re-
placing the battery, turn off the slide switch.
• If the airplane is broken or damaged, do not use it.
• Do not use a combination of new and old batteries or different
kinds of batteries in the transmitter (charger).
Other precautions:
• Never put any parts in the mouth. There is a danger of suffocation.
• Sometimes the 4.8V Ni-MH battery pack may become warm.
Pay special attention to this after using the airplane.
• Do not point the transmitter (charger) antenna at people or
animals. It may cause an accident. Do not bend the antenna.
• Do not play with the transmitter roughly, hit it or swing it
around.
• Do not look steadily at the flashing LED on the transmitter.
You may feel sick.
Before flying the airplane, be sure to read the following.
1. Airplane R/C
The airplane is different from driving an RC car. A safe and
pleasant radio controlled flight may become dangerous if an
inexperienced person flies the airplane or because of radio
interference. Read this section, “Before flying the airplane,
be sure to read the following”, and the “Owner’s manual” thor-
oughly. Follow the rules for a safe and pleasant experience.
2. Radio waves
This airplane uses the frequency specified by the Japan Radio
Wave Safety Association. The frequency used by this airplane
is marked on the box. A ribbon is included that should be
attached to the tip of the transmitter antenna. The ribbon color
indicates the frequency used by the transmitter. When you play
with the airplane, be sure to attach this ribbon to the antenna.
The frequency used by this airplane cannot be changed by
changing crystal. There is a likelihood that someone nearby
may be using the same frequency. Since the radio waves can
reach 200 m or more, you can interfere with each other and
lose control of the airplane. If this happens, it is a dangerous
situation. Before playing with the airplane, be sure to check
the RC operation. To check, turn on the airplane switch. If the
propellers start rotating without using the controls on the trans-
mitter, there is someone nearby using the same frequency. If
you see someone else with the same color ribbon as you have
on your transmitter, he/she is using the same frequency as you.
In this case, play with the plane at another location, at a differ-
ent time, or talk to the other person and work out a method for
taking turns.
A408 2
English
3
CONTENTS
BEFORE USING THE PRODUCT ........................................................................................................................ 2
CONTENTS .............................................................................................................................................................. 3
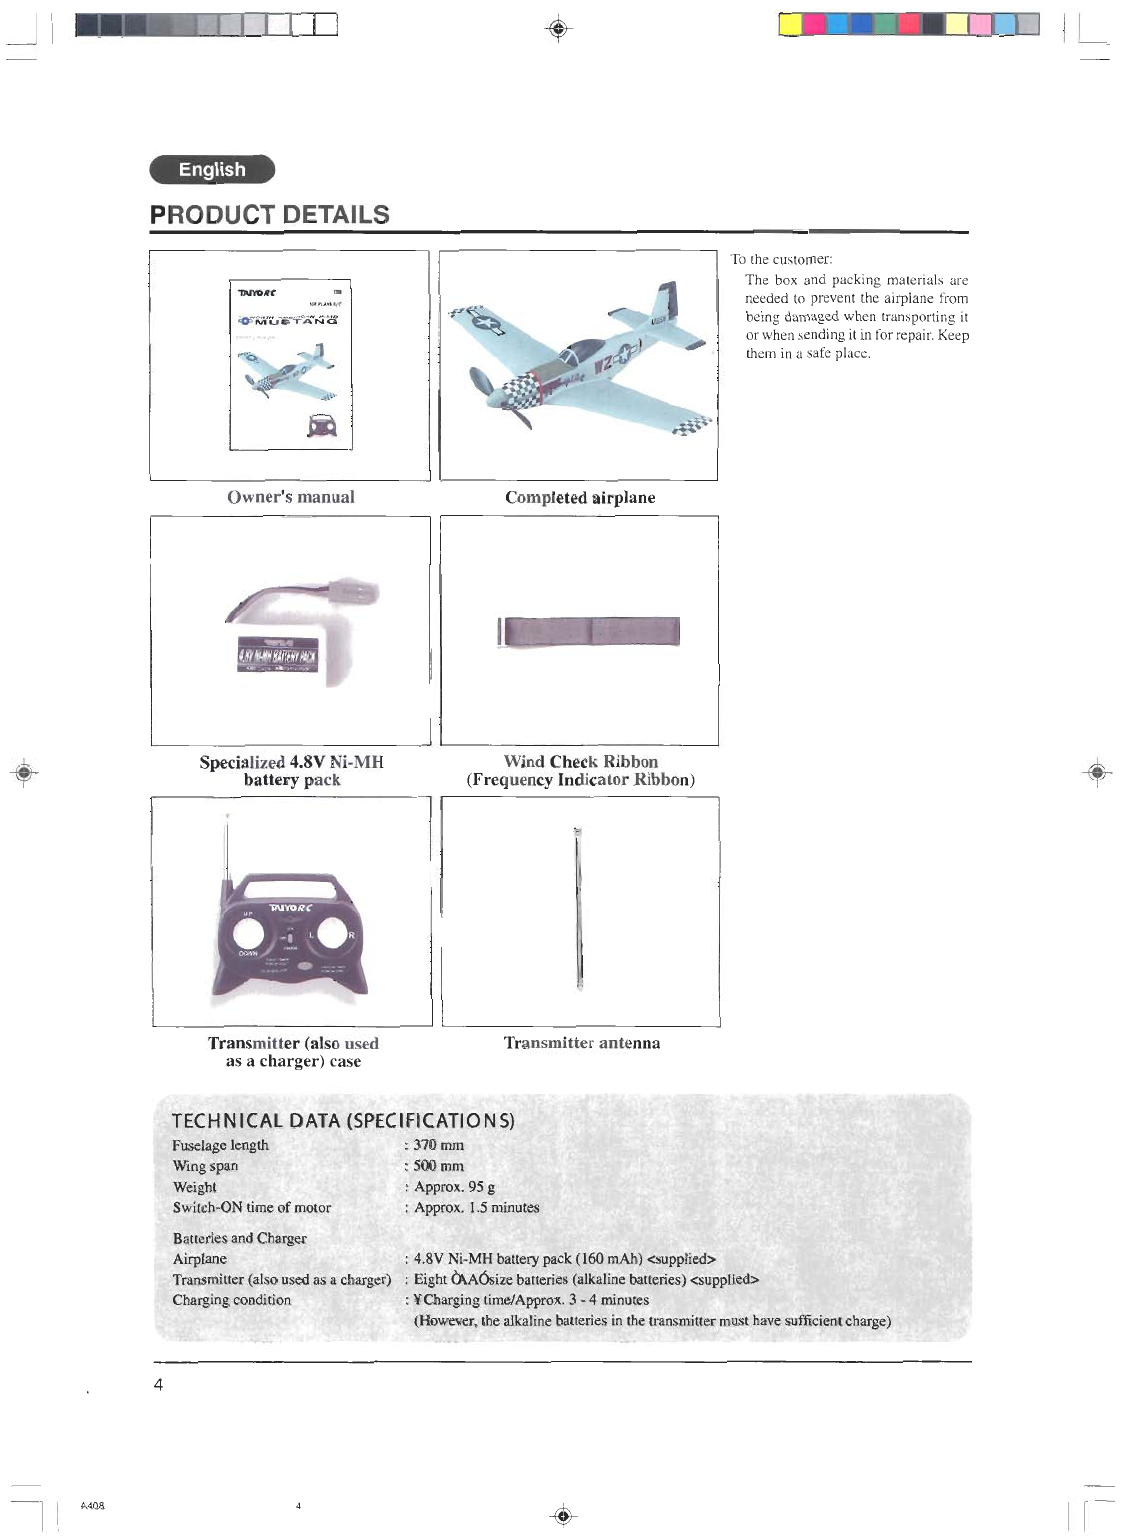
PRODUCT DETAILS .............................................................................................................................................. 4
TECHNICAL DATA (SPECIFICATIONS) .............................................................................................................................. 4
NAMES OF THE PARTS ........................................................................................................................................ 5
Airplane body (assembled condition) ....................................................................................................................................... 5
Transmitter (also used as a charger) ......................................................................................................................................... 5
HOW TO ASSEMBLE THE AIRPLANE .............................................................................................................. 6
I How to Install and Remove the Antenna .............................................................................................................................. 6
II How to Attach the Wind Check Ribbon (Frequency Indicator Ribbon) .............................................................................. 6
III How to Install the Batteries .................................................................................................................................................. 6
IV How to Charge the Specialized 4.8V Ni-MH Battery Pack ................................................................................................. 7
V How to Put the Battery Pack into the Airplane .................................................................................................................... 8
WHERE TO FLY THE AIRPLANE....................................................................................................................... 8
First, look for a good place for flying with the following features. .......................................................................................... 8
Do not play with the airplane in the conditions shown below. ................................................................................................. 9
HOW TO FLY THE AIRPLANE ............................................................................................................................ 9
Transmitter Functions ............................................................................................................................................................. 10
Lesson 1 : For a Person Flying the Airplane for the First Time ............................................................................................. 11
How to launch the airplane from your hand ......................................................................................................... 11
Lesson 2 : After you have practiced launching the airplane as described in Lesson 1, try actually flying the plane. ........... 12
How to make a successful landing ........................................................................................................................ 14
Airplane Maintenance (Repairs) ........................................................................................................................... 14
A408 3
English
5
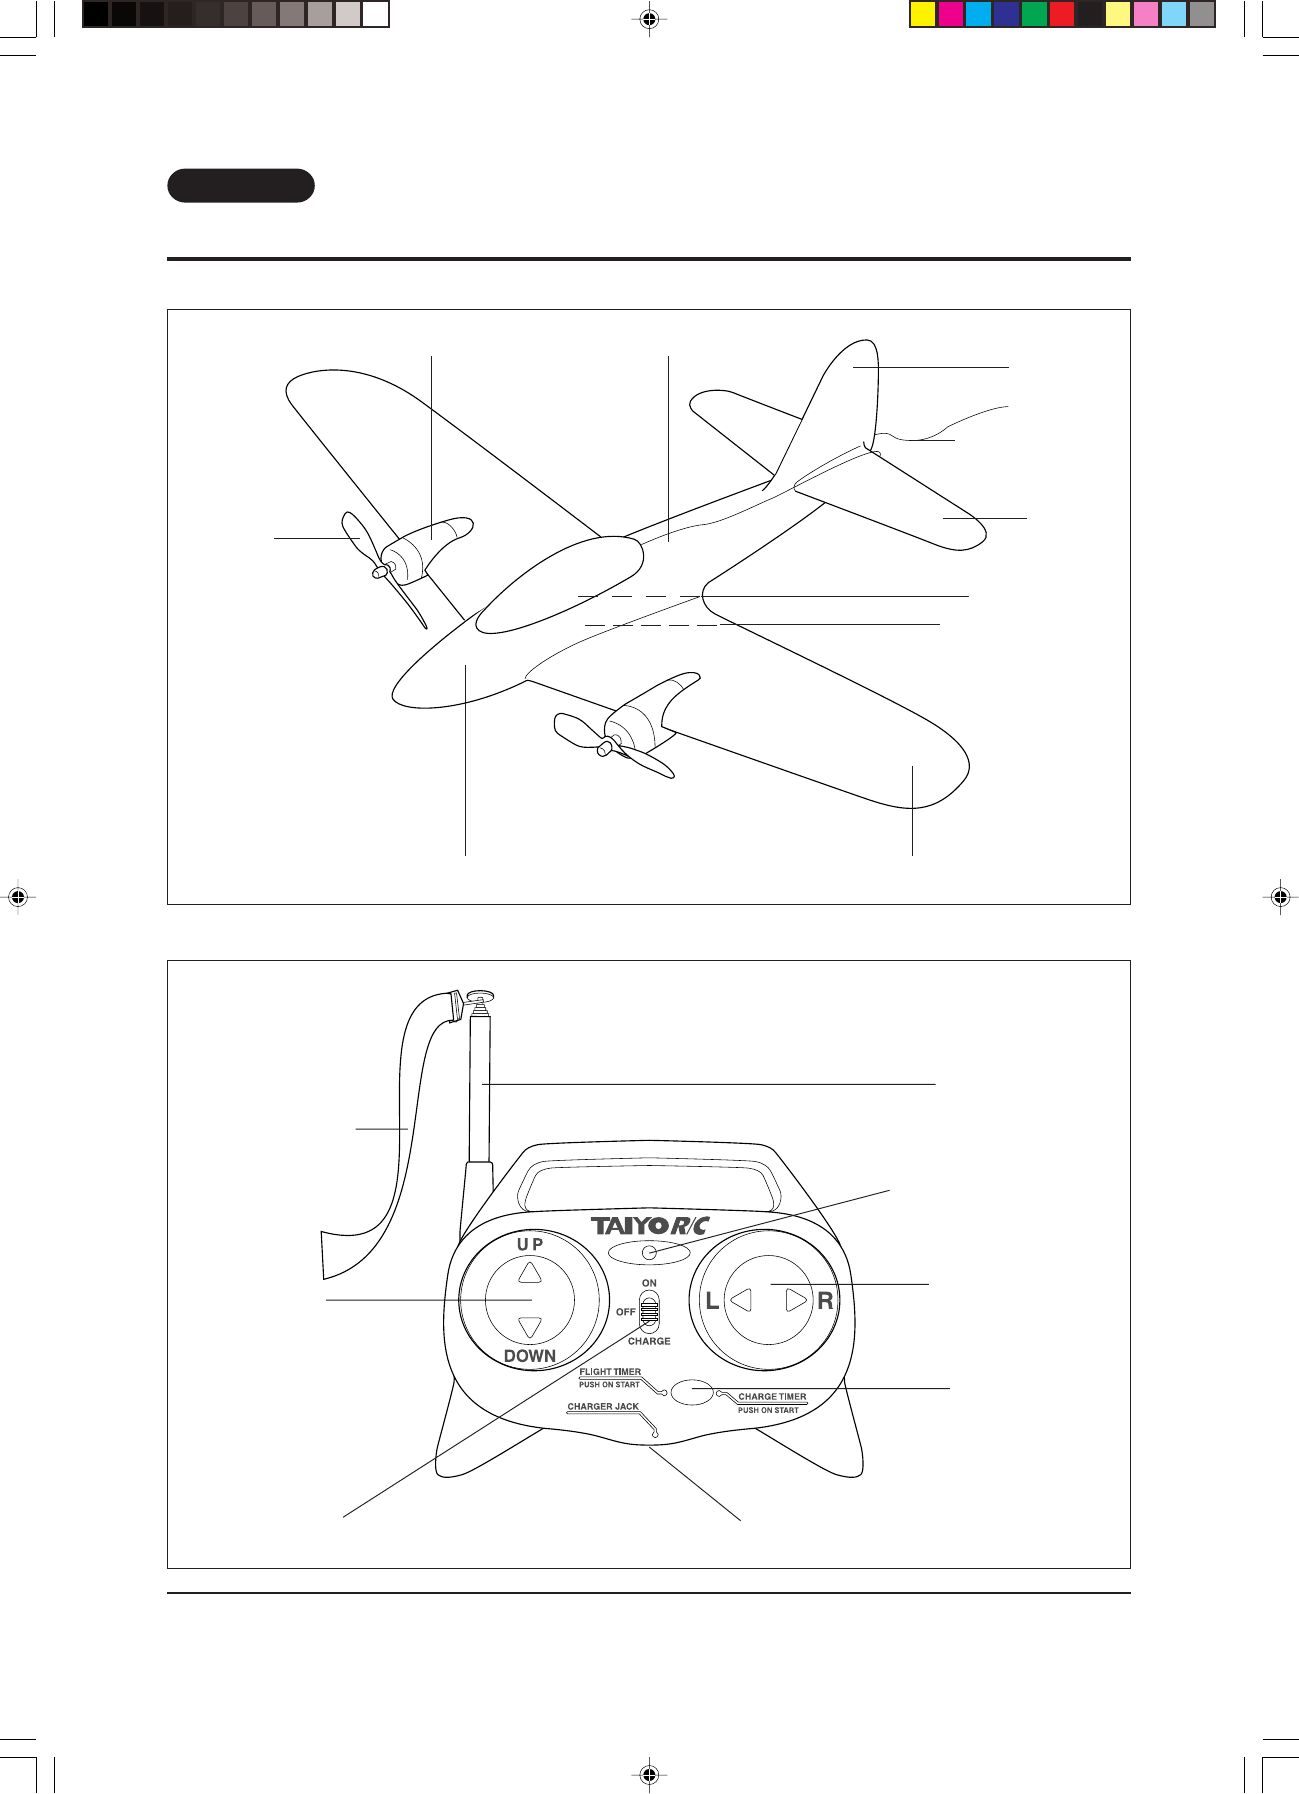
NAMES OF THE PARTS
Airplane body (assembled condition)
Transmitter (also used as a charger)
Motor unit
Propeller
Fuselage
Tail rudder
Reception antenna
Elevators
Receiver (inside)
Power switch (belly)
Main wingSpecialized 4.8V Ni-MH battery pack compartment and battery pack (belly)
Wind check ribbon
(Frequency indicator
ribbon)
Ascend/descend
(power control)
button
Transmitter antenna
LED power indicator lamp
Power and charge
selector switch
Turn left/right button
Flight timer and
charging timer button
Specialized 4.8V Ni-MH battery pack charging connector jack
A408 5
English
6
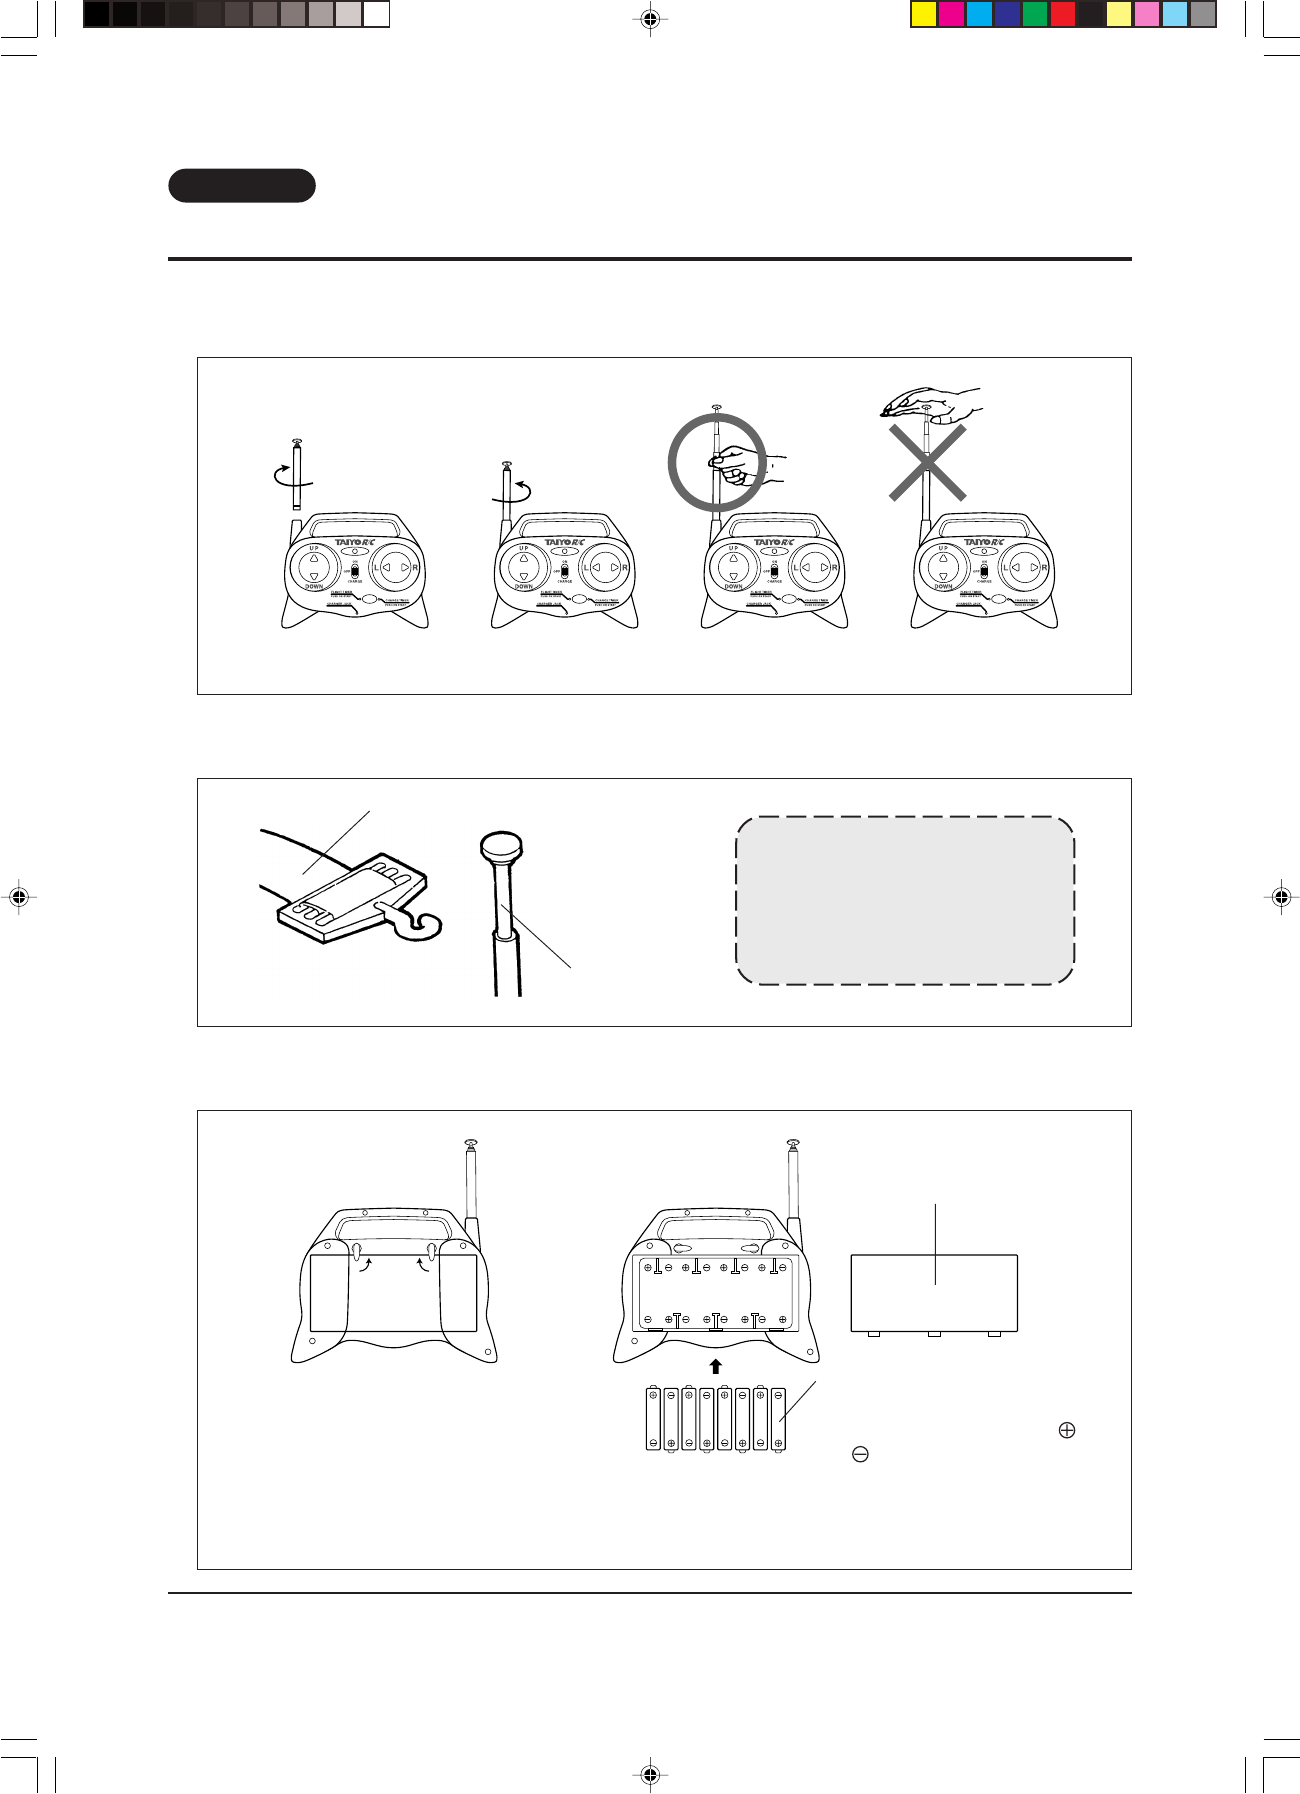
HOW TO ASSEMBLE THE AIRPLANE
I How to Install and Remove the Antenna
(1) To install the antenna, screw it into the transmitter body. To reduce the antenna length, push in the lowest segment first, then the
next, etc. This will prevent the antenna from being broken.
II How to Attach the Wind Check Ribbon (Frequency Indicator Ribbon)
(1) Put the hook on the ribbon onto the tip of the antenna.
III How to Install the Batteries
•This transmitter (charger) uses eight AA size alkaline batteries (included).
Transmitter
antenna
Ribbon
Ribbon color code:
(1) 26.995 MHz —— Brown
(2) 27.045 MHz —— Red
How to remove
the antenna
How to install
the antenna
* The antenna is a screw-in type. If the antenna is loose, it may not work. Therefore, make sure it is tight.
Battery box cover
Rotate the catches on the upper left and right to unlock
the cover. Then, remove the cover from the battery box.
To replace the battery box cover, reverse the procedure.
Eight LR6
As shown in the left, insert eight
LR6. Pay attention to the polarity
and of the batteries.
* When the batteries in the transmitter (charger) are low, the LED power indicator lamp will grow dim. The distance that the
transmitter can transmit will also be reduced, and the 4.8V Ni-MH battery pack will not be properly charged. Replace the
LR6 as soon as there is any sign that they are dying.
A408 6
English
7
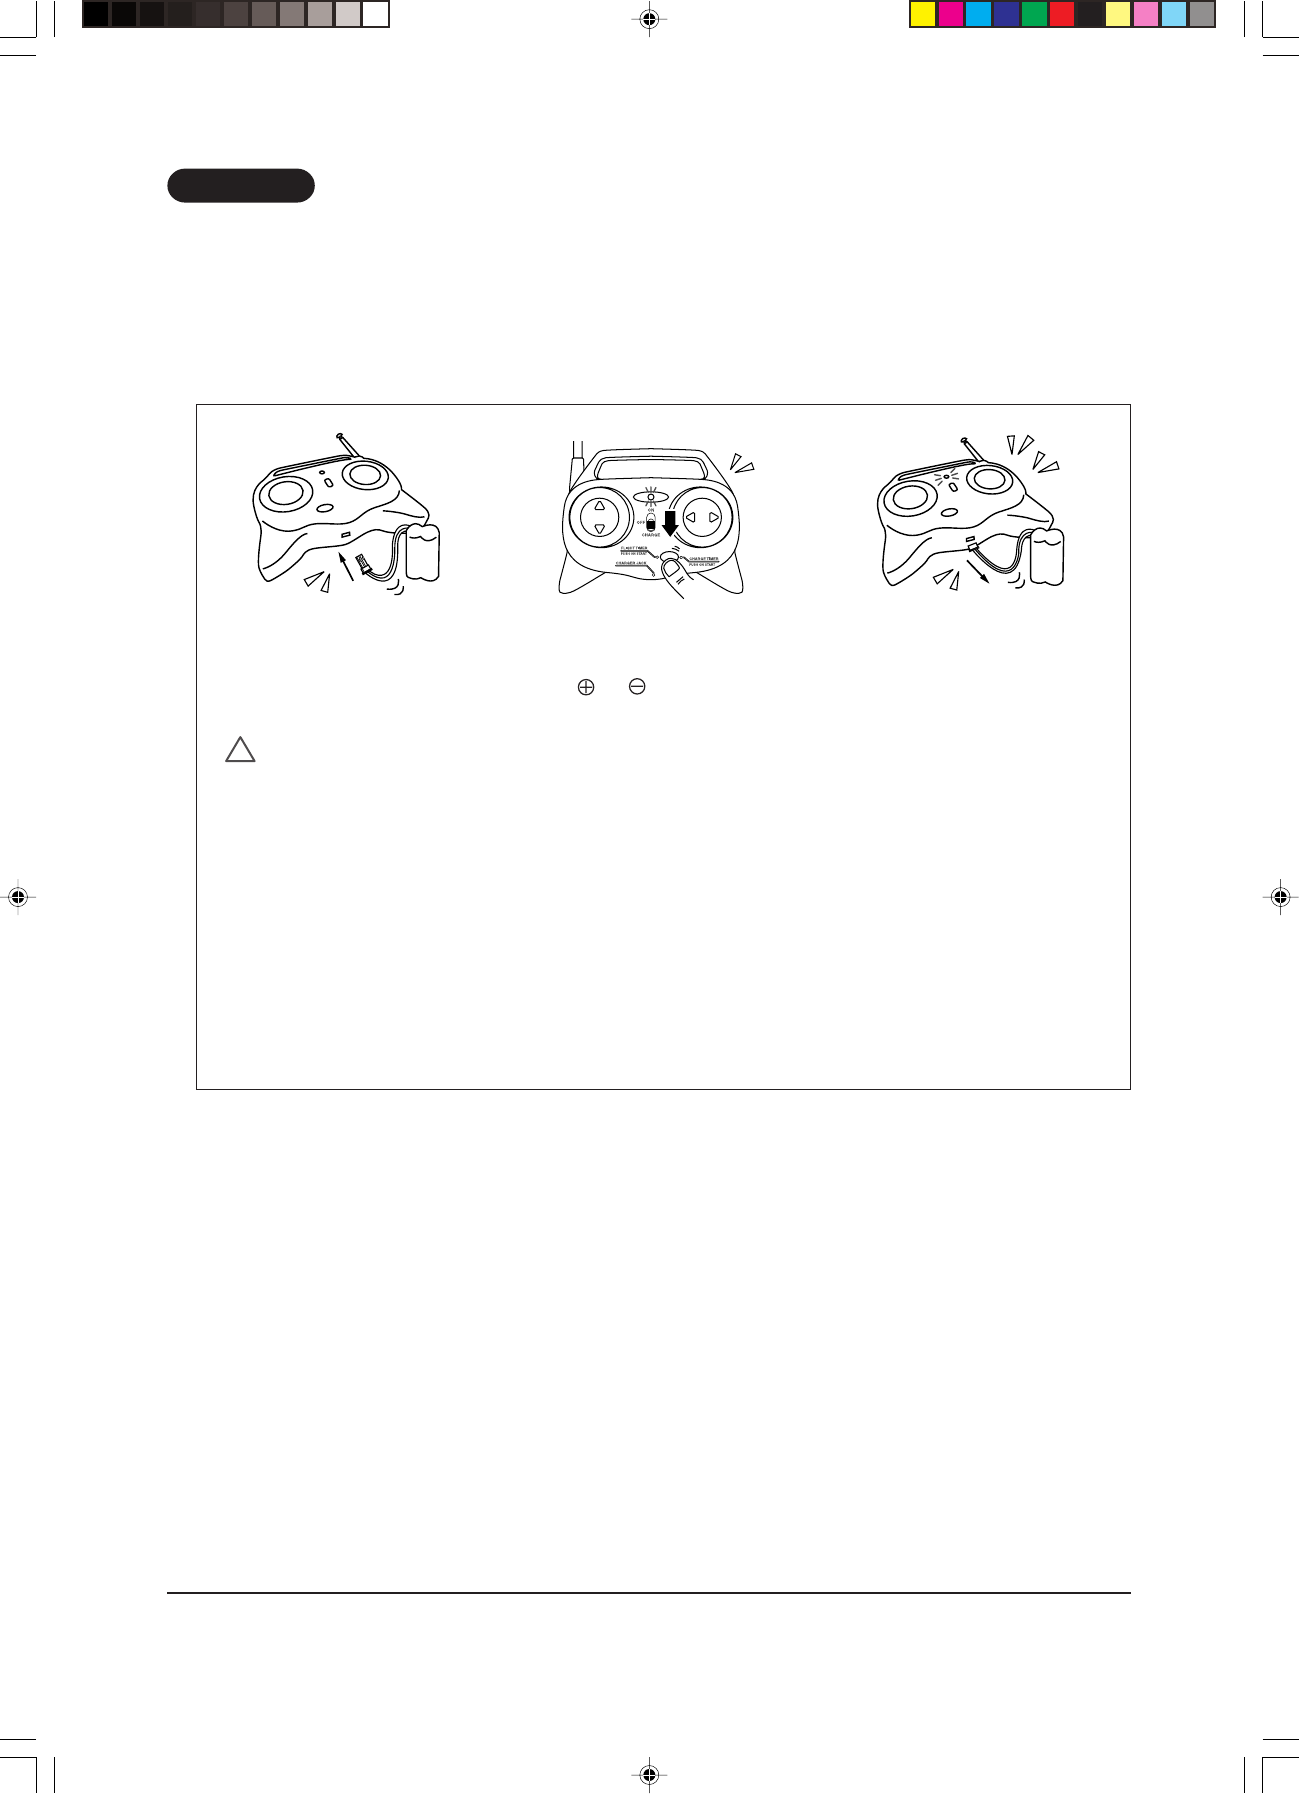
IV How to Charge the Specialized 4.8V Ni-MH Battery Pack
(1) Plug the specialized 4.8V Ni-MH battery pack connector into the connector jack on the lower part of the transmitter.
(2) Move the power switch to the [CHARGE] side, and press the [CHARGE TIMER] button. A beep will be heard. The LED power
indicator lamp will flash to tell you that charging has started.
(3) When charging is complete, two beeps will be heard. Then, the LED power indicator lamp will light, to tell you that charging is
complete. Unplug the battery pack connector from the transmitter body.
(4) Turn off the power to the transmitter (charger).
Beep
beep
Beep
To the customer:
Be sure to move the main switch to the OFF position before moving the main switch to the ON or CHARGE position.
The connector cannot be plugged in if the polarity and of the connector pins is reversed (the connector is keyed so that it
only goes in one way). Do not use force to plug in the connector. Check the orientation of the connector, and then plug it in.
!
CAUTION
* This charger can only charge the specialized 4.8V Ni-MH battery pack. It cannot charge any other kinds of batteries.
* Do not charge the battery pack near a fire or in any place exposed to high temperatures.
* Do not leave the battery pack unattended while charging. This is so that you can stop charging if a problem occurs.
* Never disassemble or modify the transmitter (charger).
* After flying the airplane, be sure to remove the battery pack from the airplane and unplug the connector.
* Never short-circuit the battery pack. A large current will flow and the battery pack will become very warm. It is very dangerous.
* Recharging a battery pack that is already charged will make it too hot.
* If the battery pack gets wet, stop using it immediately. The battery pack may be short-circuited inside, which may damage
it. Wipe the battery pack until it is dry on the outside and then let it dry thoroughly in the shade before using it again.
* When unplugging the connector, do not pull on the cord. Hold the connector itself to unplug it.
* Never throw the battery pack into water or a fire. Do not disassemble it or try to solder it.
* When the battery pack has been charged correctly, if the power in the battery pack results in reduced flying time, the battery
may have deteriorated. In this case, it may be difficult to recharge it. If this happens, replace the battery pack with a new one.
* The battery pack can be recharged 200 - 300 times, in normal use.
(1) (2) (3)
A408 7
English
8
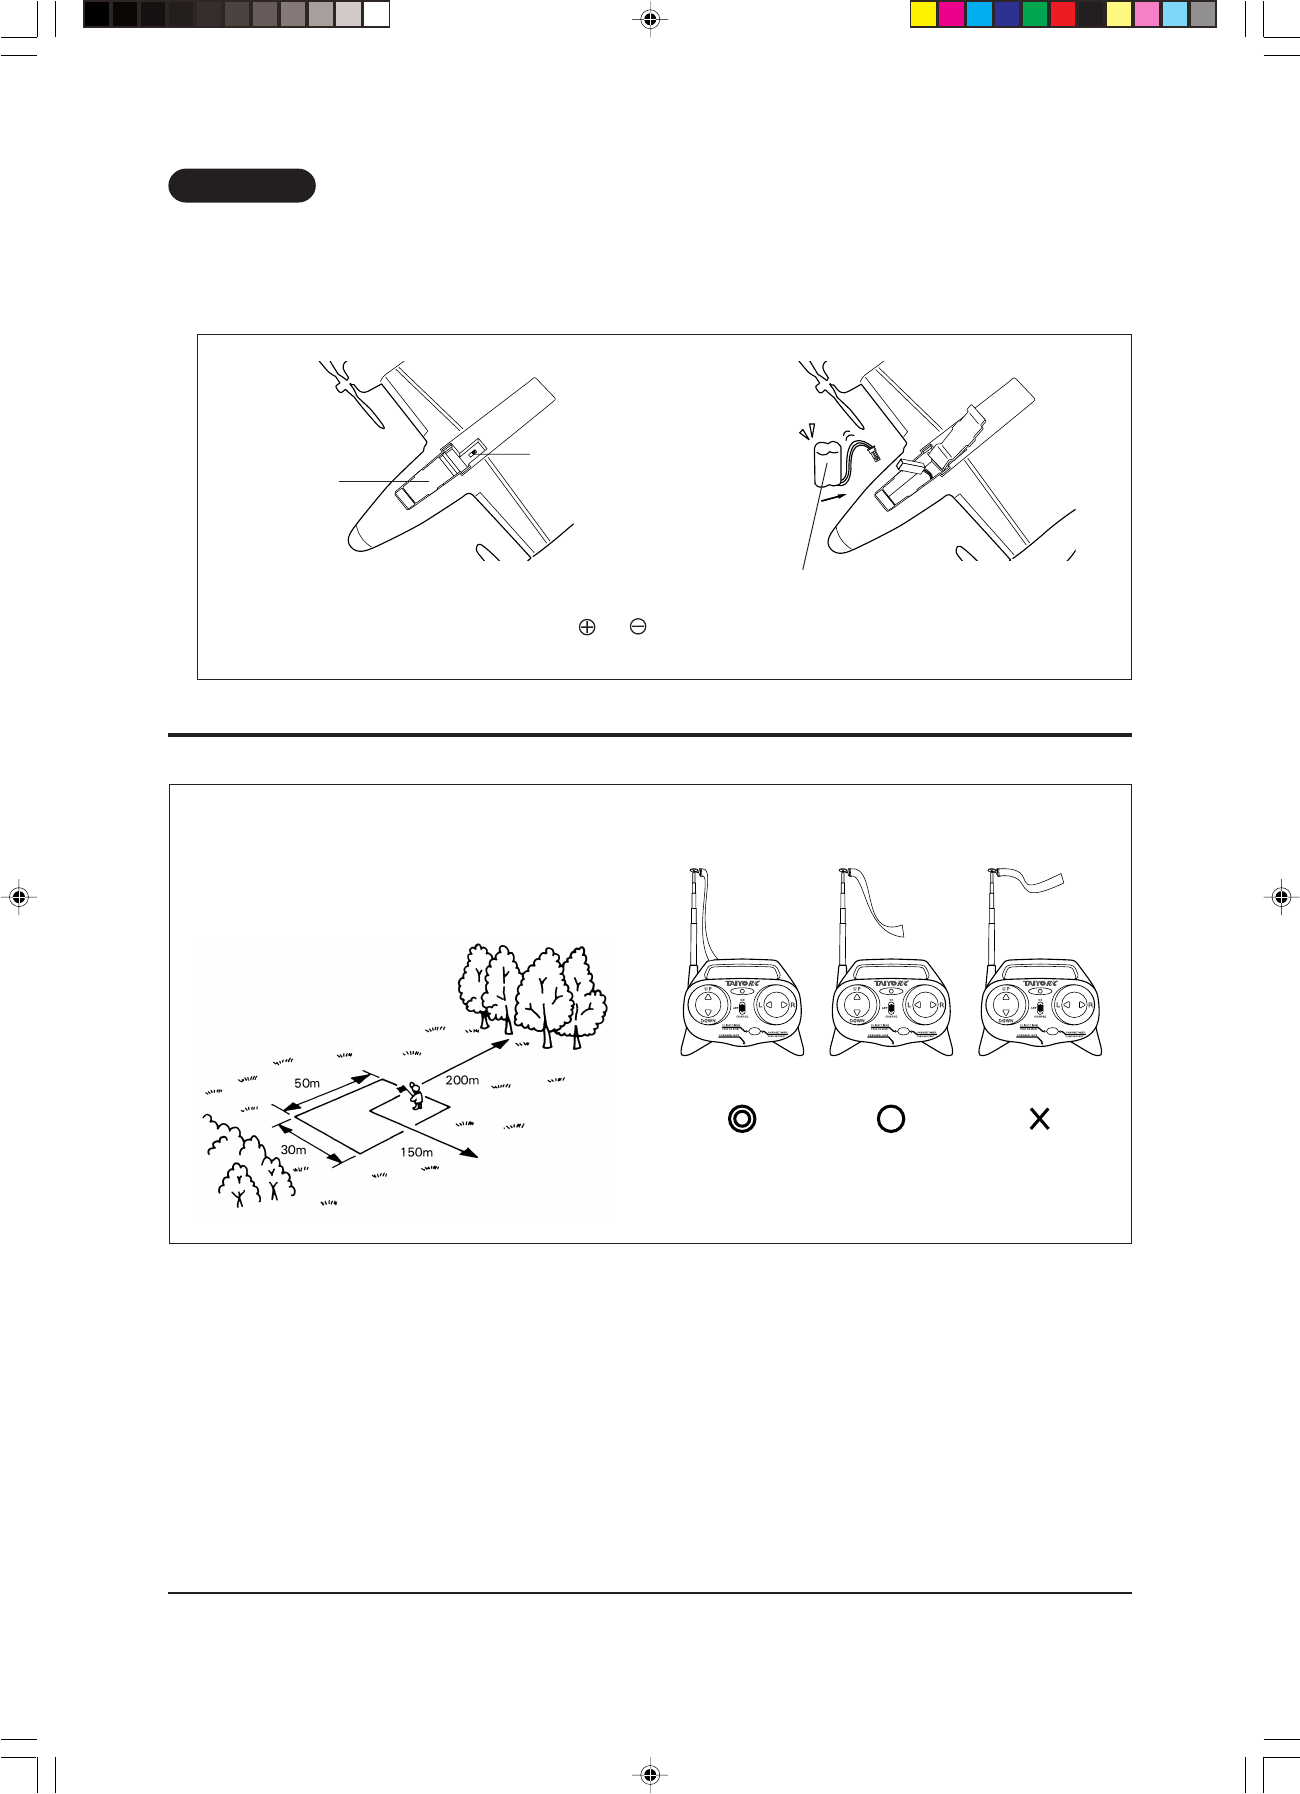
V How to Put the Battery Pack into the Airplane
(1) Open the battery pack compartment cover.
(2) Plug the battery pack connector into the connector in the battery pack compartment. Then, insert the battery pack into the
compartment, and close the cover.
WHERE TO FLY THE AIRPLANE
First, look for a good place for flying with the following features.
* A flat place that is at least 400 meters square with no ob-
stacles
* A wind velocity of 0 to 2 m per second is the best for
flying the plane. In these conditions, the transmitter rib-
bon will hang at an angle of 45° or less.
•An open area with good visibility and no obstacles
•The ground should be flat and there should not be any
rocks or bushes
•Little or no wind
0 m/second
(calm) 1 - 2 m/second 5 m/second
or more
The connector cannot be plugged in if the polarity and of the connector pins is reversed (the connector is keyed so that it
only goes in one way). Do not use force to plug in the connector. Check the orientation of the connector, and then plug it in.
Battery pack
compartment
cover
Be sure that the
power switch has
been turned off.
4.8V Ni-MH battery pack
(1) (2)
A408 8
English
9
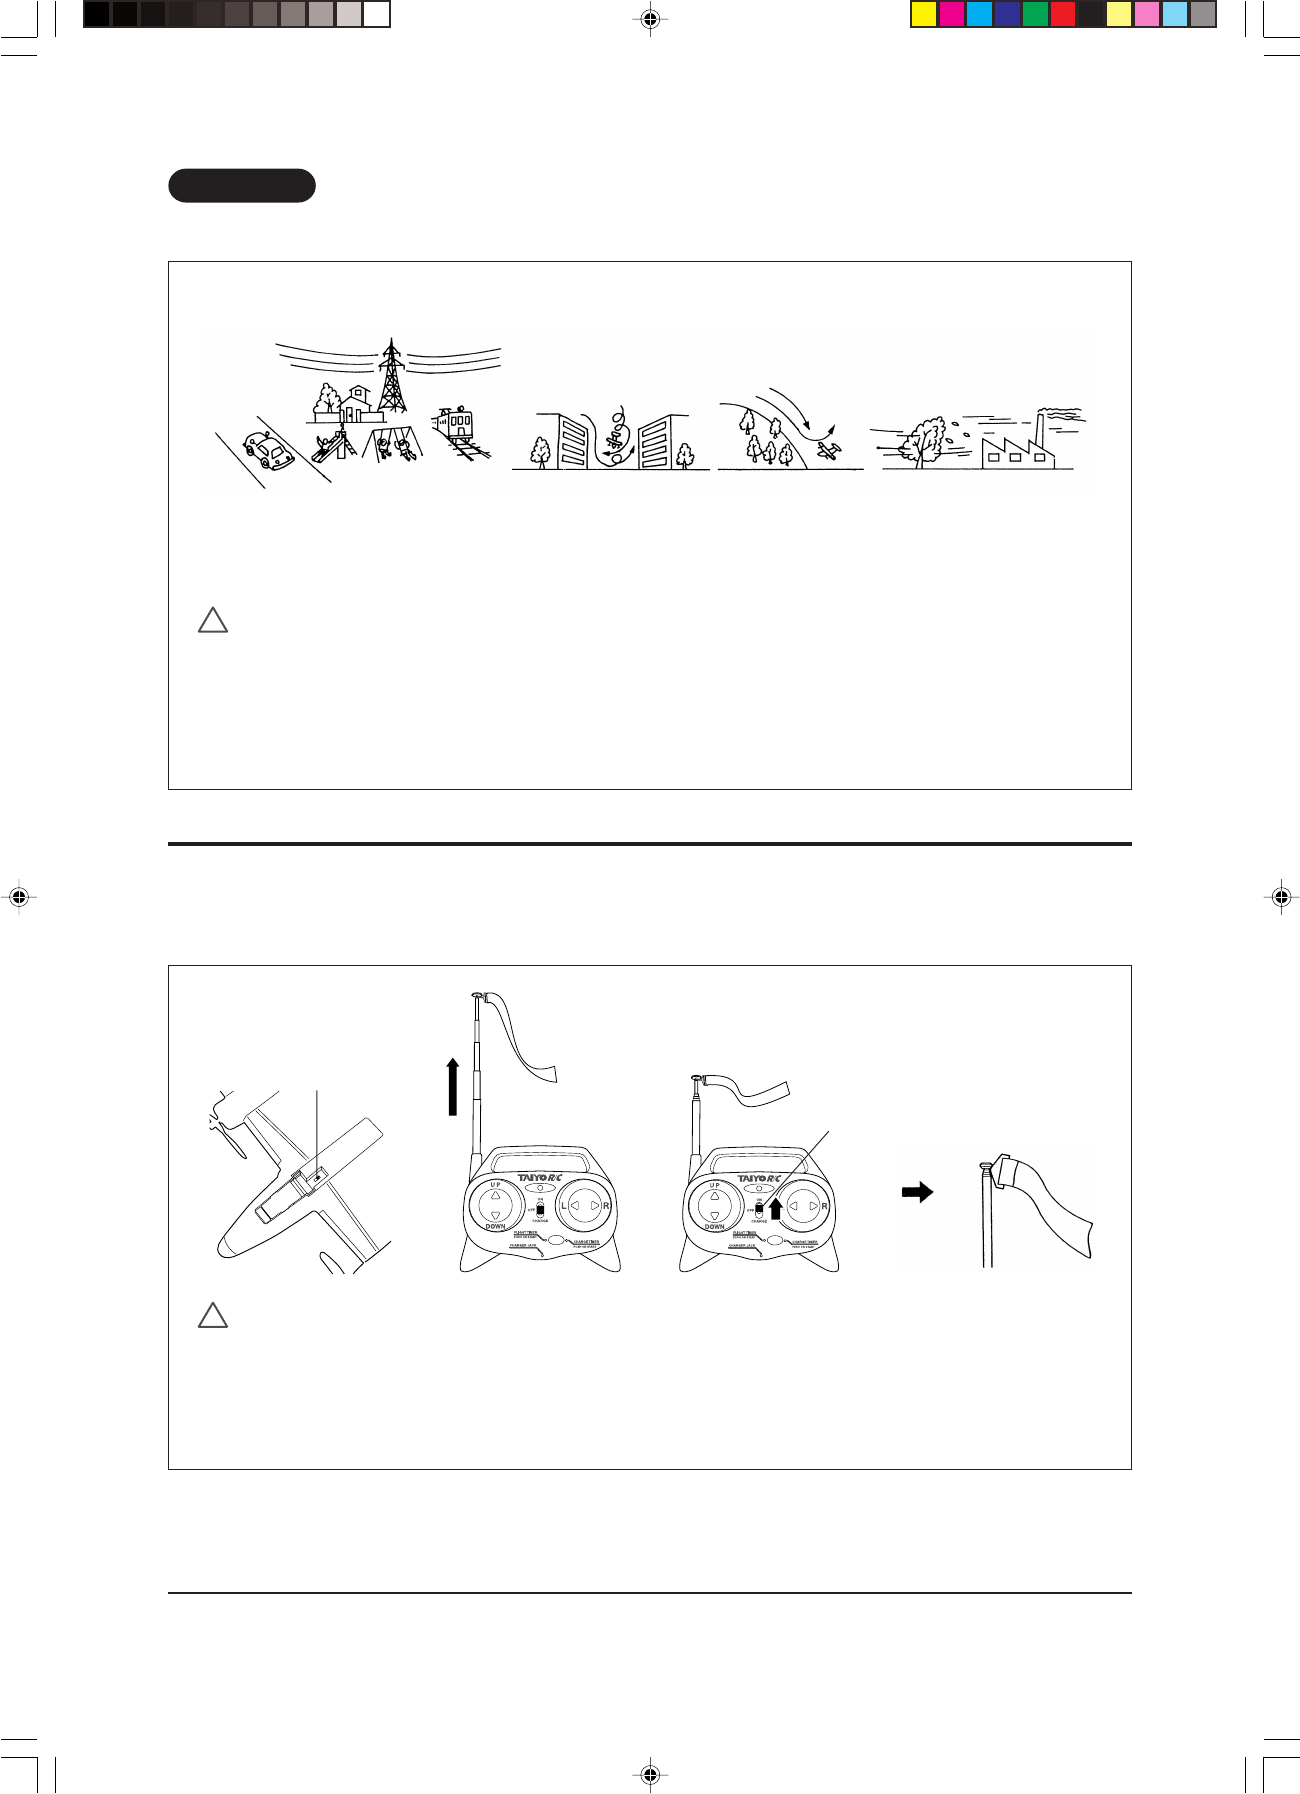
Do not play with the airplane in the conditions shown below.
HOW TO FLY THE AIRPLANE
(1) Turn on the switch on the airplane.
(2) Turn on the switch on the transmitter.
(3) Extend the transmitter antenna all the way out.
(4) Check the direction and strength of the wind with the ribbon.
!
CAUTION
When you turn on the switch on the airplane, the propellers will turn for a moment. Therefore, be sure to turn on the switch while
standing behind the airplane. Even though the reception antenna may seem too long, do not cut it or coil it up.
Even if the wind is weak on the ground, it may be stronger in the sky. The airplane may be carried away by strong winds in the
sky. Therefore, fly the airplane in a place where there are no downwind obstacles (streams, swamps, etc.) to retrieving the
airplane if it is carried away by the wind.
Power switch
Power switch
Wind
If the wind is strong, do not
fly the airplane.
(1) (2) (3) (4)
* When the transmitter ribbon is flying out to the side, the wind is too strong. Stop flying the airplane.
!
CAUTION
* Make sure that no one else is using the same frequency as you.
* Fly the airplane in a wide-open place. Make sure that there are not any buildings or trees near you and that people are not
standing near you.
* Before flying the airplane, check the area around you.
* While the airplane is flying, do not take your eyes off of it.
* Any child who is not experienced at flying the airplane should have an adult present to help.
Any place surrounded by roads, near
a train line, high-voltage lines, etc.
Any place where there are lots of
people or where houses are clustered
close together.
Strong windAny place where
there are
downdrafts
Turbulence
A408 9
English
10
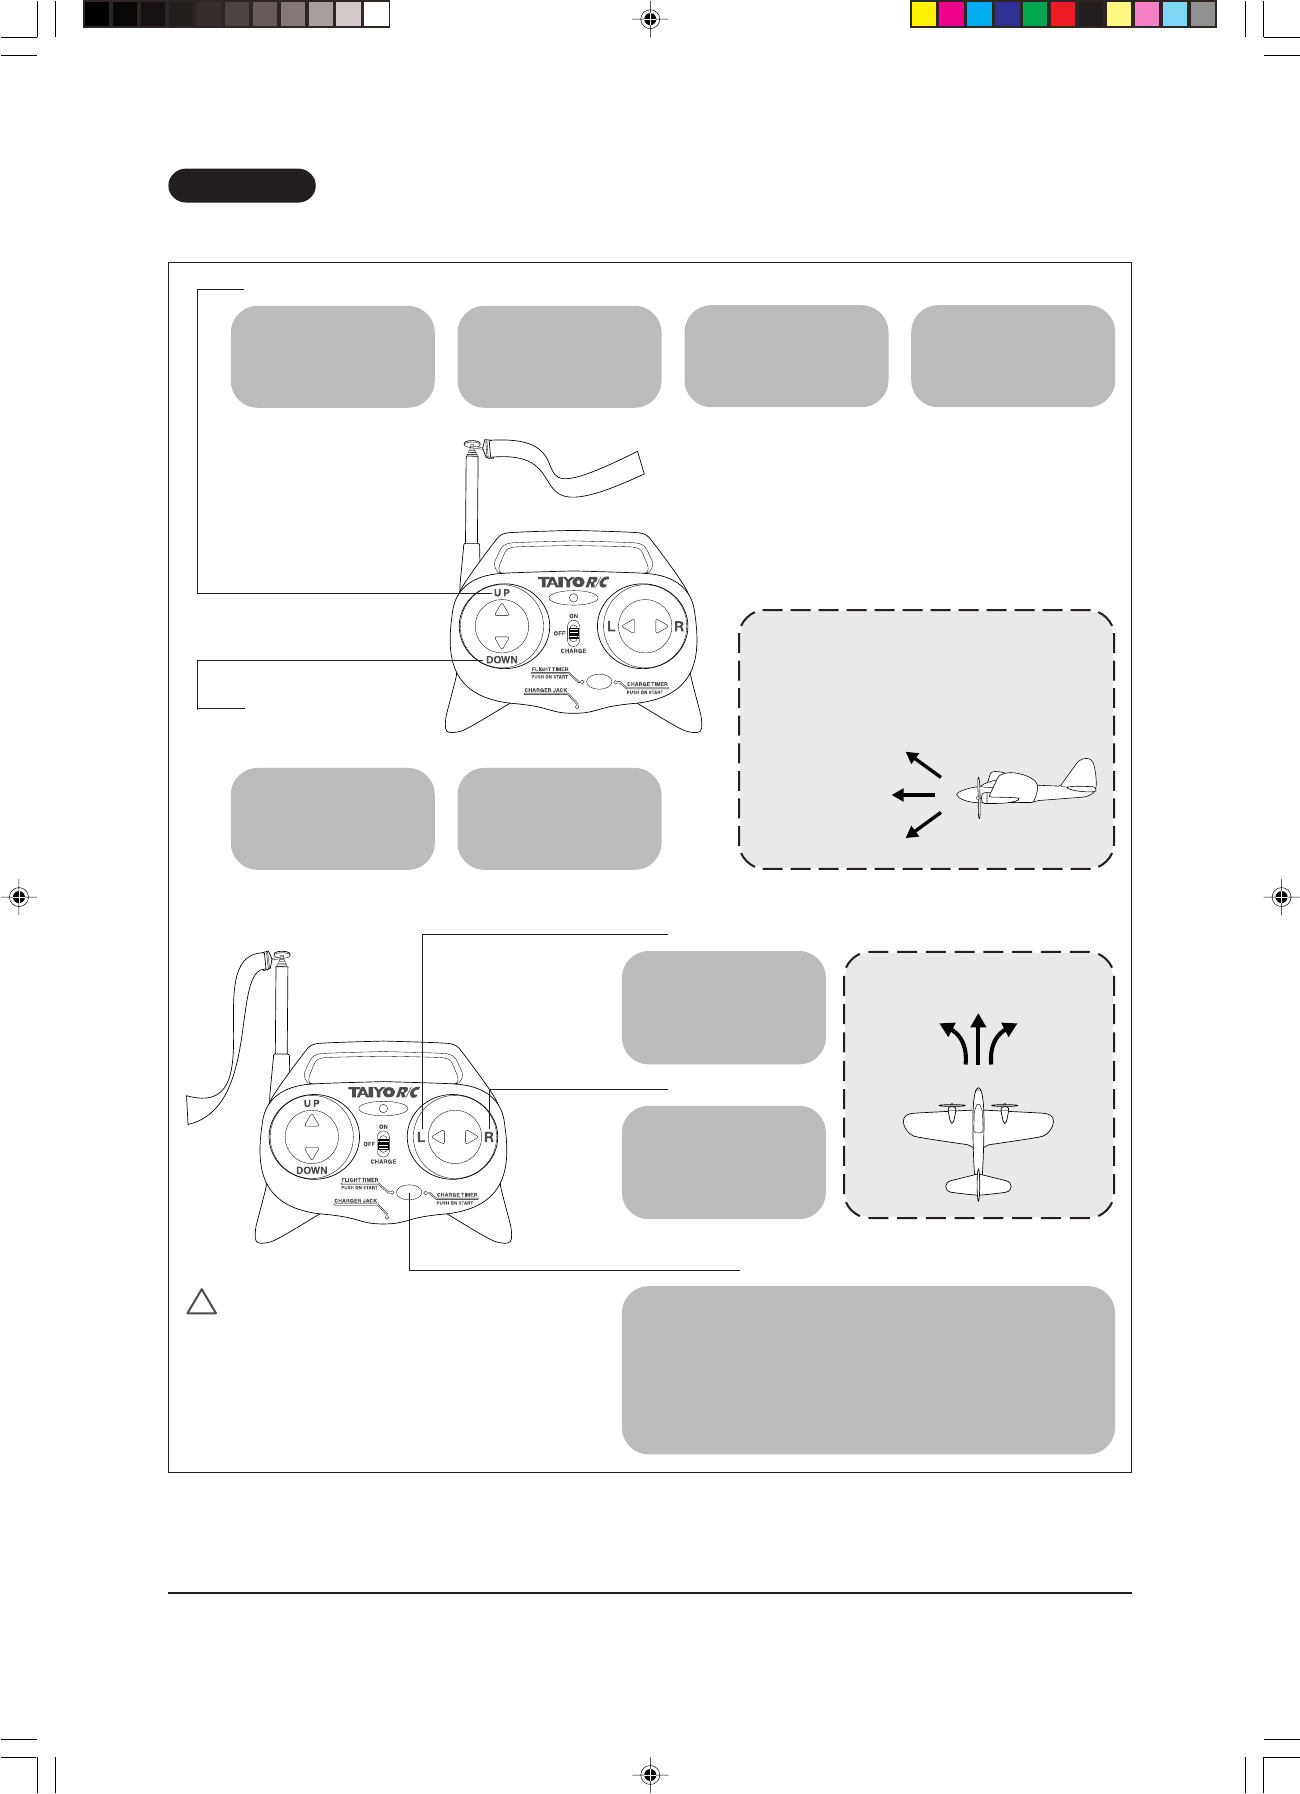
Transmitter Functions
<L button>
When the L button is
held down
The airplane turns to
the left.
Left turn
(L button)
<R button>
When the R button is
held down
The airplane turns to
the right.
Right turn
(R button)
<FLIGHT TIMER Button>
When the [FLIGHT TIMER] button is pressed just before take-
off, a beep will be heard and a countdown will be started. When
the flying time (battery life) is running short, two beeps will be
heard to advise you to land the airplane. Try to land it safely. The
total flying time on one battery charge is about 1 minute and 30
seconds. If the battery is run completely down, you can no longer
control the airplane.
!
CAUTION
If anyone is playing with a radio-controlled toy near you,
check with each other about which frequencies are being
used. When you turn on the airplane switch, if the propel-
lers start rotating, there is someone nearby using the same
frequency.
<UP button>
When the UP button is
not pressed
Stop
When the UP button is
pressed once
Low speed
When the UP button is
pressed a second time
Medium speed
When the UP button is
held down
High speed
* When you release the
button, the speed will
return to the medium
speed.
<DOWN button>
* If the airplane is fly-
ing at medium speed
When the DOWN but-
ton is pressed once
Low speed
When the DOWN button
is pressed a second time
Stop
Relationship between speed and
operation
Medium speed is for level flight, low speed for
descending and high speed for climbing.
Climbing
(high speed)
Level flight
(medium speed)
Descending
(low speed)
A408 10
English
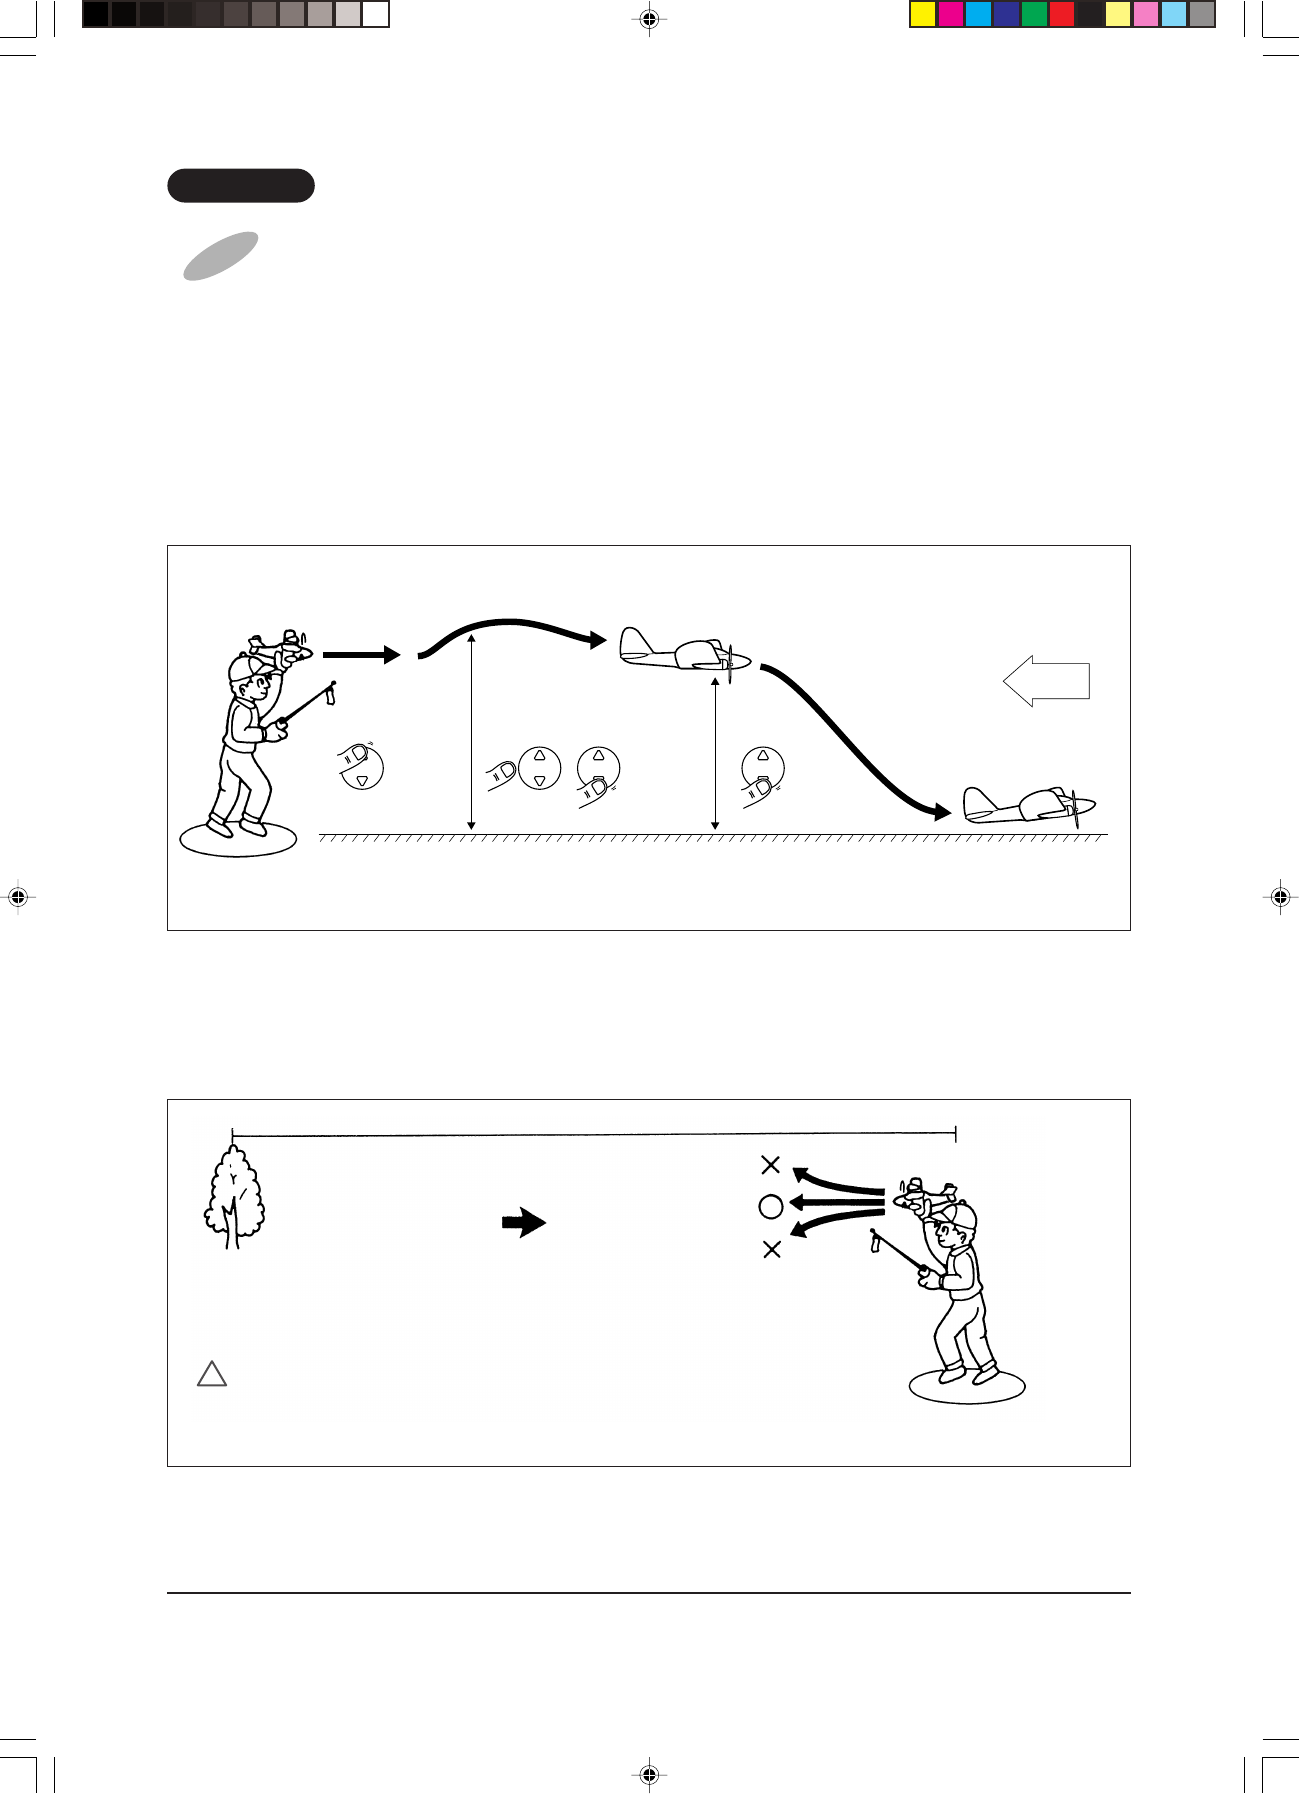
11
Stay at least 150 m
away from high
buildings or trees.
Wind Launching the
airplane from
your hand
Center of an open space
!
CAUTION
If you throw the airplane too strongly, it will climb too fast, stall and then crash.
If you throw it too weakly, it will lose altitude and crash.
Launching the airplane
from your hand
High speed
About 5 m Medium
speed Low speed
About 2 m
Stop
Wind
Landing
* Although the airplane may seem difficult to control at first, do not give up.
Read the manual carefully and practice.
Lesson 1
For a Person Flying the Airplane for the First Time
First of all, repeat the practice shown in the following drawing, until you get used to the movements the airplane will make.
(1) Point the airplane into the wind. Hold down the [UP] button on the transmitter to make the motor run at high speed.
(2) While maintaining high speed, throw the plane straight forward. When the airplane has climbed to about 5 m, release the [UP] button
to change to medium speed. Fly the plane in level flight. Then, press the [DOWN] button once to reduce the speed (to low) and the
airplane will descend.
(3) When the airplane has descended to about 2 m above the ground, press the [DOWN] button once again to stop the propellers. The
airplane will land.
(4) If the airplane is turning to the right, press the [L] button to turn it to the left. If the airplane is turning to the left, press the [R] button
to turn it to the right. Aim the airplane into the wind while landing and try to keep it flying straight.
How to launch the airplane from your hand
Run into the wind and throw the airplane straight forward into the wind.
(1) Hold the airplane near its center of gravity, over your head.
(2) Use the [UP] button on the transmitter to run the motor at high speed, and keep the airplane horizontal. Run into the wind and when you
feel the airplane becoming light, release it gently.
A408 11
English
12
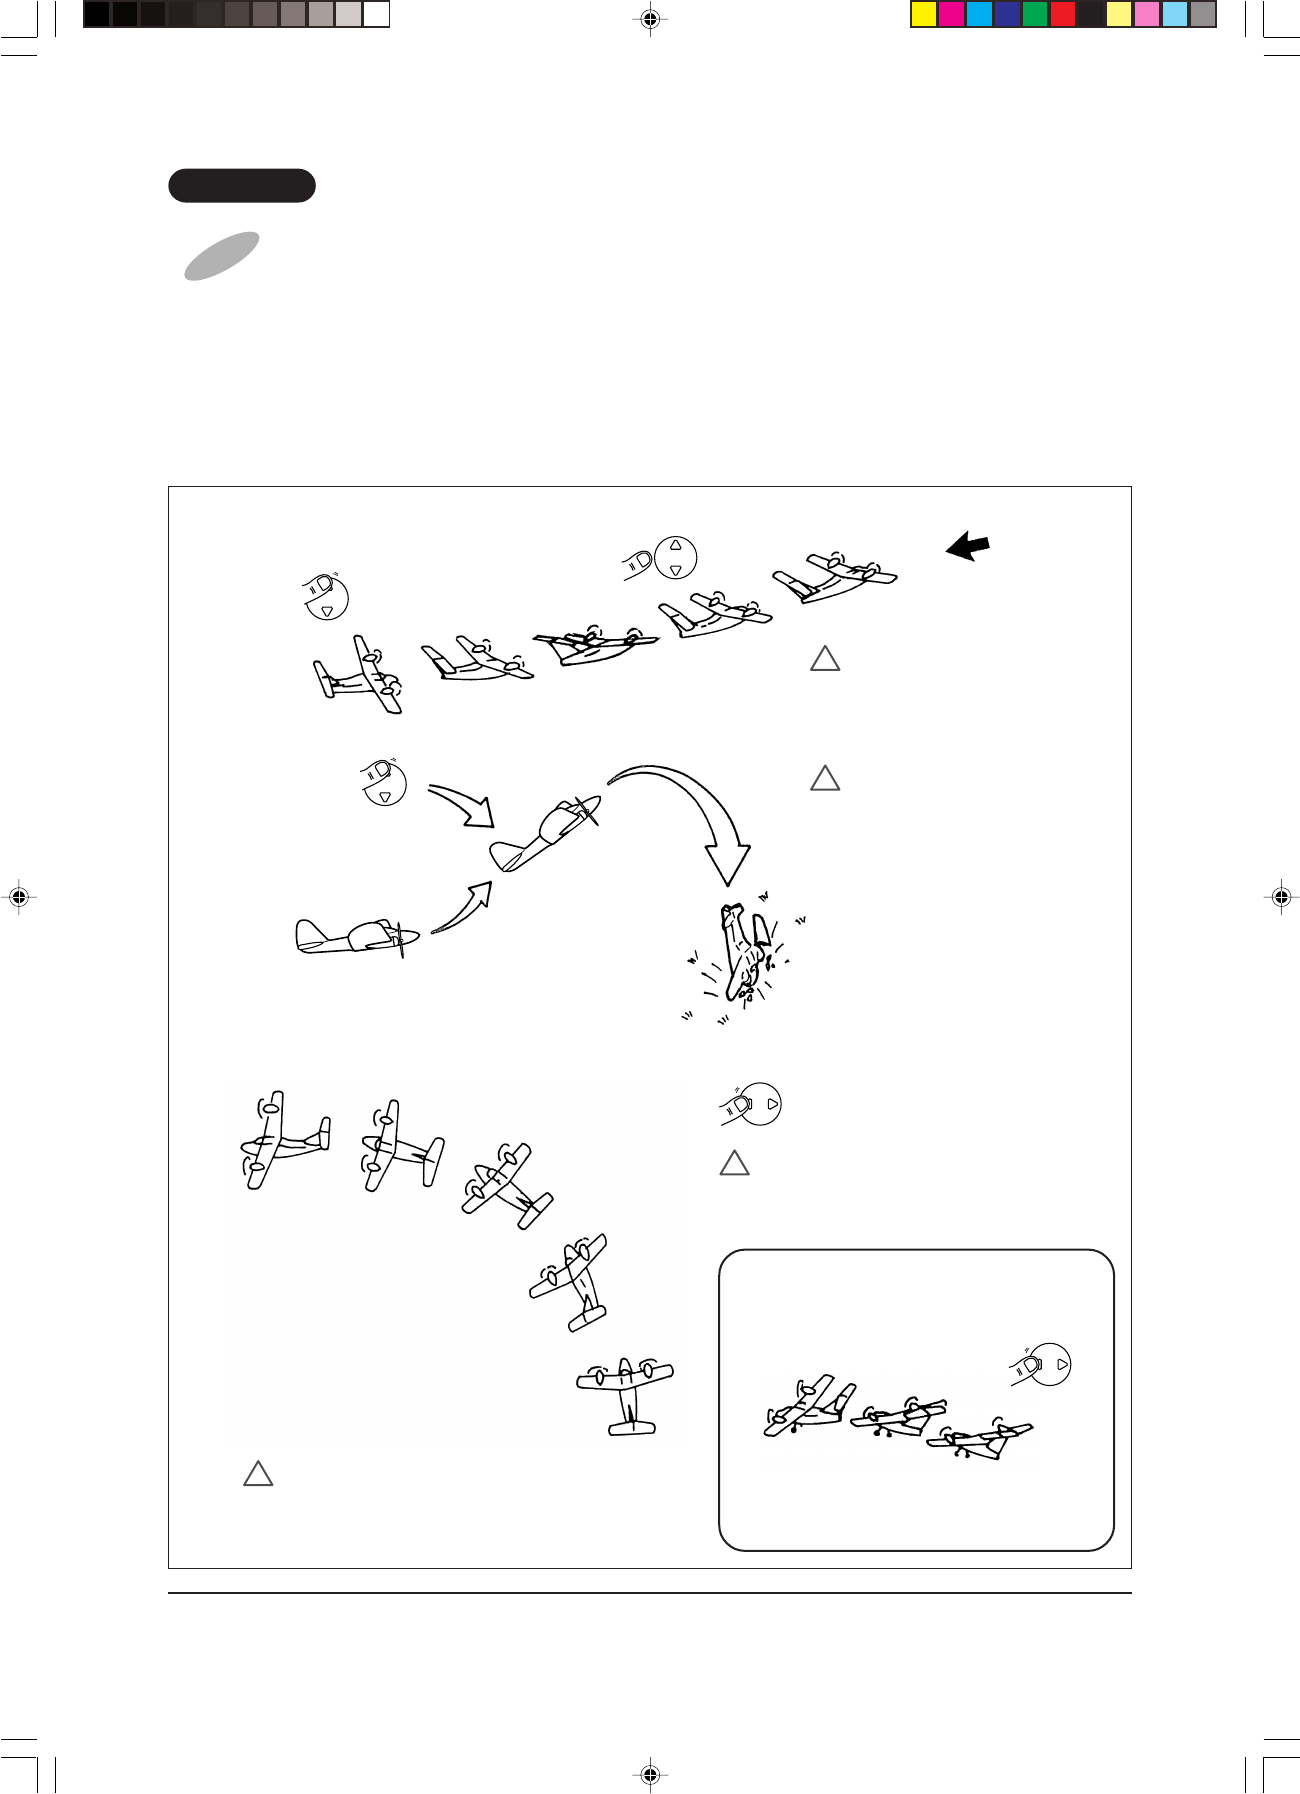
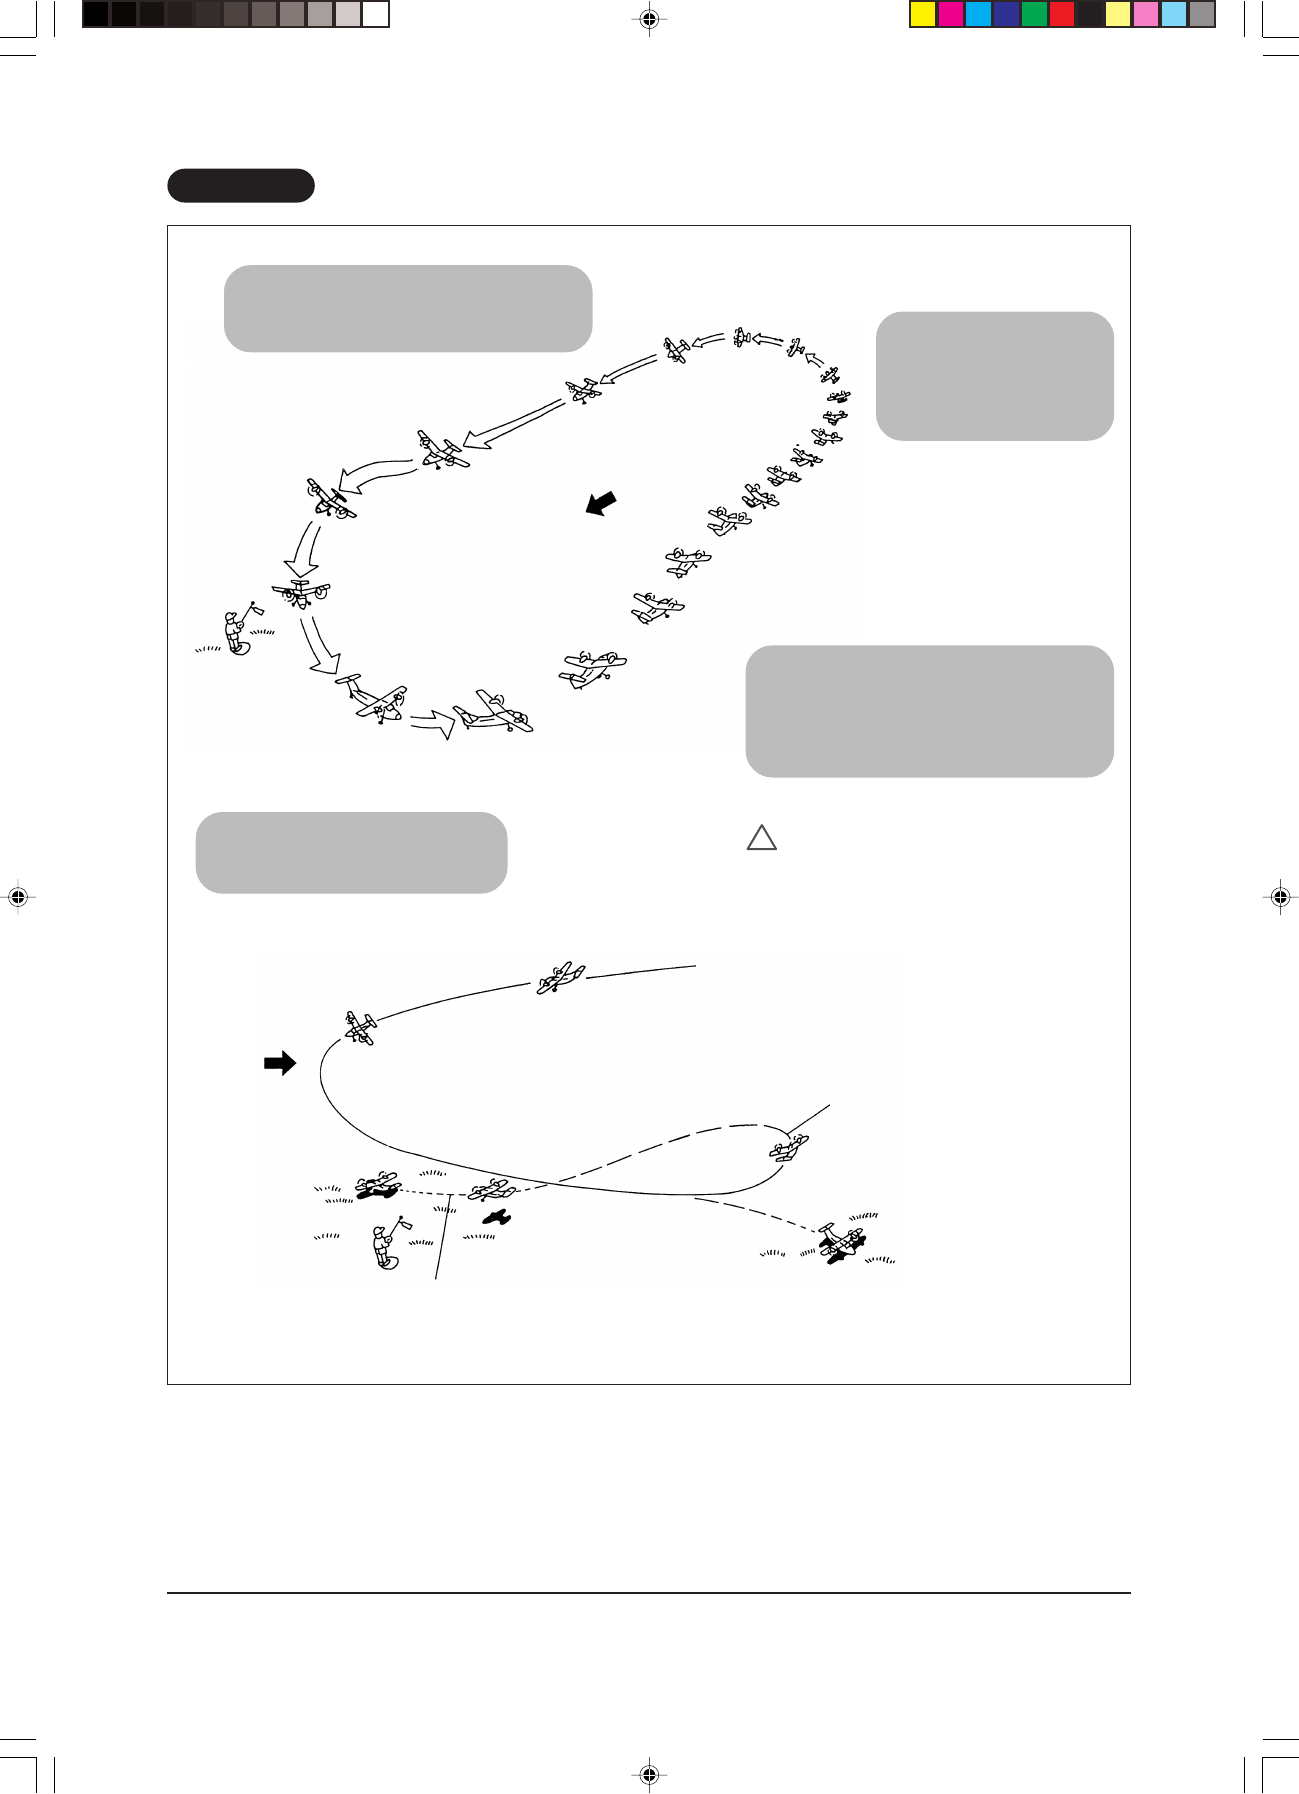
Lesson 2
After you have practiced launching the airplane as described in Lesson 1, try actually flying
the plane.
(1) Launch the airplane straight into the wind and make it climb. When the airplane has climbed to the desired level, release the [UP]
button to return to medium speed. The airplane will then fly level.
(2) When the plane is high enough, try to start turning the airplane slowly.
(3) To prevent the airplane being carried away by the wind, try to fly it into the wind, relative to your position.
(4) When you hear two beeps from the flight timer, start to prepare for a landing right away.
(2)
When a turning operation is performed,
how does the airplane behave?
The airplane will tilt and it will lose some altitude.
* When a turn is complete, push the button to turn
in the opposite direction. This will allow the
airplane to stay level and fly stably.
!
CAUTION
Before you become familiar with flying the airplane, do not
try and make it climb at a steep angle. Be careful not to use
too much rudder.
* Press the button repeatedly.
!
CAUTION
Do not hold down the [R or L] button. Press either one
repeatedly, at short intervals.
Wind
!
CAUTION
If the battery pack is not charged properly,
the airplane may not climb high enough.
High speed
(1)
High speed
Medium speed
Stall
Crash
!
CAUTION
If you hold the [UP] button down too long,
to keep the speed high, the nose of the
airplane may go up and it will stall. This
may cause the airplane to crash.
A408 12
English
13
(3) A tail wind
The airplane will speed up and go quickly. Start
your turn well before the plane reaches the edge
of the flying area.
A cross wind
(When starting a turn with a tail wind)
Since the airplane response to a turn
command using the [R or L] buttons is
slow, a big turn will occur.
A cross wind
(When starting a turn with a
head wind)
When you press the [R or L]
button while flying into the
wind, the airplane will turn
rapidly. The turning radius
will be quite small.
A head wind
Look at the movement of the airplane carefully.
Correct the rudder position, as necessary, to al-
low the airplane to fly straight into the wind. If
the speed is increased too much, the plane will
gain altitude too fast and stall.
!
CAUTION
Be careful not to allow the airplane to fly so far or
high that you lose sight of it.
Wind
(4)
Wind
direction
If the altitude is too low,
point the airplane back
downwind to land it.
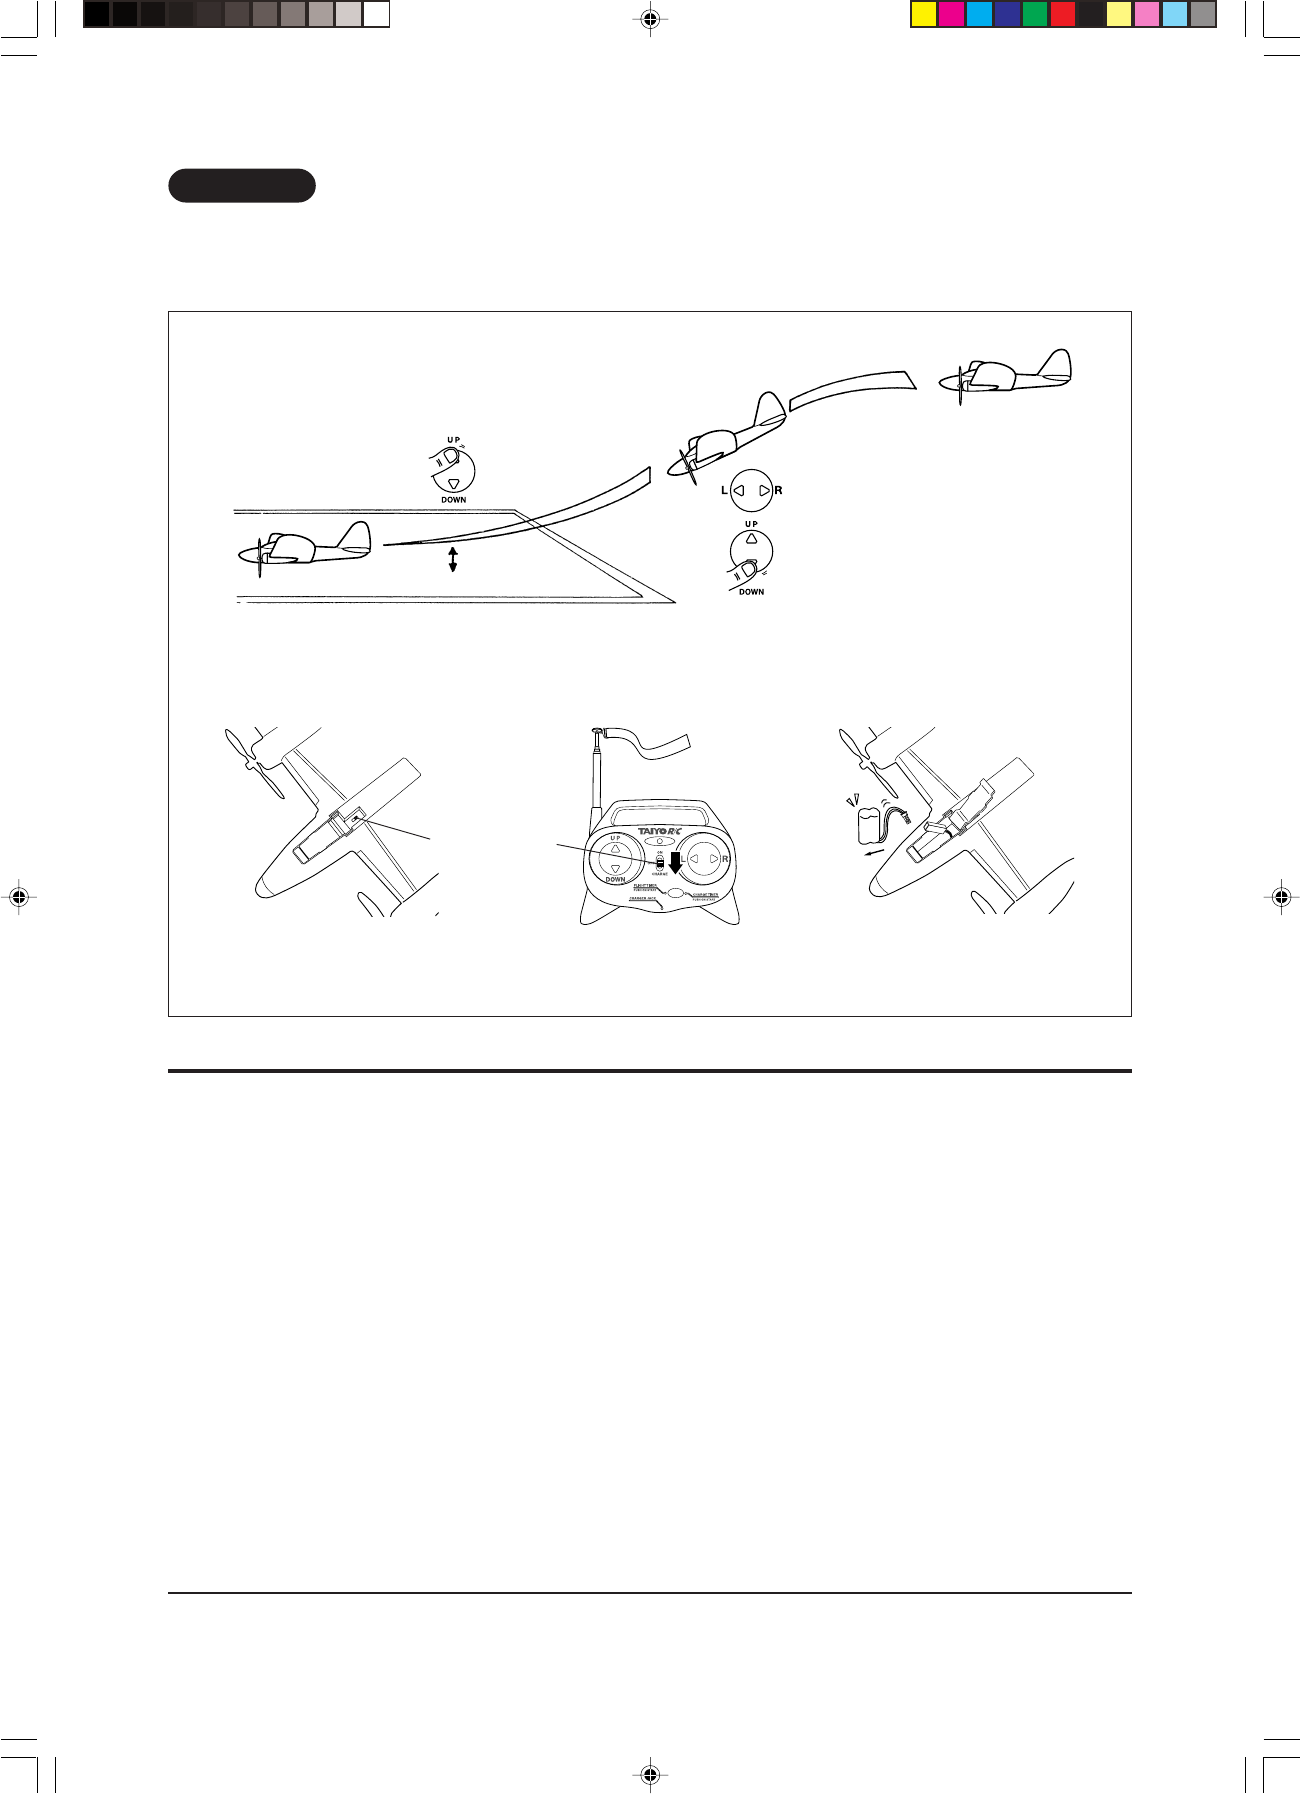
4. When the plane is about 1 m above the ground, increase the speed a little, and lift the
nose of the airplane a little, to make the belly level with the ground.
5. Let the airplane coast a distance of several meters. When it touches the ground, the
landing is complete.
2. When the plane is
low enough, turn
the airplane and fly
it downwind.
1. While flying the airplane straight into the wind, gradually decrease the
altitude (This is to prevent the airplane from being carried away by the
wind).
3. Then, turn the airplane once again
and fly it into the wind. This should
mean that the airplane is making an
approach and is ready to land.
A408 13
English
14
H ow to make a successful landing
(5) After landing the airplane, turn off the airplane switch and the transmitter (charger) switch, in that order.
(6) Remove the battery pack from the airplane, and unplug the connector.
Airplane Maintenance (Repairs)
* If mud enter into the airplane or stuck to it near the tail assembly, the center of gravity of the airplane may change. Therefore, be sure
to clean the plane as needed.
* If the airplane is badly damaged, it may become unbalanced and cannot fly properly. Please have it repaired by customer service. (For
more details, read the "About after-sales service" section.)
* Daily maintenance extends the life of the airplane. If grass or mud is stuck on the airplane, be sure to remove it all. Check each section
of the plane for looseness.
* Since the airplane is made of EPP material that is difficult to break and is very flexible, some paints may peel off easily. Please note
this possibility.
* When you are through flying
the airplane, be sure to col-
lapse the transmitter antenna.
Landing is complete
Gliding condition
(preparing to land)
Speed up and keep the
airplane level.
Stop the propellers. Keep adjusting
the left-and-right tilt of the airplane
while it descends.
1 m
Stop
* Although the airplane may seem difficult to control the airplane at first, do not give up. Read the manual carefully
and practice.
(5) (6)
Power switches
A408-English
A408 14
Direction to Change the Propeller
1. Pull the propeller cap while widening on left and right side.
2. Take off nut by using pliers (Turn to right side), than take off washer. At last take the propeller off.
3. Please be careful installing propeller, flat portion of the propeller is to face front of the airplane. Please refer to direction #1 and
#2 for assembly.
Other Maintenance
* If the body of the airplane is broken, please use glue for "Styrofoam."
* If the rudder hinge comes off, please use very thin double-sided tape to repair.
* If the vertical rudder hinge is broken or lost, please use clear film from the package. Cut clear film into 8mmx18mm and use it
to repair.
* If the rudder horn comes off from the shock of landing or other, please use high viscosity type of glue to repair.
English
15
Precautions, when Carrying Airplane
* Do not carry on vertical tail, may come off.
* Do not carry on main wing or horizontal tail, may change the shape of the wing.
* Turn off the power switch. Propeller may spin.
* Please carry on body.
A408 15
MEMO
Note
- The manufacturer is not responsible for any radio or TV interference caused by unauthorized modifications to this equipment.
Such modifications could void the user's authority to operate the equipment.
A408 2