TandD RTR6X WIRELESS CORE TEMPERATURE DATA LOGGER User Manual
TandD Corporation WIRELESS CORE TEMPERATURE DATA LOGGER
UserManual.wiki
>
TandD
>
RTR6X User Manual
USERS MANUAL
Navigation menu
Upload a User Manual
Namespaces
Wiki Guide
HTML
PDF
Info
Views
User Manual
Discussion / Help
Navigation
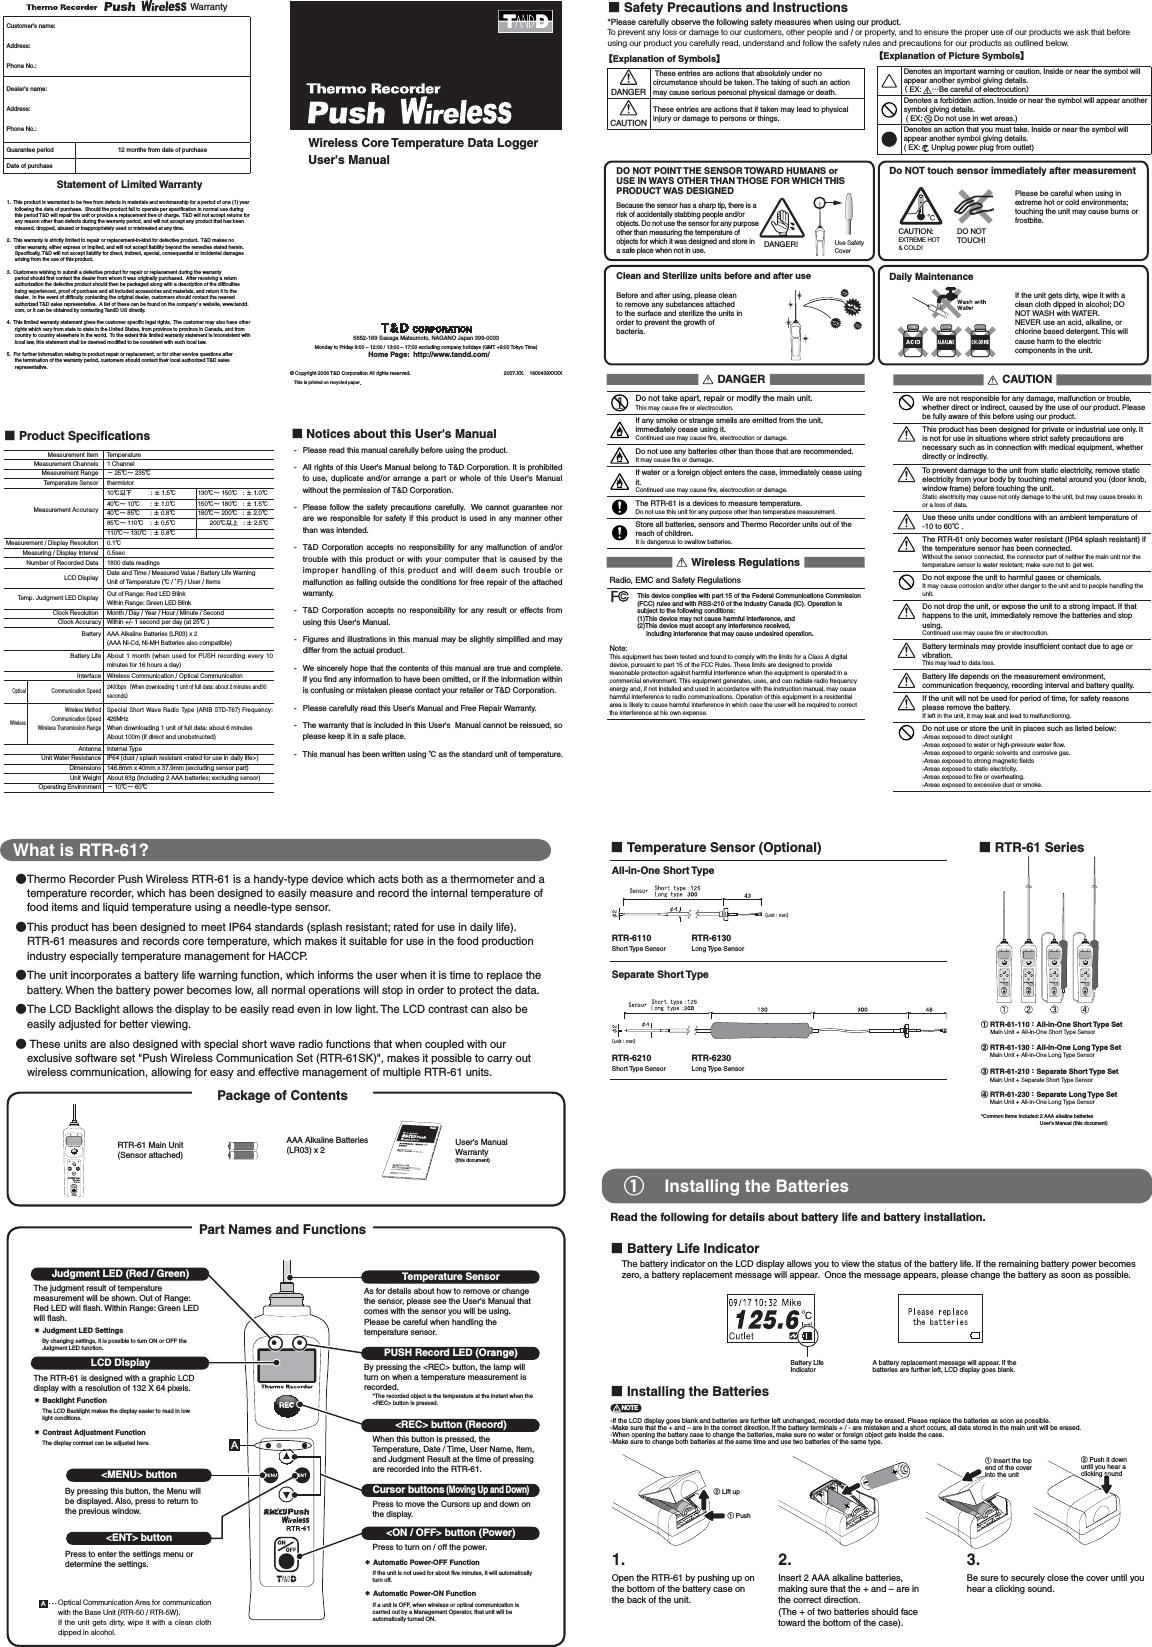
![Menu Settings Window DetailsCheck DataThe 83rd data reading is highlighted by the cursor. Data ListAll recorded data is displayed in descending order (from the newest to the oldest data). Specify data by moving cursors and press the <ENT> button to view detailed information. Judgment ResultCheck Data Data details (Date/Time of Recorded Data, Measurement Item, User Name, Temperature, and Judgment Result) can be viewed. ȤJudgment OKȁȁ ȤLower Limit Error ȁȁ ȤUpper Limit ErrorSelect User elect and set the User Name of the persons who will measure temperature. (Up to 63 user names can be registered into an RTR-61 unit.) Select Item Select and set the Measurement Items. (Up to 63 items can be registered into an RTR-61 unit.) Set Operation ŋŶťŨŮŦůŵġōņŅŐŏŐŇŇJudgment LEDIt is possible to turn ON / OFF the blinking of Upper and Lower Limit Judgment LED. Button SoundIt is possible to turn ON / OFF the beep which sounds when pressing a button. Backlight The Backlight factory default setting for the RTR-61 is "ON in Use", which will backlight the window for 3 seconds only when in operation. Here you can shift the setting to "Always ON" or "Always OFF". Unit of Temp. Select Fahrenheit [ɋF] or Celsius [Ɏ]. ńŭŰŤŬġŔŦŵŵŪůŨ102520070932ŜńŢůŤŦŭŞ ŜġŐŌġŞClock SettingThe RTR-61 clock settings can be made here. (See the following section "How to Make Clock Settings" for details.) Contrast It is possible to adjust the contrast of the display. Remote Info Before carrying out wireless communication, it is necessary for the Management Operator to register Data Loggers (RTR-61 units) as Remote Units and register them into Groups. The Group Name and Remote Unit Name can be viewed here for the RTR-61 unit being used. Memory Usage132 of data readings are recorded. Each RTR-61 can record and store up to 1,800 of data readings. The number of stored data can be viewed here. ӳȁMain Window Names and FunctionsSee the following for the items displayed in the Top Window and the Main Menu Window.ɡTop Window By turning the Power ON, the Top Window will appear. Following are the main display items and marks that appear in the Top Window. ItemUnitRecording ModeCurrent Temperature Battery Status or Wireless Communication in ProgressUser NameCurrent Date / TimeRemote Mode Current Temperature : The currently measured temperature will be displayed. Item : Up to 12 characters can be entered.User Name : Up to 8 characters can be entered.Current Date /Time : Current Time (Month / Date / Hour / Minute)Unit [ ] : Select from Fahrenheit / CelsiusRecording Mode [ ] : Select from Endless / One TimeBattery Status [ ] : The remaining amount of battery power will appear.Wireless Communication in Progress [] :While wireless communication is occurring, this mark will appear. Remote Mode[ ] : The recording of temperature measurements is being controlled by wireless communication.ɡMain Menu Window While the Top Window is being displayed, pressing the <MENU> button on the face of the unit will display the Main Menu.Cursor ScrollTitleHighlightTitle: The title of the menu will be displayedHighlight: The cursor selected item is displayed in white letters on a black background. Cursor: Select the item by moving the Cursor up and down by pressing the arrow buttons < > on the face of the unit.Press the <ENT> button on the face of the unit to select the desired menu.Press the <MENU> button on the face of the unit to return to the previous window. Scroll : The scroll up and down arrows show that data exists outside of the display area. ɣȤ Press <> button on the face of the unit to scroll up. ɥȤ Press < > button on the face of the unit to scroll down.ɡRecorded Temp (Displayed normally after PUSH Recording) 2ECORDED4EMP#UTLETPUSH Record LED "ON"The recorded temperature is displayed for about three seconds; after which the unit returns automatically to the Top Window. - If the Button Sound has been set to "ON", the unit beeps when recording temperature.ӷȁAbout the Message DisplayEven when the power is OFF, an automatic Power-ON may occur to display a message. ӸȁMeasurement Error MessagesIf a temperature measurement error occurs, there may be a poor sensor connection. In such a case, an Error Message will appear. ӶȁHow to Make Clock Settings In order to make the clock settings for the RTR-61 unit, please follow the directions as written below. ӴȁAbout the PUSH Recording Window This window will appear by pressing the <REC> button on the RTR-61 unit to record temperature. ɡWait for Temp (Measuring in progress and waiting for the constant temp)If the "Wait for Constant Temp Function" has been applied to your RTR-61 unit by the Management Operator, this message will be displayed while waiting for the temperature measurement to stabilize. Do not remove the sensor while "Wait for Temp" is on display and the PUSH Record LED is blinking.- When the "Wait for Constant Temp Function" is active, the temperature will not be recorded until temperature stabilization has been achieved. Due to this, after pressing the <REC> button it may take some time before the temperature is actually recorded. - If the temperature is not stabilized even after 15 seconds have elapsed, recording will not be performed and you will be returned to the Top Window. - If the Button Sound has been set to "ON", the unit beeps both when the "Wait for Temp" operation has been started and when the temperature has been recorded. ӵȁMenu ContentsDetails about the Main Menu and the Operational Settings Menu are as follows.Depending on the settings, some operations are restricted from being carried out by manipulating the buttons on the unit. Refer to the following for details: ɡRemote (Remote Mode)When an RTR-61 unit has been set to "Remote Mode" by the Management Operator, it is not possible to use the "PUSH Recording" function without fi rst receiving a "Measurement Command" from the Operator. Even while the power is OFF, when an RTR-61 unit receives a "Measurement Command", the LCD backlight will begin to fl ash and a beeping sound will notify the user that it is time to carry out a recording. To record a measured temperature while in Remote Mode, please carry out the following procedures:1. Open the [Clock Setting] window. 2. By pressing the <ENT> button, "Month" will blink. By pressing the arrow buttons < >, the numerical values get larger or smaller. 3. Press the <ENT> button to determine the value. Then press the arrow buttons < > to move the cursor. 4. By pressing the <ENT> button, "Day" will blink. By pressing the arrow buttons < >, the numerical values get larger or smaller. 5. Press the <ENT> button to determine the value. After this, please make all settings in the same way. Pressing< >ȤMoves the cursor in the order of Month-Day-Year-Hour-Minute. Pressing< >ȤMoves the cursor in the order of Minute-Hour-Year-Day-Month. 6. Finally, move the cursor to the position of "OK" and press the <ENT> button to complete the settings. - To stop making clock settings at anytime, move the cursor to "Cancel" and press the <ENT> button. ɡSettings Change MessagesIf any settings changes have been made via wireless communication to the RTR-61 unit in use, a notifi cation message will be displayed for about two seconds. After that, you will be automatically returned to the Top Window. - Messages will be displayed regardless of any mode settings in the RTR-61. ɡCreated MessagesThe RTR-61 unit can receive any created message from the Management Operator. They will continue to be displayed until the <ENT> button on the face of the unit is pressed. - By making the backlight light up or the beeping sound occur, the user can be informed that a message has been received. - Messages can be received regardless of mode settings in the RTR-61. - Note that there is no message storing function, so messages will not be redisplayed once you press the <ENT> button. Check the sensor connection. ɡFULL when in One-time Mode1. Measurement Command Message example When a Measurement Command is received, push the <ENT> button on the face of the unit to return to the Top Window. *The backlight fl ashing and beeping sound will continue until the <ENT> button is pressed. 2. Top Window When the display switches to the Top Window, the specifi ed item will be on display. 3. Please measure and record the temperature of the specifi ed item. This symbol shows that the data recording capacity is full and no more new data can be recorded. In order to carry out recording again, it is necessary to fi rst download the recorded data from the RTR-61 to the manager's computer and then delete it from the unit. ɡKey Lock Function Because the Management Operator has placed a restriction on carrying out direct operations using the RTR-61, only the <REC> and <ON/OFF> buttons are operable.- Note that if a Message (see Section ӷ) or a Measurement Command is received from the Management Operator, the <ENT> button will become operable.ӲȁOperations TableThis is a table of operations for RTR-61. When using, please refer to the following chart. ńũŦŤŬġŅŢŵŢġġŜııĹĴŞ’06 11/27 15:40NGŊŵŦŮȇŕŰŮġġġġġġġ100 .9ɎńŶŵŭŦŵńũŦŤŬġŅŢŵŢŔŦŭŦŤŵġŖŴŦųŔŦŭŦŤŵġŊŵŦŮŎŢŪůġŎŦůŶ4OP7INDOW-AIN-ENU7INDOWɁ0RESSTHE-%.5BUTTONONTHEFACEOFTHE242UNITɦ4OGETBACKTOTHEPREVIOUSWINDOWPRESSTHE-%.5BUTTONɁ0RESSTHE%.4BUTTONONTHEFACEOFTHE242UNIT2EMOTE)NFO -EMORY5SAGEőųŦŴŴġŵũŦġġġġġġġţŶŵŵŰůŴġŵŰġŴŦŭŦŤŵġŢġŖŴŦųįġġőųŦŴŴġŵũŦġġġġġġġţŶŵŵŰůŴġŵŰġŔűŦŤŪŧźġŅŢŵŢġġġőųŦŴŴġŵũŦġġġġġġġţŶŵŵŰůŴġŵŰġŴŦŭŦŤŵġŢůġŊŵŦŮį#HECK$ATAŔŦŵġŵũŦġŮŰůŵũĭġťŢźĭġźŦŢųĭġũŰŶųġŢůťġŮŪůŶŵŦįȺńŢůŤŦŭȻ*UDGMENT,%$3ETTINGS7INDOW"UTTON3OUND3ETTINGS7INDOW5NITOF4EMP3ETTINGS7INDOW#LOCK3ETTING3ETTINGS7INDOW#ONTRAST3ETTINGS7INDOWŐŏŐŇŇ3ETTINGS7INDOW"ACKLIGHT]3ET/PERATIONőųŦŴŴġŵũŦġġġġġġġţŶŵŵŰůŴġŵŰġŴŦŭŦŤŵġŢġŎŦůŶįġőųŦŴŴġŵũŦġġġġġġġţŶŵŵŰůŴġŵŰġŴŦŭŦŤŵġŢġŎŦůŶįġ3ELECT5SERœŦŮŰŵŦġŊůŧŰňœŐŖőŖŏŊŕȇġŏŢŮŦȇġŏŢŮŦŎŦŮŰųźġŖŴŢŨŦġőŖŔʼnġœŦŤŰųť[0000/1800]ŔŦŭŦŤŵŦťġŊŵŦŮŊŵŦŮȇńŶŵŭŦŵŖűűŦųġȇȁIJĹıōŰŸŦųȇȁIJijıɎɎŕŰŮŪŴġŸŰųŬŪůŨġůŰŸőųŦŴŴġŵũŦţŶŵŵŰůŴġŵŰġŴŦŭŦŤŵĻŐŏŐŇŇ]őųŦŴŴġŵũŦţŶŵŵŰůŴġŵŰġŴŦŭŦŤŵĻɎȌŇ]őųŦŴŴġŵũŦţŶŵŵŰůŴġŵŰġŴŦŭŦŤŵĻőųŦŴŴġŵũŦţŶŵŵŰůŴġŵŰġŢťūŶŴŵġŵũŦġŤŰůŵųŢŴŵġŭŦŷŦŭłŭŸŢźŴġŐŏłŭŸŢźŴġŐŇŇġŐŏġŪůġŶŴŦġ]őųŦŴŴġŵũŦţŶŵŵŰůŴġŵŰġŴŦŭŦŤŵĻŋŶťŨŮŦůŵġōņŅŐŏŔŦŵŶűŃŶŵŵŰůġŔŰŶůťŐŇŇŔŦŵŶűŖůŪŵġŰŧġŕŦŮűńŦŭŴŪŶŴɎŔŦŵŶű09 / 30 / 20070930ŃŢŤŬŭŪŨũŵłŭŸŢźŴŔŦŵŶű$ATA,IST 5SER,IST )TEM,IST3ELECT)TEMŐŏŔŦŵŶűńŭŰŤŬġŔŦŵŵŪůŨ](https://usermanual.wiki/TandD/RTR6X/User-Guide-867369-Page-2.png)
