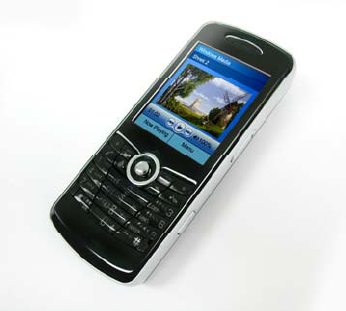
Tatung M1 Quad Band Smart Phone W/ Bluetooth User Manual cover
Tatung Company Quad Band Smart Phone W/ Bluetooth cover
Tatung >
Users Manual
1
TATUNG
SMARTPHONE
M1 USER MANUAL
Smartphone User Manual
1
Congratulations on the purchase of your
new Windows Mobile™ Smartphone!
Please read before operating your device.
THE SMARTPHONE IS NOT CHARGED WHEN
YOU TAKE IT OUT OF THE PACKAGE.
DO NOT REMOVE THE BATTERY WHEN THE
SMARTPHONE IS BEING CHARGED.
WHEN INSTALLING YOUR SIM CARD, MAKE
SURE THE SMARTPHONE IS POWERED OFF
AND THE SIM CARD IS INSERTED INTO THE
SLOT SECURELY.
YOUR WARRANTY IS INVALIDATED IF YOU
OPEN OR TAMPER WITH THE OUTER CASING
OF THE SMARTPHONE.
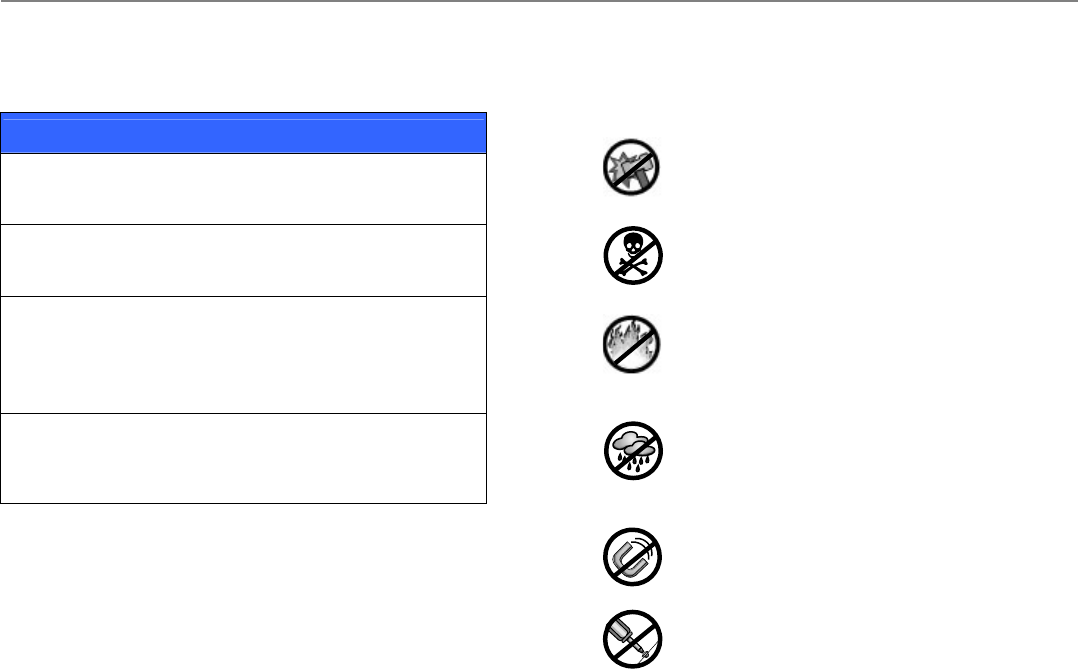
Safety Instructions
To ensure your safety, and prevent the Smartphone
from potential damages, please follow the instructions
carefully at all times.
Avoid dropping, hitting, applying excessive
pressure or putting heavy objects on the
Smartphone.
Avoid exposing the Smartphone to chemical,
corrosive and alcoholic liquids or using materials
to clean the Smartphone.
Do not use, leave, expose, or store the
Smartphone under fire or where it will be
subjected to prolonged direct sunlight or extreme
temperatures.
Avoid exposing the Smartphone to water. If any
water may drop on the panel, please use a dry
cloth to wipe the Smartphone right away so not to
harm the player and its system.
Keep the Smartphone away from strong
magnetic objects or environments.
Do not try to modify, repair or take apart
components of your Smartphone. If
you need further service, please refer servicing
to the authorized service technician or provider.

Smartphone User Manual
2
? Avoid pushing objects into product Never push
any objects into the Mini-SD card slot or other
openings in the product.
? Use only original manufacturer-approved
accessories that don’t contain any metal, else
FCC RF exposure guidelines will be violated.
? While using earphones, please pay attention to
the volume. Being exposed to high volume can
damage your hearing.
This device can cause interference to an aircraft's
navigation system and network. In most
countries it is against the law to use this device
on board an airplane.
Do not use this product in gas stations, fuel
stores, chemical plants and locations containing
explosives.
Vehicle drivers in motion are not permitted to use
hand-held devices, except in emergency. In
some countries, using hands-free devices as an
alternative is allowed.
Hospitals or health care facilities may be using
equipment that could be sensitive to external RF
energy. In most hospitals or medical facilities,
using this device is forbidden.
Contents
Chapter 1 Get Started
1.1 KnowYour Smartphone
1.2 Setup Your Smartphone
1.3 Status Indicators
1.4 Accessories
1.5 Enter Text and Numbers
1.6 Navigate
1.7 Secure Your Smartphone
Chapter 2 Use Your Smartphone
2.1 Make a Phone Call
2.2 Receive a Phone Call
2.3 Use the Contacts and Beam
2.4 In-call Options
2.5 Retrieve a Voice Mail Message
2.6 Review Your Calls
2.7 Speed Dials
2.8 Additional Dialing Information

Smartphone User Manual
3
Chapter 3 Use Your Camera
3.1 Use the Camera
3.2 Use Pictures & Videos
Chapter 4 Personalize Your
Smartphone
4.1 Customize Smartphone Settings
4.2 Customize Profiles and Sounds
4.3 Customize Date and Time
Chapter 5 Get Connected
5.1 Connect to the Internet
5.2 Pocket Internet Explorer
5.3 Bluetooth
5.4 Modem Link
5.5 Wireless Manager
Chapter 6 Messaging Features
6.1 Set up Accounts
6.2 Manage Accounts
6.3 Send E-mail and Text Messages
6.4 Receive E-mail and Text Messages
6.5 View Message Folders
6.6 Instant Messaging
6.7 MMS Messaging
Chapter 7 Synchronization
7.1 Use ActiveSync
7.2 Install ActiveSync
7.3 Exchange Server
7.4 Synchronize music, video and pictures
Chapter8 Applications
8.1 Use Calendar
8.2 Use Tasks
8.3 Use Calculator
8.4 Use Voice Notes
8.5 Use Windows Media Player
8.6 Use JAVA Manager
8.7 Games

Smartphone User Manual
4
Appendix
Regulatory Notices
Troubleshooting
Specifications
INDEX

Chapter 1 Get Started
1
Chapter 1
Get Started
1.1 Know Your Smartphone
1.2 Setup Your Smartphone
1.3 Status Indicators
1.4 Accessories
1.5 Enter Text and Numbers
1.6 Navigate
1.7 Secure Your Smartphone
1.1 Know Your Smartphone
This section will help you familiarize yourself with
your Smartphone, including a basic introduction
to the buttons and features.
1. Power Button
Press and hold the Power Button to switch on or
off your Smartphone. Press and quickly release
the Power Button to display the Quick List,
which enables you to change profiles, lock your
Smartphone, manage wireless status, or switch
off your Smartphone.

Chapter 1 Get Started
2
2. Mini-SD Card Slot
Use the push-push technique. Simply push the
Mini-SD card to click in or push again to eject.
3. Earphone Jack
Plug the stereo headset into the Earphone Jack
to use the headset frofile and listen to music or
multimedia files.
4. Volume Up/Down Button
This button allows you to adjust the volume at
any time.
5. Camera Button
Press this button once to switch on the preview
mode. Press again for still pictures capturing or
video recording.
6. Mini USB Port
Plug the Mini USB cable into the port to
synchronize data in your Smartphone with
desktop or laptop. Also, plug the AC adapter in
here to charge the battery.
7. Receiver
8. Microphone
9. Battery Charging Indicator
Indicate the charging status.
Battery Charging Indicator Status
Solid Green Battery is fully charged.
Solid Amber Battery is being charged.
10. Navigation Button
Scroll left, right, up, and down or press down as
enter. When executing Windows Media Player
10, scroll up or down for adjusting the volume;
scroll left or right to select previous or the next
song; to fast forward/rewind quickly, scroll and
hold left or right, press down to pause, press
again to play.
11. Media Player Button
Switch on Windows Media Player 10.
12. Left Softkey
Perform the function shown in the “Softkey
Label” on the screen immediately above the
button. (For example, when in the Home
screen, pressing the Left Softkey opens the
Start menu.)

Chapter 1 Get Started
3
13. Right Softkey
Perform the function shown in the “Softkey
Label” on the screen immediately above the
button. (In many cases, pressing the Right
Softkey opens a menu associated with a
particular application.)
14. Messaging
Execute Text Messages/Outlook E-mail/MMS
15. End Button
Press to end a phone call or return to the Home
screen. Press and hold to lock the keypad.
16. Talk Button
Press to start a call or answer an incoming call.
Press and hold to turn the speakerphone mode
on or off, or switch between an active call and a
call on hold.
17. Back Button
Press to return to the previous screen, or to
backspace over one character in a text field.
Press and hold to delete the contents of an
editable field.
18. Home Button
Press to return to the Home screen at any time.
19. Display Screen
The layout of the Display Screen will be
described in chapter 1.6.
20. Camera Lens with Self-Portrait Mirror
Incoming live video stream enters here and is
shown on the display screen when you are in
Camera mode. Position the Smartphone until
the mirror reflects the desired image.
21. Loud Speaker 1
Ring tones, music and speakerphone can be
played through the loud speaker.
22. Loud Speaker 2
Ring tones, music and speakerphone can be
played through the loud speaker.
23. RF ANT Output
Chapter 1 Get Started
4
1.2 Setup Your Smartphone
In this section you will learn how to install the
battery, the SIM card, the Mini-SD card and to
charge the battery.
Install the SIM Card
The SIM (Subscriber Identification Module) card
contains a computer chip that stores your
personal number, phone book, and other
services provided by your service provider.
1. Slide the back cover all the way out to open the
battery compartment.
2. Remove the battery by lifting the battery grip.
3. Insert the SIM card into the SIM card slot and
leave the chamfered corner facing out.
Install the Mini-SD Card
Use the Mini-SD (Secure Digital) card in your
Smartphone. You may plug the Mini-SD card to
the Mini-SD slot to store images, video, music
and other data on your Smartphone.
Install the Battery
1. Align the cooper contacts on the battery
towards the battery connector inside the
battery compartment (you can see the cooper
contacts).
2. Push the upper side of the battery to click in.
Slide the back cover back to the Smartphone.
1 3
2
Chapter 1 Get Started
5
Charge the Battery
Charge your battery fully (about 4 hours) before
using the Smartphone. You may connect your
Smartphone to an electrical outlet by using the
adapter or connect your Smartphone to a PC by
using a Mini USB cable.
NOTE: The time it takes for a battery to be fully
charged depends on the environment temperature at
the time of charge; a full charge normally takes about
3.5-4 hours under 0-10 degree temperatures, and
below 3 hours for temperatures ranging from 20-45
degrees.
Mode Estimated battery life
Talk time 3.5 to 4 hours
GPRS Up to 2 hours
Standby 200 hours
Fully charge the new battery before using your
Smartphone for the first time. When the low-battery
message appears, save any unsaved data you are
working on then switch off the Smartphone. Do not
restart your Smartphone until you have connected it to
an external power source or connect to a PC’s USB
port.
NOTE: Do not leave your Smartphone connected to a
charger for longer than a week because overcharging
can shorten a battery’s lifespan. Your battery will
automatically discharge when the device is not in use.
Leaving the battery in exceedingly hot or cold places
may also reduce its capacity or shorten its lifespan.
Your Smartphone can be charged while switched on or
off. Charge your battery by plugging the AC adaptor
into the mini USB port on the left side of the
Smartphone. You may also charge your Smartphone
using the Mini USB cable while connected to the PC’s
USB port.
Chapter 1 Get Started
6
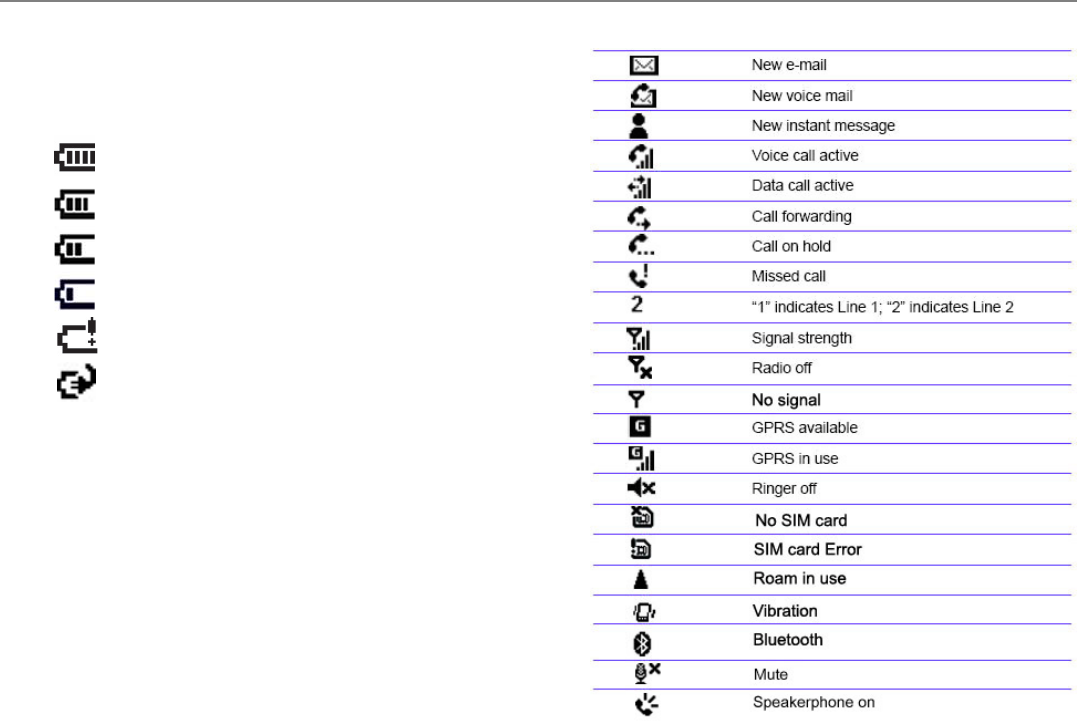
Battery Capacity Indicator Icons
The Battery Capacity Indicator displayed on the
Title Bar of the display screen indicates the
capacity of the battery,
Full
50%~74% capacity
28%~49% capacity
Less than 27% capacity
Very Low alert (less than 4%)
Charging
1.3 Status Indicators
Chapter 1 Get Started
7
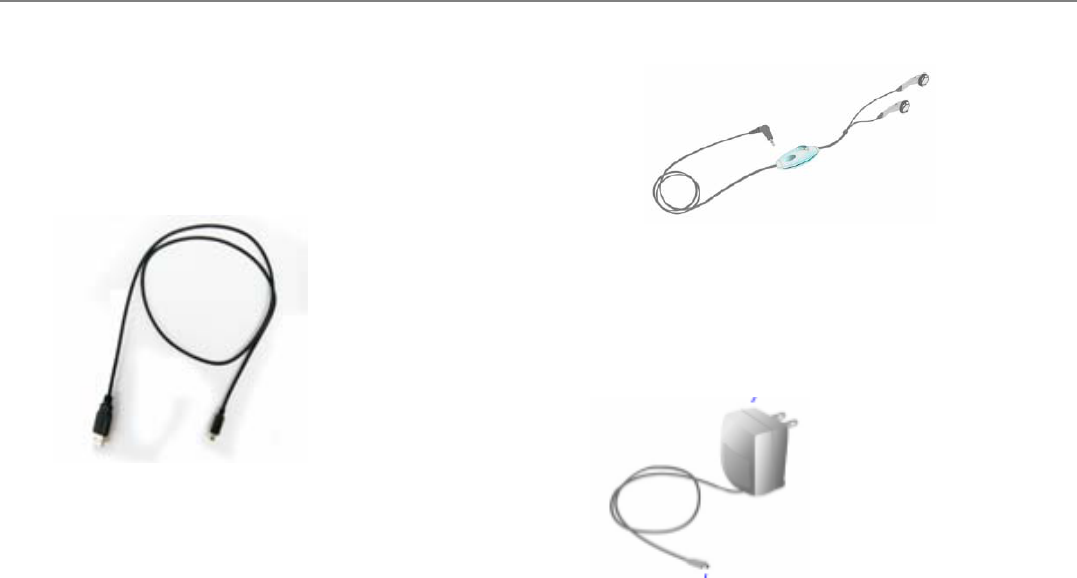
1.4 Accessories
Mini USB Cable
A Mini USB cable is provided to allow you to
synchronize information between your Smartphone
and PC using Microsoft ActiveSync. You may also
charge the battery by plugging the cable to a PC USB
port.
Stereo Headset
Use the headset to listen to music or multimedia files.
The earphones can also function as a hands free
device.
Using the headset
Connect the headset cable to the earphone jack
located on the top of the Smartphone. Press the
“Hook Detect” button on the headset to receive an
incoming call. Press and hold that button to end a
call.
AC Charger
Your Smartphone can be charged while powered on or
off. Charge your battery by plugging the AC adaptor
into the mini USB connector on the side of the
Smartphone. The AC adaptor is shown below.
Holster
Also furnished with your Smartphone is a handy
carrying pouch.
Chapter 1 Get Started
8
1.5 Enter Text and Numbers
Your Smartphone supports three input modes for
entering text and numbers: Multipress, T9, and
Numeric. Your Smartphone will automatically
select the appropriate input mode in the editable
field. You can toogle the input modes by holding
down the * key.
Input and mode choices are Symbols, 123, Abc,
and T9 English. The indicator of input mode
functioned displays on the Title Bar. All the
indicators are shown as below.
Indicator Mode
abc Multipress text input mode, lowercase
Abc Multipress text input mode, uppercase
ABC Multipress text input mode, caps lock
t9 T9 text input mode, lowercase
T9 T9 text input mode, uppercase
T9 T9 text input mode, cap lock
123 Numeric input mode
Multipress Mode
In Multipress mode, you can enter a letter by
pressing the number key on which the letter
appears.
1. To enter the first letter on the number key,
press the key once, to enter the second letter,
press the key twice quickly, and so on.
2. The letter entered most recently is underlined
until you have completed the keypresses for
the letter and moved on to the next letter.
For example (In Multipress Mode) :
Entered word Pressed keys
day 3, 2, 999
great 4, 777, 33, 2, 8
Press the # key to move a space.
Press the 1 key repeatedly to switch the
punctuation mark.
NOTE: When you enter letters on the same
number key, you must pause and wait until the
underline disappears after entering the first letter.
Then you can continue to enter the next letter.
(This pause is called the Multipress time-out, and
you can adjust the length of the time of the pause
Chapter 1 Get Started
9
between keypresses.)
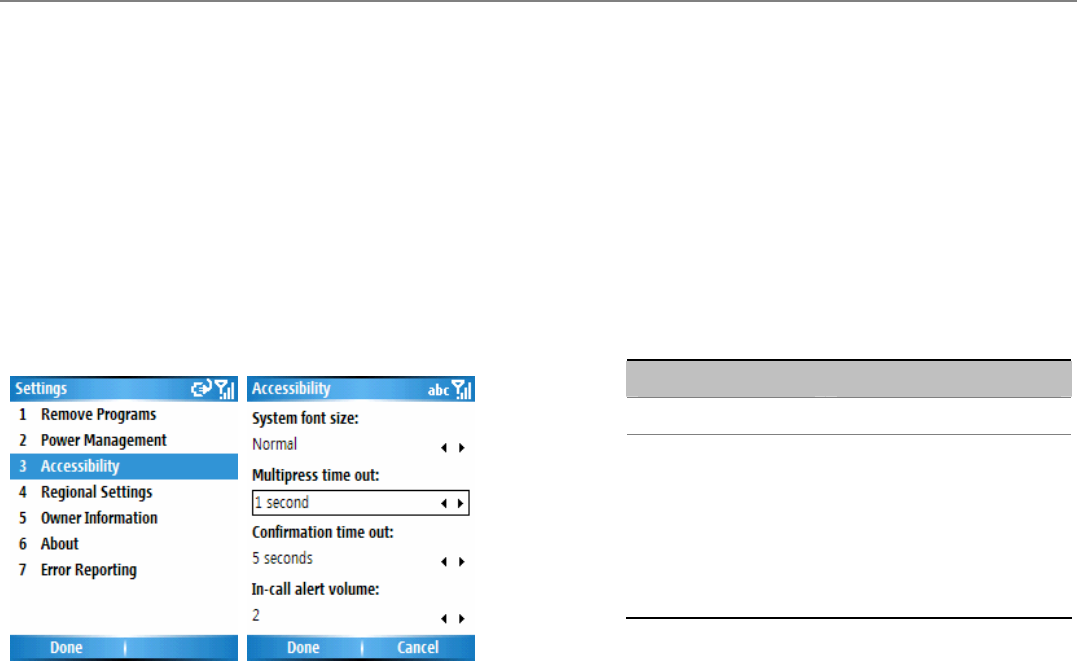
To change the Multipress time out:
1. From the Start menu>select Settings.
2. Select More>Accessibility.
3. In the Multipress time out field, select the
length of the pause between keypresses
preferred.
4. Press the Left Softkey (“Done”) to save the
settings and return to the settings screen.
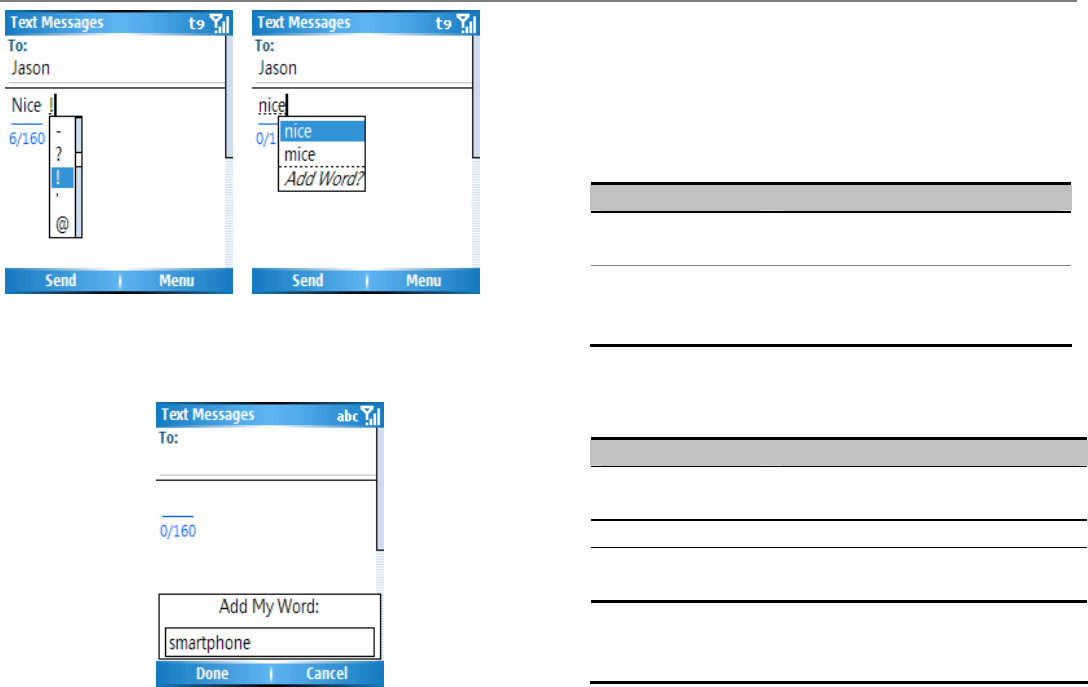
T9 Mode
In the T9 mode, just press the number keys that
contain the letters that you want to spell a word. T9
will then analyze your keypresses and
automatically complete the word.
1. Press and hold the * key to invoke the input
menu. Scroll down and choose “T9 English.”
2. Enter letters by pressing the keys on which the
letters appear. Press a key only once for each
letter.
For example (In T9 Mode) :
Entered word Pressed keys
nice 6, 4, 2, 3
Press the # key to accept the word and enter a
space after it. Or you may scroll through the other
word options by using the Navigation Button
and then press down to accept the word choice.
Press 1 and then scroll up or down the
Navigation Button to cycle through common
punctuation symbols.
Chapter 1 Get Started
10
NOTE: T9 cannot always find the word you want in the
T9 dictionary. You may add your word to the T9
dictionary.
Numeric Mode
When you are in the Numeric mode, just press the
number(s) you want to enter on the keypad. If a field
permits a numerical entry only, such as the Work
phone number field in Contacts, the input mode will
automatically default to Numeric mode.
Task Directions
Enter a number Press the desired corresponding key
on the keypad
Enter the (+) sign
(for international
calls)
Press and hold 0
Miscellaneous Input Tasks
Task Directions
Enter a space In Multipress or T9 mode, press the#
key.
Start a new line Press down the Navigation Button
Enter a symbol Press and hold the#key>select the
wanted symbol>press Done.
Delete characters Press the Back Button to backspace
over a single character, or hold it to
delete a paragraph.
Chapter 1 Get Started
11
1.6 Navigate
This section discusses how to navigate through your
Smartphone’s screens in order to perform tasks
efficiently.
Navigation Button
It provides an easy way to move or scroll through
selections on the screen. You can scroll the button
left, right, up, or down to select desired item. Or you
may select a highlighted item by pressing down the
Navigation Button. In many cases, scrolling to an
item and pressing down the Navigation Button
executes a command, or takes you to a program or
setting, or serves as the Done/Save function. When
you scroll to a checkbox, pressing the Navigation
Button activates or clears the box.
Softkeys
There are two softkeys on your Smartphone, located
directly below the display screen: the Left Softkey and
the Right Softkey. Each softkey performs the
command displayed above it on the screen (called the
“Softkey label”).
1. Getting
Menus
On many screens, the function of the Right Softkey is
to open a menu which displays a list of options that are
relevant to the current screen/application. Selecting a
menu option will either perform that command or take
you to another part of the user interface where you can
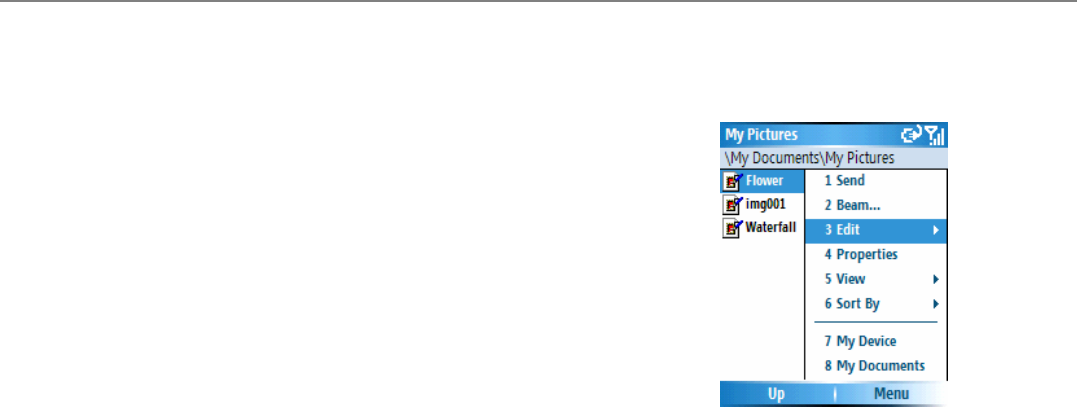
perform the command. The example menu shown
below comes from the File Explorer application.
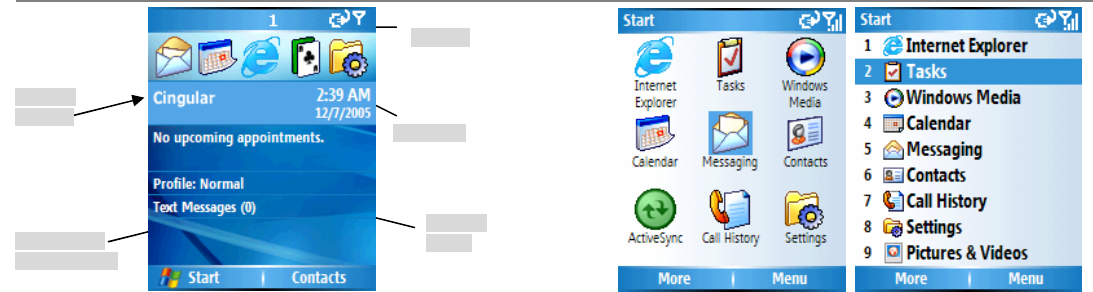
The Home button
Pressing the Home Button takes you to the Home
screen. You can access to all the programs of your
Smartphone from the Home screen.
The top of the Home screen displays five currently
accessed applications. The center of the screen
displays the name of the system provider, upcoming
appointments, current profile, the number of text
massages, and time/date. Selecting one of these will
open the related screen.
Chapter 1 Get Started
12
Note: The screen layout shown above is one of the
attributes of Home screen. You may use Settings>
Home screen to change to the desired Home screen
layout including Windows Simple, Windows Default,
Large Font, Windows Basic, and MSN Default.
Adittionally, you may press and hold the # button to
switch between Line1 and Line 2.
The Start menu
You can immediately start executing some bundled
programs by using the Start menu. (You can also
optionally install more from the included Application
CD.)
Grid View List View
1. Press the Left Softkey to open the Start menu.
To access the next “page” of the Start menu,
press 9 on your keypad.
2. Select an item and press down the Navigation
Button. (Or you may press the corresponding
number in the list view..)
NOTE: You may switch the view of the Start menu by
selecting Start menu form the Settings screen.
The Back Button
Press the Back Button to return to the previous screen
(similar to the Back button on an Internet browser.) In
a text field, pressing the Back Button to move the
cursor back and delete the character to the left (similar
Date/Time
Current
Profile
Numbers of
text messages
Service
Provider
Title Bar
Chapter 1 Get Started
13
to pressing the Backspace key on a keyboard).
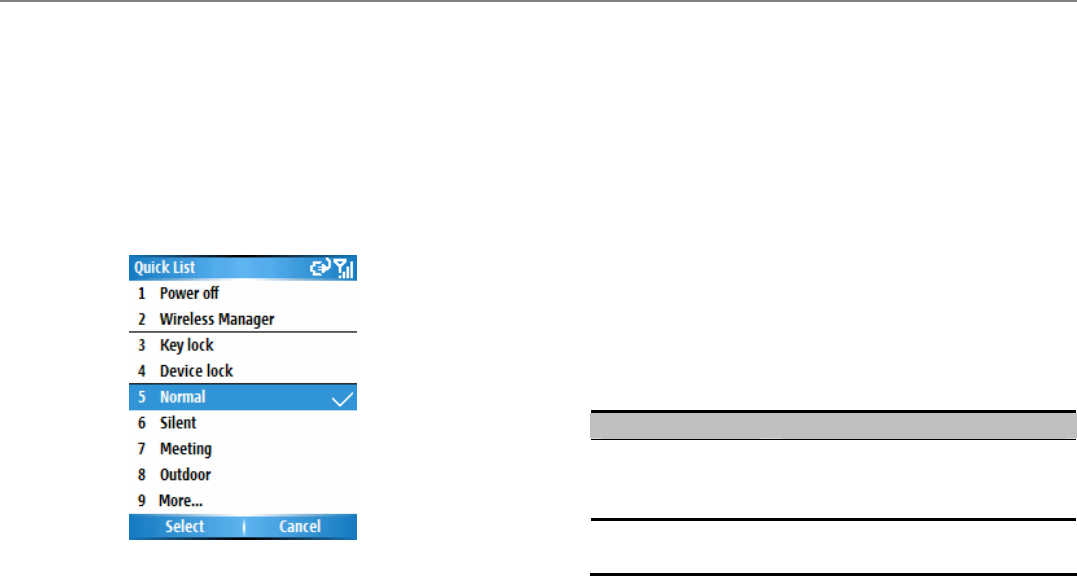
The Quick List
The Quick List offers convenient access to a list of
functions, such as managing your wireless status,
locking your Smartphone, locking the Smartphone's
keypad, and choosing a different profile.
1. Press and quickly release the Power Button on
the top of your Smartphone to invoke the Quick
List. (Caution: If you press and hold the Power
Button too long, your Smartphone will power
off.)
2. Select the item you want and press down the
Navigation Button, or the corresponding
number.
1.7 Secure Your Smartphone
You can set up the level of security you want to have
on your Smartphone by locking the SIM card, the
keypad, or the entire phone.
Lock the Keypad
The keypad lock turns off the keypad functionality.
This is a helpful feature if, for example, your
Smartphone is turned on and in your pocket, and you
want to prevent accidental keypresses from dialing a
number, etc.
Task Directions
Lock your keypad In the Home screen, press and hold
the End button. Or go to the Quick
List and select Key Lock.
Unlock your keypad In the Home screen, press Unlock,
and press the*key.
Chapter 1 Get Started
14
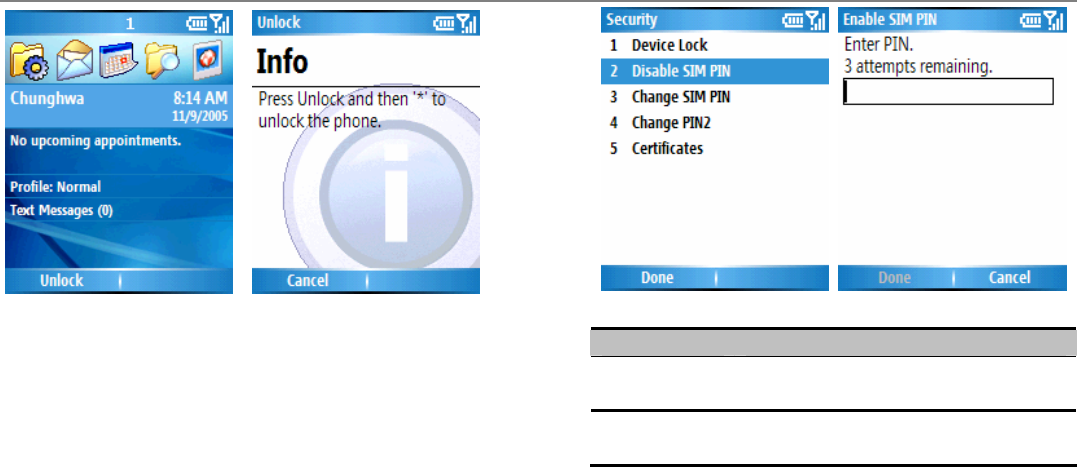
Lock your SIM card
Locking your SIM (Subscriber Identity Module) card
prohibits you from using the Smartphone, but you can
still turn it on and make emergency calls. When you
turn your Smartphone on, you will be prompted for your
PIN (Personal Identify Number) which you must enter
correctly. (shown as the left picture below.)
Task Directions
Lock the SIM Start>Settings>Security>Enable
SIM Lock>Enter your PIN>Done
Unlock the SIM Start>Settings>Security>Disable
SIM Lock>enter your PIN>Done
Lock Your Smartphone
Locking your Smartphone prevents access to personal
data. When you enable this feature, your Smartphone
will lock itself after a specified time of inactivity. You
will have to enter your Smartphone lock password
before the access is granted. You can still receive
calls and make emergency calls, when the
Smartphone is locked.
p
Chapter 1 Get Started
15
Task Directions
Lock
your Smartphone
1.Press Power button to invoke Quick
List>Device lock Or Start>
Settings>Security>Device lock
2. Select the amount of time in the
Prompt if device unused for field
3. In the Password field, enter the
password you want to use.
4. In the Confirm password field, enter
the password again>Done
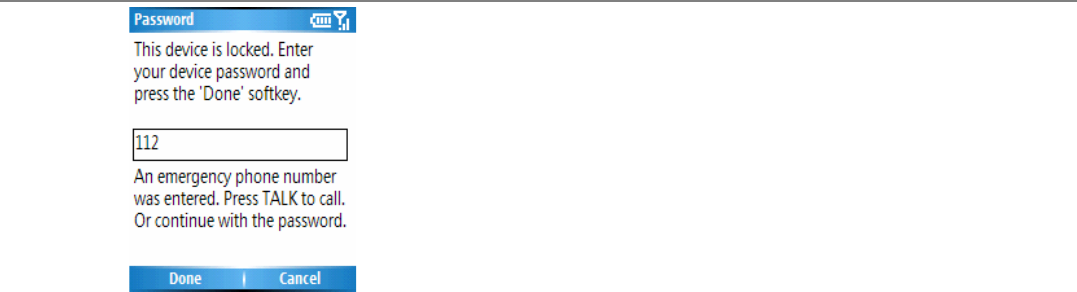
Unlock
your Smartphone
1. Press Unlock>enter your password
2. Press Unlock again.
Turn off
phone lock
Start>Settings>Security>Disable
Phone Lock>enter your password>
Done
NOTE: If you forgot your password, please call your
Customer Care Service Center for information about
how to reset your device and thereby regain access to
it. The procedure will cause your Smartphone to lose
all programs you had installed, and personal data.
However, note that if you had previously synchronized
with a PC, you will be able to recover the lost programs
easily by synchronizing with it again, after the reset.
Therefore it is recommended that you synchronize
periodically, in the event that you ever need to easily
recover your data.
You can still receive calls and make emergency calls,
even when the device, the keypad, or the SIM card is
locked.
Chapter 1 Get Started
16
Chapter 2 Use Your Smartphone
1
Chapter 2
Use Your Smartphone
2.1 Make a Phone Call
2.2 Receive a Phone Call
2.3 Use the Contacts and Beam
2.4 In-call Options
2.5 Retrieve a Voice Mail Message
2.6 Review Your Calls
2.7 Speed Dials
2.8 Additional Dialing Information
2.1 Make a Phone Call
There are several ways to make a call on your
Smartphone.
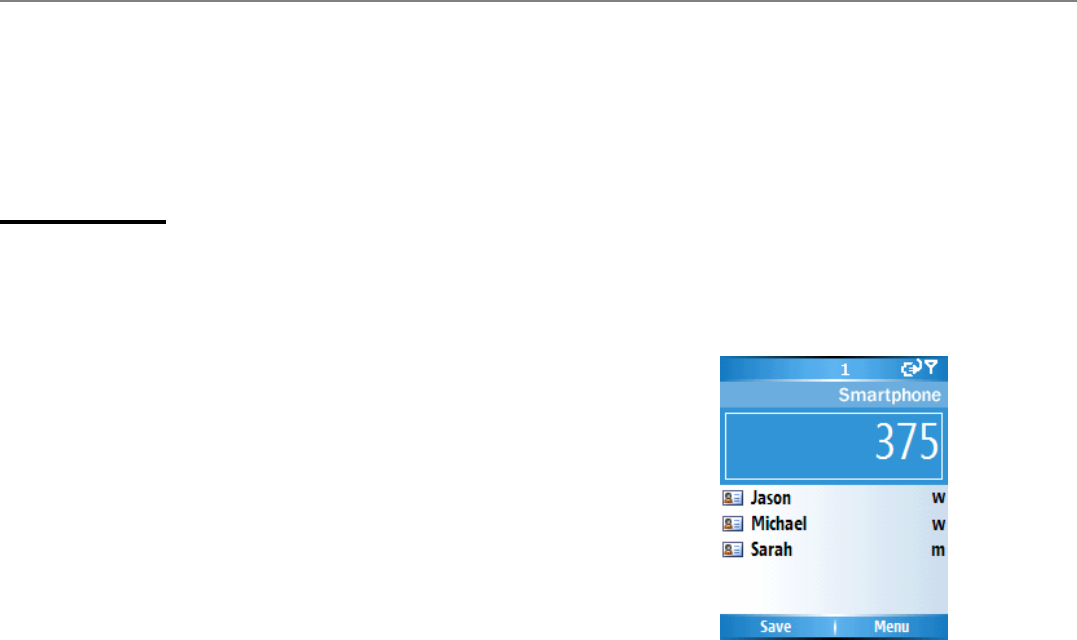
Make a phone call from the Home screen
In the Home screen>enter the phone number>press
the Talk Button to make the call.
Press the Back button if you need to backspace over
a digit. As you enter a phone number, your phone
searches Contacts, Call History, Speed Dial lists,
and your SIM card, to find a matching number.
Matched names and numbers will be displayed.
In this example, the first few digits of a phone number
have been entered. The names listed in this screen

Chapter 2 Use Your Smartphone
2
have all been found to have phone numbers that start
with these digits. At this point, you can select the
desired name without entering more numbers.
Make a call from Contacts
To make a phone call by Contact name:
1. In the Home screen or the Start menu, select
Contacts. If there are many contacts listed, you
can enter the first few letters of the desired
contact's name to perform a search.
2. Select the name you want to call and press the
Talk Button.
To change the default number for a Contact:
1. In the Home screen or the Start menu, select
Contacts.
2. Select the contact>scroll the Navigation Button
left or right to change the default number.
The abbreviation at the right side of the list
indicates the default number. For example, if you
change “w” to “m,” the default number changes
from Work phone (w) to Mobile phone (m).
To make a phone call from an open Contact card:
1. In the Home screen or the Start menu, select
Contacts.
2. Select the desired contact, then press down the
Navigation Button to display all the information
for that contact.
3. Select the number you want to call, then press the
Talk Button.
NOTE: For more information about Contact list
abbreviations and Contact, please see section 2.3.
Make a phone call using a recently dialed
number
1. Home screen>press the Talk Button to display a
list of recently-dialed names/numbers.
2. Select the item you want to dial>Talk Button
Make a phone call from the Call History list
1. Start menu>Call History
2. Select the number or name you want to call>Talk
Button.
Make a phone call from a hyperlink
When you see an underlined phone number presented
as a hyperlink in an E-mail message, just scroll to it,
Chapter 2 Use Your Smartphone
3
and press down the Navigation Button to make the
phone call.
Make emergency calls
You can call emergency service numbers under any
circumstances, even if you have locked the SIM card
and/or your phone. Dial the emergency number
appropriate for your location, and press the Talk
Button.
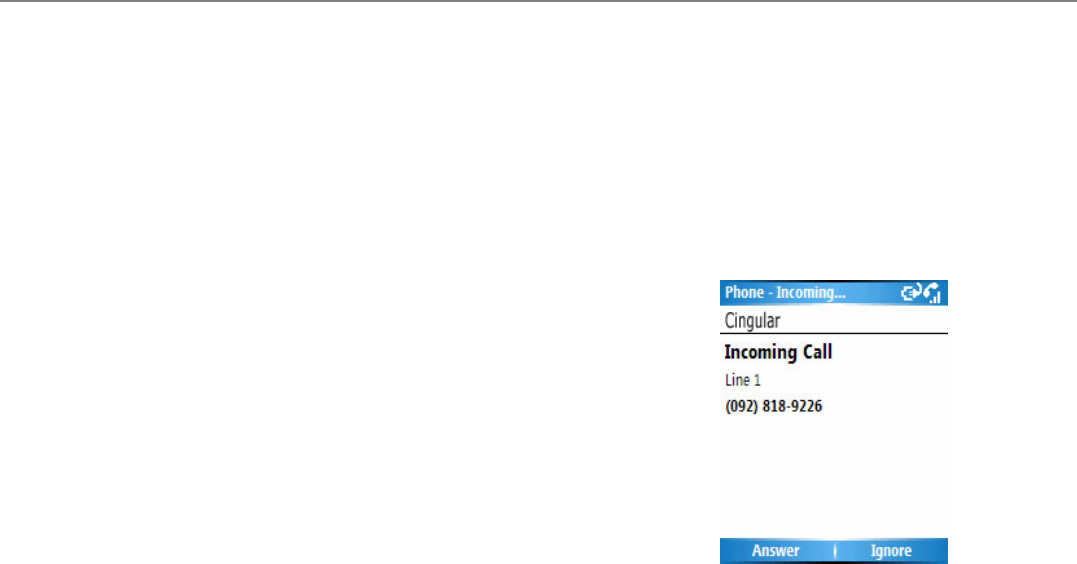
2.2 Receive a Phone Call
When there is an incoming call, the name and number
of the caller are displayed on the screen. If the name
of the caller is not in your Contacts list, only the caller's
phone number is displayed. You can answer a call by
pressing the Talk button or select Answer. If don't
want to take the call, select Ignore (Note that selecting
Ignore will connect the caller to your voice mail box, if
you have subscribed to this service.)
NOTE: This is the default display for incoming calls.
See the next section if you want a photo you have
associated with the caller to be displayed on your
screen during incoming calls.
Chapter 2 Use Your Smartphone
4
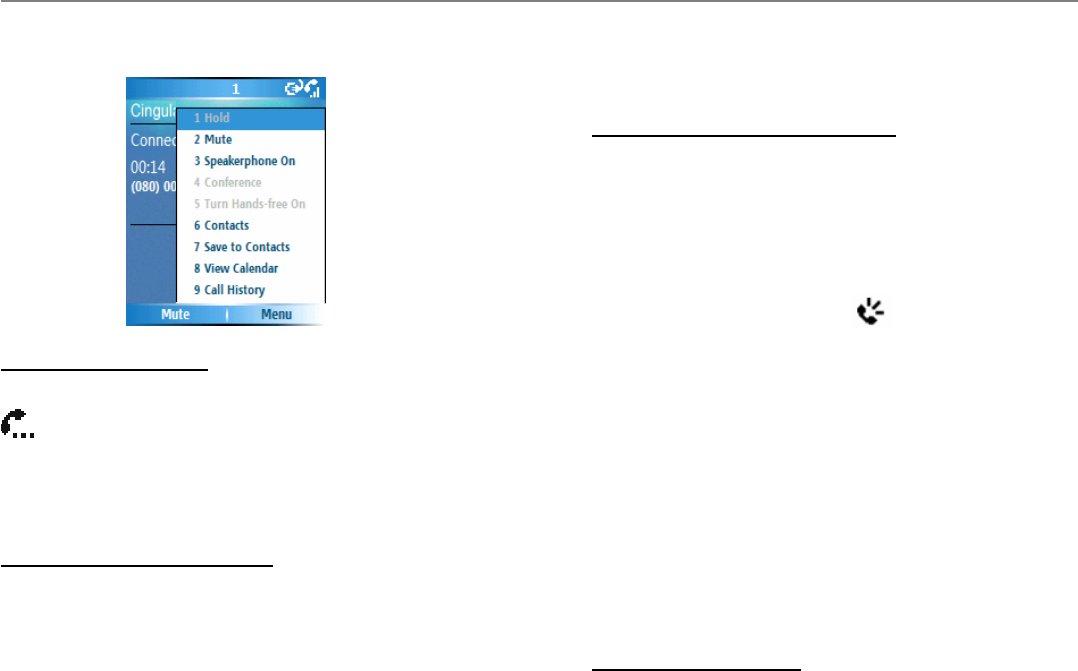
When a phone call is in progress, you may select Menu
to execute advanced commands.
Use the Hold function
To hold a phone call, select Menu>Hold. The
icon will flicker on right side of the Title Bar. To
unhold the phone call, select Menu>Unhold or press
the Left softkey to select Unhold on the screen.
Use the Conference function
1. You may hold a call, and then dial the second phone
number or answer another incoming call when a
phone call is in progress.
2. Select Menu>Conference
Not all of the service provider support the Conference
function. Please refer the service to the service
provider.
Switch on/off the Speakerphone
Use the built-in speakerphone function, you may place
the Smartphone away from your face as long as you
can hear the voice from the loud speakers.
y When a phone call is in progress, select Menu>
Speakerphone On. The icon will show on the
screen.
y To switch off the speakerphone, select Menu>
Speakerphone Off.
Otherwise, you may press and hold the Talk button to
switch on/off the Speakerphone.
NOTE: Don’t hold your Smartphone closing to your
ears when using the Speakerphone function to avoid
damage to your hearing.
Use the Mute function
You may mutef the microphone when a phone call is in
progress, so that you can hear the other party’s voice
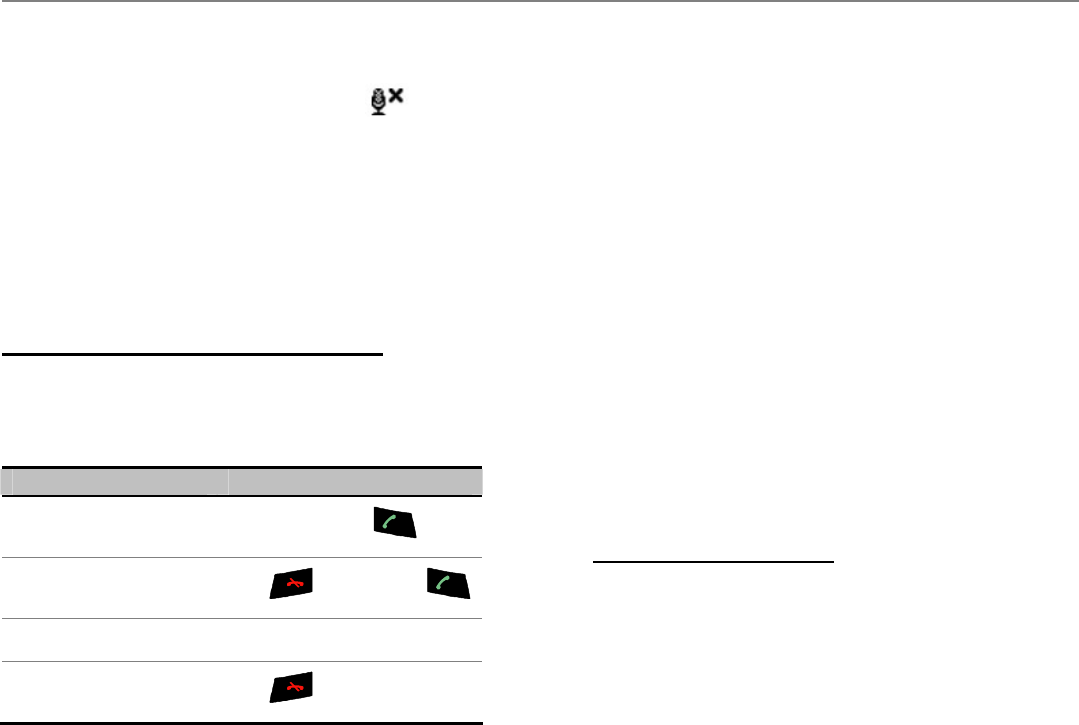
Chapter 2 Use Your Smartphone
5
and while the other party can’t hear your voice.
y To mute the microphone when a phone call is in
progress, select Menu>Mute. The icon will
show on the screen.
y To Unmute, select Menu>Unmute to turn on the
microphone.
Otherwise, you may press Left softkey to select Mute
on the screen to switch on/off the microphone.
Answer a second call using Call Waiting
If you are already talking on the Smartphone when
you receive another call, the Call Waiting screen will
appear.
Task Directions
place the current call on
hold and answer the
incoming call Select Answer or
End the first call before
answering the incoming
call Press >Answer or
Swap the first call and
the second call Press Swap
Reject the second call
(connected to your
voice mailbox) Press
2.3 Use Contacts and Beam
You can think of Contacts as an online address book,
where you can store information about people and
businesses you communicate with in contact cards.
For example, you can store multiple phone numbers,
E-mail and street addresses, Web pages, birthdays,
anniversary dates, etc. You can use Contacts to dial
phone numbers and compose E-mail and SMS
messages directly from a contact card.
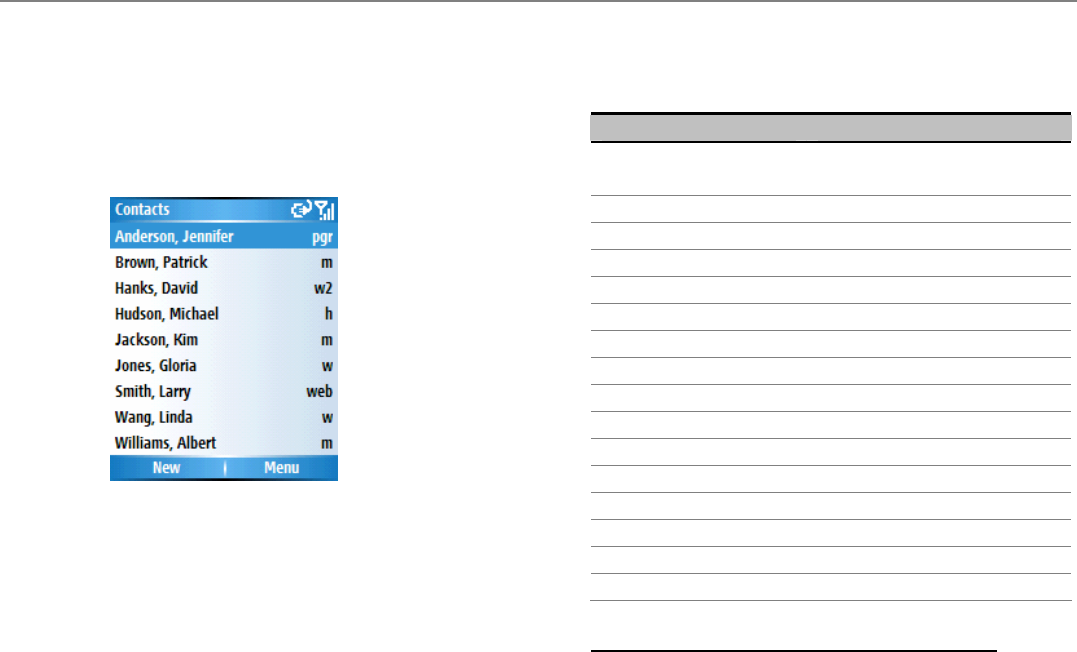
The Contact list
The Contacts list displays the names of your contacts
alphabetically, along with an abbreviation for the
default communication method, such as the person's
work phone number (w) or home phone number (h).
This makes it easy to reach the contact using the
method you prefer. Note that if the contact entry
includes a work phone number, your phone will
automatically set it as the default number.
To access your Contacts:
You may access your Contacts in the method as
follows:
x In the Home screen, press the Right Softkey to
open the Contacts list directly.
Chapter 2 Use Your Smartphone
6
x Select Contacts from the Start menu
x Select the Contacts icon from the “most recently
used” icons in the Home screen
A sample Contacts listing is shown below.
The following table shows some of the abbreviations
that might be displayed in the Contacts list, and their
meanings.
Abbreviation Meaning
w Work phone
w2 Work2 phone
h Home phone
h2 Home 2 phone
M Mobile Home
pgr Pager
car Car phone
txt Text message
e E-mail
e2 E-mail 2
e3 E-mail 3
co Company phone
rdo Radio phone
ast Assistant phone
im Instant message
im2 Instant message 2
im3 Instant message 3
To call a contact using the default number:
1. In the Home screen, select Contacts to directly
open the Contacts. Or form the Start menu, select
Contacts.

Chapter 2 Use Your Smartphone
7
2. Scroll to and highlight the contact you want to call.
3. Press the Talk button. The phone dials the
contact's default phone number. The abbreviation
for this number appears to the right of the contact
name.
NOTE: If you want to change the default number,
select the desired Contact entry and scroll left or right
to select the abbreviation you want to assign as the
default.
To call a contact using a number other than the
default number:
1. Select the contact on the list. Scroll the Navigation
Button left or right to display the abbreviation for the
number you want to use.
2. Press the Talk button.
To find a contact by entering a name:
Begin entering the name of the contact to find until the
name is displayed.
For example, to find "Linda," enter 5, 4, 6, 3, 2 because
these numbers correspond to the letters for that name.
To filter contacts:
1. Select Filter from the Menu.
2. Select the category whose entries you want to
display, such as All Contacts, Recent, No
Categories, Business, Holiday, Personal, or
Seasonal. Only the contacts assigned to the
category you select are displayed on the list.
To create a new contact:
1. When the Contacts list is displayed, select New, or
select New Contact from the Menu.
2. After entering the desired data, select Done.
To delete a contact:
Select the desired entry in the Contacts list, then
select Delete Contact from the Menu.
Chapter 2 Use Your Smartphone
8
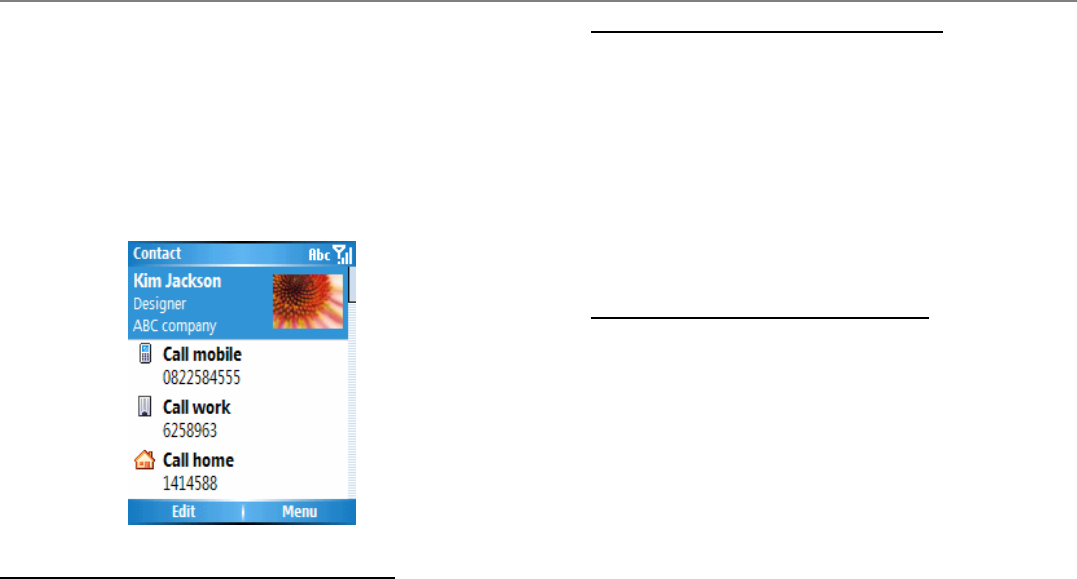
Contact cards
To view a “contact card,” select the desired contact in
the list and press down the Navigation Button.
A contact card displays all of the information that you
have entered for that contact. You can use the menu
to edit it, send a text message, save it to your SIM card,
beam the Contact, delete it, or add it to speed dial.
To view and edit an existing contact card:
1. Select the desired entry from the Contact list.
2. Press down the Navigation Button to view the
contact card. If you wish to modify it, select Edit from
the menu.
To call a contact from a contact card:
1. Select the desired entry from the Contact list.
Press down the Navigation Button to access that
contact card.
2. Scroll the Navigation Button to select the number
you want to call.
3. Press down the Navigation Button or select Call to
dial that number.
To send E-mail from a contact card:
1. Select the desired entry from the Contact list.
Press down the Navigation Button to open the
related contact card.
3 Scroll to Send e-mail, and then select E-mail (press
the Right Softkey) to go to the Messaging screen.
4. Select Outlook E-mail on the screen. Enter a
subject, compose your message, and then select
Send.
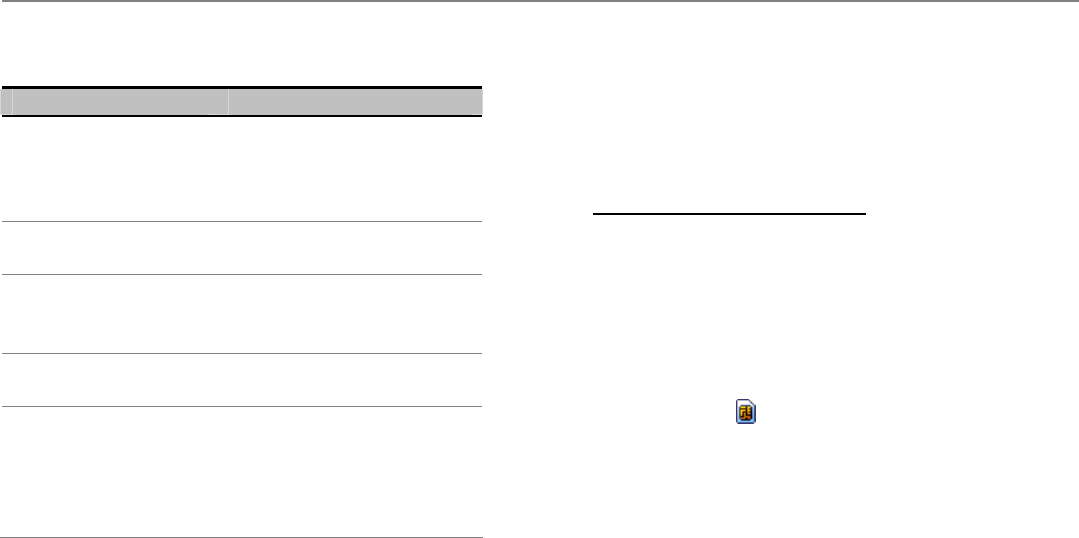
Use contact card menu options
Select the desired contact on the list, then press the
Action button to access the related contact card.
Chapter 2 Use Your Smartphone
9
Using the menu accessed from that screen, you can
perform the functions illustrated below.
Command Function
Edit Modify information on the
contact card.
Save to SIM Save the contact to the SIM
card.
Send Text Message Send text messages from the
Contact list.
Beam Contact
Send the contact card data to
another mobile device or a
desktop PC using Bluetooth
Delete Remove the contact card from
the Contacts list.
Add to Speed Dial
Create a shortcut to a phone
number, E-mail address, or
Web URL by assigning one or
two numbers as a speed dial.
(See section 2.7.)
SIM contacts
SIM contacts are stored on your SIM card. When you
insert your SIM card into a different device, you can
view and use the SIM contact information on the new
device. Unlike regular contact cards, you can store
only one phone number for each SIM contact.
To create a new SIM contact:
1. In the Home screen or from the Start menu, select
Contacts.
2. Open the Menu and select New SIM Contact.
3. Enter the Name and Number, then select Done.
The new contact appears on your contact list.
A SIM icon will display to the right of the name,
indicating that the contact is stored on your SIM
card.
Chapter 2 Use Your Smartphone
10
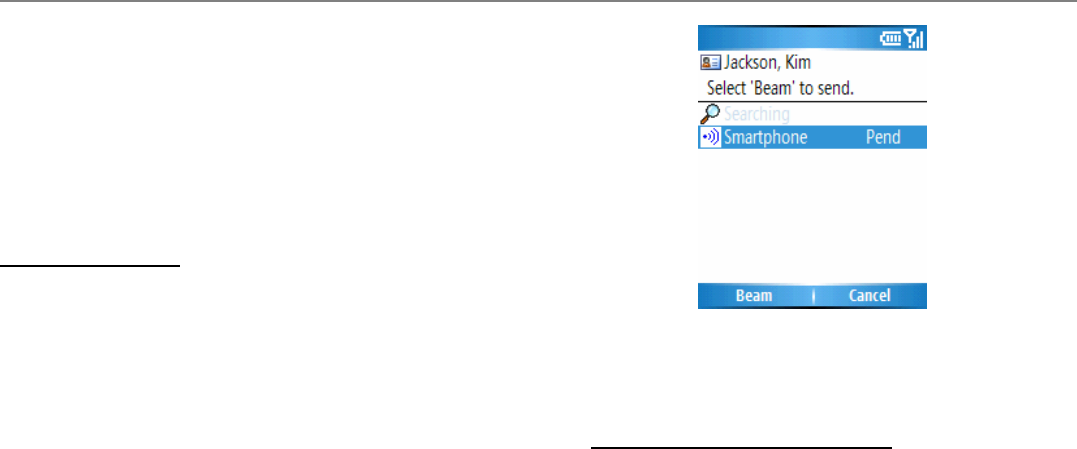
Beam information
You can use the Bluetooth on your Smartphone phone
to send and receive (beam) contact information
between your Smartphone and another mobile device
or a PC that has Bluetooth.
NOTE: You cannot beam SIM contacts. See Chapter
5 for more information about Bluetooth.
To beam a contact:
1. In the Home screen or from the Start menu, select
Contacts.
2. Select the Contact entry you want to beam.
3. Select Beam Contact from the Menu in the
Contacts screen.
4. Scroll to the device to which you want to beam.
5. Select Beam.
Status information will then be displayed, indicating the
name of the device to which your Smartphone is
beaming, and whether the beaming process is pending
or has failed.
NOTE: Make sure that both Bluetooth radios are
turned On and that Bluetooth is Discoverable on the
receiving device.
To receive beamed information:
1. Start>Settings>Connections>Beam
2. Select the Receive incoming beams checkbox.
5. Select Done. Your Smartphone is now capable of
receiving beams (until you clear the Receive
incoming beams checkbox).

Chapter 2 Use Your Smartphone
11
NOTE: Make sure your Bluetooth radio is turned On
and in Discoverable mode. Your Smartphone can
receive beamed files of any type, but you may need to
copy some files to your PC for viewing.
2.4 In-Call Options
Listed menu options below might be available when a
call is in progress. Some of these options are only
available during multiple calls or a conference call.
Option Function
End Disconnect the call.
Hold Place the active call on hold.
Unhold Takes the call off hold.
Swap Switch between two calls
Save Contacts Create a Contact record for the caller.
Conference Join together all existing calls, if you
have subscribed to this service.
Private
Break one call out of a conference and
make this call active while the rest of the
conference is on hold.
Speakerphone Switch the caller’s voice onto the loud
speakers.
Mute
Mute the microphone for the active call.
The other callers will not hear anything
you say, but you can still hear the other
callers.
Unmute Turn the microphone back on for the
active call.
Chapter 2 Use Your Smartphone
12
2.5 Retrieve a Voice Mail Message
When In the Home screen, press and hold 1 (varies
with operator) to call your voice mailbox, and follow the
prompts to retrieve your messages.
NOTE: This is actually a Speed Dial (see section 2.7).
Speed Dial 1 is reserved for voice mail access and the
number is configured in your settings.
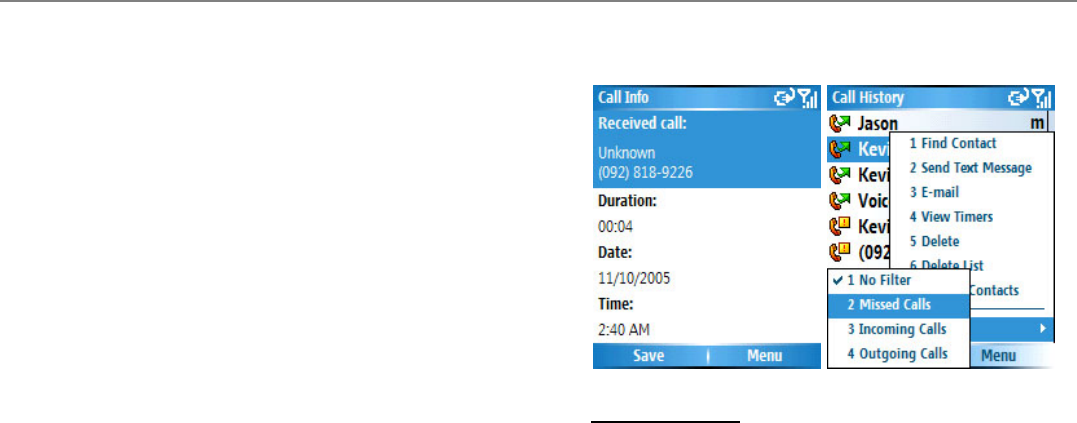
2.6 Review your Calls
Using Call History and Call Timers, you can view
information about phone calls that you have made,
received, and missed.
Call History
Call History displays the last 36 calls that you have
made, received, and missed. Each recorded call
contains the caller's name and the number, if available,
the duration, the start time, and date. (Shown as the
left picture next page.)
The oldest calls are automatically deleted from the list
to make space for the newest calls.
To filter the list:
Start>Call History>Filter>select the desired
category from the submenu including Missed Calls,
Incoming Calls, and Outgoing Calls. (Shown as the
right picture above.)
Chapter 2 Use Your Smartphone
13
Other commands on the menu in the Call History
screen besides Filter:
Option Function
Find Contact View related Contact information.
Send Text
Message Send text massage to the contact.
E-mail Switched to the Messaging screen to
send e-mails.
View Timers Opens the Call Timers screen. See the
subsection below for details.
Delete Remove the selected item from the Call
History.
Delete List Remove all items from the Call History.
Save to
Contact Create a new Contact using the info
related to the selected item in Call History.
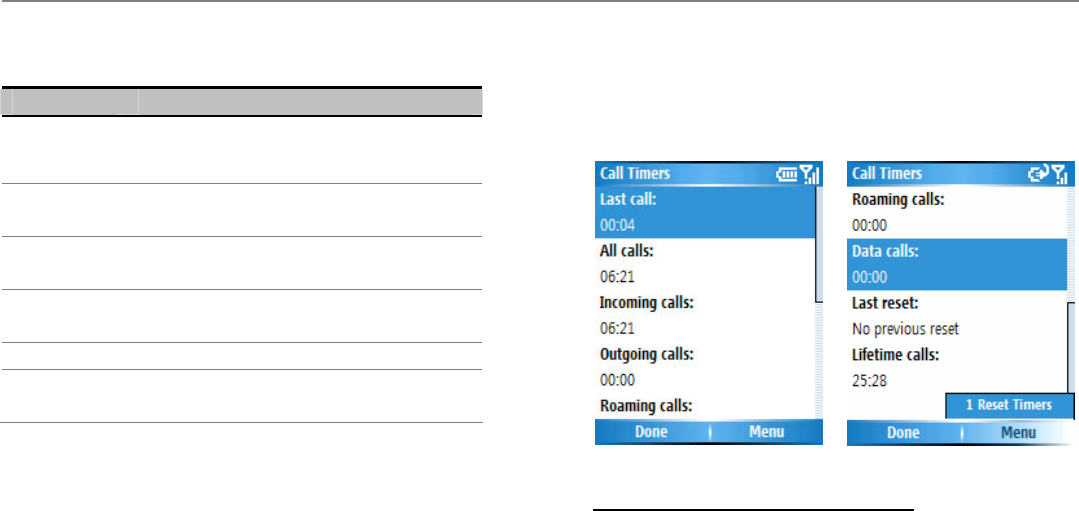
Call Timers
Call Timers displays detailed information regarding the
length of your last call, the total time of calls made and
received, calls by type (incoming, outgoing, roaming,
and data), and a lifetime counter.
To access the Call Timers screen:
Start>Call History>Menu>View Timers
Call Timers is useful for keeping track of your calling
patterns. It can help you estimate your monthly bill.
You can reset Call Timers to zero from Menu to start
timing calls for a new monthly billing cycle.
Chapter 2 Use Your Smartphone
14
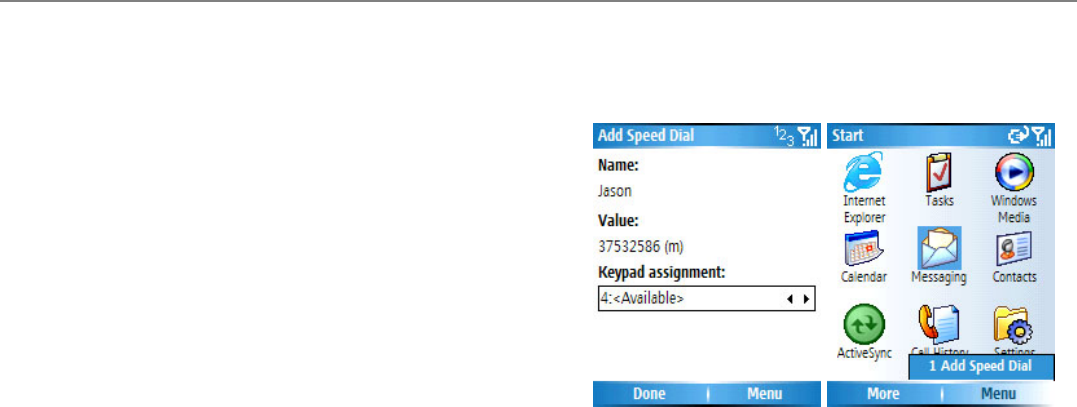
2.7 Speed Dials
You can create “Speed Dials” for frequently-called
phone numbers by pressing and holding specific keys.
You may choose Speed Dial entries from 2-99; Speed
Dial 1 is reserved for voice mail access and configured
in your settings.
Create a Speed Dial for a phone number
1. Home screen or Start menu>Contacts.
2. Select the desired Contact entry>press down the
Navigation Button to access the Contact card.
3. Select the phone number for which you want to
assign a Speed Dial.
4. Select Menu>Add to Speed Dial>Keypad
assignment.
5. Scroll the Navigational Button left or right to select
choices, or press down the Navigation Button to
view the full list.
6. Select Done to save the new Speed Dial.
You can also create Speed Dials for an E-mail address,
an instant message, a call paper, a fax number, or a
Web page address (URL) that is stored in Contacts or a
program on the Start menu.
Make a call using a Speed Dial
When in the Home screen, press and hold the number
that you have assigned as a Speed Dial for a number.
If the Speed Dial number consists of two digits, press
the first digit and then press and hold the second digit.
Chapter 2 Use Your Smartphone
15
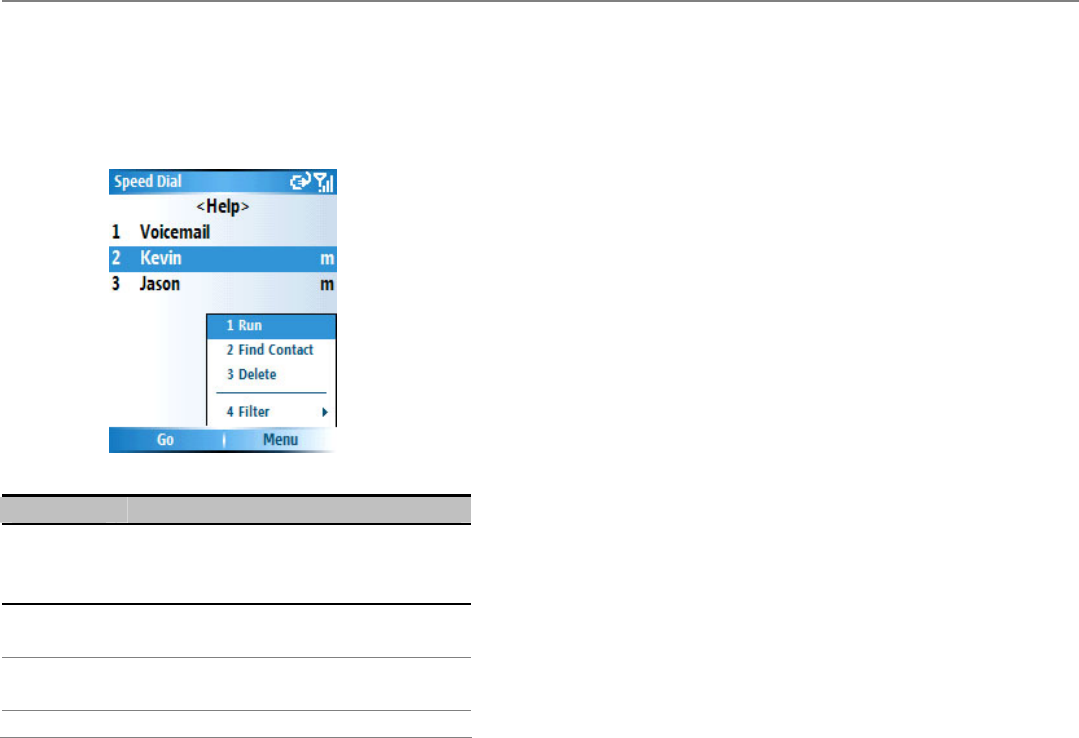
View Speed Dials you have created
In the Home screen, select Speed Dial from the Start
menu. All Speed Dial entries will be listed. In
addition, you can use the menu in this screen to
perform the following:
2.8 Advanced Dialing Information
The following information includes advanced dialing
options useful for phone numbers requiring special
dialing instructions.
Insert an international country code
To enter the plus sign, press and hold 0 until + appears.
International calls require a country code to be included
in the phone number. A plus sign (+) must appear first,
followed by the country code and the rest of the phone
number.
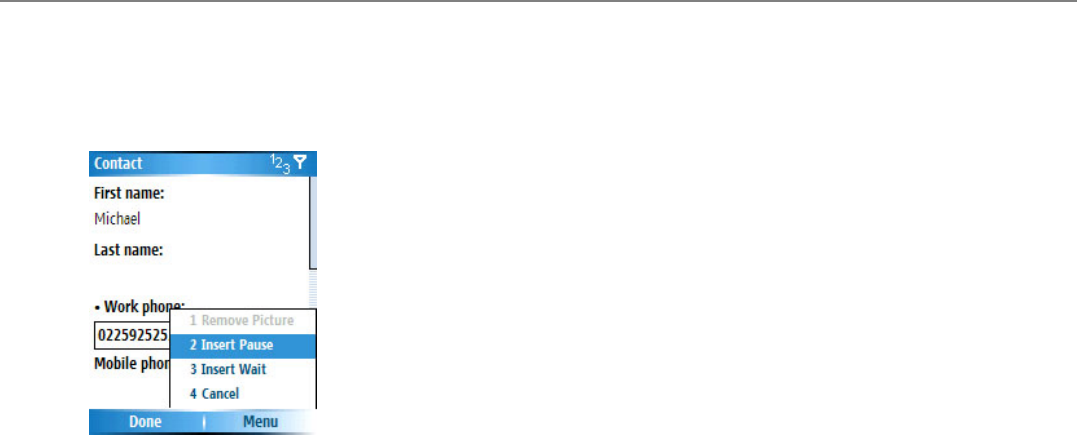
Insert a three-second pause in a dialing
sequence
Some international calls require a three-second pause
in the dialing sequence in order for the call to process
successfully.
1. From the Home screen or Start menu>Contacts.
2. Select the Contact entry in whose phone number
you want to insert a pause>press the Navigation
Button to access the Contact card.
3. Menu >Edit>select the specific phone number
in which you want to insert the pause.
Option Function
Run
Dial the number, start Internet Explorer, or
invoke Messaging. You may also select
Go
Find
Contact Open the Contact card associated with
the selected Speed Dial.
Delete Delete the selected Speed Dial entry from
the list.
Filter Filter the list.
Chapter 2 Use Your Smartphone
16
4. Press the Navigation Button left or right position
the cursor within the number where you want to
insert a three-second pause.
5. Menu>Insert Pause>Done
Insert a manual pause in a dialing sequence
There may be phone numbers that require a pause
longer than three seconds in the dialing sequence.
For these cases, you can pause as long as you want,
and manually continue the dialing sequence using the
Talk Button.
Follow the same steps outlined in “Inserting a
three-second pause in a dialing sequence,” except in
Step 5, select Insert Wait from the menu. The letter
“w” will appear in the number for your reference, to
show where the indefinite pause will occur in the
dialing sequence.
Note: Don’t forget that when you call a number
containing a “manual pause,” you will need to press the
Talk Button to continue dialing.

Chapter 3 Use Your Camera
1
Chapter 3
Use Your Camera
3.1 Use the Camera
3.2 Use Pictures & Videos
3.1 Use the Camera
You can capture still images in Still mode, or switch to
Video mode to capture live video streams (with audio if
desired.) You may send the captured files via E-mail,
MMS, or Bluetooth.
Invoke Camera mode
Switch to Camera mode on your Smartphone by using
the methods shown as below:
• Press the Camera Button on the right side of your
Smartphone. The live incoming video stream will
be shown on your screen.
If you have not yet started the Camera application,
the Still capture mode will be active by default. If
you previously started the Camera in the current
session, the most recently used capture mode will
be active.
• Start>Pictures & Videos>Camera
NOTE: Newly-captured files are stored in your \My
Documents\My Pictures folder by default. Normally,
the first time you capture a still image or live video
streams, a new My Pictures folder will be created
under \My Documents, and the newly captured file will
Chapter 3 Use Your Camera
2
be saved there.
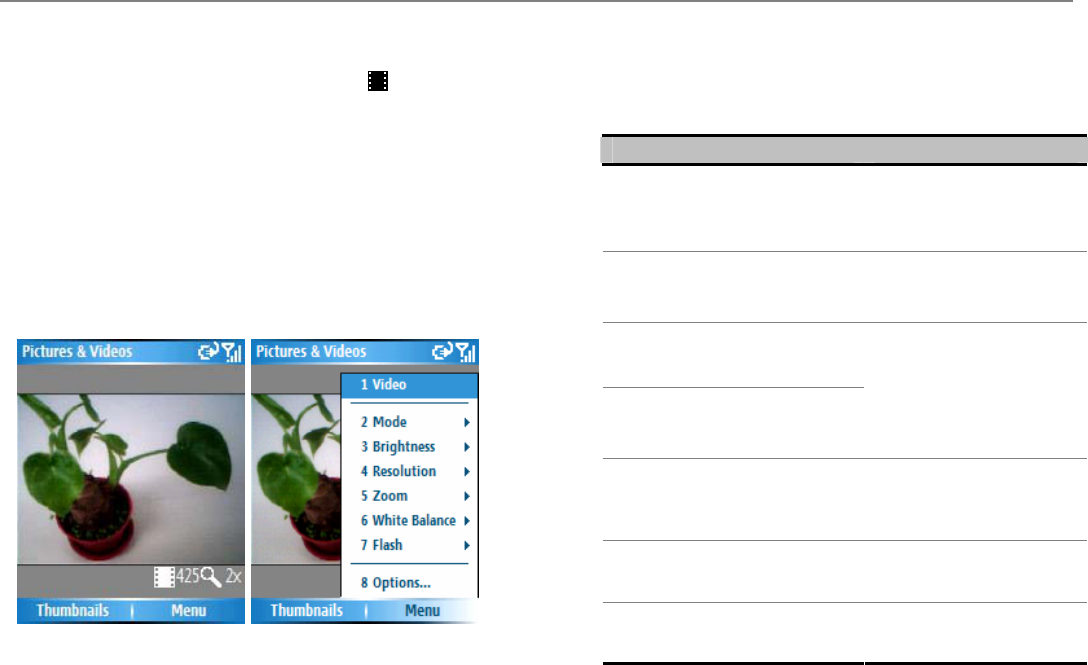
Capture a still image using Still mode
1. Switch to Still mode. (You will see the icon
shown near the lower right of the screen, and the
number of images you still can capture, according to
available memory and your current settings.)
2. Position the camera lens to capture the desired
image. You may scroll the Navigation Button
up/down to zoom in/out. (The current zoom ratio is
shown near the lower right of the screen.)
3. Select Menu to choose advanced capturing settings
shown as the right picture above. (The items of
settings are specified as the table next page.)
4. Press the Camera Button, or press down the
Navigation Button to capture images.
The options of menu in Still mode:
Note: “1X” indicates normal (unzoomed) size.
Option Function
Video Switch to Video mode
Mode
Normal/Burst/Timer
The capture mode
Brightness
+3/+2/+1/ 0/-1/-2/-3
Select suitable brightness
for capturing.
Resolution The zoom capability
depends on the resolution
QQVGA/QVGA/VGA/SXGA
Zoom
zoomX1/zoomX2/zoomX4
SXVGA
VGA
QVGA
QQVGA
1X
1X, 2X
1X, 2X, 4X
1X, 2X, 4X
White Balance
Automatic/Sunny/Cloudy/Night/
Black & White/Sepia/Negative/
Fluorescent/Incandescent
Adjust for various lighting
conditions
Flash
On/Off
Switch on/off the flash
Options
General/Slide Show/Camera/ Video
Specify the saved files,
output format, or other
settings in different mode.

Chapter 3 Use Your Camera
3
To review the newly-captured picture:
A review screen will appear immediately after you have
captured a picture.
You may press the Left Softkey (“Camera”) to switch
to Still mode, or press the Righrt Sofykey (“Menu”) to
execute other commands, including Delete, Send,
Beam, Use as Home Screen, Edit, Properties, and
Options.
The details of these commands are shown as the table
next page.
Command Function
Delete Delete the reviewed picture
Send Go to Messaging to send the picture.
Beam Beam the reviewed picture to another
device via Bluetooth.
Use as Home
Screen
Set up the reviewed picture as Home
Screen. You may select the display
area and adjust the transparency.
Edit
Rotate, Crop, or Auto Correct the
reviewed picture, and Save As another
file.
Properties
Rename or view the properties of the
reviewed picture, including File Type,
Dimensions, File Size, Date Created,
or Protected status.
Options Specify the saved files, output format, or
other settings in different mode.
Capture a video using Video mode
1. Switch to Video mode. (You will see the icon
shown near the lower right of the screen, and the
length of time you still can capture, according to
available memory and your current settings.)
2. Position the camera lens to capture the desired
image.

Chapter 3 Use Your Camera
4
3. Select Menu to choose advanced capturing settings
shown as the right picture above. (The items of
settings are specified as the table next page.)
4. Press the Camera Button, or press down the
Navigation Button to start or stop capturing (you
may stop by pressing the Left Softkey or pause by
pressing the Right Softkey.)
The options of menu in Video mode:
Option Function
Still Switch to Still mode
Brightness
+3/+2/+1/ 0/-1/-2/-3
Select suitable brightness
for capturing.
Quality
QQVGA/QVGA
Capture size
White Balance
Automatic/Sunny/Cloudy/Night/
Black & White/Sepia/Negative/
Fluorescent/Incandescent
Adjust for various lighting
conditions
Options
General/Slide Show/Camera/ Video
Specify the saved files,
output format, or other
settings in different mode.
Chapter 3 Use Your Camera
5
Set various Options
After you select Options from the menu, you can enter
different screens to customize various behaviors of
Camera mode, as follows:
In the General screen:
Item Selection
When sending pictures in
email, use this picture size:
x Original size
x Large (640X480)
x Medium (320X240)
x Small (160X120)
When rotating a picture,
rotate 90 degrees:
x Left
x Right
In the Slide Show screen:
Item Selection
During slide show,
optimize for viewing:
x Landscape pictures
x Portrait pictures
Play screensaver when
connected to my PC
and idle for 2 minutes.
x Check
x No check
In the Camera screen:
Item Selection
Save files to:
x Main memory
(Files will be saved in \My
Documents\My Pictures.)
x Storage Card
(Files will be saved in
\Storage Card\DCIM)
Type filename prefix: x img (by default), or you may
enter desired prefix
Still image compression
level:
x Normal quality
x Low quality
x High quality
In the Video screen:
Item x Selection
Include audio when
recording video files.
x Check
x No check
Time limit for videos:
x No limit
x 15 seconds
x 30 seconds
Chapter 3 Use Your Camera
6
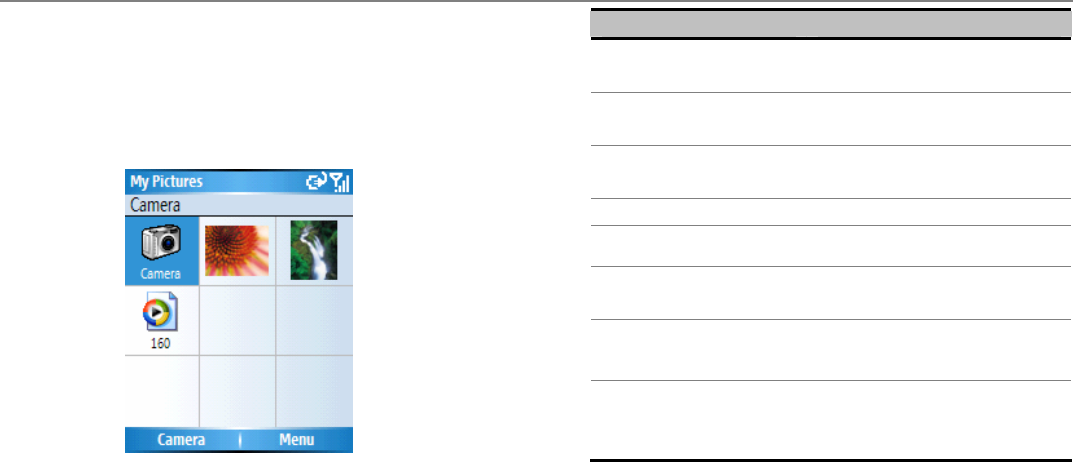
3.2 Use Pictures & Videos
The Pictures & Videos application allows you to view
pictures, play videos, send/beam/delete/edit the files,
play slide show, etc. The commands will be detailed
as follows:
Manage your pictures and videos
You can scroll to the pictures and videos to manage
them by selecting Menu in the Pictures & Videos
screen. The commands are detailed as follows:
Command Function
Send Go to Messaging to send the
picture.
Beam Beam the reviewed picture to
another device via Bluetooth.
Save to contact Save the picture as a contact’s
photo
Delete Delete the reviewed picture
Edit
Cut/Copy/Paste/New Folder Manage the files.
Play Slide Show Display the pictures in Slide
Show mode
Folders
My pictures/My Device/
Storage Card
Choose the folder you want to
explorer.
Options
Specify the saved files, output
format, or other settings in
different mode.
Play the Videos
1. In the My Pictures screen, select the picture you
want to view.
2. Press down the Navigation Button, or select the
Left Softkey. (“Play”)
View the pictures
1. In the My Pictures screen, select the picture you
Chapter 3 Use Your Camera
7
want to view.
2. Press down the Navigation Button, or select the
Left Softkey. (“View”)
When you view the picture, the Title Bar will show the
file name of the picture. You may select Send to
execute Massaging function, or select Menu to
execute other commands.
Besides the same commands introduced in the
previous page, the other commands are detailed as
follows:
To zoom the picture:
From Menu, select Zoom>select Zoom in, Zoom out,
Fit to Screen, or Actual Size
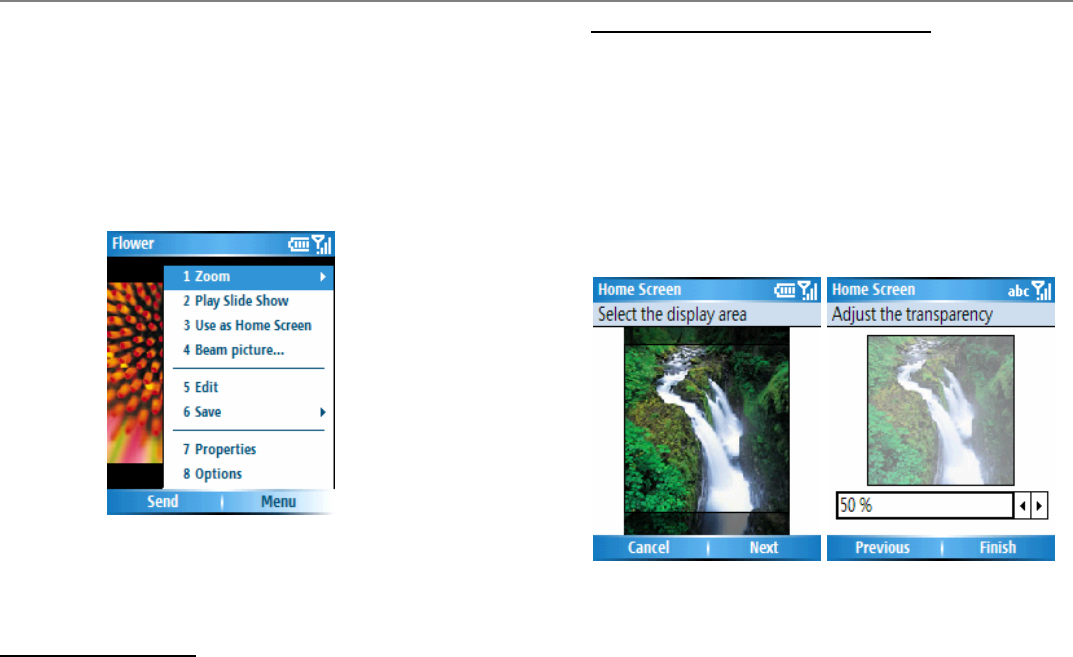
To use the picture as Home Screen:
1. Menu>use as Home Screen
2. To Select the display area, scroll the Navigation
Button left/right or up/down>Next
3. To Adjust the transparency, scroll the Navigation
Button to select to percentage of transparency.>
Finish
4. Then the picture will be displayed in the Home
Screen as the background image.
Note: If you want to change the picture, you may also
go to Settings>Home Screen>Background image
>scroll the Navigation Button left or right to select
the desired picture.
Chapter 3 Use Your Camera
8
To edit the picture:
You may edit the picture by executing the commands
of Rotate, Crop, Auto Correct, Undo, Cancel, or
Save as. The commands are detailed as follows:
Command Function
Rotate
Rotate the picture 90 degrees left or right
depending on the setting in Options>
General.
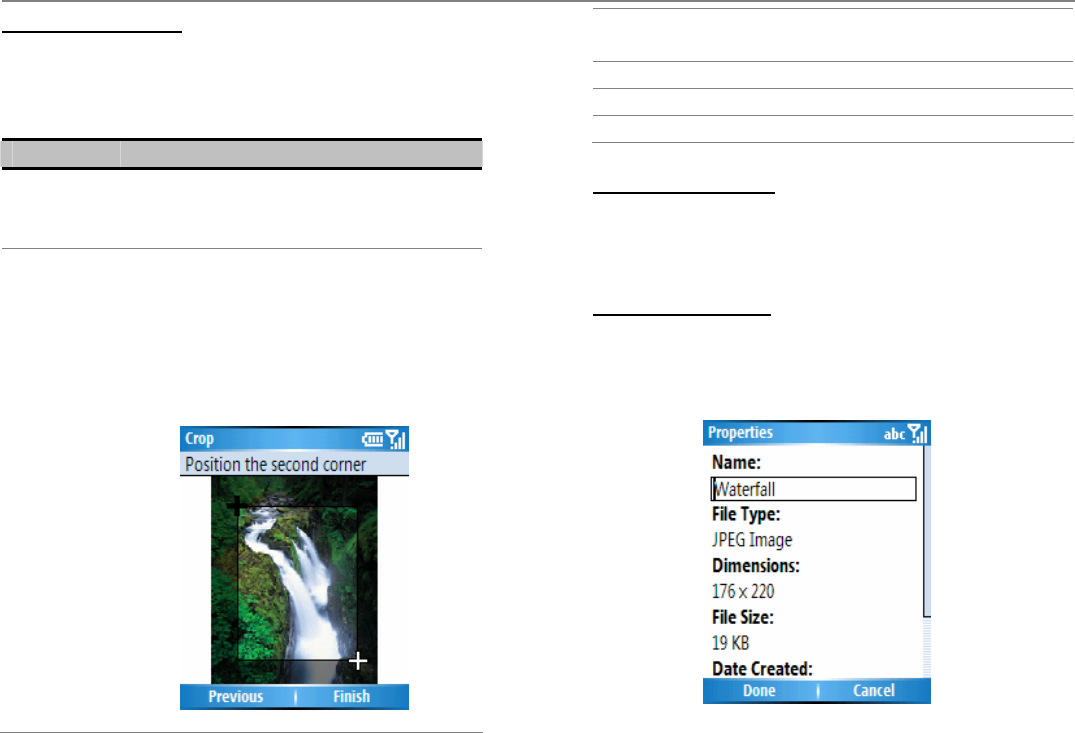
Crop
1. To Position the first corner, scroll the
Navigation Button to the desired
position and then press down the
Navigation Button.>Next>Position
the second corner in the same way.
2. Select Previous to reedit the picture, or
select Finish to decide the final picture.
Auto
Correct The color of the picture will be corrected
automatically.
Undo Undo the command.
Cancel End the Edit screen.
Save as Save the file as another name.
To save the picture
You may select Save to Contact to assign a picture as
a contact’s picture, or select Save As to save the file as
another name.
To view Properties
You can rename and view properties including File
Type, Dimensions, File Size, the date of Created
Date, and Protected status.
Chapter 4 Personalize Your Smartphone
1
Chapter 4
Personalize Your Smartphone
4.1 Customize SmartPhone Settings
4.2 Customize Profiles and Sounds
4.3 Customize Date and Time
4.4 File Explorer
4.1 Customize Smartphone Settings
You can easily view and change various settings in
your Smartphone. For example, you can use your
favorite photo for the Home screen background, set up
Call Forwarding to manage your calls more efficiently,
define the Right Softkey to invoke different applications,
and much more.
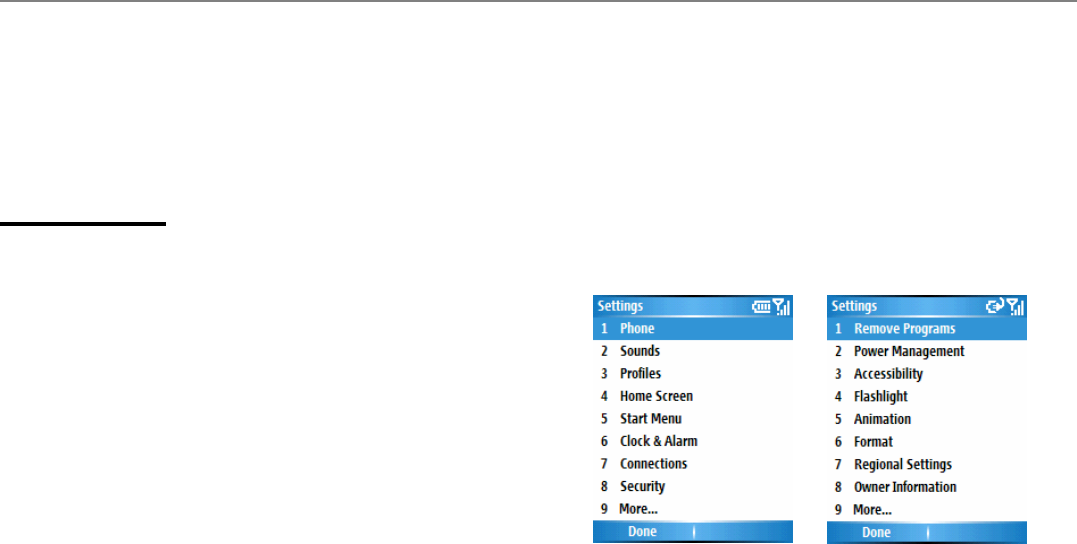
Select Settings from the Start menu. The items in the
Settings screens are detailed below.
Note: If you press 9 (“More”) in the first Settings
screen, the second Settings screen (shown above on
the right) will display.

Chapter 4 Personalize Your Smartphone
2
Phone
When you select Phone in the Settings screen, the
Phone screen appears and offers the following
options:
Call Barring
Block incoming and/or outgoing calls.
Call Forwarding
Forward calls to another number.
Call Options
Specify your Voice Mail number, Country code,
and Area code. If you check the Any key
answer checkbox, you will be able to answer
incoming calls by pressing any key. If Show SIM
Contacts is checked, entries on the SIM card will
be displayed in your Contacts list.
Call Waiting
Turn the Call Waiting function on or off.
Caller ID
Let your identification be known to all callers, to
only the people in your contacts, or to no callers at
all.
Channels
Configure cell broadcast.
Fixed Dialing
Limit your calling area to one or more specific
phone numbers and/or area codes.
1. Check the Enable fixed dialing box
2. Select Menu>Edit Numbers>Menu>Add
3. Enter the number in the Number pattern field.
>Done
Note: If you enable the Fixed Dialing function, you
will unable to save new contact to the SIM.
Networks
Identifies your current network, and allows you to
change your network selection from Automatic to
Manual.
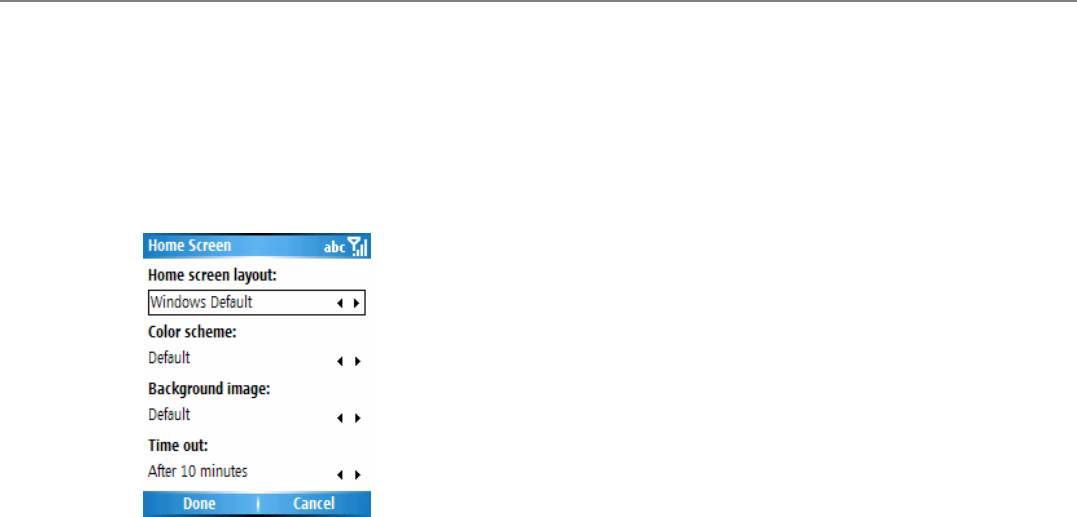
Home Screen
Home Screen settings are used to change the Home
screen layout, the color scheme, the background
image, and the time delay before the Home screen
appears when your Smartphone is idle.
Chapter 4 Personalize Your Smartphone
3
To view or change these settings, select Settings>
Home Screen. Windows Default is the default
setting in the Home screen layout field.
Note: The images available for selection in the
Background Image field are those currently in the My
Documents folder of your Smartphone.
Start menu
Select Settings>Start Menu to select the display of
Start menu. You may switch list view or grid view;
hide or show the icon label; turn the highlights of the
icons on or off.
Connections
Please see chapter 5 for usage of this setting.
Security
Please see chapter 1.7 for usage of this setting.
Remove Programs
This feature allows you to delete any application
software from your Smartphone that you installed.
When you select Settings>Remove Programs, the
programs you have installed will be listed in the
Remove Programs screen. Select the one you want
to remove, then select Remove from the menu.
Note: You cannot use this feature to remove any of the
core programs that came with the Smartphone, such
as Contacts, Calendar, Internet Explorer, etc.
To add programs to your Smartphone, follow the
instructions as follows:
1. Download the programs into your PC.
2. Connect your Smartphone and PC.
3. Double Click the *.exe file quickly.

Chapter 4 Personalize Your Smartphone
4
x If the execute file is a setup wizard, please follow
the instructions to install the program. After
installation, the setup wizard will transmit the
program to the Smartphone automatically.
x
x If the setup wizard isn’t invoked, you need to copy
the program file to the Program Files folder of
your Smartphone.
Power Management
Select Settings > Power Management to check the
current battery level in the form of a percentage. You
may also adjust various power-saving settings,
including Backlight time out on battery, Backlight
time out on AC, Display time out, Keypad backlight
time out.
Accessibility
Select Settings>Accessibility to view or modify your
settings for System font size, Multipress tme out,
Confirmation time out, and In-call alert volume.
Flashlight
Select Settings>Flashlight to switch On/Off the
flashlight. The function facilitates you to have a handy
light in the dark environment.
Animation
Select Settings>Animation to turn On/Off the
Start-Up Animation.
Format
Select Settings>Format to format the Storage Card.
Regional Settings
Select Settings > Regional Settings to adjust
Language, Locale, Short Date style, Long Date
style, Time format, Positive and Negative number,
Positive and Negative currency. After changing the
settings, you must power your Smartphone off and
back on to make the changes take effect.
Note: When changing languages, it is possible that not
all applications will be displayed with the new language
because of the default “language set” in your
Smartphone.
Owner Information
Select Settings > Owner Information to enter your
personal information such as Name, Telephone
number, and E-mail address. This is helpful, for
example, in the event that you lose your Smartphone,
so that you can be contacted if it is found. In the
Owner Information screen, there is also a Notes field in

Chapter 4 Personalize Your Smartphone
5
which you can enter any other miscellaneous
information, if desired.
Certificates
On your Smartphone, you can add and delete public
key certificates. These certificates help establish your
identity when you log on to a secure network, such as a
corporate network. Certificates also help establish
the identity of other computers, such as servers, with
which you connect. This helps prevent unauthorized
users from accessing your device and its information.
You can store two types of certificates on your
Smartphone: Personal certificates that establish your
identity, and Root certificates that establish the identity
of servers with which you connect. Your Smartphone
may include a set of pre-installed certificates.
Certificates that establish your identity:
Select Settings>Certificates>Personal, then select
View from the menu to view the selected certificate, or
Delete to delete it.
Certificates that identify servers you've connected
to:
Select Settings > Certificates > Root. Select the
desired certificate in the list, then select View from the
menu to view the details of the selected certificate (or
Delete to delete it).
About
Select Settings>About to display information about
your Smartphone's operating system such as version
numbers, copyright information, processor,
total/available storage, and total/available memory.
Error Reporting
Select Settings>Error Reporting to enable or disable
Error Reporting.
Chapter 4 Personalize Your Smartphone
6
4.2 Customize Profiles and Sounds
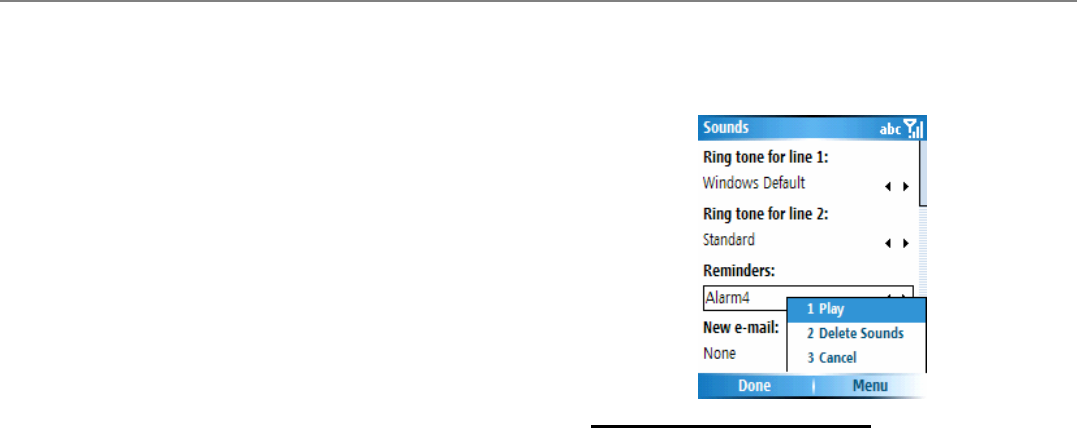
Sounds
Sounds settings are used to customize the sounds for
ring tones, notifications, and reminders.
Select Sounds in the Profiles screen. You can
specify what sound file to use for the following
functions:
• Ring tone (line 1 and line 2)
• Reminders
• New e-mail
• New text message
• New voice message
• New instant message
• New channel message
• Alarm clock
• SIM toolkit messages
• Exclamation
• Question
• Warnings
• Keypad control
After selecting one of the fields above, you can scroll
the Navigation Button left or right to select sounds.
Or, press down the Navigation Button to open the
Select an Item screen to view the entire list of sounds
available for that field, and select from that list.
You can use the menu in the Sounds screen to Play or
Delete Sounds. Select Done to save all changes.
To set up your own ring tone:
1. Copy the MP3 files from the PC into your
Smartphone. Open ActiveSync, select Explorer,
find the My Documents folder and paste the MP3
files.
2. In the Sounds screen>Ring tone for line 1 (or2).
3. Scroll the Navigation button left or right to select
the desired MP3 song in the field>Done, then the
new ring tone is set.
About Digital Right Management (DRM)
Chapter 4 Personalize Your Smartphone
7
Digital Right Management is for protecting the right
of the digital content. Due to the digital right
management, you may not be able to play some of
music on your computer or this product. In
the mean time, you are also unable to copy the
music from this product to other devices directly.
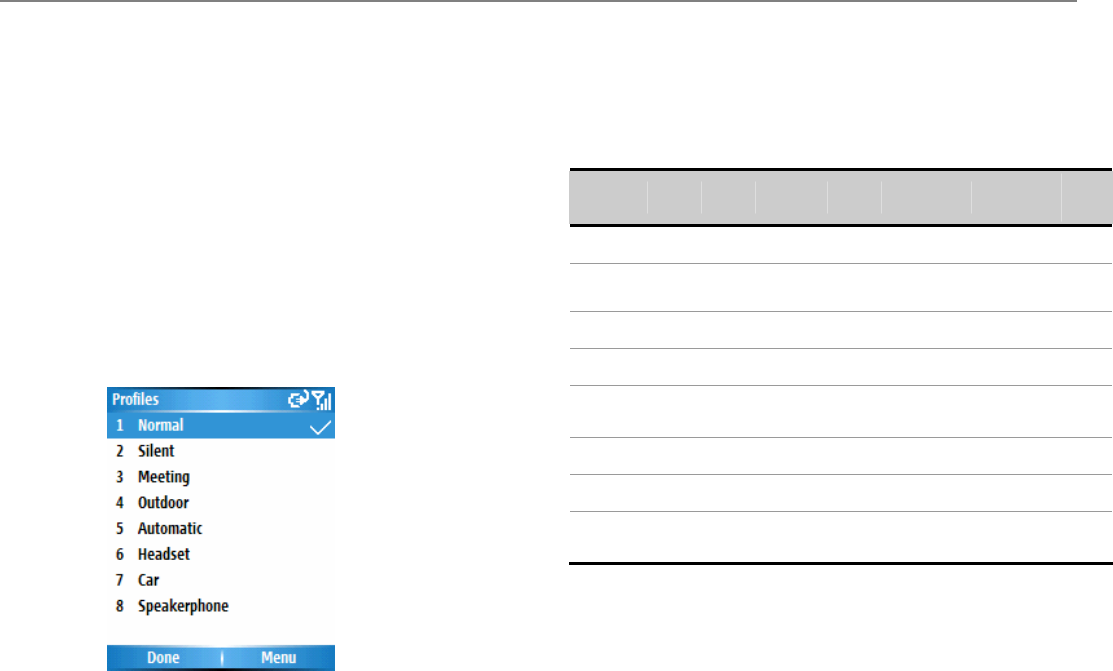
Profiles
You can choose each of the Profiles of announcing
you the incoming phone calls, messages, or upcoming
events. Select Profiles in the Settings screen to
access the screen shown below. All available profiles
are listed, and the active profile is indicated by a check
mark to the right.
For example, when you are attending a meeting, you
can choose the Meeting profile, which turns off your
system sound volume and ring volume, notifies you of
incoming calls via vibration, etc.
The following table illustrates the profiles that come
with your Smartphone, and their default attributes.
NOTE: The Headset profile and Car profile both have
an additional field (Auto-answer) which lets you
optionally specify a number of seconds for the
Smartphone to automatically pick up the incoming
calls.
Profile
Name Ring
Type Ring
Volume Alarm
Type Alarm
Volume Notification
Type Notification
Volume
System
Sound
Volume
Normal Ring 3 Increasing 3 Play sound 3 3
Silent Silent Off Play
sound Off Play sound Off Off
Meeting Vibrate Off Vibrate Off Vibrate Off Off
Outdoor Ring Loud Increasing Loud Play sound Off Off
Automatic Switch between the Normal profile and Meeting Profile
when the calendar shows busy status.
Headset Ring 3 Increasing 3 Play sound 3 3
Car Ring 4 Increasing 4 Play sound 4 4
Speaker
phone Ring Loud Increasing Loud Play sound Loud Loud
Chapter 4 Personalize Your Smartphone
8
To modify the attribute of the profiles:
1. Select the profile you want to modify.>Menu>Edit
2. You may rename the existing profile, or scroll left or
right to select the desired attribute in each of the
item.
If you later want to restore the settings back to the
default attributes, select Reset to default in the Menu.
NOTE: You may also select a different profile using the
Quick List. To display the Quick List screen, press
the Power Button on your phone and release quickly.
Scroll to the desired profile and then press the Action
button to select it.
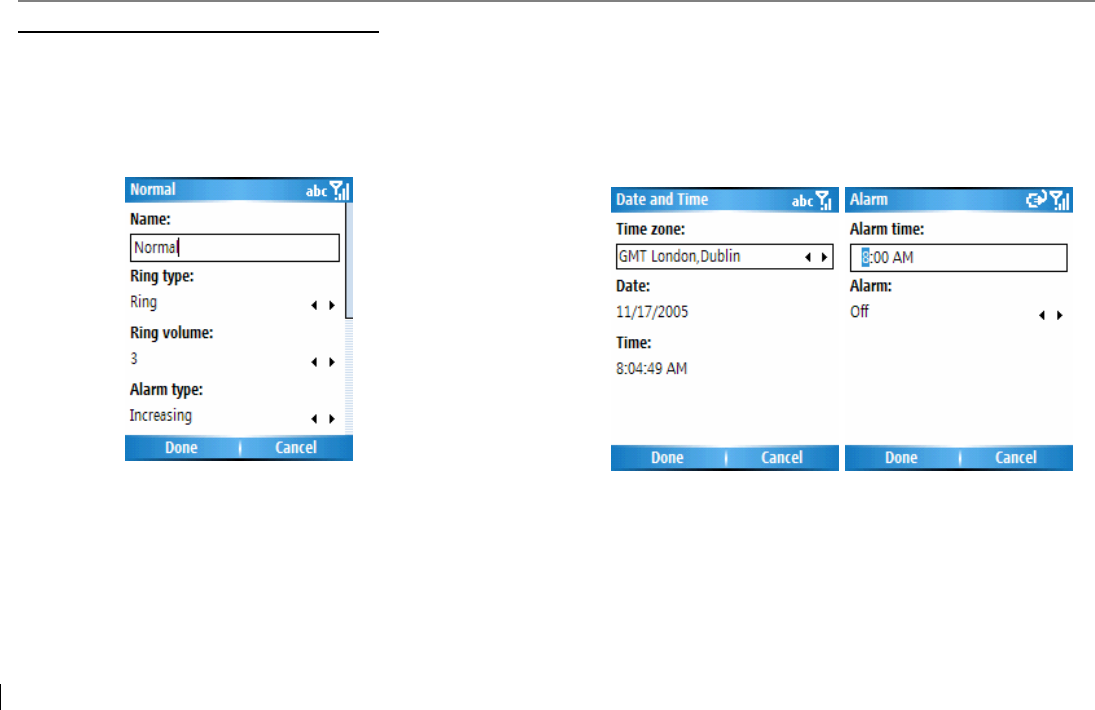
4.3 Customize Clock and Alarm
Select Clock & Alarm from the settings screen. The
Date and Time and Alarm screen will open as shown
below. It allows you to change your time zone, date,
time, set an alarm time, and turn the alarm feature on
or off.
Chapter 4 Personalize Your Smartphone
9
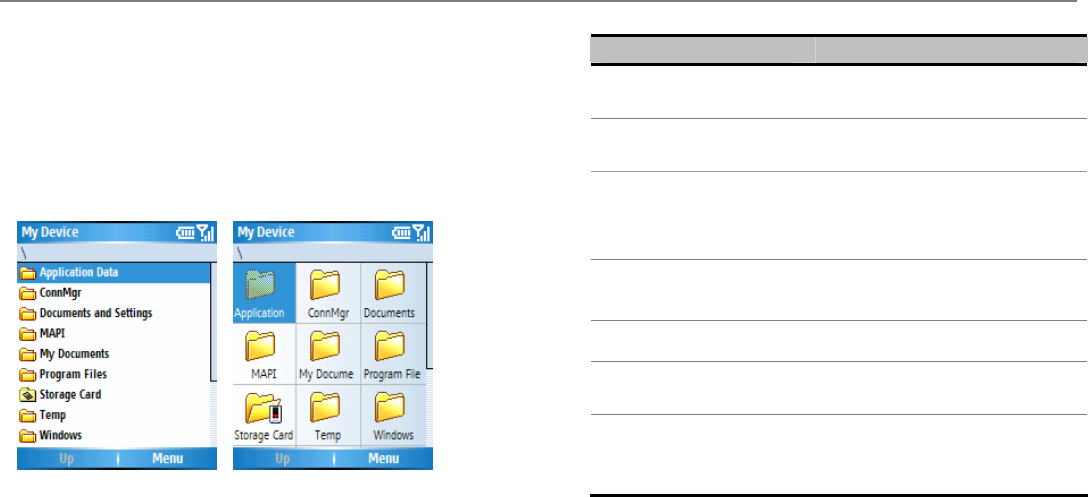
4.4 File Explorer
Select File Explorer from the Start menu to invoke the
File Explorer application which provides many
easy-to-use features for file and folder management.
It operates in either the List View or Icons View
(shown as the pictures below).
List View Icons View
Menu Commands in File Explorer
Selection Display
Send Go to the Messaging screen to
send the file to someone.
Beam Beam the file to another Bluetooth
device.
Edit
Cut/Copy/Paste
/Delete/Rename
/New Folder
Edit the files in your Smartphone.
Properties
Name/Location/Type/
Size/Created time.
View the related information of the
file.
View
Icons/List Switch the View of the file folders.
Sort by
Name/Date//Size/Type Allows you to sort the items on the
list by the options.
My Device
Storage Card
My Documents Change the folder to view
Chapter 5 Get Connected
1
Chapter 5
Get Connected
5.1 Connect to the Internet
5.2 Pocket Internet Explorer
5.3 Bluetooth
5.4 Modem Link
5.5 Wireless Manager
5.1 Connect to the Internet
When in the Home screen, select Settings>
Connections to access the Connections screen.
The settings in this screen enable you to set up Dial-up,
GPRS (General Packet Radio Service), Proxy, and
VPN (Virtual Private Network) connections so you can
connect to the Internet or your corporate network.
With the GPRS connection, you can browse the Web,
download E-mails, chat using MSN Messenger, or
synchronize wirelessly with the server. Check with
your service provider to see if a data connection has
already been set up for you, and if over-the-air
configuration is supported.

Chapter 5 Get Connected
2
Dial-up Connections
You need to set up a dial-up connection to connect
directly to the Internet or to your corporate network.
To create a dial-up connection to the Internet:
1. In the Home screen, select Settings >
Connections>Dail-up>Menu>Add
2. In the Add Dailup screen, enter a name for the
connection in the Description field.
3. In the Connects to field, select The Internet.
4. Enter the appropriate information for the remaining
fields, and select Done.
To create a dial-up connection to your corporate
network:
1. When in the Home screen, select Settings >
Connections>Dail-up>Menu>Add
2. In the Add Dailup screen, enter a name for the
connection in the Description field.
3. In the Connects to field, select Work.
4. Enter the appropriate information for the remaining
fields, and select Done.
In the same way as above, you may choose the
following in the Connections screen, then select Add
from the menu to add new connections:
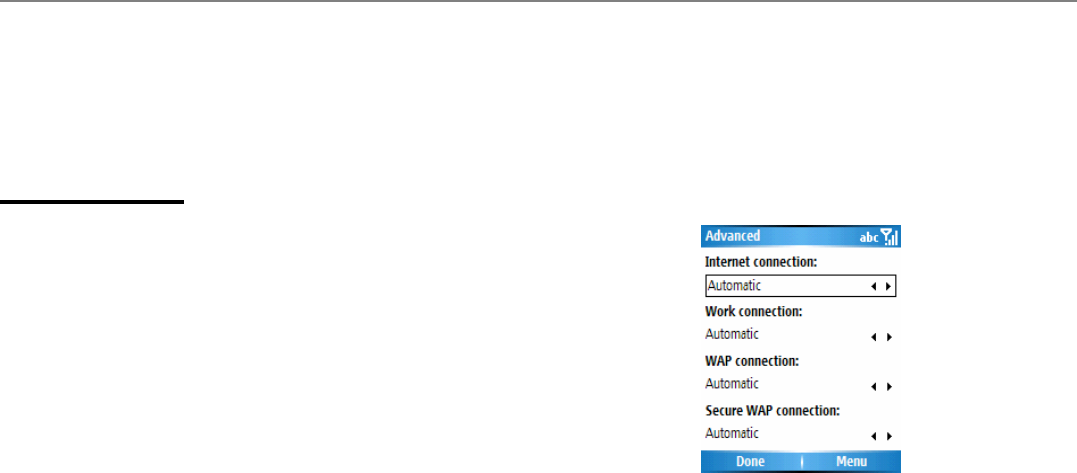
VPN Connections
A VPN connection is used to access your corporate
network using an existing Internet connection.
Proxy Connections
A Proxy connection is used to access the Internet using
an existing connection to your corporate or a WAP
network.
GPRS Connections
If there is a GPRS coverage in your area and you have
subscribed to the service, you may set up a GPRS
connection to access your corporate network or the
Internet.

Chapter 5 Get Connected
3
Options
After setting up the connection, you may go to Options
to specify number of redial attempts, amount of idle
time to wait before disconnecting, and type of
connection your desktop has.
1. In the Connections screen, select Menu>
Advanced>Menu>Options
2. Scroll the Navigation Button left or right to select
the appropriate settings in the fields>Press Done
Add a URL Exception
Some URLs for Web pages on your company Intranet
may use periods, for example:
intranet.companyname.com.
To view these pages on Internet Explorer, you must
create a URL exception. Otherwise, the pages will not
display.
NOTE: You do not need to create URL exceptions for
Internet URLs.
1. In the Connections screen, select Menu>
Advanced>Menu>Work URL Exceptions
2. Select Add from the menu.
3. In the URL Pattern field, enter the URL. Separate
multiple URLs with a semicolon (;). Then select
Done.
5.2 Internet Explorer
Using Internet Explorer (IE), you can browse the World
Wide Web on your Smartphone. IE supports HTML
(Hypertext Markup Language), cHTML (compact
Hypertext Markup Language), xHTML, and WML 2.0.
It also supports JScript, ActiveX controls, and CSS
(cascading style sheets). The browser supports
images and sounds, but it does not support frames on
a Web page.
Start Internet Explorer
1. Home Screen>Start>Internet Explorer
2. Select one site in the list of Favorites>Press down
the Navigation Button>Go
Enter a URL
Menu>Address Bar>enter the desired URL>Go
View a list of recently-visited web pages
Address Bar screen, select View History>select a
pre-visited site>Go

Chapter 5 Get Connected
4
Press the Back Button on your Smartphone to return
to a Web page you visited in the same session.
The Smartphone caches the Web pages that you view
and stores them until the cache is full. It then
replaces the oldest pages with the new pages. If you
go back to a page that is cached on your phone, you
will see the stored version unless you refresh the page
to see the current version.
NOTE: While you are connected to the Internet, you
can change between Internet Explorer and other
programs on your Smartphone by pressing the Home
Button and invoking the program you want. This
does not close your Internet connection.
Subsequently returning to Internet Explorer in the
same phone session would re-display the most
recently opened Web page.
Add a site to the Favorites list
You may mark the Web page you want to visit another
time as a favorite.
1. When the desired Web page is open, select Menu
>Add Favorite
2. The name and URL of the current page is already
filled in. You may edit the Name field and Address
(URL) field if necessary. If you previously created
additional folders, select a folder in the Folder field.
By default, only the Favorites folder exists. To create
a new folder in which to place URLs, select Add
Folder from the menu in the Favorites screen.
3. Select Add to add it to your Favorites.
To edit the Name, Address (URL), or Folder fields of an
existing entry in your favorites, select the desired
Favorite on the list, then select Edit from the menu.
To delete a favorite, select Delete.

Chapter 5 Get Connected
5
Change the display of the Webpage
1. When a Web page is open, select Menu>View
2. Select one of the selections shown as below.
Selection Display
One Column
Display the content in one column. The
width of the column and the screen are the
same. It means that you rarely need to
scroll left or right.
Default
The display is similar to the desktop layout.
You don’t need to scroll horizontally and
still can view the most part of the Web
page.
Desktop
The display is the same with the desktop
layout. You need to scroll horizontally and
vertically.
Full Screen
Show
pictures
If you select the view option, a check will
show beside the selection.
Send Link via E-mail
1. Open the Web page you want to send.
2. Menu>Tools>Send Link via E-mail
3. In the Messaging screen, select Outlook E-mail or
Text messages.
4. A new message is created and the Web site is
concluded in the message content.
Select the font size
1. When a Web page is open, select Menu>Zoom
2. Select font size including Largest, Larger, Medium,
Smaller, or Smallest.
View the properties of a Web page
You can view the information of a web site, such as the
Name, Address (URL), Type, Size, Protocol,
Encryption, and Security Zone.
1. Open the Web page you want to send.
2. Menu>Tools>Properties
Customize Internet Explorer
You can customize Web browsing options, change the
network to connect to, and make more memory
available on your phone by clearing stored cookies and
Web pages.
In the Favorite screen, select Menu>Options>select
either General, Connections, or Memory to view or
edit. The details of Options are shown as below.

Chapter 5 Get Connected
6
Option Function
General
Select if Play sounds, Warn when
changing to an unsecure page, Allow
cookies, Warm when page content is
blocked by security settings. You may
also scroll the Navigation Button left or right
to select Encoding.
Connections Select if Automatically detect settings,
and select network.
Memory View the storage of Temporary Files,
Cookies, and History.
5.3 Bluetooth
Bluetooth is a short-range wireless communications
technology. Devices with Bluetooth capabilities can
exchange information over a distance of about 30 feet
(10 meters) without requiring a physical connection.
The software included with your Smartphone allows
you to use Bluetooth to beam information such as files,
contact cards, appointments, and tasks to other
Bluetooth-enabled devices.
Bluetooth mode
Select Settings>Connections>Bluetooth>select
On, Off, or Discoverable. The behavior of each of
these modes is summarized below.
On — The Bluetooth radio is turned on and you can
use the Bluetooth features. But the Smartphone
doesn’t allow detection by another device.
Off — The Bluetooth radio is turned off. You might
want to turn the Bluetooth radio off at times to conserve
battery power, or in situations where radio use is
prohibited, like on the airplanes or in the hospitals.
Discoverable — The Bluetooth radio is turned on, and
any other Bluetooth devices within range (about 10
meters) can detect your device and attempt to beam
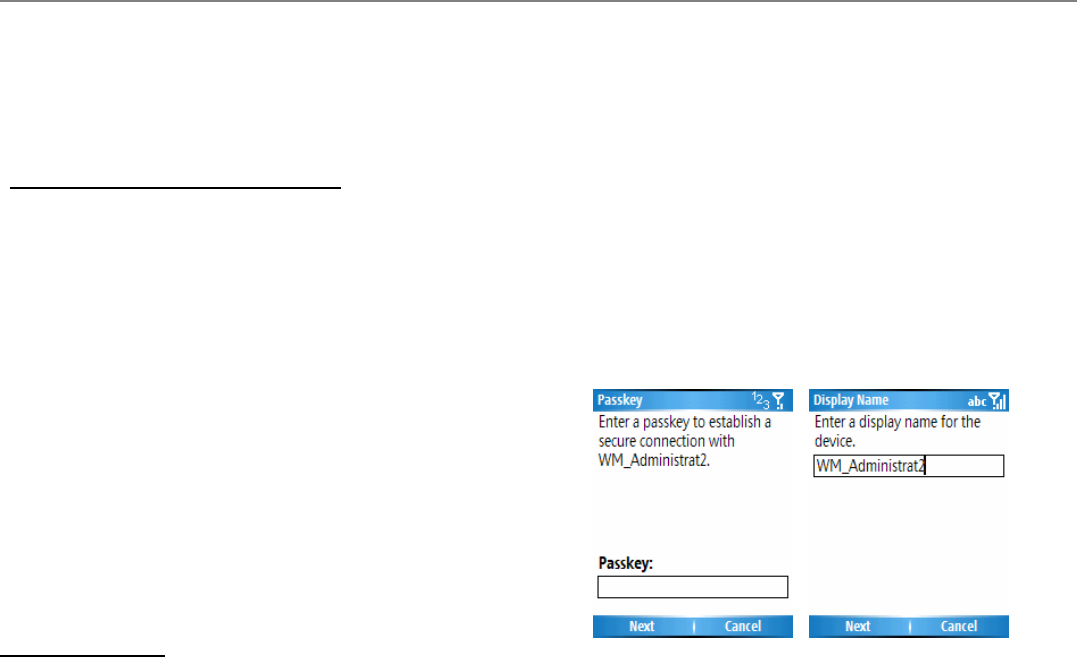
Chapter 5 Get Connected
7
information to it, establish a bond, or use a Bluetooth
service. In this mode, other devices can detect your
device, whether or not a bond has been created.
However, in order to receive a beam from another
device, you must accept it on your device.
To Beam information via Bluetooth
1. Select the item you want to beam. The item may
be a contact, an appointment in the calendar, or
work.
2. Select Menu>Beam [an item]>Select the
Bluetooth device
3. Select Beam
Bonds
A bond is a relationship that you create between your
Smartphone and another Bluetooth device in order to
exchange information more securely. Creating a bond
involves entering the same PIN (Personal identification
number) on the two devices you want to bond. Once
a bond is created, the devices recognize the bond and
are able to exchange information without your entering
a PIN again.
To create a bond:
Make sure that the two devices are within 10 meters of
each other and that Bluetooth is in discoverable mode
on both devices.
1. Home Screen>Start>Settings>Connections>
Bluetooth>Menu
2. Select Devices>Menu>New. Your device
searches for other Bluetooth devices and displays
them on the list.
3. Select the device you wished to connect, then press
down the Navigation Button to select it.
4. In the Passkey screen, enter a passkey of between
1 and 17 characters, and select Next.
5. Enter the same passkey on the other device.

Chapter 5 Get Connected
8
6. If desired, enter the name of the other device in
Name, and select Next.
7. In the Services screen, select Done.
To accept a bond:
Make sure that Bluetooth is turned on and in
the Discoverable mode.
1. When prompted to bond with the other device, select
Yes.
2. In the Passkey screen, enter a passkey of between
1 and 17 characters, and select Next. You must
enter the same passkey that was entered on the
device requesting the bond.
3. If desired, enter the name of the other device in
Name, and select Next.
4. Select Done. The bond is now created. Now you
can exchange information with the other device.
To delete a bond:
1. Settings>Connections>Bluetooth
2. Select Devices from the Menu.
3. Select the bond you want to delete>Menu>Delete.
5.4 Modem Link
Using Modem Link, you can use your Smartphone as
an external modem for another device or computer by
using a bluetooth or USB connection.
Set up the Smartphone as a modem
1. Select Start>More>Accessories>Modem Link.
2. Select USB in the Connection field.
3. Select Access point name. (Please consult the
service provider the appropriate Access point name.)
And then select Activate.
4. Connect your Smartphone to your computer via USB
cable. (The ActiveSync program will stop
automatically.)
5. If prompted to install a driver, use the modem drivers
provided on the companion CD. Follow the wizard
to install the device.
6. In the Found New Hardware Update Wizard
screen, select Install from a list or specific
location (Advanced)>Next.
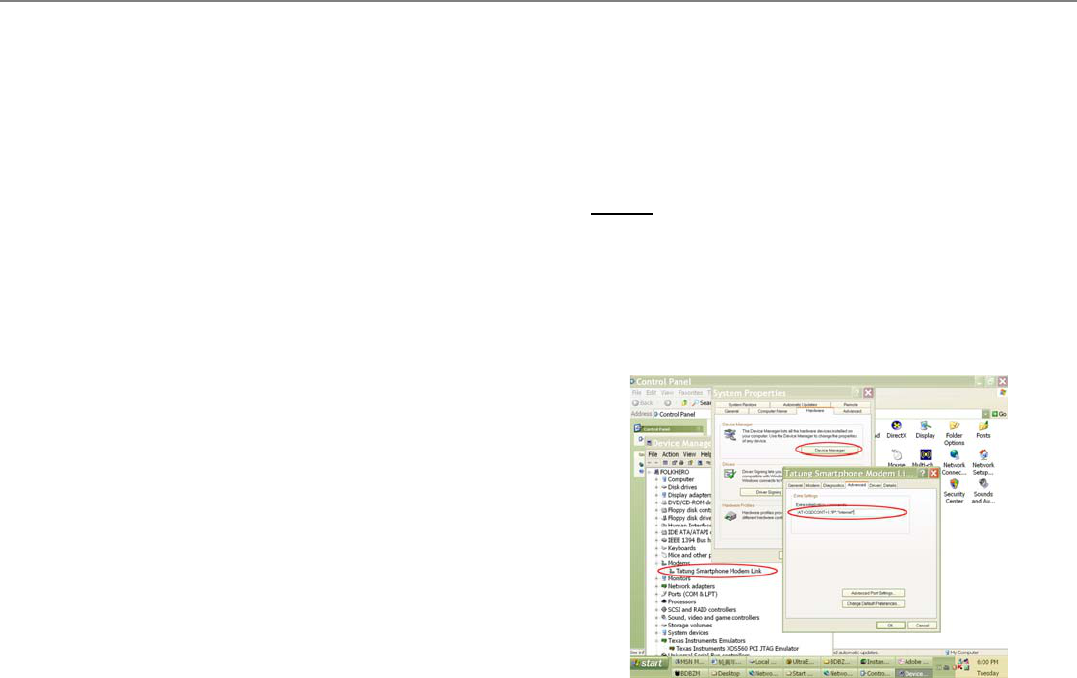
Chapter 5 Get Connected
9
7. Insert the companion CD to the CD-ROM drive.
Select Search for the best driver in these
locations.
8. Check the “Include this location in the search:”
box>Browse>Select the CD-ROM drive or the
folder the driver locates>Next.
9. After installation, click Finish.
Create a new connection
1. Create your connection on the PC’s desktop by
selecting Start>Control Panel>Network
Connections>File menu>New Connection
2. The New connection Wizard screen displays, and
then select Next to create a new connection.
2. Select Connect to the internet>Next
3. Select Set up my connection manually>Next
4. Connect using a dial-up modem>Next.
5. Type the name of your ISP in the ISP Name box>
Next.
6. If you connect to the Internet by using GPRS, use
the dial up numbers (e.g.*99#) provided by the
service provider to dial>Next.
7. Type an ISP account name and password>Finish.
NOTE: You may need to add a string of commends in
the Extra initialization commands box (e.g.
AT+CGDCONT=1,"IP","internet") on your PC under My
Computer>Property>Hardware>Device Manager
>Modems>Smartphone Modem Link>Property>
Advanced.
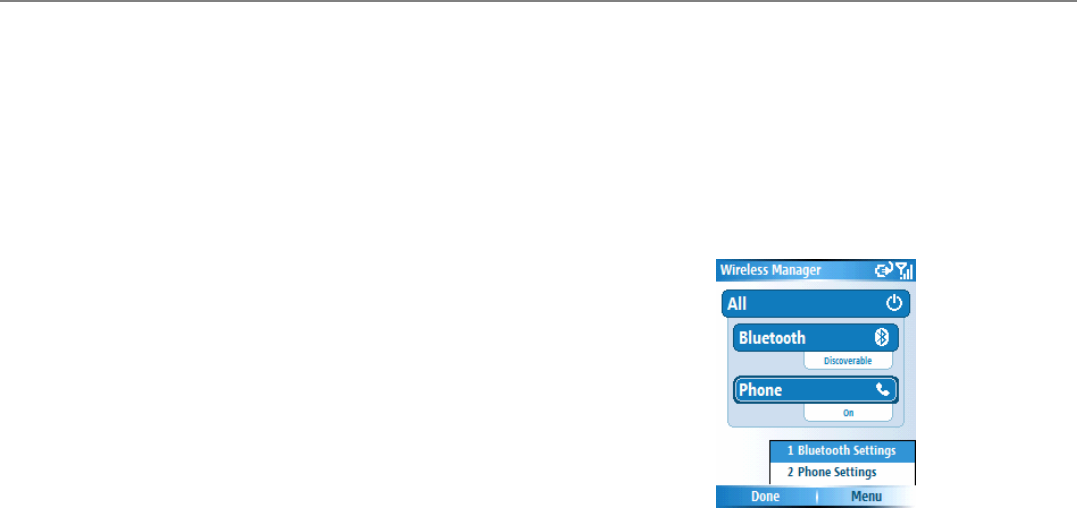
Chapter 5 Get Connected
10
Dial-up and connect to the Internet
1. Select Start>Control Panel>Network
Connections>Choose the dial-up connection.
2. A connection screen displays>Enter Password (if
necessary)>Dial.
3. Invoke the Internet Explorer on your PC, and then
you cam start to surf the internet.
5.5 Wireless Manager
Wireless manager is like the central switch facilitating
you to switch on or off the Smartphone wireless
functions.
Switch on/off the Bluetooth function or have it
discoverable.
Switch on/off the Phone (GSM) function, this will set
the phone into the flight mode.
Scroll to the corresponding selections and press down
the Navigation Button to change the state of the
wireless functions.
To execute advanced settings, select Menu>
Bluetooth Settings or Phone Settings>Change the
settings>Done.

Chapter 6 Messaging Features
1
Chapter 6
Messaging Features
6.1 Set up Accounts
6.2 Manage Accounts
6.3 Send E-mail and Text Messages
6.4 Receive E-mail and Text Messages
6.5 View Message Folders
6.6 Instant Messaging
6.7 MMS Messaging
6.1 Set up Accounts
Your Smartphone is equipped with messaging features
such as the functions to send and receive E-mail, Text
message, and MMS (Multimedia Messaging). It also
allows you to view and manage your message folders,
customize message notifications and use MSN
Messenger to communicate with others. Please note
that not all E-mail services allow users to set up POP3
on mobile devices. Consult your network
administrator or service provider for more information.
Configure E-mail accounts
You can send E-mail messages by synchronizing or by
connecting directly to an E-mail server through your
Internet service provider or a corporate network.
To set up an E-mail account:
1. When in the Home Screen, select Start >
Messaging
2. Select Outlook E-mail>Menu>Options>
New Account
3. Enter your display name for this E-mail account, and
your E-mail address>Next.
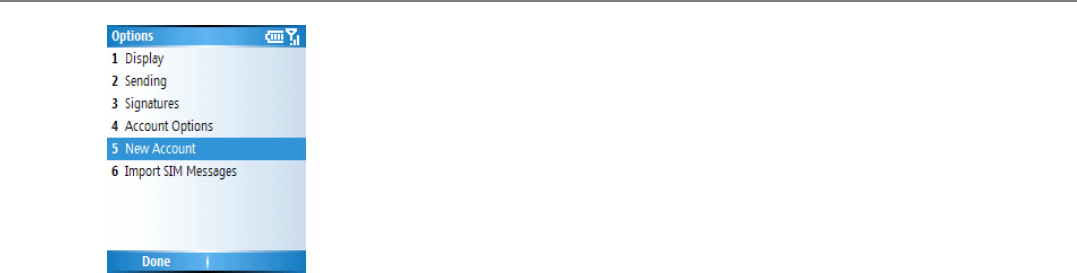
Chapter 6 Messaging Features
2
NOTE: Before configuring E-mail on your Smartphone,
you must have an E-mail account. You will also need
to configure your Smartphone's connection, as
described in Chapter 5.
4. Leave the Auto setup box checked to obtain E-mail
setting from the Internet. Your Smartphone will
make an Internet connection and attempt to
determine the server settings for E-mail.
NOTE: If the Auto setup couldn’t obtain e-mail
settings, select Next to enter settings manually as
following steps. If you are not sure what to enter, then
consult with your network administrator.
5. Enter your user Name and Password. In Domain,
enter the domain name (if necessary)>Select Save
password>Next.
NOTE: If your password is saved, you don’t need to
enter it each time you connect to your E-mail server.
Please note that if you save your password and then
lose your phone, your E-mail could be accessed by
someone else.
6. In Server type, scroll to select the type of E-mail
server that hosts your mailbox (IMAP4 or POP3).
In Account name, enter a name for this account.
You must use a different name for each account
that you set up.
7. In Network, scroll to the type of network that your
E-mail server runs on>Next.
8. Enter information about your Incoming Server and
Outgoing Server>Next.
9. Select the message download option>Next.
10.Select the connection option>Next
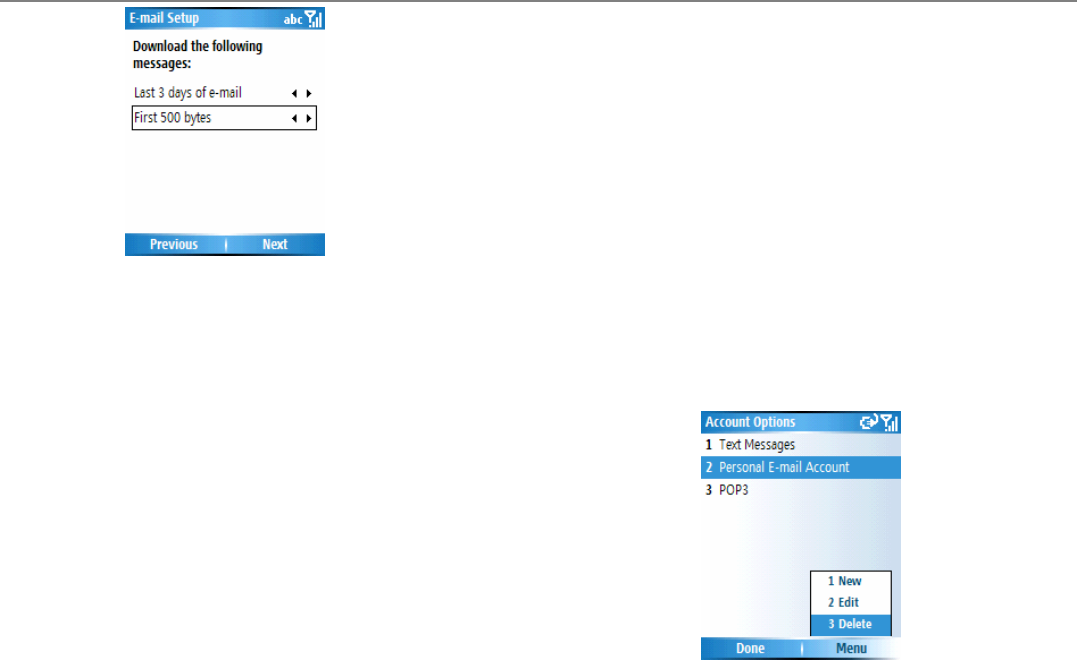
Chapter 6 Messaging Features
3
11. To begin using e-mail, select Finish and select
Send/Receive from the Menu.
6.2 Manage Accounts
Use and manage up to eight messaging accounts with
your Smartphone.
View the list of accounts
In the Home screen select Start>Messaging.
The list of accounts is displayed and the number of
unread messages in the Inbox of each account is
shown in parentheses.
Move between accounts
If you have an account open, you can quickly switch to
another account by scrolling right or left, or selecting
Menu>Switch Accounts.
Edit the account options
1. In the Home screen, select Start>Messaging>
select an account.
2. Select Menu>Options>Account Options>Menu
>Edit
3. Select the type of options to change>Done
Delete an account
1. In the Home screen, select Start>Messaging>
select an account.
2. Select Menu>Options>Account Options>
Select an account>Menu>Delete
3. An Alert screen displays, and select Yes.

Chapter 6 Messaging Features
4
6.3 Send E-mail and Text Messages
You can start creating a new E-mail, SMS, or MMS
(Multimedia Messaging) from Messaging. Only
numbers input are allowed for SMS and MMS
messages, and E-mail addresses for MMS and E-mail
messages.
Create a message
1. In the Home Screen, select Start>Messaging.
2. Select Text Messages, Outlook E-mail, or MMS>
Select>New
3. In To, enter the recipient E-mail address or phone
number. Insert a semicolon (;) between multiple
addresses or numbers.
• Add Recipient from Contacts
In To, select Menu>Add Recipient>Scroll to
the desired contacts>Select.
• Check Names from Contacts
If the recipients or addresses are entered by
yourself, you may check if those are valid.
In To, enter the names>Menu>Check
Names
If the Smartphone cannot recognize one or
more recipient or the addresses are not valid, A
Alert screen displays to advice you to check
the information.
• Removed Recipient
In To, select Menu>Remove Recipient
4. In Subject, enter a subject. This field does not
appear for Text Messages.
5. Enter the content of the message>Send
• Insert predefined text into messages.
In Subject, select Menu>My text>Scroll to
the desired text>Insert or press down the
Navigation Button.
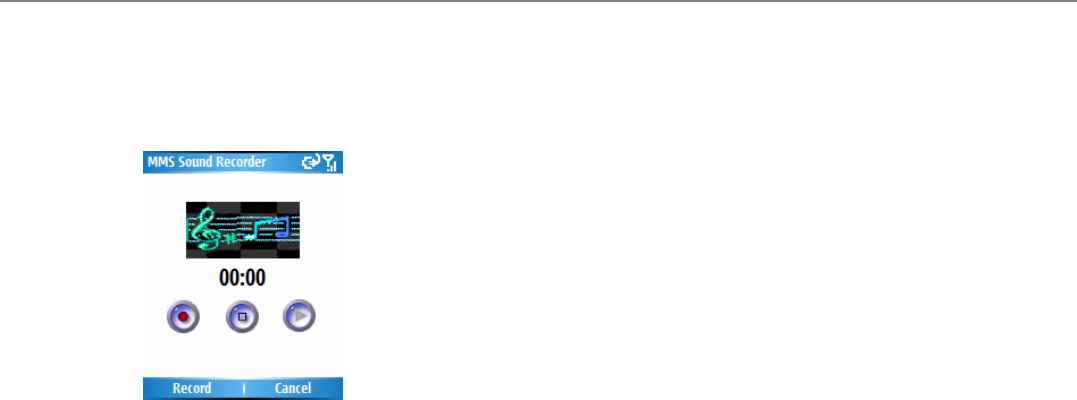
Chapter 6 Messaging Features
5
• Insert voice notes or pictures into a
message.
Select Menu>Insert>Select Voice Note or
Picture, and you will be prompted to insert
picture or start recording.
• Cancel a message
Start>Messaging>Choose an account>
New>Enter information in the message>
Menu>Cancel Message
• Save a draft of a message
You can save a draft of a message that you
have composed to finish and send later. The
message is stored in the Drafts folder of the
account.
Start>Messaging>Choose an account>
New>Enter information in the message>
Menu>Save to Drafts
• Reopen and send a message draft
Start>Messaging>Choose an account>
Menu>Folders>Select Drafts>Scroll to the
draft message to open>Edit>Edit the
message>Send
• Set up sending options
Start>Messaging>Choose an account>
Menu>Options>Sending>Check the
“Include copy of original message when
replying to e-mail” box, or/and “Save copies
of sent items” box.
NOTE: E-mail messages are stored in Outbox and
sent to recipients the next time you connect to your
E-mail server and receive E-mails. Text messages
are sent immediately.
When creating a message, you may go to Menu>
Message Options to select Priority level, set
Security options, and select Language.
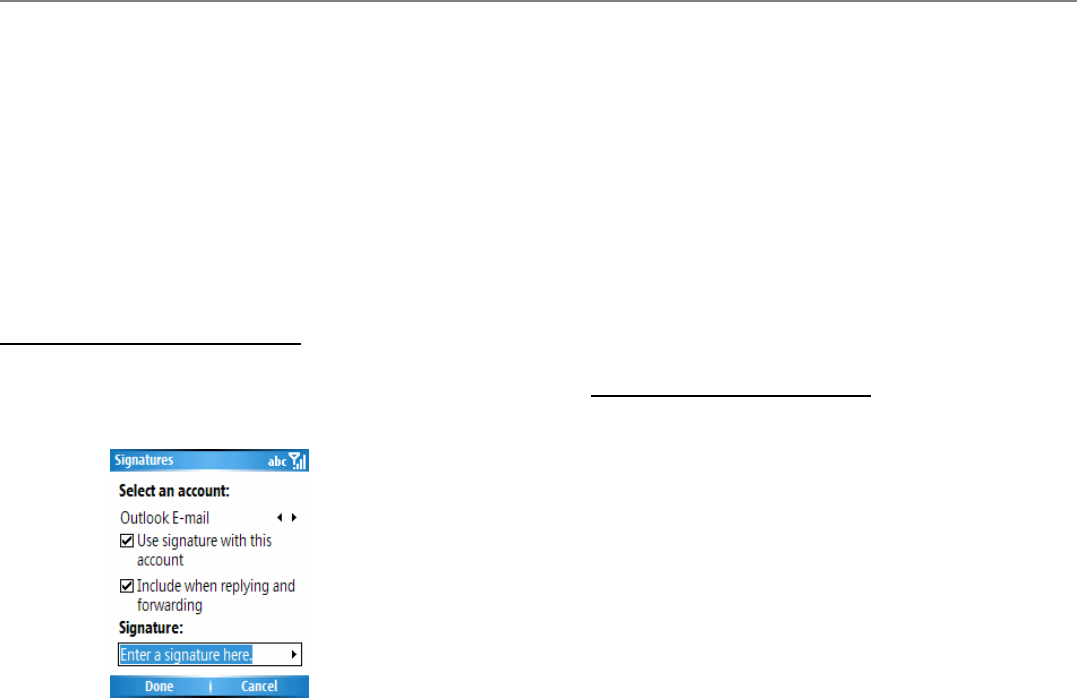
Chapter 6 Messaging Features
6
You can send and receive SMS messages up to 160
characters in size. If an SMS message is longer than
160 characters, it is automatically sent in chunks as
several small SMS messages, and is then unified as
one SMS message after all of the small SMS
messages have been received.
Insert signatures into messages
For each messaging account, you can specify a
signature to be automatically inserted into messages
that you send.
To specify a signature to insert:
1. Start>Messaging>Choose an account>Menu>
Options>Signatures
2. Scroll left or right to switch to the account for which
to specify a signature.
3. Select Use signature with this account.
4. Select Include when replying and forwarding.
Otherwise, a signature is inserted only in new
messages.
5. Replace the text within the Signature box with a
signature to insert>Done. The signature is
inserted into messages that you send from this
account.
To stop inserting a signature:
1. Start>Messaging>Choose an account>Menu>
Options>Signatures
2. Select the account for which you want to stop
inserting a signature into messages.
3. Clear the Use signature with this account
checkbox>Done. A signature will no longer be
inserted into messages that you send from this
account.
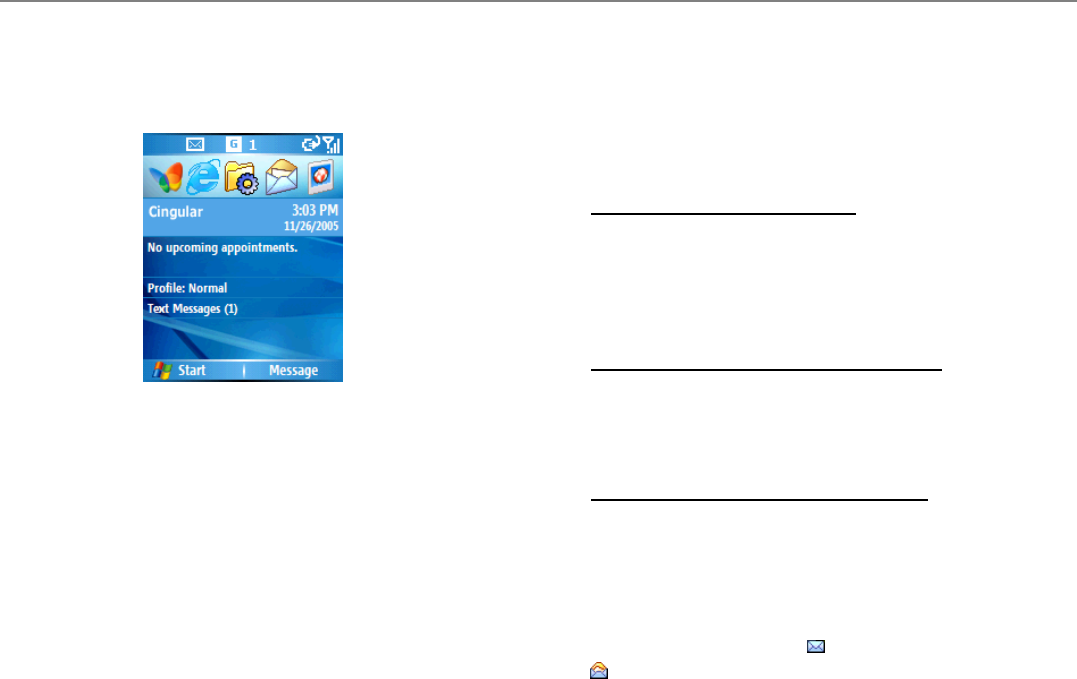
Chapter 6 Messaging Features
7
6.4 Receive E-mail and Text Messages
You can receive E-mail and Text messages through
Inbox synchronization or by connecting to your E-mail
server.
When an email message is received, the Smartphone
play a sound and display an envelope icon on the top
of the screen automatically.
By default, the Home screen also displays the number
of unopened E-mail and Text messages. To quickly
view the new messages, scroll down and select the
message notification area on the Home screen, or
select the Message soft key.
Work with the message list
Received messages are displayed and stored in the
Inbox folder of the appropriate account. By default,
messages are displayed in the sequence of the time
you receive, allowing you to change the display order
and date of sent messages.
View the Inbox message list
Home Screen>Start>Messaging>Scroll to the
appropriate account>Select>Menu>Folders>
Inbox>Select. The Inbox message list displays your
received messages.
Change message list display options
Start>Messaging>Choose an account>Menu>
Options>Display>Change the display options>
Done
Mark a message as Read or Unread
Start>Messaging>Choose an account>Menu>
Mark as Read/Unread>Press down the Navigation
Button
If the message is marked as Read (or Unread), an
unopened envelop icon (or an open envelop icon
) shows in front of the message list.

Chapter 6 Messaging Features
8
Forward a message:
1. From an open message, select Menu>Forward.
2. In To, enter the recipient E-mail addresses or phone
numbers. Insert a semicolon (;) between multiple
addresses or Phone numbers.
3. Optionally, you can enter an introductory message
by scrolling to the message area, pressing down the
Navigation Button to insert a blank line, and
entering your text.
4. Select Send. Text messages are sent immediately.
Email messages are stored in Outbox and sent to
recipients the next time you synchronize or connect
to your E-mail server.
Delete a message:
Start>Messaging>Choose an account>Scroll to the
message to delete>Menu>Delete
Download a complete E-mail message or an
attachment:
When you receive large E-mail messages and
attachments, your Smartphone downloads only a
portion of them. You can view the partial message or
attachment and decide if you want to download the rest
of it. (You may set up the size you want to download
first, please see section 6.1)
Start>Messaging>Choose an account>Scroll to a
message or select the attachment in an open message
>Menu>Download Message
The complete message or attachment is retrieved the
next time you synchronize or connect to your E-mail
server and Send/Receive E-mail.
View an attachment:
In an open message containing a downloaded
attachment, select the attachment. Note that you can
open attachments only for files that are supported by
the phone’s installed applications.
The attachment size is omitted from messages
received from a POP3 E-mail server.
In the message list, messages with an attachment
display an envelope icon with a paper clip, which looks
like this:
Within a message, attachments are displayed as a list
of hyperlinks at the bottom of the message, and are
preceded by an attachment icon. The hyperlink
Chapter 6 Messaging Features
9
includes the file name and the size of the attachment.
The following icons indicate the state of each
attachment status:
Not downloaded
Marked for download
Downloaded
6.5 View Message Folders
Each messaging account has a set of folders in which
your Smartphone stores messages for each account.
Folder Function
Deleted
Items Contains messages that you have
marked for deletion.
Drafts Contains messages that you have saved
before sending.
Inbox Contains received messages.
Outbox
Contains sent E-mail messages
awaiting synchronization, or messages
that will be sent upon the next E-mail
server connection. SMS messages are
sent immediately over the network and
appear in your SMS Outbox folder only
for a few seconds.
Sent Items Contains copies of the sent messages.
When you synchronize or send and receive E-mail,
your Smartphone synchronizes any additional E-mail
folders that you have created in Outlook on your
desktop computer or on your E-mail server. It also
synchronizes the messages contained in those folders,
if the folders are marked for synchronization.

Chapter 6 Messaging Features
10
To view message folder contents:
Start>Messaging>Choose an account>Menu>
Folders>Select the folder you want to view>Select
To move a message to a different folder:
Start>Messaging>Choose an account>Scroll to the
message to move>Menu>Move>Select the folder
into which to move the message.
To clear the Deleted items folder:
Start>Messaging>Choose an account>Menu>
Folders>Scroll to Deleted items folder>Menu>
Clear Text Messages>Select
To import SIM messages from a SIM card:
Start>Messaging>Choose an account>Menu>
Options>Import SIM Messages>Press down the
Navigation Button
The commands in the folders:
Command Function
Delete Delete the selected message.
Reply Reply to the sender.
Reply All Reply to the sender and all other
people who received the message.
Forward Forward the message to other E-mail
addresses.
Folders The folders in this account.
Switch
Accounts Switch between accounts.
Move Move the selected message to another
folder.
Mark as
Read/Unread To mark the message as read or unread.
Download
message Retrieve the entire E-mail message from
the E-mail server.
Options Display a list of Inbox options that you
can customize.
Send/Receive Connect to your E-mail server to send
and receive messages.
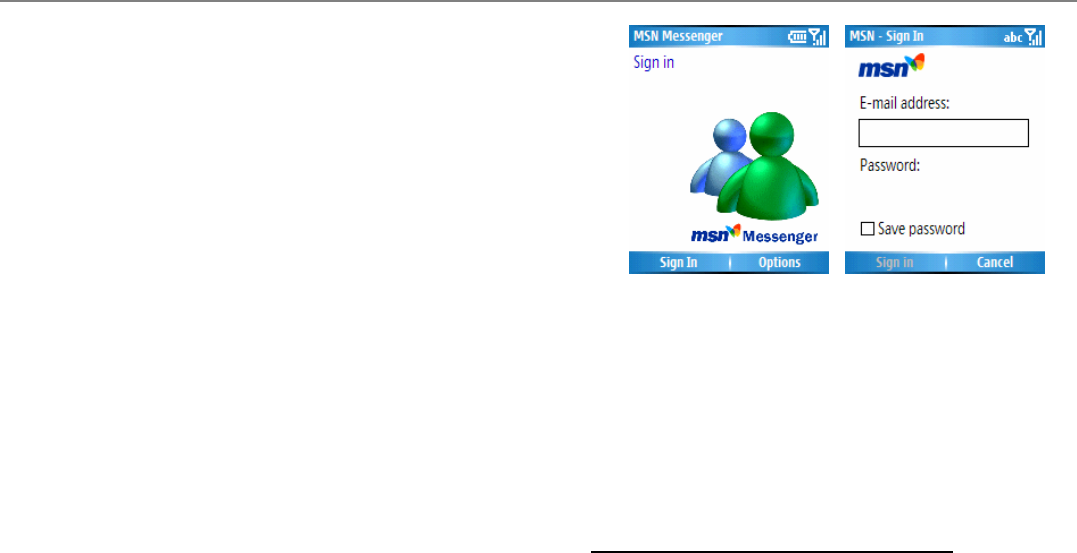
Chapter 6 Messaging Features
11
6.6 Instant Messaging
You can use MSN Messenger on your Smartphone to
send and receive instant messages. MSN Messenger
on your phone provides the same chat environment as
MSN Messenger on your desktop computer. Features
of this environment include:
• Sending and receiving instant messages.
• Seeing the status of others on your Messenger
contacts list, or changing your own status (e.g.,
available, busy, out to lunch, etc).
• Inviting other people to a chat.
• Blocking contacts from seeing your status or
sending you messages.
Use Pocket MSN
MSN Messenger on your Smartphone provides the
same chat/instant message environment as MSN
Messenger on your desktop computer. Among other
things, you can use it to:
NOTE: You need either a .NET Passport account or a
Hotmail account to set up MSN Messenger. To set up a
Microsoft .NET Passport account, go to:
http://www.passport.com. Once you have an
account, you need to create a connection on your
Smartphone that allows you to connect to the Internet.
For more information about creating connections, see
Chapter 5.
To sign in and out of MSN Messenger:
1. Home screen>Start>Messaging>Pocket MSN>
MSN Messenger>Sign In.
2. In E-mail address, enter the sign-in name that you
use for Hotmail or your .NET Passport

Chapter 6 Messaging Features
12
3. In Password, enter your Hotmail or .NET Passport
password.
4. Select Save password if you don't want to enter
your password again next time.
5. Select Sign In.
6. To sign out, select Menu>Sign out.
NOTE: If you do not sign out of MSN Messenger, you
will remain on a data connection. This may result in
additional charges from your service provider.
To add or delete an MSN Messenger contact:
In the MSN Messenger contacts list, select Menu>
Add Contact. Add the Hotmail or .NET Passport
sign-in name of a person with whom you want to chat.
To delete an MSN Messenger contact:
In the MSN Messenger contacts list, select Menu>
Delete Contact.
To send an instant message:
Sign in to MSN Messenger>Scroll to the contact with
whom you want to chat.>Menu>Send Message>
Enter your message>Send.
To reply to an instant message:
1. Select Menu>Chats.
2. Select the name of the person sending the instant
message. The message displays, along with a box
for your reply.
3. Enter your reply and select Send. If you want to be
able to receive instant messages at any time your
phone is connected to a network, select Menu >
Options > Passport Account > Run this program
when connection is available > Done.
To invite a contact to an ongoing chat:
From a chat, select Menu > Invite>choose a contact.
The contact receives an instant message and can join
the chat.
To change between chats:
Select Menu>Chats. In the list of ongoing chats,
select the name of a contact with whom to chat.
To return to the contacts list:
From a chat, select Menu>My Contacts.

Chapter 6 Messaging Features
13
To end a chat:
Select Menu>End Chat.
To see who is already chatting:
Select Menu>Chats.
To block or unblock an MSN Messenger contact:
In the MSN Messenger contacts list, select the
contact's name.>Menu>Block. The contact will no
longer be able to see your status or send you
messages. To unblock the contact, select Menu>
Unblock.
To change your status:
In the MSN Messenger contacts list, select your name.
>Select a status description, such as Busy. This
status is displayed next to your name on the contact
lists of your contacts.
To change your display name:
On the MSN Messenger contacts list, select Menu.
Select Options>Passport Account. In My display
name, enter your name as you want it to display in the
contacts lists of your contacts>Done.
6.7 MMS Messaging
You can use MMS to create, view, store, send, or
receive multimedia messages that include text, photos,
videos, or audio files.
Invoke MMS
To invoke MMS, please follow one of the methods as
follows:
1. In the Home Screen select Start>Messaging>
MMS
2. In the Pictures & Videos screen>Select one
picture>Menu>Send>MMS
3. From Camera application, after capturing pictures
and videos, select Menu>Send>MMS
MMS Settings
Select Start>Messaging>MMS>New>Menu>
Options>MMS Settings>Scroll to the account to edit
>Menu>Select the desired command, including Add,
Edit, Delete, Select, or Cancel.
There are some fields for you to set up in the Edit
screen or Add MMS Profile screen , including MMSC

Chapter 6 Messaging Features
14
URL, Data Connections, WAP Gateway, IP Address,
Port, and Encoding. After editing, select Done.
The MMSC (“Multimedia Messaging Service Centre”)
settings are normally pre-set to the appropriate values,
and in most cases you will not need to change them.
Edit Message Options
You may edit the Send/Receive settings by selecting
Message Options from the Menu in the MMS screen
>Send Options or Receive Options>Edit the
options.
Create and send an MMS message
You may create messages consisting of multiple slides.
Each slide can contain a photo or video, audio (with
photos only), and text. Messages will display similar
to a slide show. You can then send your messages to
other mobile devices or E-mail accounts.
1. Start>Messaging>MMS>New
2. In the To, enter the recipient’s phone number or
E-mail address. In the Subject field, enter a
subject.
3. Insert a Picture, Video, Audio, and Text
To insert a Picture, Video, or Audio.
a. Select the Insert Picture/Video... or Insert
Audio box.
b. Press down the Navigation Button. All of your
available files will be displayed in a Thumbnail
view.
c. Scroll to the photo, video, or audio you want to
attach>Select.
NOTE: An audio file cannot be inserted into a slide
which already contains a video file.
To insert text:
Scroll to the Insert Text... portion and manually
enter the desired text.
If you want to insert a predefined text, select Insert
>My Text from the Menu>Choose desired text
>Select Insert. You may select Edit My text
from the Menu in the Insert My Text screen to
define your text.
4. Optionally, you may insert more slides by selecting
Menu>Slides>Insert. Another slide will be
created for you to compose.
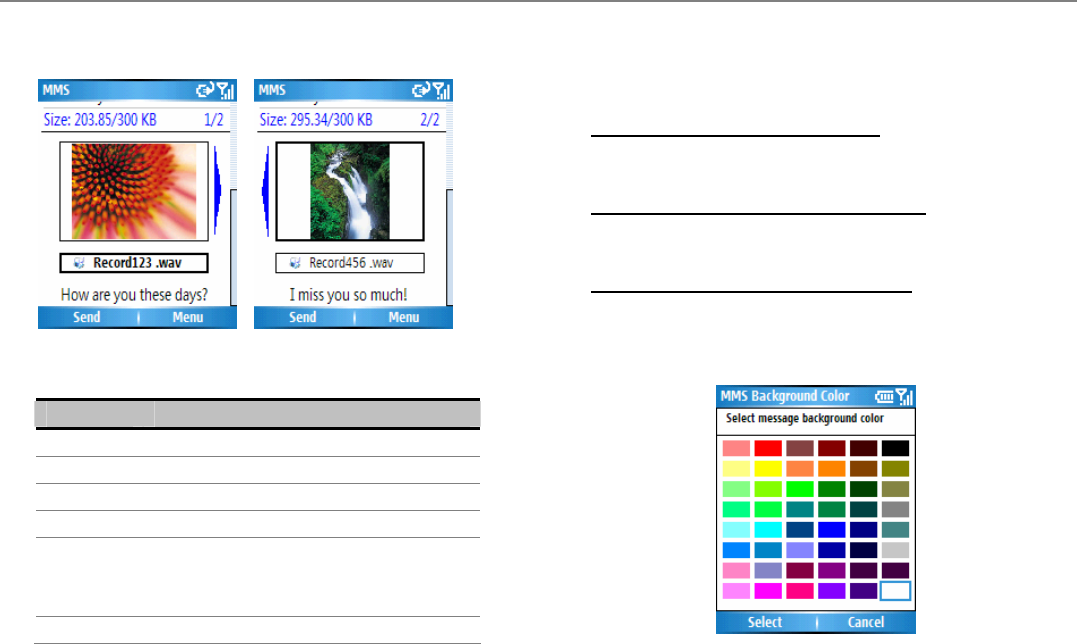
Chapter 6 Messaging Features
15
Scroll the Navigation Button left/right to view the
slides you’ve created.
You may edit the slides by select Menu>Slides.
The commands are shown as below:
Command Function
Insert Insert another slide
Delete Remove the selected slide
Next Jump to the next slide.
Previous Jump to the previous slide
Move
Move the order of the slides
Select the slide to move>Menu>Move
>Scroll to the desired order>Select
Duration Set up the slide duration in seconds.
5. After finishing composing the message>Send
All of the content you insert is included onto a single
slide. The recipient will see the photo or video along
with any text. Attached audio will play as well.
To preview the MMS message:
In MMS screen, select Menu>Preview
To save the MMS message to Draft:
In MMS screen, select Menu>Save to Draft
To change the Background Color:
In MMS screen, select Menu>Options>Background
Color>Scroll to the desired color>Select
The Menu accessed from the Select a Picture/Video
screen contains the following commands:

Chapter 6 Messaging Features
16
Command Function
View Play the selected video or display the
selected picture.
Camera Lets you capture a new picture or video
and attach it to the MMS slide.
Cancel Return to previous screen.
My Pictures
My Device
Storage Card
Lets you choose a different folder from
which you can select a photo or video to
add to your message.
To use the Template:
To create a new MMS message from the Template
Gallery, select Menu in the MMS screen>Template>
Gallery>Scroll to the desired template>Select.
To save the current message in the template gallery,
select Menu in the MMS screen>Template>Save
To send and receive messages:
If you select Never, your account is set up to
receive/send messages manually and your message
will be routed to the Outbox for sending. To send the
message, go to the Outbox of the MMS account, and
select Send/Receive from the menu.
If you select a period of time such as Every fifteen
minutes or Every two hours, you will automatically
get an administrator message in your MMS Inbox
prompting you to send the message.

Chapter 7 Synchronization
1
Chapter 7
Synchronization
7.1 Use ActiveSync
7.2 Install ActiveSync
7.3 Exchange Server
7.4 Synchronize music, video and pictures
7.1 Use ActiveSync
Maintaining good data synchronization between your
Smartphone and your desktop or notebook PC is
important. A tool is provided for sharing information
called "ActiveSync" ActiveSync synchronizes
information stored on your Smartphone to your PC or
Exchange Server. It also allows you to share files
between your Smartphone phone and your PC
seamlessly.
When you perform synchronization, ActiveSync
compares the information on your Smartphone with the
information on your PC and/or Exchange Server, and
updates all locations with the most recent information.
With ActiveSync, you can:
• Keep your Outlook information, Inbox,Calendar,
and Contacts up-to-date by synchronizing your
Smartphone with your PC.
• Copy/move files between your Smartphone and
your PC.
y Install new Smartphone software applications and
utilities.

Chapter 7 Synchronization
2
• Select and specify the type of information you
want to synchronize. For example, you can
choose how many future appointments to
synchronize.
7.2 Install ActiveSync
Before synchronization is begun, you must install the
ActiveSync 4.1 or above on your desktop or notebook
PC. Use the Companion CD that came with your
Smartphone.
1. Insert the Companion CD into the CD-ROM drive,
and install the ActiveSync onto your PC. After
finished installation, the Synchronization Setup
Wizard will be invoked automatically.
2. Follow the instructions on the screen to finish
settings,
a. Create the synchronization connection between
your Smartphone and PC.
b. Set up the connection between Your
Smartphone and Exchange Server, and
synchronize the information by using Exchange
Server directly. You need to assign the site,
user name, password, and domain name.
3. Adjust the settings for a particular type of information,
click on the type and then select Settings. By
default, Calendar, Contacts, Tasks, and Inbox will be
synchronized.
7.3 Exchange Server
Before synchronizing information with a server, make
sure all the requested server authentication information
such as username, password, and the name of the
Mobile Information Server are correct.
Set up Exchange Server
1. On your Smartphone's Home screen, select Start>
ActiveSync>Menu >Add Server Source.
2. Enter the Server address as the server>Next
If you want your Smartphone to save your password
so that you don’t need to enter it when connecting,
select Save password.
3. Enter the User Name, Password, and Domain.
4. Choose the items to sync, including Contacts,
Calendar, E-mail, and Tasks>Finish
5. Menu>Options>Scroll to Calendar or E-mail
Select Settings>Change the settings>Done
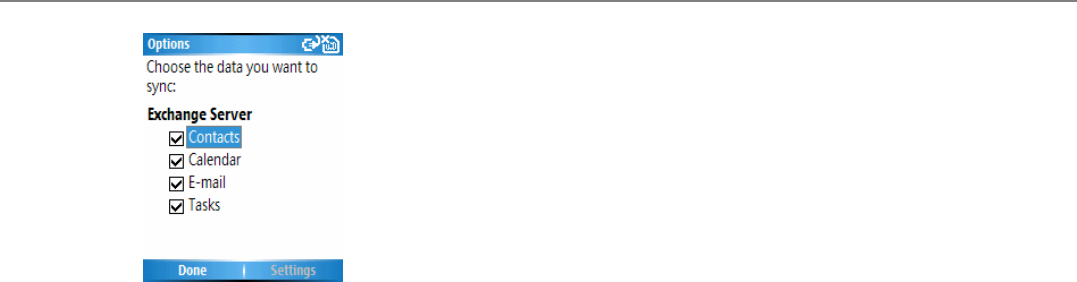
Chapter 7 Synchronization
3
To begin synchronizing with the server, select Sync in
the Active Sync screen and enter the password (If
necessary).
Schedule server synchronization
You can create a schedule for automatically
synchronizing information on your Smartphone with a
PC or with an Exchange Server. To set up a
synchronization schedule with an Exchange server,
you must use ActiveSync on your Smartphone. You
can schedule synchronization of your Smartphone on
two separate schedules:
1. To edit schedule settings, your Smartphone must be
disconnected from your PC.
2. On your Smartphone's Home screen, select Start>
ActiveSync>Menu>Schedule
a. Select how often to synchronize in the Peak
time sync list.
Peak times schedule: To synchronize
during working hours or other times you
experience higher mail volumes.
b. Select how often to synchronize in the
Off-peak time sync list.
Off-peak schedule: To synchronize during
times when you experience lower mail
volumes. When you are roaming, you can
synchronize manually to reduce roaming
charges, or you can synchronize using the
mobile schedules.
c. Select whether or not to synchronize on a
schedule on the Roaming sync list.
d. Select Sync outgoing items as they are sent to
synchronize every time you send E-mail.
5. Select Done.

Chapter 7 Synchronization
4
If you created a schedule for synchronizing while
connected to a PC as well as a schedule for
synchronizing remotely (wirelessly), your Smartphone
synchronizes according to both schedules.
Synchronize information via Bluetooth
You may use Bluetooth to connect your Smartphone to
the PC, and execute synchronization.
1. Follow the ActiveSync Help on your PC to set up
the Bluetooth functions.
2.Home>Start>ActiveSync>Menu>Connect via
Bluetooth
NOTE: Confirm that the Smartphone and PC have
initiated the Bluetooth function and approached to each
other.
7.4 Synchronize music, video and pictures
If you want to take your music or other digital media
with you, ActiveSync works with Windows Media
Player to synchronize music, video, and pictures with
your device.
Other than selecting the Media information type in
ActiveSync to be synchronized, all media
synchronization settings must be set in Windows
Media Player. Before media can be synchronized, do
the following:
1. Install Windows Media Player 10 on the PC
before synchronization.
2. Connect your Smartphone to the PC with a
USB cable. If the device is also connected to
PC using Bluetooth, you must end that
connection before media can be synchronized.
3. Insert a 32 MB or larger storage card(mini SD
card) on your Smartphone.
4. Set up a sync partnership between the storage
card and Windows Media Player.
5. The files will invoke synchronization on your
Smartphone. The next time you connect your
Smartphone to the PC and use the Windows

Chapter 7 Synchronization
5
Media Player on your PC, the synchronization
will start to execute automatically.
Change Media synchronization settings
Once you select the Media information type in
ActiveSync to be synchronized, any of your favorite
music, video and picture files on Windows Media
Player playlists can be synchronized by ActiveSync.
All you have to do is set up synchronization in Windows
Media Player for those media files. You can change
which media files are synchronized and set up sync
partnerships with a storage card as follows:
1. Open Windows Media Player.
2. Click the Sync tab.
3. Select the storage card.
4. Click Set up Sync.

Chapter 8 Applications
1
Chapter8
Applications
8.1 Calendar
8.2 Tasks
8.3 Calculator
8.4 Voice Notes
8.5 Windows Media Player
8.6 Games
8.7 Java Manager
8.1 Calendar
Calendar is the scheduling program on your
Smartphone, where you can create and view
appointments. You can view your calendar by day,
week, or month. When you create and edit
appointments on the Calendar, your changes are
reflected on your PC when you synchronize.
To create a new appointment:
1. On the Calendar screen, select Menu>New
Appointment.
2. Enter information about the appointment>Done.
NOTE: In the Reminder field, you can specify the
amount of time prior to the appointment that you want
to be reminded.
To edit or delete an appointment:
1. Select the desired appointment>Menu>Edit or
Delete.
2. If the appointment is recurring, select Yes to edit
only the current occurrence, or select No to edit the
series.
3. Make your changes and select Done.
Chapter 8 Applications
2
View your schedule
You may view your schedule in three different views:
Agenda, Week, and Month. Agenda View is the
default view for calendar information. This view
displays meetings and appointments scheduled for the
current day.
.
Agenda View
Appointments are shown in chronological order
according to start time. All-day appointments are
shown as a single line on the top of the Agenda view.
To change view of the schedule:
1. Scroll the Navigation Button left or right to select a
desired date/time.
2. Press the Left Softkey or select the desired view
from Menu to switch to the other views. You may
select Menu to Go to Today or Go to Date.
All-day events
Morning appointments
Afternoon appointments
Morning & afternoon
appointments
Customize the calendar view
You may select Menu>Options on the Calendar
screen to change viewing options for Calendar, such as
specifying the first day of the week and the number of
days per week to display, showing and hiding week
numbers, and set an interval of Rimiders.
Select Start in the Home screen>Calendar>Menu>
Options>Scroll to the item to change and adjust it>
Done
All day appointment
The hours of the two
meetin
g
s conflict

Chapter 8 Applications
3
Beam Appointment
You may beam the appointment to another Bluetooth
Device.
Select the event to beam>Menu>Beam
Appointment>Select the Bluetooth device to beam to
>Beam
8.2 Tasks
A task is a personal or work-related project,
assignment, or errand to track through to completion.
A task can occur once, or it can recur. A recurring
task can repeat at regular intervals, or repeat based on
the date you mark the task complete.
To start the Tasks application, select Tasks from the
Start menu.
The Task List
The task list is your "things to do" list. When you create
or edit tasks with Outlook on your PC and then
synchronize with your Smartphone, additional task
information may display. A task that has been marked
as high priority is preceded by an exclamation mark,
and one marked as low priority by a downward-pointing
arrow. Overdue tasks are displayed bold and red. Note
that if you synchronize tasks with your PC, completed
tasks are removed from your Smartphone during
synchronization. They are then displayed in gray with a
strikethrough on your PC.
To create a new task:
Select Start from the Home Screen>Tasks>Scroll
up the Navigation Button to move the cursor to “Enter
new task here” field>Enter the task name and press
down the Navigation Button.
To mark a task as Complete:
Select the desired task in the list (one whose checkbox
is not checked) and then select Complete.
To change a completed task to Incomplete:
Select the desired task on the list (one that has already
been marked as Complete with a checked checkbox)
and then press the select Activate.

Chapter 8 Applications
4
8.3 Calculator
Calculator performs basic arithmetic, such as addition,
subtraction, multiplication, and division.
To perform a calculation:
1. Select Accesories from the Start menu.>
Calculator.
2. Enter the first number of the formula using the
keypad>Options.
3. Select the type of calculation to perform: Add,
Subtract, Multiply, Divide, or Decimal Point.
• To insert a decimal point, press the asterisk (*) key
on your keypad or select Decimal Point from
Options.
• To insert mathematical symbols, press the (#)key
until the symbol you want is displayed. Or, you may
scroll the Navigation Button to select a
mathematical symbol as follows: Press the Up
button for the plus sign (+); Down for the minus sign
(-); Left for the division sign (/); and Right for the
multiplication sign (X).
4. Enter the second number of the formula using the
keypad.
5. Open the Options menu again and select Equals,
or simply press down the Navigation Button.
To clear a displayed number or calculation, press
the Left Softkey (“Clear”).
To clear the last digit entered, press the Back button.
8.4 Voice Notes
You can use Voice Notes to create and play back short
voice recordings and verbal reminders, instead of
entering text, using your Smartphone’s built-in audio
recorder. Voice Notes are included on the All Notes
list and are named consecutively (Recording1,
Recording2, and so on).
To create a Voice Note:
1. Start>Voice Notes
2. On the All Notes screen, select Record, or select
Record from the Menu. Right after you do this, the
recording process begins, so be ready to start
speaking into your Smartphone’s microphone
immediately. A counter displays the number of

Chapter 8 Applications
5
seconds elapsed during recording.
3. Select Stop to stop recording a voice note. The
voice note is saved (to \My Documents\Notes), and
appears in the All Notes list of Voice Notes. By
default, the first recording is named Recording1.
To rename, play, or delete a Voice Note:
Select the desired Voice Note file>Select either
Rename, Play, or Delete from the Menu.
If you delete a voice note that has a default name, such
as “Recording1,” this name becomes available for the
next new voice note that you create.
8.5 Windows Media Player
Your Smartphone comes with Microsoft® Windows
Media® Player 10 Mobile, which lets you play
Windows Media Audio, Windows Media Video, and
MP3 audio files.
To start Windows Media Player, select Windows
Media from the Start Menu. Or, press the Media
Player Button.
File Formats Supported File Extensions
Video
Windows Media Video
wmv
Audio
Windows Media Audio
MP3
MIDI
.wma
.mp3
.mid, .midi, .rmi
Windows Media Player 10 Mobile has three primary
screens, including Payback screen, Library screen,
and Now Playing screen, which are illustrated on the
next pages.
Playback screen
This screen displays the playback controls (such as

Chapter 8 Applications
6
Play, Pause, Next, Previous, and Volume), the album
art window, and the video window.
The functions of operating the keypad in the
Playback screen:
Operation Function
Navigation Button
Scroll Up Increase volume
Scroll Down Decrease volume
Scroll Left Play the previous file.
Scroll Left and hold Fast forward
Scroll Right Playing the next file.
Scroll Right and hold Rewind
Press Down Pause or Play.
# Button Switch on/off the sound.
* Button Change the preference level.
To assign the functions hardware buttons in Media
Player:
1. Select Options>Buttons
2. Scroll to the desired commands>Menu>Assign
3. A “Assign Button” screen appears>Press button
to assign>OK
The amount of
elapsed time Volume
Chapter 8 Applications
7
Select Reset from the menu if you ever want to return
all button assignments to their original default settings.
The commands of menu in the Playback screen
Command Function
Library Switch to different Library, such as
My Device or Storage Card.
Play/Pause Play or pause playback.
Stop Stop playback.
Shuffle/Repeat
Play the items in the Now Playing
playlist in a random order or
repeatedly.
Full screen Play the video clip in full screen
(Landscape).
Options
Adjust Media Player options related
to Playback, Video, Network, Library,
Skins, and Buttons.
Properties Display the property of the selected
file.
About Display the information about
Windows Media Player 10 Mobile.
Library screen
This screen alows you to quickly find your audio files,
video files, and playlists. It contains categories such
as My Music, My Video, My TV, My Playlists, and
Now Playing. Each library represents an available
storage location.
You may sort your content by criteria such as, artist
name, album title, or genre (shown as the right picture
above).

Chapter 8 Applications
8
The commands of menu in the Library screen
Command Function
Queue up Add the selected item to the end of
the playlist.
Delete form
Library
Remove the selected item from the
Library.
Now Playing Display the Now Playing list
Library Switch to different Library, such as
My Device or Storage Card.
Update Library
Automatically searching the new
items and add it to the Library by
searching your device or storage
card.
Open File Search and play the item stored in
your device or storage card.
Open URL Play the media files on a network.
Properties Display the property of the selected
file.
Player Go to the Playback screen
To play the media from Libraries:
Use the Libraries to search and play the music, video,
and playlist stored in your Smartphone or storage card.
1. Go to the Library screen.
2. If necessary, select Menu in the Library screen>
Library>Select the desired Library, such as My
Device or Storage Card.
3. In the Library screen, select one item (such as My
Music or My Playlists)>Select the item to play
(such as the song, album, or artist). If the desired
file isn’t in the Library, please select Menu in the
Library screen>Open File>Select the desired file
and play.
To play the media on the internet
Use the Open URL function to play the music or video
stored on the Internet, or network server.
1. Go to the Library screen.
2. Menu>Open URL.
3. Enter the address in the URL box or select the
desired address in the History box.
NOTE: You need to connect to the Internet before
playing the item on the Internet.
Change the skin of the Windows Media Player
You may select a new skin to change the appearance
of the player.
1. Go to the Playback screen
Chapter 8 Applications
9
2. Select Menu>Options>Skins
3. Scroll the Navigation Button left or right to select
desired skin>Done.
NOTE: After downloading the skin to your PC, please
unzip the files (if necessary). Copy the .skn and .bmp
files to your Smartphone by using ActiveSync. To
make sure that the skins will appear in the Skin options,
don’t save the skin files in the Windows folder of the
Smartphone.
Now Playing screen
The playlist indicates the media file which is current
playing and all other files that are “queued up” to play
next.
The commands of menu in the Library screen
Command Function
Library Switch to different Library, such
as My Device or Storage Card.
Move Up
Move Down Select the upper or lower item
Remove from Playlist Remove the selected item from
the palylist
Shuffle/Repeat
Play the items in the Now
Playing playlist in a random
order or repeatedly.
Clear Now Playing Clear all the items in the Now
Playing list.
Error Details Display the error content of the
selected item.
Properties Display the property of the
selected file.
NOTE: A number of resources are available to help
you troubleshoot. For more information, see the
Windows Media Player Mobile pages at:
http://www.microsoft.com/windows/windowsmedia
/player/windowsmobile/faq.aspx
Chapter 8 Applications
10
8.6 Games
Bubble Breaker
The object of Jawbreaker is to clear out all the balls.
The rule is that you may only clear out adjacent
same-colored balls.
1. Start>Games>Bubble breaker>Menu>New
Game
2. Scroll to the ball you want to clear and press down
the Navigation Button.>The group will be outlined,
and the score for that selection will be shown.
2. Press down the Navigation Button again. To select
a different grouping, press down the Navigation
Button Up/Down/Left/Right.
Score equation:
S = B * (B-1)
S: Score per move
B: Number of balls cleared out
Solitaire
The object of Solitaire is to use all the cards in the deck
to build up the four suit stacks in ascending order,
beginning with the aces. You win the game when all
cards are on the suit stacks.
1. Start>Games>Bubble breaker>Menu>New
Game>Solitaire
2. Move any aces on the seven stacks to the four card
spaces at the top of the screen, and then make any
other available plays.
3. When you have made all available plays, select
Draw from the menu to turn over cards. The card
that is face up on the deck is always available for
play.
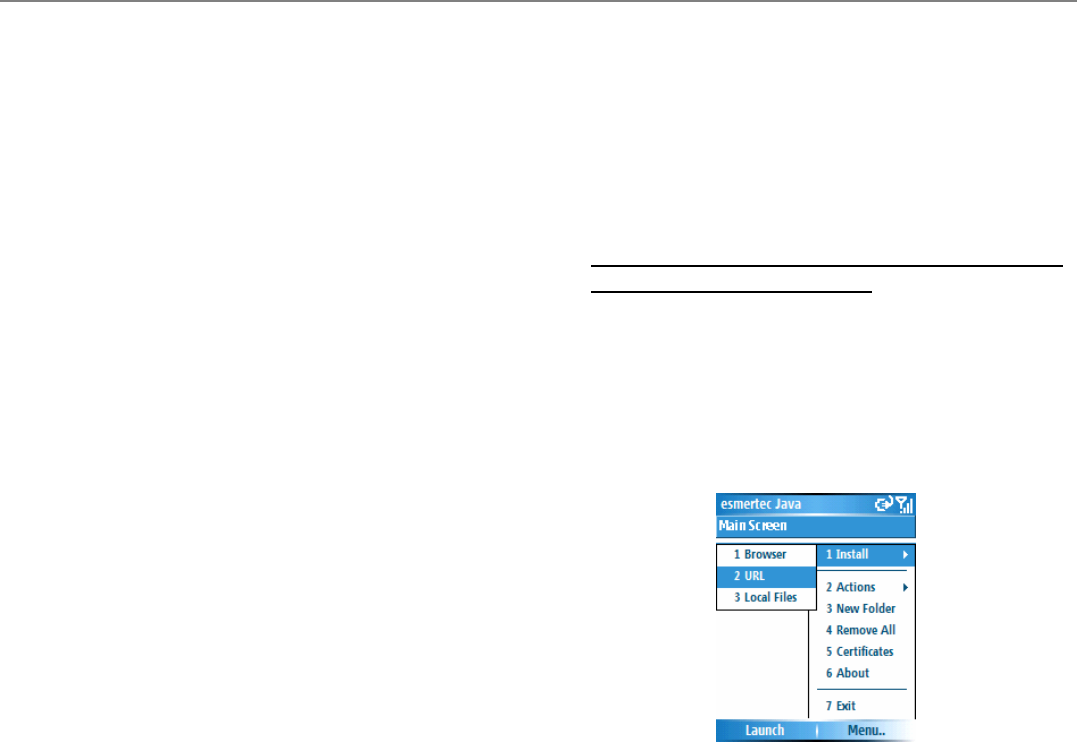
Chapter 8 Applications
11
To move cards:
A number or character is displayed above each card
stack. On the keypad, press the number or character
of the card to move, and then press the number or
character of the stack to which you want to move the
card. Scrolling the Navigation Button up moves a
card to one of the four stacks in the upper right corner
of the screen if it belongs there.
8.7 Java Manager
Your Smartphone supports Java 2 Edition, J2ME.
The Java Manager allows you to download Java
applications such as games and tools specifically
designed for mobile phones. The Java Manager
gives you the flexibility of installing and managing
additional J2ME applications from the Internet.
To download and install MIDlets directly from the
Internet on your Smartphone:
1. Start>More>Games>Java Manager>Menu>
Install
2.Select Browser or URL>Connect to the Internet
and select a MIDlet you wish to download.
(Download both the .jad file and related .jar file.)
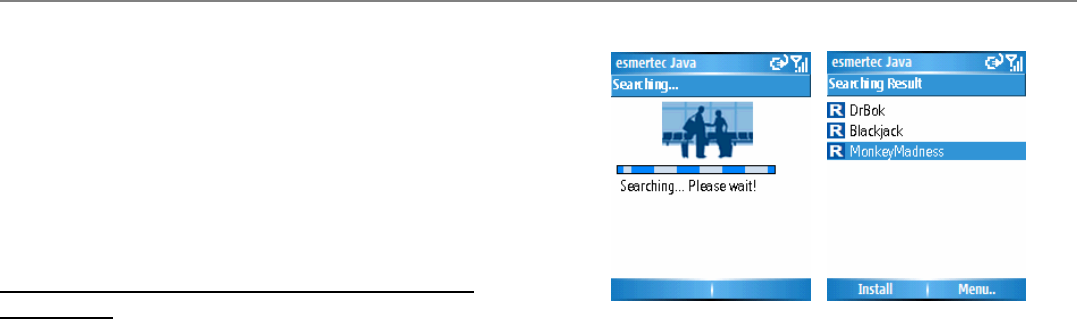
Chapter 8 Applications
12
3. Confirm what you wished to download the relevant
files before the download begins. Once the
download is complete, the Java Manager
automatically starts, and prompts you to install your
new MIDlet.
4. After installation, confirm if you want to launch the
MIDlet. If select Yes, you will start the MIDlet
application right away.
To download and install MIDlets from the Internet
on your PC:
1. Make sure that your Smartphone is synchronized to
your PC. Using the Internet Explorer, go to any site
that provides MIDlets for download.
2. Choose the game or utility you wished to install,
download it, and save it to your PC.
3. Copy the MIDlets to the \My Documents folder or
the \Storage Card folder.
4. Start>More>Games>Java Manager>Menu>
Install>Local Files. The Smartphone will search
the MIDlets antomatically.
5. Select the desired MIDlet form the Searching
Result list>Install.
6. Select or create a folder to install into.
7. After installation, confirm if you want to launch the
MIDlet. If select Yes, you will start the MIDlet
application right away.
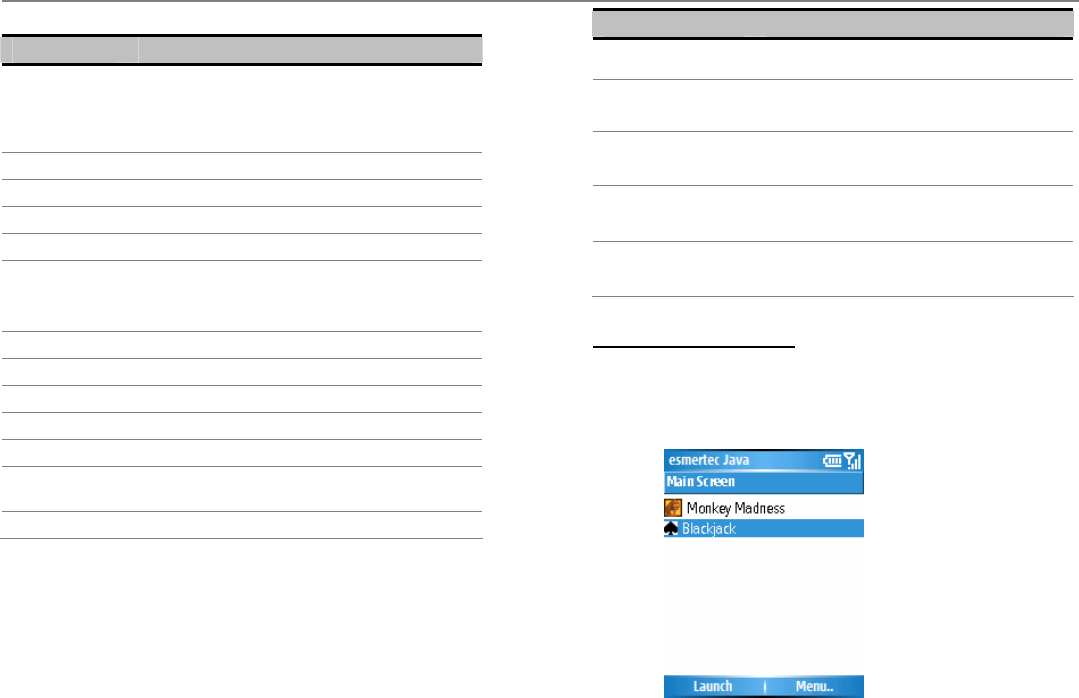
Chapter 8 Applications
13
Menu on the Main screen of Java Manager
Command Function
Install
Browser
URL
Local Files
Install a new MIDlet directly form the
internet or the folder on your Smartphone.
Actions
Info View the information about the MIDlet.
Remove Remove the MIDlet.
Update Update the version of the MIDlet.
Security Set up the state of permission, including
Local connection, Recording,
Messaging, Net access and Auto Star
Rename Rename the MIDlet
Move Move the MIDlet to another folder.
New Folder Create a new folder.
Remove All Remove all of the MIDlets.
Certification Manage the certificates.
About View the information about Java
Manager.
Exit Exit the Java Manager screen.
NOTE: Some of the security items cannot be used in
all of the MIDlet suits. The description of the security
items are as the following table:
Security items Description
Local connection Allows the MIDlet suite to access
service.
Recording Allows the MIDlet suite to record
sounds and images.
Messaging Decides if the MIDlet suite could
send/receive Text messages.
Net access Decides if the MIDlet suite could
access the internet.
Auto Start Allows the MIDlet suite to be
executed any time.
To launch the MIDlet:
1. Start>More>Games>Java Manager
2. Select the desired MIDlet>Launch

Appendix
1
Appendix
Regulatory Notices
Specifications
Troubleshooting
Index
Regulatory Notices
Agency Identification Numbers
For regulatory identification purposes, your
Smartphone is assigned a model number of M1. The
Battery Pack has been assigned a model number of
1688.
To ensure continued reliable and safe operation of your
Smartphone, use only the accessories listed in this
document.
NOTE: This product is intended to be used with a
certified class 2 limited power source, rated 5 volts DC,
maximum 1A power supply unit.
European Union Notice
Products with CE marking comply with the R&TTE
Directive (99/5/EC), the EMC Directive (89/336/EEC)
and the Low Voltage Directive (73/23/EEC) issued by
the Commission of the European Community.
Compliance with these directives implies conformity to
the following European Norms:
EN 60950 (IEC 60950) - Safety of Information
Technology Equipment.

Appendix
2
ETSI EN 301 489-7 - Electromagnetic compatibility
and Radio spectrum Matters (ERM);
ElectroMagnetic Compatibility (EMC) for radio
equipment and services; Part 7: Specific conditions
for mobile and portable radio and ancillary
equipment of digital cellular radio
telecommunications systems (GSM and DCS).
ETSI EN 301 511 – Global System for Mobile
communications (GSM); Harmonized standard for
mobile stations in the GSM 850 and DCS 1800
bands covering essential requirements under article
3.2 of the R&TTE directive (1999/5/EC).
ANSI/IEEE C.95.1-1992- specific absorption rate in
mobile phone emission condition for body health.
FCC part 15 - Radio Frequency Devices and part
24 – Personal Communications Services.
EN 50360 - 2001– Product standard to demonstrate
the compliance of mobile phones with the basic
restrictions related to human exposure to
electromagnetic fields (300 MHz – 3 GHz).
SAR value: FCC: (1g) 850MHZ: Body 0.514 mW/g;
Head 0.539 mW/g. 1900MHZ: Body 0.596 mW/g;
Head 1.040 mW/g. CE: (10g) 900MHZ: Head 0.736
mW/g. 1800MHZ: Head 0.558 mW/g.
ETSI EN 301 489-1 Electromagnetic compatibility
and Radio spectrum Matters (ERM);
ElectroMagnetic Compatibility (EMC) standard for
radio equipment and services; Part 1: Common
technical requirements.
ETSI EN 301 489-17 Electromagnetic compatibility
and Radio spectrum Matters (ERM);
ElectroMagnetic Compatibility (EMC) standard for
radio equipment and services; Part 17: Specific
conditions for 2.4 GHz wideband transmission
systems and 5 GHz high performance RLAN
equipment.
ETSI EN 300 328 Electromagnetic compatibility and
Radio spectrum Matters (ERM); Wideband
Transmission systems; data transmission
equipment operating in the 2.4 GHz ISM band and
using spread spectrum modulation techniques.

Appendix
3
FCC Warning statement
This equipment has been tested and found to comply
with the limits for a Class B digital device, pursuant to
part 15 of the FCC rules. These limits are designed to
provide reasonable protection against harmful
interference in a residential installation. This equipment
generates, uses and can radiate radio frequency
energy and, if not installed and used in accordance
with the instructions, may cause harmful interference to
radio communications. However, there is no guarantee
that interference will not occur in a particular
installation. If this equipment does cause harmful
interference to radio or television reception, which can
be determined by turning the equipment off and on, the
user is encouraged to try to correct the interference by
one or more of the following measures:
-Reorient or relocate the receiving antenna.
-Increase the separation between the equipment and
receiver.
-Connect the equipment into an outlet on a circuit
different from that to which the receiver is connected.
-Consult the dealer or an experienced radio/TV
technician for help.
Any changes or modifications (including the antennas)
made to this device that are not expressly approved by
the manufacturer may void the user’s authority to
operate the equipment.
This device complies with Part 15 of the FCC Rules.
Operation is subject to the following two conditions:
(1) This device may not cause harmful interference.
(2) This device must accept any interference received,
including interference that may cause undesired
operation.
Cautions
In August 1996 the Federal Communications
Commission (FCC) of the United States with its action
in Report and Order FCC 96-326 adopted an updated
safety standard for human exposure to radio frequency
electromagnetic energy emitted by FCC regulated
transmitters. Those guidelines are consistent with the
safety standard previously set by both U.S. and
international standards bodies. The design of this
phone complies with the FCC guidelines and these
international standards. Use only the supplied or an
approved antenna. Unauthorized antennas,
modifications, or attachments could impair call quality,
damage the phone, or result in violation of FCC
regulations. Do not use the phone with a damaged
antenna. If a damaged antenna comes into contact
with the skin, a minor burn may result. Please contact

Appendix
4
your local dealer for replacement antenna.
Body-worn operation
This device was tested for typical body-worn
operations with the back of the phone kept 2.0cm from
the body. To maintain compliance with FCC RF
exposure requirements, use only belt-clips, holsters or
similar accessories that maintain a 2.0cm separation
distance between the user’s body and the back of the
phone, including the antenna. The use of belt-clips,
holsters and similar accessories should not contain
metallic components in its assembly. The use of
accessories that do not satisfy these requirements may
not comply with FCC RF exposure requirements, and
should be avoided.
Safety Precautions for Radio Frequency
(RF) Exposure
Tests for SAR are conducted using standard operating
positions specified by the FCC with the phone
transmitting at its highest certified power level in all
tested frequency bands. Before a phone model is
available for sale to the public, it must be tested and
certified to the FCC that it does not exceed the limit
established by the government-adopted requirement
for safe exposure. In general, the closer you are to a
wireless base station antenna, the lower the power
output. To conform to the demanded operation and
ensure the safety of users, don’t close to the antenna
when operating the device.
Exposure to RF Signals
Your wireless Smartphone phone is a radio transmitter
and receiver. It is designed and manufactured not to
exceed the emission limits for exposure to radio
frequency (RF) energy set by the Federal
Communications Commission of the U.S.
Government. These limits are part of comprehensive
guidelines and establish permitted levels of RF energy
for the general population. The guidelines are based
on the safety standards previously set by both U.S. and
international standards bodies:
• American National Standards Institute (ANSI) IEEE.
C95.1-1992
• National Council on Radiation Protection and
Measurement (NCRP). Report 86. 1986
• International Commission on Non-Ionizing Radiation
Protection (ICNIRP) 1996
• Ministry of Health (Canada), Safety Code 6. The
standards include a substantial safety margin
designed to assure the safety of all persons,
regardless of age and health.
Appendix
5
The exposure standard for wireless mobile phones
employs a unit of measurement known as the
Specific Absorption Rate, or SAR. The SAR limit set
by the FCC is 1.6W/kg. In the U.S. and Canada, the
SAR limit for mobile phones used by the public is 1.6
W/kg averaged over one gram of tissue. The
standard incorporates a substantial margin of safety to
give additional protection for the public and to account
for any variations in usage. Normal conditions only
ensure the radiative performance and safety of the
interference.
Safety Precautions for Power Supply
Unit
Use the correct external power source
A product should be operated only from the type of
power source indicated on the electrical ratings label.
If you are not sure of the type of power source required,
consult your authorized service provider or local power
company. For a product that operates from battery
power or other sources, refer to the operating
instructions that are included with the product.
Handle battery packs carefully
This product contains a Lithium-Ion battery. There is a
risk of fire and burns if the battery pack is handled
improperly. Do not attempt to open or service the
battery pack. Do not disassemble, crush, puncture,
short external contacts or circuits, dispose of in fire or
water, or expose a battery pack to temperatures higher
than 140° F (60° C).
Additional safety information
Medical Devices
Operation of any radio transmitting equipment,
including mibile phones, may interfere with the
functionality of medical devices. If you use any
personal medical device, consult the manufacturer of
WARNING:
Your Smartphone contains a Lithium-Ion battery pack.
There is a risk of fire and burns if the battery pack is
handled improperly.
Do not disassemble, crush, puncture, short external
contacts, or dispose of in fire or water.
Do not attempt to open or service the battery pack.
Replace only with the battery pack designated for
this product.
Recycle or dispose of batteries properly.
Do not discard with your regular trash.

Appendix
6
your device and your physician to determine if they are
adequately shielded from external RF energy.
Pacemakers
The Health Industry Manufacturers Association
recommends that a minimum separation of six inches
be maintained between a handheld wireless phone and
a pacemaker to avoid potential interference with the
pacemaker. These recommendations are consistent
with the independent research by and
recommendations of Wireless Technology Research.
Persons with pacemakers should:
• Always keep the Smartphone more than 6 inches
from their pacemaker when the phone is turned on.
• Not carry the phone in a breast pocket.
• Use the ear opposite the pacemaker to minimize the
potential for interference. If you have any reason to
suspect that interference is taking place, turn your
phone off immediately.
Hearing Aids
Some digital wireless phones may interfere with some
hearing aids. In the event of such interference, you
may consult your service provider.
Damage requiring service
Unplug the Smartphone from the outlet and refer
servicing to an authorized service technician or
provider under the following conditions:
• Liquid has been spilled or an object has fallen
into the product.
• The product has been exposed to rain or water.
• The product has been dropped or damaged.
• The product does not operate normally when
you follow the operating instructions.
Appendix
7
Specifications
Processor TI OMAP 730, 208 MHz,
ARM9/ARM7 32-bit RISC Processor
Memory 128MB NAND Flash, 64MB SDRAM
Display
Type 2.2”Transflective, TFT LCD
Resolution 176 x 220, 65,536 colors
GSM / GPRS GSM850/GSM900/DCS1800/
PCS1900
Camera CMOS, 1.3 Mega pixel
Photo capture 1280x1024, 640x480, 320,240,
160x120
Video Record 320×240, 160×120 15 fps
Zoom 4X digital zoom In/Out w/Hardware
key adjustable
Communication
Bluetooth Bluetooth v1.1, class 2
Audio Built-in Receiver and Microphone
Speaker phone function
Music Built-in 0.5W 17mm Speaker
I/O Port USB v1.1
Power Supplier
AC Adaptor AC input 100~240 v, 50/60 Hz
DC output 5V DC, 1A Current
Battery Li-ion, 1100mAh 5VDC
Expansion slots
Mini-SD Card slot Mini-SD Card (up to 1GB)
Multimedia
Image format BMP/JPG/GIF
Audio MP3/WMA/WAV/MIDI
Video WMA

Appendix
8
Troubleshooting
If you encounter a problem with your Smartphone,
review the list below to try and find a solution. If still
having problems, please contact Technical Support or
your dealer.
Problem Solution
y The screen of my
Smartphone is
blank.
Your battery may be run
down. Charge the battery
immediately.
y During incoming
calls or when
alarms should
occur, my
Smartphone does
not make any
sound or vibration.
• Select Start>Settings>
Phone or Sounds to check
the settings.
• Select Settings from the
Start menu>Calendar>
Menu>Options>see if
Set Reminders is
activated.
y A “battery low”
warning screen
pops up.
Plug the AC adapter into
your Smartphone to charge
it.
y Viewing my
incoming
messages.
y Select Start>
Messaging>Select
either Text messages,
Outlook E-Mail, or MMS.
y Scroll down and select
the message notification
area on the Home screen,
or select the Message
soft key.
y Can’t create or
paste files because
of no storage space
available.
Select Start>Settings>
About to view your memory
usage and free space.
Delete any unnecessary
files such as old E-mail,
image files, or large video
files.
y An image or video
file can’t be open.
The file type may not be
supported. Supported
image/video file formats are
listed in section 8.5.
ActiveSync Problems
y ActiveSync
operation cannot be
performed or
connected.
• Make sure the USB cable
is connected securely.
• Make sure you have
installed the ActiveSync
on the Companion CD
• Make sure the settings are
correct in File menu>
Connection Settings...
Appendix
9
in the ActiveSync window
on your desktop
computer.
• If still not working, try to
uninstall ActiveSync, then
reinstall.
y I cannot perform
over-the-air
synchronization.
Ensure that Exchange
Server has been installed.
Connection Problems
y Cannot connect to
the Internet.
• Ensure that you have set
up and connected to an
ISP(Internet Service
Provider).
• Ensure that the wireless
connection to your mobile
Service Provider is
switched on and that the
signal is unobstructed.
• Verify with your ISP that
your user name and
password are correct.
y Cannot find a
particular device.
• Ensure that the other
device is activated.
• Ensure that you are within
10 meters of each other,
and that there are no
obstructions.
• Ensure that the other
device is not in “Off” mode.