Technicolor Connected Home USA DSS98B Satellite Receiver User Manual 15351420 Cover

Technicolor Connected Home USA LLC Satellite Receiver 15351420 Cover

Contents

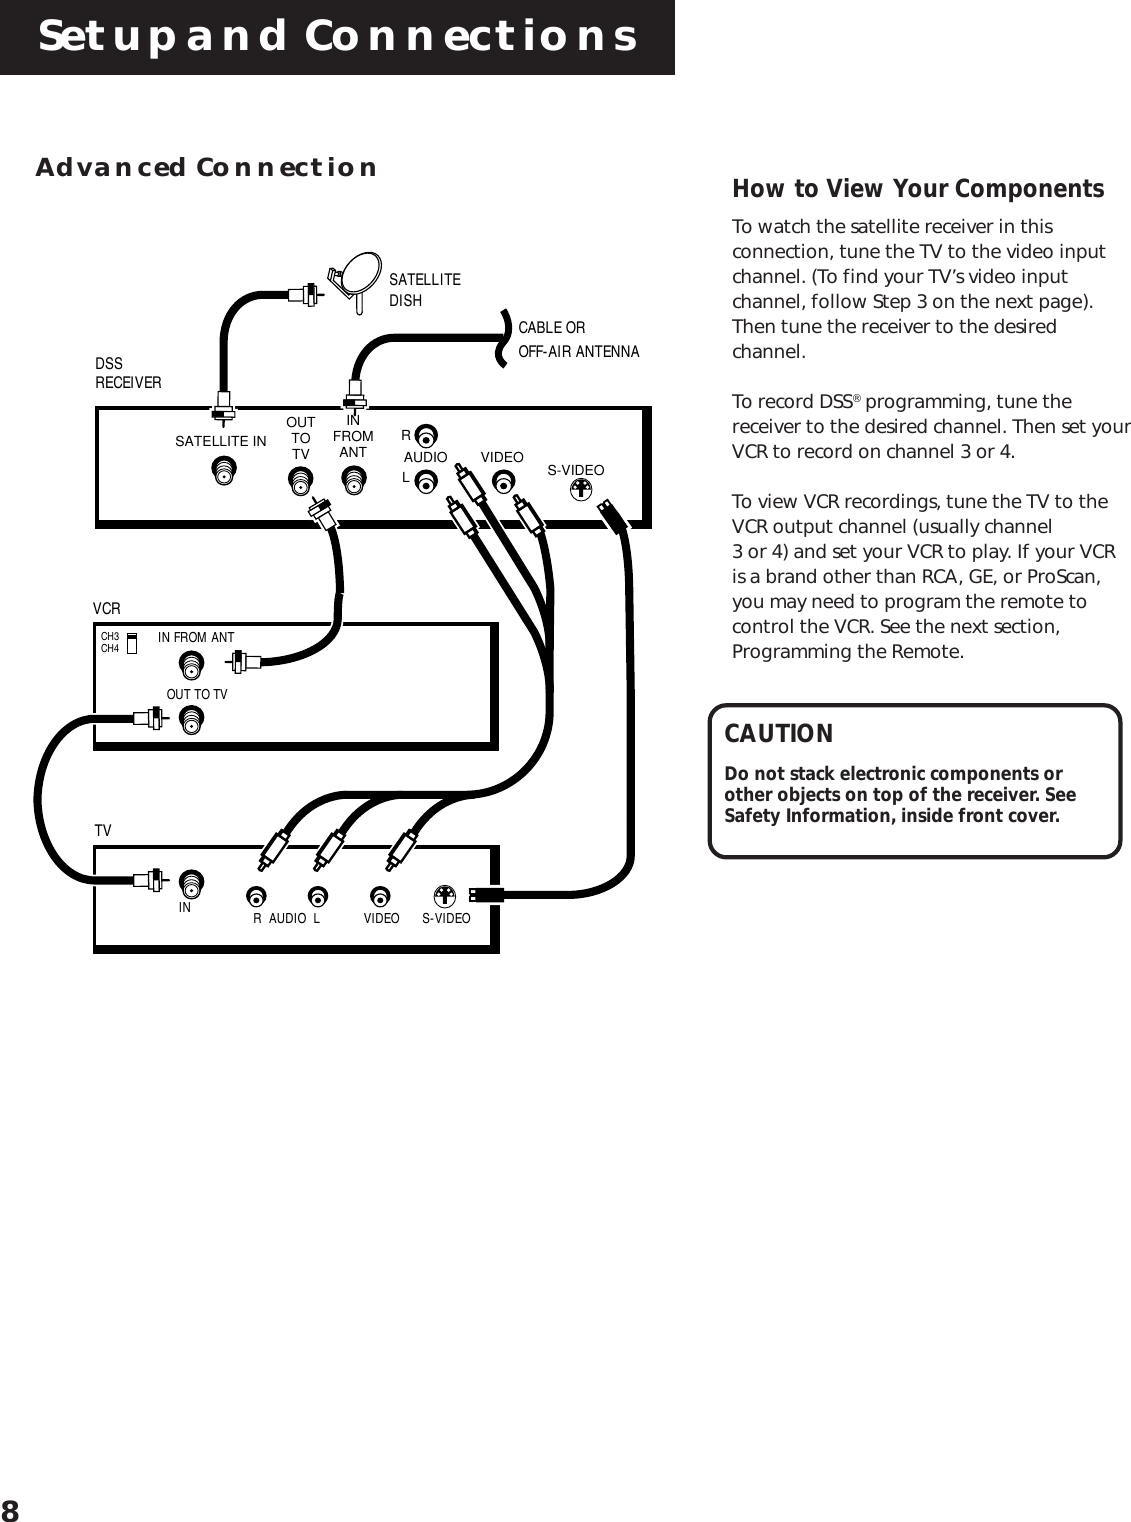
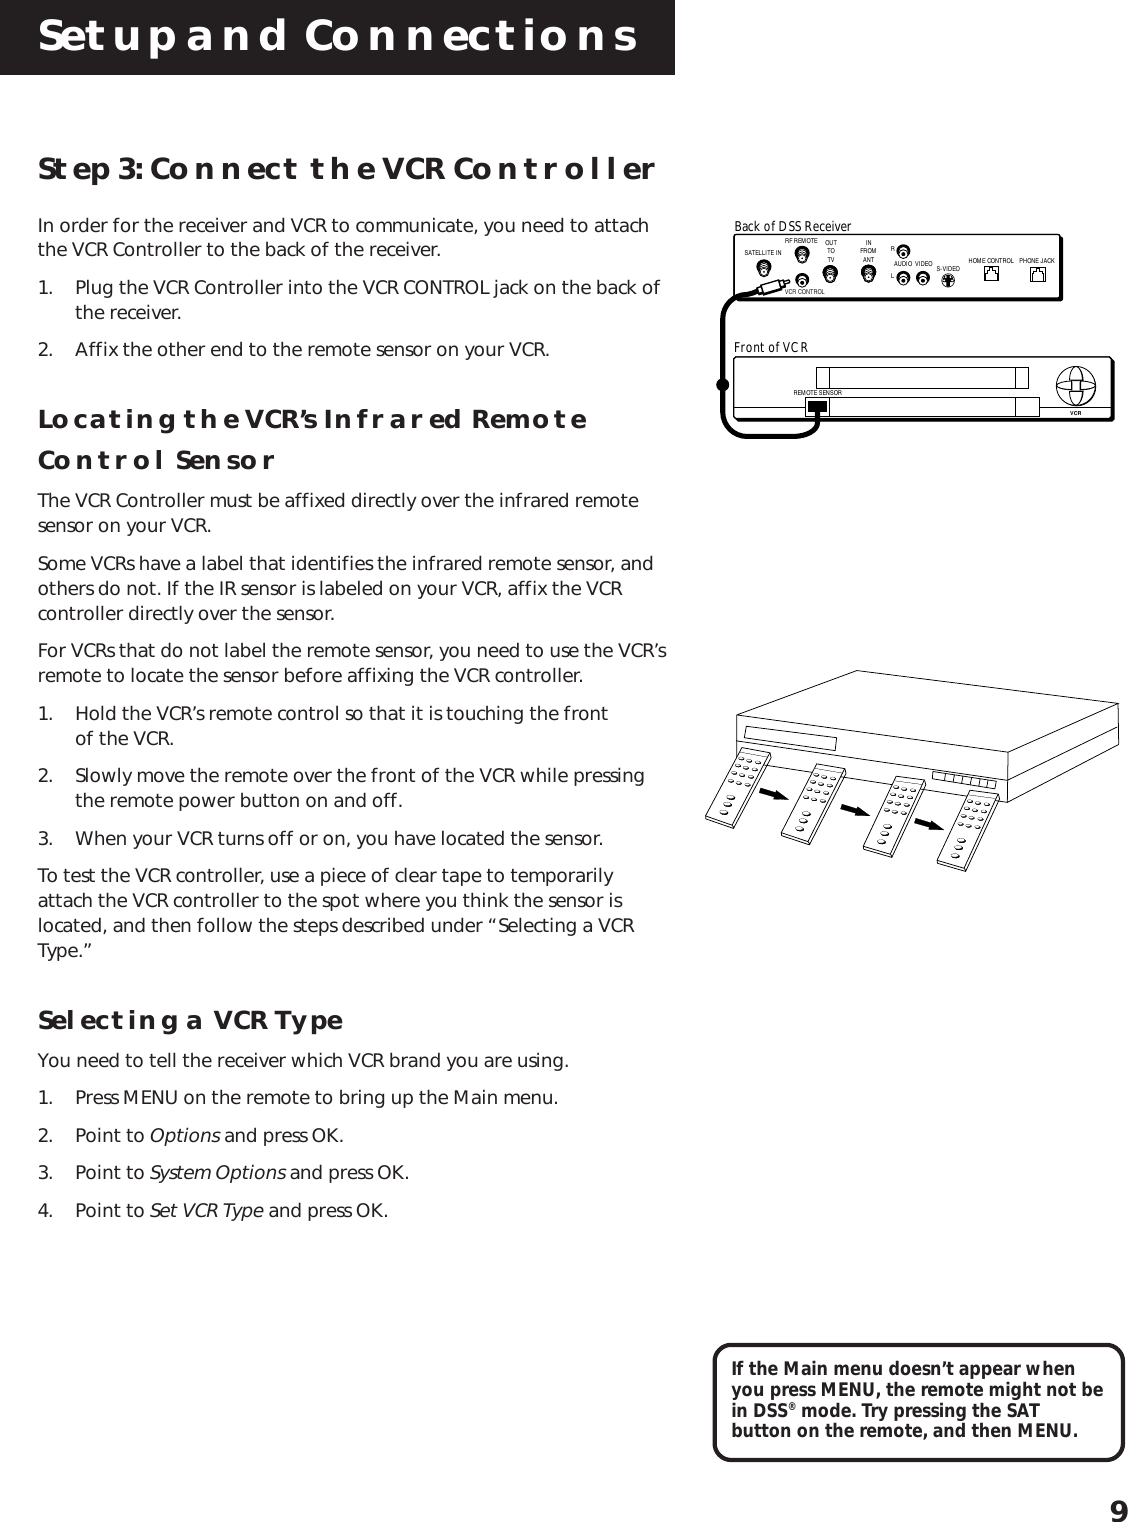
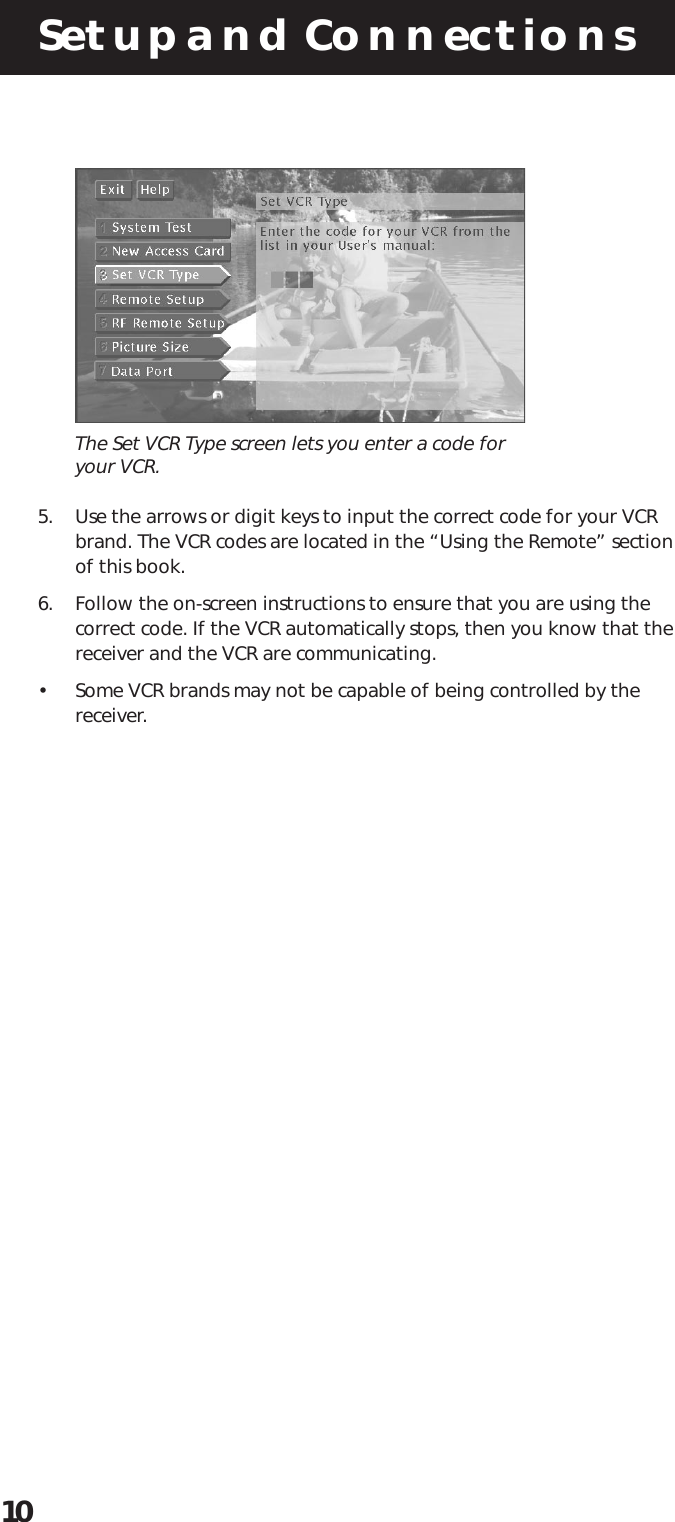
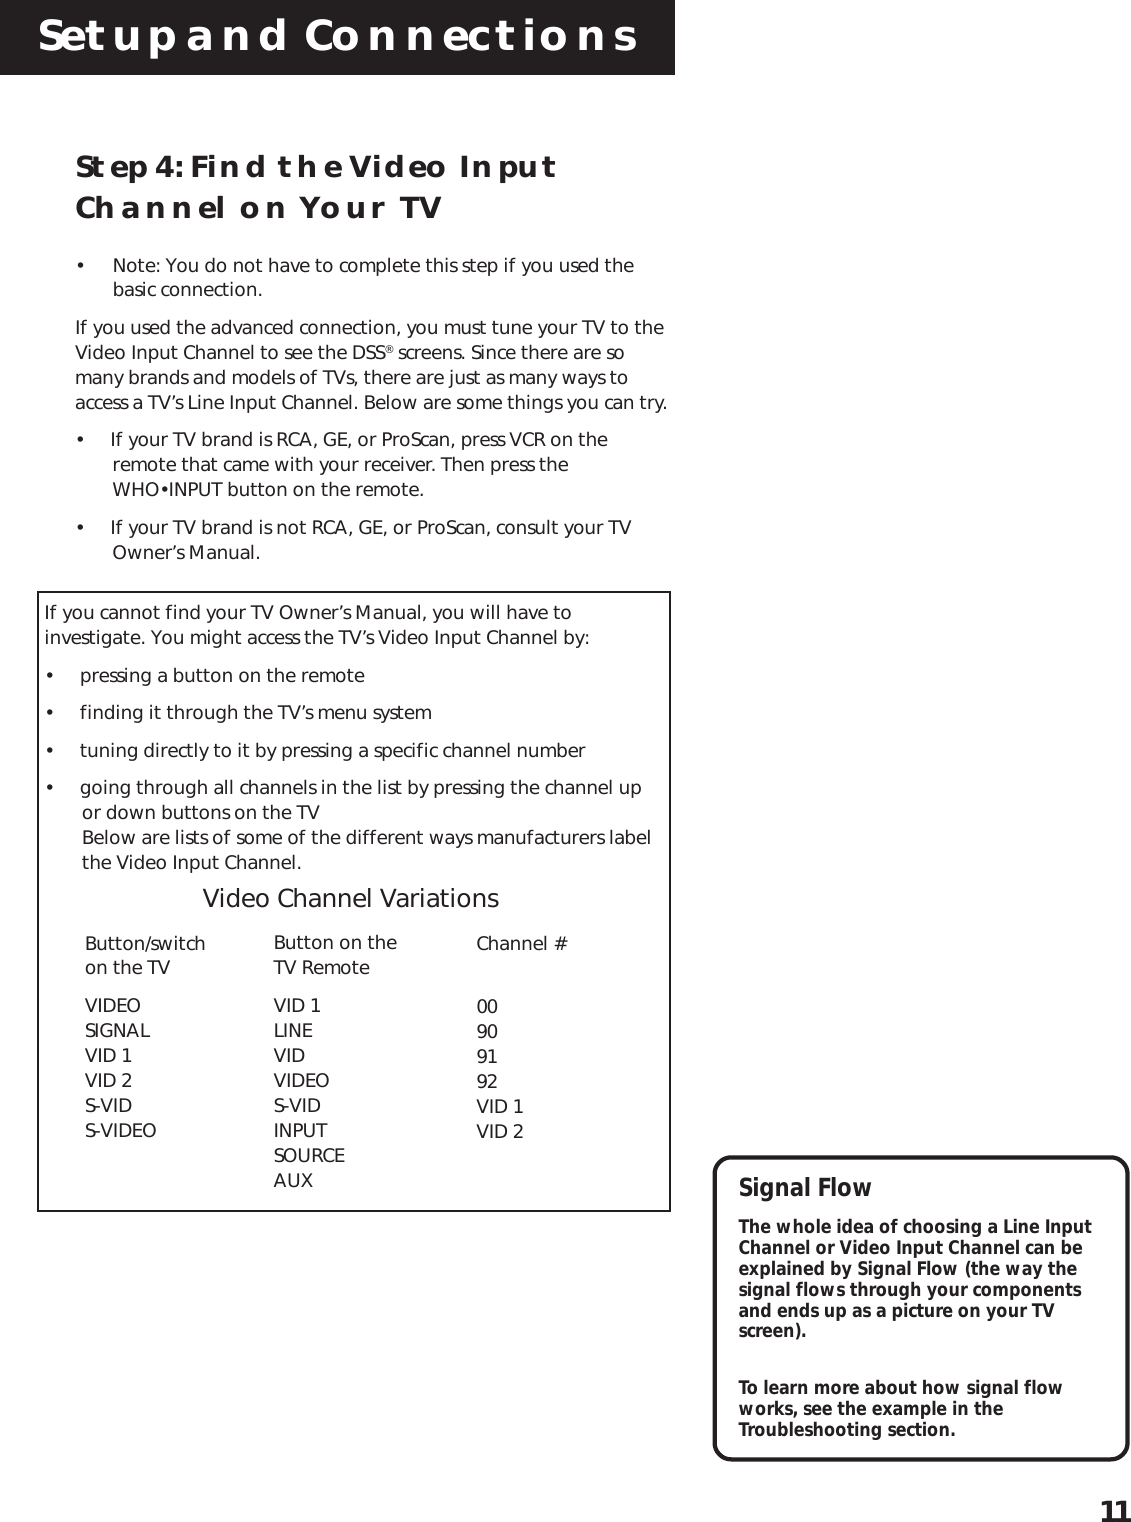
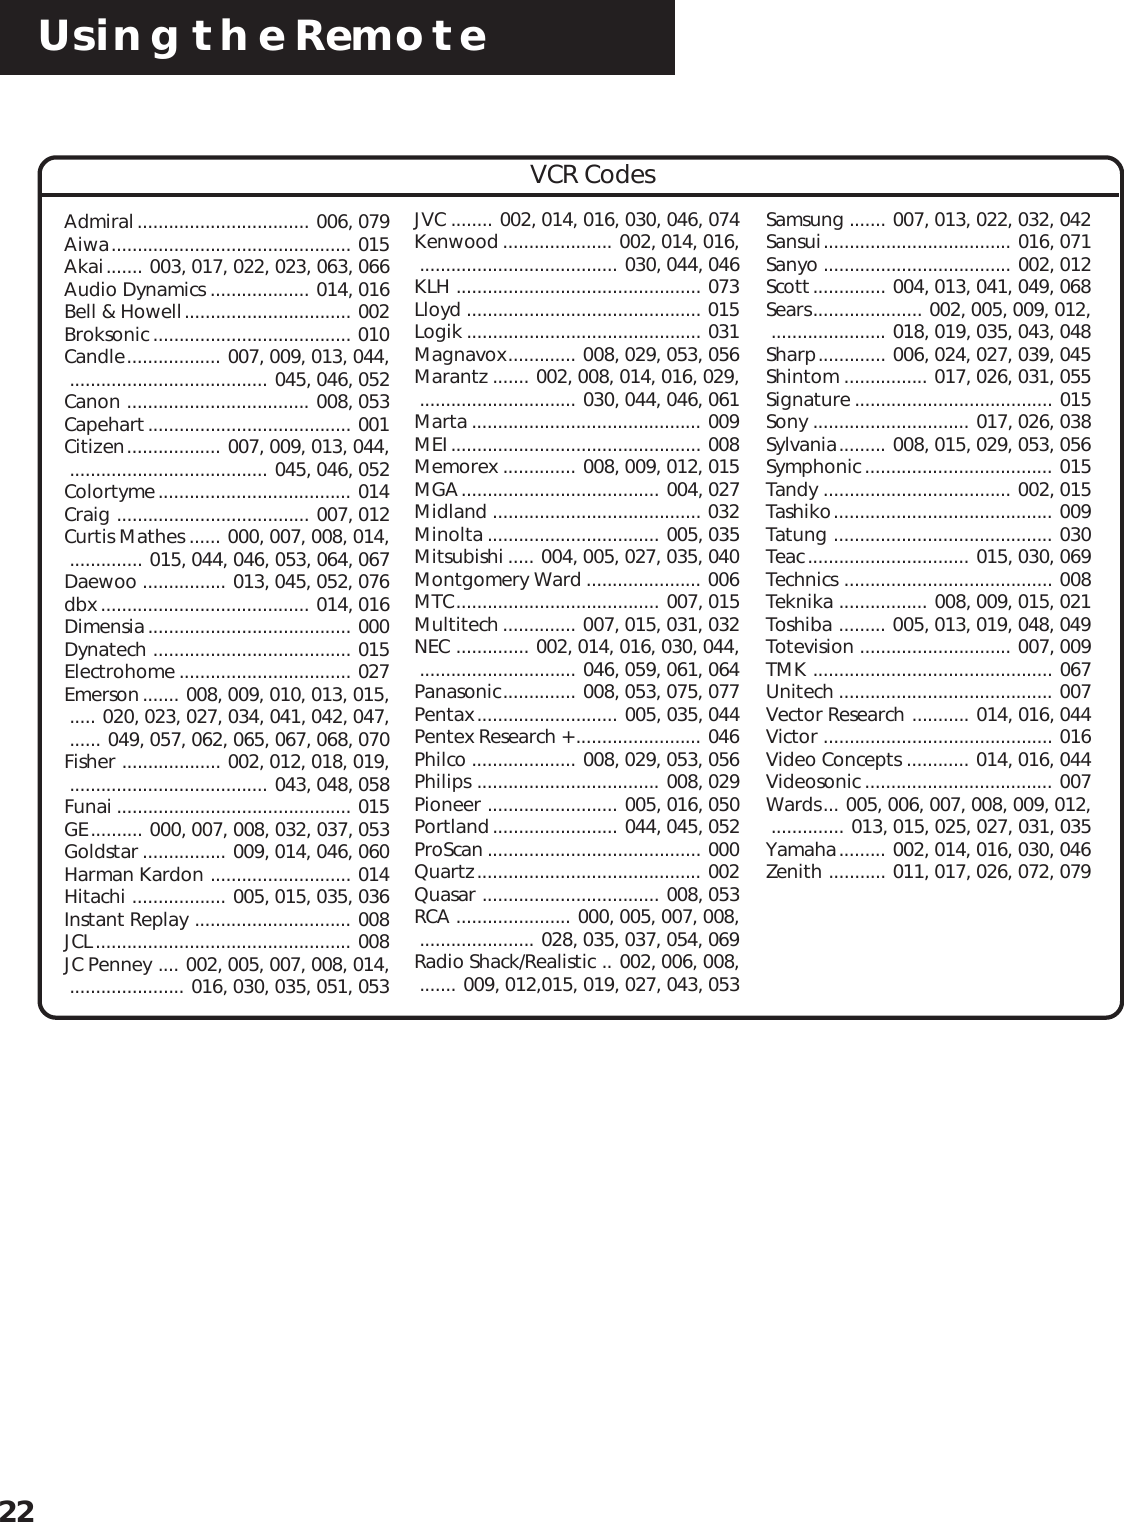
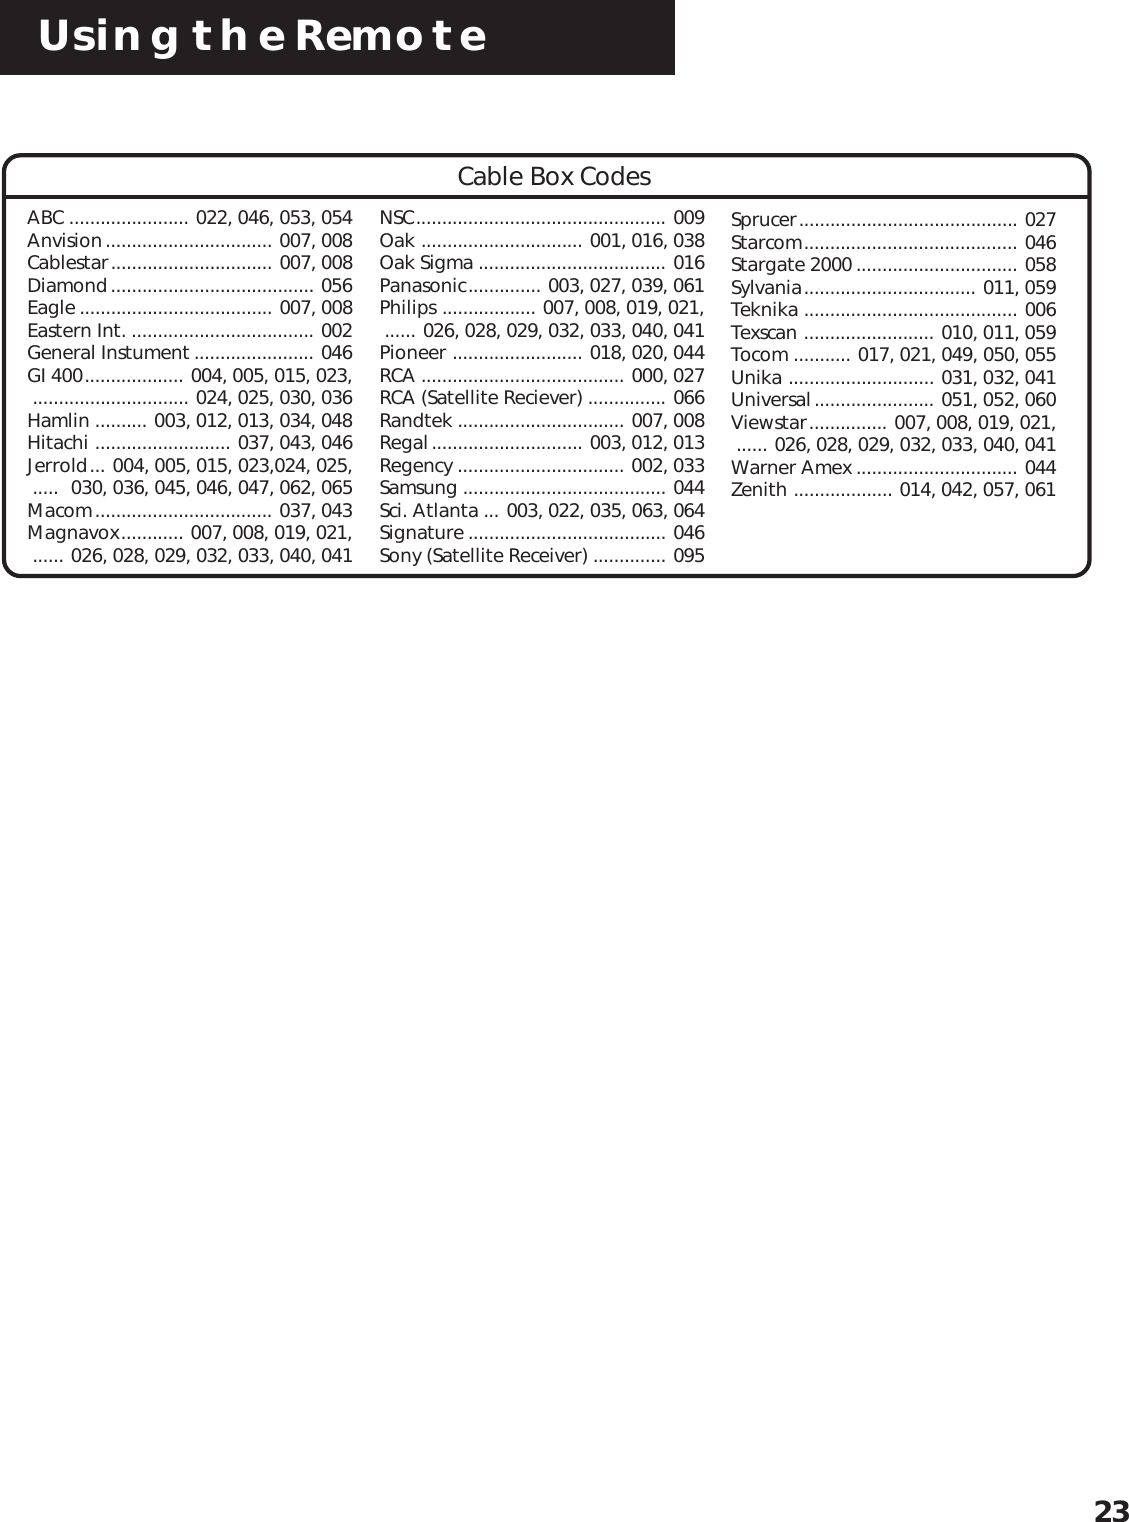
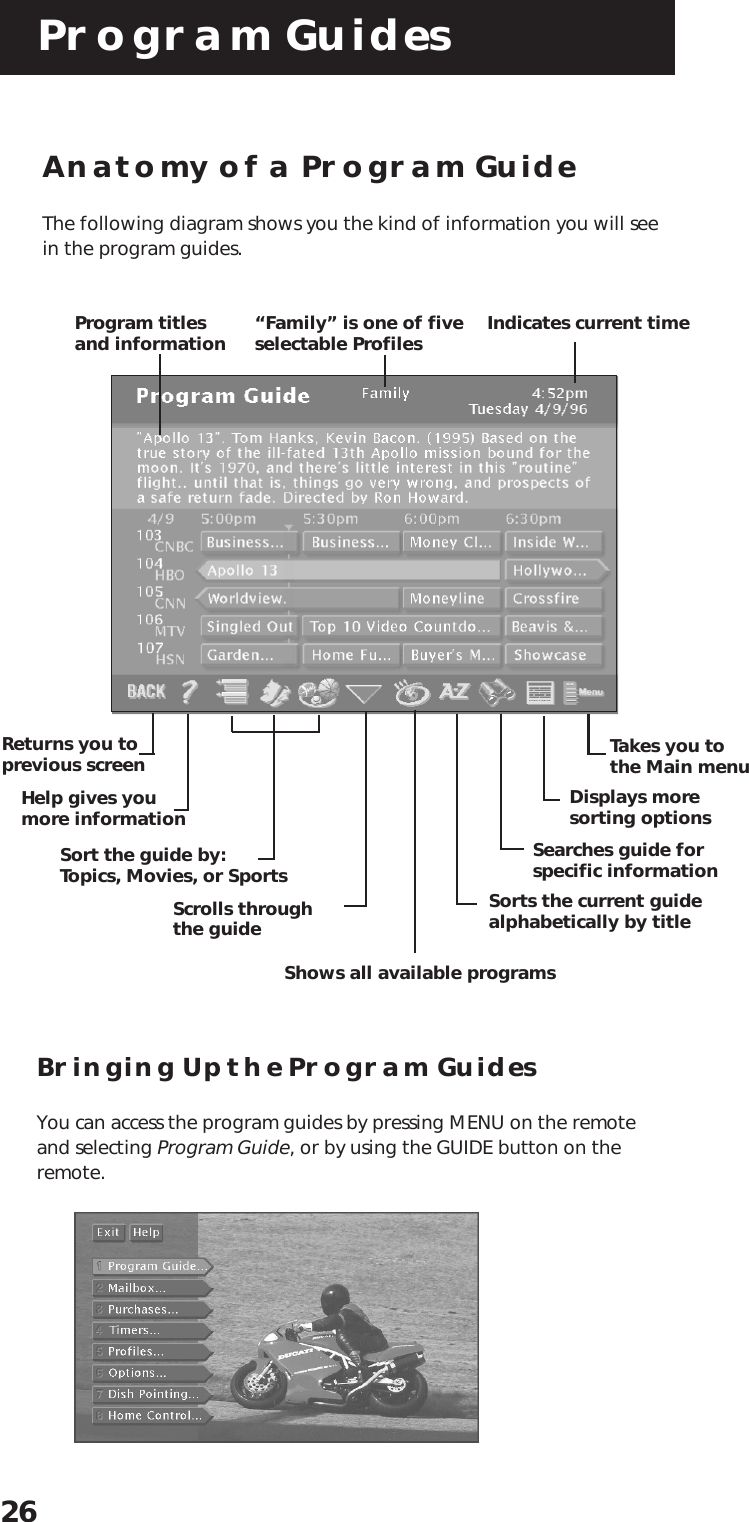
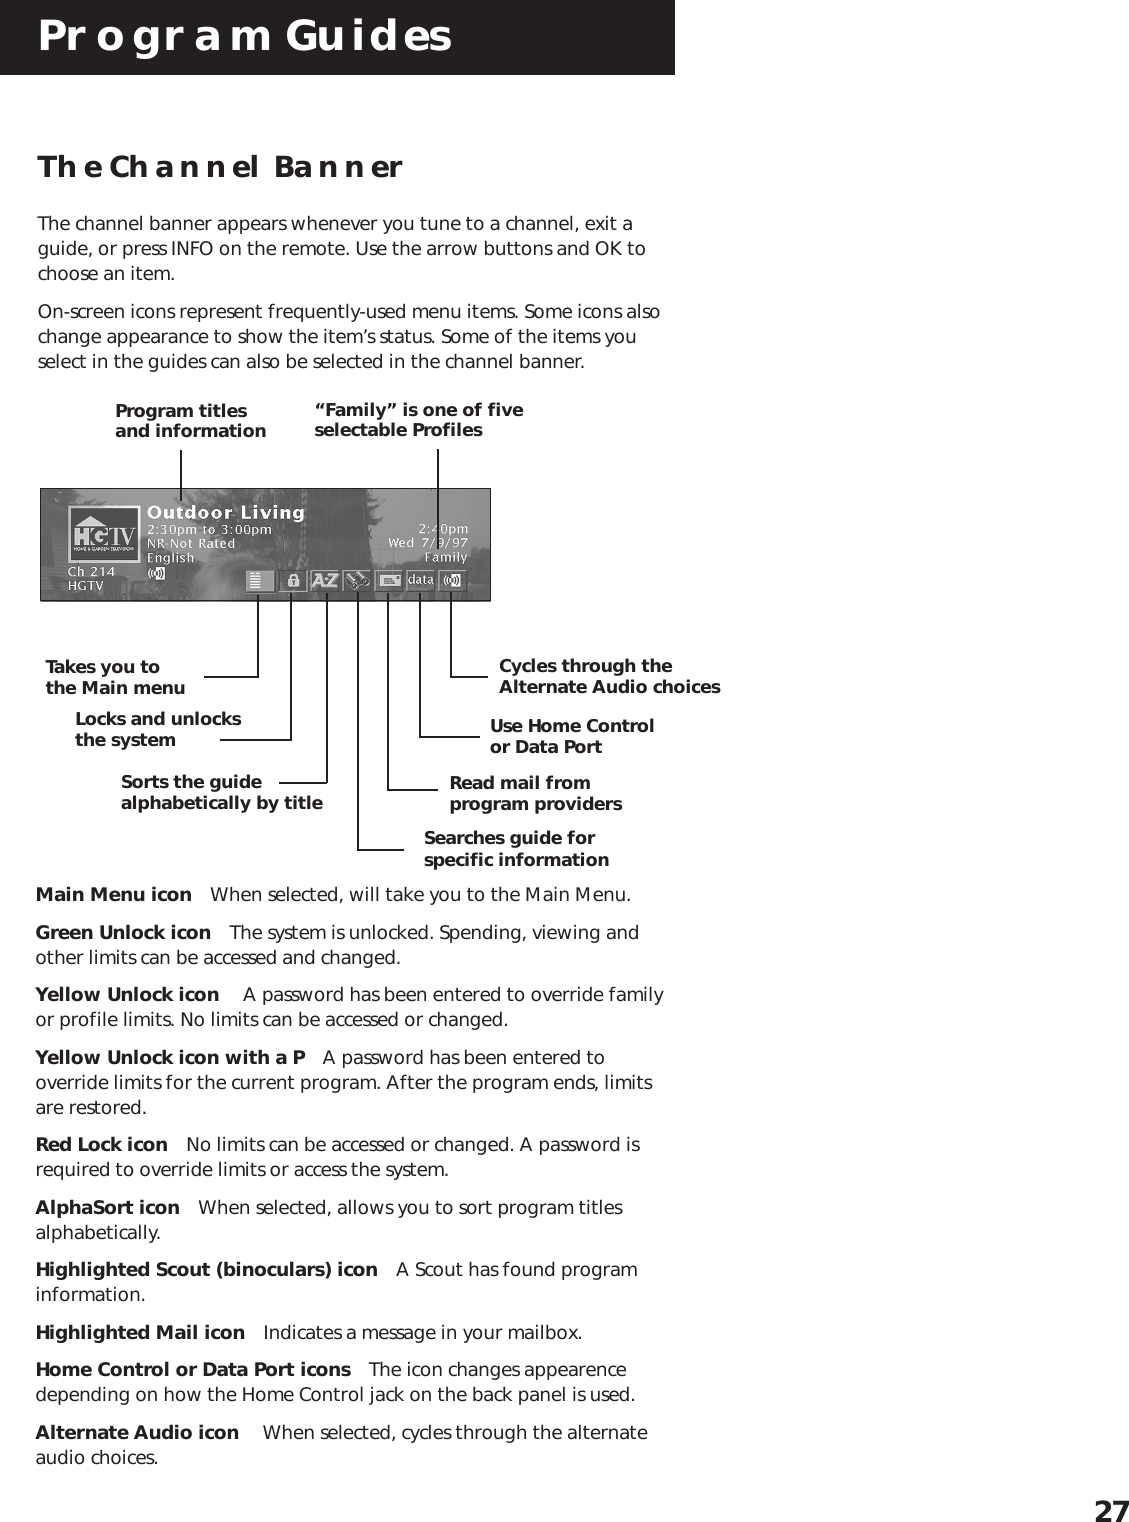
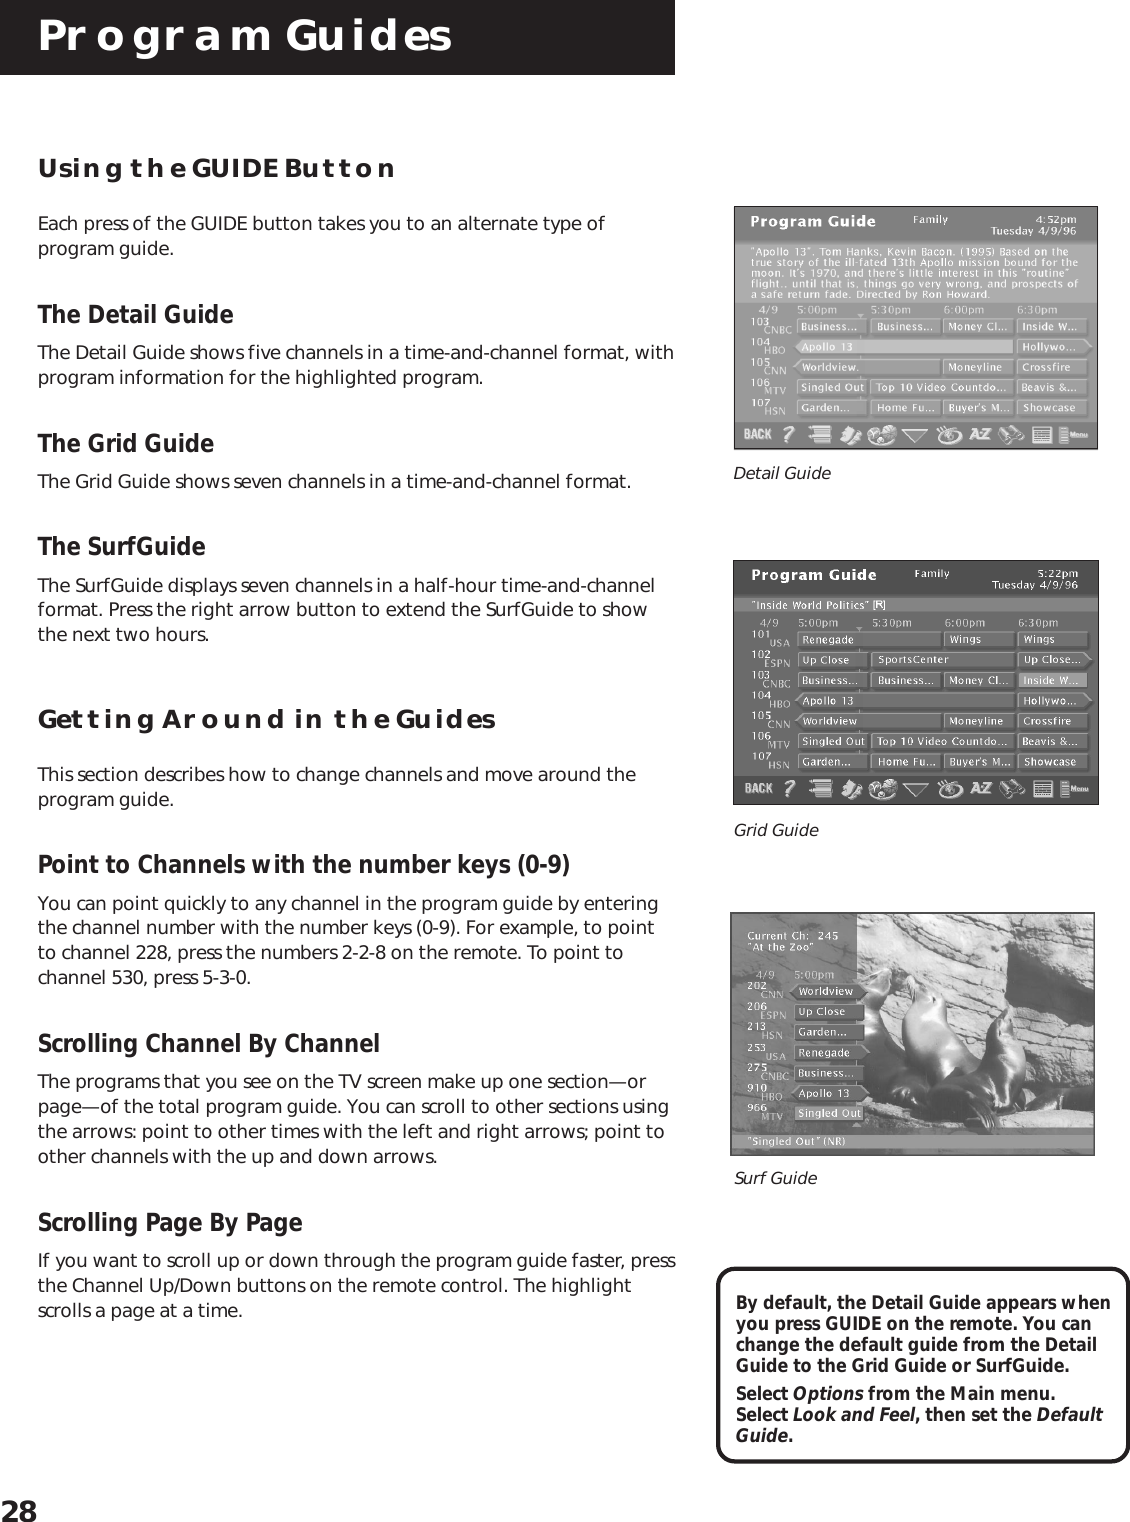
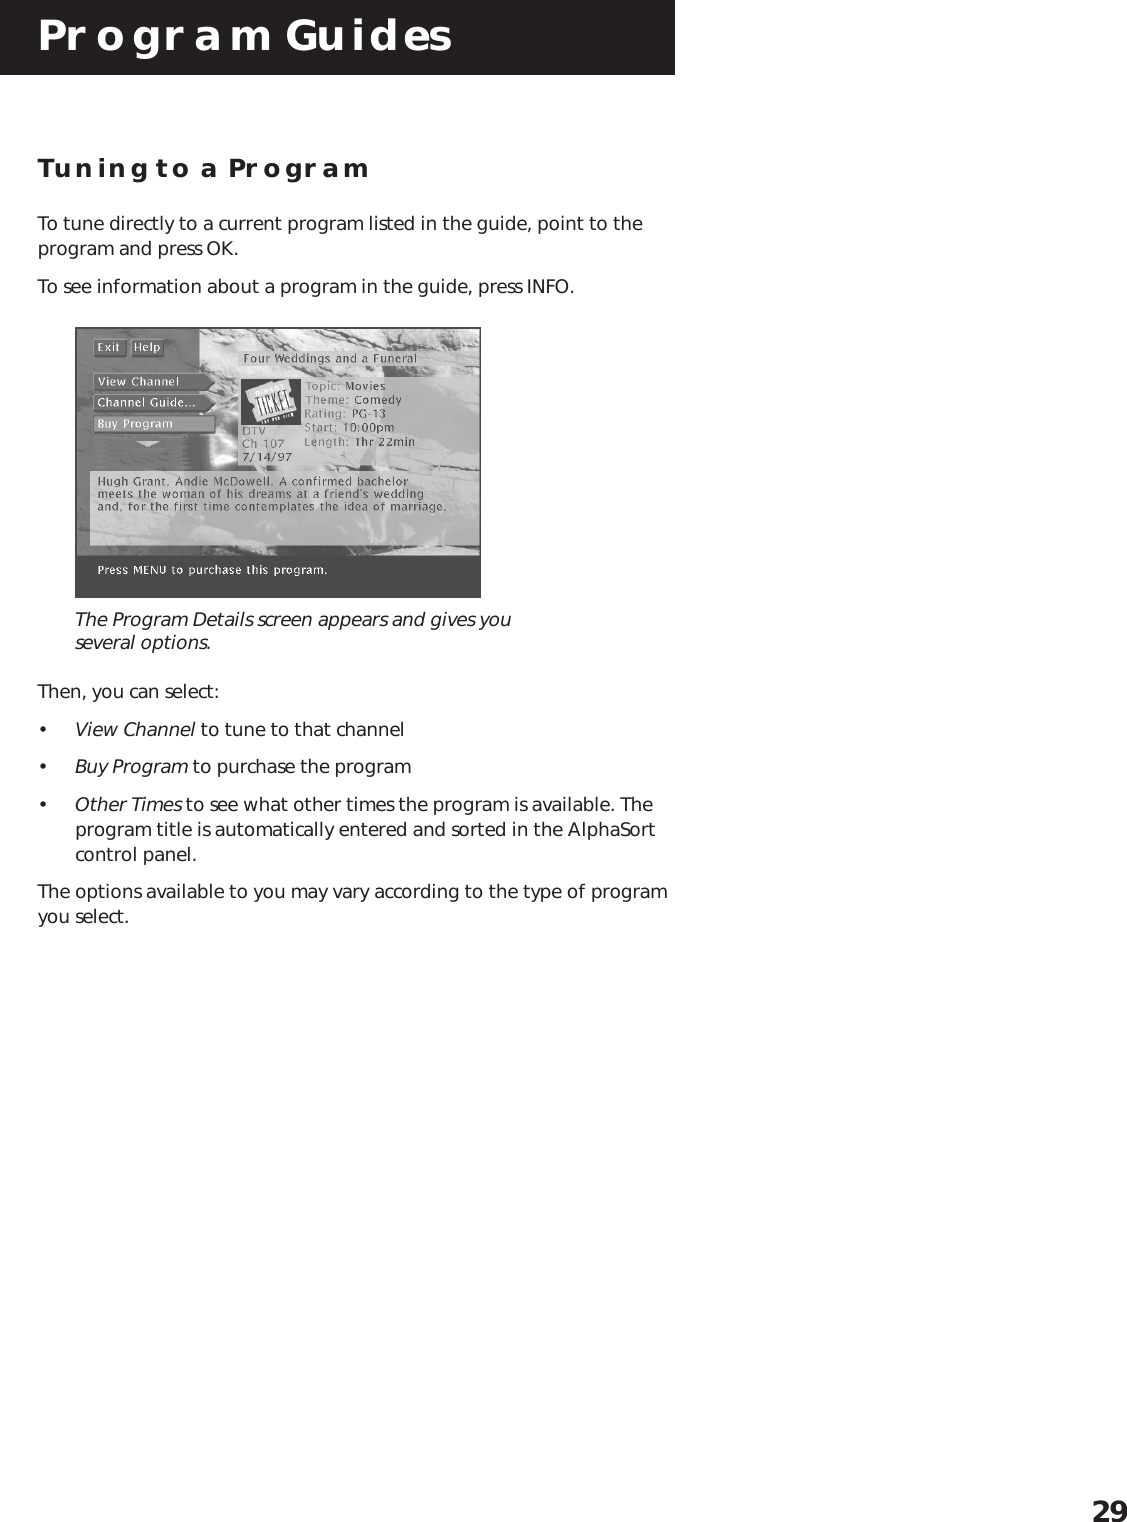
First Half of Users Manual

SATELLITE RECEIVERUSER'S GUIDE
Safety InformationWARNING TO REDUCE THE RISK OF ELECTRIC SHOCK, DO NOT REMOVECOVER (OR BACK). NO USER SERVICEABLE PARTS INSIDE.REFER SERVICING TO QUALIFIED SERVICE PERSONNEL.This symbol indicates“dangerous voltage” inside theproduct that presents a risk ofelectric shock or personal injury.This symbol indicatesimportant instructionsaccompanying the product.RISK OF ELECTRIC SHOCKDO NOT OPENWARNINGTo reduce risk of fire orshock hazard, do notexpose this receiver torain or moisture.Cautions Do not stack electronic components or other objects on top ofthe Receiver. The slots on top of the receiver must be left uncoveredto allow proper airflow to the unit. Blocking the airflow to the unitcould impair performance or damage your receiver and othercomponents.Do not stack the receiver on top of a “hot component” such as anaudio power amplifier.FCC Regulations state that unauthorized changes or modifications tothis equipment may void the user’s authority to operate it.The RF remote control complies with part 15 of the FCC Rules.Operation is subject to the following two conditions: 1) The RF remotecontrol may not cause harmful interference and; 2) The RF remotecontrol must accept any interference received, including interferencethat may cause undesired operation.Note to Cable TV Installer: This reminder is provided to call your attention to Article 820-40 of theNational Electrical Code (Section 54 of the Canadian Electrical Code,Part 1) which provides guidelines for proper grounding and, inparticular, specifies that the cable ground shall be connected to thegrounding system of the building as close to the point of cable entry aspractical.Note to Satellite Dish Installer: This reminder is provided to call your attention to Article 810 and inparticular article 810-15 of the National Electrical Code which coversproper installation and grounding of television receiving equipment aswell as to article 820-40 of the National Electrical Code which specifiesthat the satellite dish cable ground shall be connected to thegrounding system of the building as close to the point of cable entry aspractical.IMPORTANT NOTICE: This device incorporates an anticopy process technology that isprotected by U.S. patents and other intellectual property rights. Theanticopy process is licensed for non-commercial, home use only. Reverseengineering or disassembly is prohibited.Care and Cleaning: Use a soft cloth or dusting attachment of your vacuum cleaner to dustyour receiver. Remove dust from the ventilation holes on the top andbottom.Plastic surfaces are easily scratched and can be marred by alcohol andvarious solvents. Avoid excessive use of oil-based furniture polishessince the materials used in the cabinet will accumulate more dust. Anon-abrasive, anti-static cleaner/polisher is recommended.
Table of Contents1Setup and Connections ........................................ 3Step 1: Unpack the DSS® System ...................................................4Step 2: Connect Your Receiver to Your TV and Other Devices ..... 4Things to Know Before Connecting Components .................. 4Jacks and Cables........................................................................ 5Back of the Receiver ................................................................. 6Basic Connection.......................................................................7Advanced Connection .............................................................. 8Step 3: Connect the VCR Controller ...............................................9Locating the VCR’s Infrared Remote Control Sensor .............. 9Selecting a VCR Type ................................................................9Step 4: Find the Video Input Channel on Your TV ......................11Step 5: Interactive Setup............................................................... 12Step 6: Place Batteries in the Remote Control ............................ 12STEP 7: Plug in and Turn on the System....................................... 12Step 8: Order DSS® Programming................................................. 13Using the Remote ............................................... 15Remote Control Buttons ...............................................................16The Point and Select Method .......................................................18Programming the Remote Control .............................................. 19TV Codes..................................................................................21VCR Codes ...............................................................................22Cable Box Codes...................................................................... 23Program Guides .................................................. 25Bringing Up the Program Guides........................................... 26Anatomy of a Program Guide ...................................................... 26The Channel Banner...................................................................... 27Using the GUIDE Button......................................................... 28Getting Around in the Guides ............................................... 28Tuning to a Program............................................................... 29Additional Program Guides.................................................... 30Sorting the  Guides ................................................................. 32The Menu System ............................................... 39Using the Menu System ................................................................ 40Back and Help ......................................................................... 40Menu Descriptions .................................................................. 41The Program Guide .......................................................................42The Mailbox................................................................................... 43How to Tell When You Have Mail.......................................... 43Checking Your Mail.................................................................43
Table of Contents2DSS® is a registered trademark of DIRECTV, Inc., a unit of Hughes Electronics Corp.StarSight-Licensed: The manufacture and sale of the television schedule feature of this product was licensedunder one or more of the following patents of StarSight Telecast, Inc.; U.S. Patent Nos. 4,706,121; 4,977,455;5,151,789; 5,335,277: and 5,353,121.Pay-Per-View Programs ................................................................. 44Purchasing and Previewing .................................................... 44Tuning to a PPV Program ....................................................... 44Using the Purchases Menu ..................................................... 47Reviewing and Canceling an             Upcoming Purchase ................................................................47Spending Limits.......................................................................48Timers Feature ............................................................................... 49Profiles ........................................................................................... 51Creating a Profile Channel List .............................................. 52Setting the Ratings Limit........................................................ 53Viewing Hours.........................................................................54Setting Up Spending Limits.................................................... 54Locking a User’s Profile........................................................... 55Locking the System ................................................................. 56Choosing Your Profile............................................................. 57Options ..........................................................................................57Look and Feel.......................................................................... 58System Options .......................................................................59Audio Language ..................................................................... 60Alternate Data ........................................................................ 60The Dish Pointing Menu Screen ...................................................61Using the On-Screen  Signal Meter........................................ 62Home Control..........................................................................63Edit Fetch Menu ............................................................................65Customizing the Fetch Menu ................................................. 66Customizing the FETCH Button.............................................. 66Troubleshooting.................................................. 69Appendix A: Warranty Information .................. 74Appendix B: FCC Regulations ............................ 75Appendix C: Accessories .................................... 76Appendix C: Accessories .................................... 77Index.................................................................... 78
Setup and Connections3Getting StartedThis manual is designed to get you started quickly. The firstthree sections of the manual introduce you to your DSS®system, and show you how to use the on-screen guides andmenus.In Setup and Connections, you’ll learn:• different ways to connect the receiver to your TV• how to connect the VCR controller• how to order programming• how to program the remote controlUsing the Remote defines the buttons of the remote and howto program it to control other components.Program Guides details the items and features associated withthe different guides.The Rest Of The ManualThe rest of the book includes menu information,troubleshooting information—such as running a system test—and an index.➣Setup and Connections1➣Program GuidesUsing the Remote➣The Menu System432➣Troubleshooting5Setup and Connections
Setup and Connections4Step 1: Unpack the DSS® SystemMake sure to locate the remote control and the VCR controller.Step 2: Connect Your Receiver toYour TV and Other DevicesDuring the satellite dish antenna installation, the receiver may havebeen connected to your TV with just a coaxial cable for the system test.Depending on what components you have, another connection mayprovide better picture and audio quality. The following sections providecable and connection information to help you decide what connection isbest for you.Things to Know Before ConnectingComponentsProtect Your Components from Power Surges• Connect all components before plugging any power cords into thewall outlet.• Always turn off the receiver, TV and other components before youconnect or disconnect any cables.Position Cables Correctly to Avoid Audio Hum orInterference• Insert all cable plugs firmly into their jacks.• Place the audio/video cables to the sides of the TV’s back panelinstead of straight down the middle after you connect yourcomponents.• Try not to coil any twin-lead cables and keep them away from theaudio/video cables as much as possible.• Make sure all antennas and cables are properly grounded. Refer tothe Safety Tips sheet packed with your unit.Protect Your Components from Overheating• Do not block ventilation holes in any of the components. Arrangethe components so that air can circulate freely.• Do not stack components.• Allow adequate ventilation when placing your components in astand.• Place an amplifier or receiver on the top shelf of the stand soheated air rising from it will not flow around other components.ReceiverRemote Control VCR Controller
Setup and Connections5Jacks and CablesS-Video Jack and CableThe S-Video jack provides the best picture quality for your satellitesystem.This jack is available on many TVs and is used in conjunction with audiocables to connect the receiver to your TV. Remember also to connect theleft and right audio cables because the  S-Video jack carries only thepicture signal, not the sound.Audio/Video Jacks and Cables (RCA-type)The audio/video jacks provide very good picture and stereo soundquality, and should be used if your TV has no S-Video jack.Theses jacks are used for most audio/video connections betweencomponents. The receiver audio/video jacks are color coded (yellow forvideo, red for right audio, and white for left audio). If your TV has onlyone input for audio (mono), connect it to the right (red) audio jack onthe receiver.RF Jacks and Coaxial Cables (F-type)The RF jacks provide good picture and mono sound quality, and are tobe used if audio/video connections are not available for your TV.These jacks are required for antenna or cable-TV connections. The RFjacks on the receiver are labeled IN FROM ANT and OUT TO TV. Thecoaxial cable supplied with your DSS® system is used to connect the RFjacks between the receiver and your TV’s antenna input.VCR Controller Jack and CableThe VCR controller cable plugs into a jack on the receiver’s back panel.The other end of the cable affixes to your VCR’s remote sensor.Audio/Video JacksVCR Controller JackRF JackS-Video Jack
Setup and Connections6Back of the ReceiverThe diagram below describes each of the back panel jacks found on yourreceiver. When connecting A/V cables, be sure to connect correspondingOUTPUTS and INPUTS (Video to Video, Right Audio to Right Audio, etc.).SATELLITE INOUTTOTVRF REMOTES-VIDEOVIDEORLAUDIO HOME CONTROLVCR CONTROLINFROMANTPHONE JACKPHONE JACK  Use toconnect the receiverto a phone line. TheDSS® system requiresa phone lineconnection toperiodically call outto programproviders.RF REMOTE  Use toconnect an optionalRF antenna for RFremote signals.Connecting anantenna extends theremote’s range.VCR CONTROLAllows the receiverto control your VCR. LOW SPEED DATAPORT  This port allowsyou to connect the DSS®system to  accessories,such as the HomeControl base module.S-VIDEO  Provides thebest picture quality. Ifyour TV has S-VIDEOcapability, use this jackalong with the audio/video jacks to connectthe receiver to your TV.SATELLITE INUse to connectthe receiver tothe satellitedish antenna.VIDEO  Provides better picturequality than the OUT TO TV jack. Ifyour TV has audio/video capability,use this jack to connect the receiverto your TV. You must also connectthe AUDIO jacks.AUDIO (R and L)  Providebetter sound quality thanthe OUT TO TV jack. If yourTV has audio/videocapability, use these jacksto connect the receiver toyour TV. You must alsoconnect the VIDEO jack.IN FROM ANT  Use toconnect the DSS®system to an off-airantenna or cable TVsignal.OUT TO TV  Use toconnect the receiverto your TV. However,if your TV has audio/video jacks, youshould use thosejacks to get betterpicture and soundquality.
Setup and Connections7How to View Your ComponentsTo watch the satellite receiver in thisconnection, tune the TV to either CH 3 or 4.(The default is CH 3. You may change theoutput channel to 4 by choosing SystemsOptions from the Main menu and selectingOutput Channel.)To record DSS® programming, tune thereceiver to the desired channel and set yourVCR to record on channel 3 or 4.To view VCR recordings, tune the TV to theVCR output channel (usually CH 3 or 4) and setyour VCR to play. If your VCR is a brand otherthan RCA, GE, or ProScan, you may need toprogram the remote to control the VCR. Seethe next section, Programming the Remote.Basic ConnectionSATELLITE ININFROMANTOUTTOTVDSSRECEIVERVCRIN FROM ANTOUT TO TVINCH3 CH4 TVSATELLITE DISHCABLE OR OFF-AIR ANTENNACAUTIONDo not stack electronic components orother objects on top of the receiver. SeeSafety Information, inside front cover.
Setup and Connections8How to View Your ComponentsTo watch the satellite receiver in thisconnection, tune the TV to the video inputchannel. (To find your TV’s video inputchannel, follow Step 3 on the next page).Then tune the receiver to the desiredchannel.To record DSS® programming, tune thereceiver to the desired channel. Then set yourVCR to record on channel 3 or 4.To view VCR recordings, tune the TV to theVCR output channel (usually channel3 or 4) and set your VCR to play. If your VCRis a brand other than RCA, GE, or ProScan,you may need to program the remote tocontrol the VCR. See the next section,Programming the Remote.Advanced ConnectionSATELLITE ININFROMANT S-VIDEOVIDEORLAUDIOOUTTOTVDSSRECEIVERVCRIN FROM ANTOUT TO TVLR S-VIDEOVIDEOAUDIOINCH3 CH4 TVSATELLITE DISHCABLE OR OFF-AIR ANTENNACAUTIONDo not stack electronic components orother objects on top of the receiver. SeeSafety Information, inside front cover.
Setup and Connections9Step 3: Connect the VCR ControllerIn order for the receiver and VCR to communicate, you need to attachthe VCR Controller to the back of the receiver.1. Plug the VCR Controller into the VCR CONTROL jack on the back ofthe receiver.2. Affix the other end to the remote sensor on your VCR.Locating the VCR’s Infrared RemoteControl SensorThe VCR Controller must be affixed directly over the infrared remotesensor on your VCR.Some VCRs have a label that identifies the infrared remote sensor, andothers do not. If the IR sensor is labeled on your VCR, affix the VCRcontroller directly over the sensor.For VCRs that do not label the remote sensor, you need to use the VCR’sremote to locate the sensor before affixing the VCR controller.1. Hold the VCR’s remote control so that it is touching the frontof the VCR.2. Slowly move the remote over the front of the VCR while pressingthe remote power button on and off.3. When your VCR turns off or on, you have located the sensor.To test the VCR controller, use a piece of clear tape to temporarilyattach the VCR controller to the spot where you think the sensor islocated, and then follow the steps described under “Selecting a VCRType.”Selecting a VCR TypeYou need to tell the receiver which VCR brand you are using.1. Press MENU on the remote to bring up the Main menu.2. Point to Options and press OK.3. Point to System Options and press OK.4. Point to Set VCR Type and press OK.If the Main menu doesn’t appear whenyou press MENU, the remote might not bein DSS® mode. Try pressing the SATbutton on the remote, and then MENU.REMOTE SENSORVCRFront of VCRBack of DSS ReceiverSATELLITE INOUTTOTVRF REMOTES-VIDEOVIDEORLAUDIO HOME CONTROLVCR CONTROLINFROMANT PHONE JACK
Setup and Connections10The Set VCR Type screen lets you enter a code foryour VCR.5. Use the arrows or digit keys to input the correct code for your VCRbrand. The VCR codes are located in the “Using the Remote” sectionof this book.6. Follow the on-screen instructions to ensure that you are using thecorrect code. If the VCR automatically stops, then you know that thereceiver and the VCR are communicating.• Some VCR brands may not be capable of being controlled by thereceiver.
Setup and Connections11Step 4: Find the Video InputChannel on Your TV• Note: You do not have to complete this step if you used thebasic connection.If you used the advanced connection, you must tune your TV to theVideo Input Channel to see the DSS® screens. Since there are somany brands and models of TVs, there are just as many ways toaccess a TV’s Line Input Channel. Below are some things you can try.•     If your TV brand is RCA, GE, or ProScan, press VCR on theremote that came with your receiver. Then press theWHO•INPUT button on the remote.•     If your TV brand is not RCA, GE, or ProScan, consult your TVOwner’s Manual.If you cannot find your TV Owner’s Manual, you will have toinvestigate. You might access the TV’s Video Input Channel by:•     pressing a button on the remote•     finding it through the TV’s menu system•     tuning directly to it by pressing a specific channel number•     going through all channels in the list by pressing the channel upor down buttons on the TVBelow are lists of some of the different ways manufacturers labelthe Video Input Channel.Video Channel VariationsButton/switchon the TVVIDEOSIGNALVID 1VID 2S-VIDS-VIDEOButton on theTV RemoteVID 1LINEVIDVIDEOS-VIDINPUTSOURCEAUXChannel #00909192VID 1VID 2Signal FlowThe whole idea of choosing a Line InputChannel or Video Input Channel can beexplained by Signal Flow (the way thesignal flows through your componentsand ends up as a picture on your TVscreen).To learn more about how signal flowworks, see the example in theTroubleshooting section.
Setup and Connections12Step 5: Interactive SetupIf you self-installed your satellite dish antenna, you may have alreadyused the interactive setup to find the dish pointing coordinates,acquire and fine-tune the signal, and run a system test.If you need to run the interactive setup again, select Options fromthe Main menu, then select Interactive Setup.If you just want to check your dish pointing coordinates, or run thesignal strength meter, select Dish Pointing from the Main menu.Step 6: Place Batteries in theRemote ControlFollow these steps whenever you need to install or change thebatteries in your digital satellite receiver’s remote.1. Remove the cover from the battery compartment.2. Insert batteries in the battery compartment, matchingthe + and – end of each battery.3. Replace the cover.STEP 7: Plug in and Turn on theSystemPlug the end into the wall outlet, matching the wide blade of theplug with the wide slot in the outlet. Be sure to insert the plugcompletely.To turn on the system, press the SAT button on the remote or on theON•OFF button on the front panel. If your TV brand is RCA, GE, orProScan, press the TV button on the remote to turn on the TV. Ifyour TV brand is not RCA, GE, or ProScan, see the next section, Usingthe Remote, for details on how to use the remote to control your TV.
Setup and Connections13Step 8: Order DSS® ProgrammingAfter you have installed your system, you should contact the serviceproviders, DIRECTV and USSB to receive DSS® programming.Programming with DIRECTV: Call 1-800-347-3288Programming with USSB: Call 1-800-204-USSBWhen you order programming, you needto know your Access Card number. To getthe number, select Options from the Mainmenu, then System Options, and thenselect System Test.Wait for the system to run all of its tests.The Access Card number is displayed atthe end of the system test.Write the Access Card number in thespace below for easy reference:___________________________________
Setup and Connections14
Using the Remote15How to use your Universal RemoteThis section defines the buttons of the remote and how toprogram it to control other components.The universal remote can be programmed to control mostbrands of remote controllable VCRs, satellite receivers,and cable boxes. If you have an RCA, GE, or ProScancomponent, you probably don’t need to program it at all.➣Setup and Connections1➣Program Guides➣3➣Troubleshooting5Using the RemoteUsing the Remote2The Menu System4
Using the Remote16Remote Control ButtonsON•OFF Turns the device you are controlling on or off.VCR Tells the remote to control the VCR.TV Tells the remote to control the TV.DVD Tells the remote to control the DVD player.HOUSE ICON Tells the remote to control the home devices.AUX Tells the remote to control  other components, such as a cablebox or laser disc player.SAT Tells the remote to control the receiver.MUTE Reduces the TV’s volume to its minimum level. Press again torestore the volume.SKIP This key is not used by the receiver.CHAN UP/DOWN Use to scan up and down through the channels inthe current channel list. If you are in the program guide or menu system,use the CHAN UP/DOWN buttons to page up and down a screen at atime.VOL UP/DOWN Adjusts the audio volume.FETCH Either brings up the Fetch menu or tells the receiver to take theaction you programmed it to take.GO BACK Moves you back and forth between your last two selectedchannels. In the menu system, returns you to the previous screen.GUIDE Brings up the on-screen program guide. Press the GUIDE buttonseveral times to toggle through the different types of guides.INFO Brings up the on-screen channel banner. Press again to getprogram details.ARROWS Use the navigation arrows to move the on-screen highlightup, down, left, or right. Using the arrows to highlight a menu item isalso called “pointing.”OK Selects a highlighted choice if you are already in the menu system.MENU Displays the Main Menu.CLEAR Removes the on screen displays and return to normal viewing.DIGIT KEYS (0 - 9) Use the digit keys to tune directly to a channel. Ifyou are in the menu system, use the digit keys to enter numbers for thetime, date, channel and passwords.
Using the Remote17WHO•INPUT Press the WHO button one or more times to togglethrough your user profiles.ANTENNA Lets you switch the source of the video signal from satellitesignals to an off-air antenna or cable signal when using the OUT TO TVjack.TRANSPORT KEYS (REVERSE, PLAY, FORWARD, RECORD, STOP,PAUSE) Use when controlling an auxillary device, such as a VCR orLaserdisc player. Note that the RECORD button is used to schedule atimer recording when using the program guide.PIP OFF Controls the display of the PIP window when in TV mode.When in home control mode, turns off the selected device.SWAP DIM When in TV mode, controls the display of the PIP window.When in home control mode, dims the selected device.CH CTRL BRIGHT When in TV mode, controls the channels. When inhome control mode, brightens the selected device.RESET ON When in TV mode, returns the video settings to the default.When in home control mode, turns on the selected device.
Using the Remote18The Point and Select MethodPoint and Select is the two-step method you use to navigate through themenu system and program guides. Once you know how to point andselect, you can explore the on-line menus.1. PointYou point by pressing the arrow keys on the remote. Pressing thearrow keys moves the on-screen highlight to different items in theprogram guide and the menu screens. Pressing an arrow once movesthe highlight one space in the direction of the arrow.For example, to point down (that is, to move the highlight towardthe bottom of the screen), press the down arrow. To point right,press the right arrow.2. SelectOnce you have pointed to an item on the screen, select it bypressing the OK button on the remote. Selecting an item tells themenu system to go ahead and make the change you have indicated.For example, the instructions in the User’s Manual might tell you toPoint to the Back button and press OK.Don’t worry about getting stuck inside amenu. Pressing the CLEAR button on theremote takes you out of the menu systemand back to the program you werewatching.
Using the Remote19Programming the Remote ControlThe satellite system’s remote can be programmed to control most brandsof remote controllable TVs. The remote is programmed to control mostRCA, GE and ProScan TVs. The remote needs to be programmed tocontrol other manufacturers’ brands.Testing the RemoteTo determine whether the universal remote needs to be programmed,turn a device ON, such as a VCR, point the remote at the VCR, and pressthe VCR button. Then press POWER or CH ^ (channel up) or CH v(channel down) to see if the VCR responds to the remote commands. Ifnot, the remote needs to be programmed.There are two ways to program the remote: automatic or direct entry.Using Automatic Code SearchThe following instructions can be used to program the remote to controleach of the devices connected to your TV. If you want to exit theautomatic code search without programming any of your devices, pressCLEAR until the LED turns off.1. Turn on the device you want to control (VCR, SAT, etc.)2. Press and hold the button you want to program (VCR, AUX, etc.).While holding the device button, press and hold ON•OFF until thered light on the remote turns on, then release both buttons.3. Press and release PLAY, then wait 5 seconds or until the LED stopsflashing.At this point the remote is searching for the correct code toprogram. If, after 5 seconds, the device you want to control doesnot turn off, press PLAY again to tell the remote to search the nextset of codes.Continue pressing PLAY until the device turns off or you havesearched through all of the codes. There are 20 total sets of codes. Ifthe device does not turn off after pressing PLAY 20 times, then theremote cannot control that particular device.If the device you want to control does turn off:1. Press and release REVERSE, then wait 2 seconds. Repeat thisstepuntil the device turns back ON.2. To finish, press and hold STOP until the red light on the remoteturns off.This remote may not operate all modelsof the brands that are shown. Use thecodes shown in this manual, or on thesheet packed with your remote.
Using the Remote20Using Direct Entry1. Turn on the component to be programmed.2. Look up the brand and code number(s) for the component on thecode list on the last page of this section, Using the Remote.3. Press and hold the button on the remote you want to program.4. Enter the code from the code list.5. Release button, and then press ON•OFF to see if the componentresponds to the remote commands. If it doesn’t, try pressing thecomponent button and then ON•OFF again.6. If you get no response, repeat these steps using the next code listedfor your brand, until the component responds to the remotecommands.Using the Remote to Control a DeviceOnce the remote has been programmed successfully, you are ready touse it to control your devices.To operate the device:1. Press the device button (TV, VCR, DVD, or AUX) to set the remote tocontrol the device.2. Press ON•OFF to turn the device ON or OFF.3. Use the remote buttons that apply to that device.Modes of OperationBecause this universal remote can control several different components(DVD player, VCR, Cable Box, etc.) it uses operational modes triggered bythe component buttons. For example, if you want the remote to controlthe TV, you would press the TV button to put the remote into TV modebefore you could control the TV.Using the Remote to Control a SecondReceiverThe remote can control two receivers. From the Main menu, selectOptions, then System Options, then Remote Setup. Have the AUX buttoncontrol the second receiver, while the first receiver is controlled by theSAT button.
Using the Remote21TV CodesLaserdisc/DVD Player CodesRCA ....................................... 033, 037RCA (DVD Player) ......................... 078Pioneer .................................. 033,033ProScan .................................. 033,037A-Mark.......................................... 102Admiral................................. 005, 114Akai....................................... 002, 103Amtron ......................................... 064Anam ..................................... 104,105Anam National..................... 038, 106AOC............... 011, 019, 027, 088, 107Bell & Howell........................ 005, 013Candle........................... 011, 027, 033Citizen................... 011, 027, 033, 064Colortyme..................... 011, 027, 084Concerto ............................... 011, 027Contec/Cony . 036, 037, 040, 042, 064Craig ............................................. 064Curtis Mathes 000, 011, 015, 027, 037CXC ............................................... 064Daewoo ........ 011, 019, 027, 112, 116Daytron................................. 011, 027Dimensia....................................... 000Electrohome ........ 006, 011, 014, 027,...................................... 038, 061, 068Emerson...... 011, 026, 027, 028,  029,.............. 030, 031, 032, 037,042, 053,............. 064, 065, 067, 075, 076, 078,.............................. 079, 094, 095, 096Envision ................................ 011, 027Fisher .................... 017, 021, 039, 041Funai ............................................. 064GE......... 000, 008, 009, 011, 012, 027,..............  038, 068, 086, 089, 091,116Goldstar ....... 003, 004, 006, 011, 019,...................................... 027, 037, 050Hallmark ............................... 011, 027Hitachi ......... 009, 011, 027, 036, 037,............................. 040, 047, 048, 063,.............................. 080, 094, 097, 098Infinity .......................................... 013JBL................................................. 013Jensen ................................... 011, 027JVC ....................... 012, 024, 036, 037,.............................. 040, 048, 051, 074Kawasho ....................... 002, 011, 027Kenwood .............. 006, 011, 014, 027Kloss Novabeam................... 035, 043KTV ............................................... 078Loewe ........................................... 013Luxman ................................. 011, 027LXI ......... 000, 013, 018, 021, 023, 054Magnavox.... 006, 007, 010, 011, 013,...................... 016, 027, 033,035, 043,.............................. 049, 066, 087, 089Marants ........................................ 013Marantz ................ 011, 013, 027, 069Memorex ...................................... 005MGA............. 006, 011, 014, 019, 022,...................... 027, 041, 056, 061, 068Mitsubishi .... 006, 011, 014, 019, 022,.............................. 027, 041,055, 056,.............................. 061, 068, 108, 117MTC............................... 011, 019, 027Multivision.................................... 081NAD ...................................... 018, 023NEC ....... 011, 014, 019, 027, 038, 084Panasonic...... 012, 013, 038, 086, 111Penney. 000, 008, 011, 019, 027, 040,.............................. 068, 077, 086, 088Philco ... 006, 007, 010, 011, 013, 016,.............. 019, 027,033, 035, 037, 038,...................................... 043, 087, 089Philips .......... 002, 006, 007, 010, 011,...................... 013, 016, 033,035, 037,.............................. 038, 043, 066, 073Pioneer . 011, 027, 045, 062, 093, 113Portland................ 011, 019, 027, 037ProScan ......................................... 000Proton........... 011, 027, 037, 072, 118Quasar .................. 012, 038, 092, 111Radio Shack ......... 000, 021, 025, 036,.............................. 037, 059, 064, 078RCA ...... 000, 006, 011, 019, 027, 034,...... 038, 044, 046, 088, 100, 101, 109Realistic......................................... 021Sampo................................... 011, 027Samsung .............. 006, 011, 014, 015,................ 019, 027,036, 037, 077,110Sanyo .... 017, 021, 039, 056, 057, 058Scott.............................. 028, 037, 064Sears..... 000, 006, 011, 014, 017, 018,.............. 021, 023, 027,039, 040, 041,.............................. 051, 071, 083, 095Sharp.... 011, 020, 025, 027, 037, 052,.............................. 053, 059, 060, 108Signature ...................... 005, 094, 108Sony .............................................. 002Soundesign................... 011, 027, 033Sylvania........ 006, 007, 010, 011, 013,..................... 016, 027, 033, 035, 043,.............................. 049, 066, 087, 089Symphonic.................... 064, 076, 115Tatung .......................................... 038Technics ........................................ 012Techwood ............................. 011, 027Teknika ................ 011, 019, 027, 033,.............................. 036, 037, 040, 066Telecaption................................... 090TMK ...................................... 011, 027Toshiba ................ 018, 021, 023, 040,.............................. 071, 077, 085, 090Universal............................... 008, 009Victor ............................................ 051Vidtech ................................. 019, 027Wards........... 000, 005, 006, 007, 008,...................... 009, 010, 011, 013,019,...................... 025, 027, 028,035, 043,...................... 059, 066, 076, 082, 089Yamaha................. 006, 014, 019, 027Zenith ........................... 001, 099, 114
Using the Remote22VCR CodesAdmiral................................. 006, 079Aiwa.............................................. 015Akai....... 003, 017, 022, 023, 063, 066Audio Dynamics ................... 014, 016Bell & Howell................................ 002Broksonic ...................................... 010Candle.................. 007, 009, 013, 044,...................................... 045, 046, 052Canon ................................... 008, 053Capehart....................................... 001Citizen.................. 007, 009, 013, 044,...................................... 045, 046, 052Colortyme..................................... 014Craig ..................................... 007, 012Curtis Mathes ...... 000, 007, 008, 014,.............. 015, 044, 046, 053, 064, 067Daewoo ................ 013, 045, 052, 076dbx ........................................ 014, 016Dimensia....................................... 000Dynatech ...................................... 015Electrohome ................................. 027Emerson....... 008, 009, 010, 013, 015,..... 020, 023, 027, 034, 041, 042, 047,...... 049, 057, 062, 065, 067, 068, 070Fisher ................... 002, 012, 018, 019,...................................... 043, 048, 058Funai ............................................. 015GE.......... 000, 007, 008, 032, 037, 053Goldstar ................ 009, 014, 046, 060Harman Kardon ........................... 014Hitachi .................. 005, 015, 035, 036Instant Replay .............................. 008JCL................................................. 008JC Penney .... 002, 005, 007, 008, 014,...................... 016, 030, 035, 051, 053JVC ........ 002, 014, 016, 030, 046, 074Kenwood ..................... 002, 014, 016,...................................... 030, 044, 046KLH ............................................... 073Lloyd ............................................. 015Logik ............................................. 031Magnavox............. 008, 029, 053, 056Marantz ....... 002, 008, 014, 016, 029,.............................. 030, 044, 046, 061Marta ............................................ 009MEI................................................ 008Memorex .............. 008, 009, 012, 015MGA...................................... 004, 027Midland ........................................ 032Minolta ................................. 005, 035Mitsubishi ..... 004, 005, 027, 035, 040Montgomery Ward ...................... 006MTC....................................... 007, 015Multitech .............. 007, 015, 031, 032NEC .............. 002, 014, 016, 030, 044,.............................. 046, 059, 061, 064Panasonic.............. 008, 053, 075, 077Pentax........................... 005, 035, 044Pentex Research +........................ 046Philco .................... 008, 029, 053, 056Philips ................................... 008, 029Pioneer ......................... 005, 016, 050Portland........................ 044, 045, 052ProScan ......................................... 000Quartz........................................... 002Quasar .................................. 008, 053RCA ...................... 000, 005, 007, 008,...................... 028, 035, 037, 054, 069Radio Shack/Realistic .. 002, 006, 008,....... 009, 012,015, 019, 027, 043, 053Samsung ....... 007, 013, 022, 032, 042Sansui.................................... 016, 071Sanyo .................................... 002, 012Scott.............. 004, 013, 041, 049, 068Sears..................... 002, 005, 009, 012,...................... 018, 019, 035, 043, 048Sharp............. 006, 024, 027, 039, 045Shintom ................ 017, 026, 031, 055Signature ...................................... 015Sony .............................. 017, 026, 038Sylvania......... 008, 015, 029, 053, 056Symphonic.................................... 015Tandy .................................... 002, 015Tashiko.......................................... 009Tatung .......................................... 030Teac............................... 015, 030, 069Technics ........................................ 008Teknika ................. 008, 009, 015, 021Toshiba ......... 005, 013, 019, 048, 049Totevision ............................. 007, 009TMK .............................................. 067Unitech ......................................... 007Vector Research ........... 014, 016, 044Victor ............................................ 016Video Concepts ............ 014, 016, 044Videosonic .................................... 007Wards... 005, 006, 007, 008, 009, 012,.............. 013, 015, 025, 027, 031, 035Yamaha......... 002, 014, 016, 030, 046Zenith ........... 011, 017, 026, 072, 079
Using the Remote23Cable Box CodesABC ....................... 022, 046, 053, 054Anvision................................ 007, 008Cablestar............................... 007, 008Diamond....................................... 056Eagle ..................................... 007, 008Eastern Int. ................................... 002General Instument ....................... 046GI 400................... 004, 005, 015, 023,.............................. 024, 025, 030, 036Hamlin .......... 003, 012, 013, 034, 048Hitachi .......................... 037, 043, 046Jerrold... 004, 005, 015, 023,024, 025,.....  030, 036, 045, 046, 047, 062, 065Macom.................................. 037, 043Magnavox............ 007, 008, 019, 021,...... 026, 028, 029, 032, 033, 040, 041NSC................................................ 009Oak ............................... 001, 016, 038Oak Sigma .................................... 016Panasonic.............. 003, 027, 039, 061Philips .................. 007, 008, 019, 021,...... 026, 028, 029, 032, 033, 040, 041Pioneer ......................... 018, 020, 044RCA ....................................... 000, 027RCA (Satellite Reciever) ............... 066Randtek ................................ 007, 008Regal............................. 003, 012, 013Regency ................................ 002, 033Samsung ....................................... 044Sci. Atlanta ... 003, 022, 035, 063, 064Signature ...................................... 046Sony (Satellite Receiver) .............. 095Sprucer.......................................... 027Starcom......................................... 046Stargate 2000 ............................... 058Sylvania................................. 011, 059Teknika ......................................... 006Texscan ......................... 010, 011, 059Tocom ........... 017, 021, 049, 050, 055Unika ............................ 031, 032, 041Universal....................... 051, 052, 060Viewstar............... 007, 008, 019, 021,...... 026, 028, 029, 032, 033, 040, 041Warner Amex ............................... 044Zenith ................... 014, 042, 057, 061
Using the Remote24
Program Guides25➣Setup and ConnectionsWhat is a Program Guide?A program guide is an on-screen programming schedule.There are several types of guides, each presenting theschedule in a different format.Using the program guide is easy as long as you remember thePoint and Select rule. Point to items on the screen by pressingthe arrow keys on the remote or front panel. Then, press OKto tune to that program.1➣➣The Menu System4➣Troubleshooting5Program GuidesProgram Guides3Using the Remote2
Program Guides26Anatomy of a Program GuideThe following diagram shows you the kind of information you will seein the program guides.Bringing Up the Program GuidesYou can access the program guides by pressing MENU on the remoteand selecting Program Guide, or by using the GUIDE button on theremote.“Family” is one of fiveselectable ProfilesProgram titlesand informationReturns you toprevious screenHelp gives youmore informationSort the guide by:Topics, Movies, or Sports Sorts the current guidealphabetically by titleSearches guide forspecific informationDisplays moresorting optionsTakes you tothe Main menuScrolls throughthe guideShows all available programsIndicates current time
Program Guides27The Channel BannerThe channel banner appears whenever you tune to a channel, exit aguide, or press INFO on the remote. Use the arrow buttons and OK tochoose an item.On-screen icons represent frequently-used menu items. Some icons alsochange appearance to show the item’s status. Some of the items youselect in the guides can also be selected in the channel banner.Main Menu icon When selected, will take you to the Main Menu.Green Unlock icon The system is unlocked. Spending, viewing andother limits can be accessed and changed.Yellow Unlock icon  A password has been entered to override familyor profile limits. No limits can be accessed or changed.Yellow Unlock icon with a P A password has been entered tooverride limits for the current program. After the program ends, limitsare restored.Red Lock icon No limits can be accessed or changed. A password isrequired to override limits or access the system.AlphaSort icon When selected, allows you to sort program titlesalphabetically.Highlighted Scout (binoculars) icon A Scout has found programinformation.Highlighted Mail icon Indicates a message in your mailbox.Home Control or Data Port icons The icon changes appearencedepending on how the Home Control jack on the back panel is used.Alternate Audio icon  When selected, cycles through the alternateaudio choices.“Family” is one of fiveselectable ProfilesProgram titlesand informationTakes you tothe Main menuLocks and unlocksthe system Use Home Controlor Data PortRead mail fromprogram providersSearches guide forspecific informationSorts the guidealphabetically by titleCycles through theAlternate Audio choices
Program Guides28Using the GUIDE ButtonEach press of the GUIDE button takes you to an alternate type ofprogram guide.The Detail GuideThe Detail Guide shows five channels in a time-and-channel format, withprogram information for the highlighted program.The Grid GuideThe Grid Guide shows seven channels in a time-and-channel format.The SurfGuideThe SurfGuide displays seven channels in a half-hour time-and-channelformat. Press the right arrow button to extend the SurfGuide to showthe next two hours.Getting Around in the GuidesThis section describes how to change channels and move around theprogram guide.Point to Channels with the number keys (0-9)You can point quickly to any channel in the program guide by enteringthe channel number with the number keys (0-9). For example, to pointto channel 228, press the numbers 2-2-8 on the remote. To point tochannel 530, press 5-3-0.Scrolling Channel By ChannelThe programs that you see on the TV screen make up one section—orpage—of the total program guide. You can scroll to other sections usingthe arrows: point to other times with the left and right arrows; point toother channels with the up and down arrows.Scrolling Page By PageIf you want to scroll up or down through the program guide faster, pressthe Channel Up/Down buttons on the remote control. The highlightscrolls a page at a time. By default, the Detail Guide appears whenyou press GUIDE on the remote. You canchange the default guide from the DetailGuide to the Grid Guide or SurfGuide.Select Options from the Main menu.Select Look and Feel, then set the DefaultGuide.Detail GuideGrid GuideSurf Guide
Program Guides29Tuning to a ProgramTo tune directly to a current program listed in the guide, point to theprogram and press OK.To see information about a program in the guide, press INFO.The Program Details screen appears and gives youseveral options.Then, you can select:•View Channel to tune to that channel•Buy Program to purchase the program•Other Times to see what other times the program is available. Theprogram title is automatically entered and sorted in the AlphaSortcontrol panel.The options available to you may vary according to the type of programyou select.
Program Guides30Exiting A Program GuideThere are three ways to exit a guide:• Point to a channel and press OK.• Point to Back and press OK.• Press CLEAR or GO BACK on the remote.You can point to any program and tune tothat channel or get more information. Justpress the OK or INFO buttons.Other Guides buttonAdditional Program GuidesBesides the Detail Guide, Grid Guide, and SurfGuide, there are a fewmore guides: the Channel Guide, the Logo Guide and the AttractionsGuide.You can access these guides by selecting the Other Guides button at thebottom of the Detail Guide and Grid Guide.The Channel GuideDisplays a channel’s programming schedule in a channel-by-channelformat.The Logo GuideDisplays channel logos for the current user’s profile.
Program Guides31The Attractions GuideDisplays a list of channels that show coming attractions and specialevents information.The Other Guides button also lets you sort the guide by differentvariables, such as future times, user profile channel lists, and channelgroups. You can then choose a guide format to view the programinformation.Select the Other Guides button. You can select multiple sortparameters. For example, you could sort the guide by pay-per-viewmovies that are available at a future time.Select Guide Data and use the arrow and OK buttons to choose theGuide Data group. Guide Data lets you see what’s on in the future.Other Guides button
Program Guides32Then, select PPV in the Channel Groups category.Channel Groups is another way to sort types ofprogramming.Select Back, or press the GO BACK button on the remote to return to theprevious guide. You can also choose another guide format from thecategory list.Sorting the  GuidesSorting the guide is a way of organizing the guide to show only thetypes of programs that interest you. There are several on-screen buttonsthat sort the guide in different ways.The Sorting buttons appear at the bottom of theGrid Guide and Detail Guide.
Program Guides33TopicsThe Topics button sorts the guide according to the current user’spreferences. Select the Topics button to sort the guide.The Topics button changes to the Topics Themes button. Press the TopicsThemes button to edit the current user’s themes preferences. Thesepreferences are saved in each user’s profile.Checkmark the themes that interest you.Select the categories, and checkmark the themes you would like toappear when you select the Topics button in the guides. Programmingthat fits the description of checkmarked themes will appear in the guidewhen you sort by the Topics button.MoviesSelect the Movies button to list movies only. After selecting Movies, theMovies button changes to a Movies Themes button.Select the Movies Themes button to sort the guide to list specific typesof movies, such as comedies or musicals.Select a Movies Themes that interests you.Topics Themes buttonTopics buttonMovies buttonMovies Themes button
Program Guides34Sports buttonSports Themes buttonSportsSelect the Sports button to list sporting events only. After selectingSports, the Sports button changes to a Sports Themes button.Select the Sports Themes button to sort the guide to list specific types ofsports, such as basketball or soccer.Select a Sports Theme that interests you.AllThe All button resets the guide to show all available topics, channels andlistings for the current Profile.AlphaSortAlphaSort lists in alphabetical order all the program titles in the currentguide. Select the AlphaSort button to search for specific program titlesthat are in the current program guide. Use the arrow button tohighlight a character, then press OK.For example, to search for the program, Auto Racing, the first letter youshould point to and select is “A”. (Words like “The”, “A” and “An”appear at the end of a title.) All titles that begin with “A” appear in theAlphaSort list. Next, enter the letter “U”. All titles beginning with “AU”appear in the list.All buttonAlphaSort button
Program Guides35AlphaSort searches for specific titles in the guide.Continue entering the specific title’s letters until it appears in theAlphaSort list. If you enter the wrong letter, select either Backspace orClear All.Use the arrow buttons to highlight the title you are looking for. Pressthe OK button to select it, or the INFO button to see more information.Only titles that are in the current program guide can be found byAlphaSort.ScoutThe Scout button lets you assign “Scouts” to search the guide for veryspecific program information, such as actors’ names or programdescriptions. Select the Scout button from the Program Guide to viewthe available scouts.Point to an available Scout, and select it. Select the Enter Text button toset up the information the Scout will look for in the program guide. Usethe on-screen keyboard to enter the desired search parameters.For example, if you are interested in National Basketball Associationevents, enter a common term you might see in program information,like “NBA”.Scout buttonA checkmark next to the Scout means it is in use.A highlighted binocular icon means the Scout hasfound something.
Program Guides36Select Enter Text to set up a Scout.If “NBA” appears within a program title or program description, theprogram will be included in the Scout Results program list.The Scout will search for information when the receiver is off. (This maytake up to 30 minutes for a full guide search.) You can check a Scout’sresults by selecting a Scout.Scouts look for specific program information.
Program Guides37The Other ButtonsBackExits the guide and returns you to normal viewing on the currentchannel. Press OK to continue.HelpBrings up additional information about the guide. Press OK tocontinue.Down ArrowThe arrow button allows you to scroll down through other channelsin the guide. Point to the down arrow, and then press OK to scrolldown through the program guide.The Main menuBrings up the system Main menu. Press OK to continue.Help buttonArrow buttonBack buttonMain menu button
Program Guides38

Navigation menu