Technicolor Connected Home USA DSS98B Satellite Receiver User Manual 15351420 Cover

Technicolor Connected Home USA LLC Satellite Receiver 15351420 Cover

Contents

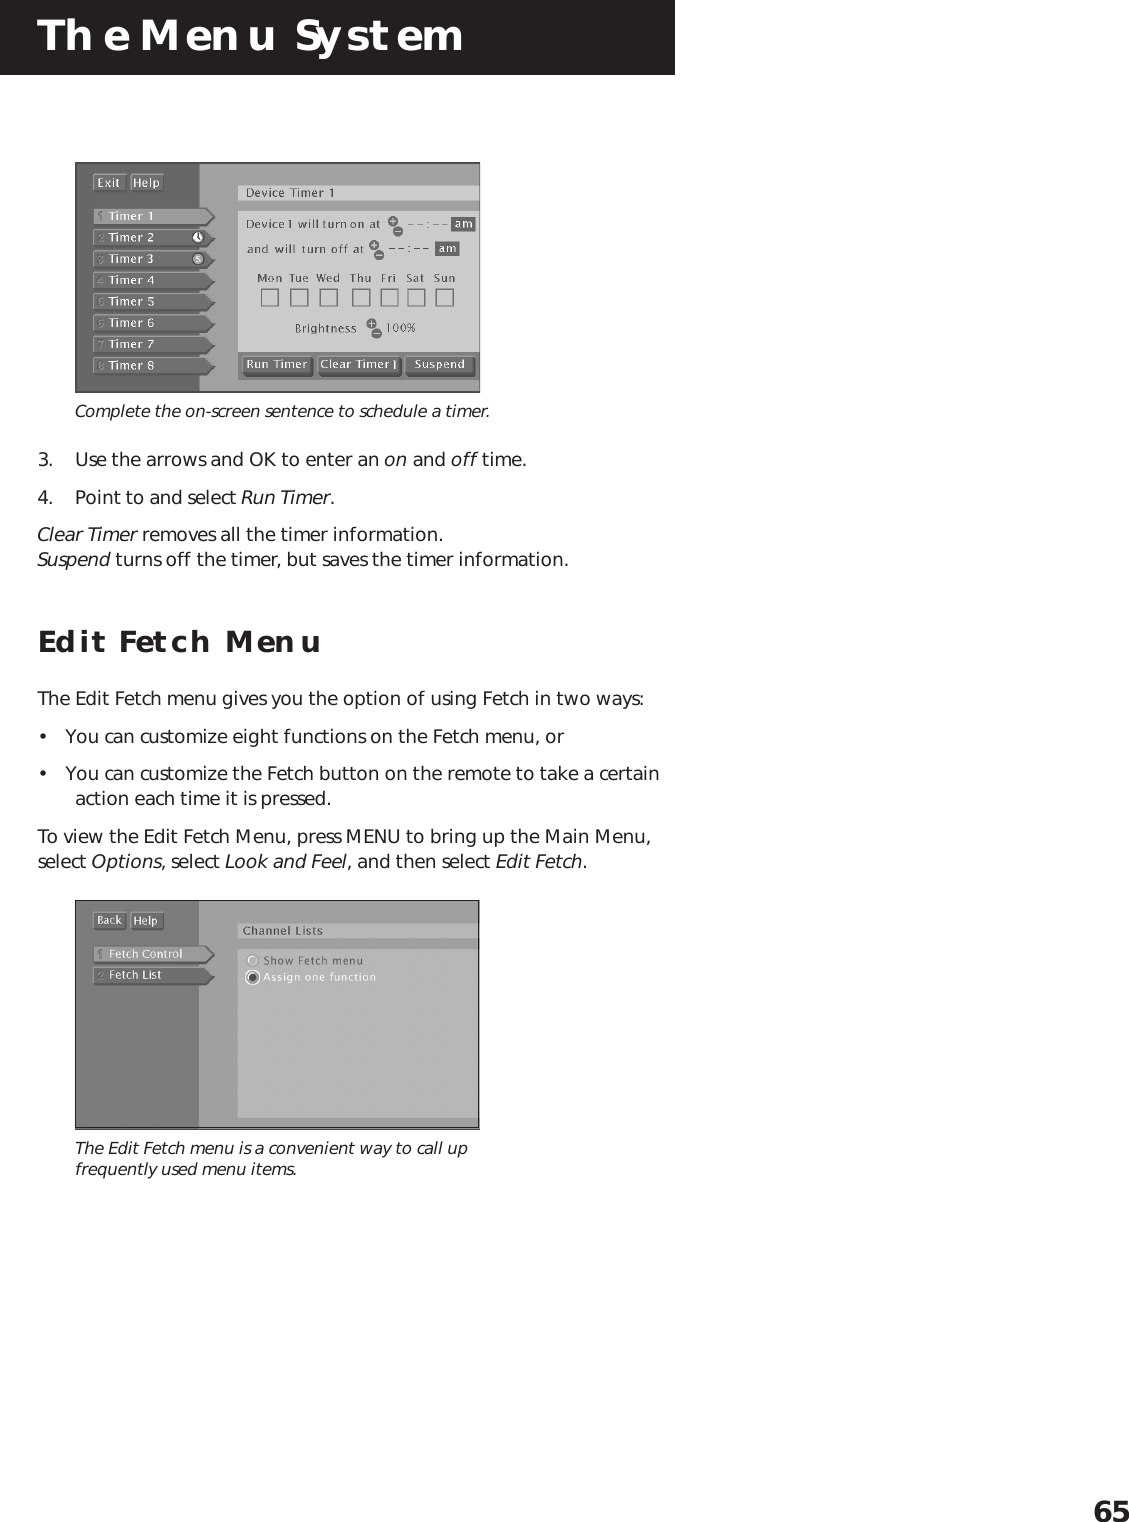
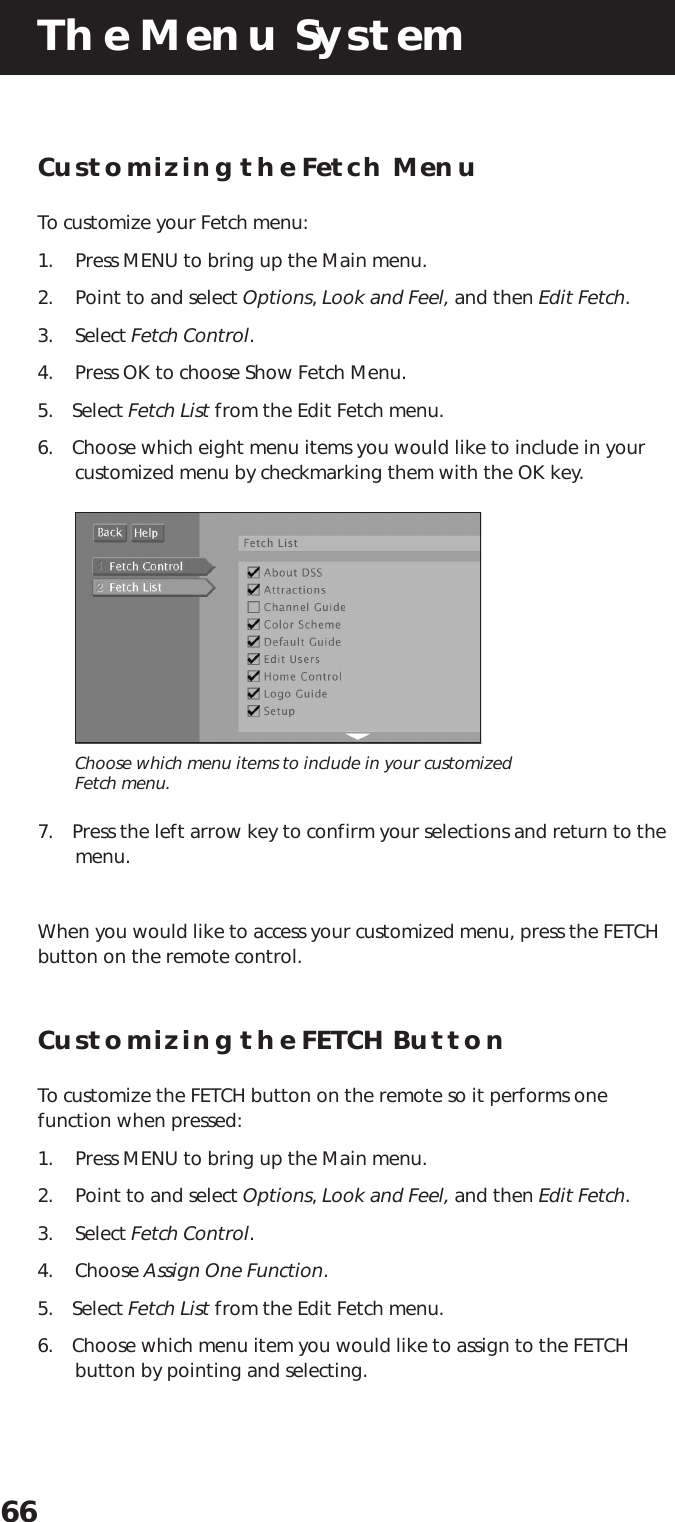
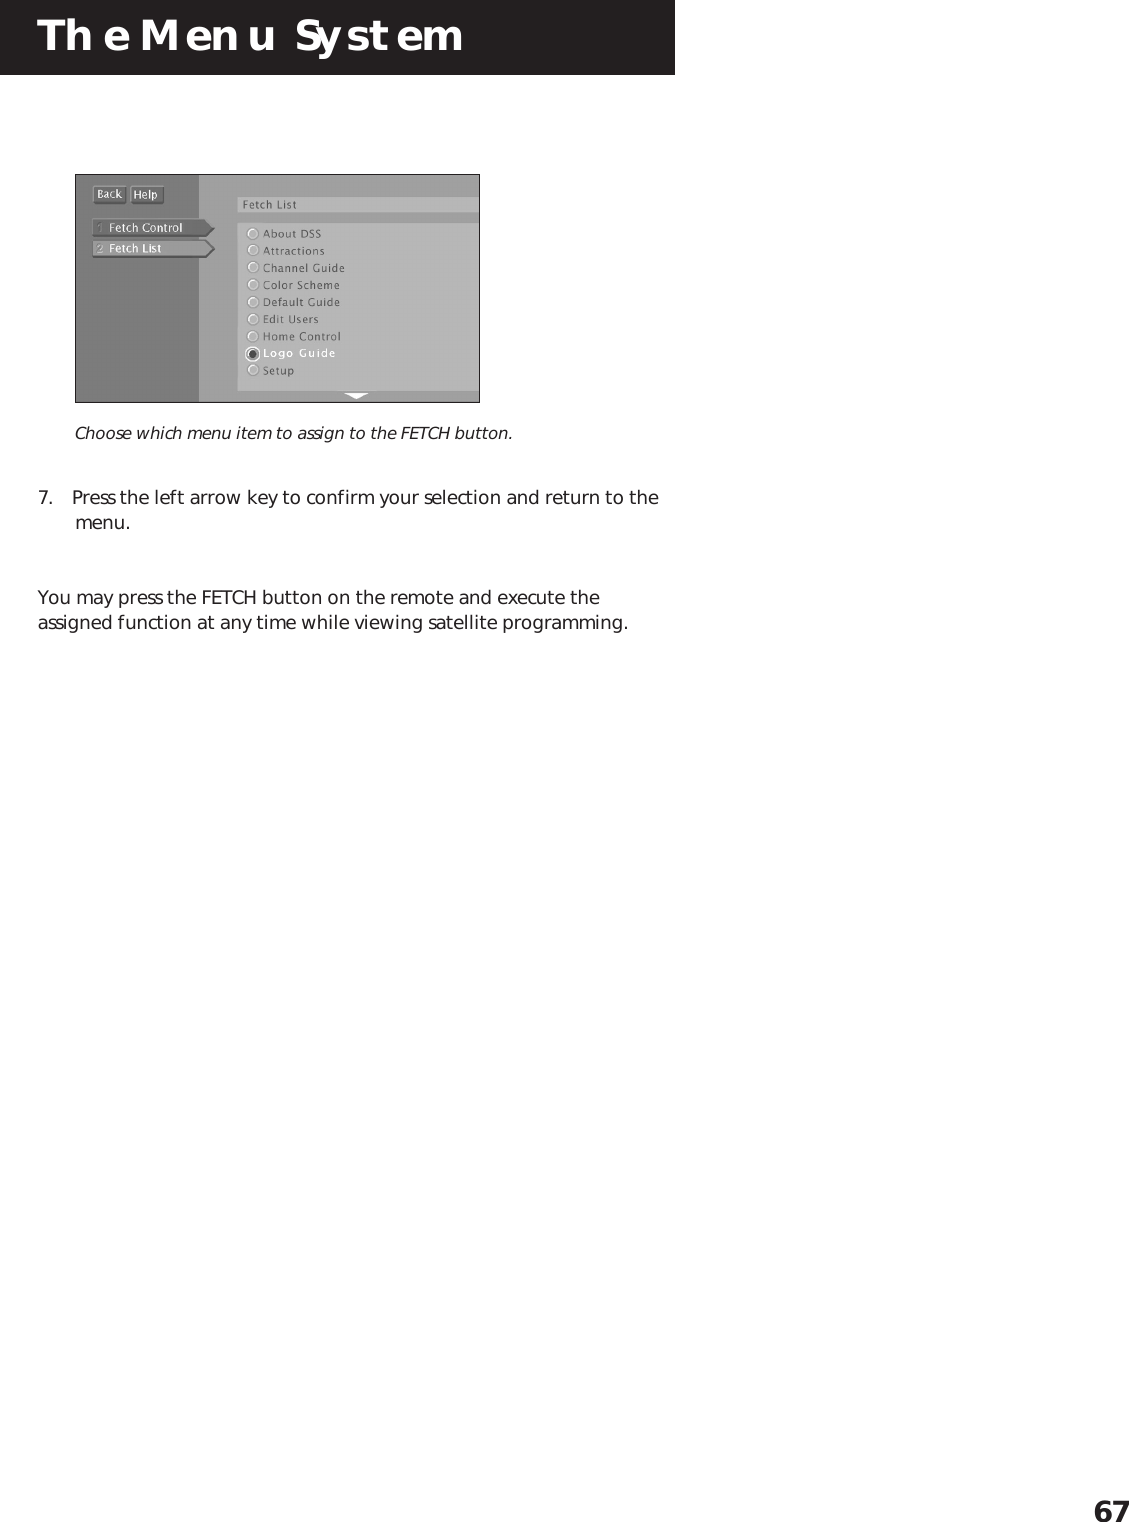
Second Hald of Users Manual

The Menu System39➣Setup and ConnectionsWhat’s a Menu?The on-screen menu is a list of choices, just like a menu in arestaurant. And, just as a restaurant menu is divided intosections such as appetizers, entrees, and desserts, the on-screen menus are also separated into sections to help you findthe information you need.Don’t Forget Point and SelectAs with all of the on-screen displays, you use Point and Selectto navigate.1➣➣Troubleshooting5Using the Remote➣2The Menu SystemThe Menu System4Program Guides3
The Menu System40Using the Menu SystemTo bring up the Main menu, press MENU on the remote.Use point and select to choose an item from the Mainmenu.To use the menu system, you need to know the Point and Select rule.Use the arrows on the remote to point to an item on the screen, andthen press OK to select it.Back and HelpThere are Back and Help buttons at the top of most screens. Point toBack and press OK to leave that screen. Point to Help to see moreinformation about that screen.Exiting a ScreenThere are three ways to exit a menu:• Point to Back and press OK.• Press the CLEAR button on the remote control. The on-screendisplays clear from the screen and you return to TV viewing.• Press the GO BACK button on the remote. You return to theprevious on-screen display or normal programming.Using HelpAll menus have a Help button. For example, selecting the Help buttonfrom the Main menu shows you information about using the Main menuscreen.The rest of the Help buttons in the menu system bring up helpfulinformation explaining one aspect of that menu.Use the MENU button to bring up theMain menu, and then use Point andSelect to choose a menu option.Context-Sensitive HelpMost of the screens contain informationto help you decide what to do next. Ifyou get stuck, look for the help text.If the Main menu doesn’t appear whenyou press MENU, the remote might not bein DSS® mode. Try pressing the DSSbutton on the remote, and then OK.
The Menu System41Menu DescriptionsThis section briefly describes each of the available Main menu options.More information about each menu and its features is included later inthis chapter.Program GuideShows the on-screen programming schedules.MailboxUse to read mail messages from your program providers.PurchasesUse to review or cancel upcoming purchases, and to reviewpast purchases.TimersAllows you to schedule the digital satellite system to tune to a specificchannel at a specific time.ProfilesAllows you to set ratings limits, spending limits, and viewing hours, aswell as create favorite channel lists.OptionsAllows you to find out more about the receiver and remote, change howyour system looks, run the system test and install a new access card.Dish PointingUse to find your dish pointing coordinates, and to access theon-screen signal strength meter.Home ControlWith the proper equipment, this feature lets you control certain devicesand appliances in your house.Don’t Be Afraid to ExploreOnce you’ve learned the basics, feel free to poke around the menusystem because exploring is the best way to learn. The context-sensitivehelp at the bottom of the screen provides instructions for gettingthrough any particular menu or control panel. Remember, press CLEAR atany time to leave the menu system and return to regular system viewing.Don’t Forget About the CLEARButtonPress the CLEAR button on the remote toremove the on-screen menus and returnto normal viewing.
The Menu System42The Program GuideSelecting Program Guide brings up your default program guide: theDetail Guide, the Grid Guide or SurfGuide.Anatomy of a Program GuideThe following diagram shows you the kind of information you will see inthe Detail Guide and Grid Guide.Bringing Up the Program GuidesBesides selecting Program Guide in the Main menu, you can press theGUIDE button on the remote.Displays moresorting options“Family” is one of fiveselectable ProfilesProgram titlesand informationReturns you toprevious screenHelp gives youmore informationSort the guide by:Topics, Movies, or Sports Sorts the current guidealphabetically by titleSearches guide forspecific informationTakes you tothe Main menuScrolls throughthe guideShows all available programsIndicates current timeWant More Information?Read the section in this book calledProgram Guides for all the details.
The Menu System43The MailboxThe mailbox shows you messages that are sent—or “mailed”—from yourprogram providers. For example, you may receive a message calling yourattention to a new service.How to Tell When you Have MailThere are two ways to tell if you have mail, depending on whether thereceiver is turned on or off.• If the receiver is turned on, the mail icon in the channel banner ishighlighted.• If the receiver is turned off, the power light on the front panel ofthe receiver flashes.Checking Your MailSelect Mailbox on the Main menu or channel banner to view your mail.1. Point to a message and press OK. The message is opened for you toread.Mail provides the latest information from programproviders.2. Press OK again to close the letter.After you read a message and want to erase it, point to EraseMessage and press OK. When you exit the display screen, messagesnot erased are saved in memory.
The Menu System44Pay-Per-View ProgramsPay-per-view programs (PPV) are programs that you purchase—like amovie ticket—on an event-by-event basis. For instance, there might be aspecific channel that runs nothing but previews for movies. Afterpreviewing the movie, you can purchase it or find out more detailsabout it. PPV programs can also be found in the program guide.Purchasing and PreviewingThere are several ways to purchase and preview PPV movies and events:• Tune to a PPV program’s channel. Program providers may offer on-screen purchase instructions, usually as the PPV program begins.• Choose a PPV program from the program guide.• Preview a coming attraction by selecting a channel from theAttractions Guide.Tuning to a PPV ProgramWhen you use the channel buttons or digits on the remote to tune to aPay-Per-View channel, you need to press the INFO button to bring upthe Program Details screen in order to purchase a program.Use the program guide to get to the Program Details screen.Follow the on-screen instructions to purchase the selected program.You may need to enter your four-digitpassword to order a PPV program if itcosts more than the spending limit youset up in the Profiles menu.
The Menu System45Using the Program Guide for PPVProgramsWhen you use the program guide to select a PPV program, the ProgramDetails screen gives you a few more options.The Program Details screen gives you several options.You can select:•View Channel to tune to that channel•Channel Guide to see a program lineup for that channel•Buy Program to purchase the program•Other Times to see what other times the program is available. Theprogram title is automatically entered and sorted in the AlphaSortcontrol panel.The options available to you may vary according to the type of programyou select.You need to connect your phone line toyour satellite receiver to be able to orderPPV programs using the on-screen menus.
The Menu System46Using the Attractions GuideYour program providers may offer future programming events notcurrently listed in your Program guide. These events are called “comingattractions,” and can be previewed in the Attractions Guide.1. Press the GUIDE button on the remote until the Detail Guide or GridGuide appears on-screen.2. Use the down arrow button to move the highlight to the bottom ofthe screen.3. Point to and select the Other Guides button.4. Point to and select the Attractions Guide.The Other Guides menu provides several guide formats.5. Point to a channel and select it.The Attractions Guide is accessed through the OtherGuides menu.
The Menu System47Using the Purchases MenuThe Purchases menu allows you to review upcoming and past purchases.The Purchases menu shows you upcoming or pastpurchases, and spending limits.The list of purchases may be longer than one screen; use the downarrow keys to see more items. The display also shows the title, channel,date, time, and cost of each program.• Note that the Past Purchases list might be modified after eachbilling cycle and still show purchases for which you havealready paid.Reviewing and Canceling anUpcoming PurchaseUse Point and Select to choose an upcoming purchase from the FuturePurchases screen. You can review the program description, as well ascancel an upcoming purchase.The Purchase Edit screen lets you cancel anupcoming purchase.
The Menu System48Spending LimitsUse the Spending Limit option to indicate a per-event spending limit forpay-per-view programs.1. Point to Spending Limit, and press OK.You can set a per-event spending limit for each Profile.2. Use the digits on the remote or use the arrow keys to enter a single-program spending limit.After a spending limit is set and the system is locked, you must enter apassword to purchase a pay-per-view program that costs more than yourspending limit allows.Important!Spending limits are in effect only whenthe system is locked.
The Menu System49On-screen icons are an easy way tounderstand the timers.indicates the timer is set.indicates the timer is set for        a PPV.indicates a timer conflict.Editing or Canceling a TimerFrom the Timers screen, select the Timeryou want to edit or cancel, and then dothe following:• Use the arrows keys to edit the    Timer, then select Run Timer.• Select Clear Timer to cancel the    timer.• To watch the program daily    or weekly, edit that program’stimer.Timers FeatureThe Timers feature allows you to preset your system to automaticallytune to a particular channel at a predetermined time.To use the Timers feature, select Timers from the Main menu to bring upthe Timers screen. Select a Timer (1-8) and then use the arrow keys tocomplete the on-screen sentence. When the sentence is complete, selectRun Timer.Complete the on-screen sentence to set up a timer.Setting Up Timer RecordingsThe Timers feature allows you to set up timer recordings when youconnect the VCR Controller to your satellite receiver, and tell thereceiver what type of VCR you are using.Recording with TimerIf you choose Record instead of Watch when setting the Timer (and haveset up your VCR as previously discussed), the Timer will toggle on yourVCR, then start and stop recording a program.To record with timers:• Your VCR must be preset to the digital satelitte system outputchannel (RF or Line).• Your VCR must be OFF at the time the program is to start recording.
The Menu System50Schedule a Timer with the RECORD ButtonYou can schedule a recording directly from the guide.1. With a program highlighted, press the RECORD button on theremote. The Program Details appears on-screen.2. To schedule a timer to record, select:•Record Program to set a timer to record the program.•Buy and Record to purchase the program and set up a timer torecord the program. (Some Buy and Record programs may have adifferent purchase price.)The options available to you may vary according to the type of programyou select.Editing or Canceling a TimerFrom the Timers screen, select theTimer you want to edit or cancel,and then do the following:• Use the arrows keys to edit theTimer, then select Run Timer.• Select Clear Timer to cancel thetimer.• To record the program on a dailyor weekly edit that program’stimer.
The Menu System51ProfilesWhen you select Profiles from the Main menu, the first screen you see isthe Master Edit control panel. In addition to the Family profile, you cancreate as many as four different profiles that can be easily accessed byusing the WHO button on the remote control.You can personalize the profile by entering a name.You can personalize each profile.You can also edit the user profiles. Select a profile from the Edit Userscontrol panel. By moving down the options you can create or edit theuser’s channel list, set a ratings limit, viewing hours, per-event spendinglimits and assign a profile password.
The Menu System52Creating a Profile Channel List1. Point to and select a user.2. Point to Edit Channels and press OK.To start, you can add or delete all channels.3. Use the arrow keys to point to a channel, and press OK to remove(or replace) the check mark. Checkmarked items appear in thechannel list.Add or Delete All ChannelsYou might be able to save time when creating a channel list by using theAdd All Chans option or the Delete All Chans option to either add allchannels or delete all channels before removing or adding individualchannels.Also, program providers may make additional channels available. Toprevent new channels from appearing in a profile channel list, chooseDelete All Chans and checkmark only the channels you want to appearin the list.Important!You need to lock the system in order forrating limits, channel limits, viewinghours, and spending limits to go intoeffect.After you lock the system, you need toenter the system password to edit thelimits. See “Locking the System” fordetails.
The Menu System53Setting the Ratings LimitThe Ratings Limit menu enables you to set a maximum viewing limit forrated movies (based on the MPAA ratings system), as long as theprogram provider has transmitted the proper code.• Note that the ratings limit cannot be enforced if a program has notbeen rated, if rating information for that program is nottransmitted by the program provider, or if the system has not beenlocked.1. Point to Set Rating Limit and press OK.Use the arrow keys to move the selector up anddown.2. Use the up and down arrows to move the rating selector to thehighest rating you want to be able to view. In the precedingillustration, movies that are rated up to and including a “PG-13”rating can be viewed.After the Rating Limit is set and the system is locked, you must enter thesystem password to watch programs with a rating higher than yourlimit.After the system has been locked, youmust enter the correct password in orderto access the Edit Users control panel.Don’t Forget Your PasswordIf you forget a USER password, you needto unlock the system and then assign anew user password.If you forget the SYSTEM password,contact your program provider’sauthorization center.
The Menu System54Viewing HoursUse the Viewing Hours option to limit the total amount of time, as wellas the viewing hours a user can watch programming.1. Point to Viewing Hours, and press OK.You can limit viewing seven days a week.2. Use the digits on the remote or point to the + or – and press OK tocomplete the on-screen sentence. Choose the days to view, howmany hours can be viewed each day (0-24 hours) and whenprogramming can be viewed. Be sure to lock the system for theselimits to take effect.Setting Up Spending LimitsSelect the Spending Limit option to indicate a per-event spending limitfor pay-per-view programs.1. Point to Spending Limit, and press OK.You can set a per-event spending limit for each profile.
The Menu System552. Use the digits on the remote or use the arrow keys to enter a single-program spending limit.After a Spending Limit is set and the system is locked, you must enterthe system password to purchase a pay-per-view program that costsmore than your Spending Limit allows.Locking a User’s ProfileEach user can be assigned a personal password to lock his or her profile.When a password is assigned, the user must enter the password beforehe or she can view programs using that profile. Profile passwords do notallow access to, or editing of the profile limits. You must enter thesystem password to edit profile limits.1. Point to Lock User and press OK.Each user can have a password.2. Use the arrow or digit keys to select each number of the password.
The Menu System56Locking the SystemYou can lock the system in order to put into effect the ratings, spending,viewing, and channel limits you have set up. When you lock the system,no one can modify any of these settings without first entering the four-digit system password.1. Point to Lock System and press OK.Locking the system protects the limits you set up.2. Use the arrows or the digit keys to enter a four-digitsystem password.3. Enter the password a second time to confirm it.In order for the changes to take effect, you must exit out of the menusystem.Unlocking the SystemWhen the system is unlocked, the channel, spending, viewing, andratings limits, that you have set are no longer in effect.1. Point to Unlock System and press OK.2. Point to Yes and press OK to confirm that you want to unlock thesystem.Program UnlockIf your system is locked and you attempt to access a channel or programthat is blocked by one or more limits, you are asked to enter the four-digit system password to override the system lock.If you enter the password to override the rating or spending limit, alllimits are unlocked until you turn off the receiver. When you turn on thereceiver again, the system will be locked, and the Family profile channellist will be selected. You can also re-lock the system by selecting the lockicon in the channel banner.The Lock/Unlock icons in the channelbanner provide an easy way to lock orunlock the system. Just point and select tochange the lock status.Green Unlock icon The system is unlocked.Spending, viewing and other limits can beaccessed and changed.Yellow Unlock icon A password has beenentered to override family or profilelimits. No limits can be accessed orchanged.Yellow Unlock icon with a “P” A passwordhas been entered to override limits for thecurrent program. After the program ends,limits are restored.Red Lock icon No limits can be accessed orchanged. A password is required tooverride limits or access the system.
The Menu System57Choosing Your ProfileEach time that you turn on the receiver, the Family profile is selected bydefault. To select a different profile:1. Press the WHO•INPUT button to scroll through the profiles.The WHO•INPUT button toggles through the profiles.2. When your profile appears, enter your four-digit personal passwordto activate your profile.• If the profile is not password protected, you can just press OK toactivate it.The channel, spending, ratings and viewing limits will reflect the chosenprofile only when the system is locked.OptionsThe Options menu lets you set up preferences for the look and feel ofthe system as well as how some of the features work.The Options menu lets you change how thesystem works.The following sections explain your options when changing yourpersonal preferences. Follow the on-screen instructions to make changesto the system.
The Menu System58Interactive SetupIf you self-installed your satellite dish antenna, you may have alreadyused the interactive setup to find the dish pointing coordinates, acquireand fine-tune the signal, and run a system test. If you just want to checkyour dish pointing coordinates, or run the signal strength meter, selectDish Pointing from the Main menu.About DSSSelect About DSS from the Options menu to choose from a list of on-lineHelp topics. Point and select to find out about the specific parts of thesatellite system.Program Guide shows a screen-by-screen overview of the Programguide features.Menu System  shows a screen-by-screen overview of the satellitesystem menus.Remote Control  shows a descriptive list of the remote control buttons.Front Panel  shows a list of the receiver’s front panel features.  Point toan item to see a brief description.Back Panel shows a list of the receiver’s back panel features. Point to anitem to see a brief description.Glossary shows a list of common satellite system and TV terms. Point toa glossary item to see a brief description.Look and FeelDefault Guide lets you choose which guide appears first when youpress the GUIDE button on the remote. The choices are Grid Guide,Detail Guide and SurfGuide.Color Scheme lets you pick which color appears in the guides andmenu system.Translucency lets you choose the translucency of the menu displays.Slide the indicator bar to make the screens more opaque or less opaque.Animation lets you select which graphics are displayed and also lets youselect the animation time-out.Edit Fetch lets you combine your favorite menu items onto one menu,or assign one function to the Fetch button on the remote. (See thesection “Edit Fetch Menu” for details.)
The Menu System59System OptionsSystem Test The System Test display screen is accessed through theOptions menu, and allows you to initiate diagnostic procedures on theDSS® system. You should use this feature to get your Access Cardnumber, or when your receiver doesn’t seem to be working correctly.A message screen appears, telling you whether the system passed eachtest. If your system fails a test, run the system test several times beforeconcluding that there is a problem. Occasional fluctuations in the phoneline or satellite signal can give temporary false readings.New Access Card Periodically, your program provider may issue you areplacement access card. The New Access Card Setup display screenallows you to transfer information from the old card onto the new one.Follow the display screen prompts to initialize your new card. Once youhave transferred the information to the new card, your old cardbecomes invalid.Because your specific account information is stored in the access card,power failures should have no effect on your satellite system.Set VCR Type  To use the VCR controller feature, you need to tell thereceiver which VCR brand you are using.1. Use the arrows or digit keys to input the correct code for your VCRbrand. The VCR codes are located in the Remote Control section.2. Follow the on-screen instructions to ensure that you are using thecorrect code. If the VCR automatically stops tape play, then youknow that the receiver and the VCR are communicating.•  Some VCR brands may not be capable of being controlled by thereceiver.RF Remote Setup The remote can control the receiver using both IR(Infrared) signals and RF (radio frequency) signals. IR signals require lineof sight to the receiver’s front panel remote sensor. RF signals cancontrol the receiver from other parts of your house–even through walls.Occasionally, due to interference or other RF devices, you may need tochange the remote and receiver RF code. To change the code:Follow the on-screen instructions to change the remote RF code.Output Channel Lets you choose on which channel to view satelliteprogramming, either channel 3 or channel 4.
The Menu System60Picture Size The Picture size display screen allows you to choosebetween a standard TV screen and a Cinema option. A standard TVscreen has an aspect ratio of 4:3; the Cinema option has an aspect ratioof 16:9.Data Port  Lets you choose whether the low speed data port is used forlow speed data or communicating with the Home Control Baseaccessory. See the Home Control section in this book for moreinformation.Audio LanguageWhen you select Audio Language from the Options menu, the AudioLanguage display screen comes up.Point to the audio language or audio type you want and press OK. Thesatellite system will then automatically set the audio program to theselected audio program type when that type is available.To change the audio:• Point to Audio Language from the Options menu and press OK toset the default Audio Language.Alternate DataSelects from among the available data on the current channel.
The Menu System61The Dish Pointing Menu ScreenFollow these steps to obtain your dish pointing coordinates:1. Turn on your television and satellite receiver.2. Tune your television to the satellite receiver’s output channel.3. Press MENU on the remote to bring up the Main menu.4. Use the arrows to highlight the “Dish Pointing” option, and thenpress OK to access the dish pointing screen.NOTE: The menu screen that you see may be slightly different fromthe one pictured here.5. Use the arrows on the remote or the front panel to highlight “ZipCode” and then press OK.6. Enter the zip code for the dish installation location.7. Record the elevation and azimuth numbers below.Elevation _____________ Azimuth ___________Elevation is the up/down angle that thedish is pointed.Azimuth is side toside direction thatthe dish is pointed. You only need to use one of the availablemethods to find your dish pointingcoordinates. If you know the zip code forthe locality where the dish is beinginstalled, use that.
The Menu System62Using the On-Screen  Signal MeterThe signal strength meter is used to determine whether or not you arereceiving the satellite signal, and it also indicates the strength of thesatellite signal.Follow these steps to bring up the on-screen signal meter:1. Turn on your television and satellite receiver.2. Tune your television to the satellite receiver’s output channel.3. Press MENU on the remote to bring up the Main menu.4. Use the arrows to highlight the “Dish Pointing” option, and thenpress OK to access the dish pointing screen.5. Use the arrows on the remote to highlight “Signal Meter” and thenpress OK.If the dish is pointed to the correct azimuth andelevation, the signal meter will show you the currentsignal strength (and you should hear a continuous tone).If you are not receiving a signal, you need to incrementally adjust theazimuth setting on the dish. After you receive a signal, you will want tocontinue to adjust the azimuth to try to get the best possible signal.ImportantChanging transponders is not the same as fine-tuning the dish.Although the signal strength may appear to change, this may be due todifferent types of interference. To fine-tune the dish, consult the DSSInstallation Guide and follow the instructions on adjusting the dishelevation and azimuth.While the maximum signal strength is100, the signal strength you achieve willprobably be less. Although there is nodifference in picture quality between asignal strength of 60 and 85, the higherthe signal, the less likely you are toexperience negative effects in degradedconditions such as rain or snow (called“rain fade”).Peak SignalThe “Peak Signal” indicates the highestsignal strength you have obtained, whichis not necessarily the highest possiblesignal.
The Menu System63Home ControlHome Control lets you remotely control several lamps and appliancesthrough your receiver.Home Control SetupThe Home Control Data Interface connects to the HOME CONTROL jackon the back of the receiver. Once connected, you must tell the receiverto use this port for Home Control.1. Press OK to bring up the Main menu.2. Point to and select Options.3. Point to and select System Options.4. Point to and select Data Port and choose Home Control as thedefault setting.Device Setup1. From the Main menu select Home Control.Home Control can control several devices.2. Select a device you would like to control.3. Complete the on-screen sentence using the arrow buttons and OK.Press OK to scroll through the lists of appliances and locations.To use control devices, you must connect aHome Control Data Interface to thereceiver and a remote module to thedevice you want to control. The HomeControl Data Interface connects to theHOME CONTROL jack on the back of thereceiver.Once connected, you must tell thereceiver to use this port for Home Control.These devices are available as accessoriessold through your digital satellite dealeror the accessories order form at the backof this book.HOME CONTROL
The Menu System64Keep track of devices by assigning a label.4. Use the arrow buttons and OK to select the house and modulecodes that match the device’s remote module and label the module.Select Save Setup to complete the setup.Device ControlOnce the device is set up, there are two ways to control it; with themenu system, or with a timer. Select a device from the Home Controlmenu screen. You can then, turn it on, turn it off, or adjust thebrightness for lamp modules.Select Edit Setup to change a device.Control the device from the menu.To schedule a timer:1. Select Set Timer.2. Schedule a timer by completing the on-screen sentence.You can schedule several timers to controlthe same device at different times.On-screen icons are an easy way tounderstand the timers.indicates the timer is set.indicates the timer is       suspended.
The Menu System65Complete the on-screen sentence to schedule a timer.3. Use the arrows and OK to enter an on and off time.4. Point to and select Run Timer.Clear Timer removes all the timer information.Suspend turns off the timer, but saves the timer information.Edit Fetch MenuThe Edit Fetch menu gives you the option of using Fetch in two ways:• You can customize eight functions on the Fetch menu, or• You can customize the Fetch button on the remote to take a certainaction each time it is pressed.To view the Edit Fetch Menu, press MENU to bring up the Main Menu,select Options, select Look and Feel, and then select Edit Fetch.The Edit Fetch menu is a convenient way to call upfrequently used menu items.
The Menu System66Customizing the Fetch MenuTo customize your Fetch menu:1. Press MENU to bring up the Main menu.2. Point to and select Options, Look and Feel, and then Edit Fetch.3. Select Fetch Control.4. Press OK to choose Show Fetch Menu.5. Select Fetch List from the Edit Fetch menu.6. Choose which eight menu items you would like to include in yourcustomized menu by checkmarking them with the OK key.Choose which menu items to include in your customizedFetch menu.7. Press the left arrow key to confirm your selections and return to themenu.When you would like to access your customized menu, press the FETCHbutton on the remote control.Customizing the FETCH ButtonTo customize the FETCH button on the remote so it performs onefunction when pressed:1. Press MENU to bring up the Main menu.2. Point to and select Options, Look and Feel, and then Edit Fetch.3. Select Fetch Control.4. Choose Assign One Function.5. Select Fetch List from the Edit Fetch menu.6. Choose which menu item you would like to assign to the FETCHbutton by pointing and selecting.
The Menu System67Choose which menu item to assign to the FETCH button.7. Press the left arrow key to confirm your selection and return to themenu.You may press the FETCH button on the remote and execute theassigned function at any time while viewing satellite programming.
The Menu System68
Troubleshooting69Tips for Solving ProblemsYou may have some questions about using your satellitesystem that you are unsure how to answer. This sectionprovides the answers to such questions. You will find howto run a system test, how to diagnose problems, and howto correct problems.➣Setup and Connections1➣Program GuidesUsing the Remote➣32➣TroubleshootingTroubleshooting5The Menu System4
Troubleshooting70Running the System TestThe  System Test allows you to run a basic diagnostics check on yoursatellite system. If you are experiencing any trouble with your system,run the system test. It will allow you to get your Access Card number, orto initiate diagnostic procedures on the satellite  system.First make sure that•  All connections—jacks, cables, etc.—are correctly in place. See thesection “Setup and Connections” for more information.• There are batteries in the remote, and that they are workingcorrectly.• The access card is installed in the receiver.Follow these steps to run the diagnostics system test on your system.1. Turn on your TV and the receiver.2. Press DSS to put the remote in DSS® system mode, then press OK tobring up the Main menu.3. Point to and select Options.4. Point to and select System Options.5. Point to and select System Test.6. If your system does not pass the system test, check any of thesepotential trouble areas: cabling, pointing the satellite dish, phoneconnection, and access card.7. If you continue to have problems, call 1-800-679-4776.You should run a system test several times before concluding that thereis a problem. Occasional fluctuations in the phone line or satellite signalcan give temporary false readings.Fine-Tuning the SignalIf you self-installed your satellite dish antenna, you may have alreadyused the interactive setup to find the dish pointing coordinates, acquireand fine-tune the signal, and run a system test.If you need to run the interactive setup again, select Options from theMain menu, then select Interactive Setup.If you just want to check your dish pointing coordinates, or run thesignal strength meter, select Dish Pointing from the Main menu.
Troubleshooting71How Signal Flow worksHow the Digital Satellite Signals get to Your TVIn the example above:1. Program providers send signals to your antenna dish.2. The antenna dish sends the signal to the receiver’s SATELLITE IN jack.3. The signal continues through the coaxial cable to the VCR and then to the TV. (The VCR may seem like an       unnecessary link in the chain, but this setup lets you record DSS® programming and off-air antenna/cable       programming.)If you use audio/video cables, the satellite  signal also flows through the audio/video cables to the TV’s line inputs (left,right, and video or S-video).How Off-Air Antenna/Cable Signals get to Your TVIn the example above:1. Off-air/cable broadcasters send signals to your off-air antenna or through cable to your home.2. The signal passes through the receiver along the coaxial cable to your VCR. The signal can also pass through       the VCR to the TV.  (The VCR may seem like an unnecessary link in the chain, but this setup lets you record DSS®       programming and off-air antenna/cable programming.)DSS® SignalFrom dish antenna TV SignalFrom antenna or cableIf you use audio/video cables,view the DSS® signal by tuningthe TV to its Line Input Channel.If you use coaxial cables(and no audio/videocables), view the satellitteor off-air antenna signalby tuning the:TV to channel 3VCR to channel 3Coaxial cablesAudio/video cablesDigital Satellite ReceiverVCRTVVideo OutAudio OutS-VideoVideoLeftRightANT INOUT TO TV CH 3CH 4ANT INSATELLITE IN INFROM ANTOUTTOTVVideo InS-VideoVideoAudio InLeft Right
Troubleshooting72Wrong Signal?The receiver and most VCRs let you toggle between signals. If you don’tsee the signal you think you should be seeing, try using these buttons totoggle between the signals:•  Press the TV/VCR button on the VCR remote or on the VCR’s frontpanel.•  Press the ANTENNA button on the remote control.Taking either of these actions lets you switch the source of the videosignal from satellite signals to the off-air antenna or cable signal, andvice versa.
73Appendix A: Warranty InformationRepair HelpThomson Consumer Electronics offers hardware repair service if you encounter any problems with your system. Many problems canbe diagnosed over the phone, or if necessary a replacement unit can be shipped to you.  Please have your satellite systemmodel, serial number and date of purchase ready when you call.  If your unit is out of warranty, we will quote the cost of anexchange unit to you. Refer to RCA Digital Satellite System Limited Warranty for the repair service phone number.Returning Equipment to Thomson for Repair or ExchangeIf we are unable to resolve your problem over the phone we will gladly service your unit or exchange it for a new or refurbishedunit. Refer to the limited warranty in this booklet to learn about your specific rights and responsibilities.  Always consult Thomsonand get a Return Authorization number before returning anything. Obtain a Return Authorization (RA) number from thetelephone representative before returning your equipment to avoid delays, accounting errors, or even loss of your unit.Important Information to Customers Who Ship Defective Equipment to Thomson ConsumerElectronicsThe Thomson representative who authorizes the return of your equipment will give you an RA number over the phone.  Therepresentative will also provide you with instructions on where and how to return your unit.  Write the number in large, clearcharacters on the outside of the box.  To avoid confusion and misunderstandings, shipments without an RA number clearly visibleon the outside of the box will be returned to you at your expense.Include a brief note describing the problem and any conversations you have had with Thomson personnel about the problem.Include your name, address and model/serial number of your unit.  These numbers are located on the back of your receiver. If yoursatellite system is within the warranty period, please provide a copy of the bill of sale to verify purchase date.  Use the original boxand packing material to protect the equipment from damage in shipment. For your protection, insure all shipments for fullreplacement value and use a reliable shipper.  Thomson assumes no responsibility for warranty shipments from the customerto the factory if not shipped in the manner prescribed by Thomson.RCA DIGITAL SATELLITE SYSTEM LIMITED WARRANTYWhat your warranty covers:• Any defect in materials or workmanship.For how long after your purchase:• 90 days - Unit exchange, which includes parts and labor.• 91 days to 1 year - Unit exchange, which includes parts only; you pay the labor.• The warranty for rental units begins with the first rental or 45 days from date of shipment to the rental firm, whichever comesfirst.What we will do:•During the initial 90 days:Exchange the defective portion of your DSS® with a new or, at our option, refurbished unit.•After the 90 days and within one year:Exchange the defective portion of your DSS® with a new or, at our option, refurbished unit.  We will charge you a flatexchange cost to replace a defective receiver.  This charge covers the labor cost for its repair.How you get service:• Call 1-800-679-4776 and have your unit’s date of purchase and model/serial number ready.  The model/serial numberinformation is on the back of your receiver.• A representative will troubleshoot your problem over the phone.• If the representative determines that you should receive a replacement receiver you will be provided with a ReturnAuthorization (RA) number and the location of a nearby exchange point if one exists.  No returns will be accepted without theRA number.• If the representative determines that your antenna/dish is defective he or she will arrange for its repair or replacement.To receive a replacement receiver before you return yours:If you are located near an exchange point:1. We will send a replacement unit to our exchange point.
74Appendix A: Warranty Information2. The exchange location will notify you of its arrival.3. Take your unit and evidence of purchase date, such as a bill of sale, to the exchange location and you will be provided the newor refurbished unit.  Please retain all accessories such as the remote control hand unit.4. If the repairs are covered by your warranty, you will not be billed.If you are not located near an exchange point:1. Provide your Discover, Mastercard or Visa account number and expiration date to your phone representative.  This is for securitypurposes only and your account will not be charged at this time.2. We will send you a replacement unit.3. If you return the unit to us within 14 days from the date you were provided a RA number, only items not covered by warrantywill be charged to your account.  If your unit is not received within 14 days, the suggested retail value of the receiver will becharged to your credit card.  This amount will be credited if the unit is subsequently received.4. Ship your defective unit back to us using the replacement unit’s carton.  Shipping instructions will be included on the cartonalong with your RA number which will allow you to easily ship the unit back to us.  Make sure you insure your shipment in caseof damage or loss.  Include with the shipment:• Evidence of purchase date such as a bill of sale.• A brief note describing your receiver problem.• Your name, address and phone number.Thomson assumes no responsibility of warranty shipments from the customer to the factory if not shipped in themanner prescribed by Thomson.To receive a replacement receiver after we have received your unit:• Write the RA number on the outside of the carton used to return the unit.  Insure your shipment in case of damage or loss.• Carefully pack the unit using the original box and packing material if possible.  Please retain all accessories that were includedwith your unit, such as the remote control hand unit.• Include with the shipment:1. Evidence of purchase date such as a bill of sale.2. A brief note describing your receiver problem.3. Your name, address and phone number.• The representative will advise the address to mail a cashier’s check or money order for payment if there are any out of warrantylabor or parts charges, and you elect not to use your credit card.• After we receive your product, a new or refurbished unit will be shipped to you.What your warranty does not cover:• Acts of God, such as but not limited to lightning damage.• Adjustment of customer controls.• Damage from misuse or neglect.• A unit that has been modified or incorporated into other products or is used for institutional or other commercial purposes.• Batteries.• Units purchased, serviced or operated outside the U.S.A. and Alaska.• For units intended for use in Alaska, this warranty does not cover installation or the dish antenna.  It only covers the receiver.• Loss of programming.• Installation.• Shipping damage if the unit was not packed and shipped in the manner prescribed by Thomson.• Storage fees may be charged by the exchange point if you fail to pickup the replacement unit in a timely manner.Product Registration:• Please complete and mail the Product Registration Card packed with your product.  It will make it easier to contact you shouldit ever be necessary.  The return of the card is not required for a warranty coverage.How state law relates to warranty:• This warranty gives you specific legal rights and you may have other rights that vary from state to state.If you purchased your product outside the United States:• This warranty does not apply.  See your dealer for warranty information.
75Appendix B: FCC RegulationsFCC Registration InformationYour equipment is registered with the Federal Communications Commission and is in compliance with parts 15B and 68, FCCRules and Regulations.1. Notification to the Local Telephone Company.On the bottom of this equipment is a label indicating among other information, the FCC Registration number and RingerEquivalence Number (REN) for the equipment.  You must, upon request, provide this information to your telephonecompany.The REN is useful to determine the number of devices you may connect to your telephone line and still have all these devicesring when your telephone number is called.  In most (but not all) areas, the sum of the RENs of all devices connected to oneline should not exceed 5.  To be certain of the number of devices you may connect to your line as determined by the REN,you should contact your local telephone company.Note: This equipment may not be used on coin service provided by the telephone company. Party lines are subject to statetariffs, and therefore you may not be able to use your own telephone equipment if you are on a party line.  Check with yourlocal telephone company.Notice must be given to the telephone company upon permanent disconnection of your equipment from your line.2. Rights of the Telephone Company.Should your equipment cause trouble on your line which may harm the telephone network, the telephone company shall,where practicable, notify you that temporary discontinuance of service may be required.  Where prior notice is notpracticable and the circumstances warrant such action, the telephone company  may temporarily discontinue serviceimmediately.  In case of such temporary discontinuance, the telephone company must:  (1) promptly notify you of suchtemporary discontinuance  (2) afford you the opportunity to correct the situation and  (3) inform you of your right to bring acomplaint to the Commission pursuant to procedures set forth in Subpart E of Part 68, FCC Rules and Regulations.The telephone company may make changes in its communications facilities, equipment, operations of procedures wheresuch action is required in the operation of its business and not inconsistent with FCC Rules and Regulations.  If these changesare expected to affect the use or performance of your telephone equipment, the telephone company must give youadequate notice, in writing, to allow you to maintain uninterrupted service.Radio InterferenceThis equipment has been type tested and found to comply with the limits for a Class B Digital Device in accordance with thespecifications in Part 15 of FCC Rules.  These rules are designed to provide reasonable protection against radio and televisioninterference in a residential installation.  This equipment generates, uses and can radiate radio frequency energy and, if notinstalled and used in accordance with the instructions, may cause harmful interference to radio communications. However,there is no guarantee that interference will not occur in a particular installation.                                                              If thisequipment does cause interference to radio or television reception (which you can determine by turning the equipment offand on), try to correct the interference by one or more of the following measures.• Reorient or relocate the receiving antenna (that is, the antenna for radio or television that is “receiving” theinterference).• Change the position of the satellite receiver with respect to the radio or television equipment that is receivinginterference.• Move the satellite receiver away from equipment receiving interference.• Plug the satellite receiver into a different wall outlet so the receiver and equipment receiving interference are ondifferent branch circuits.If these measures do not eliminate interference, please consult your dealer or an experienced radio/television technician foradditional suggestions.  Also, the Federal Communications Commission has prepared a helpful booklet, “How To Identifyand Resolve Radio/TV Interference Problems”.  This booklet is available from the U.S. Government Printing Office,Washington, D.C. 20402.  Please specify stock number 004-000-00345-4 when ordering copies.
76RG-6 Coaxial Cable12 feet D912 $12.9525 feet D925 $15.9550 feet D950 $21.9575 feet D975 $29.95100 feet D901 $35.95S-Video Cable 12 feet D913 $12.95Weatherproof “F” Connector (2) D905 $ 5.30TVRO Bullet Amplifier D903 $24.95Self-Installer’s Kit DKIT96 $69.95Remote Control 232579 $40.45Home Control Kit HCDSS10 $59.95Lamp Module HC10LM $14.952-Prong Appliance Module HC20AM $16.953-Prong Appliance Module HC30AM $16.95Appendix C: AccessoriesAccessory Order Form for Digital Satellite SystemsPricePart No. TotalDescription$$$Prices are subject to change without notice.Total Merchandise...............................................................Sales Tax .............................................................................We are required by law to collect the appropriate sales taxfor each individual state, country, and locality to whichthe merchandise is being sent.Shipping, Handling, and Insurance .....................................Total Amount Enclosed........................................................Use VISA, MasterCard, or Discover preferably.Money order or check must be in U.S. currency only.No COD or CASH.$     5.00QtyAll accessories are subject to availability.HCDSS10 Home Control Kitcontains a Data Interfacethat connects to the DSS®receiver, and a lamp module.HC10LM Lamp module letsyou control incandescentlamps. Use to dim/brightenand turn lamps on/off.HC20AM or HC30AMAppliance modules turnsmall appliances, like coffeepots, popcorn makers, orstereo, on or off.  Alsocontrols non-incandescentlamps Choose 2 prong(HC20AM) or 3 prong(HC30AM).Please complete other side also✂Detach HereRG-6 Coaxial Burial Cablewith weatherproof “F”connectorsSelf-Installer’s Kit containscable and hardware toinstall the dish and connectthe system.Remote Control replaces alost remote. Or, order asecond remote forconvenience.MUTECH+VOLVOLCH-1236547890INPUTANTENNAGUIDE FETCHMENUCLEARINFO ALT. AUDWHOGO BACKDSS2DSS1TVPOWERSELECT
77Appendix C: Accessories®rrsTMCharge your order on your VISA,MasterCard, or Discover Card byfilling in belowUSE YOUR CREDIT CARDIMPORTANT: Copy complete account numberfrom your VISA cardIMPORTANT: Copy complete account numberfrom your MasterCard My card expires:My card expires:Copy Number above your name onMasterCardAUTHORIZED SIGNATURE(Credit card order will not be processed without signature)Prices are subject to change without notice.Name: Street:Apt:City:State: Zip:Print or type your name and address clearly. Please make sure that both sides of this form have been filled out completely.•  Allow 4 weeks for delivery.•  All accessories are subject to availability.•  Prices are subject to changeA complete and correct order will save you days of waiting.IMPORTANT: Copy complete account numberfrom your Discover Card My card expires:United States and Canada OrdersTo place your order by phone, have your Visa,MasterCard or Discover Card ready and call the toll-freenumber listed below between 8AM and 10PM (EST)Monday through Friday or between 9AM and 5PM (EST)Saturday.Use this number only to place on order for accessoryitems listed on this order form.1-800-338-0376To place your order by mail, detach and mail thecompleted order form with credit card information,money order or check in US currency (made payable toThomson Consumer Electronics, Inc.) to the followingaddress:Video AccessoriesPO Box 8419Ronks, PA 17573
78Index
79If your DSS® system needs service, please contact your dealer or thenearest Servicenter from the yellow pages. Please do not send anyproducts to the Indianapolis address listed in this manual or on thecarton. This will only add delays in service for your product.10330 North Meridian StreetIndianapolis, IN 46290©1998 Thomson Consumer Electronics, Inc.Trademark(s)® RegisteredMarca(s) Registrada(s)Printed in USATOCOM  15351420The following materials were usedin printing this publication:85%THIS PAPER CONTAINS 85% RECYCLED MATERIAL.THIS PAPER IS WHITENED BY A TOTALLYCHLORINE-FREE PROCESS.

Navigation menu