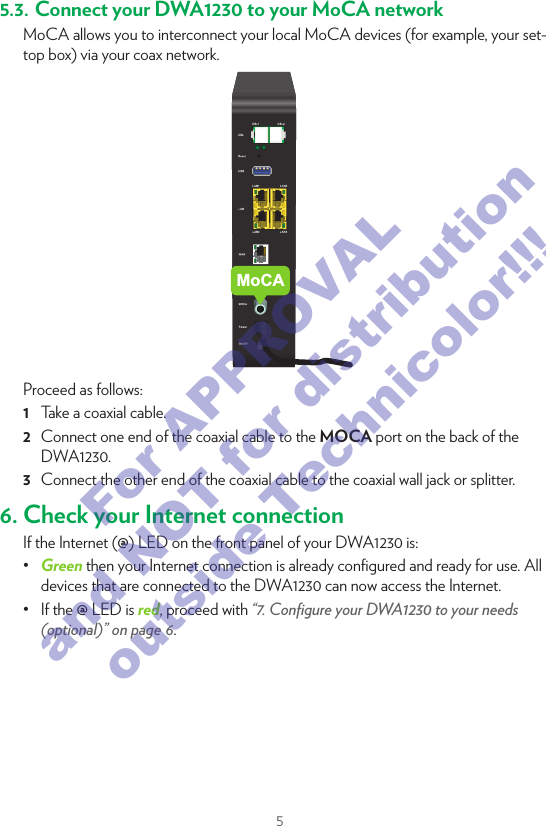
Technicolor Connected Home USA DWA1230 Wireless .11ac Smart Ultra Broadband Gateway User Manual

Technicolor Connected Home USA LLC Wireless .11ac Smart Ultra Broadband Gateway Users Manual
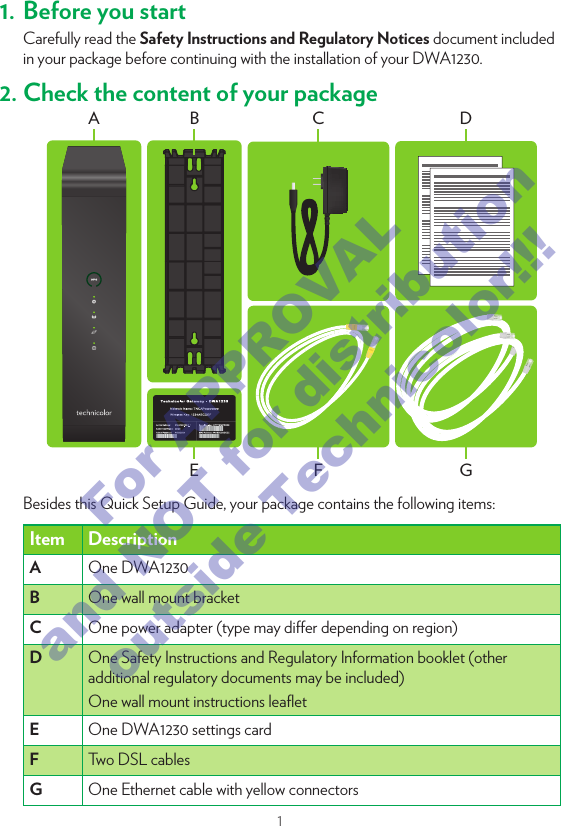
Contents

Users Manual.pdf

DWA1230Quick Setup GuideFor APPROVAL and NOT for distribution outside Technicolor!!!
11. Before you startCarefully read the Safety Instructions and Regulatory Notices document included in your package before continuing with the installation of your DWA1230.2. Check the content of your packageEFGCDA BBesides this Quick Setup Guide, your package contains the following items: Item DescriptionA   One DWA1230B   One wall mount bracketC   One power adapter (type may dier depending on region)D   One Safety Instructions and Regulatory Information booklet (other additional regulatory documents may be included)One wall mount instructions leafletE   One DWA1230 settings cardF   Two DSL cablesG   One Ethernet cable with yellow connectors3. Connect the DWA1230 to the Broadband serviceDSL1 DSL21  Take both DSL cables.2  Plug one DSL cable into the DSL 1 port and plug the other one in the DSL2 port.3  Plug the other end of both DSL cables into your telephone wall sockets.4. Power on the DWA1230PowerOn/O1  Plug the connector of the electric power supply adapter into the Power port. Plug the adapter into a nearby power outlet.2  Press the On/O button.For APPROVAL and NOT for distribution outside Technicolor!!!
21. Before you startCarefully read the Safety Instructions and Regulatory Notices document included in your package before continuing with the installation of your DWA1230.2. Check the content of your packageEFGCDA BBesides this Quick Setup Guide, your package contains the following items: Item DescriptionA   One DWA1230B   One wall mount bracketC   One power adapter (type may dier depending on region)D   One Safety Instructions and Regulatory Information booklet (other additional regulatory documents may be included)One wall mount instructions leafletE   One DWA1230 settings cardF   Two DSL cablesG   One Ethernet cable with yellow connectors3. Connect the DWA1230 to the Broadband serviceDSL1 DSL21  Take both DSL cables.2  Plug one DSL cable into the DSL 1 port and plug the other one in the DSL2 port.3  Plug the other end of both DSL cables into your telephone wall sockets.4. Power on the DWA1230PowerOn/O1  Plug the connector of the electric power supply adapter into the Power port. Plug the adapter into a nearby power outlet.2  Press the On/O button.For APPROVAL and NOT for distribution outside Technicolor!!!
35. Connect your network devicesWe recommended you to first connect one computer/tablet (if possible via a wired connection), then complete the rest of the procedure and as a final step connect the other (wired and/or wireless) devices.5.1.  Connect your wired (Ethernet) devicesLANIf you want to connect a device using a wired (Ethernet) connection:1  Take the Ethernet cable with the yellow connectors.2  Connect one end of the Ethernet cable to one of the yellow Ethernet ports on your DWA1230.3  Connect the other end of the Ethernet cable to your device.4  Connect your other Ethernet devices.5  We recommend you to first configure the DWA1230 (see “7. Configure your DWA1230 to your needs (optional)” on page6) before connecting your wireless clients (see “5.2. Connect your wireless devices” on page4).5.2. Connect your wireless devicesConnection procedureYou can connect to an access point:•  Automatically using WPS:Network NameWPSNetwork Name1  Start WPS Push Button Configuration (PBC) on your wireless device.2  If your wireless device prompts you to select your access point from a list, select the item that uses the Network Name printed on the DWA1230 settings card or on the bottom label of your DWA1230.3  Briefly press the WPS  button on the front panel of the DWA1230.4  The WPS LED on the front panel starts blinking orange.5  After maximum two minutes, the WPS LED will be in either of the following states:•  Solid green: the registration was successful. •  Blinking red: the DWA1230 could not find your wireless device. Try again or connect your wireless devices manually.•  Manually: Configure your wireless device with the Network Name and Wireless Key printed on the bottom label of your DWA1230.For APPROVAL and NOT for distribution outside Technicolor!!!
45. Connect your network devicesWe recommended you to first connect one computer/tablet (if possible via a wired connection), then complete the rest of the procedure and as a final step connect the other (wired and/or wireless) devices.5.1.  Connect your wired (Ethernet) devicesLANIf you want to connect a device using a wired (Ethernet) connection:1  Take the Ethernet cable with the yellow connectors.2  Connect one end of the Ethernet cable to one of the yellow Ethernet ports on your DWA1230.3  Connect the other end of the Ethernet cable to your device.4  Connect your other Ethernet devices.5  We recommend you to first configure the DWA1230 (see “7. Configure your DWA1230 to your needs (optional)” on page6) before connecting your wireless clients (see “5.2. Connect your wireless devices” on page4).5.2. Connect your wireless devicesConnection procedureYou can connect to an access point:•  Automatically using WPS:Network NameWPSNetwork Name1  Start WPS Push Button Configuration (PBC) on your wireless device.2  If your wireless device prompts you to select your access point from a list, select the item that uses the Network Name printed on the DWA1230 settings card or on the bottom label of your DWA1230.3  Briefly press the WPS  button on the front panel of the DWA1230.4  The WPS LED on the front panel starts blinking orange.5  After maximum two minutes, the WPS LED will be in either of the following states:•  Solid green: the registration was successful. •  Blinking red: the DWA1230 could not find your wireless device. Try again or connect your wireless devices manually.•  Manually: Configure your wireless device with the Network Name and Wireless Key printed on the bottom label of your DWA1230.For APPROVAL and NOT for distribution outside Technicolor!!!
55.3. Connect your DWA1230 to your MoCA networkMoCA allows you to interconnect your local MoCA devices (for example, your set-top box) via your coax network.MoCAProceed as follows:1  Take a coaxial cable.2  Connect one end of the coaxial cable to the MOCA port on the back of the DWA1230.3  Connect the other end of the coaxial cable to the coaxial wall jack or splitter.6. Check your Internet connectionIf the Internet (@) LED on the front panel of your DWA1230 is:•  Green then your Internet connection is already configured and ready for use. All devices that are connected to the DWA1230 can now access the Internet.•  If the @ LED is red, proceed with “7. Configure your DWA1230 to your needs (optional)” on page6.7. Configure your DWA1230 to your needs (optional)If you want to make additional changes to the default settings (for example, you want to change the wireless security settings) of your DWA1230, proceed as follows:1  Make sure that you have the following information at hand: Admin Settings address Admin User Name Admin PasswordYou can find this information  on the DWA1230 settings card that is included in your box or on the bottom label of your DWA1230.2  Open your Internet browser on a computer or device that is currently connected to your DWA1230 (either wired or wirelessly). Browse to the Admin Settings address.3  The DWA1230 user interface appears. By default, you are logged in as guest. This means that some items are hidden. To view all items, click Sign In and enter the Admin User Name as user name and the Admin Password  as password.4  Under Internet Access, check the status of your Internet connection. If it is not connected, click Internet Access, enter the Username and Password for your Internet connection and then click Save.5  If needed, you can make further changes to the settings but we recommend to keep the default settings.For APPROVAL and NOT for distribution outside Technicolor!!!
65.3. Connect your DWA1230 to your MoCA networkMoCA allows you to interconnect your local MoCA devices (for example, your set-top box) via your coax network.MoCAProceed as follows:1  Take a coaxial cable.2  Connect one end of the coaxial cable to the MOCA port on the back of the DWA1230.3  Connect the other end of the coaxial cable to the coaxial wall jack or splitter.6. Check your Internet connectionIf the Internet (@) LED on the front panel of your DWA1230 is:•  Green then your Internet connection is already configured and ready for use. All devices that are connected to the DWA1230 can now access the Internet.•  If the @ LED is red, proceed with “7. Configure your DWA1230 to your needs (optional)” on page6.7. Configure your DWA1230 to your needs (optional)If you want to make additional changes to the default settings (for example, you want to change the wireless security settings) of your DWA1230, proceed as follows:1  Make sure that you have the following information at hand: Admin Settings address Admin User Name Admin PasswordYou can find this information  on the DWA1230 settings card that is included in your box or on the bottom label of your DWA1230.2  Open your Internet browser on a computer or device that is currently connected to your DWA1230 (either wired or wirelessly). Browse to the Admin Settings address.3  The DWA1230 user interface appears. By default, you are logged in as guest. This means that some items are hidden. To view all items, click Sign In and enter the Admin User Name as user name and the Admin Password  as password.4  Under Internet Access, check the status of your Internet connection. If it is not connected, click Internet Access, enter the Username and Password for your Internet connection and then click Save.5  If needed, you can make further changes to the settings but we recommend to keep the default settings.For APPROVAL and NOT for distribution outside Technicolor!!!
*DSL37756460*DSL37756460TECHNICOLOR1-5, rue Jeanne d’Arc92130 Issy-les-MoulineauxFrancewww.technicolor.comCopyright 2017 Technicolor. All rights reserved. DMS3-QIG-25-477 v1.0.All tradenames referenced are service marks, trademarks, or registered trademarks of their respective companies. Specifications subject to change without notice. For APPROVAL and NOT for distribution outside Technicolor!!!

Navigation menu