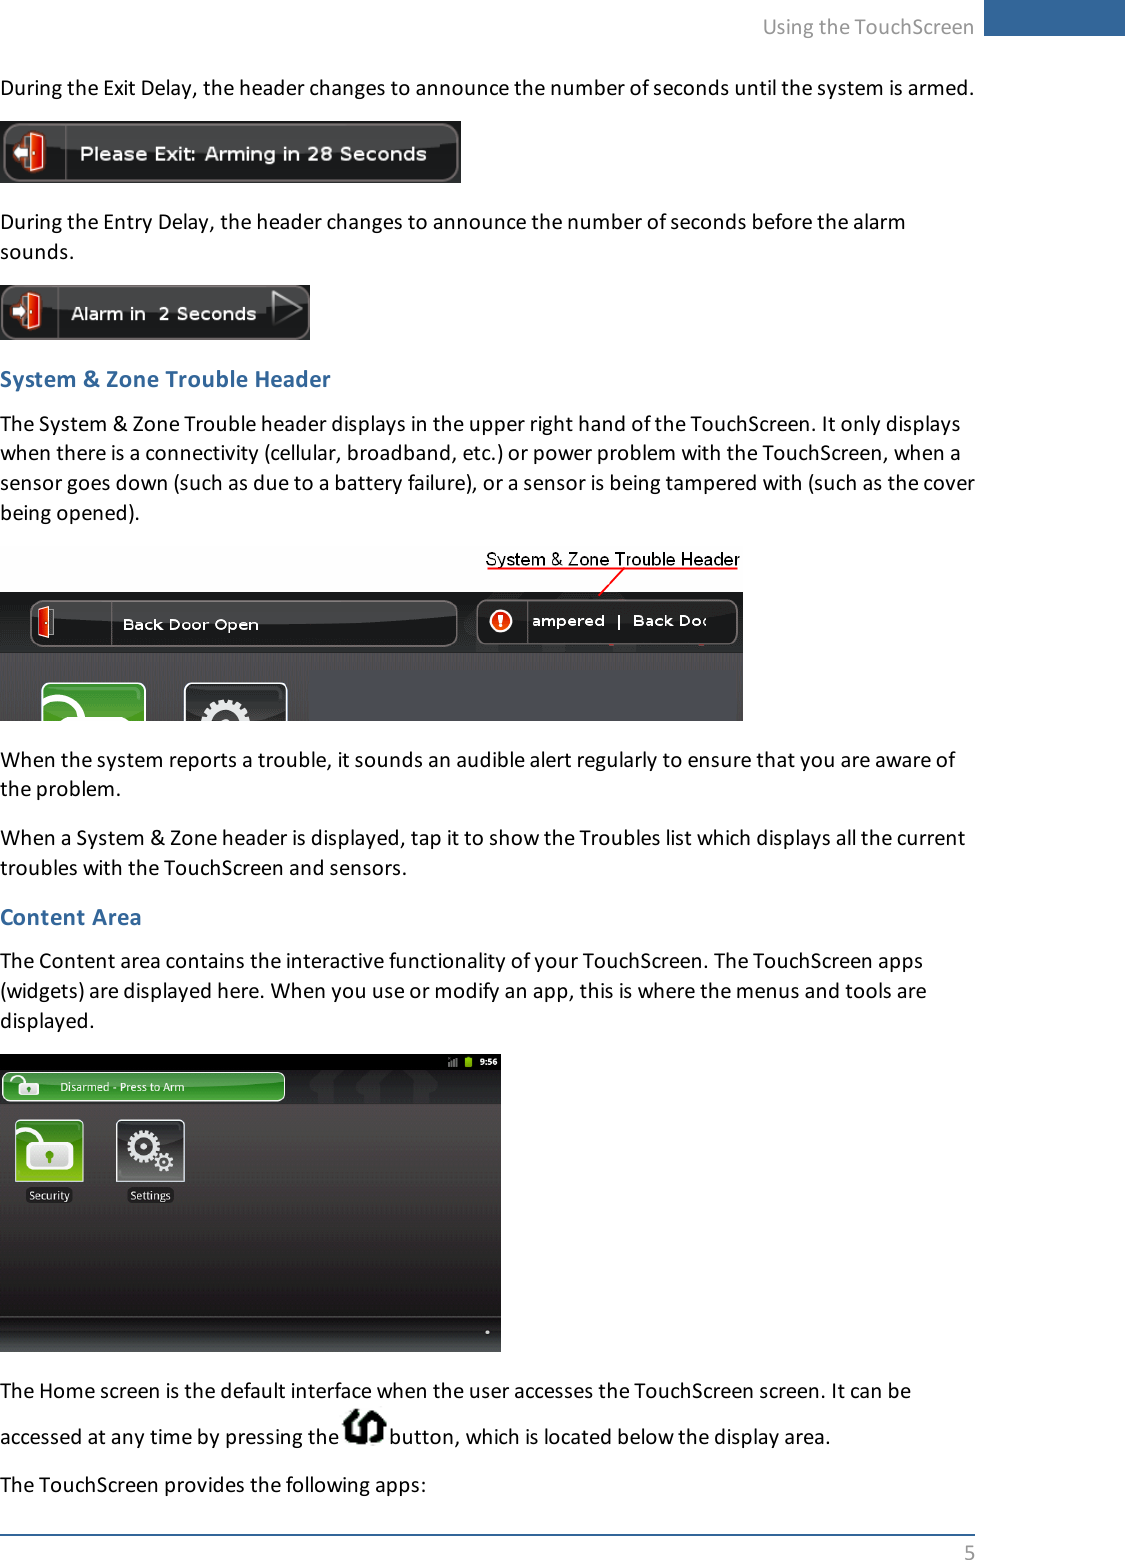
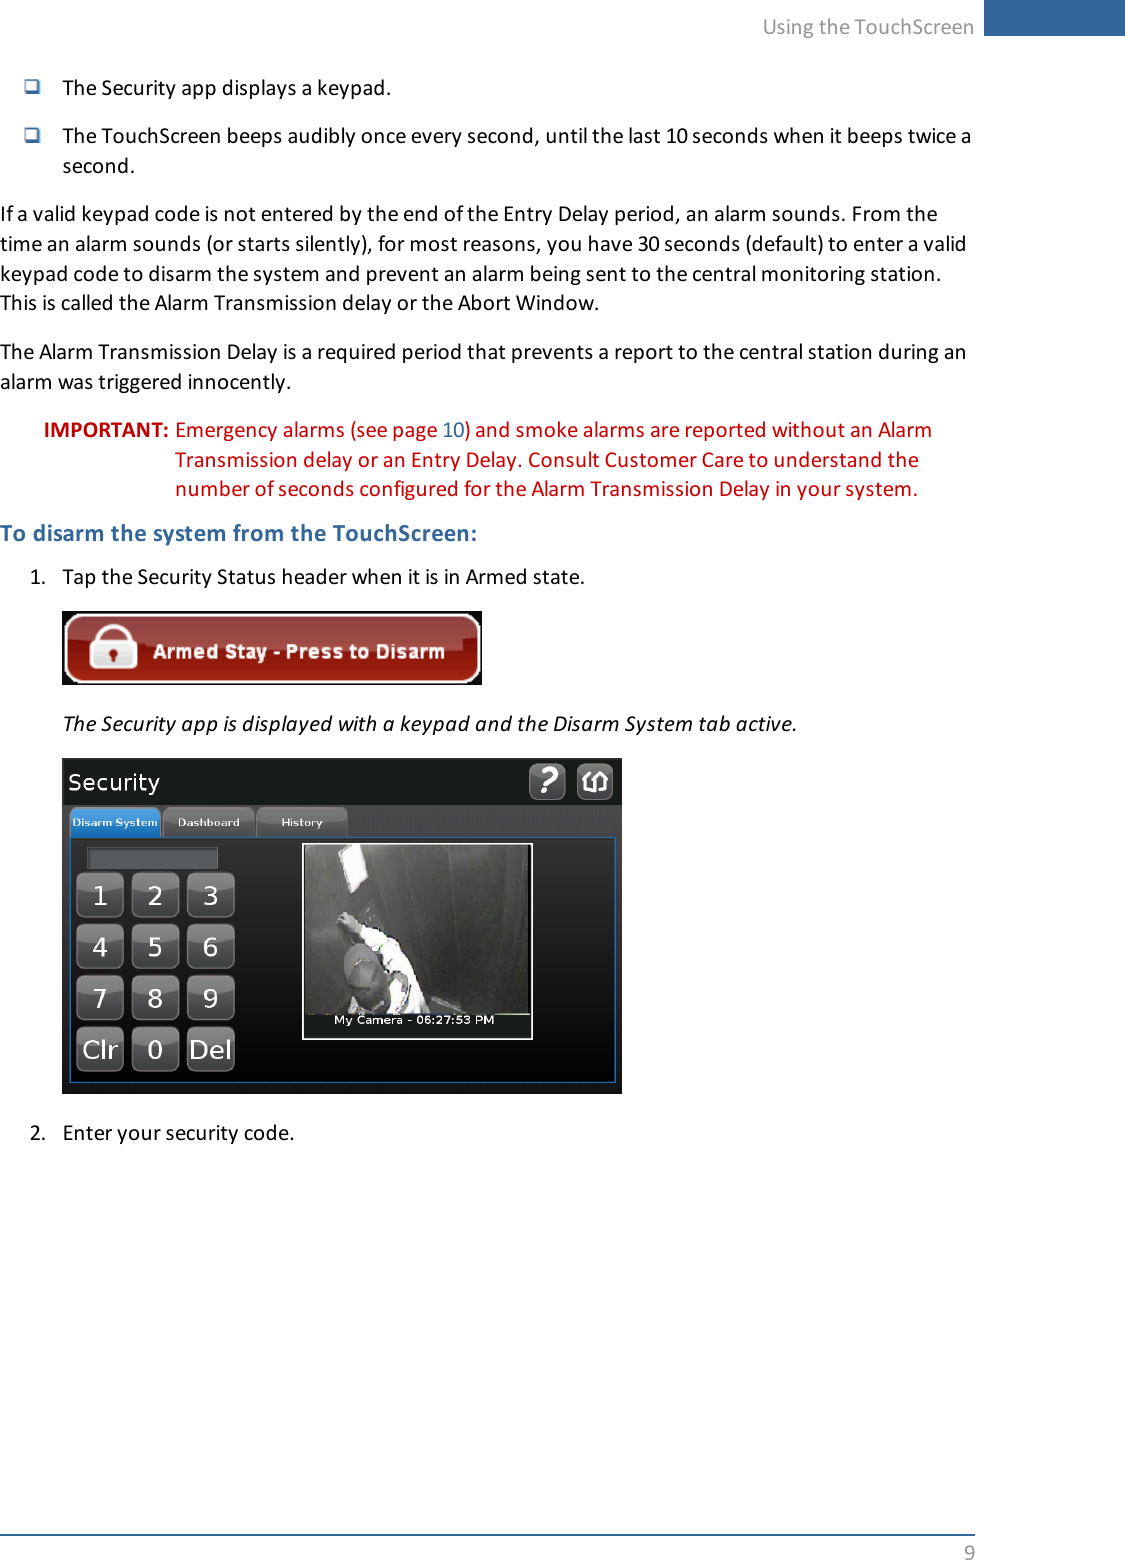
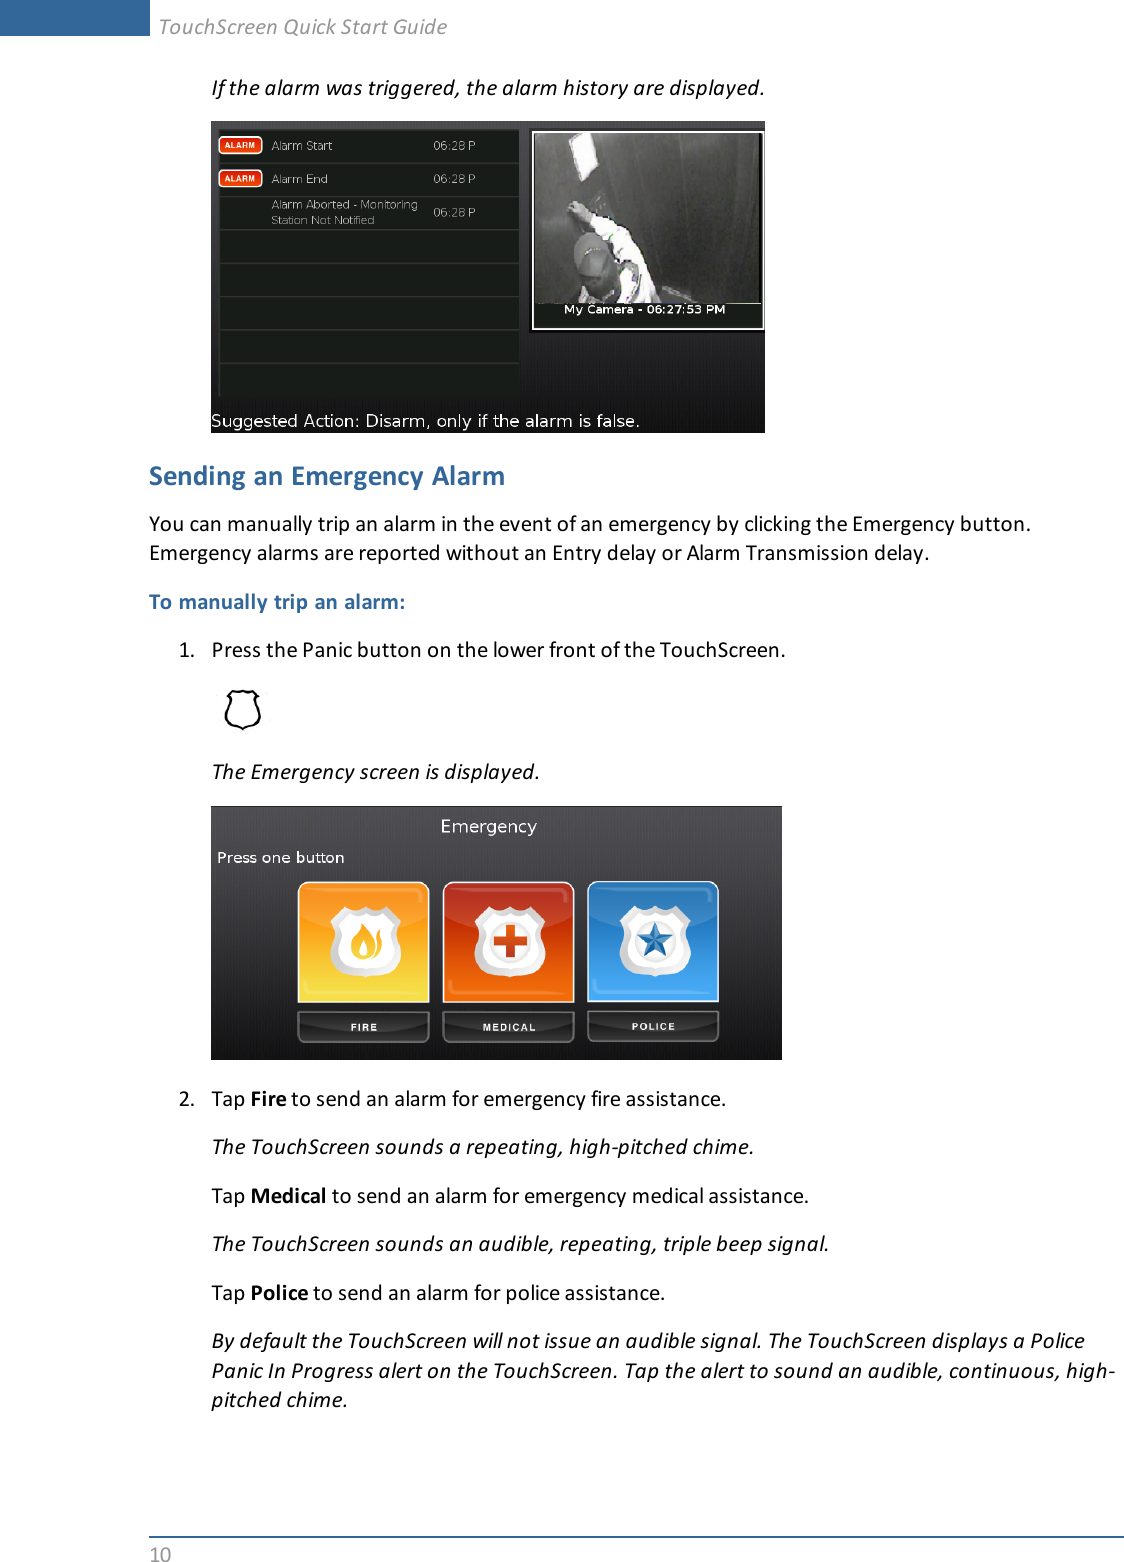
Technicolor Connected Home USA TCA200XX Touch Screen Alarm Panel User Manual 3 8 Grenada TouchScreen User Guide

Technicolor Connected Home USA LLC Touch Screen Alarm Panel 3 8 Grenada TouchScreen User Guide

Contents

Quick Start Guide

TouchScreen Quick Start GuideTechnicolor TCA200Release 3.8 GrenadaRev 3.8 Grenada SU1August 27, 2011© 2006, 2007, 2008, 2009, 2010, 2011 iControl Networks, Inc., the iControl logo, uControl, Inc. the uControl logo, OpenHome,and Converge and all other uControl products and technology names are trademarks or registered trademarks of iControlNetworks, Inc. All other products or services mentioned herein are trademarks of their respective companies.
2CompliancesFCC NoticeThis device has been designed, constructed, and tested for compliance with FCC Rules that regulate intentional andunintentional radiators. As the user of this device, you are not permitted to make any alterations or modifications to thisequipment or to use it in any way that is inconsistent with the information described in this guide, without the express writtenpermission of Technicolor. Doing so will void your authority to operate this equipment.This device complies with FCC Rules Part 15 and Industry Canada RSS-210. Operation is subject to the following two conditions:1. This device may not cause harmful interference2. This device must accept any interference, including interference that may cause undesired operation of the deviceCet appareil est conformé aux FDD règles la partie 15 et RSS-210 d’Industrie Canada applicables aux appareils radio exemptsde licence. L’exploitation est autorisé aux deux conditions suivantes :1. L’appareil ne doit pas produire de brouillage, et2. L’appareil doit accepter tout brouillage radioélectrique subi, même si le brouillage est susceptible d’en compromettrele fonctionnement.This Class B digital apparatus complies with Canadian ICES-003.Cet appareil numérique de la classe B est conforme à la norme NMB-003 du Canada.RF Exposure information: This devise is only authorized for use in a mobile or fixed application. At least 20cm (8 inches) ofseparation distance between the touchscreen and the user’s body must be maintained at all times to ensure compliance withthe FCC and Industry Canada RF Exposure Requirements.Informations d'exposition aux RF: Cet appareil est uniquement pour une utilisation dans une application mobile ou fixe. Aumoins 20 centimètres de distance de séparation entre l’écran tactile et le corps de l’utilisateur doit être maintenue en touttemps pour assurer la conformité avec les exigences de la FCC et Industrie Canada, l’ exposition.Device PurposeFire/Alarm Central PanelUL and ULC NoticesThis device complies with UL 985, UL1023, UL1635, ULC S545, ULC C1023.Limitations of Security ProductsSecurity products and alarm systems do not offer guaranteed protection against burglary, fire, or other emergencies. They mayfail to warn for diverse reasons, including (but not limited to): power failure, dead batteries, improper installation, coverage,coverage areas overlooked during installation, defeat by technically sophisticated intruders, component failure, or inadequatemaintenance. Alarm systems should be checked weekly to ensure that all devices are working properly.AN ALARM SYSTEM IS NOT A SUBSTITUTE FOR INSURANCE.TouchScreen Quick Start Guide
Using the TouchScreen3Using the TouchScreenThe Technicolor TCA200 TouchScreen is the center of your home security system. This Android-powereddevice allows you to perform actions such arming and disarming your security system, monitoring thestatus of your security sensors, and sending emergency alarms.Note: This Quick Start Guide provides an overview of the TouchScreen and its basic operation. Thisguide assumes the TouchScreen has been activated and you have been assigned a securitycode. For more information, see the TouchScreen User's Guide and the HomeSystemInstallation Guide. The latest versions can be found athttp://www.icontrol.com/support/manuals/technicolor/3_8_Grenada_TouchScreen_User_Guide_Technicolor.pdf and http://www.icontrol.com/support/manuals/technicolor/3_8_Grenada_Home_Installation_Technicolor.pdfFor detailed information about operating an Android device, refer to the Androiddocumentation provided by Google.Warning: The rechargeable battery that came with your TouchScreen is only available through yourservice operator. If your battery needs to be replaced, contact your service operator to arrange forreplacement.The following diagram shows the major components of the TouchScreen:
4Each button is described in the following table:Button DescriptionHome button. Press this button to go to the Home (main) screen in the TouchScreen screen.Android menu button. Press this button to display the Android configuration menu.Back button. Press this button to return to the previous screen.Emergency Alarm button. Press this button to manually and immediately send an alarm tothe appropriate call center. The button is located at the bottom right in front of the device.When A/C power is available, this button is lit. See page 10 for more information.Understanding the ScreenThe TouchScreen communicates with your security system. It combines security and home controls on agraphical interface, providing:A real-time view of the system statusesTools to manage your security systemAdditional optional applications such as news and weatherThe first screen displayed is the Home screen. It is from this screen that you navigate through menus bytapping buttons to access the function you desire. If the screen is black (showing nothing) this is becausethe system is not receiving A/C power or the display is powered off to conserve battery life.The screen is divided into the following operational sections:Security Status HeaderSystem & Zone Trouble HeaderContent AreaSecurity Status HeaderThe Security Status header displays in the upper left hand of the TouchScreen. It tells you whether thesystem is armed or disarmed and other information. Tap this header to arm or disarm the system.Also, during troubles that would prevent arming (such as a monitored door or window being opened) anannouncement replaces the Arm/Disarm status.TouchScreen Quick Start Guide
Using the TouchScreen5During the Exit Delay, the header changes to announce the number of seconds until the system is armed.During the Entry Delay, the header changes to announce the number of seconds before the alarmsounds.System & Zone Trouble HeaderThe System & Zone Trouble header displays in the upper right hand of the TouchScreen. It only displayswhen there is a connectivity (cellular, broadband, etc.) or power problem with the TouchScreen, when asensor goes down (such as due to a battery failure), or a sensor is being tampered with (such as the coverbeing opened).When the system reports a trouble, it sounds an audible alert regularly to ensure that you are aware ofthe problem.When a System & Zone header is displayed, tap it to show the Troubles list which displays all the currenttroubles with the TouchScreen and sensors.Content AreaThe Content area contains the interactive functionality of your TouchScreen. The TouchScreen apps(widgets) are displayed here. When you use or modify an app, this is where the menus and tools aredisplayed.The Home screen is the default interface when the user accesses the TouchScreen screen.It can beaccessed at any time by pressing the button, which is located below the display area.The TouchScreen provides the following apps:
6Select the Security app to view options related toarming/disarming the system, enabling/disabling securityzones, viewing history logs, and recent security zoneevents.Select the Settings appto access tools to modifythe TouchScreen con-figurations.Understanding Arming ModesYou can arm the system by multiple scenarios:Arm Away—Everybody leavingArm Stay—People are still active inside (see page 6)Arm Night—Everybody going to bed (see page 7)Different arming modes utilize different rules for when sensors are tripped and for Entry/Exit delays. AnExit delay is a short period of time after the system is armed for you to leave the premises (default 60seconds). An Entry delay is a short period of time after a sensor is tripped at an Entry/Exit door if thesystem is armed (default 30 seconds). You must enter a valid keypad code within the Entry delay periodto avoid sounding an alarm. Consult with your installer or Customer Care representative to customizethe Entry/Exit delays on your system.Note: After the alarm is faulted the Alarm Transmission Delay period starts (see page 9).In the Armed state and during the Entry Delay period, if the central system loses all connectivity withyour TouchScreen, an alarm is immediately sent to the central monitoring station. This prevents anintruder from attempting to stop an alarm by destroying the TouchScreen.Arm Away ModeThe Arm Away mode is used when everyone is leaving the house. The following rules apply:Alarm trips immediately if a monitored Perimeter zone (non-entry/exit door or window) is opened.Interior motion detectors are armed.Entry/Exit zones start an Entry DelayExit Delay starts when the system is armedArm Stay ModeThe Arm Stay mode is used to arm the system when there are still people in the premises. The followingrules apply:Alarm trips immediately if a monitored Perimeter zone (non-entry/exit door or window) is opened.Interior motion detectors not armed.Entry/Exit zones start an Entry Delay.Exit Delay starts when the system is armed.Exit Delay does not beep and is twice the length of Alarm Away mode.TouchScreen Quick Start Guide
Using the TouchScreen7Arm Night ModeThe Arm Night mode, is used when everyone is going to bed.This mode works the same as Arm Stay except that there is no Entry Delay period. If an entry/exit zone isopened, an alarm sounds immediately.Note: There is still an Exit Delay period that works the same as in Arm Stay mode.Arming and Disarming the SystemThe Security status of your security system is displayed in the Security Status header.Message the Security Status header displays when thestatus is “Disarmed”.Tap to arm the system.Message the Security Status header displays when thestatus is “Armed”.Tap to disarm the system.Arming the System from the TouchScreenTo arm the system from the TouchScreen:1. Tap the Security Status header when it is in Disarmed state.The Security Options screen is displayed with a keypad and the Arm System tab open.2. Tap an arming mode (Arm Stay, Arm Away, or Arm Night) and enter your security code.3. The Security Status header changes to display a countdown message.The text of the message will vary, depending on which arming mode you selected.
8Special Rules:If you selected the Arm Away mode, you have until the Exit Delay is over to exit the prem-ises.Otherwise, the system is automatically armed in Arm Stay mode. There is still an Exit Delayperiod for the other Arming modes as well, but they do not require that the door open andclose during the period.If you open and shut an Entry/Exit door during the Exit Delay and then re-enter the prem-ise, the Exit delay restarts at 120 seconds for Arm Stay and Arm Night or 60 seconds for ArmAway. It will only do this one time. If the wrong code is entered, the countdown timerresets to 60 or 120 seconds.If an Entry/Exit door is left open at the end of Exit Delay, the Entry Delay immediately startsand, if the system is not disarmed, an alarm will sound.Cancelling the Arming ProcessIf you arm the system in Arm Away or Arm Stay mode, the Security Status header displays a countdownof the number of seconds until the Exit Delay is over. You can choose to cancel the arming process.To cancel the arming process:1. Tap the Security Status header while it is displaying a countdown.The Security app is displayed with a keypad and the Disarm System tab active.The Security app is displayed with a keypad and the Arm System tab open.2. Enter your security code to stop the arming process.Disarming the SystemWhen you enter an armed premises, an Entry Delay period starts:During the Entry Delay, the header changes to announce the number of seconds before the alarmgoes off.TouchScreen Quick Start Guide
Using the TouchScreen9The Security app displays a keypad.The TouchScreen beeps audibly once every second, until the last 10 seconds when it beeps twice asecond.If a valid keypad code is not entered by the end of the Entry Delay period, an alarm sounds. From thetime an alarm sounds (or starts silently), for most reasons, you have 30 seconds (default) to enter a validkeypad code to disarm the system and prevent an alarm being sent to the central monitoring station.This is called the Alarm Transmission delay or the Abort Window.The Alarm Transmission Delay is a required period that prevents a report to the central station during analarm was triggered innocently.IMPORTANT: Emergency alarms (see page 10) and smoke alarms are reported without an AlarmTransmission delay or an Entry Delay. Consult Customer Care to understand thenumber of seconds configured for the Alarm Transmission Delay in your system.To disarm the system from the TouchScreen:1. Tap the Security Status header when it is in Armed state.The Security app is displayed with a keypad and the Disarm System tab active.2. Enter your security code.
10If the alarm was triggered, the alarm history are displayed.Sending an Emergency AlarmYou can manually trip an alarm in the event of an emergency by clicking the Emergency button.Emergency alarms are reported without an Entry delay or Alarm Transmission delay.To manually trip an alarm:1. Press the Panic button on the lower front of the TouchScreen.The Emergency screen is displayed.2. Tap Fire to send an alarm for emergency fire assistance.The TouchScreen sounds a repeating, high-pitched chime.Tap Medical to send an alarm for emergency medical assistance.The TouchScreen sounds an audible, repeating, triple beep signal.Tap Police to send an alarm for police assistance.By default the TouchScreen will not issue an audible signal. The TouchScreen displays a PolicePanic In Progress alert on the TouchScreen. Tap the alert to sound an audible, continuous, high-pitched chime.TouchScreen Quick Start Guide
Using the TouchScreen11Evacuation PlanDevelop an emergency evacuation plan for use in the event of fire. Here are some recommendationsfrom the National Fire Protection Association.Make an evacuation plan for how to leave your home in the case of fire or other emergency.Sketch a map of your home that shows all the doors and windows. Discuss the plan with everyonein your home so that everyone will know what to do.Have at least two ways to exit each room. Make sure that windows and doors open easily.Discuss with your family and agree on a single meeting location outside your home.In the event of fire, get out and stay out. Don’t go back inside for people, pets or possessions.Do not open a door if the handle is hot.If there is smoke stay low to the ground and go under the smoke.Escape your home before calling the fire department. Call the fire department and police from theoutside meeting place using your cell phone or call from a neighbor’s phone.Practice your home evacuation plan.Additional Emergency PreparationsDo not wait until an emergency occurs to make a plan. Talk to each other about what each personshould do in different types of emergency.Learn your security system. Get to know how to arm and disarm it and what to do when theauthorities or central monitoring calls.Make sure everyone (who should know) knows the Secret Word, when to use it, and that itshould not be shared.Understand the difference between your keypad code and the duress code.Understand that you should never enter the premises if you hear an alarm. Call police from a cellphone or a neighbor’s phone.

Navigation menu