Technicolor Delivery Technologies Belgium TG790 Home Service Gateway User Manual
Technicolor Delivery Technologies Belgium Home Service Gateway
Contents
- 1. User Manual (Operation)
- 2. User Manual (Statement)
User Manual (Operation)

DRAFT
Verizon Home
Service Gateway
TG790
Setup and User Guide
DRAFT

DRAFT
1
Getting Started ........................................................... 1
1.1 Check the Box Contents............................................................................................................... 3
1.2 Getting to Know the HSG ............................................................................................................ 4
1.2.1 Front Panel ............................................................................................................................................ 5
1.2.2 Back Panel.............................................................................................................................................. 7
2
Setup............................................................................ 9
2.1 Connect the HSG to the Cantenna.........................................................................................11
2.2 Power on the HSG........................................................................................................................12
2.3 Connect Your Network Devices ..............................................................................................13
2.3.1 Wireless Connection to the HSG..................................................................................................14
2.3.2 Wired Connection to the HSG ......................................................................................................18
3
Graphical User Interface (GUI)................................. 19
3.1 Main...................................................................................................................................................22
3.1.1 My Router ............................................................................................................................................23
3.1.2 My Network.........................................................................................................................................26
3.1.3 Action Zone.........................................................................................................................................28
4
GUI: Wireless Settings .............................................. 29
4.1 Wireless Status ..............................................................................................................................30
4.2 Basic Security Settings................................................................................................................32
4.3 Advanced Security Settings......................................................................................................35
4.3.1 Securing Your Wireless Connection ...........................................................................................36
4.3.2 SSID Broadcast ...................................................................................................................................37
4.3.3 Wireless MAC Authentication.......................................................................................................38
4.3.4 802.11b/g/n Mode............................................................................................................................39
4.3.5 Other Advanced Wireless Options..............................................................................................40

DRAFT
5
GUI: My Network....................................................... 41
5.1 Network Status..............................................................................................................................42
5.2 Network Connections.................................................................................................................43
5.2.1 Ethernet Properties...........................................................................................................................44
5.2.2 Wireless Access Point Properties.................................................................................................45
5.2.3 Coax Connection...............................................................................................................................46
5.2.4 Broadband Connection (Ethernet) .............................................................................................48
5.2.5 Broadband Connection (Coax).....................................................................................................50
6
GUI: Firewall Settings............................................... 53
7
GUI: Parental Control ............................................... 55
7.1 Parental Control............................................................................................................................56
7.2 Rule Summary ...............................................................................................................................58
7.2.1 Parental Control Log........................................................................................................................59
8
GUI: Advanced Settings ........................................... 61
8.1 Diagnostics .....................................................................................................................................64
8.2 Restore Defaults............................................................................................................................66
8.3 Reboot Gateway ...........................................................................................................................67
8.4 ARP Table ........................................................................................................................................68
8.5 Users..................................................................................................................................................69
8.6 DNS Server ......................................................................................................................................70
8.7 System Settings.............................................................................................................................72
8.8 Port Configuration .......................................................................................................................73
8.9 Date and Time ...............................................................................................................................74
8.10 IP Address Distribution...............................................................................................................75

DRAFT
9
GUI: System Monitoring........................................... 77
9.1 Router Status..................................................................................................................................79
9.2 Advanced Status...........................................................................................................................80
9.2.1 System Logging.................................................................................................................................81
9.2.2 Full Status/System wide Monitoring of Connections ..........................................................82
9.2.3 Traffic Monitoring .............................................................................................................................83
9.2.4 Bandwidth Monitoring....................................................................................................................84
9.2.5 IGMP Proxy ..........................................................................................................................................85
10
Support...................................................................... 87
10.1 General Troubleshooting ..........................................................................................................89
10.2 Troubleshooting Your Wireless Connection ......................................................................91
10.3 Resetting your HSG......................................................................................................................93
10.4 Configuring Dynamic IP Addressing on Windows...........................................................95

DRAFT

1
DRAFT
Getting
Started
1 Getting Started
DMS-CTC-20110909-0007 v0.12
DRAFT
Introduction
This Setup and User Guide will help you to setup your Home Service Gateway (HSG)
and deploy its services on your home network.
Your Home Network
Your home network consists of the following components:
One Cantenna
One Home Service Gateway (HSG)
One or more network devices
The Cantenna
The Cantenna is located on the roof and is the interface between your home
network and the Verizon 4G LTE network.
The Cantenna controls the following network devices:
DTV Set Top Boxes
Port Forwarding
Application Layer Gateway (ALG)
The HSG
The Home Service Gateway is located in your home and is responsible for:
Managing the communication between your network devices (computers,
wireless devices).
Acting as an interface between your home devices and the Cantenna (hence the
Verizon 4G LTE network)
1Getting Started
DMS-CTC-20110909-0007 v0.1 3
DRAFT
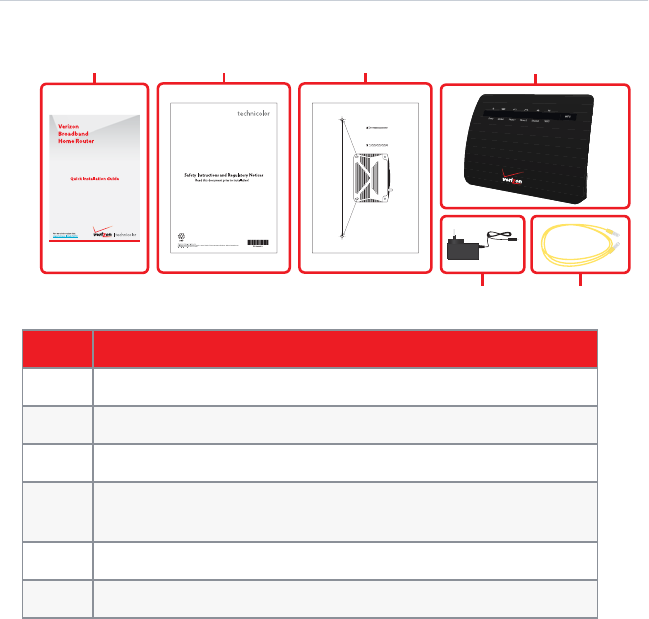
1.1 Check the Box Contents
Your box should contain the following items:
32 4
71/2 inch | 190mm
1/4 inch | 6mm ± 1/3 inch | max 8,9mm
1
56
Item Description
1This Quick Installation Guide
2The Safety and Regulatory Notices
3The Wall Mount Instructions
4The Home Service Gateway.
In this Setup and User Guide we will refer to it as HSG.
5One power supply
6One yellow Ethernet cable (RJ-45)
When one of these items is missing call 800- 837-4966.
Read Safety Instruction
Please read “Safety Instructions and Regulatory Notices” before you start with the
installation of the HSG.

1 Getting Started
DMS-CTC-20110909-0007 v0.14
DRAFT
1.2 Getting to Know the HSG
This section introduces you to the different components of the HSG.
Topic Page
“1.2.1 Front Panel” 5
“1.2.2 Back Panel” 7
1Getting Started
DMS-CTC-20110909-0007 v0.1 5
DRAFT
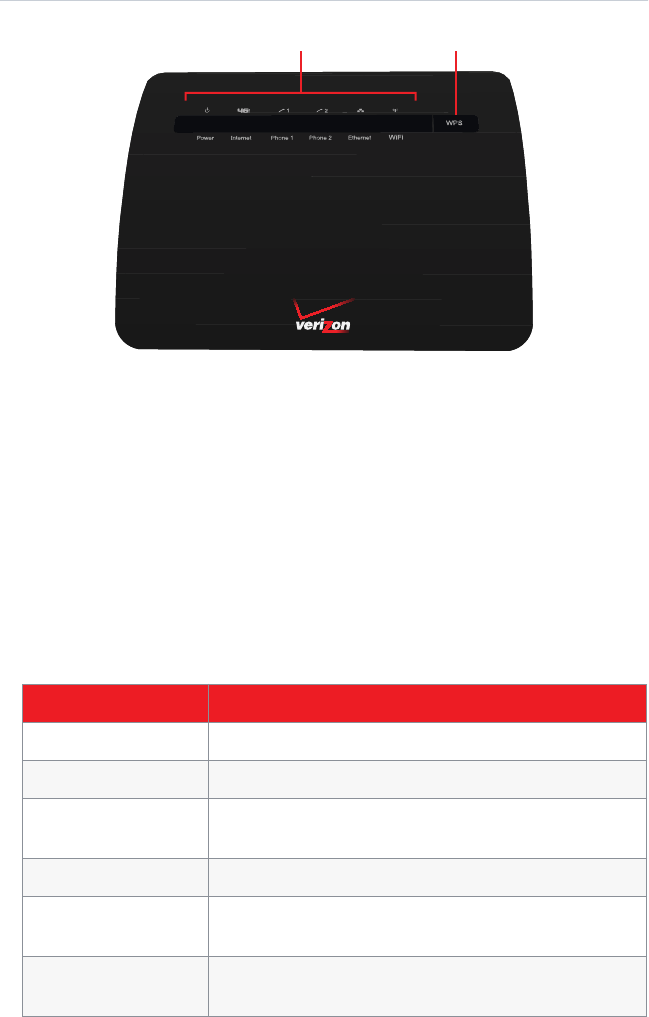
1.2.1 Front Panel
Status LEDs WPS button
Components
On the front panel of your HSG, you can find:
The Status LEDs:
These Status LEDs allow you to check the state of the services offered by the HSG.
WPS button:
The WPS button allows you to add new wireless clients to your local network in a
swift and easy way, without the need to enter any of your wireless settings
(network name, wireless key, encryption type).
Status LEDs
On the front panel of your HSG, you can find the following items:
LED Description
Power Indicates the power status of the HSG.
Internet Indicates the connectivity to the Cantenna.
Phone [1-2] Indicates the connectivity to the phone connected to
the HSG.
Wireless Indicates whether wireless is enabled on your HSG.
USB Indicates the connectivity of the connected USB
devices.
Ethernet Indicates the connectivity to the connected Ethernet
devices.

1 Getting Started
DMS-CTC-20110909-0007 v0.16
DRAFT
WiFi Indicates the connectivity to the Cantenna.
LED Description
1Getting Started
DMS-CTC-20110909-0007 v0.1 7
DRAFT
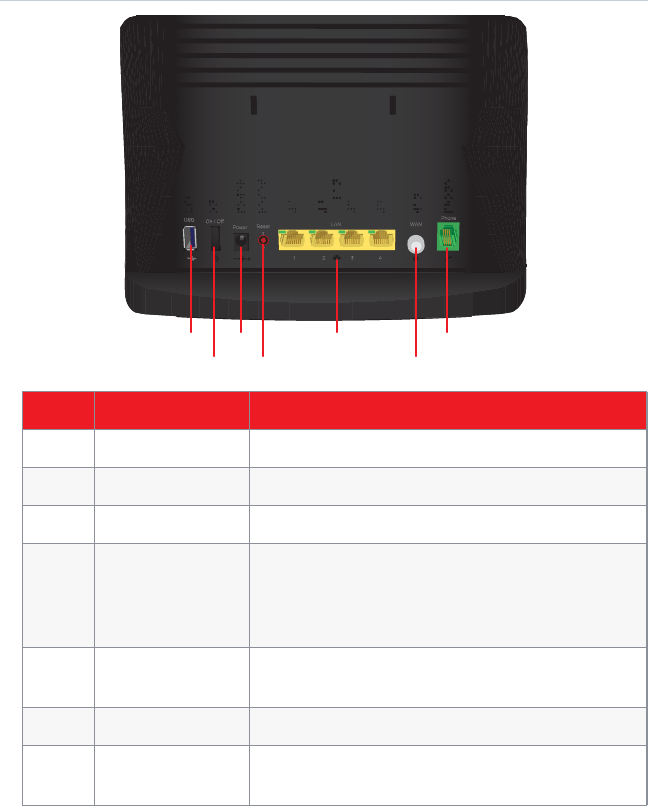
1.2.2 Back Panel
Item Name Description
AUSB port Allow you to power or charge your USB devices.
BPower switch Allows you to switch your HSG on/off.
CPower inlet This is where you will plug in the power adapter.
DReset button If you press this button for 5 seconds the HSG will
return to its factory default settings. All changes
that you made to the default configuration will be
lost.
ELAN port Allows you to connect your local devices (e.g. a
computer) using Gigabit Ethernet.
FWAN port Allows you to connect your HSG to the Cantenna.
FPhone port Allows you to connect your telephone to the
Verizon telephone network.
A
B
C
D
E G
F
1 Getting Started
DMS-CTC-20110909-0007 v0.18
DRAFT

2
DRAFT
Setup
2 Setup
DMS-CTC-20110909-0007 v0.110
DRAFT
Overview
To setup your HSG, you have to complete the following steps:
1If a different router was being used previously, disconnect it. Remove all
components, including power supplies and cables; they will not work with the
HSG.
2Connect the HSG to the Cantenna.
For more information, see “2.1 Connect the HSG to the Cantenna” on page 11.
3Power on your HSG.
For more information, see “2.2 Power on the HSG” on page 12.
4Connect your network devices.
For more information, see “2.3 Connect Your Network Devices” on page 13.
5Optionally, you can further configure the HSG to your needs (for example, change
the wireless security) using the Graphical User Interface (GUI) of the HSG.
For more information, see
In case of problems
If you have trouble configuring your HSG, try the following:
1Refer to “Support” on page 87.
2If you did not find a solution in the Troubleshooting section, call the Help Desk at
800- 837-4966.
2Setup
DMS-CTC-20110909-0007 v0.1 11
DRAFT
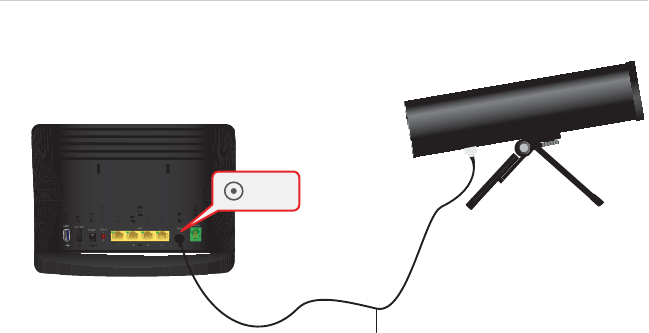
2.1 Connect the HSG to the Cantenna
Procedure
Coax cable
WAN
Cantenna
HSG
1Take one end of the coaxial cable and connect into the coaxial wall jack.
2Connect the other end to the Coax port of your HSG.
3After a few minutes, the WAN Coax LED must be solid green. If this is not the
case, make sure that the coaxial cable is connected properly at both ends.
2 Setup
DMS-CTC-20110909-0007 v0.112
DRAFT
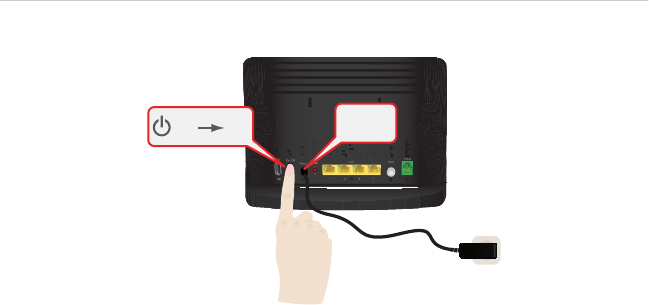
2.2 Power on the HSG
Procedure
Off On Power
1Take the power supply that is included in your box.
2Connect the power cord to the Power port of your HSG.
3Plug the other end into an electrical outlet.
4Push the On/Off button to turn on the HSG.
5Wait a few minutes to allow the HSG to complete the start up phase.
6The Power LED on the front panel of your HSG must be solid green.

2Setup
DMS-CTC-20110909-0007 v0.1 13
DRAFT
2.3 Connect Your Network Devices
Introduction
This section helps you to connect your network devices (for example, a computer, a
network printer,...) to the HSG network.
Connection options
If you want to connect your computer to the HSG using:
A wireless connection, proceed with “2.3.1 Wireless Connection to the HSG” on
page 14.
A wired (Ethernet) connection, proceed with “2.3.2 Wired Connection to the HSG”
on page 18.
2 Setup
DMS-CTC-20110909-0007 v0.114
DRAFT
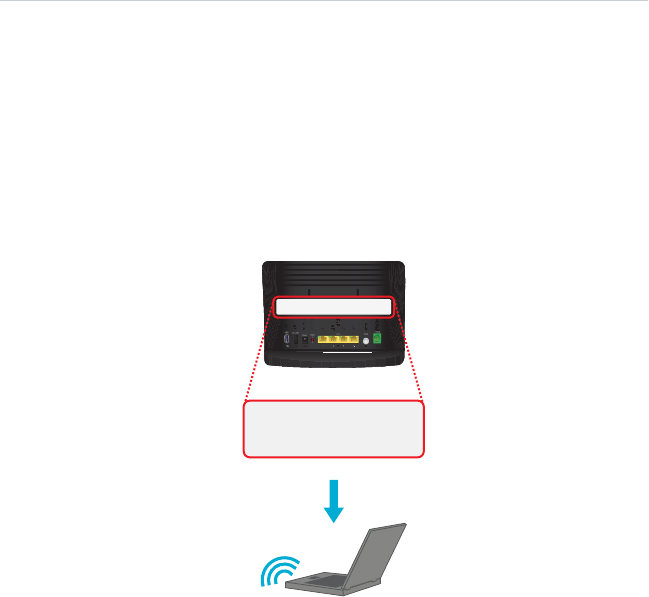
2.3.1 Wireless Connection to the HSG
Requirements
Your network device must be equipped with a WiFi-certified wireless client.
Your network device must be configured to obtain an IP address automatically.
This is the default setting.
Procedure
If you want to connect a computer using the wireless network, configure the
wireless client on your computer with the wireless settings printed on the label of
your HSG.
ESSID: **************
WPA key: **************
To configure these settings on:
Windows 7, proceed with “Connect your computer on Windows 7” on page 15.
Windows Vista, proceed with “Connect your computer on Windows Vista” on
page 15.
Windows XP, proceed with “Connect your computer on Windows XP” on page 16.
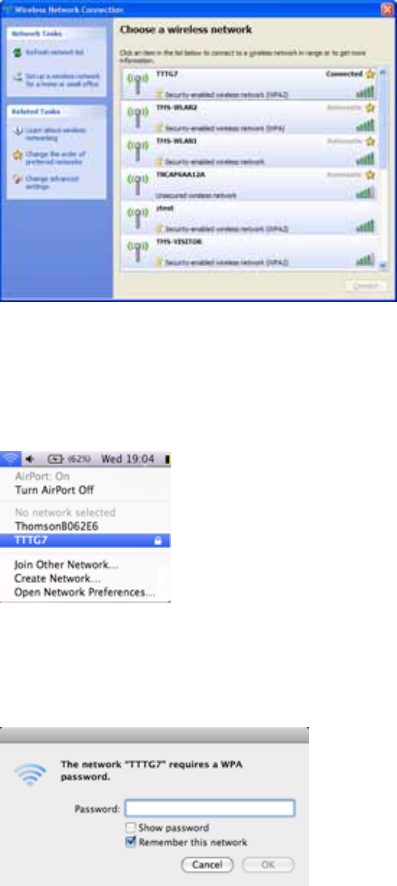
Mac OS X, proceed with“Connect your computer on Mac OS X” on page 17.
On another operating system, consult the help of your wireless client or
operating system.
2Setup
DMS-CTC-20110909-0007 v0.1 15
DRAFT
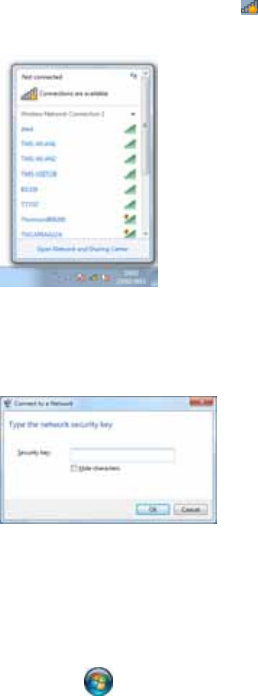
Connect your computer on Windows 7
Proceed as follows:
1Click the wireless network icon ( )in the notification area.
2A list of available wireless networks appears.
Double-click the HSG access point.
Note The HSG is listed with the network name (ESSID) that is printed on the
bottom of your HSG (for example: TTTG7).
3Windows prompts you to enter the network security key.
Type the WPA key that is printed on the bottom of your HSG in the Network key
and Confirm network key box and click Connect.
Connect your computer on Windows Vista
Proceed as follows:
1Click Start and click Connect To.
2A list of available wireless networks appears.
3Double-click the HSG access point.
Note The HSG is listed with the network name (ESSID) that is printed on the
bottom of your HSG (for example: TTTG7).
2 Setup
DMS-CTC-20110909-0007 v0.116
DRAFT
4Windows prompts you to enter the network security key.
Type the WPA key that is printed on the bottom of your HSG in the Network key
and Confirm network key box and click Connect.
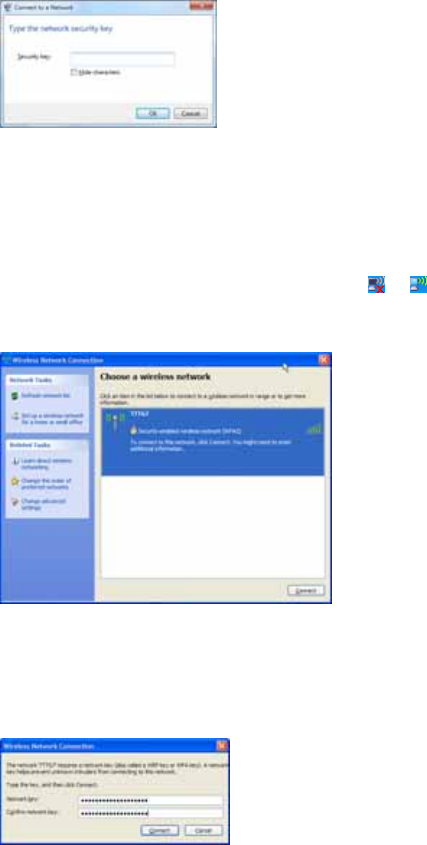
Connect your computer on Windows XP
Proceed as follows:
1Right-click the wireless network connection icon ( or )in the notification area
and then click View Available Wireless Networks.
2A list of available wireless networks appears.
Double-click the HSG access point. The HSG is listed with the network name
(ESSID) that is printed on the bottom of your HSG (for example: TTTG7).
Note If the HSG is not in the list, see “Windows can not find the HSG access
point” on page 91.
3Windows prompts you to enter the network security key.
Type the WPA key that is printed on the bottom of your HSG in the Network key
and Confirm network key box and click Connect.
2Setup
DMS-CTC-20110909-0007 v0.1 17
DRAFT
4You are now connected to the HSG:
Connect your computer on Mac OS X
Proceed as follows:
1Click the Airport icon on the menu bar.
2A list of available wireless networks appears.
Select the HSG from the list.
Note The HSG is listed with the network name (ESSID) that is printed on the
bottom of your HSG (for example: TTTG7).
3The AirPort window prompts you to enter your WPA password.
Type the WPA key that is printed on the bottom of your HSG in the Password
box, select the Remember is network box and click OK.
4You are now connected to the HSG network.
2 Setup
DMS-CTC-20110909-0007 v0.118
DRAFT
2.3.2 Wired Connection to the HSG
Requirements
Both your network device (for example, a computer, an Ethernet switch,...) and
HSG must have a free Ethernet port.
Your network device must be configured to obtain an IP address automatically.
This is the default setting. For more information, see “10.4 Configuring Dynamic IP
Addressing on Windows” on page 95.
Procedure
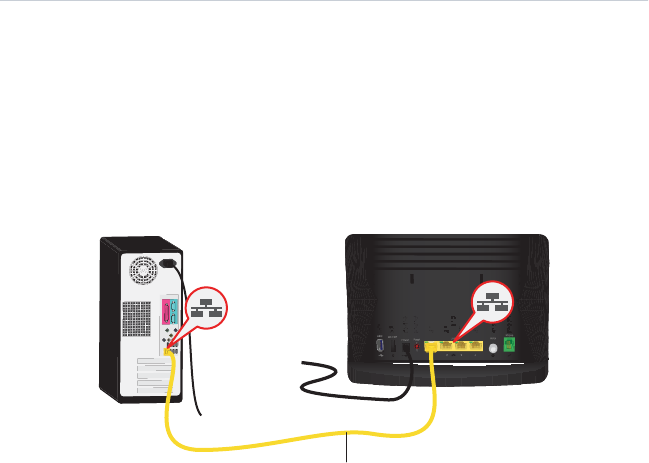
Computer
HSG
Yellow Ethernet Cable
Proceed as follows:
1Take the yellow Ethernet cable that was included in your box.
2Plug the Ethernet cable into one of the four yellow Ethernet ports on the back of
the HSG.
3Plug the other end of the yellow Ethernet cable into an Ethernet port on the
computer.
4If you did not yet start up your computer, start up your computer.
5The Ethernet LED on the front panel of your HSG should light up (solid or
blinking).
6Use the same procedure to connect your other Ethernet devices (computers,
network printers,...).

3
DRAFT
Graphical
User Inter-
face (GUI)
3 Graphical User Interface (GUI)
DMS-CTC-20110909-0007 v0.120
DRAFT
Introduction
The Graphical User Interface (GIU) allows you to configure your HSG from your web
browser.
Requirements
JavaScript must be enabled on your browser (this is the default setting). For more
information, consult the help of your web browser.
Accessing the GUI
Proceed as follows:
1Open your web browser.
2In the Address box, type http://sgw.lan (or http://192.168.1.254) and press
ENTER.
3The HSG prompts you to enter your user name and password. Enter your user
name and password and click OK.
Note If you did not yet change the password, type admin in the User Name
box and type the Login password printed on the bottom label of your
HSG in the Password box.
4The HSG GUI appears.
3Graphical User Interface (GUI)
DMS-CTC-20110909-0007 v0.1 21
DRAFT
Menu
The menu bar on the front contains the following items:
Icon Name For more information, see...
Main “3.1 Main” on page 22.
Wireless Settings “4 GUI: Wireless Settings” on page 29.
My Network “5 GUI: My Network” on page 41.
Firewall Settings “6 GUI: Firewall Settings” on page 53.
Parental Control “7 GUI: Parental Control” on page 55.
Advanced “8 GUI: Advanced Settings” on page 61.
System Monitoring “10 Support” on page 87.

3 Graphical User Interface (GUI)
DMS-CTC-20110909-0007 v0.122
DRAFT
3.1 Main
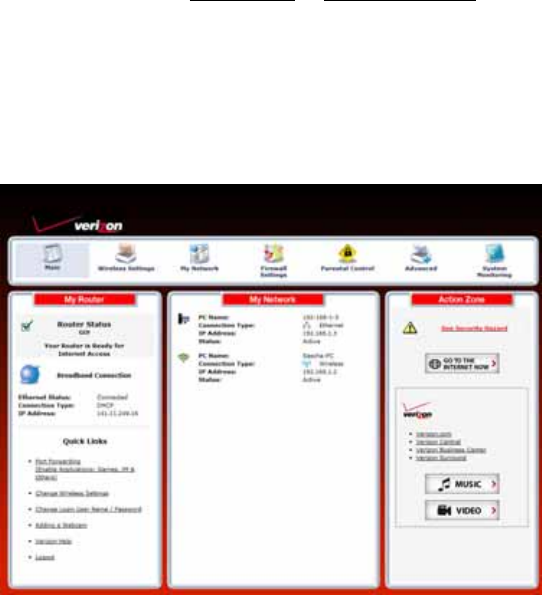
Main page
The Main page provides a summary view of the main services of the HSG. The
content of the page is divided into three groups:
My Router
For more information, see “3.1.1 My Router ” on page 23.
My Network
For more information, see “3.1.2 My Network” on page 26.
Action Zone
For more information, see “3.1.3 Action Zone” on page 28.
3Graphical User Interface (GUI)
DMS-CTC-20110909-0007 v0.1 23
DRAFT
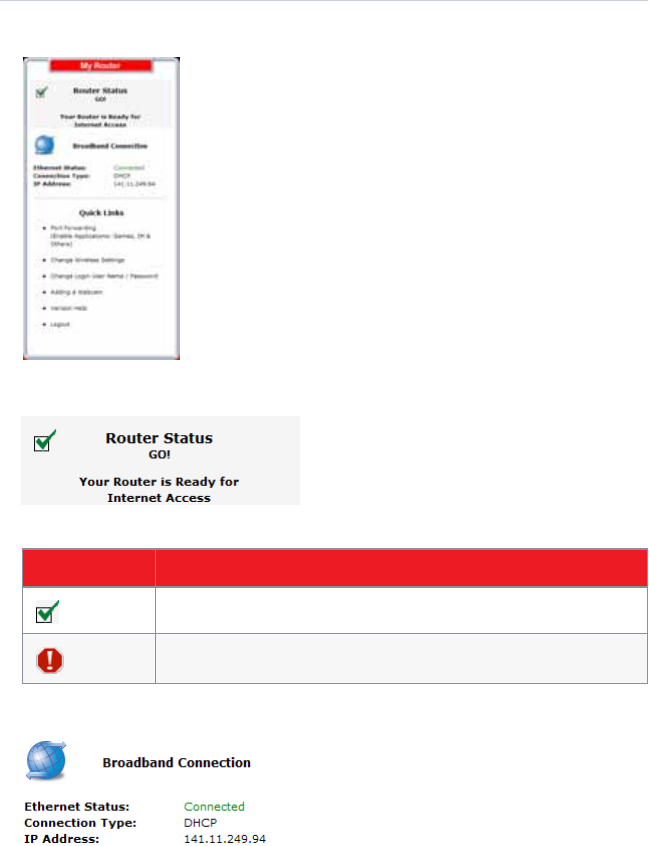
3.1.1 My Router
Introduction
The My Router pane displays the status of the HSG’s network
and Internet connection and contains the following items:
Router Status
Broadband Connection
Quick Links
Router Status
The Router Status informs you about the status of your Internet connection:
Icon Description
Indicates that the HSG is connected to the Internet.
Indicates that the HSG is not connected to the Internet.
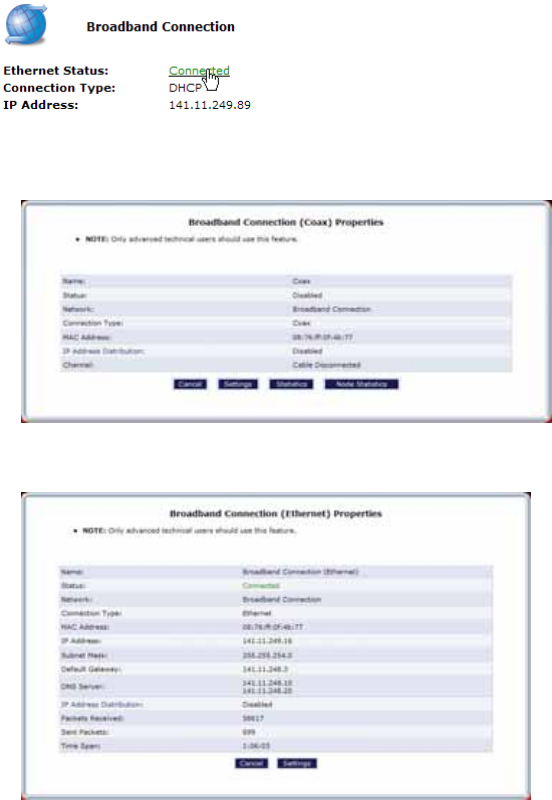
Broadband Connection
Under Broadband Connection, you can view:
Ethernet Status or Coax Status.
The IP address and connection type of your broadband connection (if you are
connected to the Internet).
3 Graphical User Interface (GUI)
DMS-CTC-20110909-0007 v0.124
DRAFT
To view more information about your broadband connection:
1Under Broadband Connection, click the Disconnected or Connected link:
2Depending on whether you choose Ethernet or Coax for your WAN connection,
one of the following pages appears:
The Broadband Connection (Ethernet) Properties page
For more information, see “5.2.5 Broadband Connection (Coax)” on page 50.
The Broadband Connection (Ethernet) Properties page
For more information, see “5.2.4 Broadband Connection (Ethernet)” on page 48.
3Graphical User Interface (GUI)
DMS-CTC-20110909-0007 v0.1 25
DRAFT
Quick Links
The Quick Links section provides links to frequently used pages. The following
quick links are available:
Port Forwarding
Click this link to assign a service (for example a HTTP server) to a network device.
Request for this service that are initiated from the Internet will automatically be
forwarded to this device.
Change Wireless Settings
Click this link to configure the wireless access point of your HSG.
For more information, see “GUI: Wireless Settings” on page 29.
Change Login User Name/Password
Click this link to change your login information.
For more information, see “8.5 Users” on page 69.
Adding a Webcam
Click this link to view the instructions for connecting a webcam to your network.
Verizon Help
Click this link to view the online help of your HSG.
Logout:
Click this link to quit your session. You will need to re-enter your user name and
password to return to the GUI.
3 Graphical User Interface (GUI)
DMS-CTC-20110909-0007 v0.126
DRAFT
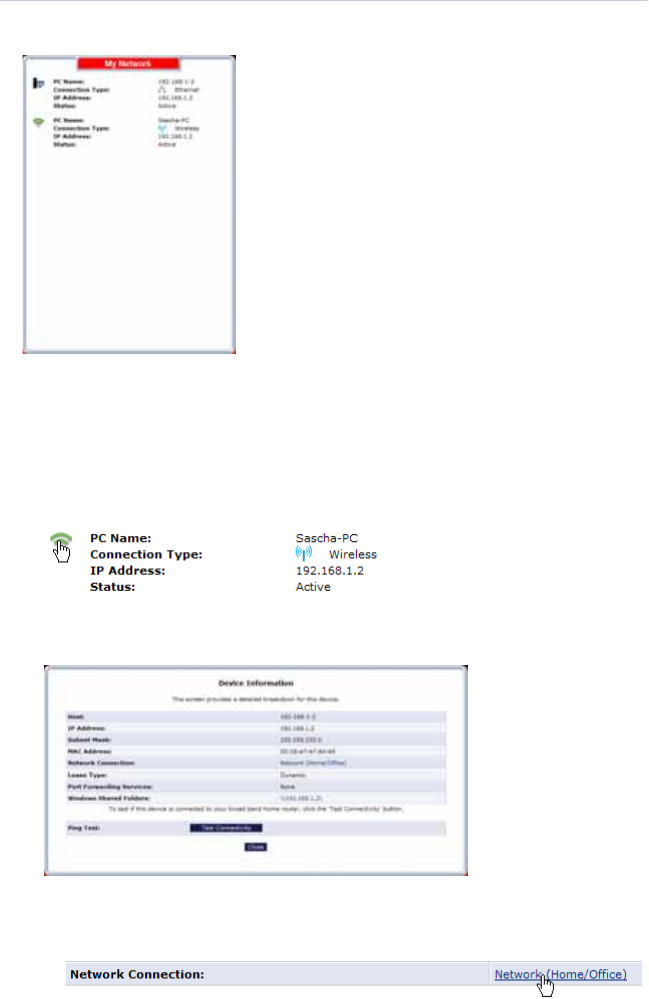
3.1.2 My Network
Introduction
The My Network pane, provides you an overview of
the devices that are currently connected to the HSG.
The following information is provided for each
device:
PC Name:
Displays the name that will be used to reference
to this device.
Connection Type:
Displays how the device is connected to the HSG
(Ethernet, Wireless or Coax).
IP Address:
Displays the IP address of the device.
Status:
Displays whether the device is currently
connected or not.
Viewing detailed device information
To view the complete device information:
1Click the icon next to the device.
2The Device Information page appears and displays detailed information about
the device:
3Click:
The Network Connection link to view more information on the network
interface that this device is using.

3Graphical User Interface (GUI)
DMS-CTC-20110909-0007 v0.1 27
DRAFT
Windows Shared Folders link to view the shared folders of this computer.
Test Connectivity to check if the device is currently connected to the HSG.
Close to return to the Main page.
3 Graphical User Interface (GUI)
DMS-CTC-20110909-0007 v0.128
DRAFT
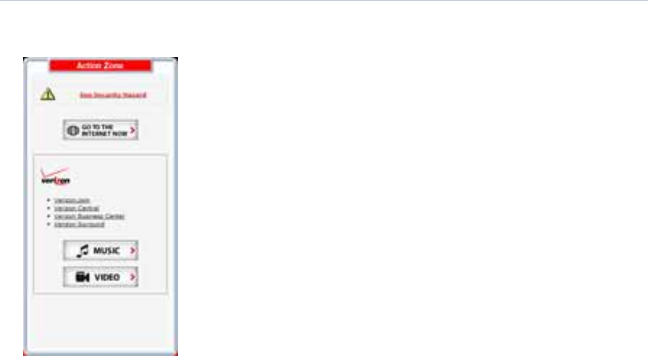
3.1.3 Action Zone
Introduction
The Action Zone pane allows you to access
Click:
See Security Hazard to check the security log.
GO TO THE INTERNET NOW to browse to your home
page.
Verizon. com to access the Verizon corporate website.
Verizon Central to browse the My Verizon portal
Verizon Business Center
The Business Center is a daily destination site aimed at
helping companies improve productivity, stay informed,
and expand their business connections
Verizon Surround
A cutting edge, broadband entertainment site featuring
movie trailers, hot new tunes, cool games and fast-pace
message boards. Stay up to date on the latest Hollywood
happenings, special offers and more at Verizon Surround.
MUSIC to browse to the music channel of Verizon
Surround.
VIDEO to browse to the music section of Verizon
Surround.

4
DRAFT
GUI: Wire-
less
Settings
4 GUI: Wireless Settings
DMS-CTC-20110909-0007 v0.130
DRAFT
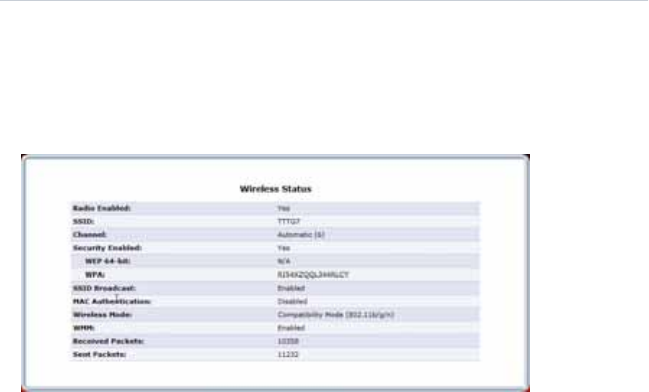
4.1 Wireless Status
Introduction
The Wireless Status page provides you an overview of the wireless settings that are
currently used by your HSG.
Overview
The following settings are available:
Radio Enabled:
Displays whether the HSG’s wireless radio is active.
SSID:
To be able to distinguish one wireless network from another, each wireless
network has its own network name, often referred to as Service Set IDentifier
(SSID). All your wireless devices on your network must use this network name.
Channel:
Displays the channel to which the wireless connection is currently set. When you
select Automatic (default setting), the HSG automatically selects the best
channel for your wireless communication. The actual channel will then be
displayed between parentheses (for example, Automatic (6) indicates that
channel 6 is selected)
Security Enabled:
Displays whether wireless security is enabled. If security is enabled, the HSG is
using one of the following encryption types to secure your wireless connection:
WEP 64-bit:
The oldest and also most encryption type. We recommend to use WPA instead.
Only use it if your wireless client does not support WPA.
WPA+WPA2:
This is a mixed mode. In this mode WPA2, is the preferred encryption type but
wireless clients do not support WPA2, can still use WPA as encryption type.
Choose this option if not all of your wireless clients support WPA2 or if you are
not sure. Wireless clients that support WPA2 will use WPA2, the others will use
WPA.
4GUI: Wireless Settings
DMS-CTC-20110909-0007 v0.1 31
DRAFT
WPA2 (default):
The most recent and most secure version of WPA. Choose this version if you
are sure that all your wireless clients support WPA2.
WPA:
The first version of WPA. Choose this option if you are sure that none of your
wireless clients support WPA2.
When you connect to the HSG, you have to enter the key that is listed next to
the encryption type.
SSID Broadcast:
Displays whether the HSG is broadcasting its SSID. If activated, the SSID will
appear in the list when a wireless client scans for available networks. For more
information, see “4.3.2 SSID Broadcast” on page 37.
MAC Authentication:
If MAC authentication is enabled, only wireless clients that are included in the
Access list are allowed to connect. For more information, see “4.3.3 Wireless MAC
Authentication” on page 38.
Wireless Mode:
Displays the types of wireless device that can join the network. Options include:
Compatibility Mode (802.11b/g/n)
In this mode 802.11b, 802.11g and 802.11n can be used to connect to the HSG.
Legacy Mode (802.11b/g)
In this mode only 802.11b- and 802.11g connections can be used to connect
to the HSG. 802.11n connections are not allowed
Received Packets:
The number of packets received and sent since the HSG’s wireless capability was
activated.
Sent Packets:
Displays the number of packets received and sent since the HSG’s wireless
capability was activated.
4 GUI: Wireless Settings
DMS-CTC-20110909-0007 v0.132
DRAFT
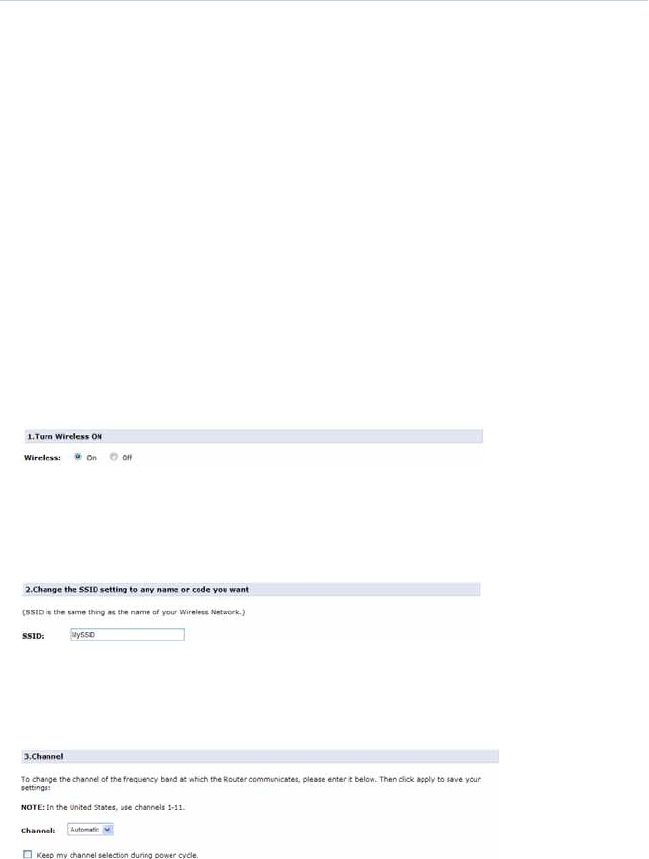
4.2 Basic Security Settings
Introduction
The Basic Security Settings page allows you to configure the basic wireless settings
of your HSG in a step-by-step approach.
Overview of the steps
This section describes:
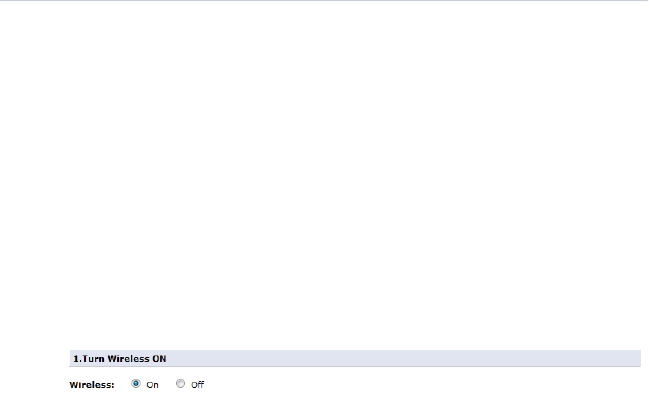
Step 1: Turn Wireless ON/OFF
Step 2: Change the SSID setting to any name or code you want
Step 3: Channel
Step 4: Click on the button next to WEP
Step 5: Select a WEP Key
Step 6: Turn WPS ON
Step 7: Write down wireless settings
Step 1: Turn Wireless ON/OFF
If you are not using your wireless connection, you might consider to turn it off.
Make sure that nobody is using the wireless connection before turning it off.
Step 2: Change the SSID setting to any name or code you want
If you want to change the default network name of your wireless network, type the
new network name in the SSID box.
Step 3: Channel
If you want to change the channel for your wireless communication, select a new
channel in the Channel list.
We recommend you to use Automatic (this is also the default). When Automatic is
selected the HSG will choose the channel that has the least interference. Only
change it if you experience wireless connectivity problems.
4GUI: Wireless Settings
DMS-CTC-20110909-0007 v0.1 33
DRAFT
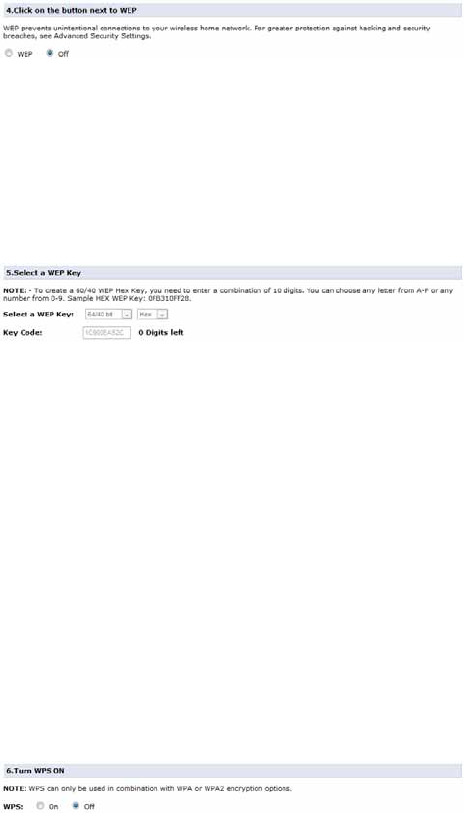
Step 4: Click on the button next to WEP
In this step you are able to use WEP encryption to secure your wireless connection.
WEP has been proven to have some security issues. It is recommended to keep the
Off option selected and use WPA(2) instead. For more information, see
“4.3.1 Securing Your Wireless Connection” on page 36.
The only reason why you might consider to use WEP is if you have older wireless
devices in your network that only support WEP.
Step 5: Select a WEP Key
If you did choose to use WEP, this step allows you to choose the WEP key.
1In the Select a WEP key list, select:
64/40 bit and Hex to enter a combination of 10 digits. You can choose any
letter from A-F or any number from 0-9. For example: 0FB310FF28.
64/40 bit and ASCII to enter a combination of 5 ASCII characters. For example:
hello.
128/104 bit and Hex to enter a combination of 26 digits. You can choose any
letter from A-F or any number from 0-9. Sample HEX WEP Key:
0FB310FF280FB310FF28123456.
128/104 bit and ASCII to enter a combination of 13 ASCII characters. For
example: sayhelloworld.
2Enter the key of your choice in the Key Code box.
3If needed, complete the other steps
4Click Apply on the bottom of the page.
Step 6: Turn WPS ON
Wi-Fi Protected Setup (WPS) allows you to add new wireless clients to your local
network in a swift and easy way, without the need to enter any of your wireless
settings (network name, wireless key, encryption type).
WPS can only be turned on if you are using WPA or WPA2 to encrypt your wireless
connection. If WEP or no encryption is used, the selection will be unavailable.
To turn WPS on/off:
1Under WPS, select On/Off.
4 GUI: Wireless Settings
DMS-CTC-20110909-0007 v0.134
DRAFT
2If needed complete the other steps.
3Click Apply.
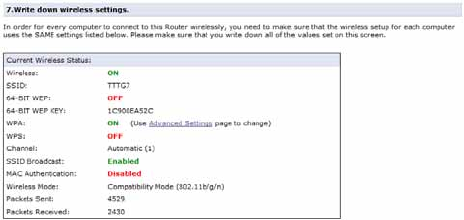
Step 7: Write down wireless settings
This step gives you an overview of the settings that will be active as soon as you click
the Apply button on the bottom of the page.
You can print or write down this overview, to
APPLY YOUR CHANGES
Do not forget to click Apply on the bottom of your page to activate your changes.

4GUI: Wireless Settings
DMS-CTC-20110909-0007 v0.1 35
DRAFT
4.3 Advanced Security Settings
Introduction
The Advanced Security Settings page allows you to take your wireless security to
the next level.
To improve the security of your wireless network you can add the following security
levels:
Level 1: Encrypt your wireless traffic with a wireless key to make sure that only
the sender and the receiver can read the data that is sent over your wireless
connection.
For more information, see “4.3.1 Securing Your Wireless Connection” on page 36.
Level 2: Disable the broadcasting of your wireless network name to hide your
wireless network from other users.
For more information, see “4.3.2 SSID Broadcast” on page 37.
Level 3: Limit access to your wireless network for certain devices.
Limit access based on the MAC address of the wireless device.
For more information, see “4.3.3 Wireless MAC Authentication” on page 38.
Limit access based on the wireless mode supported by the wireless device.
For more information, see “4.3.4 802.11b/g/n Mode” on page 39.

4 GUI: Wireless Settings
DMS-CTC-20110909-0007 v0.136
DRAFT
4.3.1 Securing Your Wireless Connection
Encryption types
The HSG supports the following encryption types:
WEP:
The least safe encryption type used for wireless connections. WEP has been
proven to have security issues. Only use this encryption if your wireless device
does not support WPA(2).
WPA+WPA2:
This is a mixed mode. In this mode WPA2, is the preferred encryption type but
wireless clients do not support WPA2, can still use WPA as encryption type.
Choose this option if not all of your wireless clients support WPA2 or if you are
not sure. Wireless clients that support WPA2 will use WPA2, the others will use
WPA.
WPA2 (default):
The most recent and most secure version of WPA. Choose this version if you are
sure that all your wireless clients support WPA2.
WPA:
The first version of WPA. Choose this option if you are sure that none of your
wireless clients support WPA2.
None
If you want to configure WPA2 on the built-in wireless utility of Windows
XP Service Pack 2 (SP2), you first have to:
Upgrade your Windows XP to Service Pack 3.
- or -
Install the following update: http://support.microsoft.com/kb/917021.
Although the HSG allows you to use WEP or no security, we strongly advise against
using on of them! We recommend you to use WPA2.
Changing the encryption type
1On the Wireless Settings menu, click Advanced Security Settings.
2Under Level 1, select the encryption type of your choice.
3Enter a the pre-shared key of your choice or use the default one.
4Click Apply.
4GUI: Wireless Settings
DMS-CTC-20110909-0007 v0.1 37
DRAFT
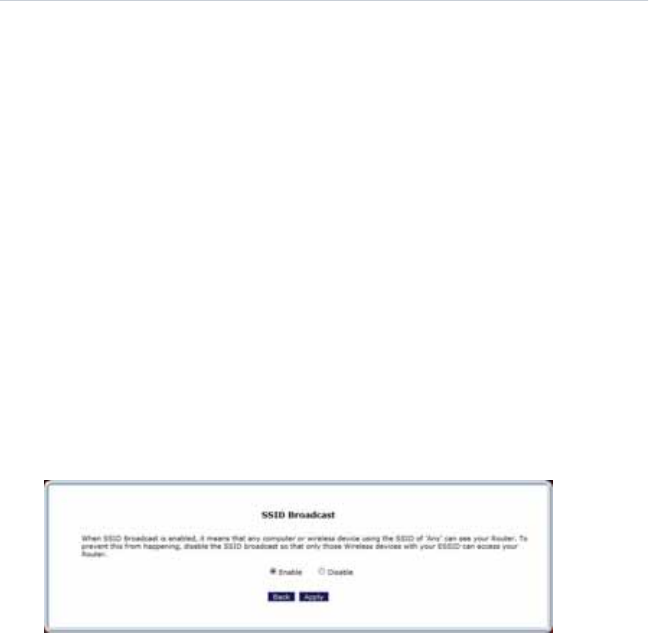
4.3.2 SSID Broadcast
SSID
To be able to distinguish one wireless network from another, each wireless network
has its own network name, often referred to as Service Set IDentifier (SSID). All your
wireless devices on your network must use this network name (and the correct
encryption).
Broadcast
By default, the HSG broadcasts its wireless SSID. Wireless clients can then detect the
presence of your network and inform the users that this network is available.
Note Enabling SSID broadcast does not mean that everyone can connect to your
network. They still need the correct wireless key to connect to the HSG
network. It only informs them that your network is present.
Disabling SSID Broadcast
Proceed as follows:
1On the Wireless Settings menu, click Advanced Security Settings.
2Under Level 2, click SSID Broadcast.
3The SSID Broadcast page appears:
Click:
Enable to allow wireless clients to see your wireless network.
Disable to prevent wireless clients from seeing your wireless network.
4Click Apply.

4 GUI: Wireless Settings
DMS-CTC-20110909-0007 v0.138
DRAFT
4.3.3 Wireless MAC Authentication
MAC Address
A MAC (Media Access Control) address is a unique hexadecimal code that identifies a
device on a network. Each network device has such a MAC address.
MAC Authentication
When using MAC authentication, you allow or deny devices to access to your
network based on their MAC address.
Warning: MAC authentication alone is not enough!
Wireless MAC Authentication only offers a limited level of security. Hackers can
easily detect a trusted MAC addresses and clone this trusted MAC address to their
own computer, which will enables them to pass the MAC authentication filter. That’s
why it is important that you first secure your wireless connection (preferably with a
WPA encryption key). This way hackers won’t be able to interpret your wireless
traffic.
Enabling MAC
Proceed as follows:
1On the Wireless Settings menu, click Advanced Security Settings.
2Under Level 3, click Wireless MAC Authentication.
3Select Enable Access List.
4Select:
Accept all devices listed below if you want to block all devices by default.
Deny all devices listed below if you want to allow all devices by default.
5Now you can add exceptions to the default rule: enter the MAC addresses of the
device in the Client MAC Address box and click Add. Repeat this step for each
device.
Note If you choose Accept all devices listed below and you are currently
connected using a wireless connection, make sure to add the MAC
address of your wireless client. If you do not do so, your will
disconnected from the wireless network.
6Click Apply.
4GUI: Wireless Settings
DMS-CTC-20110909-0007 v0.1 39
DRAFT
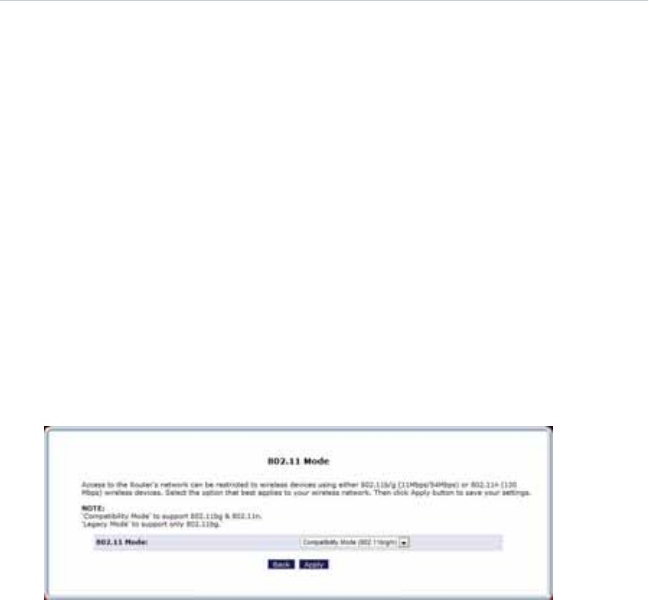
4.3.4 802.11b/g/n Mode
Introduction
The 802.11b/g/n Mode page allows you to specify which wireless standards you
want to support.
Wireless standards
The HSG is able to support the following wireless standards:
802.11n offers the highest speed (up to 130Mbps) and best range.
802.11g offers speeds up to 54Mbps.
802.11b offers speeds up to 11Mbps.
Procedure
Proceed as follows:
1On the Wireless Settings menu, click Advanced Security Settings.
2Under Level 3, click 802.11b/g/n Mode.
3The 802.11 Mode page appears:
In the 802.11 Mode list, select either of the following modes:
Compatibility Mode (802.11b/g/n)
In this mode 802.11b, 802.11g and 802.11n can be used to connect to the HSG.
Legacy Mode (802.11b/g)
In this mode only 802.11b- and 802.11g connections can be used to connect
to the HSG. 802.11n connections are not allowed.
4Click Apply.
4 GUI: Wireless Settings
DMS-CTC-20110909-0007 v0.140
DRAFT
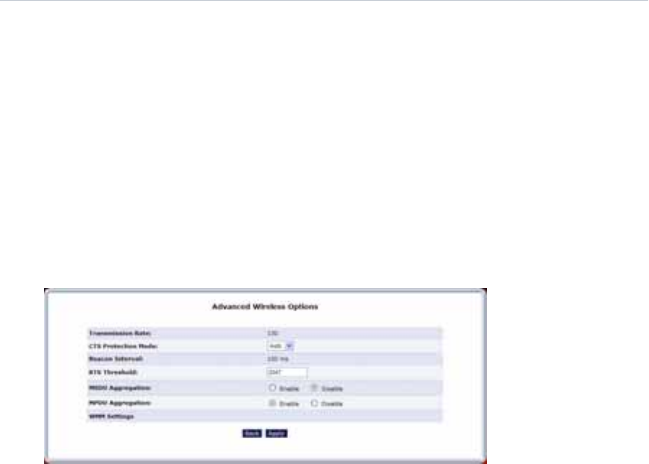
4.3.5 Other Advanced Wireless Options
Warning
Changing the Advanced Wireless Options may affect your router's wireless
performance. Do not make any changes to these options unless you have been
instructed to do so by Verizon support personnel.
Accessing the Advanced Wireless Options page
Proceed as follows:
1On the Wireless Settings menu, click Advanced Security Settings.
2Under Level 3, click Other Advanced Wireless Options.
3The Advanced Wireless Options page appears.

5
DRAFT
GUI: My
Network
5 GUI: My Network
DMS-CTC-20110909-0007 v0.142
DRAFT
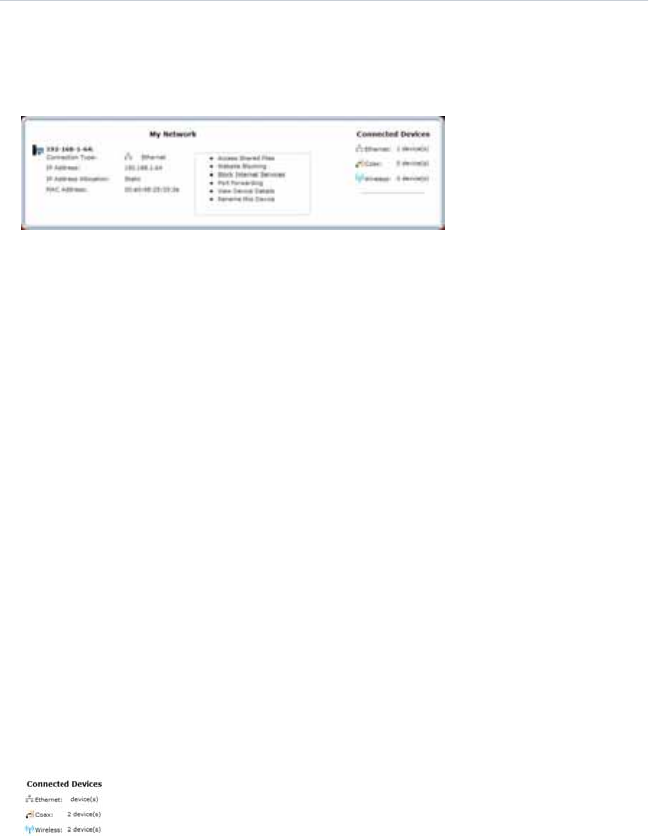
5.1 Network Status
Introduction
The Network Status page provides you an overview of the devices that are
currently connected to the HSG.
Device Information
The following information is provided for each device:
PC Name:
Displays the name that will be used to reference to this device.
Connection Type:
Displays how the device is connected to the HSG (Ethernet, Wireless or Coax).
IP Address:
Displays the IP address of the device.
IP Address Allocation:
Displays whether the device is using:
ADynamic IP address
In this case the HSG assigns the first available address in the address pool. This
also means that your may get a different IP address the next time you connect.
AStatic IP address
In this case the device uses a dedicated IP address, you will always use the
same IP address for your connection. You can assign a static IP address either
on the HSG or your device.
MAC Address:
Displays the unique hardware address of the HSG.
Connected Devices
The Connected Devices pane on the right displays how many
devices are connected to a specific interface on the HSG.
5GUI: My Network
DMS-CTC-20110909-0007 v0.1 43
DRAFT
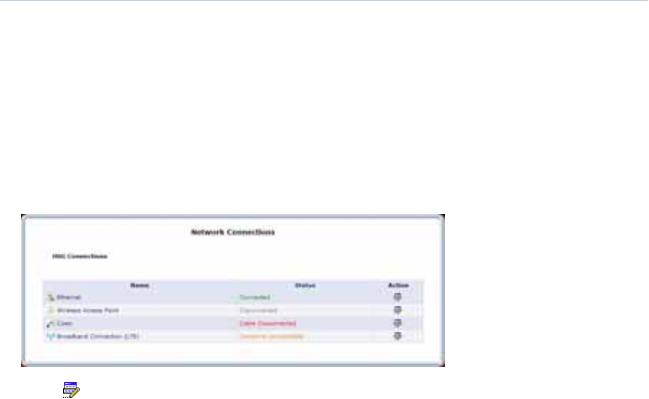
5.2 Network Connections
Warning
The settings covered in this section should be configured by experienced network
technicians only!
Introduction
The Network Connections page allows you to configure the network connections
of your HSG.
Click or the name of the connection to edit or view the settings of the
connection.
5 GUI: My Network
DMS-CTC-20110909-0007 v0.144
DRAFT
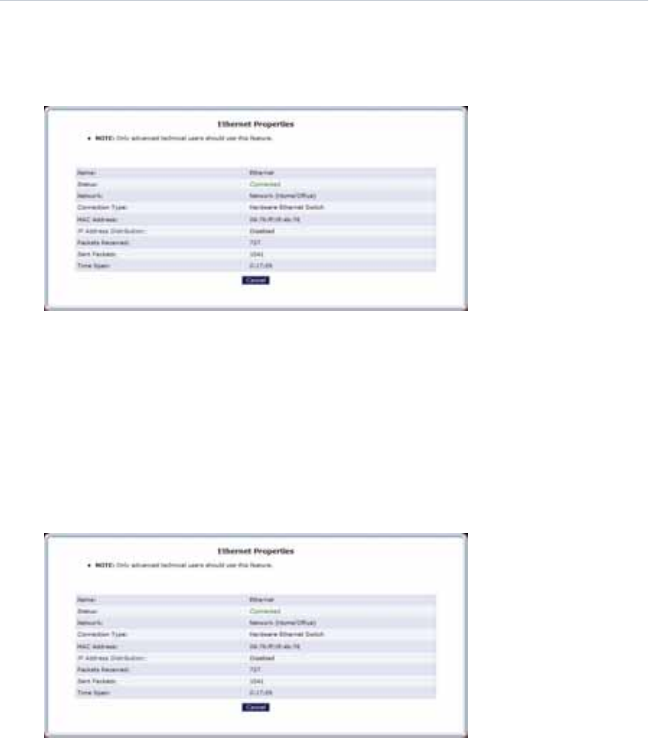
5.2.1 Ethernet Properties
Introduction
The Ethernet Properties page allows you to view the properties of the Ethernet
switch of your HSG.
Accessing the Ethernet Properties page
Proceed as follows:
1On the My Network menu, click Network Connections.
2The Network Connections table appears. Under Network (Home/Office), click
Ethernet.
Note If you do not see this item, click Advanced on the bottom of the page.
3The Ethernet Properties page appears:
4If you want to change the DHCP settings of your HSG, click IP Address
Distribution. For more information, see “8.10 IP Address Distribution” on page 75.
5GUI: My Network
DMS-CTC-20110909-0007 v0.1 45
DRAFT
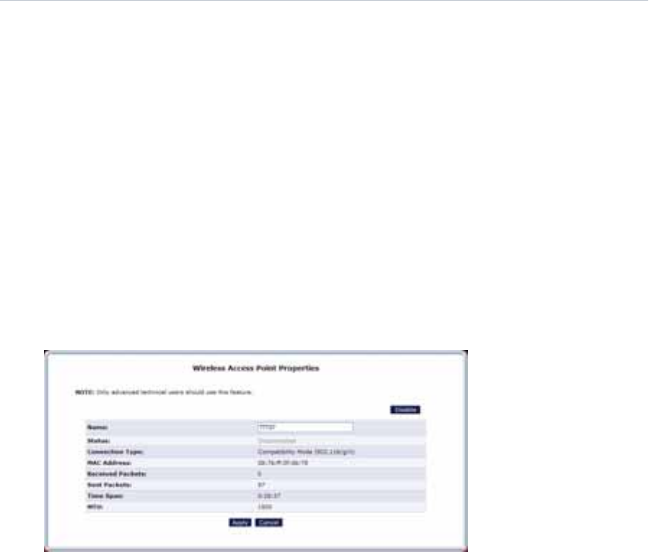
5.2.2 Wireless Access Point Properties
Introduction
The Wireless Access Point Properties page allows you to:
View the properties of the wireless access point of your HSG.
View/ change the network name (SSID) of the wireless access point.
Access
Proceed as follows:
1On the My Network menu, click Network Connections.
2The Network Connections table appears. Under Network (Home/Office), click
Wireless Access Point.
Note If you do not see this item, click Advanced on the bottom of the page.
3The Wireless Access Point Properties page appears:
4If you want to:
Turn off the wireless access point, click Disable in the upper-right corner.
Change the network name (SSID), type the new name in the Name box and
click Apply.
5 GUI: My Network
DMS-CTC-20110909-0007 v0.146
DRAFT
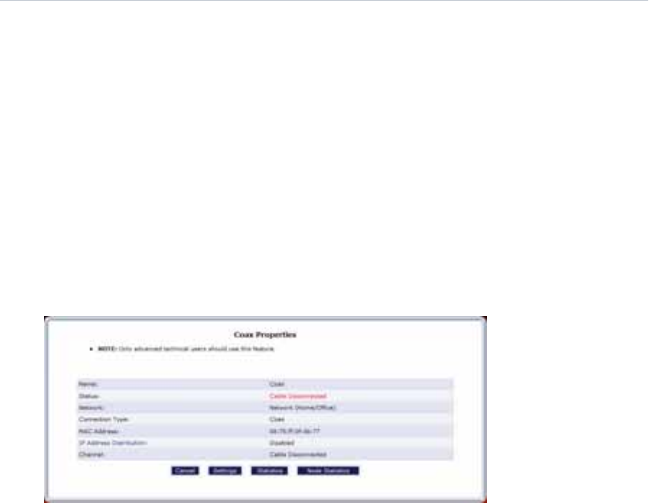
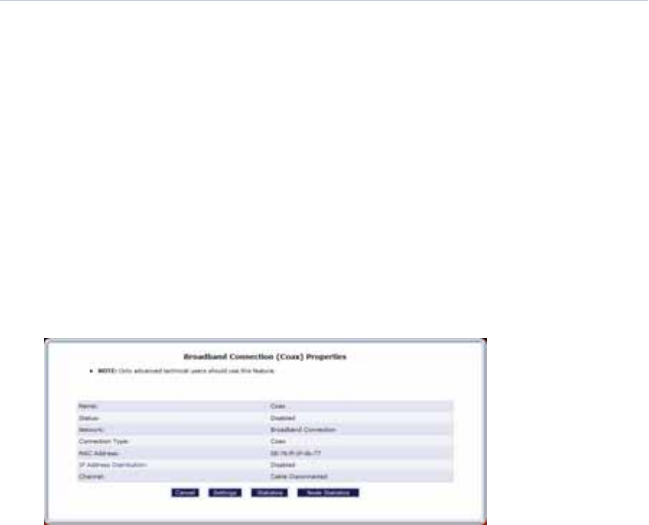
5.2.3 Coax Connection
Introduction
A Coax connection connects devices (such as set-top boxes) to the HSG Router using
a coaxial cable.
The Coax Properties page allows you to view/change the settings of this
connection.
Accessing the Coax Properties page
Proceed as follows:
1On the My Network menu, click Network Connections.
2The Network Connections table appears. Click Coax.
3The Coax Properties page appears:
Properties
The following properties are available:
Status:
Displays the status of the coax connection.
Network:
Displays the type of network.
Connection Type:
Displays the type of connection.
MAC Address:
Displays the unique hardware address of this interface.
IP Address Distribution:
To change the value, click IP Address Distribution. For more information, see
“8.10 IP Address Distribution” on page 75.
Channel:
The channel used by the coax connection.
Controls
Click:
Settings to change the following advanced settings:
5GUI: My Network
DMS-CTC-20110909-0007 v0.1 47
DRAFT
Channel
Allowable frequency
Network Coordinator Mode
Transmit Power Control
Maximum Transmit Power
Privacy
Statistics to view the statistics of your Coax connection
Node statistics to view the statistics of the devices that are using the Coax
connection.
5 GUI: My Network
DMS-CTC-20110909-0007 v0.148
DRAFT
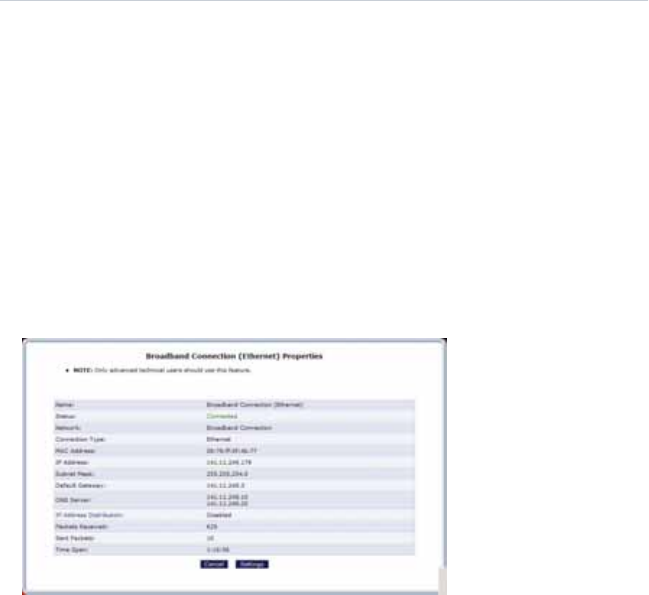
5.2.4 Broadband Connection (Ethernet)
Introduction
The Broadband Ethernet connection connects the HSG Router to the Internet using
an Ethernet cable.
The Broadband Connection (Ethernet) Properties page allows you to view/
change the settings of this connection.
Accessing the Broadband Connection (Ethernet) Properties page
Proceed as follows:
1On the My Network menu, click Network Connections.
2The Network Connections table appears. Click Broadband Connection
(Ethernet) Properties.
3The Broadband Connection (Ethernet) Properties page appears.
Properties
The following properties are available:
Status:
Displays the status of the Ethernet connection (for example, “Down”,
“Connected”).
Network:
Select the type of connection being configured from the drop-down list (options:
Network [Home/Office], Broadband Connection, or DMZ).
Connection Type:
Displays the type of connection. Since this is an Ethernet Connection, “Ethernet”
is displayed. Physical Address Displays the physical address of the network card
used for the network.
MAC Address:
Displays the unique hardware address of this interface.
IP Address:
The local IP address of the HSG and its DHCP server.
5GUI: My Network
DMS-CTC-20110909-0007 v0.1 49
DRAFT
Subnet mask:
The subnet mask is used in combination with the IP address to identify your
network.
Default Gateway:
The server that is used to pass traffic outside the local network.
DNS Server:
The DNS servers used by the Broadband Connection (Ethernet). These servers will
translate the DNS names (for example: www.google.com) into IP addresses (for
example: 74.125.230.84).
IP Address Distribution:
To change the value, click IP Address Distribution. For more information, see
“8.10 IP Address Distribution” on page 75.
Packets Received:
The number of packets that were received over the Broadband Connection
(Ethernet) connection.
Sent Packets:
The number of packets that were sent over the Broadband Connection (Ethernet)
connection.
Time Span
Changing the properties
Clicking Settings allows you to change:
The DHCP setting
The DNS settings
The routing table
5 GUI: My Network
DMS-CTC-20110909-0007 v0.150
DRAFT
5.2.5 Broadband Connection (Coax)
Introduction
A Coax Broadband connection connects the HSG Router to the Internet using a
coaxial cable.
The Broadband Connection (Coax) Properties page allows you to view/change
the settings of this connection.
Accessing the Broadband Connection (Coax) Properties page
Proceed as follows:
1On the My Network menu, click Network Connections.
2The Network Connections table appears. Click Broadband Connection (Coax)
Properties.
3The Broadband Connection (Coax) Properties page appears.
Properties
The following properties are available:
Status:
Displays the status of the coax connection.
Network:
Displays the type of network.
Connection Type:
Displays the type of connection.
MAC Address:
Displays the unique hardware address of this interface.
IP Address Distribution:
To change the value, click IP Address Distribution. For more information, see
“8.10 IP Address Distribution” on page 75.
Channel:
The channel used by the coax connection.
Changing the properties
Clicking Settings allows you to change:
5GUI: My Network
DMS-CTC-20110909-0007 v0.1 51
DRAFT
The DHCP setting
The DNS settings
The routing table
5 GUI: My Network
DMS-CTC-20110909-0007 v0.152
DRAFT

6
DRAFT
GUI: Fire-
wall
Settings
6 GUI: Firewall Settings
DMS-CTC-20110909-0007 v0.154
DRAFT
Introduction
The firewall controls the flow of data between the local network and the Internet.
Both incoming and outgoing data are inspected and then either accepted (allowed)
or rejected (barred) from passing through according to a set of rules.
To make sure that your entire network is protected the firewall is integrated in the
Cantenna.
Accessing the Cantenna Firewall pages via the HSG
Proceed as follows:
1On the top menu, click Firewall Settings.
2The HSG directs you to the Cantenna firewall page.

7
DRAFT
GUI:
Parental
Control
7 GUI: Parental Control
DMS-CTC-20110909-0007 v0.156
DRAFT
7.1 Parental Control
Introduction
The Parental control page allows you to:
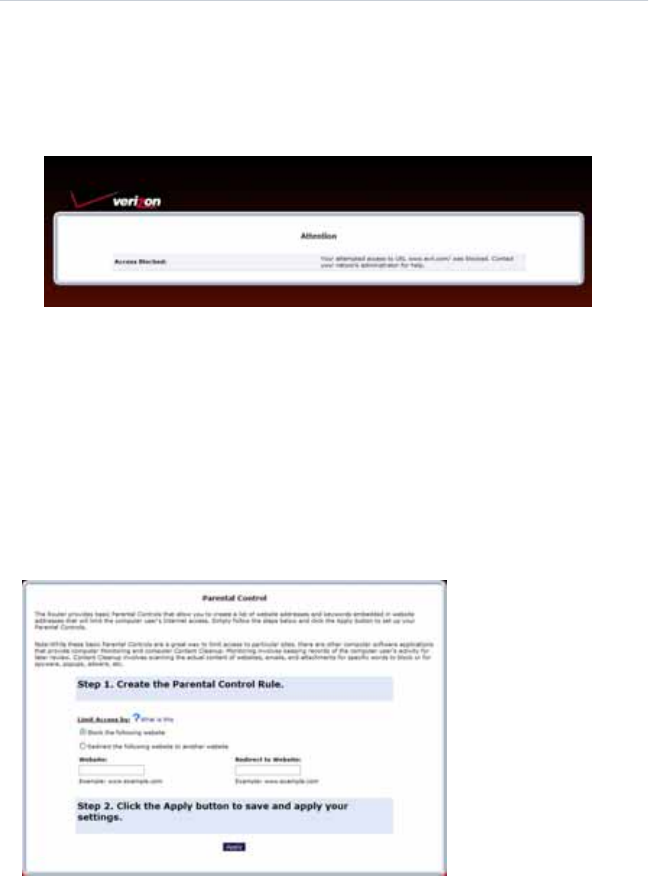
Block a website:
When the user tries to access the blocked page he will get the standard page
announcing that this page has been blocked.
For more information, see “Blocking a website” on page 56.
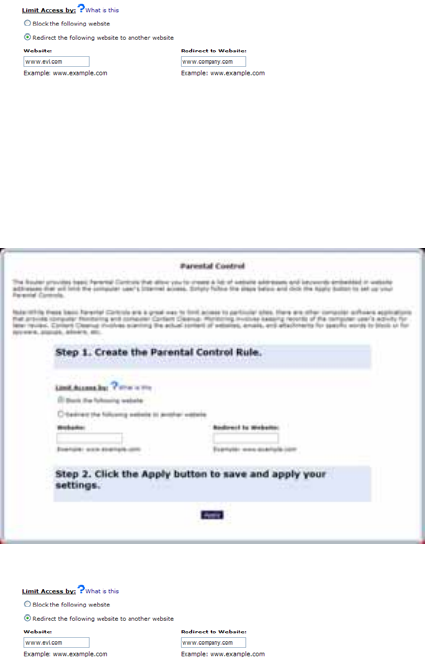
Redirect a website to another website.
When the user tries to access the blocked page he will be redirected to the page
of your choice (for example: an intranet page explaining the intranet policy). For
more information, see “Redirecting a website to another website” on page 57.
Blocking a website
Proceed as follows:
1On the top menu, click Parental Control.
2The Parental Control page appears.
7GUI: Parental Control
DMS-CTC-20110909-0007 v0.1 57
DRAFT
3Select Block the following website and enter the URL of the Website that you
want to block in the Website box for example (www.evil.com).
4Click Apply.
Redirecting a website to another website
Proceed as follows:
1On the top menu, click Parental Control.
2The Parental Control page appears.
3Select Redirect the following website to another website.
4Enter the URL of the website that you want to block in the Website box (for
example: www.evil.com).
5Enter the URL of the website that you want to redirect to in the Redirect to
Website box (for example: www.company.com).
6Click Apply.
7 GUI: Parental Control
DMS-CTC-20110909-0007 v0.158
DRAFT
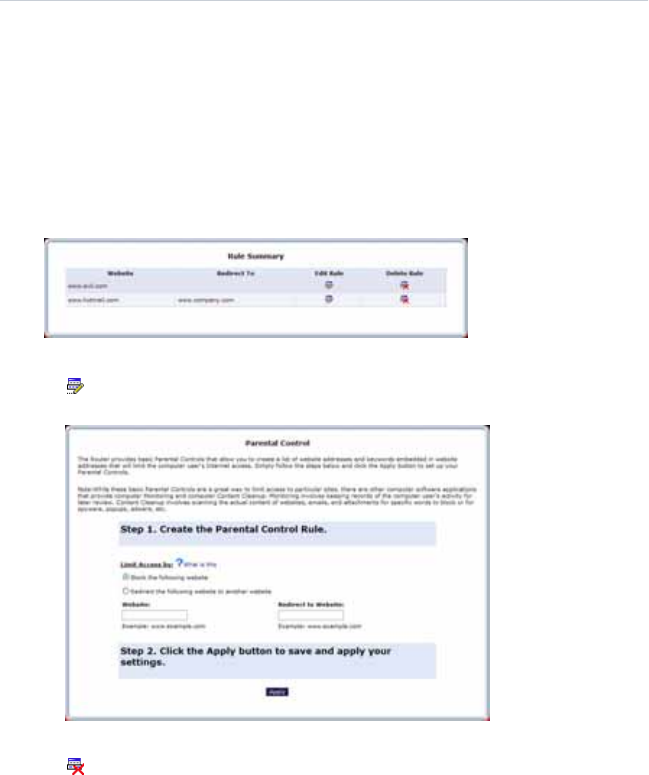
7.2 Rule Summary
Introduction
The Rule Summary page allows you to view or change the existing parental control
rules.
Changing a parental control rule
Proceed as follows:
1On the Parental Control menu, click Rule Summary.
2The Rule Summary page appears.
3Click:
to edit a rule. The Parental Control page will then allow you to change the
rule.
For more information, see “7.1 Parental Control” on page 56.
to delete a rule.
7GUI: Parental Control
DMS-CTC-20110909-0007 v0.1 59
DRAFT
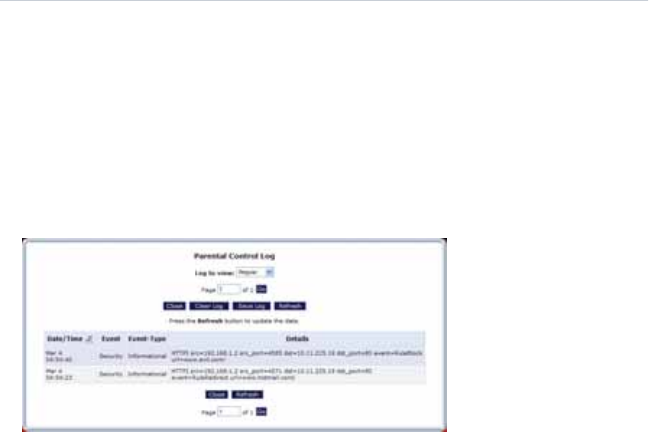
7.2.1 Parental Control Log
Introduction
The Parental Control Log page allows you to view when people tried to access the
a blocked page.
Accessing the Parental Control Log page
Proceed as follows:
1On the Parental Control menu, click Parental Control Log.
2The Parental Control Log page appears.
Under Details you can see the detailed information about the event. The most
important items are:
src: The IP address of the user that tried to access the website.
url: The URL of the website that the user tried to access.
3Optionally, click:
Close to go to the Rule Summary page.
Clear Log to remove all entries.
Save Log to save the log entries to a text file.
Refresh to update the list.
7 GUI: Parental Control
DMS-CTC-20110909-0007 v0.160
DRAFT

8
DRAFT
GUI:
Advanced
Settings
8 GUI: Advanced Settings
DMS-CTC-20110909-0007 v0.162
DRAFT
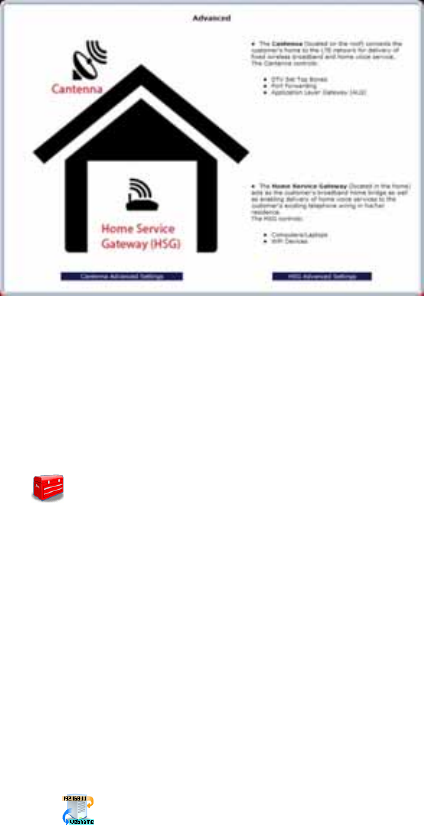
Introduction
The Advanced page allows you to configure the more advanced services of both
the HSG and the Verizon.
To access the Advanced, proceed as follow:
1On the top menu, click Advanced.
2The Advanced page appears.
3On the bottom of this page, click:
Cantenna Advanced Settings to configure the settings of the Cantenna.
For more information about these settings, read the user documentation of
your Cantenna.
HSG Advanced Settings to configure the settings of the HSG.
For more information about these settings, read the rest of this chapter.
Utilities
Click:
Diagnostics to perform diagnostic tests on the HSG.
For more information, see “8.1 Diagnostics” on page 64.
Restore Defaults to reset the HSG to its default settings.
For more information, see “8.2 Restore Defaults” on page 66.
Reboot Router to restart the HSG
For more information, see “8.3 Reboot Gateway” on page 67.
ARP Table to display active devices and their IP and MAC addresses.
For more information, see “8.4 ARP Table” on page 68.
Users to create and manage users.
For more information, see “8.5 Users” on page 69.
DNS Server
Click DNS Server to manage the local (LAN) network for host name and IP address.
For more information, see “8.6 DNS Server” on page 70.

8GUI: Advanced Settings
DMS-CTC-20110909-0007 v0.1 63
DRAFT
Configuration
Click:
System Settings to change the system settings of the HSG.
For more information, see “8.7 System Settings” on page 72.
Port Configuration to configure the Ethernet LAN ports.
For more information, see “8.8 Port Configuration” on page 73.
Date and time
Click Date and Time to configure the HSG clock and calendar of the HSG.
For more information, see “8.9 Date and Time” on page 74.
IP Address Distribution
Click IP Address Distribution to manage the IP addresses of devices on the
network.
For more information, see “8.10 IP Address Distribution” on page 75.
8 GUI: Advanced Settings
DMS-CTC-20110909-0007 v0.164
DRAFT
8.1 Diagnostics
Introduction
The Diagnostics page allows you to ping a device or website. Ping is used to test if a
host (for example, a website, a computer) is reachable.
Procedure
To diagnose network connectivity:
1On the top menu, click Advanced.
2The Advanced page appears. Click HSG Advanced Settings on the bottom of
the page and then click Yes to confirm that you want to access the advanced
settings.
3Under , click Diagnostics.
4The Diagnostics page appears.
In the Destination box, type one of the following:
The DNS name (for example: www.google.com) or IP address (for example:
141.11.249.33) of a website.
The DNS name (for example: Sascha-PC.lan) or IP address (for example:
192.168.1.3) of network device.
5If needed change the number of pings in the Number of pings box.
6Click Go.
7The HSG is now pinging the destination. You can follow the progress in the
Packets box.
8At the end of the test the results appear.
Under:
Status you can see if the test was successful or not.
Packets you can see the number packets that were received and how many
percent that were lost.
8GUI: Advanced Settings
DMS-CTC-20110909-0007 v0.1 65
DRAFT
Round trip time, you can see the amount of time it took for the packet to get
back to the HSG.
8 GUI: Advanced Settings
DMS-CTC-20110909-0007 v0.166
DRAFT
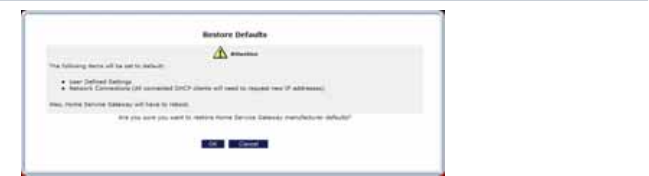
8.2 Restore Defaults
Introduction
The Restore Defaults page allows you to return to the factory defaults of your HSG.
For more information, see “10.3 Resetting your HSG” on page 93.
8GUI: Advanced Settings
DMS-CTC-20110909-0007 v0.1 67
DRAFT
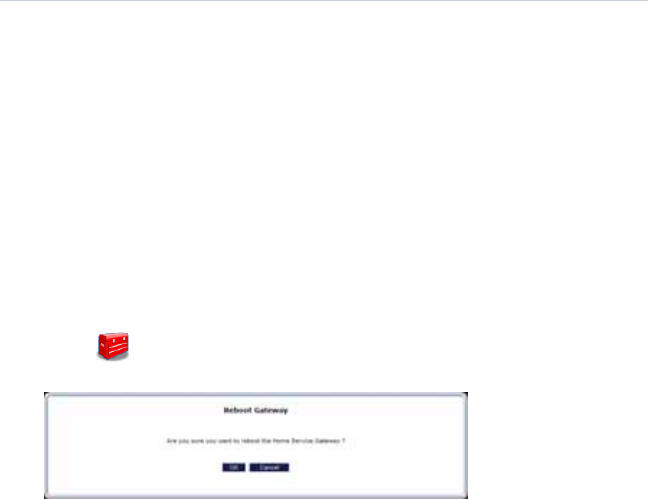
8.3 Reboot Gateway
Introduction
This Reboot Gateway page allows you to restart your HSG.
WARNING
During the reboot all services provided by the HSG will be unavailable.
Procedure
To reboot the HSG:
1On the top menu, click Advanced.
2The Advanced page appears. Click HSG Advanced Settings on the bottom of
the page and then click Yes to confirm that you want to access the advanced
settings.
3Under , click Reboot Gateway.
4The HSG prompts you to confirm the reboot.
Click OK.
5The HSG restarts. This may take up to two minutes.
Note To access the HSG’s GUI after restarting the HSG, click the Refresh button
of your web browser.
8 GUI: Advanced Settings
DMS-CTC-20110909-0007 v0.168
DRAFT
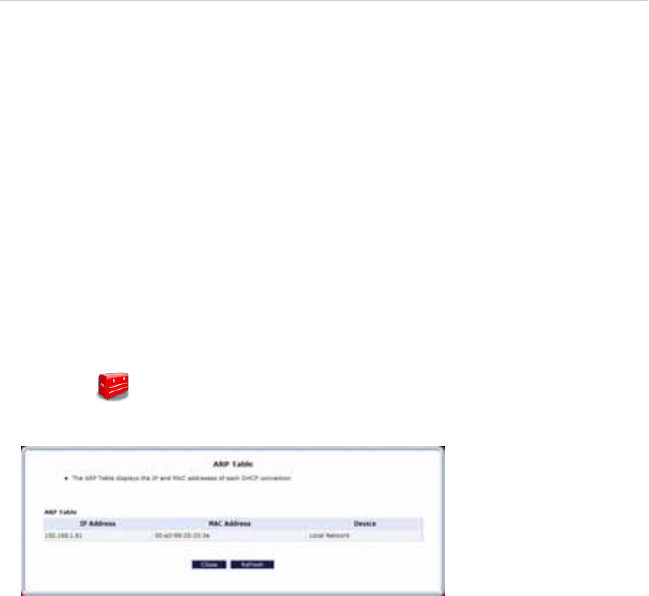
8.4 ARP Table
ARP
The Address Resolution Protocol is a protocol that translates the IP address of a
network device into its MAC address.
The ARP table page
The ARP Table page provides you a mapping between the IP address and the MAC
address of the device that is using this IP address.
Viewing the ARP table
Proceed as follows:
1On the top menu, click Advanced.
2The Advanced page appears. Click HSG Advanced Settings on the bottom of
the page and then click Yes to confirm that you want to access the advanced
settings.
3Under , click ARP Table.
4The ARP Table page appears.
The following fields are available:
IP Address
MAC Address
Device
Displays the network interface that the device is using. For more information,
see “5.2 Network Connections” on page 43.
8GUI: Advanced Settings
DMS-CTC-20110909-0007 v0.1 69
DRAFT
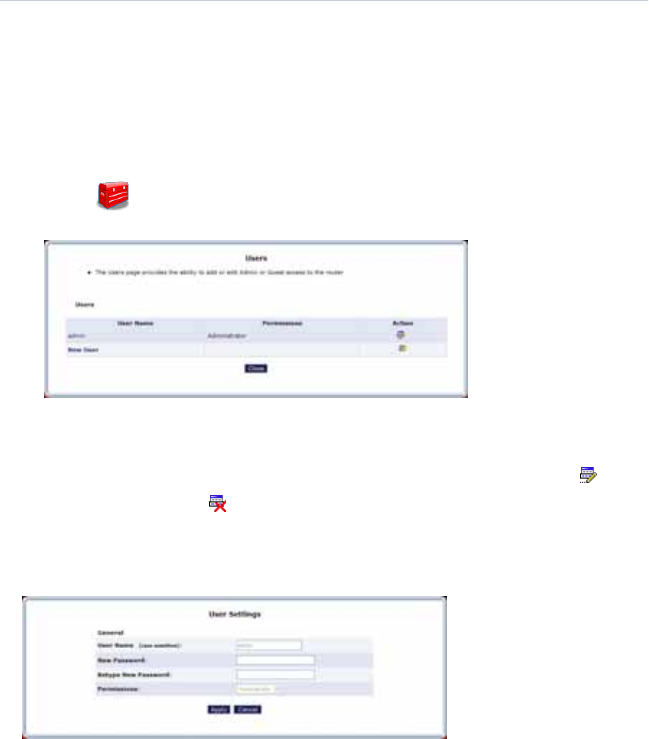
8.5 Users
Introduction
The Users page allows you to manage the user accounts for access to the HSG GUI.
1On the top menu, click Advanced.
2The Advanced page appears. Click HSG Advanced Settings on the bottom of
the page and then click Yes to confirm that you want to access the advanced
settings.
3Under , click Users.
4The Users page appears.
5If you want to:
Create a new user, click New User.
Change the settings of an existing user, click the name of the user or .
Delete a user, click .
User Settings page
When editing or creating a user account the User Settings page appears:
The following fields are available:
User Name
The name a remote user will use to access the home or office network. This entry
is case-sensitive.
New Password/Retype New Password
The password for the user (and enter again to confirm).
Permissions
The level of access the user is allowed. Options include: Administrator or User.
Note You can not change the User Name and Permissions of the admin user.

8 GUI: Advanced Settings
DMS-CTC-20110909-0007 v0.170
DRAFT
8.6 DNS Server
Introduction
The Domain Name System (DNS) translates domain names into IP addresses and
vice versa. The HSG’s DNS server is an auto-learning DNS, which means that when a
new computer is connected to the network, the DNS server learns its name and
automatically adds it to the DNS table. Other network users can immediately
communicate with this computer using either its name or its IP address.
Services offered
The following services are provided by the DNS server of the HSG:
Shares a common database of domain names and IP addresses with the DHCP
server.
Supports multiple subnets within the local network simultaneously.
Automatically appends a domain name to unqualified names.
Allows new domain names to be added to the database using the HSG’s GUI.
Permits a computer to have multiple host names.
Permits a host name to have multiple IPs (needed if a host has multiple network
cards).
Configuration
The DNS Server does not require configuration. However, the list of computers
known by the DNS can be viewed or a new computer can be added to the list.
Viewing DNS Table
Proceed as follows:
1On the top menu, click Advanced.
2The Advanced page appears. Click HSG Advanced Settings on the bottom of
the page and then click Yes to confirm that you want to access the advanced
settings.
3Under , click DNS Server.
4The DNS Server page appears.
Click:
Add or to add a new entry to the list. For more information, see “Adding a
DNS entry” on page 71.
8GUI: Advanced Settings
DMS-CTC-20110909-0007 v0.1 71
DRAFT
to edit an existing DNS entry.
to delete an existing DNS entry.
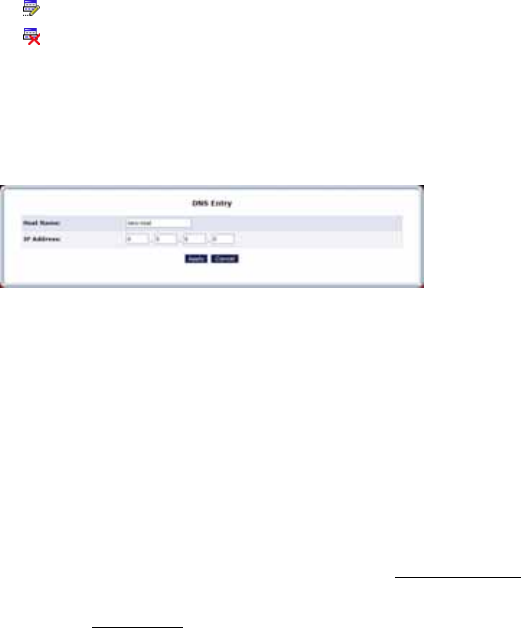
Adding a DNS entry
On the DNS Server page:
1Click Add DNS Entry at the bottom of the page.
2The DNS Entry page appears.
3Enter a DNS name for the host in the Host Name box.
4Enter the IP address of the host in the IP Address box.
5Click Apply.
Accessing a device via its DNS name
Once that a device is listed in the DNS table you can access it via <DNS.
name>.<DNS suffix>.
Example
Your host is using PC-Jim as DNS name and lan as DNS suffix (this is the default DNS
suffix).
If this host is running a web server, you can access it via http://PC-Jim.lan.
If this host is a Windows computer with shared files on it, you can access these
shared files via \\PC-Jim.lan.
8 GUI: Advanced Settings
DMS-CTC-20110909-0007 v0.172
DRAFT
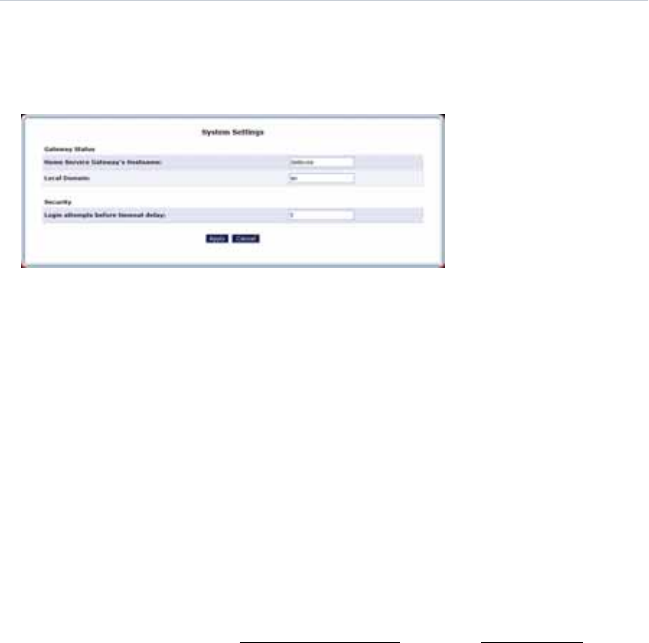
8.7 System Settings
Introduction
The System Settings page allows you to configure various system and
management parameters.
The page is divided into the following groups:
Gateway Status
Security
Gateway Status
Under Gateway Status, the following properties are available:
Home Service Gateway’s Hostname
Specify the HSG’s host name by entering it into the text box. The host name is
used in combination with the Local Domain to access the HSG.
Local Domain
Specify the network’s local domain by entering it into this text box. The Local
Domain is used in combination with the Home Service Gateway’s Hostname to
access the HSG.
So if you change the host name to gateway and the local domain to home, you will
have to access the GUI using http://gateway.home instead of http://hsg.lan.
Security
Under Security, you can enter how many tries a user gets to login to the GUI
without blocking GUI access.

8GUI: Advanced Settings
DMS-CTC-20110909-0007 v0.1 73
DRAFT
8.8 Port Configuration
Introduction
The Port Configuration page allows you to set up the HSG’s Ethernet ports as either
Supported speeds
The HSG supports the following speeds:
1 Gigabit (=1000 Megabits) per second (Gbps)
100 Megabits per second (Mbps)
10 Megabits per seconds
The HSG also has an Auto setting where it automatically selects the highest speed
supported by the connected device.
Supported Duplex
The HSG supports the following communication systems:
Full-duplex:
Supports communication in both directions and at the same time.
Half-duplex:
Supports communication in both directions but only one at a time.

8 GUI: Advanced Settings
DMS-CTC-20110909-0007 v0.174
DRAFT
8.9 Date and Time
Introduction
The Date and Time page allows you to configure the date and time that the HSG will
be using for System logging.
For more information, see “9.2.1 System Logging” on page 81.
Accessing the Date and Time page
Proceed as follows:
1On the top menu, click Advanced and then click Yes to confirm that you want to
access the advanced settings.
2Under , click Date and Time.
3In the Time Zone list, select your time zone or select Other to create one if your
time zone is not listed.
4Under Daylight Saving Time you can change the daylight saving settings
5Under Automatic Time Update:
Select Enabled if you want the HSG to synchronize its time settings with a
Network Time Protocol (NTP) server. This guarantees you that you will always
be using the correct time.
Clear Enabled if you want to set the time manually. Use the Clock Set button
on the bottom of the page to enter the correct date and time.
6Click Apply.

8GUI: Advanced Settings
DMS-CTC-20110909-0007 v0.1 75
DRAFT
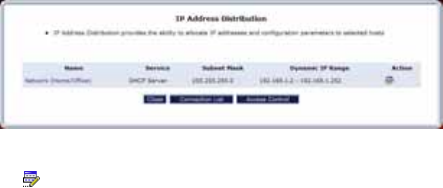
8.10 IP Address Distribution
Introduction
The HSG’s DHCP server makes it possible to easily add computers configured as
DHCP clients to the network. It provides a mechanism for allocating IP addresses to
these hosts and for delivering network configuration parameters to them.
For example, a client (host) sends out a broadcast message on the network
requesting an IP address for itself. The DHCP server then checks its list of available
addresses and leases a local IP address to the host for a specific period of time and
simultaneously designates this IP address as “taken.” At this point, the host is
configured with an IP address for the duration of the lease.
The host can choose to renew an expiring lease or let it expire. If it chooses to renew
a lease, it will also receive current information about network services,
as it did with the original lease, allowing it to update its network configurations to
reflect any changes that occurred since it first connected to the network. If the host
wishes to terminate a lease before its expiration, it can send a release message to the
DHCP server, which will then make the IP address available for use by others.
HSG DHCP server functions
The DHCP server of the HSG:
Displays a list of all DHCP hosts devices connected to the HSG.
Defines the range of IP addresses that can be allocated in the network.
Defines the length of time for which dynamic IP addresses are allocated.
Provides the above configurations for each network device and can be
configured and enabled/disabled separately for each network device.
Can assign a static lease to a network computer so that it receives the same IP
address each time it connects to the network, even if this IP address is within the
range of addresses that the DHCP server may assign to other computers.
Provides the DNS server with the host name and IP address of each computer
connected to the network.
Accessing the IP Address Distribution page
To view a summary of the services currently being provided by the DHCP server:
1On the top menu, click Advanced and then click Yes to confirm that you want to
access the advanced settings.
2Under , click IP Address Distribution.
8 GUI: Advanced Settings
DMS-CTC-20110909-0007 v0.176
DRAFT
3The Routing page appears.
Click:
or the name of the entry to change the settings.
Connection List to see the current DHCP connections.
Access Control to allow/deny access for specific client based on their MAC
address of the client.

9
DRAFT
GUI:
System
Monitoring
9 GUI: System Monitoring
DMS-CTC-20110909-0007 v0.178
DRAFT
Introduction
The System Monitoring menu consists of the following items:
Router Status
For more information, see “9.1 Router Status” on page 79.
Advanced Status
For more information, see “9.2 Advanced Status” on page 80.
9GUI: System Monitoring
DMS-CTC-20110909-0007 v0.1 79
DRAFT
9.1 Router Status
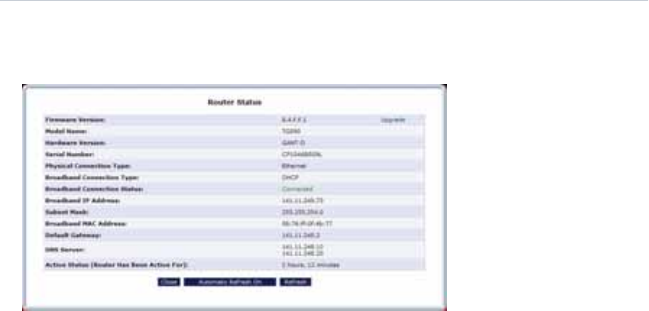
Introduction
The Router Status page provides basic information about your HSG.
Accessing the Router Status page
On the top menu, click System Monitoring.
9 GUI: System Monitoring
DMS-CTC-20110909-0007 v0.180
DRAFT
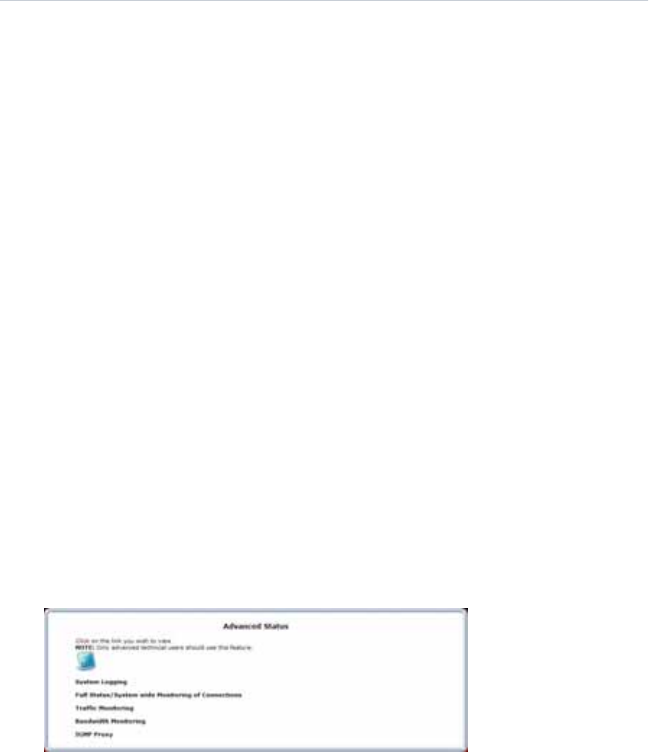
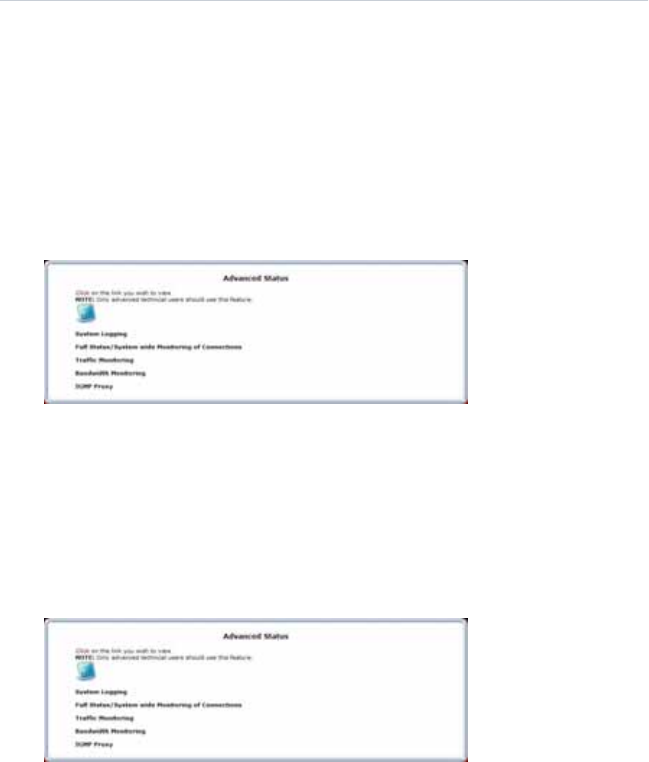
9.2 Advanced Status
Introduction
The Advanced Status page contains more advanced status information that is
bundled in the following groups:
System Logging:
For more information, see “9.2.1 System Logging” on page 81.
Full Status/System wide Monitoring of Connections:
For more information, see “9.2.2 Full Status/System wide Monitoring of
Connections” on page 82.
Traffic Monitoring:
For more information, see “9.2.3 Traffic Monitoring” on page 83.
Bandwidth Monitoring:
For more information, see “9.2.4 Bandwidth Monitoring” on page 84.
IGMP Proxy:
For more information, see “9.2.5 IGMP Proxy” on page 85.
WARNING
The advanced status pages are intended for advanced technical users only!
Accessing the Advanced Status page
Proceed as follows:
1On the top menu, click System Monitoring and then click Yes to confirm that
you want to access the advanced settings.
2The Advanced Status page appears:
3Click on the item that you want to view.
9GUI: System Monitoring
DMS-CTC-20110909-0007 v0.1 81
DRAFT
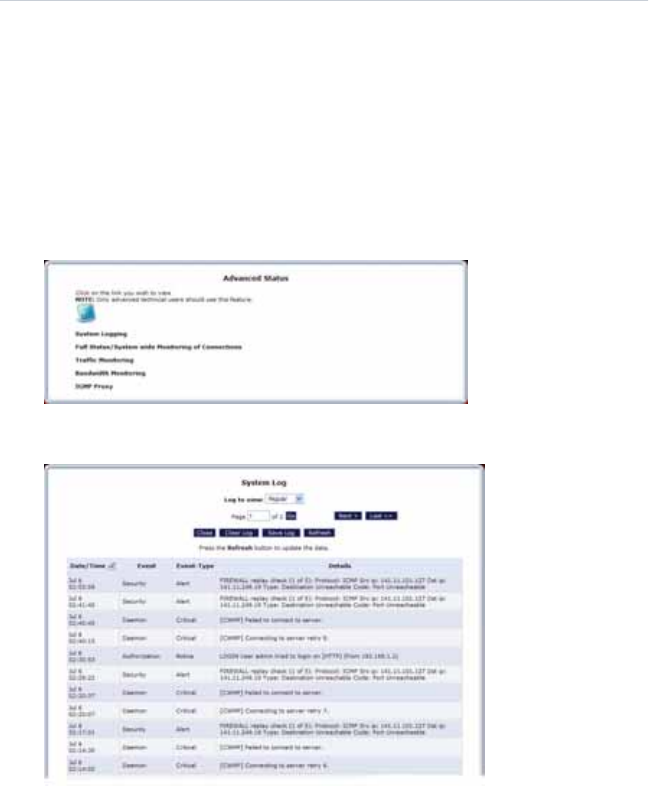
9.2.1 System Logging
Introduction
The System Logging page summarizes the last events recorded on your Thomson
Gateway.
Accessing the System Logging page
Proceed as follows:
1On the top menu, click System Monitoring and then click Yes to confirm that
you want to access the advanced settings.
2The Advanced Status page appears.
Click System Logging.
3The System Logging page appears.
9 GUI: System Monitoring
DMS-CTC-20110909-0007 v0.182
DRAFT
9.2.2 Full Status/System wide Monitoring of Connections
Introduction
The Full Status/System wide Monitoring of Connections page provides an
overview of all network connections.
Accessing the System Logging page
Proceed as follows:
1On the top menu, click System Monitoring and then click Yes to confirm that
you want to access the advanced settings.
2The Advanced Status page appears.
Click Full Status/System wide Monitoring of Connections.
3The Full Status/System wide Monitoring of Connections page appears.
4Click:
Refresh to update the information.
Automatic Refresh On to let the HSG automatically update the information.
9GUI: System Monitoring
DMS-CTC-20110909-0007 v0.1 83
DRAFT
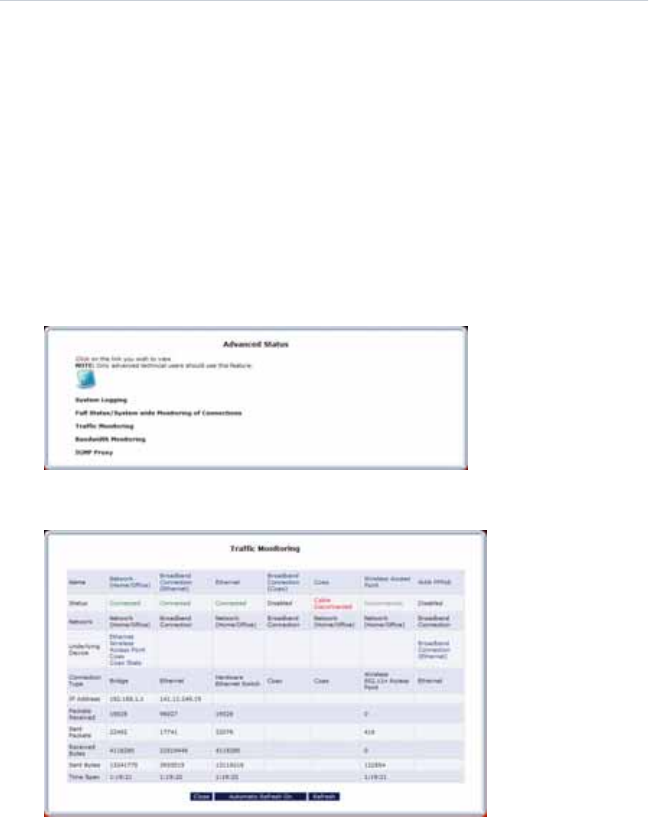
9.2.3 Traffic Monitoring
Introduction
The HSG constantly monitors traffic within the local network and between the local
network and the Internet. The Traffic Monitoring page allows you to view up-to-
the-second statistical information about data received from and transmitted to the
Internet, and about data received from and transmitted to computers in the local
network.
Accessing the System Logging page
Proceed as follows:
1On the top menu, click System Monitoring and then click Yes to confirm that
you want to access the advanced settings.
2The Advanced Status page appears.
Click Traffic Monitoring.
3The Traffic Monitoring page appears.
Buttons
Under the overview table, the following buttons are available
Close to return to the Advanced Status page.
Refresh to update the information.
Automatic Refresh On to let the HSG automatically update the information
every minute or Automatic Refresh Off to switch back to manual updating.
9 GUI: System Monitoring
DMS-CTC-20110909-0007 v0.184
DRAFT
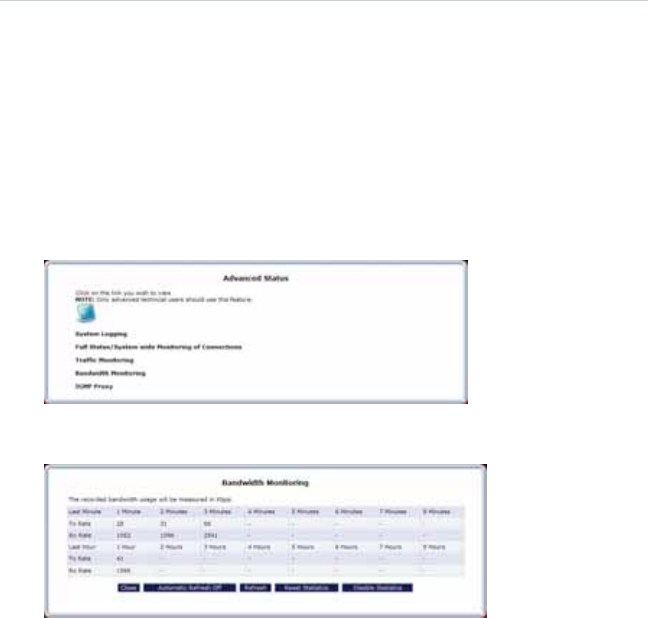
9.2.4 Bandwidth Monitoring
Introduction
The Bandwidth Monitoring page allows you to view the traffic sent or received by
the HSG during a specific time slot.
Accessing the System Logging page
Proceed as follows:
1On the top menu, click System Monitoring and then click Yes to confirm that
you want to access the advanced settings.
2The Advanced Status page appears.
Click Bandwidth Monitoring.
3The Bandwidth Monitoring page appears.
Buttons
Under the overview table, the following buttons are available
Close to return to the Advanced Status page.
Automatic Refresh On to let the HSG automatically update the information
every minute or Automatic Refresh Off to switch back to manual updating.
Refresh to update the information.
Reset Statistics to reset the counters.
Disable Statistics to turn off bandwidth monitoring or Enable Statistics to re-
enable bandwidth monitoring.
9GUI: System Monitoring
DMS-CTC-20110909-0007 v0.1 85
DRAFT
9.2.5 IGMP Proxy
Introduction
The IGMP Proxy task allows you to view IGMP Proxy multicast group memberships
and statistics.
Viewing the IGMP Proxy Multicast Group Membership page
Proceed as follows:
1On the top menu, click System Monitoring and then click Yes to confirm that
you want to access the advanced settings.
2The Advanced Status page appears.
Click IGMP Proxy.
3The Multicast Group Membership page appears.
Viewing the IGMP Proxy Multicast Group Statistics
Proceed as follows:
1On the top menu, click System Monitoring and then click Yes to confirm that
you want to access the advanced settings.
2The Advanced Status page appears.
Click Bandwidth Monitoring.
3The Multicast Group Membership page appears. On the left menu, click IGMP
Proxy Multicast Group Statistics.
4The IGMP Proxy Multicast Group Statistics page appears.
9 GUI: System Monitoring
DMS-CTC-20110909-0007 v0.186
DRAFT

1
DRAFT
Support
10 Support
DMS-CTC-20110909-0007 v0.188
DRAFT
Call the Help Desk
If this Troubleshooting section does not provide a solution to your problem, please
call the Help Desk at 800-837-4966.
10 Support
DMS-CTC-20110909-0007 v0.1 89
DRAFT
10.1 General Troubleshooting
Check the LEDs
If the HSG does not work as expected, the status LEDs on the front panel may
provide you enough information to locate the problem:
LED Color State Description
Power Green Solid Powered on.
Blinking Upgrade ongoing.
Do not remove any cables or switch off the
HSG when the HSG is upgrading.
Red Solid Self-test failed, indicating device
malfunction
Off Not powered.
Internet Green Solid Connected to the Internet, no activity
detected.
Blinking Connected to the Internet, activity.
Orange Solid Failed to connecting to the Internet.
Off The HSG is either powered off or starting
up.
Phone Green Solid Connected to the Verizon telephone
network.
Blinking Call ongoing or connecting to the Verizon
telephone network.
Red Solid Failed to connect to the Verizon telephone
network.
Orange Blinking Voice mail message available.
Off The HSG is either powered off or
telephony is not enabled.
WiFi Green Solid Wireless is enabled on your HSG, no
activity
Blinking Wireless is enabled on your HSG, activity
Off Wireless is disabled on your HSG.

10 Support
DMS-CTC-20110909-0007 v0.190
DRAFT
Ethernet Green Solid Connected to the Ethernet device, no
activity
Blinking Connected to the Ethernet device, activity
Off No device connected.
LED Color State Description
10 Support
DMS-CTC-20110909-0007 v0.1 91
DRAFT
10.2 Troubleshooting Your Wireless Connection
Windows can not find the HSG access point
If the built-in Windows wireless client manager can not find your HSG access point:
If you are using a laptop, check if your laptop has a button to enable/disable the
wireless client. Switch it on and try again.
Make sure your computer is within range.
Make sure that wireless is enabled on your HSG:
aTake a computer that is connected to the HSG or connect your computer with
an Ethernet cable (for more information, see “2.3.2 Wired Connection to the
HSG” on page 18).
bBrowse to the GUI. For more information, see “Accessing the GUI” on page 20.
cOn the Wireless Settings menu, click Basic Security Settings.
dUnder 1. Turn Wireless ON, select On.
eClick Apply.
Change the wireless channel:
aTake a computer that is connected to the HSG or connect your computer with
an Ethernet cable (for more information, see “2.3.2 Wired Connection to the
HSG” on page 18).
bBrowse to the GUI. For more information, see “Accessing the GUI” on page 20.
cOn the Wireless Settings menu, click Basic Security Settings.
dUnder 3. Channel, select another channel.
eClick Apply.
Poor wireless connectivity
Try the following:
Change the wireless channel:
aTake a computer that is connected to the HSG or connect your computer with
an Ethernet cable (for more information, see “2.3.2 Wired Connection to the
HSG” on page 18).
bBrowse to the GUI. For more information, see “Accessing the GUI” on page 20.
cOn the Wireless Settings menu, click Basic Security Settings.
dUnder 3. Channel, select another channel.
eClick Apply.
Check the signal strength, indicated by the wireless client manager. If the signal is
low, try to move the HSG for optimal performance.
10 Support
DMS-CTC-20110909-0007 v0.192
DRAFT
Use WPA2 as encryption. For more information, see “4.3.1 Securing Your Wireless
Connection” on page 36

10 Support
DMS-CTC-20110909-0007 v0.1 93
DRAFT
10.3 Resetting your HSG
Resetting your HSG
If at some point you can no longer connect to the HSG or you want to make a fresh
install, it may be useful to perform a reset to factory defaults.
Warning
A reset to factory default settings deletes all configuration changes you made. For
example:
The ESSID and WPA key on the bottom of your HSG will be used to secure your
wireless connection. So you may need to re-associate your wireless clients, as
described in “2.3.1 Wireless Connection to the HSG” on page 14.
The Login password required to access the GUI pages will be reset to the one
that is printed on the bottom of the HSG.
Methods
You can choose between:
Resetting the HSG via the HSG GUI
Reset the HSG via the Reset button
Resetting the HSG via the HSG GUI
Proceed as follows:
1Browse to the GUI.
For more information, see “Accessing the GUI” on page 20.
2On the menu on the top click Advanced.
3The HSG prompts you to confirm your choice. Click Yes.
4Under , click Restore Defaults.
5The Restore Defaults page appears. Click Restore Defaults.
6The HSG prompts you to confirm your choice, click OK.
7The HSG restores the factory defaults and restarts.
8The HSG returns to the HSG login page.
Reset the HSG via the Reset button
Proceed as follows:
1Make sure the HSG is turned on.

10 Support
DMS-CTC-20110909-0007 v0.194
DRAFT
2Use a pen or an unfolded paperclip to push the recessed Reset button for 5
seconds and then release it.
Reset
3The HSG restarts with the factory default settings

10 Support
DMS-CTC-20110909-0007 v0.1 95
DRAFT
10.4 Configuring Dynamic IP Addressing on
Windows
Windows 7/Vista
1Select Network and Sharing in the Control Panel.
2Click View Status, then click Properties.
3Click Continue in the User Account Control window.
4In the General tab of the Local Area Connection Properties window select
Internet Protocol Version 4 (TCP/IPv4), then click Properties.
5The Internet Protocol Version 4 (TCP/IPv4) Properties window appears.
6Click the Obtain an IP address automatically radio button.
7Click the Obtain DNS server address automatically radio button.
8Click OK in the Internet Protocol Version 4(TCP/IPv4) Properties window, then
click OK in the Local Area Connection Properties screen to save the settings.
Windows XP
1Select Network Connections in the Control Panel.
2Right-click Ethernet Local Area Connection, then click Properties.
3In the General tab, select Internet Protocol (TCP/IP), then click Properties.
4The Internet Protocol (TCP/IP) Properties window appears.
5Click the Obtain an IP address automatically radio button.
6Click the Obtain DNS server address automatically radio button.
7Click OK in the Internet Protocol (TCP/IP) Properties screen, then click OK in
the Local Area Connection Properties screen to save the settings.
Macintosh OS X
1Click on the Apple icon in the top left corner of the desktop.
2From the menu that appears, select System Preferences.
3The System Preferences window appears. Click Network.
4From the Network window, make sure Ethernet in the list on the left is
highlighted and displays Connected”
5Click Assist me.
6From the tab that appears, click Diagnostics.
7Follow the instructions in the Network Diagnostics assistant.
10 Support
DMS-CTC-20110909-0007 v0.196
DRAFT