Technologies Humanware PGITAB Modular video magnifier User Manual

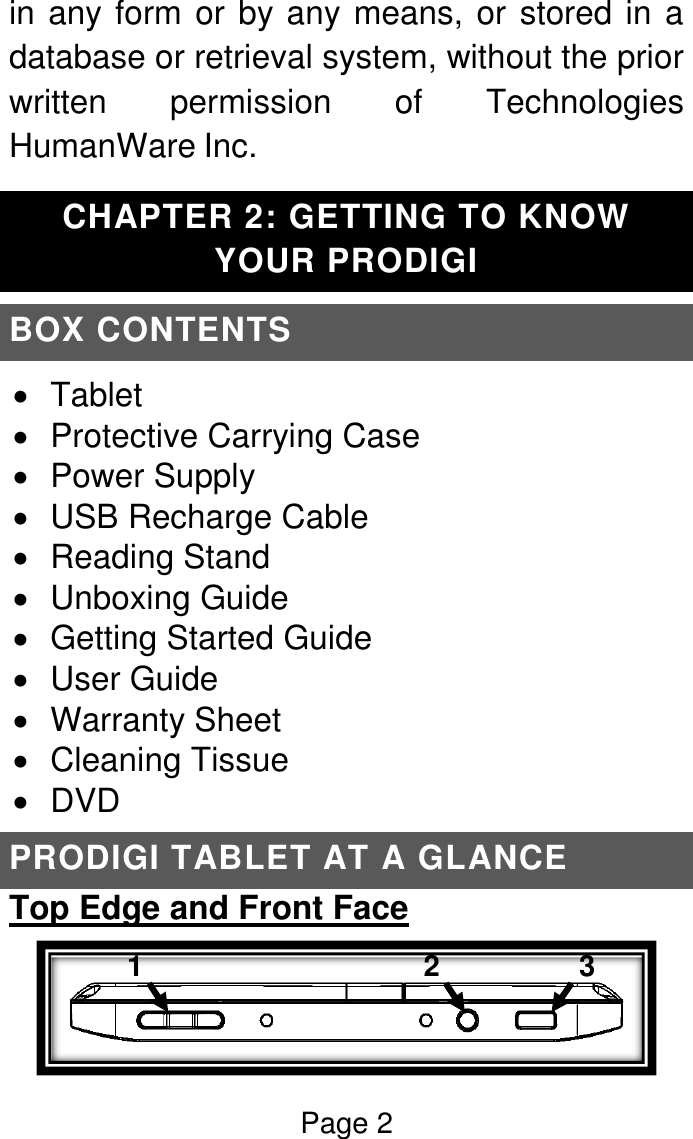
Technologies Humanware Inc. Modular video magnifier Users Manual

Users Manual

 CONTENTS Chapter 1: Introduction ................................. 1 Chapter 2: Getting to know your Prodigi ...... 2 Box Contents ............................................. 2 Prodigi Tablet at a glance ......................... 2 Setting up .................................................. 4 Chapter 3: Using Prodigi .............................. 6 Magnifying ................................................. 6 Capturing and Reading ............................. 8 Chapter 4: Switching to Standard Interface 12 Magnifying (Standard Interface) .............. 13 Capturing and Reading (Standard Interface) ................................................. 15 Spot Reading .......................................... 17 Using the Carousel menu ........................ 18 Viewing saved documents ...................... 20 Chapter 5: Choosing your contrast ............. 22 Chapter 6: Changing your Settings ............ 25 Chapter 7: Recharging your Tablet ............ 32 Chapter 8: Software update ....................... 35 Chapter 9: Troubleshooting ........................ 37 Appendix A: Safety and Maintenance ........ 40 Appendix B: Specifications ......................... 45 Appendix C: Warranty ................................ 46
Page 1  CHAPTER 1: INTRODUCTION Thank you for purchasing Prodigi, the touch-controlled  personal  vision  assistant  system from  HumanWare,  global  leader  in  assistive technologies for people who have low vision. Prodigi  is  a  simple,  intelligent,  portable,  and adaptable line of products aimed at restoring and  maintaining  independence  for  people living with vision loss. Prodigi  Tablet,  small  enough  to  fit  in  your pocket,  is  a  complete  magnification  system that  will  allow  you  to  magnify  and  read documents,  capture  images,  and  spot  read on-the-go, anywhere you are. Carefully  read  the  operating  and  safety instructions described in this user guide prior to  using  your  Prodigi.  If  you  have  any questions about your system, please contact HumanWare  Customer  Service  by  consulting the contact information in the back of this user guide. Copyright 2014 by Technologies HumanWare Inc.,  all  rights  reserved.  No  part  of  this publication may be reproduced or distributed
Page 2  in any form or by any means, or stored in a database or retrieval system, without the prior written  permission  of  Technologies HumanWare Inc. CHAPTER 2: GETTING TO KNOW YOUR PRODIGI BOX CONTENTS   Tablet   Protective Carrying Case   Power Supply   USB Recharge Cable   Reading Stand   Unboxing Guide   Getting Started Guide   User Guide   Warranty Sheet   Cleaning Tissue   DVD PRODIGI TABLET AT A GLANCE Top Edge and Front Face  1  2  3
Page 3   Bottom Edge and Back Side          4  5  8  9  7  Prodigi  10  11  6
Page 4  1. Plus-Minus keys 2. Power Button 3. Read Button 4. Speaker 5. Touchscreen 6. Back Button 7. Audio Port 8. Recharge Port 9. Release Button (for battery) 10. Battery Compartment 11. LED Lights (2) SETTING UP 1. Connect the USB Recharge Cable to the Power Supply.  2. Hold the Tablet so that the screen side is facing you and the recharge port is aiming downwards.  Make  sure  the  tactile HumanWare logo on the recharge cable is facing you (1). Carefully connect the cable to  the  recharge  port  and  plug  it  to  an outlet.
Page 5    IMPORTANT: Use caution while inserting the cable into the Recharge Port.  3. Let the  Tablet recharge for 8 consecutive hours (initial charge). 4. Press  Power  to  power  on  the  Tablet. Prodigi  will  take  about  1  minute  to initialize.  HumanWare’s  logo  will  appear on  the  screen,  followed  by  Prodigi’s startup screen.   1
Page 6  CHAPTER 3: USING PRODIGI MAGNIFYING   Power on the Tablet.   Hold the Tablet about 1 to 2 inches (3 to 5 cm) above the document or object you wish to view.   It  is  recommended  to  use  the  Reading Stand  to  stabilize  the  Tablet  above  the document you wish to view. Make sure the  tactile  HumanWare  logo  on  the Reading Stand is facing up (1) and that you  place  the  Tablet  front  face  up  on the Reading Stand:  1
Page 7    Use  the  Plus-Minus  keys  to  adjust  the zoom level. To increase character size, press the Plus key (the  right  one). To decrease  character  size,  press  the Minus key (the left one).    Move  the  Tablet  (or  slide  the  Reading Stand)  above  the  object/document  to find the information you are looking for.   To toggle between color, positive, and negative  contrasts,  press  and  hold  the Back  button  to  access  the  Settings. Then,  scroll  down  to  select  Contrast, and  tap  (press  your  finger  down quickly on the touchscreen) to toggle between  the  different  contrasts.  Press Back to exit the Settings. Note:  You  can  either  tap  or  use  the  Plus-Minus keys to toggle between different values in the Settings.    By  default,  Prodigi  will  read  aloud  the Settings’  menus,  items,  and  values.  To deactivate  Speech,  press  and  hold  the Back  button,  select  Speech,  and  tap. Press Back to return to your document.
Page 8   Diamond  Edge  contrast  will  become available  once  you  freeze  an  image  of what  you  are  viewing.  To  freeze  an image, press and hold the Read button. You will hear a clicking noise indicating that the document has been captured.   Press Back to unfreeze the image.   You  can  adjust  the  brightness  of  what you  are  viewing  by  accessing  the Settings menu. Press and hold the Back button  and  select  Brightness.  Tap  to adjust  the  brightness  in  percentage. Once you reach your desired brightness level,  press  Back  or  simply  wait  a  few seconds  to  continue  magnifying.  Press and hold the Back button if you want to return to the Settings menu. CAPTURING AND READING   First, press and hold the Back button to access  the  Settings  menu  and  tap  to select Working Range: Full Page. Press Back to exit the Settings menu.
Page 9    Position the Tablet at 4 inches (10 cm) or  more  above  the  document  you  wish to capture and read.  Note: To see a complete letter-size page on the  screen,  position  the  Tablet  at  about  10 inches (25 cm) above your document.   Press  and  hold  the  Read  button  to capture your document. You will hear a clicking  noise  indicating  that  the document has been captured.   Press  Read  again  to  scroll  and  read aloud the text according to your reading preferences.    To  adjust  the  volume,  use  the  Plus-Minus keys while reading.   To pause, press Read.   To resume, press Read again. Note:  Text  can  be  presented  in  3  different ways (Reading Modes): it can be transformed into a single line in the Line mode, a column in  the  Column  mode,  or  you  can  read  text without  losing  its  configuration  in  the  Page mode (default).
Page 10  Two  “greater  than”  inequality signs will mark the  end  of  a  paragraph  in  the  Line  and Column  modes  (˃˃).  Prodigi  will  beep  and announce “End of document” when you reach the  end  of  your  document;  press  Read  to start reading from the beginning again.   To set a different Reading Mode, press and hold the Back button to access the Settings  menu  and  select  Reading Mode.  Tap  to  change  your  Reading Mode.  Press  Back  to  exit  the  Settings menu.   You  can  increase  the  speech  rate  by swiping  to  the  left  (sliding  and releasing  your  finger to  the  left)  on the  touchscreen,  and  decrease  the speech  rate  by  swiping  to  the  right. Note that changing the speech rate will change the reading speed (text scrolling speed) accordingly. Note: You can also increase or decrease the speech  rate  from  the  Settings.  Press  and hold  the  Back  button,  select  Speech  Rate,
Page 11  and  tap  to  change  the  value.  Press  Back multiple times to exit the Settings.    To  deactivate  Speech,  press  and  hold the Back button, select Speech and tap. When Speech is deactivated, you will be able  to  change  the  reading  speed  (text scrolling speed) by swiping left or right, or from the Settings (in the Visual menu and  Text  submenu).  You  can  toggle back  to  Speech  On  by  pressing  and holding the Read button anywhere in the Settings menu.   Prodigi  contains  2  different  voices  that can  be  used  to  read  aloud  text documents.  To  select  a  different  voice, press  and  hold  the  Back  button,  select Voice, and tap to toggle between the 2 reading voices. Press Back to return to your  document.  Make  sure  that  the language  of  the  selected  voice  is  the same  as  in  the  document  you  want  to read.   Press Back to stop reading and return to camera view.
Page 12  Note:  If  the  captured  image  is  too  dark, blurry, or unfocused, you may want to turn on the camera’s flash and capture a new image. Press and hold the Back button to access the Settings and select Flash. Tap to set it to On. Press Back to exit the Settings. Turning  on  or  off  the  camera’s  flash  is  only possible  when  the  camera’s  Working  Range is set to Full Page. CHAPTER 4: SWITCHING TO STANDARD INTERFACE Prodigi  contains  two  different  interfaces, Simple and Standard, which can be changed according to your specific needs. By default, Prodigi’s  interface  is  set  to  Simple  (see previous  chapter  for  more  information). Prodigi’s  Standard  interface  allows  you  to perform  more  touch  gestures,  keep  your documents in memory, and further customize your system.
Page 13  To switch your interface to Standard:    Press  and  hold  the  Back  button  to access  the  Settings,  select  All  Settings and tap.    Select General and tap.    Tap again to change the User Interface. Select Yes, and tap to confirm. MAGNIFYING (STANDARD INTERFACE)   After  switching  your  interface  to Standard,  Prodigi  will  automatically launch the Magnifier.    You can manipulate the Tablet, navigate in  the  text  and  adjust  the  brightness  in the  same  way  as  on  the  Simple interface.  See  chapter  3  (section Magnifying) for more information.
Page 14    In addition  to the  Plus-Minus  keys,  you can use the pinch and zoom gesture to adjust  the  zoom  level.  Decrease  the distance  between  2  fingers  to  zoom out,  and  increase  the  distance  to zoom in:    In addition to changing the contrast from the  Settings,  you  can  toggle  between color, positive, and negative contrasts by  swiping  on  the  right  edge  of  the touchscreen:
Page 15    To  freeze  and  save  an  image  of  what you  are  viewing,  press  and  hold  the Read  button.  It  will  be  saved  in  the Gallery  for  future  use.  Press  Back  to unfreeze the image. CAPTURING AND READING (STANDARD INTERFACE)   First, press and hold the Back button to access  the  Settings  menu  and  tap  to select Working Range: Full Page. Press Back to exit the Settings menu. Note: Manipulate the Tablet, navigate in the enlarged text, and adjust the brightness in the same  way  as  on  the  Simple  interface  (see chapter  3,  section  Magnifying  for  more information). To toggle between the different contrasts,  swipe  on  the  right  edge  of  the touchscreen  or  access  the  Settings  (see previous section for more information).
Page 16    Press  and  hold  the  Read  button  to capture  and  save  your  document.  You will hear a clicking noise indicating that the document has been captured, and it will  be  saved  in  the  Gallery  for  future use.   Press  Read  again  to  scroll  and  read aloud the text according to your reading preferences.    To pause, press Read or Back.   To resume, press Read again.   On the Standard interface, in addition to deactivating  speech  from  the  Settings, you can toggle between Speech On and Off when reading a document by doing a  double  tap  gesture  on  the touchscreen  (tapping  twice  quickly with 1 finger).   You  can  change  the  speech  rate  or reading  speed,  adjust  the  volume,  and select  a  different  reading  voice  in  the same  way  as  on  the  Simple  interface (see  chapter  3,  section  Capturing  and Reading).
Page 17    While  paused,  press  Back  to  stop reading,  and  Back  again  to  return  to camera view. Note:  Turn  on  the  camera’s  flash  if necessary in the same way as on the Simple interface.  See  chapter  3  (section  Capturing and Reading) for more information. SPOT READING   Once  you  have  captured  a  document (either  at  Working  Range:  Close-up  or Full  Page),  you  will  notice  a  rectangle frame  on  the  top  left  corner.  This  is Prodigi’s  locator.  Move  the  locator  by slowly  moving  your  finger  on  the touchpad  without  lifting  it  (pan gesture) to quickly reach a section of the document you want to read:
Page 18   Tap to enlarge the section delimited by the locator:    When  a  section  of  a  document  is magnified,  pan  to  reach  other  parts  of the document.   Press  Back  to  see  the  locator  again. This  is  a  practical  way  to  locate  your position on the document. USING THE CAROUSEL MENU Prodigi  has  3  main  applications  –  Magnifier, Gallery,  and  Settings.  They  are  presented one by one in the carousel menu:
Page 19  To  access  the  carousel  menu  from  the Magnifier:   Press  Back  to  close  the  Magnifier  and access the carousel menu.  Prodigi  will  announce  “Main  Carousel” followed  by  the  currently  selected application. The  currently  selected application is positioned in the center of the screen:    Swipe left or right in the carousel menu to select an application.   To launch a selected application, simply tap.    To cancel, press Back.
Page 20  VIEWING SAVED DOCUMENTS The  Gallery  contains  all  the  documents  you saved.   Select  and  tap  on  the  Gallery  in  the carousel menu:    Swipe  left  or  right  in  the  Gallery  to  flip through your saved documents.    The  currently  selected  document  is  in the  center  of  the  screen.  Prodigi  will announce  and  indicate  the  first  word contained  in  the  currently  selected document.  If  the  document  contains  no words, Prodigi will tag it as an image.    To  open  a  selected  document,  simply tap.   Move  the  locator  to  quickly  reach  a section  of  the  document  you  want  to magnify.   Tap to see the section delimited by the locator at your preferred zoom level.
Page 21    You can toggle between color, positive, negative,  and  Diamond  Edge™  (if  the image  contains  text)  contrasts,  and adjust  the  brightness  in  the  same  way as  with  the  Magnifier  (see  section Magnifying (Standard interface) for more information).   Press Back to see the locator again.   Press  Back  again  to  close  a  document and  return  to  the  Gallery.  Once  you close  a  document,  Prodigi  will remember  your  position  and  apply  it automatically the next time you open the document. Notes: Prodigi will announce “Gallery empty” if  the  Gallery  contains  no  documents.  The Gallery  cannot  contain  more  than  100 documents. Once you pass this number, you will  be  prompted  to  delete  some  documents from the Gallery before saving new ones.
Page 22  To delete a document:   In  the  Gallery,  press  and  hold  your finger  down  on  the  image  you  want  to delete. You will be prompted ‘DELETE?’ and a red ‘X’ will appear. Tap to confirm, or press Back to cancel.  CHAPTER 5: CHOOSING YOUR CONTRAST Prodigi  allows  you  to  view  documents, pictures  and  objects  in  3  types  of  contrast: color, positive  or  negative.  For documents that contain text, a 4th type of contrast can be used:  Diamond  Edge™.  Positive,  negative, and  Diamond  Edge™  contrasts  are enhanced;  they  are  meant  to  enhance  the original  color  of  a  document  or  object  to facilitate your visual experience.
Page 23  Color  contrast  is  useful  if  you  want  to  view documents, objects, and photographs in their original color.  Positive contrast shows text and images in 2 colors  according  to  your  selected  color combination,  the  default  combination  being Black  on  White.  This  is  a  practical  way  to view  text  in  the  best  color  combination  for your vision. Negative contrast shows text and images in reversed  contrast  as  compared  to  your selected  color  combination.  For  example,  if your combination is Black on White, negative contrast  will  show  text  and  images  in  White on Black. This is useful if you wish to reverse the  contrast  of  a  text  that  contains  different contrasts. Diamond Edge™ contrast combines the best of  both  worlds;  it  shows  Diamond  Edge Text™  in  your  selected  color  combination and images in their original color. This allows you  to  magnify  text  indefinitely  without compromising  its  quality  in  the  best  color combination  for  your  vision,  while  viewing
Page 24  images  in  their  original  color  on  the  same page. To  toggle  between  the  different  contrasts, press and hold the Back button to access the Settings, select Contrast, and tap to choose a contrast.  Press  Back  to  return  to  your document or object. Prodigi’s  Standard  interface  also  allows  you to  toggle  between  the  different  contrasts  by swiping on the right edge of the touchscreen:   Note: The contrast cannot be changed while in Line or Column mode, or while viewing an image at 1x (Read View or Gallery).
Page 25  CHAPTER 6: CHANGING YOUR SETTINGS (Note: The values marked with a star (*) are default settings.) To  quickly  configure  your  system  while viewing a document, you can press and hold the Back button to access the Settings menu. The currently selected item is announced and highlighted by a rectangular frame. Scroll up or down to move the rectangle and select an item. The items will be read one at a time (by default). Tap  or  use  the  Plus-Minus  keys  to toggle the value. Press Back to return to your document. The  Settings  menu  lists  the  battery  charge level and the most frequently used settings:  Working  Range  (Camera’s  focus  on work area): Close-up*, Full Page   Brightness (Change the brightness of a live  or  captured  image,  except  for  1x image in Read view and in Gallery): 0 to 100% (50%*)
Page 26   Contrast:  Diamond  Edge  (if  captured image  contains  text),  Color*,  Positive, Negative  Colors: Black on White* (see list of 16 color pairs in main Settings below)  Reading Mode: Page*, Column, Line   Speech: On*, Documents only, Off  Speech  Rate:  Very  slow,  Slow, Normal*, Fast, Very fast   Voice: Voice 1*, Voice 2  Tablet Volume: 0 to 15 (9*)  Headphone  Volume  (when headphones are plugged): 0 to 15 (3*)  Flash  (Turn  flash  on  or  off  when Working Range: Full Page is selected): On, Off* You  can  further  customize  your  system  by selecting  All  Settings  at  the  end  of  the Settings  menu.  With  Prodigi’s  Standard interface, you can also access these Settings by  selecting  and  opening  the  Settings application in the carousel menu:
Page 27  The  Settings  contain  5  main  menus:  Visual, Audio,  Gestures  and  Controls,  General,  and About.  Scroll  up  or  down  in  the  Settings  to select  a  menu.  Prodigi  will  announce “submenu”  if  a  selected  menu  contains submenus and display an arrow on the right edge  of  the  screen.  To  open  a  menu  or submenu,  simply  select  it  and  tap  or  press the  Plus  key.  Once  you  have  reached  the setting  you  want  to  modify,  tap  or  use  the Plus-Minus  keys  to  change  its  value.  Press Back to return to a previous screen. VISUAL The Visual menu contains 3 submenus: 1. Display contains the following settings:  Screen  Brightness  (Change  the screen’s  brightness  level):  1  to  100% (60%*)  Contrast:  Diamond  Edge  (if  captured image  contains  text),  Color*,  Positive, Negative (see chapter 5)  Diamond  Edge: Always*, On Request (See chapter 5)
Page 28   Colors  (Select  from  16  color  pairs): Black  on  White*,  White  on  Black, Yellow  on  Black,  Orange  on  Black, Cyan on Black, Purple on Black, Green on  Black,  Black  on  Green,  Black  on Purple,  Black  on  Cyan,  Black  on Orange,  Black  on  Yellow,  Blue  on Yellow, Yellow on Blue, White on Blue, Blue on Black  Locator  Color  (change  the  locator’s color):  Red*,  Orange,  Yellow,  Purple, Cyan, Green, Blue  Preferred  Zoom  (change  the  locator’s initial zoom level): 2 to 35x (4x*) 2. Text contains the following settings:  Reading Mode: Page*, Column, Line   Reading  Speed:  Very  slow,  Slow, Normal*, Fast, Very fast   Font  Size:  Minimum,  Small,  Medium, Standard*,  Large,  Very  large,  Extra large, Maximum  Font Type: Regular, Bold* 3. Camera contains the following setting:  Working  Range  (Camera’s  focus  on work area): Close-up*, Full Page
Page 29  AUDIO The  Audio  menu  contains  the  following settings:  Tablet Volume: 0 to 15 (9*)  Headphone  Volume  (when headphones are plugged): 0 to 15 (3*)  Sounds: On*, Off  Tablet Vibrations: On*, Off  Speech: On*, Documents only, Off  Speech  Rate:  Very  slow,  Slow, Normal*, Fast, Very fast  Voice: Voice 1*, Voice 2 GESTURES AND CONTROLS The Gestures  and  Controls menu contains 1 item:  1. Gestures  (Enable  and  disable  gestures. By default, all gestures are deactivated on Simple  interface  and  activated  on Standard interface):
Page 30   Swipe  on  right  edge  /  Contrast: Toggle  between  Color,  Positive, Negative,  and  Diamond  Edge™ contrasts  (Note:  The  last  selection  will be saved in Prodigi’s memory).  Pinch and Zoom: Adjust the zoom level by decreasing or increasing the distance between 2 fingers.  Double  tap  /  Speech: Toggle between Speech  On  and  Off  by  tapping  twice quickly with 1 finger.  Tap  /  Zoom: Press  your  finger  down quickly  (tap)  to  zoom  at  your  preferred zoom level from the locator. GENERAL The  General  menu  contains  the  following items:  User Interface: Simple*, Standard  System  Language:  Language  1*, Language  2  (Choices  depend  on country or region)
Page 31   WI-FI Setup (Help of a sighted person is  required  to  configure  wireless network)  Tablet Auto Shutoff: 3 min*, 5 min, 10 min  Software Update (see chapter 8)  Delete  Gallery  content  (Standard interface  only):  Permanently  delete  all files in Gallery.  Restore  to  Factory  Defaults  (except for  restoring  the  selected  user interface) ABOUT The  About  menu  contains  the  following items:  Software (Version)  Tablet SN (Serial Number)  Tablet Model  Android (Version)
Page 32  CHAPTER 7: RECHARGING YOUR TABLET Maximizing operating efficiency:   In  a  working  situation  where  you  need the  Tablet  intermittently,  you  can  enter Standby  mode  when  you  are  not  using the  Tablet  by  pressing  Power  quickly. The screen will power off and a double-beep will be sounded.   Exit  Standby  mode  by  pressing  Power quickly again.   If you will not be using the Tablet for the next  few  days,  it  is  recommended  that you power it off by pressing and holding the Power button. Recharging the battery: Press and hold the Back button to enter the Settings  menu  and  to  display  the  Tablet’s battery charge level. Swiping upwards in the Settings  menu  from  the  first  item  will announce the charge level (if Speech is set to On in the Settings). If the battery charge level
Page 33  is  below  10%,  it  is  recommended  that  you recharge the battery. IMPORTANT:  The  battery  becomes  warm during  recharging.  Do  not  recharge  the battery near a heat source. To  recharge  the  battery  using  mains electricity:   Connect  the  USB  Recharge  Cable  to the  Tablet  Power  Supply.  Then, carefully  connect  the  USB  Recharge Cable to the Tablet and plug the Power Supply to an outlet.   Let the Tablet recharge for 8  hours the first time and for 4 hours subsequently. To recharge the battery with a computer:   First,  press  Power  shortly  to  enter Standby Mode.    Then, plug the USB recharge cable to a computer USB port.  Note:  Please  note  that  recharging  the battery this way can take longer than by plugging it to an outlet.
Page 34    Press Power to exit Standby Mode. Battery safety precautions:  Do not disassemble or modify the battery.   Use  only  the  specified  HumanWare charger.   There  is  a  risk  of  overheating,  fire  or explosion  if  the  battery  is  put  in  a  fire, heated, subjected to impact, put in contact with water, or if its terminals are shorted. Replacing the battery: Contact  HumanWare  or  your  authorized distributor to obtain a replacement battery.   Power off the Tablet and unplug it from the outlet.    Hold the Tablet up, its back side facing you.    Press  the  release  button  near  the  left edge  of  the  Tablet,  and  simultaneously slide the compartment door to the left to remove it.   The battery’s upper left edge has a tab. Use this tab to lift the used battery up.
Page 35  Note:  The  model  and  serial  numbers can be found under the battery.   To  insert  the  new  battery:  there  are connector  pins  on  the  lower  right  edge of the battery. Insert the right edge first, and  press  gently  on  the  left  edge  to snap the new battery in place.    Slide  the  compartment  door  back  on until  the  release  button  snaps  back  in place. CHAPTER 8: SOFTWARE UPDATE Before initiating a software update, the WI-FI network has to be configured with the help of a sighted person.    Press  and  hold  the  Back  button  to access  the  Settings,  and  select  All Settings.  Tap  to  open.  Select  General and tap. Select WI-FI Setup and tap.    Tap the OFF button on the top edge of the screen to switch it to ON.    Tap  on  the  network  you  wish  to configure.
Page 36    To  enter  your  password,  tap  on  the blinking  cursor.  A  keyboard  will  appear on the screen. Enter the password and tap on Done. Then, tap on Connect.   Press Back twice to return to General in Prodigi’s Settings.   To  initiate  a  software  update,  select Software Update and tap. IMPORTANT:  Make  sure  your  system  is connected  to  power  before  updating  the software.   Once  the  WI-FI  connection  is established, Prodigi will tell you whether your  software  is  up  to  date  or  whether an update is available.    If an update is available and you wish to install  it,  select  Install  and  tap.  If  you wish to cancel, select Cancel and tap.   If  you  chose  to  install  the  update, Prodigi  will  download  the  update  and show  the  download  progress  in percentage.
Page 37    Once the download is complete, Prodigi will  reboot  and  install  the  update automatically.  Android’s  green  logo  will be shown on screen during the update. CHAPTER 9: TROUBLESHOOTING If  the  image  on  the  screen  is  flickering while magnifying:   Make  sure  that  the  Working  Range  is set to Close-up in the Settings. If the screen is blank:   Zoom  out  of  the  image  for  minimum magnification.   The  Tablet  could  be  powered  off  or  in Standby Mode. Press Power to power it on or to exit Standby Mode. If colors are difficult to detect:   Check  if  you  have  sufficient  ambient light.    Choose  a  different  contrast  or  color combination in the Settings.    Adjust  the  brightness  level  in  the Settings.
Page 38  If there is a lot of glare:  Tilt  object  in  a  different  direction  to reduce glare.   Reduce  the  brightness  level  in  the Settings.   Reduce external lighting effects.  If  the  camera’s  flash  is  turned  on and your  captured  image  is  too  bright  or uneven, turn off the flash in the Settings and capture a new image. If the image/text is out of focus or blurry:   Use the Plus-Minus keys to zoom in and then out of the image so as to trigger the camera’s  focus.  If  needed,  capture  a new image of your document.    Make  sure  you  hold  the  camera  still while capturing an image.  Turn  on  the  camera’s  flash  in  the Settings and capture a new image.   Make  sure  your  Tablet  is  powered  off, and  wipe  the  LED  lights  and  camera surface  on  the  back  side  with  your included cleaning tissue.
Page 39  If the audio reading does not make sense:   Make sure the voice setting is the same as your document’s language. Change it in the Settings if necessary.  If the Tablet is not responding:   Make  sure  the  battery  is  not  empty. Recharge it if necessary. Other problems:   Restore factory defaults in the Settings.   Press and hold the Power button for 10 seconds and release. Wait 30 seconds, and press Power again.   Power  off  the  Tablet,  remove  the battery, and install it back again.    Contact  your  dealer  or  technical support.
Page 40  APPENDIX A: SAFETY AND MAINTENANCE Safety Instructions: The  user  must  not  stare  at  the  2  LED  light sources that are located on the back side of the Tablet.  Keep  away  from  water  or  high  humidity.  Do not submerge. Power off your Prodigi before cleaning it. Use only cables provided with your Prodigi.  This  product  should  be  operated  from  the type of power indicated on the marking label. If  you  are  unsure  of  the  type  of  power available, consult your dealer or local power company. Only use your Prodigi indoors. Do not expose it  to  sudden  or  extreme  changes  in temperature  or  humidity  conditions.  This product  should  not  be  placed  near  a  heat source  or  exposed  to  direct  sun  light  for  a prolonged period of time.
Page 41  Refer all servicing of this product to qualified service personnel. Do not attempt to service it  yourself,  as  opening  or  removing  covers may expose you to dangerous voltage points or other risks. Susceptibility to Interference: There  may  be  temporary  degradation  of  the image when Prodigi is subjected to a strong radio-frequency field, electro-static discharge or transient electrical noise. An electro-static discharge  (caused  by  static  electricity)  may cause the screen to go blank. If this happens, power the system off and on again. Warning RF Exposure Compliance: The antenna(s) used for this transmitter must be installed to provide a separation distance of at least 1 cm from all persons and must not be co-located or operating in conjunction with any other  antenna  or  transmitter.  Users and installers  must  be  provided  with  antenna installation  instructions  and  transmitter operating  conditions  for  satisfying  RF exposure compliance.
Page 42  FCC / Industry Canada Two Part Stmt: This  device  complies  with  FCC  Part  15  and Industry  Canada  license  exempt  RSS standard(s).  Operation  is  subject  to  the following two conditions: (1) this device may not  cause  interference,  and  (2)  this  device must  accept  any  interference,  including interference  that  may  cause  undesired operation of the device. Per Industry Canada RSS rules: This  device  complies  with  Health  Canada’s Safety  Code.  The  installer  of  this  device should ensure that RF radiation is not emitted in  excess  of  the  Health  Canada’s requirement.  Changes  or  modifications  not expressly approved by the party responsible for compliance could void the user’s authority to operate the equipment. FCC  and  Industry  Canada  identification numbers: FCC ID: XT5PGITAB IC: 8760A-PGITAB
Page 43  These  identification  numbers  are  printed  on the  permanent label  located  in  the  battery compartment. Remove the battery to see the label. FCC Warning: This equipment has been tested and found to comply  with  the  limits  for  a  Class  B  digital device,  pursuant  to  part  15  of  the  Federal Communications  Commission  (FCC)  Rules. These  limits  are  designed  to  provide reasonable  protection  against  harmful interference  in  a  residential  installation.  This equipment  generates  and  can  radiate  radio frequency  energy  and,  if  not  installed  and used in accordance with the instructions, may cause  harmful  interference  to  radio communications.  However,  there  is  no guarantee that interference will not occur in a particular  installation.  If  this  equipment causes  harmful  interference  to  radio  or television reception, which can be determined by turning the equipment off and on, you are encouraged to try to correct the interference by one or more of the following measures:
Page 44  Reorient or relocate the receiving antenna. Increase  the  space  between  the  equipment and receiver. Connect  the  equipment  to  an  outlet  on  a circuit different from that to which the receiver is connected. Consult  your  dealer  or  an  experienced radio/TV technician for help. Maintenance and Disposal Instructions: Wipe  your Prodigi’s  surfaces  with  a  soft  and dry cloth.  At the end of Prodigi’s operational lifetime, its internal  components  must  be  disposed  in compliance with local authorities. Prodigi contains no hazardous materials. For disposal, return to HumanWare or follow local governing ordinances or hospital procedure.
Page 45  APPENDIX B: SPECIFICATIONS Operating Conditions:   Temperature: 0 to 35 °C / 32 to 95 °F  Humidity: 5 to 95% Transport and Storage Conditions:  Temperature: -20 to 60 °C / -4 to 140 °F  Humidity: 5 to 95% Power Supply:  Tablet Input Voltage: 5 V
Page 46  APPENDIX C: WARRANTY HumanWare  warrants Prodigi, effective from the date of delivery, to be free of any defects in material and workmanship for a period of 1 year unless otherwise required by law in the country or region of purchase.  This warranty is non-transferable and applies to all cases where the damage is not a result of improper use, mistreatment, or negligence. Improper use is use of this device other than described  in  this  manual.  In  no  event  shall HumanWare  or  its  distributors  be  liable  for indirect or consequential damages. No  replacement  or  repair  covered  by  the warranty will be carried out unless the system is accompanied by a copy of the original bill of  purchase.  Please  keep  your  original receipt.  If  the  system  has  to  be  returned, please use the original packaging.   [End of document VER-10-2014-11-28]
  ACCD-0053 REV 07

Navigation menu