Tecom Co GR2512 WiFi 2/1-port ATA router User Manual WiFi Router quick user guide 070530
Tecom Co Ltd WiFi 2/1-port ATA router WiFi Router quick user guide 070530
Tecom Co >
Users Manual
2/1-port FXS ATA WiFi-Router Quick User Guide
Copyright © 2007, M/C:TSIP-2512GR-R3 Page 0
2/1-port FXS ATA WiFi-Router
Quick User Guide
Preliminary
Copyright © All Reserved, 2007
QUG-TSIP-2512GR-R3-960604

2/1-port FXS ATA WiFi-Router Quick User Guide
Copyright © 2007, M/C:TSIP-2512GR-R3 Page 1
FCC Statement
This equipment has been tested and found to comply with the limits for a Class B digital device,
pursuant to Part 15 of the FCC rules. These limits are designed to provide reasonable protection
against harmful interence in a residential installation. This equipment generates, uses, and can radiate
radio frequency energy and, if not installed and used in accordance with the instructions, may cause
harmful interference to radio communications. However, there is no guarantee that interference will not
occur in a particular installation.
If this equipment does cause interference to radio or television reception, which can be determined by
turning the equipment off and on, the user is encouraged to try to correct the interference by one or
more of the following measures:
l Reorient the receiving antenna.
l Relocate the equipment with respect to the receiver.
l Plug the equipment into a different outlet so that equipment and receiver are on different branch
circuits.
l Consult the dealer or an experienced radio/television technician for help.
FCC Caution: The manufacturer is not responsible for any radio or TV interference caused by
unauthorized modifications to this equipment; such modifications could void the user’s authority to
operate the equipment. This equipment complies with Part 15 of FCC Rules. Operation is subject to
the following two conditions: (1) This equipment may not cause harmful interference, and (2) this
equipment must accept any interference received, including interference that may cause undesired
operation.
FCC Radiation Exposure Statement
This equipment complies with FCC radiation exposure limits set forth for an uncontrolled environment.
This equipment should be installed and operated with minimum distance 20cm between the radiator
and your body. This transmitter must not be co-located or operating in conjunction with any other
antenna or transmitter. IEEE 802.11b or 802.11g operation of this product in the USA is
firmware-limited to channels 1 through 11.
Europe CE Declaration of Conformity
This equipment complies with the requirements relating to electromagnetic compatibility, EN55022
Class B for ITE and EN 50082-1. This meets the essential protection requirements of the European
Council Directive 89/336/EEC on the approximation of the laws of the Member States relating to
electromagnetic compatibility.
CE Mark Warning
This is a Class B product. In a domestic environment, this product may cause radio interference, in
which case the user may be required to take adequate measures.
Environment
The phone you have purchased, as well as any used batteries must not be disposed of with household
waste. You should return these to your distributor if they are replaced or dispose of them in an
approved recycling centre.
Trademarks
Windows 98/2000/XT/NT™ and Internet Explorer™ are registered trademarks of Microsoft
Corporation. All other company, brand and product names, like Netscape Navigator™ are trademarks
or registered trademarks of their respective owners.

2/1-port FXS ATA WiFi-Router Quick User Guide
Copyright © 2007, M/C:TSIP-2512GR-R3 Page 2
WARNING!
1. Read these installation instructions carefully before connecting the 2/1-port FXS ATA WiFi-Router
to its power source.
2. To reduce the risk of electric shock, do not remove the cover from the 2/1-port FXS ATA
WiFi-Router or attempt to dismantle it. Opening or removing covers may expose you to dangerous
voltage levels. Equally, incorrect reassembly could cause electric shock on re-use of the
appliance.
3. Do not expose the 2/1-port FXS ATA WiFi-Router to Fire, direct sunlight or excessive heat.
4. Do not expose the 2/1-port FXS ATA WiFi-Router to rain, water or moisture.
5. Do not install the 2/1-port FXS ATA WiFi-Router in an environment likely to present a THREAT OF
IMPACT.
6. The 2/1-port FXS ATA WiFi-Router is designed to work in temperatures from 5oC to 45oC.
7. To ensure compliance with international safety standards, only use the power adapter that is
supplied with the unit.
8. The 2/1-port FXS ATA WiFi-Router must be installed at least 1 meter from radio frequency
equipment, such as TVs, radios, hi-fi or video equipment (which radiate electromagnetic fields).
9. Do not connect the WAN port to any network other than an Ethernet network.
10. Do not attempt to upgrade your 2/1-port FXS ATA WiFi-Router in an unstable power environment.
This could cause unexpected issues.
11. Do not work on the system or connect or disconnect cables during lightning storms.
12. Children don't recognize the risks of electrical appliances. Therefore use or keep the 2/1-port FXS
ATA WiFi-Router only under supervision of adults or out of the reach from children.
13. No repair can by performed by the end user, if you experience difficulties with this equipment, for
repair or warranty information, please contact your supplier.
!

2/1-port FXS ATA WiFi-Router Quick User Guide
Copyright © 2007, M/C:TSIP-2512GR-R3 Page 3
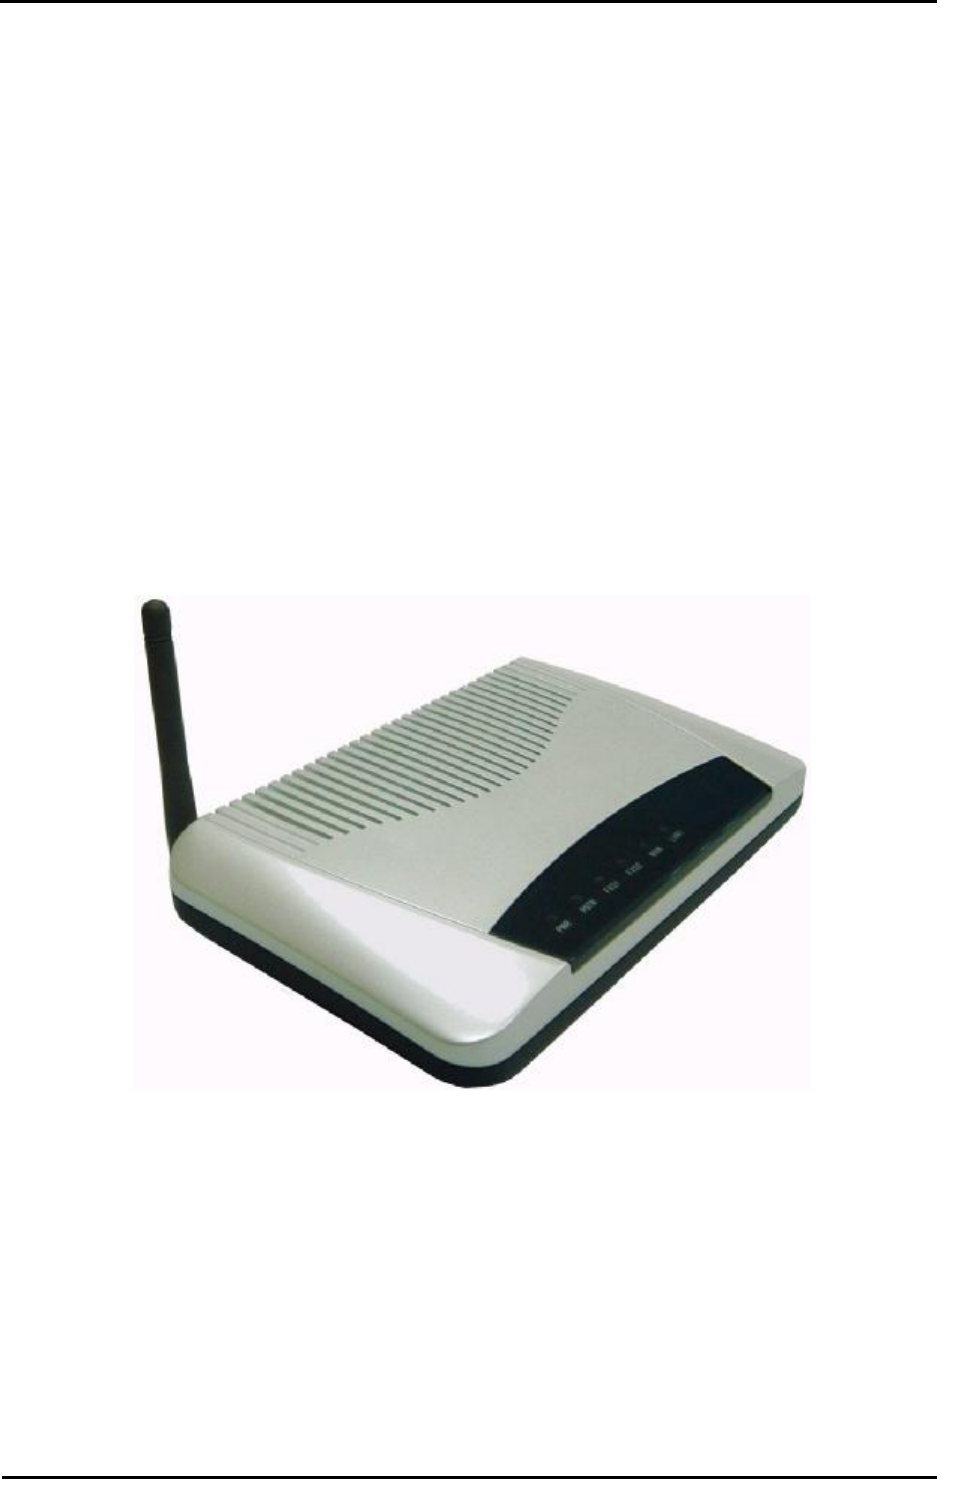
1 Introduction
The 2/1-port FXS ATA WiFi-Router is a SIP- based high performance WiFi IP gateway with embedded
router. It is ideal for residential/SOHO or even SME VoIP communications. It can support 2 FXS ports for
phone or FAX. Furthermore, this product is configurable for matching with different telephones, facsimiles,
voice mail systems, IVR system and different country networks over the world by software settings.
This router is built with a powerful router and full wire-speed Ethernet switch that not only save money and
space, but also offer unbeatable superior voice quality for VoIP calls. This router can be configured
downgrade to an IP-Sharer/NAT or a pure bridged switch for various applications. Of course, the WiFi
facility enables user's PCs to connect to Internet or link this VoIP router to Internet world. This WiFi
support brings a lot of convenience, benefits and mobility for better productivity.
This Quick Guide takes you through the basic steps necessary to install and configure your 2/1-port FXS
ATA WiFi-Router, as well as establish a connection from your phone to the Internet.
The package contains:
- One 2/1-port FXS ATA WiFi-Router
- One 13VDC / 800mA power adapter for use with the 2/1-port FXS ATA WiFi-Router
- This Quick User Guide
The System Requirements:
Before starting, you must ensure the following items:
- You already have a cable or DSL broadband connection to the Internet.
- The modem must have an Ethernet port for connection to your 2/1-port FXS ATA WiFi-Router.
2 Features
Physical
- Temperature: Operating 0o to 45 o C, Storage: -20o to 70 o C
- Humidity: Operating 15% to 85%, Storage: 10% to 90%
- 2 or 1 FXS (POTS) ports
- 100/10Mbps RJ45 Ethernet ports for WAN & LAN
- 1 WiFi antenna support IEEE 802.11b/g
- LEDs: PWR, LAN4, LAN3, LAN2, LAN1, WAN, FXS1, FXS2
- 1 DC power input Jack (2.5mm) for a switching power supply
- 1 Reset button for Factory default setting
Key Features
- Superior voice quality and versatile features support
- Integrated wire and wireless access in box
- Support Telephone/FAX over IP
- Embedded router and L2/L3/L4 switch mechanism
- Supports rich supplementary call features
- Intelligent Dial Plan and flexible route selection
- Good interoperability with Soft switch, IP-Centrex, IP-PBX, and SIP servers
- Support generic or secure APS
- Auto provisioning, web management and security enhancement
- Cyber attack and broadcast storm protection

2/1-port FXS ATA WiFi-Router Quick User Guide
Copyright © 2007, M/C:TSIP-2512GR-R3 Page 4
3 About The WiFi ATA
LED Indications:
There are 9 LED indicators in the router to show the Power (PWR), LAN Port4 (LAN4), LAN Port3
(LAN3), LAN Port2 (LAN2), LAN Port1 (LAN1), WAN Port (WAN), Telephone port1 (FXS1),
Telephone port2 (FXS2) status.
DC IN:
Power input jack 2.5mm diameter, external wall-mount 13V/800mA power adaptor.
Reset (RST) button:
For factory default setting.
FXS port:
There is one or two two RJ-11 Type analog telephone jack interface. It is for user to connect with an
analog phone (traditional phone).
WAN port:
There is one RJ-45 Networking interface. It supports 10/100Mps Fast Ethernet. You connect this
RJ-45 Fast Ethernet port to the cable or DSL for Internet access.
LAN port:
There are four RJ-45 Networking interface. It supports 10/100Mps Fast Ethernet. You connect this
RJ-45 Fast Ethernet port to PCs, IP phone, or other Internet access devices.
WiFi antenna:
Support IEEE 802.11b/g
2/1-port FXS ATA WiFi-Router Quick User Guide
Copyright © 2007, M/C:TSIP-2512GR-R3 Page 5
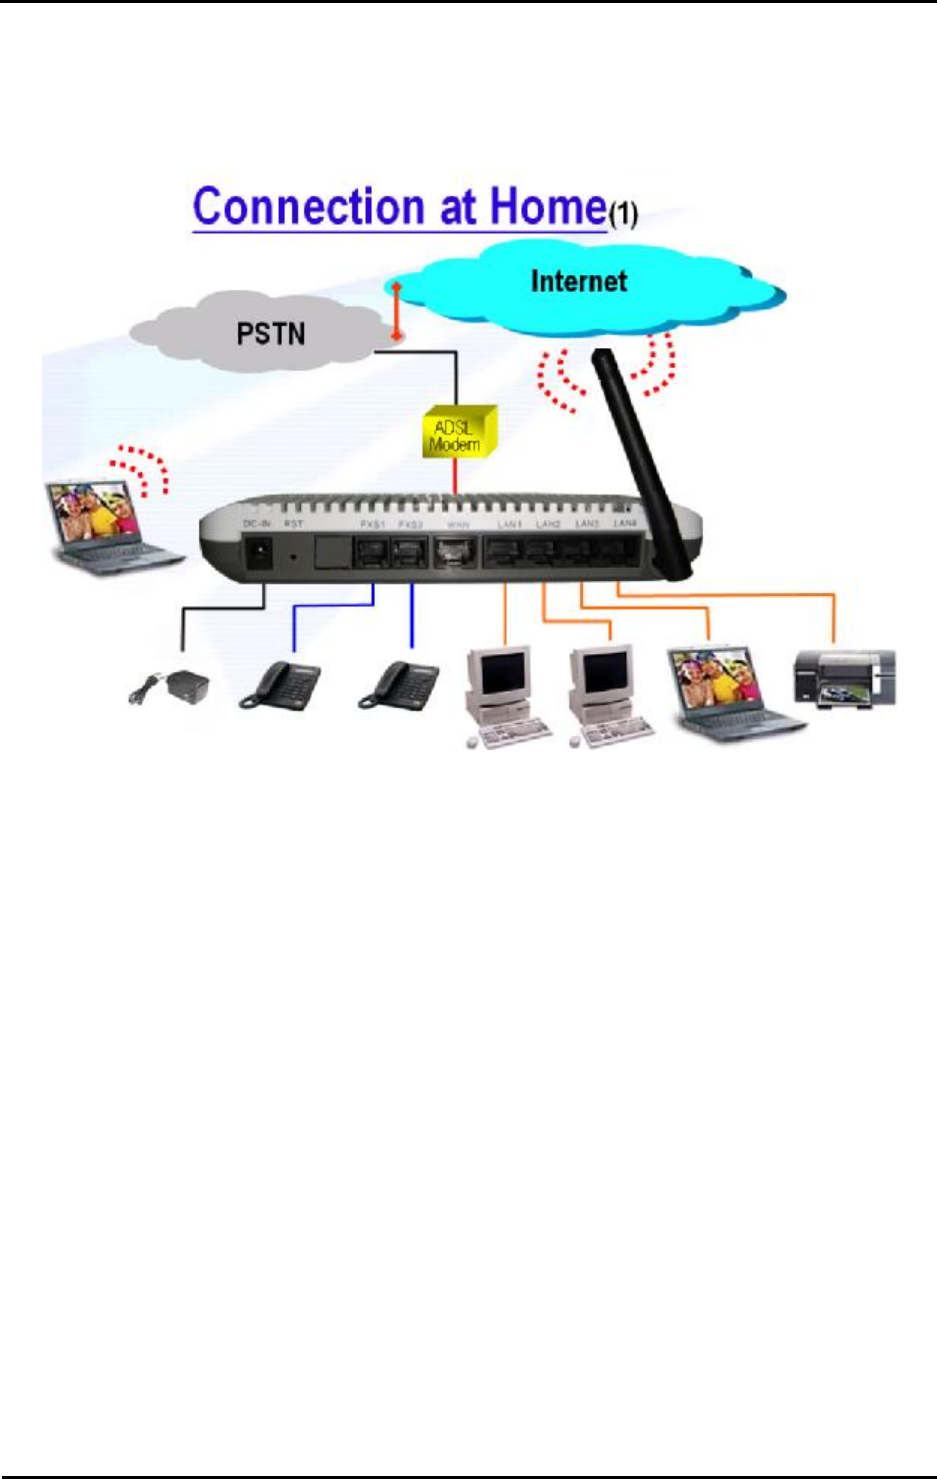
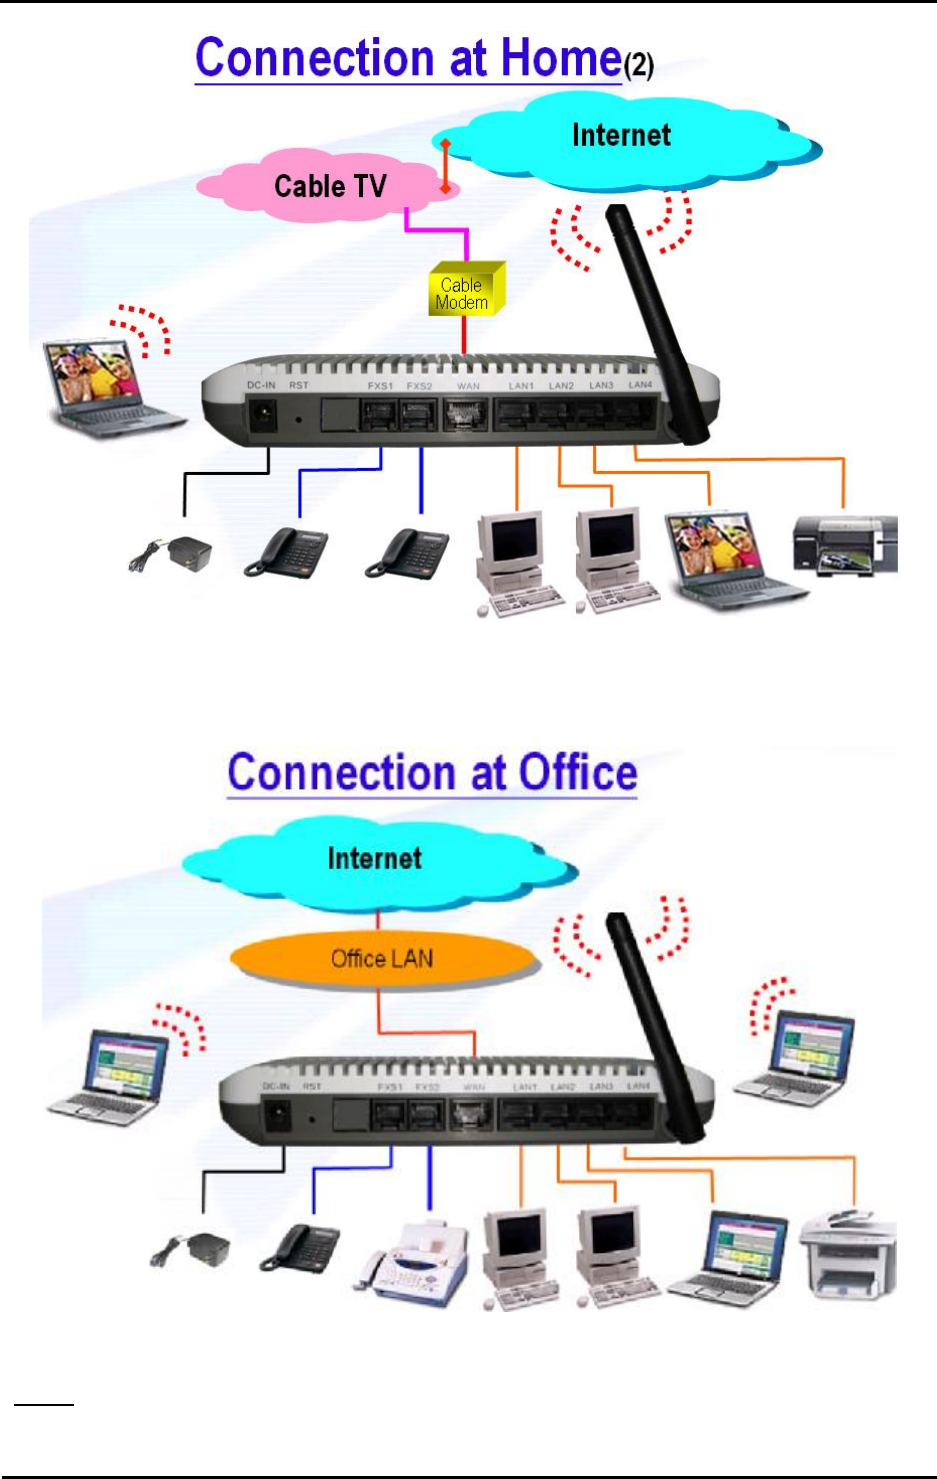
4 Installation
Figure 4.1 The Connection of 2/1-port FXS ATA WiFi-Router at Home(1)
2/1-port FXS ATA WiFi-Router Quick User Guide
Copyright © 2007, M/C:TSIP-2512GR-R3 Page 6
Figure 4.2 The Connection of 2/1-port FXS ATA WiFi-Router at Home(2)
Figure 4.3 The Connection of 2/1-port FXS ATA WiFi-Router at Office
Step 1: Connect analogue phone and Ethernet cable

2/1-port FXS ATA WiFi-Router Quick User Guide
Copyright © 2007, M/C:TSIP-2512GR-R3 Page 7
Please refer to the figure Fig.4.1 ~ 4.3 above. Then please connect one analogue phones to FXS1
port. And then use an Ethernet cable (CAT-5) to connect the WAN port to the broadband network
end (e.g. an ADSL modem, a cable modem, or a router etc).
Step 2: Connect power
With the power adaptor in the product package, please plug its power cord to the rear panel of
2/1-port FXS ATA WiFi-Router. Then plug the power plug to the wall outlet. You will see that the
LEDs on 2/1-port FXS ATA WiFi-Router are turned on.
[Note]: The RST button is used for:
Reset to factory default values – when WiFi-Router is in ready mode, press this button
longer than 5 seconds.
Reboot the system – when WiFi-Router is in ready mode, press this button less than 5
seconds.
Step 3: Configure network and register account
Please refer to Chapter 5 to configure the network well and successfully register your account.
Check if the 2/1-port FXS ATA WiFi-Router works by pickup an analogue phone, if there is a dialing
tone, and then dial several numbers to see whether the phone is responsive.
Step 4: Connect LAN port
Please refer to the figure Fig.4.1 ~ 4.3 above. And then use an Ethernet cable (CAT-5) to connect
one of the four LAN ports on the Router to PC, notebook, printer, router, or hub.
Step 5: Connect to WiFi Router
Please refer to Chapter 8 to connect a PC or notebook to 2/1-port FXS ATA WiFi-Router well. The
PC or notebook should can browser the Internet fine.
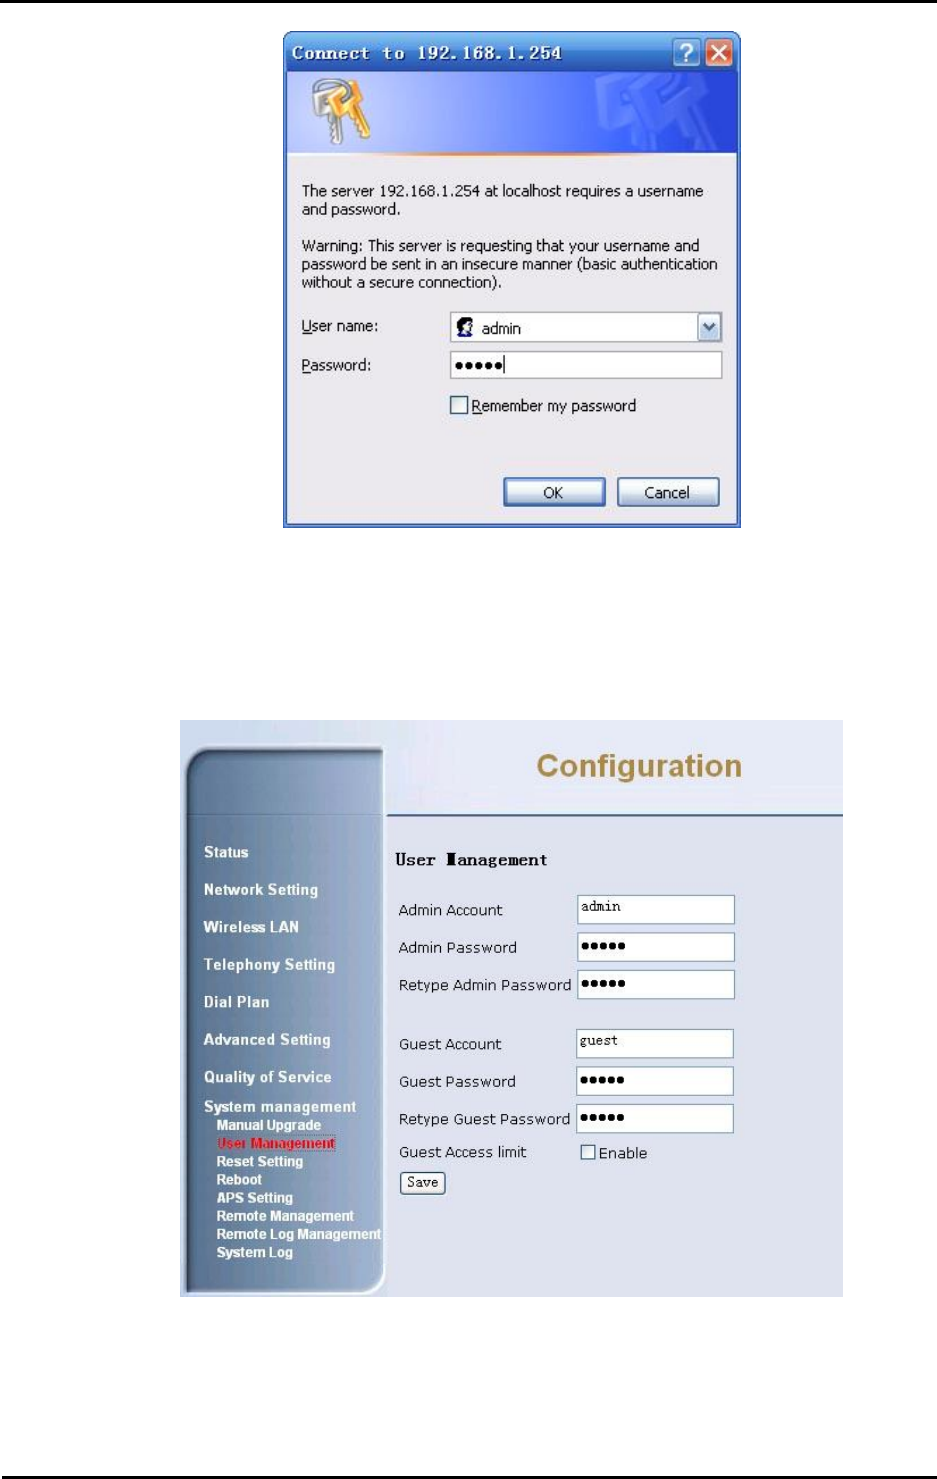
5 Setup WiFi-Router Thru Web Browser
The router provides a built-in web server. You can connect your PC to the LAN port. And you can use web
browser (like Microsoft IETM) to configure the router. For the factory default setting, please follow the steps
below for configuration.
- First please connect your pc to LAN port and configure your IP to the 192.168.1.xxx network
segment.
- Then input the IP address http://192.168.1.254/ in the web browser.
- You will access to the router and get the Login page.
2/1-port FXS ATA WiFi-Router Quick User Guide
Copyright © 2007, M/C:TSIP-2512GR-R3 Page 8
- Please input the username: “guest” and password: “guest”. Then click “Login” button.
- You also can login as an administrator by input the username: “admin” and password: “admin”.
Then click “Login” button.
- After get in the web page, it is highly recommended to change Username and Password. You can
change your username (login) name and password in System management-> User Management
page. After you finish the Settings, please click the Save button.
- Configure all settings in different web pages for your router.
- After configuration, please “Save” to update the settings in the router.
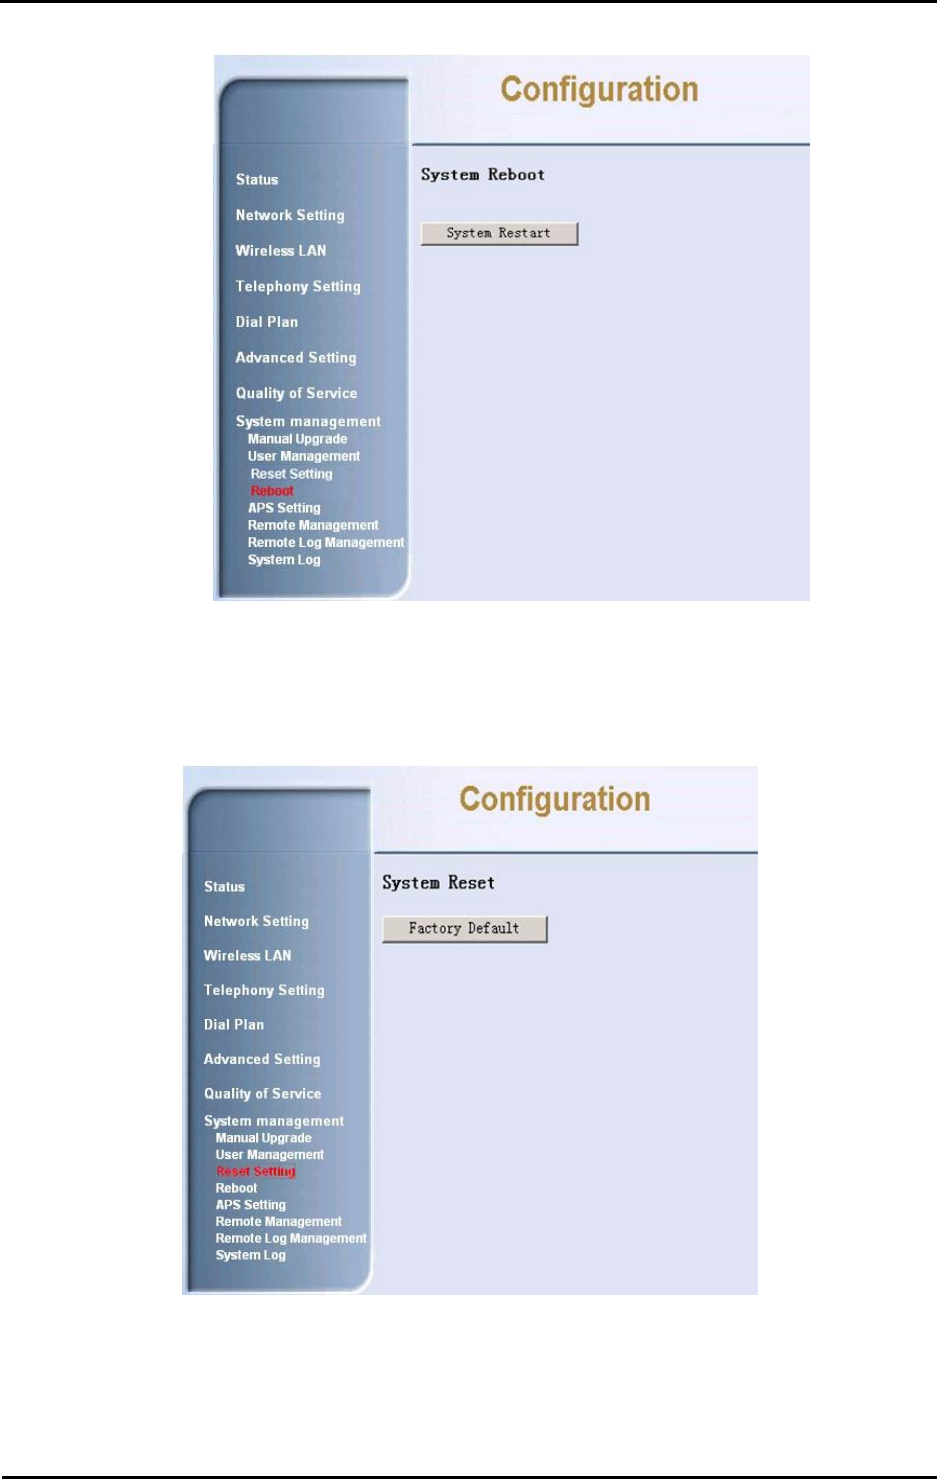
- By reboot function you can restart the router. If you want to restart the ATA, you can just click the
System Restart button, then the ATA will reboot automatically.
2/1-port FXS ATA WiFi-Router Quick User Guide
Copyright © 2007, M/C:TSIP-2512GR-R3 Page 9
- After configuration, please “Save” to update the settings in the router.
- You can click “Factory Default” button to restore to factory default setting in System
management->Reset Setting page.
6 Setup SIP Configuration
2/1-port FXS ATA WiFi-Router Quick User Guide
Copyright © 2007, M/C:TSIP-2512GR-R3 Page 10
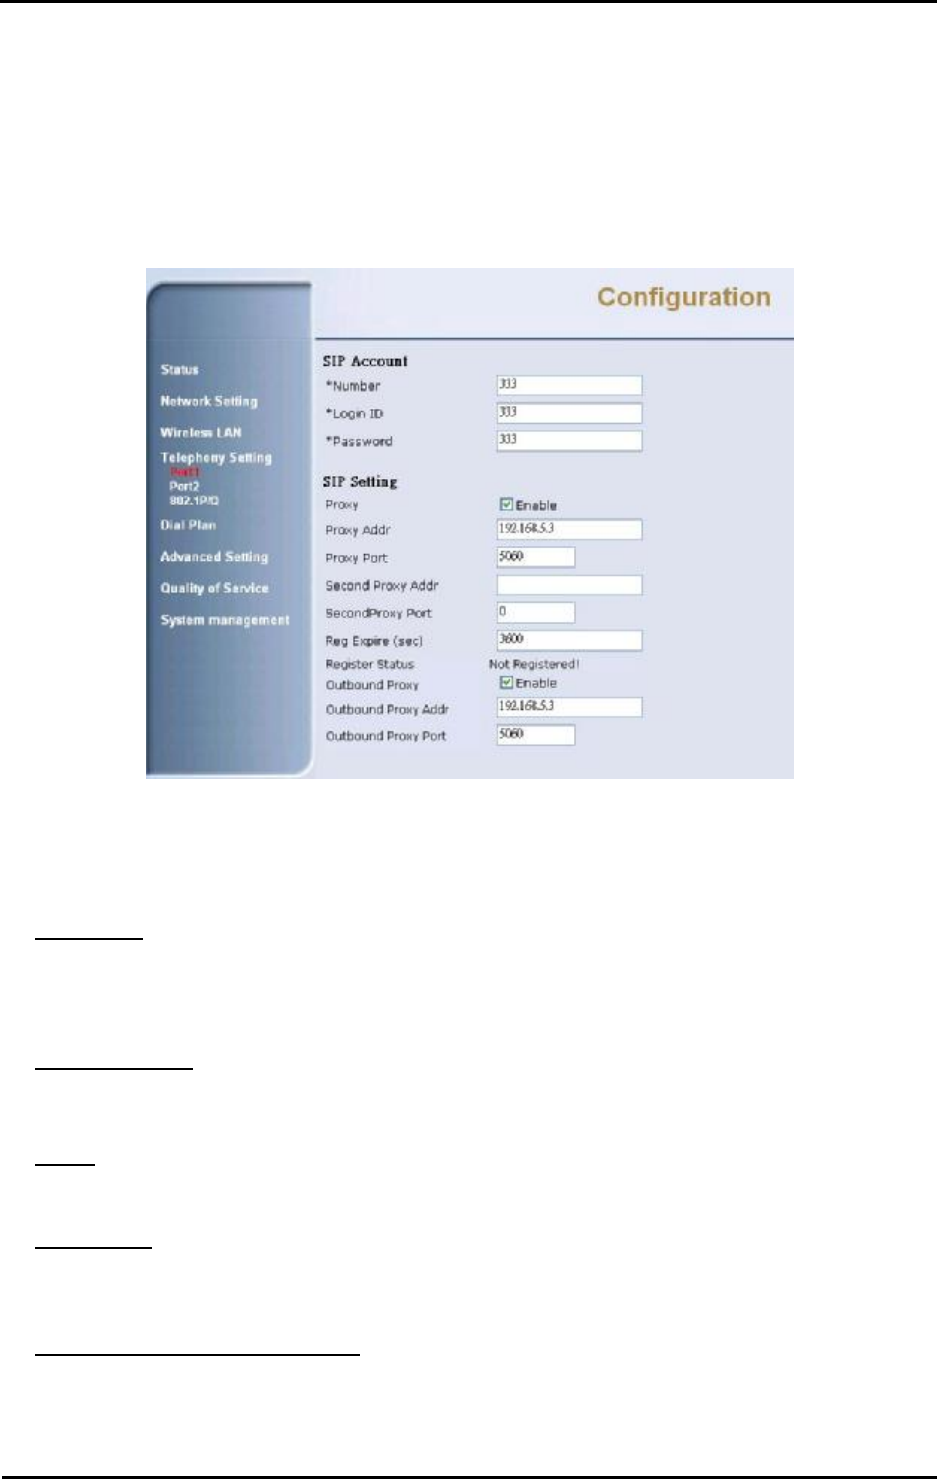
Before you place a call, you must setup SIP configuration in Telephony Setting page. Port1 is for FXS1,
port2 is for FXS2.
- You must give number, Login ID, Password
- Check Proxy Enable box to enable SIP proxy function and then give proxy address in Proxy Addr
field.
- Check Outbound Proxy Enable box to enable outbound proxy function and then give outbound proxy
address in Outbound Proxy Addr field.
- After configuration, please “Apply” to update the settings in the router.
7 How to Operate the Device
Place a call
- Step 1. Pick up handset; you can get a dial tone.
- Step 2. Input the number you want to call, and press “#” to call out
Answering a call
- Step 1. If you hear the Ringing, you can pick up the handset to receive the call.
- Step 2. After you finish the conversation then hang-up the handset to disconnect the call.
Redial
- Step 1. Pick up the handset, the press”*14” to call the last number you dialed
Call Return
Step 1. Pick up the handset, the press”*69” to call the last number called you
Placing a second call during a call
When you are talking to someone, you may need to call a second people without hanging up the first one.
To achieve this purpose you can follow the steps below:

2/1-port FXS ATA WiFi-Router Quick User Guide
Copyright © 2007, M/C:TSIP-2512GR-R3 Page 11
- Step 1. Hook flash the phone, then you can hear the dial tone, dial the numbers you want to call
and
press “#” to call out.
- Step 2. If you hear busy tone after hooking flash the phone, it means you can’t dial a second call now.
You just need to hook down the phone.
- Step 3. If you hear ring tone after hooking down the phone, pick up it to release a call, or you can
ignore it. It will automatically stop when the remote hang up this call.
Answer a second call during a call
When you are talking to someone, you may hear call waiting tone. This means a second call is coming.
You have 3 different choices as below:
[Hang up the current line to accept the incoming line]
- Hook down the phone to hang up the current line.
- Then you hear the ring tone.
- Hook off the phone to answer the second call.
[Hold the current line to accept the incoming line]
- Hook flash (which means quickly hook down and then hook off the phone) the phone, and then you
can accept the second call and hold the first call. The one who was held will hear nothing from you.
- To switch between the two calls, you just need to hook flash the phone.
- To end the second call or the second calling party hangs up, you just need to hang up the phone.
- Then you will hear the phone is ringing, pick the phone to continue the first call.
[Ignore the second call]
- To ignore the second call, you just need to do nothing to continue the first call.
Make a transfer
When you are talking to one person and holding another person, you may want them to talk to each other
without your attending. Please follow the steps below:
- Step 1. Call first person and talk with him/her.
- Step 2. Hold the call by hook flash and dial the second person’s phone number and press “#” to call
out.
- Step 3. After the second person pick up the phone, you can just press “#” to transfer. They can talk
to each other.
Make a 3-way conference
- Call the first person you want to invite to the conference.
- After he/she pick up the phone, hold the call by hook flash.
- Dial the second person’s phone number you want to invite to the conference.
- After the second person pick up the phone, you press”*” to make you 3 talk to each other.
For more operations, please refer to the User’s Manual or Administrator Guide.
8 Wireless function
Connect to WiFi Router use wireless connection
- Step 1. Make sure wireless function of your PC or notebook has been enabled.
- Step 2. Search wireless connection, if you find a wireless connection named “2/1-port
WiFi-Router”; double click to connect to router.
- Step 3. If the wireless icon in the status bar shows connecting ok, your PC or notebook has already
connected to the WiFi Router.