User Manual
Telcare Blood Glucose
Monitoring System
User Manual
This meter contains a rechargeable internal baery. In order to save
baery power, it will power down (go dark) aer 20 seconds. If this
happens while you are using the meter, there is nothing wrong. To
wake up the meter, either insert a test strip or turn the power buon
“o” and then “on”.
This device will not transmit data when it is not in use. The data
transmission me is no more than six minutes.

Home glucose monitoring is
universally recognized as essential
to the management of diabetes and
prevention of complications.
“
”

Thank you for choosing the Telcare Blood Glucose Meter (BGM) to
help you manage your diabetes.
The Telcare BGM is an advanced wireless monitoring system
that connects you, the paent, with your healthcare provider to
enhance your ability to manage your blood glucose levels. The
Telcare BGM has been designed to be accurate and easy to use.
This manual contains all of the informaon needed to use and
maintain your new blood glucose meter. Please read it carefully
before using your new Telcare BGM.
Telcare BGM provides an easy and precise way to measure blood
glucose using fresh capillary whole blood taken from your ngerp.
The added convenience of autocoding can help reduce the chance
of inaccurate readings caused by incorrect coding of the meter. The
test results are plasma-calibrated for easy comparison to lab results.
When your test is complete your results are securely transmied
to the Telserve Web Portal (www.MyTelcare.com), where they may
be accessed by you (the paent) and any other authorized person
(doctor, educator, family member, etc.), eliminang the need to
manually record your results.
Telcare BGM is a rechargeable baery operated meter intended
for use as an aid by persons with diabetes and by healthcare
professionals to monitor glucose concentraon in whole blood.
If you have quesons or simply need more informaon, please visit our website
at www.telcare.com. Thank you again for choosing the Telcare BGM.

Table of Contents
Your Telcare Blood Glucose Meter
The Telcare BGM Device 1
Telcare Test Strips 3
The Display Screen 4
Seng Up Your Telcare BGM 5
Control Soluon Modes
Performing the Control Test 8
Tesng Your Blood Sugars
Checklist 14
Preparing Your Lancing Device 16
Understanding Your Results 26
Viewing Your Meter’s Memory 27
Maintenance of Your Telcare BGM
Cleaning and Storage 28
Charging the Telcare BGM 29
Troubleshoong 30
Terms of Warranty 33
About Telcare / Contact 34

Your Telcare BGM
Unboxing the Telcare BGM for the rst me
Before we begin, take a moment to go over the contents of your
Telcare BGM kit. Your kit should include all of the following items:
- Telcare Blood Glucose Meter (baery included)
- AC Charger
- Lancing Device
- Lancets
- Instrucon Manual
Make sure you charge your glucose meter for at least 12 hours
before rst use. To charge your glucose meter, use the AC Charger
included in your kit.
You should use the Telcare BGM for:
- Tesng blood glucose
- Tesng only with fresh capillary whole blood samples
You should NOT use the Telcare BGM for:
- The diagnosis of diabetes
- Tesng blood glucose on newborns
- Tesng of arterial blood
1
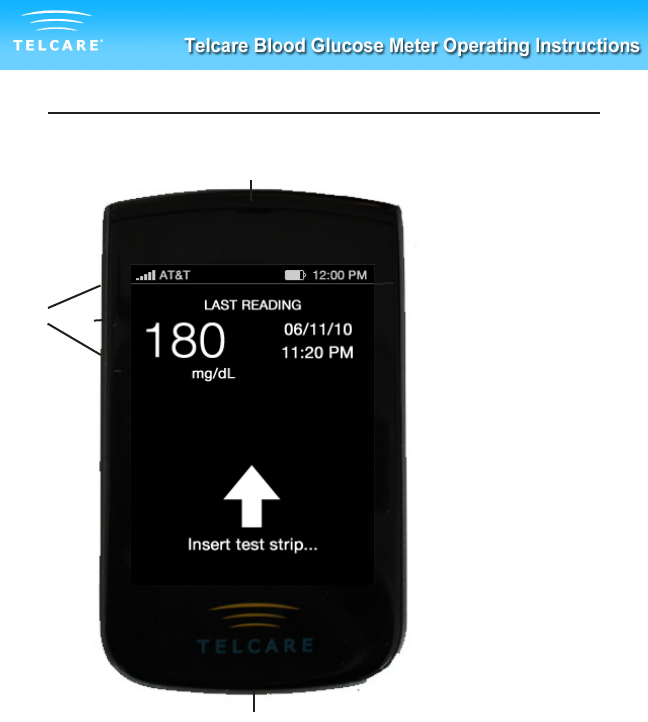
The Telcare BGM Device
q
weq
w
e
r
Power Buon
UP / DOWN Keys
Enter Buon
Display Screen
2
t
y
t
y
Insert Test Strip
(White side up)
Charging Port
(Do not aempt
to insert strip
here)
r
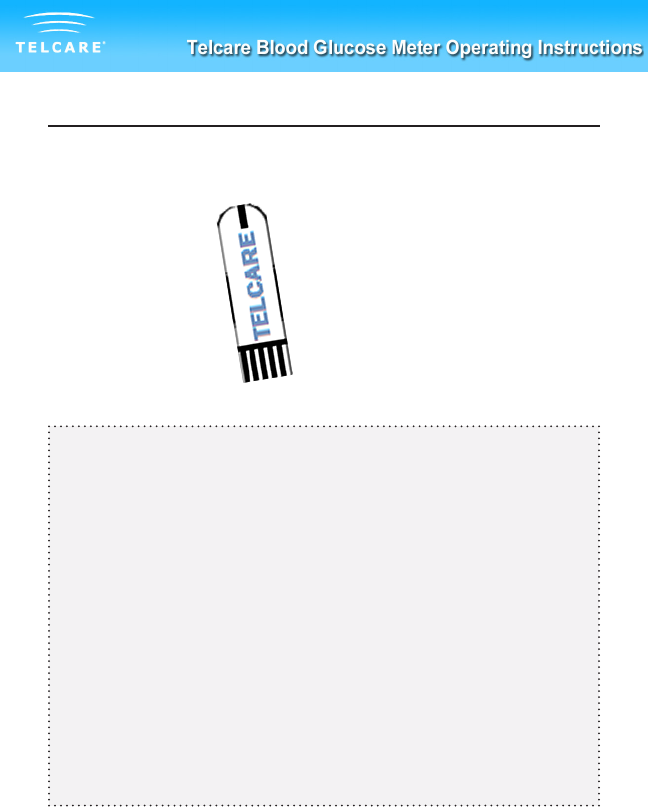
Telcare Test Strips
q
w
Blood Sample End
Contact End
(Put into device)
IMPORTANT NOTES ON TEST STRIPS:
• Check the expiraon date printed on the test strip bole
and its package. Do not use expired test strips.
• Use each test strip immediately aer removing it from the
bole.
• Do not use wet or damaged test strips.
• Keep away from direct sunlight and heat. Store the test
strip bole in a dry, cool place.
• Record the “date opened” on the bole label. Discard the
bole and any remaining test strips 3 months aer the
date of opening.
• Do not operate the meter outside the temperature range of
50˚F to 104˚F.
3
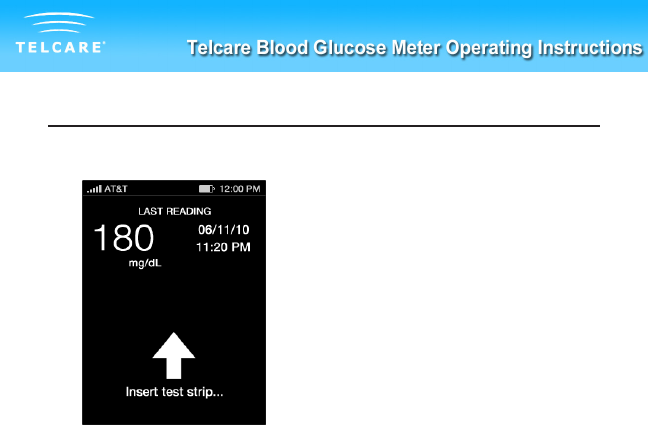
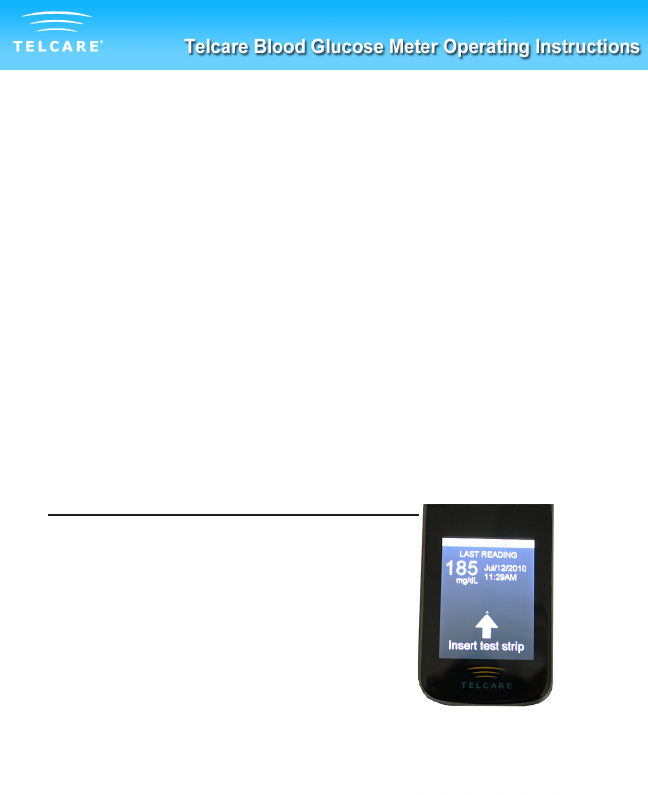
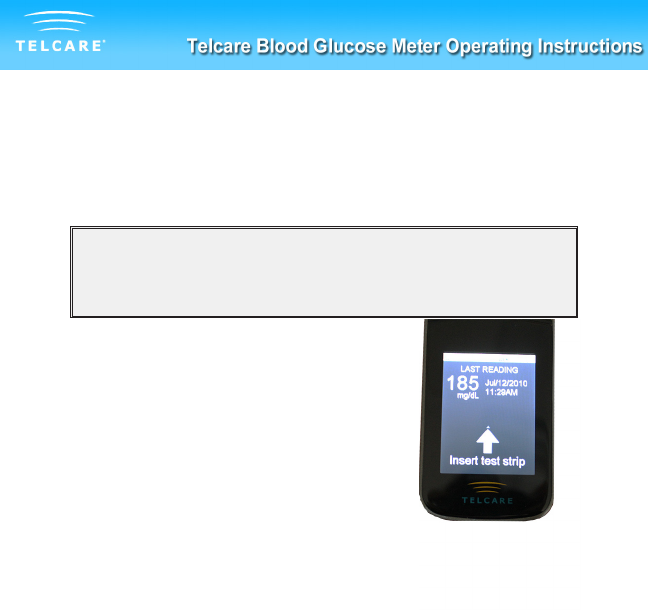
The Display Screen
The Display Screen
Wireless Signal Strength
Current Time
Baery Level
Last Test Reading
Time of Last Reading
qwe
rtq
w
e
r
t
4
From the Display screen, you can see the following things:
- Wireless Signal Strength
- Current Time
- Baery Level
- Last Test Reading
- Time of Last Reading
In this Display screen, use the UP/DOWN buons (located on the
le of your meter) to access the meter’s opons:
- Test Mode
- L1 Control Soluon Mode (Low)
- L2 Control Soluon Mode (High)
- Sengs Menu
Seng Up Your Telcare BGM
Your Telcare BGM is precongured with your informaon already
stored, including your me zone. During each cellular connecon
(which occurs aer a glucose reading has been saved), the web
server will recognize and validate that the me displayed on your
Telcare BGM is accurate. The web server will automacally update
your Telcare BGM me, if appropriate. Also, if your physical locaon
changes the web server will recognize your me zone change and
update your meter’s clock.
If you would like to view your meter’s precongured sengs,
navigate to the Sengs screen.
Geng to the Sengs Screen
1. PWR your Telcare BGM Device On
2. Use the UP/DOWN Buons to reach the “Sengs” screen
5
Sengs Opons
Alarms
Create up to 3 alarms to help remind yourself when to test next.
Date and Time
This page allows you to view the Date and Time sengs of your
device.
Volume
This page allows you to select the volume of your meter. Use the
UP/DOWN keys to select the appropriate volume. There are six
possible volumes you may select from.
Mobile Network
This is an advanced feature. This page allows you to view the details
of the mobile network your device uses for communicaon to the
MyTelcare.com Web Portal.
Auto-Sync
Disabling Auto-sync will prevent the meter from communicang
with the MyTelcare.com Web Portal. Readings will sll be stored in
the Glucose Meter.
6
Retrieve Blood Glucose History
Your last 300 glucose and control test readings are stored within
the meter. Please see ‘Viewing Your Meter’s Memory’ for further
details.
Airplane Mode
Turning on Airplane Mode disables cellular network access. You will
not be able to transmit your readings while Airplane Mode is turned
on. Your meter’s clock will connue to work properly while in this
mode.
If a me zone change occurs, your meter will not automacally
update to the new me unl Airplane Mode has been disabled.
About
This is an advanced feature. You may view detailed informaon
regarding your device from this page. Push the Enter buon to exit
the About page.
To exit the Sengs Menu, scroll to “Back” and press the “Enter”
buon.
7
Control Soluon Modes
Control soluon tesng is to make sure your Telcare BGM and Test
Strips are working well. You should perform control soluon tesng
when:
• Using the meter for the rst me
• Using a new bole of Telcare No Code Test Strips
• You le the test strip bole cap open
• You dropped the meter
• You suspect, for any reason, that the meter and test strips
are not working
• The blood glucose test results do not reect how you feel
• Praccing the tesng procedure
Step by Step Guide to Control Tesng
qPower on the Telcare BGM
device with the PWR buon
wThe device will automacally
start in “Normal Test Mode”,
ready to check blood glucose.
You will see “Insert Test Strip”
on the display.
8
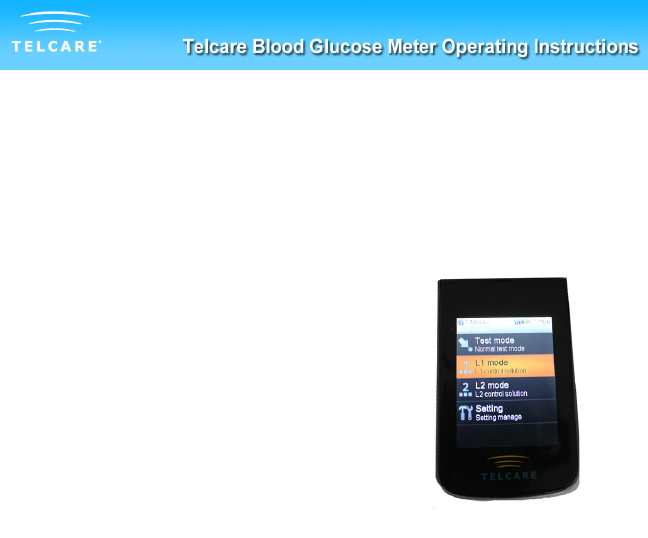
Use the UP / DOWN keys to access the
main menu. Switch modes from “Normal
Test Mode” to L1 Control Soluon Mode
or L2 Control Soluon Mode. You can
also access the “Sengs” menu.
To test Level 1 (L1) control soluon, use
the UP/DOWN buons to highlight L1
mode. Press the middle (ENTER) buon
to select L1 mode.
To test Level 2 (L2) control soluon, use
the UP/DOWN buons to highlight L2
mode. Press the middle (ENTER) buon
to select L2 mode.
e
9
t
y
You can select any Mode you
want by pushing the ENTER
buon.
Take out a Telcare test strip
from the test strip bole.
Close the bole immediately.
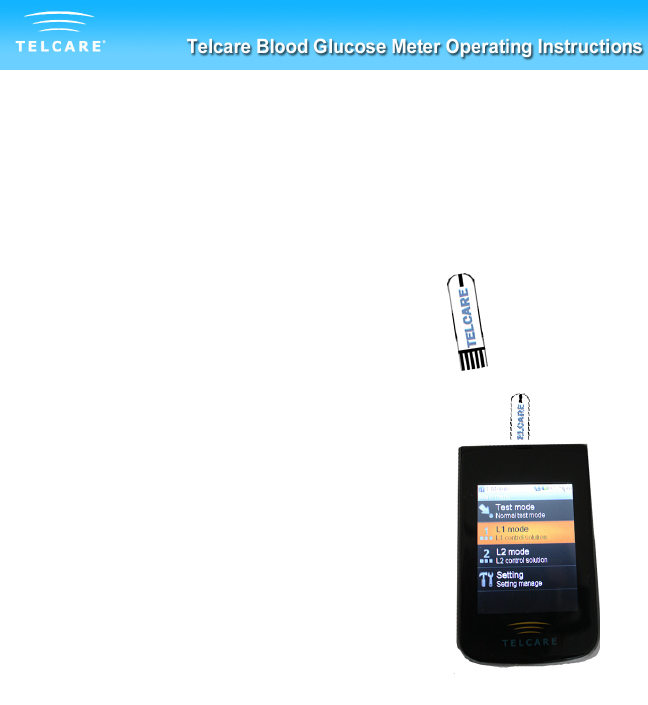
r
Insert the test strip into
the meter. Make sure the
“Telcare” label on the strip is
facing you.
10
u
Squeeze a drop of control soluon onto a clean,
dry surface. Use Level 1 soluon for L1 mode. Use
Level 2 soluon for L2 mode. Do not apply control
soluon to the test strip directly from the bole.
Immediately replace the bole cap on the control
soluon bole.
i
Gently touch the p of the test
strip to the drop of control
soluon. You should see the
top half of the test strip ll
with the liquid.
oThe screen will start to count
down. Aer 7 seconds, the
control test result will appear
on the meter’s display screen.
11
a
Compare the reading on the screen to the “L1
Control Soluon” or “L2 Control Soluon” range
printed on the test strip bole or package. If the
reading falls outside the level printed on the test
strip bole that you used, please see Control
Soluon Trouble Shoong below.
IMPORTANT TIPS
1. Only use Telcare Glucose Control Soluon with the
Telcare Test Strips. Other brands of control soluon
may produce inaccurate results.
2. Always check the expiraon date. DO NOT use
expired control soluon.
3. DO NOT FREEZE. Store the control soluon at room
temperature.
12

Control Soluon Troubleshoong
If your control soluon tesng is out of range (too high or too
low), it may be caused by the following:
• Wrong brand of control soluon
• Control soluon not at room temperature
• Expired or contaminated control soluon
• Damaged test strip
• Meter malfuncon
• Wrong ambient temperature (should be between 50˚F~104˚F).
• Check the expiraon and open bole date on the control
soluon and on the test strips. Repeat tesng using a new
test strip. If the result is sll out of range, use a new bole of
control soluon and retest.
• If the problem persists, call Telcare at (877) 777-4710. Do not
perform any blood glucose tests unl you resolve this issue.
13
Tesng Your Blood Sugar
Before you begin, make sure to:
• Set up your Telcare BGM properly. Run a control
test before rst use. (See Step by Step Guide to Control
Tesng on page 8.)
• Wash your hands and tesng site thoroughly with warm
water and soap. Dry your hands well.
• Test in a place where the temperature range is between
50˚F~104˚F. (See Troubleshoong Your Telcare BGM on page
31 for more informaon.)
You will need:
- Your Telcare Blood Glucose Meter
- A new Telcare Blood Glucose Test Strip
- A lancing device with a clean, unused lancet
(or safety lancets)
- The clear cap for Alternate Site Tesng (AST) if
tesng on palm
14
Step by Step Blood Sugar Tesng
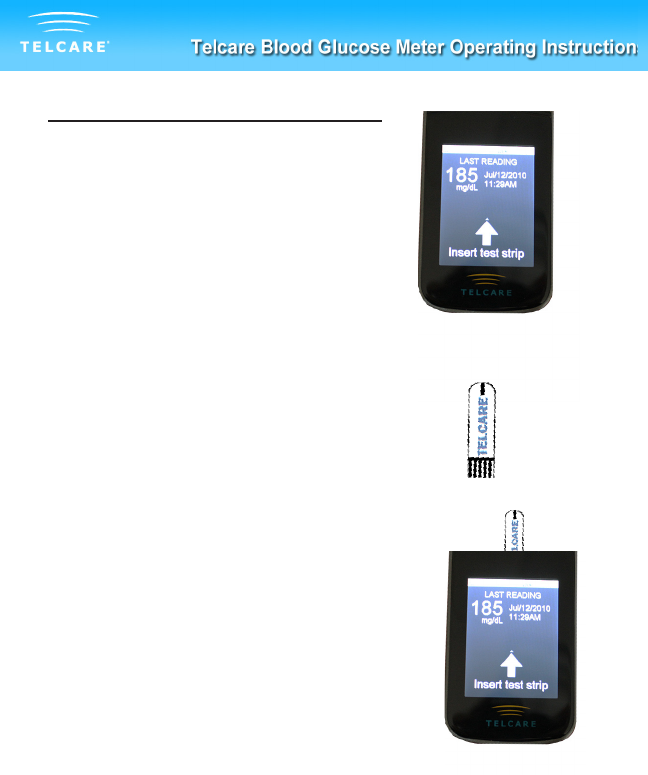
qPower on the Telcare BGM
device with the PWR buon.
The device will automacally
start in “Normal Test Mode”.
It will ready to check blood
and “Insert test strip” will be
displayed.
15
wTake out a Telcare No Code
Test Strip from the test strip
bole, and close the bole
immediately.
eInsert the test strip into your
Telcare BGM device.
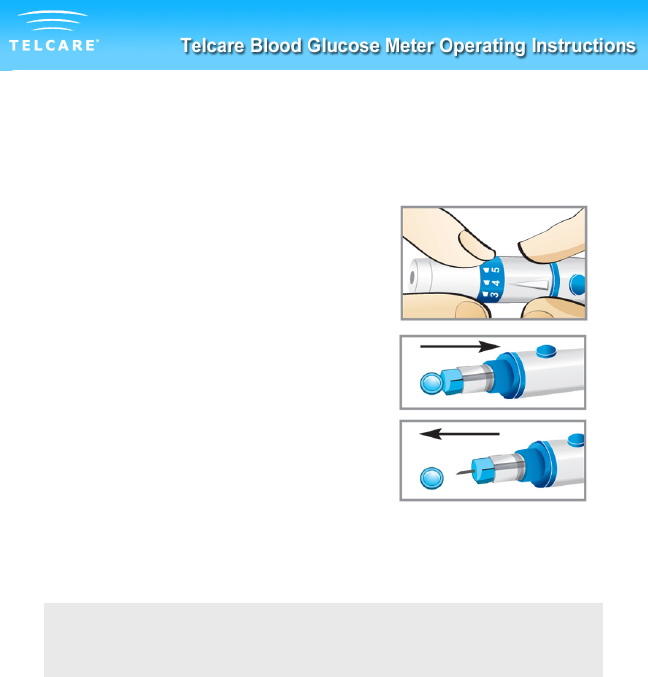
Prepare Your Lancing Device
r
16
A) Unscrew the cap of the lancing device
and push the lancet into the device
rmly unl it is fully seated.
B) Twist the protecve cover o the
lancet. Twist the adjustable cover
clockwise onto the lancing device.
IMPORTANT:
Use a new sterile lancet every me you test to avoid cross contaminaon.
If alcohol wipes are used to clean the area, make sure it is dry before the
blood sample is obtained.
17
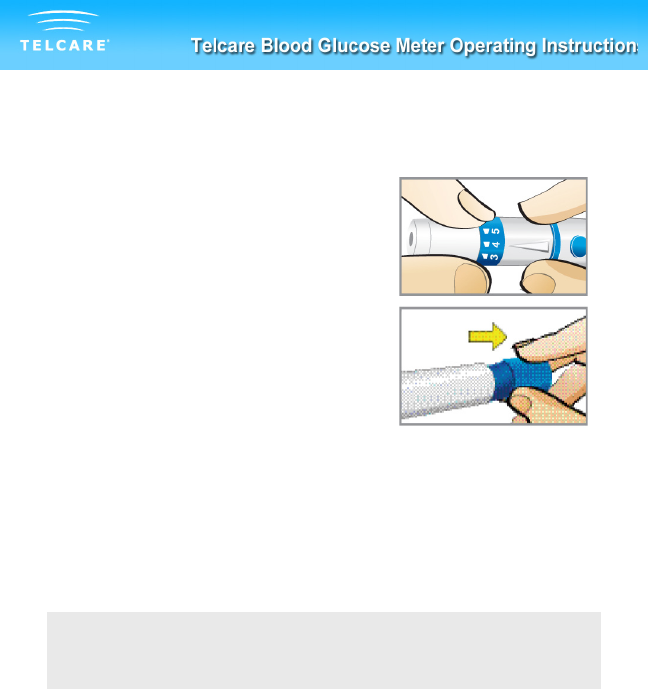
C) Adjust the puncture seng on the
cap for the puncture depth level (1 is the
lightest and 5 is the deepest).
D) With one hand holding the cap, pull
back the lancing device with your other
hand unl you hear a click. The lancing
device is now ready for use.
NOTE:
• For ngerp tesng, use the blue cap.
• For alternate site tesng on your palm, use the clear cap.
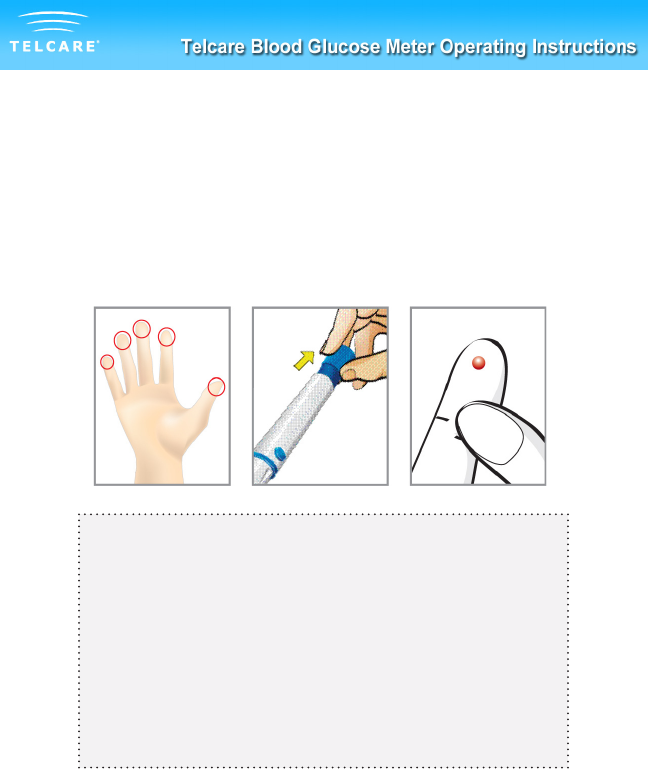
tFingerp Tesng
18
Hold the lancing device (with the blue cap) against the
side of your ngerp and press the release buon to
create a puncture.
Tips for ngerp tesng
• Gently massage your hand and nger toward the
puncture site to form a drop of blood. Do not “milk,”
or squeeze around the puncture site.
• Lance the side of your ngerp to avoid soreness.
To avoid calluses, choose a dierent lancing site
each me.
yTesng Using an Alternate Test Site
Your Telcare Blood Glucose Meter is
capable of tesng your blood glucose
from your palm, usually referred to as an
alternate site test, or AST.
Alternate site tesng can be less painful
than ngerp tesng, but because of
the physiological dierences between
your ngerp and palm, alternate site
test result maybe signicantly dierent
than results from ngerp tesng under
certain condions.
You should consult with your doctor or
healthcare professional before using
alternate site tesng.
Important Informaon on Alternate Site Tesng
19

Alternate Site Tesng SHOULD NOT be used when:
• You have Hypoglycemic unawareness (not able to tell if
you have low blood sugar)
• Within 2 hours of a meal, exercise, or medicaon
• You will be operang machinery or driving a car
• You are sick
20
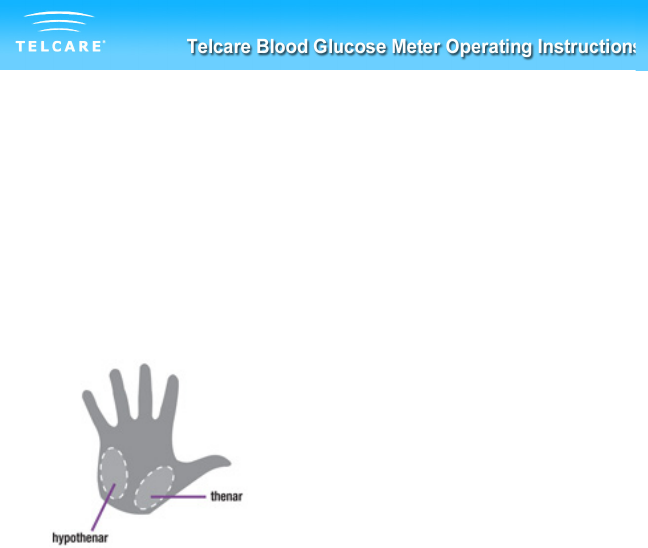
Tesng on your Palm
Prepare the lancing device with a new lancet and clear cap. Cock
the lancing device so that it is ready to use. Select a site on your
palm that does not have veins, moles, excessive hair, or bone.
Vigorously rub the side of your palm with your other hand for at
least ten seconds. You should feel it get quite warm.
Press the opening of the clear cap against a eshy area of the
palm. Press the lancing device up and down in a slow pumping
moon for several seconds to help the ow of blood.
Keep steady pressure on the area and press the release buon.
Don’t be afraid to apply pressure to the area with the lancing
device to assist the ow of blood. Connue to press the cap
against the area for a few seconds to allow blood to come to the
surface. You can see the blood drop through the clear cap. Do not
smear the blood when removing the lancing device. If the blood
drop is too small, the meter will show “Error: Not Enough Blood”.
Insert a new strip and obtain a new blood drop.
If the results from alternate site tesng dier from
how you feel, use ngerp tesng instead.
21
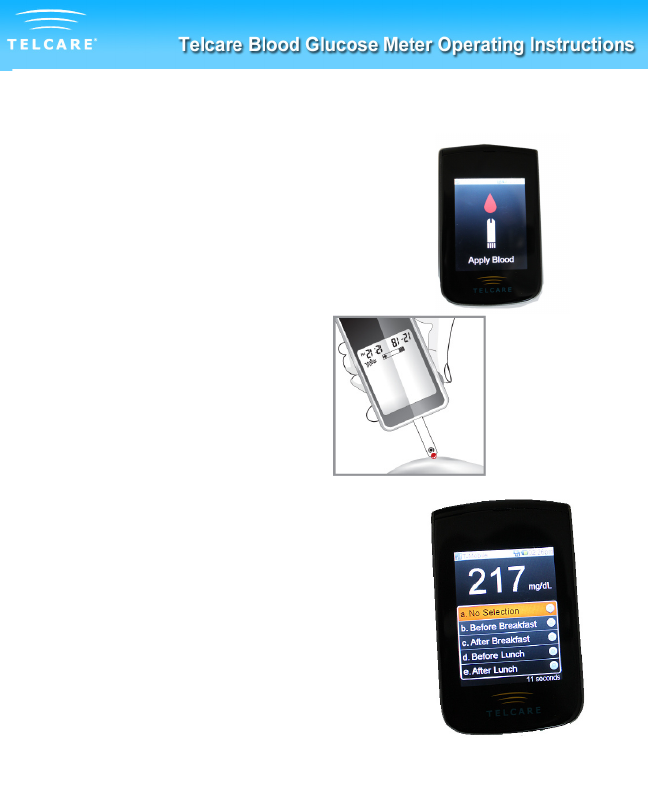
u
Gently touch the test strip to the drop of
blood. The test strip will absorb the blood.
Keep the test strip in the blood drop unl
the meter beeps to indicate the test strip
has enough blood to test.
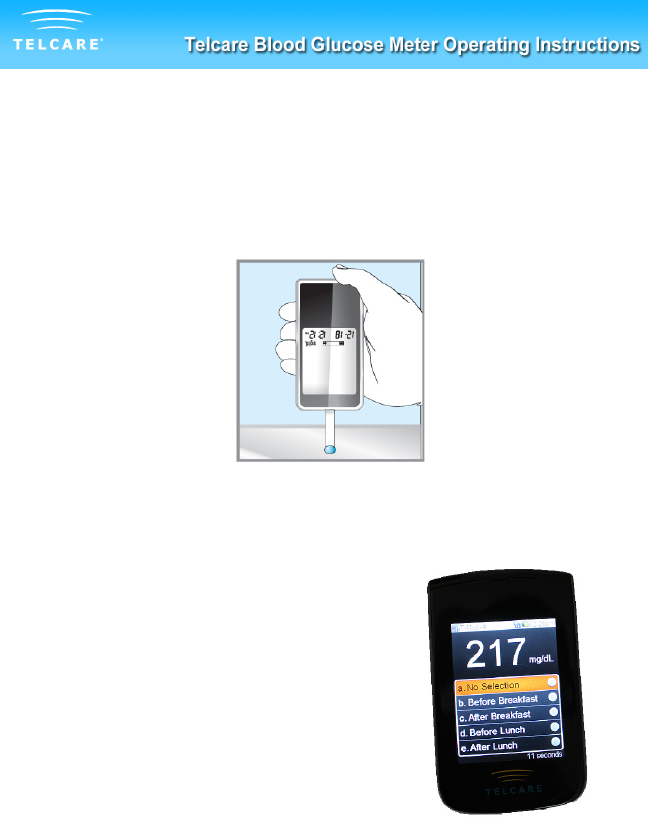
i
The screen will start to count down. Aer
7 seconds, your glucose level will appear
on the display screen. You will then have
20 seconds to select a Reading Tag (e.g.,
Before Breakfast) from the list displayed.
Use the DOWN buon to scroll to the
correct tag. Press the ENTER buon to
select that tag.
Your test result will be automacally stored
into the meter memory. If a reading tag
is not selected aer 20 seconds, it will
automacally be tagged as “No Selecon”.
22
Applying Blood the Test Strip
Tagging Your Data
oYour Results Screen
IMPORTANT
If you see “HI” or “LO” displayed, your blood glucose level may be
above 600 mg/dL or below 20 mg/dL. Wash your hands. Dry your
hands completely. Test again using ngerp tesng, DO NOT test on
your palm. If you sll receive the same result, call your physician or
healthcare professional immediately.
a
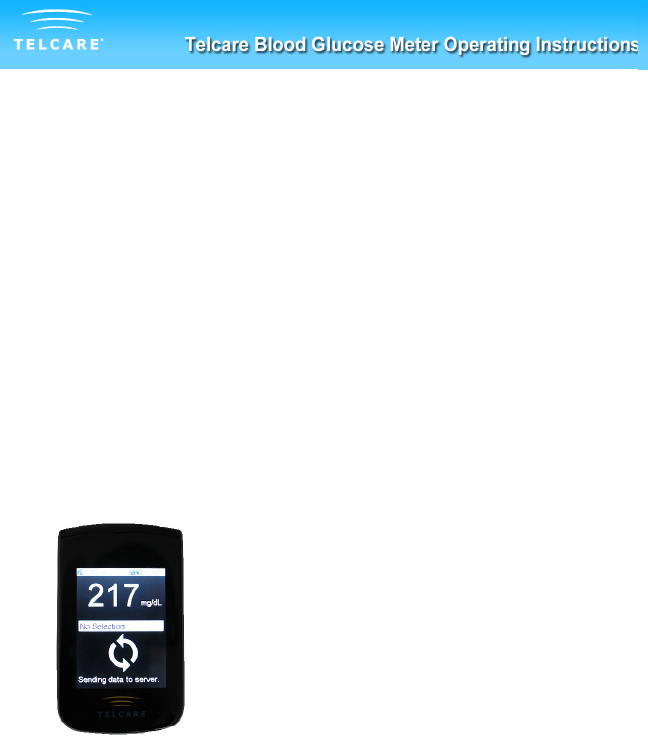
Sending your results to the MyTelcare.com
Web Portal
Your Telcare BGM will automacally transmit
your results aer the device has saved your
reading.
23
Sending Your Results
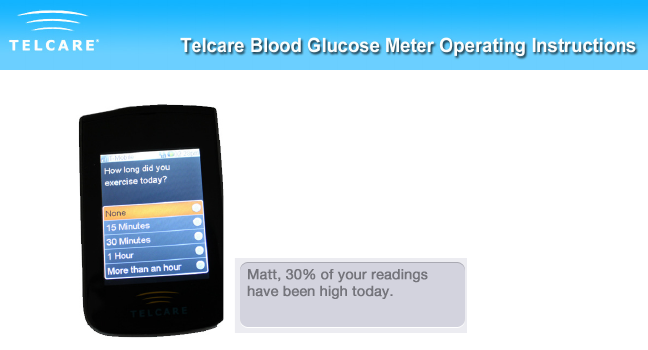
Aer each successful transmission to the
MyTelcare.com Web Portal, a personalized
message will appear on your device with
informaon, ps, and blood glucose trends
from your readings.
The message could also be a mulple choice queson. Use the
UP/DOWN buons to select the appropriate answer. Press the
ENTER buon to transmit the answer to your MyTelcare.com Web
Portal.
To access your readings at hp://mytelcare.com, use the login
credenals provided to you at the me of your Telcare BGM
delivery. If you have addional quesons or require login
support, please contact Telcare at (877) 777-4710, or email
support@telcare.com.
24

If Your Data Transmission is Not Successful
If the device cannot communicate with the Telserve web
server, the following message will appear:
“Unable to complete transmission to server. Retrying...(this
could take a minute)”
If the device cannot communicate with the Telserve web
server it will automacally retry to send the data 3 mes.
(Once every 20 seconds).
If three retries fail, you will see the following message:
“No Connecon to Server. Data will be sent at next test.”
If no connecon is present, your test results will be stored in
your device and sent later.
25

Understanding Your Blood Glucose Test Results
Your blood glucose level will vary depending on many factors. Some
of these are food intake, medicaon, health, stress, and exercise.
The ideal range for adults without diabetes is:
• Between 74~106 mg/dL before meals(1).
• Less than 140 mg/dL two hours aer a meal(2).
It is important to consult with your physician or healthcare
professional to determine your target range.
What to do if you get a high or low reading
If the Meter displays results that are HI or LO, or you get a result
that is more than 250 mg/dL or below 50 mg/dL AND you feel ill:
• Treat your diabetes according to the instrucons from your
doctor and/or healthcare provider.
If the Meter displays results that are “HI” or “LO,” or you get a result
that is more than 250 mg/dL or below 50 mg/dL AND you DO NOT
feel ill:
• Test your meter with a control soluon, refer to page 6,
‘Control Soluon Tesng’.
• Wash your hands and test again using your ngerp.
If you sll get a high or low reading, contact your healthcare
professional.
References:
1. Stedman,Thomas Lathrop. Stedman’s Medical Diconary, 27th
Edion, 1999, pg. 2082
2. American Diabetes Associaon, “Clinical Pracce Recommendaons
2003.” Diabetes Care, Vol 26, Supplement 1, pg. S22.
26
Viewing Your Meter’s Memory
Your Telcare Blood Glucose Meter stores up to 300 test and control
results. Each result is stored with date and me.
You will need:
- Your Telcare Blood Glucose Meter
qPower on the Telcare BGM
device by using the PWR
buon.
wUse the UP/DOWN keys to
access “Sengs Mode”.
eSelect “Retrieve” from the
“Sengs Mode” screen.
rUse the UP/DOWN keys to cycle through the
stored readings.
To exit the Retrieve history menu, you must scroll
to the boom of your reading history and select
“BACK”. [Shortcut: Press the UP buon when your
most recent reading is highlighted. Doing so will
display the Back opon.]
27

Maintenance of the Telcare BGM
Caring for your Telcare Blood Glucose Meter is easy. Follow these
guidelines to keep it working well and in opmal condion.
Cleaning the Meter
• If the meter gets dirty, use a moist (NOT WET) lint-free cloth
with a mild detergent.
• Do not allow water inside the meter or hold it under running
water.
• Do not use glass or household cleaners on the meter.
• Do not clean the test strip holder.
Storage and Precauons
• Handle the meter with care. Severe shock, such as dropping the
meter, could damage it.
• The meter and test strips only work in the temperature range of
50˚F to 104˚F.
• Don’t leave the meter in a place that is extremely hot or
extremely cold (e.g., anywhere near a heat source or in an
extremely hot or cold car.
• Do not expose the meter or test strips to high levels of humidity,
such as in the bathroom or kitchen.
• Immediately close the bole cap ghtly aer removing a test
strip.
• Do not disassemble the meter. If you do it will void the warranty.
If you have technical problems or quesons, contact Telcare at
(877) 777-4710.
28
Charging Your Telcare Blood Glucose Meter
Your Telcare BGM uses a rechargeable baery. It can be charged
and discharged hundreds of mes, but will eventually wear out.
If you noce siginifcant reducon in the duraon of your meters
operang me before needing a recharge, your baery may need
replacing. Please contact Telcare technical support at (877)777-
4710, or email support@telcare.com.
If le unused, a fully charged baery will lose its charge over me.
Always charge indoors.
To Charge Your Device
Plug the power cord into an electrical outlet and plug the other end
of the cord into the data port of the Telcare BGM.
Note
If your device does not turn on when you push the
power buon, your baery may be weak. Charge the
baery. If aer 5 hours of charging the device does
not turn on, contact Telcare technical support at (877)
777-4710 for assistance.
29
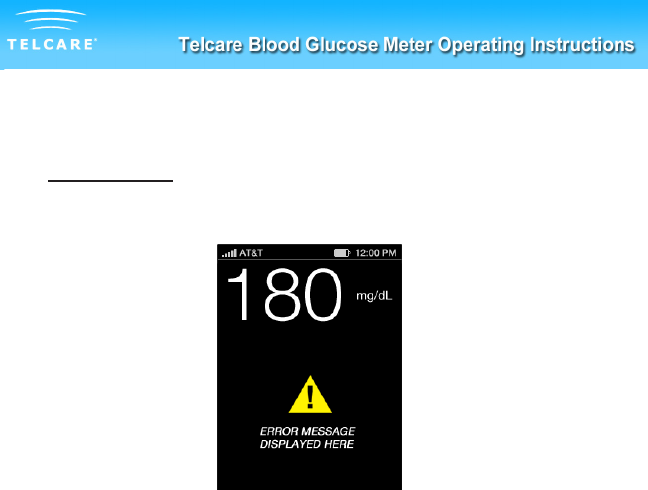
Troubleshoong Your Telcare BGM
Error Codes
In the event your device experiences an error, you will see the
following screen along with an error message.
1) Error: Please Restart Meter
What It Means: The meter may be damaged.
Acon to take: Restart meter and contact Telcare support if the
problem persists.
2) Error: Used Strip Inserted
What It Means: Your test strip may be used or damaged
Acon to take: Repeat the test with a new test strip. Remember,
add the sample only when you see the prompt
on the display screen.
30
3) Error Message: Not Enough Blood
What It Means: There is not enough blood or control sample in
the test strip.
Acon to take: Remove the test strip and repeat the test with a
new test strip.
4) Error Message: Temperature is out of range
What It Means: The temperature is out of range
Acon to take: Move the meter into an area that is between
50˚F~104˚F. Allow 10 to 15 minutes for it to
reach the new temperature.
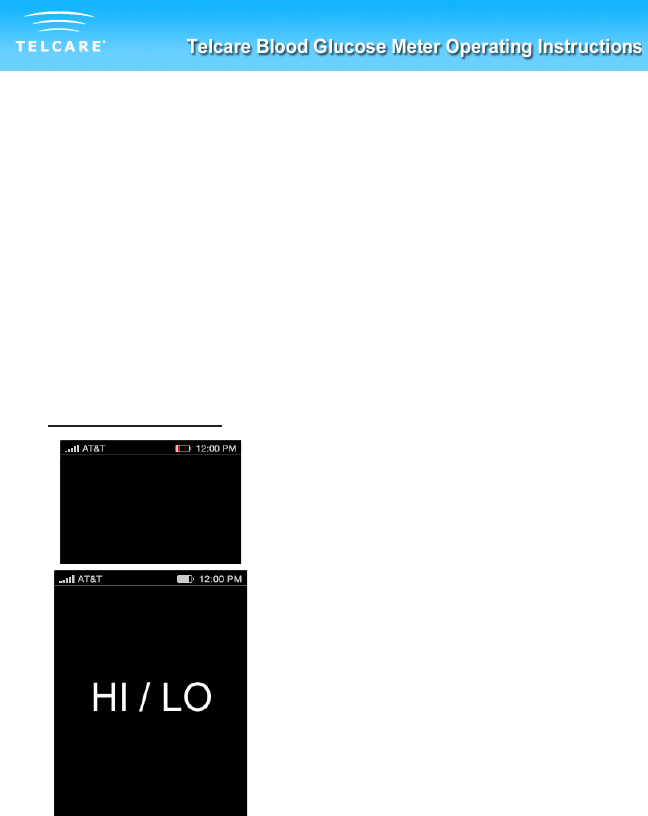
Other Messages
If your meter displays a “Low
Baery” message or icon, charge the
baery.
HI / LO Displayed
If you see either HI or LO displayed
on your device, your blood sugar
level is out of range (either in excess
of 600 mg/dL (HI) or lower than
20mg/dL (LO) ). Wash and dry your
hands and repeat the test with a new
test strip. If the result is sll HI or LO
contact your physician immediately.
31
Communicaon Errors
If you are having trouble uploading your results to the Telserve web
server (communicaon error messages), you may want to try the
following:
- If tesng indoors, move closer to a window for beer cellular
recepon
- If you are sll having dicules, try moving outside of the
building
- Check to see if there is cellular coverage in your area
If the above acons do not resolve your problem, contact Telcare
technical support at (877) 777-4710, or email support@telcare.com.
32

Terms of Warranty
Telcare warrants the Telcare Blood Glucose Meter to be free of
defects in workmanship and materials under normal use for a
period of one (1) year from the date of purchase.
The liability of Telcare is limited to repair or replacement and in
no event shall Telcare be liable for any collateral or consequenal
damages or loss.
Instruments subjected to misuse, abuse, neglect, exposure to
water, unauthorized repair or modicaon are excluded from this
warranty.
This guarantee specically excludes expendables and consumables.
All warranty claims must be directed to the Telcare authorized
dealer responsible for the sale of the system.
This warranty applies only to the original purchaser of the system.
33

Telcare is commied to creang the very best medical device
experience for paents and healthcare professionals. Connecng
powerful hardware and innovave soware via a “no wires”
approach, Telcare’s oerings aim to provide convenient and
eecve disease management tools.
The Telcare Blood Glucose Monitoring System won the People’s
Choice Award at CTIA Wireless 2009, Best in Show at MobiTechFest
2009 and was an E-tech Finalist at CTIA Wireless 2010.
About Telcare
34

Contact Telcare
TELCARE, Inc.
66 Commonwealth Ave
Suite 100
Concord, MA 01742
Phone: (877) 777-4710
Email: support@telcare.com
Website - www.telcare.com
Federal Communicaon Commission Interference Statement
This equipment has been tested and found to comply with the limits for a Class B digital device,
pursuant to Part 15 of the FCC Rules. These limits are designed to provide reasonable protecon against
harmful interference in a residenal installaon. This equipment generates, uses and can radiate radio
frequency energy and, if not installed and used in accordance with the instrucons, may cause harmful
interference to radio communicaons. However, there is no guarantee that interference will not occur
in a parcular installaon. If this equipment does cause harmful interference to radio or television
recepon, which can be determined by turning the equipment o and on, the user is encouraged to try
to correct the interference by one of the following measures:
- Reorient or relocate the receiving antenna.
- Increase the separaon between the equipment and receiver.
- Connect the equipment into an outlet on a circuit dierent from that to which the receiver is
connected.
- Consult the dealer or an experienced radio/TV technician for help.
• This device complies with Part 15 of the FCC Rules. Operaon is subject to the following two
condions: (1) This device may not cause harmful interference, and (2) this device must accept any
interference received, including interference that may cause undesired operaon.
• FCC Cauon: Any changes or modicaons not expressly approved by the party responsible for
compliance could void the user’s authority to operate this equipment.
FCC Radiaon Exposure Statement
This equipment complies with FCC radiaon exposure limits set forth for an uncontrolled environment.
This equipment should be installed and operated with minimum distance 20cm between the radiator &
your body.
This transmier must not be co-located or operang in conjuncon with any other antenna or
transmier.
35