Tele Radio C1108A Radio module User Manual
Tele Radio AB Radio module
UserManual.wiki
>
Tele Radio
>
C1108A User Manual
ONFC1108A & 4807A-C1108A User Manual
Navigation menu
Upload a User Manual
Namespaces
Wiki Guide
HTML
PDF
Info
Views
User Manual
Discussion / Help
Navigation
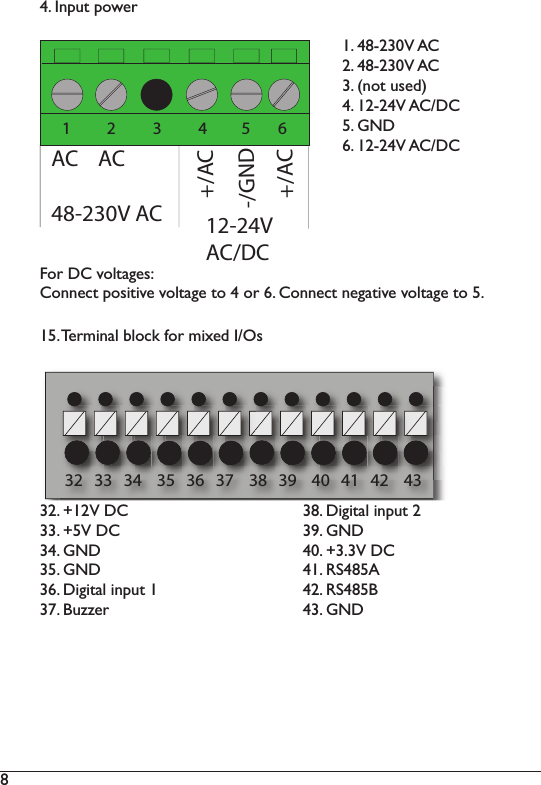
![4 RECEIVERTECHNICAL DATAE*W!6&6)'&%%+"$)'("#&6<$!("RX MODEL 12 V DC 24V DC 48V AC 230V ACR00004-03 HSU)69 IMU)69 IMU)69 HU)69R00004-08 TUU)69 HMU)69 HNU)69 TU69RELAYS: R00004-03 H)#*5+)%+,*-#)X6*C+#Y7%+*C#)) )) ) ) IO9)9;Z[)Q)R)5&"'$!(")%+,*-#)X<($+"$!*,))) ) ) 5%++\?6*C+#Y7%+*C#)S9)9;Z[2)R00004-08 H)#*5+)%+,*-#)X6*C+#Y7%+*C#)) )) ) ) IO9)9;Z[)Q)IR)5&"'$!(")%+,*-#)X<($+"$!*,))) ) ) 5%++\?6*C+#Y7%+*C#)S9)9;Z[2)OPERATING FREQUENCY: ]UN2UIHTL]HO2]SRT)E^D2V@K_FK`;a):9`bJP) IT)7*"C#JZcKP)))))) ) ) RT)W)IHO)W)IRO)662Y)) ) ) H]2T”)W)M]2O”)W)O]2N”BKZd^3P)))) ) IUUU)=%*6#Y)H2H),7#2K`;9eJFf93Z>`)Ze);f9JJP) ZeOT \)<($+"$!*,)5%++)6+*"#)$4*$)-(&)4*8+)$()#&<<,-)8(,$*=+)$()=+$)8(,$*=+)(&$)(5)*)%+,*-)X+2=2)8!*)*)'(""+'$!(")'(67[2)IMPORTANT!)B+)%+'(66+".)$4*$)$4+)5&"'$!("*,!$-)(5)$4+)J3>e)7&$$(")!#)7+!"=)$+#$+.)*$)*)%+=&,*%)7*#!#P)9$)*)6!"!6&6?)/4+")&#+.)5(%)HUU)4(&%#2)3+#$)$4+)J3>e) button by pressing and pulling it out. STOP BUTTON TEST](https://usermanual.wiki/Tele-Radio/C1108A/User-Guide-1759649-Page-4.png)
![T AC AC48-230V 12-24VAC/DC+/AC-/GND+/ACSR1 SR2 1 2 3 45671 2 3 4 5 6 8 9 10 11 12 13 14 15 16 17 18 19 20 21 22 23 24 25 26 27 28 29 30 31732 33 34 35 36 37 38 39 40 41 42 43R1SR1 SR2 R2 R3 R4 R5 R6 R7LED1LED2LED3LED4LED5LED6LED7LED6LED7LED3LED2LED1SR 1+2 LED LED4 LED5LED1LED81. Stop relays 1+2 LED (red)2. Stop relays 1+2N2)>7,!=*$(%-)5&#+P)H9)X#,(/[?)6&#$))))))))'(6<,-)/!$4)ZK;O]IYK`OUO]IM2)3+%6!"*,)7,('C)5(%)<(/+%)#&<<,-))) (see next page)T2)V&"'$!(")%+,*-#)ILRO2)@+,*-)fKA#ILR)X%+.[7. Function LED 7 (green)S2)V&"'$!(")fKA)O)X-+,,(/[]2))V&"'$!(")fKA)T)X%+.[10. Antenna connector11.Function LED 4 (orange)12. Function LED 3 (green)13. Function LED 2 (yellow)14. Function LED 1 (red)IT2)3+%6!"*,)7,('C)5(%)6!W+.)ZY>#IO2)V&"'$!(")7&$$(") (Cancel button)17. Select button (OK button)234TO79111213814ITIO17101RECEIVER TG-R00004-03, TG-R00004-08BASE BOARDIMPORTANT! 3+,+)@*.!()%+6($+)'("$%(,#)*%+)(5$+")7&!,$)!"$()/!.+%)*<<,!'*$!("#2)B+)%+'(66+".)$4*$)$4+)#-#$+6)!#)<%(8!.+.)/!$4)*)/!%+.)+6+%=+"'-)#$(<)/4+%+)"+'+##*%-2](https://usermanual.wiki/Tele-Radio/C1108A/User-Guide-1759649-Page-5.png)
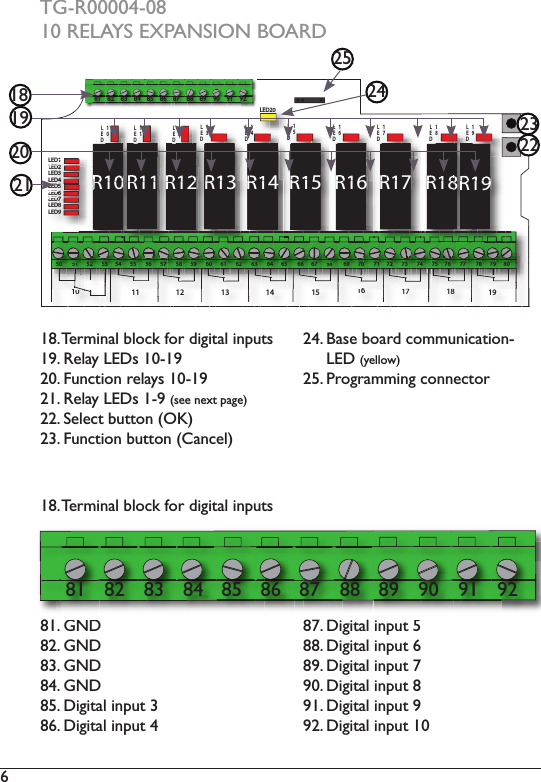
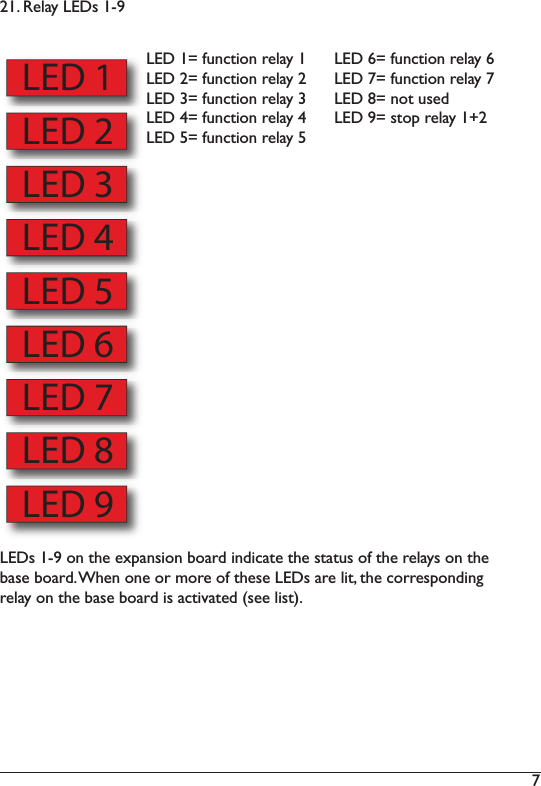
![9 TRANSMITTER T0009-12I2)@&77+%)'(8+% 7. Button 42. Top LED S2):&$$(")T)X#$*%$)7&$$("[3. Display ]2):&$$(")O)X#$*%$)7&$$("[4. Button 1 10. Stop buttonT2):&$$(")HO2):&$$(")N](https://usermanual.wiki/Tele-Radio/C1108A/User-Guide-1759649-Page-9.png)
![13 11. ;("1%6)7-)<%+##!"=)7&$$(")T2) The display shows [Registering] while the process is ongoing. )))))))))B4+")$4+)%+'+!8+%)4*#)5(&".)$4+)$%*"#6!$$+%?)*,,)%+,*-)fKA#)i*#42)12. e%+##)$4+)%+'+!8+%)J+,+'$)7&$$("2)))))))))V&"'$!(")fKA#)ILR)i*#4)N)$!6+#2)34+)%+,*-)fKA#)=()(552)13. 34+)%+'+!8+%)%+#$*%$#2) All Function LEDs light for approx. 1 second. IMPORTANT! For safety reasons, avoid registering transmitters in receivers where you don´t intend to use it. ERASE THE TRANSMITTER FROM THE RECEIVERIMPORTANT! Do not use the erase function during a running session. NOTE ! The receiver must be powered during the erase function. 1. e&,,)(&$)$4+)#$(<)7&$$(")(")$4+)$%*"#6!$$+%2)2. e%+##)$%*"#6!$$+%)7&$$(")O2)b++<)<%+##+.2)3. Press the stop button.4. @+,+*#+)7&$$(")O2))))))))))34+)$(<)fKA)i*#4+#)X=%++")/4+")$4+)7*$$+%-)'*<*'!$-)!#)=((.?)%+.)) when the battery capacity is poor).T2) d()$()jK%*#+k)!")$4+);("1=&%*$!(")6+"&2)O2) )J+,+'$)*)%+'+!8+%)$()+%*#+2)7. ;("1%6)7-)<%+##!"=)7&$$(")T2) The display shows [Erasing] while the process is ongoing. If the erasing fails, the display shows [FAILED]. If the erasing succeeds, the display shows [OK]. 8. 34+)$%*"#6!$$+%)$&%"#)(552)](https://usermanual.wiki/Tele-Radio/C1108A/User-Guide-1759649-Page-13.png)