Telefield IP-125 IP Phone User Manual IP115 125 2012 11 30
Telefield Ltd. IP Phone IP115 125 2012 11 30
Users Manual
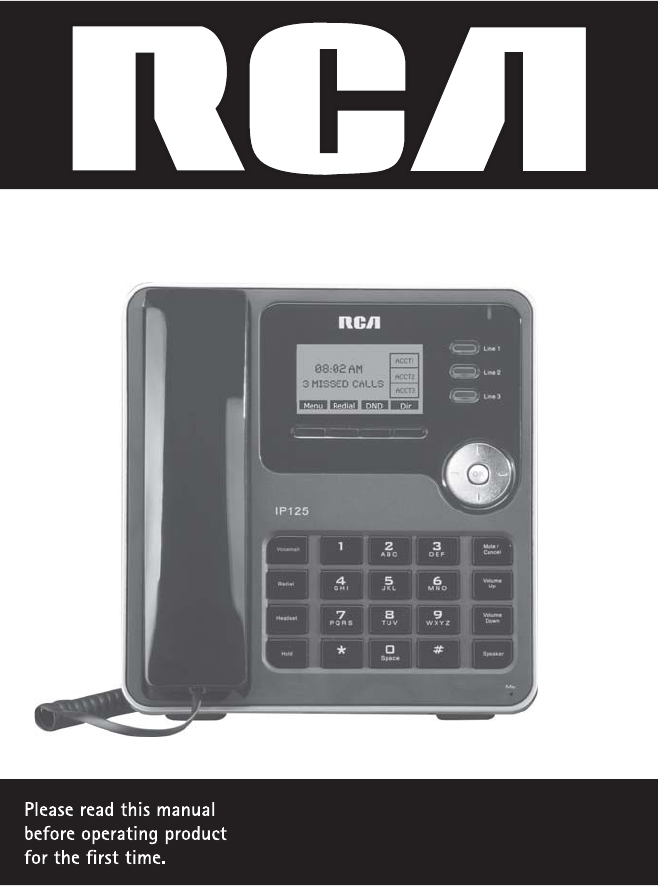
IP115/125
IP Phone
This product meets the applicable Industry Canada technical specifications.
Le present matériel est conforme aux specifications techniques applicables d’Industrie Canada.
The Ringer Equivalence Number is an indication of the maximum number of terminals allowed to
be connected to a telephone interface. The termination on an interface may consist of any
combination of devices subject only to the requirement that the sum of the Ringer Equivalence
Numbers of all the devices does not exceed five.
L’indice d’équivalence de la sonnerie (IES) sert à indiquer le nombre maximal de terminaux qui
peuvent être raccordés à une interface téléphonique. La terminaison d’une interface peut consister
en une combinaison quelconque de dispositifs, à la seule condition que la somme d’indices
d’équivalence de la sonnerie de tous les dispositifs n’excède pas cinq.
IC CS-03
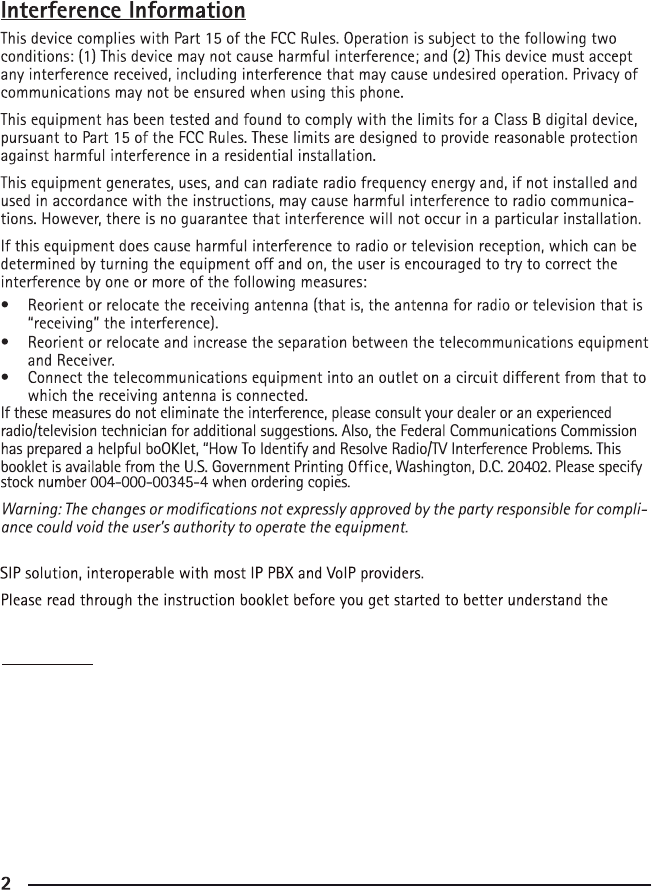
The RCA IP115/IP125 phone is designed for business environment use. It is a full-featured
features of the IP115/IP125.

3
Getting Started 5
About 5
Illustrate 5
Feature Highlights: 6
Technical Features 6
Connecting Your Phone 6
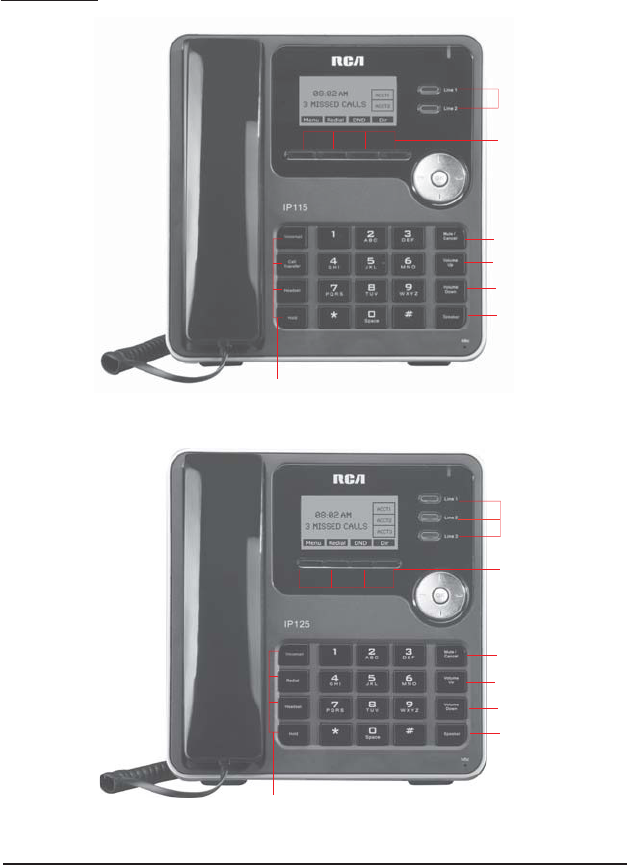
Phone overview 7
Understanding Buttons and
Hardware 7
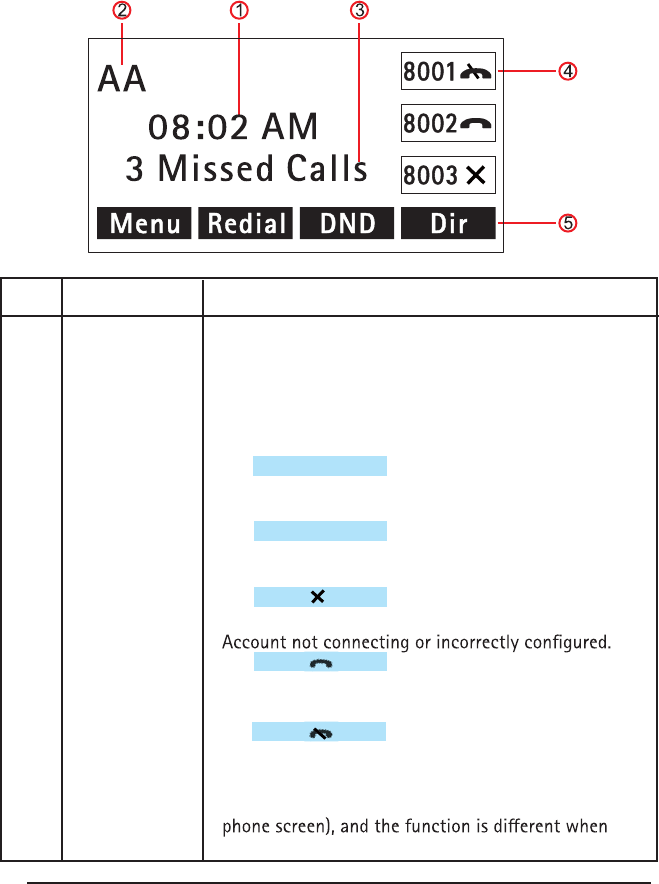
Understanding Phone Screen
Features 7
Basic Call Handling 9
Placing a Call 9
Answering a Call 10
Ending a Call 11
Using Hold and Resume
11
Transferring Calls 12
etuM gnisU 12
Do Not Disturb 13
3-way Conference 13
Expansion Installation
(only IP125 has this item) 14
Expansion Settings(only IP125
has this item) 14
etaD & emiT 15
VOIP Call Forwarding 15
Advanced Call Handling 16
Hot Line
Message Code
Fuzzy Search
16
16
16
Using the phone book
16
sgoL llaC gnisU 18
Keypad Instruction
19
19
Language
20
SIP Account Settings
Create an SIP account
Disable sip account
19
19
Network Setting 20
Change network settings
Load default settings
20
21
21
21
21
21
21
21
Customizing Rings and Volume
Change the ring tone
Adjust the volume level
Adjust the Contrast
Backlight On/O
noisrev erawtfos eht kcehC
na fo sutats eht kcehC
eludom noisnapxe
Adjust the Brightness
Customizing Screen settings
21
21
22
22
22
Test the keys
Check the LCD screen
Check the lights
Check the sound
Diagnose
22
22
22
23
23
32 ecafretnI beW
24
Network 25
SIP Account 26
Expansion Module 28
Audio
Favorite Ring Tone
29
30
Phone Book 30
Group
Contact
30
31
LDAP
Overview
32
32
32
BanList 33
Enterprise Phonebook 34
Reboot
Modify Password
Using Multiple SIP Accounts
27

HTTP Upgrade 45
Reboot 46
Phone Status 46
System info 47
48
48
49
50
50
51
Appendix
Resetting to Default Settings 40
Auto Provision 41
FTP Upgrade 43
44
TFTP Upgrade
Auto Provision
Conguration les on
TFTP/HTTP/HTTPS/FTP Server
Extern.xml les on
Phonebook on
TFTP/HTTP/HTTPS/FTP Server
TFTP/HTTP/HTTPS/FTP Server
Automatic Provisioning using
DHCP Option 66
49
49
49
49
Name of conguration le
Normal Conguration le
Broadsoft Conguration les
Download a conguration
le from the phone
54
54
54
55
55
55
59
60
61
62
AES Encryption
LDAP
1. LDAP Overview
2. Conguration
3. Attributes
3.1 Common Attributes
3.2 LDAP
3.3 Example for Conguration
4. Conguration on the RCA Phone
Service
Warranty
38
36
VLAN Settings
VPN Settings
36
Dial Plan
Global SIP
39
39
Phone Maintenance
Log 39
Password 39
51
51
51
DHCP Server
92.168.0.201
IP Phone
53
53
Password
Auto Download Software
53
53
53
53
53
54
54
54
Auto Download Kernel
Broadsoft Compatibility
Auto Download Expansion
Auto Download Enterprise
Phonebook
Booting Checked
Auto Provision Time
Examples of Auto Provision
Frequency and Time
52
53
IP Phone
Username
52
TFTP/HTTP/HTTPS/FTP Server
Auto-Provision via xable
Advance Settings 35
35
Phone Setting
4
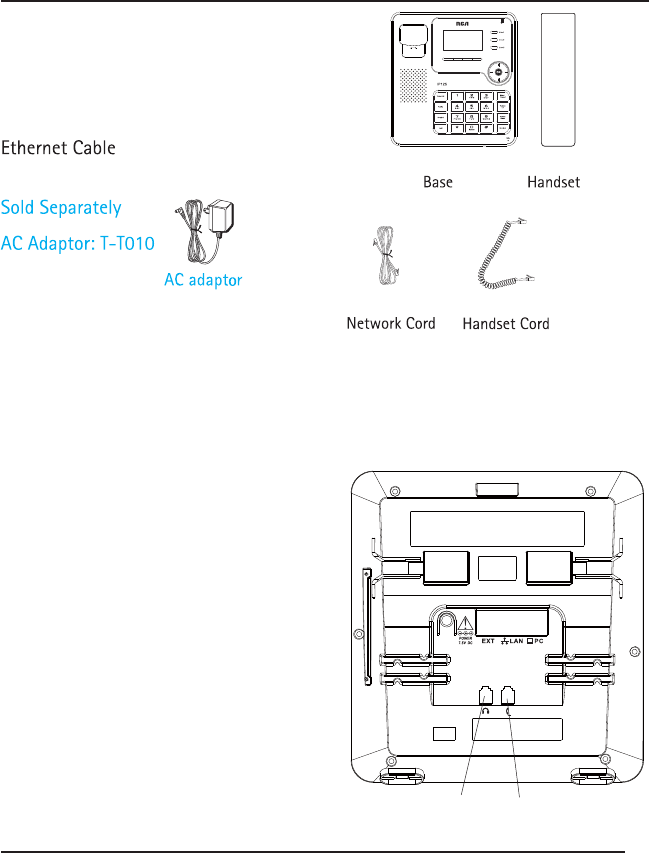
Packing List
The following components are included:
IP115/IP125
Handset & Handset Cord
Setting up your IP115/IP125
This section introduces how to set up the phone with the components in the pack-
ing list:
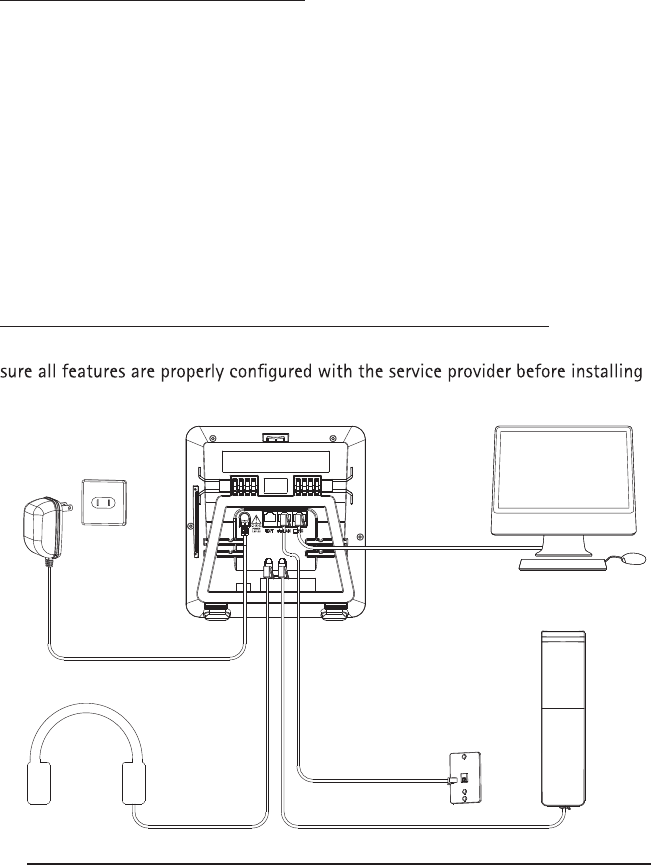
Connecting the Handset Cord
Connecting to the Network and Power.
Connecting the Handset and Headset
(not included) as shown to the side:
Note: A headset is not provided.
Note:The IP125 has a EXT port which
connect EM32 programmable key
module.
5
Getting Started
Headset
socket
Handset
socket
6
Connect Network and Power
Connect the phone to a Power over Ethernet enabled Hub/Switch/IP PBX
using Ethernet cable.
Alternatively, the phone can also be powered using an AC adaptor, which is
sold separately.
The LAN Port can also be connected to Hub/Switch/IP PBX or other internet devices.
The phone can also share the network connection with other network devices such
as a PC. Connect the phone’s PC port to the computer’s network port using an
Ethernet cable.
Note: If connect the Ethernet cable not the AC adapter (sold separately), make sure
the ethernet cable and switch/hub are PoE compliant.
Telephone Features and your VoIP Service Provider
Not all phone features are available with all VoIP service providers. Please make
the IP115/IP125.
Power Socket
Headset
PC
Handset
Network Socket
7
Overview
2 Lines
Menu/Back
Hold/DND
Conference
DIR/Toggle
Mute/Cancel
Volume Up
Volume Down
Speaker
Voicemail
Call Transfer
Headset
Hold
3 Lines
Soft Keys
Mute/Cancel
Volume Up
Volume Down
Speaker
Voicemail
Redial
Headset
Hold
8
Num Screen Functions
1 Time Shows current time.
2 Auto-answer When auto-answer is enabled, the screen displays “AA”
3 Missed calls or
date Shows the number of missed calls or show current date.
4 Line status Show the phone line status:
1) :
Disconnected from the network.
2) :
Only Peer-to-Peer call.
3) :
4) :
Network is connected and the line is available.
5) :
DND is activated.
5 Softkey labels Each displays a softkey function (displayed on your
menu changes.
LAN Dis connect
Peer-to Peer
8001
8001
8001
9
Basic Call Handling
Users can perform basic call-handling tasks using a range of features and services.
Feature availability can vary; consult the system administrator or service provider
for more information.
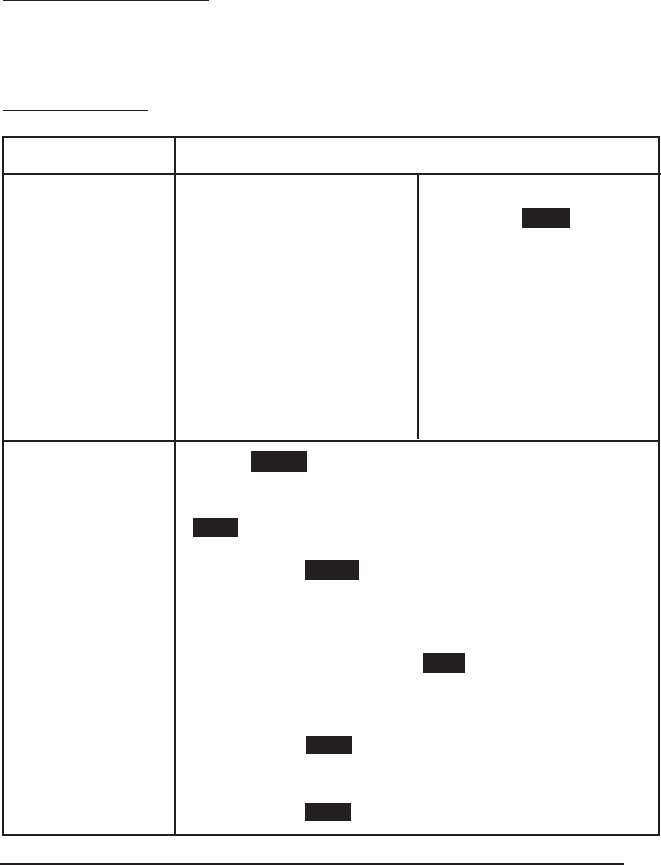
Placing a Call
If you want to:
Place a call using
the handset
Place a call using a
speakerphone
Place a call using a
headset
Redial
Dial from a call log
Place a call while
Another call is
active
Pick up the handset
Press the Speaker button,
or a Line button
Press the Headset button
• Dial a number
• Press the SEND softkey
or press the ‘#’ button
or wait 5 seconds and the
call will begin automatically
Then
--Press Redial softkey to dial the last number
-or press Right Navigation to access the Dialed Numbers
list, select a number, and press the Enter softkey then the
Enter softkey again. .
--1) Press the MENU softkey or OK button > Call history,
you can select Missed calls, Received calls and Dialed numbers,
- or while in idle mode press Navigation key > select Missed
calls (down), Received calls (left) and Dialed numbers (right)
--2) Then press OK button or Enter softkey, then the
Enter softkey again.
--1) Press the HOLD softkey;
--2)Press another Line button or Dial softkey
--3) Enter a number;
--4) Press the SEND softkey;
10
Tips
• Users can dial on-hook, without a dial tone (pre-dial). To pre-dial, enter a number,
and then lift the handset or press the softkey, Headset or Speaker buttons.
• To delete digits before dialing, press the Del softkey to erase.
Answering a Call
Users can answer a call by simply lifting the handset, or using the following meth-
ods to active the speakerphone, headset, or other options.
Basic Call Handling
Users can perform basic call-handling tasks using a range of features and services.
Feature availability can vary; consult the system administrator or service provider
for more information.
Placing a Call
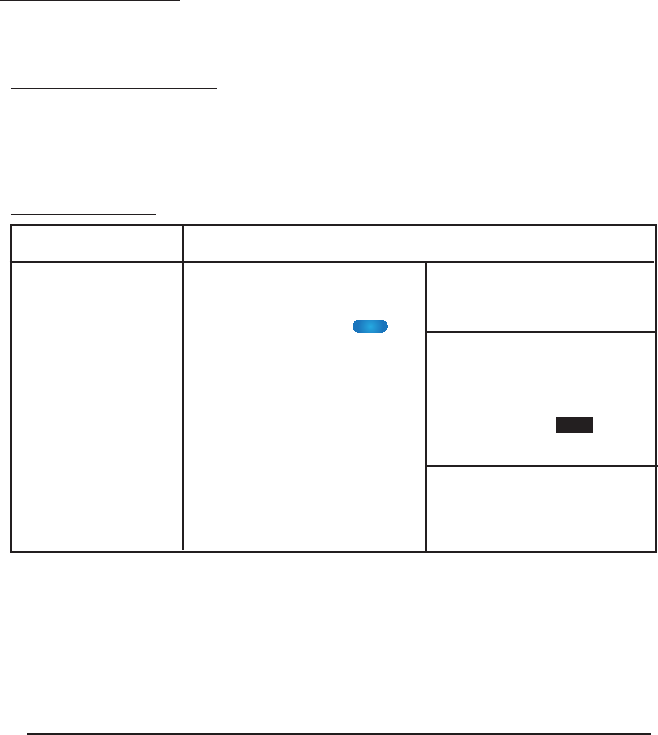
If you want to:
Answer with a
handset
Answer with the
speakerphone
Answer with the a
headset
--1) Users phone rings;
--2) Line button of the
ringing line is Blue
and ashing.
--Pick up the handset
--Press Speaker button
-or press the ashing
Line button,
-or press the ANS
softkey
--Put on headset and
press the Headset but-
ton
Then

11
Ending a Call
Hang up while using the Handset
1. Return the handset to its cradle,
-or press the End softkey
Hang up while using the Speakerphone
1. Press Speaker button,
-or press Line button for the line that is active,
-or press the End softkey
Hang up while using the Headset
1. Press Handset button,
-or press the End softkey
Using Hold and Resume (Switch Calling Line)
Put a call on hold
1. Press the HOLD softkey
Hold a line and switch to another line
1. Press another Line button for the appropriate line
Resume a call on current line
1. Press Line button or Resum softkey where the call is held
Tips
• Engaging the Hold feature typically plays music or a beeping tone for the remote
party. Please consult your service provider for more information.
• A held call is indicated by a blue ashing Line button.

12
Transferring Calls
Transfer redirects a connected call. The target is the number to which you want to
transfer the call
To talk to the transfer recipient before transferring a call (consult transfer)
1. Press the XFER softkey;
2. Enter the destination number;
3. Press the SEND softkey;
-or wait ve seconds(default)then transfer the call
To transfer to an idle line or other number without talking to the transfer
recipient (Blind transfer)
1. Press the XFER softkey;
2. Press the BLIND softkey;
3. Enter the destination number;
4. press the SEND softkey;
-or wait ve seconds(default)then transfer the call
Blind transfer to the held line
1. Press the XFER softkey;
2. Press the destination Line button of held line
Using Mute
With Mute enabled, users can hear other parties on a call but they cannot be
heard. Users can use mute in conjunction with the handset, speakerphone, or a
headset.
Toggle Mute on
Press Mute button, and the Mute icon will be on
Press Mute button, and the Mute icon will be o
Auto answer
Auto answer allows an incoming call to be answered without requiring any action
by the user. This is a useful feature for people who have a disability.
Disable Auto Answer
Press MENU softkey or the OK button >Function setting >Auto Answer >Disable.
Enable global Auto Answer
Press MENU softkey or the OK button >Function setting >Auto Answer >Enable.

13
3-way Conference
Transfer redirects a connected call. The target is the number to which you want to
transfer the call.
Connect a third party into an active call
1. When one Line is active, press CONF softkey and the call is held
2. Dial the number of the third party using the same line.
When the third party answers the call, press the CONF softkey
3. The held call will be added to the active call, and the LCD will display
CONFERENCE 0:0:10 status.
Establish a conference with held line
1) when one Line is held and the other line is active;
2) Press the CONF softkey
3) press the held line button, the 3-way Conference will begin.
Do Not Disturb
Users can use the Do Not Disturb (DND) feature to block incoming calls on their
phone with a busy tone (This feature can also be set to go to voice mail or other
extension numbers).
Enable global DND
1. Press the DND softkey;
2. All enabled lines on the phone will display 8001 status
Enable DND on a single line
Press the MENU or OK button > Function setting > DND > (select line) Enable
Disable DND
1. With global DND enabled, press the DND softkey to disable global DND;
--Line DND enabled, press the MENU softkey or OK button > Function setting >
DND >(select line) Disable
Enable Auto Answer on a group
1. Press MENU softkey or the OK button >Function setting >Auto Answer
>Enable&Filter.
2. Select a Group on the list and press OK softkey .This feature will auto answer
the call from the caller in the selected group only
Device
Press MENU softkey or the OK button >Function setting >Auto Answer >De-
vice, select Speaker or Hand set to auto answer.

14
Expansion Installation (IP125 only)
1. Press MENU or OK button> Function Settings > Expansion Installation,
2. The phone will direct you to press one of the lit blue LCD buttons on the EM32
between 1 and 6. Pressing a key will cause it to ash red. Then press the OK but-
ton on the IP125.
Expansion Settings (IP125 only)
Mode – This determines the function of the programmable key. You can choose
Asterisk BLF, Speed Dial Prex, BLA or DTMF.
Speed Dial – This sets the programmable key as a one touch dial key for the phone
number entered.
Asterisk BLF – If you are using an Asterisk based service provider or PBX this func-
tion will set the programmable key as a quick dial key and a status indicator. You
will be able to see if users on the same system as you are Online, Busy or have an
incoming call.
Speed Dial Prex – This will pre-dial any numbers you might need before dialing
the phone number you wish. This is helpful if your system requires a code to ac-
cess an outside line, for example.
BLA – Bridged Line Appearance will allow two separate phones on the same
system access to the same VoIP line. Please see your service provider or systems
administrator for instructions on how to set up this feature.
DTMF – This function will input the desired numbers as DTMF tones. This is help-
ful if you wish to have a voicemail password or other automated code set as a
one touch dial.
NOTE: Functions like BLF and BLA only work properly when using two accounts on
the same VoIP service provider or PBX. Please see your service provider or systems
administrator for more information.
Account – Choose which SIP account you wish associate with this programmable key.
Number – Using the dial pad, enter phone number or code with which to associ-
ate this programmable key.
Name – Using the alphanumeric dial pad, select a name for this programmable key.

15
7L
P
HW
\
SH
6173
6,36HUYHU
(QWHU'2:1%$&.
&
O
RFN6HWWLQJV
+RXU
0LQXWH
HQWHUVDYH%$&.
Time and Date
Time and date are displayed on the IP115/IP125 idle screen. By default the date
and time of the phone are congured manually, but users can set the phone to
obtain them from a precongured SNTP server if desired. Please contact the net-
work administrator if the time or date is incorrect.
To change Time and Date via the phone interface:
1. Press the Menu soft key >1.FUNCTION SETTINGS>
5.TIME & DATE>OK. If SNTP is selected, the phone will
automatically get the time from an NTP Server. Use the
UP and DOWN navigation keys to highlight the specic options and change
parameters. Users can set Time Zone and NTP Server respectively. By default GMT-
4:00 Eastern time is congured.
If SIP Server is chosen,the phone will automatically get the time from the SIP
Server. Press Yes soft key to save and reboot the phone.
If Manual is chosen, the time can be set manually. Use
the UP and DOWN navigation keys to highlight the
option and enter the specic date and time.
Press the OK button or the Save soft key to save the changes. Or press the Back
soft key to return to the previous screen.
VOIP Call Forwarding
Unconditional transfer
1. Press the MENU softkey or the OK button > Function setting > VoIP call forwarding;
2. Select Unconditional transfer, select Enable.
3. Input the destination number and all calls to this phone will be automatically transferred.
Busy Transfer
1. Press the MENU softkey or the OK button > Function Setting> VoIP Call
Forwarding;
2. Select Busy Transfer, select enable.
3. Input the destination number and all calls to this phone when it is in use will
be automatically trasferred.
No Answer Transfer
1. Press the MENU softkey or the OK button > Function setting > VoIP Call
Forwarding;
2. Select No Answer Transfer, select enable.
3. Input the destination number and all unanswered calls to this phone will be
automatically transferred.
16
Advanced Call Handling
Hot Line
The Hot Line feature allows the phone to dial a number automatically if it has
Hot Line Enabled it will also dial the hot line number immediately if the Line 1
seconds after pressing the Line 1.
1. Press the MENU softkey or the OK button > Function setting > Hot Line/Warm Line;
2. Press the Enter softkey, use UP or down softkey to highlight Hot Line, press the
Enter softkey to modify the number and enable/disable the feature.
3. Select Enable and enter the Hot Line number
4. Press the Ok softkey to save.
Message Code
1.Press MENU softkey or the OK button>Function setting >Message Code
2.Press Enter softkey, using the alphanumeric keys on the keypad
3.Press the OK softkey to complete
Fuzzy Search
likely matches on the LCD screen.
1.Press MENU softkey or the OK button>Function setting>Fuzzy Search.
2.Choose Enable and press OK softkey to save.
Using the phone book
Users can store a large number of contacts in the phone’s directory. They can add,
edit, delete, dial, or search for a contact in this directory.
Add Contacts
1. Press the MENU softkey > Phone book,
-or press the DIR button > Personal Phone Book;
2. Press the Opt. softkey.
3. Select Add contact, press OK button or the Enter softkey;
4. Use the Up and Down Navigation keys to enter the following contact info:
First and Last Name, up to three phone numbers, groups, SIP account to use, and blacklisting.
-NO.1-3: you can set up 3 contacts’ numbers,
5. Press the Save softkey to complete
Add group
1. Press the MENU softkey> Phone book,
-or press the DIR button > Personal Phone Book;

17
2. Press the Opt. softkey.
3. Select Add Group, press OK button or the Enter softkey;
4. Name the Group using the alphanumeric keys on the keypad.
5. Press the OK softkey to complete.
Modify group
1. Press the MENU softkey >Phone book,
-or press the DIR button > Personal Phone Book;
2. Press the Opt. softkey;
2. Select a Group, and press the Opt. softkey.
3. Select Modify Group, select a group then press OK button or press the OK
softkey;
4.Modify the Group using the alphanumeric keys on the keypad and press the OK
softkey to save the change.
Delete group
1. Press the MENU softkey > Phone book,
-or press the DIR button> Personal Phone Book;
2. Press the Opt. softkey.
3. Select Delete Group, select a group then press OK button or press the OK soft-
key to delete the group;
4. Select a group you want to delete, press OK button or OK softkey
Note: If there isn’t a group to delete, the display will read “No Group!’.
View/Edit Contacts
1. Press the MENU softkey > Phone book,
-or press the DIR button > Personal Phone Book;
2. Select View All, -or select a contact in a dierent group;
3. Select the contact, press the OK button to view or edit the contact.
LDAP
1. Press the MENU softkey > Phone book,
-or press the DIR button > LDAP;
2. Select LDAP, press the OK button.
3. Select Search name, input the name using the alphanumeric keys on the dial-
pad and press OK.
-or select Search number, input the number and press OK.
Note: Before using the LDAP function, it must be congured in the web interface.
(For details on how to use the web interface, you can refer to Section 7. Web Settings.)
18
Call from phone book
1. Press the MENU softkey > Phone book,
-or press the DIR button > Enterprise Phone book or Personal Phone Book;
2. Select View ALL,
-or select a contact in a group;
3. Select a contact, then press the DIAL softkey,
(If there are multiple numbers of one contact, press the DIAL softkey to enter the
call options interface, select the number and press the DIAL softkey)
Modify the relative account of a contact
1. Open your web browser, enter the web interface. (For details on how to use the
web interface, you can refer to 7.Web Settings.)
2. Open PhoneBook>
3. Select the account in the drop-down column of the account, click Submit to save changes.
Using Call Logs
Your phone maintains records of your missed, placed, and received calls.
View call logs
1. Press the MENU softkey > Call history >Missed Calls, Received Calls, or Dialed numbers.
2. Use the Up and Down Navigation Keys to view the call record information.
Dial from a call log
1. Press the MENU softkey or OK button > Call history, you can select Missed
calls, Received calls and Dialed numbers,
- or while in idle mode press Navigation key > select Missed calls (down), Re-
ceived calls (left) and Dialed numbers (right) )
2. Then press OK button or Enter softkey, then the DIAL softkey.
Erase your call logs
1. To delete a call record, select this record from the logs and press the DEL softkey;
2. To delete an entire call record list, press the Clear softkey
Using Messaging
This feature allows users to send and receive text messages from one IP phone to
another on the same system.
Sending a Message
1. Press the MENU soft key.
2. Choose Messaging > Create Message and use the keypad to input the alpha-
numeric message.
3. Press the OK softkey and input the destination number you want to send out message.
4. Press OK button to send.
display the envelope icon.
19
-Enable/Disable account
-Display Name: The name displayed on the screen
-User Name
-Account
-Authen user: the Authenticated user name is often the same as the
previous user name, but varies from provider to provider.
-User Pwd: Password associated with the user name
-Description: Any description users want to use with this account
-SIP1: Primary SIP server
-SIP2: Secondary SIP server
-Refresh Time: Registration refresh interval, the minimum value is 20
- Con Type : the connection type , include UDP , TCP and TLS , default value is UDP
- Amount Of Used Lines : This shows how many line buttons the SIP account
occupies. The default value is 2.
The default value is 3600.
6. After entering the account info, press the Save softkey to save the settings and
activate the account.
5.
View a Message
1. Press the MENU soft key.
2. Choose Messaging > Inbox.
3. Press OK to view.
Note: Not all service providers will support this feature, please see your system
administrator before use.
Keypad Instruction
Language
To change the language via Phone interface
1. Press the Menu softkey>System Settings>Phone Settings>Language
2. Scroll through the list of available languages. The IP115/IP125 supports English,
3. Press OK button when the desired language is highlighted.
Note: The default setting is English.
SIP Account Settings
To make calls on your IP115/125, users must have an account with a SIP based
service provider. Using the account information supplied by a service provider,
follow these steps to provision the phone to work with their network.
Create an SIP account
1. Press the Menu softkey
2. Choose System Settings > Advanced Settings
3. Enter the password (The default is blank, just press OK if the password is unchanged)
4. Choose SIP> Accounts SIP
20
Disable sip account
1. Press the Menu softkey
2. Choose System Settings >
3. Enter the password (The default is blank, just press OK if the password is unchanged)
4. Choose SIP > Accounts SIP
5. Choose Enable Account > Disable
6. Press the Save softkey
Network Setting
Please see the system administrator before making any changes to the network
settings. Any change to the network settings will require a reboot of the phone
Change network settings
1. Press the Menu softkey
2. Choose System Settings>
3. Enter the password (The default is blank, just press OK if the password is unchanged)
4. Choose Network, select either the LAN Port (connection to the network) or the
parameters:
randomly assigned IP address)
-IP: If using a Static IP address
-Mask: Subnet mask
-GW: Gateway
- DNS1: enter IP address of the primary DNS server
- DNS2: enter IP address of the secondary DNS server
-Web port: The default Web port is 80. If changed, users must use the IP
and Web port to login the web interface (ie, http://192.168.0.200:88 if Web port
88 is entered).
-Telnet port: The default Telnet port is 23. If changed, users must use the IP and
Telnet to login the web interface (ie, http://192.168.0.200:25 if Telnet port 25 is
entered).
Load default settings
1. Press the Menu softkey
2. Choose System Settings>
3. Enter the password (The default is blank, just press OK if the password is un-
changed)
4. Choose Load Default Settings and press the OK, then select OK to default settings.
Note: Accounts need at least a User Name, Password and SIP1 server to work properly.
Note:You can set a Global SIP replace accounts SIP,it can simplify the settings.

21
Reboot
1. Press the Menu softkey
2. Choose System Settings >Advanced Settings
3. Enter the password (The default is blank, just press OK if the password is unchanged)
4. Choose Reboot and press OK, then select Reboot to reboot the phone.
Modify Password
1. Press the Menu softkey
2. Choose System Settings > Advanced Settings
3. Enter the password (The default is blank, just press OK if the password is un changed)
4. Choose Password and press the OK,input the Old password and press OK,input
new password and press OK, input new password again and press OK to save.
Customizing Rings and Volume
Change the ring tone
1. Press the Menu softkey
2. Choose System Settings > Phone Settings > Ring Type
3. Press the Up and Down navigation keys to choose a ring tone. A sample of the
ring tone will play when it is highlighted
4. Press the OK button to select the ring tone
Adjust the volume level
1. Press the Menu softkey
2. Choose System Settings > Phone Settings> Volume Setting
3. Users can adjust the following volume levels:
-Ring Volume: Phone call ring volume,
-Handset Volume: Handset output volume,
-Handset Mic volume: Handset input volume,
-Speaker Volume: Hands-free speaker output volume,
-Speaker Mic Volume: Hands-free input volume,
-Headset Volume: Headset output volume,
-Headset Mic Volume: Headset microphone input volume
Customizing Screen settings
Adjust the Brightness
1. Press the Menu softkey
2. Choose System Settings >Phone Settings >Brightness
3. User can adjust the brightness levels by pressing UP or DOWN navigation key
4. Press OK to save
Adjust the Contrast
1. Press the Menu softkey
2. Choose System Settings >Phone Settings >Contrast
3. User can adjust the contrast levels by pressing UP or DOWN navigation key.

22
4.Press OK to save
Backlight On/O
1. Press the Menu softkey
2. Choose System Settings >Phone Settings >Backlight >Backlight.
3.Select Enable/All/Disable.
4.Press Ok to save.
Note:If Enable is selected, users can set the backlight time out from System
Settings>Phone Settings>Backlight>Time.
Check the software version
1. Press the Menu softkey
2. Choose View Status > Software
3. Here users can view details on the phone software
Check the status of an expansion module
1. Press the Menu softkey
2. Choose View Status > Expansion
3. Here users can check if the expansion modules attached to the phone are online
Diagnose
To diagnose a problem and help with troubleshooting, users can test specic
functions of the phone in the Diagnose menu option.
Test the keys
1. Press the Menu softkey
2. Choose Diagnose> Keys
3. Press the keys listed on the screen. As each key press is successfully registered,
the corresponding key on the screen will disappear.
4. When nished press the Mute/Cancel button to exit.
Check the LCD screen
1. Press the Menu softkey
2. Choose Diagnose > Display
3. Press the OK button and the screen will illuminate the entire screen and all of
the icons.
4. When nished press the Mute/Cancel button to exit.
23
Check the lights
1. Press the Menu softkey
2. Choose Diagnose > Lights
3. Press the OK button and the phone will illuminate all of its button and screen
lighting.
Check the sound
1. Press the Menu softkey
2. Choose Diagnose> Audio
3. Press the OK button and the phone will will begin testing the speaker. Speak
into the speakerphone or handset. The sound picked up by the mic will be played
back through the speaker.
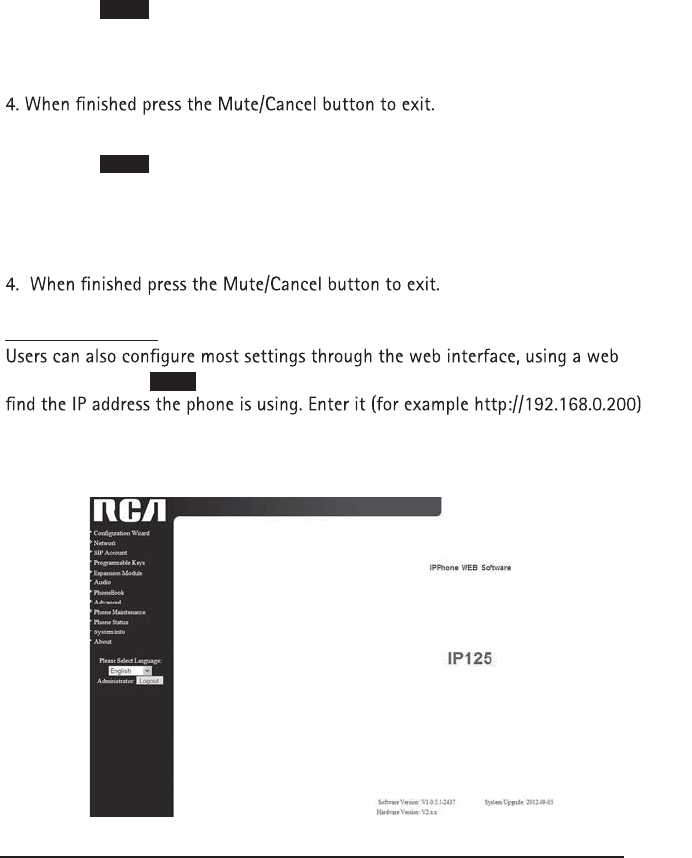
Web Interface
browser. Press the Menu softkey, select View Status then Network. Here users will
into the address bar of web browser on a computer sharing the same network. The
default login name and password are both “root”.
24
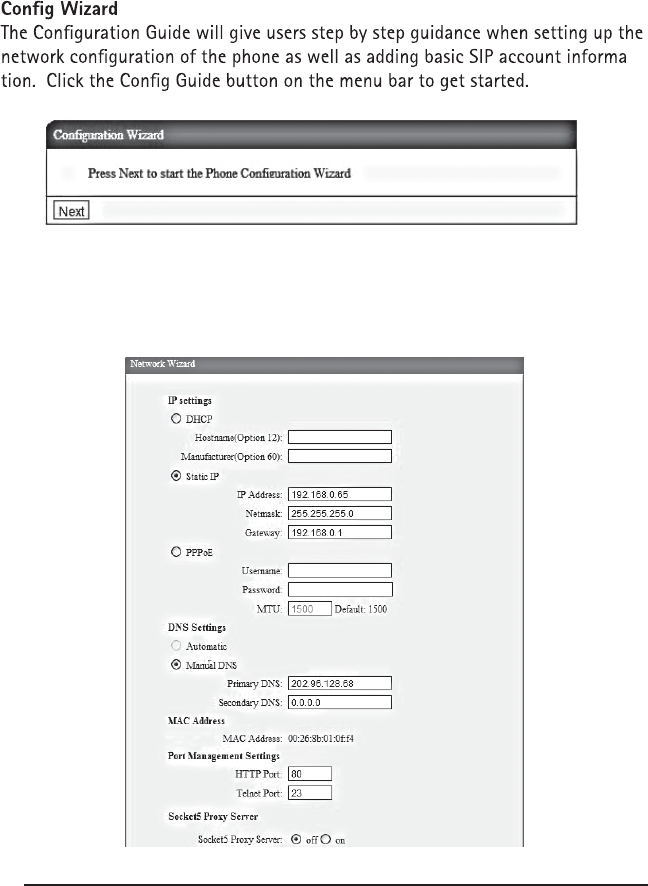
-
On this screen users can select what kind of IP type to use, set the DNS, or man-
age ports and proxies. Please see the network administrator for assistance in
using this page to work with the local area network.
25
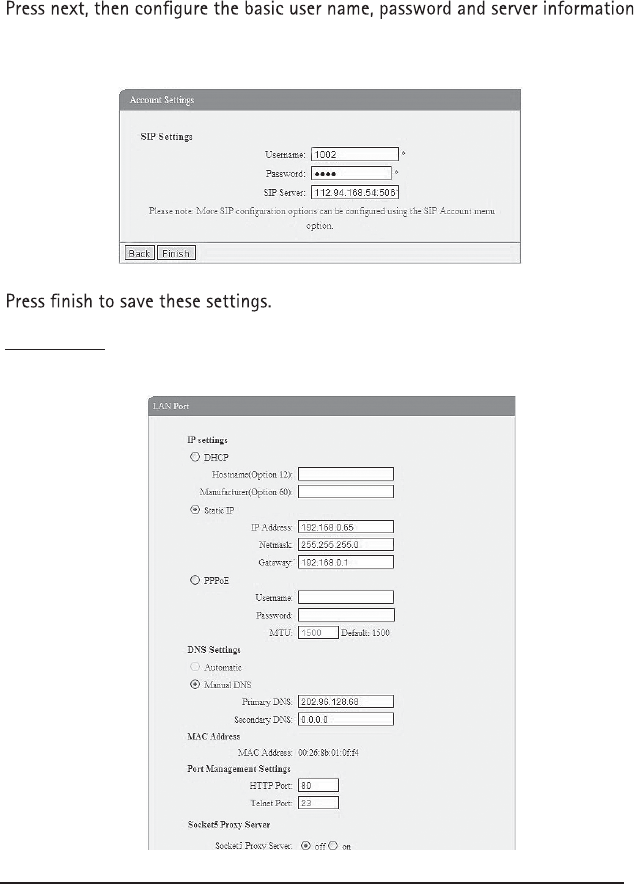
for the SIP account to be used on the phone. Some accounts may require more
information. Please see the service provider for help.
Network
Click on the Network tab on the menu bar to enter network settings in more
detail.
26
DHCP Set the phone to get IP info from DHCP server
IP Address Set the IP used by the phone manually
Netmask Set the Subnet mask manually
Gateway Set the gateway manually
Username (pppoe) The pppoe username
Password (pppoe) The pppoe password
MTU (pppoe) The Maximum Transmission Unit for pppoe
(default is 1500)
Primary DNS The primary DNS server
Secondary The secondary DNS server
MAC Address Display the MAC of the phone
HTTP Port The default Web port is 80. If changed, users must
use the IP and Web port to login the web interface
(ie, http://192.168.0.200:88 if Web port 88 is entered).
Telnet Port The default Telnet port is 23. If changed, users
must use the IP and Telnet to login the web inter
face (ie, http://192.168.0.200:25 if Telnet port 25 is
entered).
SIP Account
To make calls on your IP115/125, users must have an account with a SIP based
service provider. Using the account information supplied by a service provider, fol-
low these steps to provision the phone to work with their network.
27
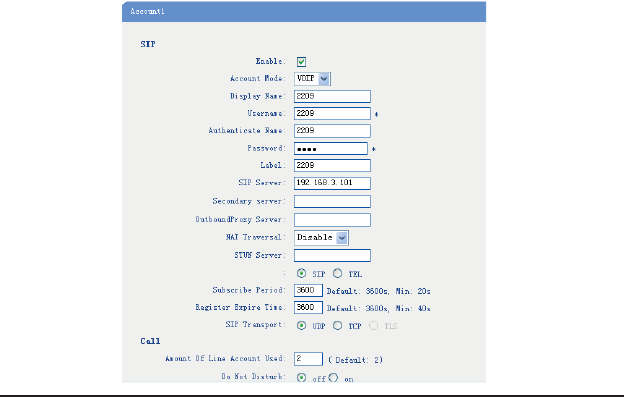
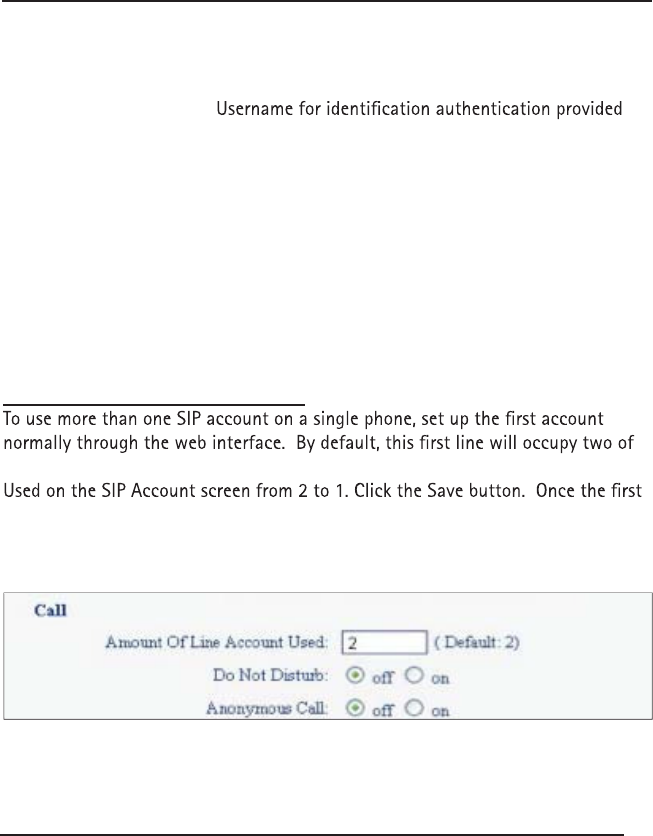
For each SIP account, users can modify the following parameters:
Field Description
Enable Enable/disable the line.
Display Name What is shown as Caller ID when making a phone call
Username Username provided by service provider
Authenticate Name
by service provider
Password Password provided by service provider
SIP Server Registration server, provided by service provider
Register Expire Time How often the Phone re-registers with the server.
Default is 3600.
Amount Of Line
Account Used The line key of account used. Default is 2.
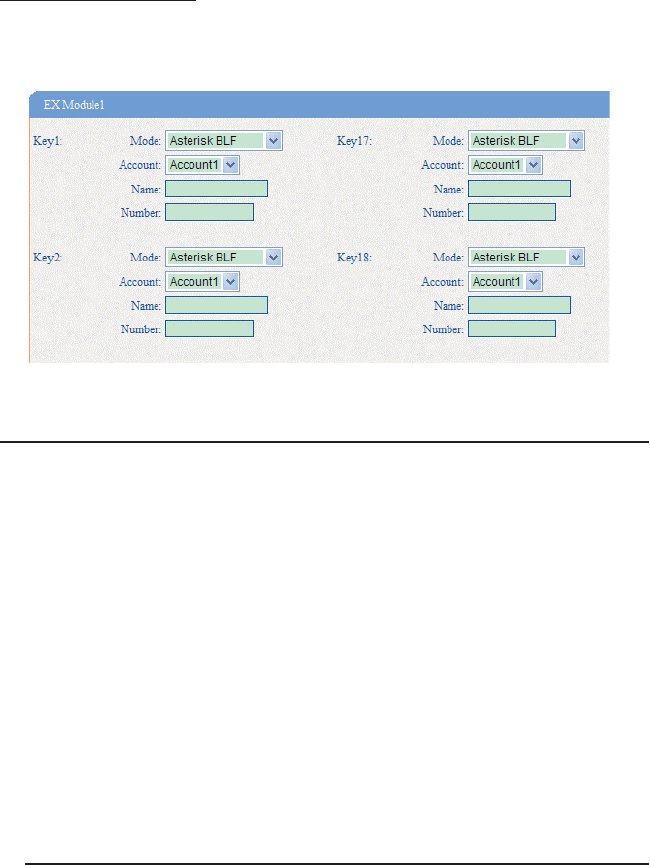
Using Multiple SIP Accounts
NOTE: If multiple accounts are set up without changing the Amount of Line Account
Used to 1, the second line will not be accessible.
the “Line” keys on the phone. Change the value in the Amount of Line Account
account is set, set up the second account (and third on the IP125 if required) as
well. Make sure the Amount of Line Account Used is set to 1 on these accounts as
well.
28
Expansion Module
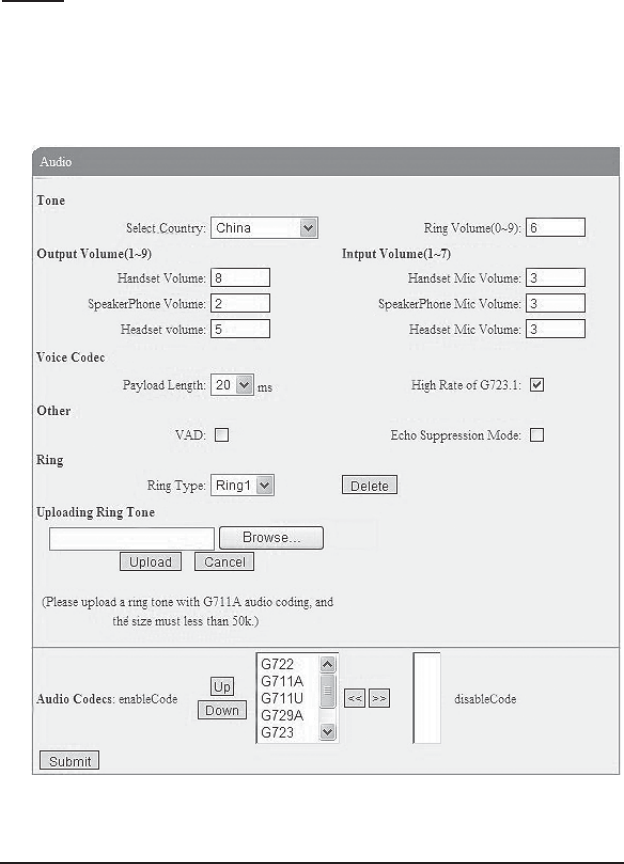
The EM32 expansion module provides users of the IP125 with 32 more speed dial
or BLF keys. Please see the section titled “Expansion Installation” for more details
on how to set up this unit.
Expansion module
Key Each Expansion module supports 32 keys.
Mode Five modes:
--Speed Dial: Enable speed dialing in this key;
--Asterisk BLF: Enable BLF in this key;
--Speed Dial Prex
--DTMF
--Asterisk BLA
Account Select which SIP account is associated with this key.
Name Description of this key.
Number Number dialed with this key.
29
Audio
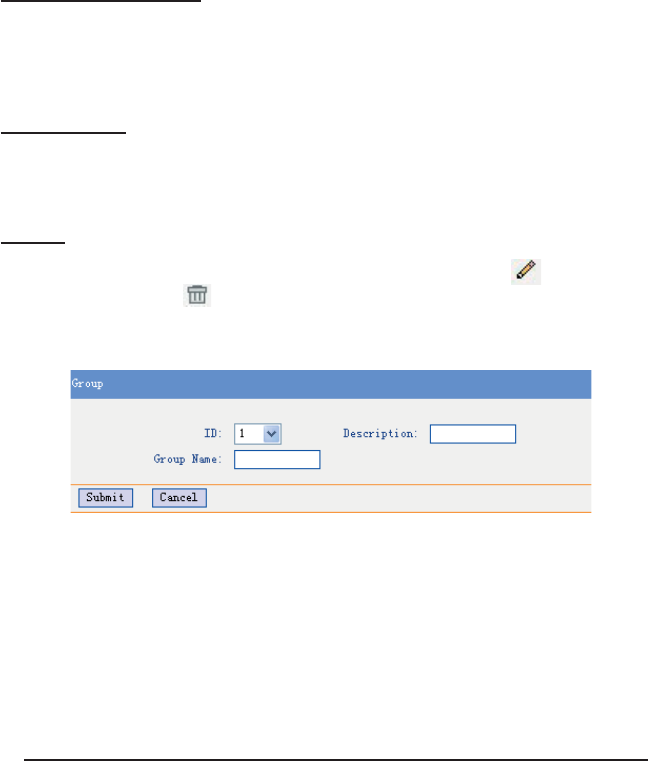
The IP115 and IP125 phones support the following voice codecs: G.722, G.711A,
G.711U, G.723, ,G.729A and iLBC.
You can enable/disable the desired codecs via Web interface. Please contact your
system administrator for more details about the codecs.
To enable/disable the codecs, click Audio on the menu bar.
30
Use the navigation keys to highlight the desired codec in the Enabled/Disable
Codecs list, and press theWW/ XX to move to the other list. Click Submit to save
the change.
Note: The Audio Codec Selection can only be managed via the web interface.
Favorite Ring Tone
To upload a new ring tone, click the BROWSE.. Button, select a ring tone le from
your PC and click upload. After the le is uploaded successfully, the le name will
appear in the drop-down menu in the Ring Type section. Select it and click the
Submit button to save the changes.
Phone Book
Users can edit their phones phonebook using the web interface. Contacts can
be added, edited, deleted and sorted into groups, which can also be created and
deleted.
Group
Click PhoneBook on the menu bar and then click Group.
To add a Group, click Add Group. To edit an existing Group, click . To delete
an existing Group, click . To delete all Groups click Delete All Group.
When adding or editing an existing group, users can modify several parameters:
31
Group
ID Unique ID number of the group
Description Description of the group
Group Name Name of the group
After clicking submit, the group is automatically saved to the phone.
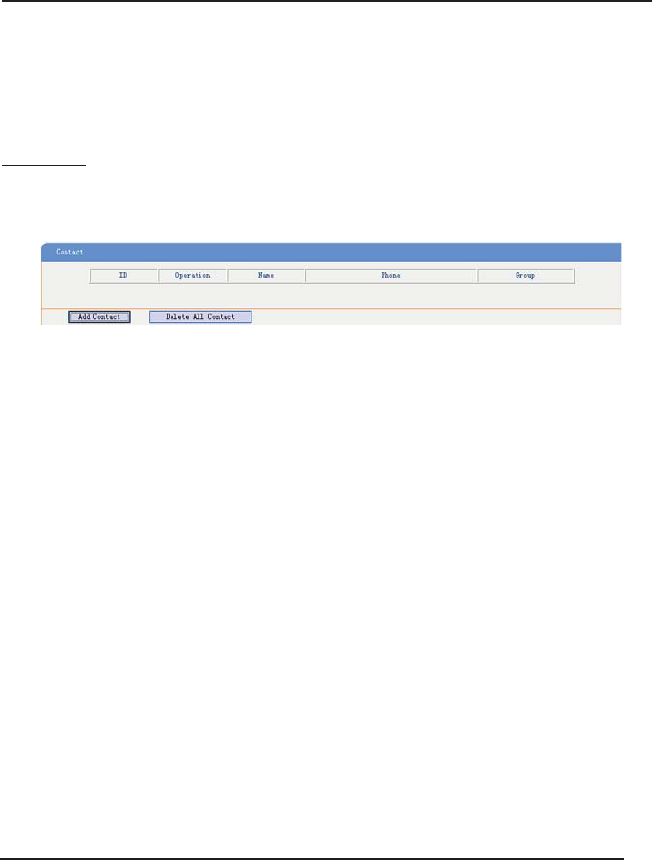
Contact
Users can add, edit and delete any contact in the phone book. The phonebook can
store a maximum of 300 contacts.
32
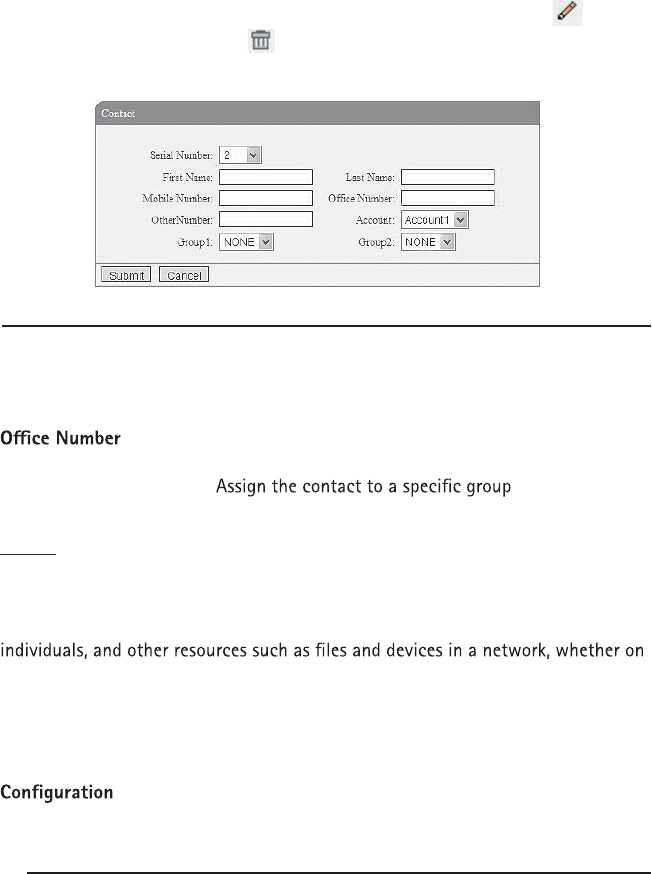
Click PhoneBook on the menu bar and then click Contact.
To add a Contact, click Add Contact. To edit an existing Contact, click . To
delete an existing Contact, click . To delete all Contacts click Delete All Contact.
When adding or editing an existing contact, users can modify several parameters:
Contact
Serial Number Unique ID number of the contact
First Name First Name of the contact
Last Name Last Name of the contact
Mobile Number Phone number of the contact
Phone number of the contact
Other Number Phone number of the contact
Group
Account Select the SIP account to associate with this contact
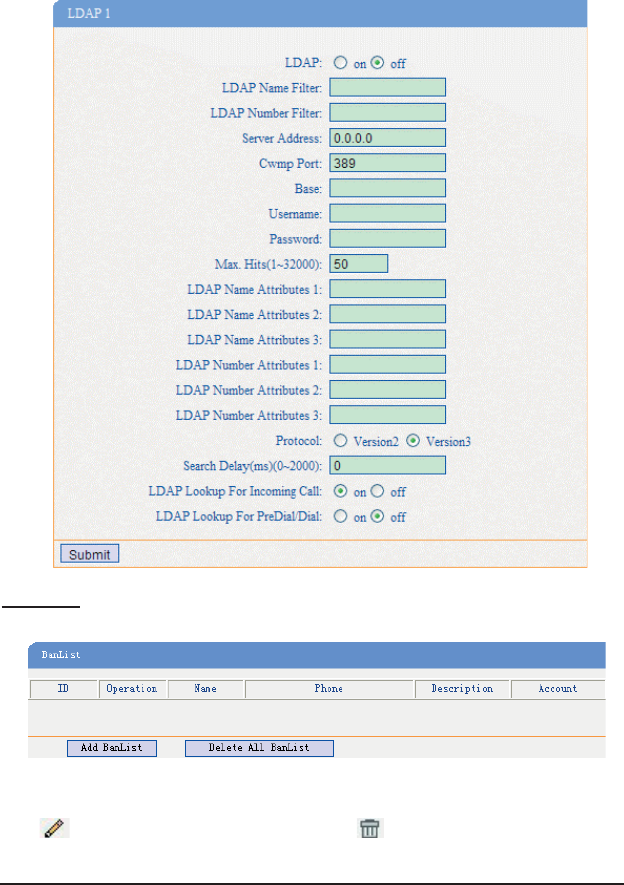
LDAP
Overview
LDAP stands for Lightweight Directory Access Protocol which is a client-server
protocol for accessing a directory service. LDAP lets you locate organizations,
the Internet or on a corporate intranet, and whether or not you know the domain
name, IP address, or geographic whereabouts.
An LDAP directory can be distributed among many servers on a network, then
replicated and synchronized regularly.
Please note that the IP115/IP125 supports LDAP Phonebook version V2.2.3.1-2210
and higher. Click PhoneBook, then LDAP to access the LDAP Phonebook set up page.
33
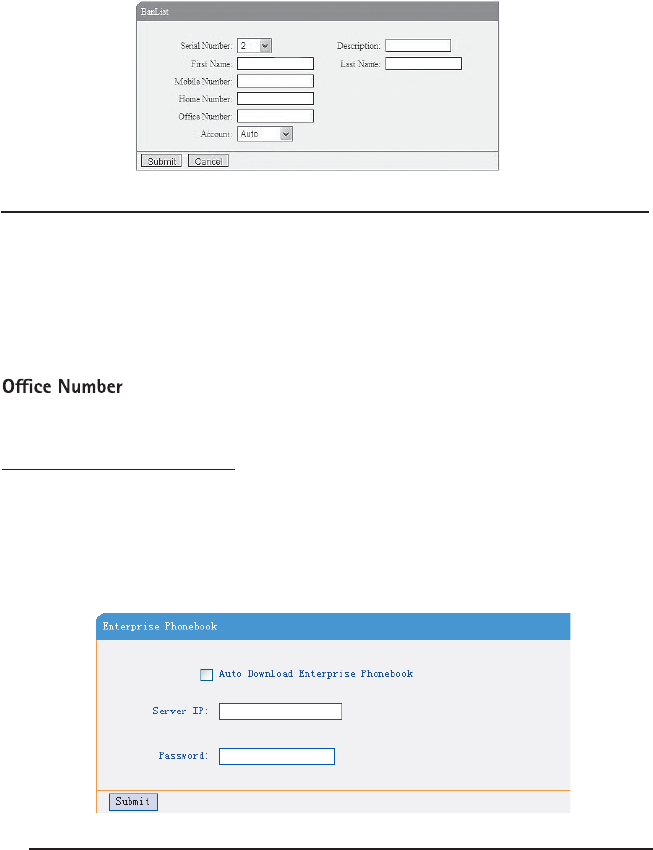
Click PhoneBook on the menu bar and then click BanList.
To add a banned number, click Add BanList. To edit an existing banned number,
click . To delete an existing BanList, click . To delete all banned numbers
click Delete All BanList.
BanList
You can add, edit and delete banlist in a phone book on web page of IP115.
34
When adding or editing an existed banned contact, users can modify several
parameters:
BanList
Serial Number Unique ID number of the banned contact
Description Description of the banned contact
First Name First Name of a banned contact
Last Name Last Name of a banned contact
Mobile Number Phone number of the ban contact
Home Number Phone number of the ban contact
Phone number of the ban contact
Account Select the SIP account to associate with this banned contact
Enterprise Phonebook
An Enterprise Phonebook is a phonebook that is created to be available to all
employees at the company. To download the Enterprise Phonebook, click Phone-
Book then Enterprise Phonebook on the menu bar. For instructions on how to set
up an Enterprise Phonebook, please see the appendix of this booklet or consult the
system administrator.
35
Advanced Settings
Phone Setting
With the Advanced settings menu, users can modify the time settings, VLAN and
VPN settings.
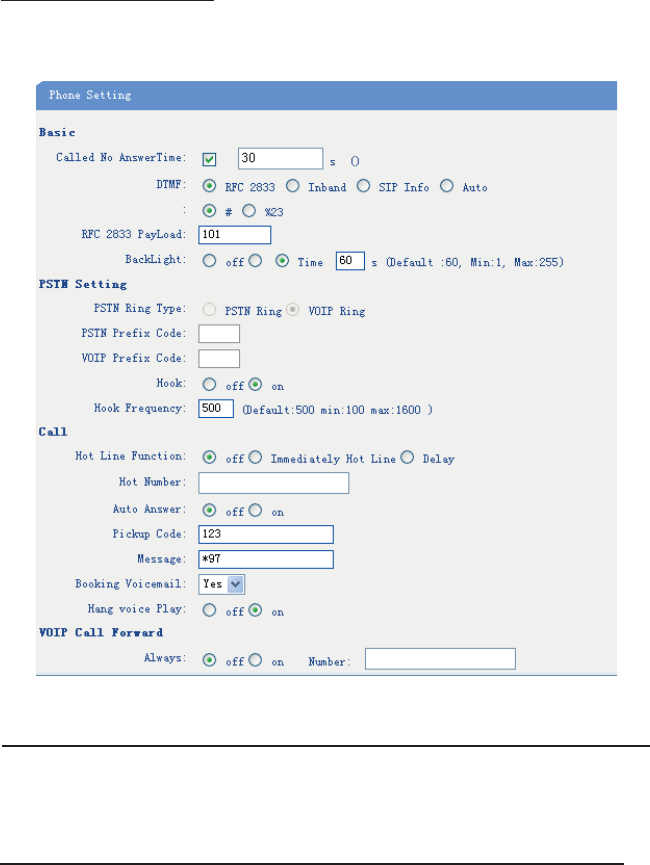
Users can click Phone Settings on the menu bar to modify the following parameters:
Phone Setting
DTMF The DTMF transmission mode. RFC 2833, Inband, or SIP Info.
BackLight The backlight of the phone LCD screen.
Set Time Mode Setting the clock mode. SNTP server, SIP Server or manual settings.
36
Daylight Saving Enable/disable automatic daylight savings adjustment
Time for the clock.
Time Format 24 hour time format or 12 hour time format
Time Zone-GMT Users can set the proper time zone. This feature only applies
when using the SNTP or SIP server modes.
Manual Setting Users can input the correct time manually. This setting only
applies when using the manual time mode.
QoS Users can set the Quality of Service priority
Network Packet Enables users to capture network packets of data to help
Mirroring troubleshoot problems.
VLAN Settings
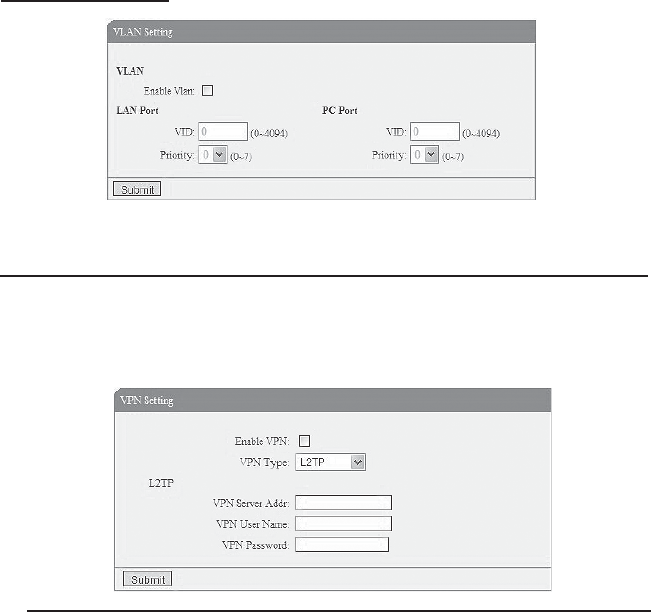
Users can click VLAN Settings on the menu bar to modify the following parameters:
VLAN Setting
VPN Settings
Enable VLAN Enable/disable the VLAN feature for phone and pc
VID Set the VLAN for the phone or pc to join

37
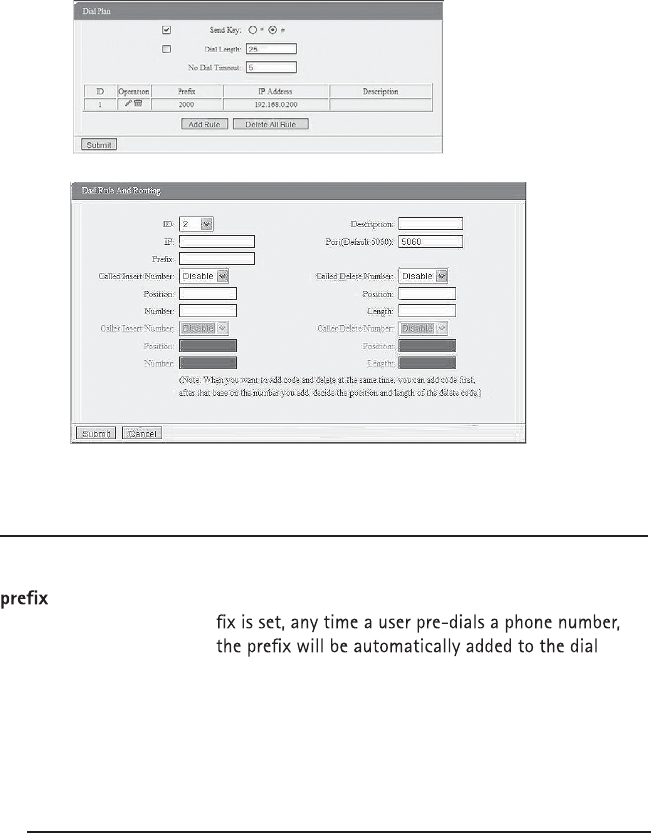
Users can click VPN Settings on the menu bar to modify the following parameters:
VPN Setting
Enable VPN Enable/disable VPN for phone and pc
VPN Type: There is two choose you can choice.
VPN Server Addr VPN Server IP address
VPN User Name VPN user name
VPN Password VPN password
38
Dial Plan
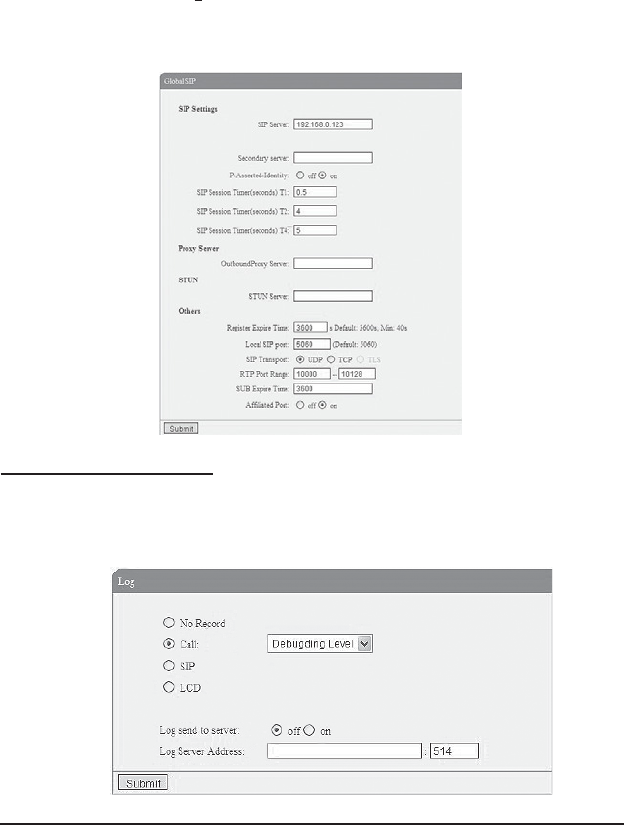
To set up a dial plan, click Dial Plan on the menu bar.
From here users can set up dial plans for their phone by setting up the following
parameters:
Dial Plan Setting
ID Dial Plan ID
IP The IP address of the phone to be called.
Numbers needed in the pre-dial sequence. After a pre
string.
Called Insert Number Enable/disable called insert number.
Position Position in which the number will be inserted.
Number Number to be inserted.
Called Delete Number Enable/disable called delete number.
Position Position of the number to be deleted.
Length The length which the number will be deleted.
Click “add rule” to entry this interface.
39
Note: Users can add code and delete code at the same time. First, add any code
changes needed. Then, based on the numbers added, decide the position and length
of the code to be deleted.
Global SIP
Users can also setup the SIP server on Global SIP by clicking on Global SIP in the
menu bar.
Phone Maintenance
Log
Should a user or system administrator need to troubleshoot the phone, creating a
log can help with that. Click Phone Maintenance then Log on the menu bar.
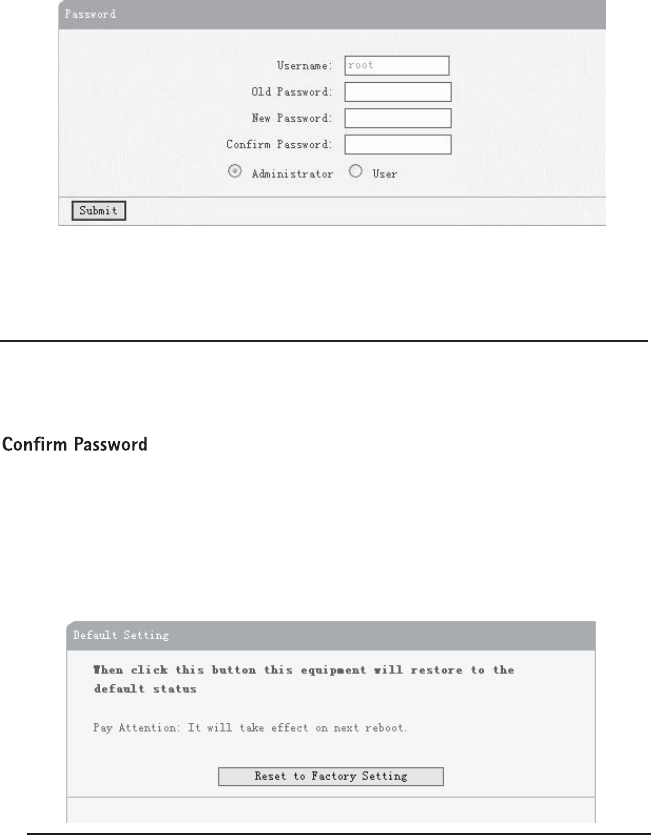
Password users can also change the password used to log in to the advanced
features on web interface.
40
To change the password, click Phone Maintenance on the menu bar, then Pass-
word to modify the following parameters:
Password
Username The login username of the web page
Old Password The old password used to login of the web page
New Password The new password used to login of the web page
The new password used to login of the web page
Administrator Select this for Administrator level access
User Select this for User level access
Resetting to Default Settings
To reset the phone to its factory default settings, click Phone Maintenance, then
Default Setting.
Password
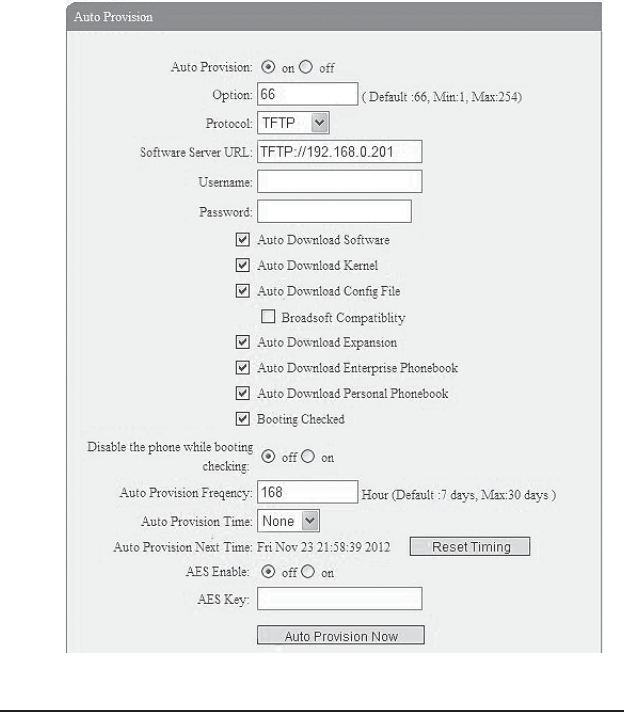
Press the ‘Reset to Factory Setting’ button, then reboot the phone. All settings will
revert to the factory default.
Auto Provision
When auto provisioning is set up for this phone, it will automatically check for
updates to the software or kernel. For more information, please see the appendix
of this booklet or ask the system administrator.
41

42
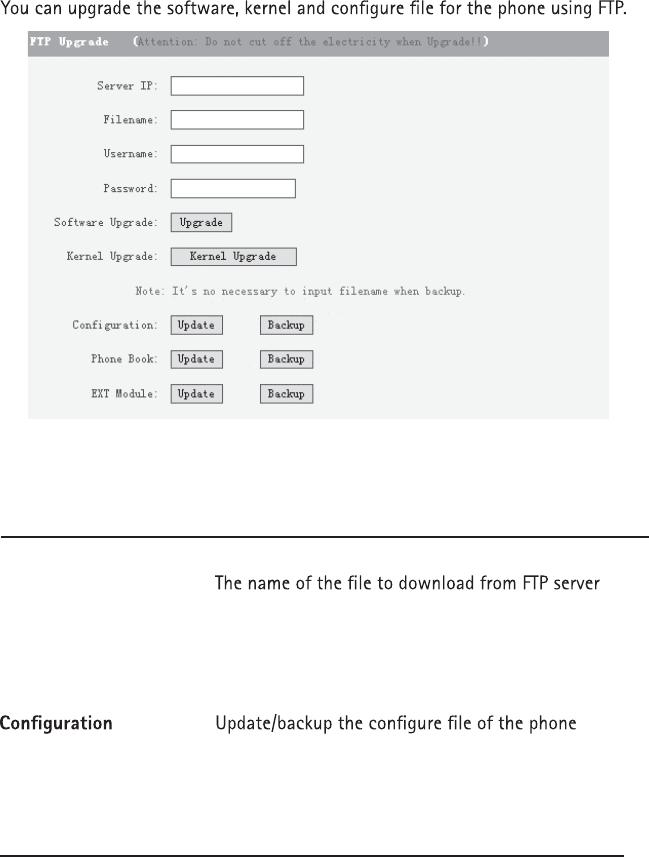
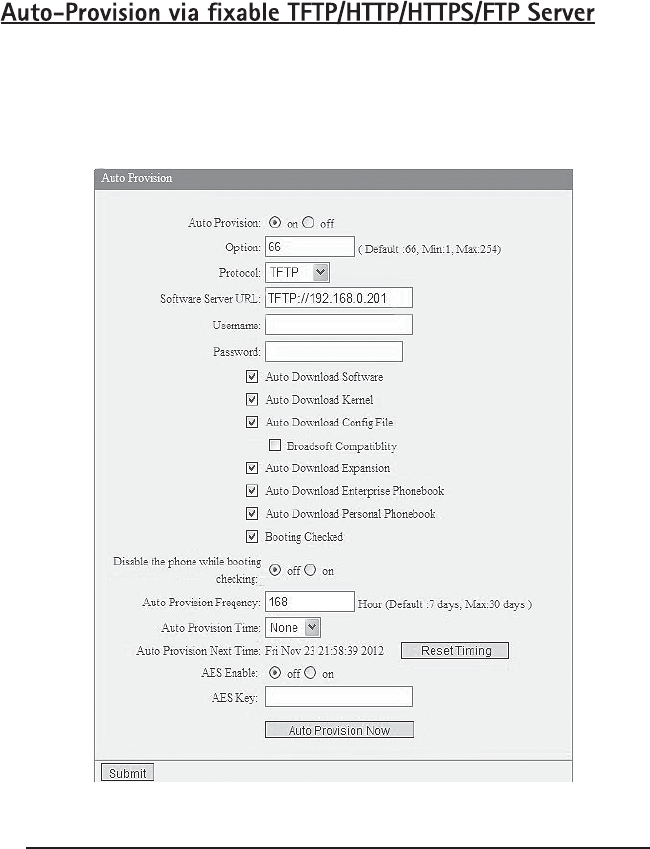
When using auto provisioning, users and system administrators can set the follow-
ing parameters:
Auto Provision
Auto Provision Enable/disable auto provision by selecting on/o
Protocol The protocol used for auto provisioning. TFTP, HTTP
or FTP.
Software Server URL The server address of the auto provision
Username The username provided by provision server
Password The password provided by provision server
Auto Download Software Auto download software from server
Auto Download Kernel Auto download kernel from server
Auto Download Cong File Auto download cong le from server
Broadsoft Compatibility Auto recongure the cong le to be compatible
with Broadsoft
Auto Download Expansion Auto download cong le for the expansion
module from server
Auto Download Personal This used to auto download personal phonebook
Phonebook from server
Booting Checked Check the auto provisioning when the phone boots up
Auto Provision Freqency Set the time interval for auto provisioning
Auto Provision Time This used to the specic time for auto provision
AES Enable Enable/disable AES encrypt for auto provision
AES Key Key of the AES
Auto Provision Now Auto provision the phone immediately
FTP Upgrade
43
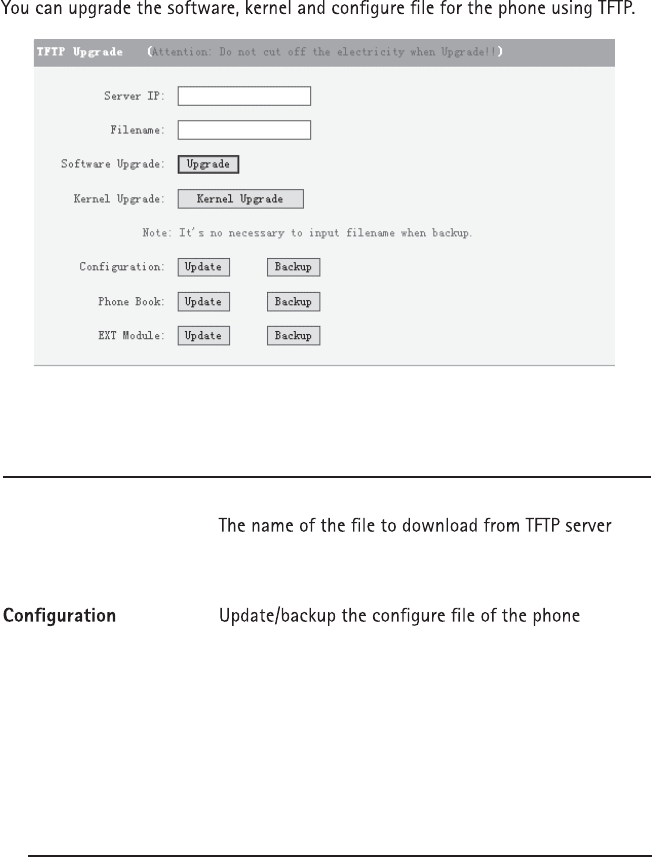
Users can click Phone Maintenance on the menu bar then FTP Upgrade to input
the following parameters:
FTP Upgrade
Server IP The IP address of the FTP server
Filename
Username The username provided by FTP server
Password The password provided by FTP server
Software Upgrade Upgrade the software of the phone
Kernel Upgrade Upgrade the kernel of the phone
Phone Book Update/backup the phonebook of the phone
EXT Module Update/backup the expansion module of the phone
44
TFTP Upgrade
Users can click Phone Maintenance on the menu bar then TFTP Upgrade to input
the following parameters:
TFTP Upgrade
Server IP The IP address of the TFTP server
Filename
Software Upgrade Upgrade the software of the phone
Kernel Upgrade Upgrade the kernel of the phone
Phone Book Update/backup the phonebook of the phone
EXT Module Update/backup the expansion module of the phone
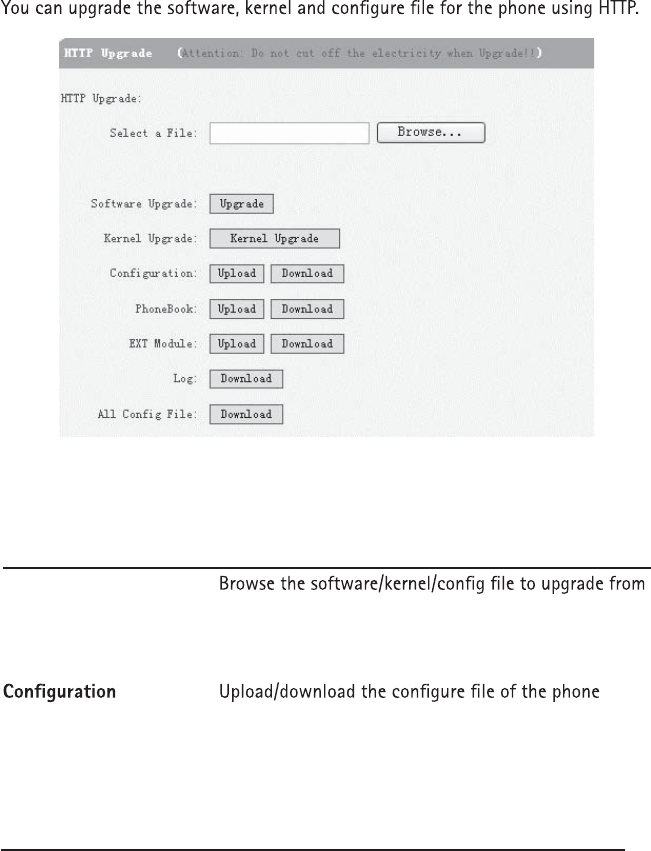
HTTP Upgrade
45
Users can click Phone Maintenance on the menu bar then TFTP Upgrade to input
the following parameters:
HTTP Upgrade
Select a File
HTTP
Software Upgrade Upgrade the software of the phone
Kernel Upgrade Upgrade the kernel of the phone
Phone Book Upload/download the phonebook of the phone
EXT Module Update/backup the expansion of the phone
46
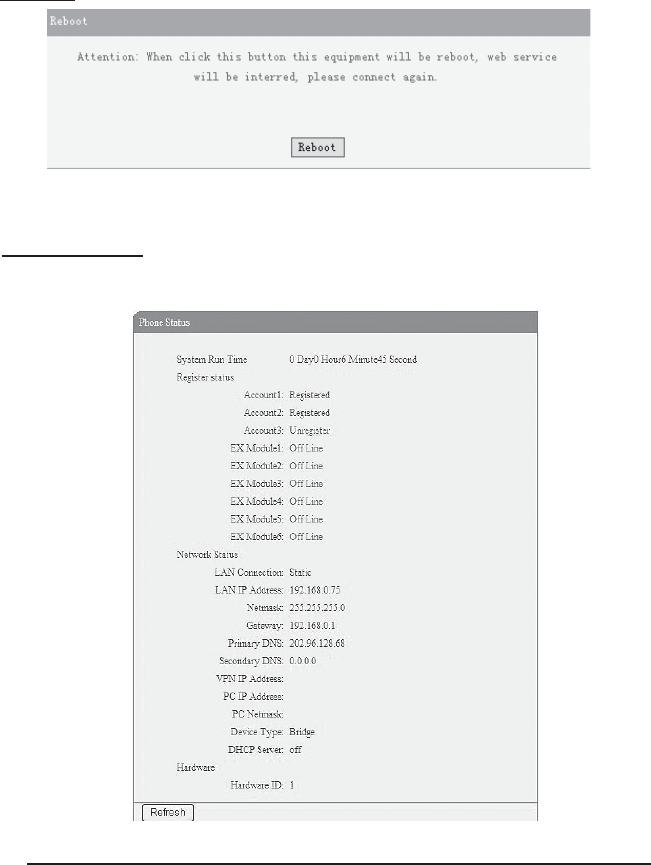
Reboot
Click Phone Maintenance on the menu bar, then Reboot. Clicking the Reboot but-
ton will restart the phone remotely.
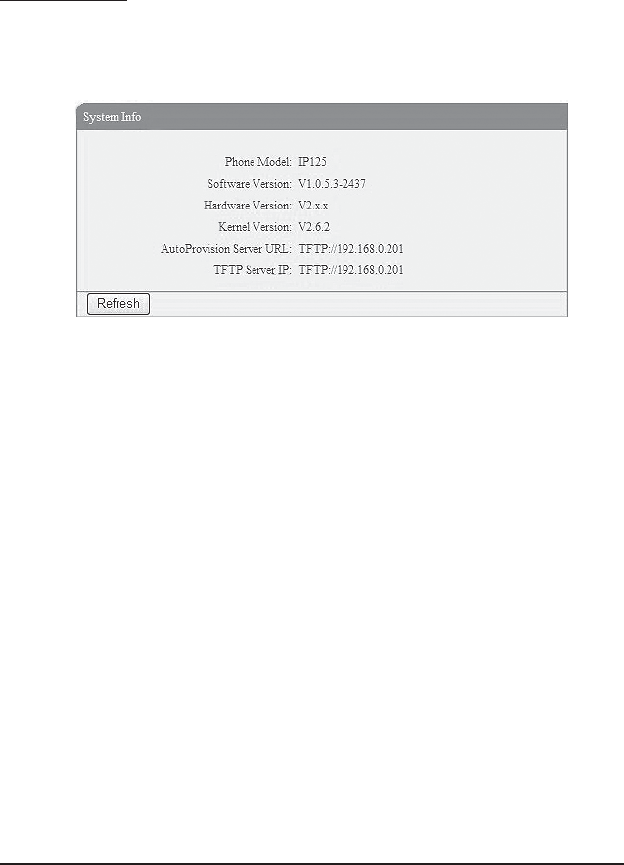
Phone Status
Click Phone Status on the menu bar to see the current status of the phone.
47
System info
Click Phone Status on the menu bar to see the system information like software
version and kernel version.

48
Appendix
Auto Provision
Pre-conguration on TFTP/HTTP/HTTPS/FTP Server
When the software or kernel auto-provision is enabled, the IP115/IP125 will
automatically check the software and kernel version, so pre-conguration on the
provisioning server will have to be done rst.
Auto Provision for Software:
1. Create a notepad le named“F000X00.cfg”(the “X” is decided by the model of
the IP phone used, for example, if the model is IP115, the le name is “F000115.
cfg”);
*Named rule of the le:
F00115.cfg: for IP115;
F00125.cfg: for IP125
2. Open the notepad le “F000X00.cfg” and write the new software name in it.
For example:
S_ES115_version2.0.4.6: for IP115;
S_ES125_version2.0.4.6: for IP125;
Write down the new version to upgrade and save it on the provisioning server.
*Please note that if the version is not older than (or the same as) the one on the
phone, auto-provisioning of the software would be not available.
3. Next, upload the new software to the TFTP/HTTP/HTTPS/FTP provisioning server
and complete the pre-conguration steps.
Auto Provision for Kernel:
1. Create a notepad le named“K000X00.cfg”(the “X” is decided by the model of
the IP phone you are using, for example, if the model is IP115, the le name is
“K000115.cfg”);
*Named rule of the le:
K00115.cfg: for IP115;
K00125.cfg: for IP125
2. Open the notepad le “K000X00.cfg” and write the new kernel name in it, for
example,
K_uImage_115.bin_version2.1.6: for IP115;
K_uImage_125.bin_version2.1.6: for IP125
Write the new version to upgrade and save it on the provisioning server.

49
*Please note that if the version is not older than (or the same as) the one on the
phone, auto-provisioning of the software would be not available.
3. Next, upload the new kernel to the TFTP/HTTP/HTTPS/FTP provisioning server and
complete the pre-conguration steps.
Conguration les on TFTP/HTTP/HTTPS/FTP Server
Name of conguration le:
The conguration le on the provisioning server is named like the MAC address of
IP phone itself. RCA’s IP phones support two dierent conguration les for auto-
provisioning:
Normal Conguration le:
A Normal Conguration le is the conguration le of the RCA IP phone. Users
can download it from the phone (see the following chapter to see how to down-
load a conguration le from an RCA IP phone) and modify it. If the IP phone’s
MAC address is 00:11:22:33:44:55, the normal conguration le of it should be
named 001122334455.xml.
Broadsoft Conguration les:
Broadsoft Conguration les support the format of Broadsoft IP-PBX. However,
they can be used for provisioning. There are two les that should be set on the
provisioning server, they are also named like the MAC address of the phone
1) 001122334455.cfg: a conguration le for system settings, for example, net-
work, audio and so on.
2) 001122334455.txt: a conguration le for SIP accounts.
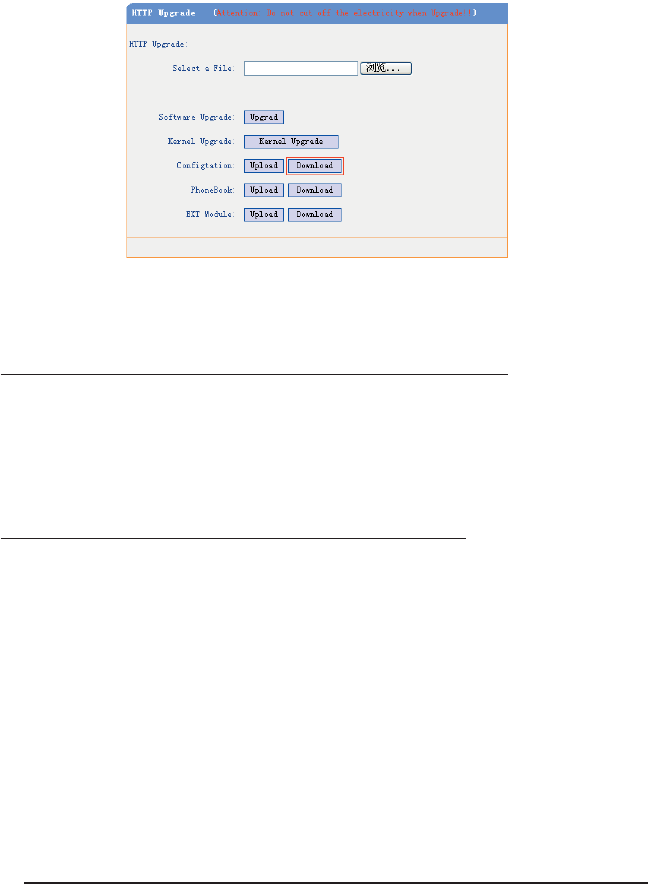
Download a conguration le from the phone:
Users can download a conguration le from the IP phone by HTTP as follows:
1. Open the web page of the IP phone, click Phone Maintenance then HTTP Up-
grade;
2. Then click the Download button after Conguration:
50
3. To use this le to auto-provision, modify it and rename it to the MAC address of
the IP Phone with .xml sux.
Extern.xml le on TFTP/HTTP/HTTPS/FTP Server
The Extern.xml includes the settings of programmable buttons on the phone and
all Expansion Modules. All the phones can download the settings from a same le
and they will have the same settings (for example, Speed-dial, BLF and so on).
*Users can’t rename the le on the provisioning server. The le name is xed to
Account1_Extern.xml. (Account1 is the rst account you register)
Phonebook on TFTP/HTTP/HTTPS/FTP Server
The RCA IP phones support both the Enterprise Phonebook and Personal Phone-
book.
Enterprise Phonebook:
Enterprise Phonebook may be used by all sta in an oce. All phones will down-
load a common phonebook. The le’s name must be Enterprise_Phonebook.xml on
the provisioning server and cannot be renamed.
Personal Phonebook:
Personal Phonebook is individual for each IP phone. The le on the provisioning
server is named by the rst account of your IP phone. If the IP phone’s rst ac-
count is 1287, the Personal Phonebook of this phone is 1287_Phonebook.xml.
51
Automatic Provisioning using DHCP Option 66
The following steps will describe auto-provisioning by TFTP. Users also can use
HTTP and FTP for auto-provisioning with RCA IP phones.
DHCP Server: (Microsoft Windows 2003 server)
1. Start up the DHCP Management Console;
2. Expand the DHCP scope which will contain the phones
3. Right-click on the Scope Options node
5. In the General tab, scroll down the list of options and identify the option la-
beled “066 Boot Server Host Name”
6. Enable the “066 Boot Server Host Name” and enter the string value according
to the examples discussed previously
string value:
192.168.0.201(TFTP Server IP Address);
7. Click the OK button
IP Phone:
1. Input the IP Phone’s IP Address in browser;
2. Enter user and password (default: root:root) then open the web page;
3. Click Phone Maintenance and select Auto Provision;
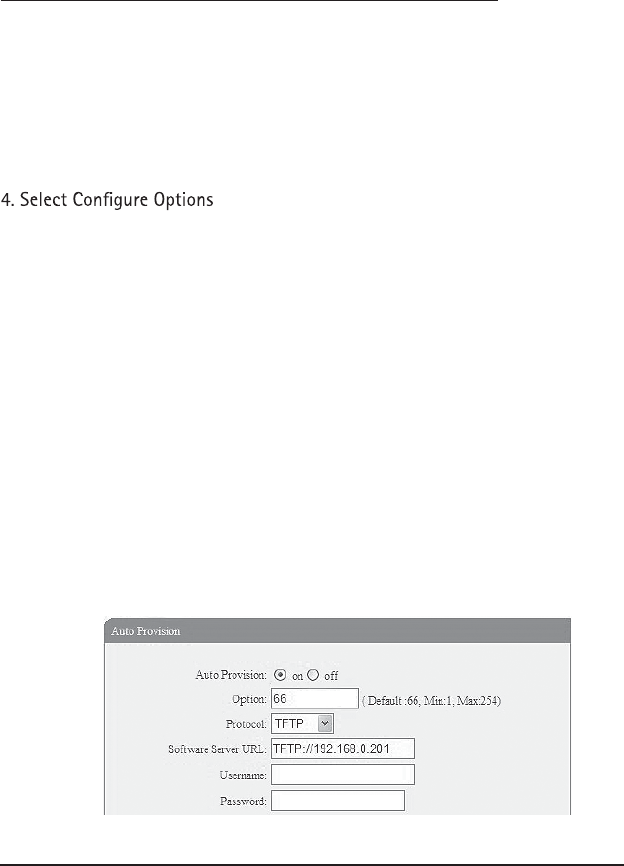
4. Select as follows:
52
5. Click Submit to save changes.
IP Phone:
1. Input the IP Phone’s IP Address in browser;
2. Enter user and password (default: root:root) then open the web page;
3. Click Phone Maintenance and select Auto Provision;
4. Select as follows:

53
It supports three protocols in Auto-Provisioning: TFTP, HTTP and FTP.
The format with provisioning server URL is:
TFTP:
TFTP://192.168.0.201 (192.168.0.201 is the default Server IP address)
HTTP:
HTTP://192.168.0.201
HTTPS:
HTTPS://192.168.0.201
FTP:
FTP://192.168.0.201
Username: The user to login FTP/HTTP/HTTPS server
Password: The password of the user using to login FTP/HTTP/HTTPS server
*Username and password are available in FTP/HTTP/HTTPS only (unavailable in
TFTP).
Auto Download Software:
Download software from server and upgrade it automatically.
Auto Download Kernel:
Download kernel from server and upgrade it automatically.
Auto Download Cong File:
Download conguration le from server and update it automatically.
Broadsoft Compatibility:
To select this function, there needs to be two conguration les (with Broadsoft
format) on the provisioning server. Otherwise, users can download the congura-
tion le from the phone via HTTP (regarding the steps, you can refer to “Download
a conguration le from your phone” in this document), modify it and upload it to
the server for auto-provision.
Auto Download Expansion:
Download conguration le of the Programmable buttons on the phone or Ex-
pansion Modules automatically.
Auto Download Enterprise Phonebook:
Download Enterprise Phonebook from server and update it automatically.
Auto Download Personal Phonebook:
Download Personal Phonebook from server and update it automatically.
Booting Checked:
Check all items selected and upgrade/update them when the phone reboots
Auto Provision Frequency: The auto provision the frequency needed.
54
Auto Provision Time:
The time to execute auto-provision.
Examples of Auto Provision Frequency and Time
1) When the Auto Provision Frequency is set and Auto Provision Time is disabled
(set to None), the Auto Provision function will work after the AutoProvision Fre-
quency;
2) When both Auto Provision Frequency and Auto Provision Time are set, for
example:
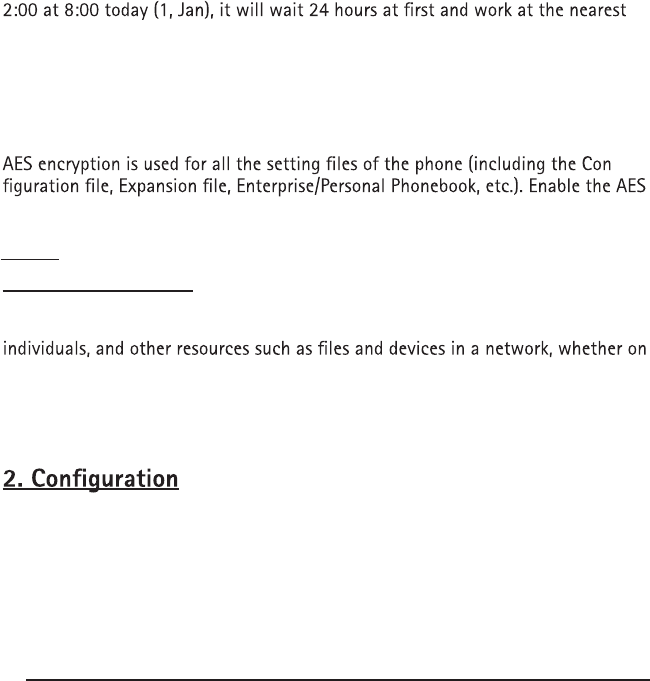
The Auto Provision Frequency is set to 24 hours, and the Auto Provision Time to
2:00, and the Auto Provision function will work at 2:00 on the day after tomorrow
(3, Jan).
Therefore, to have this function work at 23:00 tonight if it is 8:00 now, you set the
Auto Provision Frequency to 0 hours and the Auto Provision Time to 23:00.
AES Encryption:
-
Encryption function and input the AES Key matching the one on the server.
1. LDAP Overview
LDAP stands for Lightweight Directory Access Protocol which is a client-server
protocol for accessing a directory service. LDAP lets users locate organizations,
the Internet or on a corporate intranet, and whether or not you know the domain
name, IP address, or geographic whereabouts.
An LDAP directory can be distributed among many servers on a network, then
replicated and synchronized regularly.
Please note that on the IP115/IP125, the LDAP Phonebook version must be
V2.2.3.1-2210 or higher Access the web UI and click PhoneBook on the menu bar,
then click LDAP.
LDAP
55
3. Attributes
3.2 LDAP
3.1 Common Attributes
Abbreviation Name Description
cn commonName Full name of the user.
company company Company or organization
name
gn givenName First name
homePhone homeTelephoneNumber Home Phone number
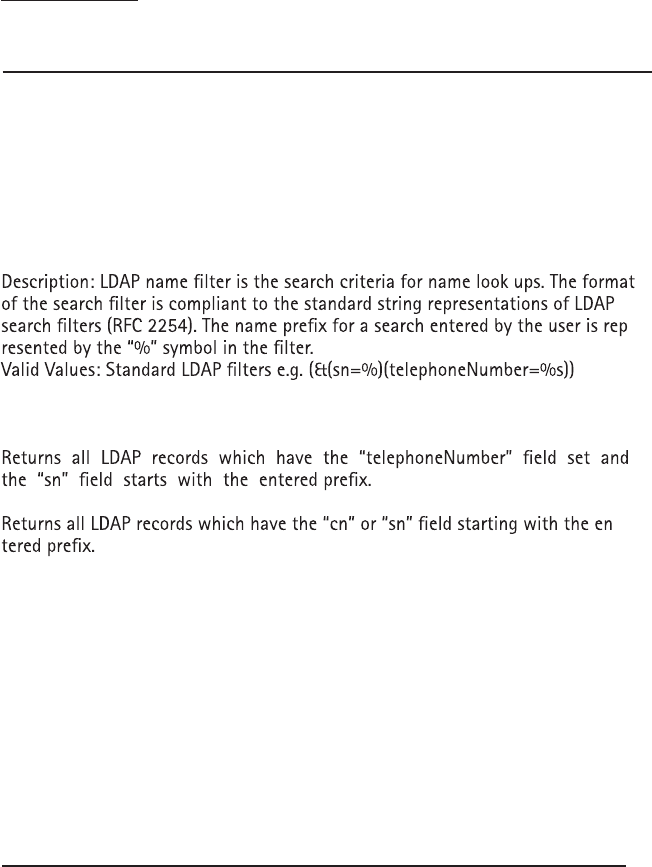
3.2.1 LDAP Name Filter
-
Default Value: <blank>
Examples:
(&(telephoneNumber=%s)(sn=%))
(|(cn=%s)(sn=%s))
-
56
(!(cn=%s))
3.2.2 LDAP Number Filter
(ipPhone=%s))
Default Value: <blank>
Examples:
(|(telephoneNumber=%s)(Mobile=%s)(ipPhone=%s))
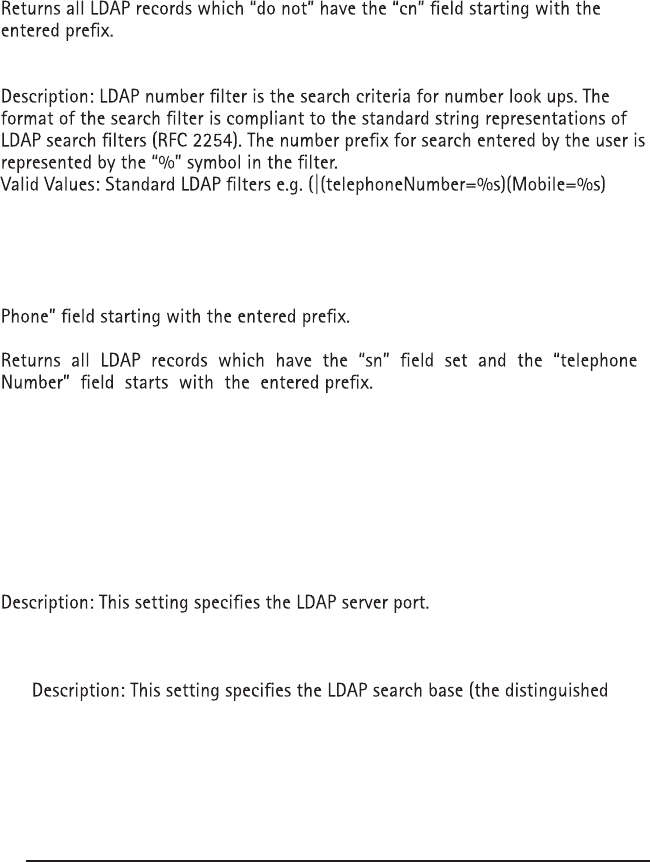
Returns all LDAP records which have the “telephoneNumber” or “Mobile” or “ip-
(&(telephoneNumber=%s)(sn=*))
-
3.2.3 Server Address
Description: This setting refers to the DNS name or IP address of the LDAP server.
Default Value: 0.0.0.0
Example:
192.168.1.100
ldap.company.com
3.2.4 Port
Default Value: 389
3.2.5 Base
name of the search base object) which corresponds to the location in the direc-
tory from which the LDAP search is requested to begin. The search base nar-
rows the search scope and decreases directory lookup time. If there are multiple
organizational units in your directory (for example, OU=Sales in O=COMPANY and
OU=Development in O=COMPANY), but the “OU=Sales” organization never uses
AOL AIM, users can restrict the lookup to the OU=Development subtree only

57
by entering providing the following search base: OU=Development, O=COMPANY.
Other examples see below.
Default Value: <blank>
Examples:
o=UNIVERSITY OF NEW ORLEANS,c=US
o=SFU,c=CA
dc=escene,dc=cn
3.2.6 User Name
Description: This setting species the bind “Username” for LDAP servers. Most
LDAP servers allow anonymous binds in which case the setting can be left blank.
However if the LDAP server does not allow anonymous binds, users will need to
provide the Username and Password allowed to query the LDAP server.
Default Value: <blank>
3.2.7 Password
Description: This setting species the bind “Password” for LDAP servers. RCA IP
phones use “simple” authentication scheme for bind requests. This setting can be
left blank in case the server allows anonymous binds. Otherwise users will need to
provide the Password along with the Username in order to access the LDAP server.
Default Value: <blank>
3.2.8 Max.Hits(1~32000)
Description: This setting species the maximum number of search results to be
returned by the LDAP server. If Max.hits is 0 or blank the LDAP server will return
all search results. Please note that a very large value of the Max.hits will slow
down the LDAP lookup, therefore the setting should be congure according to the
available bandwidth. The default value for this setting is blank.
Default Value: 50
3.2.9 LDAP Name Attributes
Description: This setting can be used to specify the “name” attributes of each re-
cord which are to be returned in the LDAP search results. This setting compresses
the search results, as the server only returns the attributes which are requested
by the RCA IP phone. The setting allows the user to congure multiple space
separated name attributes. Please consult the system administrator regarding
which name attributes are to be congured.

58
Valid Values: Space separated name attributes, see examples below.
Default Value: <blank>
Examples:
cn sn displayName
Requires “cn”, “sn” and “displayName” elds for each LDAP record.
givenName
Requires “givenName” eld for each LDAP record.
vorName nachName
Requires “vorName” and “nachName” elds for each LDAP record.
3.2.10 LDAP Number Attributes
Description: This setting can be used to specify the “number” attributes of each
record which are to be returned in the LDAP search results by the LDAP server.
This setting compresses the search results, as the server only returns the attributes
which are requested. The user can congure multiple space separated number
attributes by using this setting. Please consult the system administrator regarding
which number attributes are to be congured.
Valid Values: space separated number attributes e.g. telephoneNumber Mobile
ipPhone Home
Default Value: <blank>
Examples:
Mobile telephoneNumber ipPhone
Requires “Mobile”, “telephoneNumber” and “ipPhone” elds for each LDAP record.
Home Private Oce
Requires “Home”, “Private” and “Oce” elds for each LDAP record.
3.2.11 Protocol
Description: Protocol is the protocol version for the phone that send the bind
request to the server. Please make sure the LDAP server supports version 3/2 bind
requests.
Valid Values: version 3/version 2
Default Value: version 3
3.2.12 Search Delay(ms)(0~2000)
Description: This setting is for conguring the delay display time after search.
Valid Values: 0~2000
Default Value: 0

59
3.2.13 LDAP Lookup for Incoming Call
Description: This setting can be used to enable calling line identication using
LDAP. When the setting is enabled, the phone performs an LDAP number search
for the incoming number and displays the name of the calling party accordingly.
Valid Values: <Enabled>, <Disabled>
Default Value: Disabled
3.2.14 LDAP Sorting Results
Description: This setting is for sorting the search results. If enabled, it will arrange
in alphabetical order the name displayed; if only has the number return, it will list
in numerical order. Valid Values: <Enabled>, <Disabled>
Default Value: Disabled
3.2.15 LDAP Lookup for PreDial/Dial
Description: This setting can be used to enable call out line identication using
LDAP. When the setting is enabled, the phone performs an LDAP number search for
PreDial or Dial status.
Valid Values: <Enabled>, <Disabled>
Default Value: Disabled
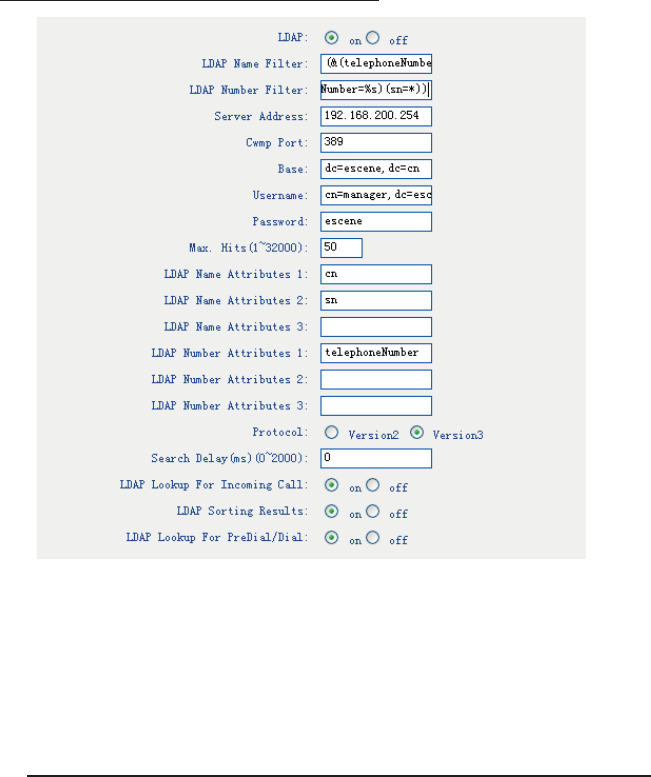
3.3 Example for Conguration
Users can use the below settings as a starting point and adjust the lter and dis-
play attributes according to their needs.
LDAP Name Filter: (&(telephoneNumber=%s)(sn=%))
LDAP Number Filter: (&(telephoneNumber=%s)(sn=*))
Server Address: 192.168.200.254 #####this setting is relate with the server
conguration.
Port: 389 #####this setting is relate with the server conguration.
Base: dc=Escene,dc=cn #####this setting is relate with the server congu-
ration. User Name: cn=manager,dc=escene,dc=cn #####this setting is relate
with the server
conguration.
Password: ***** #####this setting is relate with the server conguration.
Max.Hits: 50
LDAP Name Attributes: cn sn displayName
LDAP Number Attributes: Mobile telephoneNumber ipPhone
Protocol: Version 3 #####this setting is relate with the server
conguration.
Search Delay(ms)(0~2000): 0
60
LDAP Lookup for Incoming Call: Enabled
LDAP Sorting Results: Enabled
LDAP Lookup for PreDial/Dial: Enabled
4. Conguration on the RCA Phone

61
Service
If trouble is experienced with this equipment, for repair or warranty information, please
contact customer service at 1-800-511-3180. If the equipment is causing harm to the
telephone network, the telephone company may request that you disconnect the equipment
until the problem is resolved.
This product may be serviced only by the manufacturer or its authorized service agents.
Changes or modications not expressly approved by Teleeld NA Inc. could void the user’s
authority to operate this product. For instructions on how to obtain service, refer to the
warranty included in this guide or call customer service at 1-800-511-3180.
Or refer inquires to:
Teleeld NA Inc.
Manager, Consumer Relations
4915 SW Grith Dr. #302
Beaverton, Or 97005
Attach your sales receipt to the boOKlet for future reference or jot DOWN the date this
product was purchased or received as a gift. This information will be valuable if service
should be required during the warranty period.
Purchase date ________________________________________________
Name of store, installer or dealer _________________________________

62
Warranty
Limited Warranty
What your warranty covers:
• Defects in materials or workmanship
For how long after your purchase:
• Two years, from date of purchase
What we will do:
• Provide you with a replacement unit. The exchange unit is under warranty for the
remainder of
the original product’s warranty period.
How you get service:
• Locate your proof of purchase in the form of a bill of sale or receipted invoice which is
evidence
that the product is within the warranty period. Proof of warranty eligibility is required and
must be presented to obtain warranty service.
• Contact RCA Customer Care at (800) 511-3180. Our representatives will help you
troubleshoot and diagnose the problem. As you may be asked to disconnect your RCA
telephone from it’s power source, you must call from another telephone. If the issue cannot
be resolved by our Customer Care Team, you will be issued an RMA (Return Merchandise
Authorization) number and be given instructions on how to submit your proof-of-purchase
paperwork and where to send your defective merchandise.
• You will be responsible for shipping the defective unit back to our warranty fulllment
center at your own expense. You are responsible for damage or loss during shipment so
insuring the product during return shipping is highly recommended.
• We will ship a replacement to you freight pre-paid.
What your warranty does not cover:
• Customer instruction. (Your Instruction BoOK provides information regarding operating
instructions and user controls. Additionally, our Customer Care Center is staed 24x7 with
product experts that can assist you with any questions that may arise during setup and use
of your RCA telephone.
• Installation and setup service adjustments
• Batteries, if applicable
• Damage from misuse or neglect
• Products that have been modied of serviced outside the USA
• Products purchased from non-authorized retailers, dealers or resellers

63
• Products purchased or serviced outside the USA
• Acts of nature, such as, but not limited to lightning damage
• 3rd party products, such as headsets
Product Registration:
• Please complete and mail the Product Registration Card packed with your unit. It will
make it easier to contact you should it ever be neccessary. The return of the card is not
required for warranty coverage.
Limitation of Warranty:
• THE WARRANTY STATED ABOVE IS THE ONLY WARRANTY APPLICABLE TO THIS
PRODUCT. ALL OTHER WARRANTIES, EXPRESS OR IMPLIED
(INCLUDING ALL IMPLIED WARRANTIES OF MERCHANTABILITY OR FITNESS FOR
A PARTICULAR PURPOSE) ARE HEREBY DISCLAIMED. NO VERBAL OR WRITTEN
INFORMATION GIVEN BY TELEFIELD NA INC., ITS AGENTS, OR EMPLOYEES SHALL
CREATE A GUARANTY OR IN ANY WAY INCREASE THE SCOPE OF THIS WARRANTY.
•REPAIR OF REPLACEMENT AS PROVIDED UNDER THIS WARRANTY IS THE EXCLUSIVE
REMEDY OF THE CONSUMER. TELEFIELD NA INC. SHALL NOT BE LIABLE FOR
INCIDENTAL OR CONSEQUENTIAL DAMAGES RESULTING FROM THE USE OF THIS
PRODUCT OR ARISING OUT OF ANY BREACH OF ANY EXPRESS OR IMPLIED WARRANTY
ON THIS PRODUCT. THIS DISCLAIMER OF WARRANTIES AND LIMITED WARRANTY
ARE GOVERENED BY THE LAWS OF THE STATE OF OREGON. EXCEPT TO THE EXTENT
PROHIBITED BY APPLICABLE LAW, ANY IMPLIED WARRANTY OF MERCHANTABILITY
OR FITNESS FOR A PARTICULAR PURPOSE ON THIS PRODUCT IS LIMITED TO THE
APPLICABLE WARRANTY PERIOD SET FORTH ABOVE.
How state law relates to this warranty:
• Some states do not allow the exclusion nor limitation of incidental or consequential
damages, or limitations on how long an implied warranty lasts so the above limitations or
exclusions may not apply to you.
• This warranty gives you specic legal rights, and you also may have other rights that vary
from state to state.
If you purchased your product outside the USA, Mexico or Canada:
This warranty does not apply. Contact your dealer for warranty information.
01
13-10
send
will