Telephonics SRR300ME Short Range Radio User Manual pr2060f0 med FCC text
Telephonics Sweden AB Short Range Radio pr2060f0 med FCC text
UserManual.wiki
>
Telephonics
>
SRR300ME User Manual
User Manual
Navigation menu
Upload a User Manual
Namespaces
Wiki Guide
HTML
PDF
Info
Views
User Manual
Discussion / Help
Navigation

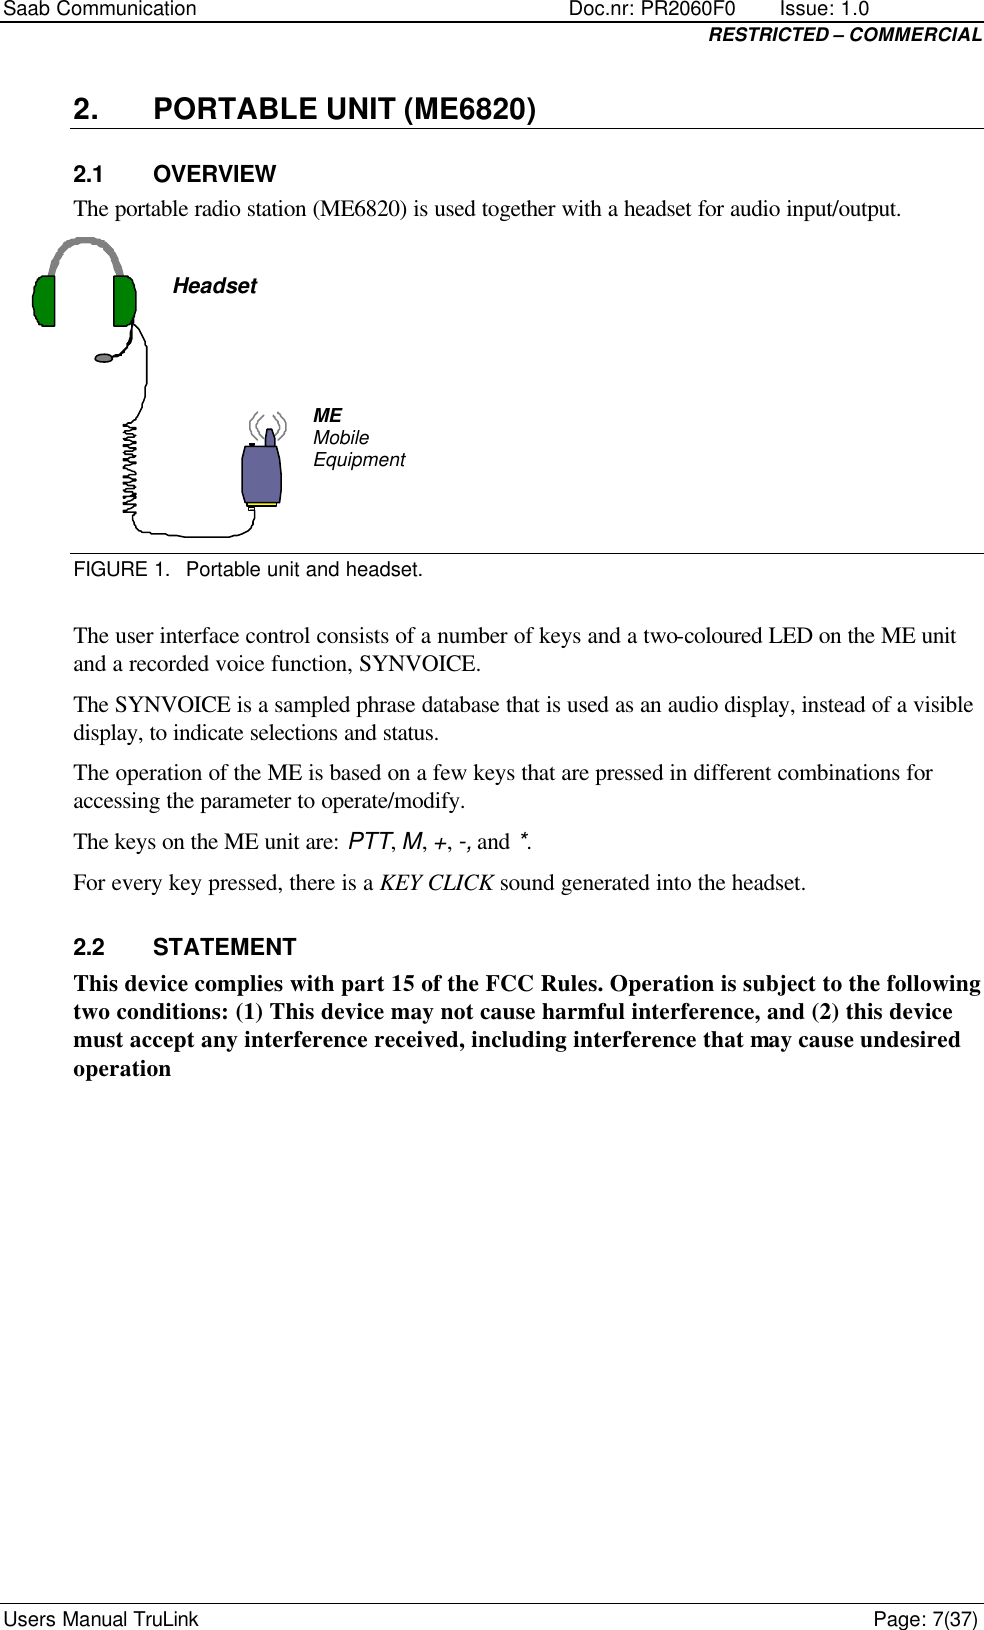
![Saab Communication Doc.nr: PR2060F0 Issue: 1.0 RESTRICTED – COMMERCIAL Users Manual TruLink Page: 5(37) 1. GENERAL 1.1 SCOPE This document is the users manual for the TruLink system. The manual explains how to handle the portable transceiver, ME6820, the fixed transceiver, AP6803, and the support station, SS6819, included in the system. The technical system description of the TruLink system can be found in [1]. 1.2 DEFINITIONS AND ABBREVIATIONS Definitions, abbreviations and acronyms used in the document are listed below: q AP Access Point Transceiver q ME Mobile Equipment q NVG Night Vision Goggles q PTT Push To Talk q SS Support Station q SYNVOICE Synthetic Voice (recorded voice message) q VOX Voice Operated Keying 1.3 REFERENCES [ 1 ] System Description (Saab Communication, PR2060H1) 1.4 STATEMENT This device complies with part 15 of the FCC Rules. Operation is subject to the following two conditions: (1) This device may not cause harmful interference, and (2) this device must accept any interference received, including interference that may cause undesired operation. 1.5 CAUTION Changes or modifications not expressly approved by the party responsible for compliance could void the user's authority to operate the equipment. 1.6 NOTE This equipment has been tested and found to comply with the limits for a Class B digital device, pursuant to part 15 of the FCC Rules. These limits are designed to provide reasonable protection against harmful interference in a residential installation. This equipment generates, uses and can radiate radio frequency energy and, if not installed and used in accordance with the instructions, may cause harmful interference to radio communications. However, there is no guarantee that interference will not occur in a particular installation. If this equipment does cause harmful interference to radio or television reception, which can be determined by turning the equipment off and on, the user is encouraged to try to correct the interference by one or more of the following measures: - Reorient or relocate the receiving antenna.](https://usermanual.wiki/Telephonics/SRR300ME/User-Guide-479323-Page-5.png)
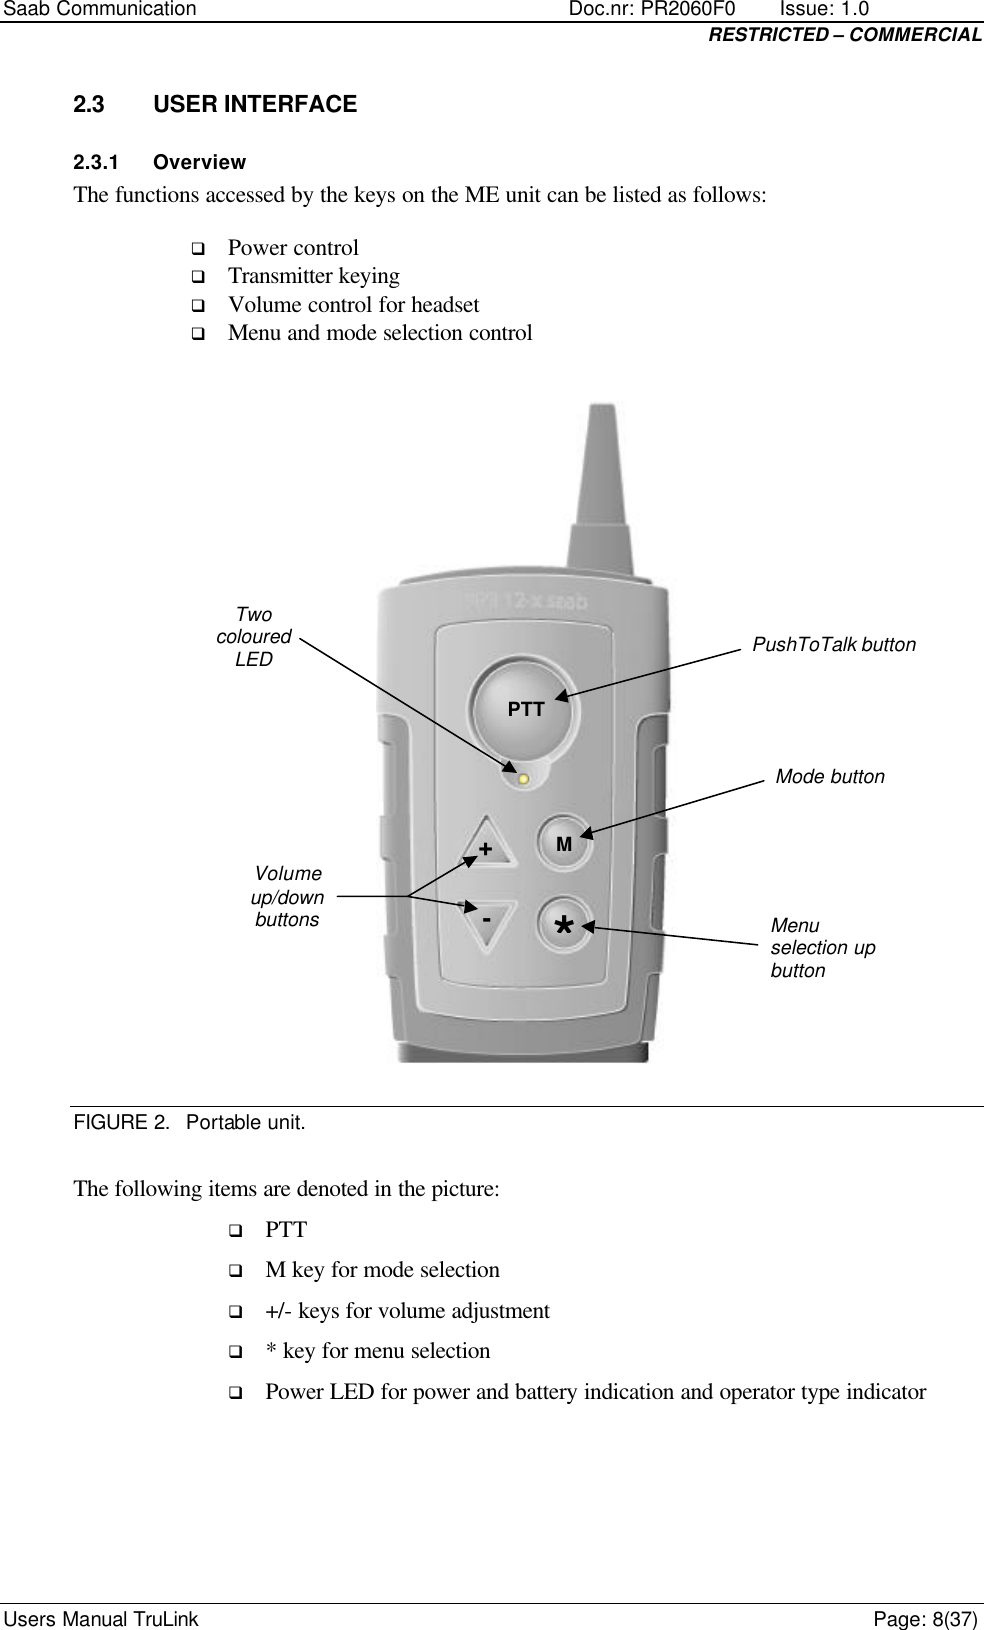
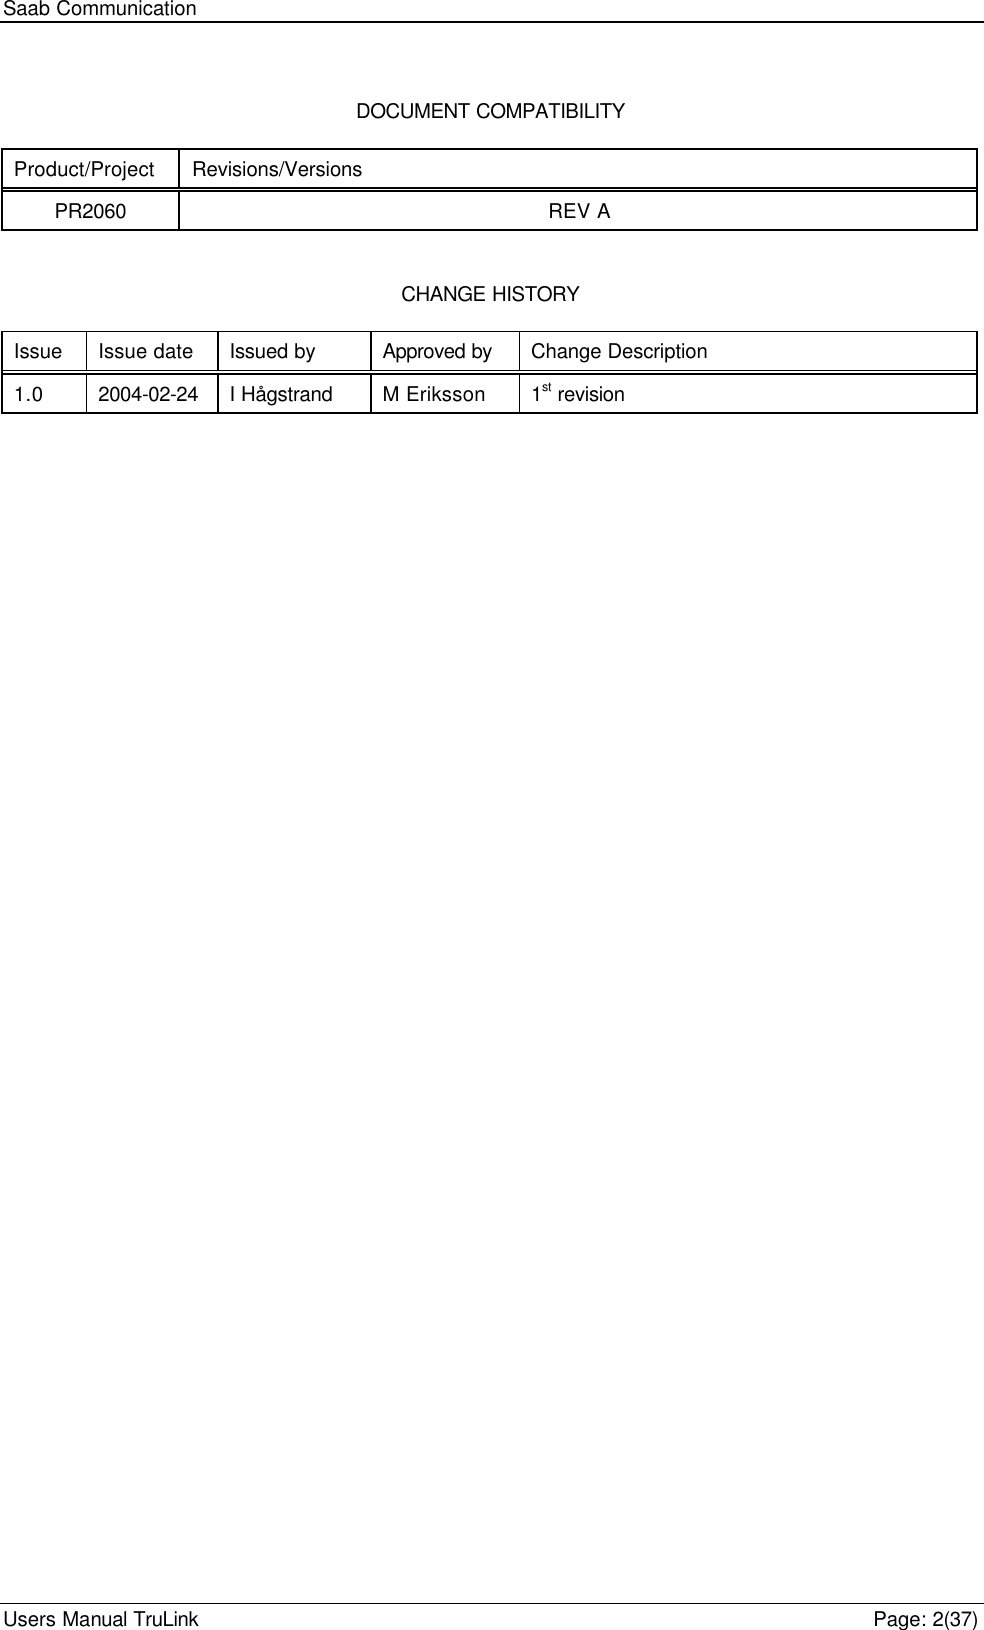
![Saab Communication Doc.nr: PR2060F0 Issue: 1.0 RESTRICTED – COMMERCIAL Users Manual TruLink Page: 9(37) 2.3.2 Power ON/OFF To switch the power on or off, the + and - keys are used together and held for about 1 second until the LED is steady green. When the unit has been powered on the user can start a network or logon to a network. 2.3.3 Start menu When ME unit is powered on the user enters the start menu. The selected items in the start menu are listed by the SYNVOICE function. It is configurable which modes should be included in the start menu but the modes in the start menu can at most be: q CHANNEL [channel list] q UNIT MODE [master/slave] q USER TYPE [list] q ORDER SYNCHRONISE AP In the start menu key PTT is used for confirming settings. To browse through the menu the M key is used and the * key is used to change a setting. If the start menu looks like the list above M is pressed twice to select USER TYPE, to change the settings of mode USER TYPE the * key is used. If PTT is pressed the changed setting is saved and the SYNVOICE function again lists the settings in the menu. If the setting is not confirmed within a configurable time the setting is changed back to default mode. If the user any time in the start menu presses PTT when no changes have been done to the settings since last time they were listed the logon procedure starts immediately. The logon procedure will also be activated if no action is taken within a configurable time, the unit then starts to logon with the default settings listed. A successful logon is announced with SYNVOICE message “LOG ON OK”. If the unit has received information of external connections during the logon procedure the user will be notified with SYNVOICE message “EXTERNAL AVAILABEL”. If destination by default is one of the external connections, 2.3.4.1, this is announced by message “EXTERNAL” plus the name of the external. If UNIT MODE is included in the start menu the user can choose to either start a new network as a Master, 2.3.3.1, or to logon to an existing network as a Slave, 2.3.3.2. 2.3.3.1 Starting a network To start a new network UNIT MODE must be set to “MASTER”. If the default setting is “SLAVE” the setting is changed with keys M and * and confirmed by pressing PTT. When the logon procedure starts the unit will start a new network with the selected channel in the start menu. A successfully started network is announced to the user by SYNVOICE message ”LOG ON OK”. 2.3.3.2 Logging on to a network To be able to logon to an existing network UNIT MODE must be set to “SLAVE”, there can only be one “MASTER” in a network. The network can be selected by the mode “CHANNEL”, the slave must have same channel number as the master of the network.](https://usermanual.wiki/Telephonics/SRR300ME/User-Guide-479323-Page-9.png)
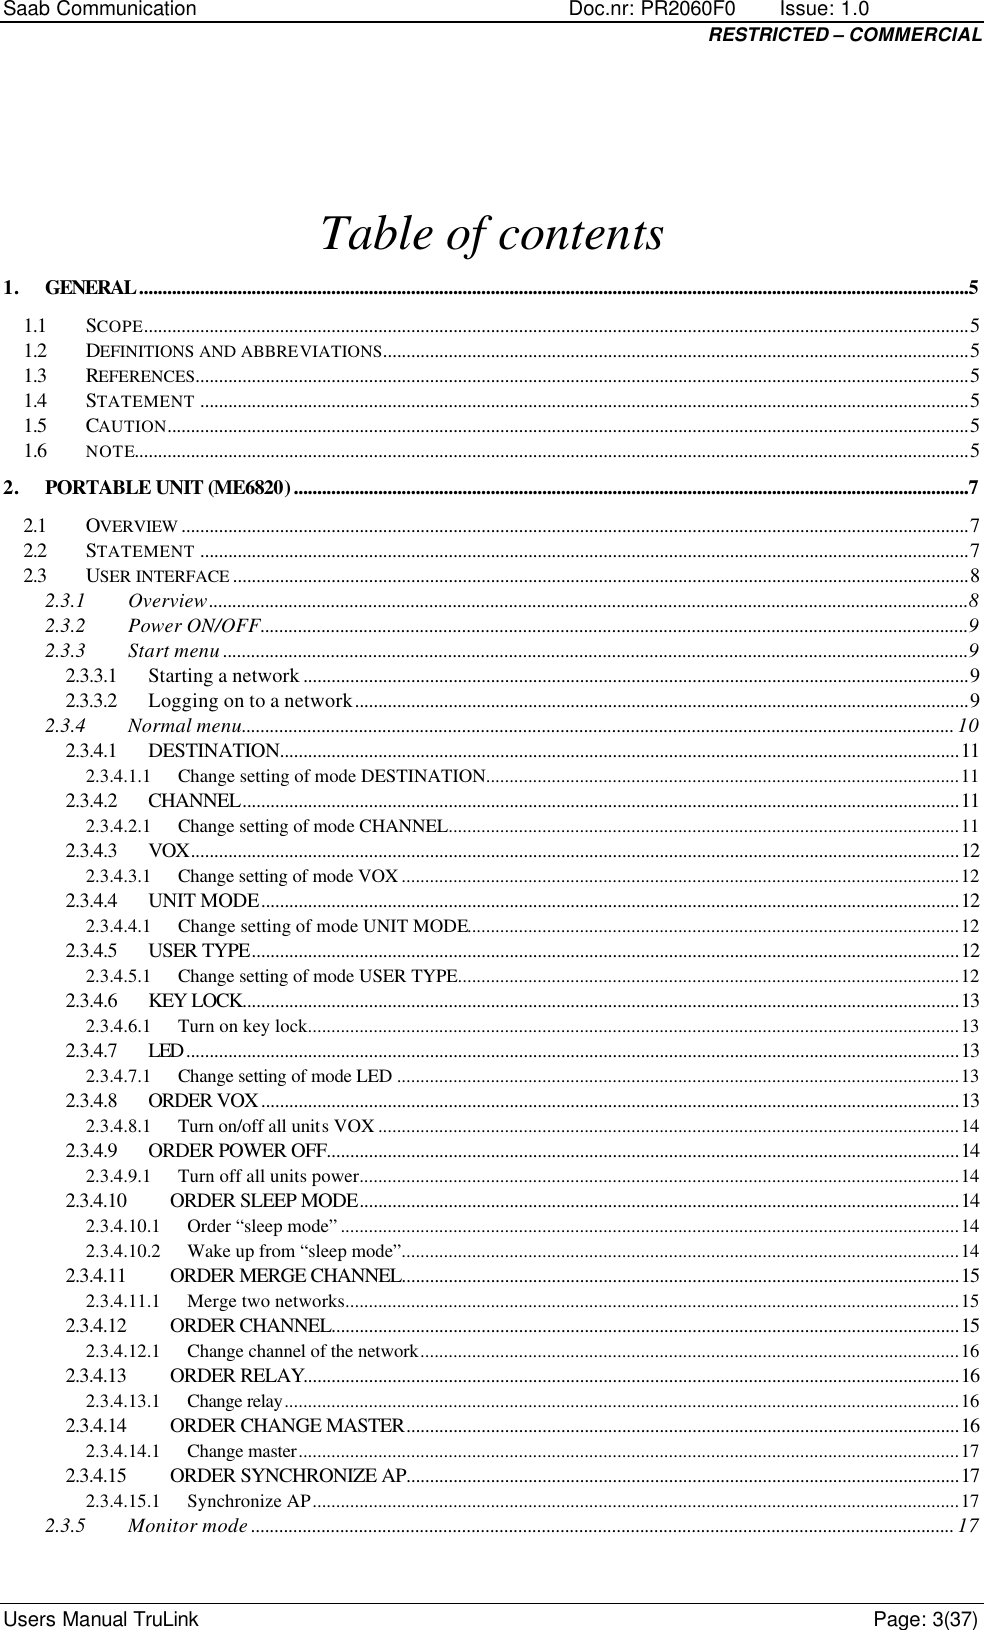
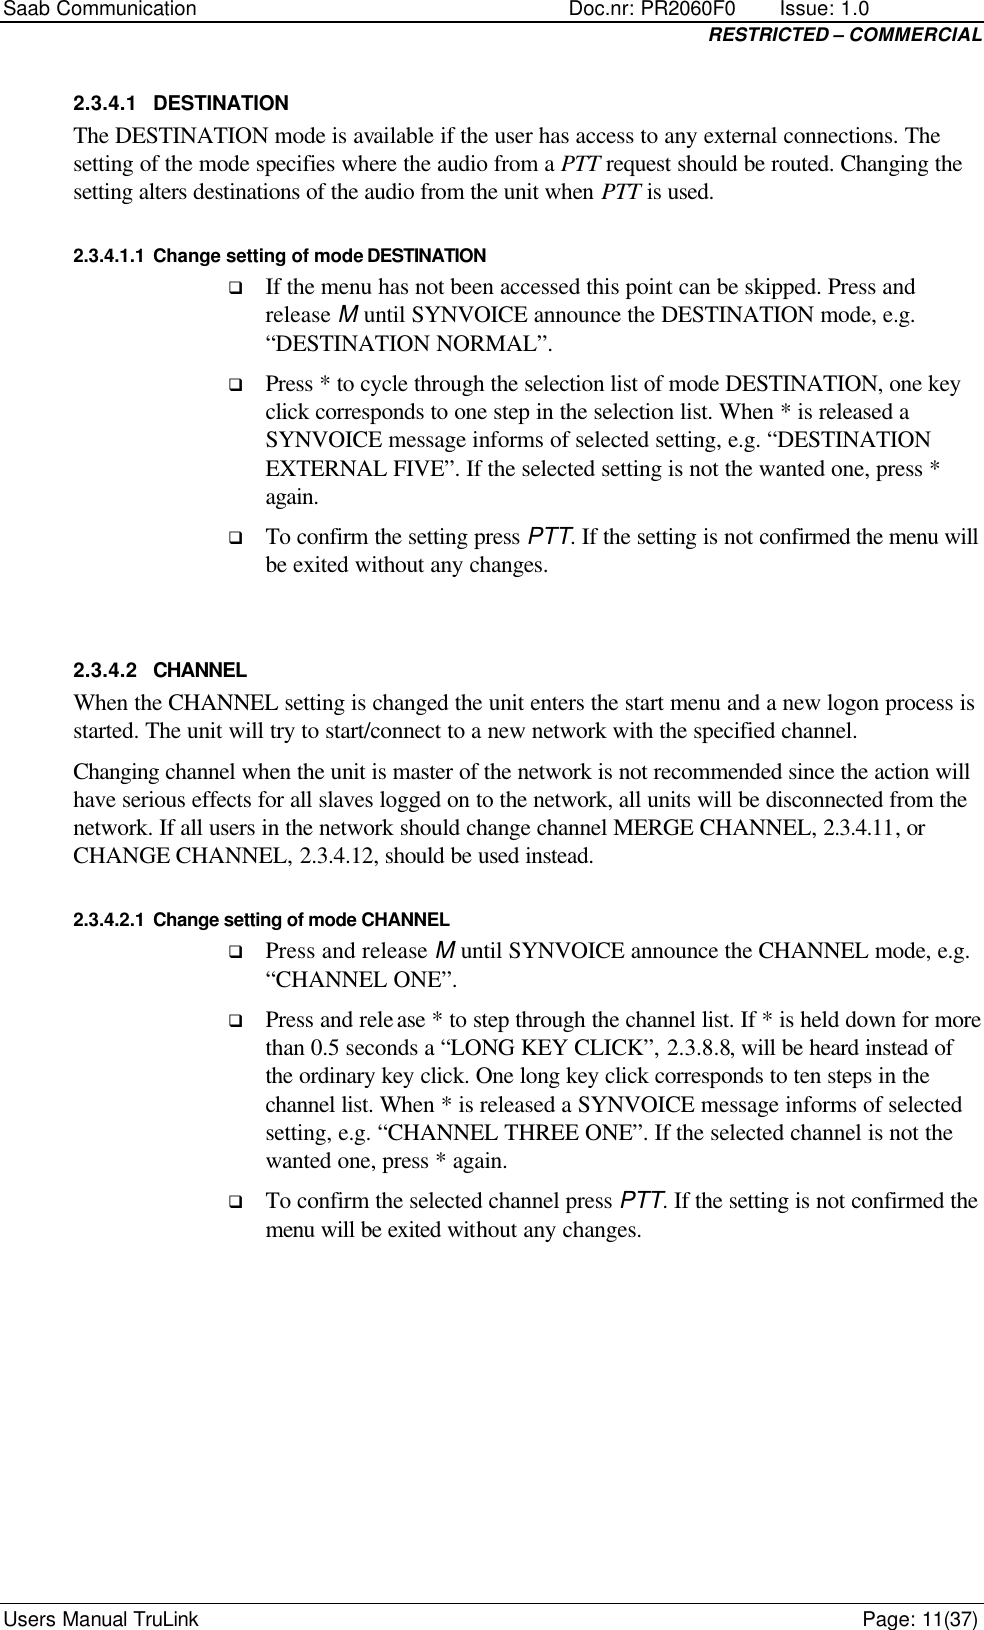
![Saab Communication Doc.nr: PR2060F0 Issue: 1.0 RESTRICTED – COMMERCIAL Users Manual TruLink Page: 10(37) When the logon procedure starts the unit will try to logon to the Master of the network. A successfully logon to a network is announced to the user by SYNVOICE message ”LOG ON OK”. If no network is available a “NEG RESPONS” sound, 2.3.8.8, is heard and then a “NO SERVICE” tone, 2.3.8.8, is repeated until next logon attempt. If logon fails due to mismatch of system configuration SYNVOICE message “CONFIGURATION ERROR” is heard in the headset and then the “NO SERVICE” tone is turned on until next logon try. The unit tries to logon for a configurable time and then power is automatically turned off. The user can access the start menu and change settings either until the unit successfully logs on to the network or until power down. 2.3.4 Normal menu When the unit has logged on or started a network the user can access the normal menu with the M key. It is configurable which modes should be included in the normal menu but the modes in the normal menu can at most be: q DESTINATION [list] – if connected to external connections q CHANNEL [channel list] q VOX [on/off] q UNIT MODE [master/slave] q USER TYPE [list] q KEY LOCK [on/off] q LED [on/off/nvg/timer] q ORDER VOX [on/off] q ORDER POWER OFF q ORDER SLEEP MODE q ORDER MERGE CHANNEL [channel list] q ORDER CHANNEL [channel list] q ORDER RELAY [on/off] q ORDER CHANGE MASTER q ORDER SYNCHRONIZE AP The M key is used for cycling between the modes in the menu and * is used for changing the settings of the selected mode. When the menu has been accessed PTT is used for confirming the settings. When a setting has been confirmed a “CONFIRMED” tone is heard in the headset and the unit exits the menu. If no action is taken, when the menu has been accessed, within a configurable time the unit exits the menu again, a “MENU EXIT” tone is then generated. Mode DESTINATION will only be available if the unit has access to any external connections, DESTINATION is then the default mode and can be changed directly with *. I.e. the menu does not have to be accessed to change the DESTINATION setting. If no external connections are available pressing * has no effect when the menu has not been accessed.](https://usermanual.wiki/Telephonics/SRR300ME/User-Guide-479323-Page-10.png)
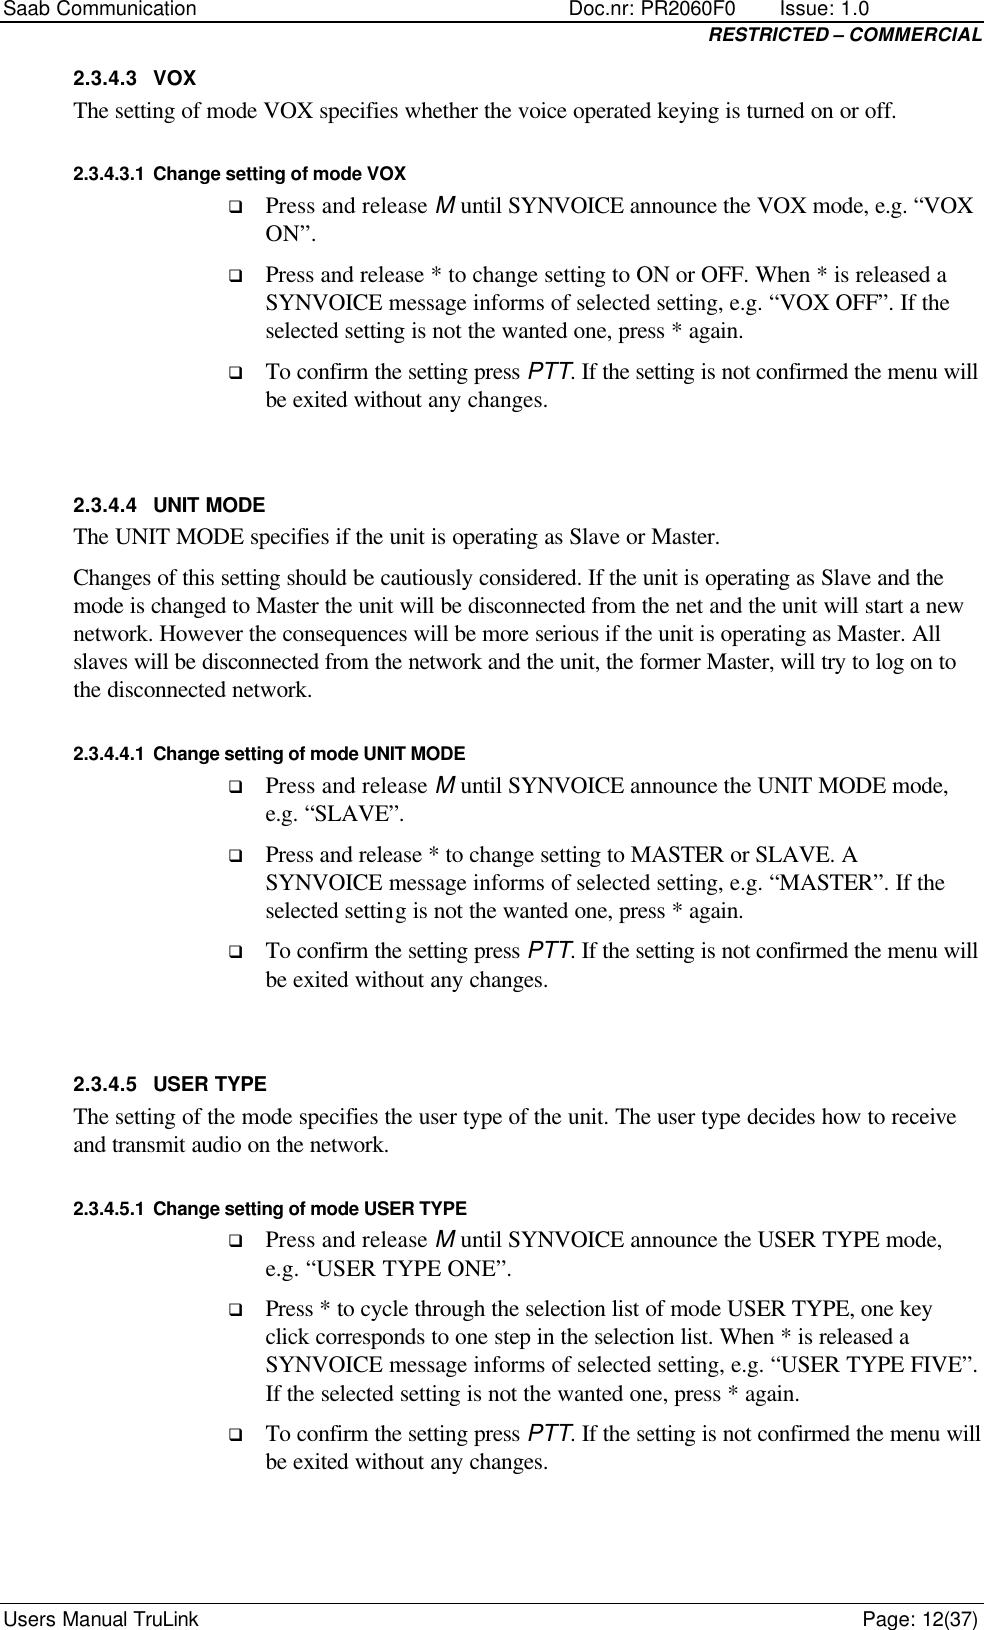
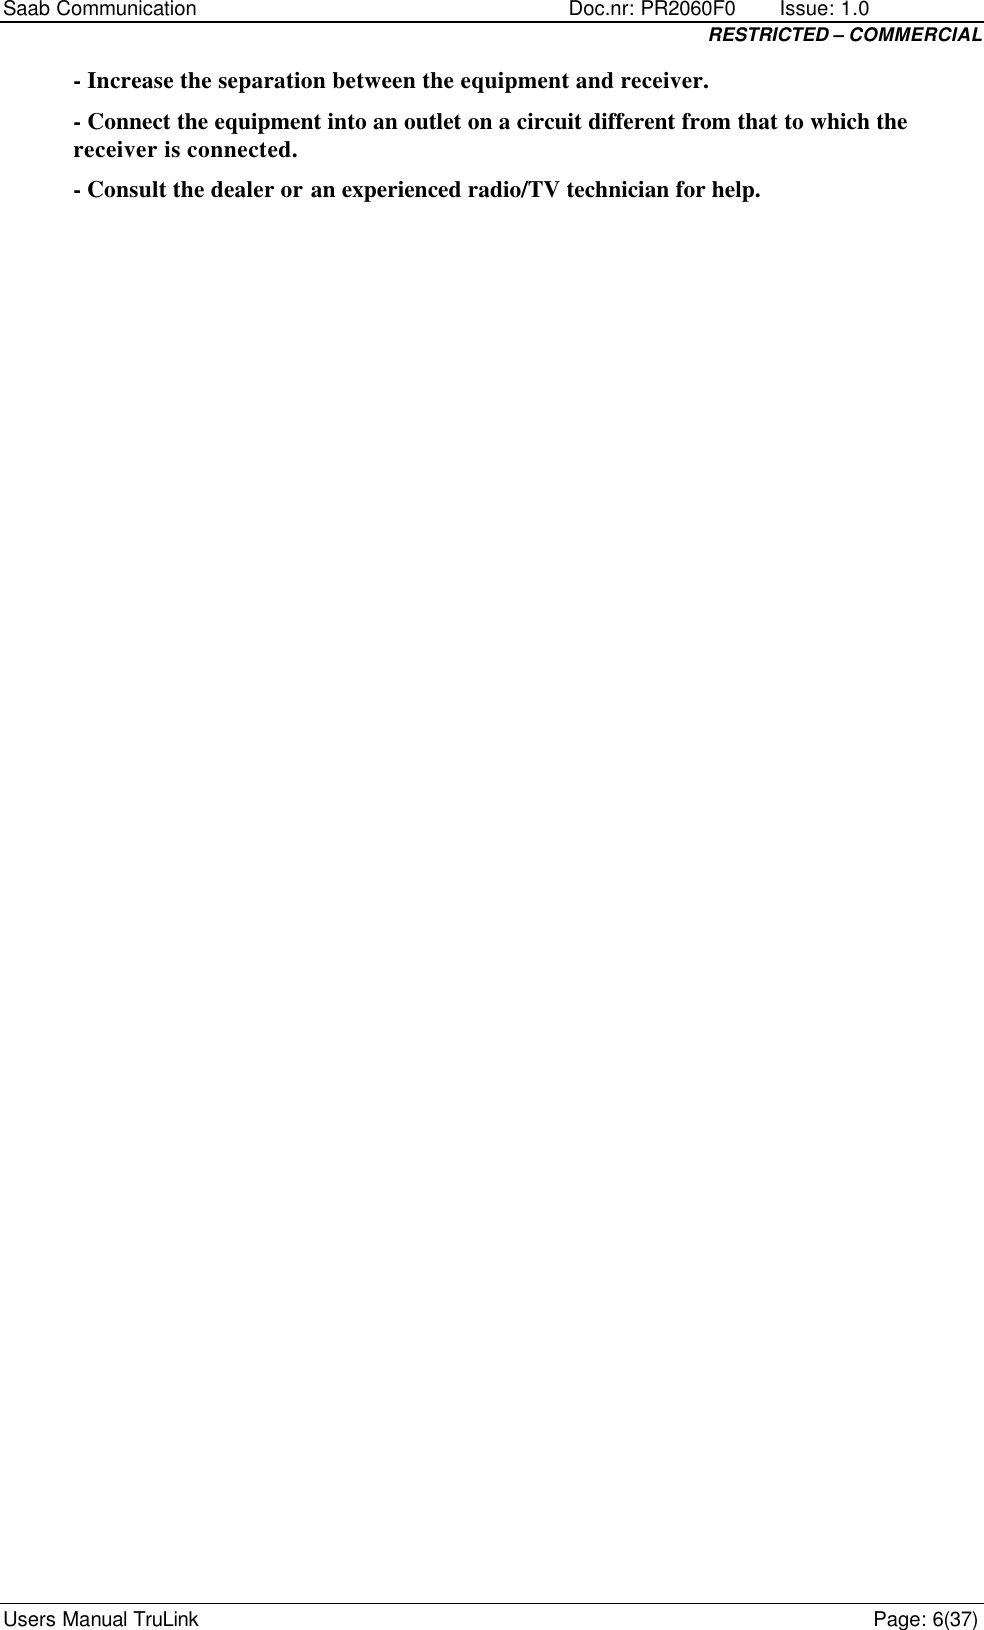
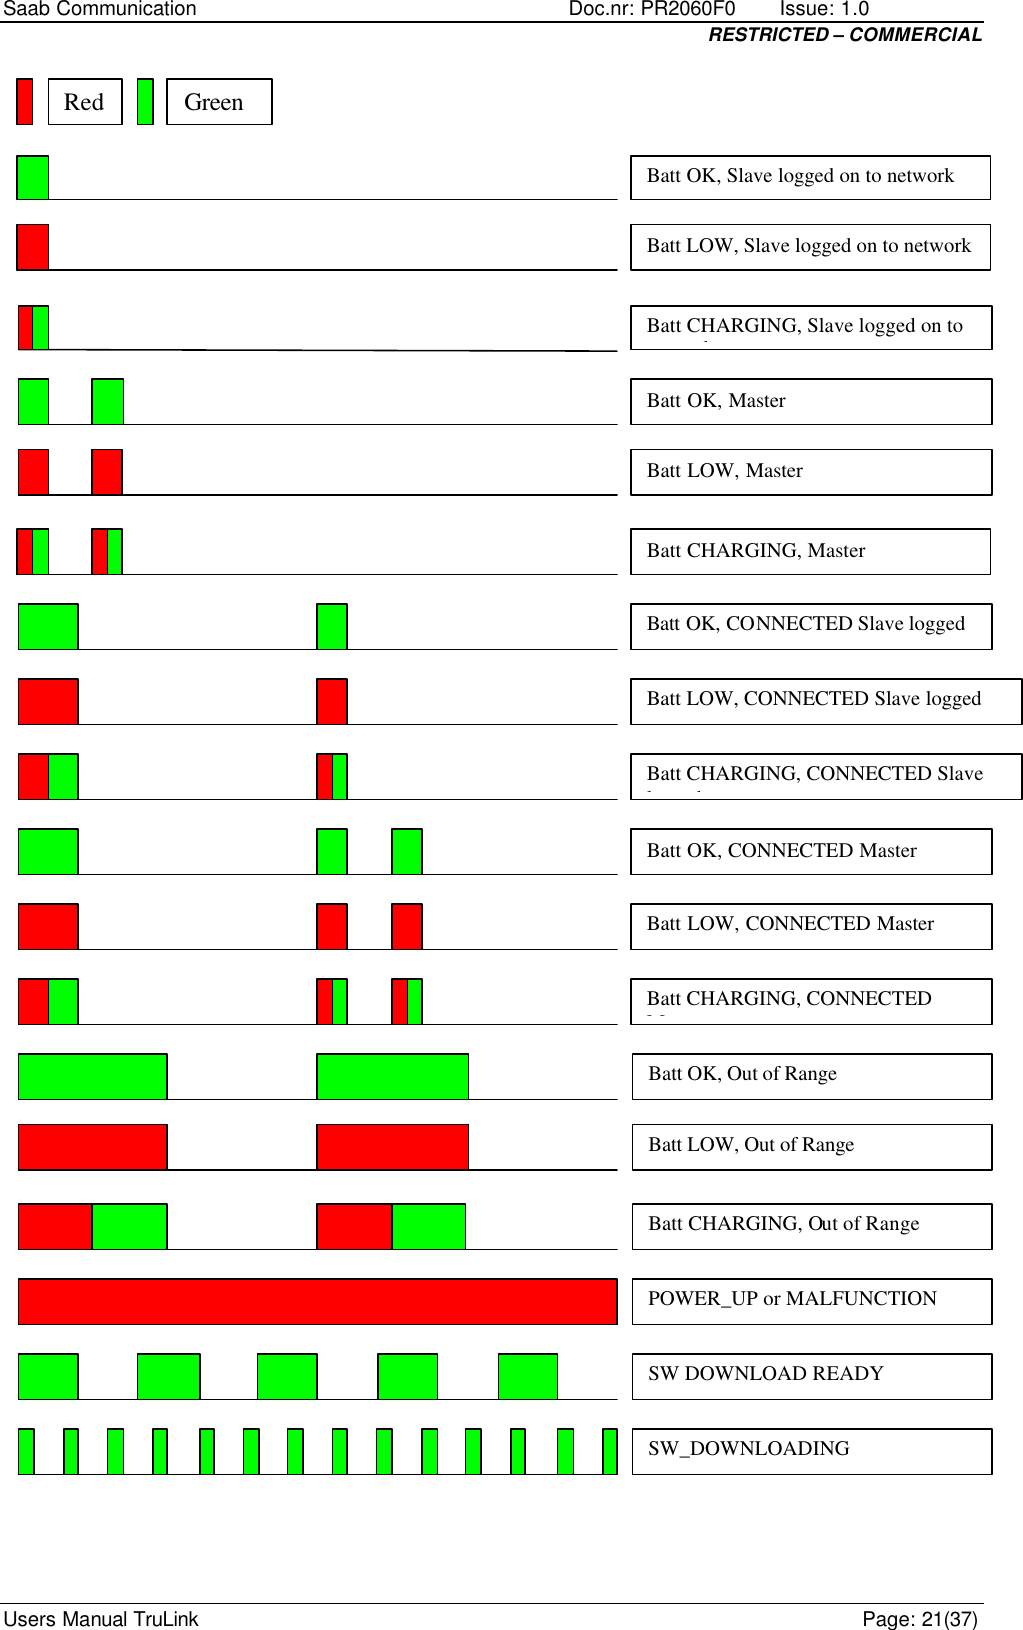
![Saab Communication Doc.nr: PR2060F0 Issue: 1.0 RESTRICTED – COMMERCIAL Users Manual TruLink Page: 20(37) 2.3.8.7 Summary of LED indications The LED indicates status according to the table: Status Colour On time [ms] Off time [ms] BATT_OK, Slave logged on to network GREEN 100 1900 LOW_BATT, Slave logged on to network RED 100 1900 CHARGE_BATT, Slave logged on to network RED+GREEN 50+50 1900 NORMAL, Master logged on to network GREEN 100/100 150/1650 LOW_BATT, Master logged on to network RED 100/100 150/1650 CHARGE_BATT, logged on to network RED+GREEN 50+50/50+50 150/1650 CONNECTED_BATT_OK, Slave connected to airplane etc. GREEN 200/100 800/900 CONNECTED_LOW_BATT, Slave connected and low battery RED 200/100 800/900 CONNECTED_CHARGE, Slave connected and charging battery RED+GREEN 100+100 / 50+50 800/900 CONNECTED_BATT_OK, Master connected to airplane etc. GREEN 200/100/100 800 / 150 / 650 CONNECTED_LOW_BATT, connected and low battery RED 200/100/100 800 / 150 / 650 CONNECTED_CHARGE, connected and charging battery RED+GREEN 100+100 / 50+50 / 50 + 50 800 / 150 / 650 OUT_OF_RANGE, normal battery GREEN 500 500 OUT_OF_RANGE, low battery RED 500 500 OUT_OF_RANGE, charging battery RED+GREEN 250+250 500 POWER_UP_BOOT RED 1000 0 POWER_UP RED 1000 0 MALFUNCTION (BIT failure, fatal error) RED 1000 0 SW_DOWNLOAD_READY GREEN 200 200 SW_DOWNLOADING GREEN 10 100](https://usermanual.wiki/Telephonics/SRR300ME/User-Guide-479323-Page-20.png)

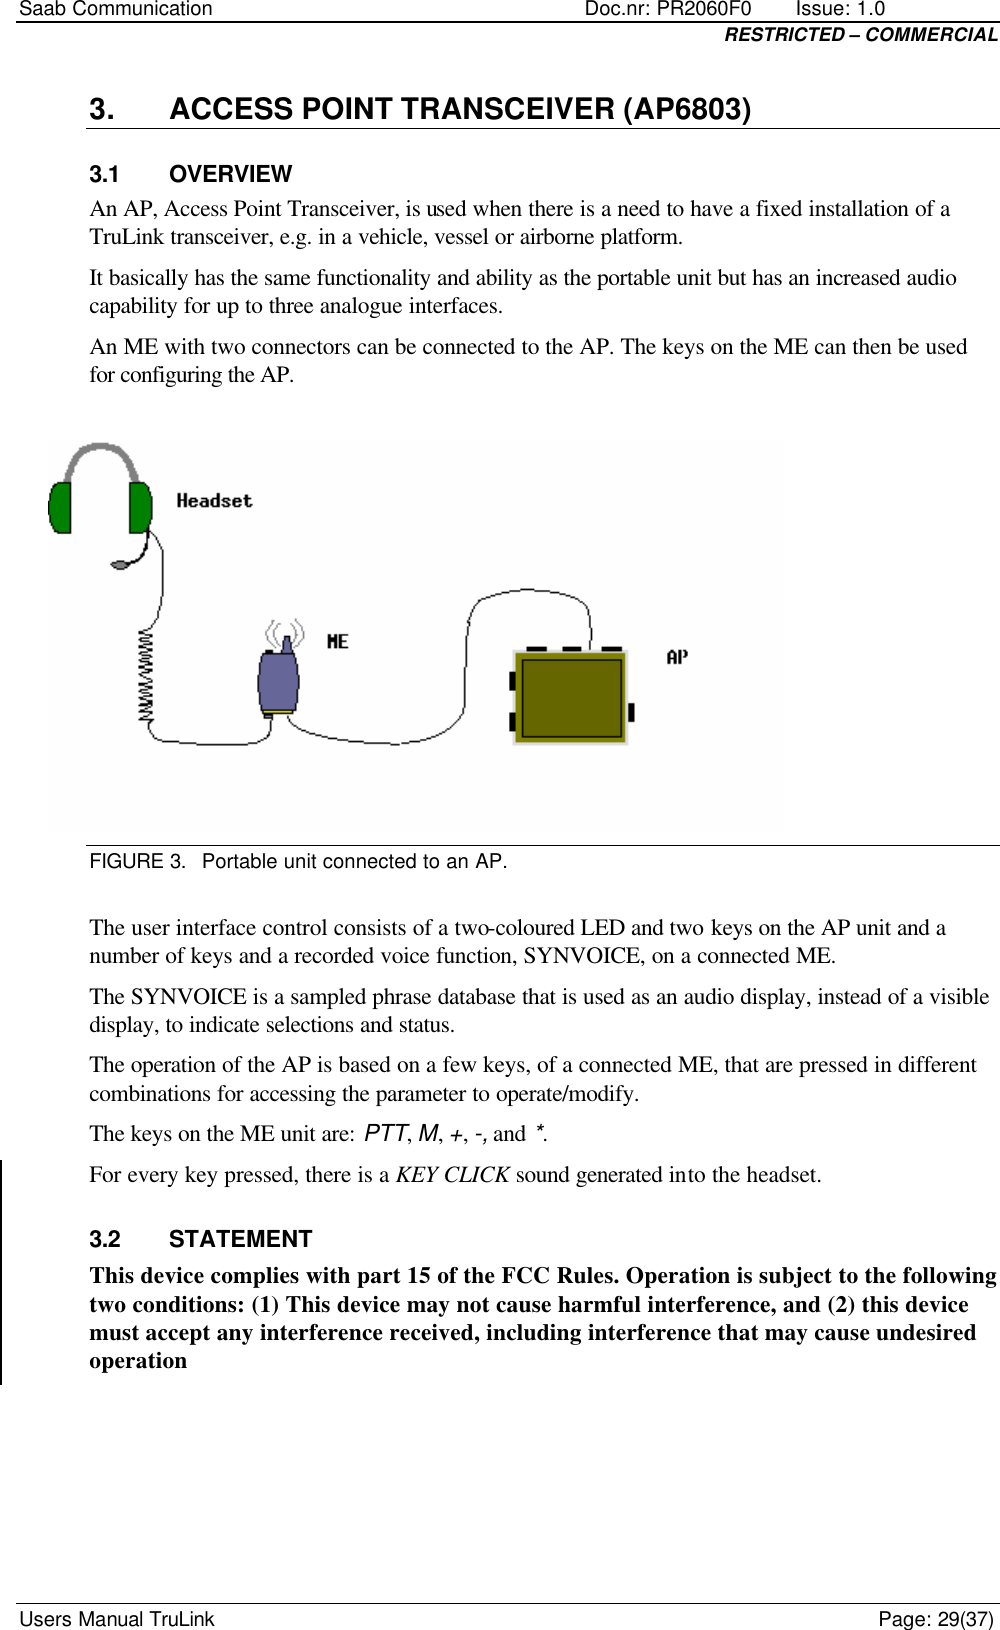
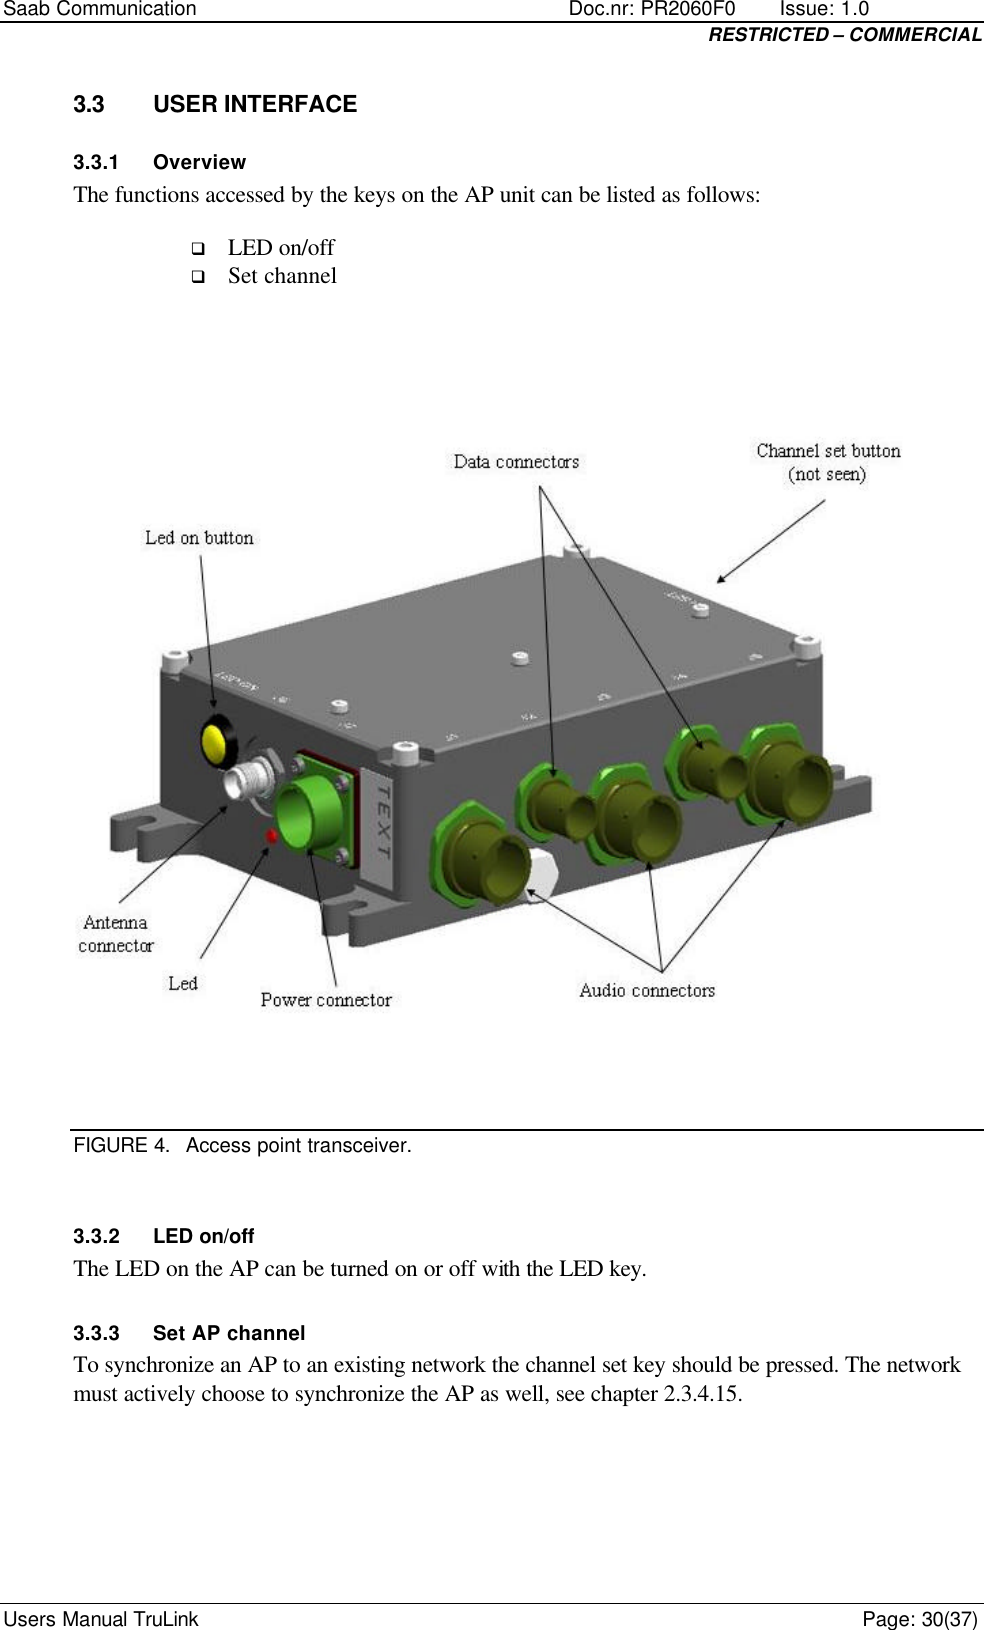
![Saab Communication Doc.nr: PR2060F0 Issue: 1.0 RESTRICTED – COMMERCIAL Users Manual TruLink Page: 31(37) 3.3.4 Menu setting of AP When an ME unit is connected to an AP the user can control the menu and mode selections of the AP with the keys of the ME. The control is basically the same as controlling a stand-alone ME except for some not available functions e.g. no transmission request with the PTT key. 3.3.4.1 Start menu of connected AP When AP unit is powered on the user enters the start menu. The selected items in the start menu are listed by the SYNVOICE function. It is configurable which modes should be included in the start menu but the modes in the start menu can at most be: q CHANNEL [channel list] q UNIT MODE [master/slave] Key PTT is used for confirming settings. To browse through the menu the M key is used and the * key is used to change a setting. If the start menu looks like the list above M is pressed one time to select UNIT MODE, to change the settings of mode UNIT MODE the * key is used. If PTT is pressed the changed setting is saved and the SYNVOICE function again lists the settings in the menu. If the setting is not confirmed within a configurable time the setting is changed back to default mode. If the user any time in the start menu presses PTT when no changes has been made to the settings since last time they were listed, the logon procedure starts immediately. The logon procedure will also be activated if no action is taken within a configurable time; the unit then starts to logon with the settings listed last time. A successful logon is announced with SYNVOICE message “ACCESS POINT”. If UNIT MODE is included in the start menu the user can choose to either start a new network as a Master, 3.3.4.1.1, or to logon to an existing network as a Slave, 3.3.4.1.2. 3.3.4.1.1 Starting a network To start a new network UNIT MODE must be set to “MASTER”. If the default setting is “SLAVE” the setting is changed with keys M and * and confirmed by pressing PTT. When the logon procedure starts the unit will start a new network with the selected channel in the start menu. A successfully started network is announced to the user by SYNVOICE message ”ACCESS POINT”. 3.3.4.1.2 Logging on to a network To be able to logon to an existing network UNIT MODE must be set to “SLAVE”, there can only be one “MASTER” in a network. The network can be selected by the mode “CHANNEL”, the Slave must have same channel number as the Master of the network. When the logon procedure starts the unit will try to logon to the Master of the network. A successfully logon to a network is announced to the user by SYNVOICE message ”ACCESS POINT”. If no network is available a “NEG RESPONS” sound, 2.3.8.8, is heard and then a “NO SERVICE” tone, 2.3.8.8, is repeated until next logon try. If logon fails due to mismatch of system configuration SYNVOICE message “CONFIGURATION ERROR” is heard in the headset and then the “NO SERVICE” tone is turned on until next logon try.](https://usermanual.wiki/Telephonics/SRR300ME/User-Guide-479323-Page-31.png)
![Saab Communication Doc.nr: PR2060F0 Issue: 1.0 RESTRICTED – COMMERCIAL Users Manual TruLink Page: 32(37) The unit tries to logon until it succeeds. The user can access the start menu and change settings until the unit successfully logs on to the network. 3.3.4.2 Normal menu of connected AP When the unit has logged on or started a network the user can access the normal menu with the M key. It is configurable which modes should be included in the normal menu but the modes in the normal menu can at most be: q CHANNEL [channel list] q UNIT MODE [master/slave] The M key is used for cycling between the modes in the menu and * is used for changing the settings of the selected mode. PTT is used for confirming the settings. When a setting has been confirmed a “CONFIRMED” tone is heard in the headset and the unit exits the menu. If no action is taken, within a configurable time, when the menu has been accessed the unit exits the menu again, a “MENU EXIT” tone is then generated. Pressing * or PTT has no effect when the menu has not been accessed. 3.3.4.2.1 Mode CHANNEL When the CHANNEL setting is changed the unit enters the start menu and a new logon process is started. The unit will try to start/connect to a new network with the specified channel. Changing channel when the unit is master of the network is not recommended since the action will have serious effects for all slaves logged on to the network, all units will be disconnected from the network. 3.3.4.2.1.1 Change setting of mode CHANNEL q Press and release M until SYNVOICE announce the CHANNEL mode, e.g. “CHANNEL ONE”. q Press and release * to step through the channel list. If * is hold down for more than 0.5 seconds a “LONG KEY CLICK”, 2.3.8.8, will be heard instead of the ordinary key click. One long key click corresponds to ten steps in the channel list. When * is released a SYNVOICE message informs of selected setting, e.g. “CHANNEL THREE ONE”. If the selected channel is not the wanted one, press * again. q To confirm the selected channel press PTT. If the setting is not confirmed the menu will be exited without any changes. 3.3.4.2.2 Mode UNIT MODE UNIT MODE specifies if the unit is operating as Slave or Master. Changing’s of this setting should be cautiously considered. If the unit is operating as Slave and the mode is changed to Master the unit will be disconnected from the net and the unit will start a new network. However the consequences will be more serious if the unit is operating as Master. All slaves will be disconnected from the network and the unit, the former Master, will try to log on to the disconnected network.](https://usermanual.wiki/Telephonics/SRR300ME/User-Guide-479323-Page-32.png)