Telephonics SRR300ME Short Range Radio User Manual pr2060f0 med FCC text
Telephonics Sweden AB Short Range Radio pr2060f0 med FCC text
User Manual

Saab Communication
Department Reference Issue date Issue index Page Document Id
System Ida Hågstrand 2004-02-24 1.0 FCC-text 1(37) PR2060F0
RESTRICTED – COMMERCIAL
Page: 1(37)
Users Manual TruLink

Saab Communication
Users Manual TruLink Page: 2(37)
DOCUMENT COMPATIBILITY
Product/Project Revisions/Versions
PR2060 REV A
CHANGE HISTORY
Issue Issue date Issued by Approved by Change Description
1.0 2004-02-24 I Hågstrand M Eriksson 1st revision

Saab Communication Doc.nr: PR2060F0 Issue: 1.0
RESTRICTED – COMMERCIAL
Users Manual TruLink Page: 3(37)
Table of contents
1. GENERAL.................................................................................................................................................................................5
1.1 SCOPE................................................................................................................................................................................5
1.2 DEFINITIONS AND ABBREVIATIONS.............................................................................................................................5
1.3 REFERENCES.....................................................................................................................................................................5
1.4 STATEMENT ....................................................................................................................................................................5
1.5 CAUTION...........................................................................................................................................................................5
1.6 NOTE..................................................................................................................................................................................5
2. PORTABLE UNIT (ME6820)................................................................................................................................................7
2.1 OVERVIEW ........................................................................................................................................................................7
2.2 STATEMENT ....................................................................................................................................................................7
2.3 USER INTERFACE .............................................................................................................................................................8
2.3.1 Overview..................................................................................................................................................................8
2.3.2 Power ON/OFF.......................................................................................................................................................9
2.3.3 Start menu ...............................................................................................................................................................9
2.3.3.1 Starting a network ..............................................................................................................................................9
2.3.3.2 Logging on to a network...................................................................................................................................9
2.3.4 Normal menu........................................................................................................................................................ 10
2.3.4.1 DESTINATION.................................................................................................................................................11
2.3.4.1.1 Change setting of mode DESTINATION.....................................................................................................11
2.3.4.2 CHANNEL.........................................................................................................................................................11
2.3.4.2.1 Change setting of mode CHANNEL.............................................................................................................11
2.3.4.3 VOX....................................................................................................................................................................12
2.3.4.3.1 Change setting of mode VOX .......................................................................................................................12
2.3.4.4 UNIT MODE.....................................................................................................................................................12
2.3.4.4.1 Change setting of mode UNIT MODE.........................................................................................................12
2.3.4.5 USER TYPE.......................................................................................................................................................12
2.3.4.5.1 Change setting of mode USER TYPE...........................................................................................................12
2.3.4.6 KEY LOCK.........................................................................................................................................................13
2.3.4.6.1 Turn on key lock...........................................................................................................................................13
2.3.4.7 LED .....................................................................................................................................................................13
2.3.4.7.1 Change setting of mode LED ........................................................................................................................13
2.3.4.8 ORDER VOX .....................................................................................................................................................13
2.3.4.8.1 Turn on/off all units VOX ............................................................................................................................14
2.3.4.9 ORDER POWER OFF.......................................................................................................................................14
2.3.4.9.1 Turn off all units power................................................................................................................................14
2.3.4.10 ORDER SLEEP MODE................................................................................................................................14
2.3.4.10.1 Order “sleep mode” ....................................................................................................................................14
2.3.4.10.2 Wake up from “sleep mode”.......................................................................................................................14
2.3.4.11 ORDER MERGE CHANNEL.......................................................................................................................15
2.3.4.11.1 Merge two networks...................................................................................................................................15
2.3.4.12 ORDER CHANNEL......................................................................................................................................15
2.3.4.12.1 Change channel of the network...................................................................................................................16
2.3.4.13 ORDER RELAY............................................................................................................................................16
2.3.4.13.1 Change relay................................................................................................................................................16
2.3.4.14 ORDER CHANGE MASTER......................................................................................................................16
2.3.4.14.1 Change master.............................................................................................................................................17
2.3.4.15 ORDER SYNCHRONIZE AP......................................................................................................................17
2.3.4.15.1 Synchronize AP..........................................................................................................................................17
2.3.5 Monitor mode ...................................................................................................................................................... 17

Saab Communication Doc.nr: PR2060F0 Issue: 1.0
RESTRICTED – COMMERCIAL
Users Manual TruLink Page: 4(37)
2.3.6 Keying of transmission....................................................................................................................................... 18
2.3.7 Volume adjustment.............................................................................................................................................. 18
2.3.8 Status indications............................................................................................................................................... 18
2.3.8.1 Out of range ......................................................................................................................................................18
2.3.8.2 Low battery warning........................................................................................................................................19
2.3.8.3 Transmission rejection ....................................................................................................................................19
2.3.8.4 Transmission indication..................................................................................................................................19
2.3.8.5 Key-click............................................................................................................................................................19
2.3.8.6 Power-on BIT failure ........................................................................................................................................19
2.3.8.7 Summary of LED indications ..........................................................................................................................20
2.3.8.8 Summary of available sounds.........................................................................................................................22
2.3.8.9 Summary of available SYNVOICE phrases ...................................................................................................23
3. ACCESS POINT TRANSCEIVER (AP6803)..................................................................................................................29
3.1 OVERVIEW ......................................................................................................................................................................29
3.2 STATEMENT ..................................................................................................................................................................29
3.3 USER INTERFACE ...........................................................................................................................................................30
3.3.1 Overview............................................................................................................................................................... 30
3.3.2 LED on/off............................................................................................................................................................. 30
3.3.3 Set AP channel .................................................................................................................................................... 30
3.3.4 Menu setting of AP.............................................................................................................................................. 31
3.3.4.1 Start menu of connected AP...........................................................................................................................31
3.3.4.1.1 Starting a network.........................................................................................................................................31
3.3.4.1.2 Logging on to a network................................................................................................................................31
3.3.4.2 Normal menu of connected AP......................................................................................................................32
3.3.4.2.1 Mode CHANNEL ........................................................................................................................................32
3.3.4.2.2 Mode UNIT MODE....................................................................................................................................32
3.3.5 Status indications............................................................................................................................................... 33
3.3.5.1 Connected AP Out of range ...........................................................................................................................33
3.3.5.2 Connected AP Key-click.................................................................................................................................33
3.3.5.3 Power-on BIT failure ........................................................................................................................................33
4. SUPPORT STATION (SS6819)........................................................................................................................................34
4.1 OVERVIEW ......................................................................................................................................................................34
4.2 STATEMENT ..................................................................................................................................................................35
4.3 USER INTERFACE ...........................................................................................................................................................36
4.3.1 Overview............................................................................................................................................................... 36
4.3.2 Power On/Off........................................................................................................................................................ 36
4.3.3 Connect ME’s ...................................................................................................................................................... 36
4.3.4 Set channel........................................................................................................................................................... 37
4.3.5 LED indications.................................................................................................................................................. 37

Saab Communication Doc.nr: PR2060F0 Issue: 1.0
RESTRICTED – COMMERCIAL
Users Manual TruLink Page: 5(37)
1. GENERAL
1.1 SCOPE
This document is the users manual for the TruLink system. The manual explains how to handle the
portable transceiver, ME6820, the fixed transceiver, AP6803, and the support station, SS6819,
included in the system.
The technical system description of the TruLink system can be found in [1].
1.2 DEFINITIONS AND ABBREVIATIONS
Definitions, abbreviations and acronyms used in the document are listed below:
q AP Access Point Transceiver
q ME Mobile Equipment
q NVG Night Vision Goggles
q PTT Push To Talk
q SS Support Station
q SYNVOICE Synthetic Voice (recorded voice message)
q VOX Voice Operated Keying
1.3 REFERENCES
[ 1 ] System Description (Saab Communication, PR2060H1)
1.4 STATEMENT
This device complies with part 15 of the FCC Rules. Operation is subject to the following
two conditions: (1) This device may not cause harmful interference, and (2) this device
must accept any interference received, including interference that may cause undesired
operation.
1.5 CAUTION
Changes or modifications not expressly approved by the party responsible for
compliance could void the user's authority to operate the equipment.
1.6 NOTE
This equipment has been tested and found to comply with the limits for a Class B digital
device, pursuant to part 15 of the FCC Rules. These limits are designed to provide
reasonable protection against harmful interference in a residential installation. This
equipment generates, uses and can radiate radio frequency energy and, if not installed
and used in accordance with the instructions, may cause harmful interference to radio
communications. However, there is no guarantee that interference will not occur in a
particular installation. If this equipment does cause harmful interference to radio or
television reception, which can be determined by turning the equipment off and on, the
user is encouraged to try to correct the interference by one or more of the following
measures:
- Reorient or relocate the receiving antenna.

Saab Communication Doc.nr: PR2060F0 Issue: 1.0
RESTRICTED – COMMERCIAL
Users Manual TruLink Page: 6(37)
- Increase the separation between the equipment and receiver.
- Connect the equipment into an outlet on a circuit different from that to which the
receiver is connected.
- Consult the dealer or an experienced radio/TV technician for help.

Saab Communication Doc.nr: PR2060F0 Issue: 1.0
RESTRICTED – COMMERCIAL
Users Manual TruLink Page: 7(37)
2. PORTABLE UNIT (ME6820)
2.1 OVERVIEW
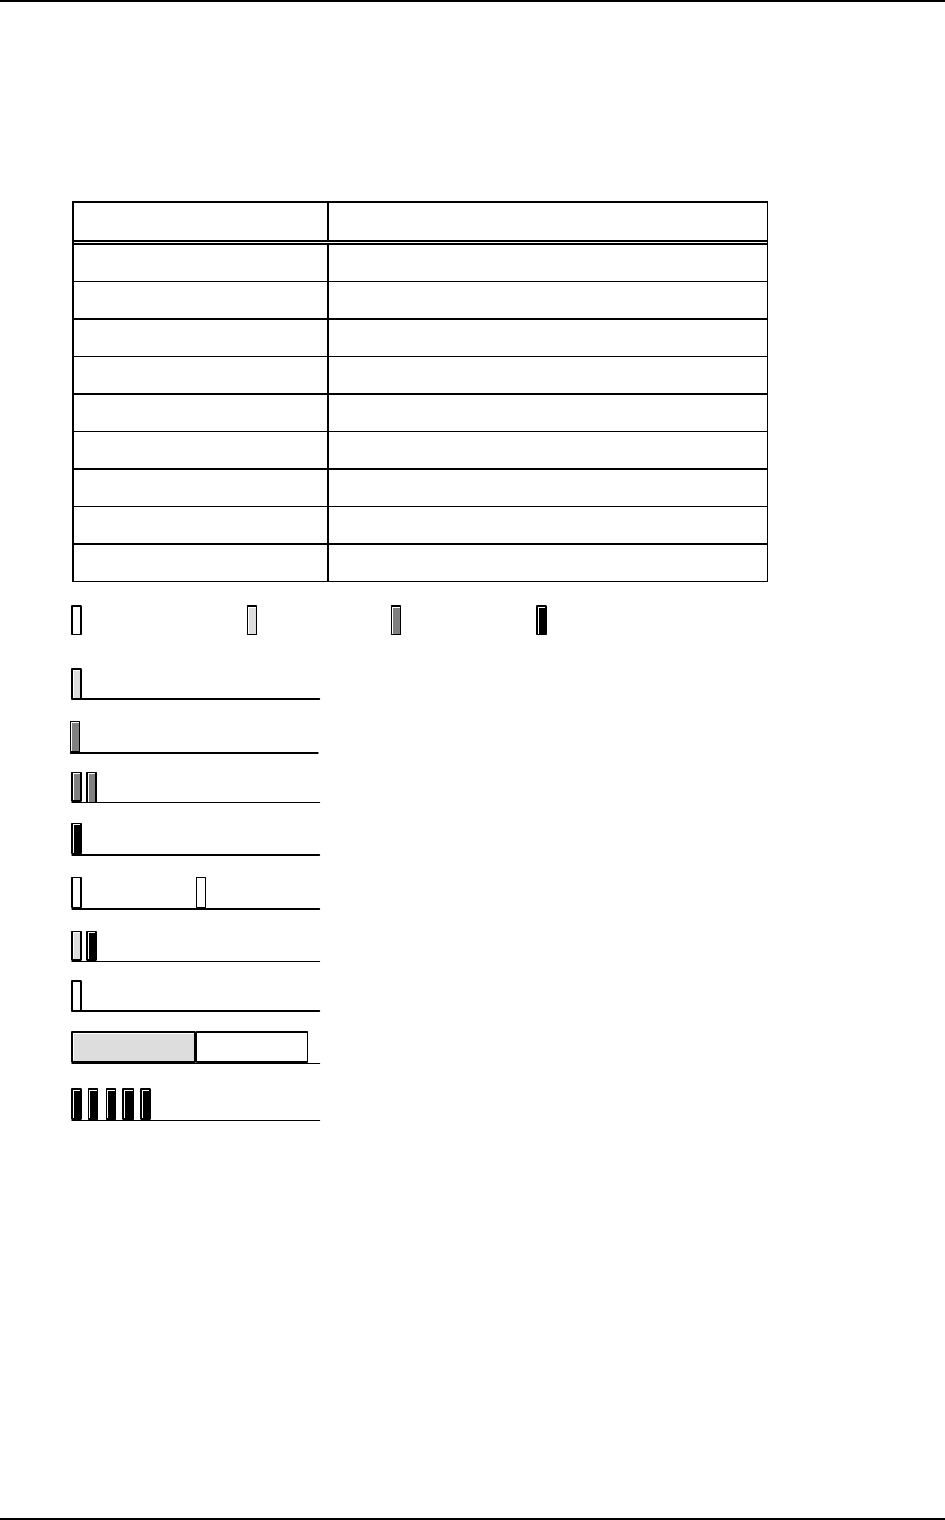
The portable radio station (ME6820) is used together with a headset for audio input/output.
ME
Mobile
Equipment
Headset
FIGURE 1. Portable unit and headset.
The user interface control consists of a number of keys and a two-coloured LED on the ME unit
and a recorded voice function, SYNVOICE.
The SYNVOICE is a sampled phrase database that is used as an audio display, instead of a visible
display, to indicate selections and status.
The operation of the ME is based on a few keys that are pressed in different combinations for
accessing the parameter to operate/modify.
The keys on the ME unit are: PTT, M, +, -, and *.
For every key pressed, there is a KEY CLICK sound generated into the headset.
2.2 STATEMENT
This device complies with part 15 of the FCC Rules. Operation is subject to the following
two conditions: (1) This device may not cause harmful interference, and (2) this device
must accept any interference received, including interference that may cause undesired
operation

Saab Communication Doc.nr: PR2060F0 Issue: 1.0
RESTRICTED – COMMERCIAL
Users Manual TruLink Page: 8(37)
2.3 USER INTERFACE
2.3.1 Overview
The functions accessed by the keys on the ME unit can be listed as follows:
q Power control
q Transmitter keying
q Volume control for headset
q Menu and mode selection control
Volume
up/down
buttons
Mode button
PushToTalk button
Menu
selection up
button
Two
coloured
LED
PTT
M
*
+
-
FIGURE 2. Portable unit.
The following items are denoted in the picture:
q PTT
q M key for mode selection
q +/- keys for volume adjustment
q * key for menu selection
q Power LED for power and battery indication and operator type indicator

Saab Communication Doc.nr: PR2060F0 Issue: 1.0
RESTRICTED – COMMERCIAL
Users Manual TruLink Page: 9(37)
2.3.2 Power ON/OFF
To switch the power on or off, the + and - keys are used together and held for about 1 second until
the LED is steady green. When the unit has been powered on the user can start a network or
logon to a network.
2.3.3 Start menu
When ME unit is powered on the user enters the start menu. The selected items in the start menu
are listed by the SYNVOICE function. It is configurable which modes should be included in the
start menu but the modes in the start menu can at most be:
q CHANNEL [channel list]
q UNIT MODE [master/slave]
q USER TYPE [list]
q ORDER SYNCHRONISE AP
In the start menu key PTT is used for confirming settings. To browse through the menu the M key
is used and the * key is used to change a setting. If the start menu looks like the list above M is
pressed twice to select USER TYPE, to change the settings of mode USER TYPE the * key is
used. If PTT is pressed the changed setting is saved and the SYNVOICE function again lists the
settings in the menu. If the setting is not confirmed within a configurable time the setting is changed
back to default mode.
If the user any time in the start menu presses PTT when no changes have been done to the
settings since last time they were listed the logon procedure starts immediately. The logon
procedure will also be activated if no action is taken within a configurable time, the unit then starts
to logon with the default settings listed.
A successful logon is announced with SYNVOICE message “LOG ON OK”. If the unit has
received information of external connections during the logon procedure the user will be notified
with SYNVOICE message “EXTERNAL AVAILABEL”. If destination by default is one of the
external connections, 2.3.4.1, this is announced by message “EXTERNAL” plus the name of the
external.
If UNIT MODE is included in the start menu the user can choose to either start a new network as
a Master, 2.3.3.1, or to logon to an existing network as a Slave, 2.3.3.2.
2.3.3.1 Starting a network
To start a new network UNIT MODE must be set to “MASTER”. If the default setting is
“SLAVE” the setting is changed with keys M and * and confirmed by pressing PTT. When the
logon procedure starts the unit will start a new network with the selected channel in the start menu.
A successfully started network is announced to the user by SYNVOICE message ”LOG ON
OK”.
2.3.3.2 Logging on to a network
To be able to logon to an existing network UNIT MODE must be set to “SLAVE”, there can only
be one “MASTER” in a network. The network can be selected by the mode “CHANNEL”, the
slave must have same channel number as the master of the network.

Saab Communication Doc.nr: PR2060F0 Issue: 1.0
RESTRICTED – COMMERCIAL
Users Manual TruLink Page: 10(37)
When the logon procedure starts the unit will try to logon to the Master of the network. A
successfully logon to a network is announced to the user by SYNVOICE message ”LOG ON
OK”.
If no network is available a “NEG RESPONS” sound, 2.3.8.8, is heard and then a “NO
SERVICE” tone, 2.3.8.8, is repeated until next logon attempt.
If logon fails due to mismatch of system configuration SYNVOICE message “CONFIGURATION
ERROR” is heard in the headset and then the “NO SERVICE” tone is turned on until next logon
try.
The unit tries to logon for a configurable time and then power is automatically turned off. The user
can access the start menu and change settings either until the unit successfully logs on to the
network or until power down.
2.3.4 Normal menu
When the unit has logged on or started a network the user can access the normal menu with the M
key. It is configurable which modes should be included in the normal menu but the modes in the
normal menu can at most be:
q DESTINATION [list] – if connected to external connections
q CHANNEL [channel list]
q VOX [on/off]
q UNIT MODE [master/slave]
q USER TYPE [list]
q KEY LOCK [on/off]
q LED [on/off/nvg/timer]
q ORDER VOX [on/off]
q ORDER POWER OFF
q ORDER SLEEP MODE
q ORDER MERGE CHANNEL [channel list]
q ORDER CHANNEL [channel list]
q ORDER RELAY [on/off]
q ORDER CHANGE MASTER
q ORDER SYNCHRONIZE AP
The M key is used for cycling between the modes in the menu and * is used for changing the
settings of the selected mode. When the menu has been accessed PTT is used for confirming the
settings. When a setting has been confirmed a “CONFIRMED” tone is heard in the headset and
the unit exits the menu.
If no action is taken, when the menu has been accessed, within a configurable time the unit exits
the menu again, a “MENU EXIT” tone is then generated.
Mode DESTINATION will only be available if the unit has access to any external connections,
DESTINATION is then the default mode and can be changed directly with *. I.e. the menu does
not have to be accessed to change the DESTINATION setting. If no external connections are
available pressing * has no effect when the menu has not been accessed.

Saab Communication Doc.nr: PR2060F0 Issue: 1.0
RESTRICTED – COMMERCIAL
Users Manual TruLink Page: 11(37)
2.3.4.1 DESTINATION
The DESTINATION mode is available if the user has access to any external connections. The
setting of the mode specifies where the audio from a PTT request should be routed. Changing the
setting alters destinations of the audio from the unit when PTT is used.
2.3.4.1.1 Change setting of mode DESTINATION
q If the menu has not been accessed this point can be skipped. Press and
release M until SYNVOICE announce the DESTINATION mode, e.g.
“DESTINATION NORMAL”.
q Press * to cycle through the selection list of mode DESTINATION, one key
click corresponds to one step in the selection list. When * is released a
SYNVOICE message informs of selected setting, e.g. “DESTINATION
EXTERNAL FIVE”. If the selected setting is not the wanted one, press *
again.
q To confirm the setting press PTT. If the setting is not confirmed the menu will
be exited without any changes.
2.3.4.2 CHANNEL
When the CHANNEL setting is changed the unit enters the start menu and a new logon process is
started. The unit will try to start/connect to a new network with the specified channel.
Changing channel when the unit is master of the network is not recommended since the action will
have serious effects for all slaves logged on to the network, all units will be disconnected from the
network. If all users in the network should change channel MERGE CHANNEL, 2.3.4.11, or
CHANGE CHANNEL, 2.3.4.12, should be used instead.
2.3.4.2.1 Change setting of mode CHANNEL
q Press and release M until SYNVOICE announce the CHANNEL mode, e.g.
“CHANNEL ONE”.
q Press and release * to step through the channel list. If * is held down for more
than 0.5 seconds a “LONG KEY CLICK”, 2.3.8.8, will be heard instead of
the ordinary key click. One long key click corresponds to ten steps in the
channel list. When * is released a SYNVOICE message informs of selected
setting, e.g. “CHANNEL THREE ONE”. If the selected channel is not the
wanted one, press * again.
q To confirm the selected channel press PTT. If the setting is not confirmed the
menu will be exited without any changes.

Saab Communication Doc.nr: PR2060F0 Issue: 1.0
RESTRICTED – COMMERCIAL
Users Manual TruLink Page: 12(37)
2.3.4.3 VOX
The setting of mode VOX specifies whether the voice operated keying is turned on or off.
2.3.4.3.1 Change setting of mode VOX
q Press and release M until SYNVOICE announce the VOX mode, e.g. “VOX
ON”.
q Press and release * to change setting to ON or OFF. When * is released a
SYNVOICE message informs of selected setting, e.g. “VOX OFF”. If the
selected setting is not the wanted one, press * again.
q To confirm the setting press PTT. If the setting is not confirmed the menu will
be exited without any changes.
2.3.4.4 UNIT MODE
The UNIT MODE specifies if the unit is operating as Slave or Master.
Changes of this setting should be cautiously considered. If the unit is operating as Slave and the
mode is changed to Master the unit will be disconnected from the net and the unit will start a new
network. However the consequences will be more serious if the unit is operating as Master. All
slaves will be disconnected from the network and the unit, the former Master, will try to log on to
the disconnected network.
2.3.4.4.1 Change setting of mode UNIT MODE
q Press and release M until SYNVOICE announce the UNIT MODE mode,
e.g. “SLAVE”.
q Press and release * to change setting to MASTER or SLAVE. A
SYNVOICE message informs of selected setting, e.g. “MASTER”. If the
selected setting is not the wanted one, press * again.
q To confirm the setting press PTT. If the setting is not confirmed the menu will
be exited without any changes.
2.3.4.5 USER TYPE
The setting of the mode specifies the user type of the unit. The user type decides how to receive
and transmit audio on the network.
2.3.4.5.1 Change setting of mode USER TYPE
q Press and release M until SYNVOICE announce the USER TYPE mode,
e.g. “USER TYPE ONE”.
q Press * to cycle through the selection list of mode USER TYPE, one key
click corresponds to one step in the selection list. When * is released a
SYNVOICE message informs of selected setting, e.g. “USER TYPE FIVE”.
If the selected setting is not the wanted one, press * again.
q To confirm the setting press PTT. If the setting is not confirmed the menu will
be exited without any changes.

Saab Communication Doc.nr: PR2060F0 Issue: 1.0
RESTRICTED – COMMERCIAL
Users Manual TruLink Page: 13(37)
2.3.4.6 KEY LOCK
If the key lock is turned on activating a key will generate SYNVOICE message “KEY LOCK
ON”, however Emergency PTT will still work correctly. The key lock is turned off by pressing M
and * in sequence.
2.3.4.6.1 Turn on key lock
q Press and release M until SYNVOICE announce the KEY LOCK mode, i.e.
“KEY LOCK OFF”.
q Press and release * once to turn on key lock. When * is released a
SYNVOICE message informs of selected setting, e.g. “KEY LOCK ON”. If
the selected setting is not the wanted one, press * again.
q To confirm the setting press PTT. If the setting is not confirmed the menu will
be exited without any changes.
2.3.4.7 LED
With this function a user can control the two coloured LED on the portable unit. The LED can be
set in normal mode, in high mode for intense sunlight, it can be turned off, it can be set in NVG
mode, or it can be turned off after a configurable time after power up.
2.3.4.7.1 Change setting of mode LED
q Press and release M until SYNVOICE announce the LED mode, e.g. “LED
NORMAL”.
q Press * to cycle through the selection list of mode LED, one key click
corresponds to one step in the selection list. When * is released a
SYNVOICE message informs of selected setting, e.g. “LED NVG”. If the
selected setting is not the wanted one, press * again.
q To confirm the setting press PTT. If the setting is not confirmed the menu will
be exited without any changes.
2.3.4.8 ORDER VOX
This function is used to turn on or off the VOX function of all units.
Users that are ordered to turn on/off the VOX are notified with SYNVOICE message “AUTO
VOX ON/OFF”.
When all units have obeyed to the order the order maker is notified with SYNVOICE message
“ORDER VOX OK”. If all units do not confirm the order the order maker is notified with
SYNVOICE message “ORDER VOX LOST”.
After a unit has answered to the order the user can override the order by manually turning on/off
the vox with mode VOX in the menu.

Saab Communication Doc.nr: PR2060F0 Issue: 1.0
RESTRICTED – COMMERCIAL
Users Manual TruLink Page: 14(37)
2.3.4.8.1 Turn on/off all units VOX
q Press and release M until SYNVOICE announce the ORDER VOX mode,
e.g. “ORDER VOX ON”.
q Press and release * to change setting to ON or OFF. A SYNVOICE message
informs of selected setting, e.g. “ORDER VOX OFF”. If the selected setting
is not the wanted one, press * again.
q To confirm the setting press PTT. If the setting is not confirmed the menu will
be exited without any changes.
2.3.4.9 ORDER POWER OFF
Using this order means that all units in the network will be turned off.
The ordered users are notified with SYNVOICE message “AUTO POWER OFF” and then
power will be turned off automatically.
When all units have obeyed to the order the order maker is notified with SYNVOICE message
“ORDER POWER OFF OK” and then the power of the unit is turned off automatically. If all units
do not confirm the order the order maker is notified with SYNVOICE message “ORDER
POWER OFF LOST” and then power will be turned off automatically anyway.
2.3.4.9.1 Turn off all units power
q Press and release M until SYNVOICE announce the ORDER POWER OFF
mode, i.e. “ORDER POWER OFF”.
q To confirm the order press PTT. If the order is not confirmed the menu will
be exited without any actions taken.
2.3.4.10 ORDER SLEEP MODE
Using this order means that all units in the network will enter sleep mode to save power.
The ordered users are notified with SYNVOICE message “AUTO SLEEP MODE” and then
sleep mode will be entered automatically.
When all units have obeyed to the order the order maker is notified with SYNVOICE message
“ORDER SLEEP MODE OK” and then the unit will enter sleep mode automatically. If all units do
not confirm the order the order maker is notified with SYNVOICE message “ORDER SLEEP
MODE LOST” and then the unit will enter sleep mode automatically anyway.
2.3.4.10.1 Order “sleep mode”
q Press and release M until SYNVOICE announce the ORDER SLEEP
MODE mode, i.e. “ORDER SLEEP MODE”.
q To confirm the order press PTT. If the order is not confirmed the menu will
be exited without any actions taken.
2.3.4.10.2 Wake up from “sleep mode”
Any user can “wake up” the network by pressing PTT or using the VOX function.

Saab Communication Doc.nr: PR2060F0 Issue: 1.0
RESTRICTED – COMMERCIAL
Users Manual TruLink Page: 15(37)
2.3.4.11 ORDER MERGE CHANNEL
With this function it is possible to merge two networks.
A user of one of the networks selects same channel as another network from the list in mode
ORDER MERGE CHANNEL. The order is sent to all users in the order makers network.
Upon reception of the order the units try to log on to the selected network as slaves. The ordered
users are notified with SYNVOICE message “AUTO MERGE CHANNEL” plus the channel
number of the other network.
When all ordered users have answered to the order the order maker is notified with SYNVOICE
message “ORDER MERGE CHANNEL OK” and then the unit tries to logon as slave to the other
network. If all units do not confirm the order the order maker is notified with SYNVOICE
message “ORDER MERGE CHANNEL LOST” and then the unit anyway tries to logon as slave
to the other network.
2.3.4.11.1 Merge two networks
q Press and release M until SYNVOICE announce the ORDER MERGE
CHANNEL mode, e.g. “ORDER MERGE CHANNEL ONE”.
q Press and release * to step through the channel list. If * is hold down for more
than 0.5 seconds a “LONG KEY CLICK”, 2.3.8.8, will be heard instead of
the ordinary key click. One long key click corresponds to ten steps in the
channel list. When * is released a SYNVOICE message informs of selected
setting, e.g. “ORDER MERGE CHANNEL THREE ONE”. If the selected
channel is not the wanted one, press * again.
q To confirm the selected channel press PTT. If the setting is not confirmed the
menu will be exited without any changes.
2.3.4.12 ORDER CHANNEL
ORDER CHANNEL is used for changing channel of the network while keeping the network intact
with same Master and slaves.
A new channel is selected from the list in mode ORDER CHANNEL.
When the users receives this order they are notified with SYNVOICE message “AUTO
CHANNEL” plus the number of the new channel and then the units try to logon to the new
channel.
When all ordered units have answered to the order the order maker is notified with SYNVOICE
message “ORDER CHANNEL OK” and then the unit tries to logon to the new channel. If all units
do not confirm the order the order maker is notified with SYNVOICE message “ORDER
CHANNEL LOST” and then the unit anyway tries to logon to the new channel.

Saab Communication Doc.nr: PR2060F0 Issue: 1.0
RESTRICTED – COMMERCIAL
Users Manual TruLink Page: 16(37)
2.3.4.12.1 Change channel of the network
q Press and release M until SYNVOICE announce the ORDER CHANNEL
mode, e.g. “ORDER CHANNEL ONE”.
q Press and release * to step through the channel list. If * is hold down for more
than 0.5 seconds a “LONG KEY CLICK”, 2.3.8.8, will be heard instead of
the ordinary key click. One long key click corresponds to ten steps in the
channel list. When * is released a SYNVOICE message informs of selected
setting, e.g. “ORDER CHANNEL FOUR ONE”. If the selected channel is
not the wanted one, press * again.
q To confirm the selected channel press PTT. If the setting is not confirmed the
menu will be exited without any changes.
2.3.4.13 ORDER RELAY
Mode ORDER RELAY is used when a unit temporarily needs to take over as Master in the
network.
The old master and the slaves of the network are notified with SYNVOICE message “AUTO
RELAY ON” and then try to log on to the new Master as Slaves.
When the old Master has answered to the order the order maker change to Master of the network,
the users are notified with SYNVOICE message “AUTO RELAY ON”.
When all ordered units have answered to the order the order maker is notified with SYNVOICE
message “ORDER RELAY OK” and then the unit takes over as Master. If all units do not confirm
the order the order maker is notified with SYNVOICE message “ORDER RELAY LOST” and
then the unit starts as Master anyway.
No other unit except the order maker can use the order when the mode is in RELAY ON.
When the order maker sets the mode in RELAY OFF the old master takes over as master again
and the users are notified with SYNVOICE message “AUTO RELAY OFF”.
When all ordered units have answered to the order the order maker is notified with SYNVOICE
message “ORDER RELAY OK” and then the unit tries to log on to the old Master. If all units do
not confirm the order the order maker is notified with SYNVOICE message “ORDER RELAY
LOST” and then the unit tries to log on to the old Master anyway.
2.3.4.13.1 Change relay
q Press and release M until SYNVOICE announce the ORDER RELAY mode,
i.e. “ORDER RELAY ON”.
q To confirm the order press PTT. If the order is not confirmed the menu will
be exited without any actions taken.
2.3.4.14 ORDER CHANGE MASTER
Mode ORDER CHANGE MASTER is used when a unit wishes to take over as Master in the
network.
The old master and the slaves of the network are notified with SYNVOICE message “AUTO
CHANGE MASTER” and then try to log on to the new Master as Slaves.

Saab Communication Doc.nr: PR2060F0 Issue: 1.0
RESTRICTED – COMMERCIAL
Users Manual TruLink Page: 17(37)
When all ordered units have answered to the order the order maker is notified with SYNVOICE
message “ORDER CHANGE MASTER OK” and then the unit takes over as Master. If all units
do not confirm the order the order maker is notified with SYNVOICE message “ORDER
CHANGE MASTER LOST” and then the unit takes over as Master anyway.
2.3.4.14.1 Change master
q Press and release M until SYNVOICE announce the ORDER CHANGE
MASTER mode, i.e. “ORDER CHANGE MASTER”.
q To confirm the order press PTT. If the order is not confirmed the menu will
be exited without any actions taken.
2.3.4.15 ORDER SYNCHRONIZE AP
Mode ORDER SYNCHRONISE AP is used to synchronize an AP to a network.
The AP will take over as Master of the network.
Before the order is performed the channel set key should be pressed on the AP to prepare the AP
for the synchronization, see chapter 3.3.3.
The users of the network are notified with SYNVOICE message “AUTO SYNCHRONIZE
ACCESS POINT” and then try to log on to the AP as Slaves.
When all ordered units have answered to the order the order maker is notified with SYNVOICE
message “ORDER SYNCHRONIZE ACCESS POINT OK” and then starts the synchronisation
of the AP. If all units do not confirm the order the order maker is notified with SYNVOICE
message “ORDER SYNCHRONIZE ACCESS POINT LOST” and then starts the
synchronisation of the AP anyway.
The users become aware of a successful synchronisation whit the log on message “LOG ON
OK”. When a synchronisation fails the slaves will not be able to log on to the network. To start a
new network one of the users must actively set his unit to Master, 2.3.4.4.
2.3.4.15.1 Synchronize AP
q Press and release M until SYNVOICE announce the ORDER
SYNCHRONIZE AP mode, i.e. “ORDER SYNCHRONIZE ACCESS
POINT”.
q To confirm the order press PTT. If the order is not confirmed the menu will
be exited without any actions taken.
2.3.5 Monitor mode
In normal mode the user transmits and receives audio from other users and external equipments. In
Monitor mode the users audio will not be transmitted to external equipments but the user still
receives all radio traffic, including traffic from external equipments.
q To enter Monitor mode M is pressed and held down until SYNVOICE announce
“MONITOR MODE”, approximately four seconds.
q To exit Monitor mode M is pressed and held again until SYNVOICE announce
“NORMAL MODE”.

Saab Communication Doc.nr: PR2060F0 Issue: 1.0
RESTRICTED – COMMERCIAL
Users Manual TruLink Page: 18(37)
2.3.6 Keying of transmission
When the user wants to speak to conferences the ME has to be keyed for transmission.
The following three ways to get a user allocation exists:
q Using the VOX function (voice triggered keying)
q Using the PTT
q Using the emergency PTT
If the request is rejected the user gets a negative response by means of a tone in the headset.
When the connection is granted the transmitter sends the outgoing speech and a side tone is heard
in the user headset.
The VOX function is keyed when the user speaks.
When the PTT is pressed twice within 500 ms the emergency PTT function is activated.
Emergency PTT means that an access of a voice channel is guaranteed.
2.3.7 Volume adjustment
The + and – keys are used to adjust the volume. A “KEY CLICK” sound, 2.3.8.8, indicates a
change of volume level.
The volume is never completely shut off. If the user tries to decrease the volume lower then the
minimum level, the “KEY CLICK LOW” sound, 2.3.8.8, is heard instead of the normal key click.
If the user tries to increase the volume higher than the maximum level, the “KEY CLICK HIGH”
sound, 2.3.8.8, is heard instead of the normal key click. To increase the volume one more step the
+ key is held for three seconds; the limiter value is then set to the LIMITER HIGH limit. At the
same time a repeating warning signal is started to alert the user of the overridden limiter limit. If
the – key is pressed the volume is reduced one level and the limiter is again set to the LIMITER
NORMAL limit.
2.3.8 Status indications
The unit’s status and operation are indicated with audio, tones and SYNVOICE, and visually with
LEDs.
2.3.8.1 Out of range
If the unit operate as Slave and the radio connection with the Master is lost, a “NO SERVICE”
sound, 2.3.8.8, is heard in the headset. At the same time the LED indicates OUT_OF_RANGE,
2.3.8.7.
The Slave automatically tries to re-logon to the Master, i.e. if the user temporarily is out of range. It
is configurable if same Master is required, this requirement can be overridden by pressing M.
Overridden requirement is notified to the user with SYNVOICE message "ANY MASTER".
If the re-logon attempts fails a ”NEG RESPONSE” sound, 2.3.8.8, is heard in the headset.
The user can anytime change network to log on by using the M and * keys and confirm change
with PTT. A new user activated log on attempt does not require same Master.
If the unit does not successfully logon to a network within a configurable time the Slave's power is
automatically turned off. Before turning off the power the user is notified with SYNVOICE
message "AUTO POWER OFF".

Saab Communication Doc.nr: PR2060F0 Issue: 1.0
RESTRICTED – COMMERCIAL
Users Manual TruLink Page: 19(37)
2.3.8.2 Low battery warning
When 20-40 minutes is the estimated remaining operation time of the battery in the ME a warning
message, “BATTERY” is given regularly, to alert the user of an empty battery. At the same time
the LED changes to LOW_BATT, 2.3.8.7.
When 5-10 minutes is the estimated remaining operation time of the battery in the ME the warning
message changes to “BATTERY EMPTY”.
When the battery in the unit is starting to be charged by an external power supply the LED
changes to CHARGE_BATT, 2.3.8.7, and the warning messages stops.
2.3.8.3 Transmission rejection
When the user wants to transmit by pressing PTT or activating the VOX function and don’t get a
granted voice slot, a “NEG RESPONSE” sound, 2.3.8.8, is given to the user.
2.3.8.4 Transmission indication
When the user transmits, a side tone is generated to the users headset.
2.3.8.5 Key-click
Every key pressed generates a key-click sound to the headset.
2.3.8.6 Power-on BIT failure
If any errors are encountered during the power-on BIT testing, the LED indicates
MALFUNCTION.

Saab Communication Doc.nr: PR2060F0 Issue: 1.0
RESTRICTED – COMMERCIAL
Users Manual TruLink Page: 20(37)
2.3.8.7 Summary of LED indications
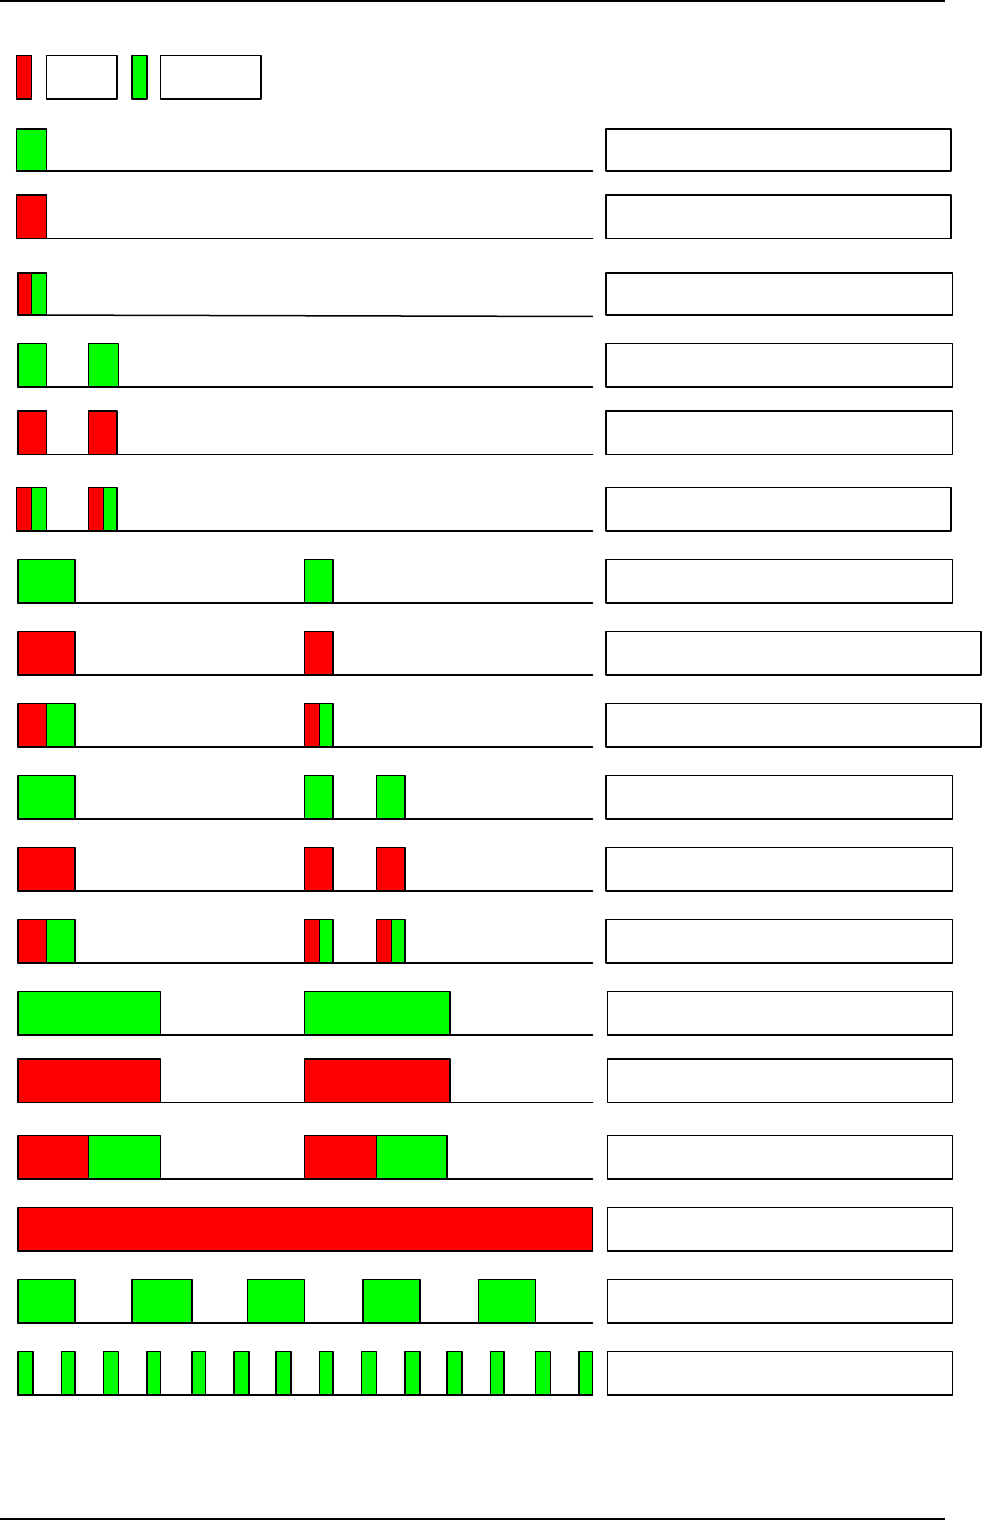
The LED indicates status according to the table:
Status Colour On time [ms] Off time [ms]
BATT_OK, Slave logged on to network GREEN 100 1900
LOW_BATT, Slave logged on to network RED 100 1900
CHARGE_BATT, Slave logged on to
network
RED+GREEN 50+50 1900
NORMAL, Master logged on to network GREEN 100/100 150/1650
LOW_BATT, Master logged on to
network
RED 100/100 150/1650
CHARGE_BATT, logged on to network RED+GREEN 50+50/50+50 150/1650
CONNECTED_BATT_OK, Slave
connected to airplane etc.
GREEN 200/100 800/900
CONNECTED_LOW_BATT, Slave
connected and low battery
RED 200/100 800/900
CONNECTED_CHARGE, Slave
connected and charging battery
RED+GREEN 100+100 / 50+50 800/900
CONNECTED_BATT_OK, Master
connected to airplane etc.
GREEN 200/100/100 800 / 150 / 650
CONNECTED_LOW_BATT, connected
and low battery
RED 200/100/100 800 / 150 / 650
CONNECTED_CHARGE, connected and
charging battery
RED+GREEN 100+100 / 50+50 /
50 + 50
800 / 150 / 650
OUT_OF_RANGE, normal battery GREEN 500 500
OUT_OF_RANGE, low battery RED 500 500
OUT_OF_RANGE, charging battery RED+GREEN 250+250 500
POWER_UP_BOOT RED 1000 0
POWER_UP RED 1000 0
MALFUNCTION (BIT failure, fatal error) RED 1000 0
SW_DOWNLOAD_READY GREEN 200 200
SW_DOWNLOADING GREEN 10 100
Saab Communication Doc.nr: PR2060F0 Issue: 1.0
RESTRICTED – COMMERCIAL
Users Manual TruLink Page: 21(37)
Red
Green
Batt OK, Slave logged on to network
Batt LOW, Slave logged on to network
Batt CHARGING, Slave logged on to
network
Batt OK, Master
Batt LOW, Master
Batt CHARGING, Master
Batt OK, CONNECTED Slave logged
on
Batt LOW, CONNECTED Slave logged
on
Batt CHARGING, CONNECTED Slave
logged on
Batt OK, CONNECTED Master
Batt LOW, CONNECTED Master
Batt CHARGING, CONNECTED
Master
Batt OK, Out of Range
Batt LOW, Out of Range
Batt CHARGING, Out of Range
POWER_UP or MALFUNCTION
SW DOWNLOAD READY
SW_DOWNLOADING
Saab Communication Doc.nr: PR2060F0 Issue: 1.0
RESTRICTED – COMMERCIAL
Users Manual TruLink Page: 22(37)
2.3.8.8 Summary of available sounds
A number of sounds can be generated into the user headset. The table below shows what sounds
are implemented and for what events.
Sounds Explanation
KEY CLICK LOW A special warning key click at some occasions
KEY CLICK Short tone sound for every key press
LONG KEY CLICK Short two-tone sound for some long key press
KEY CLICK HIGH A special warning key click at some occasions
NO SERVICE No net selected or available
EXIT Exit from any mode to default mode
AUTO CONFIRM Automatically confirmed menu parameter
NEG RESPONSE Connection reject or undefined operation
LIMITER HIGH Warning sound for setting of raised limiter value
Lowest tone Low tone Mid tone High tone
KEY CLICK LOW
LONG KEY CLICK
KEY CLICK HIGH
NO SERVICE, repeated
EXIT
NEG RESPONSE
LIMITER HIGH, repeated
KEY CLICK
AUTO CONFIRM

Saab Communication Doc.nr: PR2060F0 Issue: 1.0
RESTRICTED – COMMERCIAL
Users Manual TruLink Page: 23(37)
2.3.8.9 Summary of available SYNVOICE phrases
Phrase
no SYNVOICE phrase Comment
1 "CHANNEL ZERO"
… …
54 "CHANNEL FIFTYTHREE"
55 "USER TYPE ZERO"
… …
70 "USER TYPE FIFTEEN"
71 "MASTER"
72 "SLAVE"
73 "EXTERNAL AVAILABLE" The destination mode is now available in the
menu
74 "DESTINATION NORMAL"
75 "DESTINATION ONE" Audio will be routed to external with logical
number 1 when pressing PTT.
… …
79 "DESTINATION FIVE" Audio will be routed to external with logical
number 5 when pressing PTT.
80 "DESTINATION LOCAL" Audio will be routed to external connected to the
unit when pressing PTT.
81 "LED NORMAL"
82 "LED HIGH" LED setting for intense sunshine
83 "LED NVG"
84 "LED TIME" LED will be turned off after a configurable time
85 "LED OFF"
86 "LOW MASTER BATTERY" Low battery warning for a master that has been
configured for using an external instead of the
headset at the headset connection. The battery
warning is heard by the slaves.
87 "ME CONNECTED TO AP" When an ME has been connected to an AP to
change menu settings for the AP.
88 "ME DISCONNECTED FROM
AP"
89 "LOGGED ON" Successfully logged on or started a network.
90 "CONFIGURATION ERROR" The unit has a different system configuration
than the Master of the network. The unit will not
be able to log on to this Master.
91 "VOX OFF"
92 "VOX ON"

Saab Communication Doc.nr: PR2060F0 Issue: 1.0
RESTRICTED – COMMERCIAL
Users Manual TruLink Page: 24(37)
93 "KEY LOCK OFF"
94 "KEY LOCK ON"
95 "ORDER VOX OFF"
96 "ORDER VOX ON"
97 "ORDER POWER OFF"
98 "ORDER SLEEP MODE ON"
99 "ORDER MERGE"
100 "ORDER CHANGE
CHANNEL"
101 "ORDER RELAY OFF"
102 "ORDER RELAY ON"
103 "ORDER CHANGE MASTER"
104 “ORDER SYNCHRONISE AP”
105 “FAST KEY M OFF” Normal mode
106 "FAST KEY M ON" Monitor mode
107 "LOW BATTERY WARNING
1" First battery warning level reached
108 "LOW BATTERY WARNING
2" Second battery warning level reached
109 "LOG ON ANY MASTER" Unit is configured for logging on to same Master
that was last used. A key has been pressed to
override this requirement.
110 "AUTO POWER OFF"
111 "ACCESSPOINT"
112 “ORDER”
113 “ORDER VOX LOST” Order maker is informed that all units did not
answer to the order.
114 “ORDER VOX OK” Order maker is informed that all units have
answered to the order.
115 “ORDERED VOX OFF” Unit is informed that another unit, the order
maker, has turned off the unit’s vox function.
116 “ORDERED VOX ON” Unit is informed that another unit, the order
maker, has turned on the unit’s vox function.
117 “ORDER POWER OFF LOST” Order maker is informed that all units did not
answer to the order.
118 “ORDER POWER OFF OK” Order maker is informed that all units have
answered to the order.
119 “ORDERED POWER OFF” Unit is informed that another unit, the order
maker, will turn of the unit.
120 ”ORDER SLEEP MODE
LOST” Order maker is informed that all units did not
answer to the order.

Saab Communication Doc.nr: PR2060F0 Issue: 1.0
RESTRICTED – COMMERCIAL
Users Manual TruLink Page: 25(37)
121 "ORDER SLEEP MODE OK" Order maker is informed that all units have
answered to the order.
122 "ORDERED SLEEP MODE" Unit is informed that another unit, the order
maker, has entered the unit in sleep mode.
123 "ORDER MERGE CHANNEL
LOST" Order maker is informed that all units did not
answer to the order.
124 "ORDER MERGE CHANNEL
OK" Order maker is informed that all units have
answered to the order.
125 "ORDERED MERGE" Unit is informed that another unit, the order
maker, has merged the network with another
channel.
126 "ORDER CHANGE
CHANNEL LOST" Order maker is informed that all units did not
answer to the order.
127 "ORDER CHANGE
CHANNEL OK" Order maker is informed that all units have
answered to the order.
128 "ORDERED CHANGE
CHANNEL" Unit is informed that another unit, the order
maker, will change the channel of the unit.
129 "ORDER RELAY LOST" Order maker is informed that all units did not
answer to the order.
130 "ORDER RELAY OK" Order maker is informed that all units have
answered to the order.
131 "ORDERED RELAY OFF" Unit is informed that the old Master of the
network will take over as Master again.
132 "ORDERED RELAY ON" Unit is informed that another unit, the order
maker, will temporarily take over as Master of
the network.
133 "ORDER CHANGE MASTER
LOST" Order maker is informed that all units did not
answer to the order.
134 "ORDER CHANGE MASTER
OK" Order maker is informed that all units have
answered to the order.
135 "ORDERED CHANGE
MASTER" Unit is informed that another unit, the order
maker, will take over as Master of the network.
136 "ORDER SYNCHRONISE AP
LOST" Order maker is informed that all units did not
answer to the order.
137 "ORDER SYNCHRONISE AP
OK" Order maker is informed that all units have
answered to the order.
138 "ORDERED SYNCHRONISE
AP" Unit is informed that an AP will try to take over
as Master of the network.
For each phrase a maximum of five SYNVOICE words can be linked to the phrase, i.e. for
SYNVOICE phrase “FAST KEY M ON” SYNVOICE words “MONITOR” and “MODE” may
be linked to the phrase.
The available SYNVOICE words that can be linked to the phrases are:

Saab Communication Doc.nr: PR2060F0 Issue: 1.0
RESTRICTED – COMMERCIAL
Users Manual TruLink Page: 26(37)
No. Message
1
"ONE"
2
"TWO"
3
"THREE"
4
"FOUR"
5
"FIVE"
6
"SIX"
7
"SEVEN"
8
"EIGHT"
9
"NINE"
10
"ZERO"
11
"CHANNEL"
12
"VOX"
13
"OFF"
14
"ON"
15
"BATTERY"
16
"MASTER"
17
"SLAVE"
18
"USER TYPE"
19
"NORMAL"
20
"EXTERNAL"
21
"AUTO"
22
"ACCESS POINT"
23
"RADIO"
24
"NONE"
25
"KEY LOCK"
26
"AVAILABLE"
27
"ERROR"
28
"EMPTY"
29
"CONNECT"
30 "SLEEP"
31
"MODE"
32
"USER"
33
"ORDER"
34
"LOST"
35
"CONFIGURATION
36
"POWER"

Saab Communication Doc.nr: PR2060F0 Issue: 1.0
RESTRICTED – COMMERCIAL
Users Manual TruLink Page: 27(37)
37
"LOGGED"
38
“LOCAL”
39
“MERGE”
40
"SYNCHRONIZE"
41
"DATA"
42
"OK"
43
"TIME"
44
"RELAY"
45
"CHANGE"
46
“MONITOR”
47
“LED”
48
“NVG”
49
”COMPANY”
50
“VHF”
51
“COTHEN”
52
“HEADSET”
53
“SHOULDER”
54
“ANY”
56
"BASE STATION"
57
"VOLUME"
58
"SIDE TONE"
59
"USED"
60
"LOW"
61
"HIGH"
62
"NEW"
63
"AND"
64
"NOT"
65
"OR"
66
"DRIVER"
67
"LOADER"
68
"GUNNER"
69
"SOLDIER"
70
"COMMANDER"
71
"GROUP"
72
"RANGE"
73
"LIMITER"
74
"NO"

Saab Communication Doc.nr: PR2060F0 Issue: 1.0
RESTRICTED – COMMERCIAL
Users Manual TruLink Page: 28(37)
75
"FAILURE"
76
"BAD"
77
"ALARM"
78
"LEVEL"
79
"ALL"
80
"CONNECTION"
81
"CHARGING"
82
"YES"
83
"NO"
84
"CONFIRM"
85
"TYPE"
Saab Communication Doc.nr: PR2060F0 Issue: 1.0
RESTRICTED – COMMERCIAL
Users Manual TruLink Page: 29(37)
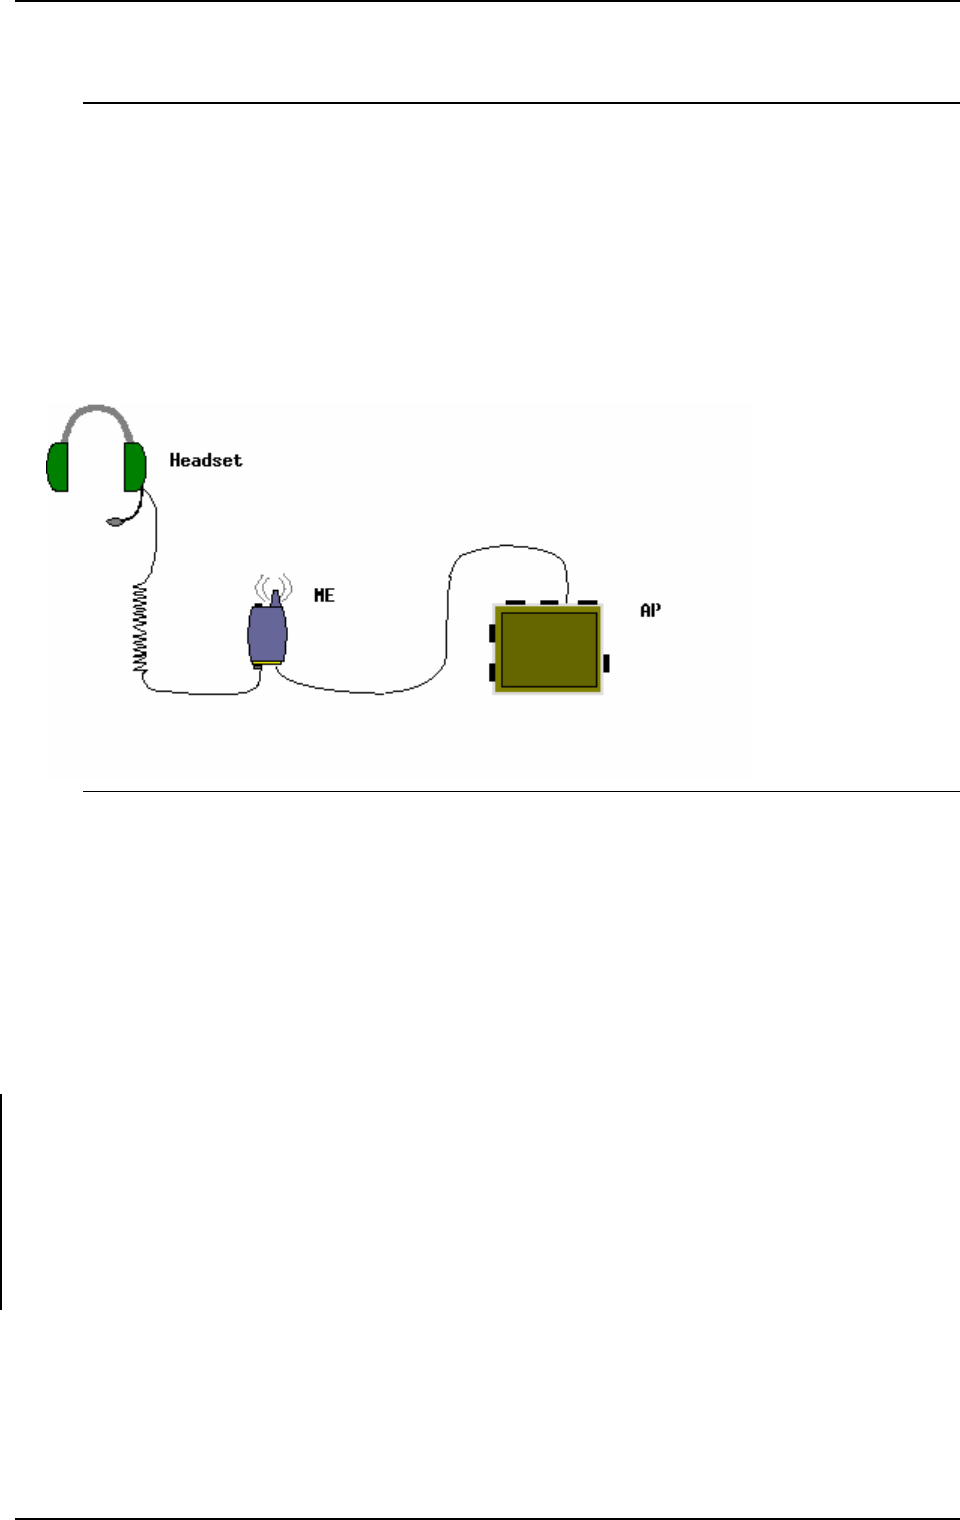
3. ACCESS POINT TRANSCEIVER (AP6803)
3.1 OVERVIEW
An AP, Access Point Transceiver, is used when there is a need to have a fixed installation of a
TruLink transceiver, e.g. in a vehicle, vessel or airborne platform.
It basically has the same functionality and ability as the portable unit but has an increased audio
capability for up to three analogue interfaces.
An ME with two connectors can be connected to the AP. The keys on the ME can then be used
for configuring the AP.
FIGURE 3. Portable unit connected to an AP.
The user interface control consists of a two-coloured LED and two keys on the AP unit and a
number of keys and a recorded voice function, SYNVOICE, on a connected ME.
The SYNVOICE is a sampled phrase database that is used as an audio display, instead of a visible
display, to indicate selections and status.
The operation of the AP is based on a few keys, of a connected ME, that are pressed in different
combinations for accessing the parameter to operate/modify.
The keys on the ME unit are: PTT, M, +, -, and *.
For every key pressed, there is a KEY CLICK sound generated into the headset.
3.2 STATEMENT
This device complies with part 15 of the FCC Rules. Operation is subject to the following
two conditions: (1) This device may not cause harmful interference, and (2) this device
must accept any interference received, including interference that may cause undesired
operation
Saab Communication Doc.nr: PR2060F0 Issue: 1.0
RESTRICTED – COMMERCIAL
Users Manual TruLink Page: 30(37)
3.3 USER INTERFACE
3.3.1 Overview
The functions accessed by the keys on the AP unit can be listed as follows:
q LED on/off
q Set channel
FIGURE 4. Access point transceiver.
3.3.2 LED on/off
The LED on the AP can be turned on or off with the LED key.
3.3.3 Set AP channel
To synchronize an AP to an existing network the channel set key should be pressed. The network
must actively choose to synchronize the AP as well, see chapter 2.3.4.15.

Saab Communication Doc.nr: PR2060F0 Issue: 1.0
RESTRICTED – COMMERCIAL
Users Manual TruLink Page: 31(37)
3.3.4 Menu setting of AP
When an ME unit is connected to an AP the user can control the menu and mode selections of the
AP with the keys of the ME. The control is basically the same as controlling a stand-alone ME
except for some not available functions e.g. no transmission request with the PTT key.
3.3.4.1 Start menu of connected AP
When AP unit is powered on the user enters the start menu. The selected items in the start menu
are listed by the SYNVOICE function. It is configurable which modes should be included in the
start menu but the modes in the start menu can at most be:
q CHANNEL [channel list]
q UNIT MODE [master/slave]
Key PTT is used for confirming settings. To browse through the menu the M key is used and the *
key is used to change a setting. If the start menu looks like the list above M is pressed one time to
select UNIT MODE, to change the settings of mode UNIT MODE the * key is used. If PTT is
pressed the changed setting is saved and the SYNVOICE function again lists the settings in the
menu. If the setting is not confirmed within a configurable time the setting is changed back to
default mode.
If the user any time in the start menu presses PTT when no changes has been made to the settings
since last time they were listed, the logon procedure starts immediately. The logon procedure will
also be activated if no action is taken within a configurable time; the unit then starts to logon with
the settings listed last time.
A successful logon is announced with SYNVOICE message “ACCESS POINT”.
If UNIT MODE is included in the start menu the user can choose to either start a new network as
a Master, 3.3.4.1.1, or to logon to an existing network as a Slave, 3.3.4.1.2.
3.3.4.1.1 Starting a network
To start a new network UNIT MODE must be set to “MASTER”. If the default setting is
“SLAVE” the setting is changed with keys M and * and confirmed by pressing PTT. When the
logon procedure starts the unit will start a new network with the selected channel in the start menu.
A successfully started network is announced to the user by SYNVOICE message ”ACCESS
POINT”.
3.3.4.1.2 Logging on to a network
To be able to logon to an existing network UNIT MODE must be set to “SLAVE”, there can only
be one “MASTER” in a network. The network can be selected by the mode “CHANNEL”, the
Slave must have same channel number as the Master of the network.
When the logon procedure starts the unit will try to logon to the Master of the network. A
successfully logon to a network is announced to the user by SYNVOICE message ”ACCESS
POINT”.
If no network is available a “NEG RESPONS” sound, 2.3.8.8, is heard and then a “NO
SERVICE” tone, 2.3.8.8, is repeated until next logon try.
If logon fails due to mismatch of system configuration SYNVOICE message “CONFIGURATION
ERROR” is heard in the headset and then the “NO SERVICE” tone is turned on until next logon
try.

Saab Communication Doc.nr: PR2060F0 Issue: 1.0
RESTRICTED – COMMERCIAL
Users Manual TruLink Page: 32(37)
The unit tries to logon until it succeeds. The user can access the start menu and change settings
until the unit successfully logs on to the network.
3.3.4.2 Normal menu of connected AP
When the unit has logged on or started a network the user can access the normal menu with the M
key. It is configurable which modes should be included in the normal menu but the modes in the
normal menu can at most be:
q CHANNEL [channel list]
q UNIT MODE [master/slave]
The M key is used for cycling between the modes in the menu and * is used for changing the
settings of the selected mode. PTT is used for confirming the settings. When a setting has been
confirmed a “CONFIRMED” tone is heard in the headset and the unit exits the menu.
If no action is taken, within a configurable time, when the menu has been accessed the unit exits
the menu again, a “MENU EXIT” tone is then generated.
Pressing * or PTT has no effect when the menu has not been accessed.
3.3.4.2.1 Mode CHANNEL
When the CHANNEL setting is changed the unit enters the start menu and a new logon process is
started. The unit will try to start/connect to a new network with the specified channel.
Changing channel when the unit is master of the network is not recommended since the action will
have serious effects for all slaves logged on to the network, all units will be disconnected from the
network.
3.3.4.2.1.1 Change setting of mode CHANNEL
q Press and release M until SYNVOICE announce the CHANNEL mode, e.g.
“CHANNEL ONE”.
q Press and release * to step through the channel list. If * is hold down for more
than 0.5 seconds a “LONG KEY CLICK”, 2.3.8.8, will be heard instead of
the ordinary key click. One long key click corresponds to ten steps in the
channel list. When * is released a SYNVOICE message informs of selected
setting, e.g. “CHANNEL THREE ONE”. If the selected channel is not the
wanted one, press * again.
q To confirm the selected channel press PTT. If the setting is not confirmed the
menu will be exited without any changes.
3.3.4.2.2 Mode UNIT MODE
UNIT MODE specifies if the unit is operating as Slave or Master. Changing’s of this setting should
be cautiously considered. If the unit is operating as Slave and the mode is changed to Master the
unit will be disconnected from the net and the unit will start a new network. However the
consequences will be more serious if the unit is operating as Master. All slaves will be disconnected
from the network and the unit, the former Master, will try to log on to the disconnected network.

Saab Communication Doc.nr: PR2060F0 Issue: 1.0
RESTRICTED – COMMERCIAL
Users Manual TruLink Page: 33(37)
3.3.4.2.2.1 Change setting of mode UNIT MODE
q Press and release M until SYNVOICE announce the UNIT MODE mode,
e.g. “SLAVE”.
q Press and release * once to change setting to MASTER or SLAVE. A
SYNVOICE message informs of selected setting, e.g. “MASTER”. If the
selected setting is not the wanted one, press * again.
q To confirm the setting press PTT. If the setting is not confirmed the menu will
be exited without any changes.
3.3.5 Status indications
The unit’s status and operation are indicated visually with LEDs on the AP. If an ME is connected
to the AP some indications also appears as sounds and SYNVOICE messages in the ME
connected headset.
3.3.5.1 Connected AP Out of range
If the unit operate as Slave and the radio connection with the Master is lost, a “NO SERVICE”
sound, 2.3.8.8, is heard in the headset. At the same time the AP LED indicates
OUT_OF_RANGE, 2.3.8.7.
The Slave automatically tries to re-logon to the Master, i.e. if the user temporarily is out of range. It
is configurable if the same Master is required this requirement can be overridden by pressing M of
a connected ME.
If the re-logon attempts fails a ”NEG RESPONSE” sound, 2.3.8.8, is heard in the ME connected
headset.
If an ME is connected the user can anytime change network to log on by using the M and * keys
and confirm change with PTT.A new user activated log on attempt does not require same Master.
If the unit does not successfully logon to a network within a configurable time the AP starts a
network at last used channel.
3.3.5.2 Connected AP Key-click
Every key pressed on a connected ME generates a key-click sound to the headset.
3.3.5.3 Power-on BIT failure
If any errors are encountered during the power-on BIT testing, the LED indicates
MALFUNCTION, 2.3.8.7.
Saab Communication Doc.nr: PR2060F0 Issue: 1.0
RESTRICTED – COMMERCIAL
Users Manual TruLink Page: 34(37)
4. SUPPORT STATION (SS6819)
4.1 OVERVIEW
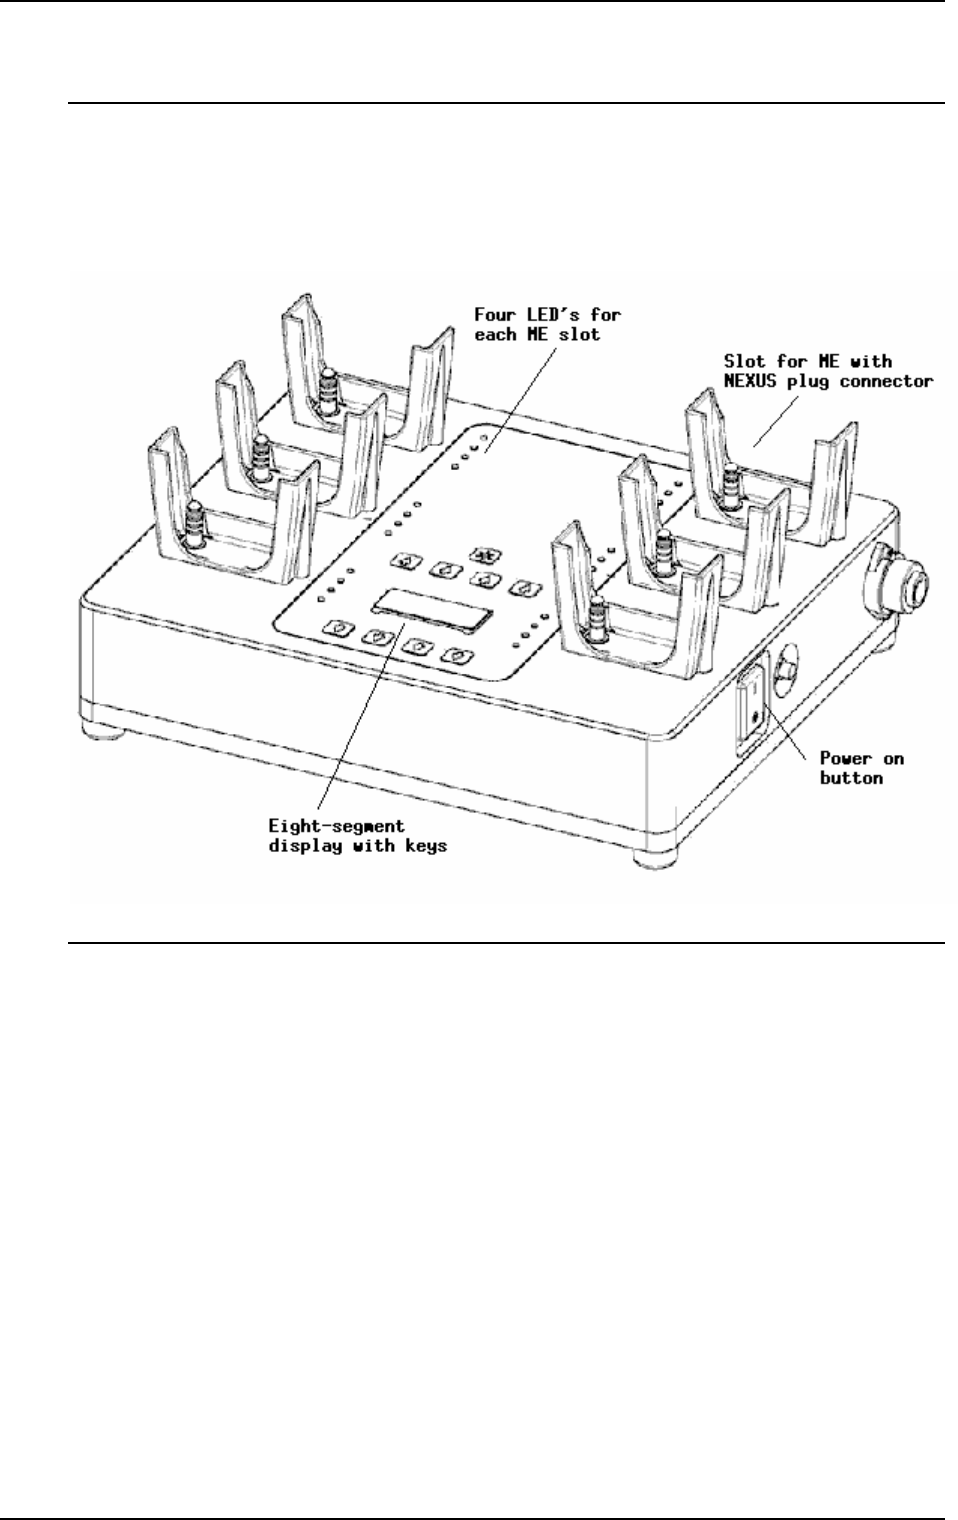
The Support Station SS6819 is used for supporting ME’s with NEXUS plug connectors. Up to six
ME’s can be supported simultaneous.
FIGURE 5. Support station.
The user interface control consists of a total of 24 LED’s, nine keys, and one four digit eight-
segment display. Every ME slot has two green and two red LED’s each to display status of each
ME.
The keys on the SS unit are:
q Increase digit1
q Increase digit2
q Increase digit3
q Increase digit4
q Decrease digit1
q Decrease digit2
q Decrease digit3
q Decrease digit4

Saab Communication Doc.nr: PR2060F0 Issue: 1.0
RESTRICTED – COMMERCIAL
Users Manual TruLink Page: 35(37)
q Set channel
4.2 STATEMENT
This device complies with part 15 of the FCC Rules. Operation is subject to the following
two conditions: (1) This device may not cause harmful interference, and (2) this device
must accept any interference received, including interference that may cause undesired
operation
Saab Communication Doc.nr: PR2060F0 Issue: 1.0
RESTRICTED – COMMERCIAL
Users Manual TruLink Page: 36(37)
4.3 USER INTERFACE
4.3.1 Overview
The functions of the SS unit can be listed as follows:
q Feed charge voltage to connected ME’s
q Show current charge status of connected ME’s
q Set channel of connected ME’s
q Display BIT result for connected ME’s
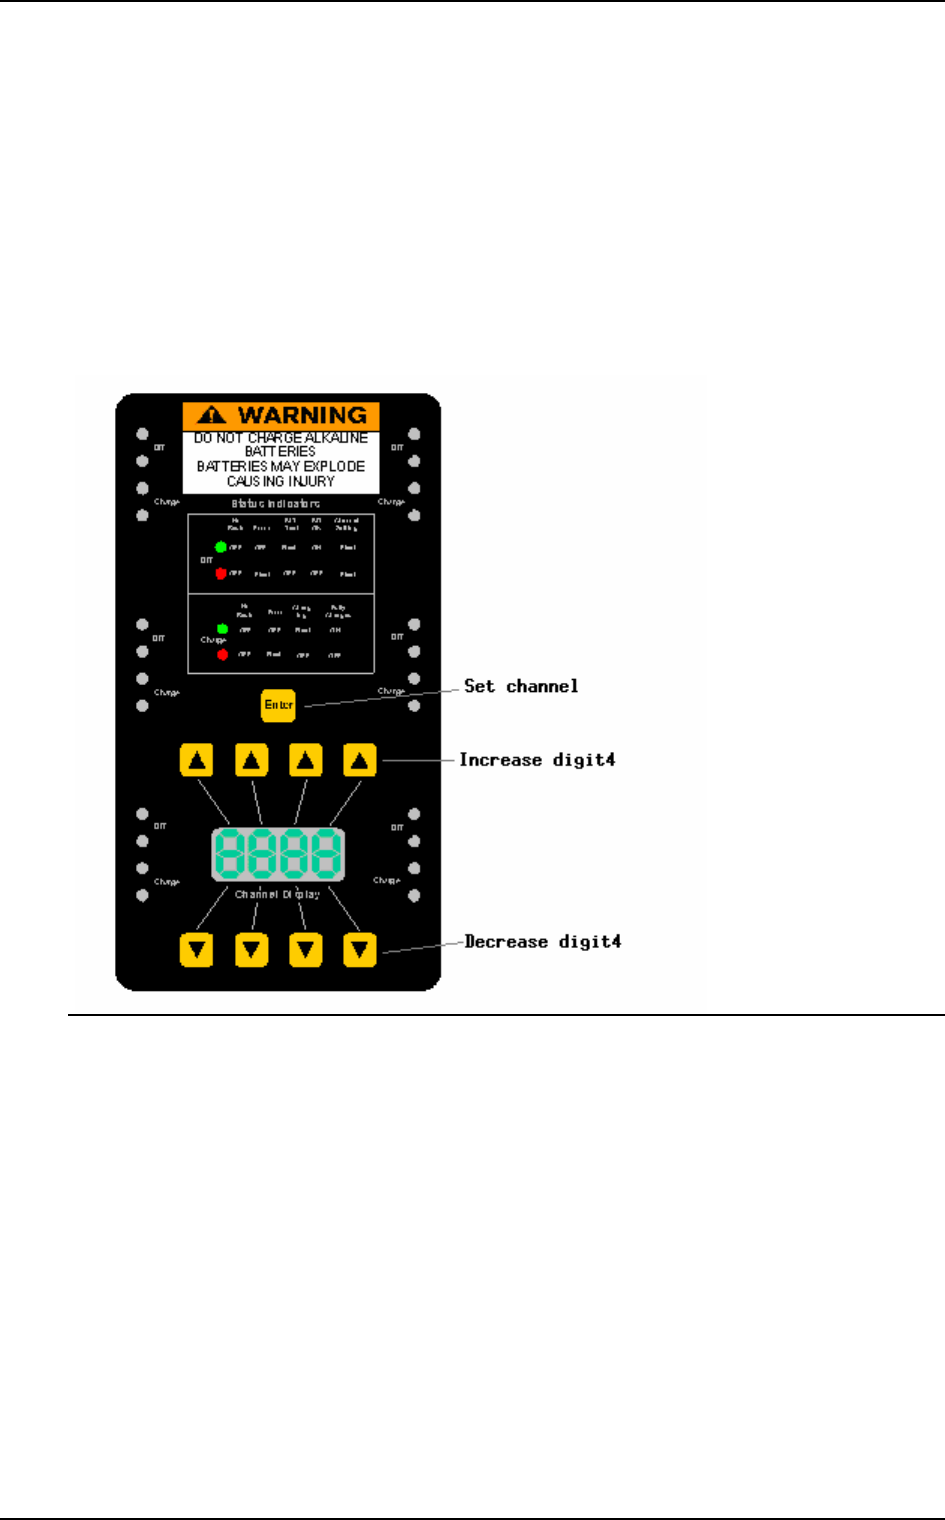
FIGURE 6. SS overlay.
4.3.2 Power On/Off
To switch the power on or off the power on/off button is pressed. When the unit has been powered
on the eight-segment display is lit.
4.3.3 Connect ME’s
The ME’s should be turned off prior to connecting them to the SS. If an ME has not been turned
off noise might be transmitted to other users for a few seconds when the ME is connected to the
SS.
When an ME has been detected by the SS all four LED’s of the ME slot will flash, 4.3.5, until the
SS has established communication with the ME. When communication has been established the
BIT and charge status is shown. As soon as an ME is detected charge voltage is applied to the ME
slot.

Saab Communication Doc.nr: PR2060F0 Issue: 1.0
RESTRICTED – COMMERCIAL
Users Manual TruLink Page: 37(37)
4.3.4 Set channel
The channel is selected with the Increase and Decrease digit keys. When the required channel is
shown in the eight-segment display the Set channel key is pressed. Do not remove connected
ME’s while the LED’s are indicating setting of channel, 4.3.5.
4.3.5 LED indications
The four LED’s of each ME indicates BIT status, charge status, detection of ME, and setting of
channel. Below is the possible indications listed.
BIT Charge Current status
Red LED Green LED Red LED Green LED
No ME OFF OFF OFF OFF
Detection of ME FLASH 50% FLASH 50% FLASH 50% FLASH 50%
Performing BIT OFF FLASH 50% - -
BIT OK OFF ON - -
BIT Error FLASH 50% OFF - -
Setting of channel FLASH 50% FLASH 50% - -
Charging - - OFF FLASH 50%
Fully charged - - OFF ON
Charge error - - FLASH 50% OFF