Telsey Srl TELSEY3070 Set top Box for IP television with WiFI User Manual
Telsey Srl Set top Box for IP television with WiFI
User Manual

Your guide to setting your set-top-box
This guide contains all you need to know to setup your TV2MORO set-top-box, so you can start
enjoying the TV2MORO service.

Content:
1. Content of box 2
2. Box setup 3
3. Remote control 4
4. Menu System 5
5. Activation 6
6. Wireless setup 8
7. Troubleshooting 9
8. Regulatory and Compliance Information 12
1
2
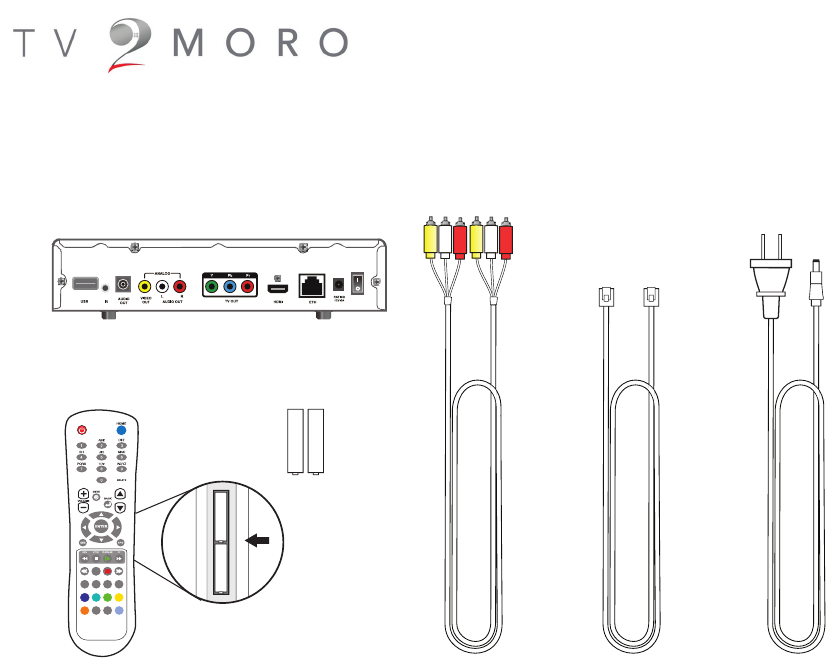
Content of Box:
Video cable
TV2MORO Set-top-box
Remote Control
Power cable
Ethernet cable
2x AAA alkaline batteries.
Insert batteries according to the diagram above
paying close attention to the direction of +/- poles
on each battery
+
-
+
-
+
-
+
-
SOFTKEY
CH PAGECH PAGE
OSD
INFO
RECPAUSE
SLOWFFSLOW REV
MTSTEXT SEEK CAPTURE
VODIPTV DVB PVR
REFRESHINTERNET SETUP VIDEO
CONFERENCE
Television
Router
TV2MORO Set-top-box
Power
LAN
LAN
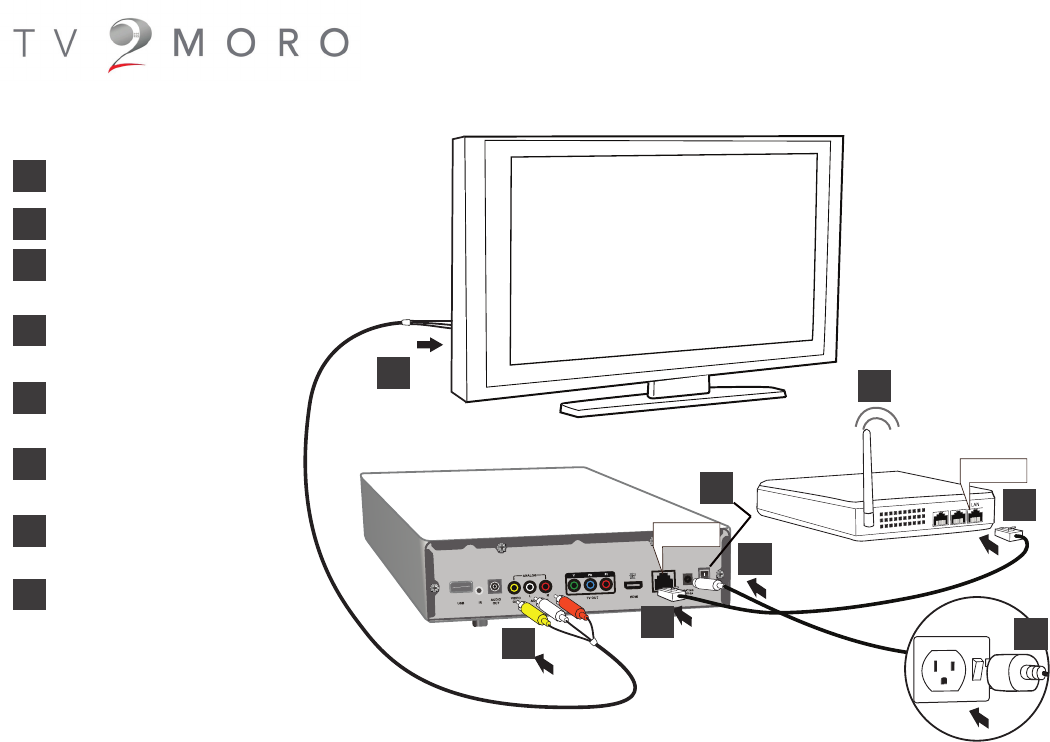
Box setup:
1. Connect video cable to TV2MORO box
2. Connect video cable to your TV
3. Connect LAN cable (Ethernet cable)
to TV2MORO box
4. Connect LAN cable (Ethernet cable)
to your Router / Modem
5. Connect Wireless, please follow
steps in page # 8
6. Connect power cable to
TV2MORO box
7. Connect Power Adapter to
power socket
8. Switch on the TV2MORO box
1
2
3
4
5
6
7
8
3

Remote control
Electronic Program Guide:
displays program guide
Display the current channel information
Use to adjust the volume
Power on/off Home Page
Cursor keys: up/down/left/right
Mute or un-mute the audio
Switch between channels
Number keys: While watching TV use to switch
channels.
4
Enter: Conrm an operation
Function bottons
Use to switch to previous channel

5
Menu System
Main Menu
The Main menu can be accessed through the Menu button on your remote control from here you can access additional options using the
Cursor keys: up/down/left/right and the OK button to conrm a selection.
At any time you can select the home option to return to the main menu.
At any time select the TV option to stream the last channel that was on.
TV Guide
The TV Guide menu will display all available channels and what is playing now and for the next few hours. Select the channel and press OK
to watch that channel. Select a program and select info to see more information.
My Account
Selecting this returns you to the last channel you were viewing before entering menu mode
Diagnostics Center
This menu allows you to gain more information about your TV2moro account.
Settings
This menu allows you to diagnose any problems you may be encountering with your set top box. From here you can test System, Video,
Audio, Network and Bandwidth.
Settings
From the setting menu you are able to adjust how your TV2moro set top box performs.
Video: NTSC/PAL/720p. (default is NTSC) Change the video output to match your TV set requirements.
Video: 4:3/16:9 Change the video aspect ratio to match your TV preference.
Network: Wired/Wireless
Streaming: Fast Start / Normal Start (Default is Normal Start).
Date and Time: (default is -5 EST ) Time zone setting must be set to match your local time which will update the program guide to your lo-
cal time.
Factory Default: This will reset your TV2moro set top box to its original status when you rst received it. This should only be done as a last
resort. All system updates and changes will be lost.
Information
This menu provides detailed system information for your TV2moro set top box.
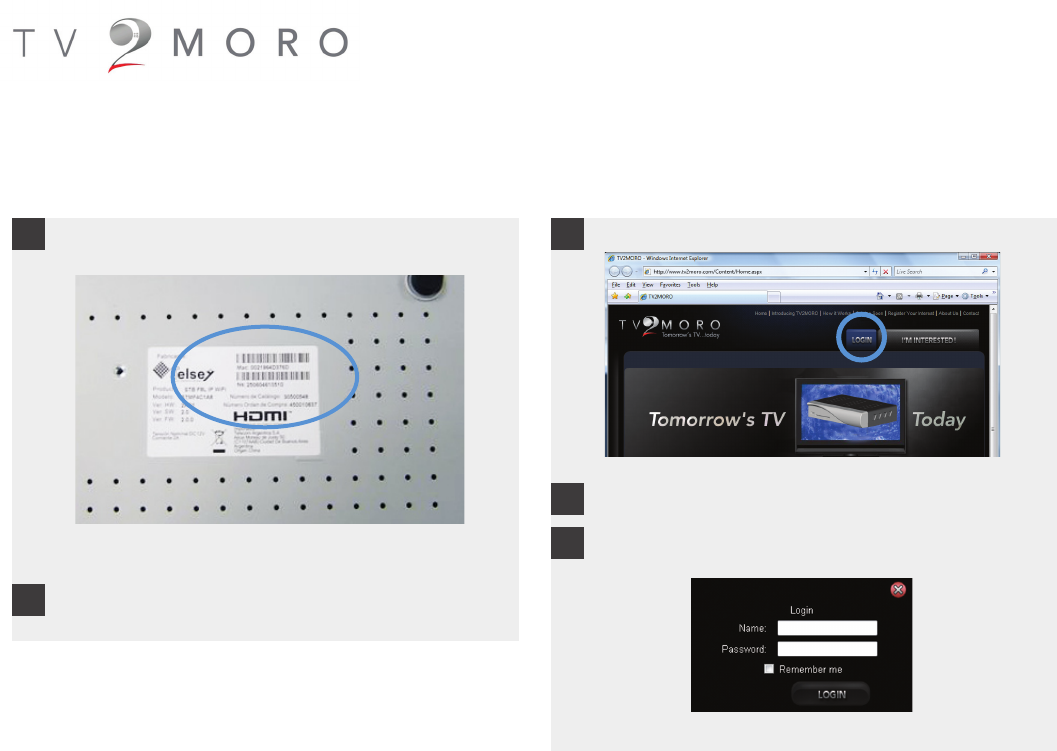
Activation by telephone or online
1. Using a computer, go to the website www.tv2moro.com.
2. Click the LOGIN button.
3. Enter your username and password you created when you rst
ordered, then click LOGIN.
TV2MORO website www.tv2moro.com
TV2MORO Login panel
6
Activation by telephone
To activate by telephone, perform the following steps
Activation online
To activate online, perform the following steps
1. Locate the MAC address at the bottom of your set top box.
2. Call 1-877-TV2MORO and have your MAC Address number
ready.
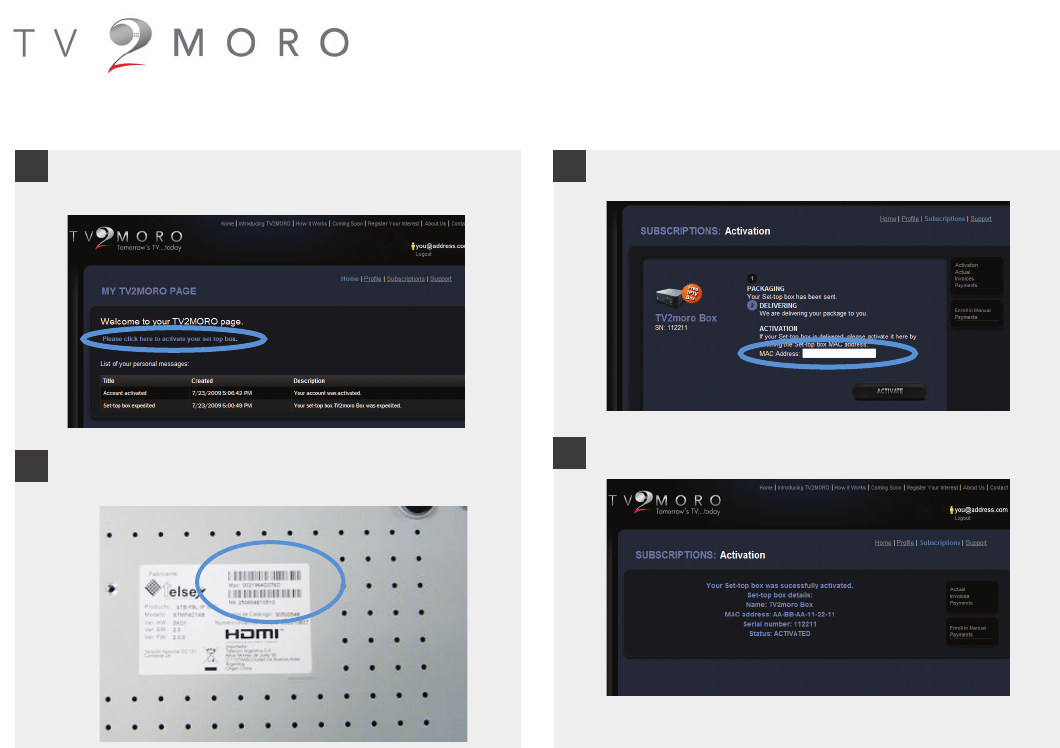
6. Enter the MAC address.
7. Your registration is complete.
Subscription activation page.
Online Activation (continued)
Activation completed screen.
7
TV2MORO account section.
4. Click on the text that says “Please click here to activate your set
top box.”
5. Locate the MAC address at the bottom of your set top box.
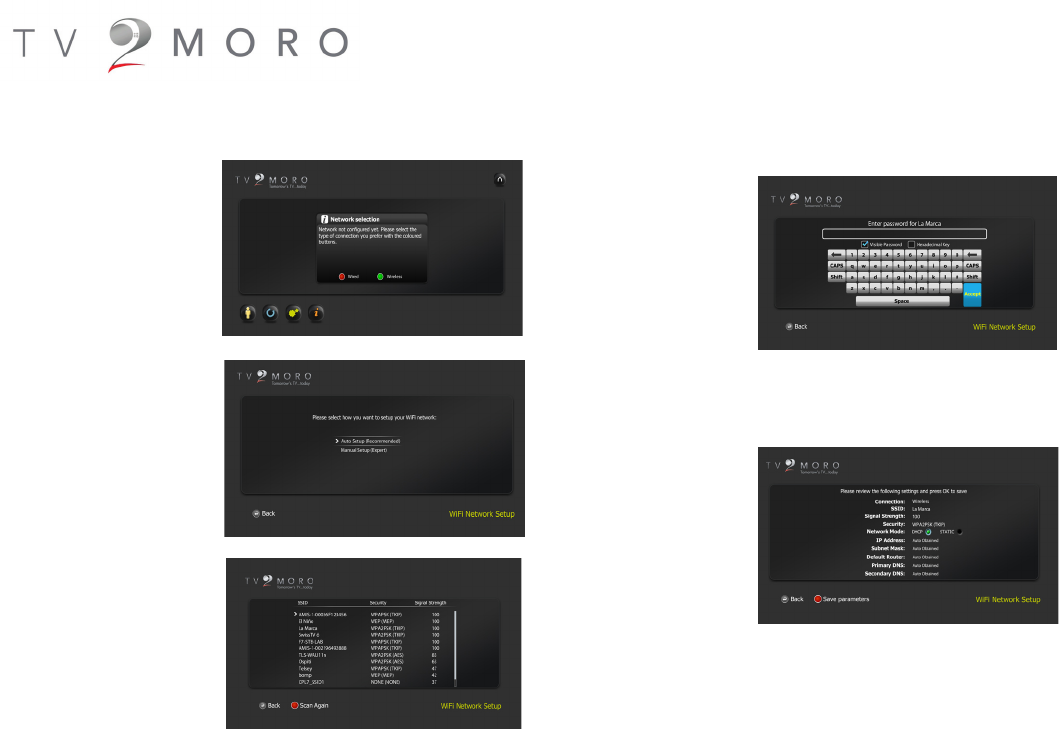
Wireless Setup
1. Under Network
Selection Choose Wire-
less by pressing on the
Green Button on your
TV2MORO remote.
2. Please make sure
Auto Setup (Recom-
mended) is selected
then press Enter on
your TV2MORO remote.
3. Browse through the
list and choose the
preferred network to
connect to, and then
press Enter button to
select a network.
8
4. If the network is pro-
tected by a password, the
user will be asked to enter it
with an on screen keyboard.
Once done press Enter on
the Accept button of the
keyboard to go to the next
step. If no password is
needed this screen will be
automatically skipped
5. In the last step of the
wizard a summary of the
selected network is shown.
Please make sure the
Network Mode is on DHCP
then Press the Red Button
on your TV2MORO remote.
Then press the Enter
button to connect to the
selected WiFi Network
Settings can be changed later on by:
• Setting box to factory values (conguration menu) which restarts the
process from beginning

9
I can’t see any of the Tv2moro screens on my TV set
Check the cable connections between the Tv2moro set top box and the TV.
Check that you have selected the correct TV input source (one of the RCA inputs if you are using the supplied cable). Make sure that you
have the right channel on the TV, typically AV, if your TV does not switch automatically. Check your TV manual for further information if
needed.
Check that the power is connected to the box, you should see a blue light on the power button.
I can see a screen labeled verifying network which says “Error”
Check your Ethernet cable is connected to the Tv2moro set top box and to your home router. Underneath the Ethernet connector on the
rear of the Tv2moro set top box are two lights. When connected to your home router the one on the left should glow green. When data is
passed the one on the right should ash orange.
My box says “Network is fine” but the network settings screen still comes up
Check your Network Settings by selecting the Diagnostic Center menu using your remote control, select the Network test and validate that
the “Network is ne”.
Select the Information page, this shows entries for your IP Address & default router, if not then there is a problem with your connection to
the internet. Check all cables to your home router and that the router is operational, check your internet access is working from your PC or
Mac. If you still experience problems please visit the help section on www.tv2moro.com.
The program guide doesn’t show right time for the shows
Navigate to the settings menu using your remote control and select the Date/Time button; verify that time zone is set correctly to your loca-
tion.
Troubleshooting
Q
A
Q
A
Q
A
Q
A

Q
A
10
Troubleshooting
My picture seems to break up and is not smooth
Navigate to the settings menu using your remote control and change the streaming setting to Normal Start.
If this does not resolve the issue, it is possible you are experiencing a temporary internet problem.
You can test your current bandwidth connection speed by selecting the Diagnostic Center menu using your remote control, select the
Bandwidth test and validate that you have enough bandwidth. If the problem persists please visit www.tv2moro.com for troubleshooting or
contact your internet provider if you are unable to use the internet.
The system says it is upgrading, but does not appear to do anything
An upgrade might take up to 10 minutes. If it seems it is taking much longer than this remove the power from the set top box, wait 20 sec-
onds, and re-apply power. The system should start normally.
The system has performed an upgrade, but nothing has happened
Some upgrades may require a full power cycle, please switch off the box, remove the power from the set top box, wait 20 seconds, and re-
apply power and switch the box on. The system should start normally.
My box is not behaving as expected
If you have tried all other options you can restore to factory default settings. Navigate to the settings menu and select “Factory Default”. All
system updates and changes will be lost.
Need more help?
Please visit the support section of our web site www.tv2moro.com
A
Q
A
Q
A
Q
A
MAC address: - - - - -
Serial No.
Username:
Password:
My Details:
Write down your MAC address, Serial Number, Username and Password.
11

EU Declaration of Comformity
CompleteTV declares that this STMC-IP product is in compliance with the essential requirements and other relevant provisions of
Directive 1999/5/EC. A copy of the Declaration of Conformity can be obtained directly from CompleteTV Ltd.
FCC Compliance Statement
Disposal and Recycling Information
This symbol indicates that the device is classed as Electrical or Electronic Equipment and should not be disposed with other household
or commercial waste at the end of its working life. When you have no further use for this device, please remove any batteries and dis-
pose of them and the product as per your local authority’s recyling processes. For more information please contact your local authority
or the retailer where the product was purchased.
Remember, if you need any help, don’t hesitate to contact 1-877-TV2MORO or 1-877-882676 or email help@tv2moro.com
Regulatory and Compliance Information
12
For US Owners Only
FCC approval
This device comply with Part 15 of the FCC/Federal Communication Commission regulations. Operation is governed by the following:
FCC ID: ZPA-TELSEY3070
This device complies with part 15 of the FCC Rules.
Operation is subject to the following two conditions:
- this device may not cause harmful interference, and
- this device must accept any interference received, including interference that may cause undesired operation.
Any unauthorized modications or changes to these devices could void the user’s authority to operate this equipment.
FCC ID: A2L-TELSEY3070