Ten Tec 539 HF AMATEUR RADIO TRANSCEIVER User Manual UDP 588 Users Guide
Ten Tec Inc HF AMATEUR RADIO TRANSCEIVER UDP 588 Users Guide
Ten Tec >
Users Manual
Table of Contents
1.Your new Argonaut VI 539..............................................................................................................................................3
1.1.Unpacking Argonaut VI Model 539..........................................................................................................................3
1.2.About this Manual......................................................................................................................................................3
1.3.Accessory package.....................................................................................................................................................3
1.4.Connection to Antenna & Power Supply...................................................................................................................4
1.5.A word about grounding............................................................................................................................................4
1.6.Philosophy of design..................................................................................................................................................5
2.Easy Operation Guide.......................................................................................................................................................6
2.1.Front Panel Indicators................................................................................................................................................6
TX/ALC LED.............................................................................................................................................................6
S-Meter / SWR Meter.................................................................................................................................................6
2.2.Front Panel Controls..................................................................................................................................................7
2.3.General Operations....................................................................................................................................................8
Power Switch (1)........................................................................................................................................................8
AF Gain Control (1)...................................................................................................................................................8
RF Gain Control (2)...................................................................................................................................................8
BW (3) Bandwidths..................................................................................................................................................9
PBT (4) Pass Band Tuning.......................................................................................................................................9
Band (7).....................................................................................................................................................................9
Split (8)......................................................................................................................................................................9
AGC (9)......................................................................................................................................................................9
A/B (10).....................................................................................................................................................................9
RIT (7).....................................................................................................................................................................10
POWER (7).............................................................................................................................................................10
Mode (10).................................................................................................................................................................10
Headphones (20 on rear panel)................................................................................................................................10
Tuning Steps and VFO LOCK (8)...........................................................................................................................10
PRE (8)....................................................................................................................................................................10
Recalling A Stored Memory (9)...............................................................................................................................11
Storing a Frequency to Memory (8)........................................................................................................................11
NR/NB (9) Noise Reduction/Noise Blanker..........................................................................................................12
2.4.SSB Mode Operation...............................................................................................................................................13
Monitor Level (3, 5, 7).............................................................................................................................................13
Speech Processing (3, 5, 8)......................................................................................................................................13
Auto Notch (9)..........................................................................................................................................................13
MIC Connector ........................................................................................................................................................14
Mic Gain and Line Gain(10)....................................................................................................................................15
2.5.CW Mode Operation................................................................................................................................................16
Internal Keyer CW Speed Setting............................................................................................................................16
Internal Keyer Weighting / Dit Spacing & Curtis Mode A/B..................................................................................16
CW Sidetone Frequency...........................................................................................................................................16
CW Sidetone Level..................................................................................................................................................16
QSK Delay...............................................................................................................................................................16
CW Keying and Wiring............................................................................................................................................17
2.6.AM Mode Operation................................................................................................................................................17
2.7.Digital Mode Operation...........................................................................................................................................17
2.8.Interfacing to a computer for Firmware Update Mode and PC Control/Logging Purposes....................................18
2.9.Power Up Modes......................................................................................................................................................19
Configuration Menu (PWR(7))................................................................................................................................19
Master Reset (SPL(8) )............................................................................................................................................19
Firmware Update Mode (A/B (10))..........................................................................................................................20
2.10.Optional Filter Installation.....................................................................................................................................21
2.11.Extended Feature Access via USB/Serial..............................................................................................................22
2.12.Retaining User Settings..........................................................................................................................................22
539 / Argonaut VI Users manual Release 0.10 – November 13, 2012
Part #74479
Printed in USA 1
3.Argonaut VI Rear Panel..................................................................................................................................................23
ANT (11)..................................................................................................................................................................23
AUX (12)..................................................................................................................................................................23
FUSE (13).................................................................................................................................................................23
DC IN (14)...............................................................................................................................................................23
GROUND TERMINAL (15)...................................................................................................................................23
DC OUT (16)............................................................................................................................................................23
USB (17)...................................................................................................................................................................23
KEY (19)..................................................................................................................................................................23
EXTERNAL HEADPHONES (20) .......................................................................................................................23
ACC 1 (18)...............................................................................................................................................................24
Keying a Linear Amplifier.......................................................................................................................................25
4.Accessory Devices..........................................................................................................................................................25
4.1.List of Optional Accessories For The Argonaut VI.................................................................................................25
4.2.Using the 712 USB/Soundcard Interface ...............................................................................................................25
5.Specifications..................................................................................................................................................................26
5.1.Transceiver Specifications.......................................................................................................................................26
5.2.Transceiver Block Diagram.....................................................................................................................................29
6.In Case of Difficulty.......................................................................................................................................................31
7.Warranty & Return Policy..............................................................................................................................................33
539 / Argonaut VI Users manual Release 0.10 – November 13, 2012
Part #74479
Printed in USA 2
1. Your new Argonaut VI 539
1.1. Unpacking Argonaut VI
Model 539
Examine the Argonaut VI transceiver for
signs of shipping damage. Should any
damage be apparent, please contact Ten-Tec
Service (865) 428-0364 to handle the claim.
1.2. About this Manual
A complete description of the features and
functions on the Argonaut VI Model 539 are
included within the pages of this manual. The
latest version of the Argonaut VI manual is
also available to view in pdf format located
under the download tab on the Argonaut VI
Transceiver via www.tentec.com.
You may also find firmware updates plus a
full set of schematic diagrams at this same
web location.
1.3. Accessory package
The additional hardware and accessories
listed in Table 1.3-1 come standard with your
new Argonaut VI.
Look over the items listed and refer to the 5
digit Ten-Tec part number and description
should you find the need to replace an
accessory.
To purchase additional accessories and parts
or to report an item missing from this list,
please contact Ten-Tec Service.
Qty Part # Description
1 27091 Auto Style Fuse, 7.5 Amp 13.8 VDC
1 35241 8 PIN DIN Connector
1 35263 Plug – Stereo, 3.5MM (1/8)
1 38040 Allen Wrench, 0.050 Hex
1 86095 DC Cable Assembly 4 Ft
1 74020 Warranty card
1 74244 Standard Warranty Sheet
1 74479 Manual for 539 Argonaut VI
1 74450 How do I become a Ten-Tec
Ambassador
1 74480 Argonaut VI Quick Start Guide
Table 1.3-1 Argonaut VI Packing List
539 / Argonaut VI Users manual Release 0.10 – November 13, 2012
Part #74479
Printed in USA 3
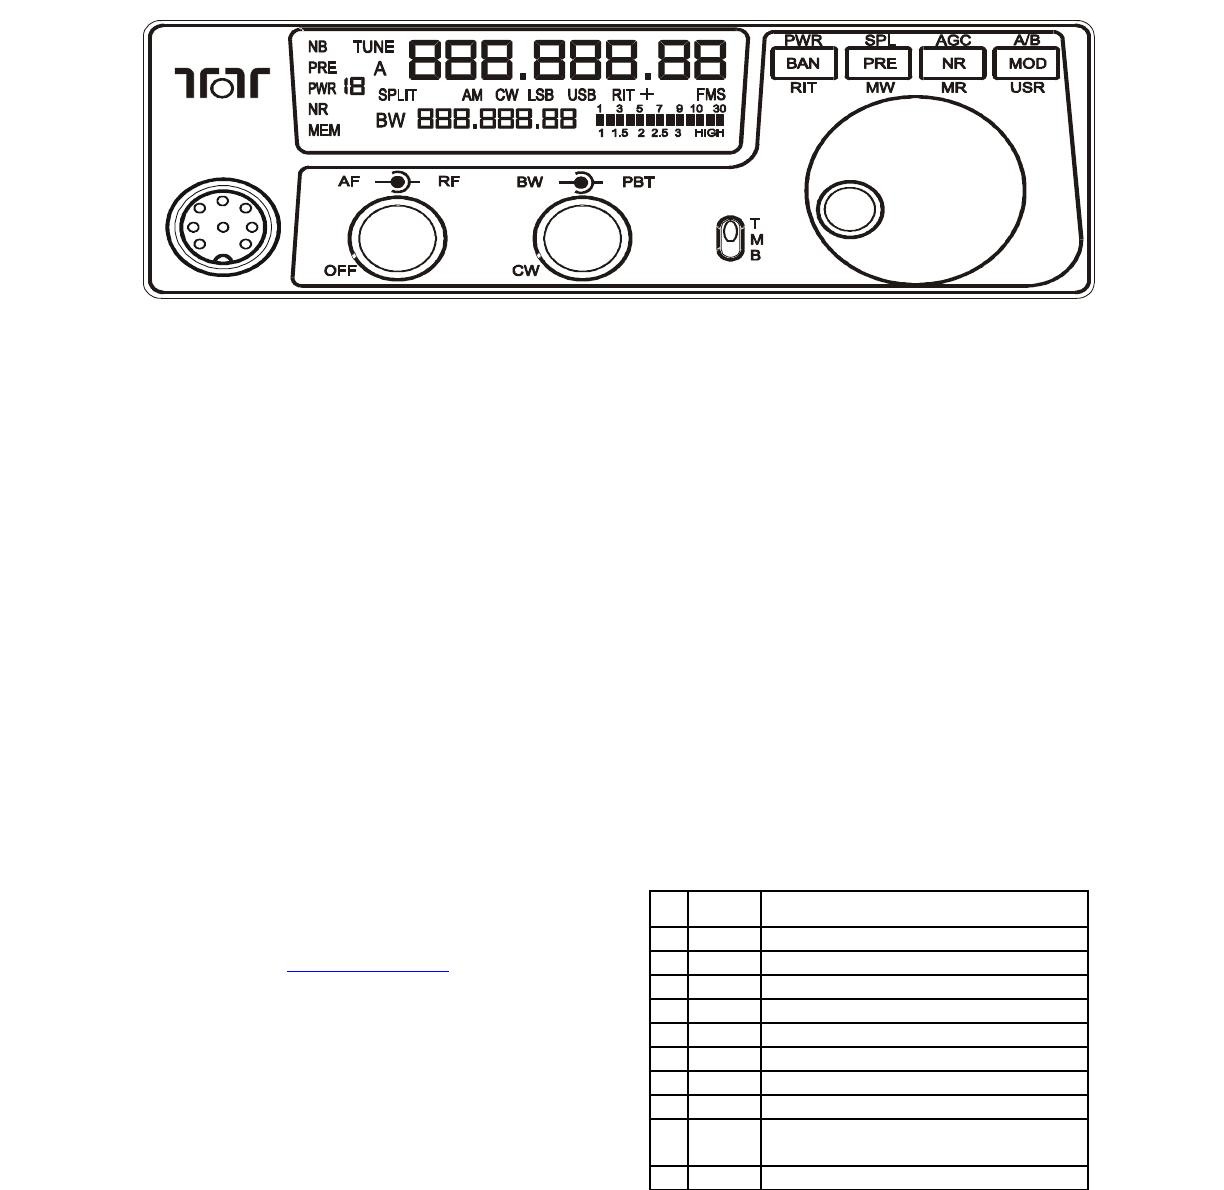
Figure 1-1 539 Front Panel
Argonaut VI
1.4. Connection to Antenna &
Power Supply
The Argonaut VI is designed for use with any
antenna system providing a 50 Ohm resistive
impedance at the desired operating frequency.
Every effort should be made to ensure the
impedance of the antenna system is as close
as possible to the specified 50-Ohm value.
Note: that the “G5RV” type antenna and
some Windom’s do not provide 50-Ohm
impedance on all HF Amateur bands, and an
external wide-range antenna coupler will be
needed. Any antenna to be used with the
Argonaut VI must, ultimately, be fed with 50
Ohm coaxial cable.
The Argonaut VI transceiver requires a
source of well-filtered and regulated DC
voltage. The supply voltage for the Argonaut
VI is 13.8 Vdc nominal +/- 15% to allow for
mobile and battery operation. The voltage
source must be capable of supplying 5-7
amperes continuous duty. We recommend
using the included DC power cable (P/N
86095).
Note: Always enable the power source first
and then the transceiver. If a generator or
battery connected to a charger is used to
supply the DC source, always turn off the
transceiver before starting or shutting off the
DC source equipment. These recharging
devices often generate large voltage spikes
that can damage the transceiver.
1.5. A word about grounding
A good ground system is essential for
optimum operation of any HF transmitter.
The best solution is to connect all the station
equipment to a single ground connection.
Refer to Local and National Electrical Codes
before making any connections with the
Argonaut VI. Another source of information
on grounding can be found in the ARRL
Handbook.
A good ground system can contribute to the
station efficiency in a number of ways
including minimizing the possibility of
electrical shock, and minimizing RF currents
flowing on the shield of the coax cable
causing interference to electrical equipment
and transceiver accessories.
It is critical that the power supply, the
Argonaut VI, and other equipment in the
station be properly grounded to an Earth
ground. Improper grounding can lead to
various issues, including RFI, ground loops,
or even death. Therefore it is extremely
important to refer to the Local and National
Electrical Codes and ARRL Handbook with
regards to grounding.
539 / Argonaut VI Users manual Release 0.10 – November 13, 2012
Part #74479
Printed in USA 4
1.6. Philosophy of design
With the Model 539 Argonaut VI, Ten-Tec
has created a QRP transceiver combining
simplified controls and ease of operation with
the excellent performance of a low first IF
ham-band architecture in a compact, mobile-
friendly structure. The analog portion of the
radio is double conversion with IF
frequencies of 9.0018 MHz and 22.5 kHz. A
third conversion to zero-frequency IF is
accomplished in the DSP processor.
Refer to the Block Diagram in the
“Specifications” section for the following
discussion. Receive signals are routed to a
T/R switch at the input of the BPF/Preselector
board. This board also contains the bandpass
filter selected for the band in use and a
switchable 12dB receive preamplifier. On the
TX/RX board, output from the preamplifier is
mixed with the first Local Oscillator to
9.0018 MHz and routed to one of the three
roofing filters. After selectivity roofing, IF
amplification is provided by a variable gain
amplifier which also develops the high-level
AGC. Finally, the 9.0018 IF signal is mixed
with the second LO to develop a 22.5 kHz
low IF for the Signal Processing Unit (SPU).
Based on a 36.096 MHz temperature-stable
reference, the Oscillator board generates first
and second LO's with a DDS circuit and fixed
frequency division. The SPU samples the low
IF at 96K samples per second and applies the
resulting data to a digital signal processor.
Numerical algorithms running in the digital
processor accomplish additional selectivity
filtering, low-level AGC, and demodulation.
The resulting audio appears at the speaker and
line outputs.
The PIC processor in the front panel CPU
module executes firmware stored in
EEPROM to perform housekeeping functions
such as synthesizer programming/tuning,
signal switching, and front panel display and
control input. Based on the control inputs
from the front panel (or remotely via the USB
interface), the CPU writes display
information, tunes the LOs, adjusts
selectivity, and chooses both receiver
detection and transmit emission modes.
Transmit operation is basically the reverse of
receive. Audio or CW signals are generated at
zero-frequency (baseband) in the DSP,
frequency-shifted to the 22.5 kHz low IF, and
output to mixers on the TX/RX board for
conversion to the operating frequency. The
signal then travels in the reverse direction
through the selected Bandpass Filter to the
low-level drivers and Power Amplifier, then
finally through the Lowpass Filter to the
antenna.
The Argonaut VI is designed to cover the
following hambands:
160M - 1.795-2.005
80M - 3.495-4.005
40M - 6.995-7.305
30M - 10.095-10.155
20M - 13.995-14.355
17M - 18.063-18.173
15M - 20.995-21.455
10M - 27.995-29.705
539 / Argonaut VI Users manual Release 0.10 – November 13, 2012
Part #74479
Printed in USA 5
2. Easy Operation Guide
2.1. Front Panel Indicators
TX/ALC LED
The “o” in the ToT Logo includes an LED.
The primary purpose for this LED is to
identify when the Argonaut VI is transmitting
approximately 80% or more of the selected
power setting. For CW mode, this should be
active during the entire dit or dah transmit
cycle. For Voice modes this will be when
transmit voice is 80% or greater than the
selected power level. This LED is also used in
the firmware update mode.
S-Meter / SWR Meter
The meter on the Argonaut VI offers two
functions:
1. S-Meter, in receive mode, the meter
shows the signal strength.
2. SWR-Meter, while transmitting and
the MOD button is pressed, the meter
shows the SWR as calculated on the
bridge in the Argonaut VI.
When in transmit the bar graph meter will
display your power output peaks. When you
wish to view the SWR, ensure that the three
position switch (5) labeled with TMB is in the
middle (M) position, and press the MOD
button while you transmit. The meter will
now display your SWR while the MOD
button is pressed. When the MOD button is
released the SWR graph disappears and the
power output will be displayed.
It is recommended that the rig be held in
transmit continuously prior to pressing MOD
to view the SWR. It is not advisable to try to
view the SWR when sending a stream of CW.
539 / Argonaut VI Users manual Release 0.10 – November 13, 2012
Part #74479
Printed in USA 6
1 3 5 7 9 10 30
1 1.5 2 2.5 3 HIGH
Figure 2.1-2 Meter-VSWR
1 3 5 7 9 10 30
Figure 2.1-1 Meter-Signal Strength
123 4 5
6
7810
9
Figure 2-1 539 Front Panel- (with indexes)
Argonaut VI

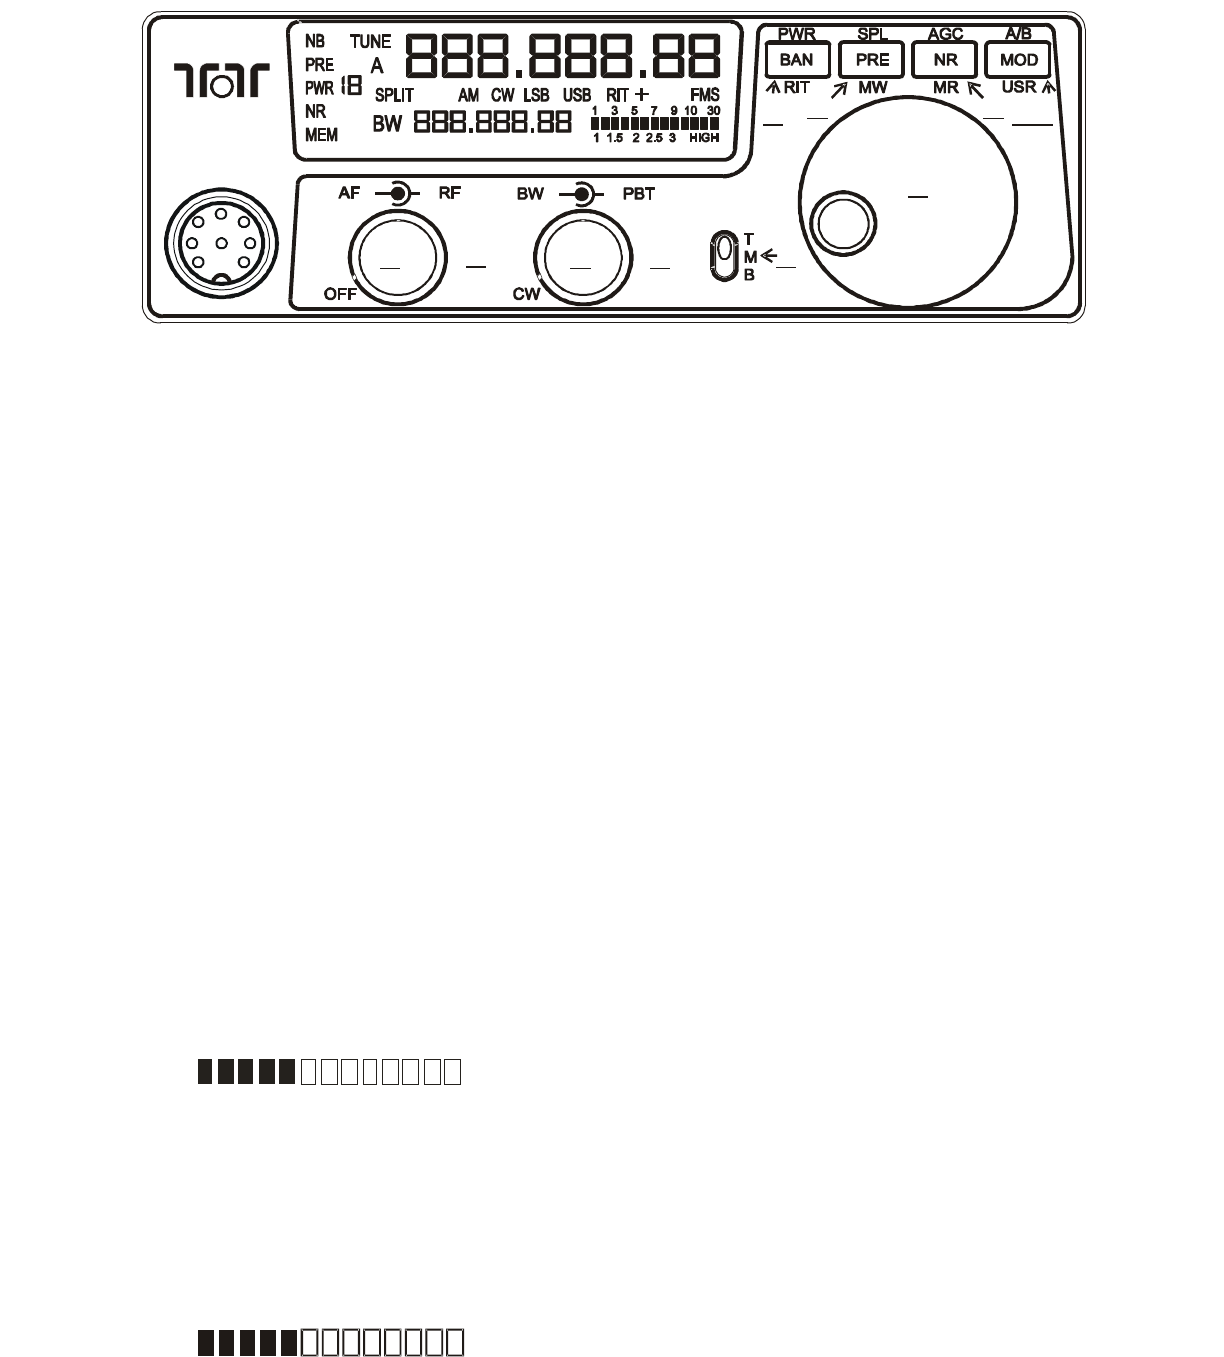
2.2. Front Panel Controls
This section provides a very brief overview of
the front panel of the Argonaut VI, more
details on each control is given later in this
manual.
Two Dual Concentric POTS (1, 2, 3, 4)
The Argonaut VI front panel provides two
dual concentric multi -function pots. One for
AF/RF Controls, and the other for BW/PBT
controls. Using the AF knob, rotating the
knob fully counter clockwise removes power
from the Argonaut VI. Rotating the AF knob
clockwise will apply power to the Argonaut
VI and increase AF Levels. Using the BW
knob, rotating fully counter clockwise enables
the adjustment of further mode dependent
features. More on this later in the manual.
Rotating the BW knob clockwise will
increase or widen the selected DSP
Bandwidth.
Three Position Switch TMB (5)
There is a three position switch on the front
panel with text T, M, and B next to it. These
refer to the position of the switch T(op),
M(iddle), and B(ottom), which identifies
which function the four multi function
buttons will perform.
Main Encoder for various adjustments (6)
There is a single Main Encoder on the front
panel that is used primarily for adjusting the
tuned frequency. It also serves as the
adjustment on various other features.
Multi Function Buttons (7, 8, 9, 10)
There are four buttons on the front panel to
change different operational features within
the Argonaut VI. These buttons perform
multiple functions. The Primary Function for
the buttons on the Argonaut VI is screened
directly on the button. Notice the four
buttons have text printed above the button, on
the button, and below the button. The location
of the TMB switch identifies the function as
stated by the T(op) row of text above the
button, or the M(iddle) row of text printed on
the button, or the B(ottom) row of text printed
below the button. These buttons also take on a
fourth meaning when the BW pot is adjusted
fully counter clockwise and the switch clicks
to the (CW) position. The functionality is
described in the following sections.
539 / Argonaut VI Users manual Release 0.10 – November 13, 2012
Part #74479
Printed in USA 7
123 4 5
6
7810
9
Figure 2-1 539 Front Panel- (with indexes)
Argonaut VI

2.3. General Operations
This section of your Argonaut VI Manual will
discuss the button operation and adjustments
common to all modes on the Argonaut VI. It
is important to read this general operations
section prior to operating the Argonaut VI
because the BW Pot (3) and the state of the
“TMB” three position switch (5) change the
function of the four push buttons (7, 8, 9, 10).
AF Gain Control And Power Switch (1)
The inner knob (1) of the AF/RF knob
provides two functions: Power control for the
rig and the AF Gain control.
Power Switch (1)
To turn on the Argonaut VI, rotate the AF
Gain control (1) clockwise. The LCD screen
will display the current firmware version and
unit serial number for three seconds. The
LCD screen will then display the last band,
frequency, and mode used. To turn off the
Argonaut VI, rotate the AF Gain control (1)
counter clockwise until power is removed and
the LCD display turns off. To place the
Argonaut VI in any of the special power up
modes, see the section on “Power Up
Modes“ for more information.
AF Gain Control (1)
This control adjusts the volume of the internal
speaker, and also for the headphones if one is
plugged into the rear jack. Rotating the AF
Gain control clockwise will increase the
volume to a maximum of 100% at full
clockwise rotation.
RF Gain Control (2)
The outer ring (2) of the AF/RF knob
provides the RF Gain feature. Adjusting the
outer ring RF Gain control clockwise
increases RF Gain action up to 100% at the
full clockwise rotation. Adjusting the outer
ring RF Gain control counter clockwise
decreases RF Gain action down to 0% at the
full counter clockwise rotation. Depending on
signal strength you may find a more pleasing
signal to noise ratio by turning the RF gain
control down to a comfortable listening level.
AF/RF Gain Control Usage Tips
One way to make a noisy band easier to listen
to and pull out weaker signals is to decrease
the RF Gain to the point where the audio is
difficult to hear, then increase the AF Gain.
Balancing these two controls in a TenTec
transceiver helps one pull out signals, and
helps decrease the band background noise to a
level that is much more enjoyable and reduces
contest fatigue.
539 / Argonaut VI Users manual Release 0.10 – November 13, 2012
Part #74479
Printed in USA 8
123 4 5
6
7810
9
Figure 2-1 539 Front Panel- (with indexes)
Argonaut VI

BW (3) Bandwidths
Adjusting the BW control will allow you to
select the DSP filtering of your choice. This
will increase the selectivity of receive and
helps remove close in unwanted signals.
The range of the DSP filters is 100hz to
2500hz in 25hz increments. When the
optional 6kHz filter is installed, this permits
4k, 5k, and 6k DSP bandwidth selections.
When dealing with crowded band conditions
and close in adjoining signals one will find
this control very useful as you begin to
narrow the filter to eliminate close in
unwanted signals. This control will
automatically select the correct roofing filter
ahead of the DSP filtering provided a specific
roofing filter is installed.
PBT (4) Pass Band Tuning
Verify that the PBT control is at 12 0'clock to
begin listening in all modes.
The PBT control will allow you to move the
passband back and forth across the desired
signal. It is beneficial in dropping QRM out
of one side or the other of the passband or it
can simply be used to improve the quality and
intelligibility of the signal. An excellent
experiment for digital communications is to
work the PBT control along with the BW
bandwidth control for the greatest selectivity
and interfering signal rejection.
Band (7)
Be sure TMB switch is in Middle position. To
change bands or toggle through the Ham
bands press the BAN button and the next
Ham band will be recalled. BAN will only
toggle through the Ham bands in one
direction. When the band is changed, the A
Frequency, the B Frequency and the Mode
are recalled from the last time the band was
used. Since the Mode is recalled, the Tuning
Rate, and the AGC will also be recalled from
the last time that Mode was used.
Split (8)
To operate SPLIT mode be sure TMB switch
is in the Top position. Press SPL (PRE)
button. The word SPLIT will appear between
VFO A and VFO B. VFO B will show the
transmitted frequency in smaller font. To exit
SPLIT mode, press the SPL (PRE) button one
more time turning off the word SPLIT.
AGC (9)
Be sure TMB switch is in the Top position.
Press AGC (NR) button will toggle the AGC
between fast, medium, and slow. The letter
F, M, or S will appear below the last digit on
VFO A
A/B (10)
Be sure TMB switch is in the Top position.
When you press and hold the A/B (MOD)
button you will now be able to set B VFO to
equal VFO A. A quick press of the A/B
(MOD) button will reverse both A and B
VFO.
539 / Argonaut VI Users manual Release 0.10 – November 13, 2012
Part #74479
Printed in USA 9
123 4 5
6
7810
9
Figure 2-1 539 Front Panel- (with indexes)
Argonaut VI

RIT (7)
Be sure TMB switch is on the Bottom
position. The RIT can now be toggled on and
off by pressing the RIT (7) button. RIT will
now be displayed on the front of the screen.
As you rotate the main VFO knob you will
notice a + or – sign appearing to the right of
the RIT. A numerical value at the bottom
center of the screen indicates each 10 Hz
above or below the main VFO frequency. If
you toggle the RIT (7) button again after
setting the RIT up or down it will
automatically reset and turn off the RIT
control returning it to zero.
POWER (7)
Be sure TMB switch is in the Top position.
The power can now be adjusted by pressing
the PWR (7) button. As you toggle this
button you will notice PWR will begin to
flash on the left side of the screen. While
PWR is flashing Rotate the main VFO knob
up or down to display the output power
desired. Pressing the PWR (7) button one
more time will turn off the flashing PWR and
lock in the desired output of the radio.
Mode (10)
Be sure the TMB switch is in the Middle
position. Pressing the MOD button will toggle
the modes to your desired choice. The
Argonaut VI will change modes each time the
button is pushed. The desired mode is
displayed in the middle of the Argonaut VI
screen between VFO A & B. The Mode
setting utilized in a given band will be
recalled when that band is used again.
Remember, AM mode will not be displayed
or active unless EaD has been selected within
the configuration menu.
Headphones (20 on rear panel)
Headphones using a ¼” mono or stereo
connector can be plugged into the jack 20
located on the rear of the Argonaut VI.
Headphone Impedance from 8-32 ohms will
offer adequate audio levels. When plugged
into the Argonaut VI the main speaker will be
deactivated.
Tuning Steps and VFO LOCK (8)
To select tuning steps of 10Hz, 100Hz, or
1kHz be sure TMB button is in the Middle.
Press/hold the PRE button. The Argonaut VI
will beep when the step size changes. One
Beep means 10hz steps. Two beeps means
100hz steps. Three beeps means 1000hz
steps. Four beeps means the main VFO
encoder is now locked, and is indicated by a
“L” in front of the VFO A display. To exit
the “Locked” state, press/hold the PRE button
until the desired step size is shown again.
PRE (8)
The preamplifier in the Argonaut VI is
designed to give you a 12dB increase in
signal strength. Be sure the TMB switch is in
the Middle position. Pressing the PRE button
will toggle the receiver Preamp on or off
When the Preamp is on, PRE is shown on the
left side of the display. The S Meter reading
will not change when the Preamp is engaged.
539 / Argonaut VI Users manual Release 0.10 – November 13, 2012
Part #74479
Printed in USA 10
123 4 5
6
7810
9
Figure 2-1 539 Front Panel- (with indexes)
Argonaut VI
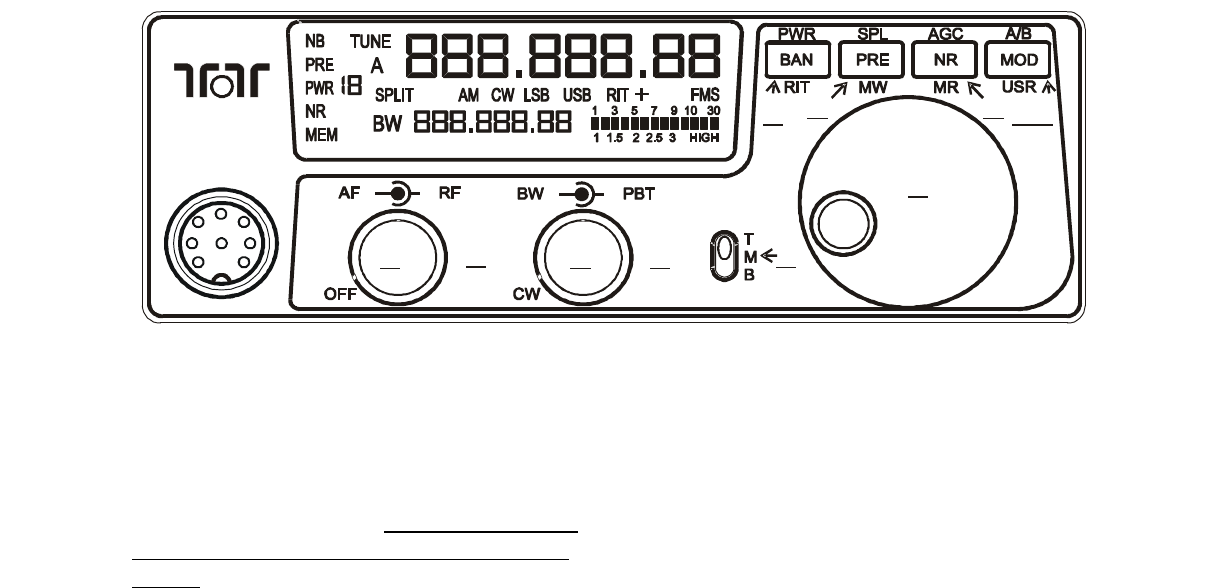
Recalling A Stored Memory (9)
Both mode and frequency can be stored in 1-
100 memories within the Argonaut VI. To
store a frequency in memory be sure the TMB
switch is on the Bottom. Select your desired
frequency and mode then press the MR (NR)
button. One beep will sound. MEM will
appear to the bottom left side of your front
screen. A previously inserted memory
frequency or --- --- -- will appear on the
screen providing for the next vacant memory.
A numeric channel number will appear below
the mode. Rotate the main VFO knob to
select your desired vacant memory location.
Press and hold MR (NR) until you hear one
beep, then quickly release the MR (NR) to
lock in that memory location. Use the main
VFO knob to scroll through 100 different
memories available and view which memory
locations are vacant. You may re-write to an
existing memory location by scrolling to that
memory number. To exit MEM mode
without saving any changes quickly tap the
MR (NR) button to exit back to your VFO
frequency and mode.
Storing a Frequency to Memory (8)
To store a memory channel be sure the TMB
switch is on the Bottom. Press down the MW
(PRE) to enter the memory mode. Rotate the
main VFO knob to select the desired memory
location. Next press and hold the MW (PRE)
until you hear 1 quick beep. Your frequency
and mode will now be stored. Upon release
of this button the MEM will also disappear.
To cancel or empty a memory channel be sure
the TMB switch is on the Bottom. Press
down the MW (PRE) to enter the memory
mode. Rotate the main VFO knob to select
the desired memory location. Next press and
hold the MW (PRE) for 2-3 seconds or until
you hear four quick beeps. Any frequency
which has been entered will now be removed.
Upon release of this button the MEM will
also disappear from the screen.
539 / Argonaut VI Users manual Release 0.10 – November 13, 2012
Part #74479
Printed in USA 11
123 4 5
6
7810
9
Figure 2-1 539 Front Panel- (with indexes)
Argonaut VI
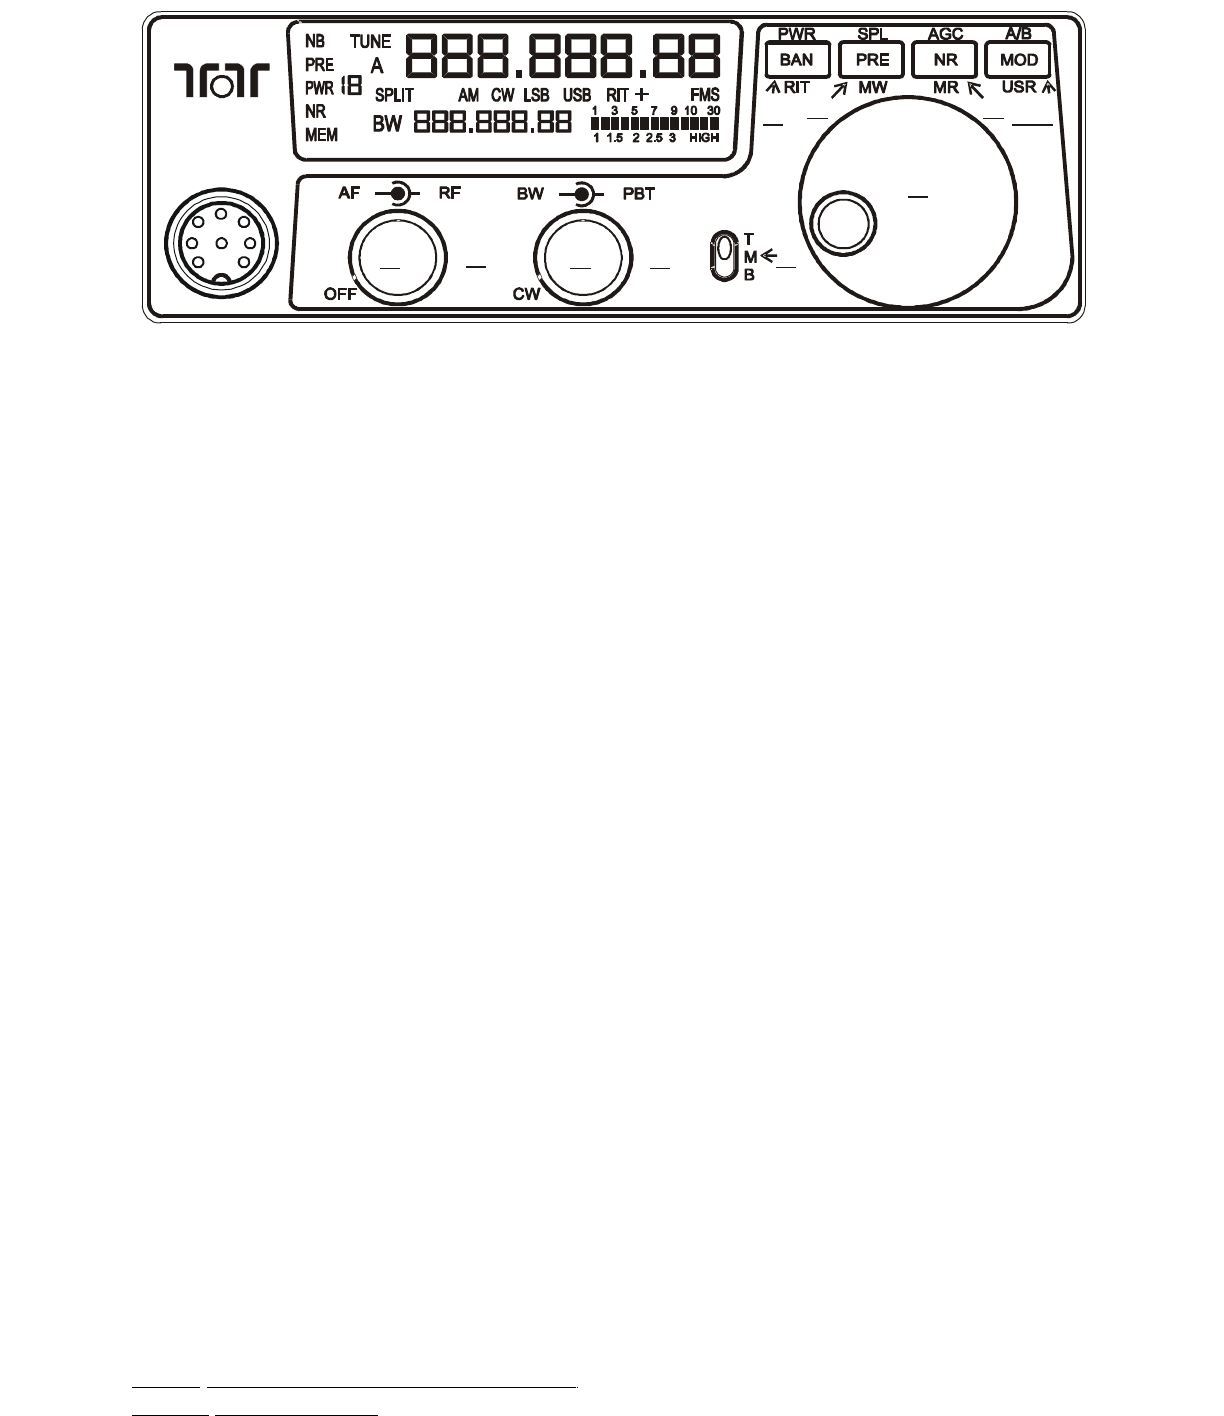
NR/NB (9) Noise Reduction/Noise
Blanker
Be sure the TMB switch is in the Middle
position. By pressing the NR button once you
will toggle the noise blanker on. NB will be
shown on the top left side of the screen.
Pressing the NR button a second time will
turn off the noise blanker and turn on the
noise reduction. Pressing the NR button a
third time will turn on both the noise blanker
and the noise reduction. Both NR and NB
will appear on the left side of the screen when
toggled on or off.
To adjust the how aggressive of either the
noise blanker or the noise reduction follow
these steps: Begin by turning both NR & NB
off so you can begin setting these features
independently. Ensure that the TMB switch
is in the Middle position. Ensure that the
bandwidth control is pointing to 12 o'clock.
To adjust how aggressive the noise blanker
operates, press the NR button (1 beep). Press
and hold the NR button one more time (1
beep) You will now see (nb) displayed on the
screen with a numerical value just left of the
SWR/PWR meter. Use the main VFO knob
to change to the required value. Press the NR
button one more time to set the desired value
to the Argonaut VI.
To set how aggressive the noise reduction
feature works toggle the NR button until just
the NR appears on the left side below PWR.
Follow the directions above to set the desired
value to the Argonaut VI.
Exit by toggling the NR button until the
NR/NB or both disappear from the screen
539 / Argonaut VI Users manual Release 0.10 – November 13, 2012
Part #74479
Printed in USA 12
123 4 5
6
7810
9
Figure 2-1 539 Front Panel- (with indexes)
Argonaut VI
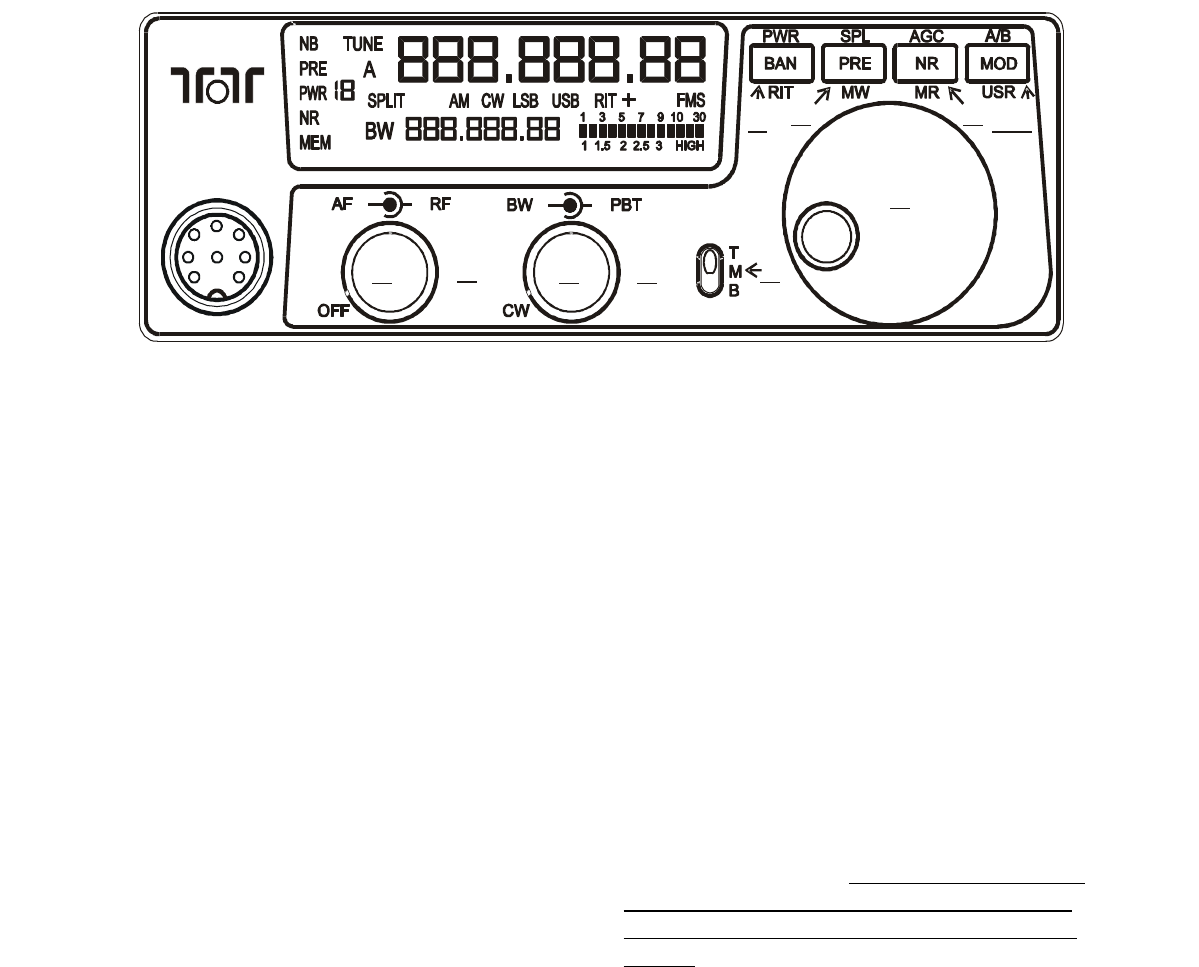
2.4. SSB Mode Operation
Be sure the TMB switch is in the Middle
position. To begin SSB operation toggle the
MOD button to either the LSB or USB for the
mode of you wish to operate. The Argonaut
VI will display the last mode you have
selected when toggling through the bands.
Note: Remember to set the PBT (4) control
to the center of rotation so the side band
signal is centered in the desired filter. This
results in a starting point for proper side band
audio.
Monitor Level (3, 5, 7)
To monitor your SSB, audio input levels, or
Speech Processing level, a built in monitor
can be heard best with a set of headphones
connected to the Argonaut VI. To activate
the monitor feature you must first set the
Argonaut VI into either LSB or USB. Be
sure the TMB button is in the Middle. Rotate
the bandwidth control until switched to the
CW position. Press the BAN button and you
will see (nnon LUL) on the screen. The level
can be adjusted from the main VFO knob and
a level amount will be displayed on the
bottom center of the screen. 0 means no
Monitor output, and non-zero means that %
will be added to the speaker and headphone
outputs. The level is still active whenever a
non-zero value is used and will be heard in
voice transmit modes when transmitting
regardless of whether the monitor is in the
adjustment mode or not.
Speech Processing (3, 5, 8)
Be sure the Argonaut VI is in the USB or
LSB mode. To turn the Speech Processor on
be sure the TMB switch is on the Bottom.
Rotate the bandwidth control until switched
to the CW position. Press the MW (PRE)
button. The screen will display (SP PrOC).
Adjust the desired amount of processing with
the main VFO knob 0-9. When set at zero the
procesor will be turned off. Any setting from
1-9 will be active and remain on all the time
when in side band modes. To exit simply
press MW (PRE) and the main frequency
display will be brought back on screen.
Remember: When you are finished making
adjustments to Monitor Level and Speech
Processing values, turn the BW pot
clockwise from the CW position to return
the Argonaut VI to normal operational
modes.
Auto Notch (9)
The Argonaut VI provides an Automatic
Notch feature. AN will operate in CW and
Voice modes. To turn it on and off requires
that you select USB or LSB mode. Then
rotate the bandwidth control until switched to
the CW position. Press the NR(9) button. This
toggles the AN setting. There is no indication
on the front panel for Auto Notch. When you
press the NR (9) button, 1 beeps means that
Auto Notch is disengaged, and 2 beeps means
that Auto Notch is engaged. Auto Notch state
is not remembered during a power cycle, and
it will default to Off upon power up.
539 / Argonaut VI Users manual Release 0.10 – November 13, 2012
Part #74479
Printed in USA 13
123 4 5
6
7810
9
Figure 2-1 539 Front Panel- (with indexes)
Argonaut VI
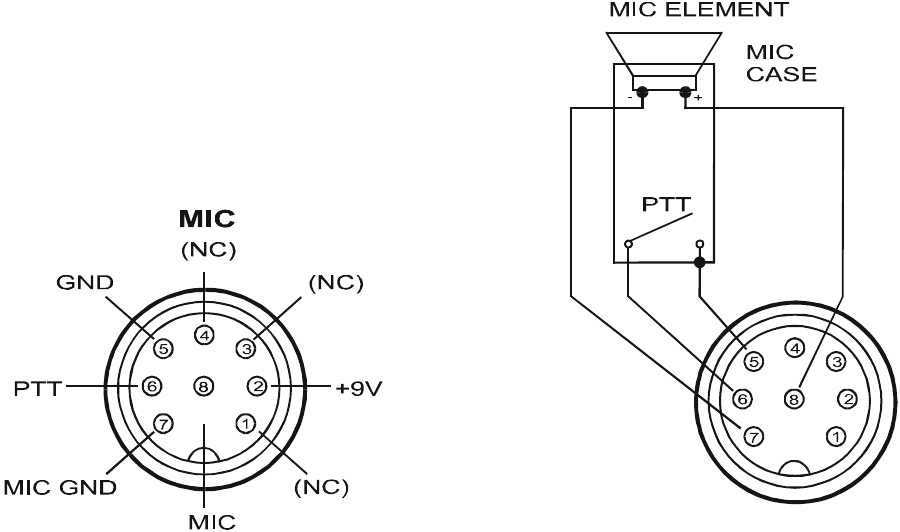
MIC Connector
Front panel jack used for connection of a
microphone. The Argonaut VI features the
common 8-pin microphone jack used in many
amateur radio transceivers. Most dynamic or
Electret Microphones can be used. When
adapting a microphone, please refer to the
wiring diagrams in Figures 2.4-1 and 2.4-2
Figure 2.4-1 Transceiver Microphone Jack
Front View
Pin 2 (+9 Vdc) need only be connected if the
microphone element in use is an electret
condenser requiring a polarizing voltage.
Chassis ground and mic signal ground are
separated to reduce the possibility of
introducing stray hum or RFI into transmit
audio signal. We recommend that the case of
the microphone also be tied to chassis ground
on the transceiver via a shielded cable to pin
5. This is to help assure stray RF does not
have a path to be coupled into transmit audio.
The cable carrying mic signal and mic signal
ground should be shielded. This prevents the
cable itself from acting as an antenna and
coupling RF back into mic audio. NOTE:
Some aftermarket microphones are not wired
with separate microphone signal grounds and
chassis ground. We recommend separate pins
for use for mic negative signal and chassis
ground as shown in Figure 2.4-2
Figure 2.4-2 Transceiver Microphone Jack
Recommended Cable Wiring
539 / Argonaut VI Users manual Release 0.10 – November 13, 2012
Part #74479
Printed in USA 14
Mic Gain and Line Gain(10)
Be sure TMB switch is in the Bottom position
and the Argonaut VI is in either LSB or USB
mode. Press USR (MOD) button until you
see (mI CgAIn) on the front display. Use the
VFO knob to adjust the microphone gain until
the ALC light flickers on voice peaks when
speaking into the microphone. This is the
LED light within the Ten-Tec logo. Once set
just press the USR (MOD) button once more
to exit. To set the LINE GAIN press and
hold the USR (MOD) button down until the
screen displays (LinEgAIn) and like before
adjust the level with the main VFO
knob.Once the line gain and microphone gain
have been established both levels will remain
unless a master reset is done. To toggle
between microphone input and Auxilliary
Line input simply press the USR (MOD)
button once for microphone gain or hold
down this button for Line Gain.
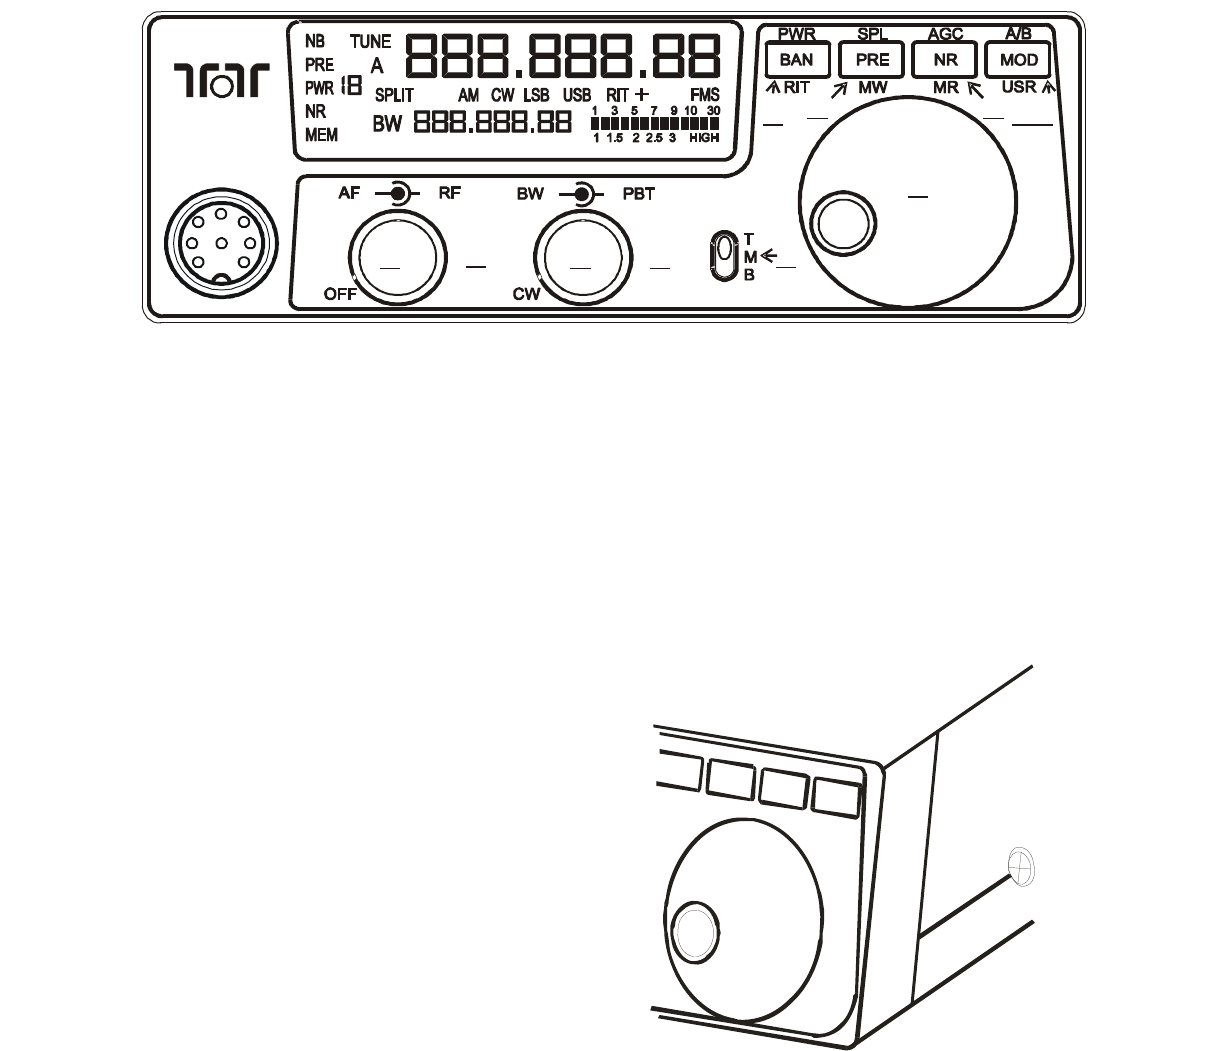
If other microphones are used with the
Argonaut VI, which may need more gain,
Ten-Tec has provided a hardware microphone
gain control, See Figure 2.4-3. Setting the
microphone gain around 35-50 and then
adjusting the trim pot on the right side of the
transceiver until proper ALC is accomplished
will help make the Argonaut VI flexible with
a multiple of different style microphones.
539 / Argonaut VI Users manual Release 0.10 – November 13, 2012
Part #74479
Printed in USA 15
123 4 5
6
7810
9
Figure 2-1 539 Front Panel- (with indexes)
Argonaut VI
PW
RSPLAGCA/B
BANPR
ENRM
OD
RITM
WM
RU
SR
H a rd w a r e M ic
G a in A d ju s t
P O T
Figure 2.4-3 HW Mic Gain Control
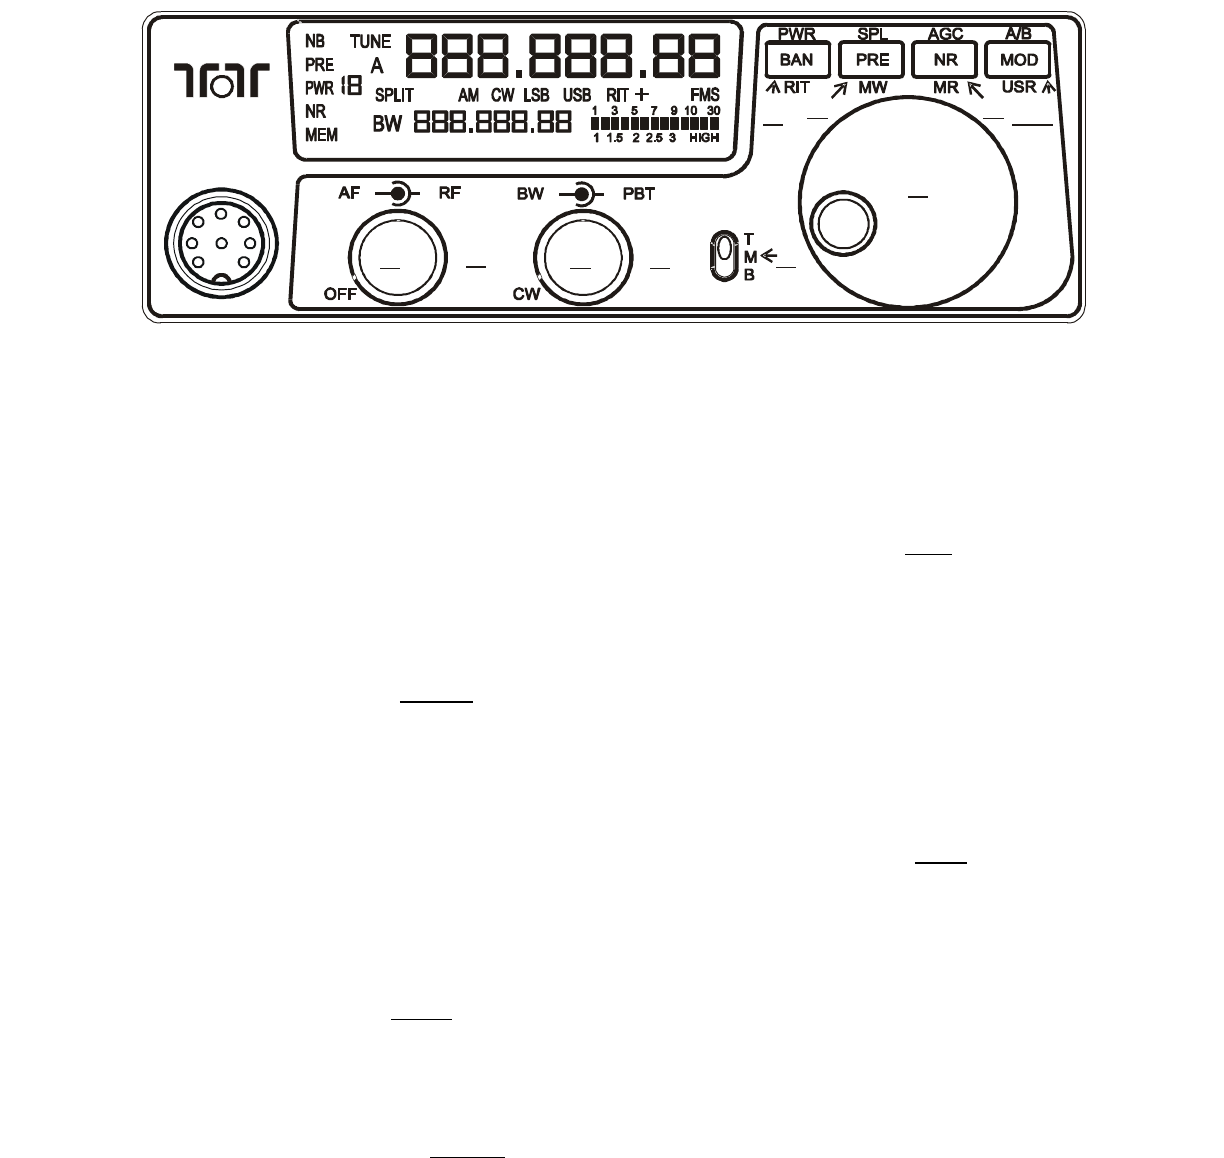
2.5. CW Mode Operation
Setting Up CW Parameters (3,5,7,8,9,10)
Ensure that the Argonaut VI is in CW Mode.
When finished, rotate the Bandwidth back to
the desired value.
Internal Keyer CW Speed Setting
Ensure that the bandwidth control is pointing
to 12 o'clock. Switch the TMB switch to the
bottom and press the USR (MOD) button
until the screen displays (SPEEd). Use the
VFO knob to adjust the speed 5-50 words per
minute. Press this button a second time to set
your desired speed into the internal keyer.
Internal Keyer Weighting / Dit
Spacing & Curtis Mode A/B
Ensure that the bandwidth control is rotated
fully counter clockwise in the CW/Clicked
position. Switch the TMB switch to the
bottom and press the USR (MOD) button
until the screen displays (dit sp). You may
now adjust the dit spacing with the main VFO
knob. Note! Values will appear on the lower
section of the screen.
Press the USR (MOD) button a second time
and your display now shows (nnOdE). You
may now select either Curtis Mode A or B
with the main VFO knob. The value selected
is shown in the VFOB frequency area. A
value of 0 means Curtis Mode A will be used
when the internal keyer is used. A value of 1
means Curtis Mode B will be used when the
internal keyer is used. Press the USR (MOD)
button a third time will return to regular VFO
mode and your settings are stored.
CW Sidetone Frequency
Ensure that the bandwidth control is rotated
fully counter clockwise in the CW/Clicked
position. Switch the TMB switch to the
bottom and press the MR (NR) button to set
the side tone frequency (st fr). Adjust the
side tone frequency with the main VFO knob
and the frequency in hz is shown in the
VFOB frequency area. Press this button a
second time to store the side tone frequency.
CW Sidetone Level
Ensure that the bandwidth control is rotated
fully counter clockwise in the CW/Clicked
position. Switch the TMB switch to the
bottom and press the MW (PRE) button to
adjust the side tone level (st lvl). Adjust the
side tone level with the main VFO knob and
the value in % is shown in the VFOB
frequency area. Press this button a second
time to store the side tone level.
QSK Delay
Ensure that the bandwidth control is rotated
fully counter clockwise in the CW/Clicked
position. Switch the TMB switch to the
bottom and press the RIT (BAN) button to
adjust your amount of QSK Delay (dELAY).
This is the time from when the transmit signal
ends until when the receive audio returns. A
setting of 0 means full QSK break in, and a
setting of non zero means more delay. Press
this button a second time to store your desired
QSK Delay into memory.
539 / Argonaut VI Users manual Release 0.10 – November 13, 2012
Part #74479
Printed in USA 16
123 4 5
6
7810
9
Figure 2-1 539 Front Panel- (with indexes)
Argonaut VI
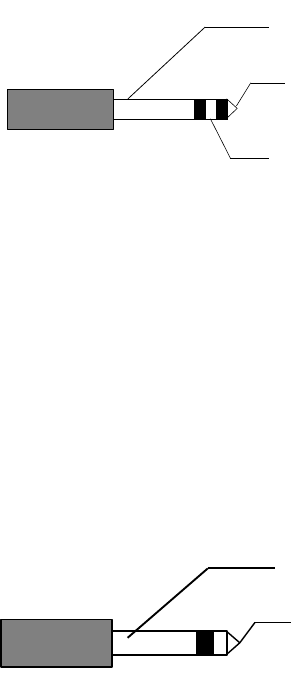
CW Keying and Wiring
The rear panel on the Argonaut VI has a 1/8”
stereo jack for connection of a key paddle.
See Figure 2.5-1 for proper wiring.
Figure 2.5-1 CW Key Wiring
A straight key, bug, or external keyer can be
used with the Argonaut VI. Simply plug a
1/8” mono style connector wired to your
device into the rear apron of the Argonaut VI,
see Figure 2.5-2. When power is turned on
the Argonaut VI will detect that mono device
automatically. If you should forget and plug
it in after power has been applied simply
toggle the mode button once through all
modes and back again to CW.
Figure 2.5-2 1/8” Mono Connector Wiring
2.6. AM Mode Operation
To operate the Argonaut VI in AM mode you
must have the 6 KHz filter installed and you
must select EA d in the configuration menu.
The peak modulated carrier level will be set
automatically for the power level you choose.
2.7. Digital Mode Operation
For most audio derived digital mode
operation you will either be in USB or LSB.
To set up the Argonaut VI for digital
communications using the ACC-1 rear
connector you must first turn on the ACC-1
line input.
To set the LINE GAIN be sure the TMB
switch is in the bottom position and the radio
is in LSB or USB. press and hold the USR
(MOD) button down until the screen displays
(LinEgAIn) and adjust the level with the
main VFO. To exit simply press the USR
(MOD) button one more time. It is important
to note that you will see different audio levels
from different software programs so
remember which favorite programs will need
more gain levels than others. Windows audio
controls will also need to be set within the
specific programs you will be using. This is
usually found under the SETTINGS on your
digital mode programs. A proper audio level
occurs just as the ALC light flashes slightly
when in transmit. If the ALC light is on
continuously you probably have too much
audio into the Argonaut VI.
539 / Argonaut VI Users manual Release 0.10 – November 13, 2012
Part #74479
Printed in USA 17
common
Key or dit
dah
common
Key

2.8. Interfacing to a computer
for Firmware Update
Mode and PC
Control/Logging Purposes
The software interface for the Argonaut VI
utilizes standard Windows driver supplied
with Windows versions XP through Windows
7. An installation program is available for
download at the TenTec download webpage
for the Argonaut VI. Start at
www.tentec.com, and follow the links until
you get to the Argonaut VI’s Download page.
Look for the latest instructions entitled “USB
to UART driver Installation….”. Download
and follow the instructions.
If at any time you need to see what “port” the
Argonaut VI is connected to, go back into
Device Manager, expand the “Ports (COM &
LPT)” selection, and you should see “USB to
UART (COMx)”. Note the x in the COMx
that is reported by Device Manager. You will
use this number when running Logging or
Control programs, the Flash Update Utility,
etc.
If required, you can change the actual port
number being used to a lower number if
required. Sometimes the update program on
some computers will require a port number
lower than 10. To do so, double click the
USB to UART (COMx) text, go to port
settings, select advanced, and select a
different COM Port Number from the pull
down box. It may display a warning message,
if it does, confirm/ok the change. Click
OK/Confirm/etc. until all windows are closed.
Disconnect the Argonaut VI, wait a few
seconds, reconnect the Argonaut VI, and you
should see the new port number in Device
Manager.
NOTE: when you plug the USB cable into a
different USB port on the PC, it will most
likely get a new COMx port number defined.
Be aware of this when reconnecting the USB
cable to the computer so that you can set it
properly in the computer program that you are
using to communicate with the Argonaut VI.
539 / Argonaut VI Users manual Release 0.10 – November 13, 2012
Part #74479
Printed in USA 18

2.9. Power Up Modes
Configuration Menu (PWR(7))
When optional items are ordered with your
Argonaut VI, then these optional items will
already be installed and configured at the
factory in the Configuration Menu. This
includes additional roofing filters and whether
or not AM mode is enabled.
If you as an owner need to configure the
Argonaut VI, start with the Argonaut VI
powered off, switch the TMB switch on the
front panel to T (TOP), press the PWR(7)
button, and continue to hold the PWR(7)
button while powering up the Argonaut VI.
Release the PWR(7) button. The front panel
display will show “F1 nO” which indicates no
filter has been installed. To select a different
value for a given Configuration Menu item,
press the PWR(7) button again and use the
VFO knob to scroll through the choices. Once
the correct choice has been made advance to
the next Configuration Menu item by pressing
the PWR(7) button. Once the settings in the
Configuration Menu have been set to the
desired values, press any key on the front
panel except the PWR(7) button to exit the
Configuration Menu.
The items contained in the Configuration
Menu and their options are shown in the
following table.
Item Settings Notes:
F1 nO / none
“60”= 6KHz
“29”=2.9KHz
“07”= 700Hz
Refer to Section
“Optional Filter
Installation” for more
information on
physical installation of
each filter
Valid options are
6kHz or nO.
Default is nO
F2 Same as F1 Same as F1
Valid options are
2.9kHz or nO.
Default is 29 (for the
2.9KHz filter)
F3 Same as F2 Same as F1
Valid options are
700Hz or nO.
Default is nO
EA d Enable AM
detection
On / OFF
Requires 6.0 KHz
Filter
The 6.0KHz filter can
only be inserted in slot
F1
Default is OFF
Table 2.9-1 Configuration Menu Items
Master Reset (SPL(8) )
Master Reset is used when you want to bring
the radio settings back to factory default. This
includes user settings and user memories. To
perform a master reset to the Argonaut VI, be
sure that the TMB switch is in the T(op)
position. Now simply press and hold down
the SPL(8) button at the same time you turn
on the power. Continue to hold down the
SPL(8) button until the screen says “reset”.
You have now performed a reset to the
Argonaut VI which will also clear all
memories and settings you have placed in
your transceiver. Performing a reset means
you will need to enter the Configuration menu
described in Advanced Settings to program
your filter positions and AM enable.
539 / Argonaut VI Users manual Release 0.10 – November 13, 2012
Part #74479
Printed in USA 19
Firmware Update Mode (A/B (10))
To upgrade your transceiver, visit the TenTec
web site (www.tentec.com) and download the
installer for the latest firmware version. A
link will be available on the 539 Downloads
page. This link will be titled with the
available version number of the firmware.
Example: “Firmware Version 1.585”. The
Date of the file will also be shown.
Here is the sequence of steps to follow once
the .exe file has been downloaded from the
Downloads web page for the Argonaut
VI/539.
1) Turn Transceiver OFF.
2) Turn Transceiver ON to verify that the
Argonaut VI has appropriate power. E.g.
the Argonaut VIs front panel display
shows the normal indicators and
frequencies.
3) Turn Transceiver back OFF.
4) Connect a PC to the transceiver using a
standard USB cable. (Note: if already
connected, disconnect for a second or
two, then reconnect, helps computers that
don’t “disconnect” the USB driver unless
it is physically disconnected)
5) Be sure the TMB button is on Top. Turn
the Transceiver ON while holding down
the “A/B” (MOD) button.
When the Argonaut VI starts up in flash
update mode, you will see the TX/ALC LED
flash on for a second, then back off, then back
on for a second. IF the USB Cable is
connected and the drivers are working
properly in the PC, then the TX/ALC LED
will turn back off. If the TX/ALC LED
remains lit and does not shut back off, then
check your USB cable and ensure that the
drivers are installed before proceeding.
6) Start the Update program
7) Select the COM port to which the
Transceiver is attached.
8) Choose UPDATE under the PROCESS
menu.
9) Select the RUF file under the Process
Menu.
10) The program will update the radio and
report any errors encountered.
During the update process the TX/ALC LED
will flicker showing active communications.
The update program will confirm that lines
are getting sent/programmed.
11) When finished, the 539 Argonaut VI will
restart and run the new firmware.
12) Sometimes Windows doesn't like the
transition of the radio from firmware
update mode to radio mode, so it is
suggested that once the radio is back up
and running showing the tuned frequency,
turn the rig back off, wait a few seconds,
then turn it back on. This helps Windows
find the USB / COM port easier.
539 / Argonaut VI Users manual Release 0.10 – November 13, 2012
Part #74479
Printed in USA 20
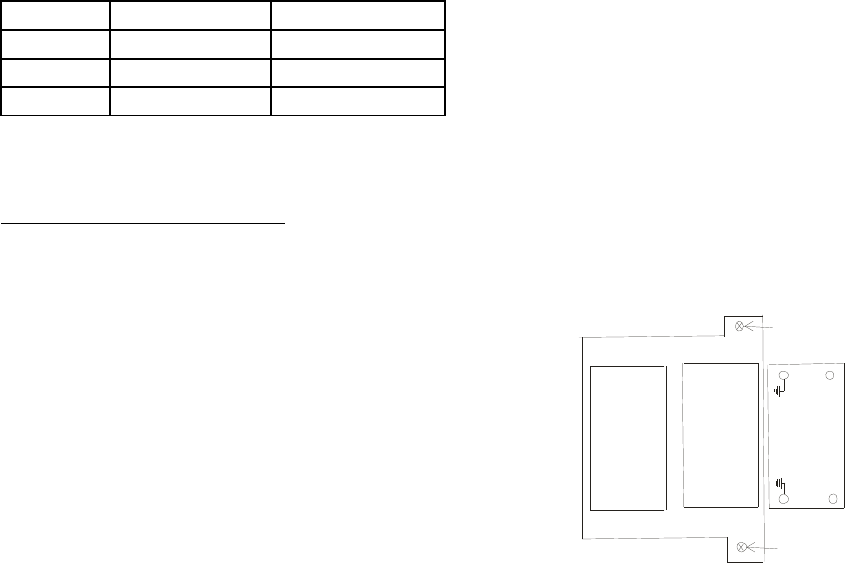
2.10. Optional Filter
Installation
The Argonaut VI has three filter slots: Filter
Slot 1 (F1), Filter Slot 2 (F2), Filter Slot 3
(F3). The Argonaut VI comes standard with a
2.9KHz filter installed in Filter Slot 2 (F2).
Optional filters are available for the Argonaut
VI as follows:
Filter Part Number Slot for Filter
6 KHz 2003 F1
2.9 KHz Standard F2
700 Hz 2006 F3
Table 2.10-1 Optional Filters
Optional Filter Installation
Optional Filters can be installed in the 3 filter
slots as described below.
To install new filters:
1. Remove the 4 cover screws, 2 on each
side of the Argonaut VI.
2. Carefully raise the top cover.
3. If necessary, unplug speaker cable located
on the left side of the main board.
4. Set the top cover aside
5. Remove the two screws that hold down
the Fitler cover over F2 and F3, and set it
aside.
6. You now see the standard 2.9KHz Filter
installed in Filter Slot 2 (F2), and two
more filter slots.
7. The 6 kHz AM filter must be installed in
slot F1 due to the height difference and
speaker arrangement. The 700Hz filter
should be installed in slot F3.
8. Locate the F1, F2, F3 slot to insert the
specific filter. Refer to Figure 2.10-1. This
is according to the filter slots on the
circuit board text. The order is shown on
the circuit board as F1, F2, F3 going from
right to left toward the center of the radio.
The ground pins are easily distinguished
by the way the pins and outer case
connect together. The ground pins will be
inserted into the left holes as you face the
front of the radio. If your filter comes
with the vibration barrier attached to the
bottom just temporarily remove this cover
to identify the ground location and re-
install vibration barrier.
9. Reinstall the Filter Cover using the two
screws.
10. If you disconnected the speaker in step 3,
then reconnect it now.
11. Reinstall the top/bottom covers with the 4
screws from step 1. Take care not to
pinch any wires between the top cover
and the filter cover or any of the brackets.
12. Refer to the section on the
“Configuration Menu“ on how program
the Argonaut VI firmware to use this
Filter Setup.
539 / Argonaut VI Users manual Release 0.10 – November 13, 2012
Part #74479
Printed in USA 21
F2
F3
F1
Screw
Screw
Figure 2.10-1 Filter Location
Showing G round Orientation
Front of Radio
2.11. Extended Feature
Access via USB/Serial
There are more features available for the
Argonaut VI that are not accessible via the
front panel controls. For this purpose, the
USR button, MR button, and MW button are
able to be programmed with new
functionality using a PC.
The USB interface also permits changing
various settings that cannot be mapped to
front panel control buttons.
This includes features such as VOX, AN, etc.
2.12. Retaining User Settings
The Argonaut VI operates the same as most
modern TenTec rigs do with regards to the
ability to retain user settings through a power
reset. For various reasons, user settings are
not immediately written into the non-volatile
memory every time that the user changes a
setting. When a user setting is changed, this
value will be stored 15 seconds after the user
has made his last change to any user setting.
Example:
Change Main Frequency to 14.02 (This starts
the 15 second user value store timer)
2 seconds later change Mode to CW (This
resets the user value store timer back to 15)
5 seconds later change AGC to Slow (This
resets the user value store timer back to 15)
Finally, do nothing for 15 seconds, and all of
the above values will be stored.
If changes are made, and the unit is turned off
before the 15-second timer has expired, then
all of those changes made since the last store
point will be lost.
539 / Argonaut VI Users manual Release 0.10 – November 13, 2012
Part #74479
Printed in USA 22

3. Argonaut VI Rear Panel
ANT (11)
The ANT connector is an SO-239 jack used
for connection of a coaxial fed transceiver
antenna, nominal impedance 50 ohms, for use
on any band the Argonaut VI covers.
AUX (12)
The Argonaut VI provides internally a
location where 9MHz IF can be brought out
from the radio. This is the access hole for this
9MHz IF data stream for use with external
panadapters. It is advisable to utilize an
external panadapter with a buffer amplifier.
FUSE (13)
Auto Style 7.5A
DC IN (14)
Power line for the Argonaut VI. It is an AMP
MATE-N-LOCK, 2 pin
GROUND TERMINAL (15)
The wing-nut equipped post is for connection
of station ground or counterpoise. See
Section “A Word About Grounding”. The
ARRL also offers excellent information in the
ARRL Handbook concerning station
grounding.
DC OUT (16)
The Argonaut VI is equipped with one DC
output connectors to power various
accessories. The output power is limited to
0.5 Amp maximum.
USB (17)
The rear panel on the Argonaut VI has a
Standard B type USB connector. This
connector is used for connecting to a PC to
perform updates of the firmware, or for
logging or control via various available
computer programs.
KEY (19)
The rear panel on the Argonaut VI has a 1/8”
stereo jack for connection of a key paddle.
See Figure 2.5-1 and 2.5-2 for proper wiring.
EXTERNAL HEADPHONES (20)
This jack is for connection of an external
speaker or headphones. When connected
using a standard 1/4” phone plug, the internal
speaker in the Argonaut VI is disabled. Tip
of the 1/4” phone plug is audio, sleeve is
ground.
539 / Argonaut VI Users manual Release 0.10 – November 13, 2012
Part #74479
Printed in USA 23
AUX
ANT
USB
ACC 1 KEY PHONES
– DC IN +
FUSE 7.5A
MODEL 539
TEN-TEC, INC.
SEVIERVILLE, TN
MADE IN USA
WWW.TENTEC.COM
DC
OUT
.5A MAX
11
12 13
14
15 16 17
18
19
20
Fig 3-1 Argonaut VI Rear Panel
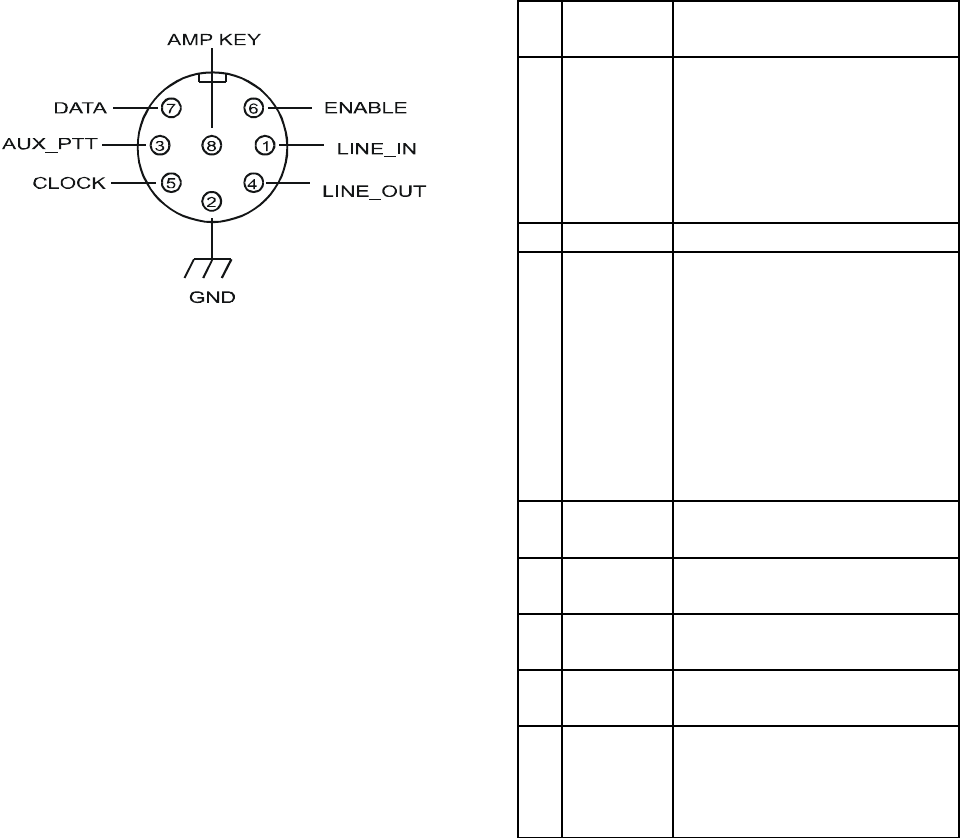
ACC 1 (18)
The Argonaut VI is equipped with an 8 pin
accessory connector. Refer to following
figure for the pin definitions as viewed from
the rear panel.
Figure 3-2 ACC1 Pin out
The pin out and function are listed in the
following table:
Pin Name /
Direction
Usage
1 Line In /
Input
Line level Audio input from
an accessory device (like a
TNC or sound card for digital
mode operation.) Selected
using the front panel MIC
button.
2 Ground Grounding
3 Aux PTT /
Input
In Voice Modes, when
grounded, this pin will key
the radio and begin
transmitting. In CW Mode,
this pin can be used as a
keying input for an external
device such as an external
keyer or a computer running
a CW generator program.
4 Line Out /
Output
Line Level Audio output.
5 Clock /
Output
Future Use (Do NOT connect
to this pin)
6 Enable /
Output
Future Use (Do NOT connect
to this pin)
7 Data /
Output
Future Use (Do NOT connect
to this pin)
8 Amp Key
Line
Used to key an external
device, such as an Amplifier.
Occurs ~17ms before RF is
generated.
Table 3-1 ACC1 Pin out
External devices can utilize the clock/data
enable to identify band changes. The protocol
is defined in the Programmers Reference
Guide for the 539.
539 / Argonaut VI Users manual Release 0.10 – November 13, 2012
Part #74479
Printed in USA 24

Keying a Linear Amplifier
Pin 8 on ACC-1 will provide an open
collector output for keying a linear amplifier.
The Argonaut VI provides a 17 ms closure
delay before RF is supplied to the linear amp.
Refer to Figure 3-2 for wiring to this
connector. Remember to use shielded cable
for making this connection. The amp key line
is NOT a relay similar to those found on
many older transceivers. It is a transistor
switch rated for a maximum of 24 volts and
250 mA from the key line of your amplifier.
Many older amplifiers using an AC relay or
relay voltages exceeding the limits of the
Argonaut VI must use an amplifier interface
relay such as the model 318 sold through the
Ten-Tec company. When using the Ten-Tec
model 418 solid state linear (sold separately)
the proper interface cable is provided with the
amplifier for both keying and band changing
the 418.
4. Accessory Devices
4.1. List of Optional
Accessories For The
Argonaut VI
The Argonaut VI permits the usage of several
optional accessories. At the time this manual
was printed, the list includes the following
items:
Item Part/Model Number
6 KHz Filter 2003
700 Hz Filter 2006
USB/Soundcard
adapter Interface
712
4 Ft DC Cable 86095
Table 4.1-1 Optional Accessories
4.2. Using the 712
USB/Soundcard Interface
To use the 712 soundcard interface for digital
modes, connect the 712 device between the
ACC-1 connector and the USB port on your
Windows computer. Audio generated from
your favorite digital programs can be used
with the Argonaut VI. See the section
“Digital Mode Operation” for directions on
how to set up the the line input for digital
mode operation.
The 712 USB Soundcard Interface should
only be connected to the Argonaut VI when
the setup is intended to be used for Digital
modes via the PC. Remember, the USB
Soundcard, when plugged in, becomes the
sound card that all windows sounds and video
sounds will go through. Meaning, when the
712 detects audio from the PC, e.g. a
Windows DING, it will put the Argonaut VI
into transmit.
539 / Argonaut VI Users manual Release 0.10 – November 13, 2012
Part #74479
Printed in USA 25

5. Specifications
5.1. Transceiver Specifications
GENERAL
Microphone Connector: 8-pin on front panel
Headphone Jack: 1/4” stereo, accepts mono or stereo on rear panel
External CW Key Jack: 1/8” stereo, accepts mono or stereo on rear panel
Aux DC Output Connector: RCA 0.5A max connected to DC Power
Frequency Range TX: 1.795-2.005 (160M), 3.495-4.005 (80M), 6.995-7.305 (40M),
10.095-10.155 (30M), 13.995-14.355 (20M), 18.063-18.173 (17M),
20.995-21.455 (15M), 27.995-29.705 (10M).
Frequency Range RX: 1.795-2.505 (160M), 3.495-5.005 (80M), 6.995-7.305 (40M),
9.995-10.155 (30M), 13.995-15.005 (20M), 18.063-18.173 (17M),
20.995-21.455 (15M), 27.995-29.705 (10M).
Specifications apply within Amateur Radio bands Only.
ACC Din Connector: 8 PIN DIN Connector-Line in, Line out, Aux PTT, Ext Key, Clock, Data,
Enable, Ground.
DC Power Connector: AMP MATE-N-LOCK, 2 pin
Fuse: Automotive Blade Style 7.5 A 32V
Tuning Step Size: 10, 100, 1000, speed sensitive, VFO Lock
Frequency Stability: +/- 0.5 PPM over operating temperature
Antenna Impedance: 50 Ohm nominal.
Antenna Connectors: 1 x SO-239
Modes: USB, LSB, CW, (AM optional)
Memories: 100
Frequency Accuracy: ±5Hz @25°C, 10 Hz tuning resolution
Supply Voltage: 9.5 – 14 Volts DC
Operating Temp. Range: 0-50 degrees Celsius
Dimensions (HxWxD): 2.25” x 6.5” x 7.6” (excluding knobs and connectors)
Weight: 3.6 lbs
Construction: Molded plastic front panel, aluminum chassis and Textured painted steel
covers
PC Control Port: USB (using CCS USB to UART Driver)
Display: Custom FSTN monochrome LCD
Display Backlight: Variable Red, Blue, Green (internal settings)
All measurements are typical. Specifications are subject to change.
539 / Argonaut VI Users manual Release 0.10 – November 13, 2012
Part #74479
Printed in USA 26

RECEIVER
SSB Sensitivity: Better than 0.7uV (0.5 Typ), 2.4Khz, 10 db SINAD, preamp off
AM Sensitivity: Better than 4 uV, (2.0uV Typ) 30% Mod, 6Kh BW, 10 dB SINAD, preamp off
Selectivity IF1: 2.9khz standard, 9.0018 MHz, 2 optional filter positions
Selectivity IF2: 30 KHz Lowpass filter
Selectivity, DSP IF: 100 built-in DSP filters from 100-6000Hz BW.
Third Order Intercept Point (IP3): 20dBm@20Khz tone separation/2.9 kHz roofing filter,
20dBm@ 2kHz separation/700Hz Roofing filter, S5 method,
preamp off
IMD3 Dynamic Range: Typical 98dB/20kHz, 98dB/2kHz,500 Hz BW,calculated 2/3(IP3-Noise
Floor), preamp off
Blocking Dynamic Range: 138dB/20kHz, 140dB/2kHz, 600 Hz BW, RF Gain @ 12 o’clock, preamp off
LO Phase Noise: 124 dBc/Hz @ 20 kHz, 114dBc/Hz @ 2 kHz
Noise Floor: Typical -138dBm/500Hz BW/Preamp on, -128dBm /500Hz BW preamp off
IF Frequencies: 1st:9.0018 MHz, 2nd:22.2 kHz, 3rd:0Hz (DSP)
IF Rejection: Typical 74 dB
1st IF Image Rejection: Typical 59 dB
2nd IF Image Rejection: Typical 69 dB
Other Spurious Response: Rejection: >80dB
Birdies: Typically less than -100dBm equivalent (no more than 5 birdies greater than
-100dBm equivalent)
Pass Band Tuning: +/- 2.1kHz, 5Hz steps. Small dead zone for centering
PreAmp: Nominal 12 db
Audio Output: 1.3 Watts into 8 ohm, <3% THD
RIT range: +/- 8.2 kHz
RIT Step size: 10Hz
S-Meter Reference: S9 = 50 uV RMS
TX>RX Recovery Time: < 20 ms
RX Headphone Output: Designed for 16-32 ohms impedance headphones. Usable at 8 ohms
AUX Audio Output: 500 mv
Auto Notch: IF DSP, multi-tone
RX Noise Reduction: IF DSP, adjustable
Noise Blanker: IF DSP, adjustable
RX Current Drain: 550 milliamps
All measurements are typical. Results will vary based on different Test Environment, Tools, and
Test Methods. Specifications are subject to change.
539 / Argonaut VI Users manual Release 0.10 – November 13, 2012
Part #74479
Printed in USA 27

TRANSMITTER
RF Power Output: Adjustable, 1-10 W, +/- 1 dB
CW, SSB, AM, AFSK,PSK Duty Cycle: 100% for up to 10 minutes @ 10 watts
CW/SSB TX Bandwidth: 2.9kHz Filter
AM TX Bandwidth: 6kHz Optional Filter
Microphone Input Impedance: >10 k-ohms at 1 kHz
Microphone Sensitivity: 1 mV RMS for full power output, internal gain adjustment, 9v dc power for
electret elements
AUX Level Input: variable, 200mV nominal
SSB Carrier Supression: > 60 dB
Unwanted Sideband Suppression: > 60 dB at 1 kHz
T/R Switching: PTT or VOX on SSB, AM. QSK on CW
CW Keyer Type: Internal Curtis Mode A or B Selectable
CW Rise and Fall Times: 5ms
CW Offset: adjustable
CW Keyer Speed: 5-50 WPM, adjustable weighting
Current Drain: 3 amps at 10 watts
Third Order Intermod: Better than 30dB below peak
SSB Generation: DSP Generated
# of DSP generated TX bandwidths: 2 built-in DSP filters – automatically selected base on mode -
2.9 kHz for CW and SSB, (6 kHz for AM option)
Note: the optional 6KHz filter is required for AM transmit.
OPTIONS
4 Pole Roofing Filters: 700Hz, 6kHz.
All measurements are typical. Specifications are subject to change.
539 / Argonaut VI Users manual Release 0.10 – November 13, 2012
Part #74479
Printed in USA 28
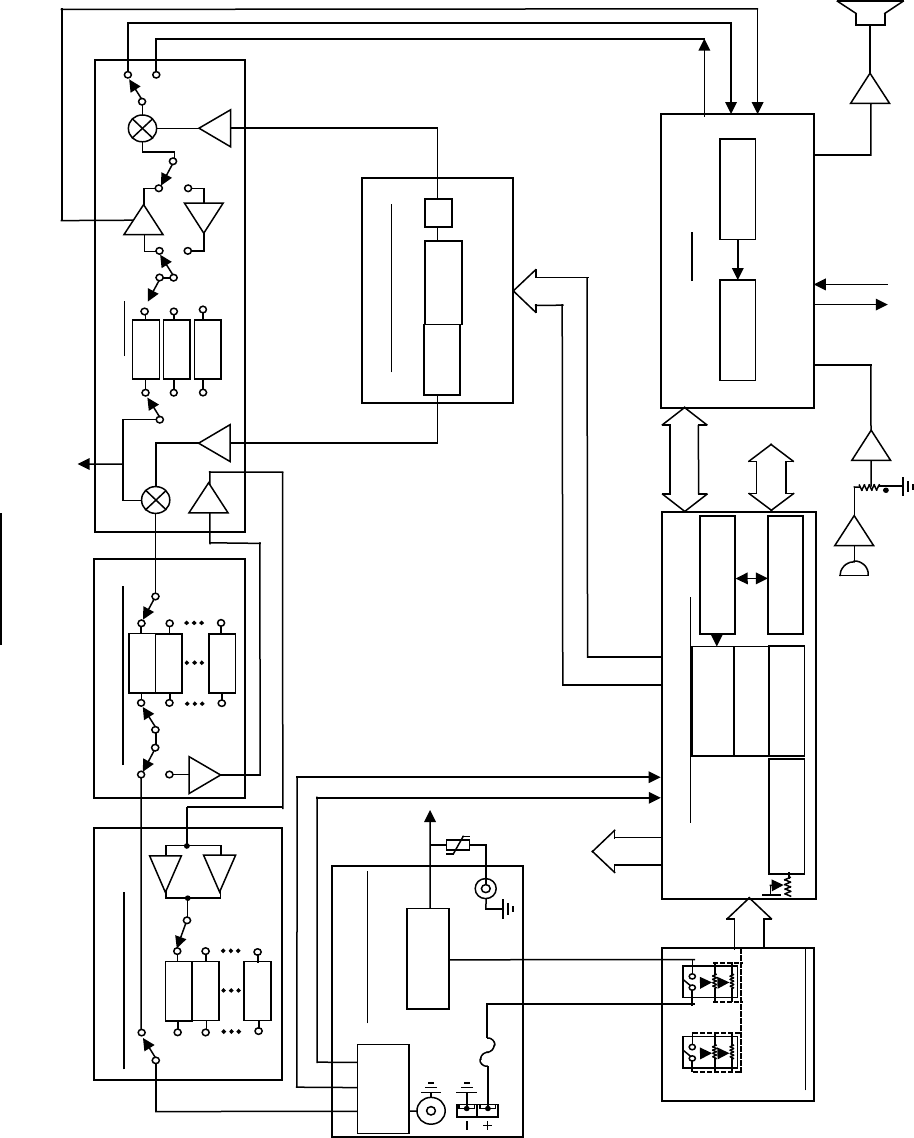
5.2. Transceiver Block Diagram
539 / Argonaut VI Users manual Release 0.10 – November 13, 2012
Part #74479
Printed in USA 29
MODEL 539
10M
15M
160M
ANT
FWD REV
LOW PASS / PA
AGC
LO1
10.8-39 MHz
LO2
9.024
LL TX
FIL TX
AGC
RX IF
CLK, DAT, ENA
MISO/MOSI
FRONT PANEL/CPU
LCD DISPLAY
LCD DRIVER
KEYPAD
ENCODER EEPROM
PWR
ON/OFF
13.8
V
MIC
MIC AMP
MIC
AUDIO
REC
AUDIO
SPEAKER
AMP
SPU
CODECDSP
CLK, DAT, ENA
TO SWITCHES
PRESELECTOR
R
T
LINE
IN/OUT
~22.5
kHz
TX IF
SYNTHESIZER
REAR PANEL
POWER
REGULATOR
7.5A DC OUT
PPTC
500
MA
USB
R
T
ROOFING FILTERS (9.0015 MHz)
TX/R
X
F1
F2
F3
VGA
R
T
R
L
I
R
T
DDS
RL
I
SWR
BRIDG
E
TCXO ÷4
9MHz IF Output
BACKLIGHT
PIC
5V
POT BOARD
AF/RFBW/PB
T
POT
A/D
10M
15M
160M
R
T
FCC Compliance
Note: This equipment has been tested and found to comply with the limits for a Class B digital
device, pursuant to part 15 of the FCC Rules. These limits are designed to provide reasonable
protection against harmful interference in a residential installation. This equipment generates, uses
and can radiate radio frequency energy and, if not installed and used in accordance with the
instructions, may cause harmful interference to radio communications. However, there is no
guarantee that interference will not occur in a particular installation. If this equipment does cause
harmful interference to radio or television reception, which can be determined by turning the
equipment off and on, the user is encouraged to try to correct the interference by one or more of the
following measures:
• Reorient or relocate the receiving antenna.
• Increase the separation between the equipment and receiver.
• Connect the equipment into an outlet on a circuit different from that to which the receiver is
connected.
• Consult Ten-Tec service for technical assistance (865) 428-0364
NOTE: THE GRANTEE IS NOT RESPONSIBLE FOR ANY CHANGES OR MODIFICATIONS NOT
EXPRESSLY APPROVED BY THE PARTY RESPONSIBLE FOR COMPLIANCE. SUCH MODIFICATIONS
COULD VOID THE USER’S AUTHORITY TO OPERATE THE EQUIPMENT.
539 / Argonaut VI Users manual Release 0.10 – November 13, 2012
Part #74479
Printed in USA 30
6. In Case of Difficulty
While we cannot cover every possible
problem, here are some hints for dealing with
some potential difficulties. Check the
obvious. Is your dc power source okay?
Check power supply, cable and connector(s).
Is the 25 ampere fuse loose or missing?
Antenna problems? Try a dummy load. Is a
proper antenna connected? Is any
external antenna switch connected and
properly set? Have you double-checked the
Argonaut VI’s many control settings,
including those in the Configuration menu,
for your intended mode of operation? Have
you checked how the optional Filter’s are
installed and confirmed their installation
order within the Configuration Menu?
One problem that results in no audio or poor
audio is the fact that sometimes you make an
adjustment to a setting and subsequently
nothing seems to work properly anymore. The
method that resolves setting issues that you
just can’t find, is to perform a Master Reset.
This was discussed in the “General
Operations” section of this manual.
Problem: No Receive Audio
Is the AUDIO (AF) turned up?
Is RF GAIN turned down? Is squelch
activated? SQL will appear in block letters
on the screen. Press FNC then FAST/SQL
and check SQUELCH level.
Is the speaker wire internal to the rig broken
or disconnected? (Have you pulled the covers
off recently?) Try headphones to see if audio
returns.
Is NR off? Under some circumstances, noise
reduction can cover band noise completely,
leading the user to think no audio is coming
from the speaker.
Problem: Distorted SSB transmit – or –
Perceived RFI in the shack.
Be certain the mic gain is set properly. The
ALC LED should flash on voice peaks, but
not remain continuously lit in SSB modes.
Check the setting of the speech processor. An
excessively high setting can reduce audio
quality.
A frequent cause of a distorted SSB signal is
inadequate RF grounding resulting in RF
feedback. Common RF grounding problems
are no ground connection, or too long a lead
to a good ground. Many problems relate to
the lack of an RF station ground, as
contrasted with a safety ground connection.
We recommend bonding all equipment
chassis together with short heavy metal braid
or strap. Make these connections from
chassis ground lug to chassis ground lug and
connect the last piece in the chain feeding the
antenna to a good earth ground. This lead
needs to be as short as possible. Lengths near
¼ wavelength on any band used can be
particularly troublesome when the far end is
connected to earth. It is very important that
the external power supply and the transceiver
and all equipment with grounding lugs are
properly grounded.
Another potential cause of distorted SSB
arises when the station is in the near field of
the antenna. This is a problem many
apartment dwellers face.
Distorted SSB transmit can result from
chassis ground and signal ground from the
microphone being tied together to a common
connection. This is a common problem with
third-party microphones. Assure the chassis
ground and signal ground from the
microphone is separated.
RF can also be induced into the transceiver on
any unshielded wires.
539 / Argonaut VI Users manual Release 0.10 – November 13, 2012
Part #74479
Printed in USA 31

Problem: Transceiver power shuts off
while transmitting
The Argonaut VI is equipped with a silicon-
controlled rectifier that opens if the PA
current draw exceeds an instantaneous power
of approximately 30 amps. This will shut off
power to the transceiver. Excessive current
draw can indicate a problem with excessive
SWR due to antenna or feedline problems.
Power to the radio can be restored by cycling
the power switch and off or the 13.8 Vdc
source on and off.
Problem: No transmit, receive OK.
Are you trying to transmit outside of the Ham
Band?
Is the gain setting correct for the microphone
input or ACC 1 jack as appropriate?
Is the POWER control turned all the way
down? Press PWR and check.
If no transmit in digital modes, are you sure a
PTT signal is being sent from your TNC or
computer to the appropriate jack on the
Argonaut VI?
Are the internal fans running at maximum? If
so, then this could indicate the Argonaut VI
has a final amplifier temperature of 70
degrees C or higher. In this condition, the
radio will stop transmitting until the final
amplifier temperature is back down to a
reasonable level.
Problem: Get a “PORT in use” when
trying to run logging or computer control
program or when trying to update the
firmware.
Have you confirmed the proper port number
in Device Manager? Remember that when
connecting the USB cable to the USB port on
the computer, every time you connect the
USB cable into a different USB port on the
computer, it will have a different COM port
number. You can verify this in Device
Manager. It is possible that the USB port was
used previously and for some reason
Windows has not released it for use. In this
instance, disconnect the USB cable at either
the computer end or the Argonaut VI end, exit
the program you are trying to use, wait a few
seconds, then reinstall the cable and then re-
start the program you were trying to use.
If the above do not solve your problem,
please consult with our service department
(865) 428-0364 or service@tentec.com
539 / Argonaut VI Users manual Release 0.10 – November 13, 2012
Part #74479
Printed in USA 32
7. Warranty & Return Policy
Warranty policy for Ten-Tec products is covered in the gold color page located on the last page of
this manual.
FOR EQUIPMENT MANUFACTURED BY TEN-TEC: Ten-Tec factory built radio equipment is
sold under a 30-day risk-free trial period. Any piece of equipment manufactured by Ten-Tec may
be returned, undamaged, within 30 days of purchase for a full purchase price refund, less shipping
charges (customer pays shipping both ways).
If you want to return a piece of equipment purchased from Ten-Tec, please call the sales
department at (865) 453-7172 from 8 a.m. to 5 p.m. Eastern time, Mon-Fri and obtain a return
merchandise authorization number. Calling in advance for an RMA number allows us to quickly
process your return and refund once your item arrives. Ship return items with letter enclosed inside
the box noting the RMA number and your name, address, and telephone number. Return items are
shipped to Ten-Tec., 1185 Dolly Parton Pkwy, Sevierville, TN 37862 USA.
539 / Argonaut VI Users manual Release 0.10 – November 13, 2012
Part #74479
Printed in USA 33