The Singing Machine SDL9040 PROFESSIONAL HD KARAOKE SYSTEM WITH BLUETOOTH User Manual SDL9040 2
The Singing Machine Company, Inc. PROFESSIONAL HD KARAOKE SYSTEM WITH BLUETOOTH SDL9040 2
Contents
- 1. user manual I
- 2. user manual II
user manual II
— E20 —
Operation
Playing Songs from the USB (Continued)
16
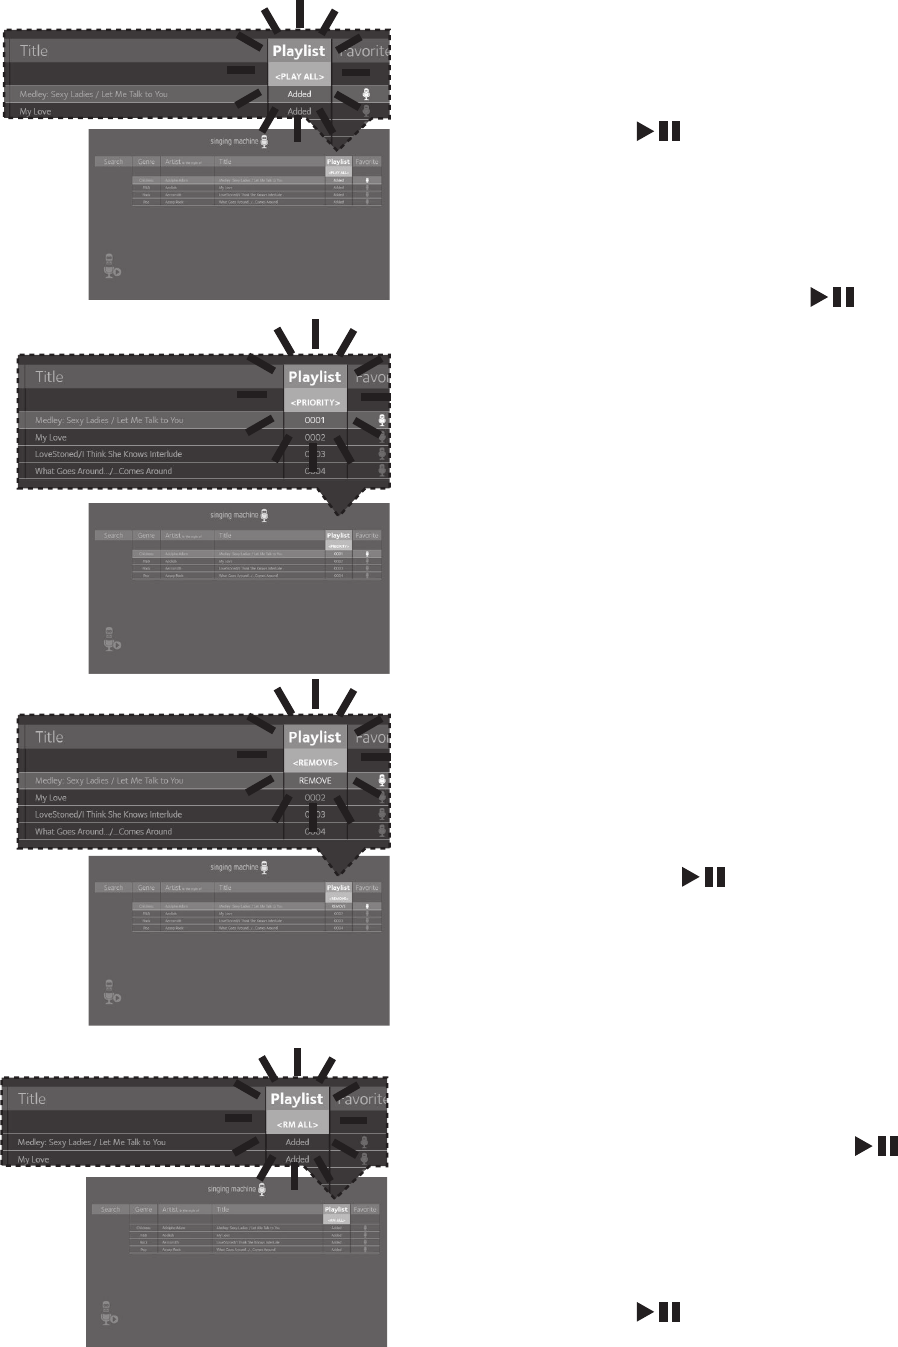
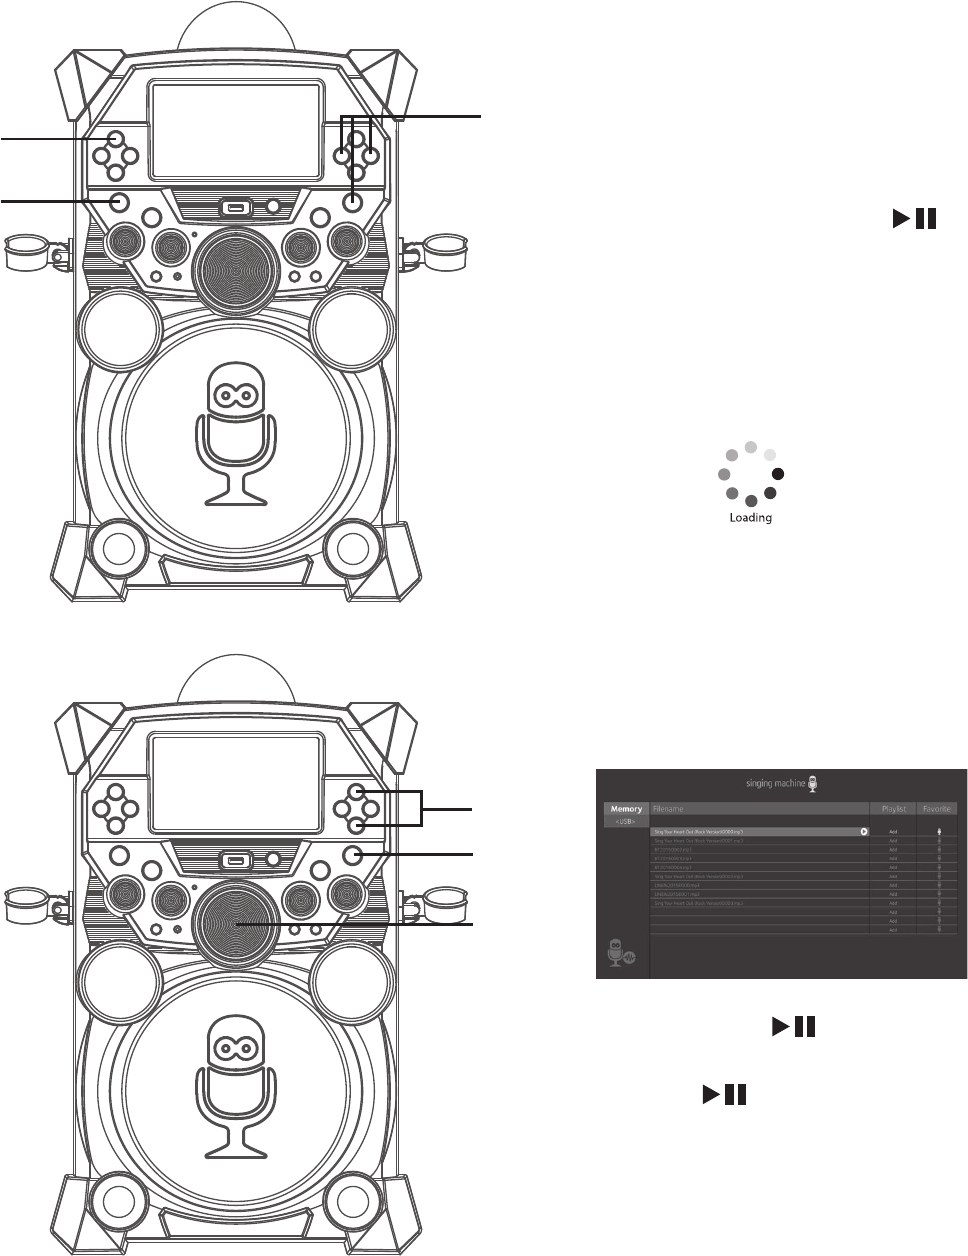
USING THE PLAYLIST: To play your
previously created playlist, select
Playlist using the NavigationRight
andLeft buttons, then press the
ENTER button; the row under
Playlist will be highlighted. Select the
desired selection using the Navigation
Right andLeft buttons as follows:
TO PLAY ALL: Select Play All and
then press the ENTER button to
play back all of the Playlist songs. (See
below to add favorites.)
PRIORITY:
a. Select priority and then navigate
down to the song you want to
prioritize.
b. Press the NavigationRight button
and the numbers will change to 0001,
0002, etc. According to the numbers
displayed the songs will be listed in that
order from top to bottom.
c. After setting all songs on your
priority list, press the MENU button
then the playlist will be highlighted.
d. Use the Navigation Down button
to select the first song and press
the ENTER button to start the
playback of all songs on the play list.
e. To change the Priority list, navigate
up and down to select the songs you
want to play in the order you desire.
REMOVE: Select Remove and then
select a song to remove using the
Navigation Up and Down
buttons. Press the ENTER button;
the song will be deleted from the
playlist.
RM ALL: To remove the whole Playlist,
select RM ALL and then press the
ENTER button; the whole Playlist
will be deleted.
— E21 —
Operation
Playing Songs from the USB (Continued)
17
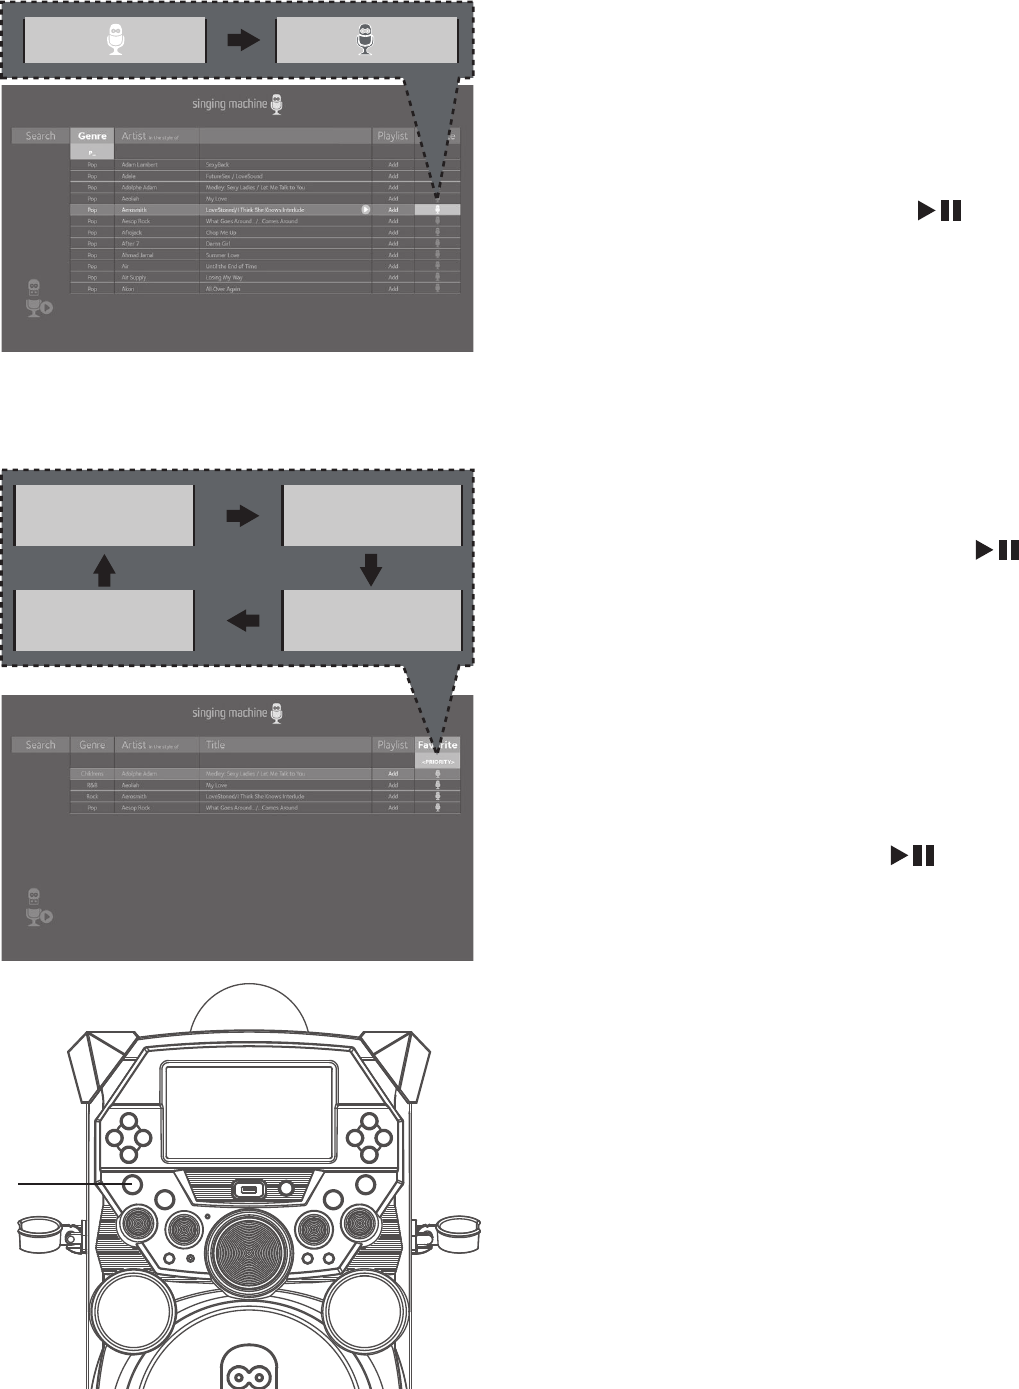
CREATING FAVORITES: To
create a favorite playlist, select a
song using the Navigation Up
and Down buttons, then scroll
to the Favorite column using the
NavigationRight or Left
button. Press the ENTER
button to confirm the operation;
the icon will turn from white to
blue. Repeat this step to add more
songs.
Notes:
• The Favorites will be stored even if the
unit is turned on or off.
• You can always edit Favorites after you
create them by selecting a song that
was added and pressing the ENTER
button again; it will change from blue to
white.
18
USING THE PLAYLIST: To play
or edit your previously created
Favorite playlist, you can use the
NavigationRight and Left
buttons to select the Favorite tag.
Then press the ENTER button
to show the favorites list. Perform
the same steps as shown in the
USING THE PLAYLIST section on the
previous page to play and edit the
Favorite playlist.
19
Press the ON/OFF button to turn
the unit off.
Note:
When in the Menu screen, press the MENU
button to go back and change categories;
i.e. while in the Playlist column press the
MENU button to go back and then select
the Artist column, etc.
<PLAY ALL> <PRIORITY>
<RM ALL> <REMOVE>
as
— E22 —
Operation
Using a Bluetooth Device
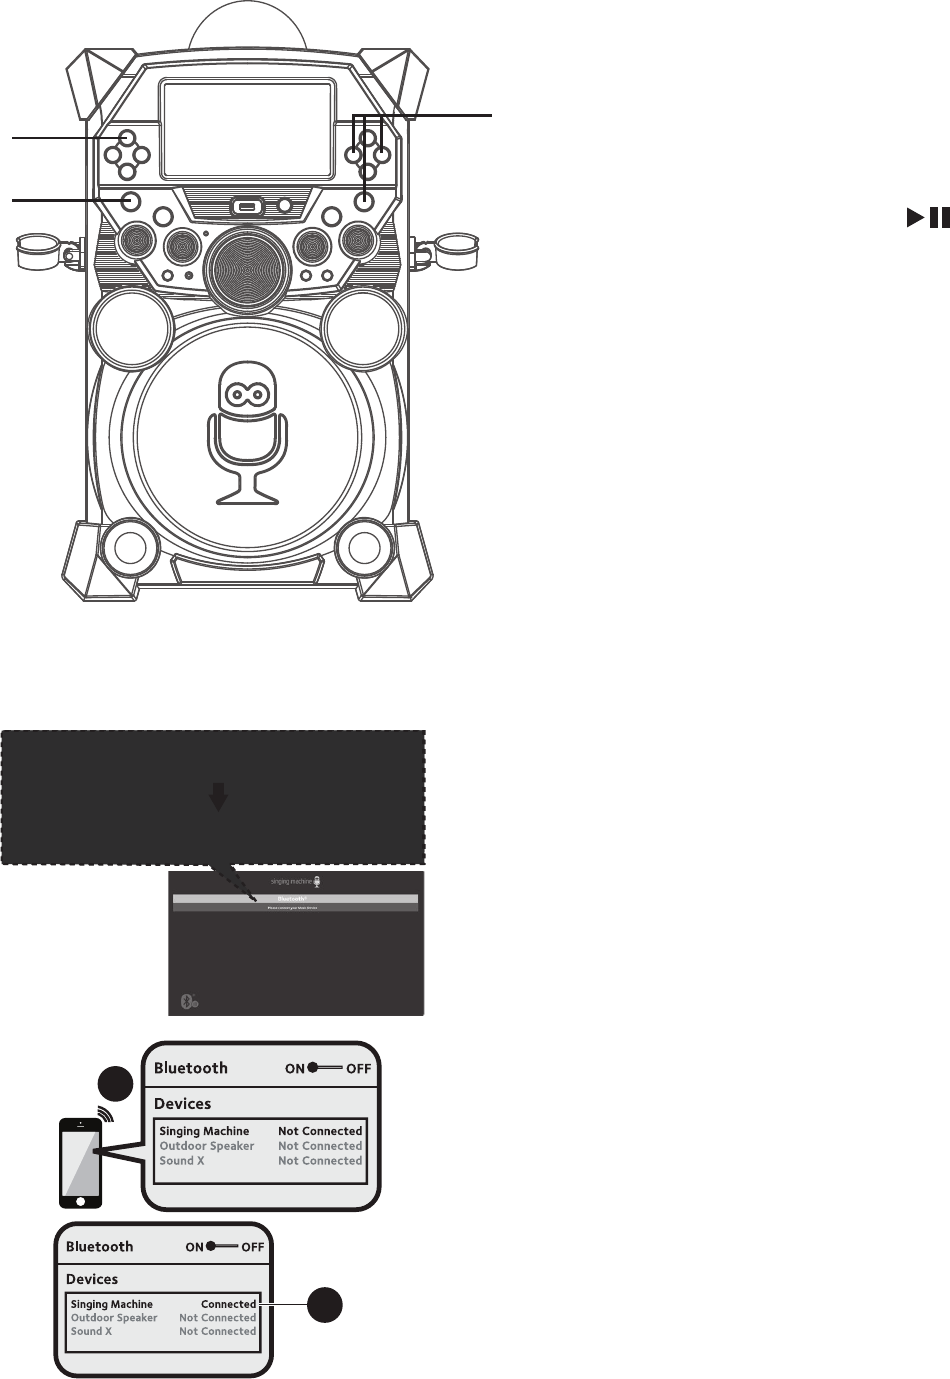
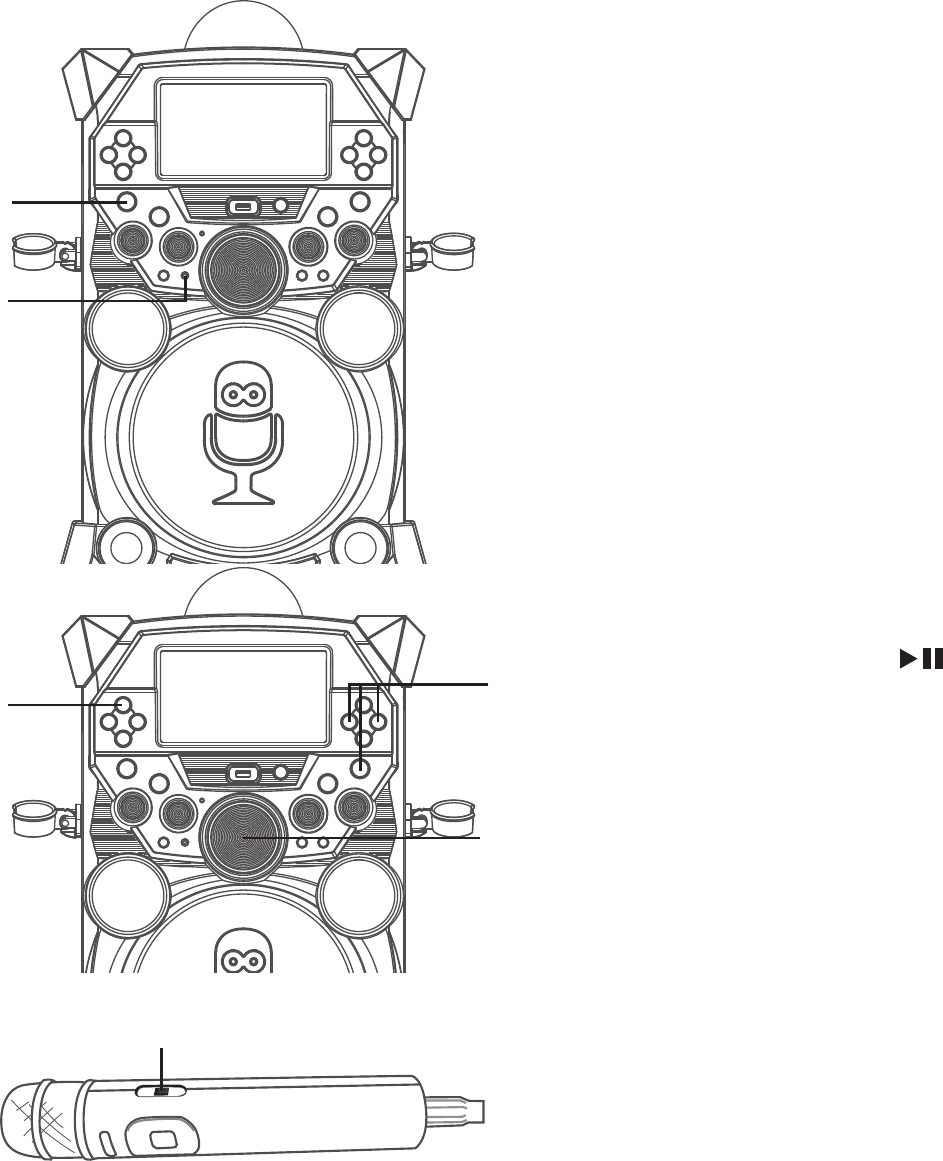
1
Connect the unit as described previously.
Press the ON/OFF button to turn the
unit on.
2
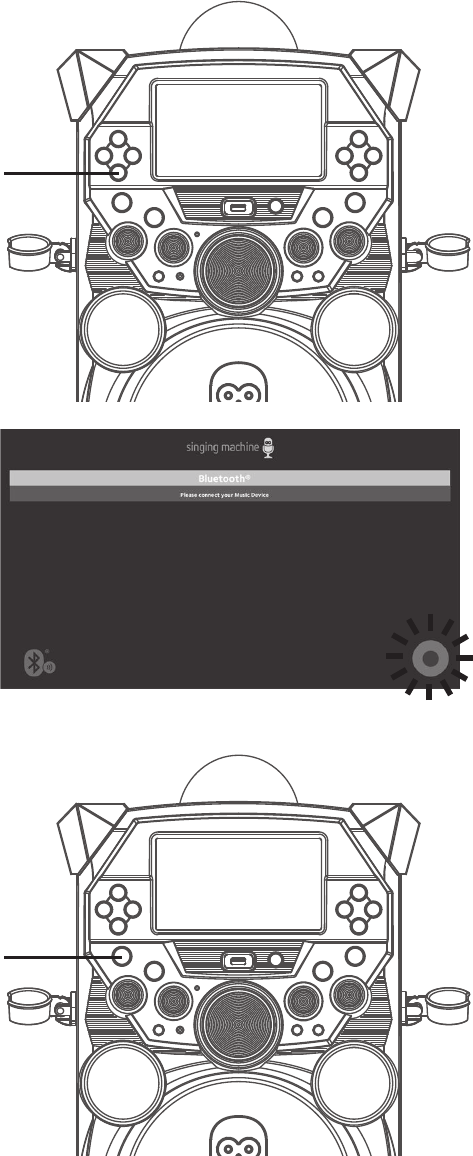
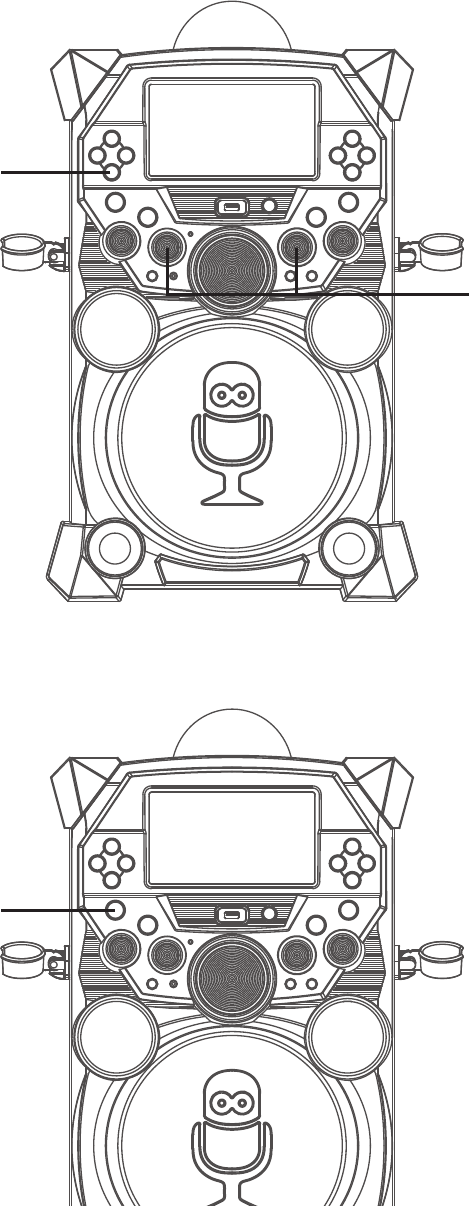
Press the NavigationRight or
Left button to select the Bluetooth
mode, then press the ENTER
button. You can also repeatedly press
the FUNCTION button to select the
Bluetooth mode. The Bluetooth indicator
will blink to show the unit is ready to pair
and “Please connect your Music Device”
will appear in the monitor.
3
Turn on your device’s Bluetooth option
in settings to search for a discoverable
device with a Bluetooth signal. Select
“Singing Machine” from the device
results on the Bluetooth menu.
Note:
• Always refer to the user manual of your
Bluetooth device for detailed instructions.
• You can also press the VOCAL/PAIR
button to disconnect any paired devices in
order to pair another device.
4
The Bluetooth indicator will light solid,
a tone will sound and the monitor
will display ”Your Music Device is
connected”.
Notes:
• If your Bluetooth device prompts you for a
passcode during the pairing process, please
enter “0000” to connect.
• On some Bluetooth devices, once pairing is
complete, select your Bluetooth device as
“Use as Audio Device” or similar.
• If connection is lost after successful
pairing, check to make sure the distance
between speaker and Bluetooth-enabled
device does not exceed 30 ft/10 meters.
Please connect your Music Device
Your Music Device is connected
3
4
Please connect your Music Device
Your Music Device is connected
u
v
v

— E23 —
Operation
Using a Bluetooth Device (Continued)
5
You can control your Bluetooth
device to start the music playback
OR press the ENTER button to
start playback. Press the ENTER
button during playback to pause the
song.
6
Adjust the volume to a comfortable
level using the MASTER VOLUME
control on this unit as well as the
Volume on your Bluetooth device.
Note: If connected to a TV, you can
adjust the TV’s volume as well.
7
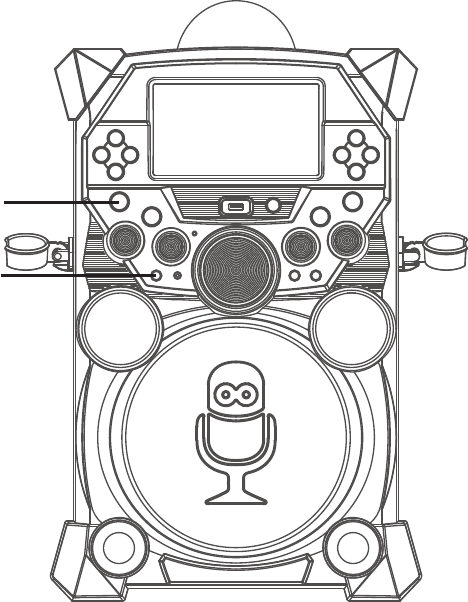
Connect the microphone(s). Slide
the Mic’s ON/OFF switch to the ON
position.
8
Adjust the MIC VOLUME 1 or 2
control as desired. Increasing this
will increase the volume of the the
respective microphone.
9
SKIP: Advance or go back one track
by pressing the NavigationRight
or Left button.
Note: You can view the lyrics on your mobile device/tablet and get more songs by
downloading the “The Singing Machine Mobile Karaoke App”; refer to the Welcome Kit for
full app download instructions.
y
U
V
X
W
— E24 —
Operation
Using a Bluetooth Device (Continued)
10
RECORD YOUR VOCAL
PERFORMANCE:
To record your singing as well as
the music, press the RECORD
button. Recording will begin and
the record icon at the bottom
right corner of the monitor will
blink red and blue.
When done recording, press
the RECORD button again; the
Record icon will stop blinking.
Notes:
• The recorded audio file will record onto
the USB drive.
• The recorded audio file will be named
with the “BT” prefix.
• See section “Playing Songs from the
Recorded Files” to play back your
recorded files.
11
Press the ON/OFF button to turn
the unit off.
at
ak
— E25 —
Operation
Playing Songs from the Recorded Files
1
Connect the unit as described
previously. Press the ON/OFF button
to turn the unit on.
2
Press the NavigationRight or
Left button to select the Recordings
mode and press the ENTER button
to continue. You can also repeatedly
press the FUNCTION button to select
the Recordings mode.
Notes:
• The Recording mode cannot be entered
unless a USB flash drive is inserted.
• A loading icon will appear when
the system is loading the files.
3
Use the Navigation Up and
Down buttons to navigate through
the list of recorded files that you have
previously recorded on your USB.
4
Press the ENTER button to start
the recorded audio file playback. Press
the ENTER button during playback
to pause the file.
5
Adjust the volume to a comfortable
level using the MASTER VOLUME
control.
u
x
y
v
v
w

— E26 —
Operation
Playing Songs from the Recorded Files (Continued)
6
You can sing along with your
previously recorded song. Simply
connect the microphone(s). Slide
the Mic’s ON/OFF switch to the ON
position.
7
Adjust the MIC VOLUME 1 or 2
control as desired. Increasing this
will increase the volume of the the
respective microphone.
Notes:
• You can search for a title using the same
procedure as shown on page E18.
• You can set and play a Playlist or
Favorite using the same procedure as
shown on pages E19 to E21.
U
V
— E27 —
Operation
Using the LINE IN Jack
1
Connect an external unit to the LINE IN
jack. Press the ON/OFF button to turn
the unit on.
2
Connect the external unit to the
LINE IN Jack on the front of this unit.
Connecting an external unit will allow
the audio to be played through your
Singing Machine.
Notes:
• It is highly recommended to set the
volume on the auxiliary unit to 1/3 or
lower to avoid distortion.
• Skipping files/tracks is not possible when
using an external device.
3
Press the NavigationRight or
Left button to select the Line In
mode and press the ENTER button
to continue. You can also repeatedly
press the FUNCTION button to select
the Line In mode.
4
Adjust the volume using the Master
Volume, TV or external device.
5
Connect the microphone(s). Slide
the Mic’s ON/OFF switch to the ON
position.
u
x
v
w
w
y
— E28 —
Operation
Using the LINE IN Jack (Continued)
6
Adjust the MIC VOLUME 1 or 2
control as desired. Increasing this will
increase the volume of the respective
microphone.
7
RECORDING YOUR SINGING:
To record your singing as well as the
music, press the RECORD button;
recording will begin and the record
icon at the bottom right of the monitor
will blink red and blue.
When done recording, press the
RECORD button again; the Record icon
will stop blinking.
Notes:
• The recorded audio file will record onto
the USB drive.
• The recorded audio file will be named
with the “LINEIN” prefix.
• See section “Playing Songs from the
Recorded Files” to play back your
recorded files.
8
Press the ON/OFF button to turn the
unit off.
W
U
V
— E29 —
Operation
Using the EXTERNAL INPUT Jack
1
Connect the unit as described
previously. Press the ON/OFF button
to turn the unit on.
2
Connect the external unit to the
EXTERNAL INPUT Jack on the front
of this unit. Connecting an external
unit will allow the audio to be played
through your Singing Machine.
Notes:
• It is highly recommended to set the
volume on the auxiliary unit to 1/3 and
the EXTERNAL INPUT Volume control
on this unit to 1/3 as well to avoid
distortion.
• Skipping files/tracks is not possible when
using an external device.
3
Play the device connected to the
EXTERNAL INPUT jack and it will play
through this unit regardless of the
function selected.
u
v
— E30 —
Troubleshooting Guide
Should this unit exhibit a problem, check the following before seeking service:
No Power
• Power is not on; press the ON/OFF button to turn power on.
• Make sure the unit is connected to AC power.
• Confirm the AC adapter is connected securely to the back of the unit
• Connect the unit to a different outlet.
• The unit has no battery left. Connect to AC power to recharge the battery.
No Sound – General
• Master Volume is set to minimum; raise volume.
• Correct Function was not selected; select using the Navigation buttons.
No Sound – If connected to a TV
• Volume on the TV is muted or too low.
• Correct source (HDMI) was not selected on the TV’s menu.
Lyrics do not appear on the TV screen
• If connected to a TV, HDMI plug is not connected properly; see page E6.
• If connected to a TV, select the correct source on the TV (usually HDMI).
• The file/track being played is not a track recording with lyrics. These are the only files
that allow you to view the lyrics on the TV screen.
No sound from the microphone
• Make sure it is firmly connected to the MIC 1 or MIC 2 jack.
• Make sure the Power switch on the Mic is set to the On position.
• Make sure the MIC VOLUME controls are not on the lowest setting.
• MASTER VOLUME is set to minimum; raise volume.
File(s) on USB jack not playing
• The file is corrupted; replace file.
• The file is not in a format this unit will play.
• The connected USB device is not supported by the product.
The Bluetooth device cannot be paired or connected with the unit.
• Ensure any other Bluetooth devices are turned off to avoid accidental pairing.
• You have not activated the Bluetooth function of your device; see page E22 or refer to
the Bluetooth device user’s manual.
• The system is not in pairing mode; press the VOCAL/PAIR button to restart pairing.
The Music is not available on the unit after successfully connecting the Bluetooth.
• Ensure your Bluetooth device can support the A2DP Bluetooth profile.
— E31 —
Updating the Firmware
Make sure the Singing Machine USB Flash Drive is securely plugged into the USB slot
before running the update. DO NOT interrupt the update. If interrupted during the update
process, the software can become corrupted and the unit will no longer function properly.
1. Create a folder on the Singing Machine USB Flash Drive named “user_update”.
2. Download the latest software (e.g xxxxxx.img) from www.singingmachine.com/
softwareupdates and save it into this folder.
3. Plug the Singing Machine USB Flash Drive into the USB jack on the unit and turn the
unit on.
4. The unit will update automatically.
Energy Saving (Auto Power System-APS)
The unit will automatically enter the Standby mode after 15 minutes in the following
situations:
1. There is no video or audio playback on USB/Bluetooth/Recordings/Line in mode;
2. The playback of external music player had been stopped but the audio cable is still
plugged into the LINE IN jack.
The unit can be resumed to turn on by pressing the ON/OFF button once.
APS is for energy saving purposes.

— E32 —
Specifications
AUDIO
Output Power (Tweeters) ....................................................................5 Watts (RMS) 8 Ohms (2)
Output Power (Full range) ........................................................................30 Watts (RMS) 4 Ohms
BLUETOOTH
Bluetooth Version ...............................................................................................................................V4.2
Working Distance ..........................................Up to 30 feet/10 meters measured in open space
RECORDED FILE
MP3 Encoding ..............................................................................................................................128kbps
USB
Format ................................................................................................................................................FAT32
Maximum Capacity ...........................................................................................................................32GB
JACK
Microphone ......................................................................................... 6.3 mm Microphone Jacks (2)
External Input ................................................................................................6.3 mm Microphone Jack
GENERAL
Power ........................................................................................................... AC 100-240V, 50/60 Hz
Battery (Lead Acid).................................................................................................................12V 7.0Ah
Dimensions - Main Unit ....................
22.2 (H) x 14.5 (W) x 13.8 (D) in (565 x 368 x 350 mm)
Weight - Main Unit ......................................................................................................20.7 lbs (9.4 kg)
Microphone ....................... -74 dB 600 Ohms impedance with 6.3 mm Dynamic Microphone
Specifications are subject to change without notice.
The terms HDMI and HDMI High-Definition Multimedia
Interface, and the HDMI Logo are trademarks or registered
trademarks of HDMI Licensing Administrator, Inc. in the Unit-
ed States and other countries.
The Bluetooth® word mark and logos are registered
trademarks owned by Bluetooth SIG, Inc. and any use of
such marks by The Singing Machine Company, Inc. is under
license. Other trademarks and trade names are those of their
respective owners.

The Singing Machine Company, Inc.
4060 E Jurupa Street, Unit B
Ontario, CA 91761-1413 USA
PRINTED IN CHINA
9040-1804-ENG01-US
Visit Our Website: www.singingmachine.com
Copyright © 2018 - All Rights Reserved.
Responsible Party Information as follow:
Company NameÿThe Singing Machine Company, Inc.
Addressÿ6301 NW 5th Way, Suite 2900, Fort Lauderdale, FL 33309, USA
Contact nameÿGary Atkinson
Telephoneÿ954-596-1000
Websiteÿwww.singingmachine.com