The Singing Machine SMK250 SING-ALONG WITH BLUETOOTH MUSIC User Manual
The Singing Machine Company, Inc. SING-ALONG WITH BLUETOOTH MUSIC
Users Manual

V 1.0
SMK250 USER’S GUIDE
SING-ALONG WITH
BLUETOOTH MUSIC
PLEASE READ BEFORE OPERATING THIS EQUIPMENT
Warnings
CAUTION: TO REDUCE THE RISK OF ELECTRIC SHOCK, DO NOT
REMOVE COVER (OR BACK). NO USER-SERVICEABLE PARTS
INSIDE. REFER SERVICING TO QUALIFIED SERVICE PERSONNEL.
The Caution marking is located on the bottom panel.
DANGEROUS VOLTAGE: The lightning ash with arrowhead
symbol within an equilateral triangle is intended to alert the
user to the presence of uninsulated dangerous voltage within
the product’s enclosure that may be of suf cient magnitude to
constitute a risk of electric shock to persons.
WARNING: TO PREVENT FIRE OR SHOCK HAZARD, DO NOT EXPOSE
THIS UNIT TO RAIN OR MOISTURE.
ATTENTION: The exclamation point within an equilateral
triangle is intended to alert the user to the presence of
important operating and maintenance (servicing) instructions
in the literature accompanying this product.
FCC WARNING: This equipment may generate or use radio frequency
energy. Changes or modi cations to this equipment may cause harmful
interference unless the modi cations are expressly approved in the
instruction manual. The user could lose the authority to operate this
equipment if an unauthorized change or modi cation is made.
This device complies with part 15 of the FCC Rules. Operation is subject
to the following two conditions: (1) This device may not cause harmful
interference, and (2) this device must accept any interference received,
including interference that may cause undesired operation.
INDUSTRY CANADA NOTICE:
This device complies with Industry Canada Iicense-exempt RSS standard(s).
Operation is subject to the following two conditions:
1. This device may not cause interference, and
2. This device must accept any interference, including interference that
may cause undesired operation of the device.
DRIPPING WARNING: This product shall not be exposed to dripping or
splashing, and no objects lled with liquids, such as vases, shall be placed
on the product.
VENTILATION WARNING: The normal ventilation of the product shall not be
impeded for intended use.
SAFETY VERIFICATION: This device is made and tested to meet safety
standards of the FCC, requirements and compliance with safety performance
of the U.S. Department of Health and Human Services and also with FDA
Radiation Performance Standards 21 CFR Subchapter.
NOTE: This equipment has been tested and found to comply with the
limits for a Class B digital device, pursuant to part 15 of the FCC Rules.
These limits are designed to provide reasonable protection against harmful
interference in a residential installation. This equipment generates, uses
and can radiate radio frequency energy and, if not installed and used in
accordance with the instructions, may cause harmful interference to radio
communications. However, there is no guarantee that interference will
not occur in a particular installation. If this equipment does cause harmful
interference to radio or television reception, which can be determined by
turning the equipment off and on, the user is encouraged to try to correct
the interference by one or more of the following measures:
• Reorient or relocate the receiving antenna.
• Increase the separation between the equipment and receiver.
• Connect the equipment into an outlet on a circuit different from that to
which the receiver is connected.
• Consult the dealer or an experienced radio/TV technician for help.
• The rating information is located at the bottom of the unit.
Important Safety Information
1. Read these Instructions.
2. Keep these Instructions.
3. Heed all Warnings.
4. Follow all Instructions.
5. Do not use this apparatus near water.
6. Clean only with a dry cloth.
7. Do not block any of the ventilation openings. Install in
accordance with the Manufacturer’s instructions.
8. Do not install near any heat sources such as radiators, heat
registers, stoves, or other apparatus (including ampli ers) that
produce heat.
9. Do not defeat the safety purpose of the polarized or grounding-
type plug. A polarized plug has two blades with one wider than
the other. A grounding type plug has two blades and a third
grounding prong. The wide blade or the third prong are provided
for your safety. When the provided plug does not t into your
outlet, consult an electrician for replacement of the obsolete
outlet.
10. Protect the power cord from being walked on or pinched
particularly at plugs, convenience receptacles, and the point
where they exit from the apparatus.
11. Only use attachments/accessories specified by the
manufacturer.
12. Use only with a cart, stand, tripod, bracket,
or table speci ed by the manufacturer, or
sold with the apparatus. When a cart is used,
use caution when moving the cart/apparatus
combination to avoid injury from tip-over.
13. Unplug this apparatus during lightning storms
or when unused for long periods of time.
14. Refer all servicing to qualified service
personnel. Servicing is required when the apparatus has been
damaged in any way, such as power-supply cord or plug is
damaged, liquid has been spilled or objects have fallen into the
apparatus, the apparatus has been exposed to rain or moisture,
does not operate normally, or has been dropped.
15. WARNING: To reduce the risk of re or electric shock, do not
expose this apparatus to rain or moisture. Do not place objects
lled with water, such as a vase, on the apparatus.
16. The AC mains plug is used as the power disconnect device
and it should remain readily accessible and operable during
intended use. In order to completely disconnect the apparatus
from power, the mains plug should be completely removed
from the AC outlet socket.
17. CAUTION: To reduce the risk of re or explosion, do not expose
batteries to excessive heat such as sunshine, rehto ro er
heat sources.
CAN ICES-3(B)/NMB-3(B)
CAUTION
RISK OF ELECTRIC SHOCK
DO NOT OPEN
1
The device has been evaluated to meet general RF exposure requirement.
The device can be used in portable exposure condition without restriction.
Le présentappareilestconforme aux CNR d'Industrie Canada applicables
aux appareils radio exempts de licence. L'exploitationestautorisée aux
deux conditions suivantes:
(1) l'appareil ne doit pas produire de brouillage, et
(2) l'utilisateur de l'appareildoit accepter tout
brouillageradioélectriquesubi, mêmesi le brouillageest susceptible
d'encompromettre le fonctionnement.
• Bluetooth wireless stereo audio streaming
• Support A2DP Profiles for most smart phones / laptops
• Mic Volume Controls
• Echo Control
• Microphone Jacks, 3.5mm x2
• Line in jack 3.5mm (Aux input / Audio input)
• Light Effect
Feature
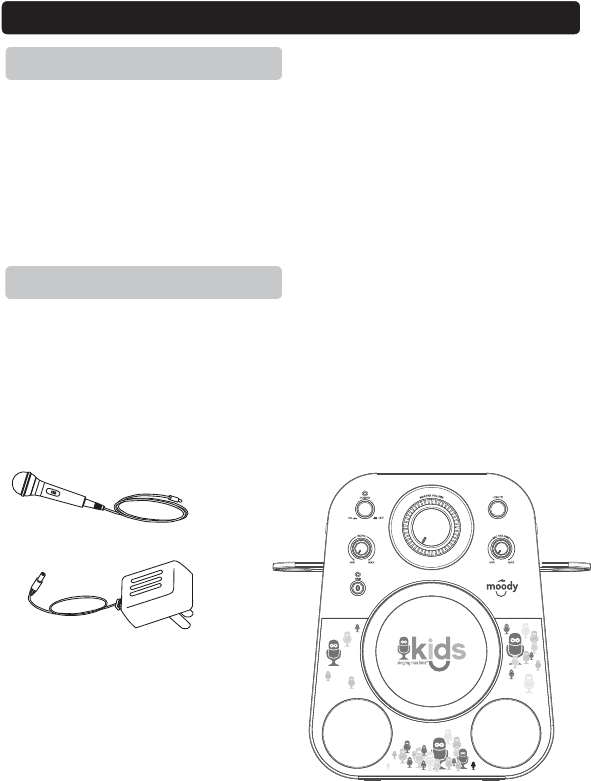
Feature / Included
• Built-in speakers
• Power: Requires AC power adapter or Batteries
• Singalong unit
• Microphones
• AC power adapter
• User Manual
Microphone
AC Adapter
Sing along unit
Included
2
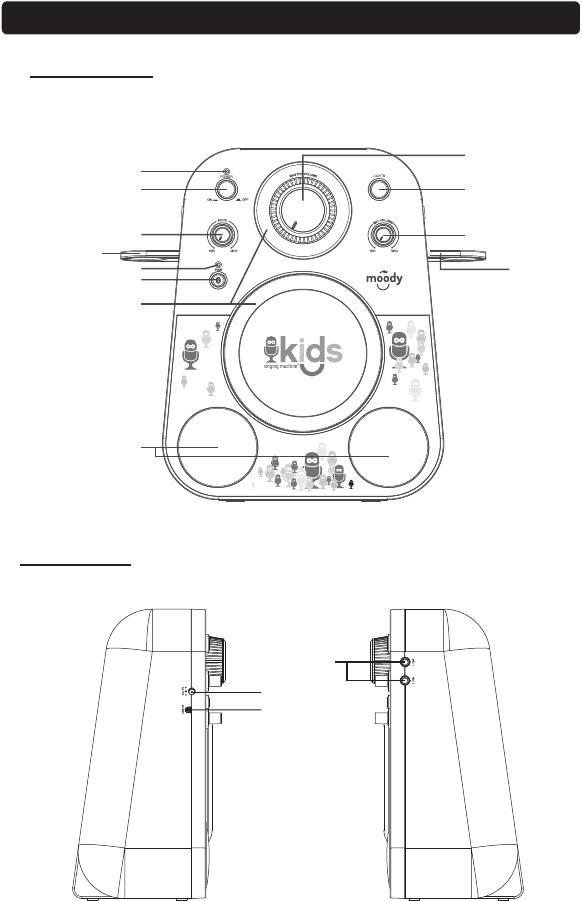
FRONT VIEW
Introduction
REAR VIEW
1
2
3
4
5
6
7
8
9
10
11
8
12
13
14
3
1. POWER Indicator: Will be light when unit turn on.
2. ON/OFF Button: Press this button to turn on / off unit.
3. ECHO Dial: Rotate to adjust echo sound effect.
L
ocat
i
o
n
Co
n
t
r
o
l
s
4. BT Indicator: Will flash when unit turn to BT (Bluetooth mode) pairing.
Will be light when Bluetooth pairing successfully.
5. PAIR Button:Press to Pair the BT device or reconnect BT device
6. LIGHT RING: Will show the light effect
7. SPEAKER
8. MIC Holder: Place the microphone on the holder
9. MIC VOLUME Dial: Rotate to adjust the volume from the MIC input.
10. LIGHTS Button: Press this button to show different lights effect and on /
off
11. MASTER VOLUME Dial: Rotate to adjust the main volume sound level.
12. DC INPUT Jack: Connect power adapter for AC power.
13. LINE IN (Aux in / Audio in) : Connect to external device audio output.
14. MIC Inputs: Mic1 and Mic2 input jack
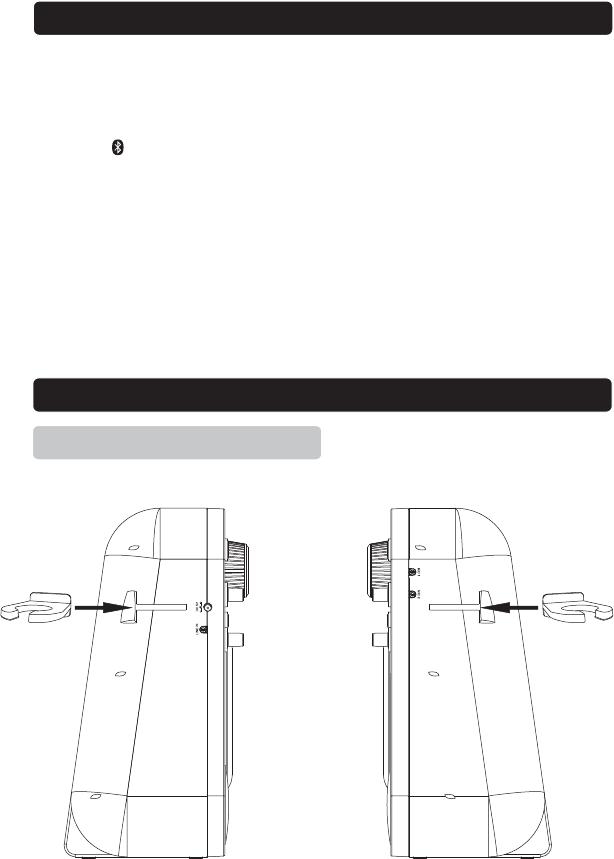
Install the mic holder to hold the Microphone onto unit.
Setu
p
Mic holder
Install Mic holder
4

Setu
p
Power
Connect Power Adapter
Plug the included AC adapter into the standard AC power outlet to power the
Sing along unit. Connect small end to DC INPUT jack of main unit.
After adapter connection, Press the ON/OFF button to turn on/off the Sing
along unit.
To turn on the unit, press the ON/OFF button, the Power indicator will light up.
To turn it off, press the ON/OFF button again, the Power indicator is off.
It is a four stages switch. Toggle press the LIGHTS button get the
different brightness lights effect and on/off the lights.
Sing along with the music by plugging in the provided microphone into either
one of the microphone sockets on the unit.
Adjust the ECHOdialof Sing alongUnitto enhance your voice for a concert hall
effect.
Connect Microphones require a microphone into the MIC 1 Input Socket or
MIC 2 Input Socket
Slide the ON/OFF switch of the MICROPHONE on and use the unit’s
MIC VOLUME to adjust the volume of audio sound from the microphone.
Requires a microphone (included)
1. Plug the microphone (see below figure) into the MIC 1 INPUT or MIC 2
INPUT.
2. Slide the ON /OFF switch of
MICROPHONE
,
3. Use the
MIC
VOLUME
dial of Sing along Unit to adjust the volume of audio
5
sound from the microphone.
Turning ON/OFF
Lights Function
Sing along Function
Echo
Microphones

External devices that have a built-in Bluetooth feature can connect wirelessly
to the Sing alongUnit.
Bluetooth O
p
eration
Pairing a Bluetooth device (No LINE IN device is plugged)
1. Power on the unit by press the ON/OFF button, Power indicator will light.
2. Set the Bluetooth function of your external device to ON and begin
searching for devices.
NOTE: The effective distance between your external device and this
apparatus is 10 meters (30 feet).
3. Once “SMK250” appears on the paired device list of your external device,
select it.
4. If you are asked for a password, enter “0000”.
5. “Connected” will be heard and Pair indicator light blue steadily that
indicates a connection has been established.
6. A few seconds later your Bluetooth connection should be ready to use.
Note: After initial pairing, the unit will stay paired unless unpaired manually by
the user or erased due to a reset of the device. If your device should become
unpaired or your find it is unable to connect, repeat the above steps or press &
hold the PAIR button again.
1ˊFollow the “Getting Connected” steps above to pair your external device.
2ˊTurn on the music player program on your external device and set it to
play.
3ˊAudio played through the connected Bluetooth Device will now be heard
through the speakers.
4ˊAdjust the MASTER VOLUME to obtain the desired volume level.
Getting Connected
Playing Music from an External Bluetooth Device
External (auxiliary) audio sources or MP3 players can connect to the Sing Along unit via
LINE IN.
1. Connect a 3.5mm Auxiliary Cable (not included) to the LINE IN jack at the
left side of unitand to the Audio Output or Phones on the audio device you
wish to play.
2. Turn on both units. (The sound “Aux mode” can be heard) .
3. After the connection, the external device will sound from speakers of your
unit.
Please note:-If not use the this function, please unplug it.
LINE IN
(
AUDIOIN
)
Auxiliar
y
O
p
eration
6

AC Power
Adapter Connect DC Jack
Use included adapter
AC~ Input 100-240V 50/60 Hz , DC Output 5V, 0.8$
$
Bluetooth For Music Share V2.1 + EDR
Master Power Output 1.8W x 2RMS
Loud Speakers Spec 3 Inch,3 Watt , 4 Ohm
Specifications are typical, individual units might vary. They are subject to continuous
improvement without notice and without incurring any obligation.
S
p
ecification
7