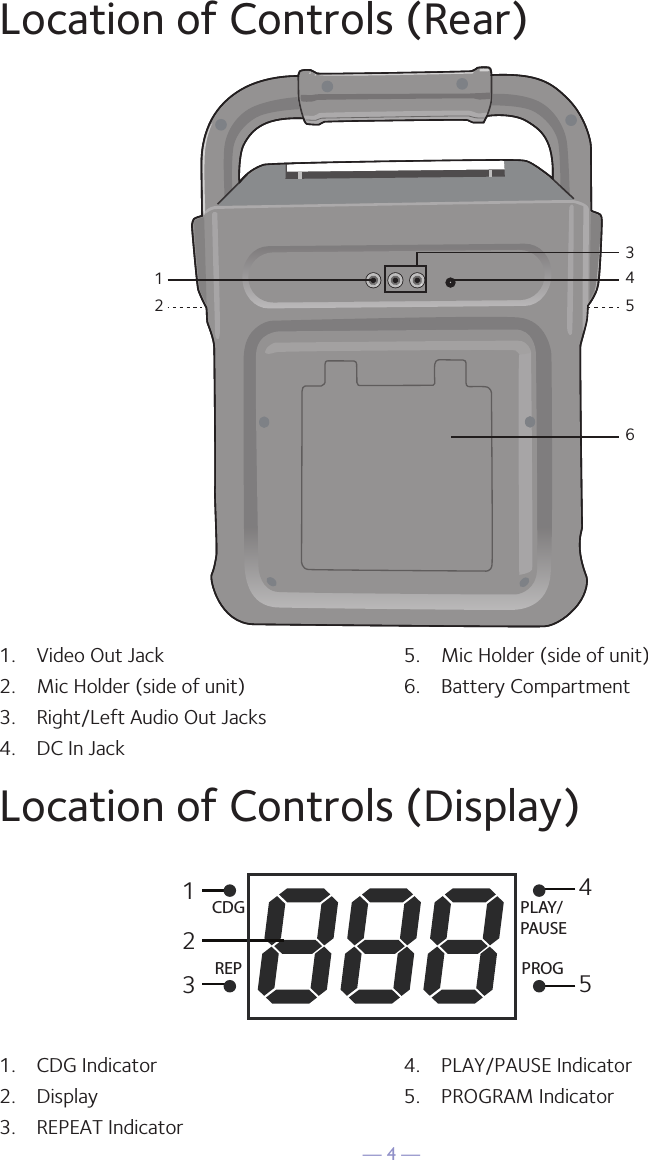
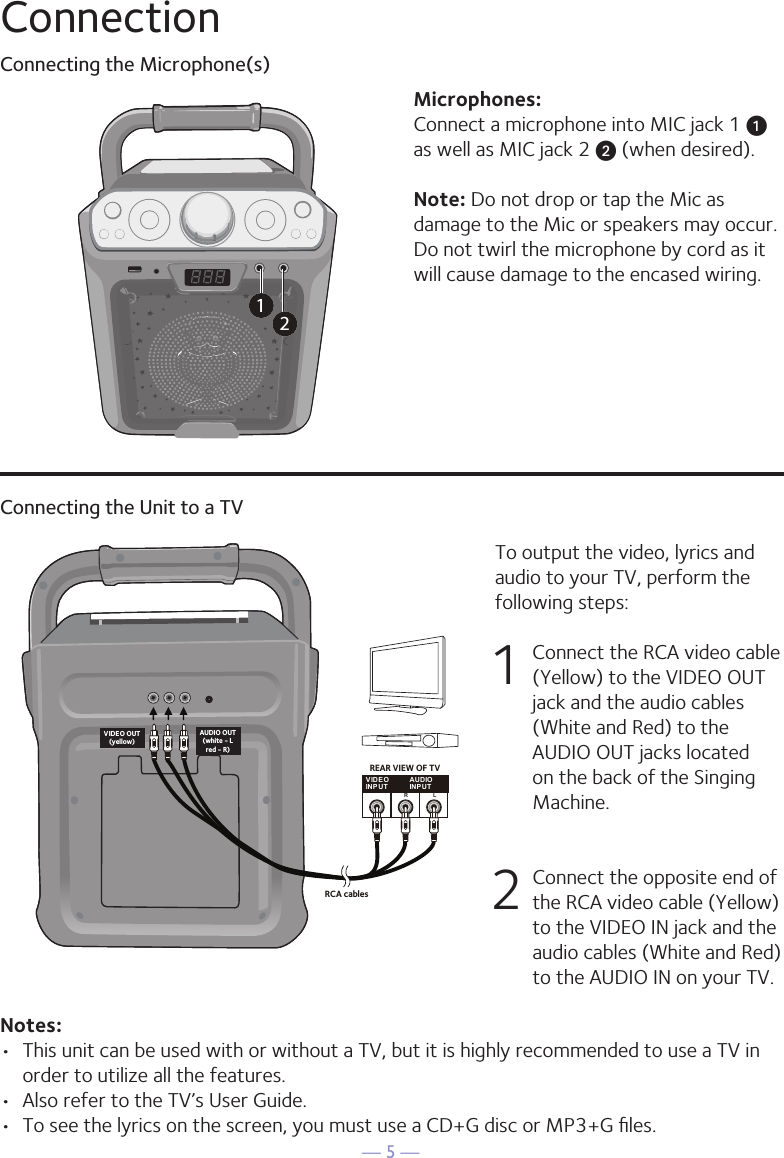
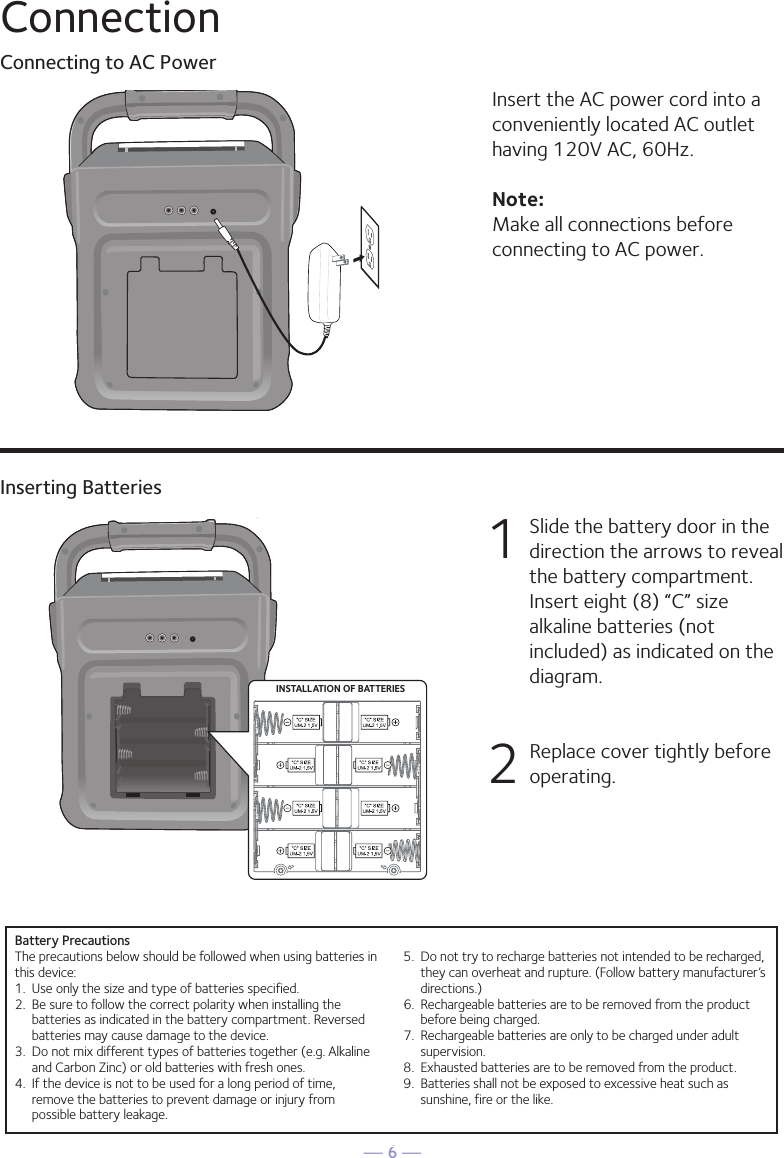
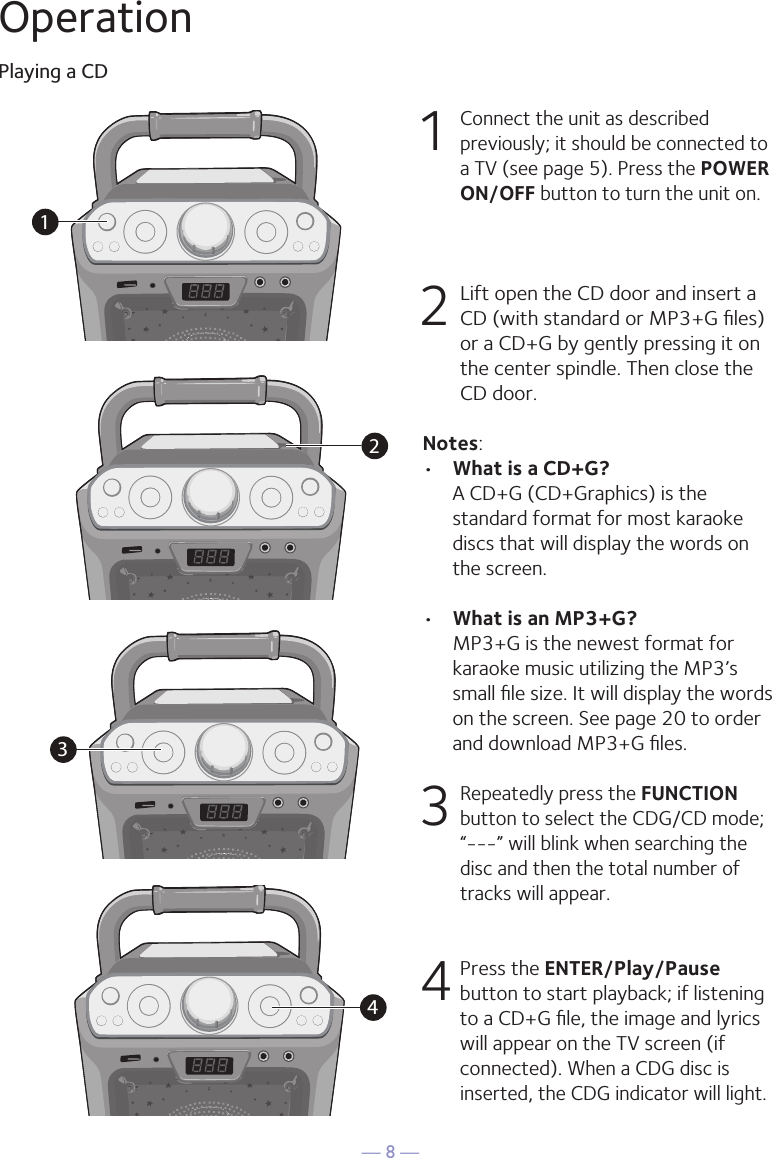
The Singing Machine SML682BT CDG AND MP3G KARAOKE PLAYER WITH BLUETOOTH User Manual

The Singing Machine Company, Inc. CDG AND MP3G KARAOKE PLAYER WITH BLUETOOTH

User Manual

TMSML682BTBK/P/WINSTRUCTION MANUALwww.singingmachine.comThe Singing Machine® is a registered trademark of The Singing Machine Co., Inc.
— 1 —WarningsCAUTION: TO REDUCE THE RISK OF ELECTRIC SHOCK, DO NOT REMOVE COVER (OR BACK). NO USER-SERVICEABLE PARTS INSIDE. REFER SERVICING TO QUALIFIED SERVICE PERSONNEL. The Caution marking is located on the bottom panel.DANGEROUS VOLTAGE: The lightning flash with arrowhead symbol within an equilateral triangle is intended to alert the user to the presence of uninsulated dangerous voltage within the product’s enclosure that may be of sufficient magnitude to constitute a risk of electric shock to persons.WARNING: TO PREVENT FIRE OR SHOCK HAZARD, DO NOT EXPOSE THIS UNIT TO RAIN OR MOISTURE.ATTENTION:  The  exclamation  point  within  an  equilateral triangle  is  intended  to  alert  the  user  to  the  presence  of important operating and maintenance (servicing) instructions in the literature accompanying this product.FCC WARNING:  This equipment  may generate  or use  radio  frequency energy. Changes or modifications to this equipment may cause harmful interference  unless  the  modifications  are  expressly  approved  in  the instruction  manual.  The  user  could  lose  the  authority  to  operate  this equipment if an unauthorized change or modification is made.   The device has been evaluated to meet general RF exposure requirement. The device can be used in portable exposure condition without restriction.This device complies with part 15 of the FCC Rules. Operation is subject to the following two conditions: (1) This device may not cause harmful interference, and (2) this device must accept any interference received, including interference that may cause undesired operation.INDUSTRY CANADA NOTICE:This device complies with Industry Canada Iicense-exempt RSS standard(s). Operation is subject to the following two conditions: 1.  This device may not cause interference, and 2.  This device must accept any interference, including interference that may cause undesired operation of the device.DRIPPING  WARNING:  This  product  shall  not  be  exposed  to  dripping  or splashing, and no objects filled with liquids, such as vases, shall be placed on the product.VENTILATION WARNING: The normal ventilation of the product shall not be impeded for intended use.SAFETY  VERIFICATION: This  device  is  made  and tested  to  meet safety standards  of  the  FCC,  requirements  and  compliance  with  safety performance of the  U.S.  Department of  Health  and Human  Services and also with FDA Radiation Performance Standards 21 CFR Subchapter.Warnings:•  This CD player employs a laser light beam. Only a qualified service person should  remove  the  cover  or  attempt  to  service  this  device,  due  to possible eye injury.  • The  use  of  controls,  adjustments,  or  procedures  other  than  thosespecified herein might result in hazardous radiation exposure. • The apparatus shall be used in an open area.CAUTION!Invisible laser radiation when open and interlocks defeated. Avoid exposureto beam.NOTE:  This equipment  has been  tested  and  found  to comply  with  the limits for a Class B digital device, pursuant to part 15 of the FCC Rules. These limits are designed to provide reasonable protection against harmful interference in a residential installation. This equipment generates, uses and can radiate radio frequency energy and, if not installed and used in accordance with the instructions, may cause harmful interference to radio communications. However,  there is  no guarantee that  interference will not occur in a particular installation. If this equipment does cause harmful interference to radio or television reception, which can be determined by turning the equipment off and on, the user is encouraged to try to correct the interference by one or more of the following measures:•  Reorient or relocate the receiving antenna.•  Increase the separation between the equipment and receiver.•  Connect the equipment into an outlet on a circuit different from that towhich the receiver is connected.•  Consult the dealer or an experienced radio/TV technician for help.•  The rating information is located at the bottom of the unit.Important Safety Information1.  Read these Instructions.2.  Keep these Instructions.3.  Heed all Warnings.4.  Follow all Instructions.5.  Do not use this apparatus near water.6.  Clean only with a dry cloth.7.  Do  not  block  any  of  the  ventilation  openings.  Install  in accordance with the Manufacturer’s instructions.8. Do  not install  near  any heat  sources  such as  radiators,  heat registers, stoves, or other apparatus (including amplifiers) that produce heat.9.  Do not defeat the safety purpose of the polarized or grounding-type plug. A polarized plug has two blades with one wider than the other.  A grounding type  plug has two blades  and a  third grounding prong. The wide blade or the third prong are provided for your safety. When the provided plug does not fit into your outlet, consult an electrician for replacement of the obsolete outlet.10.  Protect  the  power  cord  from  being  walked  on  or  pinched particularly at  plugs,  convenience receptacles,  and the  pointwhere they exit from the apparatus.11.  Only  use  attachments/accessories  specified  by  the manufacturer.12.  Use only with a cart, stand, tripod, bracket,or table specified by the manufacturer, or sold  with the  apparatus. When  a  cart is used, use caution when moving the cart/apparatus  combination  to  avoid  injury from tip-over.13.  Unplug  this  apparatus  during  lightning storms or when unused for long periods of time.14.  Refer all servicing  to qualified  service personnel.  Servicing is required when  the apparatus  has been damaged  in any  way, such as power-supply cord or plug is damaged, liquid has been spilled or objects have fallen into the apparatus, the apparatus has  been  exposed  to  rain  or  moisture,  does  not  operate normally, or has been dropped.15. WARNING: To reduce the risk of fire or electric shock, do notexpose this apparatus to rain or moisture. Do not place objects filled with water, such as a vase, on the apparatus.16.  The  AC mains  plug  is used  as  the power  disconnect device and  it should  remain readily  accessible  and operable  during intended use. In order to completely disconnect the apparatus from power,  the mains  plug should  be completely removed from the AC outlet socket.17.  CAUTION: To reduce the risk of fire or explosion, do not expose batteries  to  excessive  heat  such  as  sunshine,  fire  or  other heat sources.CAN ICES-3(B)/NMB-3(B)CAUTIONRISK OF ELECTRIC SHOCKDO NOT OPENClass II equipment symbol.This symbol indicates that the unit has a double insulation system.The device has been evaluated to meet general RF exposure requirement. The device can be used in portable exposure condition without restriction.Le présent appareil est conforme aux CNR d'Industrie Canada applicables aux appareils radio exempts de licence. L'exploitation est autorisée aux deux conditions suivantes : (1) l'appareil ne doit pas produire de brouillage, et (2) l'utilisateur de l'appareil doit accepter tout brouillage radioélectrique subi, même si le brouillage est susceptible d'en compromettre le fonctionnement.
— 2 —IncludedPlease make sure the following items are included.Wired MicrophoneMain UnitAC AdapterManual
— 3 —Location of Controls (Top/Front)18765432141312111092019181716152524232221261.  Handle2.  MASTER VOLUME Control3.  CD Compartment4.  ECHO + Button5.  FUNCTION Button6.  MIC VOLUME + Button7.  POWER ON/OFF Button8.  ECHO – Button9.  LIGHT MODE Button10.  SKIP 10+ Button11.  MIC VOLUME – Button12.  Display13.  USB Jack14.  LINE IN Jack15.  Open/Close Tab16.  Skip –/Navigation Button17.  ENTER/Play/Pause Button18.  KEY +/5 Button19.  RECORD n Button20.  Skip +/Navigation Button21.  REPEAT/PROGRAM Button22.  STOP/PAIR Button23.  KEY –/ Button24.  MIC 2 Jack25.  MIC 1 Jack26.  Speaker
— 4 —Location of Controls (Rear)1342561.  CDG Indicator2.  Display3.  REPEAT Indicator4.  PLAY/PAUSE Indicator5.  PROGRAM Indicator1.  Video Out Jack2.  Mic Holder (side of unit)3.  Right/Left Audio Out Jacks4.  DC In Jack5.   Mic Holder (side of unit)6.  Battery CompartmentLocation of Controls (Display)45132CDGREPPLAY/PAUSEPROG
— 5 —ConnectionConnecting the Microphone(s)Microphones:Connect a microphone into MIC jack 1 u  as well as MIC jack 2 v (when desired). Note: Do not drop or tap the Mic as damage to the Mic or speakers may occur. Do not twirl the microphone by cord as it will cause damage to the encased wiring.12Connecting the Unit to a TVVIDEOINPUTAUDIOINPUTR LRCA cablesVIDEO OUT(yellow)AUDIO OUT(white - Lred - R)REAR VIEW OF TVTo output the video, lyrics and audio to your TV, perform the following steps: 1  Connect the RCA video cable (Yellow) to the VIDEO OUT jack and the audio cables (White and Red) to the AUDIO OUT jacks located on the back of the Singing Machine.  2   Connect the opposite end of the RCA video cable (Yellow) to the VIDEO IN jack and the audio cables (White and Red) to the AUDIO IN on your TV.Notes: •  This unit can be used with or without a TV, but it is highly recommended to use a TV in order to utilize all the features.•  Also refer to the TV’s User Guide. •  To see the lyrics on the screen, you must use a CD+G disc or MP3+G files.
— 6 —ConnectionConnecting to AC PowerInserting BatteriesInsert the AC power cord into a conveniently located AC outlet having 120V AC, 60Hz. Note: Make all connections before connecting to AC power. 1  Slide the battery door in the direction the arrows to reveal the battery compartment. Insert eight (8) “C” size alkaline batteries (not included) as indicated on the diagram. 2   Replace cover tightly before operating. INSTALLAT ION OF BATTERIESE-3MAKING THE CONNECTIONSINSTALLATION OF BATTERIES“C” size UM2  1.5V“C” size UM2  1.5V“C” size UM2  1.5V“C” size UM2  1.5V“C” size UM2  1.5V“C” size UM2  1.5V“C” size UM2  1.5V“C” size UM2  1.5VDC OPERATION1.  Slide the battery door in the direction the arrows to reveal thebattery compartment. Insert eight (8) “C” size alkaline batteries(not included) as indicated on the diagram.2.  Replace cover tightly before operating.CAUTION: •  Replace all batteries at the same time.•  Do not mix old batteries with new batteries.Battery PrecautionsThe precautions below should be followed when using batteries inthis device:1.  Use only the size and type of batteries specified.2.  Be sure to follow the correct polarity when installing thebatteries as indicated in the battery compartment. Reversedbatteries may cause damage to the device.3.  Do not mix different types of batteries together (e.g. Alkalineand Carbon Zinc) or old batteries with fresh ones.4.  If the device is not to be used for a long period of time,remove the batteries to prevent damage or injury frompossible battery leakage.5.  Do not try to recharge batteries not intended to be recharged,they can overheat and rupture. (Follow battery manufacturer’sdirections.)6.  Rechargeable batteries are to be removed from the productbefore being charged.7.  Rechargeable batteries are only to be charged under adultsupervision.8.  Exhausted batteries are to be removed from the product.9.  Batteries shall not be exposed to excessive heat such assunshine, fire or the like.CONNECTING THE POWERInsert the DC plug of the power adapter into theDC 9V jack on the unit. You can power thesystem from a standard AC outlet by using thesupplied Power Adapter (The adapter operateson AC 100V~240V/50Hz-60Hz ).CAUTION:• The included AC adapter is for use with thisunit only. Do not use it with other equipment.• When the adapter is plugged in, the apparatusis not completely disconnected from themains, even when the power is turned off.                                        SML283-eng and fra.V4_Layout 1  11/7/16  8:37 AM  Page 3
— 7 —Connecting to Line In JackConnect an external device by using an appropriate cable (3.5mm audio cable not included) as shown.Note: See page 18 to select and use the Line In function.To External UnitAUDIO OUTPUT/ HEADPHONE JACKLINE INOperationDisco LightsWhen the unit is turned on, the Light mode 1 is automatically activated. The lights will light up and will synchronize with sound when you speak or sing into the microphone. Press the LIGHT MODE button for Light mode 2 which will display the light show but will not respond to the microphone. Press the LIGHT MODE button once again to turn off the Lights.1
— 8 —OperationPlaying a CD1 Connect the unit as described previously; it should be connected to a TV (see page 5). Press the POWER ON/OFF button to turn the unit on. 2  Lift open the CD door and insert a CD (with standard or MP3+G files) or a CD+G by gently pressing it on the center spindle. Then close the CD door. Notes: •  What is a CD+G?  A CD+G (CD+Graphics) is the standard format for most karaoke discs that will display the words on the screen.•  What is an MP3+G?  MP3+G is the newest format for karaoke music utilizing the MP3’s small file size. It will display the words on the screen. See page 20 to order and download MP3+G files.  3  Repeatedly press the FUNCTION button to select the CDG/CD mode; “---” will blink when searching the disc and then the total number of tracks will appear.4 Press the ENTER/Play/Pause button to start playback; if listening to a CD+G file, the image and lyrics will appear on the TV screen (if connected). When a CDG disc is inserted, the CDG indicator will light.1234
— 9 —57799886OperationPlaying a CD (Continued)5 Adjust the volume to a comfortable level using the MASTER VOLUME control.    Notes:•  Never place anything other than a CD in the compartment, as foreign objects can damage the unit.•  If no disc is inserted, “No” will appear on the display.•   If connected to a TV or other audio source, adjust the volume of the TV using its own volume control. 6  Connect microphone(s) as shown on page 5, and slide the ON/OFF switch on the microphone to the ON position.7  Press the MIC VOLUME + or –button as desired, which will affect both microphones.8  Press the ECHO + or – button to add an echo effect to your voice. 9  Adjust the Key using the KEY +/5 and KEY –/ buttons to obtain the best key for the playing track.
— 10 —OperationPlaying a CD (Continued)10 SKIP: Advance or go back one track by pressing the Skip –/Navigationand Skip +/Navigationbutton. You can also skip ahead 10 files/tracks using the SKIP 10+ button.11 REPEAT: During playback, press the REPEAT/PROGRAM button once to repeatedly play the selected song; the Repeat indicator will blink. Press the REPEAT/PROGRAM button a second time to repeatedly play the whole CD; the Repeat indicator will light solid. Press it again to cancel Repeat function, the Repeat/Program indicator turns off.12 PROGRAM: You can program up to 20 tracks on any disc for playback in any desired order. While in the Stop mode, press the REPEAT/PROGRAM button; the Repeat/Program indicator will blink and “01” will appear on the display indicating the first program is ready to program. 13 PROGRAM: Select the first track using the Skip –/Navigationand Skip +/Navigation buttons. Press the REPEAT/PROGRAM button again to confirm the entry. Repeat to set up to 20 tracks into memory. When done, press the ENTER/Play/Pause button to start playback.101010111213131313
— 11 —OperationPlaying a CD (Continued)      Program Notes: •  Press the STOP/PAIR button TWICE to stop and clear the program.•  If more than 20 tracks are attempted to be programmed, “FUL” will appear in the display.14  PAUSE: During playback, if you wish to pause the disc momentarily, press the ENTER/Play/Pause button; the PLAY/PAUSE indicator will blink. Press again to resume normal playback.15  Press the STOP/PAIR button to stop playback.16 RECORD YOUR VOCAL PERFORMANCE:   To record your singing as well as the music, press the RECORD button. Recording will begin and the light around the RECORD button will light solid.  When done recording, press the RECORD  button again; the light around the RECORD button will turn off.Notes: • The recorded audio file will record onto the USB drive.• See page 12 to play back your recorded files. 17  Press the POWER ON/OFF button to turn the unit off.14151617
— 12 —OperationPlaying Songs from the USB1 Connect the unit as described previously; it should be connected to a TV (see page 5). Press the POWER ON/OFF button to turn the unit on.  2   Insert a USB flash drive into the USB slot on the unit so it faces upward.3  Repeatedly press the FUNCTION button to select the USB mode; “USb” will appear when searching the drive and then the total number of files will appear.Note: It is highly recommended to have it connected to a TV for USB playback.4  Press the ENTER/Play/Pause button to start playback; if listening to an MP3+G file, the image and lyrics will appear on the TV screen (if connected). Notes: • If connected to a TV you will see the selected song and folders on the TV screen. You can navigate them using the Navigation buttons.• If you recorded any audio files you can also select them using the Navigation buttons to select the REC folder on the TV screen.5 Adjust the volume to a comfortable level using the MASTER VOLUME control.    Note: If connected to a TV or other audio source, adjust the volume of the TV using its own volume control.12345
— 13 —OperationPlaying Songs from the USB (Continued)6  Connect microphone(s) as shown on page 5, and slide the ON/OFF switch on the microphone to the ON position.7  Press the MIC VOLUME + or –button as desired, which will affect both microphones.8  Press the ECHO + or – button to add an echo effect to your voice. 9  Adjust the Key using the KEY +/5 and KEY –/ buttons to obtain the best key for the playing track.10 SKIP: Advance or go back one track by pressing the Skip –/Navigation and Skip +/Navigation buttons.  You can also skip ahead 10 files/tracks using the 10+ button.11 REPEAT: During playback, press the REPEAT/PROGRAM button once to repeatedly play the selected song; the Repeat/Program indicator will blink rapidly. Press the REPEAT/PROGRAM button a second time to repeatedly play the selected folder; the Repeat indicator will blink slowly. Press a third time to repeatedly play the USB; the Repeat/Program indicator will light solid. Press it again to cancel Repeat function; the indicator will turn off.7799881010116
— 14 —OperationPlaying Songs from the USB (Continued)12 PROGRAM: You can program up to 20 tracks for playback in any desired order. While in the Stop mode, press the REPEAT/PROGRAM button; the Program indicator will blink and ”01” will appear on the display indicating the first program is ready to program. Select the first track using the Skip –/Navigation and Skip +/Navigation buttons. Press the REPEAT/PROGRAM button again to confirm the entry. Repeat to set up to 20 tracks into memory. When done, press the ENTER/Play/Pause button to start playback.Notes: •  Press the STOP/PAIR button TWICE to stop and clear the program.•  If more than 20 tracks are attempted to be programmed, “FUL” will appear in the display.13  PAUSE: During playback, if you wish to pause the music momentarily, press the ENTER/Play/Pause button; the Play/Pause indicator will blink. Press again to resume normal playback.14  Press the STOP/PAIR button to stop playback.15  Press the POWER ON/OFF button to turn the unit off.12121212131415
— 15 —OperationUsing a Bluetooth Device1  Connect the unit as described previously. Press the POWER ON/OFF button to turn the unit on.2  Repeatedly press the FUNCTION button to select the Bluetooth; “bt” will appear in the display. The unit automatically searches for and pairs a previously paired Bluetooth device (if previously paired). If no previously paired devices are present, connect as shown in the next step.Note: You can also press the STOP/PAIR button to disconnect any paired devices in order to pair another device.  3 Turn on your device’s Bluetooth option in settings to search for a discoverable device with a Bluetooth signal. Select “Singing Machine” from the device results on the Bluetooth menu. Note: Also refer to the user manual of your Bluetooth device for detailed instructions.  4 The Bluetooth indicator will light solid and a chime will sound.Notes: • If your Bluetooth prompts you for a passcode during the pairing process, please enter “0000” to connect. •  On some Bluetooth devices, once pairing is complete, select your Bluetooth device as “Use as Audio Device” or similar.• If connection is lost after successful pairing, check to make sure the distance between speaker and Bluetooth-enabled device does not exceed 30 feet/10 meters.• Nothing will appear on the connected TV when using the Bluetooth mode unless a USB drive is inserted into the USB jack.Please connect your Music DeviceYour Music Device is connected34Please connect your Music DeviceYour Music Device is connected12
— 16 —OperationUsing a Bluetooth Device (Continued)5  Start playback of your bluetooth device. Press the ENTER/Play/Pause button during playback to pause the song. 6  Adjust the volume to a comfortable level using the MASTER VOLUME control on this unit as well as the volume on your Bluetooth device.  7   Connect microphone(s) as shown on page 5, and slide the ON/OFF switch on the microphone to the ON position.8  Press the MIC VOLUME + or –button as desired, which will affect both microphones.9  Press the ECHO + or – button to add an echo effect to your voice. 10 SKIP: Advance or go back one track by pressing the Skip –/Navigation and Skip +/Navigation buttons.56989810107
— 17 —OperationUsing a Bluetooth Device (Continued)11 RECORD YOUR VOCAL PERFORMANCE:   To record your singing as well as the music, press the RECORD button. Recording will begin and the light around the RECORD button will light solid.  When done recording, press the RECORD  button again; the light around the RECORD button will turn off.Notes: • The recorded audio file will record onto the USB drive.• See page 12 to play back your recorded files. 12  Press the POWER ON/OFF button to turn the unit off.1112
— 18 —OperationUsing the LINE IN Jack1 Connect the unit as described previously (see page 6). Press the POWER ON/OFF button to turn the unit on. 2   Connect the external unit to the LINE IN Jack on the front of this unit. Connecting an external unit will allow the audio to be played through your Singing Machine.Notes:• It is highly recommended to set the volume on the auxiliary unit to 1/3 or lower to avoid distortion.• Skipping files/tracks is not possible in this unit when using an external device.3 Repeatedly press the FUNCTION button to select the LINE IN mode; “AU” will appear in the display. 4 Adjust the volume using the MASTER VOLUME control on this unit or your external device’s volume control.5  Connect microphone(s) as shown on page 5, and slide the ON/OFF switch on the microphone to the ON position.12345
— 19 —OperationUsing the LINE IN Jack (Continued)6 Press the MIC VOLUME + or –button as desired, which will affect both microphones.7   Press the ECHO + or – button to add an echo effect to your voice. 8 RECORD YOUR VOCAL PERFORMANCE:  To record your singing as well as the music, press the RECORD button. Recording will begin and the light around the RECORD button will light solid. When done recording, press the RECORD  button again; the light around the RECORD button will turn off.Notes: •   The recorded audio file will record onto the USB drive.•  See page 12 to play back your recorded files. 9  Press the ON/OFF button to turn the unit off.767689
— 20 —OperationWhere to Download MP3+G Files24OperationTo purchase and download karaoke music,please visit http://store.singingmachine.com toaccess over 13,000 of your favorite karaokesongs. You will need a USB flash drive (notincluded) to transfer the downloads to this unit. Follow these easy steps:1Go to http://store.singingmachine.comusing your internet browser, and thenregister.2Select and purchase your favoritekaraoke music from the SingingMachine Download Store.3Download your selected purchase(s)from the Singing Machine Digital Lockerto your USB flash drive.4Insert the USB flash drive as shown onpage 12 and enjoy!Note: Your downloaded songs can also beburned to a blank CDR/CDRW.Where to Download MP3+G FilesFAQ• Where can I get additional help with the fileformats?While on the Singing Machine Store’s webpage, simply click FILE FORMATS at thelower left.Helpful Hints:The .mp3 and .cdg files are delivered fordownload in a single, compressed MP3+G.zip file.The MP3+G file cannot be played as a .zip file ona USB flash drive. To play karaoke songs using aUSB flash drive, the MP3+G .z i p file must beunzipped as follows:• Connect a USB flash drive to your computer.• Download the MP3+G file from your Digital Locker and save the .zip file to a folder onyour computer.• Double click the .zip file to open the .zip (you will see the .mp3 and .cdg files).• Drag and drop the .mp3 and .cdg files to the USB flash drive.• Remove (eject) the USB flash drive from your computer.Turn on the Singing Machine and connect the USBflash drive.
— 21 —Troubleshooting GuideShould this unit exhibit a problem, check the following before seeking service:No Power•  Power is not on; press the POWER ON/OFF button to turn power on.•  Confirm the AC adapter is connected securely to the back of the unit.•  Connect the unit to a different outlet.•  If using batteries, replace with new ones.No Sound – General•  MASTER VOLUME is set to minimum; raise volume.•  Correct Function was not selected; select using the FUNCTION button.•  If using an external device, raise the volume..No Sound – If connected to a TV•  Volume on the TV is muted or too low.•  Correct source (usually AV) was not selected on the TV’s menu.Lyrics do not appear on the TV screen•  If connected to a TV, Video plug is not connected properly; see page 5.•  If connected to a TV, select the correct source on the TV (usually AV).•  The file/track being played is not a track recording with lyrics. These are the only files that allow you to view the lyrics on the TV screen.•  Nothing will appear on the TV screen when using Line In or Bluetooth.No sound from the microphone•  Make sure the microphone is firmly connected to the MIC 1 or MIC 2 jack.•  Make sure the Mic’s ON/OFF switch on the Mic is set to the ON position.•  Make sure the mic’s volume is not set too low.•  MASTER VOLUME is set to minimum; raise volume.File(s) on USB jack not playing•  The file is corrupted; replace the file.•  The file is not in a format this unit will play.•  The connected USB device is not supported by the product.The Bluetooth device cannot be paired or connected with the unit•  You have not activated the Bluetooth function of your device; see page 15 or refer to the Bluetooth device user’s manual. •  The system is not in pairing mode; press the STOP/PAIR button to restart pairing.The Music is not available on the unit after successfully connecting the Bluetooth•  Ensure your Bluetooth device can support the A2DP Bluetooth profile.•  The volume on the external Bluetooth device is set to low or muted; raise as desired.
— 22 —SpecificationsAUDIOOutput Power ................................................................................................8 Watts (RMS) 10% THDOutput Impedance ........................................................................................................................4 OhmsCD SECTIONFrequency Response ..................................................................................................... 100Hz - 20kHzSignal-to-Noise Ratio ................................................................................................... 50dB (A-WTD)Number of Programs ...........................................................20 Step Random Access ProgrammingSampling System ..............................................................................................8 Times Over SamplingBLUETOOTHBluetooth Version ...................................................................................................................V2.1 + EDRWorking Distance ...........................................Up to 30 feet/10 meters measured in open spaceUSBFormat .................................................................................................................................................FAT32Maximum Compatibility ..................................................................................................................32GBGENERALPower ......................................................................................................................DC9V Positive CenterDimensions - Main Unit ................................................... 297mm (W)x378mm (H)x216mm (D)Weight - Main Unit .....................................................................................................................3.122KgMicrophone ........................-74 dB 600 Ohms impedance with 6.3 mm Dynamic MicrophoneAux In .......................................................................................................................... 3.5mm Stereo JackSpecifications are subject to change without notice.
— 23 —Visit Our Website: www.singingmachine.comThe Singing Machine Company, Inc.4060 E Jurupa Street, Unit BOntario, CA 91761-1413 USACopyright © 2017 - All Rights Reserved.PRINTED IN CHINAPART NUMBER HERE

Navigation menu