The Singing Machine XXSML363 Portable CD/CDG Karaoke player User Manual Manual
The Singing Machine Company, Inc. Portable CD/CDG Karaoke player Manual
Users Manual
TM
SML363BK / SML363P
INSTRUCTION MANUAL/ MANUAL DE INSTRUCCIONES/
MODE D’EMPLOI/BEDIENUNGSANLEITUNG /MANUALE DI ISTRUZIONI
www.singingmachine.com
The Singing Machine® is a registered trademark of The Singing Machine Co., Inc.
The Singing Machine® es marca registrada de The Singing Machine Co., Inc.
The Singing Machine® est une marque déposée par The Singing Machine Co., Inc.
The Singing Machine® ist eine eingetragene Handelsmarke von The Singing Machine Co., Inc.
The Singing Machine® è un marchio registrato di The Singing Machine Co., Inc.
— E1 —
Warnings
Important Safety Information
1. Read these Instructions.
2. Keep these Instructions.
3. Heed all Warnings.
4. Follow all Instructions.
5. Do not use this apparatus near water.
6. Clean only with a dry cloth.
7. Do not block any of the ventilation openings. Install in
accordance with the Manufacturer’s instructions.
8. Do not install near any heat sources such as radiators, heat
registers, stoves, or other apparatus (including amplifiers) that
produce heat.
9. Do not defeat the safety purpose of the polarized or grounding-
type plug. A polarized plug has two blades with one wider than
the other. A grounding type plug has two blades and a third
grounding prong. The wide blade or the third prong are provided
for your safety. When the provided plug does not fit into your
outlet, consult an electrician for replacement of the obsolete
outlet.
10. Protect the power cord from being walked on or pinched
particularly at plugs, convenience receptacles, and the point
where they exit from the apparatus.
11. Only use attachments/accessories specified by the
manufacturer.
12. Use only with a cart, stand, tripod, bracket,
or table specified by the manufacturer, or
sold with the apparatus. When a cart is
used, use caution when moving the cart/
apparatus combination to avoid injury from
tip-over.
13. Unplug this apparatus during lightning
storms or when unused for long periods of
time.
14. Refer all servicing to qualified service personnel. Servicing is
required when the apparatus has been damaged in any way, such
as power-supply cord or plug is damaged, liquid has been spilled
or objects have fallen into the apparatus, the apparatus has been
exposed to rain or moisture, does not operate normally, or has
been dropped.
15. WARNING: To reduce the risk of fire or electric shock, do not
expose this apparatus to rain or moisture. Do not place objects
filled with water, such as a vase, on the apparatus.
16. The AC mains plug is used as the power disconnect device
and it should remain readily accessible and operable during
intended use. In order to completely disconnect the apparatus
from power, the mains plug should be completely removed
from the AC outlet socket.
17. CAUTION: To reduce the risk of fire or explosion, do not expose
batteries to excessive heat such as sunshine, fire or other
heat sources.
CAUTION: TO REDUCE THE RISK OF ELECTRIC SHOCK, DO NOT
REMOVE COVER (OR BACK). NO USER-SERVICEABLE PARTS INSIDE.
REFER SERVICING TO QUALIFIED SERVICE PERSONNEL.
The Caution marking is located on the bottom panel.
DANGEROUS VOLTAGE: The lightning flash with arrowhead
symbol within an equilateral triangle is intended to alert the
user to the presence of uninsulated dangerous voltage within
the product’s enclosure that may be of sufficient magnitude to
constitute a risk of electric shock to persons.
ATTENTION: The exclamation point within an equilateral
triangle is intended to alert the user to the presence of
important operating and maintenance (servicing) instructions
in the literature accompanying this product.
DRIPPING WARNING: This product shall not be exposed to dripping or
splashing, and no objects filled with liquids, such as vases, shall be placed
on the product.
VENTILATION WARNING: The normal ventilation of the product shall not
be impeded for intended use.
Warning: Changes or modifications to this unit not expressly approved
by the party responsible for compliance could void the user’s authority to
operate the equipment.
Main plug is used as disconnect device and it should remain readily
operable during intended use. In order to disconnect the apparatus from
the mains completely, the main plug should be disconnected from the main
socket outlet completely.
CAUTION
RISK OF ELECTRIC SHOCK
DO NOT OPEN
WARNING: TO PREVENT FIRE OR SHOCK HAZARD, DO NOT EXPOSE
THIS UNIT TO RAIN OR MOISTURE.
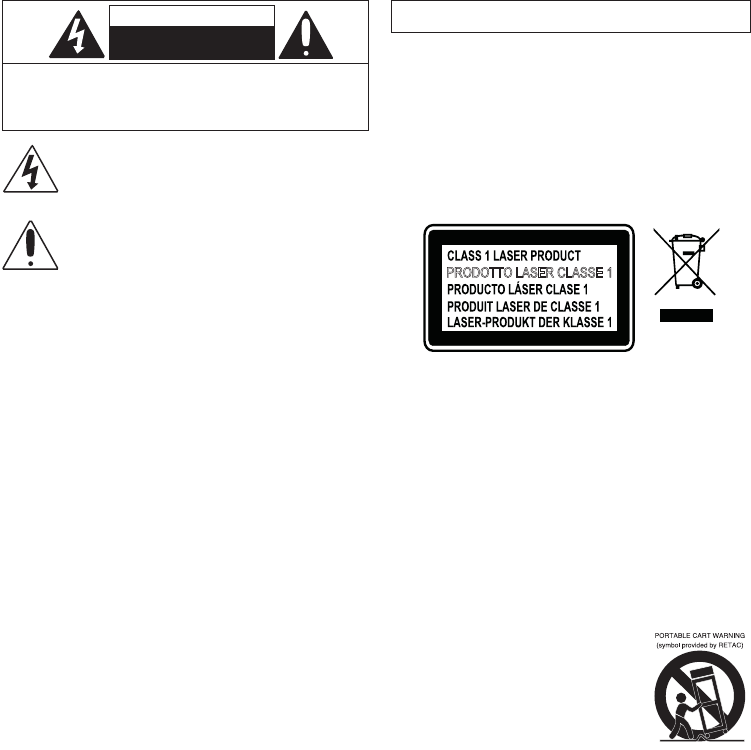
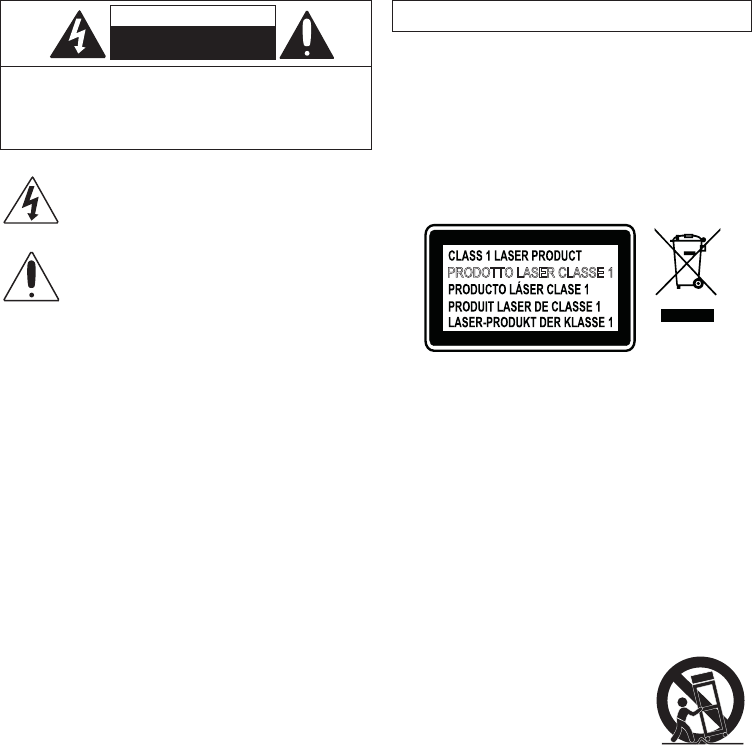
PRODOTTO LASER CLASSE 1
This symbol on the product or in the instructions means that your
electrical and electronic equipment should be disposed of at the end
of its life separately from your household waste. There are separate
collection systems for recycling in the EU.
For more information, please contact the local authority or your retailer
where you purchased the product.
Under the influence of electrostatic phenomenon, the product may
malfunction and require user to reset.
Warnings:
• This CD player employs a laser light beam. Only a qualified service
person should remove the cover or attempt to service this device, due
to possible eye injury.
• The use of controls, adjustments, or procedures other than those
specified herein might result in hazardous radiation exposure.
• The apparatus shall be used in an open area.
CAUTION!
Invisible laser radiation when open and interlocks defeated. Avoid
exposure to beam.

4
COMPLIANCE WITH FCC REGULATIONS
This device complies with Part 15 of the FCC Rules. Operation is subject to the following two
conditions:
(1) this device may not cause harmful interference, and
(2) this device must accept any interference received, including interference that may cause
undesired operation.
NOTE: This equipment has been tested and found to comply with the limits for a Class B
digital device, pursuant to Part 15 of the FCC Rules. These limits are designed to provide
reasonable protection against harmful interference in a residential installation. This
equipment generates, uses and can radiate radio frequency energy and, if not installed and
used in accordance with the instructions, may cause harmful interference to radio
communications. However, there is no guarantee that interference will not occur in a
particular installation. If this equipment does cause harmful interference to radio or television
reception, which can be determined by turning the equipment off and on, the user is
encouraged to try to correct the interference by one or more of the following measures:
- Reorient or relocate the receiving antenna.
- Increase the separation between the equipment and receiver.
- Connect the equipment into an outlet on a circuit different from that to which the receiver
is connected.
- Consult the dealer or an experienced radio/TV technician for help.
FCC ID: $$;260/
This equipment complies with FCC radiation exposure limits set forth for
an uncontrolled environment. This equipment should be installed and
operated with minimum distance 20cm between the radiator & your body.

— E2 —
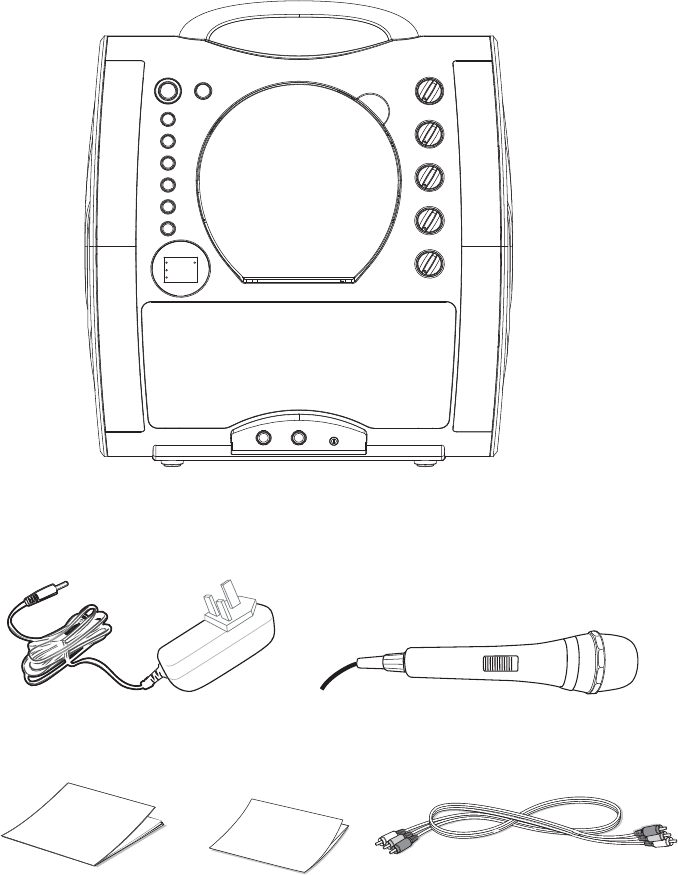
Included
What’s in the box.
Wired Microphone
Main Unit
Audio/Video Cables
Manual Welcome Kit
AC Adapter

— E3 —
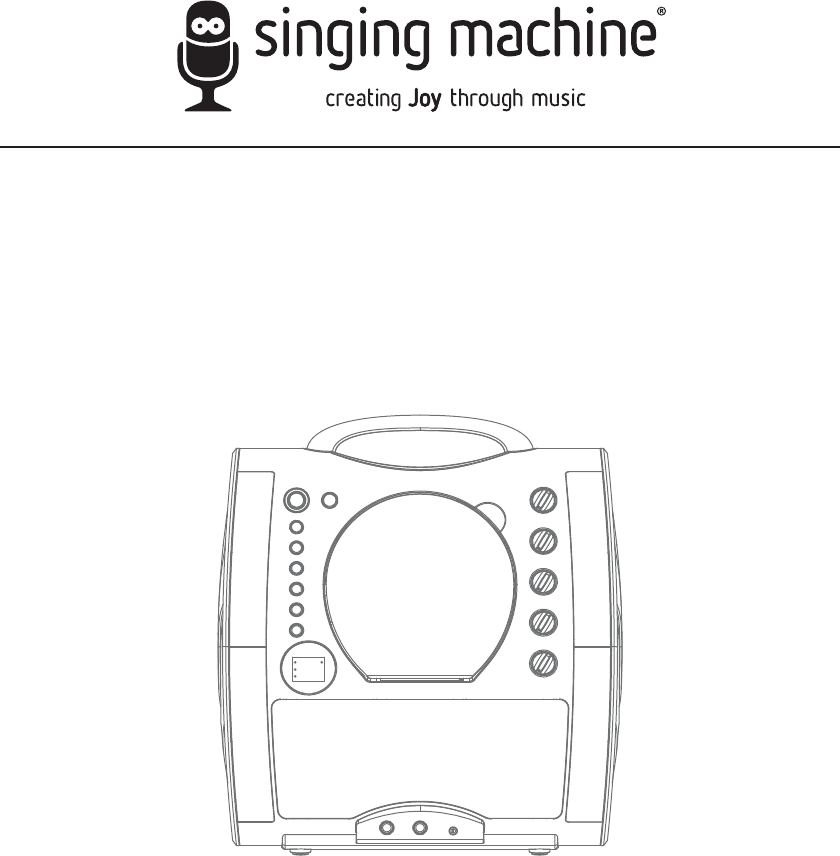
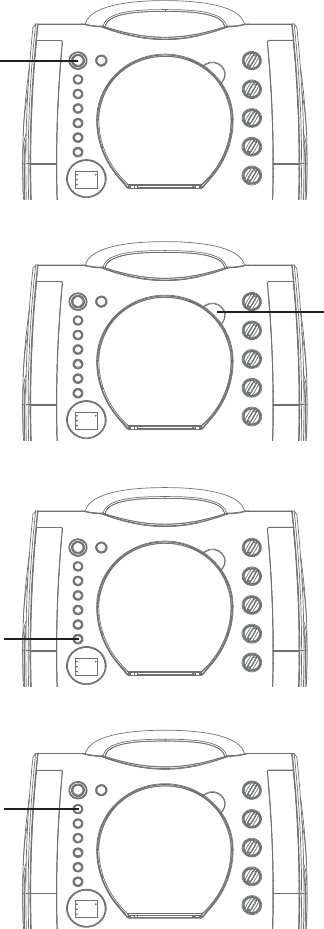
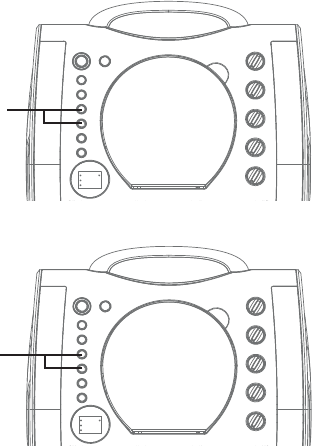
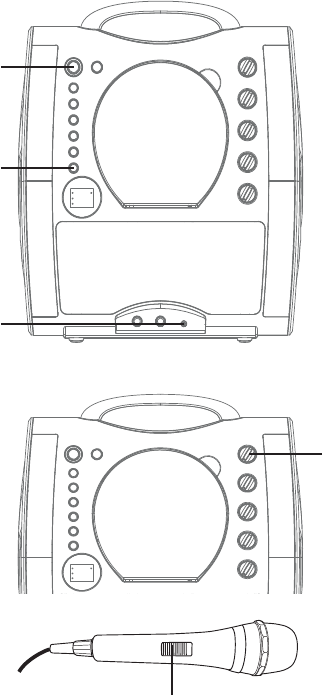
Location of Controls (Front)
1. Handle
2. LIGHTS button
3. ON/STANDBY indicator
4. ON/STANDBY button
5. Lights
6. PLAY/PAUSE/PAIR
button
7. STOP button
8. SKIP
Button
9. SKIP Button
10. PROGRAM/REPEAT
button
11. FUNCTION button
12. Display
13. Speaker
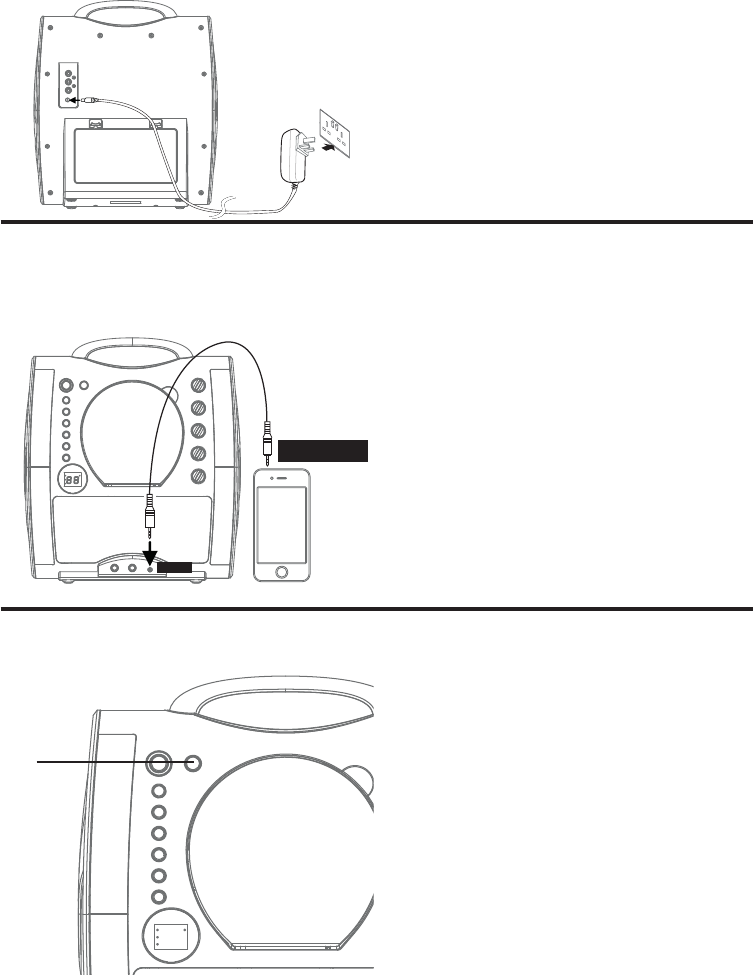
14. AUX IN jack
15. MIC 2 jack
16. MIC 1 jack
17. CD door
18. MASTER VOLUME
control
19. ECHO control
20. Auto Voice Control
21. BALANCE Control
22. MIC VOLUME control
23. CDG indicator
24. PLAY/PAUSE indicator
25. PROGRAM indicator
26. REPEAT indicator
u
v
w
x
y
U
V
W
X
ao
an
al
ak
at
am
ap
aq
ar
as
bt
bk
bl
bm
bp
bn
bo

— E4 —
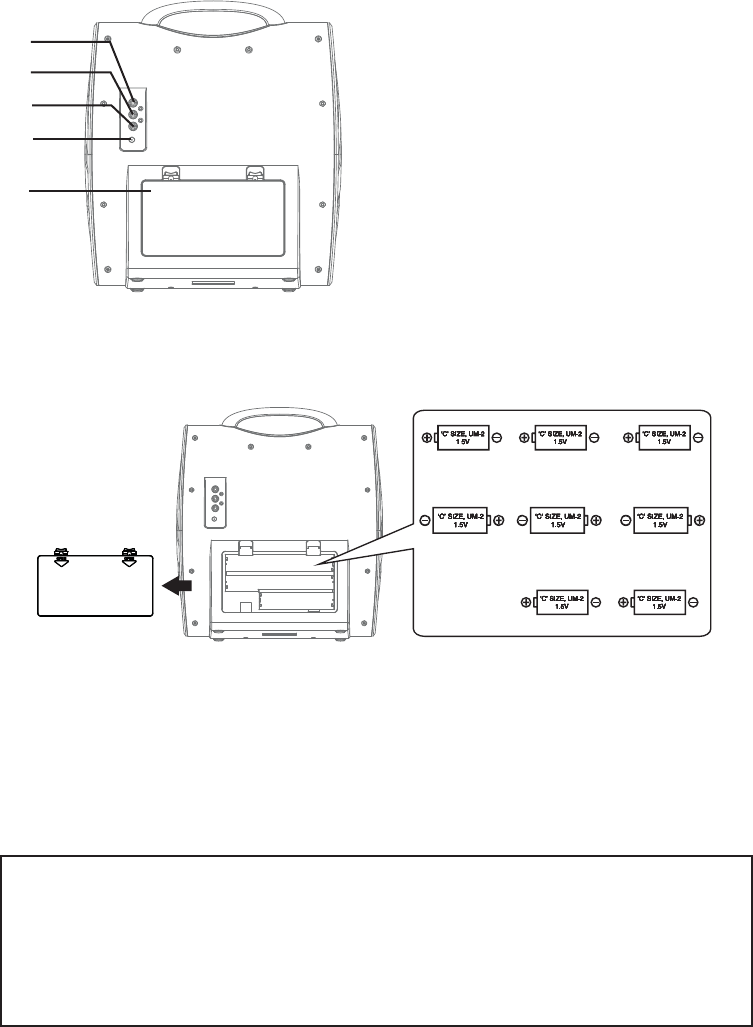
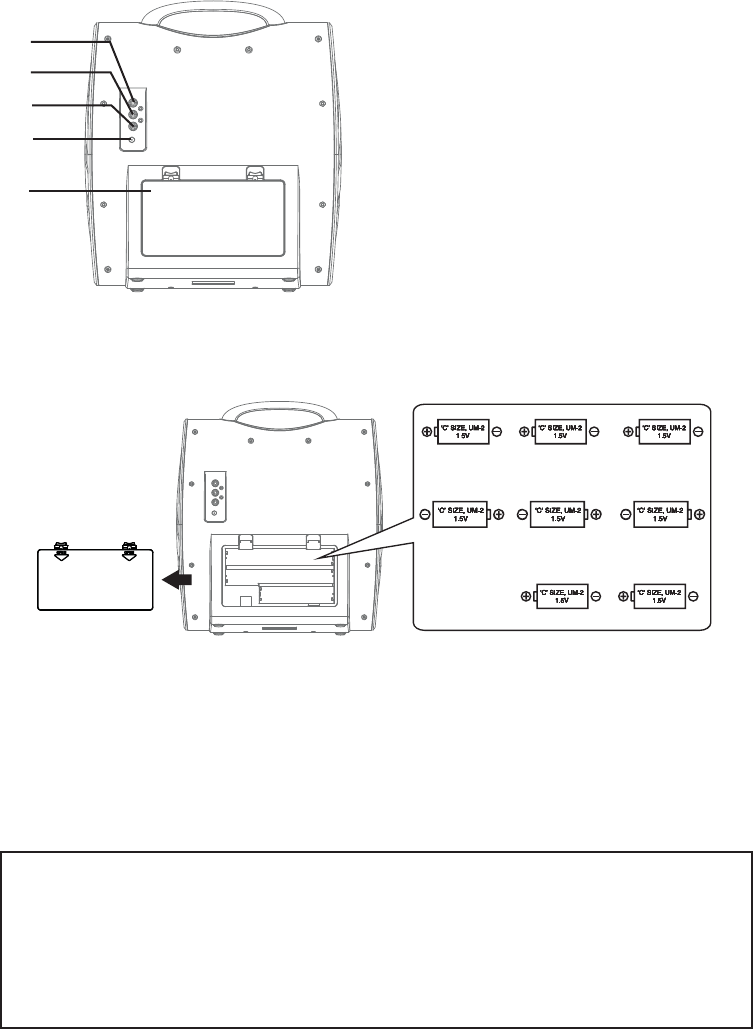
Installation of Batteries
DC OPERATION
1. Slide the battery door in the direction of the arrow to reveal the battery compartment.
Insert eight (8) “C” size alkaline batteries (not included) as indicated on the diagram.
2. Replace cover tightly before operating.
CAUTIONS:
• Replace all batteries at the same time.
• Do not mix old batteries with new batteries.
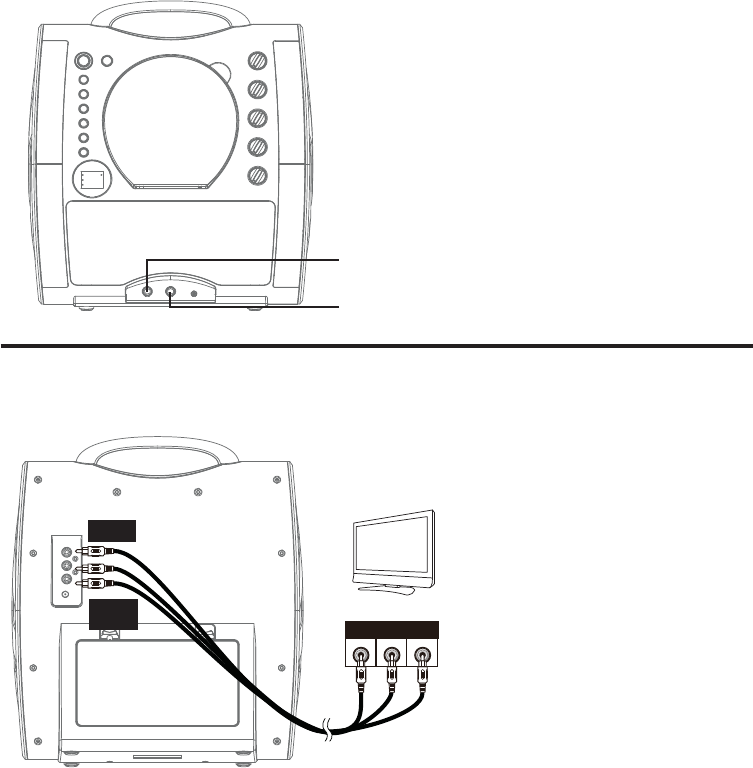
Location of Controls (Rear)
Connection
27. VIDEO OUT jack
28. AUDIO OUT jack (R)
29. AUDIO OUT jack (L)
30. DC IN Jack
31. Battery Door
Battery Precautions
The precautions below should be followed when using batteries in this
device:
1. Use only the size and type of batteries specified.
2. Be sure to follow the correct polarity when installing the batteries as
indicated in the battery compartment. Reversed batteries may cause
damage to the device.
3. Do not mix different types of batteries together (e.g. Alkaline and
Carbon Zinc) or old batteries with fresh ones.
4. If the device is not to be used for a long period of time, remove the
batteries to prevent damage or injury from possible battery leakage.
5. Do not try to recharge batteries not intended to be recharged, they can
overheat and rupture. (Follow battery manufacturer’s directions.)
6. Rechargeable batteries are to be removed from the product before
being charged.
7. Rechargeable batteries are only to be charged under adult supervision.
8. Exhausted batteries are to be removed from the product.
9. Batteries shall not be exposed to excessive heat such as sunshine, fire
or the like.
bq
br
bs
ct
ck
— E5 —
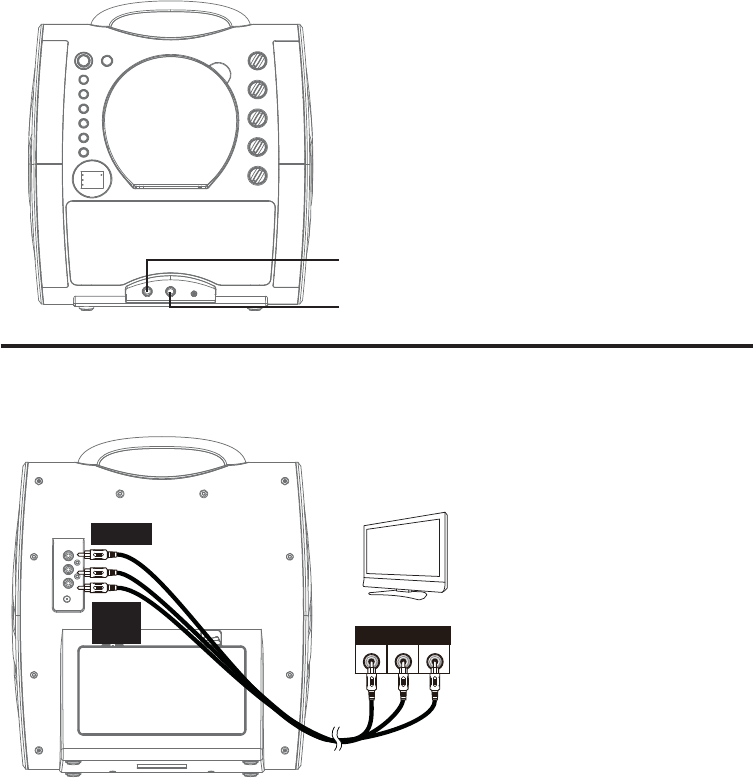
Connection
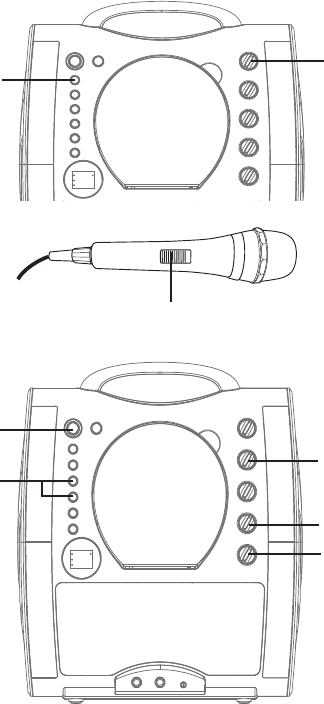
Connecting the Microphone(s)
Microphones:
Connect a microphone into Mic jack 1 as
well as Mic jack 2 (when desired).
Note: Do not drop or tap the Mic as
damage to the Mic or speakers may occur.
Do not twirl the microphone cord as it will
cause damage to the encased wiring.
Connecting the Unit to a TV
VIDEO
INPUT AUDIO
INPUT
RL
RCA cables
VIDEO OUT
(yellow)
AUDIO OUT
(white- L
red- R)
REAR VIEW OF TV
To output the video, lyrics and
audio to your TV, follow these
steps:
Connect the RCA video cable
(Yellow) to the VIDEO OUT jack
and the audio cables (White
and Red) to the AUDIO OUT
jacks located on the back of the
Singing Machine.
Connect the opposite end of
the RCA video cable (Yellow) to
the VIDEO IN jack and the audio
cables (White and Red) to the
AUDIO IN on your TV.
Notes:
• This unit can be used with or without a TV, but it is highly recommended to use a TV in
order to utilize all the features.
• Also refer to the TV’s User Guide.
• To see the lyrics on the screen, you must use a CD+G disc.
u
v
— E6 —
Connection
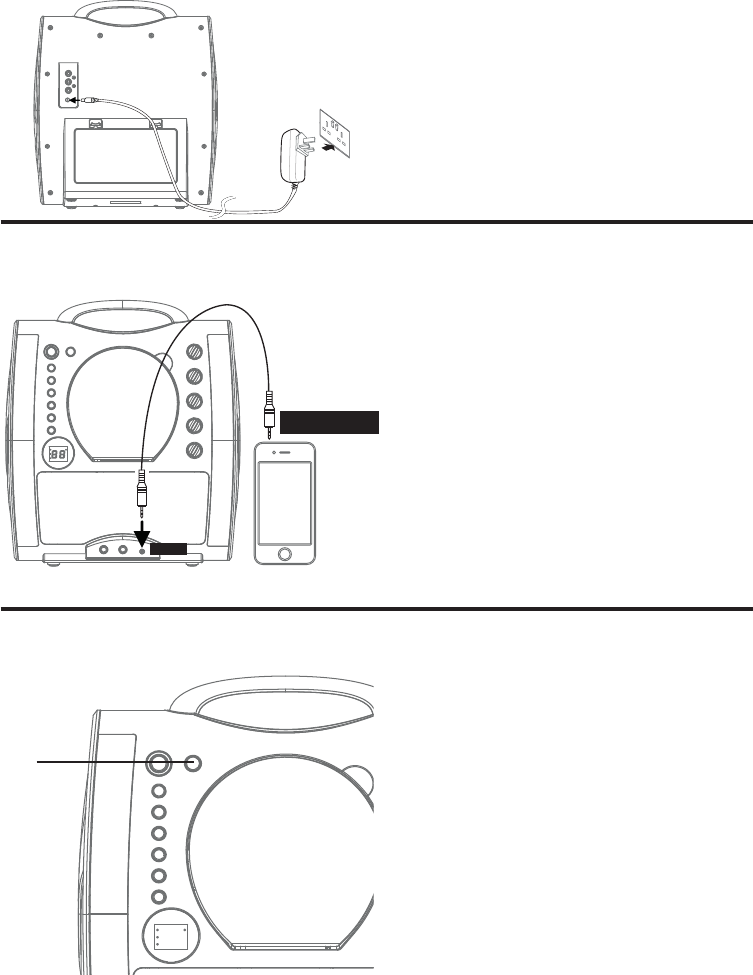
Connecting to AC Power
Connecting to AUX In Jack
Insert the AC power cord into an AC
outlet having 100-240V AC, 50-
60Hz.
Note:
Make all connections before
connecting to AC power.
Connect an external device by using
an appropriate cable (3.5mm audio
cable not included) as shown.
Note:
See page E13 to select and use the
AUX In function.
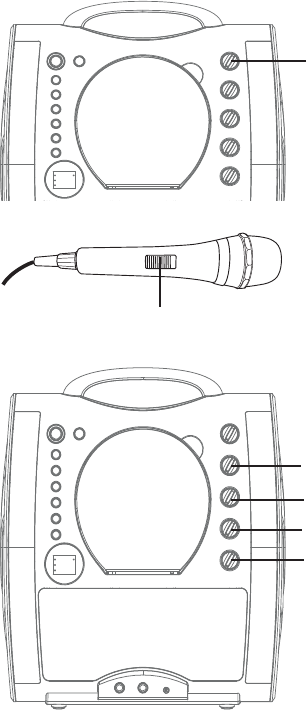
YOUR SMARTPHONE,
DIGITAL PLAYER OR
MP3 PLAYER
AUDIO OUTPUT
/ HEADPHONE JACK
AUX IN
Glowing Mood Lights
1 Press the LIGHTS button to switch
on the lighting effect, press again to
switch off.
u
— E7 —
Operation
Playing a CDG
1 Connect the unit as described
previously; if using a CD+G, it is
recommended to connect to a TV.
Press the ON/STANDBY button to
turn the unit on.
2
Lift open the CD door and insert a CD
or a CD+G by gently pressing it on the
center spindle. Then close the CD door.
Notes:
• What is a CD+G?
A CD+G (CD+Graphics) is the standard
format for most karaoke discs that will
display the words on the screen.
• Never place anything other than a CD
in the compartment, as foreign objects
can damage the unit.
• If no disc is inserted, “no” will appear on
the display.
• If connected to a TV and/or other
audio source, adjust the volume of
the external unit using its own volume
control.
3
Repeatedly press the FUNCTION
button to select the CDG mode; “--”
will appear when searching the disc and
then the total number of tracks will
appear. When a CDG disc is inserted,
the CDG indicator light will turn on.
4 Press the PLAY/PAUSE/PAIR button
to start playback; if listening to a CD+G
file, the image and lyrics will appear on
the TV screen (if connected) and the
PLAY/PAUSE indicator light will turn on.
v
u
w
x

— E8 —
Operation
Playing a CDG (Continued)
5 Adjust the volume to a comfortable
level using the MASTER VOLUME
control.
6
Connect microphone(s) and slide the
ON/OFF switch on the microphone to
the ON position.
7 Adjust the MIC VOLUME control
as desired. Increasing this control
will increase the volume of both
microphones.
8
Rotate the ECHO control to add an
echo effect to your voice. Rotate
towards MAX to increase the echo
effect.
9
AUTO VOICE CONTROL can be
activated by rotating the AVC control.
The higher this control is set to, the
more the vocals on the multiplex
recording will be muted when the
singer starts to sing through the
microphone. When the singer stops
singing, the recorded vocals on the
multiplex recording will resume to
normal.
10 Rotate the BALANCE control
clockwise to hear the music and
recorded vocals from a multiplex
recording or counterclockwise
to hear the music only from a
multiplex recording.
Note: To use the BALANCE control, a
CD+G disc must be used, otherwise it will
operate as a standard Balance control.
U
y
V
at
X
W

— E9 —
Operation
Playing a CDG (Continued)
11 SKIP: Advance or go back one track
by pressing the Skip /Skip
buttons.
12 REPEAT: During playback, press
the PROGRAM/REPEAT button
once to repeatedly play the
selected song; the REPEAT indicator
will blink. Press the PROGRAM/
REPEAT button a second time to
repeatedly play the whole CD; the
REPEAT indicator will light solid.
Press it again to cancel Repeat
function, the REPEAT indicator
turns off.
13 PROGRAM: You can program up to
20 tracks on any disc for playback
in any desired order. While in the
Stop mode, press the PROGRAM/
REPEAT button; the PROGRAM
indicator will blink and “00” will
appear. Select the first track using
the Skip /Skip buttons.
Press the PROGRAM/REPEAT
button again to confirm the entry.
After selecting the desired tracks
the display will show 01, 02, etc.
recognizing the tracks selected
have been programmed and the
PROGRAM indicator will illuminate
solid red. Repeat to set up to 20
tracks into memory. When done,
press the PLAY/PAUSE/PAIR
button to start playback.
Note:
• Press the STOP button TWICE to stop
and clear the program.
ak
al
am

— E10 —
Operation
Playing a CDG (Continued)
14 PAUSE: During playback, if you
wish to pause the disc momentarily,
press the PLAY/PAUSE/PAIR
button; the PLAY/PAUSE indicator
will blink. Press again to resume
normal playback.
15 Press the STOP button to stop
playback.
16 Press the ON/STANDBY button to
turn the unit off.
ap
an
ao

— E11 —
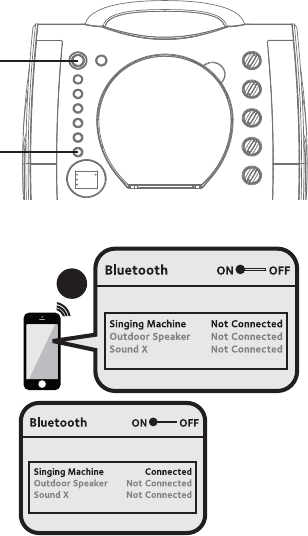
Operation
Using a Bluetooth Device
1 Connect the unit as described
previously. Press the ON/STANDBY
button to turn the unit on.
2 Repeatedly press the FUNCTION
button to select the Bluetooth mode;
“bt” will blink in the display as the unit
automatically searches for and pairs
a previously paired Bluetooth device
(if previously paired). If no previously
paired devices are present, connect as
shown in the next step.
Note: You can also press and hold the
PLAY/PAUSE/PAIR button to disconnect
any paired devices in order to pair another
device.
3 Turn on your device’s Bluetooth option
in settings to search for a discoverable
device with a Bluetooth signal. Select
“Singing Machine” from the device
results on the Bluetooth menu.
Note: Also refer to the user manual of your
Bluetooth device for detailed instructions.
4 “bt” will light solid in the display and a
successful pairing sound will be heard.
Notes:
• If your Bluetooth prompts you for a
passcode during the pairing process,
please enter “0000” to connect.
• On some Bluetooth devices, once pairing
is complete, select your Bluetooth device
as “Use as Audio Device” or similar.
• If connection is lost after successful
pairing, check to make sure the distance
between speaker and Bluetooth-enabled
device does not exceed 30 feet/10
meters.
•“Bluetooth” will blink on TV screen,
and will stop blinking after successful
connection.
3
u
v

— E12 —
Operation
Using a Bluetooth Device (Continued)
5 To control your Bluetooth device from
this unit, press the PLAY/PAUSE/
PAIR button to start playback. Press
the PLAY/PAUSE/PAIR button
during playback to pause the song.
6
Adjust the volume to a comfortable
level using the MASTER VOLUME
control on this unit as well as the
volume on your Bluetooth device.
7
Connect microphone(s) and slide the
ON/OFF switch on the microphone to
the ON position.
8
Adjust the MIC VOLUME control
as desired. Increasing this control
will increase the volume of both
microphones.
9 Rotate the ECHO control to add an
echo effect to your voice. Rotate
towards MAX to increase the echo
effect.
10 Adjust the balance between the
speakers using the BALANCE
control.
11 SKIP: Advance or go back one track
by pressing the Skip /Skip
buttons.
12 Press the ON/STANDBY button to
turn the unit off.
V
yU
at
X
al
ak
W

— E13 —
y
Operation
Using the AUX IN Jack
1 Connect the unit as described
previously. Press the ON/STANDBY
button to turn the unit on.
2
Repeatedly press the FUNCTION
button to select the AUX IN mode;
“AU” will appear on the display.
3
Connect the external unit to the
AUX IN Jack on the front of this unit.
Connecting an external unit will allow
the audio to be played through your
Singing Machine.
Notes:
• It is highly recommended to set the
volume on the auxiliary unit to 1/3 or
lower to avoid distortion.
• Skipping files/tracks is not possible on
this unit when using an external device.
4 Adjust the volume using the MASTER
VOLUME control on this unit or your
external device’s volume control.
5 Connect microphone(s) and slide the
ON/OFF switch on the microphone to
the ON position.
x
u
v
w

— E14 —
Operation
Using the AUX IN Jack (Continued)
6 Adjust the MIC VOLUME control
as desired. Increasing this control
will increase the volume of both
microphones.
7 Rotate the ECHO control to add an
echo effect to your voice. Rotate
towards MAX to increase the echo
effect.
8 Adjust the balance between the
speakers using the BALANCE control.
9 Press the ON/STANDBY button to
turn the unit off.
W
V
X
U
Energy Saving Mode
(Auto Power System-APS)
The unit will automatically enter the Standby mode after 15 minutes in the following
situations:
1. There is no CD in the compartment or the playback of CD has been stopped;
2. The playback of external music player had been stopped but the audio cable is still
plugged into the AUX IN jack;
3. The Bluetooth music has been stopped.
The unit can be resumed to turn on by pressing the ON/STANDBY button once.
APS is for energy saving purposes.
— E15 —
Troubleshooting Guide
Should this unit exhibit a problem, check the following before seeking service:
No Power
• Power is not on; press the power ON/STANBY button to turn power on.
• Confirm that the AC adapter is connected securely to the back of the unit.
• Connect the unit to a different outlet.
No Sound – General
• Master Volume is set to minimum; raise volume.
• Correct Function was not selected; select using the FUNCTION button.
• If using an external device, raise the volume.
No Sound – If connected to a TV
• Volume on the TV is muted or too low.
• Correct source (usually AV) was not selected on the TV’s menu.
Lyrics do not appear on the TV screen
• If connected to a TV, Video plug is not connected properly; see page E5.
• If connected to a TV, select the correct source on the TV (usually AV).
• The file/track being played is not a track recording with lyrics. These are the only files
that allow you to view the lyrics on the TV screen.
• Nothing will appear on the TV screen when using AUX In or Bluetooth.
No sound from the microphone
• Make sure the microphone is firmly connected to the MIC 1 or MIC 2 jack.
• Make sure the ON/OFF switch on the microphone is set to the ON position.
• Make sure the MIC VOLUME setting is not set too low.
• MASTER VOLUME is set to minimum; raise volume.
• Adjust the ECHO control past the mid point on the Singing Machine.
The Bluetooth device cannot be paired or connected with the unit
• You have not activated the Bluetooth function of your device; see page E11 or refer to
the Bluetooth device user’s manual.
• The system is not in pairing mode; press the PAIR button to restart pairing.
The Music is not available on the unit after successfully connecting the Bluetooth
• Ensure your Bluetooth device can support the A2DP Bluetooth profile.
• The volume on the external Bluetooth device is set to low or muted; raise as desired.

— E16 —
Specifications
AUDIO
OUTPUT POWER (MAXIMUM)....................................................................................2 Watts (RMS)
OUTPUT IMPEDANCE ..................................................................................................................8 Ohms
CD PLAYER SECTION
FREQUENCY RESPONSE ............................................................................................100 Hz - 20 kHz
SIGNAL-TO-NOISE RATIO ............................................................................................................. 50 dB
NUMBER OF PROGRAMS ..................................................20 Step Random Access Programming
BLUETOOTH
Bluetooth Version ...............................................................................................................................V4.2
Working Distance ..........................................Up to 30 feet/10 meters measured in open space
AUX IN SECTION .......................................................................... 3.5 mm Stereo Headphone Jack
MICROPHONE .................. -74 db 600 Ohm Impedance with 6.3 mm Dynamic Microphone
POWER SECTION ..........DC 12V 1A (8 x “C” Batteries) (Batteries not included)
DIMENSIONS (HxWxD) .......................... 13.3 x 12.0 x 6.1 inches / 33.8 x 30.5 x 15.5 cm
WEIGHT ........................................................................................................................4.0 lbs / 1.82 kgs
Specifications are typical. Individual units might vary and are subject to continuous im-
provement without notice and/or incurring any obligation.
The Bluetooth® word mark and logos are registered trademarks owned by Bluetooth SIG,
Inc. and any use of such marks and logos by The Singing Machine Company, Inc. is under
license. Other trademarks and trade names are those of their respective owners.
— S1 —
Advertencias
Información importante sobre seguridad
1. Lea estas instrucciones.
2. Conserve estas instrucciones.
3. reste atención a todas las advertencias.
4. Siga todas las instrucciones.
5. No utilice este artefacto cerca del agua.
6. Límpielo únicamente con un paño seco.
7. No obstruya las aberturas para ventilación. Instálelo de acuerdo
con las instrucciones del fabricante.
8. No instale cerca de fuentes de calor, como radiadores, rejillas de
calefacción, estufas u otros aparatos (incluso amplificadores) que
produzcan calor.
9. No desafíe el fin de seguridad del enchufe polarizado o de
conexión a tierra. Un enchufe polarizado tiene dos clavijas y una
es más ancha que la otra. El enchufe de conexión a tierra tiene
dos clavijas, y una tercera punta a tierra. La clavija ancha o la
tercera punta se suministran para su seguridad. Si el enchufe
suministrado no coincide con su tomacorriente, consulte con un
electricista para reemplazar el tomacorriente obsoleto.
10. Evite pisar o apretar el cable de alimentación, especialmente en
los enchufes, tomacorrientes y en el punto por donde salen del
artefacto.
11. Utilice sólo los complementos y accesorios especificados por el
fabricante.
12. Utilice la unidad sólo con el carro, soporte, trípode, repisa o
mesa recomendados por el fabricante, o
que se vendan junto con el producto Cuando
se utiliza un carro, tenga cuidado cuando
mueva el carro y artefacto junto a para evitar
lesiones producidas por la caída del producto.
13. Desenchufe este artefacto durante las
tormentas eléctricas o cuando no se lo utilice
durante períodos prolongados.
14. Derive todas las reparaciones al personal de
reparaciones calificado. Es necesario reparar el artefacto cuando
se encuentra dañado; por ejemplo, cuando el cable de suministro
de energía o el enchufe están dañados, cuando se derrama líquido
sobre la unidad o caen objetos dentro del mismo, cuando el
producto ha estado expuesto a la lluvia o a la humedad, cuando
no funciona con normalidad o cuando se ha caído.
15. ADVERTENCIA: Para reducir el riesgo de incendio o descarga
eléctrica, no exponga este artefacto a la lluvia o la humedad. No
coloque objetos llenos de agua, como jarrones, sobre el aparato.
16. El enchufe de conexión de CA se utiliza como dispositivo de
desconexión eléctrica y deberá estar siempre accesible y en
funcionamiento durante el uso previsto. Para desconectar
completamente el aparato de la electricidad, el enchufe de
conexión deberá quitarse por completo del tomacorriente de CA.
17. PRECAUCIÓN: Para reducir el riesgo de incendio o explosión no
exponga las baterías al calor excesivo, como al rayo del sol, fuego
u otras fuentes de calor.
ADVERTENCIA SOBRE EL CARRO
PORTÁTIL
(símbolo provisto por RETAC)
PRECAUCIÓN: PARA REDUCIR EL RIESGO DE DESCARGAS ELÉCTRICAS,
NO QUITE LA CUBIERTA (NI LA TAPA POSTERIOR) NO HAY PIEZAS
REPARABLES POR EL USUARIO DENTRO. DERIVE LAS REPARACIONES A
PERSONAL DE SERVICIO CALIFICADO.
Las marcas de Precaución se ubican en el panel inferior.
TENSIÓN PELIGROSA: La luz intermitente con símbolo de
flecha dentro de un triángulo pretende alertar al usuario de la
presencia de tensión peligrosa no aislada, dentro del paquete
del producto, que puede ser de magnitud suficiente para
constituir un riesgo de descarga eléctrica para las personas.
ATENCIÓN: El signo de exclamación dentro de un triángulo
pretende alertar al usuario de la presencia de instrucciones
importantes de operación y mantenimiento (reparaciones) en
el material que acompaña a este producto.
ADVERTENCIA DE GOTEO: Este producto no se podrá exponer a goteo
o salpicaduras, y no se colocará ningún objeto lleno con líquidos, como
jarrones, encima del producto.
ADVERTENCIA DE VENTILACIÓN: La ventilación normal del producto no se
bloqueará si se le da elt uso previsto.
Advertencia: Los cambios o modificaciones efectuados a esta unidad
que no hayan sido expresamente aprobados por la parte responsable del
cumplimiento, podrían anular la autoridad del usuario para operar el equipo.
El enchufe se utiliza como un dispositivo de desconexión y debe estar
listo para su funcionamiento cuando sea necesario. Para desconectar el
equipo por completo de la red eléctrica, el enchufe deberá desconectarse
completamente de la toma de corriente.
PRECAUCIÓN
RIESGO DE DESCARGA
ELÉCTRICA. NO ABRIR
ADVERTENCIA: PARA EVITAR INCENDIOS O PELIGROS DE DESCARGA,
NO EXPONGA ESTA UNIDAD A LA LLUVIA O HUMEDAD.
PRODOTTO LASER CLASSE 1
Este símbolo en el producto o en las instrucciones significa que su
equipo eléctrico y electrónico se debe desechar al finalizar la vida útil
del mismo en forma separada de los desperdicios del hogar. Existen
sistemas de recogida selectiva para el reciclaje en la UE.
Si desea más información, comuníquese con la autoridad local o con el
minorista donde adquirió el producto.
Bajo la influencia de fenómenos electrostáticos, se puede producir el mal
funcionamiento del producto. En ese caso, el usuario deberá reiniciarlo.
Advertencias:
• Este reproductor de CD utiliza un haz de luz láser. Solo la persona de
reparaciones calificada es quien puede retirar la cubierta y reparar este
dispositivo debido a posibles lesiones en la vista.
• El uso de controles, ajustes o la realización de procedimientos que no
sean los especificados en el presente pueden producir exposición a
radiación peligrosa.
• El artefacto deberá utilizarse en un espacio abierto.
¡PRECAUCIÓN!
Si la caja se abre o el dispositivo de seguridad se destruye, puede
producirse la emisión invisible de radiación láser. Evite la exposición al
haz de luz.

4
COMPLIANCE WITH ,C REGULATIONS
,&:$60/
This equipment complies with IC RF radiation exposure limits set forth for
an uncontrolled environment.
This equipment should be installed and operated with a minimum distance
of 20 centimeters between the radiator and your body.
ce matériel est conforme aux limites d'exposition aux rayonnements rf de
ic énoncés dans un autre environnement.
ce matériel doit être installé et exploité à une distance minimale de
20 cm entre le radiateur et votre corps.
- English:
This device complies with Industry Canada licence-exempt RSS standard(s).
Operation is subject to the following two conditions: (1) This device may not
cause interference, and (2) This device must accept any interference, including
interference that may cause undesired operation of the device.
- French:
Le présentappareilestconforme aux CNR d'Industrie Canada applicables aux
appareils radio exempts de licence. L'exploitationestautorisée aux deux
conditions suivantes:
(1) l'appareil ne doit pas produire de brouillage, et
(2) l'utilisateur de l'appareildoit accepter tout brouillageradioélectriquesubi,
mêmesi le brouillageest susceptible d'encompromettre le fonctionnement.

— S2 —
Se incluyen
Asegúrese de que estén incluidos los siguientes elementos.
Micrófono con cable
Unidad principal
Cables de Audio/Video
Manual Kit de bienvenida
Adaptador de CA

— S3 —
Location of Controls (Front)
1. Manija
2. Botón de Luces
3. Indicador de
ENCENDIDO/ESPERA
(ON/STANDBY)
4. Botón de ENCENDIDO/
ESPERA (ON/STANDBY)
5. Luz
6. Botón REPRODUCIR/
PAUSAR/SINCRONIZAR
(PLAY/PAUSE/PAIR)
7. Botón DETENER (STOP)
8. Botón SALTO (SKIP)
9. Botón SALTO (SKIP)
10. Botón PROGRAMAR/
REPETIR (PROGRAM/
REPEAT)
11. Botón de FUNCIÓN
(FUNCTION)
12. Pantalla
13. Altavoz
14. Conector de ENTRADA
AUXILIAR (AUX IN)
15. Conector para
MICRÓFONO 2 (MIC 2)
16. Conector para
MICRÓFONO 1 (MIC 1)
17. Tapa del CD
18. Control de VOLUMEN
PRINCIPAL (MASTER
VOLUME)
19. Control de ECO (ECHO)
20. Control de voz
automático (Auto Voice)
21. Control de BALANCE
22. Control de VOLUMEN
DEL MICRÓFONO (MIC
VOLUME)
23. Indicador CDG
24. Indicador de PROGRAMA
(PROGRAM)
25. Indicador de
REPRODUCIR/PAUSAR
(PLAY/PAUSE)
26. Indicador de REPETIR
(REPEAT)
u
v
w
x
y
U
V
W
X
ao
an
al
ak
at
am
ap
aq
ar
as
bt
bk
bl
bm
bp
bn
bo
— S4 —
INSTALACIÓN DE LAS PILAS
FUNCIONAMIENTO DE CC
1. Deslice la tapa de la pila en la dirección de las flechas para exponer el compartimiento
para pilas. Inserte ocho (8) pilas alcalinas tamaño “C” (no incluidas) como lo indica el
diagrama.
2. Reemplace la cubierta firmemente antes de operar.
PRECAUCIONES:
• Reemplace todas las pilas al mismo tiempo.
• No mezcle pilas viejas y nuevas.
Ubicación de los controles (reverso)
CONEXION
27. Conector de SALIDA DE VIDEO
(VIDEO OUT)
28. SALIDA AUXILIAR (AUX OUT)
derecha (R)
29. SALIDA AUXILIAR (AUX OUT)
izquierda (L)
30. Conector de entrada de CC
31. Compartimiento para pilas
Se seguirán las precauciones a continuación cuando se utilicen pilas en
este dispositivo:
1. Utilice sólo el tamaño y tipo de pilas especificadas.
2. Asegúrese de respetar la polaridad correcta cuando instale las pilas,
según lo indicado en el compartimiento de las pilas. Las pilas al revés
pueden provocar daños al dispositivo.
3. No mezcle diferentes tipos de pilas (por ejemplo, alcalinas y de
zinc-carbono) o pilas viejas con pilas nuevas.
4. Si no va a usarse el dispositivo durante un período prolongado,
asegúrese de quitar las pilas para prevenir daños o lesiones a causa de
posibles pérdidas de las pilas.
5. No intente recargar pilas que no fueron diseñadas para ese fin; pueden
recalentarse y romperse (Siga las indicaciones del fabricante de la pila).
6. Las pilas recargables se deben quitar del producto antes de la carga.
7. Las pilas recargables solo se pueden cargar bajo supervisión de un adulto.
8. Las pilas sin carga se deben quitar del producto.
9. La pila no deberá exponerse a calor excesivo como luz solar, fuego o
fuentes similares.
bq
br
bs
ct
ck
Precauciones sobre las pilas
— S5 —
CONEXION
Conexión de micrófono(s)
Micrófonos:
Inserte el enchufe de un micrófono en
la entrada para micrófono 1 u y el otro
enchufe de micrófono en la entrada para
micrófono v (si lo desea).
Nota: No arroje o dé golpecitos al
micrófono, puede dañar el micrófono o
los parlantes. No gire el micrófono por el
cable porque causará daños en el cableado
revestido.
Conexión de la unidad a un televisor
IDE O
INP UT AUDIO
INP UT
RL
Cable de video RCA
SALIDA DE
VÍDEO (amarillo)
SALIDA DE
AUDIO
(Bianco-S
rosso-D)
VISTA TRASERA DE
LA TELEVISIÓN
Para que se reproduzca el video,
las letras y el audio en su televisor,
siga los siguientes pasos:
Conecte el cable de video RCA
(amarillo) a la SALIDA DE VIDEO
(VIDEO OUT) y los cables de audio
(blanco y rojo) a las SALIDAS DE
AUDIO (AUDIO OUT) ubicadas
en la parte trasera de la Singing
Machine.
Conecte el otro extremo del
cable de video RCA (amarillo) a la
ENTRADA DE VIDEO (VIDEO IN) y
los cables de audio (blanco y rojo)
a la ENTRADA DE AUDIO (AUDIO
IN) de su televisor.
Notas:
• Esta unidad puede utilizarse con o sin televisor, pero es altamente recomendable usar
uno para aprovechar todas las funciones.
• También consulte la Guía de usuario del televisor.
• Para ver las letras de canciones en la pantalla, debe usar un disco CD+G.
u
v
— S6 —
Conexió
Conexión a alimentación de corriente alterna
Conexión a entrada de Aux
Introduzca el cable de alimentación
de CA en un tomacorriente de CA con
100-240 V de CA, 50/60 Hz.
Nota:
Haga todas las conexiones antes de
enchufar a la alimentación de CA.
Conecte su dispositivo externo
utilizando un cable adecuado (no se
incluye el cable de audio de 3,5mm)
como se muestra.
Nota:
Consulte la página S13 para
seleccionar y utilizar la función de
entrada de AUX.
A la unidad externa
AUDIO OUTPUT
/ HEADPHONE JACK
AUX IN
Luces de estado brillante
1 Oprima el botón LUZ para encender el
efecto de luz, oprímalo nuevamente
para apagarlo.
u

— S7 —
Funcionamiento
Reproducción de un CDG
1 Conecte la unidad como se describió
antes; si utiliza CD+G, se recomienda que
conecte un televisor. Oprima el botón de
ENCENDIDO/ESPERA (ON/STANDBY)
para encender la unidad.
2
Abra el compartimiento de CD e introduzca
un CD o un CD+G presionándolo
cuidadosamente en el husillo central. Cierre
la tapa del CD.
Notas:
• ¿Qué es un CD+G?
Un CD+G (CD+ Graphics), es el formato
estándar para la mayoría de los discos
de karaoke que mostrarán las letras de
canciones en pantalla.
• Nunca coloque nada que no sea un CD en el
compartimiento, como por ejemplo objetos
extraños que puedan dañar la unidad.
• Si no introdujo un disco, “No” aparecerá en.
• Si se conecta a un televisor u otra fuente de
audio, ajuste el volumen del televisor con su
propio control de volumen.
3
Presione varias veces el botón FUNCIÓN
para seleccionar el modo CDG; aparecerá
“--” cuando busque el disco. Luego,
aparecerá la cantidad total de pistas.
Cuando se introduce un disco CDG, la luz
indicadora de CDG se iluminará.
4 Presione REPRODUCIR/PAUSAR/
SINCRONIZAR (PLAY/PAUSE/PAIR)
para comenzar la reproducción; si está
escuchando un archivo CD+G, en la pantalla
del televisor aparecerá la imagen y la letra
(si está conectado) y se encenderá la luz
indicadora de REPRODUCIR/PAUSAR/
SINCRONIZAR (PLAY/PAUSE/PAIR).
v
u
w
x
— S8 —
Funcionamiento
Reproducción de un CDG (Continuó)
5 Ajuste el volumen a un nivel conveniente,
usando el control de VOLUMEN
PRINCIPAL.
6
Conecte el/los micrófono/s. Ubique el
interruptor de ENCENDIDO/ESPERA
(ON/STANDBY) del Control remoto/
Micrófono en la posición de ENCENDIDO
(ON).
7 Ajuste el control de VOLUMEN DEL
MICRÓFONO (MIC VOLUME) hasta el
nivel deseado. Al aumentar el nivel de este
control se incrementará el volumen de los
dos micrófonos.
8
Gire el control de ECO (ECHO) para darle
un efecto de eco a su voz. Gire hacia MAX
para aumentar el efecto de eco.
9
Puede activarse el control de VOZ
AUTOMÁTICO (AUTO VOICE
CONTROL) girando este control. Cuanto
más alto se ajuste este control, más
se silenciarán las voces de la grabación
multiplex cuando el cantante comience
a cantar ante el micrófono. Cuando el
cantante deje de cantar, las voces grabadas
en la grabación multiplex volverán a la
normalidad.
10 Gire el control BALANCE hacia la
derecha para escuchar la música y
las voces grabadas en una grabación
multiplex o hacia la izquierda para
escuchar solamente la música en una
grabación multiplex.
Nota: Para usar el control BALANCE, debe
utilizarse un disco CD+G, de lo contrario
funcionará como un control de balance
estándar.
U
y
V
at
X
W

— S9 —
Funcionamiento
Reproducción de un CDG (Continuó)
11 SALTO: Avance o retroceda una pista
oprimiendo los botones de SALTO
/.
12 FUNCIÓN REPETIR: Durante la
reproducción, presione REPETIR/
PROGRAMAR (REPEAT/PROGRAM)
una vez para que se reproduzca
varias veces la canción seleccionada;
el indicador Repetir (Repeat)
parpadeará. Presione el botón
REPETIR/PROGRAMAR (REPEAT/
PROGRAM) una segunda vez para
que se reproduzca varias veces el CD
completo; el indicador Repetir (Repeat)
quedará encendido y fijo. Presiónelo
nuevamente para cancelar la función
Repetir, el indicador Repetir se apaga.
13 PROGRAMAR: Puede programar
hasta 20 pistas de cualquier
disco para reproducir en el orden
deseado. Mientras se encuentre en
el modo Detener (Stop), presione
REPETIR/PROGRAMAR (REPEAT/
PROGRAM); el indicador Programar
(Program) parpadeará y aparecerá
“00”. Seleccione la primera pista
con los botones Salto hacia atrás/
adelante /. Presione REPETIR/
PROGRAMAR (REPEAT/PROGRAM)
nuevamente para confirmar la entrada.
Después de seleccionar las pistas
deseadas, la pantalla mostrará 01,
02, etc. reconociendo que las pistas
seleccionadas se han programado
y el indicador de programa se
iluminará con luz roja fija. Repita hasta
agregar un máximo de 20 pistas a
la memoria. Al finalizar, presione el
botón REPRODUCIR/PAUSAR/
SINCRONIZAR (PLAY/PAUSE/PAIR)
para comenzar la reproducción.
ak
al
am

— S10 —
Funcionamiento
Reproducción de un CDG (Continuó)
Nota:
• Oprima DOS VECES DETENER para detener
y eliminar el programa.
14 PAUSAR (PAUSE): Durante la
reproducción, si desea pausar
momentáneamente el disco, oprima
REPRODUCIR/ PAUSAR (PLAY/
PAUSE); el indicador REPRODUCIR/
PAUSAR (PLAY/PAUSE) parpadeará.
Oprima nuevamente para reanudar la
reproducción normal.
15 Oprima DETENER para detener la
reproducción.
16 Oprima ENCENDIDO/ESPERA (ON/
STANDBY) para apagar la unidad.
ap
an
ao

— S11 —
Funcionamiento
Utilizar un dispositivo Bluetooth
1 Conecte la unidad como se describió
previamente. Oprima ENCENDIDO/
ESPERA (ON/STANDBY) para encender la
unidad.
2 Oprima varias veces FUNCIÓN para
seleccionar Bluetooth; “bt” parpadeará
en la pantalla mientras la unidad busca
automáticamente y empareja un dispositivo
Bluetooth previamente emparejado (si
ya se realizó esta acción antes). Si no hay
dispositivos previamente emparejados,
realice la conexión como se muestra en el
siguiente paso.
Nota: También puede oprimir REPRODUCIR/
PAUSAR/ SINCRONIZAR (PLAY/PAUSE/
PAIR) para desconectar los dispositivos
emparejados y sincronizar uno nuevo.
3 Encienda la opción Bluetooth en su
dispositivo, desde el menú de configuración
para buscar un dispositivo reconocible
con señal Bluetooth. Seleccione “Singing
Machine” en los resultados del dispositivo
en el menú de Bluetooth.
Nota: También consulte el manual de usuario
de su dispositivo con Bluetooth para más
instrucciones.
4 “bt” se iluminará en la pantalla y quedará
fijo, y se oirá un sonido de emparejamiento
exitoso.
Notas:
• Si su dispositivo con Bluetooth le pide un
código durante el proceso de sincronización,
ingrese “0000” para conectarse.
• En algunos dispositivos con Bluetooth, una vez
finalizado la sincronización, elija su dispositivo
con Bluetooth como “Usar como dispositivo
de audio” o similar.
• Si la conexión se pierde luego de una
sincronización exitosa, verifique que la
distancia entre el altavoz y el dispositivo con
Bluetooth no supera los 30 pies/10 metros.
• No aparecerá nada en el televisor conectado
cuando utilice el modo Bluetooth.
3
u
v
— S12 —
Funcionamiento
Utilizar un dispositivo Bluetooth (Continuó)
5 Para controlar su dispositivo Bluetooth
desde esta unidad, oprima REPRODUCIR/
PAUSAR/ SINCRONIZAR (PLAY/PAUSE/
PAIR) para comenzar la reproducción.
Presione REPRODUCIR/ PAUSAR/
SINCRONIZAR (PLAY/PAUSE/PAIR)
durante la reproducción para pausar la
canción.
6
Ajuste el volumen a un nivel conveniente
usando el control de VOLUMEN
PRINCIPAL (MASTER VOLUME) de esta
unidad, así como también el Volumen de su
dispositivo Bluetooth.
7
Conecte el/los micrófono/s. Ubique el
interruptor de ENCENDIDO/ESPERA
(ON/STANDBY) del Control remoto/
Micrófono en la posición de ENCENDIDO
(ON).
8
Ajuste el control de VOLUMEN DEL
MICRÓFONO (MIC VOLUME) hasta el
nivel deseado. Al aumentar el nivel de este
control se incrementará el volumen de los
dos micrófonos.
9 Gire el control de ECO (ECHO) para darle
un efecto de eco a su voz. Gire hacia MAX
para aumentar el efecto de eco.
10 Para regular el balance entre los
altavoces, utilice el control BALANCE.
11 SALTO: Avance o retroceda una pista
oprimiendo los botones de Salto /
.
12 Oprima ENCENDIDO/ESPERA (ON/
STANDBY) para apagar la unidad.
V
yU
at
X
al
ak
W

— S13 —
y
Funcionamiento
Uso del conector de ENTRADA AUX
1 Conecte la unidad como se describió antes.
Oprima el botón de ENCENDIDO/ESPERA
(ON/STANDBY) para encender la unidad.
2
Oprima el botón FUNCIÓN (FUNCTION)
varias veces para seleccionar el modo
ENTRADA AUXILIAR (AUX IN); aparecerá
“AUXILIAR” (AU) en la pantalla..
3
Conecte la unidad externa al conector de
ENTRADA AUX en la parte trasera de esta
unidad. La conexión a una unidad externa
permitirá reproducir audio a través de su
Singing Machine.
Notas:
• Se recomienda que configure el volumen en
la unidad auxiliar a 1/3 o menos para evitar
distorsiones.
• No es posible saltar archivos o pistas cuando
se usa un dispositivo externo.
4 Ajuste el volumen con el control de
VOLUMEN PRINCIPAL (MASTER
VOLUME) de esta unidad o con el control
de volumen del dispositivo externo.
5 Conecte el/los micrófono/s. Ubique el
interruptor de ENCENDIDO/ESPERA
(ON/STANDBY) del Control remoto/
Micrófono en la posición de ENCENDIDO
(ON).
x
u
v
w
— S14 —
Funcionamiento
Uso del conector de ENTRADA AUX (Continuó)
6 Ajuste el control de VOLUMEN DEL
MICRÓFONO (MIC VOLUME) hasta
el nivel deseado. Al aumentar el nivel de
este control se incrementará el volumen
de los dos micrófonos.
7 Gire el control de ECO (ECHO) para
darle un efecto de eco a su voz. Gire
hacia MAX para aumentar el efecto de
eco.
8 Para regular el balance entre los
altavoces, utilice el control BALANCE.
9 Oprima ENCENDIDO/ESPERA (ON/
STANDBY) para apagar la unidad.
W
V
X
U
Ahorro de energía
(Sistema de apagado automático- APS)
El modo Espera de la unidad se activará automáticamente después de permanecer 15
minutos en una de las siguientes situaciones:
1. No hay CD en el compartimento o se ha detenido la reproducción del CD;
2. La reproducción del reproductor de música externo se ha detenido pero el cable de audio
3. La reproducción de Bluetooth se ha detenido.
Esta unidad se puede volver a encender oprimiendo una vez el botón ENCENDIDO/ESPERA
(ON/STANDBY). APS es para ahorro de energía.
— S15 —
Guía de Resolución de Problemas
Si esta unidad presentara un problema, lea el siguiente cuadro antes de llamar al servicio
técnico:
No hay energía
• La unidad no está encendida; oprima ENCENDIDO/ESPERA (ON/STANDBY) para
encenderla.
• Verifique que el adaptador de CA esté conectado de forma segura en la parte trasera de
la unidad.
• Conecte la unidad a otro tomacorriente.
No hay sonido (General)
• Volumen principal (Master Volume) está en mínimo: suba el volumen.
• No se seleccionó la Función correcta, seleccione con el botón FUNCIÓN.
• Si utiliza un dispositivo externo, suba el volumen.
No hay sonido – si está conectado a un televisor
• El volumen del televisor está silenciado o demasiado bajo.
• No se seleccionó la fuente correcta (generalmente AV) en el menú del televisor.
La letra de la canción no aparece en la pantalla
• Si está conectado a un televisor externo, no se conectó correctamente el enchufe
amarillo de video; consulte la página S5.
• Si está conectado a un televisor externo, no se seleccionó la fuente correcta
(generalmente AV) en el menú del televisor.
• El archivo o pista que se reproduce no es una grabación de pista con letra. Estos son los
únicos archivos que le permiten ver las letras de las canciones en la pantalla del televisor.
• No aparecerá nada en la pantalla del televisor cuando utilice Entrada AUX o Bluetooth.
No hay sonido desde el micrófono
• Asegúrese de que está firmemente conectado a la entrada para el MICRÓFONO 1 o 2.
• Asegúrese de que el interruptor de ENCENDIDO/ESPERA (ON/STANDBY) del
micrófono se encuentre en la posición ENCENDIDO (ON).
• Asegúrese de que el control de VOLUMEN DEL MICRÓFONO (MIC VOLUME) no esté
en su configuración más baja.
• El VOLUMEN PRINCIPAL está fijado en mínimo: suba el volumen.
• Ajuste el control de ECO (ECHO) pasado el punto medio en la Singing Machine.
El dispositivo Bluetooth no se puede configurar o conectar con la unidad
• No ha activado la función Bluetooth de su dispositivo; ver la página S11 o consultar el
manual de usuario del dispositivo Bluetooth.
• La unidad no está en modo de sincronización; presione el botón SINCRONIZAR (PAIR)
para reiniciar la sincronización.
La reproducción de la música no está disponible en la unidad luego de conectar de
manera exitosa el Bluetooth.
• Asegúrese de que su dispositivo Bluetooth es compatible con el perfil Bluetooth A2DP.
• El volumen del dispositivo externo con Bluetooth está bajo o en silencio; súbalo según lo
deseado.

— S16 —
Especificaciones
AUDIO
Potencia De Salida (Max) ..............................................................................................2 Watts (RMS)
Impedancia De Salida ...................................................................................................................8 Ohms
Reproductor De Cd
Respuesta De Frecuencia ..........................................................................................100 Hz - 20 kHz
Proporción De Señal Y Ruido .........................................................................................................50 Db
Cantidad de programas ..................................... Programación de acceso aleatorio de 20 pasos
Bluetooth
Versión Bluetooth ...............................................................................................................................V4.2
Distancia De Trabajo ............................................ Hasta 10 Metros Medidos En Espacio Abierto
Sección de entrada auxiliar (Aux in): .......................Entradas Para Auriculares De 3.5 Mm
Micrófono ..................Impedancia Con Micrófono Dinámico -74 Db 600 Ohm Con 6.3 Mm
Energía ..................DC 12V 1A (8 pilas tamaño “C”) (Las pilas no están incluidas)
Dimensiones (HxWxD) ...................... 13.3 x 12.0 x 6.1 pulgadas / 33.8 x 30.5 x 15.5 cm
Peso ..............................................................................................................................4.0 lbs / 1.82 kgs
Las especificaciones son las típicas. Las unidades individuales pueden variar y están sujetas a
mejoras constantes sin previo aviso y sin incurrir en ningún tipo de obligación.
El nombre de la marca Bluetooth® y los logotipos son marcas registradas propiedad de
Bluetooth SIG, Inc., y todo uso que The Singing Machine Company haga de dichas marcas
es en virtud de una licencia. Otras marcas registradas y comerciales pertenecen a sus
respectivos titulares.
— F1 —
Mises en Garde
Informations importantes sur la sécurité
1. Lisez ces instructions.
2. Conservez ces instructions.
3. Tenez compte de tous les avertissements.
4. Suivez toutes les instructions.
5. N’utilisez pas cet appareil à proximité de l’eau.
6. Nettoyez seulement avec un chiffon sec.
7. Ne bloquez aucune des ouvertures de ventilation. Installez
conformément aux instructions du fabricant.
8. Ne pas installer à proximité d’une source de chaleur telle qu’un
radiateur, une bouche de chaleur, un poêle ou d’autres appareils (dont
les amplificateurs) produisant de la chaleur
9. Ne retirez en aucun cas le dispositif de sécurité de la fiche polarisée ou
de la fiche de terre. Une prise polarisée est composée de deux fiches
dont l’une est plus large que l’autre. Une fiche de terre comporte deux
lames et une troisième broche de mise à la terre. La grande broche
ou la troisième broche sont fournies pour votre sécurité. Si la fiche
fournie ne s’adapte pas à la prise électrique, demander à un électricien
de remplacer la prise hors normes.
10. Placez le cordon d’alimentation de sorte qu’il ne soit ni piétiné ni
comprimé, en particulier au niveau de la fiche de connexion, de la
prise de courant et du point de sortie de l’appareil.
11. Utilisez uniquement les fixations/accessoires spécifiés par le
fabricant.
12. Utilisez uniquement le chariot, le pied, le
trépied, le support ou la table recommandé
par le fabricant ou fourni avec l’appareil. Si
un chariot est utilisé, déplacer l’ensemble
chariot-appareil avec précaution afin de ne
pas le renverser, ce qui pourrait entraîner des
blessures.
13. Débranchez cet appareil pendant les orages ou
au cours des longues périodes de non utilisation.
14. Veuillez vous adresser au personnel qualifié
pour toute réparation. Des réparations sont nécessaires si l’appareil
est endommagé d’une façon quelconque, par exemple : cordon ou
prise d’alimentation endommagé, liquide renversé ou objet tombé
à l’intérieur de l’appareil, exposition de l’appareil à la pluie ou à
l’humidité, appareil qui ne marche pas normalement ou que l’on a fait
tomber.
15. ATTENTION : Pour réduire les risques d’incendie ou de choc électrique,
ne pas exposer cet appareil à la pluie ou à l’humidité. Ne placez pas
d’objets remplis d’eau tels qu’un vase sur l’appareil.
16. La prise secteur CA est utilisée comme dispositif de déconnexion et
doit rester facilement accessible et manipulable pendant l’utilisation.
Afin de déconnecter complètement l’appareil du courant, la fiche
secteur doit être entièrement retirée de la prise électrique CA.
17. ATTENTION : Pour réduire le risque d’incendie ou
d’explosion, ne pas exposer les piles à une chaleur
excessive telle que les rayons du soleil, le feu ou une autre
source de chaleur.
ATTENTION CHARIOT DE
TRANSPORT
(symbole fourni par RETAC)
ATTENTION: AFIN DE RÉDUIRE LES RISQUES DE CHOCS ÉLECTRIQUES,
NE PAS OUVRIR LES COUVERCLES (OU L’ARRIÈRE). AUCUNE PIÈCE
INTERNE RÉPARABLE PAR L’UTILISATEUR. VEUILLEZ VOUS ADRESSER
AU PERSONNEL QUALIFIÉ POUR TOUTE RÉPARATION.
Le repère de mise en garde est situé sur le panneau inférieur.
TENSION DANGEREUSE: L’éclair fléché dans un triangle
équilatéral, avertit l’utilisateur de la présence d’une « tension
dangereuse » non isolée à l’intérieur de l’appareil et d’une
valeur suffisante pour constituer un risque d’électrocution.
ATTENTION: Le point d’exclamation contenu dans un
triangle équilatéral, avertit l’utilisateur de la présence, dans
la documentation qui accompagne l’appareil, de consignes
d’utilisation et de maintenance importantes.
ATTENTION AUX ÉCLABOUSSURES: Cet appareil doit être gardé à l’abri
des gouttes ou des éclaboussements d’eau ; ne posez jamais un objet
contenant de l’eau sur cet appareil, par exemple un vase.
ATTENTION À LA BONNE VENTILATION: Pour une utilisation conforme, il
ne faut pas empêcher une ventilation normale du produit.
Avertissement : Tout changement ou modification apporté à cet appareil
sans l’approbation expresse de la partie responsable de sa conformité
risque d’annuler le droit de l’utilisateur à se servir de cet équipement.
La prise secteur est utilisée comme dispositif de déconnexion et doit
rester facilement accessible pendant l’utilisation. Pour isoler totalement
cet appareil de l’alimentation secteur, il est impératif de débrancher
totalement sa prise du câble d’alimentation secteur.
ATTENTION
RISQUE DE CHOC ÉLECTRIQUE.
NE PAS OUVRIR
ATTENTION: POUR ÉVITER UN INCENDIE OU UN RISQUE D’ÉLECTROCUTION
NE PAS EXPOSER CET ENSEMBLE À LA PLUIE OU À L’HUMIDITÉ.
PRODOTTO LASER CLASSE 1
Ce symbole qui apparaît sur le produit ou dans les instructions signifie
que votre appareil électrique ou électronique, lorsqu’il ne fonctionne
plus, doit être jeté séparément de vos déchets ménagers. Il existe
aujourd’hui des systèmes de collecte et de recyclage distincts dans l’UE.
Pour plus d’informations, veuillez contacter vos autorités locales ou le
revendeur où le produit a été acheté.
Sous l’influence du phénomène électrostatique, ce produit est
susceptible de mal fonctionner et peut nécessiter un redémarrage.
Mises en garde:
• Ce lecteur CD utilise un rayon laser. Seul un personnel qualifié de
maintenance peut ôter le couvercle ou essayer de réparer ce matériel,
en raison des risques encourus pour la vision.
• L’utilisation d’éléments de commande ou d’adaptations ou encore
l’exécution de procédures qui ne sont pas décrites dans ce manuel
pourraient exposer à une irradiation dangereuse.
• Il convient d’utiliser cet appareil dans un endroit ouvert.
ATTENTION !
La radiation laser est visible en cas d’ouverture et de manipulation du
dispositif de sécurité. Évitez toute exposition au rayon.
— F2 —
Contenu
Qu’y a-t-il dans la boîte.
Microphone filaire
Module principal
Câbles audio/vidéo
Manuel d'utilisation Ensemble de bienvenue
Adaptateur secteur

— F3 —
Position des commandes (face avant)
1. Poignée
2. Bouton LIGHTS
(Lumières)
3. Voyant ON/STANDBY
(Allumé/en veille)
4. Bouton ON/STANDBY
(Allumé/en veille)
5. Lumières
6. Bouton PLAY/PAUSE/
PAIR (Lecture/pause/
appariement)
7. Bouton STOP
8. Bouton
Skip (passer)
9. Bouton Skip (passer)
10. Bouton PROGRAM/
REPEAT (Programmer/
répéter)
11. Bouton FUNCTION
(Fonction)
12. Affichage
13. Haut-parleur
14. Jack AUX IN
15. Jack MIC 2
16. Jack MIC 1
17. Porte du compartiment à
CD
18. Commande MASTER
VOLUME (Volume
principal)
19. Commande d’ÉCHO
20. Auto Voice Control
(Contrôle automatique
de la voix)
21. Commande BALANCE
(Équilibrage)
22. Commande MIC
VOLUME (Volume du
microphone)
23. Voyant CDG
24. Voyant PLAY/PAUSE
(Lecture/pause)
25. Voyant PROGRAM
(Programme)
26. Voyant REPEAT (répéter)
u
v
w
x
y
U
V
W
X
ao
an
al
ak
at
am
ap
aq
ar
as
bt
bk
bl
bm
bp
bn
bo
— F4 —
Installation des piles
Fonctionnement sur CC
1. Poussez la porte du compartiment à piles dans le sens de la flèche afin d’ouvrir le
compartiment à piles. Insérez huit (8) piles alcalines de taille « C » (non incluses), tel que
c’est indiqué sur le dessin.
2. Replacez fermement le couvercle avant de mettre en marche.
PRÉCAUTIONS:
• Remplacez toutes les piles en même temps.
• Ne mélangez pas des piles neuves et des piles usées.
Position des commandes (Arrière)
Connexion
27. Jack VIDEO OUT (Sortie vidéo)
28. Jack de sortie audio droit
(AUDIO OUT) (R)
29. Jack de sortie audio gauche
(AUDIO OUT) (L)
30. Jack DC In
31. Couvercle du compartiment à
piles
Précautions spécifiques à l’utilisation avec des piles
Les précautions ci-dessous doivent être respectées lorsque vous utilisez cet
appareil avec des piles.
1. Utilisez uniquement la taille et le type de piles spécifiées.
2. Assurez-vous de respecter la bonne polarité lorsque vous installez les piles
tel que cela est indiqué dans le compartiment à piles. Une pile positionnée à
l’envers risque d’endommager l’appareil.
3. Ne mélangez pas différents types de piles (p. Ex. alcalines et carbone zinc)
ou des piles usées avec des piles neuves.
4. Si l’appareil ne doit pas être utilisé pour une période de temps prolongée,
enlevez les piles pour empêcher tout dommage ou tout risque de blessure
dû à une fuite possible des piles.
5. N’essayez pas de recharger des piles qui ne sont pas rechargeables ; elles
pourraient surchauffer et se détériorer. (suivez les instructions du fabricant
des piles).
6. Les piles rechargeables doivent être retirées de l’appareil avant d’être chargées.
7. Les piles rechargeables doivent uniquement être rechargées sous la surveil-
lance d’un adulte.
8. Les piles usées doivent être retirées de l’appareil.
9. Les piles ne doivent pas être exposées à une chaleur élevée, telle que les
rayons du soleil, le feu, ou autres sources de chaleur.
bq
br
bs
ct
ck

— F5 —
Connexion
Connecter le(s) microphone(s)
Microphones :
Connectez un microphone au jack Mic 1
ainsi qu’au jack Mic 2 (si vous le souhaitez).
Remarque: Ne faites pas tomber ou
ne cognez pas le microphone car cela
pourrait endommager le microphone ou
les haut-parleurs. Ne faites pas tourner le
microphone au niveau du cordon car cela
abîme les câbles dans la gaine.
Connecter l’unité à un téléviseur
ENTREE
IDEO ENTREE
AUDIO
RL
Câblage RCA
SORTIE VIDÉO
(jaune)
SORTIE AUDIO
(blanc - G
rouge - D)
VUE ARRIÈRE DU TÉLÉVISEUR
Pour lire la vidéo, les paroles et le son
sur votre téléviseur, effectuez les
étapes suivantes :
Connectez le câble vidéo RCA (jaune)
au jack VIDEO OUT (sortie vidéo) et
connectez les câbles audio (blanc et
rouge) aux jacks AUDIO OUT (sortie
audio) situés à l’arrière de votre
Singing Machine.
Connectez l’embout opposé du câble
vidéo RCA (jaune) au jack VIDEO
IN (entrée vidéo) et connectez les
câbles audio (blanc et rouge) aux
jacks AUDIO IN (entrée audio) situés
sur votre téléviseur.
Remarques:
• Cette unité peut être utilisée avec ou sans téléviseur, mais il est fortement recommandé
d’utiliser un téléviseur afin de pouvoir utiliser toutes les fonctionnalités.
• Référez-vous également au guide utilisateur du téléviseur.
• Afin d’afficher les paroles sur l’écran, vous devez utiliser un disque CD+G.
u
v

— F6 —
Connexion
Connexion à l’alimentation secteur
Connexion au jack AUX In
Insérez la fiche secteur dans une prise
de courant CA, disposant de 100-
240 V CA, 50-60 Hz.
Remarque:
Connectez tous les éléments avant de
raccorder l’appareil au secteur.
Connectez un appareil externe en
utilisant un câble adapté (câble audio
3.5 mm non fourni) tel que cela est
décrit.
Remarque:
Voir page F13 pour sélectionner et
utiliser la fonction AUX In.
VOTRE SMARTPHONE
,
LECTEUR NUMERIQUE
OU LECTEUR MP3
SORTIE AUDIO/
JACK CASQUE
AUX IN
Lumières mode lueur
1 Appuyez sur le bouton LIGHTS
(éclairage) pour activer l’effet
lumineux, appuyez de nouveau pour
l’éteindre.
u

— F7 —
Fonctionnement
Lecture d’un CDG
1 Connectez l’appareil tel que décrit
précédemment ; si vous utilisez un
CD+G, il est recommandé de connecter
un téléviseur. Appuyez sur le bouton
ON/STANDBY pour allumer l’appareil.
2
Ouvrez la porte de CD et insérez un CD
ou un CD+G en appuyant délicatement
sur l’axe central. Puis fermez la porte de
CD.
Remarque:
• Qu’est-ce qu’un CD+G?
Un CD+G (CD+Graphics) est le format
standard de la plupart des disques de
karaoké qui permettent d’afficher les
paroles à l’écran.
• N’insérez jamais rien d’autre qu’un CD
dans le compartiment car des corps
étrangers peuvent endommager l’appareil.
• Si aucun disque n’est inséré, “no”
apparaîtra sur l’écran.
• Si l’appareil est connecté à un téléviseur
et/ou une autre source audio, ajustez le
volume de l’appareil externe en utilisant la
commande de volume qui lui est dédiée.
3
Appuyez plusieurs fois sur le bouton
FUNCTION (fonction) pour sélectionner
le mode CDG; “--” apparaît lors de la
recherche du disque, puis le nombre total
de pistes apparaît. Lorsqu’un disque CDG
est inséré, l’indicateur CDG s’allume.
4 Appuyez sur le bouton PLAY/PAUSE/
PAIR (lecture/pause/couplage) pour
démarrer la lecture ; si vous écoutez
un fichier CD+G, l’image et les paroles
apparaissent sur l’écran du téléviseur
(si celui-ci est connecté) et le voyant
LECTURE/PAUSE s’éclaire.
v
u
w
x

— F8 —
Fonctionnement
Lire un CDG (Suite)
5 Ajustez le volume à un niveau agréable
en utilisant la commande MASTER
VOLUME (Volume principal).
6
Connectez le(s) microphone(s) et faites
glisser le bouton ON/OFF du microphone
en position ON.
7 Réglez la commande MIC VOLUME
(Volume du microphone) comme vous
le souhaitez. Si vous augmentez cette
commande, cela augmentera le volume
des deux microphones.
8
Tournez la commande ECHO pour
ajouter un effet d’écho à votre voix.
Tournez-la vers MAX pour augmenter
l’effet de résonance.
9
Le contrôle automatique de la voix
(AUTO VOICE CONTROL) peut être
activé en tournant la commande AVC.
Plus cette commande est en position
élevée, plus les voix sur l’enregistrement
multiplex seront atténuées lorsque
le chanteur se met à chanter dans le
microphone. Lorsque le chanteur arrête
de chanter, les voix enregistrées en
multiplex reviennent au niveau normal.
10 Tournez la commande BALANCE
dans le sens des aiguilles d’une
montre pour entendre la musique
et les voix enregistrées sur un
enregistrement multiplex, ou bien
dans le sens inverse des aiguilles
d’une montre pour entendre
seulement la musique d’un
enregistrement multiplex.
Remarque: Afin d’utiliser la commande
BALANCE il faut utiliser un disque CD+G,
sinon cette commande fonctionnera comme
une commande d’équilibrage standard.
U
y
V
at
X
W
— F9 —
Fonctionnement
Lire un CDG (Suite)
11 SKIP (Suivant) : Avancez ou reculez
d’une piste en appuyant sur les
boutons Skip /Skip .
12 REPEAT (Répéter) : Pendant
la lecture, appuyez une fois sur
le bouton PROGRAM/REPEAT
(Programmer/répéter) pour lire
plusieurs fois le titre sélectionné ; le
voyant REPEAT se met à clignoter.
Appuyez une seconde fois sur
le bouton PROGRAM/REPEAT
(Programmer/répéter) pour lire
plusieurs fois l’ensemble du CD ; le
voyant REPEAT s’éclaire de façon
continue. Appuyez de nouveau
pour annuler la fonction « Repeat »
(Répéter), le voyant REPEAT s’éteint.
13 PROGRAM (Programme) : Vous
pouvez programmer jusqu’à 20
pistes de n’importe quel disque
pour les lire dans l’ordre que vous
souhaitez. Lorsque l’appareil se
trouve en mode Stop, appuyez sur
le bouton PROGRAM/REPEAT
(Programmer/répéter) ; le voyant
PROGRAM se met à clignoter et
« 00 » apparait. Sélectionnez le
premier titre en utilisant les boutons
Skip /Skip. Appuyez de
nouveau sur le bouton PROGRAM/
REPEAT pour confirmer la saisie.
Après avoir sélectionné les pistes
souhaitées, l’écran indique 01, 02,
etc., reconnaissant que les pistes
sélectionnées ont été programmées
et le voyant PROGRAM (programme)
s’éclaire en rouge de façon continue.
Répétez cette opération pour
programmer jusqu’à 20 titres dans la
mémoire. Lorsque vous avez terminé,
appuyez sur le bouton PLAY/
PAUSE/PAIR pour lancer la lecture.
ak
al
am

— F10 —
Fonctionnement
Lire un CDG (Suite)
Remarque:
• Appuyez deux fois sur le bouton STOP
pour arrêter et effacer le programme.
14 PAUSE : Lors de la lecture, si vous
souhaitez temporairement mettre
le disque en pause, appuyez sur
le bouton PLAY/PAUSE/PAIR
(lecture/pause/couplage) ; le voyant
PLAY/PAUSE se met à clignoter.
Appuyez de nouveau pour retourner à
la lecture normale.
15 Appuyez sur le bouton STOP pour
arrêter la lecture.
16 Appuyez sur le bouton ON/
STANDBY (allumer/veille) pour
éteindre l’appareil.
ap
an
ao
— F11 —
Fonctionnement
Utilisation d’un appareil Bluetooth
1 Connectez l’appareil tel que cela a été
décrit précédemment. Appuyez sur le
bouton ON/STANDBY (allumer/veille)
pour allumer l’appareil.
2 Appuyez plusieurs fois sur le bouton
FUNCTION (Fonction) pour sélectionner le
mode Bluetooth ; « bt » se met à clignoter
à l’écran pendant que l’appareil recherche
et couple automatiquement un appareil
Bluetooth précédemment couplé (si celui-ci
a été couplé auparavant). Si aucun appareil
précédemment couplé n’est à proximité,
établissez la connexion tel que cela est
décrit dans l’étape suivante.
Remarque : Vous pouvez également maintenir
le bouton PLAY/PAUSE/PAIR appuyé pour
déconnecter tout appareil couplé afin de coupler
un autre appareil.
3 Activez la fonction Bluetooth de votre
appareil externe dans les paramètres pour
chercher un appareil disponible disposant
d’un signal Bluetooth. Sélectionnez
« Singing Machine » dans la liste des
résultats du menu Bluetooth de l’appareil
externe.
Remarque : Référez-vous également au guide
utilisateur de votre appareil Bluetooth pour des
instructions détaillées.
4 Le voyant « bt » s’éclaire de façon continue
et un son de couplage réussi retentit.
Remarques :
• Si votre appareil Bluetooth vous demande
un mot de passe lors du processus de
couplage, veuillez saisir “0000” pour établir la
connexion.
• Sur certains appareils Bluetooth, une fois que
le couplage est effectué, sélectionnez votre
appareil Bluetooth en mode “Utiliser comme
appareil audio” ou similaire.
• Si la connexion est rompue après un couplage
réussi, vérifiez que la distance entre le haut-
parleur et l’appareil Bluetooth n’excède pas
30 pieds/10 mètres.
•“Bluetooth” clignote sur l’écran du téléviseur
et s’arrête de clignoter une fois la connexion
établie.
3
Appareils
Appareils
u
v

— F12 —
Fonctionnement
Utilisation d’un appareil Bluetooth (suite)
5 Afin de contrôler votre appareil
Bluetooth depuis cet appareil, appuyez
sur le bouton PLAY/PAUSE/PAIR pour
lancer la lecture. Appuyez sur le bouton
PLAY/PAUSE/PAIR lors de la lecture
pour mettre le titre en pause.
6
Ajustez le volume à un niveau agréable
en utilisant la commande MASTER
VOLUME de cet appareil ainsi que la
commande de volume de votre appareil
Bluetooth.
7
Connectez le(s) microphone(s) et faites
glisser le bouton ON/OFF du microphone
en position ON.
8
Réglez la commande MIC VOLUME
(Volume du microphone) comme vous
le souhaitez. Si vous augmentez cette
commande, cela augmentera le volume
des deux microphones.
9 Tournez la commande ECHO pour
ajouter un effet d’écho à votre voix.
Tournez-la vers MAX pour augmenter
l’effet de résonance.
10 Ajustez l’équilibrage entre les
haut-parleurs avec la commande
BALANCE.
11 SKIP (Passer) : Avancez ou reculez
d’une piste en appuyant sur les
boutons Skip /Skip .
12 Appuyez sur le bouton ON/
STANDBY (allumer/veille) pour
éteindre l’appareil.
V
yU
at
X
al
ak
W
— F13 —
y
Fonctionnement
Utilisation du jack AUX IN
1 Connectez l’appareil tel que cela a été
décrit précédemment. Appuyez sur le
bouton ON/STANDBY (Allumer/veille)
pour allumer l’appareil.
2
Appuyez plusieurs fois sur le bouton
FUNCTION (Fonction) pour sélectionner
le mode AUX IN ; « AU » apparait à
l’écran.
3
Connectez l’appareil externe au jack
LINE IN situé à l’avant de cet appareil.
La connexion d’un appareil externe
permettra de jouer le son à travers votre
Singing Machine.
Remarques :
• Il est fortement recommandé de régler le
volume de l’appareil auxiliaire sur 1/3 ou
plus bas pour éviter les déformations.
• Il n’est pas possible d’avancer d’un ou
plusieurs fichiers/titres avec cet appareil si
vous utilisez un appareil externe.
4 Ajustez le volume en utilisant la
commande MASTER VOLUME de cet
appareil ou bien la commande de volume
de votre appareil externe.
5
Connectez le(s) microphone(s) et faites
glisser le bouton ON/OFF du microphone
en position ON.
x
u
v
w

— F14 —
Fonctionnement
Utilisation du jack AUX IN (suite)
6 Réglez la commande MIC VOLUME
(Volume du microphone) comme vous
le souhaitez. Si vous augmentez cette
commande, cela augmentera le volume
des deux microphones.
7 Tournez la commande ECHO pour
ajouter un effet d’écho à votre voix.
Tournez-la vers MAX pour augmenter
l’effet de résonance.
8 Ajustez l’équilibrage entre les haut-
parleurs avec la commande BALANCE.
9 Appuyez sur le bouton ON/STANDBY
(allumer/veille) pour éteindre l’appareil.
W
V
X
U
Mode économie d’énergie
(Auto Power System-APS)
Cet appareil passe automatiquement en mode veille après 15 minutes dans les situations
suivantes :
1. In n’y a pas de CD dans le compartiment ou bien la lecture du CD a été arrêtée ;
2. La lecture du lecteur de musique externe a été arrêtée, mais le câble audio est toujours
branché au jack AUX IN.
3. La musique Bluetooth est arrêtée.
L’appareil peut être rallumé en appuyant une fois sur le bouton ON/STANDBY (Marche/
veille).
l’APS sert à faire des économies d’énergie.
— F15 —
Guide de dépannage
Si vous rencontrez un problème avec cet appareil, vérifiez la liste suivante avant de demander de
l’aide :
Ne s’allume pas
• L’appareil n’est pas sous tension, appuyez sur le bouton ON/STANBY (Marche/veille).pour le
mettre sous tension
• Assurez-vous que la prise de courant est correctement branchée à l’arrière de l’appareil.
• Branchez l’appareil à une autre prise de courant.
Pas de son - Général
• Le volume maître est réglé au minimum ; augmentez le volume.
• La bonne fonction n’a pas été sélectionnée ; sélectionnez-la avec le bouton FUNCTION
(Fonction).
• Si vous utilisez un appareil externe, augmentez le volume.
Pas de son - Lorsque connecté à un téléviseur
• Le volume du téléviseur est sur muet ou réglé trop bas.
• La bonne source (habituellement AV) n’a pas été sélectionnée dans le menu du téléviseur.
Les paroles n’apparaissent pas sur l’écran du téléviseur
• Si l’appareil est connecté à un téléviseur, la prise vidéo n’est pas correctement connectée ; voir
page F5.
• Si l’appareil est connecté à un téléviseur, sélectionnez la bonne source sur le téléviseur
(habituellement AV).
• Le fichier/titre lu n’est pas un enregistrement avec paroles. Seul ce type de fichiers vous permet
d’afficher les paroles sur l’écran de votre téléviseur.
• Rien n’apparait sur votre écran de téléviseur si vous utilisez le mode AUX In ou Bluetooth.
Le microphone n’émet pas de son
• Assurez-vous que le microphone est bien connecté au jack MIC 1 ou MIC 2.
• Assurez-vous que l’interrupteur ON/OFF du microphone est bien en position ON.
• Assurez-vous que le paramètre MIC VOLUME n’est pas réglé trop bas.
• Le volume principal MASTER VOLUME est réglé au minimum ; augmentez le volume.
• Ajustez la commande d’ECHO au-delà de la moitié sur la Singing Machine.
L’appareil Bluetooth ne peut pas être couplé ou connecté à l’appareil
• Vous n’avez pas activé la fonction Bluetooth de votre appareil ; voir page F11 ou référez-vous au
guide utilisateur de l’appareil Bluetooth.
• Le système ne se trouve pas en mode couplage ; appuyez sur le bouton PAIR (Couplage) pour
relancer le couplage.
La musique n’est pas disponible sur l’appareil après avoir connecté le Bluetooth avec succès
• Assurez-vous que votre appareil Bluetooth est compatible avec le profil Bluetooth A2DP.
• Le volume de l’appareil Bluetooth externe est réglé trop bas ou muet ; augmentez le volume
comme vous le souhaitez.

— F16 —
Spécifications
AUDIO
PUISSANCE DE SORTIE (MAXIMALE) ........................................................................2 Watts (RMS)
IMPÉDANCE DE SORTIE ..............................................................................................................8 Ohms
SECTION LECTEUR DE CD
FRÉQUENCE RÉPONSE ...............................................................................................100 Hz - 20 kHz
RAPPORT SIGNAL-BRUIT ............................................................................................................... 50 dB
NOMBRE DE PROGRAMMES .....Système d’échantillonnage de programmation aléatoire 20
pistes
BLUETOOTH
Version Bluetooth ...............................................................................................................................V4.2
Distance de fonctionnement.................... jusqu’à 30 pieds/10 mètres dans un espace ouvert
SECTION AUX IN .............................................................................. Jack de casque stéréo 3.5 mm
MICROPHONE ..............-74 dB impédance 600 Ohm avec microphone dynamique 6,3 mm
SECTION DE PUISSANCE ........................................................................................................................
..............................................CC 12 V 1 A (8 piles de type « C ») (piles non fournies)
DIMENSIONS (HxlxP) ............................. 13,3 x 12,0 x 6,1 pouces/ 33,8 x 30,5 x 15,5 cm
POIDS .......................................................................................................................4,0 onces / 1,82 kg
Les spécifications sont classiques. Les appareils individuels peuvent différer et peuvent être
sujets à l’amélioration continue sans préavis et/ou engagement.
La marque et les logos Bluetooth appartiennent à Bluetooth SIG, Inc. et La Compagnie The
Singing Machine, Inc. les utilise sous licence. Les autres marques et noms commerciaux sont
ceux de leurs propriétaires respectifs.
— G1 —
Warnhinweise
Wichtige Sicherheitsinformationen
1. Lesen Sie diese Anweisungen.
2. Bewahren Sie diese Anweisungen auf.
3. Beachten Sie alle Warnungen.
4. Befolgen Sie alle Hinweise.
5. Verwenden Sie dieses Gerät nicht in der Nähe von Wasser.
6. Nur mit einem trockenen Tuch reinigen.
7. Blockieren Sie keine der Lüftungsöffnungen. Beachten Sie beim
Einbau des Gerätes die Herstellerhinweise.
8. Installieren Sie das Gerät nicht in der Nähe von Wärmequellen wie
Heizungskörpern, Wärmespeichern, Öfen oder anderen Apparaten
(einschließlich Verstärkern), die Wärme abgeben
9. Die Schutzfunktion des polarisierten oder geerdeten Steckers darf
nicht unwirksam gemacht werden. Ein polarisierter Stecker besitzt
zwei Blätter. Ein Blatt ist größer als das andere. Ein Schukostecker
hat zwei Zinken und eine dritte Erdungszinke. Die breite Klinge oder
der Zinken dienen zu Ihrer Sicherheit. Wenn der mitgelieferte Stecker
nicht in die Steckdose passt, einen Elektriker mit dem Austauschen
der veralteten Steckdose beauftragen.
10. Achten Sie insbesondere im Bereich von Steckern, Steckdosen und
am Geräteausgang darauf, dass nicht auf das Netzkabel getreten
oder das Kabel eingeklemmt werden kann.
11. Verwenden Sie nur die vom Hersteller angegebenen Befestigungen/
Zubehörteile.
12. Verwenden Sie nur Wagen, Ständer,
Stativhalterungen und Tische, die vom
Hersteller empfohlen oder die zusammen mit
dem Gerät verkauft werden. Falls Sie einen
Rollwagen verwenden, dürfen Sie die Einheit
Gerät/ Rollwagen nur mit Vorsicht bewegen,
damit Verletzungen beim möglichen Umkippen
ausgeschlossen sind.
13. Trennen Sie das Gerät während eines Gewitters
oder bei längerer Nichtbenutzung vom
Stromnetz.
14. Beauftragen Sie Ihren zuständigen Kundendienst mit den
Reparaturarbeiten. Wartungsarbeiten oder Reparaturen sind
erforderlich, wenn das Netzkabel oder der Stecker beschädigt ist,
wenn Flüssigkeit oder andere Gegenstände in das Geräteinnere
gefallen sind, wenn das Gerät im Regen gestanden hat, sich nicht
erwartungsgemäß verhält oder wenn es gefallen ist.
15. WARNHINWEIS: Um eine Gefährdung durch Feuer oder Stromschlag
auszuschließen, das Gerät weder Regen noch Feuchtigkeit aussetzen.
Stellen Sie keine mit Wasser gefüllten Gegenstände, wie Vasen, auf
dem Gerät ab.
16. Der AC Netzstecker wird als Trennvorrichtung verwendet; die
Trennvorrichtung muss immer zugänglich und betriebsbereit
sein. Ziehen Sie zum sicheren Trennen des Geräts von der
Stromversorgung den Netzstecker vollständig aus der Steckdose.
17. ACHTUNG: Um eine Gefährdung durch Feuer oder Explosion
auszuschließen, die Batterien weder direkter Sonneneinstrahlung, Feuer
noch anderen Wärmequellen aussetzen.
ACHTUNG TRANSPORTWAGEN
(Symbol von RETAC zur Verfügung
gestellt)
ACHTUNG: UM DIE GEFAHR EINES ELEKTROSCHOCKS ZU VERMINDERN,
DIE ABDECKUNG (ODER RÜCKSEITE) NICHT ABNEHMEN. ES BEFINDEN
SICH KEINE DURCH DEN ANWENDER ZU WARTENDEN TEILE IM INNEREN
DES GERÄTS. BEAUFTRAGEN SIE IHREN ZUSTÄNDIGEN KUNDENDIENST
MIT DEN RAPARATURARBEITEN.
Das Sicherheitssymbol finden Sie an der Bodenplatte des Gerätes.
GEFÄHRLICHE ELEKTRISCHE SPANNUNG: Das Blitzsymbol
mit Pfeilspitze in einem gleichseitigen Dreieck weist den Be-
nutzer auf das Vorhandensein einer nicht isolierten gefährli-
chen elektrischen Spannung innerhalb des Systemgehäuses
hin, so dass die Gefahr von Stromschlägen besteht.
ACHTUNG: Das Ausrufezeichen in einem gleichzeitigen
Dreieck ist vorgesehen, den Benutzer auf wichtige
Operations- und Wartungsanweisungen (Instandhaltung) in
der begleitenden Anwendungsliteratur hinzuweisen.
ACHTUNG AUF TROPFEN: Schützen Sie das Produkt vor Spritzwasser
oder Tropfwasser, stellen Sie keine mit Wasser gefüllten Gegenstände (wie
Vasen) auf dem Gerät ab.
ACHTUNG AUF BELÜFTUNG: Für den bestimmungsgemäßen Gebrauch,
darf die normale Belüftung des Produkts nicht gehindert werden.
Achtung: Veränderungen oder Modifikationen an diesem Gerät, die nicht
ausdrücklich von der für die Einhaltung dieser Bestimmungen zuständigen
Stelle genehmigt werden, können bewirken, dass der Benutzer das Gerät
nicht mehr betreiben darf.
Der Netzstecker wird als Trennvorrichtung verwendet; die Trennvor-
richtung muss immer betriebsbereit sein. Wenn Sie das Gerät von der
Stromversorgung trennen müssen, ziehen Sie den Netzstecker ganz aus
der Steckdose.
ACHTUNG
GEFAHR EINES STROMSCHLAGES
NICHT ÖFFNEN
WARNHINWEIS: ZUR VERHÜTUNG VON FEUER UND ELEKTRISCHEM
SCHLAG DIESES GERÄT NICHT REGEN ODER SONSTIGER FEUCHTIG-
KEIT AUSSETZEN.
PRODOTTO LASER CLASSE 1
Das Symbol am Produkt oder in den Anleitungen bedeutet, dass Ihre
elektrischen und elektronischen Geräte nach Ablauf ihrer Lebenszeit
separat vom Hausmüll entsorgt werden müssen. Es stehen in der EU
extra Kollektionssysteme zur Abfallverwertung zur Verfügung.
Für weitere Informationen wenden Sie sich bitte an Ihre Behörde vor Ort
oder Ihren Händler, von dem Sie das Produkt erworben haben.
Im Falle von Störungen, die durch elektrostatische Entladung bedingt
sind, führen Sie bitte ein Reset durch.
Warnhinweise:
• Dieser CD-Player verwendet ein Laserlichtband. Nur der qualifizierte
Kundendienst sollte das Gerät öffnen oder reparieren, da die
Möglichkeit von Augenverletzungen besteht.
• Abweichungen von den hier angegebenen Verfahren oder Einstellungen
können zu einer gesundheitsgefährdenden Strahlenbelastung führen.
• Das Gerät soll in einem offenen Bereich verwendet werden.
ACHTUNG!
Unsichtbarer Laserstrahlungen, wenn externe Verriegelungen offen und
beschädigt sind. Vermeiden Sie Strahlungseinwirkung.

— G2 —
Enthalten
Was gibt‘s in der Schachtel.
Kabelgebundenes Mikrofon
Haupteinheit
Audio-/Videokabel
Handbuch Willkommens-Set
AC Netzadapter

— G3 —
Standort der Kontrollen (Vorderseite)
1. Griff
2. LICHT-Taste
3. ON/STANDBY (An/
Standby) Anzeige
4. ON/STANDBY Taste
5. Lichter
6. PLAY/PAUSE/PAIR
(Spielen/Pause/Paarung)
Taste
7. STOPP-Taste
8. SKIP
Taste
(Auslassen)
9. SKIP Taste
(Auslassen)
10. PROGRAM/REPEAT
(Programm/
Wiederholung) Taste
11. FUNCTION (Funktion)
-Taste
12. Anzeige
13. Lautsprecher
14. AUX-EINGANG Jack
15. MIK 2 Jack
16. MIK 1 Jack
17. CD-Tür
18. MASTER VOLUME
(Haupt-Lautstärke)
Regelung
19. Echoregelung
20. Automatische
Stimmregelung
21. BALANCE Control
(Ausgleichsregelung)
22. MIK Lautstärkenregelung
23. CDG-Anzeige
24. PLAY/PAUSE Anzeige
25. PROGRAMM-Anzeige
26. REPEAT (Wiederholen)
Anzeige
u
v
w
x
y
U
V
W
X
ao
an
al
ak
at
am
ap
aq
ar
as
bt
bk
bl
bm
bp
bn
bo
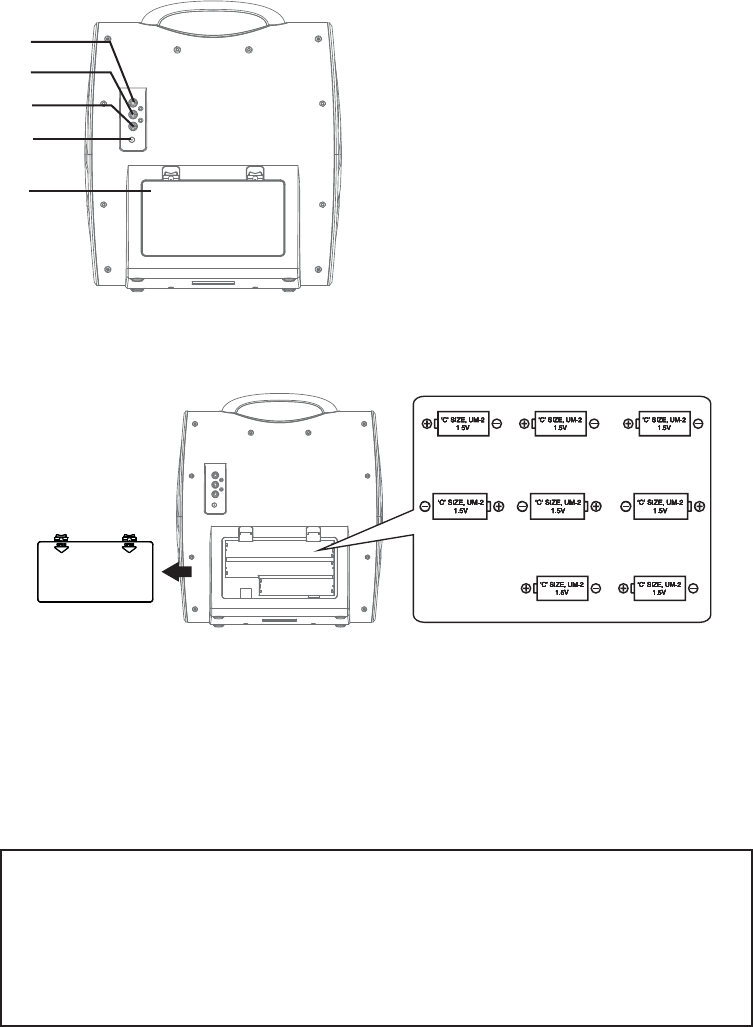
— G4 —
Installation der Batterien
DC-Betrieb
1. Schieben Sie die Tür in die angezeigte Richtung, um das Batteriefach zu öffnen. Setzen
Sie acht (8) „C“-Größen Alkalische Batterien (nicht enthalten) ein, so wie es abgebildet
ist.
2. Schließen Sie fest die Batteriefach-Tür, bevor Sie das Gerät in Betrieb nehmen.
WARNUNGEN:
• Wechseln Sie alle Batterien gleichzeitig aus.
• Verwenden Sie nicht gleichzeitig alte und neue Batterien.
Position der Kontrollen (Hinterseite)
Anschluss
27. VIDEO-AUSGANG Jack
28. AUDIO-AUSGANG Jack (R)
29. AUDIO-AUSGANG Jack (L)
30. DC-EINGANG Jack
31. Batterie-Tür
Batterie Sicherheitsanweisungen
Bitte folgen Sie diesen Anweisungen, wenn Sie in diesem Gerät Batterien
verwenden:
1. Bitte nur die Batterien des empfohlenen Typs und der angegebenen Größe
verwenden.
2. Achten Sie beim Einsetzen der neuen Batterie auf richtige Polung, so wie es
im Batteriefach angegeben ist. Batterien, die umgekehrt eingesetzt sind,
können das Gerät beschädigen.
3. Legen Sie keine Batterien unterschiedlichen Typs (z. B. Alkalisch und
Zink-Kohle) oder alte Batterien mit neuen Batterien ein.
4. Nehmen Sie den Akku heraus, wenn das Gerät über einen längeren Zeitraum
nicht benutzt wird, um jegliche Schäden oder Verletzungen wegen mögli
chem Auslaufen der Batterie zu verhindern.
5. Versuchen Sie nicht, Batterien aufzuladen, die nicht wieder aufgeladen werden
können; diese könnten überheizen und zerbersten. (Beachten Sie die Hinweise
des Batterieherstellers.)
6. Wiederaufladbare Batterien sollen aus dem Produkt entfernt werden, bevor Sie
diese wieder aufladen.
7. Wiederaufladbare Batterien sollen nur unter Aufsicht von Erwachsenen
aufgeladen werden.
8. Erschöpfte Batterien sollen aus dem Produkt entfernt werden.
9. Batterien dürfen nicht großer Hitze wie Sonnenschein, Feuer oder ähnlichem
ausgesetzt werden.
bq
br
bs
ct
ck
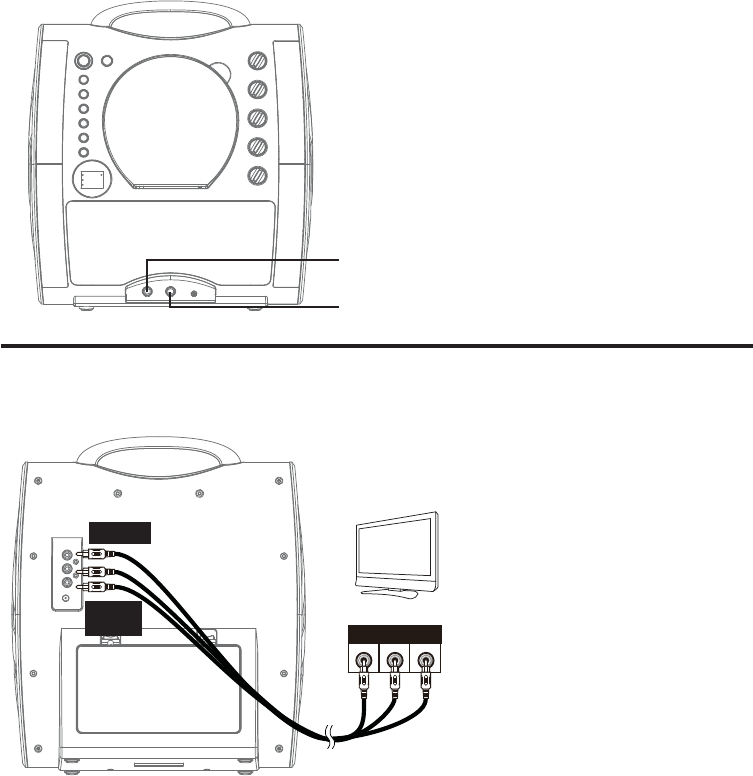
— G5 —
Anschluss
Mikrofon(e) anschließen
Mikrofone:
Stecken Sie ein Mikrofon in den Mic Jack 1
ein und auch in Mic Jack 2 (auf Wunsch).
Anmerkung: Lassen Sie das Mikrofon
nicht fallen, und klopfen Sie nicht mit
Gewalt auf das Mikrofon, da dadurch das
Mikrofon oder die Lautsprecher beschädigt
werden können. Verquirlen Sie nicht das
Kabel des Mikrofons, da dadurch die
umhüllten Drähte beschädigt werden
können.
Die Einheit an einen Fernseher anschließen
VIDEO
EINGANG AUDIOEINGANG
RL
RCA-Kabel
VIDEO-AUSGANG
(GELB)
AUDIO-
AUSGANG
(Weiß-L rot- R)
RÜCKSEITE DES FERNSEHERS
Um Video, Texte und Audio auf
ihrem Fernseher einzuschalten,
folgen Sie diesen Schritten:
Schließen Sie das RCA Videokabel
(gelb) an den VIDEO OUT Jack an,
und die Audiokabel (weiß und rot)
an die AUDIO OUT Jacks, die sich
auf der Hinterseite der Singing
Machine befinden.
Schließen Sie das andere Ende
des RCA Videokabels (gelb) an
den VIDEO IN Jack an, und die
Audiokabel (weiß und rot) an die
AUDIO IN Jacks Ihres Fernsehers.
Anmerkungen:
• Diese Einheit kann mit oder ohne Fernseher benutzt werden, jedoch ist es hoch
empfohlen, einen Fernseher zu benutzen, um alle Funktionen verwenden zu können.
• Beziehen Sie sich ebenfalls auf die Gebrauchsanweisung des Fernsehers.
• Um die Texte auf dem Bildschirm zu sehen, müssen Sie eine CD+G Platte verwenden.
u
v
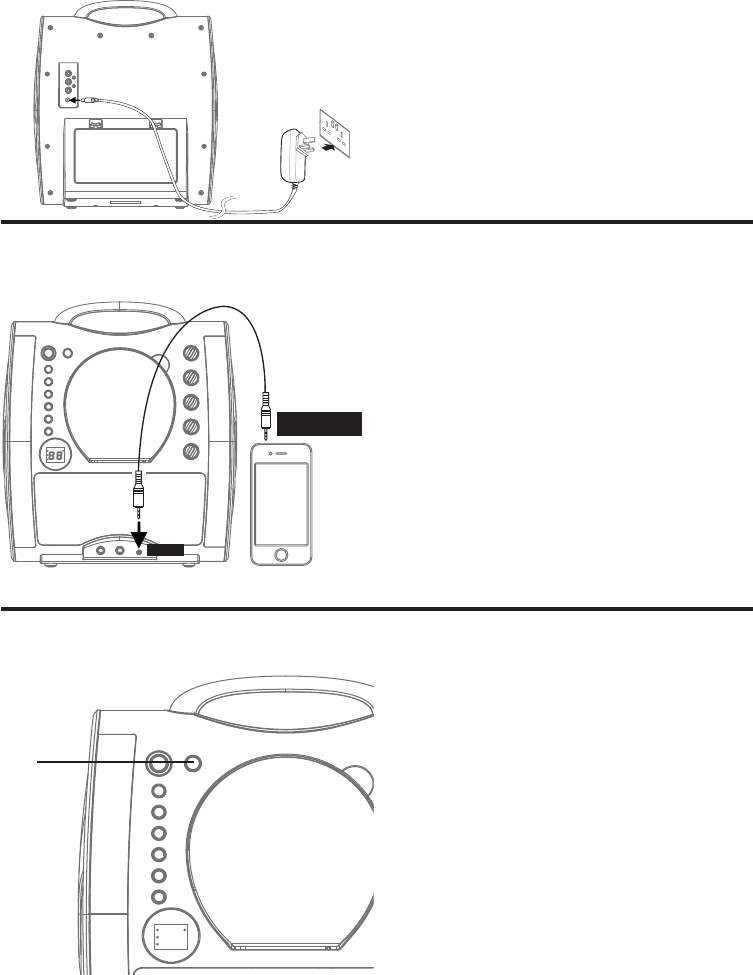
— G6 —
Anschluss
Anschließen des Netzstroms
Anschließen des AUX In Jacks
Verbinden Sie das AC-Netzkabel mit
einer AC Standard-Steckdose mit
100-240V AC, 50-60Hz.
Anmerkung:
Nachdem Sie Anschlüsse
vorgenommen haben, schließen Sie
das AC Stromkabel an.
Schließen Sie ein externes Gerät
an, indem Sie ein passendes Kabel
verwenden (3.5mm Audiokabel, nicht
enthalten), wie angezeigt.
Anmerkung:
Siehe Seite G13, um die AUX In
Funktion auszuwählen und zu
verwenden.
IHR SMARTPHONE,
DIGITAL PLAYER
ODER MP3 PLAYER
AUDIO-AUSGANG/
KOPFHÖRER-JACK
AUX IN
Glühende Stimmung-Beleuchtung
1 Drücken Sie die LIGHTS (Licht)-Taste,
um den Lichteffekt zu aktivieren,
drücken Sie nochmals um ihn
auszuschalten.
u

— G7 —
Betrieb
Eine CDG spielen
1 Schließen Sie die Einheit wie vorher
beschrieben an; falls Sie eine CD+G
benutzen, ist es empfohlen, einen
Fernseher anzuschließen. Drücken Sie
die ON/STANDBY-Taste, um die Einheit
einzuschalten.
2 Öffnen Sie die CD-Tür und setzen Sie
eine CD oder eine CD+G ein, indem Sie
sanft auf die zentrale Spindel drücken.
Schließen Sie dann sanft die CD-Tür.
Anmerkung:
• Was ist eine CD+G?
Eine CD+G (CD+Graphics) ist das
standard-Format für die meisten
Karaoke-Platten, die auch die Texte auf
dem Bildschirm anzeigen.
• Versuchen Sie auf keinen Fall, irgendetwas
anderes als eine CD in das Fach
hineinzulegen, da fremde Gegenstände die
Einheit beschädigen können.
• Fall sich keine Platte innerhalb des
Geräts befindet, erscheint “no” auf dem
Bildschirm.
• Falls das Gerät an einem Fernseher
und/oder einer anderen Audio-Quelle
angeschlossen ist, regeln Sie die
Lautstärke der externen Einheit mit
dessen eigenen Lautstärkenregelung.
3
Drücken Sie wiederholt die FUNCTION
(Funktion) Taste, um den CDG-Modus
auszuwählen; “--” erscheint während der
Suche der Platte und dann erscheint die
Gesamtzahl der Titel. Falls eine CD+G
Platte geladen ist, leuchtet die CDG
Anzeige auf.
4 Drücken Sie die PLAY/PAUSE/
PAIR Taste, um die Musik zu starten;
falls Sie eine CD+G Datei anhören,
erscheinen die Bilder und die Texte auf
dem Fernsehbildschirm (falls dieser
angeschlossen ist) und die PLAY/PAUSE-
Anzeige leuchtet auf.
v
u
w
x

— G8 —
Betrieb
Eine CD spielen (Fortsetzung)
5 Stellen Sie die Lautstärke auf ein
angenehmes Niveau anhand der MASTER
VOLUME Regelung.
6
Schließen Sie das/die Mikrofon(e) an und
schalten Sie den ON/OFF Schalter des
Mikrofons auf ON.
7 Regeln Sie den MIC VOLUME wie Sie es
wünschen. Wenn Sie diese Einstellung
lauter stellen, wird die Lautstärke beider
Mikrofone erhöht.
8 Drehen Sie die ECHO Regelung, um Ihrer
Stimme einen Echo-Effekt hinzuzufügen.
Drehen Sie in Richtung MAX, um den
Echo-Effekt stärker zu stellen.
9
AUTO VOICE CONTROL kann aktiviert
werden, indem Sie den AVC Schaltknopf
drehen. Je höher dieses eingestellt ist,
umso mehr werden die Stimmen der
multiplexen Aufnahme gedämpft, wenn
der Sänger anfängt, im Mikrofon zu
singen. Wenn der Sänger aufhört zu
singen, werden die Stimmenaufnahmen
der multiplexen Aufnahme wieder normal
hörbar.
10 Drehen Sie die BALANCE Reglung im
Uhrzeigersinn, um die Musik und die
Stimmaufnahmen einer Multiplexen
Aufnahme zu hören, oder gegen den
Uhrzeigersinn, um nur die Musik einer
Multiplex-Aufnahme zu hören.
Anmerkung: Um die BALANCE-Regelung zu
verwenden, müssen Sie eine CD+G benutzen,
ansonsten funktioniert diese nur wie eine
Standard Balance-Regelung.
U
y
V
at
X
W

— G9 —
Betrieb
Eine CD spielen (Fortsetzung)
11 SKIP (Auslassen): Gehen Sie ein
Lied vorwärts oder rückwärts, indem
Sie die Skip /Skip Tasten
drücken.
12 REPEAT (Wiederholen): Während
die Musik spielt, drücken Sie einmal
die PROGRAM/REPEAT-Taste, um
das ausgewählte Lied wiederholt zu
spielen; die REPEAT-Anzeige blinkt
dabei auf. Drücken Sie ein zweites
Mal die PROGRAM/REPEAT-Taste,
um die ganze CD wiederholt zu
spielen; die REPEAT-Anzeige bleibt
dabei an. Drücken Sie nochmals die
Taste, um die Wiederholungsfunktion
zu stoppen, die REPEAT Anzeige
schaltet aus.
13 PROGRAMM: Sie können bis zu
20 Titel von beliebigen Platten
programmieren, damit diese in einer
bestimmten Reihenfolge spielen.
Im Stopp-Modus, drücken Sie die
PROGRAM/REPEATTaste; die
PROGRAM-Anzeige blinkt dabei
und “00” erscheint. Wählen Sie den
ersten Titel aus, indem Sie die Skip
/Skip Tasten verwenden.
Drücken Sie nochmal die PROGRAM/
REPEATTaste, um den Eintrag
zu bestätigen. Nachdem Sie die
gewünschten Titel ausgewählt haben,
erscheint auf der Anzeige 01, 02,
usw. und zeigt dabei an, dass die
ausgewählten Titel programmiert
wurden und die PROGRAM-Anzeige
leuchtet rot auf. Wiederholen Sie
diese Schritte, um bis zu 20 Titel zu
speichern. Wenn Sie soweit sind,
drücken Sie die PLAY/PAUSE/
PAIR-Taste, damit die Musik zu
spielen beginnt.
ak
al
am

— G10 —
Betrieb
Eine CD spielen (Fortsetzung)
Anmerkung:
• Drücken Sie die STOP-Taste ZWEIMAL,
um das Programm zu stoppen und zu
löschen.
14 PAUSE: Während des Spielens,
falls Sie die Platte momentan auf
Pause schalten möchten, drücken
Sie die PLAY/PAUSE/PAIR-Taste;
die PLAY/PAUSE Anzeige blinkt
dabei. Drücken Sie nochmals, um die
Wiedergabe fortzusetzen.
15 Drücken Sie die STOP-Taste, um die
Wiedergabe zu stoppen.
16 Drücken Sie die ON/STANDBY
Taste, um die Einheit auszuschalten.
ap
an
ao
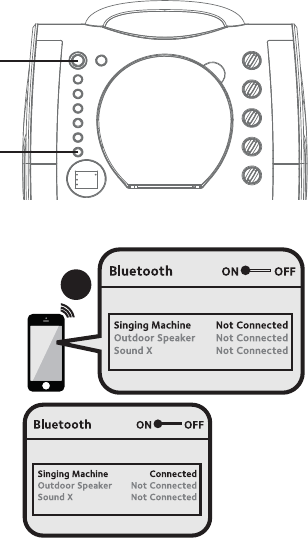
— G11 —
Betrieb
Verwendung eines Bluetooth-Gerätes
1 Schließen Sie die Einheit wie vorher
beschrieben an. Drücken Sie die ON/
STANDBY Taste, um die Einheit
einzuschalten.
2 Drücken Sie mehrmals die FUNCTION-
Taste, um den Bluetooth-Modus
auszuwählen; “bt” blinkt auf der Anzeige
während die Einheit automatisch ein
vorher gepaartes Gerät sucht und
paart (falls dieses schon vorher gepaart
wurde). Falls keine vorher gepaarten
Geräte erkannt werden, schließen Sie
dieses an, wie es im nächsten Schritt
erklärt wird.
Anmerkung: Sie können ebenfalls die PLAY/
PAUSE/PAIR Taste gedrückt halten, um ein
gepaartes Gerät zu trennen und ein neues
Gerät zu paaren.
3 Schalten Sie die Bluetooth-Funktion Ihres
Gerätes in den Parametern ein, um ein
erkennbares Gerät mit Bluetooth-Signal
zu suchen. Wählen Sie “Singing Machine”
in den Ergebnissen des Gerätes im
Bluetooth Menü aus.
Anmerkung: Schauen Sie ebenfalls in die
Gebrauchsanweisung Ihres Bluetooth-Gerätes
für detaillierte Anweisungen.
4 „bt“ leuchtet auf der Anzeige auf und Sie
hören einen Ton, der bedeutet, dass die
Paarung erfolgreich ist.
Anmerkungen:
• Falls Ihr Bluetooth während des Paaren ein
Passwort anfordert, geben Sie “0000”ein,
um die Verbindung herzustellen.
• Auf manchen Bluetooth-Geräten, wenn
das Paaren zu Ende ist, wählen Sie für Ihr
Bluetooth-Gerät “Use as Audio Device” (als
Audiogerät verwenden) oder Ähnliches aus.
• Falls nach erfolgreichem Paaren die
Verbindung abbricht, prüfen Sie, dass die
Entfernung zwischen dem Lautsprecher
und dem Bluetooth-fähigen Gerät nicht
länger als 30 Füße/10 Meter ist.
•”Bluetooth” blinkt auf dem Fernsehbildschirm
und hört auf zu blinken, wenn der Anschluss
erfolgreich ist.
3
Geräte
Geräte
u
v

— G12 —
Betrieb
Verwendung eines Bluetooth-Gerätes (Fortsetzung)
5 Um Ihr Bluetooth-Gerät von dieser
Einheit aus zu steuern, drücken Sie die
PLAY/PAUSE/PAIR-Taste, damit die
Musik beginnt. Drücken Sie die PLAY/
PAUSE/PAIR-Taste während des
Spielens, um das Lied zu pausieren.
6
Stellen Sie sowohl die Lautstärke auf ein
angenehmes Niveau anhand des MASTER
VOLUME Reglers dieser Einheit als auch
die Lautstärke Ihres Bluetooth-Gerätes.
7
Schließen Sie das/die Mikrofon(e) an und
schalten Sie den ON/OFF Schalter des
Mikrofons auf ON.
8 Regeln Sie den MIC VOLUME wie Sie es
wünschen. Wenn Sie diese Einstellung
lauter stellen, wird die Lautstärke beider
Mikrofone erhöht.
9 Drehen Sie die ECHO-Regelung, um Ihrer
Stimme einen Echo-Effekt hinzuzufügen.
Drehen Sie in Richtung MAX, um den
Echo-Effekt stärker zu stellen.
10 Stellen Sie die Balance zwischen den
Lautsprechern ein, indem Sie den
BALANCE-Regler verwenden.
11 SKIP (Auslassen): Gehen Sie ein
Lied vorwärts oder rückwärts, indem
Sie die Skip /Skip Tasten
drücken.
12 Drücken Sie die ON/STANDBY
Taste, um die Einheit auszuschalten.
V
yU
at
X
al
ak
W

— G13 —
y
Betrieb
Verwendung des AUX IN Jacks
1 Schließen Sie die Einheit wie vorher
beschrieben an. Drücken Sie die ON/
STANDBY-Taste, um die Einheit
einzuschalten.
2
Drücken Sie wiederholt die FUNCTION-
Taste, um den AUX IN-Modus
auszuwählen; “AU” erscheint dabei auf
dem Display.
3
Schließen Sie die externe Einheit an
den AUX IN Jack an der Vorderseite
dieser Einheit an. Eine externe Einheit
anzuschließen erlaubt es, den Ton durch
Ihre Singing Machine zu spielen.
Anmerkungen:
• Es wird dringend empfohlen, die Lautstärke
der Zusatzeinrichtung auf 1/3 oder
niedriger zu stellen, um Verzerrungen zu
verhindern.
• Dateien/Titel zu überspringen ist mit dieser
Einheit nicht möglich, wenn Sie ein externes
Gerät verwenden.
4 Stellen Sie die Lautstärke ein, indem Sie
den MASTER VOLUME-Regler dieser
Einheit oder die Lautstärkenregelung
Ihrer externen Einheit verwenden.
5
Schließen Sie das/die Mikrofon(e) an und
schalten Sie den ON/OFF Schalter des
Mikrofons auf ON.
x
u
v
w

— G14 —
Betrieb
Verwendung des AUX IN Jacks (Fortsetzung)
6 Regeln Sie den MIC VOLUME-Regler
(Mikrofon-Lautstärke), wie Sie es
wünschen. Wenn Sie diese Einstellung
lauter stellen, wird die Lautstärke beider
Mikrofone erhöht.
7 Drehen Sie die ECHO-Regelung, um Ihrer
Stimme einen Echo-Effekt hinzuzufügen.
Drehen Sie in Richtung MAX, um den
Echo-Effekt stärker zu stellen.
8 Stellen Sie die Balance zwischen den
Lautsprechern ein, indem Sie den
BALANCE Regler verwenden.
9 Drücken Sie die ON/STANDBY-Taste,
um die Einheit auszuschalten.
W
V
X
U
Stromsparmodus
(Auto Power System-APS)
In den folgenden Situationen geht das Gerät nach 15 Minuten automatisch auf
Standby-Modus:
1. Es befindet sich keine CD im Fach oder das Spielen der CD wurde gestoppt;
2. Das Spielen des externen Musik Players wurde gestoppt, aber das Audiokabel steckt
immer noch im AUX IN Jack.
3. Die Bluetooth-Musik spielt nicht mehr.
Die Einheit kann wiedereingestellt werden indem man einmal auf die ON/STANDBY Taste
drückt.
Das APS dient zum Strom sparen.
— G15 —
Fehlersuchanleitung
Sollte diese Einheit ein Problem aufweisen, überprüfen Sie folgende Elemente, bevor Sie
Dienstleistungen suchen.
Schaltet nicht ein
• Das Gerät ist nicht eingeschaltet; drücken Sie die Power ON/STANBY -Taste, um es
einzuschalten.
• Vergewissern Sie sich, dass das Stromkabel sicher an der Hinterseite der Einheit angeschlossen ist.
• Schließen Sie die Einheit an eine andere Steckdose an.
Kein Ton – Generell
• Die Master-Lautstärke steht auf Minimal; erhöhen Sie die Lautstärke.
• Die korrekte Funktion wurde nicht ausgewählt; wählen Sie anhand der FUNCTION Taste aus.
• Falls Sie ein externes Gerät verwenden, stellen Sie die Lautstärke höher.
Kein Ton – wenn an einem Fernseher angeschlossen
• Der Ton des Fernsehers ist stummgeschaltet oder zu leise.
• Die richtige Quelle (gewöhnlich AV) wurde im Fernsehmenü nicht ausgewählt.
Die Texte erscheinen nicht auf dem Fernsehbildschirm
• Falls das Gerät an einem Fernseher angeschlossen ist, ist der Video-Stecker nicht richtig
eingesteckt; siehe Seite G5.
• Falls das Gerät an einem Fernseher angeschlossen ist, wählen Sie die richtige Quelle auf dem
Fernseher aus (normalerweise AV).
• Die Datei/der Titel, der gespielt wird ist keine Titelaufnahme mit Texten. Dies sind die einzigen
Dateien, die es Ihnen erlauben, die Texte auf einem Fernsehbildschirm anzusehen.
• Nichts erscheint auf dem Fernseh-Bildschirm, wenn Sie AUX In oder Bluetooth verwenden.
Kein Ton kommt aus dem Mikrofon
• Vergewissern Sie sich, dass das Mikrofon fest am MIC 1 oder MIC 2 Jack angeschlossen ist.
• Vergewissern Sie sich, dass der ON/OFF Schalter des Mikrofons auf der ON-Stellung ist.
• Vergewissern Sie sich, dass die MIC VOLUME Parameter (Mikrofon-Lautstärke) nicht zu leise
gestellt sind.
• Das MASTER VOLUME steht auf Minimal; erhöhen Sie die Lautstärke.
• Regeln Sie die ECHO-Reglung über den Mittelpunkt auf der Singing Machine.
Das Bluetooth-Gerät kann nicht gepaart werden oder an der Einheit angeschlossen werden
• Sie haben nicht die Bluetooth-Funktion auf Ihrem Gerät aktiviert; siehe Seite G11 oder beziehen
Sie sich auf die Benutzeranwendung Ihres Bluetooth Gerätes.
• Das System ist nicht im Paarungsmodus; drücken Sie die PAIR Taste, um erneut zu paaren.
Die Musik ist auf der Einheit nicht verfügbar, nachdem das Bluetooth gut angeschlossen
wurde.
• Vergewissern Sie sich, dass Ihr Bluetooth-Gerät das A2DP Bluetooth-Profil unterstützt.
• Die Lautstärke auf dem externen Bluetooth-Gerät wurde leise oder stummgestellt; steigern Sie die
Lautstärke, wie Sie es wünschen.

— G16 —
Spezifikationen
AUDIO
AUSGANGSSTROM (MAXIMAL) .................................................................................2 Watts (RMS)
AUSGANGSIMPEDANZ ................................................................................................................8 Ohms
CD-PLAYER-PROFIL
FREQUENZGANG .........................................................................................................100 Hz - 20 kHz
SIGNAL-RAUSCH-VERHÄLTNIS ................................................................................................... 50 dB
ANZAHL DER PROGRAMME ..................20 Programmierungsschritte mit wahlfreiem Zugriff
BLUETOOTH
Bluetooth-Version ..............................................................................................................................V4.2
Arbeitsabstand .......................................bis zu 30 Füßen/10 Metern gemessen im freien Raum
AUX IN PROFIL ................................................................................ 3.5 mm Stereo Kopfhörer-Jack
MIKROFON .........................-74 dB 600 Ohm Impedanz mit 6.3 mm dynamischem Mikrofon
LEISTUNGSTEIL........DC 12V 1A (8 x “C” Batterien) (Batterien nicht enthalten)
MAßE (HxBxT) ................................................ 13.3 x 12.0 x 6.1 Zoll / 33.8 x 30.5 x 15.5 cm
GEWICHT .................................................................................................................4.0 Pfund / 1.82 Kg
Alle Angaben sind typische Werte. Einzelgeräte können variieren und unterliegen der kon-
tinuierlichen Verbesserung, ohne Vorankündigung und/oder ohne Verbindlichkeit.
Die Wortmarke Bluetooth® und die Logos sind eingetragene Marken und Logos von Blue-
tooth SIG, Inc. und werden von The Singing Machine Company, Inc. unter Lizenz verwendet.
Andere Marken und Produktnamen sind Eigentum der jeweiligen Rechteinhaber.
— I1 —
Avvertenze
Importanti istruzioni di sicurezza
1. Leggere queste Istruzioni.
2. Conservare queste Istruzioni.
3. Osservare tutte le Avvertenze.
4. Seguire queste Istruzioni.
5. Non usare questo impianto vicino all’acqua.
6. Pulire solo con un panno asciutto.
7. Non bloccare nessuna delle aperture di ventilazione. Installare
secondo le istruzioni del Produttore.
8. Non installare vicino a fonti di calore come radiatori, regolatori
di calore, stufe o altri apparecchi (inclusi gli amplificatori) che
producono calore.
9. Non annullare l'obiettivo di sicurezza della spina polarizzata o con
messa a terra. Una spina polarizzata ha due lame, una più grande
dell'altra. Una spina con messa a terra ha due lame e un terzo polo
di terra. La lama larga o il terzo polo sono previste per la sicurezza
dell’utente. Quando la spina fornita non entra nella presa, consultare
un elettricista per la sostituzione della presa obsoleta.
10. Proteggere il cavo di alimentazione dall’essere calpestato o
schiacciato, in particolare in prossimità a delle spine, prese e al punto
in cui esce dall'apparecchio.
11. Utilizzare soltanto collegamenti/accessori specificati dal produttore.
12. Usare solo con un carrello, supporto, cavalletto,
sostegno o tavola specificati dal produttore o
venduti con l'apparecchio. Quando si usa un
carrello, prestare attenzione quando si sposta
la combinazione carrello/impianto per evitare
cadute dell’apparecchio dall’alto.
13. Scollegare l'impianto durante i temporali o se
non viene utilizzato per lunghi periodi di tempo.
14. Per assistenza rivolgersi sempre a personale
qualificato. È necessario rivolgersi all’assistenza se l’impianto
è stato danneggiato in qualsiasi modo, come per esempio se il
cavo di alimentazione o la spina sono stati danneggiati, in caso di
rovesciamento di liquidi sull’impianto o di caduta di oggetti all'interno
dello stesso, se l’impianto è stato esposto a pioggia o umidità, se non
funziona normalmente o è stato fatto cadere.
15. AVVISO: Per ridurre il rischio di incendi o scosse elettriche, non
esporre questo apparecchio a pioggia o umidità. Non posizionare
oggetti contenenti acqua, come per esempio un vado, su questa
apparecchiatura.
16. La spina di rete CA è usata come dispositivo di scollegamento
e dovrebbe essere sempre facilmente accessibile e operativa
durante l’uso previsto. Per scollegare completamente l'apparecchio
dall'alimentazione, è necessario rimuovere completamente la spina
dalla presa di corrente CA.
17. ATTENZIONE: Per ridurre il rischio di incendio o esplosione, non esporre
le batterie ad un calore eccessivo come la luce solare, fuoco o altre
fonti di calore.
Avviso i arrello portatile
(Simbolo fornito a RETAC)
ATTENZIONE: PER RIDURRE IL RISCHIO DI SCOSSE ELETTRICHE, NON RIMUOVERE
IL COPERCHIO (O LA PARTE POSTERIORE).. NON VI SONO PEZZI RIPARABILI
DALL’UTENTE. PER LA MANUTENZIONE RIVOLGERSI A PERSONALE QUALIFICATO.
La marcatura Attenzione si trova sul pannello inferiore.
TENSIONE PERICOLOSA: La spia illuminata con il simbolo della freccia
all'interno di un triangolo equilatero avverte l'utente della presenza di
tensione pericolosa non isolata all'interno del contenitore del prodotto,
che può essere di intensità sufficiente per costituire un rischio di scossa
elettrica per le persone.
ATTENZIONE: Il punto esclamativo all'interno di un triangolo
equilatero avverte l'utente della presenza di importanti
istruzioni operative e di manutenzione (assistenza) nella
documentazione che accompagna il prodotto.
AVVERTENZA RELATIVA AL GOCCIOLAMENTO Questo prodotto non
deve essere esposto a gocciolamenti o spruzzi e nessun oggetto con-
tenente liquidi, come per esempio un vaso, non deve essere posizionato sul
prodotto.
AVVERTENZA RELATIVA ALLA VENTILAZIONE: La normale ventilazione
del prodotto non deve essere impedita per l'uso previsto.
Avvertenza: Cambiamenti o modifiche a questa unità non espressamente
approvati dalla parte responsabile della conformità potrebbero invalidare il
diritto dell'utente ad utilizzare l’impianto.
La spina principale è usata come dispositivo di scollegamento e dovrebbe
essere sempre facilmente accessibile durante l’uso previsto. Per scollegare
completamente l'apparecchio dalla rete elettrica, la spina principale deve
essere scollegata completamente dalla presa principale.
ATTENZIONE
RISCHIO DI SCOSSE ELETTRICHE
NON APRIRE
AVVISO: PER RIDURRE IL RISCHIO DI SCOSSE ELETTRICHE, NON
ESPORRE L’UNITÀ A PIOGGIA O UMIDITÀ.
PRODOTTO LASER CLASSE 1
Questo simbolo sul prodotto o nelle istruzioni indica che l’impianto
elettrico ed elettronico deve essere smaltito, al termine della sua vita
d’uso, separatamente dai rifiuti domestici. Vi sono sistemi di raccolta
differenziata per il riciclaggio nell'UE.
Per ulteriori informazioni, si prega di contattare la propria autorità locale
o il rivenditore presso il quale è stato acquistato il prodotto.
Sotto l'influenza di fenomeni elettrostatici, il prodotto potrebbe non
funzionare correttamente e potrebbe essere necessario resettarlo.
Avvertenze:
• Il lettore CD impiega un fascio di luce laser. Soltanto un tecnico
qualificato dovrebbe rimuovere il coperchio o tentare di riparare il
dispositivo, a causa di possibili lesioni agli occhi.
• L'uso di controlli, regolazioni o procedure diverse da quelle qui
specificate potrebbe provocare l'esposizione a radiazioni pericolose.
• L'impianto deve essere utilizzato in uno spazio aperto.
ATTENZIONE!
Vi sono delle radiazioni laser invisibili quando è aperta e i dispositivi di
blocco sono superati. Evitare l'esposizione al fascio di luce laser.
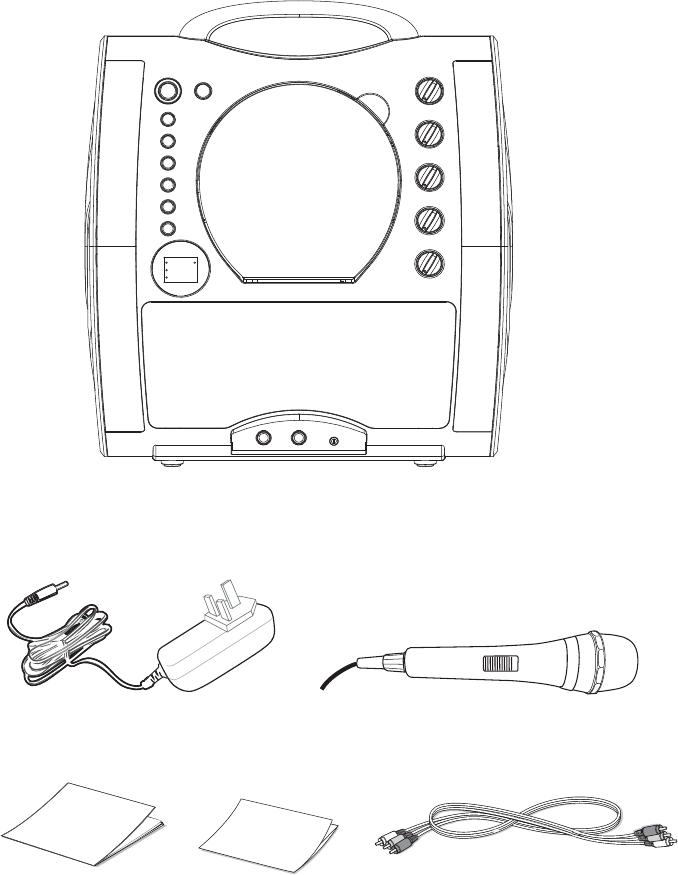
— I2 —
Microfono cablato
Unità principale
Cavi audio/video
Manuale Kit di benvenuto
Adattatore per corrente
alternata (CA)
La confezione include
Cosa include la confezione?
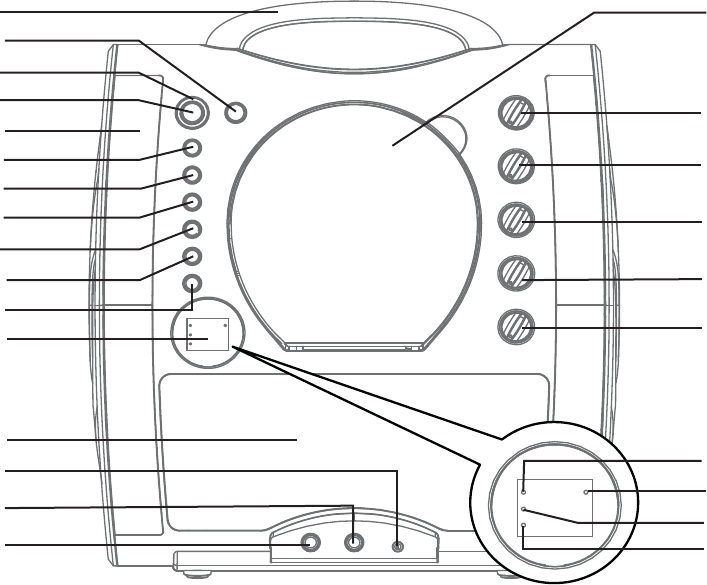
— I3 —
u
v
w
x
y
U
V
W
X
ao
an
al
ak
at
am
ap
aq
ar
as
bt
bk
bl
bm
bp
bn
bo
Posizione dei comandi (Anteriore)
1. Maniglia
2. Tasto LUCI
3. Led ON/STANDBY
4. Tasto ON/STANDBY
5. Luci
6. Tasto PLAY/PAUSE/
COPPIA
7. Pulsante STOP
8. Tasto
SKIP
9. Tasto SKIP
10. Tasto PROGRAMMA/
RIPETI
11. Tasto FUNZIONE
12. Display
13. Altoparlante
14. Jack AUX IN
15. Jack MIC 2
16. Jack MIC 1
17. Sportello CD
18. Pulsante VOLUME
MASTER
19. Tasto ECHO
20. Controllo vocale
automatico (AVC)
21. Pulsante
BILANCIAMENTO
22. Tasto VOLUME MIC
23. Led CDG
24. Led PLAY/PAUSE
25. Led PROGRAMMA
26. Led RIPETI
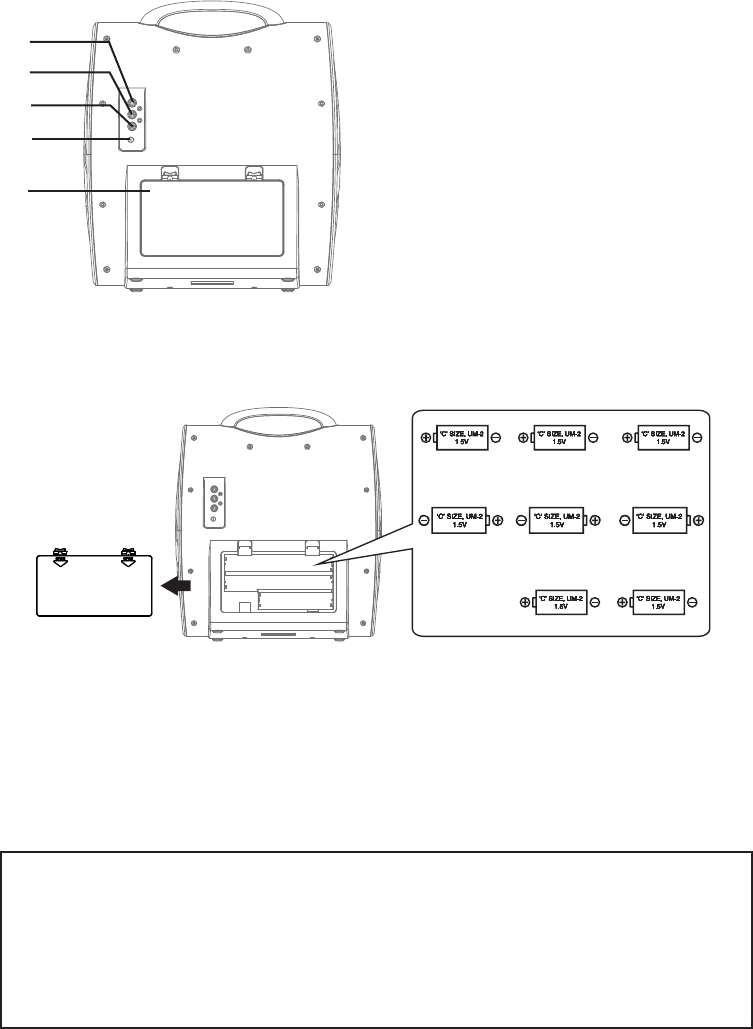
— I4 —
bq
br
bs
ct
ck
Posizione dei comandi (Posteriore)
Installazione delle batterie
Collegamento
27. Jack VIDEO OUT
28. Jack AUDIO OUT (D)
29. Jack AUDIO OUT (S)
30. Jack DC IN
31. Sportello batteria
FUNZIONAMENTO CC
1. Far scorrere la porta della batteria nella direzione delle frecce per rivelare il vano batterie.
Inserire otto (8) batterie "C" alcaline (non fornite) come indicato nello schema.
2. Riposizionare il coperchio saldamente prima di utilizzare il telecomando.
ATTENZIONE:
• Sostituire tutte le batterie allo stesso tempo.
• Non mischiare batterie vecchie con batterie nuove.
Avvertenze riguardanti la batteria
Seguire le seguenti precauzioni riguardanti l’utilizzo delle batterie in questo
dispositivo.
1. Utilizzare solo batterie di dimensioni e tipo specificati.
2. Assicurarsi di seguire la polarità corretta quando si installano le batterie
come indicato nel vano batterie. Una batteria invertita può causare danni
al dispositivo.
3. Non mescolare diversi tipi di batterie (per esempio alcaline e in zinco carbo-
nio) o le batterie vecchie con quelle nuove.
4. Se il dispositivo non deve essere utilizzato per un lungo periodo di tempo,
rimuovere le batterie per evitare danni o lesioni da eventuali perdite delle
batterie.
5. Non tentare di ricaricare le batterie non destinata ad essere ricaricata;
potrebbero surriscaldarsi e scoppiare. (Seguire le indicazioni del produttore
della batteria.)
6. Le batterie ricaricabili devono essere rimosse dal prodotto prima di essere
caricate.
7. Le batterie ricaricabili devono essere caricate soltanto sotto la supervisione
di un adulto.
8. Le batterie consumate devono essere rimosse dal prodotto.
9. Le batterie non devono essere esposte a calore eccessivo, come sole, fuoco
o simili.
.
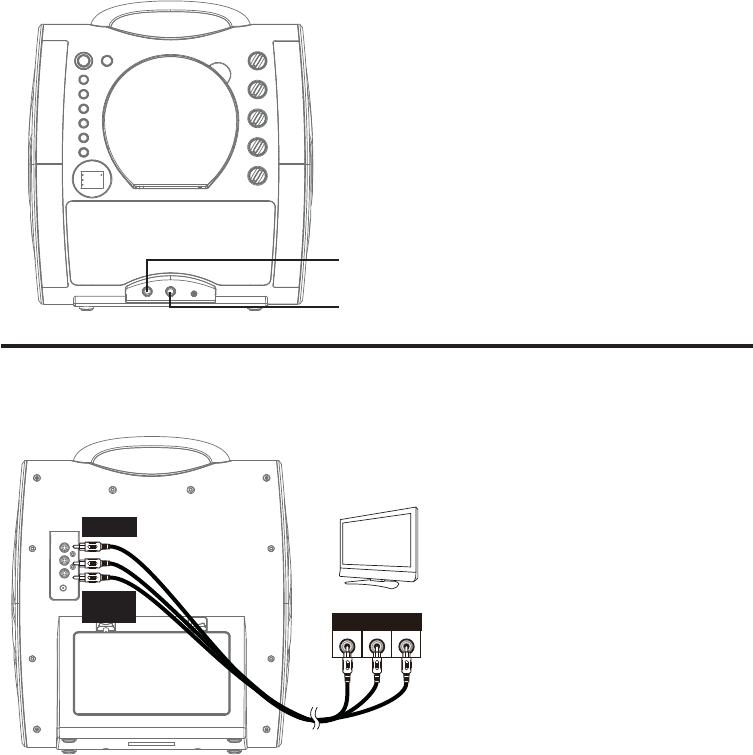
— I5 —
INGRE O
VIDEO
INGRE O AUDIO
RL
Cavi RCA
USCITA VIDEO
(GIALLO)
USCITA AUDIO
(Bianco-s
rosso-D)
VISTA POSTERIORE DELLA TV
u
v
Collegamento
Collegamento dei microfoni
Collegare l’Unità ad una TV
Per riprodurre video, testi e
audio sul televisore, svolgere le
seguenti operazioni:
Collegare il cavo video RCA
(giallo) al jack VIDEO OUT e i cavi
audio (bianco e rosso) ai jack
AUDIO OUT posti sul retro della
Singing Machine.
Collegare l'estremità opposta del
cavo video RCA (Giallo) al jack
VIDEO IN e i cavi audio (Bianco e
Rosso) all’AUDIO IN sulla TV.
Note:
• Questa unità può essere utilizzata con o senza TV, ma si consiglia vivamente di utilizzare
un televisore per sfruttare tutte le funzioni.
• Fare riferimento anche alla Guida per l’utente del televisore.
• Per vedere i testi sullo schermo, è necessario utilizzare un disco CD + G.
Microfoni:
Collegare un microfono nel Mic jack 1 e nel
Mic jack 2 (se desiderato).
Nota: Non far cadere e non toccare il
microfono in quanto si potrebbero
verificare danni al microfono o agli
altoparlanti.
Non ruotare il cavo del microfono poiché
potrebbe danneggiare il cablaggio inserito.

— I6 —
IL TUO SMARTPHONE,
LETTORE DIGITALE O
LETTORE MP3
USCITA AUDIO /
PRESA CUFFIE
AUX IN
u
Collegamento
Collegamento all’alimentazione CA:
Inserire il cavo di alimentazione CA
in una presa CA, 100-240V CA, 50-
60Hz.
Nota:
Effettuare tutte le connessioni prima
di collegarsi all'alimentazione CA.
È possibile collegare un dispositivo
esterno utilizzando un cavo adatto
(cavo audio 3,5 mm non incluso)
come indicato.
Nota:
Si veda la pagina I13 per selezionare e
utilizzare la funzione AUX In.
1 Premere il tasto LUCI per accendere
l’effetto luci, premere nuovamente il
tasto per spegnerlo.
Collegamento a AUX In Jack
Luci d'atmosfera incandescente

— I7 —
v
u
w
x
Funzionamento
Riproduzione di un CDG
1 Collegare l’unità come descritto in
precedenza; se si utilizza un CD+G,
si consiglia di collegarla ad una TV.
Premere il tasto ON/STANDBY per
accendere l’unità.
2
Sollevare lo sportello del CD e
inserire un CD o un CD+G premendo
delicatamente sul perno centrale.
Chiudere poi lo sportello CD.
Nota:
• Cos’è un CD+G?
Un CD+G (CD + Graphics) è il formato
standard della maggior parte dei dischi
karaoke, che farà apparire le parole sullo
schermo.
• Non inserire mai nulla di diverso da un
CD nello scomparto, poiché oggetti
estranei possono danneggiare l'unità.
• Se non è inserito alcun disco, sul display
apparirà la scritta "no".
• Se collegato a un televisore e/o ad
altra sorgente audio, regolare il volume
dell'unità esterna usando il proprio
controllo del volume.
3
Premere ripetutamente il tasto
FUNZIONE per selezionare la modalità
CDG; cercando il disco, apparirà prima
“--” e poi il numero totale di brani.
Quando si inserisce un disco CDG, il led
CDG si illuminerà.
4 Premere il tasto PLAY/PAUSE/
COPPIA per avviare la riproduzione; se
si ascolta un file CD+G, sullo schermo
della TV (se collegato) compariranno
immagini e testi e il led PLAY/PAUSE
verrà illuminato.

— I8 —
U
y
V
at
X
W
Funzionamento
Riproduzione di un CDG (Continua)
5 Regolare il volume ad un livello
confortevole utilizzando il pulsante
VOLUME MASTER.
6 Collegare i microfoni e far scorrere
l’interruttore ON/OFF sul microfono in
posizione ON.
7
Regolare il tasto VOLUME MIC a
piacimento. Verrà cosi aumentato il
volume di entrambi i microfoni.
8 Girare il tasto ECHO per aggiungere un
effetto eco alla voce. Girare verso MAX
per aumentare l'effetto eco.
9 L’AUTO VOICE CONTROL può essere
attivato girando il pulsante AVC. Più
alto è il livello impostato di questo
pulsante, tanto più la voce sulla
registrazione multiplex verrà silenziata
quando il cantante inizia a cantare
attraverso il microfono. Quando
il cantante si ferma, la voce sulla
registrazione multiplex tornerà alla
normalità.
10 Girare il pulsante BILANCIAMENTO
in senso orario per sentire la
musica e la voce registrata da una
registrazione multiplex o antiorario
per sentire la musica solo da una
registrazione multiplex.
Nota: Per utilizzare il controllo
BILANCIAMENTO è necessario utilizzare
un disco CD + G, altrimenti funzionerà
come controllo di bilanciamento standard.

— I9 —
ak
al
am
Funzionamento
Riproduzione di un CDG (Continua)
11 SKIP: Andare avanti o indietro di un
brano premendo il tasto Skip /
Skip .
12 RIPETI: Durante la riproduzione,
premere il tasto PROGRAMMA/
RIPETI una volta per riprodurre
ripetutamente il brano selezionato;
il led REPEAT lampeggerà. Premere
il tasto PROGRAMMA/RIPETI
una seconda volta per riprodurre
ripetutamente l’intero CD; il led
RIPETI sarà illuminato permanente.
Premerlo nuovamente per
cancellare la funzione RIPETI, il led
RIPETI si spegne.
13 PROGRAMMA: È possibile
programmare fino a 20 brani su
ogni CD per la riproduzione in
qualsiasi ordine desiderato. In
modalità Stop, premere il tasto
PROGRAMMA/RIPETI; il led
PROGRAM lampeggerà e comparirà
“00”. Selezionare la prima traccia
utilizzando i tasti Skip /
Skip . Premere nuovamente
il tasto PROGRAMMA/RIPETI
per confermare l’inserimento.
Dopo aver selezionato le tracce
desiderate, il display visualizza
01, 02, ecc riconoscendo che
le tracce selezionate sono state
programmate e l'indicatore
di PROGRAMMA si accende
rosso permanente. Ripetere per
impostare 20 tracce nella memoria.
Premere quindi il tasto PLAY/
PAUSE/COPPIA per avviare la
riproduzione.

— I10 —
ap
an
ao
Funzionamento
Riproduzione di un CDG (Continua)
Nota:
• Premere il tasto STOP DUE VOLTE per
interrompere e cancellare il programma.
14 PAUSE: Durante la riproduzione,
se si desidera interrompere
momentaneamente il disco,
premere il tasto PLAY/PAUSE/
COPPIA; il led PLAY/PAUSE
lampeggerà. Premere nuovamente
per riprendere la riproduzione
normale.
15 Premere il tasto STOP per fermare
la riproduzione.
16 Premere il tasto ON/STANDBY per
spegnere l’unità.

— I11 —
3
u
v
Funzionamento
Utilizzo di un Dispositivo Bluetooth
1 Collegare l'unità cosi come descritto in
precedenza. Premere il tasto ON/STANDBY
per accendere l’unità.
2 Premere ripetutamente il tasto FUNZIONE
per selezionare il Bluetooth; “bt” lampeggerà
sullo schermo poiché l’unità cerca
automaticamente e associati ai dispositivi
Bluetooth associati in precedenza (se associati
in precedenza). Se non vi sono dispositivi
associati in precedenza, collegare come
mostrano nella fase successiva.
Nota: È inoltre possibile premere il tasto PLAY/
PAUSE/COPPIA per scollegare eventuali dispositivi
associati per associare un altro dispositivo.
3 Attivare l'opzione Bluetooth del dispositivo
nelle impostazioni per la ricerca di un
dispositivo raggiungibile con un segnale
Bluetooth. Selezionare “Singing Machine” dai
risultati del dispositivo nel menu Bluetooth.
Nota: Per istruzioni dettagliate, consultare il
manuale d'istruzione del dispositivo Bluetooth.
4 “bt” si illuminerà intensamente sul display e si
sentirà un suono di riuscita dell’abbinamento.
Note:
• Se il dispositivo Bluetooth richiede un codice
di accesso durante il processo di associazione,
inserire "0000" per la connessione.
• Su alcuni dispositivi Bluetooth, una volta
completata l'associazione, selezionare il
dispositivo Bluetooth come "Usa come Audio
Device" o simile.
• Se dopo la realizzazione dell’associazione la
connessione è persa, verificare che la distanza
tra l’altoparlante e il dispositivo Bluetooth non
superi 10 m/30 piedi.
• “Bluetooth” lampeggerà sullo schermo TV
e smetterà di lampeggiare in seguito alla
connessione riuscita.

— I12 —
V
yU
at
X
al
ak
W
Funzionamento
Utilizzo di un Dispositivo Bluetooth (Continua)
5 Per controllare il dispositivo Bluetooth
da questa unità, premere il tasto
PLAY/PAUSE/COPPIA per avviare la
riproduzione. Premere il tastoPLAY/
PAUSE/COPPIA durante la
riproduzione per interrompere il brano.
6
Regolare il volume ad un livello
confortevole utilizzando il pulsante
VOLUME MASTER sull’unità e il tasto
Volume sul dispositivo Bluetooth.
7 Collegare i microfoni e far scorrere
l’interruttore ON/OFF sul microfono in
posizione ON.
8
Regolare il tasto VOLUME MIC a
piacimento. Verrà cosi aumentato il
volume di entrambi i microfoni.
9
Girare il tasto ECHO per aggiungere un
effetto eco alla voce. Girare verso MAX
per aumentare l'effetto eco.
10 Regolare l’equilibrio tra gli
autoparlanti utilizzando il tasto
BILANCIAMENTO.
11 SKIP: Andare avanti o indietro di un
brano premendo il tasto Skip /
Skip .
12 Premere il tasto ON/STANDBY per
spegnere l’unità.

— I13 —
y
x
u
v
w
Funzionamento
Utilizzo del Jack AUX IN.
1 Collegare l'unità cosi come descritto
in precedenza. Premere il tasto ON/
STANDBY per accendere l’unità.
2 Premere ripetutamente il tasto
FUNZIONE per selezionare la modalità
AUX IN; sul display comparirà “AU”.
3
Collegare l’unità esterna al Jack AUX
IN sulla parte anteriore di questa
unità. Collegando un’unità esterna
permetterà al file audio di essere
riprodotto attraverso la Singing
Machine. .
Note:
• Si consiglia vivamente di impostare il
volume sull’unità ausiliare a 1/3 o più
basso per evitare distorsioni.
• Non è possibile saltare file/tracce
su questa unità quando si utilizza un
dispositivo esterno.
4 Regolare il volume usando il controllo
VOLUME MASTER su questa unità o
il controllo del volume del dispositivo
esterno.
5 Collegare i microfoni e far scorrere
l’interruttore ON/OFF sul microfono in
posizione ON.

— I14 —
W
V
X
U
Funzionamento
Utilizzo del Jack AUX IN (Continua)
6
Regolare il pulsante VOLUME MIC a
piacimento. Verrà cosi aumentato il
volume di entrambi i microfoni.
7 Ruotare il pulsante ECHO per
aggiungere un effetto eco alla voce.
Girare verso MAX per aumentare
l'effetto eco.
8 Regolare l’equilibrio tra gli altoparlanti
utilizzando il tasto BILANCIAMENTO.
9 Premere il tasto ON/STANDBY per
spegnere l’unità.
Modalità risparmio energetico
(Auto Power System - APS)
L'unità entrerà automaticamente in modalità stand-by dopo 15 minuti nelle seguenti
situazioni:
1. Non vi è un CD nel compartimento o la riproduzione del CD è stata arrestata;
2. La riproduzione del lettore musicale esterno è stata arrestata, ma il cavo audio è ancora
collegato al jack AUX IN.
3. La musica Bluetooth è stata interrotta.
L'unità può essere fatta ripartire premendo una volta il ON/STANDBY.
APS è per il risparmio energetico.
— I15 —
Qualora l’unità dovesse mostrare dei problemi, eseguire le seguenti verifiche prima di rivolgersi
all’assistenza:
Alimentazione mancante
• L’alimentazione non è accesa; premere il tasto ON/STANDBY per accendere l’unità.
• Verificare che l'adattatore CA sia collegato in sicurezza nella parte posteriore dell’unità.
• Collegare l'unità a una presa diversa.
Nessun suono - Generale
• Il Volume Master è impostato su minimo.
• Non è stata selezionata la Funzione corretta; selezionare utilizzando i tasti FUNZIONE.
• Se si utilizza un dispositivo esterno, alzare il volume.
Nessun suono - Se connesso a un televisore
• Il volume del televisore è disattivato o troppo basso.
• La sorgente corretta (solitamente AV) non è stata selezionata nel menu della TV.
I testi non appaiono sullo schermo della TV
• Se collegato a un televisore, la spina video non è collegata correttamente; vedere la pagina I5.
• Se collegato a un televisore, selezionare la sorgente corretta sul televisore (solitamente AV).
• Il file/brano in riproduzione non è una traccia di registrazione con testi. Questi sono gli unici
file che consentono di visualizzare i testi sullo schermo della TV.
• Non comparirà nulla sullo schermo della TV utilizzando AUX In o Bluetooth.
Nessun suono dal microfono
• Assicurarsi che il microfono sia saldamente collegato al jack MIC 1 o MIC 2.
• Assicurarsi che l’interruttore ON/OFF sul microfono sia impostato in posizione ON.
• Assicurarsi che il VOLUME MIC non sia impostato ad un livello troppo basso.
• Il VOLUME MASTER è impostato su minimo, alzate il volume.
• Regola il controllo ECHO oltre il punto medio della Singing Machine.
Il dispositivo Bluetooth non può essere associato o collegato all’unità.
• Non è stata attivata la funzione Bluetooth sul proprio dispositivo; si veda la pagina I11 o
consultare il manuale di istruzioni del dispositivo Bluetooth.
• Il sistema non è in modalità accoppiamento; premere il pulsante COPPIA per riavviare
l’associazione.
La musica non gioca sull’unità dopo il collegamento riuscito con Bluetooth.
• Assicurarsi che il dispositivo Bluetooth sia in grado di supportare il profilo Bluetooth A2DP.
• Il volume sul dispositivo Bluetooth esterno è impostato su basso o disattivato; alzare a
piacimento.
Guida alla risoluzione dei problemi
— I16 —
Specifiche tecniche
AUDIO
POTENZA USCITA (MASSIMA) ......................................................................................2 Watt (RMS)
IMPEDENZA USCITA .......................................................................................................................8 Ohm
SEZIONE LETTORE CD
RISPOSTA IN FREQUENZA ........................................................................................100 Hz - 20 kHz
RAPPORTO SEGNALE - RUMORE ................................................................................................ 50 dB
NUMERO DI PROGRAMMI ..................................... 20 Passi Programmazione Accesso Random
BLUETOOTH
Versione Bluetooth .............................................................................................................................V4.2
Copertura ................................................................................................ Fino a 10 metri in linea d’aria
AUX IN SEZIONE .......................................................................................Cuffie Stereo jack 3,5 mm
MICROFONO ..........................-74db 600 Ohm Impedenza con Microfono Dinamico 6,3 mm
SEZIONE ALIMENTAZIONE ...................CC 12V .1A (8 x “C” Batterie) (Batterie non incluse)
DIMENSIONI (AxLxP) ................................................................................ 33,8 X 30,5 X 15,5 cm
PESO ................................................................................................................................................1,82 kg
Le specifiche sono tipiche. Le singole unità potrebbero variare e sono soggetti ad un contin-
uo miglioramento, senza preavviso e/o senza incorrere in alcun obbligo.
Il marchio scritto e il logo Bluetooth® sono marchi registrati di proprietà di Bluetooth SIG,
Inc. e l'uso di tali marchi e loghi da parte di The Singing Machine Company, Inc. è regolato da
licenza. Altri marchi e nomi commerciali sono di proprietà dei rispettivi titolari.

Visit Our Website: www.singingmachine.com
Visite nuestro sitio web: www.singingmachine.com
Visitez notre site internet : www.singingmachine.com
Besuchen Sie unsere Webseite: www.singingmachine.com
Visitate il nostro sito web: www.singingmachine.com
Singing Machine is distributed in the UK and Europe by:
Singing Machine - Distribuido en Reino Unido y Europa por:
Singing Machine est distribué au Royaume-Uni et en Europe par:
Singing Machine wird im Vereinigten Königreich und in Europa verteilt durch:
Singing Machine è distribuito nel Regno Unito e in Europa da:
PDT Limited
Unit 4b, Greengate Industrial Estate, White Moss View,
Middleton, Manchester, M24 1UN
info@pdtuk.com
Copyright © 2018 All Rights Reserved.
Derechos de autor © 2018 Todos los derechos reservados.
Copyright © 2018 Tous droits réservés.
Copyright © 2018 Alle Rechte vorbehalten.
Copyright © 2018 Tutti i diritti riservati.
PRINTED IN CHINA
IMPRESO EN CHINA
IMPRIMÉ EN CHINE
IN CHINA GEDRUCKT
STAMPATO IN CINA
363-1805-ESFGI01-PDT