The Whistler Group SC03 DIGITAL TRUNKING HANDHELD RADIO SCANNER User Manual 2
The Whistler Group DIGITAL TRUNKING HANDHELD RADIO SCANNER 2
Contents
User Manual 2
40
Scanning
41
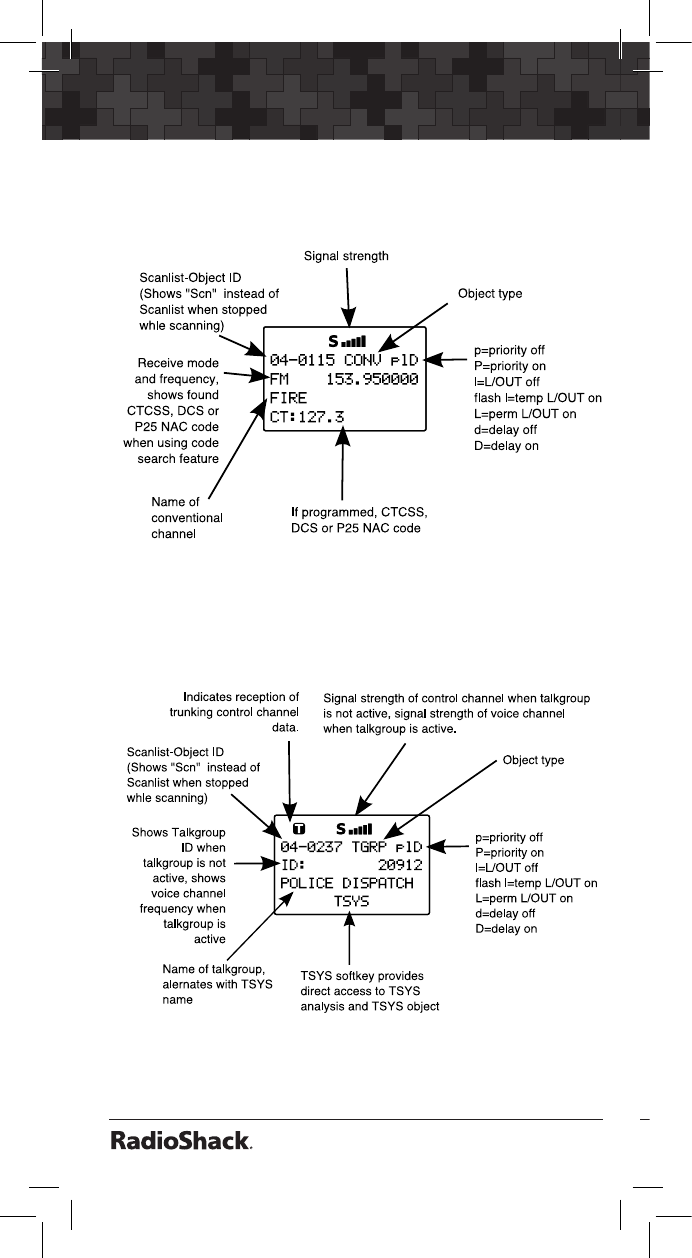
The following screen appears when the scanner
is
stopped on a conventional channel while scanning.
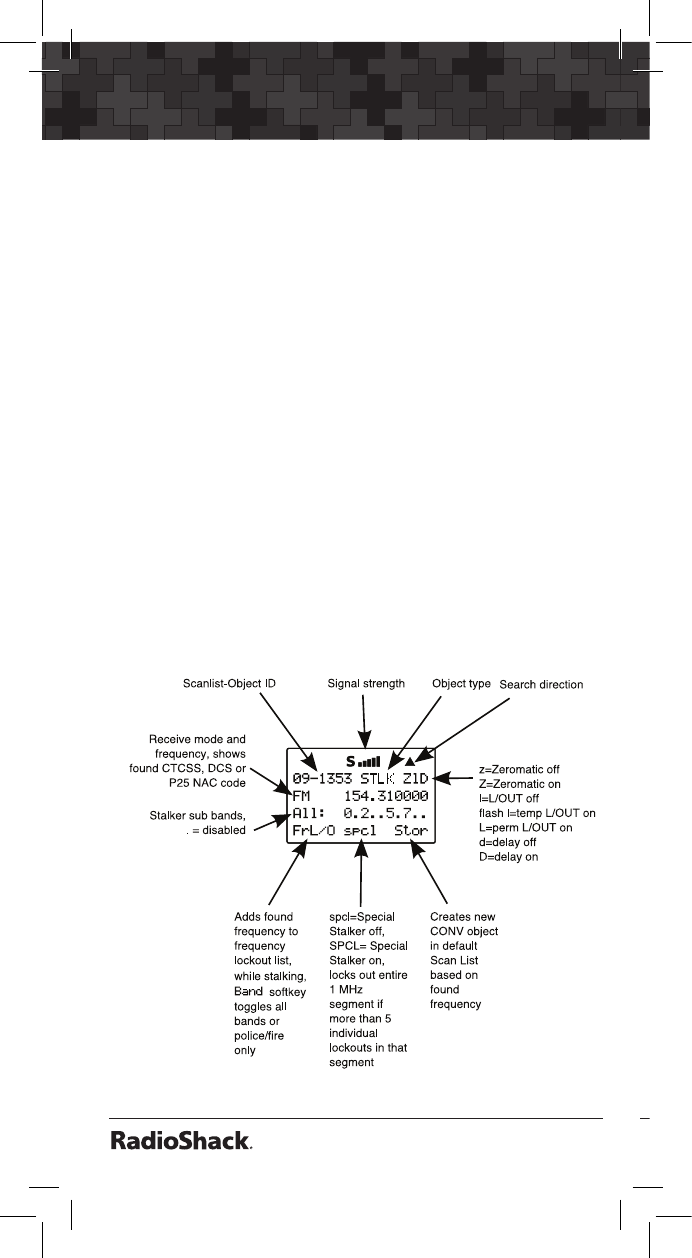
The following screen appears when the scanner is
stopped on a talkgroup channel while scanning.
40
41
Organizing Objects
The following screen appears when the scanner
is
stopped on a conventional channel while scanning.
The following screen appears when the scanner is
stopped on a talkgroup channel while scanning.
Object Numbering
Your PRO-651 is different from other types of
scanners in how it stores your Scannable Objects
in memory. Instead of fixed channels and banks,
objects are stored in the first available block of
free memory and an Object ID is assigned. The
Object ID is the “address” where the object is
stored in memory.
The Object ID and the current Scan List number
are displayed whenever an object is selected in
Manual Mode and Program Mode. The Object ID
is also displayed when the scanner stops on an
active object while scanning.
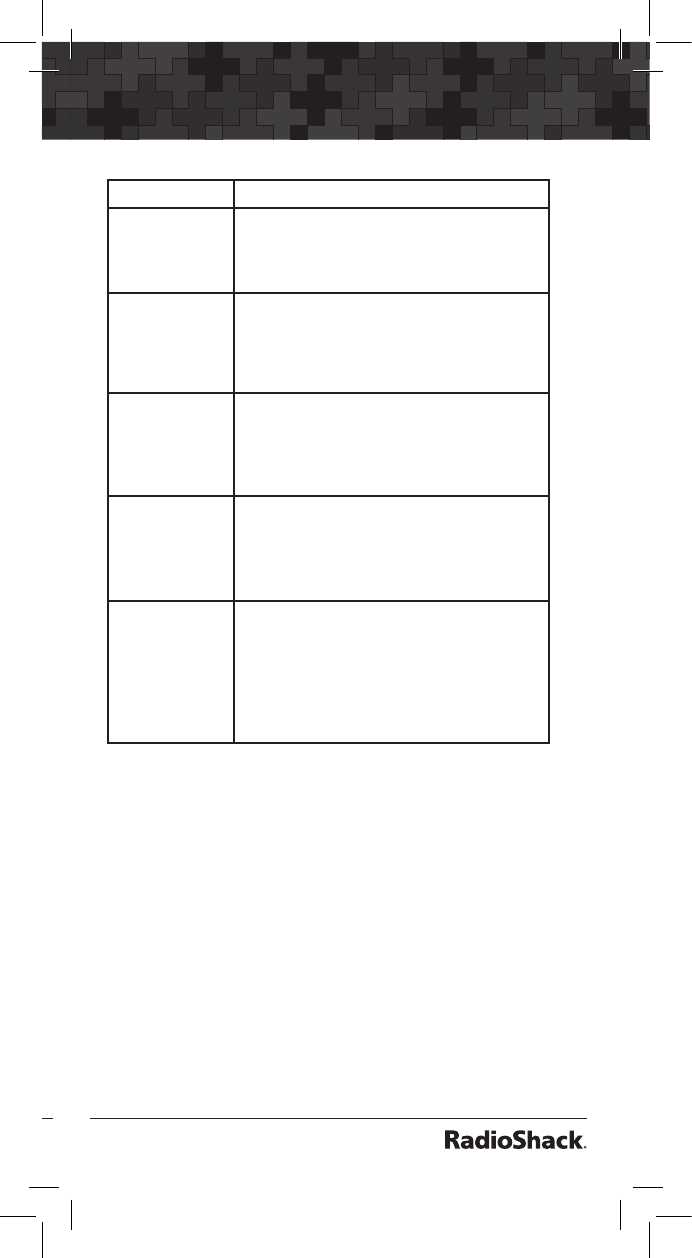
10-0348 CONV pID
FM 155.95000
FIRE
CT:127.3
Object ID
Scan List
For example: 10-0348 means Object ID 0348 is
mapped to Scan List 10.
To directly access an object using Object ID:
1. Press MAN or PGM to enter Manual Mode or
Program Mode.
2. Use the number keys to enter the Object ID,
then press ENT.
Note: Objects are not really “in” a Scan List.
Objects are “mapped” to Scan Lists, meaning
that an object can be a member of one or more
Scan Lists. Using the p or q keys to scroll up or
down while viewing a Scan List, will show all the
other objects mapped to that list.

42
Organizing Objects
43
Grouping Objects with Scan Lists
By default, new objects are automatically
assigned to Scan List 01. You can divide these
objects into separate Scan Lists so that you
can easily enable or disable groups of objects
depending on what you want to scan.
The number of objects that can be grouped in a
Scan List is limited only by the scanner’s memory,
and single objects can be members of multiple
Scan Lists.
There are 20 regular Scan Lists available, a special
“FAV” Scan List for one-button access to your
favorite Scannable Objects, and a Skywarn Scan
List.
You can also mix and match different object
types in Scan Lists as you see fit. There are no
limitations as to the type of objects that can exist
together in the same Scan List.
How you group objects in Scan Lists is entirely up
to you. Here are some examples of how objects
can be grouped:
Geographically: You may wish to group your
Scannable Objects according to the areas where
they are used. This may be useful if you use your
scanner while traveling.
By trunking system: It is possible to assign any
combination of object types to any Scan List.
However, you may wish to assign TGRP objects
associated with specific trunked radio systems
to specific Scan Lists, so you can easily enable or
disable monitoring of each system by enabling or
disabling the associated Scan List.
By object type: It may be desirable to segregate
object types by assigning them to specific Scan

42
43
Organizing Objects
Lists. For example, if you assign a group of LMIT
or SRVC searches to a single Scan List, you can
easily activate or deactivate searching on those
objects by enabling or disabling the associated
Scan List.
By application: You can group objects by their
application. For example, you may wish to place
law enforcement related objects for your area in
one Scan List, fire and rescue objects in another,
and business related objects in yet another Scan
List.
By Favorites: The Favorites (FAV) Scan List is a
powerful tool that can be used to quickly narrow
(or expand) your scanning profile. When you
press the FAV key, the radio suspends scanning
of all objects in the radio except for those that are
mapped to the FAV Scan List.
Changing Scan List Membership
New Objects
1. Press PGM to put scanner in Program Mode.
2. Press NEW softkey to create new object.
3. Press the softkey for the object you want to
create.
4. Press p or q to scroll to Scan Lists:.
5. Press t or u to scroll the Scan Lists until you
find the one you want to enable or disable.
6. Press SEL to select between On or Off. The
asterisk (*) next to the Scan List number
indicates that the object is a member of that
Scan List.
7. Press Save softkey to save the new object.

44
Organizing Objects
45
Existing Objects
1. Press PGM to put scanner in Program Mode.
2. Press p, q, t or u to scroll to the object
you want to change.
3. Press EDIT softkey.
4. Press CURR softkey to edit the current object.
5. Scroll down to Scan Lists:
6. Press u to scroll through the Scan Lists.
7. Press SEL to select On or Off for the desired
scan list item. The asterisk (*) next to the Scan
List number indicates that the object is a
member of that Scan List.
8. Press Save softkey to save change.
Naming Scan Lists
1. Press PGM to put scanner in Program Mode.
2. Press GLOB softkey.
3. Press p or q to scroll to Scan Lists:.
4. Press SEL.
5. Press u to edit the settings for the selected
Scan List.
6. Press p or q to scroll to Tag:, then press u.
7. Use the number keys to enter a name. See
“Appendix C: Text Entry and QuickText” on page
125 for information on entering text.
8. Press Done softkey when finished.
9. Press Save softkey to save changes to the
Global menu.

44
45
Organizing Objects
Enabling or Disabling Scan Lists
While Scanning
Scan List 1-10
Press the number keys that corresponds with the
Scan List you want to select.
For example, pressing 4 while scanning will
toggle the state of Scan List 04 from enabled to
disabled, or vice versa if the Scan List is already
disabled.
Scan List 11-20
Press FUNC, then press a number key, i.e., press
FUNC 3 to toggle the status of Scan List 13.
Note: If you enable a Scan List that has no
assigned objects, the number for that Scan
List will flash in the display while the scanner is
scanning.
From Global Settings Menu
1. Press PGM to enter Program Mode.
2. Press GLOB softkey.
3. Press p or q to scroll to Scan Lists: and
press SEL.
4. Press p or q to scroll to the Scan List you
wish to change then press SEL.
5. Press u to scroll to Enabled: and press
t or u to select On or Off.
The asterisk (*) indicates Scan List enabled.
6. Press the Save softkey to save settings.
7. Press Save softkey again to confirm global
changes and exit GLOB menu.

46
Organizing Objects
47
NS (Not Scanned) Scan List
If you accidently store an object with no Scan List
mappings, the object will be placed in a special
“NS” Scan List.
To access NS scan List:
1. Press PGM to enter Program Mode or press
MAN to enter Manual Mode.
2. Press t or u to scroll to the NS Scan List.
3. Press p or q to scroll through the NS
objects.
4. Press PGM.
5. Press EDIT softkey.
6. Press CURR softkey to view object menu.
7. Scroll down to Scan Lists:.
8. Press u to scroll through the Scan Lists.
9. Press SEL to select On or Off the desired
scan list item. The asterisk (*) next to the Scan
List number indicates that the object is a
member of that Scan List.
Favorite List
To add an object to Favorites:
In scan mode, Manual mode or Program mode,
press FUNC, then FAV.
Each scannable object menu also has a FAV
option. Select YES to add to Favorites.
When FAV is set to YES, the object is a member
of the Favorites Scan List in addition to any other
Scan Lists that it is mapped to.

46
47
Organizing Objects
To activate FAV scan:
Press FAV and the radio suspends scanning of all
objects in the radio except for those that are in
your Favorites list.
To clear FAV scan list:
1. Press PGM to enter Program Mode.
2. Press the GLOB softkey.
3. Press p or q to scroll to Clear FAV:.
4. Press SEL to set FAV = NO for all objects.
5. Press YES softkey to confirm.
6. Press Save softkey.
Setting the Default Scan List
By default, your scanner will store all new objects,
and objects found during Search, Tune, and
Stalker as mapped to Scan List 01.
You can easily change the default Scan List to any
Scan List you specify, including the special FAV
and Skywarn Scan Lists.
1. Press PGM.
2. Press GLOB softkey.
3. Press q to scroll down to Dflt ScanList.
4. Enter new Scan List number to use as default
scan list.
0: The “not scanned” (ns) Scan List. Objects
with no Scan List mapping.
1 - 20: Normal Scan Lists.
21: FAV Scan List.
22: Skywarn Scan List.

48
Organizing Objects
49
5. Press ENT or the Done softkey to store your
new default Scan List value.
6. Press SAVE softkey to save your changes.
Deleting Objects
To delete an object:
1. Press PGM to enter Program Mode.
2. Press p, q, t or u to navigate to the object
you wish to delete.
3. Press FUNC CL to delete the object.
The scanner will ask you to confirm the delete
command before removing the object from
the scanner’s memory. Deletions cannot be
un-done.
To delete a TSYS using the FIND feature:
1. See “Searching for Objects using FIND” on page 49.
2. Once the TSYS has been located, press the
PGM key, then press FUNC CL.
3. Press the YES softkey at both warnings to
delete the TSYS.
WARNING: All TGRPs associated with the
deleted TSYS will be lost.
To delete a TSYS using the TSYS filter.
1. Press PGM to enter Program Mode.
2. Press the EDIT softkey.
3. Press u u u, and press the TSYS softkey.
4. Press p or q to scroll to the desired TSYS,
then press FUNC CL.
5. Press the YES softkey at both delete warnings
to delete the TSYS.

48
49
Organizing Objects
WARNING: All TGRPs associated with the
deleted TSYS will be lost.
Searching for Objects using FIND
The FIND feature allows you to search for locked
out objects, or for objects containing a text string
that you specify. FIND searches for your specified
text in the following places:
• TGRP objects: ID and Tag fields.
• CONV objects: Frequency and Tag fields.
• TSYS, LMIT, SRVC and STLK objects: Tag
field.
To find locked out objects:
1. Press PGM to enter Program Mode.
2. Press EDIT softkey.
3. Press FIND softkey.
4. Press L/Out softkey. The scanner finds the
first locked out object.
5. Press L/Out to toggle lockout status.
6. Press EXIT softkey when finished.
or Press EDIT softkey to edit object menu for the
selected object.
or Press NEXT softkey to find the next locked out
object.
or Press MAN to begin monitoring the object in
Manual Mode.
or Press PGM to exit FIND and execute
programming tasks at the selected object
position.

50
Organizing Objects
51
To find objects with a specified text string:
1. Press PGM to enter Program Mode.
2. Press EDIT softkey.
3. Press FIND softkey.
4. Press Text softkey.
5. Use the number keys to enter the text string
you wish to search for. Or press the Qtxt
softkey to use QuickText in your find text
screen. See “Appendix C: Text Entry and QuickText”
on page 125 for information on entering text.
6. Press OK softkey to begin searching.
The radio will stop on any object where your
text string is found in the frequency, tag, or ID
fields as described above.
7. Press the Exit softkey to cancel the FIND
operation.
or Press EDIT softkey to edit object menu for the
selected object.
or Press NEXT softkey to find the next object.
or Press MAN to begin monitoring the object in
Manual Mode.
or Press PGM to exit FIND and execute
programming tasks at the selected object
position.
Note: FIND keeps the last search text you
specified stored for subsequent FIND operations.
Filtering by Object Type
When browsing objects in Program Mode, you can
filter the objects that are displayed by their type.
1. Press the PGM to enter Program Mode.
2. Press EDIT softkey.

50
51
Organizing Objects
3. Press t or u to scroll to display the filter
softkeys. The filter softkeys are as follows:
CONV
TGRP
TSYS
SRCH
STLK
4. Press the softkey that corresponds with that
object type to filter.
5. Press p, q, t or u to browse filtered objects.
Object Lockout
When an object is locked out, traffic is not
received on that object until it is unlocked, even if
the object is mapped to more than one Scan List.
Locking out an object locks it out “radio-wide”
until it is enabled by toggling the lockout setting.
Four types of lockout functions are available:
temporary lockout, permanent lockout, search
lockout, and talkgroup lockout.
Temporary Lockout
Temporary lockout locks out an object until
the scanner is turned off. When the scanner is
powered on again, all objects that have been
temporarily locked out are restored.
To temporarily lockout an object:
1. When the scanner stops on an object, press
L/OUT.
or
1. In Manual Mode or Program Mode, press p,
q, t or u to select an object.
2. Press L/OUT.
The lowercase “l” in the display flashes to
indicate the object is temporary lockout.

52
Organizing Objects
53
To unlock a temporary lockout object:
1. In Manual Mode or Program Mode, press
p, q, t or u to select an object.
2. Press L/OUT.
HINT: You can also toggle lockout anytime you
are viewing an object menu in Program Mode by
pressing L/OUT.
Permanent Lockout
Permanent lockout locks out an object until you
explicitly unlock it. No traffic will be received on
the locked out object while permanent lockout is
active.
1. When the scanner stops on an object, press
FUNC, then L/OUT.
or
1. In Manual Mode or Program Mode, press
p, q, t or u to select an object.
2. Press FUNC, then L/OUT.
To unlock a permanent lockout:
1. In Manual Mode or Program Mode, press
p, q, t or u to select an object.
2. Press FUNC, then L/OUT.
Change L/OUT Key Function
By default, the L/OUT key activates temporary
lockout when pressed. To change the L/OUT key
to activate a permanent lockout when pressed:
1. Press PGM to enter Program Mode.
2. Press GLOB softkey.
3. Press p or q to scroll to TLO=FUNC L/O:.

52
53
Organizing Objects
4. Press u and select YES to change the L/OUT
button to be a permanent lockout instead of
a temporary lockout.
Search Lockout
Search lockout works with certain search objects,
including LMIT searches, some SRVC searches,
and STLK objects. Frequency lockout is used to
lock out undesired frequencies that are found
during searches.
To apply search lockout during a search:
When scanner stops on the undesired frequency,
press the FrL/O softkey.
To edit or clear the search lockout list:
1. Press PGM.
2. Press GLOB softkey.
3. Scroll down to SRCH L/Outs: and press SEL.
4. Scroll to the frequencies you wish to remove
from the lockout list and press Del softkey to
remove them from the list.
5. Scroll to an empty spot and enter any
frequency you wish to manually add to the
list.
6. To clear the entire list, press FUNC, then the
Del softkey.
Talkgroup Lockout
Talkgroup lockout is similar to search lockout, as it
allows you to lockout undesired talkgroups while
searching for new talkgroup activity with wildcard
TGRP objects.
When you lock out an undesired talkgroup that
is found by a Wildcard TGRP object, the radio

54
Organizing Objects
55
creates a new TGRP object in the radio’s memory,
then locks that TRGP object out, so that the
next time it appears on the system, the radio will
ignore any traffic on that TGRP.
To lockout an undesired wildcard hit:
When the scanner stops on an undesired
talkgroup, press the TGL/O softkey.
To unlock or edit talkgroups locked out using
the wildcard lockout feature:
1. Press PGM to enter Program Mode.
2. Press p, q, t or u to select a locked out
talkgroup.
3. Press FUNC, then L/OUT to remove
permanent lockout from the talkgroup.
or Press FUNC, then CL to delete the TGRP
object from the scanner.
or Press the EDIT, then the CURR softkey to edit
and save the TGRP object.

54
55
Object Searches
Object Searches
A powerful feature of your PRO-651 is the ability to
define different types of frequency searches and
process them while scanning. Frequency searches
are just another type of Scannable Object in the
hierarchy of the radio’s memory organization, so they
can be manipulated and scanned in the same manner
as conventional channels and trunking talkgroups.
Limit Search Object (LMIT)
A Limit Search Object (LMIT) is a search object
that stores the parameters necessary for the radio
to search each frequency within a lower and an
upper limit for activity. A LMIT object can be used
for standalone searching—the radio just searches
and stops when activity is detected on a frequency,
or for searching that is performed while the radio
is scanning. The radio treats LMIT objects just like
any other Scannable Object when in Scan Mode.
When used in Scan Mode, this capability is best
suited for small ranges of frequencies that contain
more frequencies than practical to program as
individual channels. Any size range can be used,
but larger ranges that take more time to search
will increase the chances of missed activity on
other object types.
Essential Parameters
FrLo: Lower frequency limits to begin search.
FrHi: Upper frequency limits to end search.
Mode: By default the scanner will automatically
choose the receive mode that most likely applies
to the active frequency as the search proceeds.
Tag: (Recommended) Name your LMIT so you
can easily find or identify it later.

56
Object Searches
57
See “Appendix B: Detailed Menu Reference: LMIT Menu”
on page 116 for detailed menu information.
To create a new LMIT object:
1. Press PGM for Program Mode.
2. Press NEW softkey.
3. Press SRCH softkey to view available Search
types.
4. Press LMIT softkey.
5. Press p or q to select FrLo: and FrHi: then
press SEL. to select the field.
6. Use the number keys and • to enter lower
and upper search units and press ENT or the
DONE softkey to save.
7. Press p or q to select Tag:.
8. Use the number keys to enter a name for the
LMIT object. See “Appendix C: Text Entry and
QuickText” on page 125 for information on
entering text.
9. Press ENT or the DONE softkey to save.
10. Press Save softkey to store your LMIT search
as an object.
To activate LMIT search:
1. Press MAN during scanning to enter Manual
Mode.
2. Press p or q to scroll through the LMIT
objects.
3. Press the SRCH softkey. LMIT search will stop
on an active frequency.
Note: Be sure to press the SRCH softkey, and not
the SRCH key on the keypad.
3. Press PSE to hold on the active frequency.
Press PSE again to resume.
Note: It can take some time to process all of the
frequencies in a LMIT search. You can experiment
with different size frequency ranges to find a LMIT
search setup that does not interfere excessively
with scanning of other object types.
Service Search Object (SRVC)
A Service Search Object (SRVC) is similar to a
LMIT search but is optimized for a specific radio
service, and can search for activity associated
with a type of service across multiple frequency
bands. See “Dedicated SRVC Search” on page 62
or “Appendix A: Search Bands” on page 100 for sub-
band frequency information.
Essential Parameters
Service type is the critical parameter needed
for a Service Search to function. See “Appendix B:
Detailed Menu Reference: SRVC Menu” on page 119
for detailed menu information.
56
57
Object Searches
3. Press PSE to hold on the active frequency.
Press PSE again to resume.
Note: It can take some time to process all of the
frequencies in a LMIT search. You can experiment
with different size frequency ranges to find a LMIT
search setup that does not interfere excessively
with scanning of other object types.
Service Search Object (SRVC)
A Service Search Object (SRVC) is similar to a
LMIT search but is optimized for a specific radio
service, and can search for activity associated
with a type of service across multiple frequency
bands. See “Dedicated SRVC Search” on page 62
or “Appendix A: Search Bands” on page 100 for sub-
band frequency information.
Essential Parameters
Service type is the critical parameter needed
for a Service Search to function. See “Appendix B:
Detailed Menu Reference: SRVC Menu” on page 119
for detailed menu information.
58
Object Searches
59
To create a new SRVC object
1. Press PGM for Program Mode.
2. Press NEW softkey, then press SRCH softkey to
view the available Search types.
3. Press the SRVC softkey.
4. Press q to scroll to the Srvc: field.
5. Press t or u to select the type of search you
want to define. Service types include Public
Safety, Aircraft, Amateur, CB, Marine, FRS/
GMRS/MURS/DOT and Railroad.
6. Press Save softkey to store your SRVC search
as an object.
To activate SRVC search:
1. Press MAN during scanning to enter Manual
Mode.
2. Press p or q to scroll through the objects to
SRVC.
3. Press the SRCH softkey to activate the SRVC
search. SRVC search stops when an active
frequency is found.
frequency lockout list
4. To resume searching, press p.

58
59
Object Searches
To create a new SRVC object
1. Press PGM for Program Mode.
2. Press NEW softkey, then press SRCH softkey to
view the available Search types.
3. Press the SRVC softkey.
4. Press q to scroll to the Srvc: field.
5. Press t or u to select the type of search you
want to define. Service types include Public
Safety, Aircraft, Amateur, CB, Marine, FRS/
GMRS/MURS/DOT and Railroad.
6. Press Save softkey to store your SRVC search
as an object.
To activate SRVC search:
1. Press MAN during scanning to enter Manual
Mode.
2. Press p or q to scroll through the objects to
SRVC.
3. Press the SRCH softkey to activate the SRVC
search. SRVC search stops when an active
frequency is found.
4. To resume searching, press p.
Signal Stalker II Object (STLK)
A Signal Stalker Object (STLK) stores the parameters
necessary for the radio to rapidly sweep a range
of frequencies for strong signals from nearby
transmitters. A STLK object can be used for
standalone operation—the radio just sweeps and
stops when activity is detected, or for stalking that
is performed while the radio is scanning. During
scanning, the radio will check for activity on all the
enabled Scannable Objects: TGRP objects, CONV
objects, LMIT objects and STLK objects.
Essential Parameters
By default, a newly created STLK object is
ready to go without any changes. In its default
configuration, the STLK object will sweep through
all of the important land mobile radio bands
and look for strong signal activity from nearby
transmitters. You may wish to include or exclude
some bands in your sweeps in order to check other
frequency ranges or to limit the amount of time
the scanner spends sweeping frequency ranges
where local transmitter activity is less likely. See
“Appendix B: Detailed Menu Reference: STLK Menu” on
page 122 for detailed menu information.
To create a new STLK object:
1. Press PGM to place your scanner into
Program Mode.
2. Press NEW softkey, then press SRCH softkey to
view the available Search types.
3. Press STLK softkey.
4. Scroll down to Type: and press u if you want
to change between All Bands and Public
Safety.
Refer to “Dedicated Signal Stalker II” on page 64 or
“Appendix A: Search Bands” on page 100 for sub-
band frequency information.
60
Object Searches
61
If you want to include or exclude sub bands:
1. Scroll down to Sub-bands: and press t or u
to scroll through the sub-bands.
2. Press SEL to select On or Off. An asterisk (*)
indicates the sub band is enabled.
3. Press p or q to select Tag: to name your
STLK object.
4. Use the number keys to enter a name. See
“Appendix C: Text Entry and QuickText” on page
125 for information on entering text.
5. Press Save softkey to store your STLK search
as an object.
To activate STLK search:
1. Press MAN during scanning to enter Manual
Mode.
2. Press p or q to scroll through the objects to
STLK.
3. Press the STLK softkey.

60
61
Dedicated Searches
If you want to include or exclude sub bands:
1. Scroll down to Sub-bands: and press t or u
to scroll through the sub-bands.
2. Press SEL to select On or Off. An asterisk (*)
indicates the sub band is enabled.
3. Press p or q to select Tag: to name your
STLK object.
4. Use the number keys to enter a name. See
“Appendix C: Text Entry and QuickText” on page
125 for information on entering text.
5. Press Save softkey to store your STLK search
as an object.
To activate STLK search:
1. Press MAN during scanning to enter Manual
Mode.
2. Press p or q to scroll through the objects to
STLK.
3. Press the STLK softkey.
Dedicated Searches
Your scanner provides fast access to dedicated
frequency search modes that allow you to
execute searches or run Signal Stalker II without
having to go through the process of setting up
and saving a search object. This is handy for
those times where you need to run a search
quickly. Dedicated search modes do not create
new search objects or use previously created
search objects.
The SRCH key provides immediate access to the
dedicated search modes. Pressing the SRCH key
cycles through each search mode in this order:
Limit, Railroad, Public Safety, Aircraft, Ham, CB,
Marine, and FRS/GMRS/MURS/DOT.
Dedicated LMIT Search
Your scanner’s dedicated LMIT search mode
provides you with the ability to create a limit
search with a search frequency range between
upper and lower limit frequencies that you specify
and perform the limit search directly without
creating a new LMIT object. You can then monitor
that frequency range for transmissions.
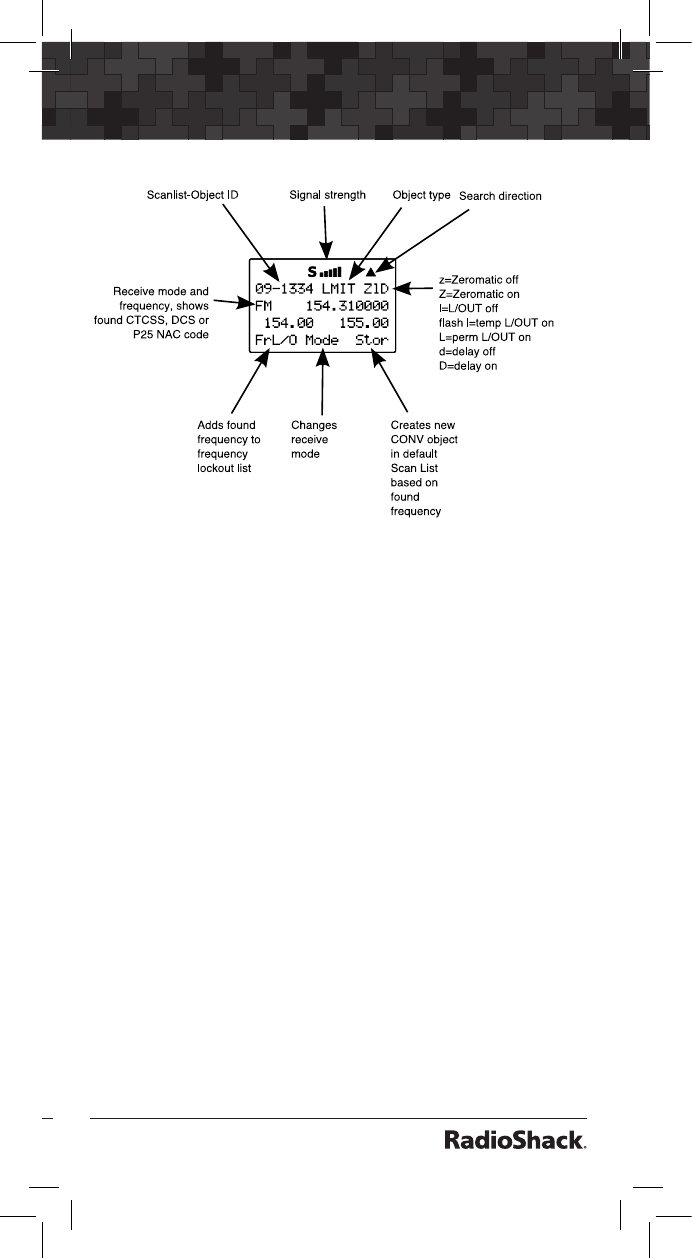
To enter LMIT mode:
1. Press SRCH repeatedly until the display
indicates LMIT search.
2. Press the Lmts softkey to set the lower and
upper frequency limits for your limit search.
Note: When a signal is being received, the Lmts
softkey (F1) changes to FrL/O. You can access
the Lmts softkey by pressing FUNC F1 when the
F1 key function is FrL/O.
3. Press p or q to change the search direction.
62
Dedicated Searches
63
4. Press the MODE softkey to change the receive
mode (AM, FM, NFM) from the default for the
current frequency range (auto).
5. Press the FrL/O softkey to add a found
frequency to the lockout list.
6. Press the STOR softkey to create a new CONV
object using the found frequency.
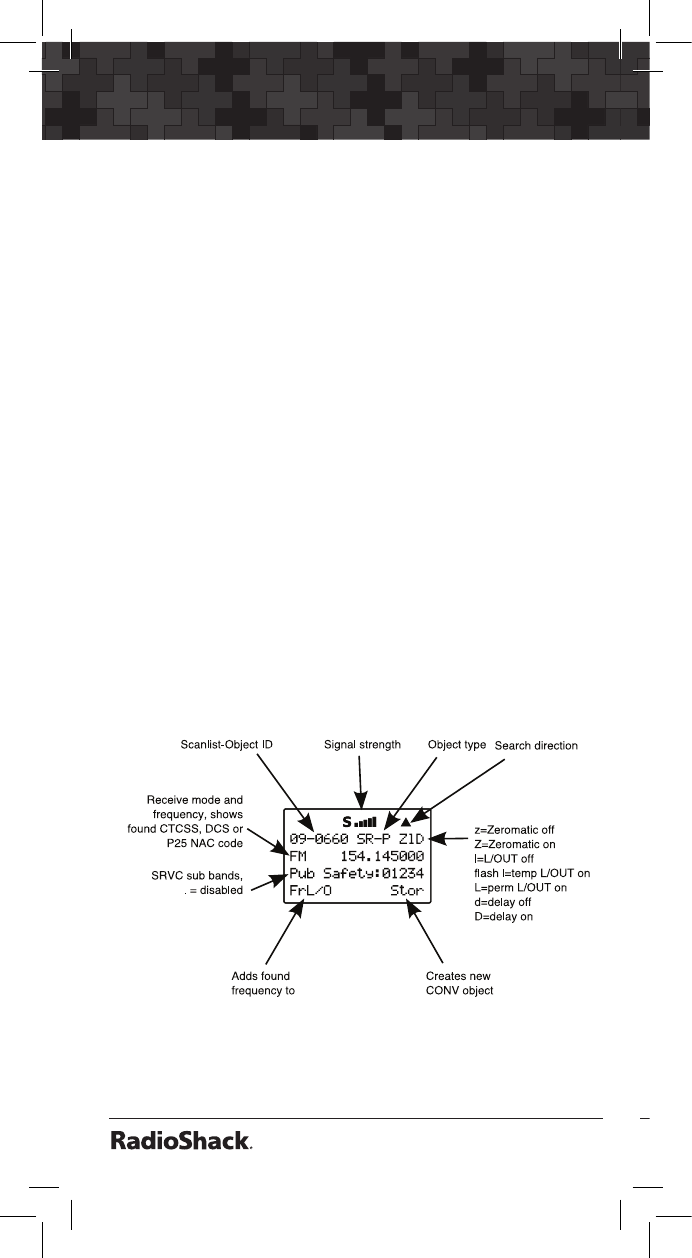
Dedicated SRVC Search
Your scanner’s dedicated SRVC search modes
provide you with the ability to instantly access
each of the scanner’s service search ranges
without creating a new SRVC object.
To activate dedicated SRVC search mode:
1. Press SRCH repeatedly until the desired
service search is indicated on the display. The
following service searches are available:
• Railroad: Searches the Association of
American Railroads (AAR) VHF railroad
frequencies used in the US and Canada.
• Public Safety (PubSafety): Searches
commonly used public safety frequencies.
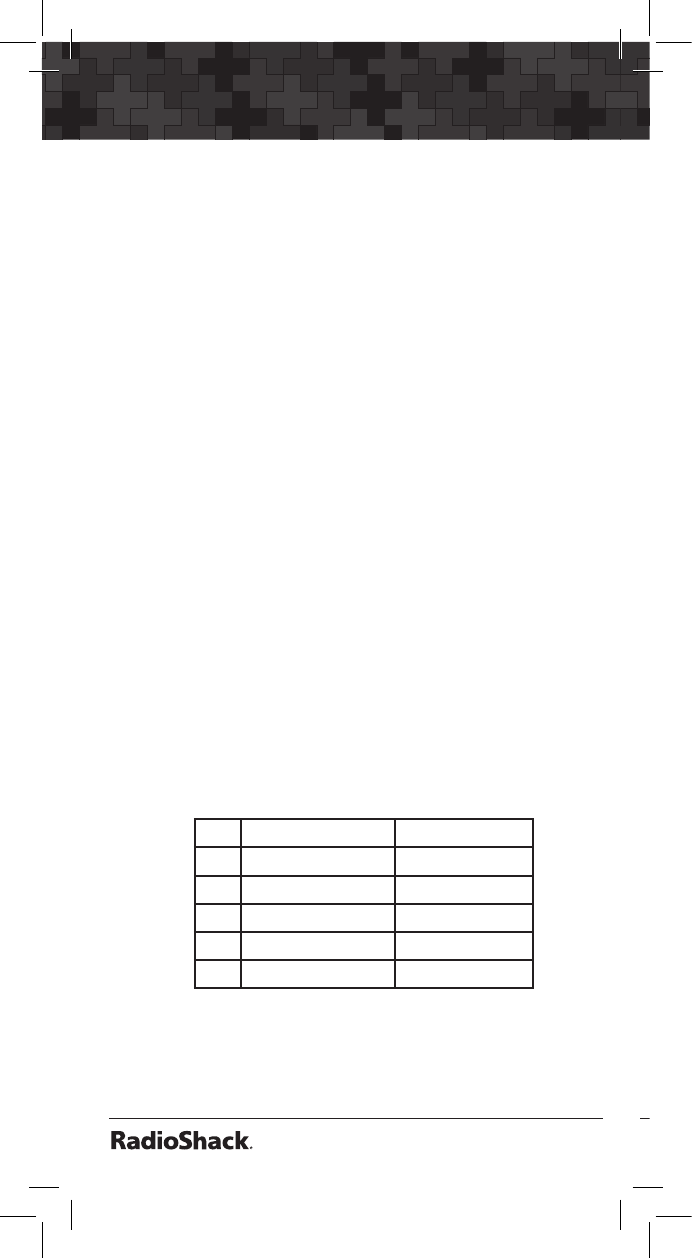
Freq. (MHz) Band
0 30.8 - 47.6 VHF Low Band
1 151-173 VHF High Band
2 453-468 UHF Band
3 764-797 700 MHz Band
4 851-869 800 MHz Band
62
63
Dedicated Searches
• Aircraft - Searches civilian and military air
frequencies.
Freq. (MHz) Band
0 108-118 Navigation
1 118-137 Civilian Voice
2 138-150 Military Voice
(excludes 2m
Amateur)
3 225-400 Military Voice
• Ham - Searches amateur radio frequencies.
Freq. (MHz) Band
0 28.0-29.7 10m Band
1 50-54 6m Band
2 144-148 2m Band
3 222-225 1.25cm Band
4 420-450 70cm Band
5 902-928 33cm Band
6 1240-1300 23cm Band
• CB - Searches the citizen’s band radio
frequencies.
• Marine - Searches the VHF-FM marine radio
band.
• FRS/GMRS/MURS/DOT/STAR (F/G/MURS)
Searches the FRS, GMRS, MURS, DOT and
STAR radio frequencies.
2. Use the numeric keypad to toggle the sub
bands on and off while searching.
3. Press p or q to change the search direction.
4. Press the FrL/O softkey to add a found
frequency to the lockout list.
5. Press the STOR softkey to create a new CONV
object using the found frequency.

64
Dedicated Searches
65
Dedicated Signal Stalker II
Dedicated STLK mode lets you access and run
Signal Stalker II easily and quickly.
In Manual, Program or Scan mode, press FUNC
SCAN to access the Signal Stalker II dedicated
mode.
Note: When a signal is being received, the Band
softkey (F1) changes to FrL/O. You can access
the Band softkey by pressing FUNC F1 when the
F1 key function is FrL/O.
Operation of the dedicated Signal Stalker II
mode is almost identical to that of the object
mode, with one exception. When dedicated
Signal Stalker II mode is used, you may press
the numeric key on the keypad that corresponds
with the sub-band you wish to enable or disable.
Disabling a sub-band will cause the Signal Stalker
II system to skip the frequencies within that sub-
band as it performs its sweeps.
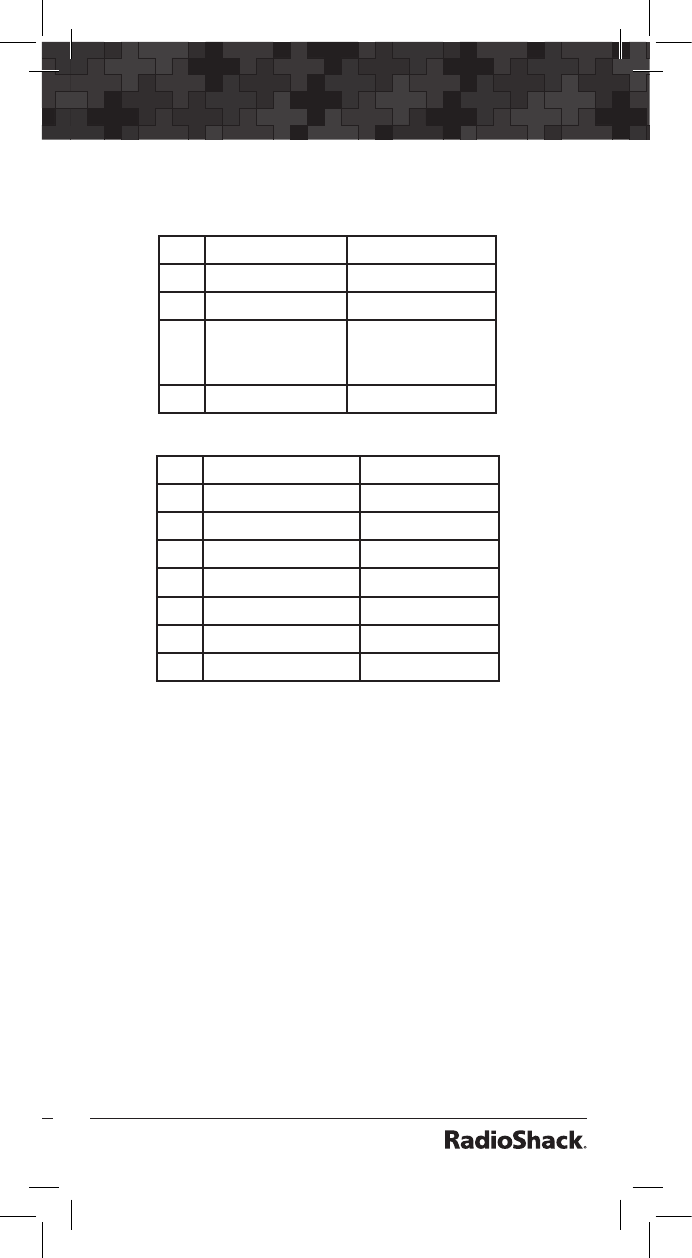
Signal Stalker II sub-bands:
Freq. (MHz) Band
0 25-54 MHz VHF Low Band
1 108-137 VHF Aircraft Band
2 137-174 MHz VHF High Band
3 216-300 220 MHz Commercial/
Amateur Band
4 300-406 UHF Military Air Band
5 406-470 UHF Band
6 470-512 UHF-T Band
7 764-797 700 MHz Band
8 806-869 800 MHz Band
9 894-1300 MHz 900 MHz Band, 23 cm
Amateur Band
Public Safety sub bands:
Freq. (MHz) Band
0 30.8 - 47.6 VHF Low Band
1 151-173 VHF High Band
2 453-468 UHF Band
3 764-797 700 MHz Band
4 806-869 800 MHz Band
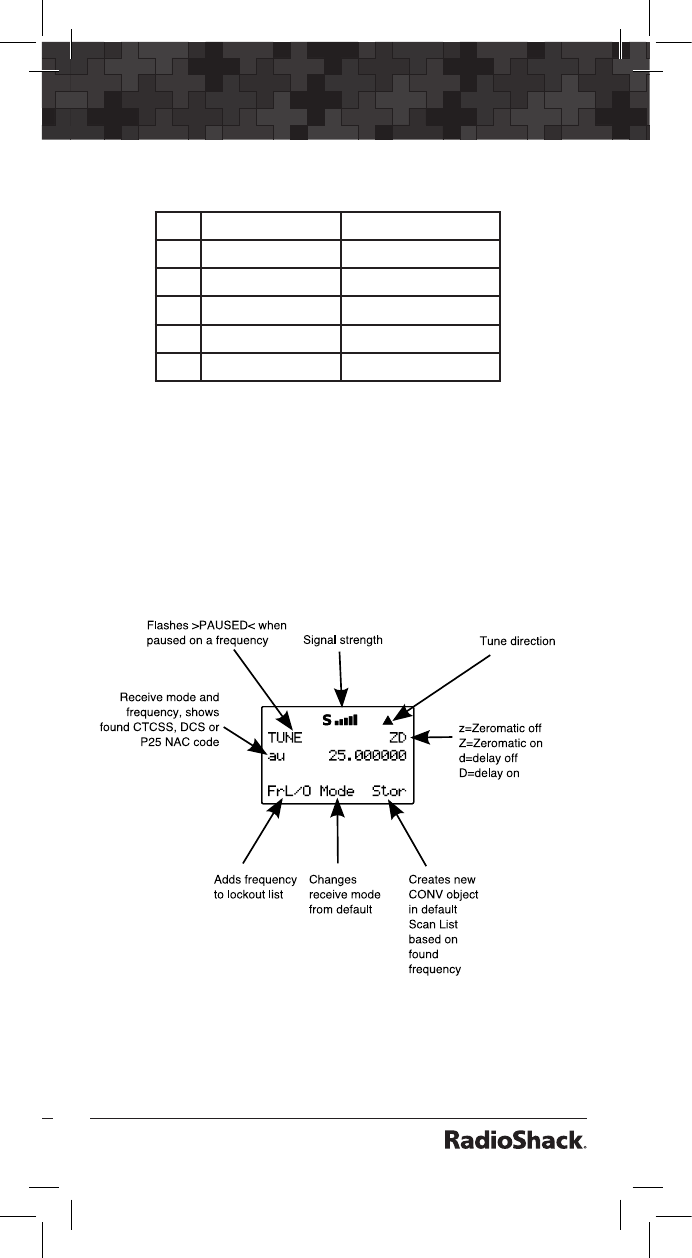
Dedicated TUNE Search
Your scanner’s dedicated TUNE mode provides
you with the ability to quickly enter any frequency
and monitor that frequency for transmissions, or
search up or down from that frequency for activity.
1. To enter
TUNE
mode, press TUNE. The
scanner displays the
TUNE
screen.
By default,
TUNE
mode is paused when first
activated.
64
65
Dedicated Searches
Public Safety sub bands:
Freq. (MHz) Band
0 30.8 - 47.6 VHF Low Band
1 151-173 VHF High Band
2 453-468 UHF Band
3 764-797 700 MHz Band
4 806-869 800 MHz Band
Dedicated TUNE Search
Your scanner’s dedicated TUNE mode provides
you with the ability to quickly enter any frequency
and monitor that frequency for transmissions, or
search up or down from that frequency for activity.
1. To enter
TUNE
mode, press TUNE. The
scanner displays the
TUNE
screen.
By default,
TUNE
mode is paused when first
activated.

66
Dedicated Searches
67
2. Press PSE to begin searching from the current
frequency.
3. Press p or q to change the search direction.
or Press FrL/O softkey to add a found
frequency to the lockout list.
or Press the MODE softkey to change the receive
mode (AM, FM, NFM) from the default for the
current frequency range (au).
or Press STOR to create a new CONV object
using the found frequency.
or Use the keypad to enter a new frequency, and
press ENT to make that the
TUNE
frequency.
Notes:
• Using FUNC TUNE from any other mode will
load the last active frequency from the other
mode into
TUNE
. For example, pressing
FUNC TUNE while parked on a trunked radio
TGRP will load the control channel frequency
into the
TUNE
mode if the control channel
frequency is the last frequency that the
scanner checked while scanning.
• Dedicated
TUNE
mode will always check
for the presence of encoded squelch and
digital modulation each time it finds an active
frequency. If a valid encoded squelch code
is found, it will be shown on the display, and
stored automatically when you press STOR to
create a new CONV object.
• Dedicated
TUNE
mode also displays
information about trunking control channels
and trunked voice channels it finds while
tuning through the RF spectrum.
The following information is displayed for each
trunking mode:
66
67
Dedicated Searches
Trunked Mode Analysis Display
Motorola 3600
baud control
channel
qq% SID:ssss Stt
qq = decoding quality of the control
channel data, SID = System ID, and
S = Site Number
P25 9600 BPS
control channel
qq% Nnnn W:wwwww
Sys:sss Rrr Stt
qq = decoding quality of the control
channel data, N = NAC, W = WACN, SYS =
System ID, R = RFSS, and S = Site Number
EDACS control
channel
qq% S:ss h/H s/S a/A
qq = decoding quality of the control
channel data, S = Site ID, h/H = not home
site/is home site, s/S = not SCAT site/is
SCAT site, a/A = not Aux CC/is Aux CC
LTR home
repeater
HR:hh A–HH–GGG
HR = the home repeater number of the
tuned frequency, A-HH-GGG = the Area,
Home Repeater and Group ID of the LTR
talkgroup
Motorola
analog voice
channel
VC: lsTGID–nnnnn
lsTGID = the decoded talkgroup ID data
from the lowspeed data stream
Note that the analog lowspeed data
protocol does not provide error
correction, and some false “VC: lsTGID”
readings should be expected.
Tune LED
Tune LED can provide visual indication of signal
strength using the tri-color LED.
To activate the Tune LED:
1. Press PGM for Program Mode.
2. Press GLOB softkey.
3. Press q to select Tune LED:.
4. Press t or u to select Tune LED on or off.
5. Press the SAVE softkey to save your changes
to the radio’s configuration memory.

68
Weather Scanning
69
Weather Scanning
Note: The weather alert feature is an extremely
sensitive, high quality receiver of weather
frequencies. However, the included flex antenna
is optimized for general purpose scanning. If you
use this scanner as your only means for receiving
weather alerts, please check to be sure you are
receiving a clear signal on the flex antenna or
switch to an external antenna that gives you clear
reception of a local NOAA weather broadcast.
Weather Radio Mode
Weather radio mode allows you to receive weather
broadcasts from your local weather service.
To use weather radio mode:
1. Press WX.
The scanner will quickly scan and lock on
to the first active weather radio frequency it
receives.
2. Press p or q to look for other weather radio
transmitters.
It is generally best to select the weather
radio transmitter that provides you with the
strongest signal. You can use the signal meter
to help you chose the best weather radio
transmitter for your area.
While operating in Weather Radio Mode,
your scanner will alert on SAME messages
that match the SAME location codes you
have entered, or all SAME messages if you do
not enter any SAME location codes.

68
69
Weather Scanning
Weather Priority Mode
Weather Priority mode samples the specified
weather frequency periodically while scanning
to see if the All Hazards 1050 Hz Warning Alert
Tone (WAT) is present. If the WAT is present,
the scanner will sound an alarm and tune to
the specified weather frequency to monitor the
nature of the alert.
To activate Weather Priority Mode:
1. Press WX.
2. Press p or q to look for other weather radio
transmitters and find the strongest weather
radio transmitter for your location.
3. Press PRI.
SAME Standby Mode
SAME Standby Mode monitors the specified
weather frequency silently, waiting to receive a
Specific Area Message Encoding (SAME) alert
that corresponds with a SAME location code that
you have previously entered. If there is a match,
the scanner will sound an alarm, display the alert
type, and monitor the nature of the alert.
To activate SAME Standby Mode, first you should
provide at least one SAME location code for your
city, county or state. By default, SAME mode will
alert on any SAME message received if no SAME
location codes are entered.
SAME alerts include FIPS codes to identify areas,
established by the US Census bureau. You can set
your scanner to alert for all areas or limit weather
alerts to up to 10 specific areas by FIPS code. A
list of SAME location codes can be found online
at: www.weather.gov.
70
Weather Scanning
71
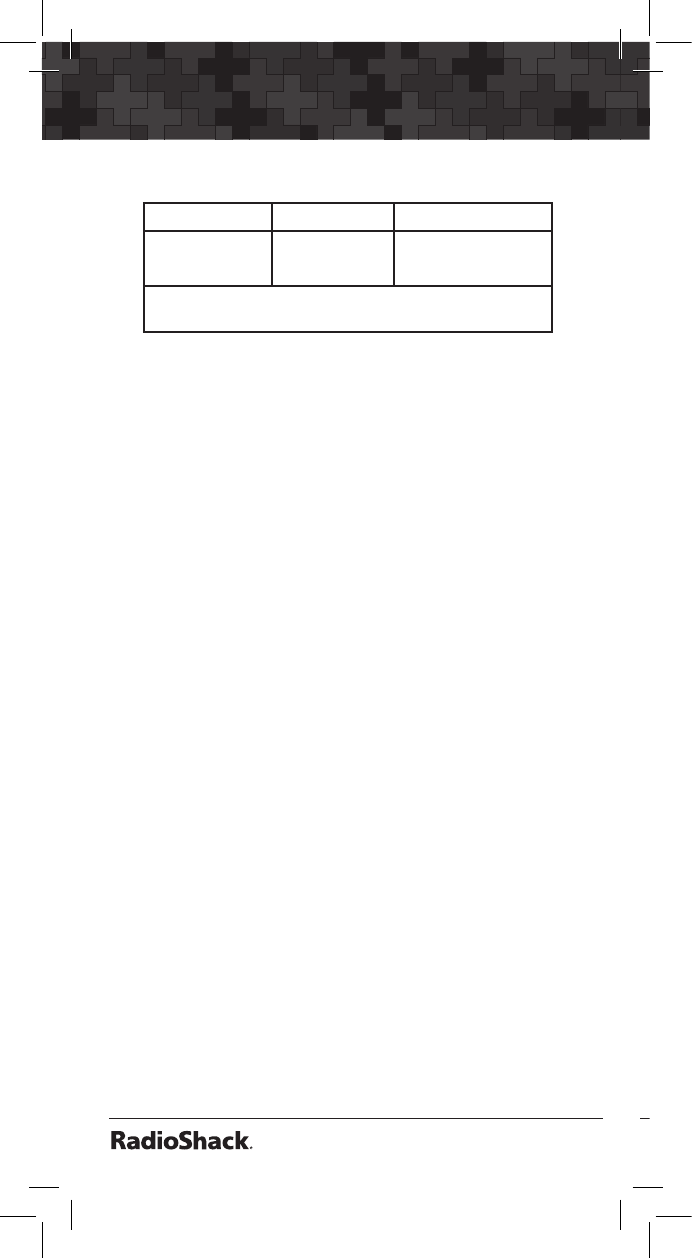
FIPS codes are formatted as follows:
Subdivisions State Code County Code
0-9
(0=entire area)
01-50
(00=all states)
XXX
(000=all counties)
Example: 048439
(0=All; 48=Texas; 439=Tarrant County)
In addition to the code for your location, you may
wish to enter additional codes for surrounding
areas and any other areas of interest so that
you can receive advance warning of adverse or
dangerous weather that may be headed in your
direction.
Your scanner also has a SAME wildcard feature,
which allows you to set the radio to alarm on
partial matches of the location code.
To enter SAME Location and Event Codes
1. Press WX to enter Weather mode.
2. Press the SAME softkey to add or edit SAME
entries.
3. Press p or q to scroll to the desired SAME
code entry.
4. Press SEL to edit the selected SAME entry.
5. With the Entry: field selected, press u to
turn the entry on.
Note: When a SAME location/event code storage
location is set for Entry ON, the radio will
process the SAME location and event code that
is stored there. When a storage location is set for
Entry OFF, that SAME location and event code
will be ignored.
6. Scroll to Code: and press u to enter a SAME
location code.
7. Press the number keys to enter a SAME code.

70
71
Weather Scanning
Note: The PRO-651 supports entry of Extended
SAME codes, which can include numbers and
letters. The text entry mode is used to enter both
numerical SAME codes and extended SAME
codes. To enter a numerical SAME code, simply
precede each number in the SAME code with
“1.” For example, to enter SAME code 048113,
press 10 14 18 11 11 13.
8. Scroll to the Event: field. Note the current
default of ***, which will allow all messages
for the specified SAME location code. We
recommend that you leave the event code
with *** to receive all alerts. A list of event
codes can be found at www.weather.gov.
9. Scroll to Tag: and press u.
10. Input a tag name that corresponds with the
SAME location code that you have entered.
See “Appendix C: Text Entry and QuickText” on
page 125 for information on entering text.
11. Scroll to Alarm:. You can specify different
alarm sounds for this SAME entry. We
recommend that you use the default setting
here for general purpose weather alerting.
12. Scroll to Lockout:. Default is off. Lockout is
a special purpose parameter that can be used
to lock out individual event or area codes. We
recommend that you leave Lockout set to
off for general purpose weather alerting.
13. When you have finished editing your SAME
entry, press the Save softkey to store the
data.
14. Press the Save softkey again to save all
SAME changes and return to the Weather
mode.