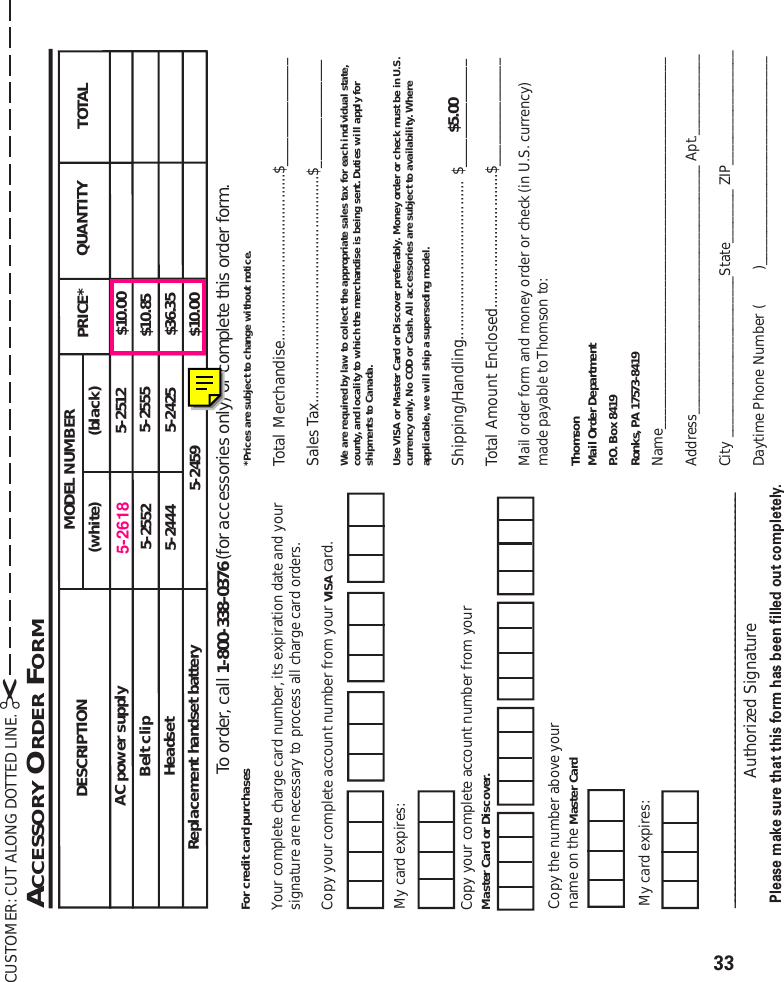
Thomson 2-6928D 900MHz SINGLE-LINE CORDLESS TELEPHONE User Manual 26998C DOM IB E 0

Thomson Inc. 900MHz SINGLE-LINE CORDLESS TELEPHONE 26998C DOM IB E 0

Contents

Draft Users Manual

1We bring good things to life.40-Channel 900 MHz Caller ID CordlessTelephone/Answering SystemUser’s Guide26998
2EQUIPMENT APPROVAL INFORMATIONYour telephone equipment is approved for connection to the Public Switched Telephone Network and is in compliance withparts 15 and 68, FCC Rules and Regulations and the Technical Requirements for Telephone Terminal Equipment publishedby ACTA.1Notification to the Local Telephone CompanyOn the bottom of this equipment is a label indicating, among other information, the US number and Ringer EquivalenceNumber (REN) for the equipment. You must, upon request, provide this information to your telephone company.The REN is useful in determining the number of devices you may connect to your telephone line and still have all ofthese devices ring when your telephone number is called. In most (but not all) areas, the sum of the RENs of alldevices connected to one line should not exceed 5. To be certain of the number of devices you may connect to yourline as determined by the REN, you should contact your local telephone company.A plug and jack used to connect this equipment to the premises wiring and telephone network must comply with theapplicable FCC Part 68 rules and requirements adopted by the ACTA. A compliant telephone cord and modular plug isprovided with this product. It is designed to be connected to a compatible modular jack that is also compliant. Seeinstallation instructions for details.Notes•This equipment may not be used on coin service provided by the telephone company.•Party lines are subject to state tariffs, and therefore, you may not be able to use your own telephone equipment ifyou are on a party line. Check with your local telephone company.•Notice must be given to the telephone company upon permanent disconnection of your telephone from your line.•If your home has specially wired alarm equipment connected to the telephone line, ensure the installation of thisproduct does not disable your alarm equipment. If you have questions about what will disable alarm equipment,consult your telephone company or a qualified installer.2Rights of the Telephone CompanyShould your equipment cause trouble on your line which may harm the telephone network, the telephone company shall,where practicable, notify you that temporary discontinuance of service may be required. Where prior notice is notpracticable and the circumstances warrant such action, the telephone company may temporarily discontinue serviceimmediately. In case of such temporary discontinuance, the telephone company must: (1) promptly notify you of suchtemporary discontinuance; (2) afford you the opportunity to correct the situation; and (3) inform you of your right to bring acomplaint to the Commission pursuant to procedures set forth in Subpart E of Part 68, FCC Rules and Regulations.The telephone company may make changes in its communications facilities, equipment, operations or procedures wheresuch action is required in the operation of its business and not inconsistent with FCC Rules and Regulations. If these changesare expected to affect the use or performance of your telephone equipment, the telephone company must give you adequatenotice, in writing, to allow you to maintain uninterrupted service.INTERFERENCE INFORMATIONThis device complies with Part 15 of the FCC Rules. Operation is subject to the following two conditions: (1) This device may notcause harmful interference; and (2) This device must accept any interference received, including interference that may causeundesired operation.This equipment has been tested and found to comply with the limits for a Class B digital device, pursuant to Part 15 of the FCCRules. These limits are designed to provide reasonable protection against harmful interference in a residential installation.This equipment generates, uses, and can radiate radio frequency energy and, if not installed and used in accordance with theinstructions, may cause harmful interference to radio communications. However, there is no guarantee that interference will notoccur in a particular installation.If this equipment does cause harmful interference to radio or television reception, which can be determined by turning theequipment off and on, the user is encouraged to try to correct the interference by one or more of the following measures:•Reorient or relocate the receiving antenna (that is, the antenna for radio or television that is “receiving” the interference).•Reorient or relocate and increase the separation between the telecommunications equipment and receiving antenna.•Connect the telecommunications equipment into an outlet on a circuit different from that to which the receiving antenna isconnected.If these measures do not eliminate the interference, please consult your dealer or an experienced radio/televisiontechnician for additional suggestions. Also, the Federal Communications Commission has prepared a helpful booklet,“How To Identify and Resolve Radio/TV Interference Problems.” This booklet is available from the U.S. Government PrintingOffice, Washington, D.C. 20402. Please specify stock number 004-000-00345-4 when ordering copies.HEARING AID COMPATIBILITYThis telephone system meets FCC standards for Hearing Aid Compatibility.US NUMBER IS LOCATED ON THE CABINET BOTTOMREN NUMBER IS LOCATED ON THE CABINET BOTTOM
3SEE MARKING ON BOTTOM / BACK OF PRODUCTRISK OF ELECTRIC SHOCK            DO NOT OPENWARNING: TOPREVENT FIRE ORELECTRICAL SHOCKHAZARD, DO NOTEXPOSE THISPRODUCT  TO RAINOR MOISTURE.THE LIGHTNINGFLASH AND ARROWHEAD WITHIN THETRIANGLE IS AWARNING SIGNALERTING YOU OF“DANGEROUSVOLTAGE” INSIDETHE PRODUCT.CAUTION: TO REDUCE THERISK OF ELECTRIC SHOCK, DONOT REMOVE COVER (ORBACK). NO USERSERVICEABLE PARTS INSIDE.REFER SERVICING TOQUALIFIED SERVICEPERSONNEL.THE EXCLAMATIONPOINT WITHIN THETRIANGLE IS AWARNING SIGNALERTING YOU  OFIMPORTANTINSTRUCTIONSACCOMPANYINGTHE PRODUCT.CAUTION:TABLE OF CONTENTSEQUIPMENT APPROVAL INFORMATION ........ 2INTERFERENCE INFORMATION ................... 2HEARING AID COMPATIBILITY ................... 2INTRODUCTION ..................................... 5BEFORE Y OU BEGIN .............................. 5PARTS CHECKLIST ............................. 5TELEPHONE JACK REQUIREMENTS ........ 5INSTALLATION AND SET UP..................... 6IMPORTANT INSTALLATION INFORMATION 6INSTALLING THE PHONE ...................... 7CONNECTING THE AC (ELECTRICAL)POWER ............................................ 7CONNECTING THE T ELEPHONE LINE ....... 7WALL MOUNTING ............................. 8TELEPHONE SETUP ................................ 8SETTING THE DISPLAY LANGUAGE ........ 9TONE/PULSE DIALING ........................ 9SETTING THE LOCAL AREA CODE ......... 9ANSWERING SYSTEM SETUP ................ 10SETTING THE V OICE T IME/DAY STAMP .10SETTING THE RING SELECT ................11SPEAKER VOLUME ............................11RECORDING THE OUTGOINGANNOUNCEMENT..............................11REVIEWING ANNOUNCEMENT.......11CORDLESS PHONE BASICS .................... 12MAKING A CALL ............................. 12REDIAL .......................................... 12RECEIVING A CALL ........................... 12FLASH ........................................... 12VOLUME ........................................ 12RINGER SWITCH.............................. 13CANCEL ......................................... 13IN USE/INDICATOR LIGHT .................. 13FINDING THE HANDSET ..................... 13CHANNEL BUTTON .......................... 13TEMPORARY TONE ........................... 13CALLER ID FEATURES .......................... 14TRANSFERRING CALLER ID RECORDSTO MEMORY ................................... 14CALLER ID WITH CALL WAITING ........ 15RECEIVING AND STORING CALLS ........ 15REVIEWING MESSAGES .................... 15DELETING RECORDS......................... 15DELETING THE CURRENT RECORD 16DELETING ALL RECORDS ........... 16DIALING A CALLER ID NUMBER ......... 16CHANGING THE NUMBER FORMAT ...... 16THE MEMORY FEATURE ....................... 17STORING A NUMBER IN MEMORY ...... 17CHANGING A STORED NUMBER ......... 17DIALING A STORED NUMBER ............. 18(Table of Contents continuedon next page)
4DIALING CALLER ID NUMBERS .......... 18CHAIN DIALING FROM MEMORY .. 18INSERTING A PAUSE IN THE DIALINGSEQUENCE ..................................... 19REVIEWING AND DELETING STOREDNUMBERS ...................................... 19ANSWERING SYSTEM OPERATION .......... 19MESSAGES INDICATOR ..................... 19SCREENING CALLS FROM THE BASE .... 20MESSAGE PLAYBACK ....................... 20MEMORY FULL ............................... 20ERASING MESSAGES ....................... 20LEAVING A MEMO ........................... 21REMOTE ACCESS ................................ 21USING THE HANDSET ....................... 21ANSWERER INDICATOR .............. 22SCREENING CALLS FROM THEHANDSET....................................... 22MEMORY FULL ............................... 22ACCESSING THE ANSWERING SYSTEMFROM ANOTHER LOCATION ................ 23CHANGING THE SECURITY CODE......... 23HEADSET AND BELT CLIP OPERATION ..... 24CONNECTING A HEADSET TO THEHANDSET....................................... 24CONNECTING THE BELT CLIP .............. 24CHANGING THE BATTERY ...................... 25BATTERY SAFETY PRECAUTIONS .25GENERAL PRODUCT CARE .................... 26HANDSET SOUND SIGNALS .................. 26ANSWER STATUS INDICATORS ............... 26HANDSET INDICATORS .......................... 27TROUBLESHOOTING GUIDE ................... 28CAUSES OF POOR RECEPTION ............... 30SERVICE ............................................ 30INDEX ............................................... 31ACCESSORY ORDER FORM ................... 33LIMITED WARRANTY ............................ 34
5INTRODUCTIONYour cordless telephone/answering system with Caller ID is designed togive you flexibility in use and high quality performance. To get the mostfrom your new cordless telephone/answering system, we suggest that youtake a few minutes right now to read through this instruction manual.CAUTION: When using telephone equipment, there are basic safetyinstructions that should always be followed. Refer to the IMPORTANTSAFETY INSTRUCTIONS provided with this product and save themfor future reference.BEFORE YOU BEGINPARTS CHECKLISTMake sure your package includes the items shown here.TELEPHONE JACK REQUIREMENTSTo use this phone, you need an RJ11C type modulartelephone jack, which might look like the one picturedhere, installed in your home. If you don’t have amodular jack, call your local phone company to find outhow to get one installed.IMPORTANT: Because cordless phones operate on electricity, you shouldhave at least one phone in your home that isn’t cordless, in case the power inyour home goes out.volumememorev/skipmessages- +play/stoperasemicin use/chargepageTALKanswererredial memory formatdelete ringerchanneloff    onflashabc2jkl5tuv8oper0def3mno6wxyz9#1ghi4pqrs7*play/stopreview skipCALL BACKprogrampausetonecancel eraseCID/VOLBase Handset AC powersupply Telephoneline cord Belt clip (providedwith 26998 only)Modulartelephoneline jackWall plate
6INSTALLATION AND SET UPCAUTION: Always disconnect phone cords from the wall outlets beforebattery installation or replacement.INSTALLATION NOTE: Some cordless telephones operate at frequenciesthat may cause interference to nearby TVs, microwave ovens, and VCRs. Tominimize or prevent such interference, the base of the cordless telephoneshould not be placed near or on top of a TV, microwave oven, or VCR. Ifinterference continues, moving the cordless telephone farther away from theTV or VCR will often reduce or eliminate the interference. Certain othercommunications devices may also use the 900 MHz frequency forcommunication, and, if properly set, these devices may interfere with eachother and/or your new telephone. If you are concerned with interference,please refer to the owner’s manual for these devices on how to properly setchannels to avoid interference. Typical devices that may use the 900 MHzfrequency for communication include wireless audio/video senders, wirelesscomputer networks, multi-handset cordless telephone systems, and some long-range cordless telephone systems.IMPORTANT INSTALLATION INFORMATION•Never install telephone wiring during a lightning storm.•Never install telephone jacks in wet locations unless the jack isspecifically designed for wet locations.•Never touch uninsulated telephone wires or terminals, unless thetelephone line has been disconnected at the network interface.•Use caution when installing or modifying telephone lines.•Temporarily disconnect any equipment connected to the phone such asfaxes, other phones, or modems.
7INSTALLING THE PHONEYour cordless telephone/answering system should be placed on a levelsurface such as a desk or table top, or you can mount it on a wall.CONNECTING THE AC (ELECTRICAL) POWERPlug the power supply cord into the power jack on the bottom of the baseand the other end into an electrical outlet. The in use/charge indicator turnson to indicate the battery is charging.Allow the phone to charge for 12 hours prior to first use. If you don’tproperly charge the phone, battery performance is compromised.NOTE: DO NOT connect the telephone line to the modular jack until thephone has charged for 12 hours.CAUTION: Use only the ATLINKS USA, Inc. power supply 5-2512(black) or 5-2509 (white)  that came with this unit. Using other powersupplies may damage the unit.CONNECTING THE TELEPHONE LINE1. Plug the one end of the telephone line cord into the jack  TEL LINE on thebottom of the base and the other end into a modular wall phone jack.2. Set the RINGER switch (on the handset) to ON, and place the handset inthe cradle.TALKanswererredial memory formatdelete ringerchanneloff    onflashabc2jkl5tuv8oper0def3mno6wxyz9#1ghi4pqrs7*play/stopreview skipCALL BACKprogrampausetonecancel eraseCID/VOL12NOTE: If the battery is not installed into the handset or its connector isnot properly plugged into the battery jack, "NO BATTERY" shows in thedisplay when the handset is placed on the its base cradle.5-2618grey
8WALL MOUNTINGNOTE: For best results, leave the phone on a flat surface during initialcharging before you hang the phone on the wall.If you want to mount the phone on a wall, slip the mounting holes (on theback of the base) over the wall plate posts, and slide the unit down intoplace. (Wall plate not included.)TELEPHONE SETUPTALKanswererredial memory formatdelete ringerchanneloff    onflashabc2jkl5tuv8oper0def3mno6wxyz9#1ghi4pqrs7*play/stopreview skipCALL BACKprogrampausetonecancel eraseCID/VOLDisplayformat/answerer buttonflash/program buttonredial buttonmemory buttonchannel/deletebuttonoff/on ringer switchTALK/CALLBACKbutton CID/VOL buttonsreview button*tone/cancelbutton0 oper/erase button# pause buttonskip buttonplay/stop button
9There are three programmable menus available: Language, Tone/PulseDialing, and Local Area Code.SETTING THE DISPLAY LANGUAGE1. Make sure the phone is OFF (not in TALK mode).2. Press and release flash/program button until 1 ENG 2 FRA 3 ESP showsin the display. The default setting is English3. Use the handset number pad or press the left or right arrow buttons toenter the desired setting. For example, to choose English press thenumber 1 key.4. When finished, press and release flash/program button again to storethe setting. You will hear a confirmation tone, and the unit enters theTone/Pulse Dialing menu.TONE/PULSE DIALING1. Make sure the phone is OFF (not in TALK mode).2. Press and release the flash/program button until 1TONE 2PULSE showsin the display. The default setting is TONE.3. Use the handset number pad or press the left or right arrow buttons toenter the desired setting. For example, to choose Tone dialing, press thenumber 1 key.4. Press the flash/program button again to store. You will hear a confirmationtone, and the unit enters the Local Area Code Setting menu.SETTING THE LOCAL AREA CODE1. Make sure the phone is OFF (not in TALK mode).2. Press and release flash/program button until ENTER AREA CODE showson the display.3. Use the handset number pad to enter your three digit area code.4. When finished, press and release flash/program button again to storethe area code and exit setup. You will hear a confirmation tone.NOTE: If you make a mistake, repeat steps 1-3.
10ANSWERING SYSTEM SETUPThis section shows you how to set up your answering system to receive incomingcalls. Before you begin the setup, you must turn on the answering system.•Press the answer on/off button on the side of the base to turn theanswering system on and off.NOTE: The answering system  displays “- -” when it is off.SETTING THE VOICE TIME/DAY STAMP1. Make sure the answering system is ON.2. Press and hold the day/check button to set the day of the week.3. Press the hour button to set the hour (a.m. or p.m.).4. Press the min button to set the minute. When you press and hold themin button, the time advances in 5-minute intervals.5. Press and release the day/check button to review the day and time settings.volumememorev/skipmessages- +play/stoperasemicin use/chargepageannounce buttonanswer on/offbuttonday/check buttonhour buttonmin buttonerase buttonmicplay/stop buttonpage buttonin use/chargeindicatormemo buttonvolume buttonsdisplayreview (-)/skip (+)buttonSETTING VOICE PROMPT LANGUAGEThe default voice prompt language is English.To change the voice prompt language of the answering system, press and hold theskip button for 2 seconds. The unit announces "SPANISH SELECTED".Note: To convert to "English", press and hold skip button again for 2 seconds.Note: In remote access mode, it will follow the selected language set and cannotconvert the voice prompt language.Besides basic telephone feature, your 26998 unit is also equipped with Digital Answering feature.  It can store message,when you are not available to answer the call, up to 10 minutes.  Besides, its voice prompt is dual language English andSpanish selectable.
11SETTING THE RING SELECTUse the RING SELECT switch on the bottom of the base to select thenumber of times you want the phone to ring before the system answersthe call. You may choose three or five rings.SPEAKER VOLUMEUse the volume up or down to adjust speaker volume to a comfortable level.RECORDING THE OUTGOING ANNOUNCEMENTFor best results when recording, you should be about nine inches from themicrophone, and eliminate as much background noise as possible.1. Make sure the answering system is ON.2. Press and hold the announce button. You need to hold the button untilyou finish the announcement.3. Begin talking after you hear the beep.4. Release the button when you finish your announcement.If you choose not to record an outgoing announcement, a defaultannouncement will play. To return to the default announcement after youhave recorded your own outgoing announcement, press and hold theannounce button and release it when you hear the beep.Sample Outgoing AnnouncementHi, this is (use your name here), I can't answer the phone right now, so please leave yourname, number and a brief message after the tone, and I'll get back to you.  Thanks.REVIEWING ANNOUNCEMENT•Press and release announce button to review your outgoingannouncement.
12CORDLESS PHONE BASICSMAKING A CALLTo make a call:•Press the  TALK/CALLBACK button before you dial.•Press TALK/CALLBACK button or place the handset in the base tohang up.IMPORTANT: Because cordless phones operate on electricity, you shouldhave at least one phone in your home that isn’t cordless, in case the power inyour home goes out.REDIALPress the redial button to redial the last number you called (up to 32digits).If you get a busy signal, and want to keep dialing the number, press TALK/CALLBACK to turn off the phone. Press TALK/CALLBACK again to turn itback on.  Then press redial to dial the number.RECEIVING A CALLTo answer a call you must press the  TALK/CALLBACK button on thehandset before you can talk.FLASHUse the flash/program button to activate custom calling services suchas call waiting or call transfer, which are available through your localphone company.TIP: Don't use the TALK/CALLBACK button to activate custom callingservices such as call waiting, or you’ll hang up the phone.VOLUMEWhen the phone is ON, press the CID/VOL left (-) and right (+) arrowbuttons to adjust the handset volume. There are four settings. VOL 1 is thelowest level and VOL 4 is the loudest.
13RINGER SWITCHThe ringer switch must be ON for the handset to ring during incoming calls.CANCELPress the *tone/cancel button to cancel any command you initiated.IN USE/INDICATOR LIGHTThe phone is ON or being charged when the in use/charge indicator on thebase is turned on.FINDING THE HANDSETThis feature helps to locate a misplaced handset.Press the page button on the base. The display shows PAGING. Thehandset beeps for about two minutes or until you press TALK/CALLBACKon the handset or press the page button on the base.NOTE: You can still page the handset with the ringer off.CHANNEL BUTTONWhile talking, you might need to manually change the channel in order toreduce static caused by baby monitors, garage door openers, or othercordless phones. Press and release the channel/delete button to advanceto the next clear channel.TEMPORARY TONEThis feature enables pulse (rotary) service phone users to access touch-tone services offered by banks, credit card companies, etc. Press the *tonebutton to temporarily make the phone touch-tone compatible. To getinformation about your bank account, for example, you would:1. Call the bank’s information line.2. Press the *tone key, when your call is answered.3. Follow the voice menu instructions to get the information. When youhang up, the phone goes back to pulse (rotary) service.
14CALLER ID FEATURESThis unit receives and displays information transmitted by your localphone company. This information can include the phone number, date, andtime; or the name, phone number, date, and time. The unit can store up to40 calls for later review.TRANSFERRING CALLER ID RECORDS TO MEMORYYou may transfer a Caller ID record to the phone’s internal memory.1. Use the CID/VOL(-) arrow or CID/VOL(+) arrow button to scroll to thedesired record.2. Press the memory button, and then press the desired memory location.For example, press the number 1 key to store the record in memorylocation 1. You will hear a confirmation tone.To replace a Caller ID record stored in a memory location with a newCaller ID record:1. Repeat steps 1 through 2 in Transferring Caller ID Records to Memory.2. Press the memory button and REPLACE MEMO? shows in the display.3. Press *tone/cancel to exit, or press memory again and the new CIDrecord replaces the old CID record in that memory location. You will heara confirmation tone.Time DateCaller ID nameNumber of callsCaller ID phone number317-555-423110:51 A.M. 8/11 REPTCALLNEWMEMO#25SMITH  JOHN
15CALLER ID WITH CALL WAITINGProvided you subscribe to Caller ID with Call Waiting service from yourphone company, you may see who is calling when you hear the call waitingbeep. The caller identification information appears in the display after youhear the tone.•Press the flash/program button to put the current call on hold so thatyou can answer the incoming call.RECEIVING AND STORING CALLSWhen you receive a call, Caller ID information is transmitted by the phonecompany to your telephone between the first and second ring.VERY IMPORTANT:  In order to use all of the features of this unit, you mustsubscribe to either the standard Name/Number Caller ID Service or Caller IDwith Call Waiting Service available through your local telephone company. Toknow who is calling while you are on the phone, you must subscribe to CallerID with Call Waiting Service.When the memory is full, a new call automatically replaces the oldest callin memory. NEW appears in the display for calls received that have notbeen reviewed.NOTE: Check with your local phone company regarding nameservice availability.REVIEWING MESSAGESAs calls are received and stored, the display is updated to let you knowhow many calls have been received.•Press the CID/VOL left (-) arrow button to scroll through the call recordsfrom the most recent to the oldest.•Press the CID/VOL right (+) arrow button to scroll through the callrecords from the oldest to the newest.DELETING RECORDSUse the channel/delete button to erase the record currently shown in thedisplay or all records.
16DELETING THE CURRENT RECORD1. Press channel/delete button. The display shows DELETE?2. Press delete/channel again to erase the current record. The displayshows DELETED, and you will hear a confirmation tone.DELETING ALL RECORDS1. Press and hold channel/delete. The display shows DELETE ALL?2. Press channel/delete again to erase all records. You will hear aconfirmation tone.DIALING A CALLER ID NUMBER1. Make sure the phone is OFF.2. Use the CID/VOL left (-) and right (+) arrow buttons to display thedesired Caller ID record.3. Press the TALK/CALLBACK button to dial the number.CHANGING THE NUMBER FORMATThe format/answerer button lets you change the format of the displayednumber. The available formats are as follows.7-digit 7-digit telephone number.10-digit 3-digit area code + 7-digit telephone number.11-digit long distance code “1” + 3-digit area code + 7-digittelephone number.1. Use the CID/VOL left (-) and right (+) arrow buttons to scroll to thenumber you want to call back.2. If the number will not dial as shown, press the format/answerer button.Repeat if necessary, until the correct number of digits are shown.3. Press TALK/CALLBACK.NOTE: To clear the local area code, press and release flash/program, untilENTER AREA CODE is displayed. Then press channel/delete to delete thecurrent local area code, or enter “000 ” to replace the current one.
17THE MEMORY FEATUREStore up to ten 24-digit numbers in memory for quick dialing. This memoryfeature is in addition to the 40 Caller ID records that can be stored in memory.STORING A NUMBER IN MEMORY1. Make sure the phone is OFF (not in TALK mode).2. Press the memory button.3. Press the desired memory location number (0 through 9).4. Press the memory button again. The display shows ENTER NAME.NOTE: If you don’t want to enter the name, skip step 5.5. Use the keypad to store a name (up to 15 characters). For example, toenter the name Bill Smith, press the two key twice for the letter B, pressthe four key three times for the letter I, and press the five key threetimes for the letter L. After one second, press the five key three timesagain for the second letter L and press the one key to insert a spacebetween the letter L and S. Press the seven key four times for the letterS, press the six key once for the letter M, press the four key three timesfor the letter I, press the eight key once for the letter T, and press the fourkey twice for the letter H.6. Press the memory button to save the name. The display showsENTER NUMBER.7. Use the number keypad to enter the telephone number you want tostore (up to 24 digits).8. Press memory again to store the number. You will hear a confirmation tone.CHANGING A STORED NUMBER1. Repeat steps 1 through 7 in Storing a Name and Number in Memory.2. Press the memory button. “REPLACE MEMO? “shows in the display.3. Press *tone/cancel to exit, or press the memory button to store thenumber. You will hear a confirmation tone.
18DIALING A STORED NUMBER1. Make sure the phone is ON by pressing the TALK/CALLBACK button.2. Press memory.3. Press the number (0-9) for the desired memory location. The numberdials automatically.DIALING CALLER ID NUMBERS1. Make sure the phone is OFF.2. Press memory.3. Use the CID/VOL left (-) and right (+) arrow buttons to scroll through thenumbers stored in memory until the desired number is shown.4. Press TALK/CALLBACK. The number dials automatically.IMPORTANT: If you make test calls to emergency numbers stored in memory,remain on the line and briefly explain the reason for the call to the dispatcher.Also, it’s a good idea to make these calls in off-peak hours, such as earlymorning or late evening.CHAIN DIALING FROM MEMORYUse this feature to make calls which require a sequence of numbers suchas using  a calling card for a frequently called long distance number.Basically, you dial each part of the sequence from memory. The followingexample shows how you can use chain dialing to make a call through along distance service:The Number For Memory LocationLong distance access number 7Authorization code 8Frequently called long distance number 9
191. Make sure the phone is ON.2. Press memory and then press 7.3. When you hear the access tone, press memory and then press 8.4. At the next access tone, press memory and then 9.TIP: Wait for the access tones before pressing the next memory button, oryour call might not go through.INSERTING A PAUSE IN THE DIALING SEQUENCEPress the # pause button to insert a delay in the dialing sequence of astored telephone number when a pause is needed to wait for a dial tone(for example after you dial 9 for an outside line, or to wait for a computeraccess tone).  Each pause counts as one digit in the dialing sequence.Pause shows in the display as a “P ”.REVIEWING AND DELETING STORED NUMBERS1. Press the memory button.2. Use the CID/VOL left (-) and right (+) arrow buttons to scroll to the desiredmemory location or press 0-9.3. While the entry is displayed, press the channel/delete button. Thedisplay shows DELETE ?4. Press channel/delete again to erase the current record. You will hear aconfirmation tone.ANSWERING SYSTEM OPERATION This section discusses the buttons and features on the answering system.MESSAGES INDICATORThe messages indicator shows you the number of new messages youhave received. The answer on/off button must be turned on for themessages indicator to work.
20SCREENING CALLS FROM THE BASEYou can screen incoming calls by waiting for the caller to begin leaving amessage (to hear who it is), then pick up the handset, and press TALK/CALLBACK to talk to the caller. The answering system automatically stopsrecording when you activate the handset or pick up an extension phone.TIP: Make sure the volume on the base is set loud enough to hear yourincoming calls.MESSAGE PLAYBACKThe messages indicator lets you know when you have messages. To playmessages, press the play/stop button on the handset or the base.If you use the handset to play a message, please make sure your handsetis off and press format/answerer to access the answering machine.While a message is playing, you can do the following:•Press play/stop button on the handset or the base to stop themessage playback.•Press the review button on the handset, or the left arrow (-) button onthe base, to go to the previous messages.•Press and release the skip button on the handset, or the (+) right arrowbutton on the base to go to the next message.•Press erase on the handset or base to erase the message that iscurrently playing.MEMORY FULLWhen the memory is full, the system answers after 10 rings. You need toerase some messages so the answering system can record new messages.ERASING MESSAGES•To   erase a message, press play/stop on the base and press and releaseerase button on the base to erase the message that is playing.•To   erase all messages, press and hold the erase button on the basewhen messages have stopped playing.
21•To   erase a message from the handset:1. Press format/answerer button on the handset.2. Press play/stop on the handset.3. Press 0/erase on the handset to erase the message that is playing.NOTE: Erased messages cannot be restored. Also, be careful you don't pressthe erase button as the next unheard message is playing because that messagewill also be erased.LEAVING A MEMOUse the Memo feature to leave a message.1. Press and hold the memo button. You need to hold the button until youfinish the message.2. Begin talking after you hear the beep.3. Release the memo button when you finish.REMOTE ACCESSThis section explains two types of remote access: using the handset toaccess the answering system and accessing the answering system fromanother phone.The handset contains integrated buttons that enable you access theanswering system with the handset.You can also access your answering system from any phone that is tone-dial compatible by entering a 3-digit security code after you hear theoutgoing announcement. A voice menu system guides you through all ofthe procedures.USING THE HANDSETPress the format/answerer button to access the answering system from thecordless handset.
22After you access the answering system, use the marked handset keys justas if you were pressing the corresponding buttons on the base (see"Answering System Operation" for details on functions). To make it easyfor you, the functions are listed on the handset above each number. Forexample, to play messages:1. Press the format/answerer button.2. Press the 2 button (play/stop.)3. When you are finished listening to your messages, press format/answerer again.ANSWERER INDICATORThe remote answering system is active when ANSWERER REMOTE isdisplayed on the handset.SCREENING CALLS FROM THE HANDSETWhen the phone rings:1. Press the format/answerer button to access the answering system. Thedisplay shows CALL SCREENING.2. Listen as the caller leaves a message.3. Press the TALK/CALLBACK button to speak to the caller or pressanswerer to stop screening the call.MEMORY FULLWhen the memory is full, the system answers after 10 rings, beeps, andwaits for the caller to enter the 3-digit security code. If a security code is notentered within 10 seconds after the unit beeps, the phone hangs up.You need to erase some of the messages so the system can record newmessages.NOTE: The unit also answers after the 10th ring if it is turned off. To accessthe answering system, enter your 3-digit security code after you hear the beep.
23ACCESSING THE ANSWERING SYSTEM FROM ANOTHER LOCATIONYou can access your answering system from any touch-tone phone by enteringyour 3-digit security code after you hear the outgoing announcement.1. Dial the phone number for your answering system.2. Enter the security code after you hear the tone.3. Follow the voice menu to use the answering system’s remote functions.The remote feature lets you perform the following functions:To Press this ButtonReview message 1Play back messages 2Stop message playback 2Erase message 0 (during message playback)Skip message 3Turn off/on answering system 4Review voice menu options 7TIP: You can bypass the outgoing announcement by pressing any numberedkey on the keypad while the announcement is playing. Then enter yoursecurity code to access the answering system.CHANGING THE SECURITY CODEThe default security code for accessing the answering system fromanother location is 1 2 3. You must use the handset to change the securitycode. With the phone off (not in TALK mode), follow these steps:1. Press the format/answerer button.2. Press * tone.3. Enter three numbers to be used as the new security code.4. Press * tone again.TIP: After pressing format/answerer, press *tone after you hear the voicemenu. Then after you enter the new security code and press *tone again, youwill hear the digits you entered followed with a confirmation tone at theearpiece of the handset.
24HEADSET AND BELT CLIP OPERATIONCONNECTING A HEADSET TO THE HANDSETFor hands free conversation, use a headset with your cordless handset.1. Connect the headset to the HEADSET jack on the side of the handset.The handset receiver and microphone are disabled when the headset isconnected.2. Adjust the headset to rest comfortably on top of your head and overyour ear. Move the microphone to approximately 2 to 3 inches fromyour mouth.3. Press the TALK/CALLBACK button to answer or make calls.4. To return to normal operation, unplug the headset from the jack.CONNECTING THE BELT CLIPTo attach the belt clip (provided with the 26998 only), insert the sides of thebelt clip into the slots on each side of the handset. Snap the ends of thebelt clip into place.TALKanswererredial memory formatdelete ringerchannelon   offflashabc2jkl5tuv8per0def3mno6wxyz9#1ghi4pqrs7*play/stopreview skipCALL BACKprogramHandset jackHeadset jackSlot forbelt clip
25CHANGING THE BATTERYMake sure the telephone is OFF before you replace battery.1. Remove the battery compartment door.2. Disconnect the battery plug from the jack in the handsetbattery compartment and remove the battery pack.3. Insert the new battery pack and connect the battery plug.4. Put the battery compartment door back on.5. Place handset in the base to charge. If you don’tcharge the handset battery properly (for 12 hours)when you first set up the phone and/or when youinstall a new battery pack, the battery’s long-termperformance will be compromised.BATTERY SAFETY PRECAUTIONS•Do not burn, disassemble, mutilate, or puncture. Likeother batteries of this type, toxic materials could bereleased which can cause injury.•To reduce the risk of fire or personal injury, use only the battery listed inthe User’s Guide.•Keep batteries out of the reach of children.•Remove batteries if storing over 30 days.NOTE: The RBRC seal on the battery used in your ATLINKSUSA, Inc. product indicates that we are participating in aprogram to collect and recycle Nickel Cadmium batteriesthroughout the United States. Please call 1-800-8-BATTERY forinformation or contact your local recycling center.Ni-CdRBRCRBRCNOTE: If the battery is not installed into the handset or its connector is notproperly plugged into the battery jack, "NO BATTERY" shows in the displaywhen the handset is placed on the its base cradle.
26GENERAL PRODUCT CARETo  keep your telephone working and looking good, follow these guidelines:•Avoid putting the phone near heating appliances and devices thatgenerate electrical noise (for example, motors or fluorescent lamps).•DO NOT expose to direct sunlight or moisture.•Avoid dropping the handset, as well as other rough treatment to the phone.•Clean the phone with a soft cloth.•Never use a strong cleaning agent or abrasive powder because this willdamage the finish.•Retain the original packaging in case you need to ship the phone at alater date.•Periodically clean the charge contacts on the handset and base with asoft cloth.HANDSET SOUND SIGNALSSignal MeaningA long warbling tone (with ringer on) Signals an incoming callThree short beeps (several times) Page signalOne long beep Confirmation toneOne short beep every 7 seconds Low battery warningOne long beep (when placing handset into Parking tone-the handset isthe cradle) placed into the cradle correctlyANSWER STATUS INDICATORSThe following indicators show the status of the answerer.0-59 Total number of messages.Blinking CL The voice time/day stamp needs set.- - Answerer off.Blinking An Currently answering a call.Blinking F Memory is full.Six blinking bars Recording a memo or announcement.14 seconds during conversation
27HANDSET INDICATORSThe following indicators show the status of a message or of the unit.ERROR Caller information has been interrupted during transmissionor the phone is excessively noisy.ENTER NAME Prompt telling you to enter the name for one of the 10memory locations.DELETE ALL? Prompt asking if you want to erase all Caller ID records.END OF LIST Indicates that there is no additional information in Caller IDmemory.NEW Indicates call or calls have not been reviewed.UNKNOWN NUMBER The incoming call is from an area not serviced by Caller ID orthe information was not sentPAGING Someone has pressed the page button on the base.BLOCKED NUMBER The person is calling from a number that has been blockedfrom transmission.REPT Repeat call message. Indicates that a new call from the samenumber was received more than once.NO CALLS No Caller ID information was received.INCOMPLETE DATA Caller information has been interrupted during transmissionor the phone line is excessively noisy.ENTER NUMBER Prompt telling you to enter the telephone number for one ofthe 10 memory locations.DELETE? Prompt asking if you want to erase Caller ID records or one ofthe 10 numbers stored in the phones’s outgoing memory.DELETED Prompt confirming the Caller ID/Memory record is erased.EMPTY Indicates a memory location is vacant.LOW BATTERY The handset battery is running out soon, please re-cradle tothe base immediately to recharge the battery.NO DATA Caller information is not available. Did you order Caller IDservice from your local telephone company? Please apply forit to receive Caller ID information.Indicates the battery is not installed or its connectoris not properly plugged into the battery jackNO BATTERYLOW BatteryIndicates the battery will run out very soon.  Please returnthe handset to the base cradle for charging
28TROUBLESHOOTING GUIDECORDLESS PHONE SOLUTIONSProblem SolutionNo dial tone • Check installation:—Is the base power cord connected to a working outlet?—Is the telephone line cord connected to the base unitand the wall jack?•Connect another phone to the same jack; the problemmight be your wiring or local service.•Is the handset out of range of the base?•Make sure the battery is properly charged (12 hours).•Is the battery pack installed correctly?•Did the handset beep when you pressed the TALK  button?Did the In use/Charge indicator come on? The battery mayneed to be charged.•Place the handset in the base for at least 20 seconds.Phone dials in pulse • Make sure the phone is in TONE mode.with tone servicePhone won’t dial out • Make sure the phone is in PULSE mode.with pulse serviceHandset does not ring • Make sure the ringer switch on the handset is turned ON.•Move closer to the base. The handset may be out of range.•You may have too many extension phones on your line. Tryunplugging some phones.•Check for dial tone.You experience static, • Change channels.noise, or fading in and out • Move closer to base (handset might be out of range).•Does the base need to be relocated? Make sure base is notplugged into an outlet with another household appliance.•Charge battery.Unit beeps • Place handset in base for 20 seconds; if it still beeps,charge battery for 12 hours.•Clean charging contacts on handset and base with a softcloth, or an eraser.•See solutions for “No dial tone.”•Replace battery.
29Memory Dialing • Did you program the memory location keys correctly?doesn't work • Did you follow proper dialing sequence?CALLER IDProblem SolutionNo Display • Is battery fully charged? Try replacing the battery.•Make sure that the unit is connected to a non-switchedelectrical outlet. Disconnect the unit from the plug andplug it in again.• Did you order Caller ID service from your local telephonecompany? The display won't work unless you order CallerID service from your phone company.Caller ID Error Message • The unit displays this message if it detects anything otherthan valid Caller ID information during the silent periodafter the first ring. This message indicates either thepresence of noises on the line, or that an invalid messagehas been sent from the telephone company.ANSWERING SYSTEM SOLUTIONSProblem SolutionCan’t hear messages, • Adjust speaker volume.beep, etc.Time/Day setting • Set the time clock.stuck at 12 a.m Mon.Answers on 10th ring • Make sure answering system is turned on.•Memory may be full.Incoming messages • Was an extension phone picked up?are incomplete • Memory is full.•Accidentally pressed play/stop button during playback andstopped message.Won’t respond to • Must use tone-dial phone.remote commands • Must enter correct security code.• Did unit hang up? If you take no action for a period of time,it automatically hangs up.
30CAUSES OF POOR RECEPTION•Aluminum siding.•Foil backing on insulation.•Heating ducts and other metal construction that can shield radio signals.•You’re too close to appliances such as microwaves, stoves,computers, etc.•Atmospheric conditions, such as strong storms.•Base is installed in the basement or lower floor of the house.•Base is plugged into AC outlet with other electronic devices.•Baby monitor is using the same frequency.•Handset battery is low.•You’re out of range of the base.SERVICEIf trouble is experienced with this equipment, for repair or warranty information,please contact customer service at 1-800-448-0329. If the equipment is causingharm to the telephone network, the telephone company may request that youdisconnect the equipment until the problem is resolved.This product may be serviced only by the manufacturer or its authorized serviceagents. Changes or modifications not expressly approved by ATLINKS USA, Inc.could void the user’s authority to operate this product. For instructions on how toobtain service, refer to the warranty included in this guide or call customer serviceat 1-800-448-0329.Or refer inquiries to:ATLINKS USA, Inc.Manager, Consumer RelationsP O Box 1976Indianapolis, IN 46206Attach your sales receipt to the booklet for future reference or jot down the datethis product was purchased or received as a gift. This information will be valuableif service should be required during the warranty period.Purchase date  ________________________________________________Name of store  ________________________________________________
31INDEXAAccessing the Answering System fromAnother Location  23Accessory Order Form  33Answerer Indicator  22Answering System Operation  19Answering System Setup  10BBattery Safety Precautions  25Before You Begin  5CCaller ID Features  14Caller ID with Call Waiting  15Cancel  13Causes of Poor Reception  30Chain Dialing from Memory  18Changing a Stored Number  17Changing the Battery  25Changing the Number Format  16Changing the Security Code  23Channel Button  13Connecting a Headset to the Handset  24Connecting the AC (electrical) Power  7Connecting the Belt Clip  24Connecting the Telephone Line  7Cordless Phone Basics  12DDeleting All Records  16Deleting Records  15Deleting the Current Record  16Dialing a Caller ID Number  16Dialing a Stored Number  18Dialing Caller ID Numbers  18EEquipment Approval Information  2Erasing Messages  20FFinding the Handset  13Flash  12GGeneral Product Care  26HHandset Indicators  27Handset Sound Signals  26Headset and Belt Clip Operation  24Hearing Aid Compatibility  2IImportant Installation Information  6In Use/Indicator Light  13Inserting a Pause in the DialingSequence  19Installation and Set Up  6Installing the Phone  7Interference Information  2Introduction  5LLeaving a Memo  21Limited Warranty  34
32MMaking a Call  12Memory Full  20, 22Message Playback  20Messages Indicator  19PParts Checklist  5RReceiving a Call  12Receiving and Storing Calls  15Recording the OutgoingAnnouncement  11Redial  12Remote Access  21Reviewing and Deleting StoredNumbers  19Reviewing Announcement  11Reviewing Messages  15Ringer Switch  13SScreening Calls from the Base  20Screening Calls from the Handset  22Service  30Setting the Display Language  9Setting the Local Area Code  9Setting the Ring Select  11Setting the Voice Time/Day Stamp  10Speaker Volume  11Storing a Number in Memory  17TTelephone Jack Requirements 5Telephone Setup  8Temporary Tone  13The Memory Feature  17Tone/Pulse Dialing  9Transferring Caller ID Records toMemory  14Troubleshooting Guide  28UUsing the Handset  21VVolume  12WWall Mounting  8Setting the Voice Prompt Language
33DESCRIPTIONAC power supplyMODEL NUMBER TOTALQUANTITYPRICE*5-2509 $10.00Belt clip 5-2552 $10.85Headset 5-2425 $36.355-25125-2459 $10.00Replacement handset battery5-25555-2444(white) (black)CUSTOMER: CUT ALONG DOTTED LINE. ✂Please make sure that this form has been filled out completely.ACCESSORY ORDER FORM*Prices are subject to change without notice.Total Merchandise.........................................$_______________Sales Tax........................................................$_______________We are required by law to collect the appropriate sales tax for each individual state,county, and locality to which the merchandise is being sent. Duties will apply forshipments to Canada.Use VISA or Master Card or Discover preferably. Money order or check must be in U.S.currency only. No COD or Cash. All accessories are subject to availability. Whereapplicable, we will ship a superseding model.Shipping/Handling....................................... $_______________Total Amount Enclosed.................................$_______________Mail order form and money order or check (in U.S. currency)made payable to Thomson to:ThomsonMail Order DepartmentP.O. Box 8419Ronks, PA 17573-8419Name_______________________________________________________Address_____________________________________ Apt.____________City ________________________State________ ZIP_________________Daytime Phone Number (         )_______________________________$5.00____________________________________________________________________Authorized SignatureMy card expires:Copy the number above yourname on the Master CardFor credit card purchasesYour complete charge card number, its expiration date and yoursignature are necessary to process all charge card orders.Copy your complete account number from your VISA card.My card expires:Copy your complete account number from yourMaster Card or Discover.To order, call 1-800-338-0376 (for accessories only) or complete this order form.5-2618
LIMITED WARRANTYWhat your warranty covers:•Defects in materials or workmanship.For how long after your purchase:•One year, from date of purchase.(The warranty period for rental units begins with the first rental or 45 days from date of shipment to the rental firm, whichevercomes first.)What we will do:•Provide you with a new or, at our option, a refurbished unit. The exchange unit is under warranty for the remainder of theoriginal product’s warranty period.How you get service:•Properly pack your unit. Include any cables, etc., which were originally provided with the product. We recommend using theoriginal carton and packing materials.•”Proof of purchase in the form of a bill of sale or receipted invoice which is evidence that the product is within the warrantyperiod, must be presented to obtain warranty service.” For rental firms, proof of first rental is also required.  Also print yourname and address and a description of the defect. Send via standard UPS or its equivalent to:ATLINKS USA, Inc.c/o Thomson11721 B Alameda Ave.Socorro, Texas  79927•Pay any charges billed to you by the Exchange Center for service not covered by the warranty.•Insure your shipment for loss or damage. ATLINKS accepts no liability in case of damage or loss.•A new or refurbished unit will be shipped to you freight prepaid.What your warranty does not cover:•Customer instruction. (Your Owner’s Manual provides information regarding operating instructions and user controls. Anyadditional information, should be obtained from your dealer.)•Installation and setup service adjustments.•Batteries.•Damage from misuse or neglect.•Products which have been modified or incorporated into other products.•Products purchased or serviced outside the USA.•Acts of nature, such as but not limited to lightning damage.Product Registration:•Please complete and mail the Product Registration Card packed with your unit. It will make it easier to contact you should it everbe necessary. The return of the card is not required for warranty coverage.Limitation of Warranty:•THE WARRANTY STATED ABOVE IS THE ONLY WARRANTY APPLICABLE TO THIS PRODUCT. ALL OTHER WARRANTIES, EXPRESSOR IMPLIED (INCLUDING ALL IMPLIED WARRANTIES OF MERCHANTABILITY OR FITNESS FOR A PARTICULAR PURPOSE) AREHEREBY DISCLAIMED. NO VERBAL OR WRITTEN INFORMATION GIVEN BY ATLINKS USA, INC., ITS AGENTS, OR EMPLOYEESSHALL CREATE A GUARANTY OR IN ANY WAY INCREASE THE SCOPE OF THIS WARRANTY.•REPAIR OR REPLACEMENT AS PROVIDED UNDER THIS WARRANTY IS THE EXCLUSIVE REMEDY OF THE CONSUMER.  ATLINKSUSA, INC. SHALL NOT BE LIABLE FOR INCIDENTAL OR CONSEQUENTIAL DAMAGES RESULTING FROM THE USE OF THISPRODUCT OR ARISING OUT OF ANY BREACH OF ANY EXPRESS OR IMPLIED WARRANTY ON THIS PRODUCT. THIS DISCLAIMEROF WARRANTIES AND LIMITED WARRANTY ARE GOVERNED BY THE LAWS OF THE STATE OF INDIANA. EXCEPT TO THE EXTENTPROHIBITED BY APPLICABLE LAW, ANY IMPLIED WARRANTY OF MERCHANTABILITY OR FITNESS FOR A PARTICULAR PURPOSEON THIS PRODUCT IS LIMITED TO THE APPLICABLE WARRANTY PERIOD SET FORTH ABOVE.How state law relates to this warranty:•Some states do not allow the exclusion nor limitation of incidental or consequential damages, or limitations on how long animplied warranty lasts so the above limitations or exclusions may not apply to you.•This warranty gives you specific legal rights, and you also may have other rights that vary from state to state.If you purchased your product outside the USA:•This warranty does not apply. Contact your dealer for warranty information.Models 26998C16260400 (Rev. 0 E/S)03-20Printed in ChinaATLINKS USA, Inc.101 West 103rd StreetIndianapolis, IN 46290© 2003 ATLINKS USA, Inc.Trademark(s) ® RegisteredMarca(s) Registrada(s)

Navigation menu