TimeLink Technology AMWTM All-in-one Multimedia Whiteboard Teaching Machine User Manual
Shenzhen TimeLink Technology Co.,Ltd All-in-one Multimedia Whiteboard Teaching Machine
User manual

All‐in‐oneMultimediaWhiteboardTeachingMachine
TL6510‐IISeries
ProductOperationInstructions
ShenzhenTimeLinkTechnologyCo.,Ltd.
3
Contents
I.UseInstructionsforAll‐in‐oneMultimediaWhiteboardTeachingMachine ....................................................................... 5
Importantinformation .................................................................................................................................................. 5
Importantprompt ......................................................................................................................................................... 5
II.IntroductiontotheMachine ............................................................................................................................................. 6
III.CompositionoftheMachine ............................................................................................................................................ 8
1.Instructionsoftheoverallfunctionalareas ............................................................................................................... 8
2.AccessoriesList ........................................................................................................................................................... 8
IV.InstallationoftheMachine .............................................................................................................................................. 9
1.Wall‐hunginstallationforboard ................................................................................................................................. 9
1.1Materialpreparation ....................................................................................................................................... 9
1.2Operationsteps ............................................................................................................................................... 9
Intersectionofmarkedhorizontallines ............................................................................................................... 10
2.Installationofprojector(0.5mprojecting80”) ........................................................................................................ 12
3.InstallationandmaintenanceofOPS ....................................................................................................................... 12
3.1InstallationanddisassemblyofOPS .............................................................................................................. 13
4.Wiring ....................................................................................................................................................................... 14
V.OperationalGuidelinesfortheMachine ......................................................................................................................... 14
1.Introductionofcentralcontrolpanel ....................................................................................................................... 14
1.1Diagramofcentralcontrolpanel ................................................................................................................... 14
1.2AccessControl ............................................................................................................................................... 14
1.3SystemControl .............................................................................................................................................. 14
1.4Display ........................................................................................................................................................... 15
1.5VolumeControl ............................................................................................................................................. 15
1.6USBExtension ............................................................................................................................................... 15
1.7Externalconnection ...................................................................................................................................... 15
2.BasicOperation ................................................................................................................................................ 16
2.1UnlocktheAccessControl ............................................................................................................................. 16
2.2ICCardAdministration .................................................................................................................................. 17
2.3PasswordAdministration ............................................................................................................................... 18
2.4RestoreFactorySettings ................................................................................................................................ 19
2.5Boot ............................................................................................................................................................... 19
2.6TouchScreenCalibration ............................................................................................................................... 19
2.7Restart/Shutdown ......................................................................................................................................... 20
2.8Recording ...................................................................................................................................................... 21
VI.High‐speedScanner ....................................................................................................................................................... 21
1.Introduction ............................................................................................................................................................. 21
2.OperationInstructionsforVideoBooth ................................................................................................................... 21
2.1WorkingConditionsofVideoBoothoftheMachine .................................................................................... 22
2.2TurnOn/OfftheVideoBooth ........................................................................................................................ 22
3.OperationInstructionsforHigh‐speedScannerSoftware ....................................................................................... 23
VII.WirelessVoiceSystem .................................................................................................................................................. 25
VIII.Pre‐installedsoftware ................................................................................................................................................... 25
IX.Troubleshooting............................................................................................................................................................... 26
X.ParameterTableoftheMachine ..................................................................................................................................... 27
XI.ProjectorConfigurationMethod ..................................................................................................................................... 28
4
1.Notes ........................................................................................................................................................................ 28
2.Configureserialcodetools ....................................................................................................................................... 28

5
I.UseInstructionsforAll‐in‐oneMultimediaWhiteboardTeachingMachine
Importantinformation
Theelectricsupplyis100V~240Vvoltage.Thepowerinclassroomhasareliablegrounding.
Itisprohibitedtocutpowerofthedevicewhenitisintheprocessofstaring‐uporshutdown,whichwill
bringseriousimpacttotheprojectorandevenleadtoitsbulbbroken.
This device is in compliance with the essential requirements and other relevant provisions of Directive 1999/5/EC.
Don’tusedevicein temperatures lower-20 ºC and higher than 45ºC
Importantprompt
Itisnotallowedtousecolorfulpanlikemarkertowriteonthewhiteboard.
Thewhiteboardcanbewipedwithawetcleancloth,but,dopayattentiontopreventwaterpermeatingfromthefraction
ofwhiteboardframeintoinside.
Pleasedonotmovetheelectrifieddevice.
Pleasekeepthedeviceawayfromheatsource.
Pleasedonotusethedeviceinahumidenvironment.
Avoidthepossibleelectricshock.Pleasedonotconnectordisconnectanycableorrepairorre‐configureduringlightning
storm.Donotusethedeviceduringlightningstorm.
Donotstuffmattersintotheventortheopeningholeofthedevice,otherwiseitmayleadtofireorelectricshockdueto
short‐circuitoftheinnercomponents.
Itisprohibitedtoopenorclosethecoveroftheprojectorreflectorlensbyforce,orelseitmaycausefault.
WhenplugginganexternalmemorydeviceofUSBdrive,pleasekeeptheexternaldeviceclean.IfitisinfectedbyTrojanor
worm,itwillslowdownthesystemoperatingspeed.Theproductparametersinthisinstructionaresubjecttotheproduct.
Theinformationinthisinstructionissubjecttochangewithoutnotice.
Specialremarks:Itisprohibitedtopressorputoverweightitemsontheboothafterthevideoboothunfolds.Theobject
putonshouldnotbeheavierthan0.5kg.
6
This equipment has been tested and found to comply with the limits for a Class B digital device, pursuant to part 15 of FCC Rul
es. These limits are designed to provide reasonable protection against harmful interference in a residential installation. This
equipment generates and can radiate radio frequency energy and, if not installed and used in accordance with the instructions,
may cause harmful interference to radio communications. However, there is no guarantee that interference will not occur in a
particular installation. If this equipment does cause harmful interference to radio or television reception, which can be determine
d by turning the equipment off and on, the user is encouraged to try to correct theinterference by one or more of the following m
easures:
--Reorient or relocate the receiving antenna.
--Increase the separation between the equipment and receiver.
--Connect the equipment into an outlet on a circuit different from that to which the
receiver is connected.
--Consult the dealer or an experienced radio/TV technician for help.
This device complies with Part 15 of FCC Rules. Operation is subject to the following two conditions: (1)This device may not cau
se harmful interference, and (2)This device must accept any interference received, including interference that may cause undesi
red operation.
Note: The manufacturer is not responsible for any radio or TV interference caused by unauthorized modifications to this equipm
ent. such modifications could void the user’s authority to operate this equipment. Any Changes or modifications not expressly
approved by the party responsible for compliance could void the user's authority to operate the equipment.
This device is measured RF output power is less than the SAR exclusion threshold value for human head and body . Therefore,
SAR test is not necessary.
7
II.IntroductiontotheMachine
TheAll‐in‐oneMultimediaWhiteboardTeachingMachineisakindofmultimediainteractiveteachingmultifunctional
devicewhichcanrealizethefunctionssuchasinteractiveteaching,writing,annotation,takingvideoofobjective,text
recognition,VGAconnection,multimediaaudioandvideoplaying,etc.Ithassolvedthecurrentproblemsofmultimedia
classroom,suchasdisperseofvariousdevices,disorderingwires,complexoperation,badcoordinationandcompatibilityof
devices,etc.
TheAll‐in‐oneMultimediaWhiteboardTeachingMachineisanenterdevicewithhuman‐machineinteractivefunction
onthebasisofPC.Itconsistsoftheboardunitfordisplayandinteractionandtheframeunitwhichmainlycontains
informationprocessingunitandtheprojector.Theformeroneislocatedatthebothsidesoftheframewherefunctional
modulesarebuiltin,suchasaudiooutputunit,interactivedisplayunit,centralizedcontrolunitandinteractivetouch
operationunit.Thelatteroneisintegratedwiththefunctionalunitslikeinformationprocessingunit(PC),projectorsupport
andadjustmentunit.
ThesoftwareofAll‐in‐oneMultimediaWhiteboardTeachingMachineisinstalledintheinformationprocessingunit(PC)
anditcanrealizethefollowingfunctions:variousinteractivedemonstrationssuchaswriting,annotating,operating
informationprocessingunit,coursewaredemonstrating,computeraideddrafting,textentering,handwritingrecognizing,
savingorannotatingthepicturesorvideoscollectedbyhigh‐speedscanner,audioorvideoplaying,etc.Thecontrolunit
performsacentralizedcontroloftheprojectorswitch,soundboxswitch,informationprocessingunitswitch,etc.
Usercancontrolthecomputerdirectlybyusinganelectronicpantotouchtheinteractiveelectronicwhiteboard.Editing,
modifying,annotating,geometricdrawing,printingandsavingofthecontentsonthecomputerscreenarealsoavailable,
convenientasusingamouse.
ThesoftwareofAll‐in‐oneMultimediaWhiteboardTeachingMachinewhichcannotonlybesetinthecomposite
push‐pullgreenboardbutalsobefixedindependentlyonthewallorthemobilesupport,hasafullsetofteaching
instruments,including:computer(Win7operatingsystem),projector,electronicwhiteboard,centralizedcontroller,
high‐speedscanner,soundbox,accesscontrolswitch,etc.Theusingmethodofthecomputerofthedeviceisthesameasa
traditionalone,whichcanbeconnectedthroughtheUSBinterfacesonthelowerleftfrontboardwithextensiondevices
including:mouse,keypad,USBdrive,mobileharddiskdriveandotherdesktopcomputerandlaptopcomputerextendible
USBdevices.
ThesoftwareofAll‐in‐oneMultimediaWhiteboardTeachingMachineiswidelyappliedinteaching,training,meeting
demonstration,remoteteaching,etc.
8
III.CompositionoftheMachine
1.Instructionsoftheoverallfunctionalareas
OPShost:CPU3GHzoraboveMainfrequency+4Ginternalmemory+500GBharddiskdrive+win7professional
operatingsystem;
Projector:projecttheimagesignaltothewhiteboard,supportingvariousmodelsandmakinginformationwritteninto
thecontrolsystemonlybysoftwareconfiguration;
Soundbox:2*20Wfullfrequencyaudio;
Centralcontrolsystem:includingaccesscontrol,systemcontrol,projectorcontrol,volumecontrol,USB2.0interface
extensionandexternalconnectionofVGAandUSB;
Objectbooth:projectingobjects(items,homework,testpaper,etc.)tothewhiteboardandannotatingontheobjectis
available;
Electronicwhiteboard:multi‐touch+anti‐glareinterference+anti‐mistouch+strongfault‐tolerantability
2.AccessoriesList
Refertothe“AccessoriesList”attached
9
IV.InstallationoftheMachine
1.Wall‐hunginstallationforboard
1.1Materialpreparation
Beforeinstallation,pleasecheckmaterialstoensurethefollowingmaterialsarenotmissing.
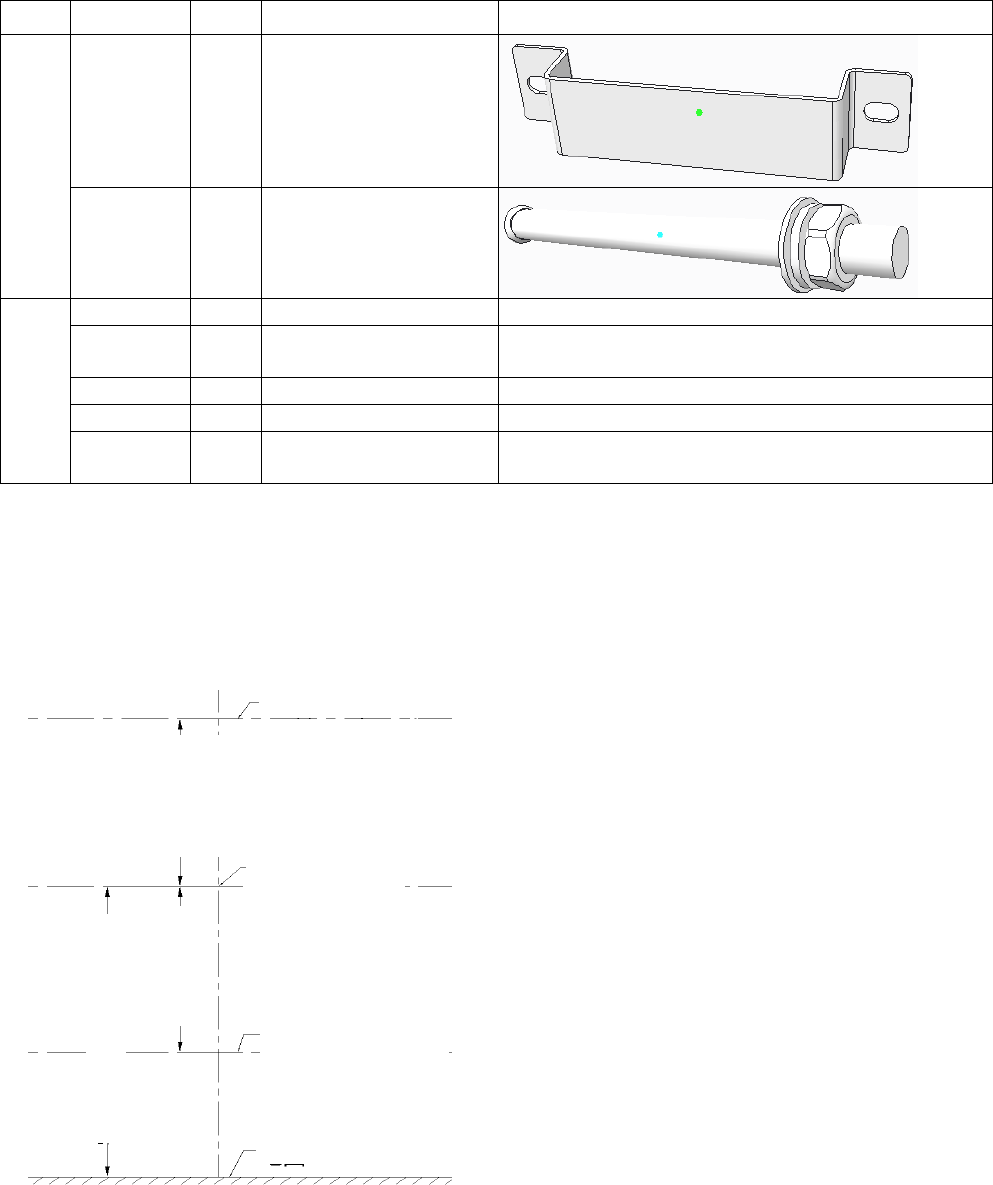
SourceDescriptionQty.UseDiagram
Inthe
accesso
rybag
Hanging
buckle4Hangingtheboardofthe
device
Setscrew
M6×808Fixthehangingbuckleon
thewall
Tools
prepare
dby
installer
Impactdrill‐ Drillholesinthewall
Ruler/tape
measure‐ Sizemeasuring
Parallelscale‐Ensuretwobucklesparallel
Spanner‐Screwingthesetscrew
Pencil‐
Drawingauxiliarylinefor
holelocation
1.2Operationsteps
1.2.1Calculatingtheheightoftheholes
Determinethewhiteboardcenter,andthenaccordingtothepositionofthecenter,calculatetheheightsoftwolinesof
holes.Thecalculationmethodisasfollows:
DistanceCfrom
boardprojection
centertoholein
theupperrow
Horizontallineoftheholeofthebuckle
Centerpointofthe
whiteboard
Horizontallineofthe
holeofthebuckle
Ground
HeightAfromboardprojection
centertotheground
DistanceBfrom
boardprojection
centertoholein
thelowerrow
10
Thedistancefromtheupperholetotheground=A+C(C=585mm)
Thedistancefromthelowerholetotheground=A‐B(B=582mm)
1.2.1Markingdrillingholesinhorizontalposition
Markthetwolineofdrillingholesinhorizontalpositionwithrulerandpencil(itisbettertomarkontheverticalcenter
lineoftheboard)
(C=585mm,B=582mm)
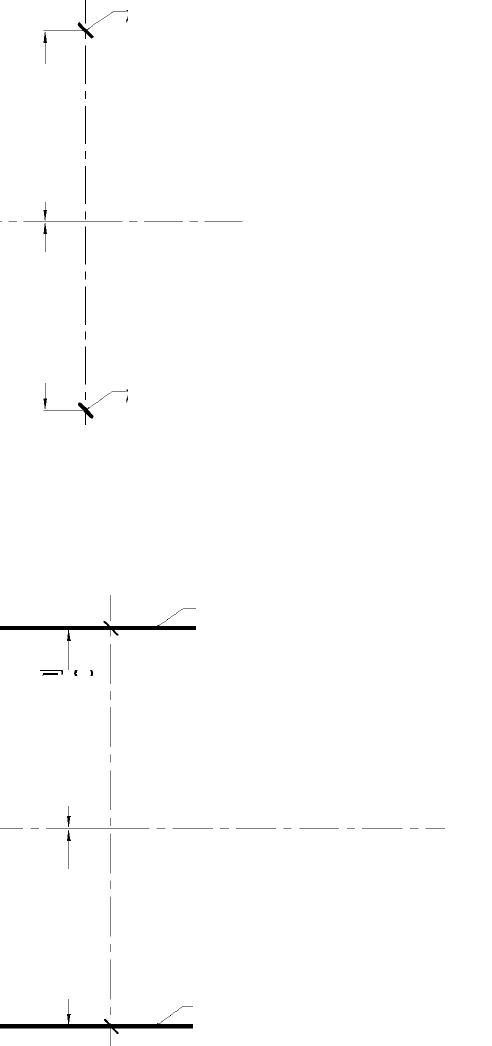
1.2.2Drawinghorizontallineofdrillingholes
Drawtwohorizontallinesalongwiththehorizontalpositionmarkedinthepreviousstepwithparallelscale.
1.2.3Markingpositionofthebuckle
Determinethecentralpositionofthebucklesrespectivelyaccordingtothemarksinthedrillingsizediagram.
Intersectionofmarked
horizontallines
DistanceCfrom
boardprojection
centertoholeinthe
upperrow
DistanceBfrom
boardprojection
centertoholein
thelowerrow
Intersectionofmarked
horizontallines
Draw the horizontal line of the
l
owe
r
buc
kl
e
w
i
t
h
pa
r
a
ll
e
l
sca
l
e
DistanceCfrom
theboardcenter
totheupper
buckle’shole
DistanceBfrom
theboardcenter
tothelower
buckle’shole
Draw the horizontal line of the
l
owe
r
buc
kl
e
w
i
t
h
pa
r
a
ll
e
l
sca
l
e
11
(D=762mm)
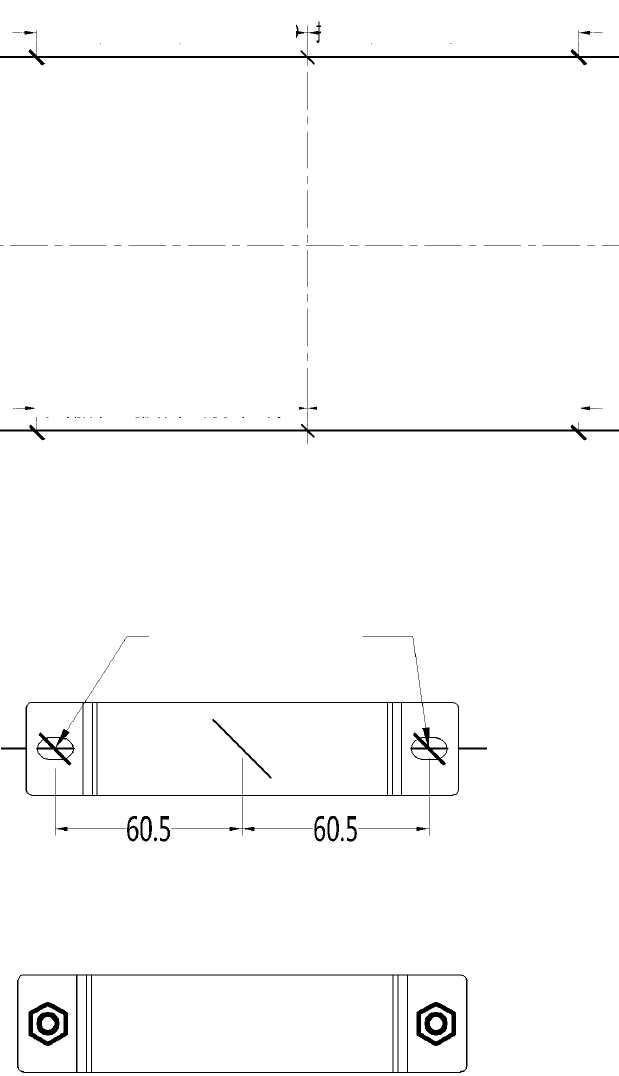
1.2.4Markingdrillingpositionanddrilling
Determinethedrillingpositionofthebucklesrespectivelyaccordingtothemarkedcentralpositioninthepreviousstep
(Notethatthereare4bucklesintotalwhichneed8holes).Drill8holeswithimpactdrill.
1.2.5Bucklemounting
Fix4bucklestothewallwith8setscrewsaccordingtotheholepositionmarkedinthepreviousstep.
1.2.6Hangingonthewall
Lifttheboard,andhangitonthebucklewithleftsideandrightsidealigned.Atsametime,theheightofhookshouldbe
alittlehigherthanthebuckle(Thefollowingfigureshowsthebackside)
Drillingdepthof6#drill
ofpercussion
drill>80mm
HorizontaldistanceDfrombuckle
centertoboardcenter HorizontaldistanceDfrombuckle
centertoboardcenter
HorizontaldistanceDfrombuckle
centertoboardcenter
HorizontaldistanceDfrombuckle
centertoboardcenter
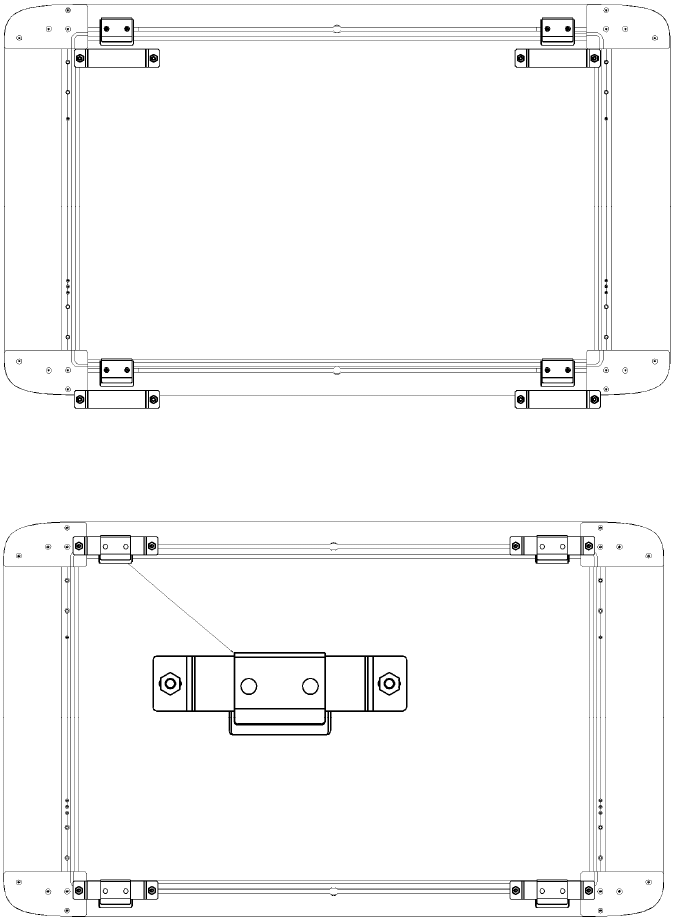
12
Puttheboarddownsoastomakethehookhitchthebuckle.Makesurefourhooksallhitchthebuckles.
Now,theboardinstallationcompletes.
2.Installationofprojector(0.5mprojecting80”)
Pleaseconsulttheprojectormanufactureraccordingtoyourprojector,toobtaintheinstallationmethodandcautions.
3.InstallationandmaintenanceofOPS
TheOPcenterofthedeviceadoptsanOPScomputer.Whenyoureceiveourdevice,theOPScomputerhasbeen
alreadyinstalledatthebackofthedevice.
OPScomputer

13
OPSinstalledonthemachine
3.1InstallationanddisassemblyofOPS
WhendisassemblingtheOPS,pullouttheconnectedcable,screwtwoscrewswhichisusedtofixtheOPStotheframe
hangersandthenpullitoutalongthechute.
TheOPScanbeinstalledconversely.
14
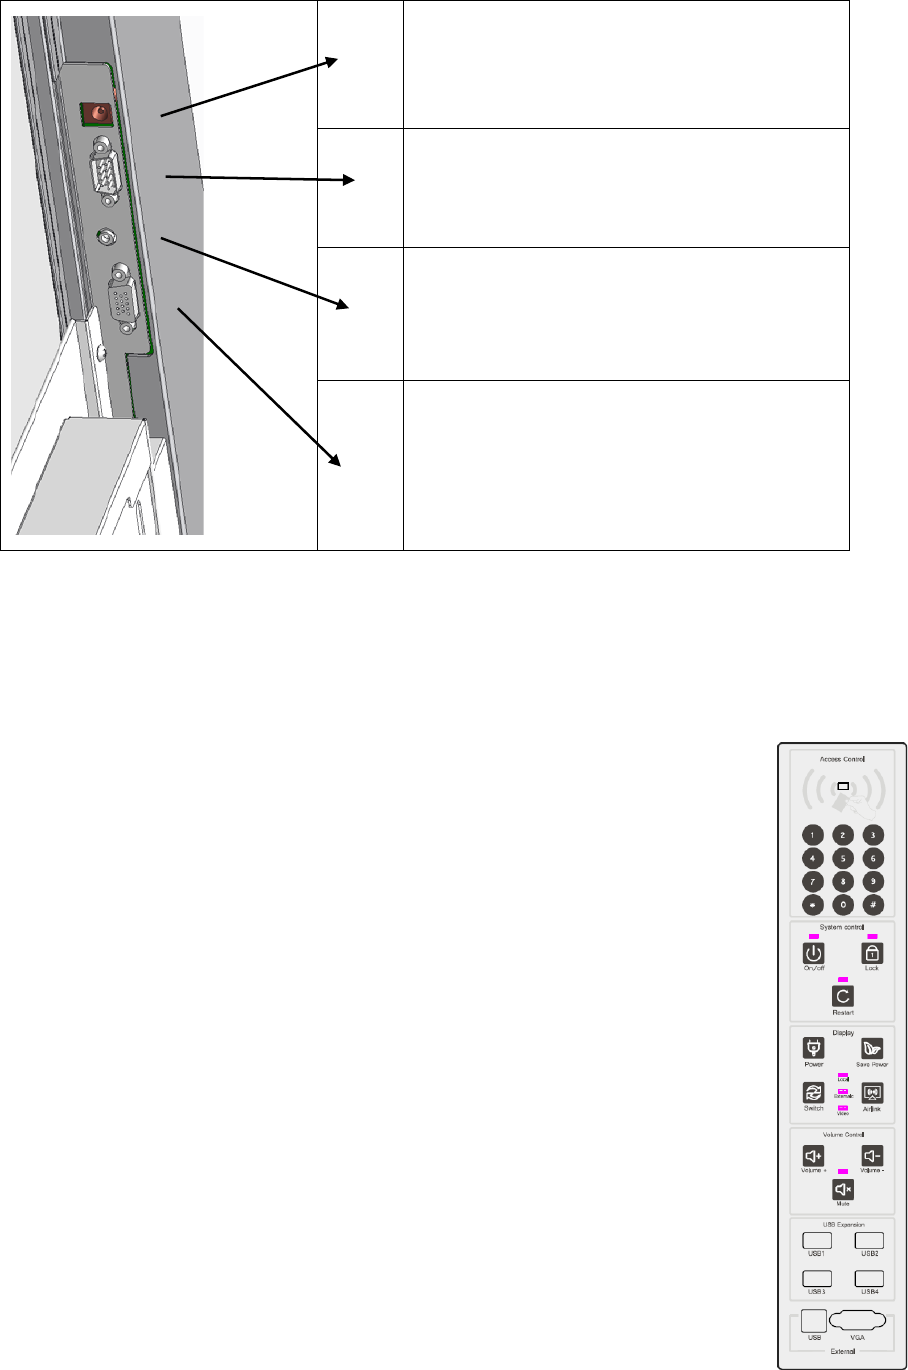
4.Wiring
Thewiringisdonefromtoptobottominsequence:
1Connect12Vpowersource(accessory)
2Connectserialline(accessory)totheprojector
serialport
3Connectaudioline(accessory)totheMICenter
(redport)interfaceatfrontofOPS
4ConnectVGAline(accessory)totheprojector
VGAinterface
V.OperationalGuidelinesfortheMachine
1.Introductionofcentralcontrolpanel
1.1Diagramofcentralcontrolpanel
1.2AccessControl
Controlboardonthefirstelectricpowerwillbeinitializedtothesystem,theninadditiontothe
numberintheentranceguardcontrolpasswordkeyboardeffectively,otherfunctionbuttonisnotopen,
includingtheentrancecard(supportM1card,includingcommonS50andS70twotypesofICcard)are
undocumentedstatus,needtousersaccordingtotherecordcardafterbootstepstoregisterforthe
entrancecard.
Therearewarningtoneandindicatorlampineachtimeofusingcardandenteringpassword.Ifit
isunlockedsuccessfully,thebuzzerringsandRFIDindicatorlampturnson;ifitfails,thebuzzeronly
makes“didi”soundfortwice.Thepanelwillgetlockedinthefollowingsituations:1)shortlyafter
electrified;2)pushingdownthelockbuttonafterthepanelisunlocked;3)aftershutdownofthe
system.
Thecentralcontrolpanelsystemhaspresetaninitialpassword888888whichisalsousedas
administratorpassword.Theinitialpasswordcanbechangedbyusersandthefactorysettingcanalso
berestoredafterthemodificationoftheinitialpassword.Fordetails,refertothedigitalcode
instructions.
1.3SystemControl
Thesystemcontrolincludesthreebuttonswhichareon/off,lockandrestart.
Thesystemcontrolismainlyonekeyswitchon/offoftheprojector,lockofthecentralcontrol
15
keyboard(exceptthenumerickeyboard)andonekeyrestartofthehostmachine.
Thereisanindicatorlampaboveeachfunctionalbutton,andthelampswillbeonafterstartingup.Whenthecentral
controlpanelisinthelockstate,theaboveindicatorlampison.Andtheindicatorlampwillflickerfor10timesandthengo
outduringthesystemrestarting.
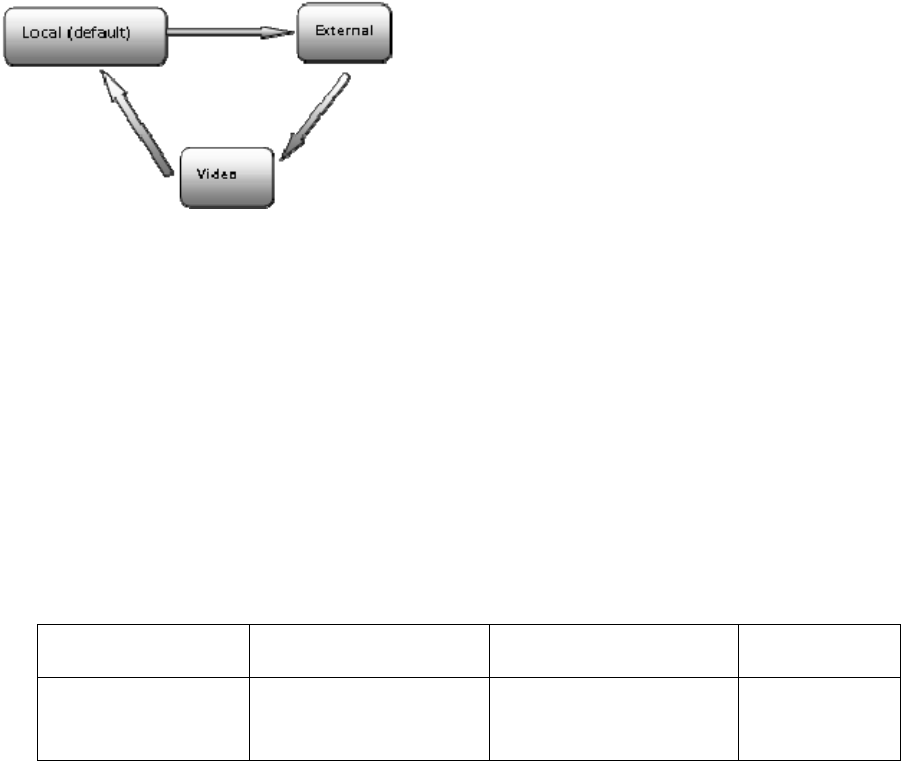
1.4Display
Theprojectorcontrolincludespowerbutton,savepowerbuttonandsignalswitchbutton.Thesebuttonscanselectthe
switchon/off,electricalconsumption,signalsourcesoftheprojectorsoastoplayaroleincontrollingtheprojectorand
replacingthefunctionsofpartoftheremotecontrolbutton.
Airlink:AkeytosupportAirlinksoftwarestartupandshutdown
Thesignalswitchsequenceisasfollows:
1.5VolumeControl
Thevolumecontrolincludesthreebuttons:volume+,volume‐andmute,correspondinglycontrollingtheamplifierof
thecentralizedcontrol,butnotthevolumeofthehostmachine.Thecentralizedcontrolhasincreasedthevolumeofthehost
machinetoitsutmostduringthestartingup,whichskipstheprocessofmanualadjustmentofthehostmachinevolumeand
makesthevolumecontrolmorereasonable.Asforthevolumeincreaseanddecreaseoftheplayer,itisnotcontrolledbythe
centralizedcontrol,butbyhand.
WhatitshouldbehighlightedisthatthroughtheinternalUSBsoundcard,thereisnoneedforhostaudiooutputwire
orexternalaudioenterwire,butoneUSBwireisenough,whichmeansitisbyUSBwirethatthehostvolumeandexternal
volumearetransferredintothecentralizedcontrol.UsingBtypeUSBenterportforexternalconnectionsavesexternalaudio
wireconnection,facilitatingtheoperation.
Thedefaultstarting‐upvolumeis50%ofthestarting‐upvolume;inmutestate,wecancancelmutebypressingthe
volumeincreaseordecreasebuttonsaswellaspressthemutebutton.Howeverthevolumeaftermuteiscancelledis
differentbydifferentwaysofcancelling.
Mutecancelling
methodPressingvolumeincrease PressingvolumedecreasePressingmute
VolumeVolumebeforemute
+10.23dB
Volumebeforemute
‐10.23dB
Volumebefore
mute
1.6USBExtension
TheUSBextensionhasfourAtypeUSB2.0interfacewhichareusedtosolvetheshortsupplyoftheUSBinterface.
FourUSB2.0interfacecanbeconnectedtothegeneralUSBdevicesincluding:USBdrive,USBmouse,USBkeyboard,
mobileharddiscdrive,etc.TheUSBextensioninterfaceusesMTT(MultipleTransactionTranslator)architectureforthe
standardUSBextensionchipssothattheUSBcommunicationspeedwillnotbeaffectedbyincreasinganotherUSB
device.Meanwhile,withastrongcompatibility,itcanbecompatiblewithvariouscommonUSBdevices.
1.7Externalconnection

16
Inconsiderationoftheexternalsignalsarealwaysused,theexternalextensionpartcontainsexternalUSBandexternal
VGA.
TheexternalUSBusesBtypeinterface.WhentheexternalUSBconnectedwiththelaptopcomputer,thecentralcontrol
systemwillconnecttheinternalUSBdeviceandUSBextensionportwiththecomputersothatthereisnoneedto
switchmanually.TheautoswitchadoptsHighSpeedUSB2.0standardswitchchiptostandardizetheUSBreadandwrite.
TheinternalUSBdeviceincludes:touchscreen,high‐speedscanner,2.4Gwirelessaudiomodule,USBsoundcard,
centralcontrolCPU,etc.
TheexternalVGAcanprojecttheimagesignaltoourelectronicwhiteboard.Whenthelaptopcomputerisneeded,just
connectthecomputerwiththeexternalVGA,withsignalswitchedtotheexternal,whichwillbeindicatedbyalamp.
AndthentheprojectorsignalwillselecttheVGAsignalofthelaptopcomputerautomaticallyandmeanwhilethe
resolutionratioofthecomputerwillbechangedto1024*768automatically.
2.BasicOperation
Tousethemachine,youhavetolearnhowtounlocktheaccesscontrol.Thisincludesthelockontheon/offkey,other
functionalkeysandtheboothwhenthepowerturnsonorthecentralcontrolisinitializing.
Definitionsoftheadministratormodeandseveralcommonlyusedfunctionkey:
Entertheadministrationmode:inanynon‐administrationmode,youcanentertheadministrationmodebyenterthe
administratorpasswordandthenpressthe*keytoconfirm,
Exitadministrationmode:pressthe0keyandholditfor3seconds,youwillexitfromtheadministrationmodelafter
hearingtheprompttonelike"Di".Ifthereisnotanyoperationonthenumberingkeysundertheadministrationmode
for5seconds,itwillautomaticallyexitfromadministrationmodewitha"Di".
FunctionkeyFunctions
*keyPressandholditfor3secondsunderadministrationmodetoenterthecard
recordandpasswordrecordstatue
#keyPressandholditfor3secondsunderadministrationmode,enterthe
passwordandthenpressandholditfor3secondstodeletethepassword,short
presstodeletethecard
0keyPressandholditfor3secondsunderadministrationmodetoexitfromthe
administrationmode
1keyPressandholditfor3secondsunderadministrationmodetorevisethe
administratorpassword
2keyPressandholditfor5secondsunderadministrationmodetoinitializethe
statistics,theadministratorpasswordisrecoveredto888888
Note:
Thebuzzerinalongblastofsound:indicatessuccessfuloperation.
Thebuzzerinasoundof“Di”:indicateseffectiveenter.
Thebuzzerinasoundof“DiDi”:indicateserrorwarning.
2.1UnlocktheAccessControl
Tounlockaccesscontrolreferstotheprocessofliftingtherestrictionstopoweronthecentralcontrolormanual,
automaticlockoperations.Theindicatorlightoftheregioncontrolledbyaccesscontrolwilltwinkleatthefrequencyof

17
1swhenitislocked.Atthesametime,theindicatorlightatthetopofthelockkeywilllightup.Threecasesofunlock:
Centralcontrolsysteminitialization:Duringtheprocesstopoweronthecentralcontrolforthefirsttime,thesystem
initializationwilllockthecentralcontrolpanelfunctionkeys(exceptthenumberingpasswordkey,thesimilarly
hereinafter).Inthiscasewejustopenoneunlockpermission,thatistousetheoriginaladministratorpassword888888
tounlockit.Enter888888andthenpress*keytoconfirm.Youwillhearthebuzzermakesalongblastofsound,atthe
sametime,theindicatorlightintheaccesscontrolareastopsblinking,andkeepsthelitstate.
Pressthelockkeymanuallyinthebootstate:ifyouwanttolockthecentralcontrolpanelfunctionkeysafterturningon
themachine,youcanmanuallypressthelockkey.Inthiscase,youcanunlockitbytheadministratorpassword,the
pre‐registeredpasswordorICcard,thebuzzerwillgivealongblastofsoundifsuccessfullyunlocked,otherwisethere
willbeasoundof"DiDi".Ifso,youcantrytore‐enterthepasswordorswipethecard.
Aftershutdownthemachine:ifthecentralcontrolsystemrecognizedthatthemachineisshutdown,itwill
automaticallylockthefunctionkeysonthecentralcontrolpanels.Inthiscase,youalsocanunlockitbythe
administratorpassword,thepre‐registeredpasswordorICcard.
2.2ICCardAdministration
ICCardadministrationincludesICcardregistrationandICcardDelete
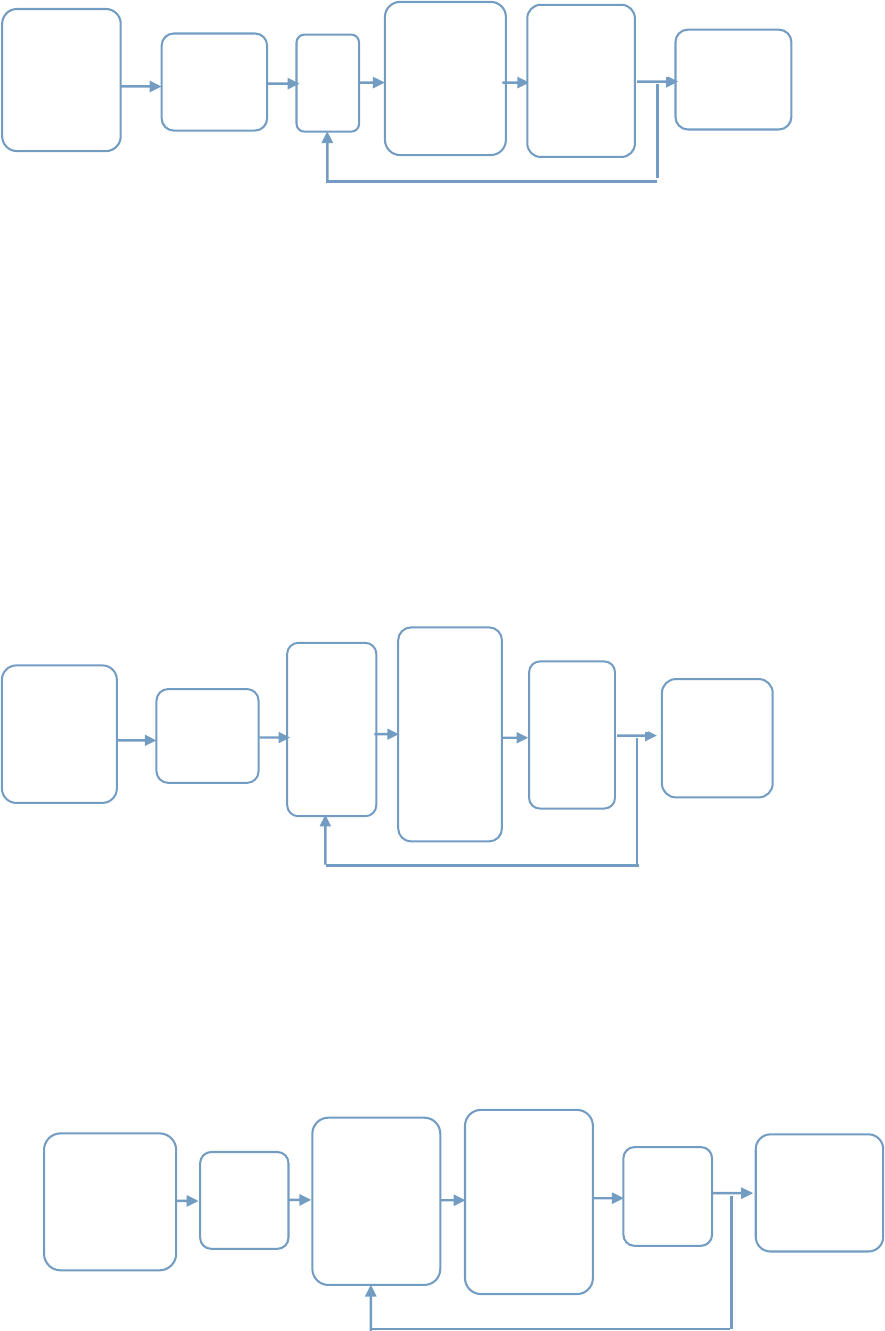
ICcardregistration:
Entertheadministrationmode,longpressthe*keyfor5seconds,whenheardthesoundof"Di",andthenclickthe*
key,andswipethecardattheinductionzone,ifthebuzzermakeasoundof"Di",itshowsthattheswipingisvalid,ifit
isanyothervoiceornovoice,thenthisisinvalid.Torecordacardyouhavetoswipeitforthreetimes,andthiscardis
recordedaseffectivecardafterthebuzzermakesalongblastofsound.Thisoperationcanbecarriedoutcontinuously.
Torecordthecardcontinuously.Intheprocessofrecordingthecard,ifyouheardany"DiDi"warningsound,thenyou
failedinrecordingthecard,youneedtopressthe*keytore‐recordthecard,ifyoupressthe*keytorecordcardbut
thetimeintervalofswipingthecardismorethan5seconds,thenitisregardedasgivinguprecordingthecard,youalso
needtopressthe*keytore‐recordcard.Atpresentthemaximumstorageis256cards.Ifthestorageisfulltherewill
bea"DiDi"sound,theexceedpartwillstartanewcycletocoverthefrontofthecardnumber.Aftercompletingthe
recordingprocess,youcanselecttomanuallyorautomaticallyexitfromtheadministrationmode.
enter the
numbers of
administrati
on password
then press *
key
press and
hold * key
for 3
seconds
press
*
key
swipe the
card at the
induction
zone for 3
times
Along
blaster of
sound after
The sound
of Di Di Di
The card is
successfully
recorded
Y
N
ICCardDeletion
Entertheadministrationmode,pressandholdthe*keyfor3seconds,whenthereisa"Di",press#key,thenswipethe
cardattheinductionzoneforonce.Ifyouhearthebuzzermakesalongblasterofsound,itshowstheinformationinthis
cardisdeleted.Thisoperationcanbecarriedoutcontinuously.Todeletethecardcontinuously.Ifthereisnotanystored
informationinthedeletedcard,youwillhearthe"DiDi"sound.Ifacardisrecordedrepeatedly,alltheinformationwillbe
deletedatonce.Ifyoupressthedeletekeythe#key,butdonotswipethecardwithin5seconds,thenitisregardedasgiving
updeletingthecard.Cardinformationcouldnotbedeleted.Aftercompletingthedeletingprocess,youcanselectto
manuallyorautomaticallyexitfromtheadministrationmode.
18
enter the
numbers of
administrati
on password
then press *
key
press and
hold*key
for 3
seconds
press
#
key
swipe the
card at the
induction
zone for
once
Along
blaster of
sound
The card is
successfully
deleted
Y
N
2.3PasswordAdministration
Passwordadministrationincludescommonpasswordregistration,administratorpasswordmodificationandPassword
delete.
Commonpasswordregistration:
Entertheadministrationmode,pressandholdthe*keyfor3seconds,whenheara"Di",pleaseenter6numbersas
password,thenpress*keytoconfirm,enterthe6numbersagain,andifthetwosetsofnumbersyouenterarematch,the
passwordisrecognizedasavalidpassword.Thebuzzermakesalongblasterofsound.Otherwise,youwillhearaprompt
toneof“DiDi”,thenthepasswordisinvalid.Thisoperationcanbecarriedoutcontinuously,toenterpasswordcontinuously.
Themaximumstorageis150setsofpassword,recordedinfullcapacitywillhave"didi"prompttone,exceedaparttostart
thecyclealloveragainbeforeyouoverwritepasswords.Enteriscompleted,canbeselectedmanuallyorautomaticallyexit
managementmode.Ifthestorageisfulltherewillbea"DiDi"sound,theexceedpartwillstartanewcycletocoverthefront
ofthecardnumber.Aftercompletingtherecordingprocess,youcanselecttomanuallyorautomaticallyexitfromthe
administrationmode.
Enter 6
numbers
as
password
again and
then press
*keyto
confir
m
enter the
numbers of
administrati
on password
then press *
key
press and
hold * key
for 3
seconds
Enter 6
numbers
as
passwor
d, then
press *
key to
confirm
Along
blaster
of sound
The
password is
successfull
y registered
Y
N
Administratorpasswordmodification:
Entertheadministrationmode,pressandholdthe1keyfor3seconds,whenheara"Di",pleaseenter6numbersasthe
newadministratorpassword,thenpress*keytoconfirm,entertherequiredadministratorpasswordagain,andifthetwo
setsofnumbersyouenterarematch,itisrecognizedasavalidpasswordmodification.Thebuzzermakesalongblasterof
sound.Otherwise,youwillhearaprompttoneof“DiDi”,thenthepasswordmodificationisinvalid.Administration
passwordcanonlybemodified,butcannotbedeleted.Themodifiedpasswordwillbeeffectiveimmediately,donotneedto
restartthecontrolpower,youcanselecttomanuallyorautomaticallyexitfromtheadministrationmode.
enter the
numbers of
administration
password then
press * key
hold the
1key
for 3
seconds
please enter 6
numbers as
the new
administrator
password,
press * key to
confirm
Along
blaster
of sound
Administrator
password
modified
successfully
Y
N
please enter 6
numbers as
the new
administrator
password
again then
press * key to
confirm
Passworddeletion:
Entertheadministrationmode,pressandholdthe*keyfor3seconds,whenheara"Di",pleaseenterpasswordwhich
youwanttodelete,pressandholdthe#keyuntilthereisa“Di”,releasethekey,thebuzzermakesalongblastofsound,
19
whichindicatesthatthepasswordisdeletedsuccessfully.Thisoperationcanbecarriedoutcontinuously.Todeletethe
passwordcontinuously.Ifthereissamepassword,allofthemwillbedeletedatonce.Aftercompletingthedeletingprocess,
youcanselecttomanuallyorautomaticallyexitfromtheadministrationmode.
press and
hold the #
key for
3munites
enter the
numbers of
administration
password then
press * key
hold the
1keyfor
3
seconds
enter
password
need to
delete
Along
blaster
of sound
password
delete
successfully
Y
N
2.4RestoreFactorySettings
Entertheadministrationmode,pressandholdthe2keyfor5secondsafteralongblasterofsound,itindicatedthatthe
initializationisdone.Aftertheinitialization,allthepasswordinformationintheICcardiserased,theadministratorpassword
recovertotheinitialpassword888888.Aftertheinitializationisdone,youcanselecttomanuallyorautomaticallyexitfrom
theadministrationmode.
enter the
numbers of
administration
password then
press * key
Press and
hold the 2
key for 5
seconds
A long
blaster of
sound
Successfully
restore
factory
settings
Y
N
2.5Boot
Themachinebootusingaonebuttonstart,whichistoopenthehostcomputerandtheprojectoratthesametime.
Inthecasethatallthelinesarecorrectlyconnectedinaccordancewiththeinstallationrequirements,thecontrol
systemwillbeinitializedimmediatelyandthefunctionkeyswillbelockedafterthecentralcontrolpanelispower‐on,inthis
timeyouneedtoentertheadministratorpassword(888888)andconfirmbypressingthe*key,whenyouheardalong"Di",
itisunlocked,pressthebootkeyatthesystemcontrolarea,whenexecutingthebootoperation,thecontrolsystem
willlightthecontrollightsafterrecognizingthehostcomputerispower‐on.Atthesametime,theprojectorpowerwillbe
turnedonimmediately.Thepowerindicatorlightoftheprojectorwillturnfromredtogreen.Ofcourse,inthecasethatthe
passwordorICcardhasbeenregistered,youcanusetheregisteredpasswordorICtounlockandthenboot.Aftergetboot,
thefollowingindicatorlightsonthecentralcontrolpanelwilllightup:accesscontrolindicatorlight,indicatorlightabovethe
startbutton,indicatorlightofthismachine,theotherlightsareintheoffstate.
2.6TouchScreenCalibration
WheninstallandusetheAll‐in‐oneMultimediaWhiteboardTeachingMachineforthefirsttime,theusersare
suggestedtomodifytheadministratorpasswordandtheregistrationICcard,andtocalibratethetouchscreeninorderto
facilitategetamoreaccuratepositioningandusethetouchscreenbetter.
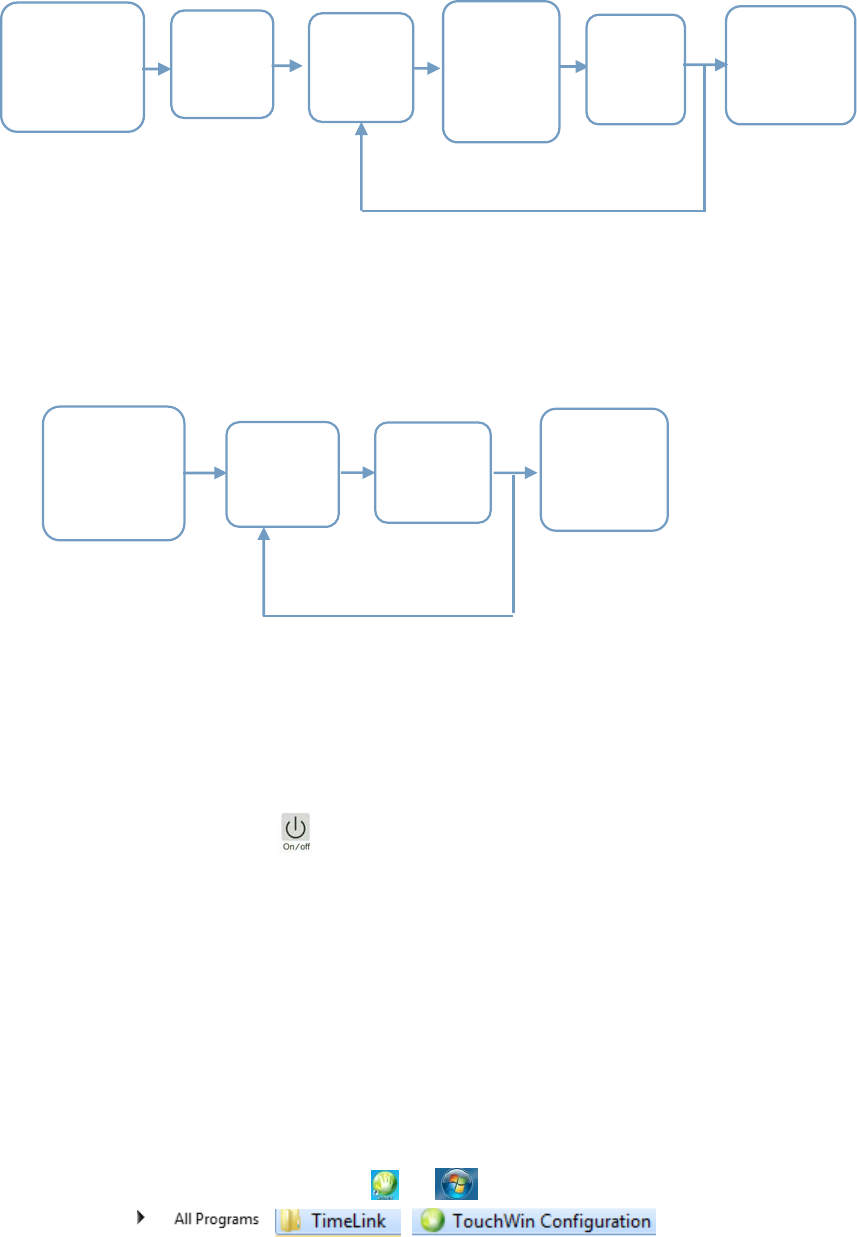
Touchscreencalibrationmethod:
Englishsystem:clickonthedesktopicon or‐‐all
programs‐‐ ‐‐ ‐‐
Enterthesoftwareinterface:
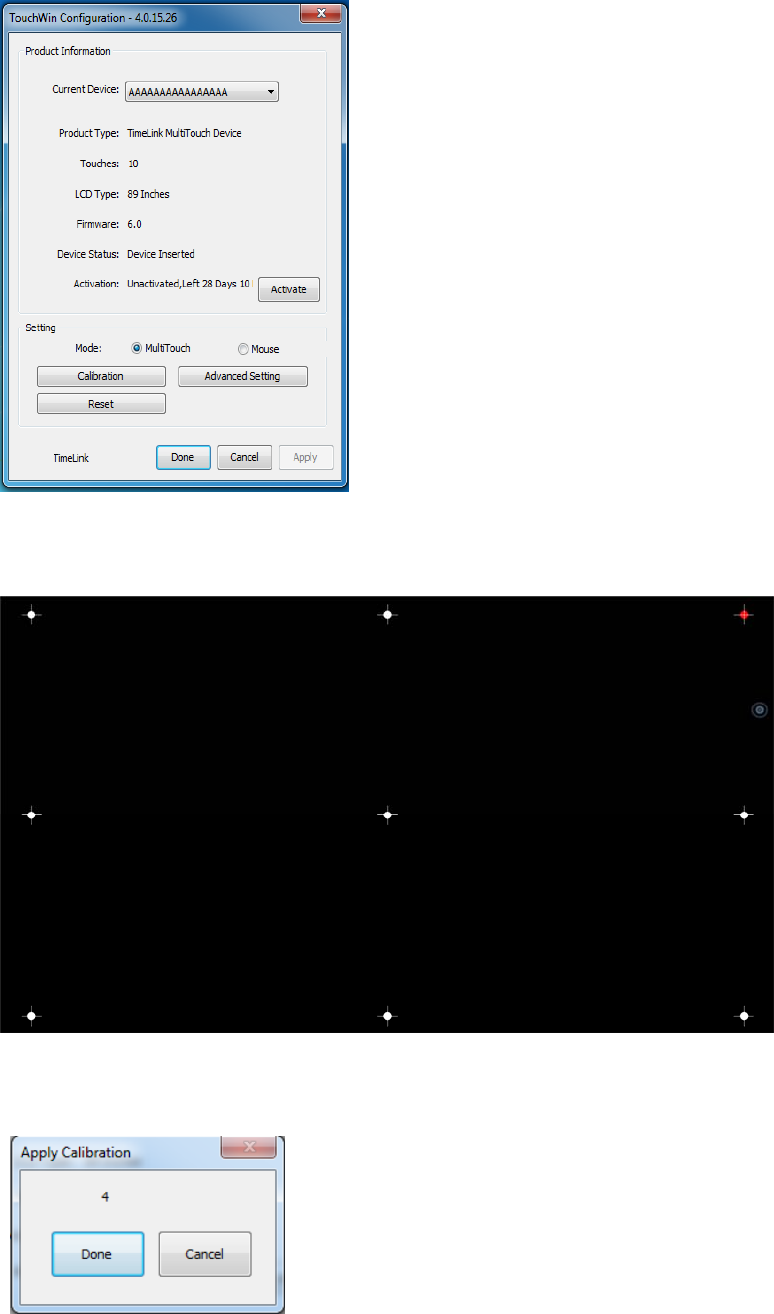
20
Clicktocalibrate,enterthenine‐pointcalibrationinterface,startfromtheredcalibrationpointsequentiallyfromthe
upperleftcornerofthestart,putthetouchpenverticallyinthemiddleofthereddotcross,aftereachclickthereddot
willmovebackwardinturn,thefollowingpictureshowsthecalibrationpointofthethirdpoints:
Completethe9calibrationpointsonebyone,therewillbecountdowntopromptsuccessfullycalibrated,youcanalso
manuallyclickthe"Done"key,indicatingthecompletionofcorrection,asshownbelow:
2.7Restart/Shutdown
Insomecircumstancesthesystemneedtoberestarted,whenthesystempanelisattheunlockingstate,youcanpress
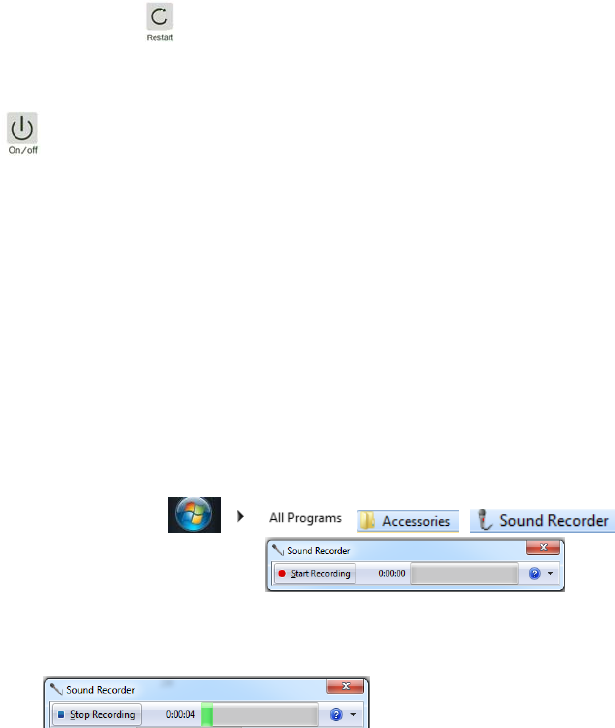
21
theresetbutton inthesystemcontrolarea,throughtheprojectionscreenyoucanseethatthesystemisinrestart
stateimmediately,atthesametimeindicatorlightabovetherestartkeywillblinkfor10timesandflashesout.
Afterusingthemachine,don'tforgettoshutitdown.Whenthesystempanelisinunlockstate,presstheon/offbutton
toshutdown.Afterthesystemexecutingshutdownoperation,thecontrolsystemrecognizethatthehostcomputer
hasbeenshutdownanditwilllockthecentralcontrolpanelautomatically,inthiscasetheindicatorlightinaccesscontrol
areablink,theindicatorlightabovethelockkeylightupandtheothersflashout..Atthesametimetosendcommandto
turnofftheprojector,theprojectorpowerindicatorlightturnsfromgreentoredandisblinking,enterintothecooling
operation,thisisnotrecommendedtocuttheprojectorpowerforcibly,topreventtheprojectorgeneratingfailuresdueto
poorheatdissipation.
2.8Recording
Thecontrolsystemcansupportthefullrangeofaudiorecordings,thatistosayaslongaswecanhearfromthe
All‐in‐oneMultimediaWhiteboardTeachingMachinehorn,wecandorecordingoperation,including:audiofiles,voicechat,
2.4Gwirelessvoiceetc..
RecordingOperationInstructions:
Englishsystem: ‐‐ ‐‐ ‐‐ ,clickonSoundRecorder,andthenthe
followingsignalboxwillpopup
Clicktostartrecordingandthenyoucanseethegreensignalontherightwillchangewiththeaudiofrequencyand
blinking
Atthesametimetherecordingtimeisdisplayed.Thesizeoftherecordingfilesisalmostnotlimitedbytherecording
time,andisstoredinthehostharddisk.Whensimultaneouslyopenmultipleaudiofiles,willberecordedinaudiosynthesis
form,thatiswecanheartheeffectofplayingthemultipleaudiofilesatthesametime,includingwirelessvoicechat,2.4G
wirelessvoice.Theywillberecordedinaudiosynthesisform.
VI.High‐speedScanner
1.Introduction
High‐speedscanner,thatisoftencalledthehigh‐speedscanner.Itisanewtypeofofficesupplies.Itissuperconvenient
designedthatitcanbefolded.Itisavailabletocompletehighspeedscanningwithinasecond.Itcanalsotakepicturesand
videos,copy,andnetworkpaperlessfaxoperation.Itsperfectsolutionsmaketheofficeworkmorerelaxed,moreefficient,
andmoreenvironmentallyfriendly.
P500Shigh‐speedscannerhasthefollowingcharacteristics:1/2.5inchCMOSspecialphotographiclens,500W+pixel,
support300timeszoom,resolution:2592*1944,workrate:XVGAmode30fps/s,automaticaperture,automaticwhite
balance,supportUSBpuredigitaloutput,supporttheformatofthe90degreerotation,singleUSBpowersupply.
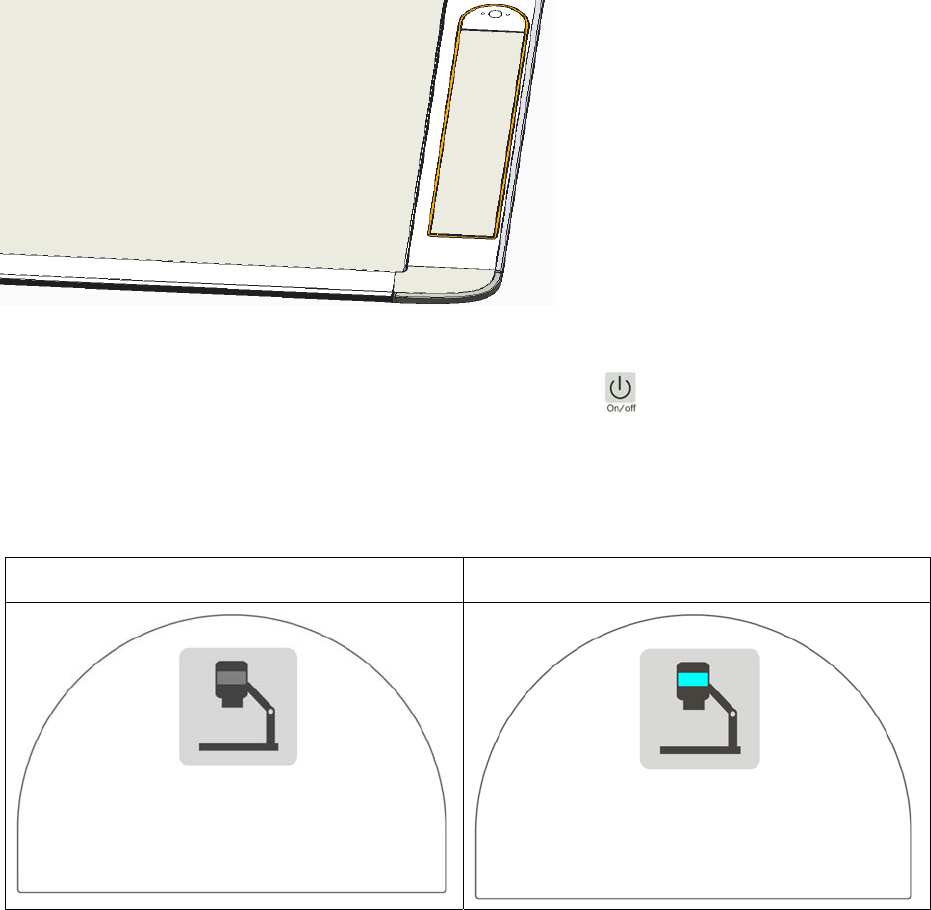
2.OperationInstructionsforVideoBooth
TheAll‐in‐oneMultimediaWhiteboardTeachingMachinemayprovidevideoboothfunction.Theboothisintegrated
intothelowerrightborderofthemachine.
22
2.1WorkingConditionsofVideoBoothoftheMachine
1)Tousevideobooth,firstofallneedtoboot(operation:theon/offkeyinthecentralcontrolpanel).Attachedis
thepictureofthecorrespondingKeyinthecentralcontrolpanel:
2)Aftertheboot,the"unlock"keyinthevideoboothisingray,cannotusevideobooth.Needtoenterthepasswordto
unlock(operation:enter6numbersaspasswordinthecentralcontrolpanelandpress"#",youcanfindthelightinthe"lock"
keyturnson).
BeforeUnlockedAfterUnlocked
3)Whendonotusethevideobooth,youcanlockitbypressingthe"lock"keyinthecentralcontrolpanel
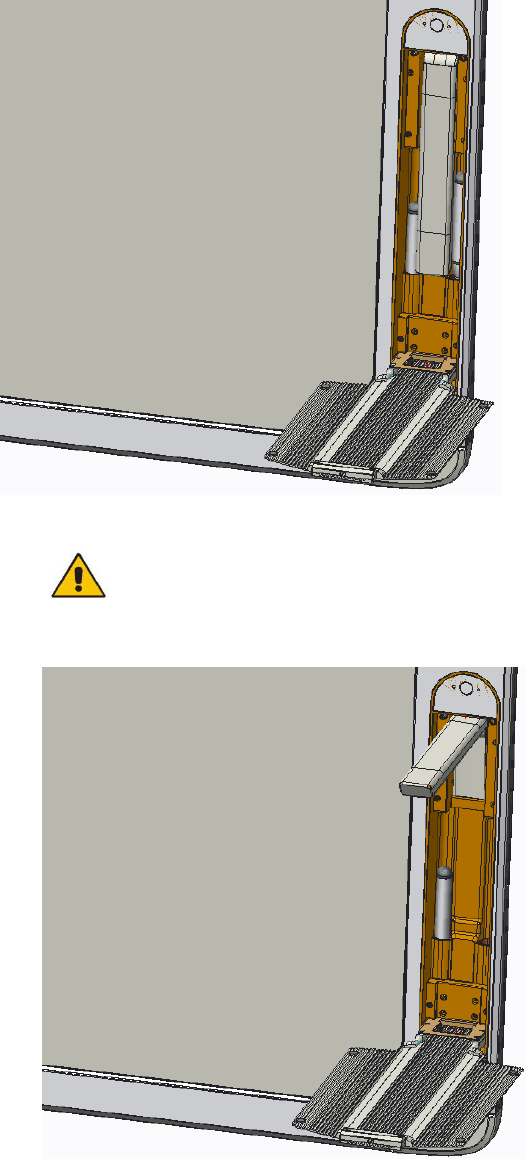
2.2TurnOn/OfftheVideoBooth
1)aftertheunlockindicator,togentlyholdthefirstpanel,pushthe"unlocked"second,finallythepop‐uponinstrument
panelwithhandlegentlyholdexhibitionboardtodown,caneffectivelypreventthepanelforpopupquicklyandcause
damagetocavity;Panelafterrotated90°,openonbothsidesoftheboard,thefollowingfigure:
Unlock Unlock
23
2)Pullthearmofhigh‐speedscannerasshowninthepicture,touseit.
Specialnote:aftertheboothisunfolded,itisstrictlyprohibitedtopressonthepanelorplacedoverweight
items.Theplacementofobjectscannotexceed0.5kg.Theinsidegraphicthepenposition,canputapenateachside,butfor
thewritingpenspecifications,pleasedonotmatchbyyourself,pleaseconsultourcustomerservicefirst.
3)Whennotinuse,closethehigh‐speedscannerarm,andthenclosethebothsidesoftheplate,andthenrotate
upwardtoclose.
3.OperationInstructionsforHigh‐speedScannerSoftware
Touseavideobooth,firstistoensurethedrivingandlecturesoftwarearewellinstalledbeforeopenlecturesoftware.
Thenyoucanusethehigh‐speedscannernormally.Youshouldpayourattentiontothatifbeenconnectedtotheexternal
USB,thehigh‐speedscannerwillbeswitchedtoanexternaldevice.Inthiscase,touseitnormally,youneedtoopenthe
clientsoftwareoftheexternalequipmentandinstallthecorrespondingdriver.Afterunfoldingthevideobooth,the
high‐speedscannercanbeusedasfollows:
24
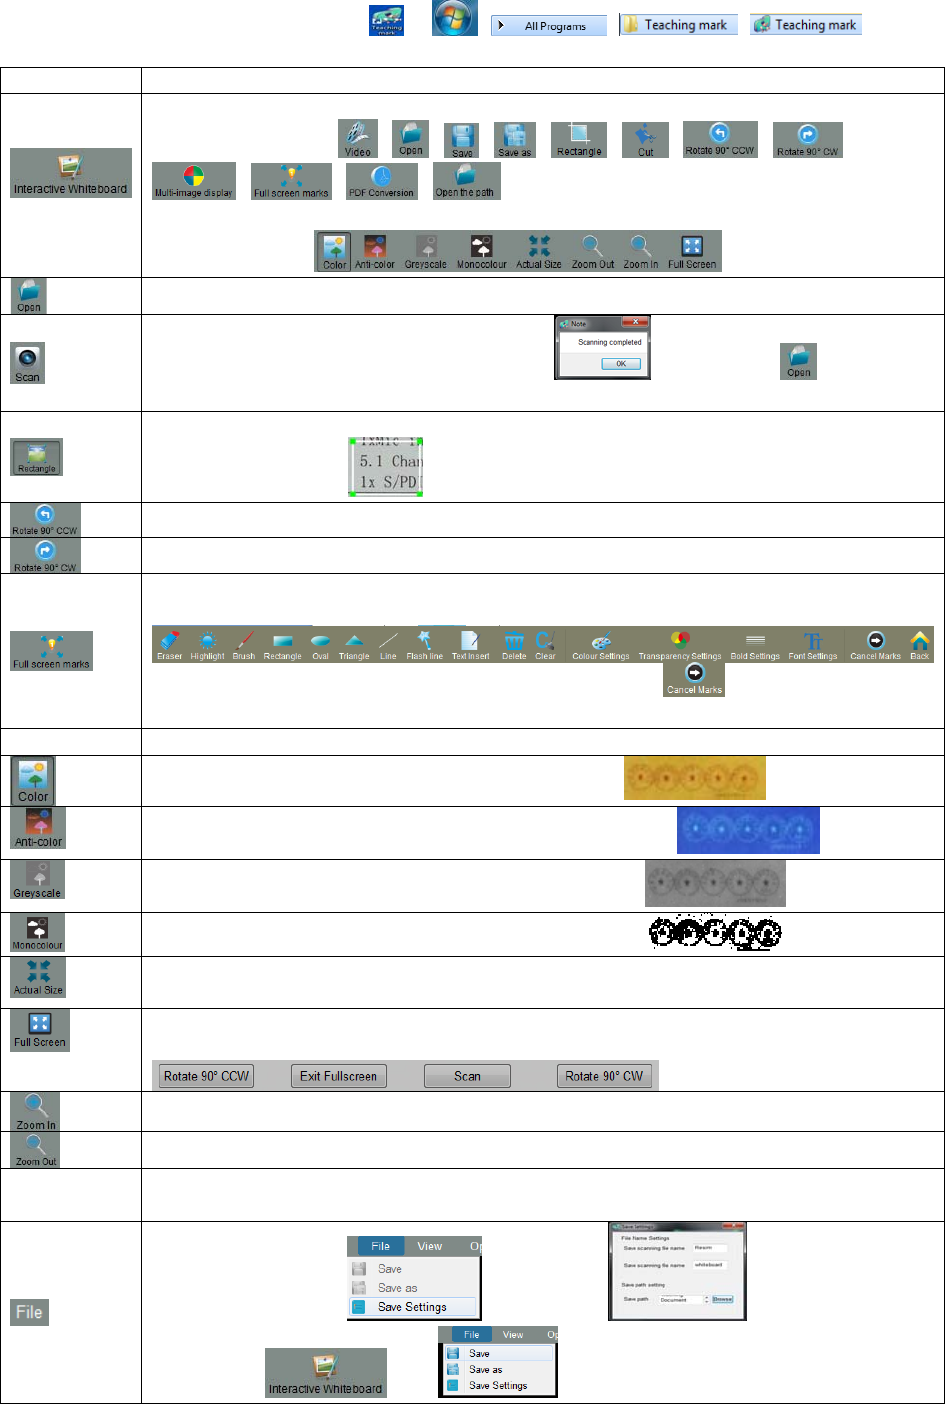
Clickonthedesktopshortcuticon ,or ‐‐ ‐‐ ‐‐ torunlecture
instrumentV1.0S,enterthedisplayscreen,andthefollowingiconsareshown:
LefticonsFunctionalDescription
Enlargethepictureandenterthetaggingfeature,including:
Fromtoptobottom:,,,,,,,,
,,,
Clickthevideoicontoreturntotheshootingscreen.
Fromlefttoright:
Selectthepicturetobeopenedfromthefolder
Takeapicture,clickandthesystemwillprompt ,clicktheicontoviewthe
takenpicture
Marqueeallowsselectinganypositionofthepicturesbeingtakento facilitateemphasisin
lectures;forexample:
Rotate90degreescounterclockwisetoadjusttheangleofthescreenbeingshot
Rotate90degreesclockwisetoadjusttheangleofthescreenbeingshot
Enterfull‐screenmarkingandthesoftwarewillgenerateanewiconatthebottom,andthe
screenwillenterthemarkingstate
,youcanun‐limitdialogoperationthroughtheUnmarkicon ;youcanalsomarkin
fullscreen.
Bottomicons
Reflecttheshootingscreenwithtruecolor,forexample
Reflecttheshootingscreenwiththebackground,forexample
Reflecttheshootingscreenwithingrayform,forexample
Reflecttheshootingscreenwithingrayform,forexample
High‐speedshootingscannerwilldisplaythetakenpictureinthesoftwareinactual
resolution
Afterenteringfull‐screen,thesoftwarewillonlyshowthetakenpicture,andthebottom
willgeneratenewicons:
Enlargethetakenpicture,equivalenttoforwardrollingofthemousewheel
Shrinkthetakenpicture,equivalenttobackwardrollingofthemousewheel
Upperright
icons
Inthedefaultinterface ,forexample:,
Clicktheicon ,and tosavethepictureorsaveas.
25
Inthedefaultinterface,itisshootingmode
Clicktheicontoenterthepicturemode
Whetherinthedefaultinterfaceorpicturemode,youcanrecordandswitchthescreen
Viewsoftwareversionattribute
Reminder:Whenusethehigh‐speedscanner,pleaseopenandcloseitslightly,occasionallytheboothdoorcannotbe
opened,youcanholdtheboothdoorslightly,thenpresstheunlockkey.Wearenottoifthereisupdateforthelecture
instrumentsoftware.
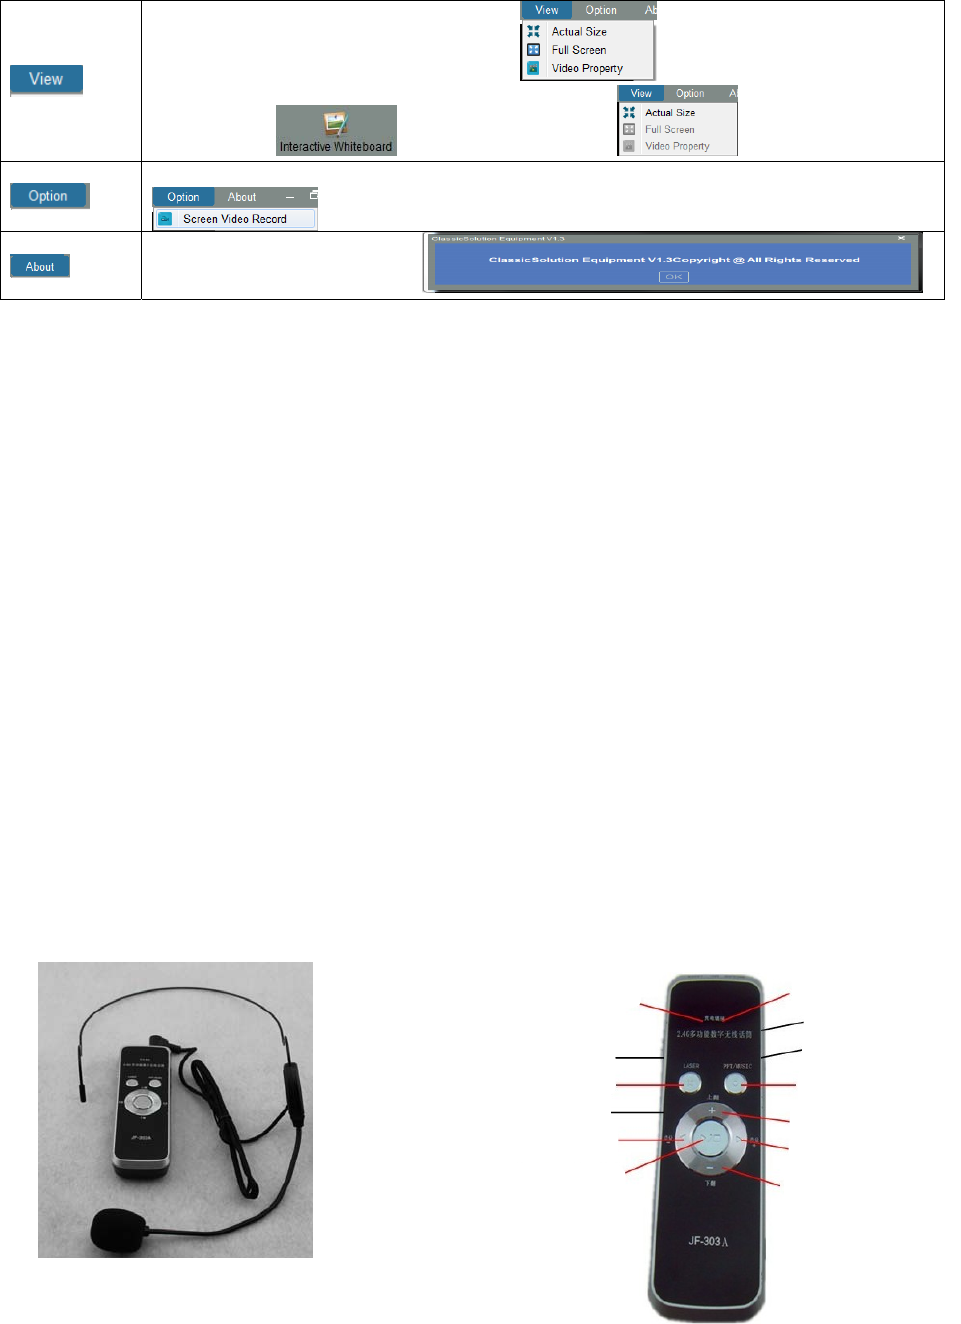
VII.WirelessVoiceSystem
Thereisa2.4Gwirelessreceivingmoduleinstalledinsidethecontrolsystem,itcanbematchedtouse2.4Gwireless
teachingmicrophoneJF‐303Aforvoicecommunication.Theusingmethodisasfollows:3metersinthenearofthecontrol
system,shifttheleftpowerkeyofthemulti‐functionalmicrophonetoON,theredandbluelightsbelowthecharging
connectionblinks,thatindicateitiscodingautomatically,afterfinishthecoding,theredlightflashedoutandthebluelight
on,thewirelessvoicecommunicationcanbeusednow.ThecharacteristicsofJF‐303A:
Equippedwithfourfunctions,i.e.thewirelessmicrophone,PPTturnpage,thelaserpointerandremotecontrollerthe
computermusicplayer;
built‐inmicrophoneandsettheexternalmicrophoneinterface,canbematchedwithaheadmountedMIC;
Thebuilt‐inlithiumbatteryandchargingmodule,areequippedwithalowvoltagealarm,chargingindicator,automatic
shutdownafterchargingfunctions.Afullchargedbatterycanbeusedformorethan12hoursaday,itcanmeetthe
requirementsofthefulldayuse;
EncryptiontechnologyisusedforprofessionalIDcode,IDcodeuptomillionsofgroups,eachsetoftheproducthasan
uniqueIDcode.Usingthesamedeviceatthesamelocationdonotinterferewitheachother;
Ifthetransmitterandreceiverdonotonthefrequency,ortoofarfromreceivingfaultfrequency,thetransmitterwill
shutdownautomaticallywithin2minutes.
VIII.Pre‐installedsoftware
1.Cloudwhiteboardthreeinonesoftware
2.Thehigh‐speedscannersoftware
Powerswitch
Power/charger indicator
Laserbutton
Chargerport
MIC/PCVOL‐
Pairindicator
MICmute
Externalaudiomute
Modeswitch
PPT page up/previous
MIC/PCVOL+
PPTpagedown/next
PPTplay/back/off/
musicplay/pause

26
3.HotkeyghostRecovery
IX.Troubleshooting
No.ProblemSolution
1Tou chscreencontactpointanddisplay
positiondeviationMaketouchscreencalibration
2
Powe
r
‐onthecentralcontrolpanel
Alonecannotfacilitatethefunction
keysinthecentralcontrolpanel
Connecttothehostsignaltransferline,thecentralcontrolpanel
canidentifythehostafterboot
3
WhentheexternalUSB,VGAis
connectedtothelaptopnotebook,the
projectionimagecannotdisplaythe
imageonthenotebook
ExternalUSBisautomaticallyswitchtothenotebook,butthe
projectorprojectionscreenneedtomanuallyswitchtoexternal
4
Whenusingforeignnotebook,the
informationofprojectionis
incomplete
Itisrelatedtothenotebookgraphicsdriver,suggesttoupdateto
thelatestofficialversion
5Findthevolumesofrecordingandthe
sourcefilearedifferent
Clickonthevolumeiconatthelowerrightcorner ‐clickthe
rightmousebutton,select
ClickRecordingafterenteringtheinterface‐ clicktheright
mousebuttononMicrophone,selectProperties,enterthenew
interface,selectLevels,settheMicrophonevolumeto60,the
othersareremain.ClickOKtoexit,re‐recordingandthe
recordingfilesandsourcefilesarebasicallyatthesamevolume.

27
X.ParameterTableoftheMachine
1Thebuilt‐in
computer
CPUIntelCorefourI3dualcorefourthreads,basicfrequency >=3.0GHz;
Internalmemory—DDR316004GB;
Harddisk—500GB;
IntelHDGraphics;VGA、HDMI、Line‐out,Mic‐in,2*USB3.0,1000MLAN;Motherboard‐based
ondesktopschemeH61orboardabove,integratedhighperformanceIntelHDGraphics;
includingVGA,HDMI,Line‐out,Mic‐in,2*USB3.0,1000MLAN;
2Projector
Simultaneouslysupportalltypesofprojectorturningon/off,VGAsignalswitching,energy
savingmodesetting,andtoreplacetheprojectoryouonlyneedtoreplacecorrespondingserial
line,andprojectorcontrolinformationiswrittenintotheinternalcontrolsystembysoftware
3
Electronic
touch
whiteboard
Whiteouterdimensions:1893.4*1250*57.6mm,outerdimensions89”;
Tou chcontrolareadimensions:1656.1*1140.1mm,thatis79”;
Thebestprojectionareadimensions(4:3):1497.6*1123.2mm,thatis73.7”;
Tou chtechnology:supportsupto32drivingfreepoint,32drivingpoint;supportanyopaque
materialswriting;supportzeropressuretouch;anti‐glare;antiunilateral80%~100%occlusion;
workonaveragecurrentof295mA,thelifeof60000hours;minimalrecognitionpoint
3mm*3mm;supportfortouchobjectsizeidentification;compatiblewithWindows8,Windows
7,WindowsVista,WindowsXP,MacOS;
4
Central
Control
System
AccessControl
RFcard:workingcurrent:22.5mA,dormancycurrent:12.5mA;ICregistration
number<=256pcs;swipingdistance<=3cm;
Numberingpassword:containsthedefaultpassword,thepasswordcanbe
registeredanddeleted,6numbers.
Power
amplifier2*20W@112dB
Multi‐function
USB
Whetheritisforconnectiontoahostorexternallaptop,aUSBporthas
implementedtoreadandwriteaudioandUSB,andexternalUSBhas
automaticswitchingfunction
Record
Realizethefullrangeofrecordingfunctionthroughthetaperecordercomes
withthewin7system,sothatallthevoicewecanhearfromtheloudspeaker
canberecorded,includingtheexpansionofmusic,chatvoice,wirelessmic,
externalcomputer,etc.,recordingtimeisnotrestricted.
2.4Gwireless
voice
Model:JF‐303A;
Thereceivingcurrent:notonthecode38.5mA,onthecode26.1mA;
Directivity:capacitancetypesingledirection;sensitivity:‐38(dB);
Frequencyrange:40Hz‐16KHz;modulation:GFSK;carrierfrequency:
2400‐2482Mhz;effectivedistance:10~20meters;RFPower:0dB;the
transmitterworkingvoltage:3.7Vpolymerlithiumbattery;continuousworking
time:8‐10H;Equippedwithfourfunctions,i.e.thewirelessmicrophone,PPT
turnpage,thelaserpointerandremotecontrollerthecomputermusicplayer.
Communicatio
nmode
Controlandhost:USB
Controlandtheprojector:232serialport
5Thebuilt‐in
booth
Model:P500S;1/2 . 5 inchesdedicatedCMOSphotographiclens,500Wpixel,support300times
zoom,workingresolution:2592*1944,rate:XVGAmode30fps/s,automaticaperture,
automaticwhitebalance,supportUSBpuredigitaloutput,supporttheformatofthe90degree
rotation,singleUSBpowersupply.
28
XI.ProjectorConfigurationMethod
1.Notes
1)Thetoolcanreadtheprojectorserialcodeofthecontrolboardandenternewserialcodes,serialcodesarewritten
in16hexadecimalnumber,maximumlengthof53bytes,ifitisnecessarytoreplacetheprojector,youonlyneedtocomplete
thecorrespondingfunctionserialcontrolcodeprovidedinthespecificationoftheprojector,andthenenterthroughthetool.
2)Amongwhich,theVGA2serialcodeshouldbefilledwiththevideoserialcodeprovidedinthespecificationof
theprojector.
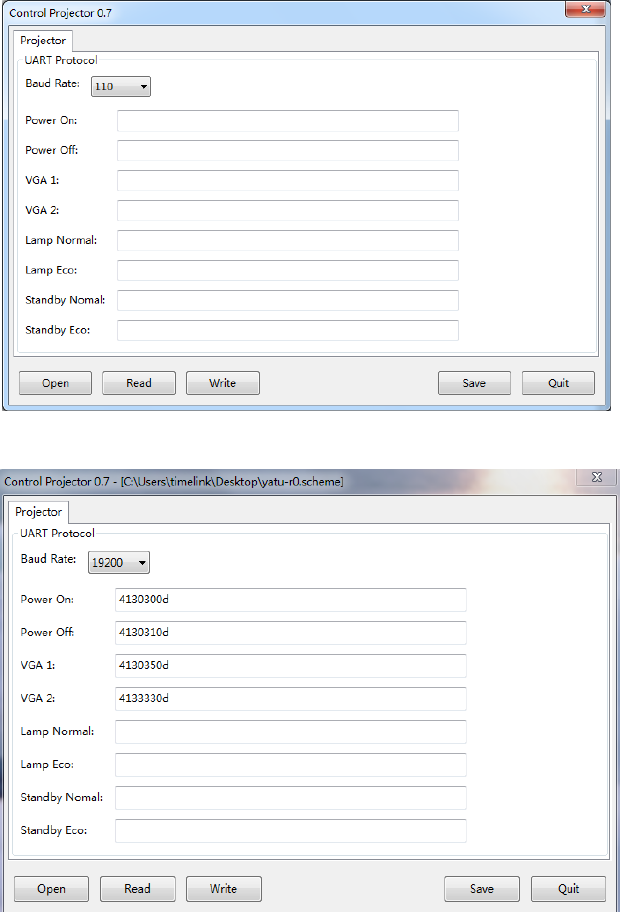
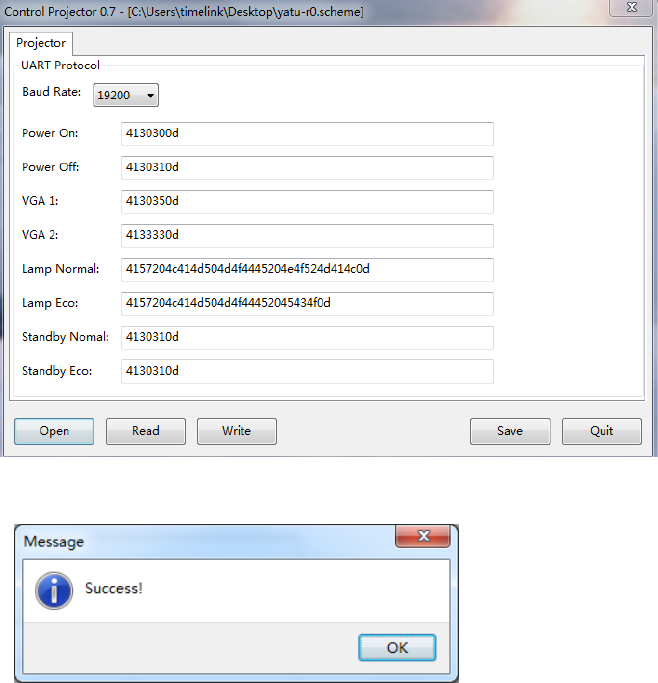
2.Configureserialcodetools
1)Openthe"projector.exe"software,asshownbelow:
2)Ifthereisaprojectorserialconfigurationfile,click"Open"key,selecttheserialportprofileoftheprojector,suchas
"YaTu‐r0.scheme",asshownbelow:
Ifthereisnoprojectorserialconfigurationfile,fillthe"BaudRate","PowerOn,"PowerOff","VGA1","VGA2"andother
16hexadecimalserialcodeoftheserialport,thewritteninformationcanbestoredasfiles,canclickontheSavebutton,as
shownbelow:
29
3) Clickonthe"Write"keytowritetheserialcodeintothecentralcontrolpanel,belowisthesymbolofsuccessful
written,click"Read"buttontoviewthewrittenserialcodevalue.
Aftercompletingthestepsabove,thecentralcontrolpanelcannormallycontrolthecorrespondingfunctionsofthe
projector.