TimeLink Technology IMASK-M TimeLink Multi-touch Screen User Manual TouchWin Instruction Manual
TimeLink Technology Co.Ltd TimeLink Multi-touch Screen TouchWin Instruction Manual
UserManual.wiki
>
TimeLink Technology
>
IMASK M User Manual
user manual
Navigation menu
Upload a User Manual
Namespaces
Wiki Guide
HTML
PDF
Info
Views
User Manual
Discussion / Help
Navigation
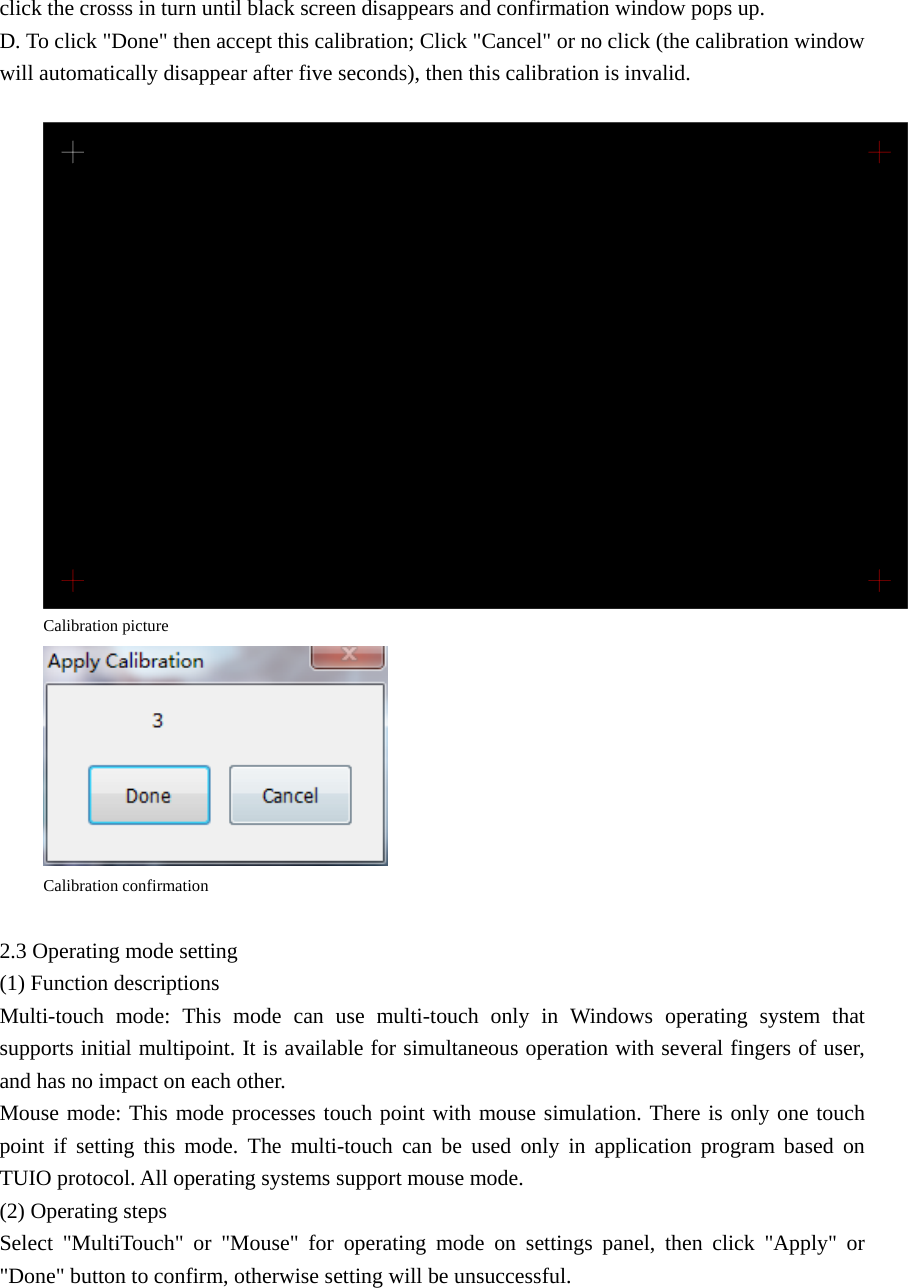
![Software installation and instruction under Mac OS Thispartisapplicabletoallversionsof"TouchWinSetupforMac"software,onlysupportMacOSXV10.6systemorlater.1 Software installation (1) Double click "TouchWinSetup.pkg", dialog box of install wizard will pop up, then implement according to prompts; (2) Installation is completed after restarting system, perform touch at this moment. 2 Configuration specifications of touch screen 2.1 Open configuration of touch screen (1) Double click "TouchWinConfig" in application (2) Configuration window of touch screen pops up Configuration interface of touch screen [Note] Size displayed in LCD type is integer data, therefore, 21 inches displayed, while 21.5 inches actually. 2.2 Calibration (1) Function descriptions If a big deviation occurs in hardware installation or at the contacts of screen cursor and finger, it may affect the usage. When using this function, please adjust the corresponding coordinates of cursor and fingers click. [Note] Use fingers only to click on the four cross points of black screen for four times when calibrate.](https://usermanual.wiki/TimeLink-Technology/IMASK-M/User-Guide-1636544-Page-2.png)
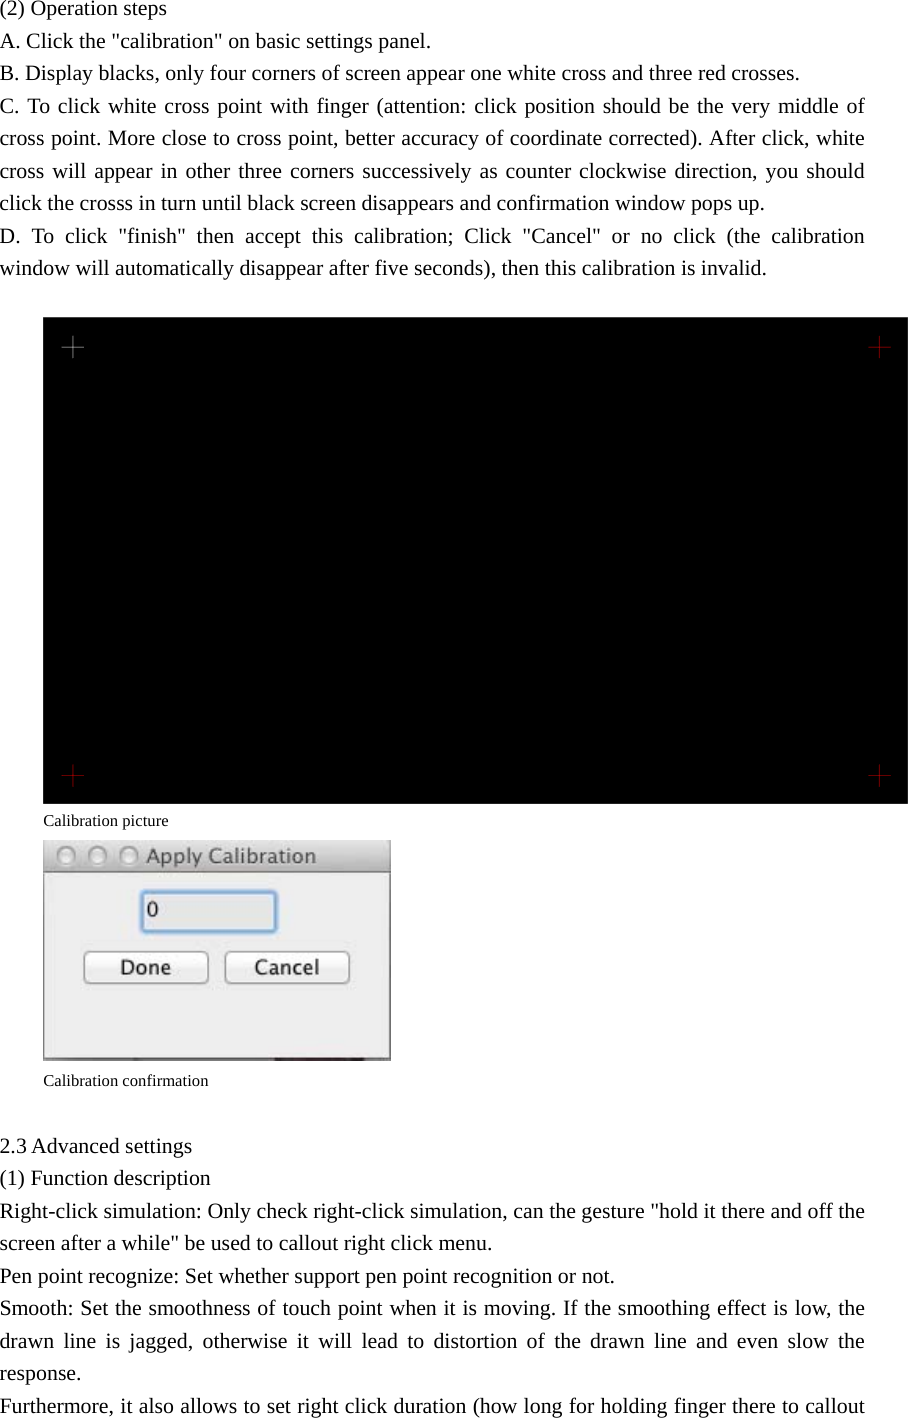
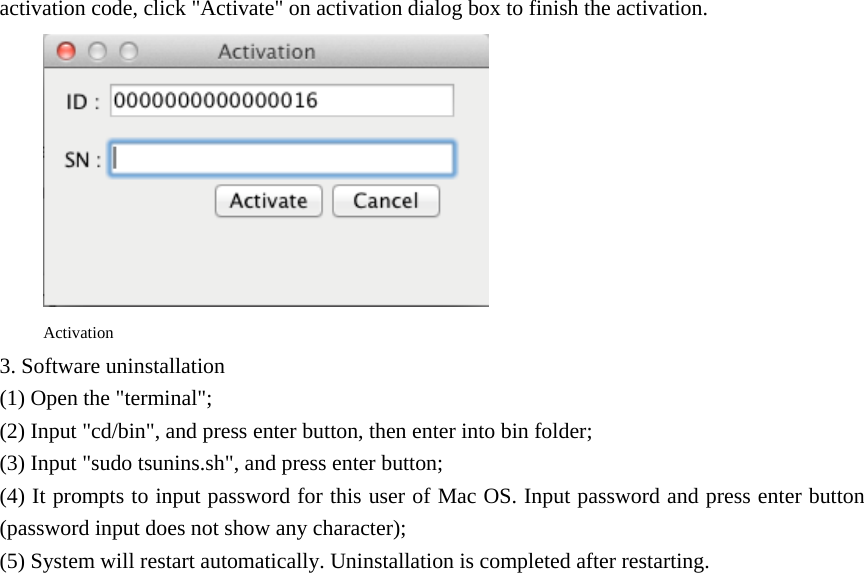
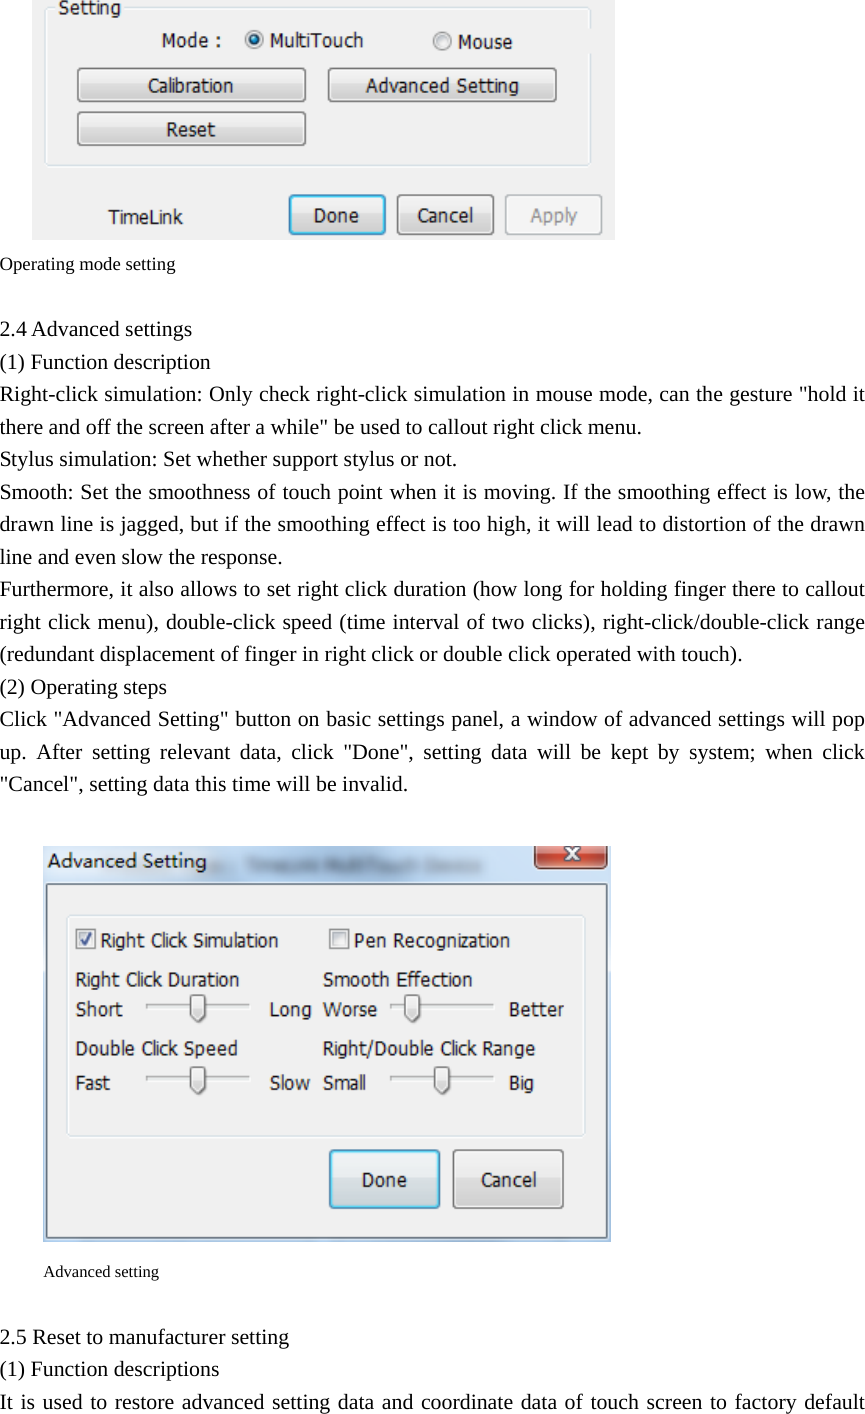
![right click menu), double-click speed (time interval of two clicks), right-click/double-click range (redundant displacement of finger in right click or double click operated with touch). (2) Operating steps Click "Advanced setting" button on basic settings panel, a window of advanced settings will pop up. After setting relevant data, click "Done", setting data will be kept in chip; when click "Cancel", setting data this time will be invalid. Advanced settings 2.4 Restore defaults (1) Function descriptions It is used to restore advanced setting data and coordinate data of touch screen to factory defaults. (2) Operating steps After clicking "Reset" button on the setting panel, the prompt window appears; click "Yes" button to confirm restore defaults and otherwise click "No". Restore factory default 2.5 Activation (1) Function description The touch screen only has 30-day's trial period if it is not activated; and if the trial period has expired, the touch screen will be unavailable. When it needs to be activated, please apply for activation code to the company. The defaults of touch screen formally manufactured is in activated state. [Note] Please don't activate repeatedly, so as not to affect use. (2) Operating steps After clicking "Activate", the activation dialog box appears. The serial number of the machine is above the activation dialog box and the activation code should be input below. After inputting the](https://usermanual.wiki/TimeLink-Technology/IMASK-M/User-Guide-1636544-Page-4.png)
![Installation of Windows system driver and instructions This part is applicable to all software of TouchWinSetup For Windows, can only be installed and used under windows systems 1. Installation of driver 1.1 Hardware requirements (1) Touch screen shall be installed before installation of software driver 1.2 Software requirements Requirements for operating system environment: (1) No need to install other plug-in board for Windows 7 operating system (2) Microsoft.net Framework 2.0 should be installed when using Windows XP operating system. 1.3 Multi-touch requirements Operating system that supports initial multi-touch: Windows7 Home Premium, Windows7 Ultimate Operating system that do not support initial multi-touch Windows7 Home, Vista, Windows XP, Window 2003 Operating systems that do not support initial multi-touch may implement multipoint through TUIO protocol, the installed operating system shall be original (not GHOST), otherwise it will affect touch. 1.4 Cautions for installation (1) Ensure the drivers such as graphics card, USB of the computer are installed properly before installation. It’s better to use the standard driver offered by manufacturers. (2) Touch screen shall be installed before installation. (3) Please close antivirus and Trojan interception programs before installation. (4) If the driver used to be installed to the computer before, please ensure it has been unloaded completely, and delete the old installation files by hand if necessary. (5) Microsoft.net Framework 2.0 must be installed first if it is Windows XP operating system. 1.5 Installation steps (1) Double-click the installation file of "TouchWin_setup.exe" (2) In Chinese operating system, select "English" or "Simplified Chinese" and click "Yes" when a dialog box of language selection for installation pops up; in English operating system, directly go to step (3); (3) Click "Next" successively according to prompts when a dialog box of installation wizard of Touch Win pops up; (4) After installation, dialog box of installation wizard of Touch Win will appear, select "yes, I want to restart" and click "Done", then it will restart immediately. If you don’t want to restart immediately, select "no, I will restart later" and click "Done". To avoid the incomplete installation, it is suggested to restart the system right now; (5) Thus far, installation of software is completed. After installation, TimeLink/TouchWin folder can be found in start menu. Open file of touch screen configuration in the folder you can implement touch screen settings. [Note]:If the dialog box appears that asks whether to stop the installation by antivirus software or intercept Trojan software during the installation, please choose release or trust. Restart the system after installation completed, otherwise, the data will not be loaded completely which will affect touch.](https://usermanual.wiki/TimeLink-Technology/IMASK-M/User-Guide-1636544-Page-6.png)
![2 Configuration specifications of touch screen 2.1 Open configuration of touch screen (1) Click "configuration of touch screen" in start menu (2) Pop up configuration window of touch screen Configuration interface of touch screen [Note] size displayed in LCD type is integer data, therefore, 21 inches displayed, while 21.5 inches actually. 2.2 Calibration (1) Function descriptions If a big deviation occurs in hardware installation or at the contacts of screen cursor and finger, it may affect the usage. When using this function, please adjust the corresponding coordinates of cursor and fingers click. [Note] Use fingers only to click on the four cross points of black screen for four times when calibrate. (2) Operation steps A. Click the “Calibration” on basic settings panel. B. Display blacks, only four corners of screen appear one white cross and three red crosses. C. To click white cross point with finger (attention: click position should be the very middle of cross point. More close to cross point, better accuracy of coordinate corrected). After click, white cross will appear in other three corners successively as counter clockwise direction, you should](https://usermanual.wiki/TimeLink-Technology/IMASK-M/User-Guide-1636544-Page-7.png)
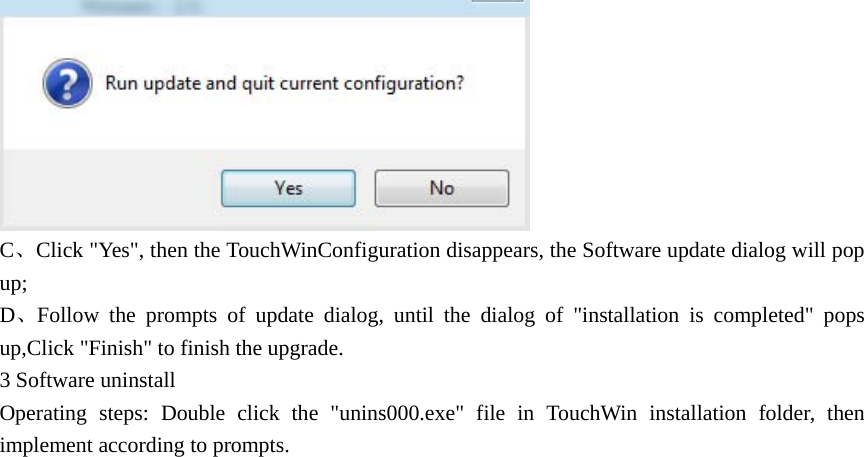
![setting. (2) Operating steps After clicking "Reset" button on the setting panel, the prompt window appears; click "yes" button to confirm restore defaults and otherwise click "No". Restore factory default 2.6 Activation (1) Function description The touch screen only has 30-day's trial period if it is not activated; and if the trial period has expired, the touch screen will be unavailable. When it needs to be activated, please apply for activation code to the company. The defaults of touch screen formally manufactured is in activated state. [Note] Please don't activate repeatedly, so as not to affect use. (2) Operating steps After clicking "Activate", the activation dialog box appears. The serial number of the machine is above the activation dialog box and the activation code should be input below. After inputting the activation code, click "Activate" on activation dialog box to finish the activation. Activation 2.7 Update (1) Function description This function available for users to update this software. (2) Operating steps A、Confirm that the network connection is working B、Click "Update" button on basic settings panel ,the following message box pops up](https://usermanual.wiki/TimeLink-Technology/IMASK-M/User-Guide-1636544-Page-10.png)