TimeLink Technology IMASK-M TimeLink Multi-touch Screen User Manual TouchWin Instruction Manual
TimeLink Technology Co.Ltd TimeLink Multi-touch Screen TouchWin Instruction Manual
user manual

User Manual
Product features
z Brand new multi-touch technology (proprietary technology of TimeLink Inc. – Surface light
wave multi-touch technology).
z Support multi-touch screen with more than 10 points, and able to increase the number of
touch points as required (16 points, 32 points).
z Size recognition of touch object, available for extending more applications
z Not requiring miniature optical cameras.
z Not requiring conductive glass substrate.
z Zero pressure touch (identical to capacitive screen).
z Anti-electromagnetic interference, immune to electrical interference of TFT-LCD.
z No drift phenomenon.
z Support using with hand and pen, not requiring electromagnetic pen and capacitive pen.
z More convenient to use, and can dismantle whenever necessary.
Technical specifications
Touch technology Surface light wave multitouch technology
Touch pressure Zero pressure
Number of touch point 10 points
Minimum identifiable size of touch point 2mm×2mm
Moving detection of minimum touch point 1mm
Response speed <10ms
Scanning speed >100 frame/second
Power supply system Power only by USB
Operating voltage 5.0V
Average current <250mA
Power consumption 1.25W
Platform supported Windows XP、Windows 2003、Vista 、
Windows 7
Mac OS X 10.6、Mac OS X 10.7
Multi-touch protocol supported TUIO Protocol (UDP Mode), TUIO Adobe
Flash Mode (TCP Mode), Windows 7
Multi-touch HID Protocol
Touch Screen 21.5-inch
Software installation and instruction under Mac OS
Thispartisapplicabletoallversionsof"TouchWinSetupforMac"software,onlysupportMacOS
XV10.6systemorlater.
1 Software installation
(1) Double click "TouchWinSetup.pkg", dialog box of install wizard will pop up, then implement
according to prompts;
(2) Installation is completed after restarting system, perform touch at this moment.
2 Configuration specifications of touch screen
2.1 Open configuration of touch screen
(1) Double click "TouchWinConfig" in application
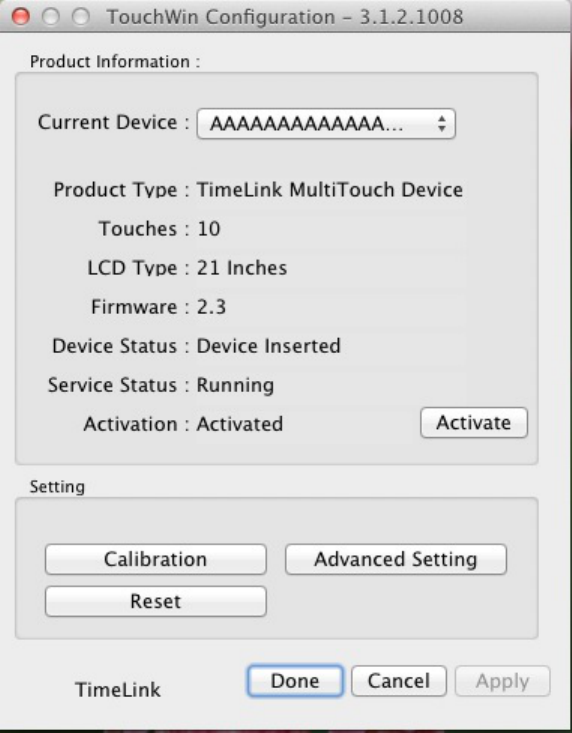
(2) Configuration window of touch screen pops up
Configuration interface of touch screen
[Note] Size displayed in LCD type is integer data, therefore, 21 inches displayed, while 21.5
inches actually.
2.2 Calibration
(1) Function descriptions
If a big deviation occurs in hardware installation or at the contacts of screen cursor and finger, it
may affect the usage. When using this function, please adjust the corresponding coordinates of
cursor and fingers click. [Note] Use fingers only to click on the four cross points of black screen
for four times when calibrate.
(2) Operation steps
A. Click the "calibration" on basic settings panel.
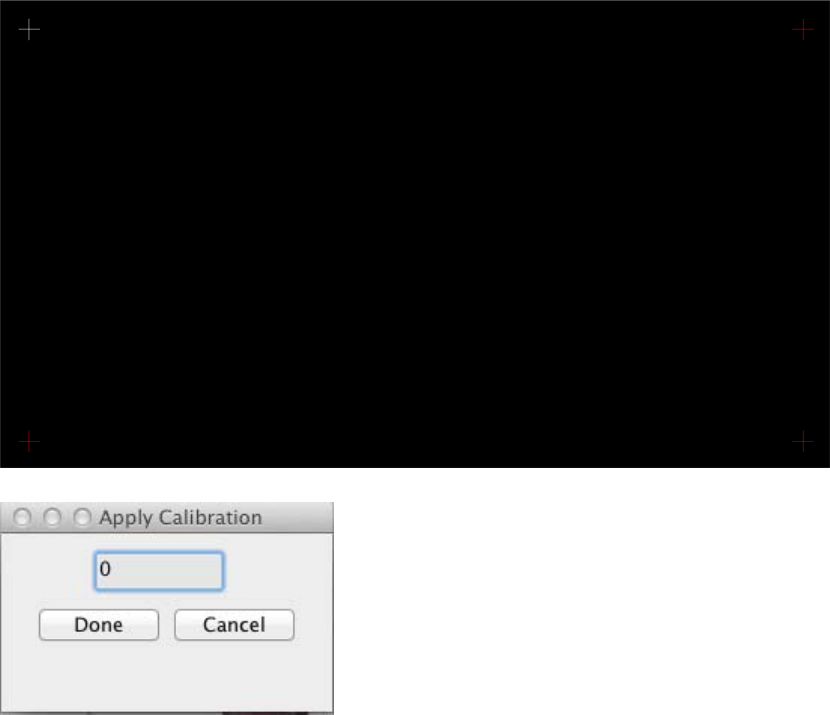
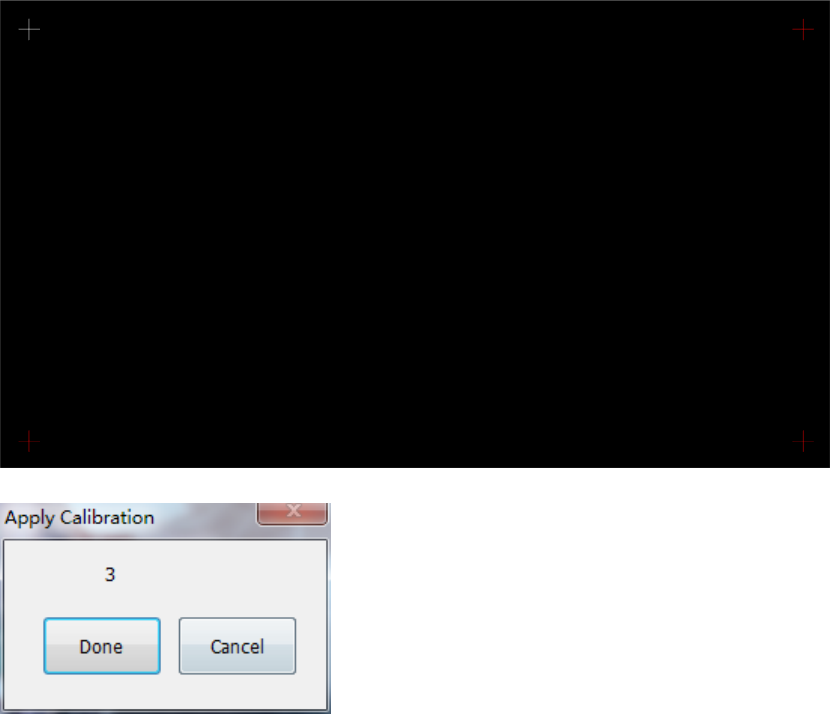
B. Display blacks, only four corners of screen appear one white cross and three red crosses.
C. To click white cross point with finger (attention: click position should be the very middle of
cross point. More close to cross point, better accuracy of coordinate corrected). After click, white
cross will appear in other three corners successively as counter clockwise direction, you should
click the crosss in turn until black screen disappears and confirmation window pops up.
D. To click "finish" then accept this calibration; Click "Cancel" or no click (the calibration
window will automatically disappear after five seconds), then this calibration is invalid.
Calibration picture
Calibration confirmation
2.3 Advanced settings
(1) Function description
Right-click simulation: Only check right-click simulation, can the gesture "hold it there and off the
screen after a while" be used to callout right click menu.
Pen point recognize: Set whether support pen point recognition or not.
Smooth: Set the smoothness of touch point when it is moving. If the smoothing effect is low, the
drawn line is jagged, otherwise it will lead to distortion of the drawn line and even slow the
response.
Furthermore, it also allows to set right click duration (how long for holding finger there to callout

right click menu), double-click speed (time interval of two clicks), right-click/double-click range
(redundant displacement of finger in right click or double click operated with touch).
(2) Operating steps
Click "Advanced setting" button on basic settings panel, a window of advanced settings will pop
up. After setting relevant data, click "Done", setting data will be kept in chip; when click "Cancel",
setting data this time will be invalid.
Advanced settings
2.4 Restore defaults
(1) Function descriptions
It is used to restore advanced setting data and coordinate data of touch screen to factory defaults.
(2) Operating steps
After clicking "Reset" button on the setting panel, the prompt window appears; click "Yes" button
to confirm restore defaults and otherwise click "No".
Restore factory default
2.5 Activation
(1) Function description
The touch screen only has 30-day's trial period if it is not activated; and if the trial period has
expired, the touch screen will be unavailable. When it needs to be activated, please apply for
activation code to the company. The defaults of touch screen formally manufactured is in activated
state.
[Note] Please don't activate repeatedly, so as not to affect use.
(2) Operating steps
After clicking "Activate", the activation dialog box appears. The serial number of the machine is
above the activation dialog box and the activation code should be input below. After inputting the
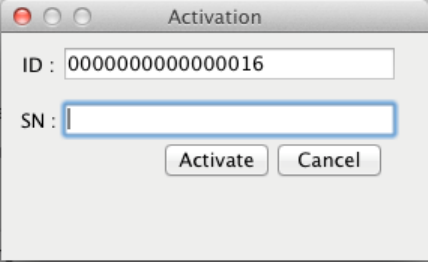
activation code, click "Activate" on activation dialog box to finish the activation.
Activation
3. Software uninstallation
(1) Open the "terminal";
(2) Input "cd/bin", and press enter button, then enter into bin folder;
(3) Input "sudo tsunins.sh", and press enter button;
(4) It prompts to input password for this user of Mac OS. Input password and press enter button
(password input does not show any character);
(5) System will restart automatically. Uninstallation is completed after restarting.
Installation of Windows system driver and instructions
This part is applicable to all software of TouchWinSetup For Windows, can only be installed and
used under windows systems
1. Installation of driver
1.1 Hardware requirements
(1) Touch screen shall be installed before installation of software driver
1.2 Software requirements
Requirements for operating system environment:
(1) No need to install other plug-in board for Windows 7 operating system
(2) Microsoft.net Framework 2.0 should be installed when using Windows XP operating system.
1.3 Multi-touch requirements
Operating system that supports initial multi-touch:
Windows7 Home Premium, Windows7 Ultimate
Operating system that do not support initial multi-touch
Windows7 Home, Vista, Windows XP, Window 2003
Operating systems that do not support initial multi-touch may implement multipoint through
TUIO protocol, the installed operating system shall be original (not GHOST), otherwise it will
affect touch.
1.4 Cautions for installation
(1) Ensure the drivers such as graphics card, USB of the computer are installed properly before
installation. It’s better to use the standard driver offered by manufacturers.
(2) Touch screen shall be installed before installation.
(3) Please close antivirus and Trojan interception programs before installation.
(4) If the driver used to be installed to the computer before, please ensure it has been unloaded
completely, and delete the old installation files by hand if necessary.
(5) Microsoft.net Framework 2.0 must be installed first if it is Windows XP operating system.
1.5 Installation steps
(1) Double-click the installation file of "TouchWin_setup.exe"
(2) In Chinese operating system, select "English" or "Simplified Chinese" and click "Yes" when a
dialog box of language selection for installation pops up; in English operating system, directly go
to step (3);
(3) Click "Next" successively according to prompts when a dialog box of installation wizard of
Touch Win pops up;
(4) After installation, dialog box of installation wizard of Touch Win will appear, select "yes, I
want to restart" and click "Done", then it will restart immediately. If you don’t want to restart
immediately, select "no, I will restart later" and click "Done". To avoid the incomplete installation,
it is suggested to restart the system right now;
(5) Thus far, installation of software is completed. After installation, TimeLink/TouchWin folder
can be found in start menu. Open file of touch screen configuration in the folder you can
implement touch screen settings.
[Note]:If the dialog box appears that asks whether to stop the installation by antivirus software or
intercept Trojan software during the installation, please choose release or trust. Restart the system
after installation completed, otherwise, the data will not be loaded completely which will affect
touch.
2 Configuration specifications of touch screen
2.1 Open configuration of touch screen
(1) Click "configuration of touch screen" in start menu
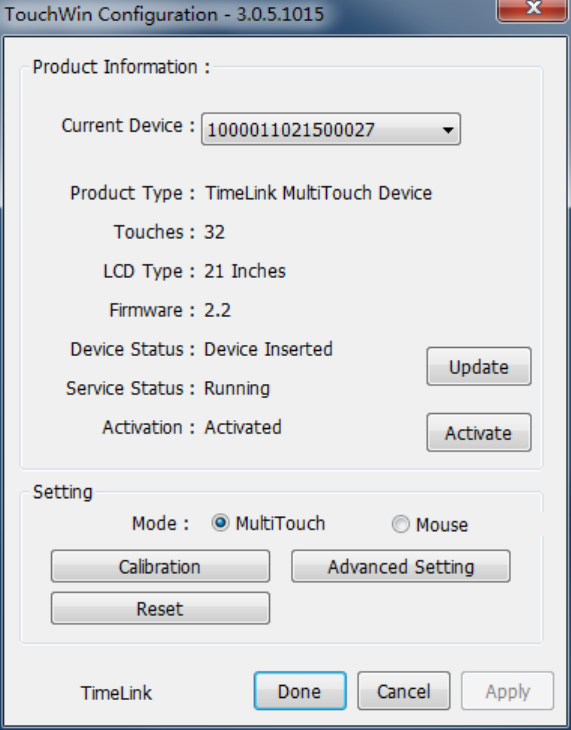
(2) Pop up configuration window of touch screen
Configuration interface of touch screen
[Note] size displayed in LCD type is integer data, therefore, 21 inches displayed, while 21.5
inches actually.
2.2 Calibration
(1) Function descriptions
If a big deviation occurs in hardware installation or at the contacts of screen cursor and finger, it
may affect the usage. When using this function, please adjust the corresponding coordinates of
cursor and fingers click. [Note] Use fingers only to click on the four cross points of black screen
for four times when calibrate.
(2) Operation steps
A. Click the “Calibration” on basic settings panel.
B. Display blacks, only four corners of screen appear one white cross and three red crosses.
C. To click white cross point with finger (attention: click position should be the very middle of
cross point. More close to cross point, better accuracy of coordinate corrected). After click, white
cross will appear in other three corners successively as counter clockwise direction, you should
click the crosss in turn until black screen disappears and confirmation window pops up.
D. To click "Done" then accept this calibration; Click "Cancel" or no click (the calibration window
will automatically disappear after five seconds), then this calibration is invalid.
Calibration picture
Calibration confirmation
2.3 Operating mode setting
(1) Function descriptions
Multi-touch mode: This mode can use multi-touch only in Windows operating system that
supports initial multipoint. It is available for simultaneous operation with several fingers of user,
and has no impact on each other.
Mouse mode: This mode processes touch point with mouse simulation. There is only one touch
point if setting this mode. The multi-touch can be used only in application program based on
TUIO protocol. All operating systems support mouse mode.
(2) Operating steps
Select "MultiTouch" or "Mouse" for operating mode on settings panel, then click "Apply" or
"Done" button to confirm, otherwise setting will be unsuccessful.
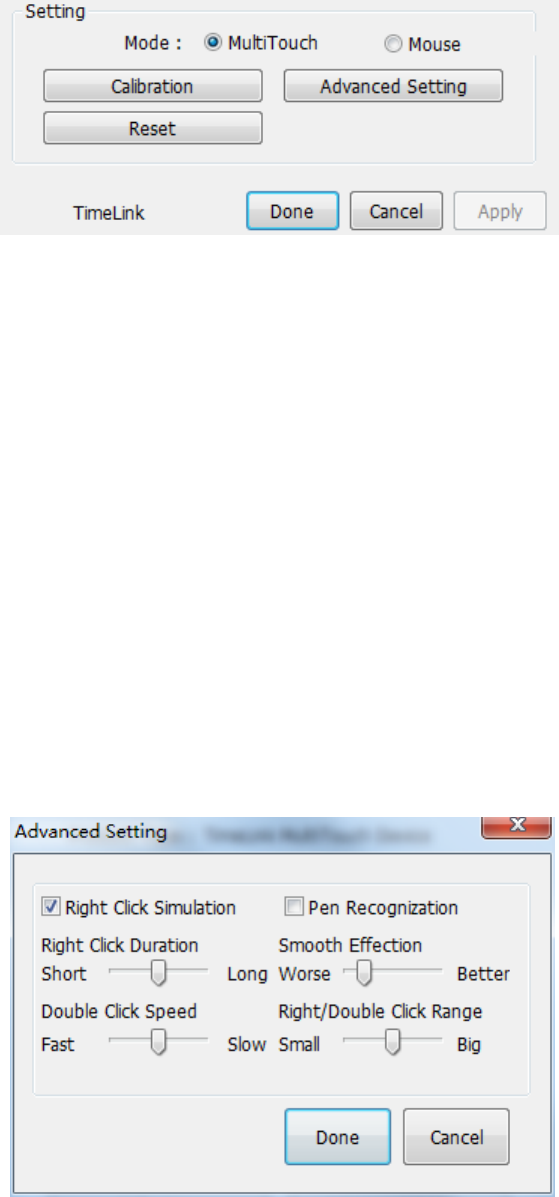
Operating mode setting
2.4 Advanced settings
(1) Function description
Right-click simulation: Only check right-click simulation in mouse mode, can the gesture "hold it
there and off the screen after a while" be used to callout right click menu.
Stylus simulation: Set whether support stylus or not.
Smooth: Set the smoothness of touch point when it is moving. If the smoothing effect is low, the
drawn line is jagged, but if the smoothing effect is too high, it will lead to distortion of the drawn
line and even slow the response.
Furthermore, it also allows to set right click duration (how long for holding finger there to callout
right click menu), double-click speed (time interval of two clicks), right-click/double-click range
(redundant displacement of finger in right click or double click operated with touch).
(2) Operating steps
Click "Advanced Setting" button on basic settings panel, a window of advanced settings will pop
up. After setting relevant data, click "Done", setting data will be kept by system; when click
"Cancel", setting data this time will be invalid.
Advanced setting
2.5 Reset to manufacturer setting
(1) Function descriptions
It is used to restore advanced setting data and coordinate data of touch screen to factory default
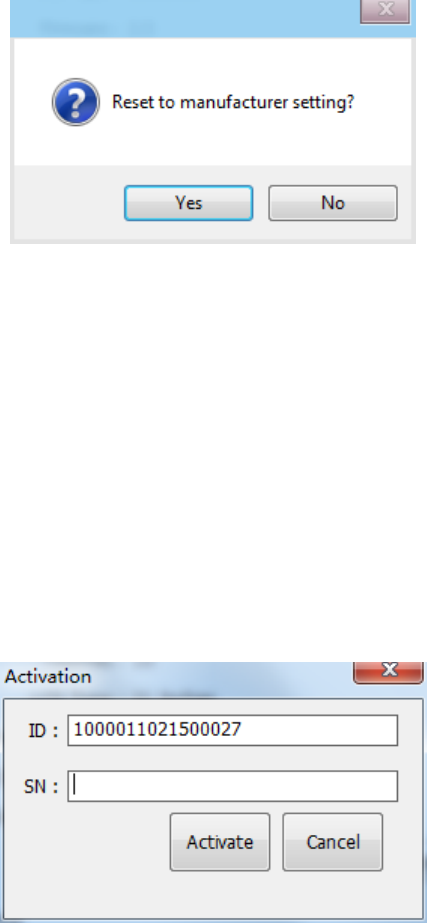
setting.
(2) Operating steps
After clicking "Reset" button on the setting panel, the prompt window appears; click "yes" button
to confirm restore defaults and otherwise click "No".
Restore factory default
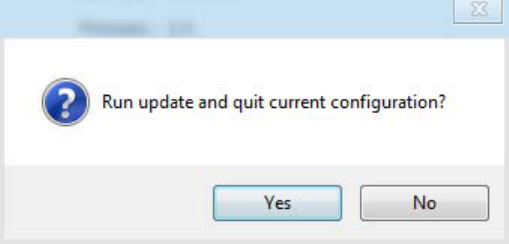
2.6 Activation
(1) Function description
The touch screen only has 30-day's trial period if it is not activated; and if the trial period has
expired, the touch screen will be unavailable. When it needs to be activated, please apply for
activation code to the company. The defaults of touch screen formally manufactured is in activated
state.
[Note] Please don't activate repeatedly, so as not to affect use.
(2) Operating steps
After clicking "Activate", the activation dialog box appears. The serial number of the machine is
above the activation dialog box and the activation code should be input below. After inputting the
activation code, click "Activate" on activation dialog box to finish the activation.
Activation
2.7 Update
(1) Function description
This function available for users to update this software.
(2) Operating steps
A、Confirm that the network connection is working
B、Click "Update" button on basic settings panel ,the following message box pops up
C、Click "Yes", then the TouchWinConfiguration disappears, the Software update dialog will pop
up;
D、Follow the prompts of update dialog, until the dialog of "installation is completed" pops
up,Click "Finish" to finish the upgrade.
3 Software uninstall
Operating steps: Double click the "unins000.exe" file in TouchWin installation folder, then
implement according to prompts.
Appendix
1 Common troubleshooting
Software and hardware may have following problems according to different situations; if the
solutions can not solve the problems, please contact with our technical section.
(1) Failure to touch
Phenomenon: The touch panel is unresponsive.
Solution:
Under Mac OS X system:
a. Press on the middle of the touch screen for 3 seconds to check whether it could be awakened.
b. Check whether the TouchWin configuration could be started and if it shows that no devices
found, please re-plug the USB interface of the touch screen to ensure a good connection between
USB interface and the computer.
c. Re-install the driver.
Under Windows system:
a. Press on the middle of the touch screen for 3 seconds to check whether it could be awakened.
b. Check whether the TouchWin configuration could be started, if the chip version is shown does
not match, please re-installs the driver. Ensure that the previous files installed are unloaded
completely before re-installing, and delete TimeLink installation folder by hand if necessary; the
touch screen must be connected firstly during installation of the driver. If it shows that no devices
found, please re-plug the USB interface of the touch screen to ensure a good connection between
USB interface and the computer. Access to device manager and try to find touch screen hardware.
(Observe if the USB input device appeared or disappeared in device manager by pulling out and
plugging USB extension cord.)
c. Check whether the driver is installed correctly, and pay attention to the situation such as
incomplete installation due to the protection of antivirus to registry.
d. Check whether the OS type matches the current touch operating mode, if the operating system
does not support multipoint, please select mouse emulation mode.
e. Check the state of touch screen by right clicking my computer-manage-device manager-Human
Interface Devices to see if there is a device of TimeLink Multitouch Device and if it is in working
order. If there is no driver signing shown, please right click the device and click unload, and tick
delete all driver files when the unload prompt box pops up. Click ok to unload and re-install the
latest driver.
(2) Multi-touch function is fail
Phenomenon: Fail to multi-touch
Solution:
Under Mac OS X system:
The Mac OS X system default to mouse emulation mode, and it can support multi touch through
TUIO protocol.
Under Windows system:
a. Stylus does not support multi-touch.
b. Ensure that if the system you used supports multi-touch.
Operating systems which support native multi-touch
Windows7 home premium edition, Windows7 ultimate
Operating systems which do not support native multi-touch
Windows7 home basic, Vista enterprise edition, Vista business edition, Windows XP
Operating systems which do not support multi-touch
Vista home basic, Vista ultimate
Note: Systems mentioned above do not support native multi-touch can support multi-touch
through TUIO mode.
c. Make sure if the software you used supports multi-touch. Software like drawing software of
windows7, the web page and zoom function in file of windows7 support multi-touch.
(3) Touch inaccurate
Phenomenon: The position of hand touch has bigger discrepancy with the corresponding position
of response of mouse point.
Solution:
a. Check whether there are foreign bodies on the touch screen. Because if there is water-drop or
other soft substance stick on the surface of the touch screen, the screen will regard it as a touch by
hand, this will cause miscalculation, in this case, we could just clean it. Then run the calibration
procedures for recalibrating.
b. Check whether it is an original operating system; ZOL and OEM operating system may affect
the accuracy of touch.
c. Open the "Table PC settings" in control panel, and confirm after clicking "Reset"; if "Reset"
button is gray, which can not be clicked, then click "Calibrate" at first, and click "Reset"
confirmation of any calibration.
d.When the desktop is set to the portrait(or flip) Direction, if you are using TUIO multi-touch
applications, touch screen should be set to Mouse mode.
(4) Disconnection
Phenomenon: Under the standard connection, the touch area is marked with discontinued lines.
Solution:
a. The touch-screen frame is damaged or covered by foreign bodies which block the light. Use
alcohol to clean and remove foreign bodies.
b. The touch screen is distorted during the installation. Dismantle it and set the screen horizontally,
and re-install after tested qualified and ensure the screen fit the displayer perfectly. And if the
touch screen is distorted seriously, and is irrecoverable, then it should be sent back to the factory
for maintenance.
(5) Mouse bounce around
Phenomenon: Under standard connection, the mouse slides in the touch area and bounces
inordinately.
Solution:
a. The touch-screen frame is damaged or covered by foreign bodies which block the light. Use
alcohol to clean and remove foreign bodies.
b. Eliminate the severe light interference from surrounding,
c. If the touch screen is distorted seriously, it should be sent back to the factory for maintenance.
(6) Line shaking
Phenomenon: under standard connection, draw line vertically or in the horizontally in the touch
area, and the brush shakes inordinately.
Solution:
a. Eliminate the severe light interference from surrounding,
b. Use the brush with nib bigger than 3mm if the stylus is less than 3mm.
c. Check if the smooth effect set at its worst state, if so, set smooth at a better state.
(7) Partly fail to touch
Phenomenon: Partly fail to touch under standard connection.
Solution:
a. The touch-screen frame is damaged or covered by foreign bodies which block the light. Use
alcohol to clean and remove foreign bodies.
b. Recalibrating
(8) Unidentifiable USB device
Phenomenon: The bubble of unidentifiable USB device under standard connection.
Solution:
a. Re-plug USB device or restart PC.
b. Check whether the driver is installed correctly.
c. If it is hardware failure, please send it back to the factory for maintenance.
(9) Slow response of the touch screen
Phenomenon: When drawing line, the line did not be drawn with the fingers sliding.
Solution:
a. Check if the smooth effect set too big in advanced settings.
b. Check whether the matched graphics driver, USB driver installed.
2 Safety warning
Do not use sharp and hard object to beat or clash the surface.
Do not use rough or abrasive cleanser.
Do not use acidic or alkaline cleanser, alcohol cleanser, abrasive cleaner, washing powder,
OA cleanser, simonize and glass cleanser which would make LCD fading, clashed or
cracked.
Do not place this product on damp place for long time;
Prevent disoperation from other harmful substance, such as acid and alkali;
Don not place this product in direct sunlight or other heat source which may damage the
outer skin and electron device of equipment.
It is forbidden for final users to copy, debug or decompile the attached software. Save it
under the law permits.
Please read the user's manual completely before installing and using this product;
In case of failure, the maintenance shall be performed by professionals in case of fault, and
do not open by yourself.

NOTE: This equipment has been tested and found to comply with the limits for a Class B digital
device, pursuant to Part 15 of the FCC Rules. These limits are designed to provide reasonable
protection against harmful interference in a residential installation. This equipment generates, uses
and can radiate radio frequency energy and, if not installed and used in accordance with the
instructions, may cause harmful interference to radio communications. However, there is no
guarantee that interference will not occur in a particular installation.
If this equipment does cause harmful interference to radio or television reception, which can be
determined by turning the equipment off and on, the user is encouraged to try to correct the
interference by one or more of the following measures:
-- Reorient or relocate the receiving antenna.
-- Increase the separation between the equipment and receiver.
-- Connect the equipment into an outlet on a circuit different
from that to which the receiver is connected.
-- Consult the dealer or an experienced radio/TV technician for help.
This device complies with Part 15 of the FCC Rules. Operation is subject to the following two
conditions: (1) this device may not cause harmful interference, and (2) this device must accept any
interference received, including interference that may cause undesired operation.
Changes or modifications not expressly approved by the party responsible for compliance could
void the user's authority to operate the equipment.
Technical and service support
Welcome to us at http://www.timelink.cn for details.
Contact:
Manufacturer: Shenzhen TimeLink Technology Ltd.
Address: Room 310, Block C, Inteling Technology Digital Park, Futian Free Trade Zone,
Shenzhen.
TEL: +86 755 8283 8577
Fax: +86 755 8283 8515
Zip Code: 518038
E-mail: support@timelink.cn