TimeLink Technology TLCIB Cloud-Intelligent-Whiteboard User Manual Instruction of CIB for User
Shenzhen TimeLink Technology Co.,Ltd Cloud-Intelligent-Whiteboard Instruction of CIB for User
User Manual
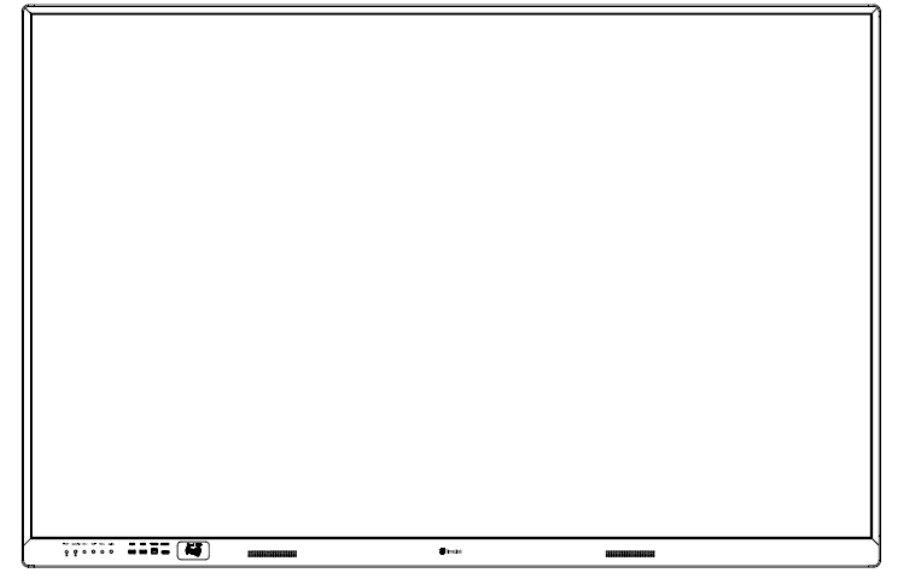
Instructions of
Cloud-Intelligent-Whiteboard for User
(CIB , short for the Cloud-Intelligent-Whiteboard)
一、Notice for use of CIB
Important information
All-in-one needs power of 12 voltage;
To ensure the safety, normative and reliable ground must be provided for the electric supply.
It is prohibited to cut down the power of device when it is in the process of staring-up or shutdown, which
will bring serious impact to the projector and even lead to its bulb broken.
二
二二
二、The composition of the CIB
1. The instructions of the function area for the CIB
The miniPC:the miniPC support win8,win10 or Android operating system, with all solid state
hard drive, high speed read and write, no fan, low-power consumption, quick start.
Central control system: including control of miniPC system,projectors, volume, digital power
amplifier, RFID card; USB2.0 interface extension, external HDMI inputs, an USB input
and wireless router also included.
Active acoustic: double channel design, each channel 8 Ω @ 15 W.
Wireless router: realize the remote interaction of Wan or LAN, remote control, data
acquisition and remote maintenance operation through the cloud platform.
Electronic whiteboard: Features including multi-point touch , strong ability to resist natural
light, preventing mistakenly touching and fault tolerant capability.
Projection area: the display scale of CIB is 16:10( the display scale can be
customizable).Through the projector the image signal can be be projected to the electronic
whiteboard.CIB can support various Projectors, just needs we write the configuration of
projector into the central control system.
Important prompt
The whiteboard can be wiped with a wet clean cloth, but, do pay attention to prevent water permeating from
the fraction of whiteboard frame into inside.
Please do not move the electrified device.
Please keep the device away from heat source.
Please do not use the device in a humid environment.
Avoid the possible electric shock. Please do not connect or disconnect any cable or repair or re-configure
during lightning storm. Do not use the device during lightning storm.
When plugging an external memory device of USB drive, please keep the external device clean. If it is
infected by Trojan or worm, it will slow down the system operating speed. The product parameters in this
instruction are subject to the product. The information in this instruction is subject to change without notice.
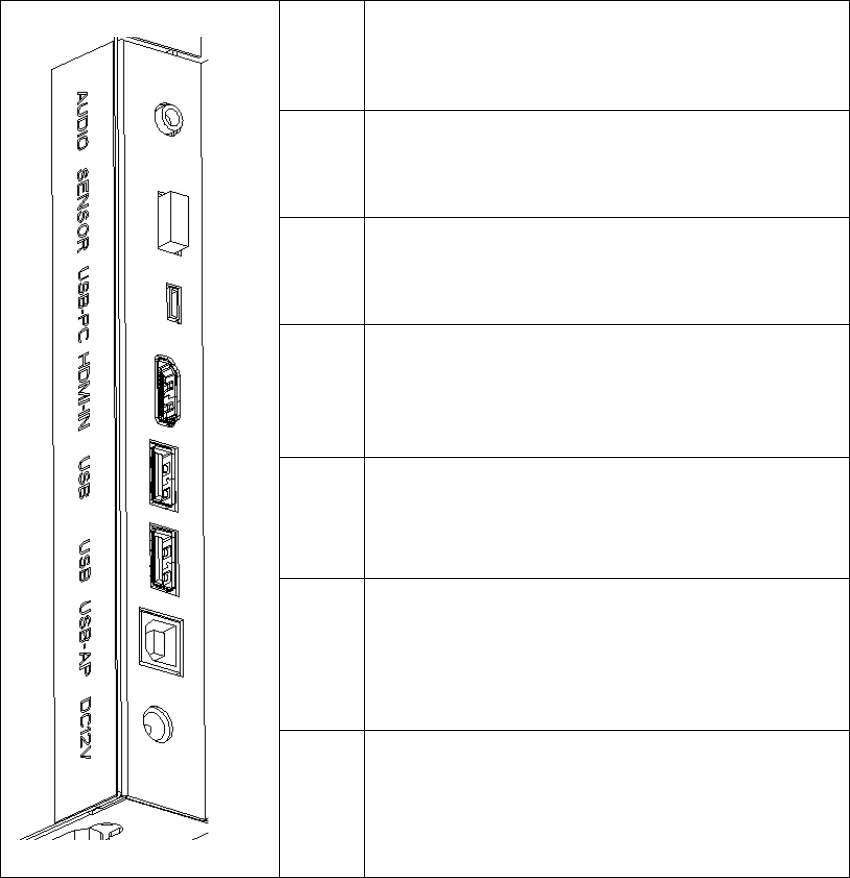
2. The instructions of the CIB’ interface
The back interfaces of the CIB are as the following table
:
1 AUDIO:external audio input
2
:
SENSOR temperature and humidity sensor
3 USB-PC:connecting the mini PC,which is a
micro-USB interface
4 HDMI-IN:connecting the mini PC
5 USB: two USB2.0 interfaces for expanding
6 USB-AP:connecting the wireless router ,which is B
type of USB
7 DC12V:12 v power supply output for wireless router
and mini PC
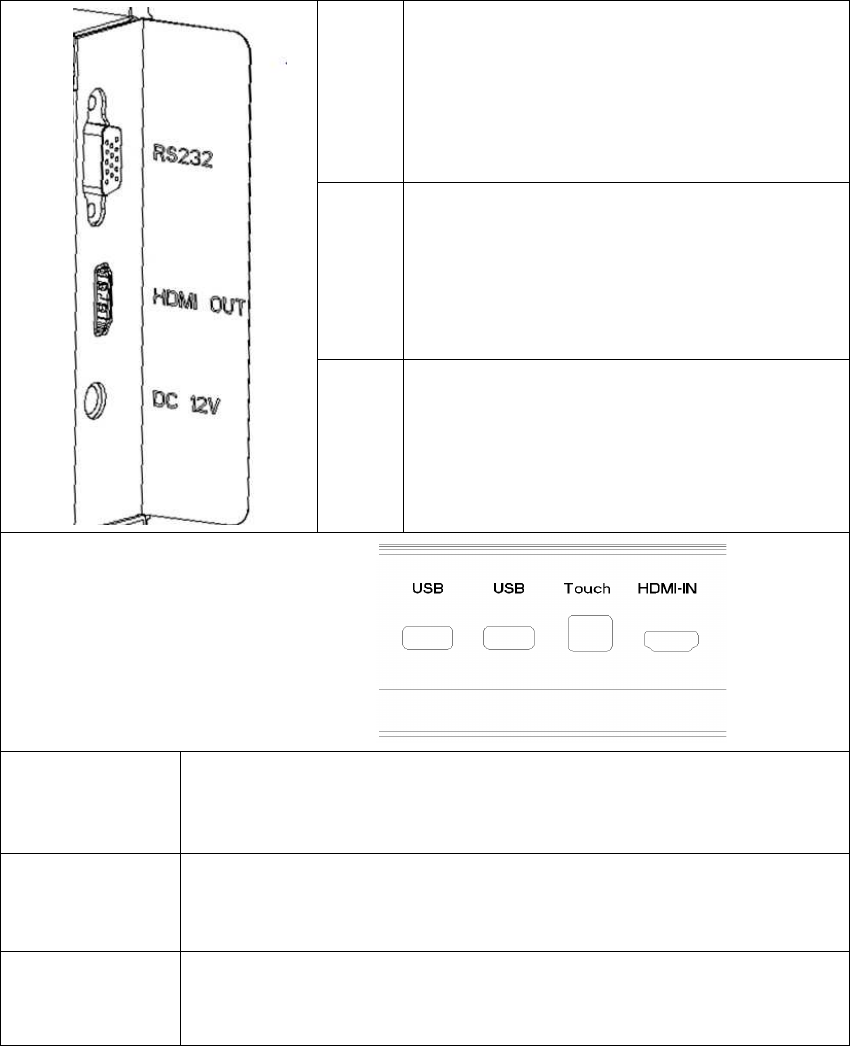
The side interfaces of the CIB are as the following table
:
1 RS232:connecting the projector
2
:
HDMI OUT connecting the projector
3 DC12V-IN:12 v power supply input
The front interfaces of the CIB:
1
:
USB two USB2.0 interfaces for expanding
2
Touch:automatically switch to the external USB Host. For example,if you
connect a notebook through the Touch port, all the USB devices of central
control will belong to notebook.
3 HDMI-IN:connecting to the external HDMI device, such as a notebook.
三
三三
三、
、、
、The instructions of the CIB’ operation
1. Key Function
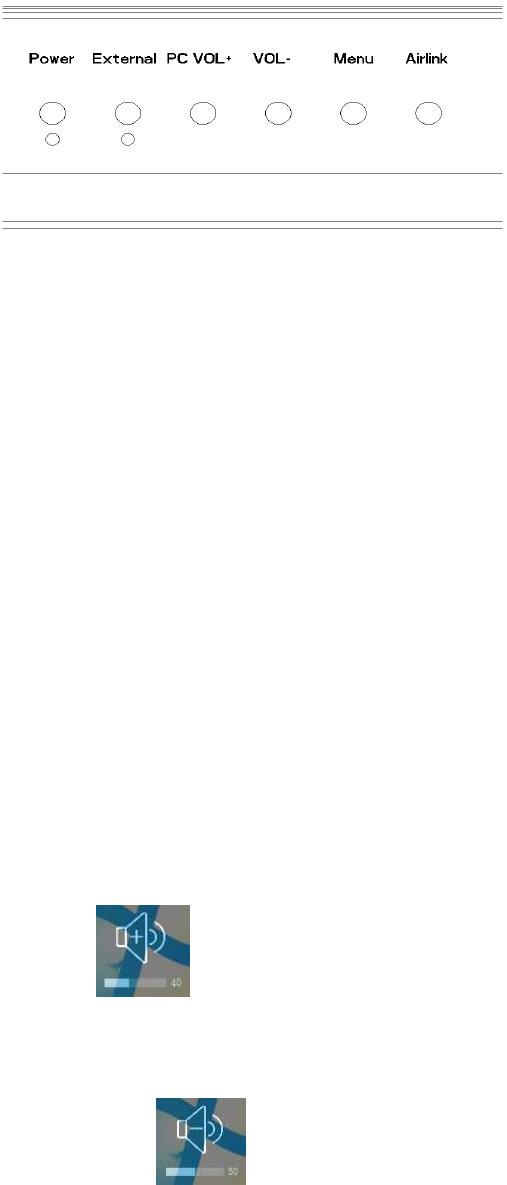
Six tuch-button, functions are as follows:
Power button
:
A key switch the mini PC and projector. At the same time, projector can be chosen by
customer, and the configuration of the projector can be configurated by customer. Details refer to
《Projector Configuration Method》
When the CIB is shutdown , the signal light below the button turns off. The mini PC will be
worked after pressing the button, then the signal light will be turned on, and the central control
will sent boot-control codes to projector via a serial port after recognizing the mini PC working
by the signal light.
When the CIB is working , the signal light below the button turns on. The mini PC will be
shutdown after pressing the button, then the signal light will be turned off, and the central control
will sent shutdown-control codes to projector via a serial port after recognizing the mini PC
shutdown by the signal light.
External PC button
:
This button realizes the switch of the HDMI between mini PC and external PC. When the
CIB firstly turns on, the output of HDMI signal is from mini PC, press the button the output of
HDMI signal switches to external PC, and the signal light below the button turns on.
Vol+ button
:
This button realizes the function of volume up, at the same time the projector will display the
symbol of Vol+ .The volume will be added 10 each press, and the max volume is 100.
Vol- button
:
This button realizes the function of volume down, at the same time the projector will display
the symbol of Vol- .The volume will be reduced 10 each press, and the min volume
is 0.
Menu button
:
Pop-up menu, which the information of the CIB ,such as the icon of CloudBoard4, AirLink,
temperature and humidity can be saw on the menu, also this menu support the function for
switching of HDMI and volume control.
Airlink button
:
This button realizes the fast wireless projection function for customer.
2.The useage of CloudBoard4
Refer to
《
CloudBoard4.0 User Guide
》
.
3.Touch Screen Calibration
For better use of touch screen firstly, we recommend calibrating the touch screen.
Methods as follows:
With driver:
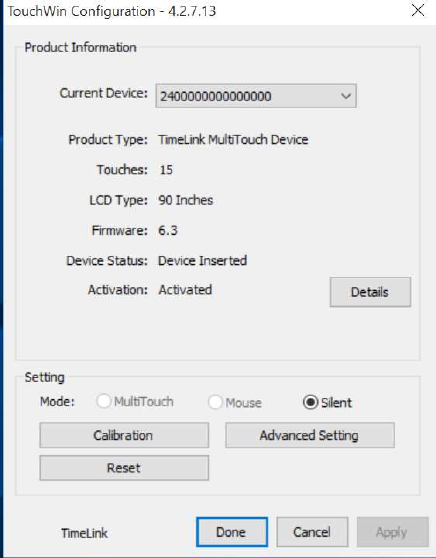
Open touch screen configuration,Click "Touch screen configuration" in the Start menu;
"Touch screen configuration" window pops up:
Calibrate
Sometimes due to hardware installation, leading to larger deviation between finger click
position and the position of the cursor appears after finger clicking which affect the use of
touch. Thus, use this feature to calibrate the location of the cursor after finger clicking.
[Note] during calibration, click the nine cross on the screen with finger.
Driver available calibration:
1) Click "calibration" button on the basic settings on the panel;
2) It displays a black screen, the screen appears only a red dot and eight white dots;
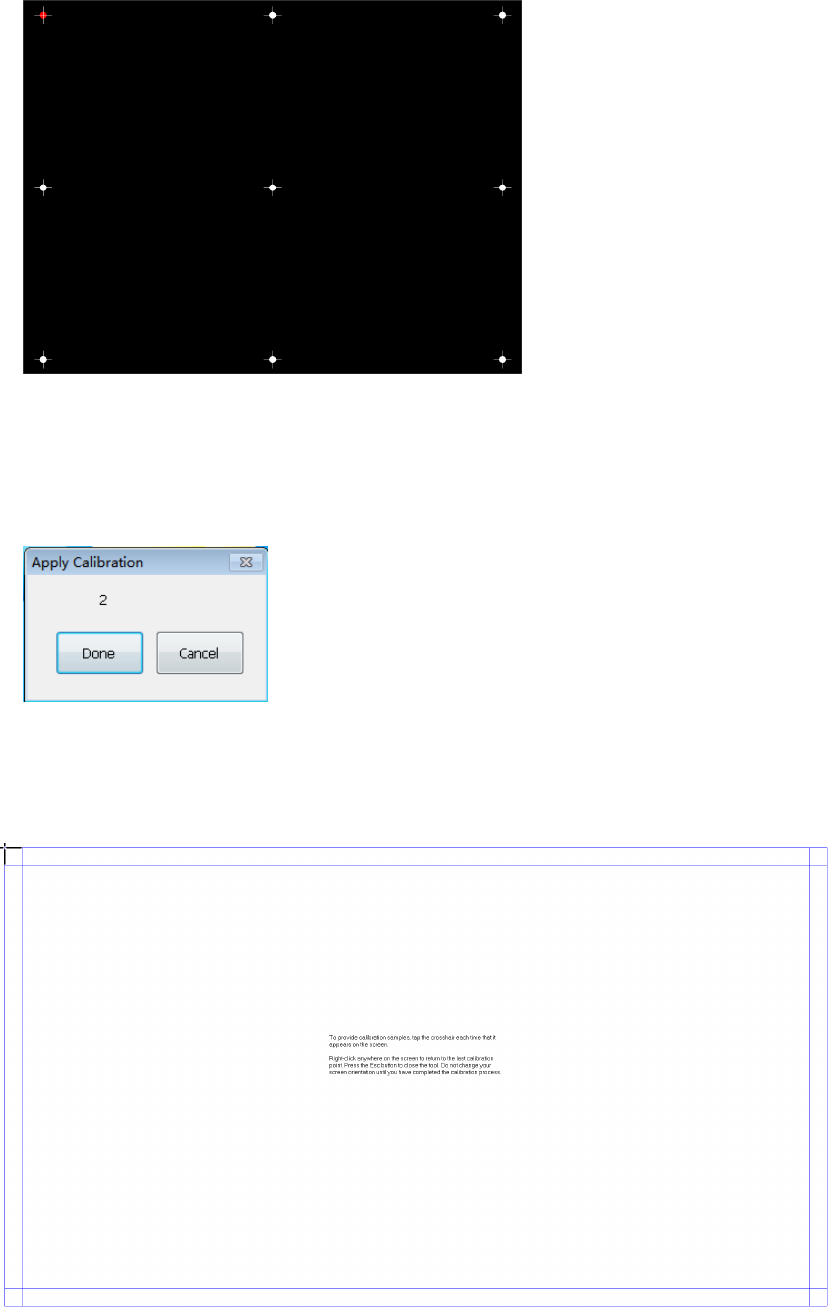
3) Click the red dot with finger (Note: the click position should be the middle of red dot, the
closer to the middle of red dot, the better accuracy of calibration will be achieved). After click, the
red dot will appear on the rest eight dots in order.
4) Click Done to accept the calibration, cancel or no click (the "Apply calibration" dialog box
will disappear in 5 seconds), the calibration is invalid.
Driver free calibration:
Turn on control panel
Choose Tablet PC Settings
Clic Calibrate…, window pops up:
The screen appears only a black dot and seven blue cross dots. Vertically click the black dot
with finger , and move with the black dot.
四
四四
四、
、、
、
Projector Configuration Method
1. Notes
1)The tool can read the projector serial code of the control board and enter new serial codes,
serial codes are written in 16 hexadecimal number, maximum length of 53 bytes, if it is necessary to
replace the projector, you only need to complete the corresponding function serial control code
provided in the specification of the projector, and then enter through the tool.
The needed projector serial codes including
:
Power On: projector boot code
Power Off: projector off code
:
VGA1 Projector HDMI input code
2.Configure serial code tools
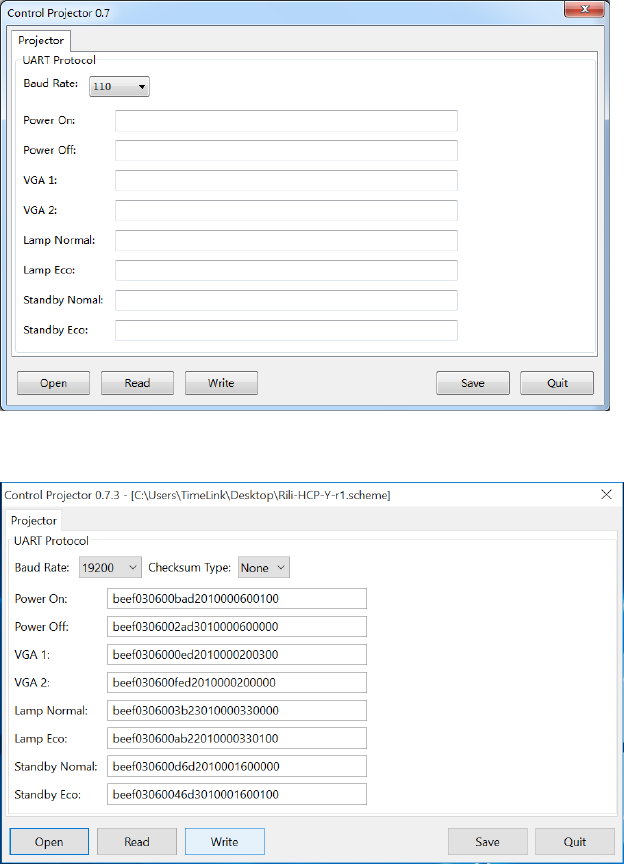
Open the "projector.exe" software, as shown below:
If there is a projector serial configuration file, click "Open" key, select the serial port profile of
the projector, such as "Rili-HCP-Y-r1.scheme", as shown below:
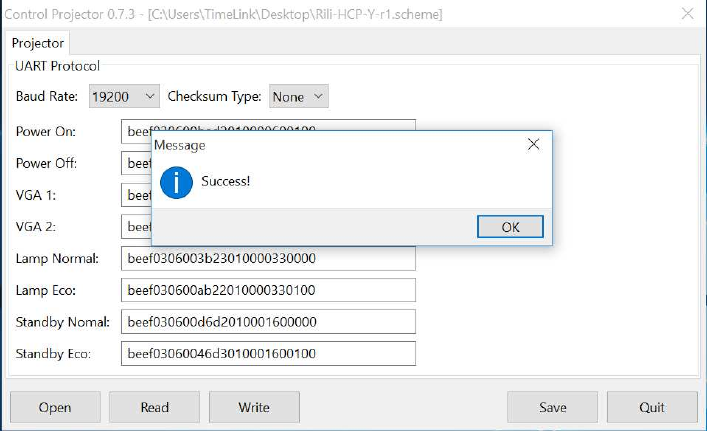
If there is no projector serial configuration file, fill the "Baud Rate", "Power On," Power Off ",
"VGA1" and other 16 hexadecimal serial code of the serial port, the written information can be
stored as files, can click on the Save button.
Click on the "Write" key to write the serial code into the central control panel, below is the
symbol of successful written , click "Read" button to view the written serial code value.
After completing the steps above, the central control panel can normally control the
corresponding functions of the projector.
Warning: Changes or modifications not expressly approved by the party responsible for
compliance could void the user’s authority to operate the equipment.
This equipment has been tested and found to comply with the limits for a Class B digital
device, pursuant to Part 15 of the FCC Rules. These limits are designed to provide reasonable
protection against harmful interference in a residential installation. This equipment generates, uses
and can radiate radio frequency energy and, if not installed and used in accordance with the
instructions, may cause harmful interference to radio communications. However, there is no
guarantee that interference will not occur in a particular installation.
If this equipment does cause harmful interference to radio or television reception, which can
be determined by turning the equipment off and on, the user is encouraged to try to correct the
interference by one or more of the following measures:
-- Reorient or relocate the receiving antenna.
-- Increase the separation between the equipment and receiver.
-- Connect the equipment into an outlet on a circuit different from that to which the receiver
is connected.
-- Consult the dealer or an experienced radio/TV technician for help.