Tinno Mobile Technology T510G MOBILE PHONE User Manual XD6T510G
SHENZHEN TINNO MOBILE TECHNOLOGY CO., LTD. MOBILE PHONE XD6T510G
Users Manual
1
Contents
1. For your Safety………………………...5
2. Mobile Phone Profile………………….8
3. Preparation before Use……………..10
Install SIM Card .......................................... 10
Install Memory Card ................................... 11
Install Battery .............................................. 12
Charge Battery............................................ 13
Notices on using the battery ....................... 14
4. General Instructions………………...16
SIM1 Dial Key ............................................. 16
Switch-on/off Key ........................................ 16
Keypad lock ................................................ 16
Icons in Standby State ................................ 17
Language and Input Mode ......................... 18
Call hint ....................................................... 18
Services ...................................................... 19
Callers’ group .............................................. 19
Term Description ......................................... 19
5. Basic Operation………………………22
Switch on .................................................... 22
Switch off .................................................... 23
Standby Shortcut Function ......................... 24
2
Dial a Call ................................................... 24
Answer a Call .............................................. 25
Read Calls .................................................. 25
Keypad Lock ............................................... 26
Power Economical Mode ............................ 26
Speedy Dialing............................................ 27
Send DTMF Signal ..................................... 27
Dial Hold ..................................................... 28
Connect to Voice mail ................................. 29
Save and Back to Previous Menu .............. 30
6. Use Menu Functions………………...30
Games ........................................................ 30
Messages .....................
错误!未定义书签。
Messages ......................................... 31
Email ................................................. 35
Broadcast Message ......................... 36
Settings ....................................................... 37
User Profiles ..................................... 37
Phone settings .................................. 39
Call settings ...................................... 43
Network Settings .............................. 47
Security Settings .............................. 48
Restore factory settings ................... 49
Camera ....................................................... 49
Services ...................................................... 51
Pho nebook .................................................. 53
3
Multimedia .................................................. 56
Image viewer .................................... 56
Video recorder .................................. 57
Video player ...................................... 58
Photo editor ...................................... 59
Sound recorder ................................. 61
Audio player...................................... 62
FM ..................................................... 63
Schedule FM record ......................... 65
File Manager ............................................... 66
Organizer .................................................... 67
Bluetooth .......................................... 67
Calendar ........................................... 73
Tasks ................................................. 75
Alarm ................................................ 75
World Clock ...................................... 76
Calculator ......................................... 76
Currency Converter .......................... 77
E-book .............................................. 77
Call history .................................................. 78
7. English Editor Operation…………...80
Basic Letter Input ........................................ 82
Number Input .............................................. 82
Symbol Input ............................................... 83
8. Use Accessories……………………..83
Notices for USB cable: ............................... 83
4
Notices for Battery ...................................... 84
Charger ....................................................... 84
9. Appendix I……………………………..85
10. Appendix II…………………………..89
5
1. For your Safety
For your safety and proper use of the mobile
phone, please read the following guidelines
carefully:
1. Do not switch the mobile phone on when
close to chemical factory, gas station or
other explosive objects.
2. Always keep the mobile phone out of
children’s reach.
3. During driving, please use headset for
safety purpose; unless otherwise in
emergency, always stop the car on
roadside to have a call conversation.
4. Because the use of the mobile phone can
cause interference in the aircraft, never
use the mobile phone in aircraft. The use
of the mobile phone is dangerous and
illegal; do switch off the mobile phone
before boarding.
5. Pay special attention to the use of the
mobile phone near heart pacemaker, deaf-aid
and some other medical devices, because the
mobile phone can cause interference with
them.
6
6. None-original factory’s accessories
and parts will lose guarantee.
7. Do not dismantle the mobile phone
without permission. In case of failure, please
contract the supplier as soon as possible.
8. Do not plug the charger into the mobile
phone and charge without battery. Always
power off the mobile phone when taking out the
battery; otherwise the memory of the phone
may be damaged.
9. When charging the mobile phone,
always keep it in the place with good
ventilation, heat sink and away from flammable
and explosive objects.
10. In order to avoid demagnetization,
always keep the mobile phone away from
magnetic objects such as CD, credit card etc.
11. Ensure the mobile phone not to
contact any liquid; once such case occurs,
remove the battery and contact the supplier
immediately.
12. Do not use the mobile phone in the
environment at too high or too low temperature,
never expose the mobile phone under strong
sunshine or too wet environment.
13. Do not use liquid or wet cloth with

7
strong cleanser to clean the mobile phone
14. This mobile phone has shooting,
videoing and audio recording functions, which
shall be used as per the related laws and
regulations.
15. Do not throw or vibrate the mobile
phone because violent treatment to the mobile
phone may damage the inner circuits and
precise structures.
16. Please do not discard the waste
battery into general household garbage.
Please deal with the waste battery according to
provisions where they are definitely made.
Tip: This user manual is based on English
operation mode; so it may vary in Tunisia operation
mode.
Warning: We will not be bear any responsibility for
any incompliance with the above guidelines or
improper use of the mobile phone.
Our company keeps the right to make
modifications to any of the content here in this user
guide without public announcement in advance.
The content of this manual may vary from the
actual content displayed in the mobile phone. In
such case, the latter shall govern.
8
2. Mobile Phone Profile
Your mobile phone has the QWERTY pad, a
single screen, an inbuilt motor, a transmission
interface for headset/charger/data cable interface.
(Below is the front of the mobile phone)
1
2
3
4
5
6
7
8
9
10
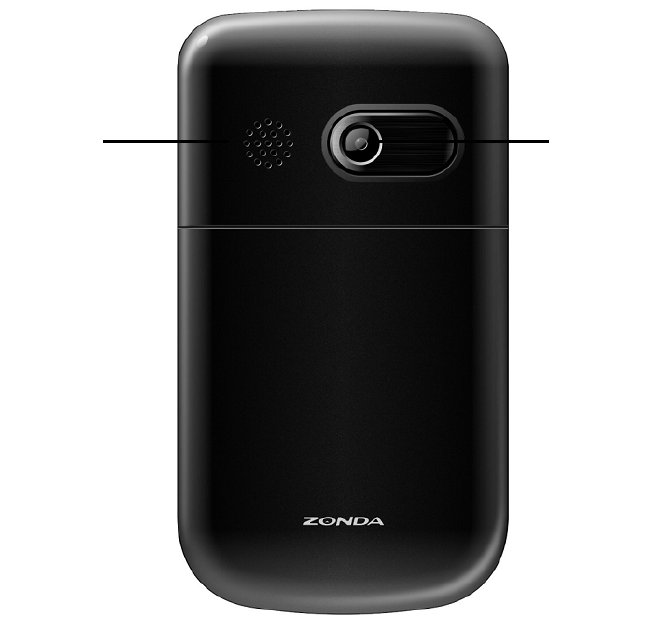
9
1.Speaker7.QWERTYkeypad
2.LCD8.Endkey
3.TrackBall9.Backkey
4.Callkey10.keytoSMS
5.OKKey11.Speaker
6.Internetservice12.Camera
11 12
10
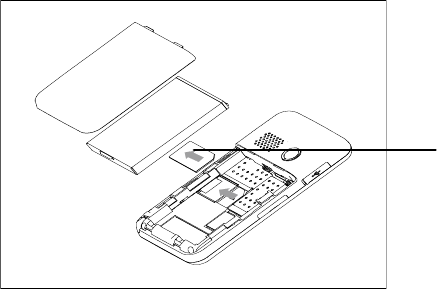
3. Preparation before Use
Install SIM Card
When registering mobile phone number, you
can apply for two different phone numbers, two
different mobile phone network service providers
and thus obtain two SIM (Subscriber Identification
Module) cards. With these two SIM cards, you can
use all functions of your mobile phone. The SIM
cards save the parameters needed for
communications and personal data, including PIN
(Personal Identification Number) code, phonebook,
short message and other extra system services.
Warning: Do not distort or scratch the SIM card nor
let it contact static, dust or moisture. If it is lost,
please contact immediately your network operator
for help.
Before SIM card installation, please switch off
the mobile phone. The SIM card is installed on the
back of the mobile phone.
Follow the following diagram to install the SIM
card.
11
Note: As the SIM card is small object, keep it out of
children’s touch or prevent children gulping it!
Install Memory Card
As the mobile phone does not have enough
storage space, to use some functions, you need to
install a memory card (This mobile phone use
T-FLASH card)
SIM 2
SIM1
SIM 1
12
1. Install T-FLASH Card: Open T-Flash card
buckle, insert the T-flash card into its slot, lock
it, then the installation is completed.
2. Remove T-FLASH Card: Open the T-Flash
card buckle, press the T-Flash card slight inward
and take it out, then lock the buckle, the removal is
finished.
Note: As the T-FLASH card is small object, keep it
out of children’s touch or prevent children gulping it!
Install Battery
The mobile phone is suitable for original
T-FLASH card
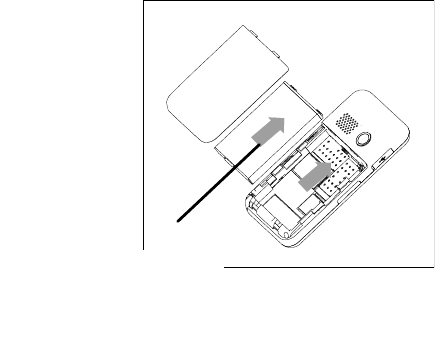
13
battery and accessories. When the battery is idle,
it is recommended to put it into the protection box.
Follow the following diagram to install the battery.
Note: Do install the battery as per the diagram so
as prevent the battery contact patch being
damaged.
Charge Battery
1. The new battery cannot reach the optimal
efficiency unless it has undergone several
continuous complete charges and
discharges.
2. When the battery is used up, charge it in
Battery
14
time. Over-discharge can damage the
battery.
3. After the battery is charged full, cut off
the connection of charger with the AC power
supply and then the connection with the
mobile phone.
Follow the following diagram to connect the
charger.
During charging, the battery capacity icon on
the screen flickers from the right to the left. After the
battery is charged full, the icon is full of bars.
Slight heat during charging is normal.
Notices on using the battery
The performance of the battery is affected by
many factors, including radio barrier network
settings, signal strength, work temperature, chosen
and used functions or settings as well as phone
accessories, tone, data or other applications.
For optimal performances, please follow the
rules below:
1. New battery or the battery having been idle
for long need charging for long.

15
2. During charging, keep the battery at room
temperature or similar temperature.
3. With time passing by, the battery will gradually
be worn and thus need longer time to charge.
This is normal. However, after normal
charging, if call duration decreases but
charging time increases, you need to buy
another battery from the original manufacturer
or authorized by the original manufacturer.
The battery of interior quality can damage
your mobile phone and cause danger!
4. If the phone is overused at low battery when
charging, there might need a longer time for
the charge indicator to be shown on the
screen.
Note: Please dispose the battery according to the
local regulations. Try to recycle the battery as
possible. Do not treat the waste battery as common
waste.
Warning: Do not throw the battery into fire so as to
prevent fire. The broken battery may cause
explosion.
16
4. General Instructions
SIM1 Dial Key
It is used to have SIM1 call (when the phone
number is input or in phonebook state) and receive
SIM1 incoming call. In standby state, press this key
to display the latest calls (all received calls, missed
calls, and dialed calls, at most 60 phone numbers).
In standby state, press this key twice successively
to dial out the latest call number.
Switch-on/off Key
In call state, it is used to interrupt a call; in call
conversation state, it is used to end a call or exit
from the current menu and back to the standby
state. Hold this key for 2~3s to switch on/off the
mobile phone.
Keypad lock
When in standby interface, if the mobile phone
17
is idle for certain time, it will be locked automatically.
Press the dial key and click the icon to unlock the
keypad, then you can roll the scroll bar on the touch
screen to unlock the keypad. After the mobile
phone is locked, the keypad cannot be activated
easily; in case of incoming call, likewise, press the
answer key to receive it; after that, the keypad will
be locked automatically.
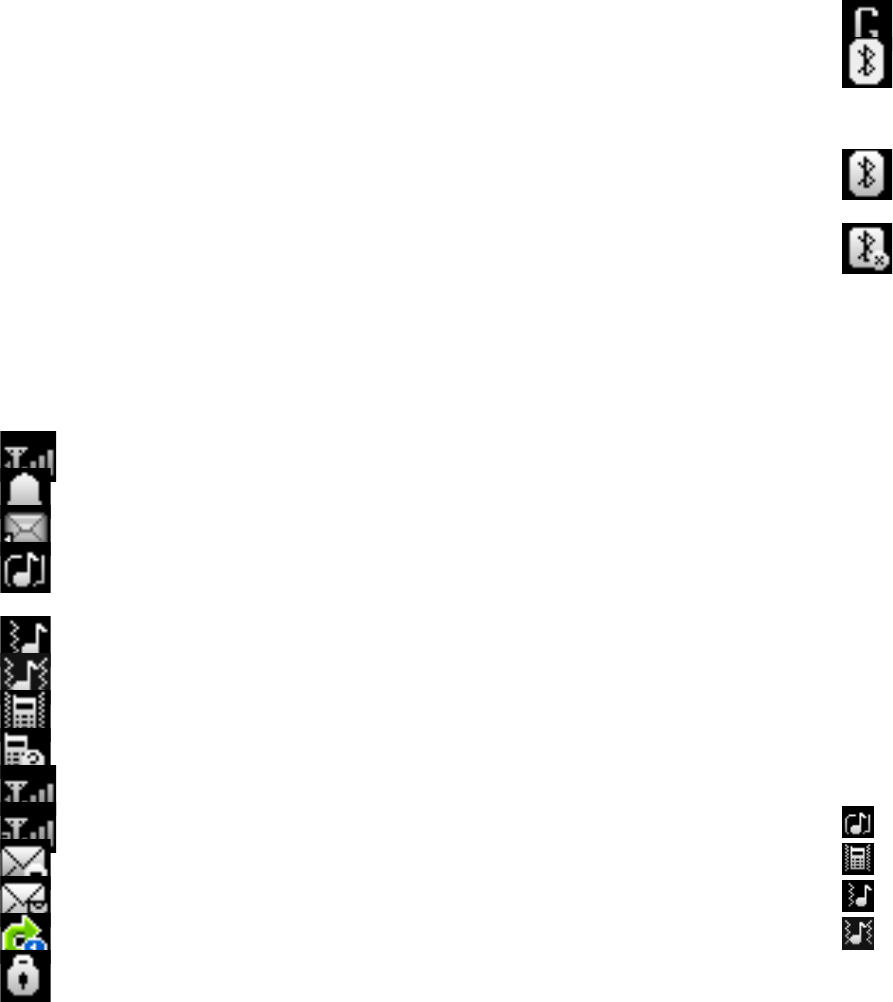
Icons in Standby State
Line 1 signal antenna
Activate the alarm clock
SIM 1 SMS
Ring; this icon may vary with different warning
modes and it may be in the three icons:
Ring after vibration
Vibration and ring
Vibration
Missed calls
Master line1
Slave line1
MMS BUSY
MMS unread
SIM1 All calls diverted
Locked
18
SIM GPRS
Continuous display indicates the Bluetooth
function has been activated and can be searched;
flicking indicates data are under transmission.
Bluetooth function has been activated and can
be searched
disconnected
Language and Input Mode
The mobile phone provides English French
and Arabic input. For details, please refer to the
section in relation to English editing.
Call hint
The mobile phone is inbuilt with vibration motor
and buzzer and provides several incoming call
modes:
Ring
Vibration
Ring after vibration
Vibration and ring
19
Services
Services are provided with SIM kit. The mobile
phone support service function. The detailed menu
items depend on SIM card and the network. When
the network provides such function and your SIM
card supports such function, the service menu will
automatically be posted in the services of the
mobile phone.
Callers’ group
The callers’ group in the mobile phone includes
friends, family, VIP colleagues, and others etc. You
can set different call tone and photo for different
callers’ group.
Term Description
z Dial domestic calls
¾ The simplest method to dial a
domestic call is click the corresponding
numbers on the dial keypad on the screen to
input phone number, then press the dial key
to dial a call via SIM1. To change phone
20
number, press “Clear key”. During dialing,
the screen will display a cartoon. When the
other party is connected, the screen will
display the corresponding information.
¾ Press end key to end the call.
¾ To dial a domestic call, input area code
+ phone number and then press the dial key.
z Dial international calls
1. If you want to make an international call, click
the * key with the stylus for long until the
international dialing prefix “+” is seen on the
screen. This will allow you make an
international call from any country without
knowing the dialing prefix .
2. After inputting the prefix, you need to input
the Country number and complete telephone
number. You can input the Country number
according to the common practice, such as,
49 for Germany, 44 for British, 46 for Sweden,
etc.
3. Dial international telephone number as
following: “+” Country number + Complete
telephone number + Dial key.
z Dial fixed-line telephone extension
1. Some fixed-line telephone extension may not
directly get through, so you need to connect
21
to the switchboard at first then put through
extension number. The mobile phone can
automatically dial extension number if you
input “P” between the switchboard and
extension number. Method for input “P” as
following: hold press or continually short
press three times “*” key (“P” will be shown
on the display).
2. Dial fixed-line telephone extension as
following: phone number + “P” + extension
number + dialing key
z Emergency calls
If your phone is under the network coverage
(you can know this by checking the signal bar at the
up left corner on the screen), you can make
emergency calls. If your network supplier does not
provide roaming service in this area, Emergency
will be shown on the screen. That means you can
only make this kind of calls. If your phone is under
the network coverage, you can even make
emergency calls without the SIM card.
In some areas, 112 (emergency call) service is
provided by the network operator. In case of failure,
consult the network operator.
z IMEI
22
It stands for International Mobile Equipment
Identity number. Switch off the mobile phone
and take off the battery, then you will see the
label with such number on the back of the
mobile phone. Also, this number is saved in
the mobile phone. After switching on, in
standby state, you can input “*#06#” to
display it.
5. Basic Operation
Switch on
Press the Switch-on/off key to switch on the
mobile phone. If the SIM card and mobile phone do
not set with password protection, then the mobile
phone will enter the switch-on menu to search
network. After the mobile phone is registered to the
network, the network operator name will occur on
the screen. In such case, you can dial or receive a
call.
After switch-on, if the mobile phone hints “Insert
SIM card”, switch off the mobile phone and check if
the SIM card is installed or installed properly.

23
After insert SIM card, the mobile phone will
automatically check the SIM card availability, and
then it will be shown information as following on the
display by sequence:
1. “Input phone password”-If you have set the
password.
2. “Input PIN”- If you set SIM card password.
3. “No service”-Indicates fail to make register
and cannot make any calls.
4. “Emergency calls only”-indicates has
registered to other network and only can
make call to 112.
5. “Searching”-the mobile phone is searching
network until find appropriate network;
Note: If you do not know SIM1 PIN code, please
contact the network service provider.
The defaulted phone password “1122”
Switch off
To switch off the mobile phone, press the end
key. When the screen displays switch-off cartoon,
the host and the slave will be off at the same time.
Do not take out the battery to switch off the mobile
phone. If so, the SIM card can be damaged easily
and some data will be lost.
24
Standby Shortcut Function
1. In standby menu, press the dial key to enter
dialed calls menu.
2. Under defaulted settings, press the upper
direction key to fast enter the audio player, press
the lower direction key to fast enter Camera, press
the left direction key to fast enter the TV, press the
right direction key to fast enter Message and press
the middle key to fast enter Phonebook list.
Dial a Call
Press the number keys on the keypad to input
phone number (press Clear key to delete the wrong
input), press SIM1 dial key to dial SIM1 call. To
hang up or cancel, press Cancel key or
switch-on/off key. After the call is connected, the
screen will display call timer.
Dial a call via phonebook: Enter and look for the
name/phone number stored in the phonebook,
press the dial key to choose call via SIM1, press
the OK key to dial it out.
25
Redial latest dialed number: In standby state,
press the dial key to view the list of the latest 60
calls or names. Roll to the desired number or name,
then choose to call via SIM1, press the OK key to
dial it out.
Answer a Call
When there is a call, as per the settings of the
mobile phone, you will be alerted with ring, vibration,
vibration and ring as well as ring after vibration.
To receive a call, press dial key to receive call.
Press the switch-on/off key to click the Refuse
key on the right lower corner to refuse a call.
If the CLI (Call Line Identity) is opened, the
phone number of the caller will occur on the screen.
If this number has been saved in the phonebook,
the name corresponding to this number will be
displayed on the screen.
If the call is to SIM1, then “SIM1” will occur in
front of the number or name.
Read Calls
In the standby menu, press the “dial key” to
26
fast view the 60 latest dialed/received /missed
calls.
Keypad Lock
Under the defaulted settings, in standby menu,
if idle for 30s, the mobile phone will automatically
enter keypad locked state.
Please the dial key or click the corresponding
icon on the screen with the stylus to unlock the
keypad.
Tip: As per the actual demand, you can set the
keypad lock. For more details, refer to Security
Settings->Keypad Lock.
Power Economical Mode
Under the defaulted settings, if idle for 15s, the
mobile phone will enter the power economical
mode, i.e. the screen backlight is off. In this way,
the mobile phone can save power and prolong
standby time.

27
Speedy Dialing
The mobile phone is provided 9
speedy-dialing numbers. You can customize the
numbers corresponding to these keys (see the
Phonebook for details). In such case, in standby
state, activate the dial key in the screen and click
the number keys 2 through 9 to have speedy
dialing. “1” key is specified for the voice mail
number. After the voice mail number is used, this
key can be used for speed dialing.
Note: For speed dialing, you must click the
corresponding keys on the screen for above 2s. If
the shortcut keys are not defined in Settings/Phone
Settings/Speed Dialing, then they will be inactive
for speed dialing.
Send DTMF Signal
When this function is set, in call conversation,
press the desired number key and * key and # key
to send DTMF signals to the other party. If such
function is inactive, then extension call will become
impossible.
28
Dial Hold
If you have applied for dial hold for the host, in
the call conversation process of the host, click
“Options” to have the following function menus:
1. Hold single-line call: Pause the current
call (subject to the SIM card). If so, both
parties will not be able to hear each other
and the pause option change into
“Retrieve”. Choose “Retrieve” to return
normal call conversation.
2. End single-line call: End the current call
conversation.
3. New Call: Enter the dial interface, dial
another call. After it is connected, the
previous call will pause. This function
needs the support from the network the
SIM card belongs to.
4. Phonebook: Enter the directory of the
phonebook.
5. SMS: While having call conversation, you
can view, receive and send short
messages.
6. Record: While having call conversation,
you can record the call.
7. Background music: You can choose call
29
background music. After activating and
choosing the desired background music,
both parties can listen to the activated
background music.
8. Mute/ Retrieve: After mute, the MIC will
be inactive. Press “Retrieve” to return the
normal call conversation.
9. DTMF: You can set whether to send
DTMF signals.
10. Switch Bluetooth Audio Out: After
Bluetooth function is activated, with this
function, you can switch audio routes.
Note: Some menu items need the support of the
local network or can occur in special cases, such
as Conference and New Call. Consult the local
network operator for details.
Connect to Voice mail
The mobile phone allows connecting the
incoming call into the voice mail and then you can
receive a notice about voice message. (The voice
mail number must be preset).
Note: Voice mail needs the support of the local
network.
30
Save and Back to Previous Menu
Enter any page, in which you can revise some
properties or parameters, then click the arrow icon
on the left of the title bar to eject the tip: To save?
You can choose Yes or No, then return to the
previous menu.
6. Use Menu Functions
The main function of the mobile phone with
details as follows:
Games
This mobile phone provides the inbuilt games.
Please refer to the operation instructions attached
to the games.
Game Settings
1. Sound effect: You can open/close game
sound.
2. Vibration: You can open/close the
vibration effect during game.

31
Continue: You can continue the game not
completed last time.
Messages
SMSisakindofnetworkservicethatcannotbe
usedtosendandreceiveshortmessagesuntilyou
applytothenetworkoperator.
BothSIMcardsofthemobilephonecansend
andreceiveSMS.TheSMSissenttotheSMScenter
ofthenetworkandthensentbythenetworktothe
targetuser(GSMuser).Iftheuserdoesnotswitch
onthemobilephoneorthemobilephonecannot
receivetheSMS(thememoryisfull),thenetwork
willsavetheSMStemporarily.Thedurationof
storagedependsonsender’ssettingsandnetwork
serviceprovider.
Withthisfunction,themobilephonecansend
andreceivechaintextmessages,whichmayaffect
themessagefees.Formoreinformation,please
consulttheserviceprovider.
WhentheSMScapacityisfull,therewillbean
SMSiconflickeringonthestandbyinterface.Thefull
capacitycanaffectSMSreception.DeletesomeSMS
tosolvetheproblem.
IftheotherpartyhasreceivedSMS,youwill
hearthealertsoundfromthemobilephone(ifsuch
alertfunctionissetasON)
32
Note:WhensendingSMSviatheSMSnetwork,the
mobilephonedisplay“Messagesent”.Itindicates
thattheSMShasbeensenttotheSMScenterinbox
setinthemobilephonebutdoesnotmeanthe
receiverhasreceivedtheSMS.Formore
information,pleaseconsulttheserviceprovider.
WriteMessage
Youcanwritemessageinthismenu.
EverySMScancontain4pagesEnglishcharacters;
TowriteSMS,press“Aa”keytoswitchinputmodes,
“sym”keytoselectSymbol;press“Delkey”toclear
onecharacterbeforethecursor,longpress“Del
key”todeleteallcharacters;presstheendkeyto
backtothestandbyinterface,presstheupand
downdirectionkeytochoosecharacters,press
“select”keytoconfirm.
ThemobilephonecansendthechainSMS
morethancharacters(limitforcommontext
messages).IftheSMScontainsmorethan160
Englishcharacters,thentheSMSwillbesplitinto
2pcsormore.Youcaninsertimages,cartoons,rings
etcintoSMS.However,theSMSwillnotbereceived
anddisplayedunlessthenetworkandthereceiving
mobilephonesupport.
Youcanenterthephonenumberorchoosea
numberfromthephonebooktosendtheSMS.In
dual‐SIMstandbymode,youcanchoosetosendthe

33
SMSviaSIM1orSIM2.
Inbox
YoucanseetheSMSintheinbox.
Reply:YoucanreplytothereceivedSMS.
Delete:DeletethecurrentSMS.
Forward:YoucandirectlyforwardthisSMSto
others.
Copytophone:YoucancopytheentriesinSIM
cardontothephone.
Movetophone:Youcanmovetheentriesin
SIMcardontothephone.
Deleteall:YoucandeleteallSMSininbox.
Copyall:Youcanhavetwooptions,i.e.copyall
entriesontheSIMcardintheinboxontothe
phoneorviceversa.
Moveall:Youcanhavetwooptions,i.e.move
allentriesontheSIMcardintheinboxontothe
phoneorviceversa.
UseNumber:Youcanextractthenumberinthe
SMSandsaveitordialacall.
UseURL:Youcanlinktothewebsitecontained
inthereceivedSMS.
UseUSSD:
Chat:Selectchatroomandsetremotenumber
tochat.
34
Outbox
WhilesendingSMS,ifyouchoose“Saveand
Send”,youcansavetheSMSintotheOutbox.You
candirectlysavetheeditedSMSintotheOutbox,in
suchcase;theOutboxwilldisplay“Nonumber”,i.e.
notargetnumber.IfyoufailtosendtheSMS,itwill
besavedintheOutbox.Also,youcanhavesuch
operationsassendfromSIM1,sendfromSIM2,edit,
delete,copytophonemovetophone,deleteall,
copyall,moveall,usenumber,useURL,Use
USSDandUseemailaddress.
Templates
Withit,youcanpre‐editsomecommonphrases,
whichisconvenientforquickSMSediting.
SMSSettings
YoucansetsomeparametersoftheSIM1SMS
orSIM2SMSinthemenu.
ProfileSettings:TosendSMS,youmustinput
theSMScenternumber.
Note:TheSMScenternumberisprovidedby
thenetworkoperator.
CommonSettings
o DeliveryReport:Thenetworkwillinform
youwhethertheotherpartyhasreceived
theSMSandwhatthetimeis.
35
o ReplyPath:Youcansendthereplypathto
thenetworkterminal.Thisfunctionneeds
thesupportfromtheSMScenter.
MemoryStatus:Youcanviewthecapacityof
theSIMcardorthephoneforSMS.
PreferredStorage:Youcansetthestorage
position(SIMorphone)forSMS.
nchoosetocallthevoiceinboxviaSIM1orSIM2.
Email
Before use, you need to set the e-mail in the
“E-mail Settings” menu. Via this menu, you can
receive and send e-mail.
1. Send Receive: You can send/receive the
e-mail from the specified mailbox.
2. Write E-mail: You can edit e-mails.
3. Inbox: You can see the received e-mails.
4. Outbox: You can see the sent e-mails.
5. Sent: You can see the backup of the sent
e-mails.
6. Drafts: You can see the drafts in the specified
mailbox.
7. Clear mailbox: You can clear the e-mails in
the specified mailbox, including inbox, outbox,
36
sent e-mail backup and drafts, or clear all
e-mails.
8. Delete marked Emails: You can delete all
marks.
9. Emai accounts: You can create new account
or choose existing account.
10. Templates: You can set 10 common phrases
in the mobile phone for your convenience.
Broadcast Message
Cellbroadcastisakindofinformationservice
suchasweatherreport,trafficetcthatthenetwork
operatorsendstotheGSMuserswithincertainarea.
Indual‐SIMmode,youcanseparatelysetSIM1and
SIM2.
ReceiveMode:YoucanON/OFFsuchfunction.
ReadMessage:Youcannotreadthereceived
informationuntilyouopensuchfunction.
Languages:Youcansetthelanguageforthe
receivedinformation.
ChannelSettings:Youcanchoose,addandedit
anddeletechannelnumber.
MMS

37
MMScancontainwords,soundandphotos.If
theMMSisoutofthelimit,themobilephonewill
beunabletoreceivetheMMS.IftheMMScontains
photos,themobilephonewilladjustphotossoasto
displaythemonthescreencompletely.
ThedisplayeffectofMMSdependson
receptiondevices.
Note:Youcannotusephotomessagesunlessthe
networkoperatororserviceprovidersupportstodo
so.YoucannotreceiveanddisplayMMSunlessthe
mobilephonehasthecompatibleMMSore‐mail
function.
Settings
With such function, you can set the
following menus.
User Profiles
Your mobile phone is provided with multiple
profiles so that you can customize some settings in
different cases for different events. Firstly, as per
your personal hobby, have individualized settings
38
on profile and then activate it. You can have such
profiles as General, Meeting, Outdoor, Indoor,
Headset Silent and Bluetooth.
The content can be edited at every profiles mode
as following:
1. Activate: Activate the chosen profile.
2. Ring Tone Settings: Include Incoming Call,
Switch-on, Switch-off, Message Alert Tone
and Keypad Tone.
3. Volume: Set the volume of Ring and Keypad
Tone.
4. Ring Mode: You can choose any one from
Ring, Vibration, Vibration and Ring, Ring
after Vibration and Light only as the current
ring mode.
5. Ring Tone Type: You can choose any one
from Once, Continuous and Progressive as
the current ring type.
6. Alert Tone: You can have Select/Cancel
settings on Warning Tone, Error Tone,
Network Connection Tone and Call
Connection Tone so as to have
corresponding tone tips.
7. Answer Mode: You can choose whether to
use any key to answer.
8. After individualized settings, choose
39
“Activate” in “Select” to start profiles.
Note:
z After the headset is inserted into the
mobile phone, the mobile phone will
automatically change into headset profile.
Unplug the headset to retrieve the profile.
z In silence profile, unplug the headset
to return to the previous profile.
z In standby state, Click # key to switch
to silence profile and again to the previous
profile.
z After connecting with Bluetooth, the
mobile phone will automatically change into
Bluetooth profile, and retrieve the original
profile after the Bluetooth is disconnected.
Phone settings
In such menu, you can set phone language,
standby wallpaper, time etc.
1. Time and Date: With this function, you can
set city, time and date format and the time of
specific place.
1) Set Home City: You can set different
cities.
Note: This option must be used together with auto
40
update of time and date. Auto update of time and
data cannot be conducted unless the network
supports.
2) Set Time and Date: You can set the
current time and date.
3) Set Format: You can set the display
format for time and date.
Note: If the battery is taken from the mobile phone
or the battery is used up for long time, when
switching on the mobile phone after reinstalling the
battery or charging the battery, you need to reset
the time and date.
2. Schedule Power on/off: You can set the time
for schedule Power on/off.
Special Note: In the area forbidding using mobile
phone (such as cabinet), you must confirm to
inactivate this function before entering this area so
as to prevent accident.
3. Language: You can choose the desired
language for phone display (this phone
supports English and Romanian) and the
defaulted language is Romanian.
4. Display characteristic: You can set standby
menu display as wallpaper, screen saver,
power on display, power off display, show
date and time, show owner number, operator
41
name.
Tip: You can edit owner number of two SIM cards
and set standby menu display as “show owner
number”. In such way, you can see the numbers or
names of the two SIM cards in the standby menu
and you will feel easy to identify SIM cards.
5. Greeting text: You can set the greeting text
displayed on the main screen.
6. Shortcuts: Set all shortcut function menu
under this function.
7. Dedicated key: You can have corresponding
settings on the up, down, left and right keys.
8. Auto Update of Time and Date: To set the
mobile phone to automatically update time
and date according to the current time zone,
choose “Activate”. Auto update of time and
date will not affect the alarm clock, calendar
or alarm clock memo setting time, which will
be subject to the time and date when created.
However, auto update of time and date may
make some set alarm clocks out of date.
9. Handwriting: It includes Speed and Color.
10. UART setup: With this option, you can
choose the access of PC software to SIM1.
11. Motion sensitive: You can set ISO speed,
change wallpaper, change music, MP4
42
rotation, change picture and turn to mute.
ISO Speed: You can set the sensitivity of the
mobile phone including Low, Average and
High.
Change Wallpaper: If setting it as on, in the
standby interface, you can freely switch wall
papers. Shaking the mobile phone leftward can
switch to the previous wallpaper while shaking
the mobile phone rightward can switch to the
next wallpaper. If setting it as off, you can shield
this function.
Change Music: If setting it as on, you can freely
switch music. Shaking the mobile phone
leftward can switch to the previous music while
shaking it rightward can switch to the next music.
If setting t as off, you can shield this function.
MP4 Rotation: If setting it as on, you can freely
switch video angles. When rotating the mobile
phone clockwise or counterclockwise by 90º,
you can automatically adjust the direction of the
video according to your angle. If setting t as off,
you can shield this function.
Change Picture: If setting it as on, you can
freely switch pictures while browsing them.
Shaking the mobile phone leftward can switch
to the previous picture while shaking the mobile
43
phone rightward can switch to the next picture.
If setting it as off, you can shield this function.
Turn to Mute: If you setting this function as on,
when there is a call coming in, you can overturn
your mobile phone, then the mobile phone can
automatically become mute. If setting it as off,
you can shield this function.
Tip: If the screen saver actively, When you shake
the mobile phone it will switch the pictures in
screen saver.
12. Misc Settings:
Key light: You can set this function On or Off.
LCD backlight: You can adjust the brightness
and time of LCD backlight.
Call settings
1. SIM1 call settings:
You cannot have the following settings
unless you insert SIM1:
1) Caller ID: Including set by Network,
hide ID and send ID.
z Set by Network: While having a call
conversation, you can send my caller ID in
the form preset by the system.
44
z Hide ID: While having a call
conversation, you will not send my caller ID.
If the system does not support such function,
call may fail.
z Send Caller ID: While having a call
conversation, you can send my caller ID to
the system.
Note: This function needs network support.
2) Call Waiting: You can set this function
On or Off. The call hold and multi-party call
cannot be active unless this function is
activated. This needs network support.
3) Call Divert: This is a kind of network
function, which cannot be used unless you
apply to the network operator for it. With this
function, you can divert SIM1 calls meeting
he conditions to another number.
z Divert all voice calls: The network will
divert all voice calls without conditions.
z Divert if Unreachable: When the
network cannot find your mobile phone
(switched-off or out of the service area), it will
divert the calls.
z Divert if no Answered: When the
mobile phone does not answer the call, the
45
network will automatically divert it.
z Divert if Busy: When you are on line,
the network will divert the call.
z Divert All Data Calls: Network support
needed.
z Cancel All Diverts: Cancel all diverting
functions.
4) Call barring: Including Outgoing Calls,
Incoming Calls, Cancel All and Change
Barring password.
z Outgoing Calls:
All Calls: You can bar all outgoing SIM1 calls.
International Calls: You can bar international
calls via SIM1.
International Calls Except To Home PLMN:
When abroad, you can dial the calls of the
current country and the original country (the
service providers allows to do so).
z Incoming Calls:
All Calls: You can bar all incoming SIM1
calls.
When Roaming: You can bar all calls into the
main SIM card except the calls of the local
service area.
z Cancel All: You can cancel SIM1 call
barring settings and dial/receive calls
46
normally.
z Change Barring password: You can
apply to the network to change the password
for SIM1 call Barring.
5) Line Switching: You can choose Line 1
or Line 2.
2. Black list: You can add number into the
blacklist, and also you can set it as On or Off.
3. Auto Redial: You can set it as On or Off. After
the first automatic redial fails, at most ten
times can be available to connect a phone
number.
Note: Some settings need network support. For
example, call barring can not be used unless
the local network and SIM card open it.
4. Speed Dialing: You can set whether to
activate this function and edit the related
speed dialing numbers. If this function is
“Active”, then you dial any of the
corresponding individual keys (2-9) on the
standby interface to dial the number
specified for this key.
5. IP dial: You can set you IP list.
6. Background Music:
Select when making call: If setting it as on,
during call, there will be background music
47
coming out. If setting it as off, you can shield
this function.
Playback Settings: You can set volume
and continuous play interval.
Effect List: There are 10 kinds of
defaulted background music such as riding
motorcycle and walking on pavement etc.
7. More:
1) Call Time Display: You can set whether to
display call time during call conversation.
2) Call Time Reminder: You can set one alert
tone or periodic alert tone for several round
minutes during call conversation so that you
can understand call time. You can turn off the
alert tone.
3) Auto quick end: You can set call time limit.
Network Settings
1. SIM1 Network Setup
If you insert SIM1, you can have network
settings. You can have network selection and
preferred network.
1) Network Selection:
Automatic: The mobile phone can
choose useable network freely.
48
Manual: You can log in the specified network.
When it is not used, the mobile phone will not
be able to register to other networks
automatically.
2) Preferred Network: You can choose a
preferred network. The mobile phone has
saved the current network, choose and
enter this option, then you can have the
following operations on it: Add from List,
Create, Change Preferred Network and
Delete.
Security Settings
1. SIM1 Security Setup: You cannot have such
setting until you insert SIM1.
z SIM1 Lock: You can set SIM1 lock as
On or Off (SIM1 PIN code).
z Phone Lock: You can set it as On or
Off. It is a password of 4-8 digits and the
defaulted one is 1122.
z Keypad Lock: You can set it as On or
Off. The mobile phone has keypad lock
function. When it lasts certain time, the
keypad will be locked, including such options
as Off, 5s, 30s, 60s and 5min.
49
z Change Password: You can change
the defaulted phone password “1122” into
4-8-digit number easy to remember.
z Fixed Dial: This function needs the
support of the SIM card and the network
operator. When it is activated, you can only
dial the phone numbers saved in SIM1 fixed
dial list. To activate it, you need to input SIM1
PIN2 code.
z Barred Dials: You can set barring all or
some dials. (SIM card support needed)
2. SIM1 Security Setup: You cannot have such
setting until you insert SIM1, similar to SIM1,
no more descriptions are needed.
Restore factory settings
You can restore the factory settings of the
mobile phone. The factory setting password is
0000.
Camera
With this function, you can use the inbuilt
camera to take photos. The lens of the camera is
50
located on the back of the slide and the screen is
used as the viewing window. All photos taken are in
JPG form. After downloading the photos onto PC,
you need some software to view them.
If the storage space of the mobile phone is
insufficient to store the taken photos, it is necessary
to delete some old photos or other files in “File
Management” function list to release more space.
Description of Camera Options:
1. Photos: To view the saved pictures.
2. Camera Settings: Set the related property of
the camera during shooting.
1) LED highlight: You can set it ON or OFF
2) Shutter Sound: EQ 1, EQ2, EQ3 or Off
3) EV: EV-4 —EV+4
4) Banding: 50Hz or 60Hz
5) Delay Time: 5s, 10s, 15s or Off.
6) Cont Shot: Single, Three, Five or Off.
3. Image Settings: Set the size and quality of
pictures.
1) Image size: 240×400,
640×480,1280×1024, 1600×1200,
2048*1536.
2) Image Quality: High, Middle, Low
4. White Balance: Auto, Daylight, Tungsten,
Fluorescent, Cloud, Incandescence and
51
Manual.
5. Scene Mode: You can set it as Auto or Night.
6. ISO Speed: Auto, Low, Middle, High.
7. Effect Setting: Set photo special effect,
including Normal, Greyscale, Sepia, Sepia
Green, Sepia Blue, Color invert etc.
8. Add Frame: Off, Frame1, Frame2.
9. Storage: Phone or Memory Card.
10. Restore Default: You can default user’s
settings.
Services
With this function, you can access multiple
services on the Internet. These services include
weather report, news and financial and economic
information etc. This function is provided by the
network supplier. According to the services the SIM
card provides, there will be new menu options
occurring. If the SIM card and network do not
support this function, it will not be inactive. For
more details, please contact the network provider.
Internet service menu:
1. Homepage: Start the website chosen in the
connection settings file.
2. Bookmarks: Enter the options menu and
52
have the following operations on the
bookmark:
z Go to: Log into the chosen website.
z Edit: Edit the chosen bookmark name
and website.
z Send: You can send the chosen
bookmark in SMS, MMS or e-mail.
z Delete: Delete the chosen bookmark.
z Delete All: Delete all bookmarks.
z Add: Add new bookmarks.
3. Recent pages: Record the latest 10 web
pages browsed.
4. Offline pages: View the saved web
pages.
5. Input address: Input the website to be
logged in.
6. Service Inbox: The mobile phone can
receive the service information
(“Recommended” information) sent by
the service provider. For example, the
service information can be the notice of
related news headlines, which can
include one piece of news or a service
website.
7. Settings
z Select SIM
53
z Edit Profile: The mobile phone has
inbuilt with some setting files and you can
activate, use and edit them. Also there are
some blank setting files, with which, you can
set related information.
z Browse Options: You set whether to
display images during waiting time and when
browsing WebPages.
z Service Message Settings: You can
set this function On or Off. In such menu, you
can set the content, status and “SL Settings”
for the Whitelist.
z Clear Cache: You can clear cache. When the
data of the cache are excessive, network
surfing speed can be affected.
z Clear cookies: You can clear personal data.
z Trusted certificates: Entrust.net WAP CA?
1999 Limited liability. See
www.entrust.net/wapcps
Phonebook
The mobile phone is provided with the
business card folder type phonebook. The
information of every contact saved on the mobile
phone include three phone numbers (mobile phone,
54
home phone and company phone), Company
Name, E-mail Address, Office Number, Fax
Number, Birthday, Associate Picture, Associate
video, Associate Sound and Caller Group (five
types: Friends, Family, VIP, Business and Others).
Every contact saved into SIM1 can only include
name and number.
z The mobile phone supports 1,000
groups of numbers
z The mobile phone support speed
dialing. Press the number keys on the
keypad of the screen dial interface for more
than 2s to directly dial the speed dialing
phone numbers preset.
This phone also supports the following features:
1. Quick Search
2. Search contact:
z Name Search: Input the name to be
searched, press “Search” in the phonebook,
then you can find the matching name.
3. Add new contacts:
z To SIM1: Add contact names and
numbers.
z To phone: Add contact can include
Name, Number, Home Number, Company
Name, E-mail Address, Office Number, Fax

55
Number, Birthday, Associate Picture,
Associate video, Associate Sound and Caller
Group.
4. Copy All: You can copy all contacts
from SIM1 to phone, from phone to SIM1,
from phone to SIM1.
5. Delete: You can delete the contacts
from SIM1, and from phone wholly or one by
one.
6. Callers’ Group: Include Friends, Family,
VIP, Business and Others.
7. Extra numbers: You can set SIM1
owner number, SIM1 service dialing number,
SOS number. (Service dialing number and
SOS number needs the support of the SIM
card, consult the network operator for details).
8. Settings:
z Memory Status: You can view the
current use status of the phonebook, including
SIM1and phone memory. The display format is
“Used/Total”.
z Preferred Storage: You can choose the
storage path for the current number, including
SIM1 and phone memory.
z Fields: You can choose the display
items in the phonebook and the display items
56
in the Add Contact interface, including Home
Number, Company Name, E-mail Address,
Office Number, Fax Number, Birthday,
Associate Picture, Associate video, Associate
Sound and Caller Group.
z My vCard: You can edit my vCard
(Include: Name, Number, Company Name,
E-mail Address, Office Number and Fax
Number) and Send my vCard.
z vCard version: You can choose 2.1
version or 3.0 version for the business card.
9. Caller Picture: You can set the call
big-head sticker.
10. Caller Ringtone: You can set call
tones.
11. Caller Video: You can set call videos.
Multimedia
Image viewer
Allphotostakenaresavedinthealbum.
OptionsDescription

57
ViewYoucanviewtheselectedphotos.
SlideshowYoucanbrowserpicturesasSlideshow.
EditYoucaneditthepicturesasthephoneguides.
BrowseStyleTherearetwobrowsestyles,i.e.listand
matrix.
Useas
Youcansendphototowallpaper,Screensaver,
powerondisplay,poweroffdisplay,call
picture.
SendAsmultimediamessage;asemail.
RenameYoucanrenametheselectedphoto.
Delete Youcandeletetheselectedphoto.
DeleteAllfilesYoucandeleteallphotosinthealbum.
Sortby
Forconvenienceofsearch,youcanrankthem
aspername,type,timeandsizeorchoose
“None”.
Storage Youcanchoosephotosstoragepath(tophone
ormemorycard).
Video recorder
PresstheOKkeytostartvideorecording.The
durationofrecordingdependsonthetimelimitset
andfilemanagementcapacity.Enteringtheoptions,
youcanhavethefollowingsettings:
58
OptionsDescription
camcorder
Settings
YoucansetWhiteBalance,EV,NightMode
andBandingforyourrecordersoastohave
high‐qualityvideos.
VideoSettingsYoucansetCartoonQuality.
EffectSettingThereare6optionsavailable.
RestoreDefault Youcanrestoretherecordertofactory
settings.
Video player
ItsupportsthevideosinAVI.Insuchmode,you
canhavethefollowingoperationstothespecified
fileinAVI.
Optionsoftheplayer
OptionsDescription
Play ItsupportsthevideosinAVIandwillnotbe
limitedbyfilesize.Clicktheplayinterfacetoplay.
SendAsmultimediamessage;asemail;viaBluetooth.

59
RenameYoucanrenamethespecifiedvideo.
Delete Youcandeletethespecifiedvideos.
DeleteAll
filesYoucandeleteallfiles.
SortbyForconvenienceofsearch,youcanrankthemas
pername,type,timeandsizeorchoose“None”.
StorageYoucanchoosevideostoragepath(tophoneor
memorycard).
Photo editor
Click this function icon, enter and view the
saved pictures shot. Choose one desired picture,
press the round key in the middle, there will be one
“MENU” icon (If hidden, click the screen to see it),
click to enter, and then you will have the following
options:
1. View: You can view the selected
photos.
2. Browse Style: There are two browse
modes, i.e. list style and matrix style.
3. Use: You can send photo to Wallpaper,
Screen saver, power on display, power off
display, Phonebook.
60
4. Send: You can send photo to MMS,
Email and Bluetooth.
5. Rename: You can rename the
selected photo.
6. Delete: You can delete the selected
photo.
7. Delete All s: You can delete all photos in
the album.
8. Sort by: For convenience of search, you
can rank them as per name, type, time
and size or choose “None”.
9. Storage: You can choose pictures
storage path (to phone or memory card).
In the screen page of viewing pictures, there are
another 5 icons on the bottom (If they are hidden,
click the screen slightly to see them again); the
Triangle icon on the left is used to view the previous
picture (the previous picture of the first picture is
the last picture); opposite to it, you will see the
Triangle icon on the far right to view the next picture
(the next picture of the last picture is the first
picture); “+” and “-” respectively indicate Zoom in
and Zoom out; the bending arrowhead icon is to
switch between vertical screen and horizontal
screen to view the corresponding pictures.
61
Sound recorder
Afterchoosing“SoundRecorder”andpress
“OK”toenter,youcanthepreviousrecordfiles.
Press“Options”tohavethefollowingoperations:
Record:Youcanrecordnewfiles.
Play:Youcanplaytheselectedfile.
Append:Youcanhaveannexrecordforthefiles
ofthesuperiorlevel(onlyfortherecordfilesin
AMR).
Rename:Youcanrenamethechosenfile.
Delete:Youcandeletethechosenfile.
DeleteAllfiles:Youcandeleteallfiles.
Settings:Youcansetthestoragepositionfor
recordfiles,includingphoneandmemorycard.
Alsoyoucansettheformatoftherecordfile,
includingAMRandWAV.
Useas:youcanuseasuserprofiles.
Send:Yousendtherecordfiletoemailand
multimediamessage.
62
Audio player
The mobile phone has the function of playing
music. If the operation system is Windows 2000
above, no driver needs installing. To download
music, you must insert the T-Flash card into the
mobile phone, switch off the mobile phone, connect
the mobile phone and PC with USB cable, then the
PC will detect the new hardware and create a new
mobile HD. Download the chosen MP3 file to under
"My Music" of the mobile disk rather than in such
folders as Audio, Images and Photos; otherwise,
the file cannot be played. (Only MP3, AMR, WAV
and MIDI supported).
Description of MP3 options:
1. Update Tracklist: Enter the tracklist
and update it (e.g. the deleted music in the
file management will not disappear until
update is conducted.
2. Settings:
1) Play Settings: List (from Phone/from
Memory Card), automatic tracklist (on/off),
Repeat (One/All/Off), Random (On/Off),
Background Play (On/Off).
63
2) Sound Effect Settings:
For sound special effect, you can have the
following options:
Off
z Equalizer: Normal, Bass, Dance,
Classical,Treble, Party, Rock and Pop.
z Reverb Effect: Concert, Shower,
Church, Small Room, Opera and Bath
Room.
z Surround Effect: Mode1 and Mode2.
z Play Speed: Normal, Fast, Fastest,
Slowest and Slow.
3) Bluetooth Settings: BT Stereo
Output(On/Off), BT Stereo Headset(You can
switch the sound between Bluetooth headset
and phone).
FM
Your mobile phone supports FM radio. There is
an antenna on the side of the mobile phone. To use
the mobile phone to listen to radio, please turn and
64
pull the antenna out. While listening to radio, you
can dial or receive a call normally. During call
conversation, the radio will turn mute automatically.
If some applications are using GPRS or CSD to
send or receive data, they may interfere with the
radio.
When the FM radio is activated, the mobile
phone will display the number and name (if having
been saved) and frequency of the radio channel. If
you have saved some radio channels (at most 9
channels) in the mobile phone, you can roll to
choose the desired channel.
1. Search channels
1) Search manually:
When the FM radio is activated, press the
left and right direction keys to search radio
channels manually. Press the left direction
key once forward by 0.1mHz and the right
direction key backward by 0.1mHz to search
the desired channel.
2) Search automatically:
When the FM radio is activated, press the
upper direction key and then the left/right
direction key to search radio channels
automatically. After channels are searched,
the search will stop.
65
2. Close FM radio: Press the lower direction
key to close FM radio.
3. Adjust volume: In the FM radio play interface,
Click “+”or “-” key to adjust volume.
4. Option menu
Channel list: Display the channels to be
saved; at most, you can save 9 channels.
Manual input: You can edit the specified radio
frequency band. The frequency of the radio is
between 87.5mHz and 108.0mHz.
Preset Auto Search: You can have automatic
search and save the searched channels into
the list.
Schedule FM record
YoucanscheduletorecordcertainFMRadio
channelatanytime,sothatyouwillnotmissthe
program.
66
File Manager
YoucanmanageAudio,ImagesandEBook.
[Phone]‐‐Thestoragebodyisphone.
[Open]:YoucanopenAudio,ImagesandEBook
Received
Audio—ImagesFolder
Open:Youcanseethecurrentimage.
Newfolder:Youcansetthecurrentfiletoa
newfolder.
Rename:Youcanrenamethefiles
Delete:Youcandeletethecurrentrecord.
Sortby:Youcanrankfilesaspername,type,
timeandsizeorchoose“None”.
Images—ImagesFolder
Open:Youcanseethecurrentimage.
Newfolder:Youcansetthecurrentfiletoa
newfolder.
Rename:Youcanrenamethefiles
Delete:Youcandeletethecurrentrecord.
Sortby:Youcanrankfilesaspername,type,
timeandsizeorchoose“None”.
EBook—ImagesFolder
Open:Youcanseethecurrentimage.
67
Newfolder:Youcansetthecurrentfiletoa
newfolder.
Rename:Youcanrenamethefiles
Delete:Youcandeletethecurrentrecord.
Sortby:Youcanrankfilesaspername,type,
timeandsizeorchoose“None”.
Organizer
Bluetooth
The mobile phone supports dual-Bluetooth
function; you can use Bluetooth wireless
technology to set wireless connection with other
compatible devices, including mobile phone,
computer, headset, in-car accessories etc. With
Bluetooth function, you can send photo, video
segment, audio segment, personal business card
and memo. You can also establish wireless
connection with the compatible PC to transmit files
and connect to web by dialing number via SIM.
As the device supporting Bluetooth wireless
68
technology performs communications via wireless
wave, you need no keeping the device opposite to
other devices but keep the distance between tem
not more than 10m (about 33”). However, Bluetooth
connection can be affected by wall or other
electronic equipments etc. To ensure mutual
operation between this device and other devices
supporting Bluetooth wireless technology, consult
the manufacturer to confirm whether the device by
it is compatible with this device. Do not use
Bluetooth function in hospital and aircraft etc.
Bluetooth Menu
1. Power
Before using Bluetooth function, you need to
activate this option. When Bluetooth function
or other functions are being used, allowing this
function to operate in the back desk will
consume more power. It is recommended to
close this function when it is idle.
2. Inquiry audio device
With this function, you can inquiry audio
device. For other devices, enter My Devices to
search.
3. Remote control
After the mobile phone is connected with PC
and corresponding operations are done, the
69
mobile phone can control the operations on
PC remotely, i.e. the phone functions as a
mouse and remote controller.
4. My Devices
After entering this option, you will see the
Bluetooth devices compatible with the mobile
phone. Entering options, you can have
necessary operations on the desired
Bluetooth device or search the incompatible
Bluetooth devices.
5. Active Devices:
With this function, you can see all devices
connected with the mobile phone and their
link service type. You can interrupt the
specified link service.
6. Settings:
Before using Bluetooth function, enter this
menu to have corresponding settings. If your
mobile phone’s Bluetooth function is not
activated, you can have activation
confirmation.
1) Visibility: After this option is activated,
other peripheral devices
supporting Bluetooth wireless technology
can see your device and its name via search.
After the step audio play service is activated,
70
this device will be unable to be searched.
2) Change Device Name: You can edit
my device name.
3) Authentication: After this option is
activated, matching is needed when
peripheral device accesses my device via
Bluetooth (for matched devices as well).
After closing the option, no matching is
needed for the matched devices.
4) Audio Path: You can leave the audio
on my device or send to other
hand-free devices via Bluetooth. If using
Bluetooth to have a call, set this path as
hand-free devices.
5) Storage Priority: You can choose
phone or memory card.
6) FTP Settings: You can set the file
directory shared by my device and the
access right to online Bluetooth devices.
7) BIP Settings: You can set the
transmission of the pictures and other files
alike, to Phone, i.e. C: \Received\ or to
Memory card.
7. My Bluetooth:
Here, you can see the name of my device,
my device’s Bluetooth device address and

71
the Bluetooth services supported by my
device.
Tip: When searching Bluetooth devices, make
sure that the peripheral Bluetooth devices are
within the signal cover range and can be
searched. To match the searched devices,
you need to discuss with the user of this
device about a pair of matching passwords
(0000). To match the hand-free device, you
must input its matching password. After
matching, this device will be saved in my
device view.
Use Bluetooth to Receive/Send Data:
1. Open the applications needed to save
the content to be sent. For example, to send
photos to another compatible device, you
should enter the album or file management.
2. Choose the content to be sent, and
then choose Options->Send->To Bluetooth.
The screen will display the device supporting
Bluetooth wireless technology and within the
signal coverage. To disconnect search,
choose “Cancel”.
3. Choose the device to be connected with.
4. If another device requires matching
before data transmission, the device will
72
send hint and require inputting matching
password (0000).
5. After the connection is established, the
mobile phone will display data
transmission speed.
6. When other Bluetooth devices send
data to my service, the mobile phone will hint and
ask whether to receive the data. The received data
will be stored in the initially set Received folder.
You can use the Bluetooth headset for
communication and listen to music:
The mobile phone supports communication
with Bluetooth; you can listen to music with the
stereo Bluetooth headset. Before using these
functions, you need to connect the mobile phone
with Bluetooth headset and choose the desired
services. To listen to music, you need to choose
sound step; it is necessary to choose handfree
device service for communication.
Tip:
1. The function of using Bluetooth
headset for calls is limited to only host (SIM1)
call. If alternate SIM1 calls are available, this
function will not be supported.
2. Before using Bluetooth headset for
calls, please go to the menu settings to confirm
73
that the audio path has been set as hand-free
device.
3. Non-stereo Bluetooth headset cannot
be used to listen to music.
4. When stereo Bluetooth headset is
used to listen to music, there will not audio
output on the phone terminal.
5. Incoming calls or dialing calls will
suspend the ongoing music.
Use the following methods to disconnect:
1. Close the activated Bluetooth to
disconnect all devices.
2. Enter online devices and disconnect
the specified online service.
3. Enter my devices; delete the matched
devices to disconnect other devices with my
device.
4. The connection with the devices out of
the signal coverage will be ineffective.
Calendar
Withthisfunction,youcansetthealarmclock
toremindyouofyourscheduleandrecordyour
schedule.Rollthehighlightblocktothedesireddate
74
andthenthecurrentdatewillbehighlightedin
green.Ifthedateissetwithmemofunction,then
thisdatewillbehighlightedinred.Toviewall
memosofoneday,pressOKtoseetheschedule.
Youcanhavethefollowingoperations:
View:Youcanviewthescheduleofthedate
wherethecursorisonandsetthetime,date,
contentandwhethertoactivatealarmonthis
scheduleoftodays.Wheneditingtheschedule,
youcanchoosealarmtypewiththeleftand
rightdirectionkeys.Inaddition,youcanhave
suchoperationsasDelete,DeleteandAddon
theschedule.
Viewall:Youcanviewtheentirescheduleof
thedatewherethecursorisonandsetthe
time,date,contentandwhethertoactivate
alarmonthisschedule.
Addevent:youcanselecttasktypeasreminder,
meeting,course.
Deleteevent:Youcandeletethetaskasthe
phoneguides.
JumptoDate:Youcanmovetothecalendarof
thespecifieddate.
Gotoweeklyview:Youcangotoweeklyand
monthlyview.
75
Tasks
YoucanhavesuchoperationsasCreateMemo,
Browse,Add,Edit,Delete,DeleteAllandSendon
memos.
Ifyouhavesetalarmforthememo,whenthe
settimeisreached,themobilephonewillringand
displaythememocontent.
Alarm
Thetimeformatforthealarmclockisidentical
tothatofclock.Whenthemobilephoneisoff,the
alarmclockcanstillworkprovidedthebatteryis
sufficient.Thesystemhasset5alarmclockoptions
andthedefaultedisoff.Youcanactivateoneoption
oralloptionsaccordingtotheactualdemand.Every
alarmclockoptioncansetindependenttimeand
date.Whenthetimeisreached,themobilephone
willgiveoutalerttoneandflickerthecurrenttime
anddateonthescreen.PressStoptostopalarm
clock;pressSleep,thenthemobilephonewillpause
ringingandcontinueafter4min.
Ifalarmtimeisreachedbutthemobilephone
isswitchedoff,thenthemobilephonewillbe
76
switchonautomaticallyandring.IfStopispressed,
thenthemobilephonewillaskyouwhetherto
switchonthemobilephone.Press“No”toswitch
offthemobilephoneand“Yes”toregisteratthe
networkandswitchonthemobilephone.
World Clock
Presstheleftandrightdirectionkeystoview
thecurrenttimeofeverycountrycorrespondingto
everytimezone.
Calculator
Theupperdirectionkeyfor“+”andthelower
directionkeyfor“-”,theleftdirectionkeyfor
"×"andtherightdirectionkeyfor"÷";
Presstheclearkeytoclearthelatestinputsor
resultsdigitbydigit;presstheclearkeylongto
clearallcontentorresult;
Press“OK”keytoobtaintheresult.
Note:Theprecisionofthiscalculatorislimitedand
canbeusedforsimplecalculation.
77
Currency Converter
Tosaveexchangerate,press“OK”,thenchoose
tosetexchangerate.Chooseoneexchangerate
fromthedisplayedoptions.Afterthat,press“OK”to
confirm.Thentheexchangeratewillbesavedinthe
memoryuntilyouenteranewonetoreplaceit.To
convertcurrency,enterthesumtobeconverted,
press“OK”andthenchoosetolocalcurrencyor
foreigncurrency.
E-book
The mobile phone can read e-book. Enter
this menu, then you can update the e-book cabinet
and have global settings which are to set such
values or properties as Font Style, Font Size, Scroll,
Auto Scroll, Scroll Speed, Full Screen (on/off),
Encoding and Alignment.
You can have Page and Line two options.
Page: After finishing reading the current page, you
can turn to the next page and the whole current
page will disappear. Line: After you finish reading
the current page, you can continue reading, the
new content will be displayed in line until the last
78
line, to be visual, the words of the whole screen will
move upward in line.
Auto Scroll: According to the set scroll speed,
the system automatically set some time. When the
set time expires, the system will come to the next
page.
Scroll speed: You can set the scroll speed
according to your reading demand. Totally, you can
set five levels, i.e. Level 1, Level 2, Level 3, Level 4
and Level 5.
The mobile phone supports two formats, i.e.
txt and pdb.
Connect the mobile phone with PC, then you
can copy the e-book in txt to the e-book folder; after
that you can disconnect the mobile phone and PC.
Enter the E-book function, choose the desired
e-book, press the central key or click slightly the
chosen e-book to read it.
Call history
Missedcalls
79
LastCall:Withthisfunction,youcanviewthe
lastcalltime.
Dialedcalls:Withfunction,youcanviewthe
durationofalldialedcalls.
Receivedcalls:Withthefunction,youcanview
thedurationofallreceivedcalls.
Resetall:Withthisfunction,youcanclearall
durationrecordsofcalls.
Note:Theactualcalldurationandservicetimein
thebilloftheserviceprovidermaybedifferent
fromthem,whichdependsonthenetwork
functions,accountingroundingandtaxetc.
CallCost
Thisneedsthesupportofthenetworkservice
provider.
LastCallCost:Withthisfunction,youcanview
thefeesofthelastcall.
TotalCost:Withthisfunction,youcanviewthe
feesofallcalls.
ResetCost:Withthisfunction,youcanclearall
feerecords.
MaxCost:Withthisfunction,youcanlimitcall
feesinthespecifiedpricingunitorcurrency
unit.PIN2codemustbeinputtosetcallcost.
PricePerUnit:Thisfunctionneedsnetwork
80
support.Formoredetails,pleaseconsultthe
networkoperator.
SIMtextmessageCounter
Withthisfunction,youcanseeandpresetthe
numberofsentmessagesandreceivedmessages.
GPRSCounter
LastSent:Youcanviewthesendingtrafficof
lastlink.
LastReceived:Youcanviewthereception
trafficoflastlink.
AllSent:Youcanviewthesendingtrafficofall
links.
AllReceived:Youcanviewthereceptiontraffic
ofalllinks.
ResetCounter:Youcanclearalllinktraffic.
7. English Editor Operation
The mobile phone provides multiple
convenient word input modes to support the use of
other functions. Generally, in the place to input
words, click the word input area to enter the word
81
input screen where you can have hand-writing
modes etc.
Note: Click the area where words are to be
input to enter the text editing interface, then the
input screen will display the input mode
corresponding to such area. (For example, to input
phone number, the numeric keypad will
automatically occur). Below is the description for
the editing page.
Enter any interface where text edit or word
input is needed, then you will see the interface with
the edit area under the title of the screen and the
soft keypad in the lower part of the screen.
There is one icon on the left upper corner of
the editing area, which indicates the input mode
used currently. For example, “123” means the
current input is number input; “ABC” means
highercase input. Click this icon to switch to the
desired input mode.
In the soft keypad area, in the first row, from
the left to the right, you can see such symbols as “.”,
“1”, “2”, “3” and “Clear”. The “Clear” symbol is used
to clear the character before the cursor; hold it for
certain duration to clear all information. In the
second row, from the left to the right, you will such
symbols as “↑”, “4”, “5”, “6” and “Enter”; the “Enter”
82
symbol is used to make the cursor come to the next
line. In the third row, from the left to the right, you
will see such symbols as “Blank”↓ “7”, “8”, “9” and
“A/a”; click the “Blank” icon to input one blank, click
“A/a” to switch highercase and lowercase, which
can be activated only in English input mode. In the
last row, from the left to the right, you can see the
symbols as “!…( insert symbols)”, “*”, “0”, “#”,
“ Switch input mode”.
Basic Letter Input
After “ABC” is chosen, the screen will
display an analogue keypad for English input. Click
or press the corresponding keys to input English
letters or words. Click “ABC” or “A/a” to switch
between highercase and lowercase.
Number Input
This mode is used to input numbers. After
“Number” is chosen, the number analogue keypad
will occur; click the corresponding number keys to
input the numbers into the place where the cursor
is flickering.
83
Symbol Input
All input modes above provide symbol input.
If you cannot see the desired symbols, you can
click the “!…” icon in the analogue keypad. Directly
click the desired symbol to input it. Also you can
choose symbols in the menu and insert them into
the text. Click the arrow icon on the right lower
corner of the screen, then you can back to the
previous numeric menu.
8. Use Accessories
Notices for USB cable:
1. Always connect and stop USB device
correctly.
2. Never use Windows formatting command to
format the mobile disk of the mobile phone;
otherwise, it will be damaged severely.
3. USB work environment: Windows2000 / XP.
For other operation systems, the connection
between PC and the mobile phone cannot be
84
conducted unless USB driver is installed.
Tip: The USB cable has the functions to connect
with PC and charge the battery.
Notices for Battery
1. More than 12h charging is needed for the
new battery or that idle for long.
2. Other batteries other than the original one
can damage your mobile phone and cause
risk! The short in any form can lead to
explosion, fire or personal injury!
3. For your security and environment protection,
do not throw the battery freely but put it into
the specified recovery place.
Charger
1. Do not plug the charger into the mobile
phone and charge without battery so as to
prevent the phone being damaged.
2. Always use the charger in dry place indoor;
never let the charger touch any liquid during
use so as to prevent damaging the phone or
even causing explosion, fire or personal

85
injury!
3. Always use the charger by the original
manufacturer so as to prevent damaging the
phone or even causing fire or personal injury
etc!
9. Appendix I
Troubleshooting
Phenomena Possible Causes
Unable to
switch on
1. Does the battery
have power.
2. Is the battery placed
correctly
SIM failed
1. The SIM card is dirty.
Clean it.
2. Reinstall the SIM
card.
3. The SIM card is
damaged. Replace it.
4. (The same to Salve)
86
Poor signals
Check the signal strength
icon on the screen. If the
icon contains 5 bars, it
indicates the signal is the
strongest; if below 2 bars, it
indicates the signal is very
poor. (The same to salve)
Unable to dial
out
1. Maybe you have set
Hide My Caller ID but
your network
operator does not
provide this service
for you.
2. Strong interference
exists around you.
3. Maybe you have
activated the call
restriction function.
4. Maybe you have
activated Line 2 but
your network
operator does not
provide this service
for you.

87
Unable to
charge the
battery
1. The battery may
discharge too much;
so it cannot be
charged until it is
connected for certain
time.
2. Its performance has
worsened.
Unable to
register to the
network
1. Too weak signals or
strong interference.
2. SIM card installed
properly? Bad
contact or SIM card
damaged? If the SIM
card is broken,
please contact the
network operator to
replace it.
Photos taken
are too dark
1. Check if the too low
photo brightness is
set.
2. Check if ambient ray
is too dark.
88
Photos taken
are too unclear
1. Check if the object
taken is moving.
2. Check if the mobile
phone shivers slightly
while you press
shutter.
Photos taken is
distorted
The object taken may be too
close to camera lens.
Unable to
access service
menus.
Maybe the SIM card does
not support service function.
Only part of the
photo set as
standby photo
can be seen.
The size of the photo may
be too big. The
recommended size is
240*400.

89
10. Appendix II
Abbreviations and Definitions
SMS Short Message Service
EMS Enhanced Message Service
SIM Subscriber Identity Module
GSM Global System for Mobile
Communication
PIN Personal Identity Number
PUK PIN Unblocking Key
IMEI International Mobile Equipment
Identity
CB Cell Broadcast
GPRS General Packet Radio Service
MMS Multimedia Message service
90
11. Appendix III FCC RF Exposure
Information
TheSARlimitofUSA(FCC)is1.6W/kgaveraged
overonegramoftissue.DevicetypesT100(FCCID:
XD6T510G)hasalsobeentestedagainstthisSAR
limit.ThehighestSARvaluereportedunderthis
standardduringproductcertificationforuseatthe
earis1.118W/kgandwhenproperlywornonthe
bodyis1.205W/kg.Thisdevicewastestedfor
typicalbody‐wornoperationswiththebackofthe
handsetkept1.5cmfromthebody.Tomaintain
compliancewithFCCRFexposurerequirements,use
accessoriesthatmaintaina1.5cmseparation
distancebetweentheuser'sbodyandthebackof
thehandset.Theuseofbeltclips,holstersand
similaraccessoriesshouldnotcontainmetallic
componentsinitsassembly.Theuseofaccessories
thatdonotsatisfytheserequirementsmaynot
complywithFCCRFexposurerequirements,and
shouldbeavoided.
91
Thisdevicecomplieswithpart15oftheFCCrules.
Operationissubjecttothefollowingtwoconditions:
(1)thisdevicemaynotcauseharmfulinterference,
and(2)thisdevicemustacceptanyinterference
received,includinginterferencethatmaycause
undesiredoperation.
NOTE:Themanufacturerisnotresponsibleforany
radioorTVinterferencecausedbyunauthorized
modificationstothisequipment.Suchmodifications
couldvoidtheuser’sauthoritytooperatethe
equipment.
NOTE:Thisequipmenthasbeentestedandfoundto
complywiththelimitsforaClassBdigitaldevice,
pursuanttopart15oftheFCCRules.Theselimits
aredesignedtoprovidereasonableprotection
againstharmfulinterferenceinaresidential
installation.Thisequipmentgeneratesusesand
canradiateradiofrequencyenergyand,ifnot
installedandusedinaccordancewiththe
instructions,maycauseharmfulinterferenceto
radiocommunications.However,thereisno
guaranteethatinterferencewillnotoccurina
particularinstallation.Ifthisequipmentdoes
causeharmfulinterferencetoradioortelevision
92
reception,whichcanbedeterminedbyturningthe
equipmentoffandon,theuserisencouragedtotry
tocorrecttheinterferencebyoneormoreofthe
followingmeasures:
‐Reorientorrelocatethereceivingantenna.
‐ Increasetheseparationbetweentheequipment
andreceiver.
‐Connecttheequipmentintoanoutletonacircuit
differentfromthattowhichthereceiveris
connected.
‐Consultthedealeroranexperiencedradio/TV
technicianforhelp