Tobii TOBIIC12B Tablet Communication Device User Manual 2
Tobii Technology AB Tablet Communication Device 2
Tobii >
Contents
- 1. User Manual 1
- 2. User Manual 2
User Manual 2
31
Tobii C-Series User’s Manual
5.6.1 Adjusting the Sound
You can congure the built-in speakers using the Windows 7 Control
Panel > Hardware and Sound and the C-Series Hardware
Options.
Refer to Microsoft’s information on how to congure the sound in the
Windows 7 Control Panel.
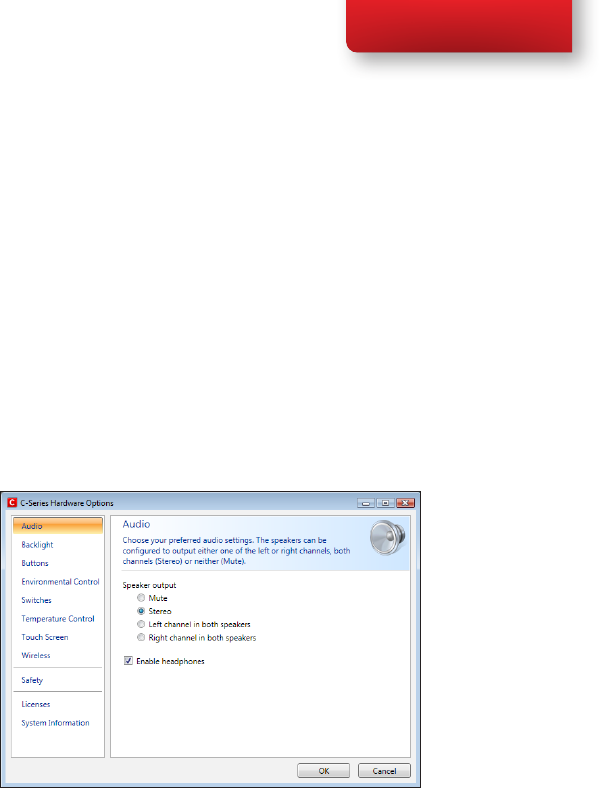
To congure the sound in C-Series Hardware Options:
1. Open the C-Series Hardware Options > Audio.
2. Click one of the options below Speaker output.
The two audio channels, Left and Right, provide two levels of audio output.
For example, the Left Channel may output the auditory scanning cues to
the user’s headphones, while the Right Channel could output the chosen
text to the speakers of the device, to be spoken aloud.
Please note that the Left and Right Channel do not refer to left and right
speakers. Either channel can output sound/audio to both of the speakers.
Chapter 5 Using the Tobii C-Series
32
Tobii C-Series User’s Manual
5.7 Using Headphones
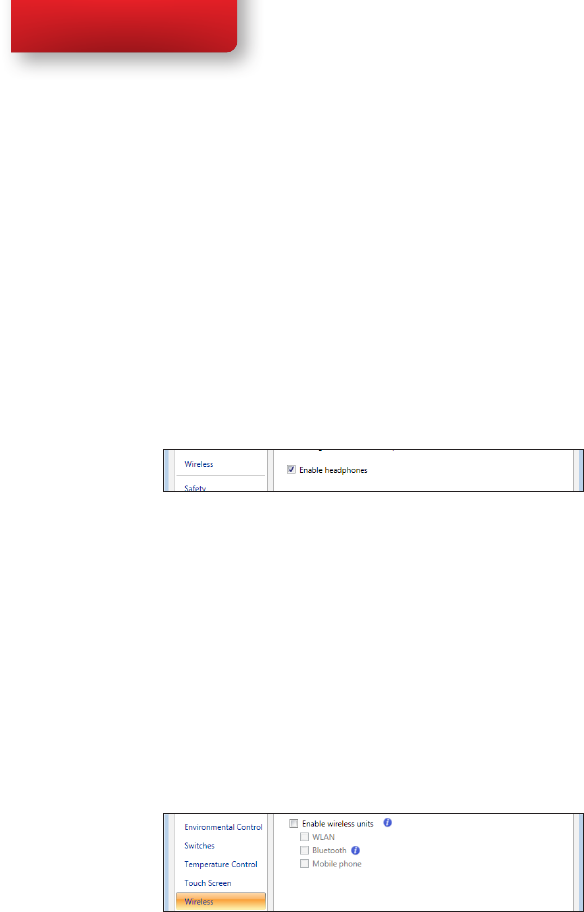
If you want to enable the use of headphones:
1. Open the C-Series Hardware Options > Audio.
2. Select the Enable headphones check box.
If you want to disable the use of headphones:
1. Open the C-Series Hardware Options > Audio.
2. Click to clear the Enable headphones check box.
5.8 Using Bluetooth® (optional)
The built-in Bluetooth® enables connection to wireless devices which
comply with ordinary Bluetooth® standards.
5.8.1 Handling Licenses
To use Bluetooth® communication in the device, a license is required.
To view or enter a license, go to the Licenses section in the C-Series
Hardware Options.
5.8.2 Enabling and Disabling Bluetooth® Communication
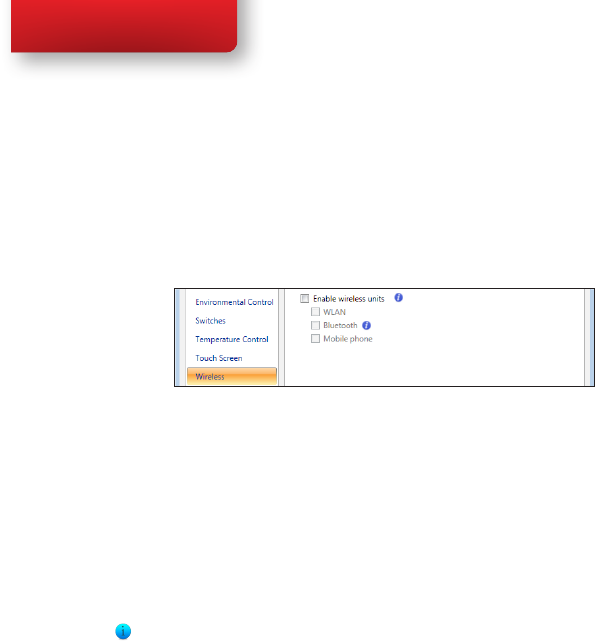
You enable and disable Bluetooth® communication in the Wireless section
in the C-Series Hardware Options.
To enable Bluetooth® communication:
1. Select the Enable wireless units check box.
2. Select the Bluetooth check box.
Chapter 5 Using the Tobii C-Series
33
Tobii C-Series User’s Manual
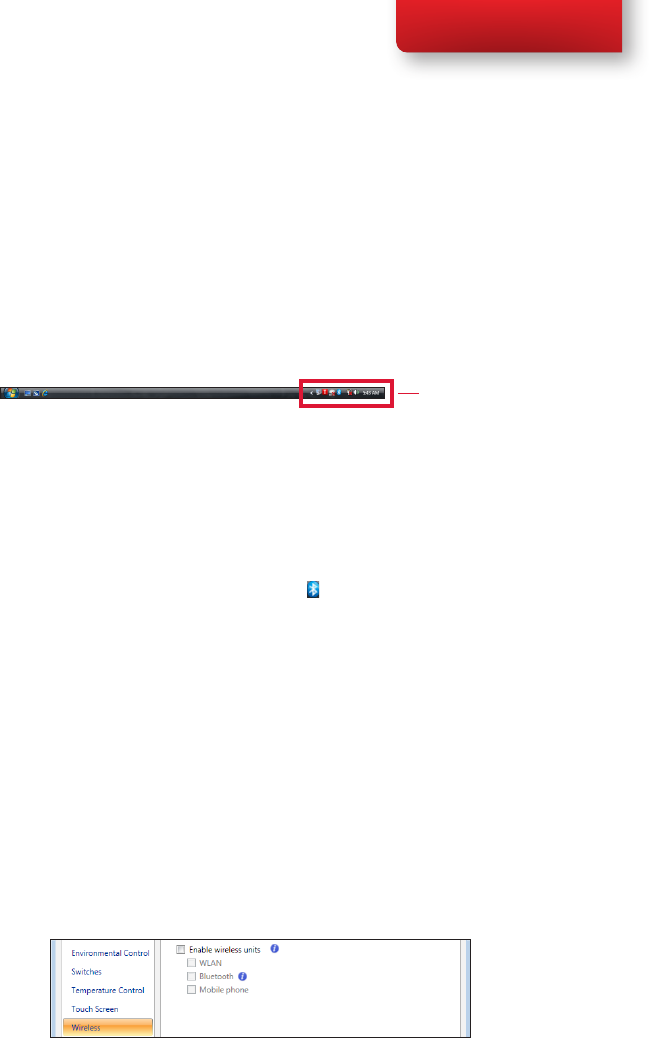
To disable Bluetooth® communication:
• Clear the Bluetooth check box or the Enable wireless units
check box for disabling all wireless units.
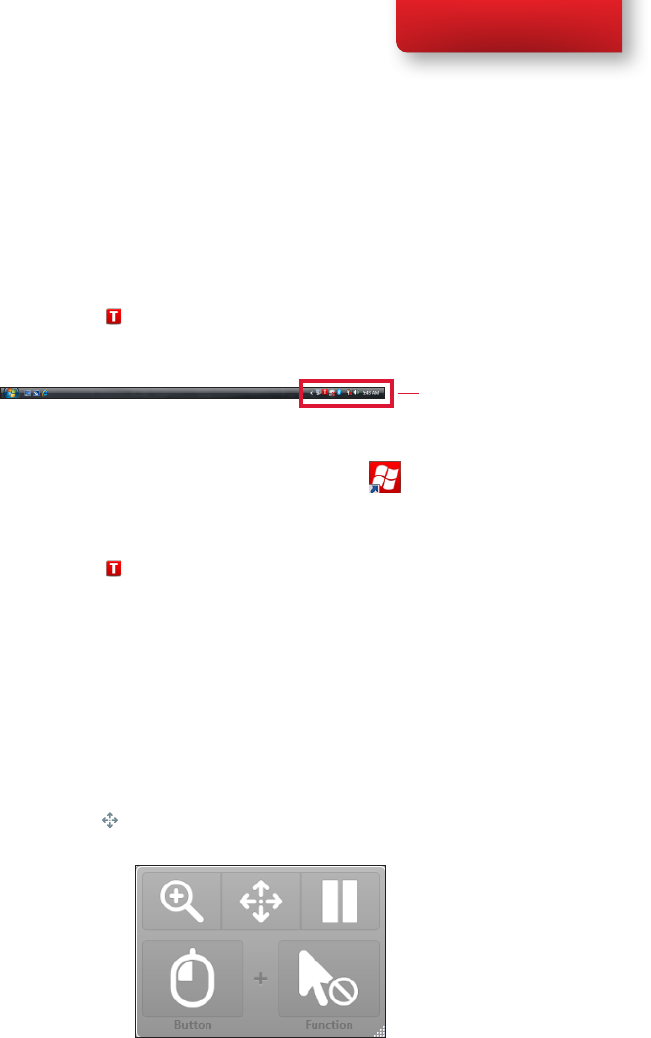
If the Bluetooth® communication is activated you can see the Bluetooth
icon in the Notication area on the desktop.
Notication Area
5.8.3 Connecting to a Bluetooth® Device
When the Bluetooth communication is activated (see above) you can
connect the C-Series device to another Bluetooth® device.
To search for available Bluetooth® devices and connect to them, use the
Bluetooth Devices in Windows 7. To access Bluetooth Devices:
• Double-click on the Bluetooth icon, , in the Notication area.
5.9 Using the WLAN (optional)
The built-in WLAN (Wireless Local Area Network) support enables
connection to a wireless network in compliance with the standard
802.11 b/g for the C8 and C12 and 802.11 b/g/n for the C15.
5.9.1 Handling Licenses
To be able to use WLAN communication, a license is required. To view
or enter a license, go to the Licenses section in the C-Series Hardware
Options.
5.9.2 Enabling and Disabling the WLAN Communication
You can enable and disable WLAN communication in the Wireless section
in the C-Series Hardware Options.
Chapter 5 Using the Tobii C-Series
34
Tobii C-Series User’s Manual
To enable WLAN communication:
1. Select the Enable wireless units check box.
2. Select the WLAN check box.
To disable WLAN communication:
• Clear the WLAN check box or clear the Enable wireless units
check box for disabling all wireless units.
5.9.3 Connecting to a WLAN
To enable WLAN communication:
1. Click on the WLAN icon, , in the Notication area on the
Desktop.
2. Select Connect to a network.
3. Select a network to connect to.
A wireless access point which supports antenna diversity is recommended
when setting up a wireless network to use with a C-Series device, for
reliable performance. Such access points are generally recognized by having
two antennas on the router device.
Using an antivirus program is strongly recommended.
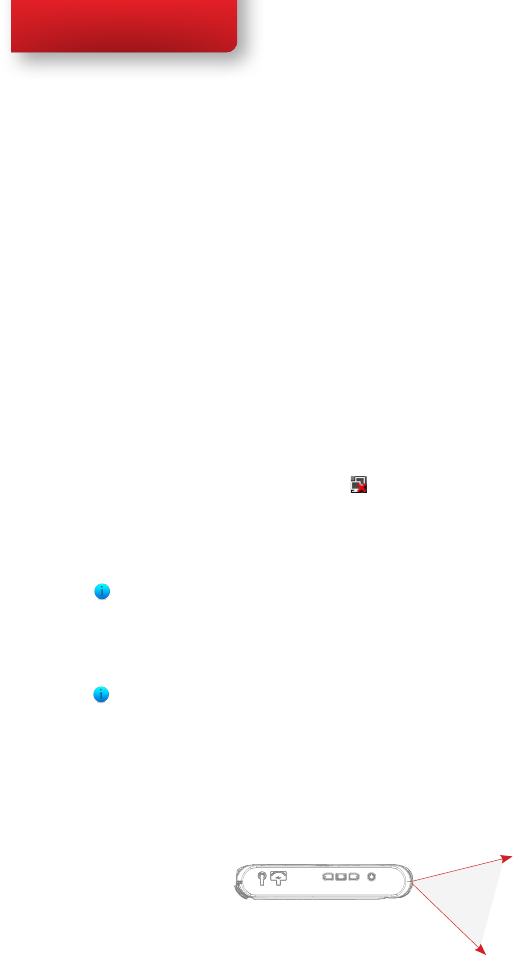
5.10 Using the Camera
The built-in camera allows you to take snapshots of items in front of the
C-Series device. On the Tobii C8, the camera is located on the top of the
device.
Chapter 5 Using the Tobii C-Series
35
Tobii C-Series User’s Manual
On the Tobii C12 and Tobii C15, it is located on the back of the device.
Refer to Tobii Communicator or alternative communication software
manuals for camera function utilization.
5.11 Using the Mobile Phone (optional)
To use the built-in Mobile phone communication feature you need a valid
SIM card from a network operator in your area. The SIM card should be
installed beneath the SIM card cover on the back of the C-Series device.
The Mobile phone feature can be used to:
• Send and receive text messages (SMS) and multimedia message
(MMS)
• Make telephone calls through synthetic voice
• Answer telephone calls through synthetic voice
5.11.1 Handling Licenses
To be able to use Mobile phone communication, a license is required.
To view or enter a license, go to the Licenses section in the C-Series
Hardware Options.
Chapter 5 Using the Tobii C-Series
36
Tobii C-Series User’s Manual
5.11.2 Enabling and Disabling the Mobile Phone
You can enable and disable Mobile phone communication in the
Wireless section in the C-Series Hardware Options.
To enable Mobile phone communication:
1. Select the Enable wireless units check box.
2. Select the Mobile Phone check box.
To disable Mobile phone communication:
• Clear the Mobile Phone check box or clear the Enable
wireless units check box for disabling all wireless units.
The SIM card must not have a security code enabled to be used with a
C-Series device.
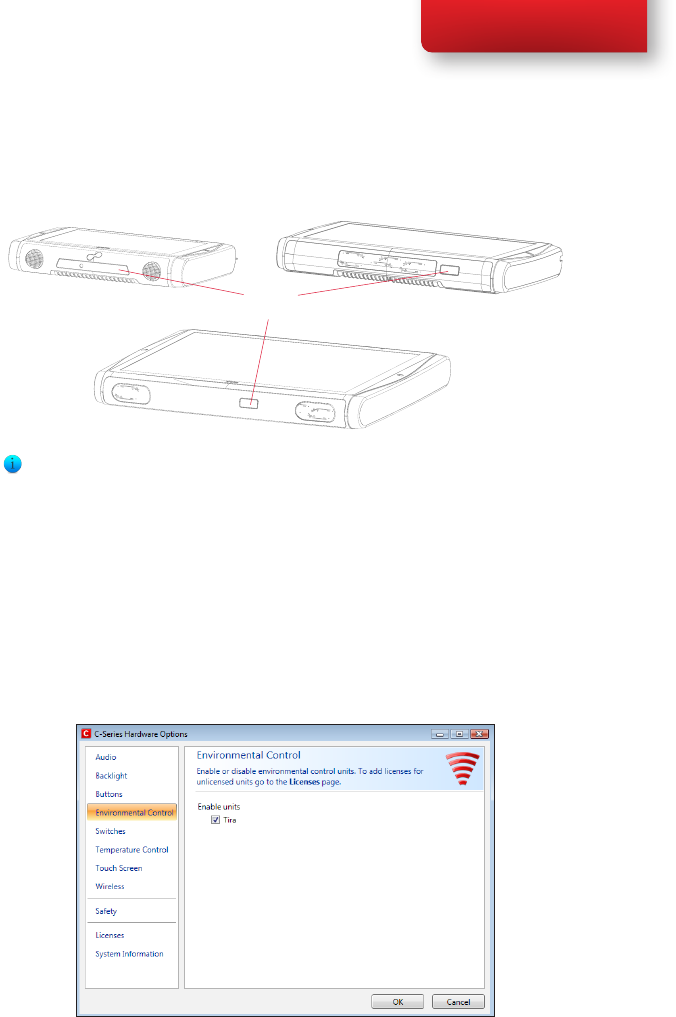
5.12 Using Environmental Control
(optional)
The C-Series device includes an environmental control unit, Tira-2.1.
The Tira is a programmable infrared device that can be used to control
equipment with IR remote controllers such as TV-sets or DVDs. Refer
to Tobii Communicator or alternative communication software manuals
on how to connect, congure and use IR remote controls.
Chapter 5 Using the Tobii C-Series
37
Tobii C-Series User’s Manual
Tira-2.1
(IR Environmental Control)
C15
C8 C12
If the device you are trying to control is not responding, try tilting the
C-Series device up or down slightly to change angle at which the IR signal is
being sent.
5.12.1 Handling Licenses
To use the Tira, a license is required. To view or enter a license, go to the
Licenses section in the C-Series Hardware Options.
5.12.2 Enabling and Disabling Tira
You can enable and disable Tira in the Environmental Control section of the
C-Series Hardware Options.
To enable Tira:
Chapter 5 Using the Tobii C-Series
38
Tobii C-Series User’s Manual
• Select the Tira check box.
To disable Tira:
• Clear the Tira check box.
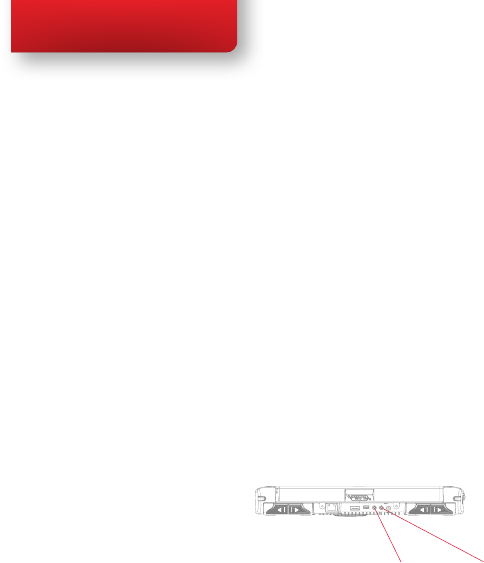
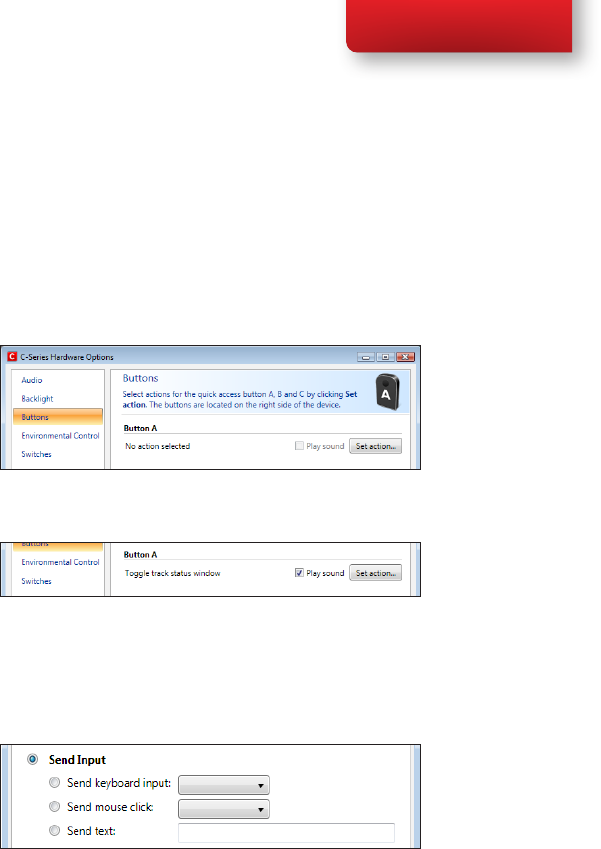
5.13 Creating Shortcuts to Actions
You can create shortcuts to tasks, called actions, by programming the
quick access buttons and connected Switches. The quick access buttons
are located on the right side of the C-Series device, named A, B and C.
Switches are connected to the Switch connectors.
Switch 1
3,5 mm mono
Switch 2
3,5 mm mono
5.13.1 Available Actions
This is a short description of each action available to set:
• Send input – Allows the user to send input to an alternative
program (keystroke, mouse click or text).
• Start Program – Allows the user to start a program.
• Volume – Allows the user to adjust the volume up or down or to
set mute on or off.
• Backlight – Allows the user increase or decrease the backlight of
the screen.
• Eye tracking – Allows the user to show and hide the track status
window, calibrate or pause the eye tracking on or off.
• Wireless – Allows the user to either set all radio connections on or
off, or a specic wireless connection.
• Touch Screen – Allows the user to turn on or off the Touch
Screen.
The available actions are the same for the quick access buttons and
Switches. To create a shortcut to an action:
1. Open the C-Series Hardware Options.
Chapter 5 Using the Tobii C-Series
39
Tobii C-Series User’s Manual
2. Select Buttons or Switches, depending on which one you want
to customize.
3. Click Set action to view the dialog box where you can select the
action you would like the button to perform. By selecting one of
the actions, the options for this action will be revealed below the
chosen action.
If you would like the quick access button to make a sound when pressed,
select the Play sound check box after having set an action.
5.13.2 Selecting Actions
Send Input – choose either to send a keyboard input, a mouse click or
specied text by clicking the option you want the device button or Switch
to perform.
• Send keyboard input – In the Send keyboard input list,
select the keystroke you want to send to an alternative program.
• Send mouse click – In the Send mouse click list, select the
desired mouse click: left, middle or right mouse click.
• Send text – In the Send text box, type the text you want to
send to an alternative program.
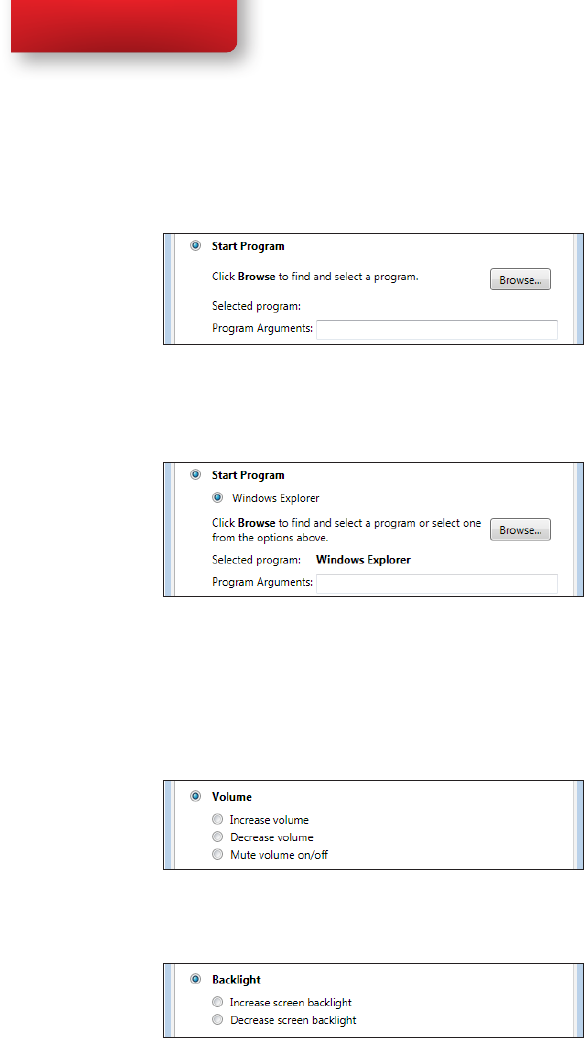
Start Program – Click Browse the rst time you are using this option to
nd and select a program.
Chapter 5 Using the Tobii C-Series
40
Tobii C-Series User’s Manual
The next time you click the Start Program option a list of previously
selected programs will be displayed. You can then directly select a program
from the list or click Browse if you want to start a program not in the list.
For the selected program it is possible to add program arguments.
However, this is normally not required. If the program should require
arguments and you do not know what to enter, please contact the company
you purchased the software from.
Volume – choose to increase, decrease or mute the volume by clicking the
preferred option.
Backlight – choose to either increase or decrease the screen backlight by
clicking the preferred option.
Eye Tracking – choose to toggle track status window, calibrate eye
Chapter 5 Using the Tobii C-Series

41
Tobii C-Series User’s Manual
tracking or toggle eye tracking on/off.
To enable this option you have to install the Tobii Eye Control Suite and a
CEye. See Tobii CEye Module chapter.
Wireless – you can either set all radio connections on/off or each
individual wireless unit on/off one by one, by clicking the options.
Touch Screen – choose to turn the touch screen on or off.
If actions for a Switch are customized both in the C-Series Hardware
Options and in Tobii Communicator or in alternative communication
software all actions will be performed simultaneously. Ensure that the
specied action for a Switch does not conict with an action set for the
same Switch in Tobii Communicator or in alternative communication
software.
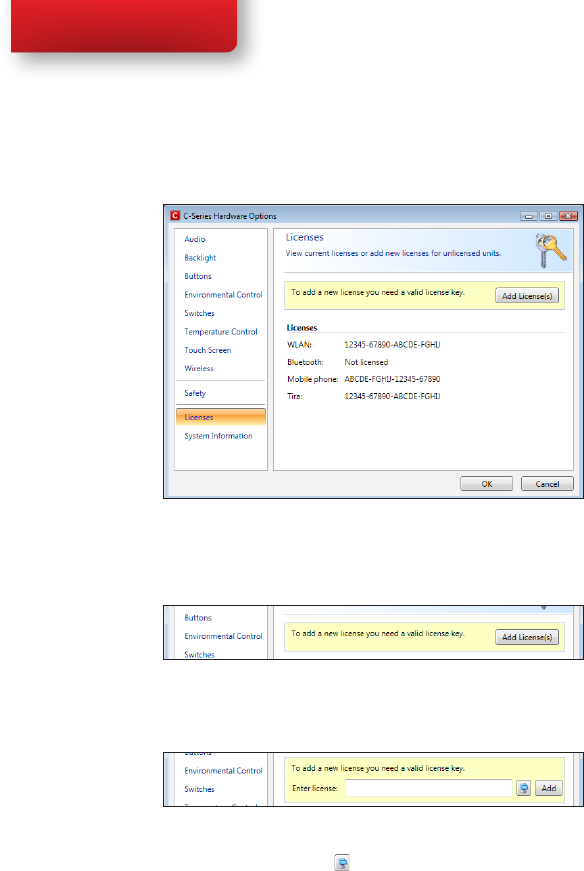
5.14 Handling Licenses
To add new and/or view existing licenses:
• Open the C-Series Hardware Options > Licenses.
Chapter 5 Using the Tobii C-Series
42
Tobii C-Series User’s Manual
To add a
license:
1. Click Add License(s).
2. In the Enter license box, type the new license and then click
Add.
For typing the license use either a connected keyboard or the on-screen
keyboard by clicking this button .
5.15 System Information
To view the version and model of the device:
1. Open the C-Series Hardware Options.
2. Select System Information. Please have this information
available if you have problems with the device and need to contact
Customer Support.
Chapter 5 Using the Tobii C-Series

43
Tobii C-Series User’s Manual
By clicking Copy all information you can paste the information into a
document (such as Notepad or WordPad) or directly into an e-mail.
5.16 Performing Backup and Restore
5.16.1 User Profile Card
The C-Series device comes with a 1GB SD card installed. The purpose
of this card is to backup personal settings and data. In the case of fatal
damage to the C-Series device, Tobii Technology can remove the SD
card and have it inserted into a new device for quick and easy retrieval
and restoration of personal data and settings.
5.16.2 Restoring Backup Files by the User
The backup les are placed in the directory Q:\Backup\<date>. The
backup process, which runs as user TobiiTaskManager, executes once a
week (every Sunday at 15.00) and the three latest backups are saved.
If your C-series device is not up and running at this time the backup will
not be performed.
The process backs up les for all users. If the backup drive does not
have enough space some les will not be backed up. Image les have the
lowest priority (backed up last). The largest le size for the backup of
individual les is 100 MB, les larger than this will be excluded.
To restore backup les, copy the folders in the directory
Q:\Backup\<date> to the C:\ drive.
Copies of these backup les can be saved anywhere you wish, to an
external hard drive, for example, or to a USB stick. Copy the folders in
the directory Q:\Backup\<date> to any external directory or drive of
your choosing.
5.16.3 Restoring the Factory Settings of a C-Series Device:
Every C-Series device has a factory image stored on the disk. If you
need to restore the device back to its original state, this can be done by
Chapter 5 Using the Tobii C-Series
44
Tobii C-Series User’s Manual
using our OEM Factory Restore Application.
Please note that this will delete any personal data or software installed after
the device was delivered.
The device will be reset to the exact same image it had when it was shipped
from Tobii
To restore the factory settings for your C-Series device, performe the
following procedure:
1. Backup your personal data such as documents and Tobii
Communicator settings etc.
2. Shut down the device
3. Connect a keyboard
4. Start up device again.
5. Press and hold F8 during startup
6. Select “Repair your computer”
7. Select the keyboard layout (language) you want
8. Select “Tobii User” and enter “Tobii” as password (Case Sensistive)
9. Select “OEM Factory Restore Application”
10. Select “Restore”.
11. Now accept the agreements and conrm the restore again with
“Yes”.
The factory restore process will now start. This will take about 30-40
minutes. After the restore process is nished, the device will be reset to
its original image. If you have ordered additional licenses after you ordered
the device, these will have to be input again. Any licenses originally ordered
together with the device will automatically be activated. Also, if the device
was ordered without a CEye module, Tobii Eye Control Suite will have to
be reinstalled if the device is intended to be used with a CEye.
Make sure you’ve connected the power supply before you start the process
- do not run the device on batteries, as it might run out of power during the
factory restore. In such a scenario, you might have to send the unit back to
Tobii for repair.
Chapter 5 Using the Tobii C-Series
45
Tobii C-Series User’s Manual
The Tobii CEye Module is an eye control unit which is designed to dock
seamlessly into a Tobii C12 or C15 (not used with C8) and operate with
precision regardless of glasses, contact lenses, eye color or light conditions.
The CEye Module enables you to control the computer with your eyes.
By looking at the screen, you control the mouse pointer and you click by
blinking, dwelling (staring at the screen for a certain length of time) or using
a Switch.
6.1 Installing the Tobii CEye Module
To enable eye control with a Tobii C12 or C15 you must rst connect the
Tobii CEye Module to the device and then install the Tobii Eye Control
Suite. See instructions below.
Do not use the table stand (or regular mounting bracket stand) with a CEye
connected.
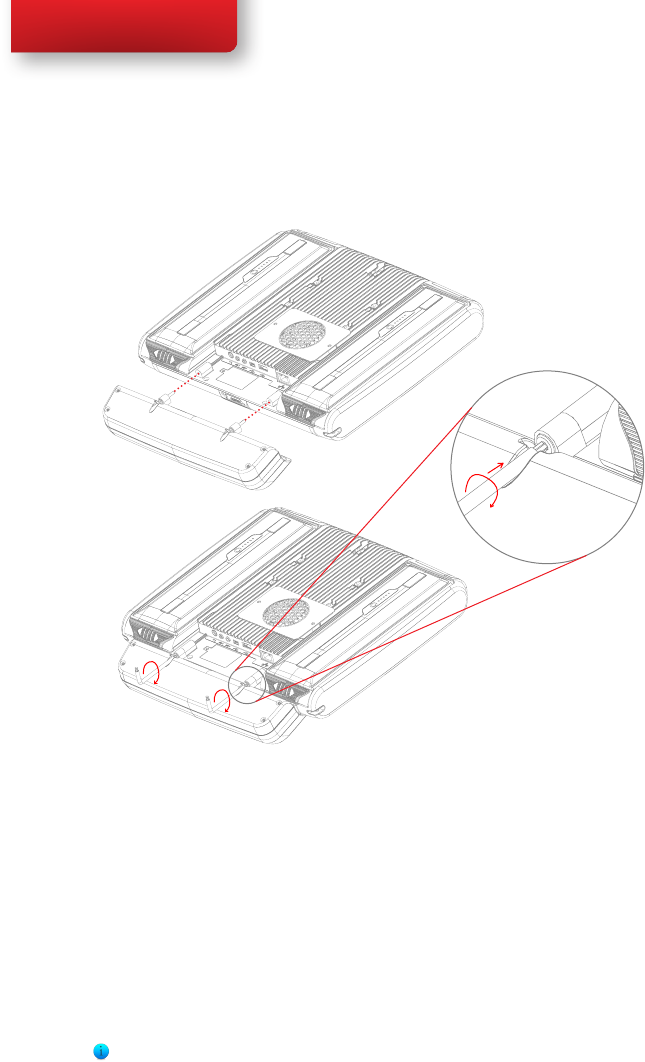
6.1.1 Mounting the CEye Module to the Tobii C12 or C15
When mounting the Tobii CEye to a Tobii C12 or C15 it is important that
the contact areas between them are clean.
Mount the CEye to the Tobii C12 or C15 in the following way:
1. Make sure that the Tobii C12/C15 is shut down.
2. Remove the power adapter and batteries.
3. Place the Tobii C12/C15 face down on a at surface.
4. Use the accompanying Torx 10 screwdriver and screws to mount
the CEye to the Tobii C12/C15.
Do not overtighten the screws, tighten until you encounter resistance.
Overtightening may increase risk for breakage and will not improve
functionality. First, screw one screw in lightly, then the second, lightly.
Second, tighten the rst screw, then the second.
Tobii CEye Module &
Eye Control6
Chapter 6 Tobii CEye Module & Eye Control
46
Tobii C-Series User’s Manual
6.1.2 Required Software
The required software for the CEye module is the Tobii Eye Control Suite.
The Tobii Eye Control Suite includes two components: the interaction
server application and a system tray application, Tobii Eye Control
Options.
The interaction server runs in the background and has no user interface.
A user interface is instead provided by the tray application, Tobii
Eye Control Options, or by Tobii Communicator or alternative
communication software. The interaction server also contains the
Windows Control application, accessible from the Tobii Eye Control
Options.
The latest required software will be on a USB stick delivered with the CEye
Module.
Chapter 6 Tobii CEye Module & Eye Control
47
Tobii C-Series User’s Manual
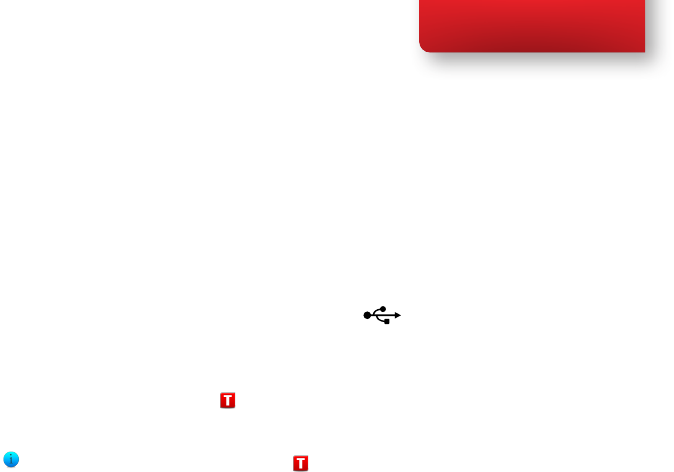
6.1.3 Installation of Eye Control Software from USB Stick
To install the latest necessary software from the USB stick, make sure the
C-Series Device is turned on, then:
1. Insert the included USB stick in one of the two USB ports on
the C-Series (marked with the USB icon, ). The AutoPlay
window opens automatically, labeled with the name of the USB
manufacturer and the drive, KINGSTON (D:).
2. Double-click on the Open folder to view les folder.
3. Double-click on the -Startup icon to start the Tobii Eye
Control Suite installation process.
Be aware that after double-clicking the -Startup icon it may take up to
a minute or so before the Tobii Eye Control Suite window will open.
Though nothing appears to be happening during this time, drivers are being
automatically installed.
4. Tobii Eye Control Suite window will open. Read the installation
information and follow the instructions (click Next, etc.). After
installation is complete, click Close.
5. Close the KINGSTON (D:) drive window
6. Remove the USB stick.
The required software is now installed onto your C-Series device. To
activate the software once your CEye module is physically attached:
• Open Tobii Communicator or your alternative communications
software, and follow the instructions provided in the respective
manuals for enabling and calibrating eye control.
To enable eye control in the Windows environment (Windows Control),
launch Tobii Eye Control Options using the following pathway:
• Start > All Programs > Tobii > Tobii Eye Control Suite >
Tobii Eye Control Options
See Accessing the Tobii Eye Control Options in this chapter of the
User’s Manual for more information.
Chapter 6 Tobii CEye Module & Eye Control
48
Tobii C-Series User’s Manual
6.2 Using the Tobii CEye Module
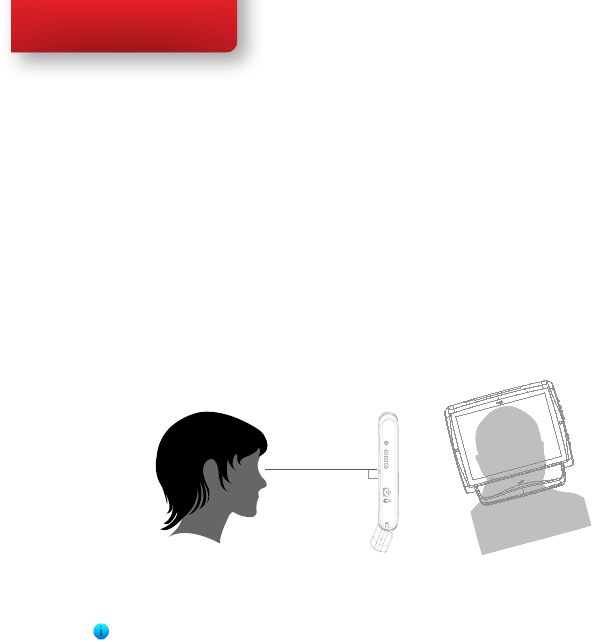
6.2.1 Positioning
The Tobii C12 or C15 with the CEye attached is designed to work optimally
when it is parallel to the user’s eyes at a distance of about 60 cm (23.5 in).
This means that for those users leaning sideways or those lying down the
C12/CEye or C15/CEye also needs to be tilted in order to keep the users
eyes parallel to the screen and at the optimal distance.
~60cm
90°
Make sure the user is placed comfortably in relation to the optimal
positioning of, and distance from, the unit. Be aware also that the user’s
comfort, as well as the Eye Tracking performance, will be enhanced if the
sun is not shining directly on the screen or into the user’s eyes.
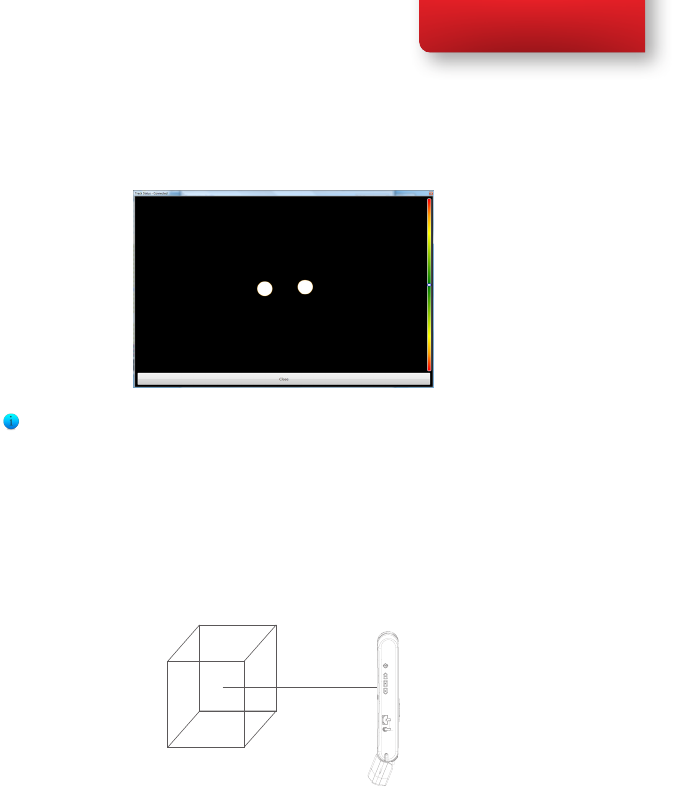
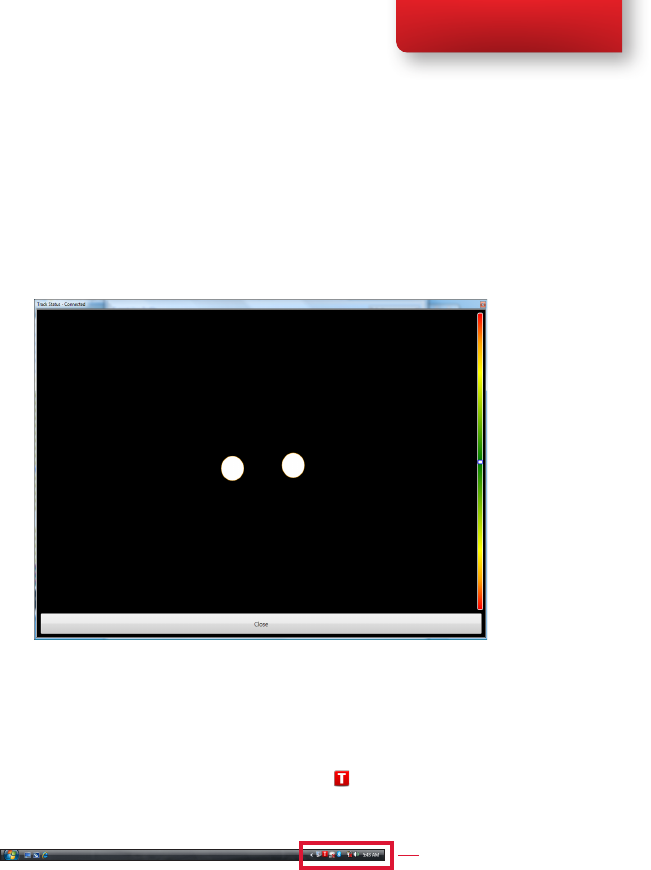
6.2.2 Track Status Viewer
Use the Track Status viewer (see Using the Tobii C-Eye
Module>Showing Track Status for more information on how open the
Track Status viewer) to help determine the optimal height and horizontal
positioning for eye tracking with the C12/CEye or C15/CEye.
• Ideally, the two dots that represent the user’s eyes should be in the
middle of the Track Status viewer.
• Use the distance meter on the right hand side of the Track Status
viewer to determine the optimal distance the user should be from
the C12/CEye or C15/CEye.
• The white bar in the distance meter should hover near the center,
within the green, when the optimal distance from the C12/CEye or
C15/CEye is reached.
Chapter 6 Tobii CEye Module & Eye Control
49
Tobii C-Series User’s Manual
For information about calibration of the CEye see Using the Tobii C-Eye
Module>Calibrating. Also check the lighting conditions, related to what
is mentioned above, when calibrating.
6.2.3 Track Box
The Tobii CEye allows for extensive head movement. Once the C12/
CEye or C15/CEye is properly calibrated and placed in front of the user, no
further adjustments are required.
30 cm
20cm
40 cm
~60cm
The Tobii CEye produces an industry leading sized track box with the
approximate dimensions of 40 cm x 30 cm 20 cm / 15.7 in x 11.8 in x 7.9
in (Width x Height x Depth). The Track Box is an invisible box positioned
approximately 60 cm (23.5 in) straight out from a point just above the
middle of the C12 screen.
In order to be tracked properly for functional Eye Tracking the user needs
at least one eye in the track box at all times.
Chapter 6 Tobii CEye Module & Eye Control
50
Tobii C-Series User’s Manual
6.2.4 Accessing the Tobii Eye Control Options
The Tobii Eye Control Options is a program for quick and easy access
to control functions such as track status, calibration and common settings.
You start Tobii Eye Control Options in one of the following ways:
• Go to Start menu > All Programs > Tobii > Tobii Eye
Control Suite > Tobii Eye Control Options.
• Double-click on the Tobii Eye Control Options icon, , in the
Notication area, or on the shortcut, , on the Desktop (if one
has been made).
• Right-click (hold nger on icon for touch screen right clicking) on
the Tobii Eye Control Options icon, , in the Notication area
and then click Settings.
In the list to the left in Tobii Eye Control Options, select which option
you want to change. In the list to the right, the available options will be
revealed.
Click OK to save changes. This will also close Tobii Eye Control Options
closes.
Click Cancel to cancel the changes. This will also close Tobii Eye Control
Options.
Click Apply to save changes. Tobii Eye Control Options will remain open.
Chapter 6 Tobii CEye Module & Eye Control
51
Tobii C-Series User’s Manual
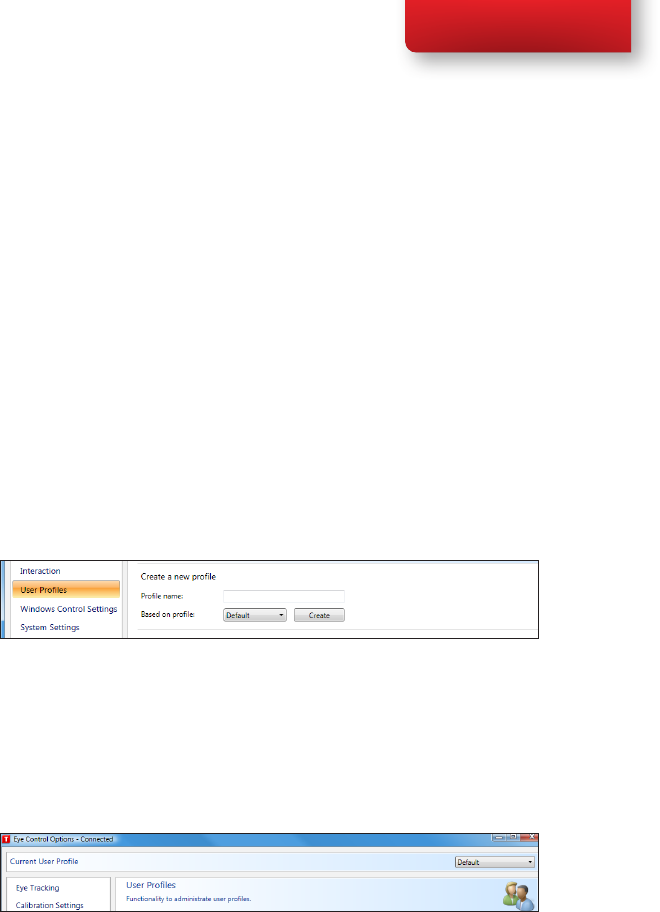
6.2.5 Creating a New Profile
Use of different proles allows you to store multiple people’s calibrations
and feedback preferences on one device. Alternatively, one person might
want to store multiple proles for him/herself if that person wears glasses
occasionally or uses multiple means of accessing the device.
To create a new prole:
1. Open Tobii Eye Control Options, click User Proles.
2. Enter a new name in the Prole name eld.
3. Select an existing prole in the Based on prole drop down list.
The new prole will inherit all settings from the selected prole.
Note that if no proles have been created previously, the only one
to select is the default prole.
4. Click Create to save the new prole. The new prole is saved
directly upon clicking Create.
6.2.6 Selecting Current User Profile
To select current user prole:
1. Open Tobii Eye Control Options.
2. Select a user prole in the Current User Prole drop down list.
3. Select Apply.
Chapter 6 Tobii CEye Module & Eye Control
52
Tobii C-Series User’s Manual
6.2.7 Deleting a Profile
To delete a prole:
1. Open Tobii Eye Control Options > User Proles.
2. Select a prole in the Prole to delete drop down list.
3. Click Delete to delete the selected prole. The prole is deleted
directly upon clicking Delete. Note that the default prole cannot
be deleted.
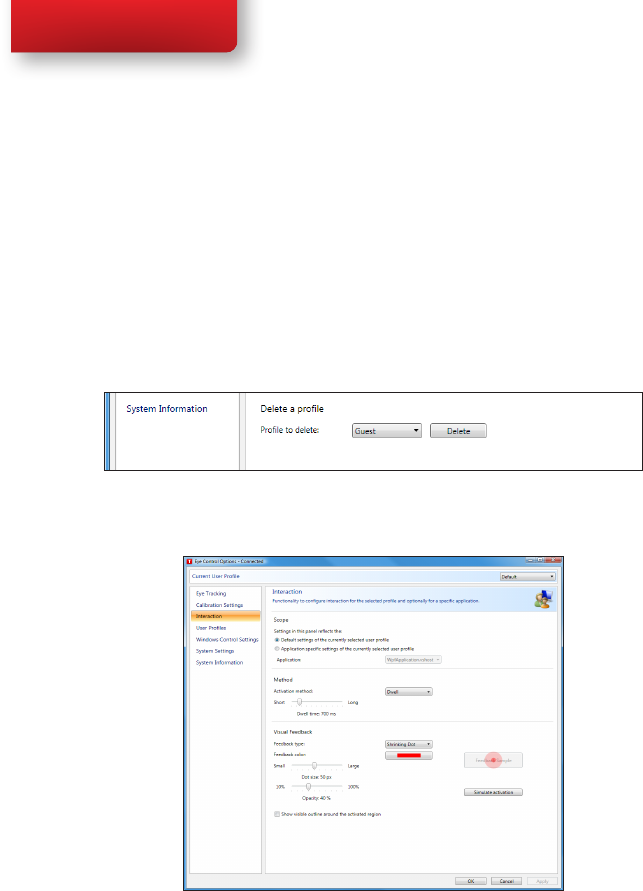
6.2.8 Customizing the Interaction
To adapt the CEye module’s interaction, follow the steps below.
1. Open Tobii Eye Control Options > Interaction.
Chapter 6 Tobii CEye Module & Eye Control

53
Tobii C-Series User’s Manual
Scope
2. Select how the interactions setting should be reected:
• Click Default settings of the currently selected user
prole if you want to apply the new settings to the whole
user prole and not only to a particular application.
• Click Application specic settings of the currently
selected user prole if you want to apply the new
settings to a specic application of a user prole. Then select
application in the Application drop down list.
Method
3. Select the activation method from the Activation method drop
down list. There are three methods available, each with different
activation times:
• Dwell. Adjust the dwell time by moving the Dwell time
slider.
• Switch. Adjust the minimum time for a click duration and the
minimum time between clicks by moving the respective slider.
• Blink. Adjust the minimum and maximum duration for a blink
by moving the respective slider.
Visual Feedback
4. Select the symbol for visual feedback from the Dwell feedback
type drop down list.
5. Select the color of the feedback symbol in the Feedback color
drop down list.
6. Specify the dot size and opacity of the feedback symbol by moving
the respective slider.
7. Select the Show visible outline around the activated region
checkbox to see a dashed line around the activated area in all
instances of eye control selection
8. Select Simulate activation if you want to see how the activation
method will appear on the screen. The example is shown above the
Simulate activation button.
Chapter 6 Tobii CEye Module & Eye Control
54
Tobii C-Series User’s Manual
6.2.9 Customizing the Calibration
To customize the calibration, follow the steps below.
1. Open Tobii Eye Control Options > Calibration Settings.
General
2. Select calibration background by clicking the background color
button and select the desired color.
3. Specify the number of points you want to calibrate with (two, ve
or nine) from the Calibration points drop down list. The higher
number of points, the more accurate the calibration.
4. Select if you want to have sound feedback or not from the Sound
feedback drop down list.
Chapter 6 Tobii CEye Module & Eye Control

55
Tobii C-Series User’s Manual
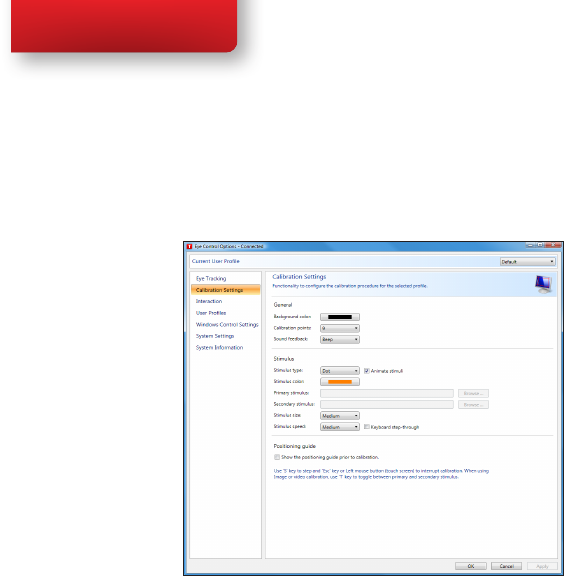
Stimulus
5. Select the stimulus type from the Stimulus type drop down list.
There are three types available, each with different customizing
options:
• Dot:
- Select color of the dot by clicking the Stimulus color
button.
- Select size of the dot by selecting from the Stimulus
size drop down list.
- Select speed of the dot by selecting from the Stimulus
speed drop down list.
• Image:
- Select primary stimulus by clicking Browse and selecting
an image.
- Select secondary stimulus by clicking Browse and
selecting an image.
- Select size of the image by selecting from the Stimulus
size drop down list.
- Select speed of the image by selecting from the
Stimulus speed drop down list.
• Video:
- Select primary stimulus by clicking Browse and selecting
a video.
- Select secondary stimulus by clicking Browse and
selecting a video.
- Select size of the video by selecting from the Stimulus
size drop down list.
- Select speed of the video by selecting from the
Stimulus speed drop down list.
6. Check the Animate stimuli check box if you want the stimuli to
be animated.
7. If you want to control the calibration, i.e. decide when to move the
calibration stimuli, with a keyboard, check the Keyboard step-
through check box.
Chapter 6 Tobii CEye Module & Eye Control
56
Tobii C-Series User’s Manual
• For Keyboard step-through, use the ‘S’ key to step (to
move the calibration stimuli) and the ‘Esc’ key, the Left mouse
button or touching the touch screen to interrupt calibration.
When using Image or Video calibration, use the ‘T’ key to
toggle between primary and secondary stimulus images.
6.2.10 Customizing the Calibration Area
Customizing the calibration area can be useful if you have discovered that
the user cannot access certain areas of the screen using eye control. By
sizing the calibration area to exclude the areas that the user cannot access it
can improve the overall calibration.
To customize the calibration area, follow the steps below:
1. Open Tobii Eye Control Options > Eye Tracking.
2. Click the Calibration Area… button.
3. A blue semi-transparent area is displayed on the desktop. You
can move and resize the blue area to make it t your preferred
calibration area.
Chapter 6 Tobii CEye Module & Eye Control
57
Tobii C-Series User’s Manual
6.2.11 Showing Track Status
The track status viewer is a window/dialog where you can verify that the
eye tracker recognizes your eyes and that you are well positioned in front
of the device.
Open the track status viewer in one of the following ways:
• Open Tobii Eye Control Options > Eye Tracking and select
the Track status button.
• Right-click (hold nger on icon for touch screen right clicking) on
the Tobii Eye Control Options icon, , in the Notication area
and select Show track status.
Notication Area
Chapter 6 Tobii CEye Module & Eye Control
58
Tobii C-Series User’s Manual
6.2.12 Calibrating
The calibration can be started in one of the following ways:
• Open Tobii Eye Control Options > Eye Tracking and then
click the Start Calibration... button.
• Right-click (hold nger on icon for touch screen right clicking) on
the Tobii Eye Control Options icon, , in the Notication area
and select Start Calibration.
Notication Area
6.2.13 Interrupting Calibration
Interrupt the calibration in one of the following ways:
• Press Esc.
• Left-click on the screen with the mouse.
• Touch the screen.
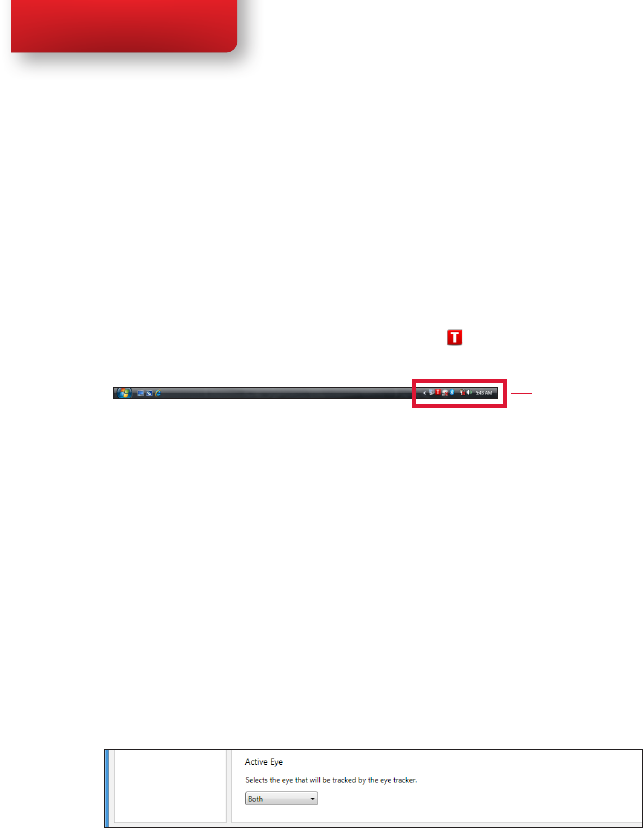
6.2.14 Customizing Active Eye
Select the eye you want to be tracked by the eye tracker by:
1. Opening Tobii Eye Control Options > Eye Tracking.
2. Selecting active eye from the Active Eye drop down list.
Note! This is done after a calibration is nished.
Chapter 6 Tobii CEye Module & Eye Control
59
Tobii C-Series User’s Manual
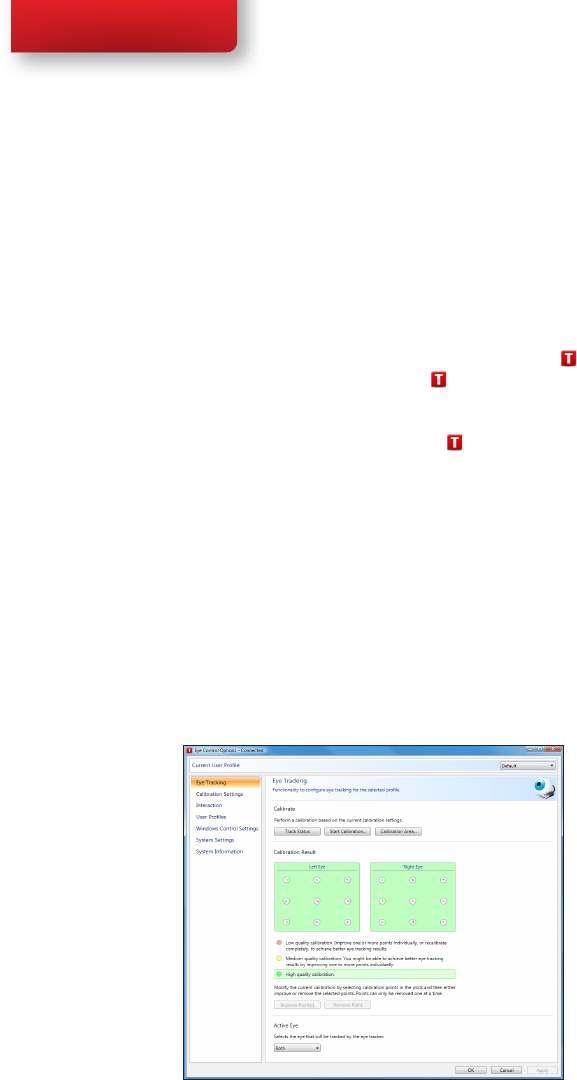
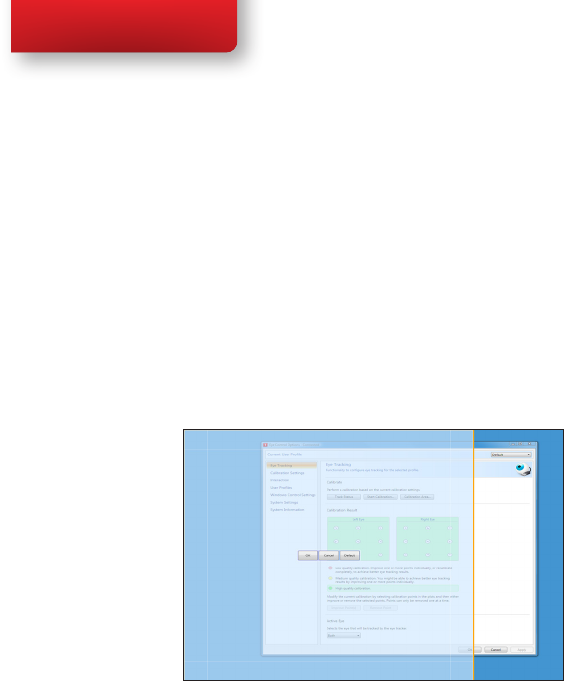
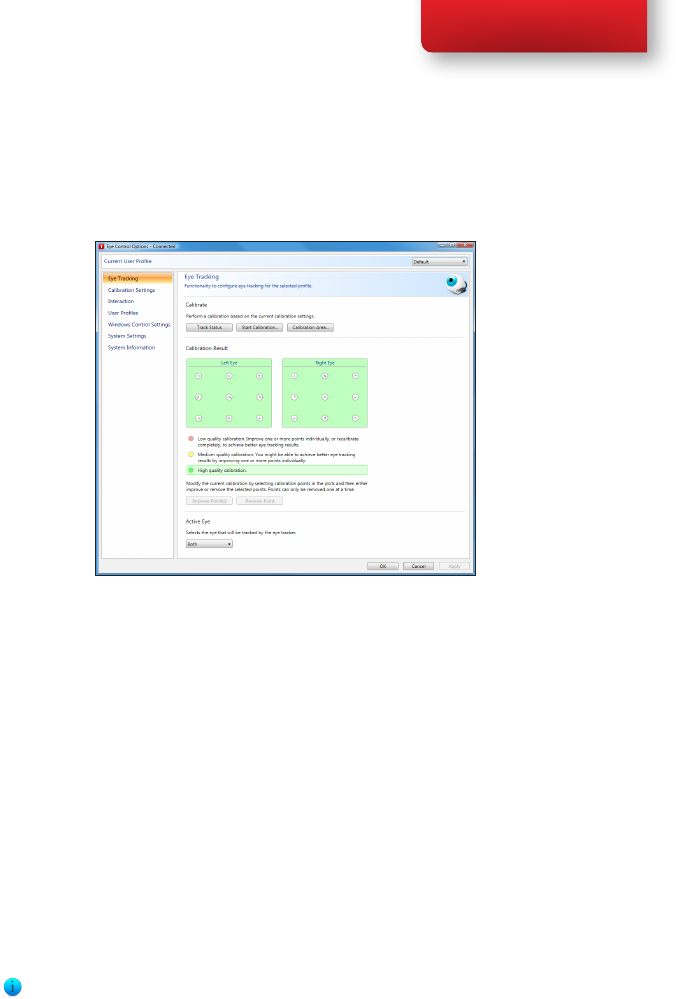
6.2.15 Improving Calibration Point(s)
After calibration, you may want to improve one or more points.
There is a color scheme used that will help you to understand the quality of
your calibration.
• If the background color of the Calibration Result is light red, you
have achieved a relatively low quality calibration. You can improve
one or more points individually, or recalibrate completely, to
achieve better eye tracking results.
• If the background color of the Calibration Result is light yellow,
you have achieved a medium quality calibration. You might be able
achieve better eye tracking results by improving one or more
points individually.
• If the background color of the Calibration Result is green, you have
achieved a high quality calibration.
Be aware that no matter what quality of calibration you have achieved you
will be able to select OK or Apply and begin using eye control. It is the
accuracy and functionality of the eye control that is affected by the quality
of the calibration results. Try for the best calibration possible.
Chapter 6 Tobii CEye Module & Eye Control
60
Tobii C-Series User’s Manual
The closer the lines within the calibration point are to a dot in the center of
the circle of the calibration point, the better the calibration is of that point,
.You can choose the points to be improved and calibrate only those
points again. Improve one or more calibration points by:
1. Opening Tobii Eye Control Options > Eye Tracking.
2. Under Calibration Result marking the point(s) you want to
improve.
3. Clicking Improve Point(s) and a calibration for the selected
point(s) will start.
6.2.16 Removing Calibration Point(s)
If there is a calibration point that is consistently bad after calibration (the
green lines are scattered all around and outside the circle of the calibration
point) you can remove that point completely from the calibration, this may
improve the calibration of the other points. Be aware that if you remove a
point, that area of the screen will be uncalibrated and eye tracking will not
function properly there.
Remove one or more calibration points by:
1. Opening Tobii Eye Control Options > Eye Tracking.
2. Under Calibration Result marking the point(s) you want to
remove.
3. Clicking Remove Point(s).
Chapter 6 Tobii CEye Module & Eye Control
61
Tobii C-Series User’s Manual
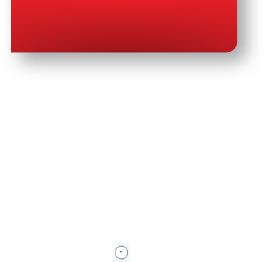
6.2.17 Customizing Windows Control
To customize Windows Control, follow the steps below:
• Open Tobii Eye Control Options > Windows Control
Settings.
Mouse control speed
• Customize the mouse control speed by moving the Mouse
control speed slider. Move the slider to the right to increase the
speed and to the left to decrease it.
Magnier size and zoom
• Customize the size of the magnier by moving the Magnier Size
slider. Move the slider to the right to increase the size and to the
left to decrease it.
• Customize the zoom factor by moving the Zoom Factor slider.
Move the slider to the right to increase the zoom factor and to the
left to decrease it.
Chapter 6 Tobii CEye Module & Eye Control
62
Tobii C-Series User’s Manual
Auto switch from right to left click
• Check this check box if you want Windows Control to
automatically switch the desired mouse click selection back to a left
click, , after a right click, , has been chosen and performed.
Auto start
• Check the Auto start windows control at boot check box
if you want Windows Control to auto start when the Tobii Eye
Control Suite starts.
Turn off scroll functionality
• Check the Turn off scroll functionality check box if you do not
want eye controlled scrolling to be active.
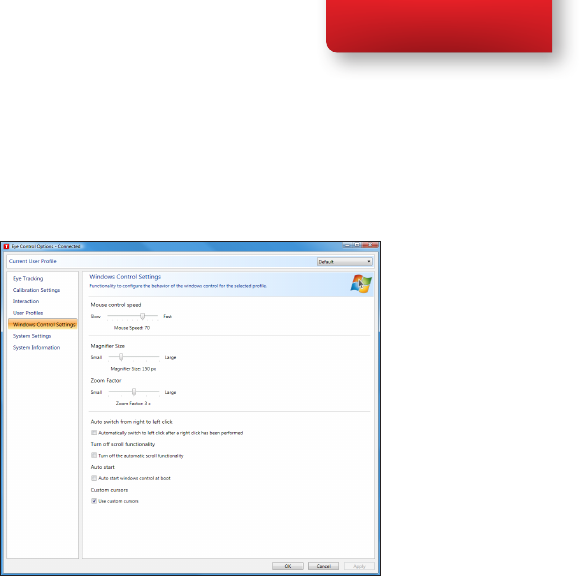
Custom cursors
Custom cursors is a feature that turns the regular mouse cursor into a
number of different cursors when using Windows Control.
The different cursors visually represent the type of “mouse click” for
eye control that you have chosen from the Windows Control Menu (for
the denitions of the Windows Control Menu symbols see Clicking
with Windows Control, Magnifying with Windows Control and
Selecting Windows Control Functions).
or + = cursor type (move cursor, no clicking)
+ = cursor type (single left click)
+ = cursor type (single right click)
+ = cursor type (double left click)
+ = cursor type (double right click)
or + = cursor types (drag) and (drop)
or + = cursor type (no movement)
Chapter 6 Tobii CEye Module & Eye Control
63
Tobii C-Series User’s Manual
• Check the Custom cursors check box to activate custom cursors
for Windows Control.
6.2.18 Starting and Disabling Windows Control
To start the Windows Control, right-click on the Tobii Eye Control
Options icon, , in the Notication area and select Enable Windows
Control.
Notication Area
Or
Select the Tobii Windows Control shortcut icon, , from your
desktop. This will immediately start Windows Control.
To disable Windows Control right-click on the Tobii Eye Control
Options icon, , in the Notication area and select Disable Windows
Control.
You can also start the Windows Control Menu from Tobii Communicator
or alternative communication software, which has implemented the
functions provided by the Tobii Eye Control SDK
6.2.19 Placing the Windows Control Menu
The menu can be placed anywhere on the desktop or docked along the
edge of the screen. You dock the Windows Control Menu by dragging it
to the edge of the screen. You can also do this by pressing and dragging
the Move icon . When the menu is docked you have to look outside the
screen to bring up the Window Control Menu items.
Chapter 6 Tobii CEye Module & Eye Control
64
Tobii C-Series User’s Manual
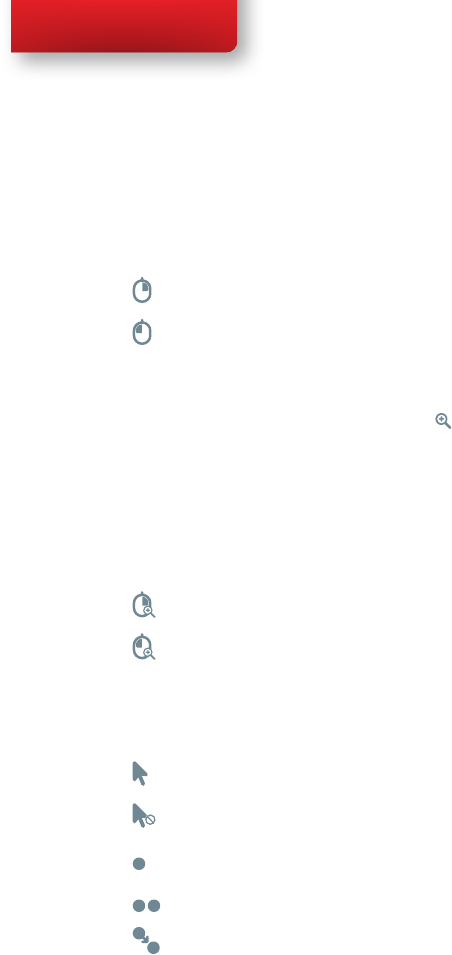
6.2.20 Clicking with Windows Control
Select what type of mouse click you want to perform from the Button
drop down list in the Windows Control Menu.
Right-click simulates a right mouse click.
Left-click simulates a left mouse click.
6.2.21 Magnifying with Windows Control
To use the magnier, select the magnier icon, , in the Windows Control
Menu.
If you want to perform a click with the magnier:
1. Select the magnier.
2. Select the other options as usual. The options will now have
changed to reect the magnication state.
Right Click Zoom
Left Click Zoom
6.2.22 Selecting Windows Control Functions
You can set different functions for clicking:
Mouse cursor
No cursor movement on screen
Single-click
Double-click
Drag and drop
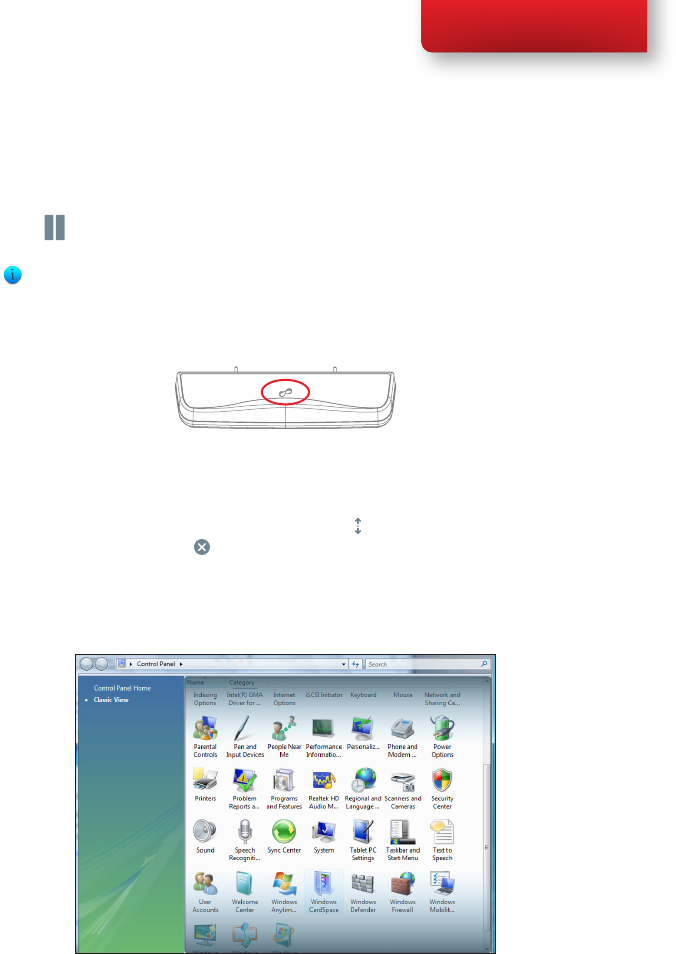
6.2.23 Pausing Windows Control
To pause Windows Control select the Pause icon in the Windows Control
Menu.
Chapter 6 Tobii CEye Module & Eye Control
65
Tobii C-Series User’s Manual
Pause
When Windows Control is not enabled, pausing eye control can also be
accomplished by looking at (about) the Tobii logo at the bottom/center of
the Tobii CEye,then selecting, using eye control, the pause icon that pops
up.
6.2.24 Scrolling with Windows Control
The scroll buttons appear automatically in the upper right corner in any
object which can be scrolled. The buttons will only appear on the window
which has focus. To activate the scroll press the icon. If the buttons are in
the way you can use the icon to hide them.
When scroll mode is activated you will see a shaded gradient over the
window which will be scrolled.
To scroll, look at the top or bottom of this gradient area.
Scroll functionality can be turned off in Tobii Eye Control Options >
Windows Control Settings > Turn off scroll functionality.
Chapter 6 Tobii CEye Module & Eye Control

66
Tobii C-Series User’s Manual
7.1 Temperature & Humidity
7.1.1 General Use
The Tobii C-series and CEye is best kept in dry conditions at room
temperature. The recommended range for temperature and the humidity
value for the device is as follows:
Portable mode:
• Temperature: 0°C to 30°C (32°F to 86°F)
• Humidity: Max 70% (no condensation on the device)
Mounted mode:
• Temperature: 0°C to 40°C (32°F to 104°F)
• Humidity: Max 70% (no condensation on the device)
7.1.2 Transportation and Storage
For transportation and storage excluding batteries the recommended
range for temperature and the humidity value for the device is as follows:
• Temperature: -40°C to 70°C (-40°F to 158°F)
• Humidity: 20% to 70% (no condensation on the device)
The Tobii C-series and CEye is not waterproof or water resistant. The
device should not be kept in excessively humid, damp or otherwise wet
conditions. Do not submerge the device in water or in any other liquid. Be
careful not to allow liquids to be spilled upon the device.
7.2 Changing the Side Covers
To remove the side covers:
1. Shut down the C-series.
2. Remove the power adaptor and batteries (See Installing and
Releasing the Batteries)
3. Place the C-Series device face down on a at surface with the side
cover you wish to remove facing away from you.
4. Take a rm grip on the top and bottom of the device and push the
Product Care7
Chapter 7 Product Care
67
Tobii C-Series User’s Manual
two protruding plastic tabs away from you with your thumbs. With
some pressure the tabs should release and the side cover should
come off.
To reapply the side covers:
1. Place the C-Series device face down on a at surface with the side
cover you wish to apply facing away from you.
2. Place the plastic tabs in their slots on the device.
3. Press the side cover onto the side of the device. You should hear a
click when it has fastened.
When reapplying the side cover to the side of the device with the power
button, be sure that the power button (and other buttons) makes it’s way
through the hole in the side cover and is not stuck under it. Otherwise the
device might not start, as the power button may be registered as pressed.
7.3 Cleaning
Before cleaning the C-Series device shut it down, unplug all cables and
remove the batteries. Use a soft, slightly damp, lint-free cloth. Avoid getting
moisture in openings on the device. Don’t use window cleaners, household
cleaners, aerosol sprays, solvents, alcohol, ammonia, or abrasives to clean
the device.
Chapter 7 Product Care
68
Tobii C-Series User’s Manual
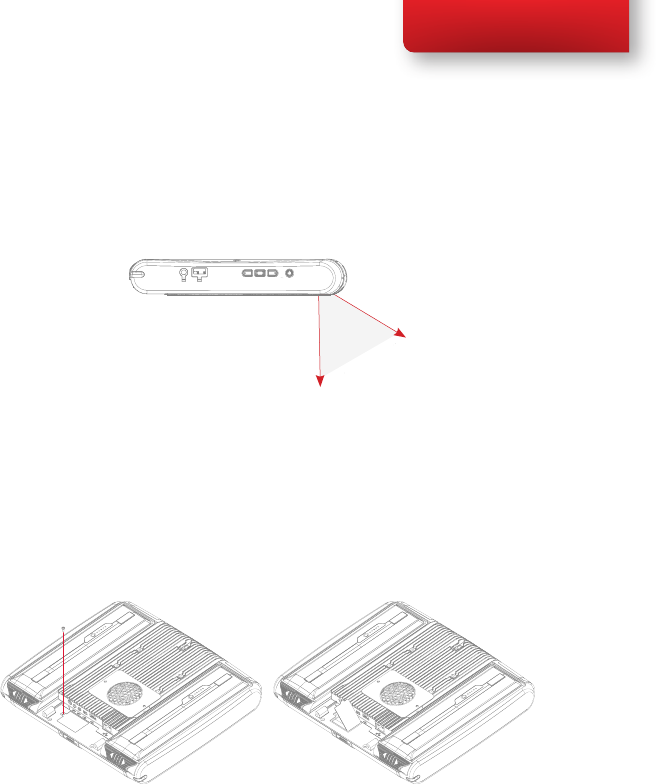
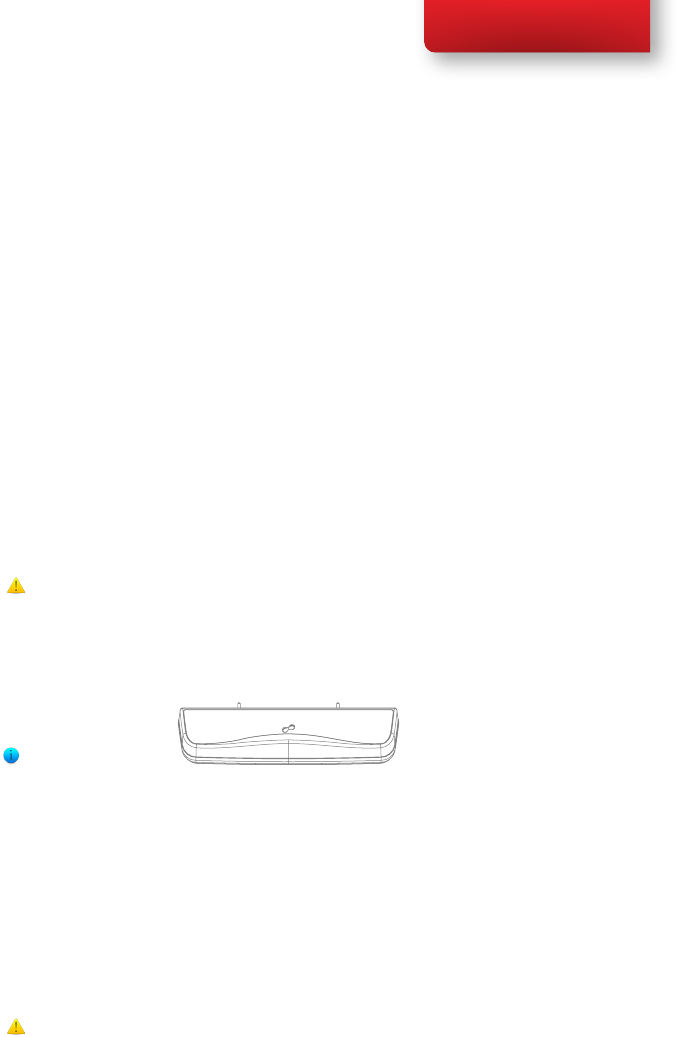
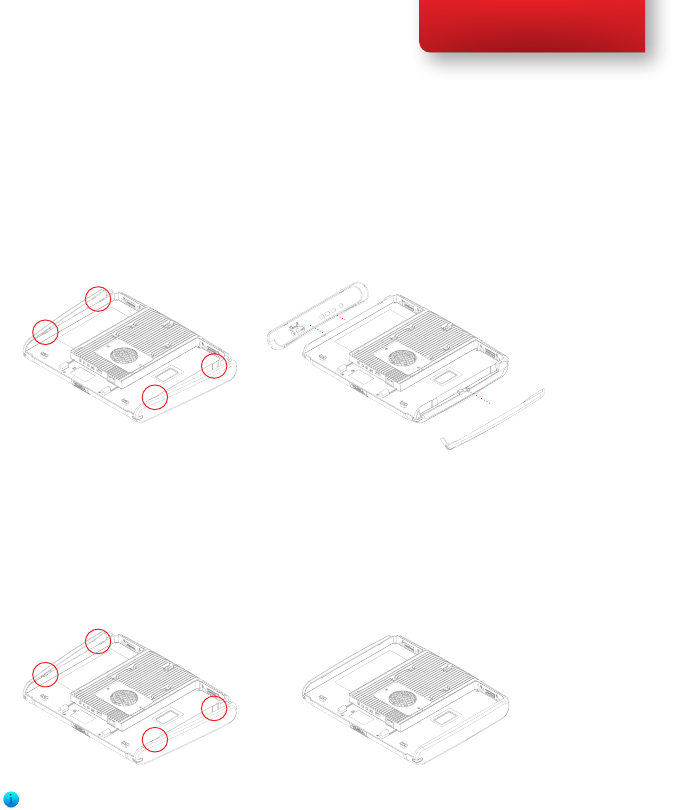
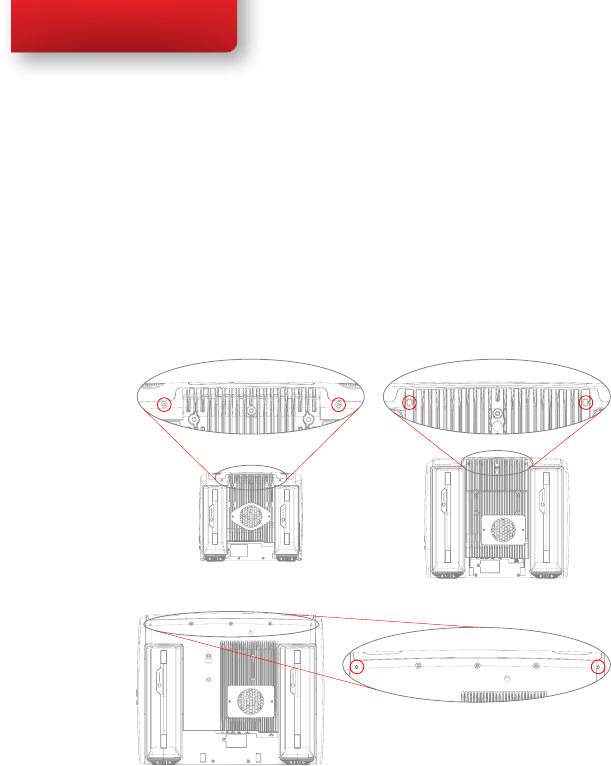
7.3.1 Cleaning of the Speaker Mesh
Spray the speaker mesh carefully with a water and dish soap mixture using a
misting spray bottle. Wipe the mesh clean. If excess moisture gets into the
speaker housing, make sure that it drains through the drainage holes (see
illustration) in the back of the device.
C8 C12
C15
7.4 Placement
Only use the arms and stands specied by the supplier and make sure that
they are mounted and fastened correctly according to the instructions. Do
not place the device on unstable and uneven surfaces.
Do not cover the ventilation opening on the back of the device, with the fan
underneath. If this opening is covered, built up heat may cause failure and be
a possible re hazard.
Chapter 7 Product Care

69
Tobii C-Series User’s Manual
7.5 Transporting the C-Series Device
Disconnect all the cables and either hold the device with both hands while
carrying it, or use the included carrying strap/shoulder strap (the carrying
strap/shoulder strap is not included for the C15).
When you transport the device for repair, shipment or traveling, use the
original casing and packaging materials.
If you have attached a CEye to a C12 or C15 device, do not carry the
connected devices by solely gripping the CEye. The CEye attachment points
may not hold the weight of the C12 or C15, and the devices could break
apart causing permanent damage to both and causing the C12 or C15 to fall.
7.6 Disposing of the Batteries
Do not dispose of the batteries in general household or ofce waste.
Follow your local regulations for the disposal of batteries.
7.7 Disposing of the C-Series Device
Do not dispose of the C-Series Device in general household or ofce
waste. Follow your local regulations for the disposal of electrical and
electronic equipment.
Chapter 7 Product Care
70
Tobii C-Series User’s Manual
8.1 Appendix A: Training Resources
Tobii offers a range of training resources for the C-Series products and
related communication products. You can nd them on the Tobii website,
www.tobii.com, including Getting Started Guides, webinars and Quick
guides. The C-Series Getting Started Guide is delivered with, and stored
on, the device.
8.2 Appendix B: CEye - Software License
The CEye module contains open source software. Please refer to the
attached license document for terms and conditions.
8.3 Appendix C: Compliance Information
8.3.1 FCC Statment
This device complies with Part 15 of the FCC Rules. Operation is subject
to the following two conditions: (1) this device may not cause harmful
interference, and (2) this device must accept any interference received,
including interference that may cause undesired operation.
Modications not expressly approved by Tobii Technology could void the
user’s authority to operate the equipment under FCC rules.
This equipment has been tested and found to comply with the limits for a
Class B digital device, pursuant to part 15 of the FCC Rules. These limits
are designed to provide reasonable protection against harmful interference
in a residential installation. This equipment generates, uses and can radiate
radio frequency energy and, if not installed and used in accordance with the
instructions, may cause harmful interference to radio communications.
However, there is no guarantee that interference will not occur in a
particular installation. If this equipment does cause harmful interference
to radio or television reception, which can be determined by turning
the equipment off and on, the user is encouraged to try to correct the
interference by one or more of the following measures:
Appendices8
Chapter 8 Appendices

71
Tobii C-Series User’s Manual
• Reorient or relocate the receiving antenna.
• Increase the separation between the equipment and receiver.
• Connect the equipment into a wall outlet on a circuit different from
that to which the receiver is connected.
• Consult the dealer or experienced radio/TV technician for
assistance.
8.3.2 Radio Wave Exposure and Specific Absorption Rate
(SAR) Information
The C-Series device has been tested as a Class 1 Medical Device. Medical
electrical equipment such as this requires special caution regarding Electro-
magnetic Compatibility (EMC) and thus needs to be installed and placed
into service according to the information provided in this manual.
Using other cables and accessories other than those provided or that are
integrated in the device may affect EMC performance.
The SAR (Specic Absorbtion Rate) limit as dictated by the FCC (in
the USA) is 1.6W/kg averaged over 1 gram of tissue. In Europe/EU (CE
regulations) it is 2.0 W/kg averaged over 10 grams of tissue. The Devices,
Tobii C8 (FCC ID: W5MTOBIIC8), Tobii C12 (FCC ID: W5MTOBIIC12B)
and Tobii C15 (FCC ID:W5MTOBIIC15) have been tested against
these SAR limits to maintain compliance with FCC/CE RF exposure
requirements.
This equipment complies with FCC RF radiation exposure limits set forth
for an uncontrolled environment.
The highest SAR value for the C8 device is: 1.025 W/kg. The highest SAR
value for the C12 device is 0.107 W/kg. The highest SAR value for the C15
device is 0.16 W/kg.
Chapter 8 Appendices
72
Tobii C-Series User’s Manual
Chapter 8 Appendices
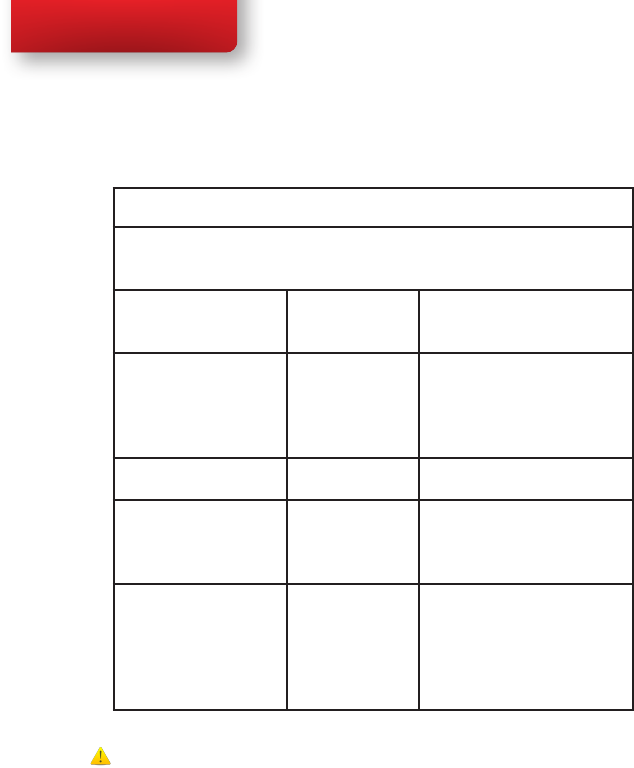
Guidance and manufacturer’s declaration – electromagnetic emissions
The C-Series is intended for use in the electromagnetic environment specied below. The
customer or the user of the C-Series device should assure that it is used in such an environment.
Emissions Test Compliance Electromagnetic environment –
guidance
RF (Radio Frequency)
emissions CISPR 11
Group 1 The C-Series must emit
electromagnetic energy in order to
perform its intended function. Nearby
electronic equipment may be affected
RF emissions CISPR 11 Class B
Harmonic emissions
IEC 61000-3-2
Not Applicable The product has an active power of
P≤75 W at rated load conditions.
Therefore no limits are applicable.
Voltage Fluctuations/icker
emissions IEC 61000-3-3
Not Applicable The product has an active power of
P≤75 W at rated load conditions.
Therefore it is not likely to produce
voltage uctuations or icker above
the limit values.
The C-Series device should not be used adjacent to or stacked with other
equipment.
73
Tobii C-Series User’s Manual
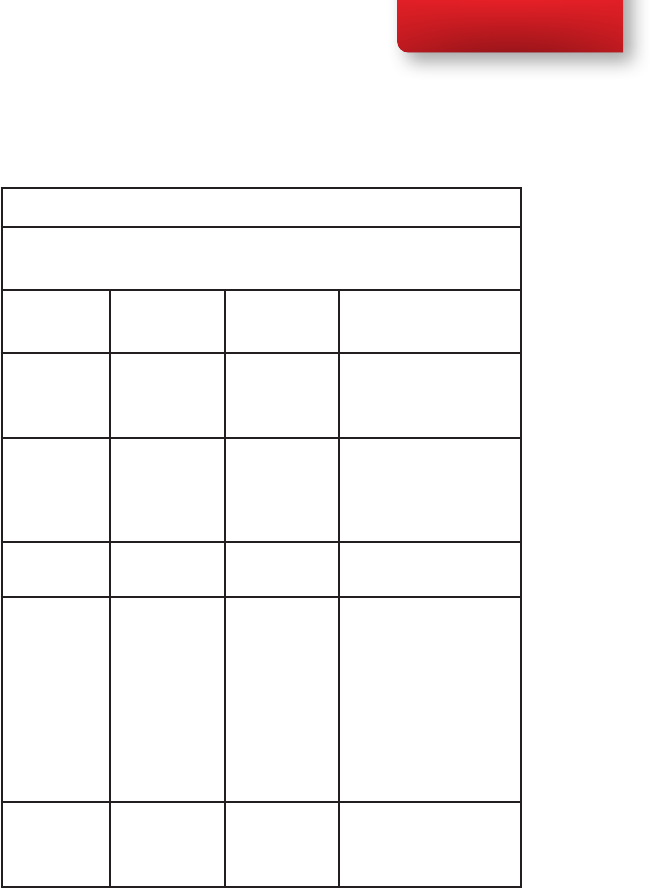
Guidance and manufacturer’s declaration – electromagnetic immunity
The C-Series device is intended for use in the electromagnetic environment specied below. The
customer or the user of the C-series device should assure that it is used in such an environment.
IMMUNITY
test
IEC 60601 test
level
Compliance
level
Electromagnetic
environment – guidance
Electrostatic
discharge (ESD)
IEC 61000-4-2
± 6 kV contact
± 8 kV air ± 6 kV contact
± 8 kV air
Floors should be wood,
concrete or ceramic tile.
If oors are covered with
synthetic material, the relative
humidity should be at least 30 %.
Electrical fast
transient/burst
IEC 61000-4-4
± 2 kV for power
supply lines
± 1 kV for input/
output lines
± 2 kV for power
supply lines
± 1 kV for input/
output lines
Mains power quality should be
that of a typical commercial or
hospital environment.
Surge
IEC 61000-4-5
± 1 kV line to line
± 1 kV line to line
Mains power quality should be
that of a typical commercial or
hospital environment.
Voltage
dips, short
interruptions and
voltage variations
on power supply
input lines.
IEC 61000-4-11
< 5 % UT (>95 %
dip in UT) for 0.5
cycles.
40 % UT (60 % dip
in UT) for 5 cycles.
70 % UT (30 %
dip in UT) for 25
cycles.
< 5 % UT (>95 %
dip in UT) for 5 s
< 5 % UT (>95 %
dip in UT) for 0.5
cycles.
40 % UT (60 % dip
in UT) for 5 cycles.
70 % UT (30 %
dip in UT) for 25
cycles.
< 5 % UT (>95 %
dip in UT) for 5 s
Mains power quality should be
that of a typical commercial or
hospital environment. If the
user of the C-Series device
requires continued operation
during mains interruptions, it is
recommended that the C-Series
device batteries are in place
or that the device be powered
from an uninterruptable power
supply (UPS).
UT is at 100 VAC 60 Hz or 230
VAC 50Hz.
Power frequency
(50/60 Hz)
magnetic eld
IEC 61000-4-8
3 A/m 3 A/m Power frequency magnetic elds
should be at levels characteristic
of a typical location in a
typical commercial or hospital
environment.
Chapter 8 Appendices
74
Tobii C-Series User’s Manual
Chapter 8 Appendices
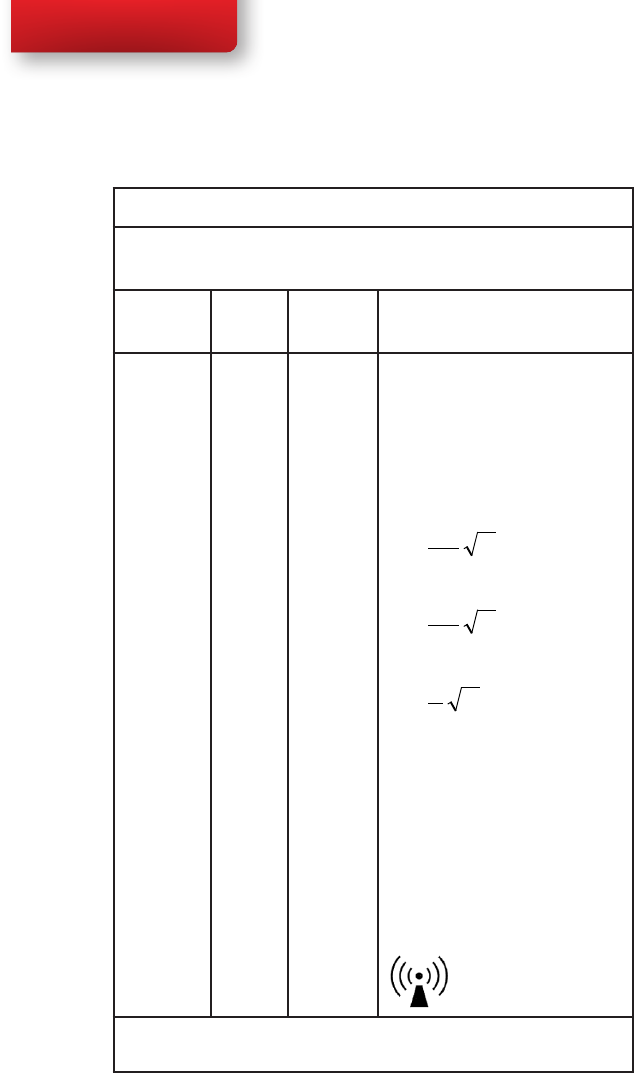
Guidance and manufacturer’s declaration – electromagnetic immunity
The C-Series device is intended for use in the electromagnetic environment specied below. The
customer of the user of the C-Series device should assure that it is used in such an environment.
Immunity
test
IEC 60601
test level
Compliance
level
Electromagnetic environment -
guidance
Conducted RF
IEC 61000-4-6
Radiated RF
IEC 61000-4-3
3 Vrms
150 kHz to
80 MHz
3 V/m
80 MHz to
2.5 GHz
3 V
3 V/m
Portable and mobile RF communications
equipment should be used no closer to any
part of the C-Series device, including cables,
than the recommended separation distance
calculated from the equation applicable to the
frequency of the transmitter.
Recommended separation distance
Pd
3
5.3
=
for 150 kHz to 80 MHz
Pd
3
5.3
=
for 80 MHz to 800 MHz
Pd
3
7
=
for 800 MHz to 2.5 GHz
where “P” is the maximum output power
rating of the transmitter in watts (W)
according to the transmitter manufacturer and
“d” is the recommended separation distance
in meters (m).
Field strengths from xed RF transmitters, as
determined by an electromagnetic site survey,a
should be less than the compliance level in each
frequency range. b
Interference may occur in the vicinity of
equipment marked with the following symbol.
NOTE 1 At 80MHz and 800MHz, the higher frequency range applies.
NOTE 2 These guidelines may not apply in all situations. Electromagnetic propagation is affected
by absorption and reected from structures, objects and people.
75
Tobii C-Series User’s Manual
a. Field strengths from xed transmitters, such as base stations for radio (cellular/cordless)
telephones and land mobile radios, amateur radio, AM and FM radio broadcast and TV
broadcast cannot be predicted theoretically with accuracy. To assess the electromagnetic
environment due to xed RF transmitters, an electromagnetic site survey should be
considered. If the measured eld strength in the location in which the C-Series device
is used exceeds the applicable RF compliance level above, the C-Series device should be
observed to verify normal operation. If abnormal performance is observed, additional
measures may be necessary, such as reorienting or relocating the C-Series device.
b. Over the frequency range 150 kHz to 80 MHz, eld strengths should be less than 3 V/m.
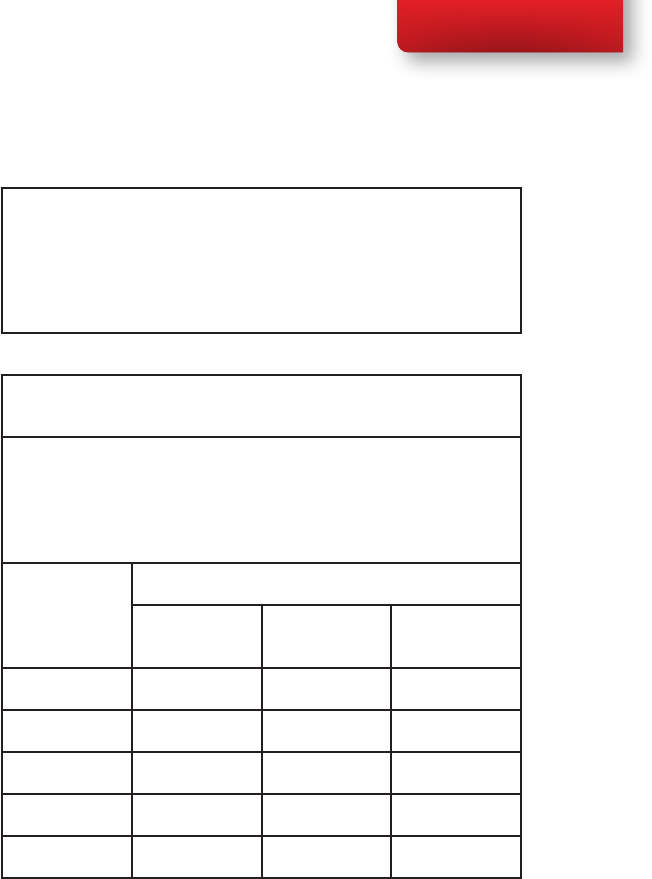
Recommended separation distances between portable and mobile RF (Radio
Frequency) communications equipment and the C-Series device.
The C-Series device is intended for use in the electromagnetic environment in which radiated RF
disturbances are controlled. The customer or the user of the C-Series device can help prevent
electromagnetic interference by maintaining a minimum distance between portable and mobile
RF communication equipment (transmitters) and the C-Series device as recommended below,
according to the maximum output power of the communications equipment.
Rated maximum
output power of
transmitter
W
Separation distance according to frequency of transmitter
150 kHz to 80 MHz 80 MHz to 800
MHz
800 MHz to 2.5
GHz
0.01 0.12 m 0.12 m 0.24 m
0.1 0.37 m 0.37 m 0.74 m
11.2 m 1.2 m 2.4 m
10 3.7 m 3.7 m 7.4 m
100 11.7 m 11. 7 m 23.4 m
Under test specications specied in 6.2.1.10 EN 60 601-1-2 (2007) the
C-Series device shall not:
• Exhibit component failure
• Exhibit changes in its programmable parameters
• Reset unintentionally to factory defaults
• Emit false alarms
• Initiate any unintended operation, even if accompanied by alarm
Chapter 8 Appendices

76
Tobii C-Series User’s Manual
Chapter 8 Appendices
With regard to the test specications specied in 6.2.1.10 EN 60 601-1-2
(2007) the cessation or interruption of any intended operation, even if
accompanied by an alarm, is allowed in the C-Series device due to it not
performing any safety critical operations.
Also with regard to the test specications specied in 6.2.1.10 EN 60 601-
1-2 (2007) errors of a displayed numerical value sufciently large to affect
diagnosis or treatment is not applicable for the C-Series device.
In order to maintain compliance as a Class 1 Medical device, the switches
that are used in combination with the C-Series device must fulll the
isolation requirements of IEC/EN 60601-1 based on 15 V DC. They must
be electrically oating switches (switches that are not grounded).
8.3.3 Industry Canada Statement
This device complies with Industry Canada licence-exempt RSS standard(s).
Operation is subject to the following two conditions: (1) this device may
not cause interference, and (2) this device must accept any interference,
including interference that may cause undesired operation of the device.
Le présent appareil est conforme aux CNR d’Industrie Canada applicables
aux appareils radio exempts de licence. L’exploitation est autorisée aux
deux conditions suivantes : (1) l’appareil ne doit pas produire de brouillage,
et (2) l’utilisateur de l’appareil doit accepter tout brouillage radioélectrique
subi, même si le brouillage est susceptible d’en compromettre le
fonctionnement.
This device has been tested to the safety requirements for exposure
to radio waves (SAR) in RSS-102 to the General Public (Uncontrolled
Environment) limits (1.6W/Kg). The highest SAR value for the C8 device
is: 1.025 W/kg. The highest SAR value for the C12 device is 0.107 W/kg.
The highest SAR value for the C15 device is 0.16 W/kg. This device can be
operated safely with a minimum distance 0cm between the equipment and
the user’s body.
Ce dispositif a été testé aux exigences de sécurité pour l’exposition aux
ondes radio (SAR) dans le CNR-102 à le grand public (environnement non
contrôlé) des limites (1.6W/Kg). La valeur maximale mesurée est de SAR
pour le C8 dispositif est: 1.025 W/kg. La valeur maximale mesurée est de
SAR pour le C12 dispositif est: 0.107 W/kg. La valeur maximale mesurée

77
Tobii C-Series User’s Manual
Chapter 8 Appendices
est de SAR pour le C15 dispositif est: 0.16 W/kg. Ce dispositif peut être
exploité en toute sécurité avec un 0cm distance minimale entre le matériel
et les corps de l’utilisateur.
This Class B digital apparatus complies with Canadian ICES-003.
Cet appareil numérique de la classe B est conforme à la norme NMB-003
du Canada.

78
Tobii C-Series User’s Manual
8.4 Appendix D: Technical Specifications
Tobii C8 Tobii C12 Tobii C15
Model T-C84-R1.0A-V0T-C12-R1.0A-V1T-C15-R1.0A-V0
Screen 8.4” resistive touch,
CCFL backlit
12.1” resistive touch,
CCFL backlit
15.0” resistive touch,
LED backlit
Screen resolution 800 x 600 pixels 1024 x 768 pixels 1024 x 768 pixels
Dimensions
(WxHxD)
9.4” x 7.9” x 1.5”
23,9 x 20,1 x 3,8 cm
12.3” x 10.4” x 1.8”
31,2 x 26,4 x 4,6 cm
14.6” x 11.8” x 2.2”
37,0 x 30,0 x 5,7 cm
Weight 4.0 lbs
1,8 kg
6.5 lbs
2,9 kg
8.8 lbs
4,0 kg
Speakers 2 integrated 2 pairs integrated
Microphones 2 integrated
Processor Intel Core Duo U2500 / 1,2 GHz
RAM 2GB DDR2
Operating system Microsoft Windows 7
Hard disk drive 60GB
SD Card 1GB
Connectors
2 x USB 2.0
1 x Mini USB 2.0
Ethernet (1 x RJ45)
2 x 1/8” Switch
1 x 1/8” Headphone (stereo)
1 x DC in 2.5/5.5 mm
WLAN (optional) IEEE 8 0 2 .11 b/g IEEE 802.11 b/g/n
Bluetooth
(optional) Class 2 v2.1 + EDR
Mobile Phone /
GSM (optional)
Tri-band (900, 1800,
1900 MHz) Quad-band (850, 900, 1800, 1900 MHz)
ECU
(Environmental
Control Unit)
Tira-2.1
Battery Time ~6h ~5h ~5h
Camera 640x480 pixels
Deskstand Integrated
Mounting Systems
Supported Optional brackets for Vesa, Daessy, Rehadapt, CJT
Power Supply Powerbox EXM 80 5121 (24 V)
Chapter 8 Appendices
79
Tobii C-Series User’s Manual
Tobii CEye
Working distance (optimal) 23,5 in
60 cm
Track Box -for Eye/Head Movement
(Width Height Depth)
15,7 x 11,8 x 7,9 in
40 x 30 x 20 cm
Head movement speed (optimal) 11, 8 in/s
30 cm/s
Gaze Data rate 30 Hz
Accuracy gaze estimation 0,8 degrees
Weight 12.3 oz
350 g
8.5 Appendix E: Approved Accessories
For information about the latest approved Tobii Accessories, please visit
the www.tobii.com website or contact your local Tobii reseller.
Chapter 8 Appendices

www.tobii.com
EUROPE, MIDDLE EAST,
AFRICA
Tobii Technology AB
Karlsrovägen 2D
S-182 53 Danderyd
Sweden
Phone : +46 8 663 69 90
Fax: +46 8 30 14 00
www.tobii.com
sales@tobii.com
CENTRAL EUROPE
Tobii Technology GmbH
Niedenau 45
D-60325 Frankfurt am Main
Germany
Phone: +49 69 24 75 03 40
Fax: +49 69 24 75 03 429
www.tobii.com
sales.de@tobii.com
NORWAY
Tobii Norge
Thormøhlens gate 55
5008 Bergen
Norway
Phone: +47 55 55 10 60
Fax: ++47 55 55 10 61
www.tobii.com
sales.no@tobii.com
ASIA
Tobii Technology, Ltd.
3-4-13 Takanawa, Minato-ku
Tokyo 108-0074
Japan
Phone: +81-3-5793-3316
Fax: +81-3-5793-3317
www.tobii.com
sales.jp@tobii.com
NORTH AMERICA
Tobii ATI
333 Elm Street
Dedham, MA 02026
USA
Toll-Free: 800-793-9227
Phone: 781-461-8200
Fax: 781-461-8213
www.tobiiATI.com
sales.us@tobii.com
Tobii Support
SWEDEN
Phone: +46 8 522 950 20
support@tobii.com
Support hours: 8 am - 6 pm
Between July-August: 9am - 5pm
(Central European Time, GMT +1)
GERMANY
Phone: +49 69 24 75 03 4-28
support@tobii.com
Support hours: 8 am - 6 pm
Between July-August: 9am - 5pm
(Central European Time, GMT +1)
USA
Toll-Free: +1-800-793-9227
Phone: +1-781-461-8200
techsupport@tobiiATI.com
Support hours: 9 am - 9 pm
(US Eastern Starndard Time, GMT -6)
JAPAN
Phone: +81-3-5793-3316
support.jp@tobii.com
Support hours: 9 am - 5.30 pm
(Japan Standard Time, GMT +9)