TomTom RIDER GPS TRACKING SYSTEM User Manual QSG
TomTom International BV GPS TRACKING SYSTEM QSG
UserManual.wiki
>
TomTom
>
RIDER User Manual
USERS MANUAL
Navigation menu
Upload a User Manual
Namespaces
Wiki Guide
HTML
PDF
Info
Views
User Manual
Discussion / Help
Navigation
![What is in the box? [boxrider.jpg] [boxSD.jpg] [AllMountsPlusHolder.jpg] [boxScrews.jpg] [BoxPlugBike.jpg] [chargeKit.jpg] [bag.jpg] [boxUSB2.jpg] [boxCD.jpg] [BTExplainleft.jpg] [BoxHelmHeadset.jpg] [boxCarHeadset.jpg] [cleaner.jpg] [booklet.jpg] [LicenseCard.jpg] 1. Your TomTom RIDER 2. A memory card (SD card) containing the application and maps 3. Mounting kit: Holder, Handlebar Mount, Handlebar Adaptor, Mirror Mount, Adhesive Mount and the adhesive pad 4. Screws and Allen keys for the mounting kit 5. Battery cable 6. Home charger, with international adaptors 7. TomTom RIDER case 8. USB cable 9. CD for Microsoft Windows® or Apple Macintosh®. The CD contains the full manual as well as a tool for backing up your memory card. 10. Bluetooth™ headset module and headset cable 11. Helmet headset 12. Standard headset 13. Screen cloth 14. Documentation pack 15. Your product code card](https://usermanual.wiki/TomTom/RIDER/User-Guide-576869-Page-2.png)
![TomTom RIDER [NumbersRider1.jpg] [NumbersRider3.jpg] [NumberRider2a.jpg] 1. Touchscreen 2. On/Off button 3. Docking connector 4. Memory card (SD card) slot 5. USB connector 6. Charging connector 7. Reset button](https://usermanual.wiki/TomTom/RIDER/User-Guide-576869-Page-3.png)
![Using your TomTom RIDER [FromPoster5.jpg] 1. Open the compartment on the bottom of your TomTom RIDER. 2. Push the memory card into the memory card slot. 3. Press and hold the On/Off button for 2 seconds, or until your TomTom RIDER starts. The first time you switch on your TomTom RIDER, it may take up to 20 seconds to start. To switch off your TomTom RIDER, press and hold the On/Off button for 2 seconds. Setting up First, you have to answer a few questions to set up your device and your Bluetooth headset module. Answer the questions by tapping the screen. You will use the touchscreen for everything you do with your TomTom RIDER. Follow the instructions to establish a Bluetooth connection between your TomTom RIDER and your Bluetooth headset module. See the Bluetooth headset module section below for more information about your Bluetooth headset module. Once you have answered the questions, your TomTom RIDER will display the Driving View. The screen is shown in black and white until your TomTom RIDER locates your current position. Once this is done, the Driving View is shown in full colour. Locating your current position Your TomTom RIDER must be outside to be able to locate your current position. The first time you start your TomTom RIDER, it takes up to 5 minutes for the device to find your current position. In future, your position will be found much faster, normally within a few seconds. If your TomTom RIDER takes longer than 5 minutes to locate your current position, make sure that you are in an open place without tall buildings or trees around you. Your TomTom RIDER does not transmit your location, so others cannot use it to track you while you are driving. Note: Before driving with your TomTom RIDER, we recommend that you charge it fully using the home charger. TomTom RIDER uses a GPS receiver to locate your current position. For more information about GPS, see this chapter: What is GPS? Bluetooth headset module [NumbersBT1.jpg] [NumbersBT2.jpg] 1. Indicators 2. Volume controls 3. On/Off button 4. Charging connector 5. Headset connector](https://usermanual.wiki/TomTom/RIDER/User-Guide-576869-Page-4.png)
![Before you can use your Bluetooth headset module with the helmet headset, you must charge the headset module using the home charger. [HeadsetExplainNoHelm.jpg] [HeadsetExplainUnder.jpg] Connect the headset cable to the Bluetooth headset module and then to the helmet headset or standard headset. Attach the Velcro pads provided to the inside of your helmet. These hold the helmet headset in place. To turn your Bluetooth headset module on, press and hold the On/Off button until you see the blue indicator light. To turn your Bluetooth headset module off, press and hold the On/Off button until you see the red indicator light. If you did not establish a Bluetooth connection between your Bluetooth headset module and your TomTom RIDER when you first turned your TomTom RIDER on, you can establish the connection at any time. From the main menu, tap Change Preferences. Tap the arrow twice to open the third preferences menu. Tap Connect to headset and follow the instructions to establish the connection. Taking care of your TomTom RIDER It is important to take care of your TomTom RIDER and to clean it correctly. Use the screen cloth provided to wipe the screen of your TomTom RIDER; do not use any liquid cleaners. Only open the compartment that contains the memory card slot when you are indoors. Do not open the compartment when your TomTom RIDER is wet. When carrying your TomTom RIDER, always use the TomTom RIDER case provided. If your TomTom RIDER gets wet, dry it with a soft cloth. Do not open the casing of your TomTom RIDER under any circumstances. Do not use the memory card (SD card) with any device other than your TomTom RIDER. Other devices may damage the memory card.](https://usermanual.wiki/TomTom/RIDER/User-Guide-576869-Page-5.png)
![Mounting the TomTom RIDER on your motorcycle Where should I mount my TomTom RIDER? When you choose where to mount your device, think about the following: The mounting options available The most comfortable position Spend some time thinking about where to mount your TomTom RIDER on your motorcycle. Not all mounts are suitable for all bikes. It should be in a position where you can see it easily and where it does not block your vision. Warning: The Adhesive Mount is very strong and it is very difficult to remove once it has been attached to your motorcycle. Before attaching the Adhesive Mount to your motorcycle, be sure that you have chosen the position where you finally want to mount your TomTom RIDER. Mounting your TomTom RIDER There are four different mounts: Handlebar Mount Handlebar Adaptor Mirror Mount Adhesive Mount The sections below describe how to use each mount. Make sure that you screw all parts of the mounts together very tightly, otherwise the mount may move while you are driving. Handlebar Mount [handlebarmount.jpg] [Clampmount5.jpg] [ScrewHolder.jpg] [clampmount1.jpg] The Handlebar Mount is attached directly onto the handlebars. To use this mount, follow these steps: 1. Unscrew the Handlebar Mount using the Allen key. 2. Wrap the piece of rubber provided around the handlebars to make the handlebars thick enough for the Handlebar Mount. Cut the piece of rubber to adjust the thickness. Note: The piece of rubber helps prevent vibration and stops the Handlebar Mount from slipping while you are driving. 3. Place the Handlebar Mount around the handlebars and over the piece of rubber. 4. Screw the Handlebar mount together tightly using the Allen key provided. 5. Screw the Holder to the Handlebar Mount using four of the small screws included with the mounting kit. If your TomTom RIDER is not in a comfortable position, unscrew the Handlebar Mount slightly and adjust the angle](https://usermanual.wiki/TomTom/RIDER/User-Guide-576869-Page-6.png)
![of the mount and the holder. Then screw the Handlebar Mount together tightly again. You can now place your TomTom RIDER in the Holder. See this section: Placing your TomTom RIDER in the Holder Handlebar adaptor [standardMount3.jpg] [standardMount6.jpg] [standardMount5.jpg] [standardMount4.jpg] The Handlebar Adaptor is secured by bolts next to the grip, as shown. To use this mount, follow these steps: 1. Carefully remove the bolts that hold the grip in place. Do not remove the grip from the handlebars. 2. Place the Handlebar Adaptor over the bolt holes. 3. Use the extra-long bolts provided to attach the Handlebar Adaptor and the grip to the handlebars. Use an Allen key (not provided) to tighten the bolts. 4. Attach the Handlebar Mount to the Handlebar Adapter. Follow steps 2 – 4 in the section Handlebar Mount above. You can now place your TomTom RIDER in the Holder. See this section: Placing your TomTom RIDER in the Holder Mirror Mount [mirrormount2.jpg] [mirrormount7.jpg] The Mirror Mount is held in place by the wing mirror. If your motorcycle or scooter has no mirrors but has the bolt holes for a wing mirror, you can still use the Mirror Mount. To use this mount, follow these steps: 1. Unscrew one of the wing mirrors on your motorcycle. 2. Place first the rubber washer, then the Mirror Mount and finally the metal washer over the bolt hole, as shown in the diagram. Note: The washers help to prevent the mirror mount from moving or from being damaged. Select the diameter of the washers according to the diameter of the bolt hole. 3. Screw the wing mirror back into place. The wing mirror holds](https://usermanual.wiki/TomTom/RIDER/User-Guide-576869-Page-7.png)
![[mirrormount8.jpg] [mirrormount9.jpg] the Mirror Mount in place. Note: If you have only the bolt holes for a wing mirror, use one of the bolts provided to hold the Mirror Mount in place. Select the diameter of the bolt according to the diameter of the bolt hole. 4. Screw the Adhesive Mount to the Mirror Mount, using four of the small screws included with the mounting kit. 5. Screw the Holder to the Adhesive Mount using four of the small screws included with the mounting kit. You can now place your TomTom RIDER in the Holder. See this section: Placing your TomTom RIDER in the Holder Adhesive Mount [AdhesiveMount4.jpg] [Adhesivemount1.jpg] [AdhesiveMount2.jpg] Use the Adhesive Mount if you are unable to use any of the other mounts, or if you want to place your TomTom RIDER in a position that is not possible using the other mounts. Attach this mount only to a part of your motorcycle that is strong enough to hold the mount, the Holder and your TomTom RIDER. Note: It is very difficult to remove the Adhesive Mount. Think carefully about where you want to attach the Adhesive Mount. Clean the position you have chosen thoroughly and make sure that you remove any grease or dirt. To use this mount, follow these steps: 1. Attach the adhesive pad to the Adhesive Mount. 2. Press and hold the Adhesive Mount in the position you have chosen. 3. Screw the Holder to the Adhesive Mount using four of the small screws included with the mounting kit. You can now place your TomTom RIDER in the Holder. See this section: Placing your TomTom RIDER in the Holder Placing your TomTom RIDER in the Holder [riderin.jpg] [riderinclose.jpg] [RiderInHolder.jpg] 1. Open the Holder and place the bottom edge of your TomTom RIDER into the Holder first. Make sure that the two teeth on the bottom of the Holder meet the two connections on your TomTom RIDER. If your TomTom RIDER is not placed in the Holder correctly, it may fall out while you are driving. 2. Push your TomTom RIDER firmly into place. 3. Close the Holder. Make sure that your TomTom RIDER is held firmly in place.](https://usermanual.wiki/TomTom/RIDER/User-Guide-576869-Page-8.png)
![You are now ready to make your first journey with your TomTom RIDER. Battery cable The battery cable can optionally be used to power and charge your TomTom RIDER from your motorcycle battery. Note: If you are unsure about setting up the battery cable, consult your local motorcycle garage. Connect the battery cable connector to the power connector on the holder. [BatteryCableExplain.jpg] Connect the red battery cable to the switched positive 12 volt power supply on your motorcycle and the black battery cable to the ground supply on your motorcycle. Make sure that the battery cable is secured safely to your motorcycle. It must not hang from the frame or interfere with the motorcycle in any way. Make sure that it is also not in contact with any areas of the motorcycle that become hot and may melt the cable.](https://usermanual.wiki/TomTom/RIDER/User-Guide-576869-Page-9.png)
![Making your first journey Planning a route with TomTom RIDER is very simple. To plan your first route, follow the steps below. 1. Tap the screen to bring up the main menu: [mainmenu.jpg] 2. Tap Navigate to… 3. Tap Address. [navigateToMenu.jpg] Now you have to specify where you want to go. This is done by selecting first the town, then the street and then either the house number or the point where two streets meet. 4. Start to type the name of the town where you want to go. [navigateToTown.jpg] After you have typed a few letters, the names of towns that match what you have typed are shown. When your destination is shown in the list, tap the name of the town to set the destination. 5. Start to type the name of the street. [navigateToRoad.jpg] As with the name of the town, the names of streets that match what you have typed are shown. When your destination is shown in the list, tap the name of the street to set the destination. 6. Now do one of the following: Enter the house number of your destination and then tap Done. To select a point where two streets meet, tap Crossing and select the name of the street as in step 5. [navigateToNumber.jpg] 7. The route is calculated by your TomTom RIDER. [routePlanned.jpg] 8. Tap Done. Your TomTom RIDER will immediately start giving you instructions for reaching your destination. To guide you to your destination, TomTom RIDER will give you spoken instructions and visual instructions on the screen. You should plan your route before you start driving. It is not possible to plan the route in this much detail once you start moving. While you are driving, only the driving menu is displayed. For more information, see this chapter: Menus Note: Before you can plan a route in this way, your TomTom RIDER must first locate your current position. Finding alternative routes](https://usermanual.wiki/TomTom/RIDER/User-Guide-576869-Page-10.png)
![If you want a different route from the one that your TomTom RIDER has planned for you, you can ask it to calculate an alternative route for you. Tap the touchscreen and then the button Find alternative…. Here are some of the options you can select: [AvoidPartOfRoute.jpg] Avoid part of route Tap this button to avoid a part of the route, perhaps a junction that is known for traffic problems. [TravelVia.jpg] Travel via… Tap this button to go via a particular location, perhaps to pick up a friend. [AvoidRoadblock.jpg] Avoid Roadblock Tap this button to avoid a roadblock that you can see up ahead. For a full description of all the options, see the manual on the CD. It is not possible to use this functionality while you are driving because then only the driving menu is displayed. You should plan your alternative route before you start driving, or stop driving and then use the main menu to plan an alternative route.](https://usermanual.wiki/TomTom/RIDER/User-Guide-576869-Page-11.png)
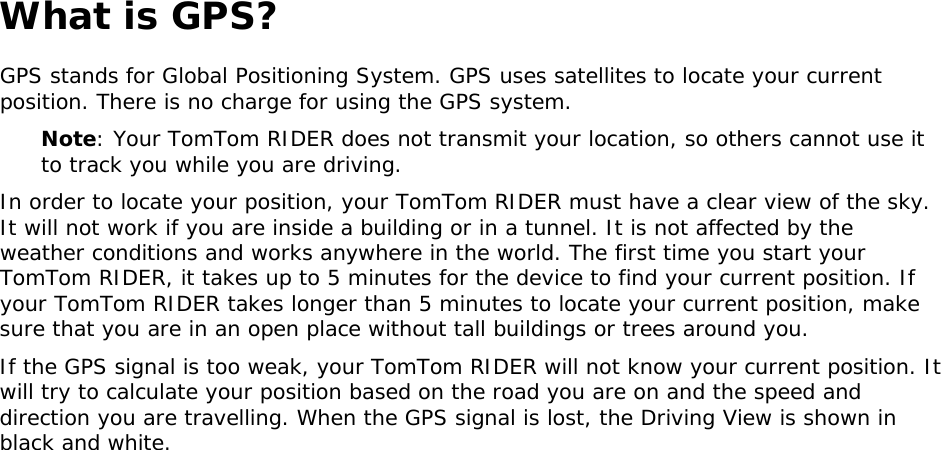
![Driving View [Image with arrows] 1. The next instruction. 2. The name of the next street to turn onto. 3. Information about your journey: remaining journey time, remaining distance, arrival time. You can select which information is displayed in the Preferences menu. 4. Your current position. 5. Buttons to zoom in and zoom out on your position. 6. The name of the next major road, if applicable. 7. Indicator of the strength of the GPS signal. For more information about GPS, see the chapter: What is GPS?](https://usermanual.wiki/TomTom/RIDER/User-Guide-576869-Page-12.png)
![Menus Tap the screen at any time when your TomTom RIDER displays the Driving View to open a menu. Main menu If you tap the screen when you are stationary, the main menu is shown: [mainmenu.jpg] Navigate to… Tap this button to start planning a route. Find alternative… Tap this button to find an alternative route to the one currently planned. You might change your route to avoid roadblocks up ahead, or to incorporate a stop into your route. For more information see the manual on the CD. TomTom Traffic Tap this button to enable or disable traffic information. TomTom Traffic is a subscription service provided by TomTom PLUS. For more information, see this chapter: TomTom PLUS Mobile phone This button opens the mobile phone menu. You can, for example, make calls, write or read messages. For more information, see the manual on the CD. Change preferences This button opens the Preferences menu. You can change many things about the way your TomTom RIDER displays information, including the map colours, the volume and the voice used for spoken instructions. For more information see the manual on the CD. [NextArrow.jpg] Whenever you see this arrow, it means that there is another screen of buttons. Tap this arrow to open the next screen. Driving menu If you tap the screen when you are driving, the driving menu is shown: [DrivingMenu.jpg] Navigate to… Tap this button to select a destination. This button opens another menu with these 4 buttons: [home.jpg] Home Tap this button to start navigating to your Home location. You can set your Home location by tapping Change preferences in the main menu, then Change Home location. [recentDestination.jpg] Recent destination Tap this button to start navigating to your most recent destination. [Itineraries.jpg] Itinerary planning Tap this button to start navigating to the next destination on you Itinerary. [PetrolStation.jpg] Tap this button to start navigating to the nearest petrol station on your route. If there is no petrol station on your](https://usermanual.wiki/TomTom/RIDER/User-Guide-576869-Page-13.png)
![A jelen berendezés megfelel az EU 99/5/EC direktívája meghatározta szükséges előírásoknak (a nyilatkozat a www.tomtom.com honlapon található). Ši įranga atitinka visus ES direktyvos 99/5/EB reikalavimus (deklaracijos tekstas tinklapyje www.tomtom.com). Šis produkts atbilst visām ES noteiktajām Direktīvām 99/5/EC (deklarācija ir pieejama www.tomtom.com ). Sprzęt ten jest zgodny z podstawowymi wymaganiami Dyrektywy UE 99/5/EC (deklarację można pobrać ze strony internetowej www.tomtom.com). TomTom týmto vyhlasuje, že RIDER spĺňa základné požiadavky a všetky príslušné ustanovenia Smernice 1995/5/ES (NV č.443/2001 Z.z.) a Vyhlásenie o zhode je k dispozícii na www.tomtom.com. Toto zariadenie je možné prevádzkovať v Slovenskej republike na základe Všeobecného povolenia č. VPR-01/2001. Bu cihaz AB Direktifi 99/5/AT'nin (beyanat www.tomtom.com adresinde mevcuttur) zorunlu gerekliliklerine uygundur. WEEE Directive In line with EU Directive 2002/96/EC for waste electrical and electronic equipment (WEEE), this electrical product must not be disposed of as unsorted municipal waste. Please dispose of this product by returning it to the point of sale or to your local municipal collection point for recycling. For more information, see www.tomtom.com ### languages … Ctick [Image] This product displays the Ctick to show it complies with all relevant Australian and NZ regulations. This Document Great care was taken in preparing this manual. Constant product development may mean that some information is not entirely up-to-date. The information in this document is subject to change without notice. TomTom International B.V. shall not be liable for technical or editorial errors or omissions contained herein; nor for incidental or consequential damages resulting from the performance or use of this material. This document contains information protected by copyright. No part of this document may be photocopied or reproduced in any form without prior written consent from TomTom International B.V. Part numbers TomTom RIDER: 4K00.001 Bluetooth headset: 4K00.002 Copyright information © 2005 TomTom International B.V., The Netherlands. Patents pending. All rights reserved.](https://usermanual.wiki/TomTom/RIDER/User-Guide-576869-Page-20.png)