Tonning Electronic Technology KWM24BT Car Radio User Manual KW M24BT Draft5 review reply20170706
Tonning Electronic Technology CO.,Ltd. Car Radio KW M24BT Draft5 review reply20170706
UserManual.wiki
>
Tonning Electronic Technology
>
KWM24BT User Manual
User Manual
Navigation menu
Upload a User Manual
Namespaces
Wiki Guide
HTML
PDF
Info
Views
User Manual
Discussion / Help
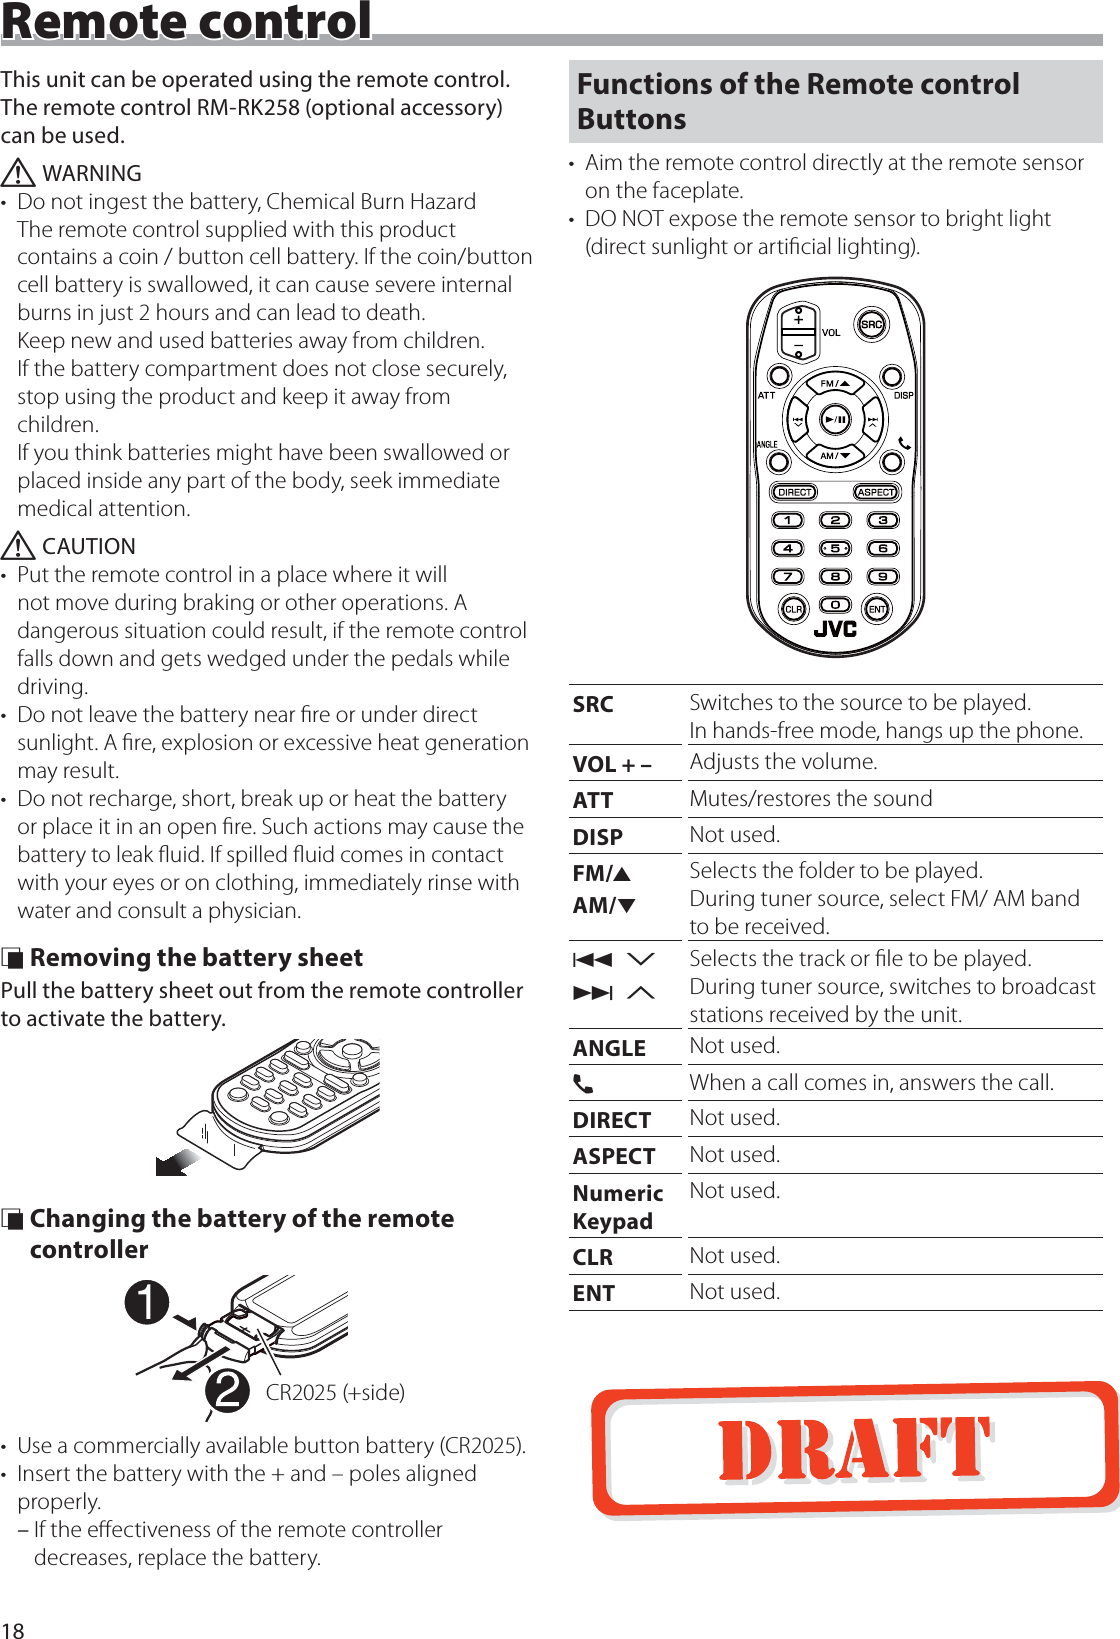
Navigation
![2Before useBefore use ....................................................................................2How to read this manual .......................................................................................2Precautions ....................................................................................................................2Getting Started ..........................................................................3Clock settings ...............................................................................................................4Touch panel adjustment .......................................................................................4Basics .............................................................................................5Functions of the Buttons on the Front Panel ..........................................5Common operations ...............................................................................................5HOME screen descriptions ..................................................................................6Source control screen descriptions ...............................................................6List screen .......................................................................................................................6USB .................................................................................................7Prep arati on .....................................................................................................................7Playback operations .................................................................................................7iPod/iPhone ................................................................................9Prep arati on .....................................................................................................................9Playback operations .................................................................................................9Tuner ............................................................................................11Tuner Basic Operation...........................................................................................11Presetting stations ..................................................................................................11FM RDS features ........................................................................................................11Tuner Setup ................................................................................................................. 12External Components ...........................................................13Using external audio/video players ............................................................ 13Rear view camera .................................................................................................... 13Bluetooth smartphone (KW-M24BT) ...............................14Register your smartphone to the unit ...................................................... 14Receive a phone call ............................................................................................. 14Make a phone call ................................................................................................... 15Playing Bluetooth Audio Device ................................................................... 16Delete the registered Bluetooth device .................................................. 16Controlling Audio ...................................................................17Controlling General Audio .................................................................................17Equalizer Control ......................................................................................................17Subwoofer settings ................................................................................................17Remote control ........................................................................18Functions of the Remote control Buttons .............................................. 18Installation .................................................................................19Before Installation ................................................................................................... 19Installing the unit ....................................................................................................20About this Unit ........................................................................ 24More information ....................................................................................................24Troubleshooting ...................................................................................................... 24Copyrights ................................................................................................................... 25Specifications ............................................................................................................26Precautions#WARNING Ñ To prevent injury or re, take the following precautions:• To prevent a short circuit, never put or leave any metallic objects (such as coins or metal tools) inside the unit.• Do not watch or fix your eyes on the unit’s display when you are driving for any extended period.• If you experience problems during installation, consult your JVC dealer. Ñ Precautions on using this unit• When you purchase optional accessories, check with your JVC dealer to make sure that they work with your model and in your area.• The Radio Data System or Radio Broadcast Data System feature won’t work where the service is not supported by any broadcasting station. Ñ Protecting the monitor• To protect the monitor from damage, do not operate the monitor using a ballpoint pen or similar tool with the sharp tip. Ñ Cleaning the UnitIf the front panel of this unit is stained, wipe it with a dry soft cloth such as a silicon cloth. If the front panel is stained badly, wipe the stain off with a cloth moistened with neutral cleaner, then wipe it again with a clean soft dry cloth. ! CAUTION• Applaying spray cleaner directly to the unit may affect its mechanical parts. Wiping the front panel with a hard cloth or using a volatile liquid such as thinner or alcohol may scratch the surface or erase screened print. Ñ How to reset your unitIf the unit or the connected unit fails to operate properly, reset the unit.Reset buttonContentsHow to read this manual• The panels shown in this guide are examples used to provide clear explanations of the operations. For this reason, they may be different from the actual panels.• In operation procedures, bracket shape indicates the key or button you should control. < >: indicates the name of panel buttons. [ ]: indicates the name of touch keys](https://usermanual.wiki/Tonning-Electronic-Technology/KWM24BT/User-Guide-3523860-Page-2.png)
![3English |Getting Started1 Turn the ignition key of your car to ACC.The unit is turned on.2 Press the < > button.3 Touch [Settings].4 Touch the corresponding key and set the value.AudioSound EectDisplays the Equalizer screen. (P.17)BeepActivates or deactivates the key-touch tone.“ON” (Default), “OFF”LoudnessSets the amounts of boost of low and high tones.“ON”, “OFF” (Default)SubwooferDisplays the Subwoofer screen. (P.17)DisplayPanel AdjustAdjust the sensing position of touch panel. See “Touch panel adjustment” (P.4).AspectSelect the screen mode.“16:9” (Default), “4:3 Pan Scan”TunerDisplays the Tuner Settings screen. (P.12)GeneralLanguageSelect the language used for the control screen and setting items. Default is “English”.1) Touch [Language].2) Select the desired language.* You can change the page to display more items by pressing [ ]/ [ ].BT Auto ConnectAutomatically reconnects the selected Bluetooth device when radio wave becomes strong enough, even after it is disconnected. “ON” (Default), “OFF”Clock SettingAdjust the clock time. (P.4).DefaultTouch [Default] to set all the settings to the initial default settings.5 Touch [6].](https://usermanual.wiki/Tonning-Electronic-Technology/KWM24BT/User-Guide-3523860-Page-3.png)
![4Getting StartedClock settings Ñ Synchronizing the clock time with FM RDSActivate [RDS Clock Sync]. See “Tuner Setup” (P.12). Ñ Adjusting the clock manually ✎NOTE• Deactivate [RDS Clock Sync] before adjusting the clock. See “Tuner Setup” (P.12).1 Press the < > button.2 Touch [Settings].3 Touch [General].4 Touch [Clock Setting].Clock screen appears.5 Selects time format.[12] (Default : North America, South America sales area only)[24] (Default : Europe, CIS sales area only)6 Touch [R] or [S] to set the clock time.• If you have selected [12] as the time format, touch [AM] or [PM] before setting the clock time.7 Touch [6].Touch panel adjustment1 Press the < > button.2 Touch [Settings].3 Touch [Display].4 Touch [Panel Adjust].5 Follow the instruction on the screen and touch the center of each +.• To cancel the touch panel adjustment, touch [Cancel].• If the touch position is deviated, [OK] is not displayed. Retry from the beginning.6 Touch [OK].](https://usermanual.wiki/Tonning-Electronic-Technology/KWM24BT/User-Guide-3523860-Page-4.png)
![5English |BasicsBasicsFunctions of the Buttons on the Front Panel1234561Remote Sensor• Receives the remote control signal.2 (HOME)• Displays the HOME screen. (P.6)• Pressing for 1 second turns the power off.• When the power off, turns the power on.3EQ• Displays the Equalizer screen. (P.17)* During video file playback, you can set only the preset equalizer curve.* The Equalizer screen is not displayed during picture file playback or on the list screen or SETUP screen etc,4+ , – (Volume)• Adjusts volume. The volume will go up until 20 when you keep pressing [ + ].5 (MUTE, Display o)• Mutes/restores the sound.• Pressing for 1 second turns the screen off. When the screen is off, touch the display to turn on the screen. 6Reset• If the unit or the connected unit fails to operate properly, the unit returns to factory settings when this button is pressed.Common operations Ñ Turning on the power1 Press the < > button. Ñ Turning o the power1 Press and hold the < > button. Ñ Adjusting the volume1 Press the <+> or <–> button. ✎NOTE• The volume will go up until 20 when you keep pressing [ + ]. Ñ Mutes the sound1 Press the < > button. To restore the sound, touch the button again, or adjust the volume. Ñ Turn o the screen1 Press and hold the < > button. To turn on the screen, touch the display.](https://usermanual.wiki/Tonning-Electronic-Technology/KWM24BT/User-Guide-3523860-Page-5.png)
![6BasicsHOME screen descriptions1 Press the < > button.HOME screen appears.12536471Clock displayTouch to displays the Clock screen.2Switches to the radio broadcast. (P.11)3[USB] Plays files on a USB device. (P.7)[iPod] Plays an iPod/iPhone. (P.9)• When iPod/iPhone is connected.4Switches to an external component connected to the AV-IN input terminal. (P.13)5Displays the Hands Free screen. (P.15)6Plays a Bluetooth audio player. (P.16) (KW-M24BT only)7Displays the SETUP screen. (P.3)Source control screen descriptionsYou can perform source playback operations on the source control screen.143251Clock displayTouch to displays the Clock screen.2Source name3• appears when the Bluetooth smartphone is connected. *• appears when the Bluetooth audio player is connected. *• appears when the mute function is active. (P.5)* KW-M24BT only4[DIM]Select dimmer mode. Dim 1, Dim 2, Not dim5Returns to previous screen.List screenThere are some common function keys in the list screens of most sources.1 You can change the page to display more items by pressing [ ]/ [ ].](https://usermanual.wiki/Tonning-Electronic-Technology/KWM24BT/User-Guide-3523860-Page-6.png)
![7English |USBUSBPreparation Ñ Connecting a USB device1 Remove the cap of the USB terminal.2 Connect the USB device with the USB cable.The unit reads the device and playback starts. Ñ To disconnect the USB device:1 Press the < > button.2 Touch a source other than [USB].3 Detach the USB device. Ñ Usable USB deviceThis unit can play MPEG1/ MPEG2/ MPEG4/ MP3/WMA/ AAC/ JPEG/ BMP les stored in a USB mass storage class device. (P.24)• File system: FAT16/ FAT32• This unit can recognize a total of 9 999 files and 320 folders (a maximum of 9 999 files per folder).• The maximum number of characters: – Folder names : 24 characters – File names : 24 characters – Tag : 30 characters ✎NOTE• When the USB device is connected to this unit, it can be charged through the USB cable.• Install the USB device in the place where it will not affect safe driving.• You cannot connect a USB device via a USB hub and Multi Card Reader.• Take backups of the audio files used with this unit. The files can be erased depending on the operating conditions of the USB device. We shall have no compensation for any damage arising from any erased data.• No USB device comes with this unit. You need to purchase a commercially available USB device. • Cap the USB terminal whenever not using.Playback operations Ñ Control the music you are listening to on the source control screen.1632541The jacket of the currently playing file is displayed.2##:##:## : Playing time/ Total playing timePlay time bar : Touch to change the playing position.3[L] : Plays or pauses.[E] [F] : Searches the previous/next content. Touch and hold to fast forward or fast backward.[] : Selects Repeat playback mode. Lights o (Default): Repeats all files in the USB device. : Repeats the current file.FO : Repeats all files in the current folder.[] : Selects Random playback mode. : Randomly plays all files.Lights o (Default): Normal playback.4Displays the information of the current file.Only a file name is displayed if there is no tag information.5Searches file. (P.8)6D, etc. : Playback status : Repeat playback mode indicator : Random playback mode indicator](https://usermanual.wiki/Tonning-Electronic-Technology/KWM24BT/User-Guide-3523860-Page-7.png)
![8USB Ñ For Video playback1 When the operation buttons are not displayed on the screen, touch the display.3212451D, etc. : Playback status : Repeat playback mode indicator : Random playback mode indicator##:##:## : Playing time/ Total playing timePlay time bar : Touch to change the playing position.2To switch the operation buttons.3[] : You can adjust image quality in video screen.[Brightness]: Adjusts the brightness. (00 to 08)[Contrast]: Adjusts the contrast. (00 to 08)[Tint]: Adjusts the tint. (00 to 08)[Color]: Adjusts the color. (00 to 08)[Reset]: To clear the adjustment.[] : Select the zoom ratio. “Off”, “x2”, “x3”, “x4”, “x5”, “1/2”, “1/3”, “1/4” [3] [2] [ < ] [ > ] : Scrolls the screen.4The operation buttons disappear when 4 is touched or when no operation is done for about 10 seconds.5Displays the File List screen. (P.8) Ñ Selecting a track in a list1 Touch [ ].2 Select whether you search by audio files [ ], video files [ ] or picture files [ ].3 Touch [Y] to moves to the upper hierarchy.4 Touch the desired folder.When you touch a folder its contents are displayed.5 Touch desired item from the content list.Playback starts.](https://usermanual.wiki/Tonning-Electronic-Technology/KWM24BT/User-Guide-3523860-Page-8.png)
![9English |iPod/iPhoneiPod/iPhonePreparation Ñ Connecting iPod/iPhone• For Lightning connector models: Use USB Audio cable for iPod/iPhone—KS-U62 (optional accessory).• For details about connecting iPod/iPhone, see page 23 .1 Remove the cap of the USB terminal.2 Connect the iPod/iPhone.The unit reads the device and playback starts. Ñ To disconnect the iPod/iPhone1 Press the < > button.2 Touch a source other than [iPod].3 Detach the iPod/iPhone. Ñ Connectable iPod/iPhoneThe following models can be connected to this unit.Made for• iPhone 7 Plus• iPhone 7• iPhone SE• iPhone 6s Plus• iPhone 6s• iPhone 6 Plus• iPhone 6• iPhone 5s• iPhone 5c• iPhone 5• iPod touch (6th generation)• iPod touch (5th generation) ✎NOTE• If you start playback after connecting the iPod, the music that has been played by the iPod is played first. In this case, “Reading” is displayed without displaying a folder name, etc. Changing the browse item will display a correct title, etc.• Cap the USB terminal whenever not using.Playback operations Ñ Control the music you are listening to on the source control screen.1632541Artwork (Shown if the track contains artwork)2##:##:## : Playing time/ Total playing timePlay time bar : For confirmation of current playing position3L : Plays or pauses.[E] [F] : Searches the previous/next content. Touch and hold to fast forward or fast backward.[] : Selects Repeat playback mode. Lights o (Default): Repeat off : Functions the same as Repeat All. 1 : Functions the same as Repeat One. [] : Selects Random playback mode. : Functions the same as Shuffle Songs. Lights o (Default): Random off4Displays the information of the current file.5Searches content. (P.10)6D, etc. : Playback status : Repeat playback mode indicator : Random playback mode indicator](https://usermanual.wiki/Tonning-Electronic-Technology/KWM24BT/User-Guide-3523860-Page-9.png)
![10iPod/iPhone Ñ Selecting a content in a list1 Touch [ ].2 Touch desired item.When you touch a category its contents are displayed.3 Touch desired item from the content list.Playback starts.• Touch [6] to moves to the upper hierarchy. ✎NOTE• The source control screen appears when you touch [6] at the top hierarchy.](https://usermanual.wiki/Tonning-Electronic-Technology/KWM24BT/User-Guide-3523860-Page-10.png)
![11English |TunerTunerTuner Basic Operation1 Press the < > button.2 Touch [Tuner]. Ñ Source control screen413251Displays the information of the current station:PS name, Frequency, PTY Genre, Indicator Items[<<] [>>] : Touch to the next frequency manually.2Recalls the memorized station.When touched for 2 seconds, stores the current receiving station in memory.3[E] [F] : Tunes in a station with good reception automatically. *1[TA]*2*3 : Traffic information mode is set. (P.11)[PTY]*2*3 : Select the available Program Type. (P.11)*1 If “AF” is set to ON on the Tuner screen, only RDS stations are received. (P.12)*2 FM only*3 Europe, CIS sales area only4[1] : Presets stations automatically5[FM] : Switches the FM band. “FM1”, “FM2”, “FM3”[AM] : Switches the AM band. “AM1”, “AM2”Presetting stations Ñ Storing stations in the memoryYou can preset 18 stations for FM and 12 stations for AM.1 Touch [FM] or [AM] to select the band.2 Touch [1].The local stations with the strongest signals are found and stored automatically.• If “AF” is set to “ON” on the Tuner screen, only RDS stations are stored in the memory. (P.12) Ñ Manual memoryYou can store the current receiving station in memory.1 Tune in to a station you want to preset.2 Touch and hold [#] (#:1-6) in which you want to store the station. Ñ Recalling the preset station1 Touch [#] (#:1-6). ✎NOTE• Only frequncies are registered as preset stations. Information about RDS stations is not registered.FM RDS features(Europe, CIS sales area only) Ñ Search by program type1 Touch [PTY].2 Select a program type from the list.PTY Search starts. Ñ Trac Information1 Touch [TA].Switches to the traffic information automatically when the traffic bulletin starts. (TA indicator lights up.)“ON”, “OFF” (Default)• If “AF” is set to “ON” on the Tuner screen, the station is switched to the RDS station. (P.12)When the trac bulletin startsThe Traffic Information screen appears automatically.](https://usermanual.wiki/Tonning-Electronic-Technology/KWM24BT/User-Guide-3523860-Page-11.png)
![12TunerTuner Setup Ñ Function menu1 Press the < > button.2 Touch [Settings].3 Touch [Tuner].4 Set each item as follows.Area *1North America (Default): For North/Central/South America, AM/FM intervals: 10 kHz/200 kHz.South America: For some South American countries, AM/FM intervals: 10 kHz/50 kHz.Europe: For Europe, AM/FM intervals: 9 kHz/50 kHz.StereoDetermines whether to receive stereo broadcasts in the stereo mode or monaural mode (the MONO indicator lights up).“ON” (Default), “OFF”LocalTunes in only to the stations with sufficient signal strength. (LOC indicator lights up.)“ON”, “OFF” (Default)RDS Clock SyncSynchronizing the Radio Data System station time data and this unit’s clock.“ON” (Default), “OFF”AF *2When station reception is poor, automatically switches to the station that is broadcasting the same program over the same Radio Data System network. “ON” (Default), “OFF”*1 North America, South America sales area only*2 Europe, CIS sales area only5 Touch [6].](https://usermanual.wiki/Tonning-Electronic-Technology/KWM24BT/User-Guide-3523860-Page-12.png)
![13English |External ComponentsUsing external audio/video players Ñ Starting playback1 Connect an external component to the AV-IN input terminal. (P.22)2 Press the < > button.3 Touch [AV-IN].4 Turn on the connected component and start playing the source. Ñ For Video playback1 When the operation buttons are not displayed on the screen, touch the display.1The operation buttons disappear when 1 is touched or when no operation is done for about 5 seconds.Rear view cameraTo use a rear view camera, the REVERSE lead connection is required. For connecting a rear view camera. (P.22) Ñ Displaying the picture from the rear view cameraThe rear view screen is displayed when you shift the gear to the reverse (R) position.• To erase the caution message, touch the screen.](https://usermanual.wiki/Tonning-Electronic-Technology/KWM24BT/User-Guide-3523860-Page-13.png)
![14Bluetooth smartphone (KW-M24BT)Bluetooth smartphone (KW-M24BT) Ñ About the Bluetooth smartphone and Bluetooth audio playerThis unit conforms to the following Bluetooth specications:VersionBluetooth Ver.2.1 + EDRProleSmartphone/ Cell-phone:HFP (V1.6) (Hands Free Profile)PBAP (V1.1.1) (Phonebook Access Profile)Audio player:A2DP (V1.2) (Advanced Audio Distribution Profile)AVRCP (V1.3) (Audio/Video Remote Control Profile)Sound codecSBC Ñ About mobile phones compatible with Phone book Access Prole (PBAP)If your mobile phone supports PBAP, you can display the following items on the touch panel screen when the mobile phone is connected.• Phone book (up to 1000 entries)• Dialed calls, received calls, and missed calls (up to 20 entries in total)Register your smartphone to the unitYou can use your Bluetooth smartphone when paired to this unit.You can register up to 5 Bluetooth devices.• You can pair the device and the unit using SSP (Secure Simple Pairing) which only requires confirmation.• One device can be connected at a time.• When you register a new Bluetooth device, disconnect the Bluetooth device currently connected and then register the new device.• A new device cannot be registered if there are 5 registered Bluetooth units. Delete unnecessary registration. (P.16)1 Turn on the Bluetooth function on your smartphone/cell-phone.2 Search the unit (“KW-M24BT”) from your smartphone/cell-phone.If a PIN code is required, enter the PIN code (“0000”).• appears when the Bluetooth smartphone is connected.• appears when the Bluetooth audio player is connected. Ñ Disconnecting the device• Turn off the Bluetooth function from your smartphone/cell-phone.• Turn off the ignition switch.Receive a phone call1 Touch [Û].• [Ý] : Reject an incoming call. Ñ Operations during a call[Ý]Ending a callYou can send tones by touching desired keys on the screen.• Touch [ ] to close the window.Switches the speaking voice output between cell-phone and speaker. Adjust the receiver volumePress the <+> or <–> button.](https://usermanual.wiki/Tonning-Electronic-Technology/KWM24BT/User-Guide-3523860-Page-14.png)
![15English |Bluetooth smartphone (KW-M24BT)Make a phone call1 Press the < > button.2 Touch [Phone].3 See the table below for each operation method.• [ ] : Disconnects the Bluetooth smartphone.• [ ] : Closes the screen for sending tones while talking.• [ ] : Displays the screen for deleting the previously registered Bluetooth devices. (P.16)Call by entering a phone number1) Touch [ ].2) Enter a phone number with number keys.3) Touch [Û]. Make a call• Touch [W] to delete the last entry.Call using call records1) Touch [ ] (Incoming Calls), [ ] (Outgoing Calls), [ ] (Missed Calls).2) Select the phone number from the list.Make a callCall using the phonebook1) Touch [ ].2) Select the name from the list.Make a call• [ ] : Updates the phonebook. Touch this button after you have made a change to the phonebook of your cell-phone.Call by voiceYou can make a voice call using the voice recognition function of the Bluetooth smartphone.1) Touch [ ].2) Touch [ ].3) Say the name registered in the Bluetooth smartphone.• Touch [ ] to cancel voice dialing.](https://usermanual.wiki/Tonning-Electronic-Technology/KWM24BT/User-Guide-3523860-Page-15.png)
![16Bluetooth smartphone (KW-M24BT)Playing Bluetooth Audio Device1 Press the < > button.2 Touch [BT Audio]. Ñ Source control screen23141The jacket of the currently playing file is displayed.2[L] : Plays or pauses.[E] [F] : Searches the previous/next content. 3Displays the information of the current file.Only a file name and a folder name are displayed if there is no tag information.4D, etc. : Playback status : Repeat playback mode indicator * : Random playback mode indicator ** The settings on the Bluetooth audio device are displayed. ✎NOTE• Operations and display indications may differ according to their availability on the connected device.Delete the registered Bluetooth device1 Press the < > button.2 Touch [Phone].3 Touch [ ].4 Touch the device name.5 Touch [ ].](https://usermanual.wiki/Tonning-Electronic-Technology/KWM24BT/User-Guide-3523860-Page-16.png)
![17English |Controlling General Audio1 Press the < > button.2 Touch [Settings].3 Touch [Audio].4 Touch [Sound Effect].5 Touch [ ].6 Set each item as follows.Feder[] [ ]Adjust the front and rear volume balance.12 (front) to -12 (rear)Balance[] [ ]Adjust the left and right volume balance.12 (right) to -12 (left)[Reset] To clear the adjustment. Ñ Loudness1 Press the < > button.2 Touch [Settings].3 Touch [Audio].4 Touch [Loudness].Sets the amounts of boost of low and high tones.“ON”, “OFF” (Default)Equalizer Control1 Press the < > button.2 Touch [Settings].3 Touch [Audio].4 Touch [Sound Effect].5 Set each item as follows.1321You can select frequency bar and adjust its level. (-7 to +7)• The adjustments are stored and “User” is activated.2To recall the preset equalizer curve.3The “User” preset and the current EQ curve returns to flat.Subwoofer settings1 Press the < > button.2 Touch [Settings].3 Touch [Audio].4 Touch [Subwoofer].5 Set each item as follows.Frequency[80Hz], [120Hz], [160Hz], [OFF]Low Pass Filter adjustment. (Default OFF)Volume[–], [+]Adjusts the subwoofer level. 0 to 12 (Default 6)Controlling Audio](https://usermanual.wiki/Tonning-Electronic-Technology/KWM24BT/User-Guide-3523860-Page-17.png)
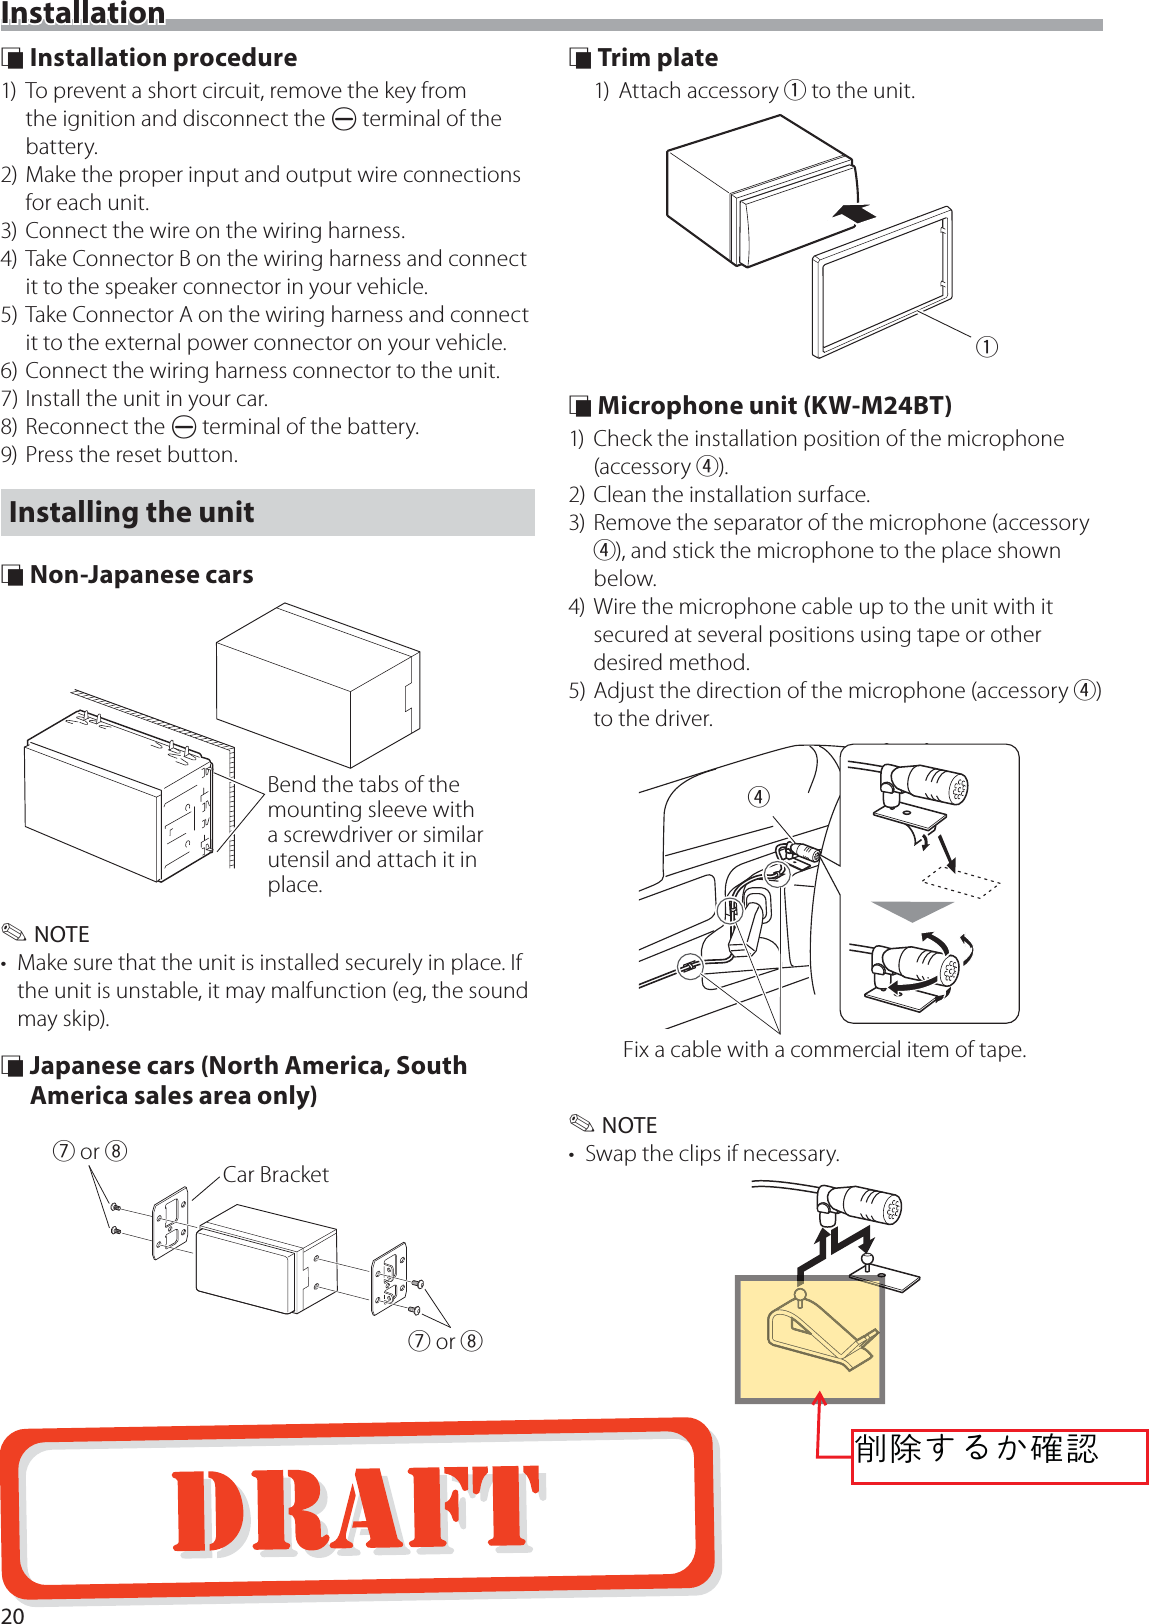
x15 [1] x16 [1] x17 [1](M5 × 6 mm) x48 [1](M5 × 7 mm) x49(2 m) x1[1] North America, South America sales area only[2] KW-M24BT only](https://usermanual.wiki/Tonning-Electronic-Technology/KWM24BT/User-Guide-3523860-Page-19.png)
![22InstallationFRONTREARAV-INLLLRRRVOUTANTCAMV15A5V=1AMICSUBWOOFERPARKINGBRAKEREVERSEGEARSIGNALSTEERINGWHEELREMOTECONTROL2468135724681357Connect to the vehicle’s parking brake detection switch harness.For best safety, be sure to connect the parking sensor.Light Green (Parking sensor wire)Accessory 9: Extension cablePurple/White (Reverse sensor wire)Accessory 4: Bluetooth Microphone (KW-M24BT only)To steering remoteTo use the steering wheel remote control feature, you need an exclusive remote adapter (not supplied) matched to your car.Connect to vehicle’s reverse lamp harness when using the optional rear view camera.Light Blue/Yellow (Steering remote control wire)Fuse (15A) Ñ Wiring harness connector function guidePin Color and functionA-4 Yellow BatteryA-5 Blue/White[3] Power ControlA-7 Red Ignition (ACC)A-8 Black Earth (Ground) ConnectionB-1/ B-2 Purple (+) / Purple/Black (–) Rear RightB-3/ B-4 Gray (+) / Gray/Black (–) Front RightB-5/ B-6 White (+) / White/Black (–) Front LeftB-7/ B-8 Green (+) / Green/Black (–) Rear Left• Speaker Impedance: 4-8 Ω ! CAUTIONBefore you connect the commercially available ISO connectors to the unit, check the following condition:• Make sure that the pin assignment of the connector matches with the JVC unit.• Take extra notice of the power wire.• In case battery wire and ignition wire are not corresponding then change them accordingly.• In case the car does not have an ignition wire, use a commercially available interface. Ñ Connecting wires to terminalsSubwoofer Preout CapCapFM/AM antenna inputFM/AM antennaConnector AConnector BUSB device[2]USB terminal[1] (0.8 m)[1] USB maximum power supply current : DC 5 V = 1 A[2] Sold separately[3] Max. 300mA, 12VISO Connector Rear Audio Preout (Left; White, Right; Red)AV-IN audio input (Left; White, Right; Red)Front Audio Preout (Left; White, Right; Red)Visual Output (Yellow)Rear view camera input (Yellow)AV-IN visual input (Yellow)](https://usermanual.wiki/Tonning-Electronic-Technology/KWM24BT/User-Guide-3523860-Page-22.png)
![23English |InstallationFRONTREARAV-INLLLRRRVOUTANTCAMV15A2468135724681357P.CONTANT.CONTAccessory 6Accessory 5Blue/White (Power control/ Antenna control wire)Connect either to the power control terminal when using the optional power amplifier, or to the power terminal for the booster amplifier of the film-type or short pole type antenna. (Max. 300mA, 12V) *1 If no connections are made, do not let the cable come out from the tab.FRONTREARAV-INLLLRRRVOUTANTCAMV15A5V=1AKS-U62 (0.8m)[3]iPod/iPhone[2]Lightning connector[1] iPod/iPhone maximum power supply current : DC 5 V = 1 A[2] Sold separately[3] Optional accessory Ñ Connecting an iPod/iPhoneCapUSB terminal[1] (0.8 m)White/BlackGray/BlackGreen/BlackPurple/BlackSpeaker impedance: 4-8 ΩPurpleGreenGrayWhiteTo front left speakerTo front right speakerTo rear left speakerTo rear right speaker*1Red (Ignition wire)Black (Ground wire) ¤(To car chassis)Yellow (Battery wire)Ignition key switchCar fuse boxACCB+Battery North America, South America sales area only](https://usermanual.wiki/Tonning-Electronic-Technology/KWM24BT/User-Guide-3523860-Page-23.png)

![26About this UnitSpecications Ñ Monitor sectionPicture Size: 6.75 inches (diagonal) wide: 151.8 mm (W) × 79.7 mm (H)Display System: Transparent TN LCD panelDrive System: TFT active matrix systemNumber of Pixels: 1,152,000 (800H x 480V x RGB)Eective Pixels: 99.99 %Pixel Arrangement: RGB striped arrangementBack Lighting: LED Ñ USB interface sectionUSB Standard: USB 2.0File System: FAT 16/ 32Maximum Power Supply Current: DC 5 V 1 AD/A Converter: 24 BitAudio Decoder: MP3/ WMA/ AACVideo Decoder: MPEG1/ MPEG2/ MPEG4 Ñ Bluetooth sectionTechnology: Bluetooth Ver.2.1 + EDRFrequency: 2.402 – 2.480 GHzOutput Power: +4 dBm (MAX), Power Class2Maximum Communication range: Line of sight approx. 10m (32.8 ft)Audio CodecSBCProle (Multi Prole support)• HFP (V1.6) (Hands Free Profile)• A2DP (V1.2) (Advanced Audio Distribution Profile)• AVRCP (V1.3) (Audio/Video Remote Control Profile)• PBAP (V1.1.1) (Phonebook Access Profile) Ñ DSP sectionGraphics equalizerBand: 7 BandFrequency (BAND1 – 7): 62.5/ 160/ 400/ 1k/ 2.5k/ 6.3k/ 16k HzGain: ±7 dB Ñ FM tuner sectionFrequency Range (step): 87.5 MHz – 108.0 MHz (50 kHz)Usable Sensitivity: 12.2 dBf: 1.1 μV/75 Ω (For North America, South America sales area, S/N : 30 dB) (For Europe, CIS sales area, S/N : 26 dB)Quieting Sensitivity: 19.2 dBf: 2.5 μV/75 Ω (For North America, South America sales area, S/N : 50 dB) (For Europe, CIS sales area, S/N : 46 dB)Frequency Response: 30 Hz – 14 kHzS/N Ratio (dB): 55 dB (MONO)Selectivity (± 400 kHz): Over 70 dBStereo Separation: 37 dB (1 kHz)NOTE• Although the effective pixels for the liquid crystal panel is given as 99.99% or more, 0.01% of pixels may not light or may light incorrectly.• Specifications subject to change without notice.(XURSHN+]ႅ႒ႏႣuGhଝYWWo¡ႅ႒ႏႣ](https://usermanual.wiki/Tonning-Electronic-Technology/KWM24BT/User-Guide-3523860-Page-26.png)