Top Victory Electronics BDL4620QL 46 inch (116.8 cm)Display User Manual BDL4620QL DFU V1 ENG 20151022 for safety 01
Top Victory Electronics (Taiwan) Co Ltd 46 inch (116.8 cm)Display BDL4620QL DFU V1 ENG 20151022 for safety 01
UserManual.wiki
>
Top Victory Electronics
>
BDL4620QL User Manual
Users Manual
Navigation menu
Upload a User Manual
Namespaces
Wiki Guide
HTML
PDF
Info
Views
User Manual
Discussion / Help
Navigation

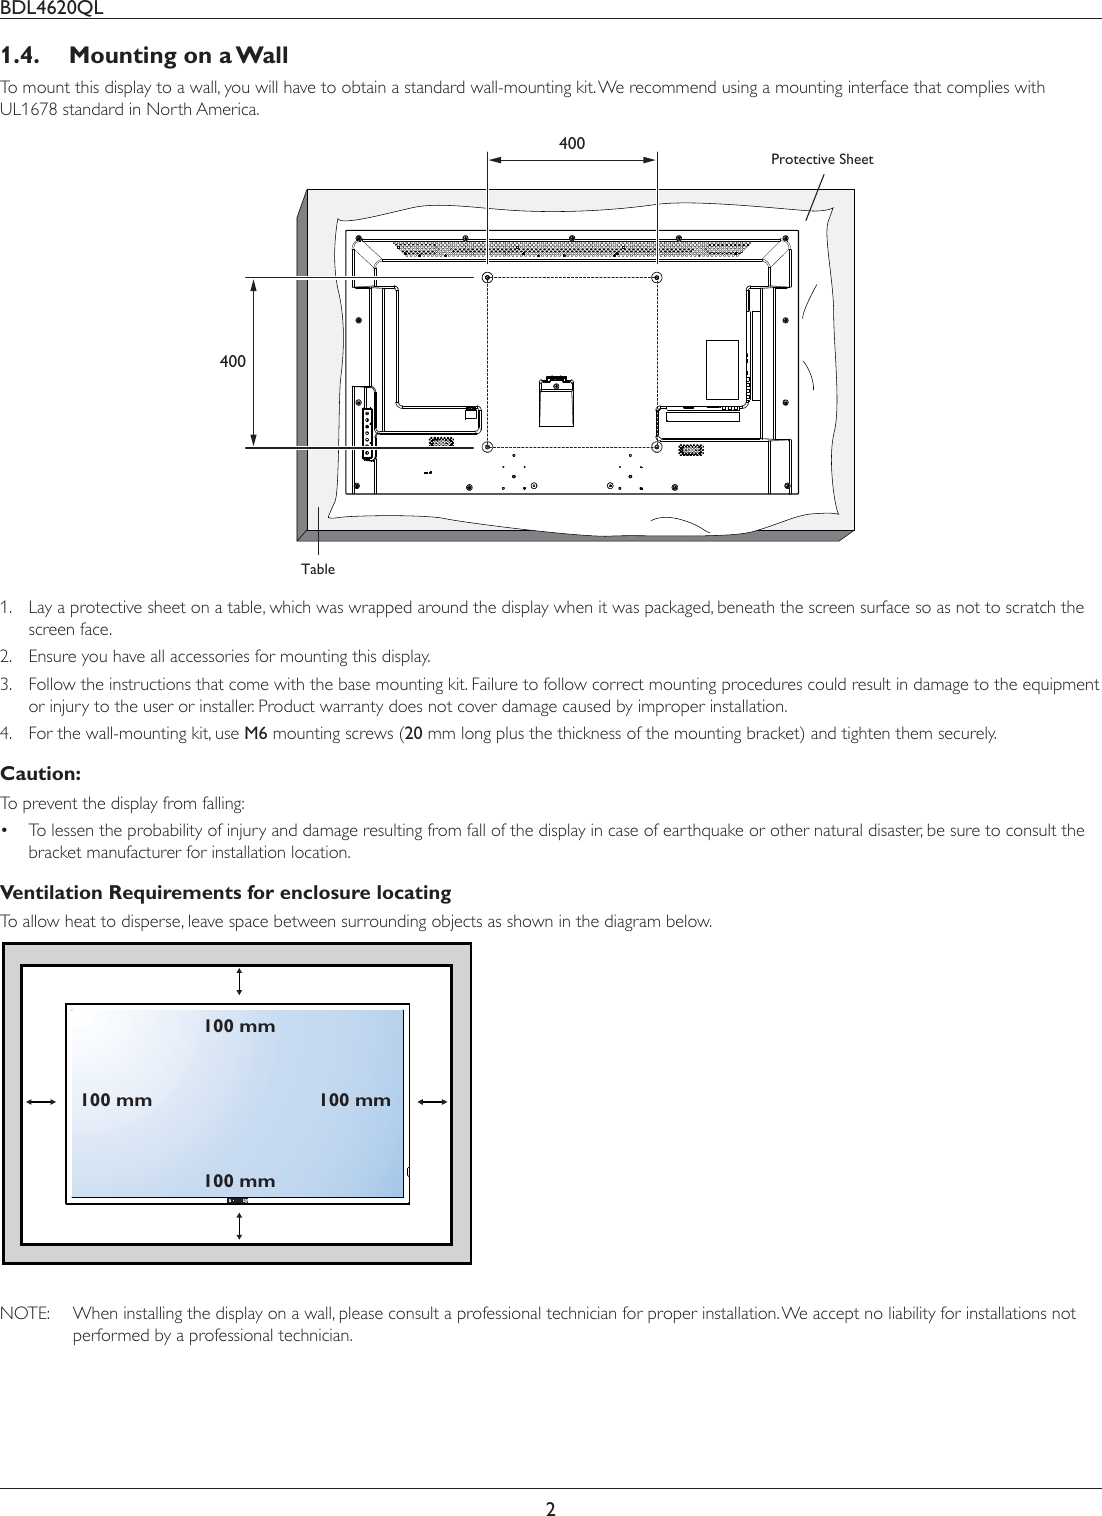
![BDL4620QLiiiImportant Safety Instructions1. Read these instructions.2. Keep these instructions.3. Heed all warnings.4. Follow all instructions.5. Do not use this apparatus near water.6. Clean only with dry cloth.7. Do not block any ventilation openings. Install in accordance with the manufacturer’s instructions.8. Do not install near any heat sources such as radiators, heat registers, VWRYHVRURWKHUDSSDUDWXVLQFOXGLQJDPSOLÀHUVWKDWSURGXFHKHDW9. Do not defeat the safety purpose of the polarized or grounding-type plug. A polarized plug has two blades with one wider than the other. A grounding type plug has two blades and a third grounding prong. The wide blade or the third prong are provided for your VDIHW\,IWKHSURYLGHGSOXJGRHVQRWÀWLQWR\RXURXWOHWFRQVXOWDQelectrician for replacement of the obsolete outlet.10. Protect the power cord from being walked on or pinched particularly at plugs, convenience receptacles, and the point where they exit from the apparatus.11. 2QO\XVHDWWDFKPHQWVDFFHVVRULHVVSHFLÀHGE\WKHPDQXIDFWXUHU12. Use only with the cart, stand, tripod, bracket, or WDEOHVSHFLÀHGE\WKHPDQXIDFWXUHURUVROGZLWKWKHapparatus. When a cart is used, use caution when moving the cart/apparatus combination to avoid injury from tip-over.13. Unplug this apparatus during lightning storms or when unused for long periods of time.14. 5HIHUDOOVHUYLFLQJWRTXDOLÀHGVHUYLFHSHUVRQQHO6HUYLFLQJLVUHTXLUHGZKHQWKHDSSDUDWXVKDVEHHQGDPDJHGLQDQ\ZD\VXFKDVSRZHUVXSSO\FRUGRUSOXJLVGDPDJHGOLTXLGKDVEHHQVSLOOHGor objects have fallen into the apparatus, the apparatus has been exposed to rain or moisture, does not operate normally, or has been dropped.WARNING: TO REDUCE THE RISK OF FIRE OR ELECTRIC SHOCK, DO NOT EXPOSE THIS APPARATUS TO RAIN OR MOISTURE.WARNING: Apparatus shall not be exposed to dripping or splashing DQGQRREMHFWVÀOOHGZLWKOLTXLGVVXFKDVYDVHVVKDOOEHplaced on the apparatus.WARNING: The batteries (batteries installed) shall not be exposed WRH[FHVVLYHKHDWVXFKDVVXQVKLQHÀUHRUWKHOLNHWARNING: The mains plug or appliance coupler is used as the disconnect device,the disconnect device shall remain readily operable.WARNING 7RSUHYHQWWKHVSUHDGRIÀUHNHHSFDQGOHVRURWKHURSHQÁDPHVDZD\IURPWKLVSURGXFWDWDOOWLPHV WARNING: To prevent injury, this apparatus must be securely DWWDFKHGWRWKHÁRRUZDOOLQDFFRUGDQFHZLWKWKHinstallation instructions.CAUTION 7KHVHVHUYLFLQJLQVWUXFWLRQVDUHIRUXVHE\TXDOLÀHGservice personnel only. To reduce the risk of electric shock,do not perform any servicing other than that contained in the operating instructions unless you are TXDOLWLÀHGWRGRVRCAUTION: Excessive sound pressure from earphones and headphones can cause hearing loss. Adjustment of the HTXDOL]HUWRPD[LPXPLQFUHDVHVWKHHDUSKRQHDQGheadphone output voltage and the sound pressure level. 7KHUHIRUHWRSURWHFW\RXUKHDULQJDGMXVWWKHHTXDOL]HUto an appropriate level.For UL/CUL application: For use only with UL Listed Wall Mount Bracket with minimum weight/load: 41.1 kg.For CB application: Unit without base weight: 13.7NJ7KHHTXLSPHQWand its associated mounting means still remain secure during the test. (Used wall mounting kit: 400 x 400 mm distance by using M6 screws of 20 mm long plus the thickness of the mounting bracket.)](https://usermanual.wiki/Top-Victory-Electronics/BDL4620QL/User-Guide-2796800-Page-3.png)
![BDL4620QLivRegulatory InformationCE Declaration of ConformityWe declare under our responsibility that the product is in conformity with the following standards: EN60065:2002+A1:2006+A11:2008+A2:2010+A12:2011 (Safety UHTXLUHPHQWRI$XGLRYLGHRDQGVLPLODUHOHFWURQLFDSSDUDWXV (15DGLR'LVWXUEDQFHUHTXLUHPHQWRI,QIRUPDWLRQ7HFKQRORJ\(TXLSPHQW (1,PPXQLW\UHTXLUHPHQWRI,QIRUPDWLRQ7HFKQRORJ\(TXLSPHQW EN61000-3-2:2006 +A1:2009+A2:2009 (Limits for Harmonic Current Emission) EN61000-3-3:2008 (Limitation of Voltage Fluctuation and Flicker) EN 50581:2012 (Technical documentation for the assessment of electrical and electronic products with respect to the restriction of hazardous substances)following provisions of directives applicable: 2006/95/EC (Low Voltage Directive) 2004/108/EC (EMC Directive) 2009/125/EC (ErP Directive, EC No. 1275/2008, 642/2009 Implementing Directive for Standby and Off mode power consumption) 93/68/EEC (Amendment of EMC and Low Voltage Directive) and is produced by a manufacturing organization on ISO9000 level. 2011/65/EU (RoHS 2 Directive) Federal Communications Commission (FCC) Notice (U.S. Only)7KLVHTXLSPHQWKDVEHHQWHVWHGDQGIRXQGWRFRPSO\with the limits for a Class B digital device, pursuant to part 15 of the FCC Rules. These limits are designed to provide reasonable protection against harmful LQWHUIHUHQFHLQDUHVLGHQWLDOLQVWDOODWLRQ7KLVHTXLSPHQWJHQHUDWHVXVHVDQGFDQUDGLDWHUDGLRIUHTXHQF\HQHUJ\and, if not installed and used in accordance with the instructions, may cause harmful interference to radio communications. However, there is no guarantee that interference will not occur in a particular installation. ,IWKLVHTXLSPHQWGRHVFDXVHKDUPIXOLQWHUIHUHQFHWRradio or television reception, which can be determined E\WXUQLQJWKHHTXLSPHQWRIIDQGRQWKHXVHULVencouraged to try to correct the interference by one or more of the following measures: Reorient or relocate the receiving antenna. ,QFUHDVHWKHVHSDUDWLRQEHWZHHQWKHHTXLSPHQWand receiver. &RQQHFWWKHHTXLSPHQWLQWRDQRXWOHWRQDcircuit different from that to which the receiver is connected. Consult the dealer or an experienced radio/TV technician for help.&KDQJHVRUPRGLÀFDWLRQVQRWH[SUHVVO\DSSURYHGE\the party responsible for compliance could void the XVHU·VDXWKRULW\WRRSHUDWHWKHHTXLSPHQWUse only an RF shielded cable that was supplied with the display when connecting this display to a computer device.7RSUHYHQWGDPDJHZKLFKPD\UHVXOWLQÀUHRUVKRFNKD]DUGGRQRWexpose this appliance to rain or excessive moisture.THIS CLASS B DIGITAL APPARATUS MEETS ALL REQUIREMENTS OF THE CANADIAN INTERFERENCE- CAUSING EQUIPMENT REGULATIONS.This device complies with Part 15 of the FCC Rules. Operation is subject to the following two conditions: (1) this device may not cause harmful interference, and (2) this device must accept any interference received, including interference that may cause undesired operation.NOTE:THE MANUFACTURER IS NOT RESPONSIBLE FOR ANY RADIO OR TV INTERFERENCE CAUSED BY UNAUTHORIZED MODIFICATIONS TO THIS EQUIPMENT.SUCH MODIFICATIONS COULD VOID THE USER’S AUTHORITY TO OPERATE THE EQUIPMENT. 127(7KLVHTXLSPHQWKDVEHHQWHVWHGDQGIRXQGWRFRPSO\ZLWKWKHlimits for a Class B digital device, pursuant to Part 15 of the FCC Rules. These limits are designed to provide reasonable protection against harmful interference in a residential installation. 7KLVHTXLSPHQWJHQHUDWHVXVHVDQGFDQUDGLDWHUDGLRIUHTXHQF\HQHUJ\and, if not installed and used in accordance with the instructions, may cause harmful interference to radio communications. However, there is no guarantee that interference will not occur in a particular installation.,IWKLVHTXLSPHQWGRHVFDXVHKDUPIXOLQWHUIHUHQFHWRUDGLRRUWHOHYLVLRQUHFHSWLRQZKLFKFDQEHGHWHUPLQHGE\WXUQLQJWKHHTXLSPHQWRIIDQGon, the user is encouraged to try to correct the interference by one or more of the following measures: --Reorient or relocate the receiving antenna. ,QFUHDVHWKHVHSDUDWLRQEHWZHHQWKHHTXLSPHQWDQGUHFHLYHU&RQQHFWWKHHTXLSPHQWLQWRDQRXWOHWRQDFLUFXLWGLIIHUHQWIURPWKDWto which the receiver is connected. --Consult the dealer or an experienced radio/TV technician for help.3ROLVK&HQWHUIRU7HVWLQJDQG&HUWLÀFDWLRQNotice7KHHTXLSPHQWVKRXOGGUDZSRZHUIURPDVRFNHWZLWKDQDWWDFKHGSURWHFWLRQFLUFXLWDWKUHHSURQJVRFNHW$OOHTXLSPHQWWKDWZRUNVtogether (computer, display, printer, and so on) should have the same power supply source.The phasing conductor of the room’s electrical installation should have a reserve short-circuit protection device in the form of a fuse with a nominal value no larger than 16 amperes (A).7RFRPSOHWHO\VZLWFKRIIWKHHTXLSPHQWWKHSRZHUVXSSO\FDEOHPXVWbe removed from the power supply socket, which should be located QHDUWKHHTXLSPHQWDQGHDVLO\DFFHVVLEOH$SURWHFWLRQPDUN´%µFRQÀUPVWKDWWKHHTXLSPHQWLVLQFRPSOLDQFHZLWKWKHSURWHFWLRQXVDJHUHTXLUHPHQWVRIVWDQGDUGV317and PN-89/E-06251.](https://usermanual.wiki/Top-Victory-Electronics/BDL4620QL/User-Guide-2796800-Page-4.png)


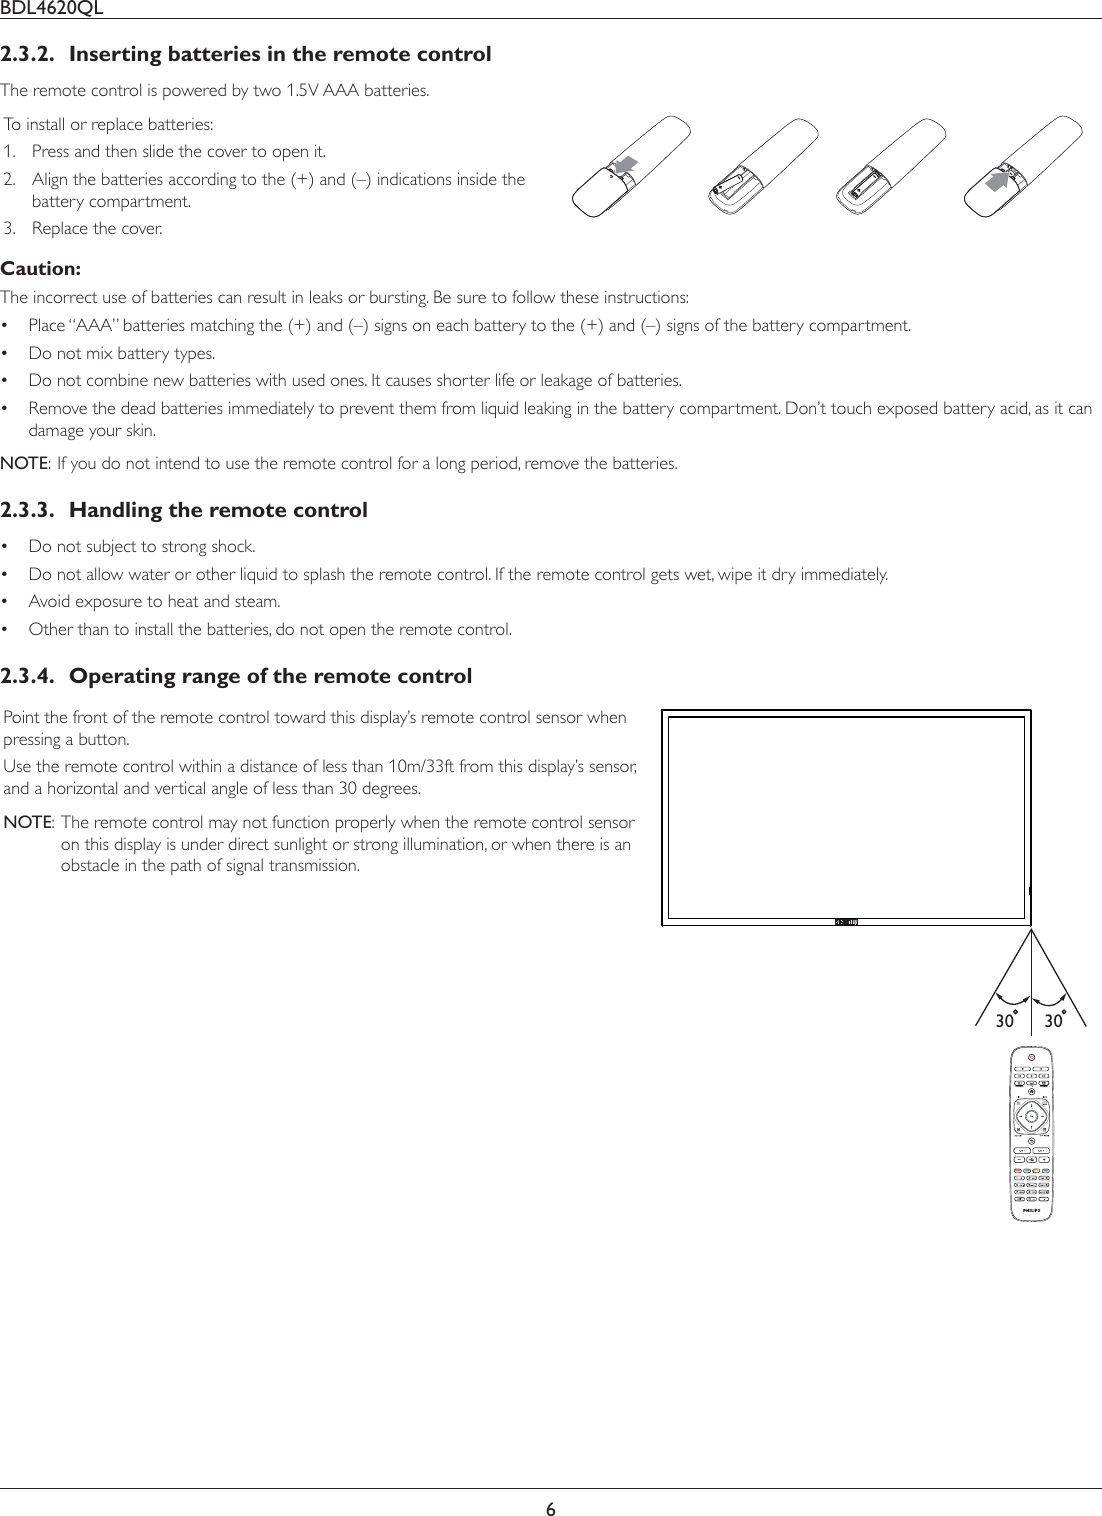
![BDL4620QL32. Parts and Functions2.1. Control PanelINPUT MENU325417681 [] buttonPress to switch the display on or off.2 [] buttonPress to select input source.3 [] buttonPress to access the OSD menu.4 [] buttonPress to move the highlight bar up to adjust the selected item while OSD menu is on.5 [] buttonPress to move the highlight bar down to adjust the selected item while OSD menu is on.6 [] buttonPress to increase the adjustment while OSD menu is on, or to increase the audio output level while OSD menu is off.7 [] buttonPress to decrease the adjustment while OSD menu is on, or to decrease the audio output level while OSD menu is off.8 Remote control sensor and power status indicator Receives command signals from the remote control. -Lights green when this display is turned on -Lights red when this display is in standby mode -Lights off when the main power of this display is turned off](https://usermanual.wiki/Top-Victory-Electronics/BDL4620QL/User-Guide-2796800-Page-11.png)
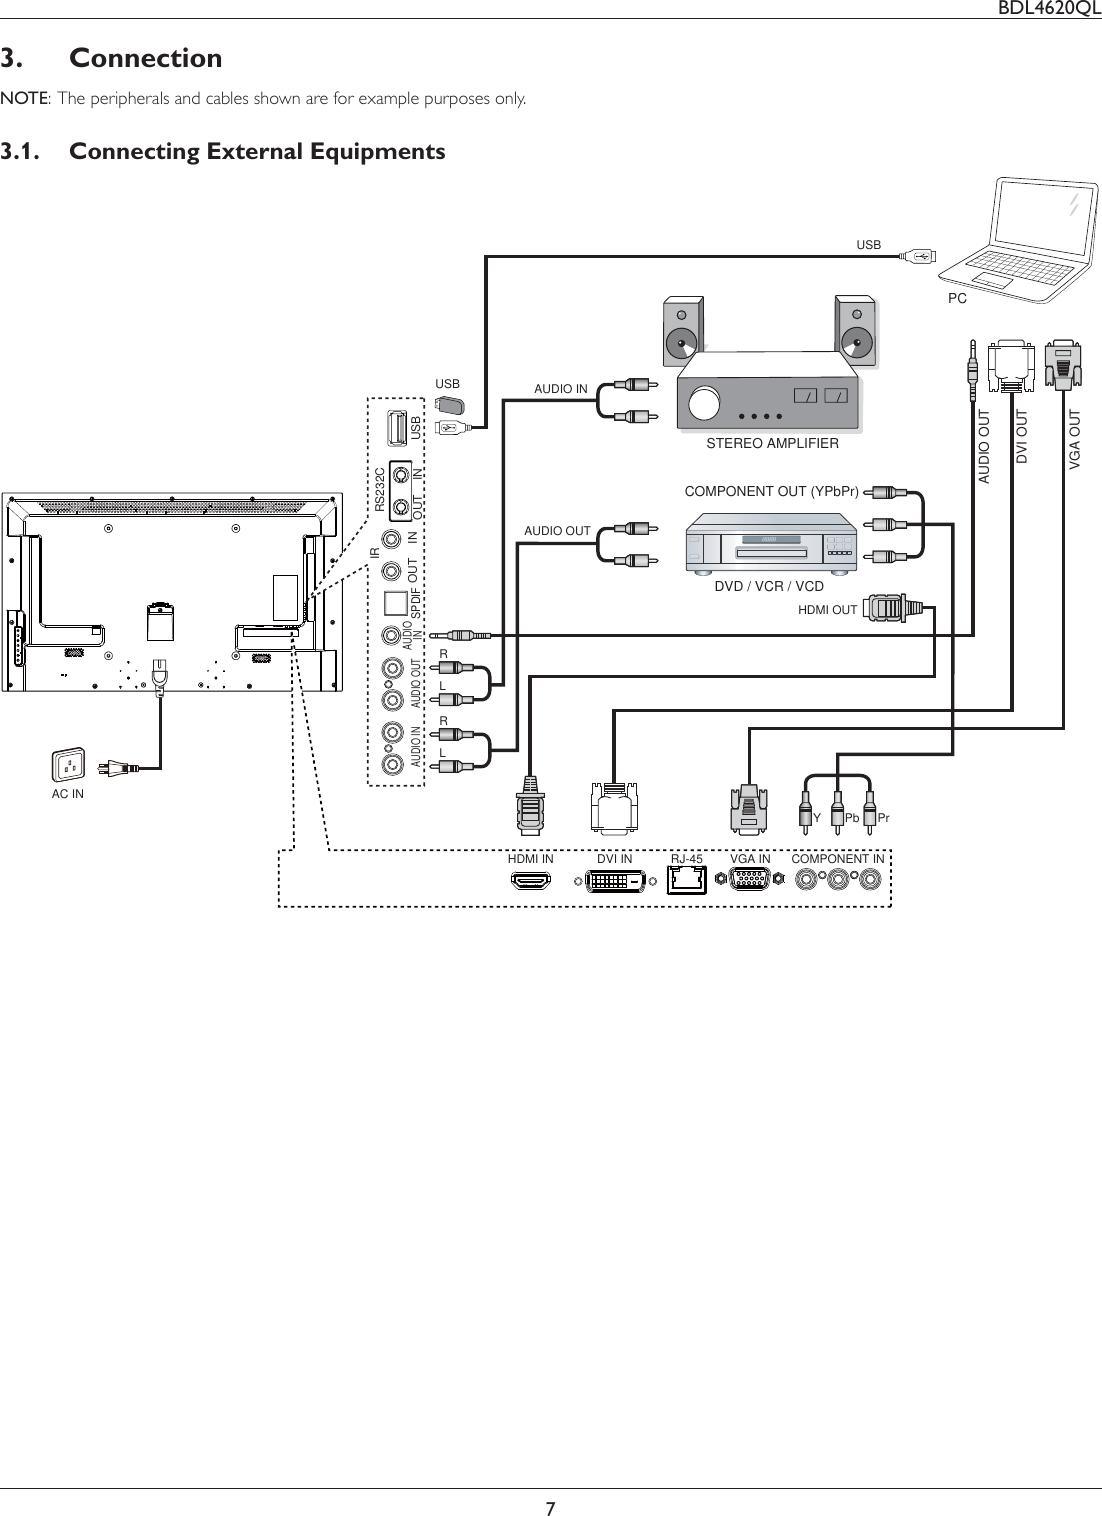
![BDL4620QL42.2. Input/Output Terminals3 465789101112131415162 1YPbPrLRLR INOUTINOUT1 AC INAC power input.2 MAIN POWER SWITCHMain power on/off switch.3 HDMI INHDMI video/audio input.4 DVI INDVI-D video input.5 RJ-45LAN control function for the use of remote control signal fromcontrol center.6 VGA IN (D-Sub)VGA video input.7 COMPONENT IN (RCA)Component YPbPr video source input.8 AUDIO IN (RCA)Audio input from external AV device.The audio content is the same as the speakers.9 AUDIO OUT (RCA)Audio signal output to connect your external AV device.10 AUDIO IN (3.5mm)Audio input from your PC.11 SPDIF OUTDigital audio signal output to connect your external AV device.12 IR OUT / 13 IR IN (3.5 mm)IR signal output/input for the loop-through function.NOTES: This display’s remote control sensor will stop working if the jack [IR IN] is connected. To remotely control your A/V device via this display, refer to page 8 for IR Pass Through connection.14 RS232C OUT / 15 RS232C IN (2.5 mm)RS232C network output/input for the loop-through function.16 USB PORTConnect your USB storage device.](https://usermanual.wiki/Top-Victory-Electronics/BDL4620QL/User-Guide-2796800-Page-12.png)
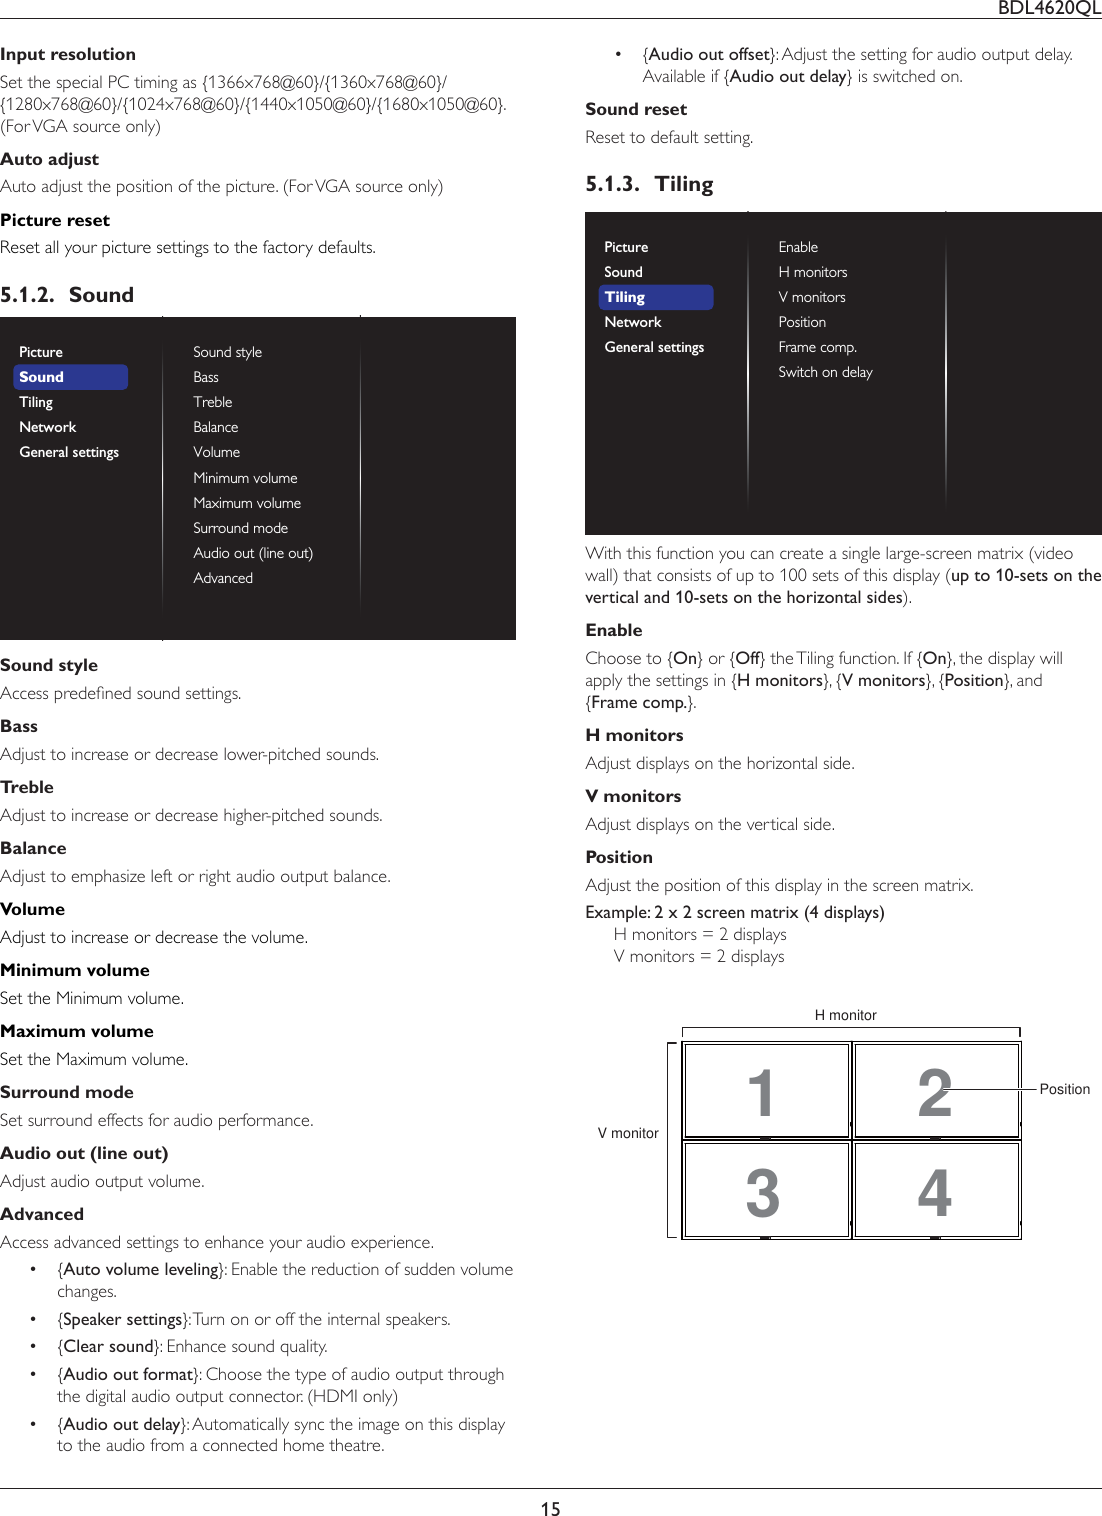
![BDL4620QL52.3. Remote Control2.3.1. General functions11415161023456789111012131 POWER buttonSwitch this display on or off.2 PLAY buttons&RQWUROSOD\EDFNRIPHGLDÀOHV3 SOURCE buttonSelect input source. Press [ ] or [ ] button to select from USB, Network, HDMI, DVI, YPbPr, AV, or VGA. Press [ ] button WRFRQÀUPDQGH[LW4 HOME buttonAccess the OSD menu.5 LISTNo function.6 NAVIGATION buttonsNavigate through menus and select items.7 button&RQÀUPDQHQWU\RUVHOHFWLRQ8 ADJUST buttonAccess currently available options, picture and sound menus.9 BACK buttonReturn to the previous menu page or exit from the previous function.10 VOLUME buttonAdjust volume.11 MUTE buttonPress to turn the mute function on/off.12 COLOR buttonsSelect tasks or options.13 NUMERIC buttonsEnter text for network setting.14 FORMAT buttonChange picture format.15 INFO buttonDisplay information about current activity.16 OPTIONSAccess currently available options, picture and sound menus.](https://usermanual.wiki/Top-Victory-Electronics/BDL4620QL/User-Guide-2796800-Page-13.png)
![BDL4620QL83.2. Connecting Multiple Displays3.2.1. RS232C control connection (optional)PCDISPLAY 1 DISPLAY 2[RS232C IN][RS-232C][RS232C OUT] [RS232C IN] [RS232C OUT]3.2.2. IR connection (optional)DISPLAY 1 DISPLAY 2[IR IN] [IR OUT] [IR IN]ExternalIR Receiver [IR OUT]NOTE: This display’s remote control sensor will stop working if the [IR IN] is connected.3.3. IR Pass-through Connection (optional)DISPLAY DVD / VCR / VCD(DVD / VCR / VCD)(BDL4620QL)Remote Control[IR OUT][IR IN]](https://usermanual.wiki/Top-Victory-Electronics/BDL4620QL/User-Guide-2796800-Page-16.png)
![BDL4620QL93.4. Wire-connecting to Network (optional)If you connect this display to a home network, you can play photos, music and videos from your computer. See 3OD\PXOWLPHGLDÀOHV(Page 10) for more detail.PC[RJ-45][RJ-45] ROUTERINTERNETTo setup the network:1. Switch on the router and switch on its DHCP setting.2. Connect the router to this display with an Ethernet cable.3. Press button on the remote control, then select {Setup}.4. Select {Connect to network}, then press button.5. Follow the on-screen instructions to install the network.6. :DLWIRUWKLVGLVSOD\WRÀQGWKHQHWZRUNFRQQHFWLRQ7. If you are prompted, agree to the “End User Licence Agreement”.NOTE: Connecting with a shielded CAT-5 Ethernet cable to comply with the EMC directive.](https://usermanual.wiki/Top-Victory-Electronics/BDL4620QL/User-Guide-2796800-Page-17.png)
![BDL4620QL104. OperationNOTE: The control button described in this section is mainly on the UHPRWHFRQWUROXQOHVVVSHFLÀHGRWKHUZLVH4.1. Watch the Connected Video SourceSee page <7>IRUH[WHUQDOHTXLSPHQWVFRQQHFWLRQ1. Press [] SOURCE button.2. Press [] or [ ] button to choose a device, then press [ ] button.4.2. Change Picture FormatYou can change the picture format to suit the video source. Each video source has its available picture formats.The available picture formats depend on the video source:1. Press [] FORMAT button.2. Press [] or [ ] button to choose a picture format, then press [] button. {Auto zoom`(QODUJHWKHSLFWXUHWRÀOOWKHVFUHHQRecommended for minimal screen distortion but not for HD or PC. {Movie expand 16:9}: Scale 4:3 format to 16:9. Not recommended for HD or PC. {Wide screen}: Shows wide screen format content unstretched. Not recommended for HD or PC. {Unscaled}: Provide maximum detail for PC. Only available when PC mode is selected in the {Picture} menu. {4:3}: Display the classic 4:3 format.4.3. Play multimedia files via Local Area Network7RSOD\ÀOHVYLD/RFDO$UHD1HWZRUN\RXZLOOQHHG A wired home network, connected with a Universal Plug and Play (uPnP) router. Optional: A LAN cable that connects your display to your home network. A media server running on your computer. $SSURSULDWHVHWWLQJVRQ\RXUFRPSXWHUÀUHZDOOWRDOORZ\RXWRUXQthe media server.4.3.1. Set up the network1. Connect your display and the computer to the same home network. See illustration below to connect your display to a network.2. Switch on your computer and the router. Single display setup:PC[RJ-45][RJ-45] ROUTER Multiple display setup:PC[RJ-45] [RJ-45]DISPLAY 1[RJ-45]DISPLAY 2ROUTERNOTE: If the apparatus does not return to DLNA mode due to external electrical disturbances (e.g. electrostatic discharge), user LQWHUYHQWLRQLVUHTXLUHGSet up media sharing1. ,QVWDOODPHGLDVHUYHURQ\RXUFRPSXWHUWRVKDUHPHGLDÀOHV7KHVHare some media servers: For PC: Windows Media Player 11 (or higher) or TVersity For Mac: Twonky2. Switch on media sharing on your computer using the media server. For more information on how to set up the media server, refer to the website of the media server.4.3.2. How to use DLNA-DMPEnsure you have connected to the network.You can press button to display the connection of the network.Picture formatPicture styleSound styleSmart powerVolumeMonitor groupMonitor IDModel nameSWVersionSerial noTemperatureNetwork configurationIP addressNetmaskGatewayNetwork nameEthernet MAC addressWide screenStandardPersonalOff011BDL4620QL1.2525°CDHCP & Auto IP192.168.1.116255.255.255.0192.168.1.1BDL4620QLFF:FF:FF:FF:FF:FF:HDMI 1 1080p60 26/09/2014 Friday 09:32:003OD\ÀOHVIURPGLVSOD\1. Press [ ] SOURCE button, choose Network, and press [] button.USBNetworkInternetSmartCMSHDMI DVI-DYPbPrAVVGA2. Now, you can see all the PC’s connected to the same router on the screen. Choose the right one.3. Press [] and [ ]WRFKRRVHWKHGLUHFWRU\DQGÀOHVWRSOD\4. You can connect up to 4 displays to the same PC and play same media stream.](https://usermanual.wiki/Top-Victory-Electronics/BDL4620QL/User-Guide-2796800-Page-18.png)
![BDL4620QL114.3.3. How to use DLNA-DMR from PC1. Press [ ] HOME button, choose Network and press [ ] button.PictureSoundTilingNetworkGeneral settingsNetwork settingsStatic IP ConfigurationDigital Media Rendere...Network nameClear Internet memory2. Set Digital Media Renderer DMR as ON.Network settingsStatic IP ConfigurationDigital Media Rendere...Network nameClear Internet memoryPictureSoundTilingNetworkGeneral settingsOffOn3. Set the name of your display.Network settingsStatic IP ConfigurationDigital Media Renderer - D...Network nameClear Internet memoryCancel Done ClearBDL4620QL4. Press [] HOME button, and go to Source menu. Then, choose Network and press [ ] button.5. On your PC, go to Network and Sharing Center, and click Choose homegroup and sharing options.6. Check the media formats. Then, click Choose media streaming options.....7. Go to Advanced sharing settings, and check Turn on network discovery.8. 1RZJRWRWKHGLUHFWRU\RI\RXUPHGLDÀOHV&KRRVHWKHPHGLDÀOHE\ULJKWFOLFN2QWKHVXEPHQXIURPPlay To<RXFDQÀQGDOOdisplays connected to your network. Choose the display, and click WKHPHGLDÀOHWRSOD\3OD\ÀOHV1. Press [] SOURCE button.2. Choose Browse network, and press [ ] button. 3. &KRRVHDÀOHIURPWKHFRQWHQWEURZVHUDQGSUHVV[] button to start playing. 4. Press the [PLAY] buttons on the remote control to control playing. Tips: &KRRVHWKHWRSEDUWRÀOWHU\RXUÀOHVE\W\SH Choose SortWRDUUDQJHWKHÀOHVE\DOEXPQDPHDUWLVWRURWKHUÀHOGV 7RFOHDUWKHOLVWRIRIÁLQHPHGLDVHUYHUVSUHVV[] OPTIONS button. Then, choose &OHDURIÁLQHVHUYHUV and press [ ] button.4.4. Play multimedia files from USB device1. Connect your USB device to the USB port on the display. AUDIO OUTUSBRS232CINOUTIRINOUTAUDIO IN AUDIOINSPDIFUSB2. Press [ ] SOURCE button, choose USB, and press [ ] button.](https://usermanual.wiki/Top-Victory-Electronics/BDL4620QL/User-Guide-2796800-Page-19.png)
![BDL4620QL12USBNetworkInternetSmartCMSHDMI DVI-DYPbPrAVVGA3. The connected USB device is detected automatically for all its SOD\DEOHÀOHVZKLFKZLOOEHDXWRPDWLFDOO\VRUWHGLQWRW\SHV Music, Movie, and Photo.4. Press [] BACK button to go up to the top layer in the screen. Press [] or [ ]EXWWRQWRFKRRVHWKHÀOHW\SH3UHVV[ ] button to enter its play list.5. &KRRVHWKHÀOH\RXZDQW3UHVV[] button to start playing.6. Follow the on-screen instruction to control the play option.7. Press [PLAY] buttons (H F G I J) to control playing. 4.5. Play options4.5.1. Playing music files1. Choose Music in the top bar.Music2. Choose one music track, and press [ ] button. 7RSOD\DOOWKHWUDFNVLQDIROGHUFKRRVHRQHPXVLFÀOH7KHQpress [] to Play All. To skip to the next or previous track, press [] or [ ] button. To pause the track, press [] button. Press [ ] button again to resume playback. To skip backward or forward 10 seconds, press [] or [ ] button. To search backward or forward, press [G] or [J] button, press repeatedly to toggle between different speeds. To stop the music, press [H] button.Music options While you play music, press [] OPTIONS button, then press [ ] button to choose an option: {6KXIÁH}: Enable or disable random play of tracks. {Repeat}: Choose {Repeat} to play a track or an album repeatedly, or choose {Play once} to play a track once.NOTE: To view information about a song (for example, title, artist or duration), choose the song, then press [] INFO button. To hide the information, press [] INFO button again.4.5.2. Playing movie files1. Choose Movie in the top bar. Movie2. Choose a video, and press [ ] button. 7RSOD\DOOWKHYLGHRVLQDIROGHUFKRRVHRQHYLGHRÀOH7KHQpress [] to Play All. To pause the video, press [] button. Press [ ] button again to resume playback. To skip backward or forward 10 seconds, press [] or [ ] button. To search backward or forward, press [G] or [J] button, press repeatedly to toggle between different speeds. To stop the video, press [H] button.Movie options While playing video, press [] OPTIONS button, then press [ ] button to choose an option: {Subtitles}: Choose the available subtitle settings. {Subtitle language}: Choose the language for subtitles if available. {6KXIÁH`(QDEOHRUGLVDEOHUDQGRPSOD\RIYLGHRÀOHV {Repeat}: Choose {Repeat`WRSOD\WKHYLGHRÀOHUHSHDWHGO\RU {Play once`WRSOD\WKHYLGHRÀOHRQFH {Status}: To view information about a video (for example, played position, duration, title, or date).4.5.3. Playing photo files1. Choose Photo in the top bar. Photo2. Choose a photo thumbnail, then press ] button. Start a slideshow If there are multiple photos in a folder, choose a photo. Then, press [] to Play All. To skip to the previous or next photo, press [] or [ ] button, and then press [] button. To stop the slideshow, press [H] button.Slideshow options While you play a slideshow, press [] OPTIONS button, then press [] button to choose an option: {6KXIÁH}: Enable or disable random display of pictures in the slideshow. {Repeat}: Choose {Repeat} to watch a slideshow repeatedly or {Play once} to watch once. {Slideshow Time}: Choose the displaying time for each photo in the slideshow. {Slideshow Transitions}: Choose the transition from one photo to the next.4.6. How to use Opera browser (HTML5)1. Press [ ] SOURCE button, and choose Internet and press [] button.USBNetworkInternetSmartCMSHDMI DVI-DYPbPrAVVGA](https://usermanual.wiki/Top-Victory-Electronics/BDL4620QL/User-Guide-2796800-Page-20.png)
![BDL4620QL132. Move the cursor to URL address bar. Press [ ] button and it will pop out the on-screen keyboard. You can move the cursor to HQWHUWKH85/DGGUHVV$IWHUÀQLVKLQJWKH85/DGGUHVVFKRRVHDone.HistoryBookmarkWeb Address:XInternetwww.google.comhttp://wwwwwwwwwwwwwwwwwwwwwwwwwwwwwwwwwwwwwwwwwwwwwwwwwwwwwwwwwwwwwwwwwwwwwwwwwwwwwwwwwwwwwwwwwwwwwwwwwwwwwwwwwwwwwwwwwwwwwwwwwwwwwwwwwwwwwwwwwwwwwwwwwwwwwwwwwwwwwwwwwwwwwwwwwwwwwwwwwwwwwwwwwwwwwwwwwwwwwwwwwwwwwwwwwwwwwwwwwwwwwwwwwwwwwwwwwwwwwwwwwwwwwwwwwwwwwwwwwwwwwwwwwwwwwwwwwwwwwwwwwwwwwwwwwwwwwwwwwwwwwwwwwwwwwwwwwwwwwwwwwwwwwwwwwwwwwwwwwwwwwwwwwwwwwwwwwwwwwwwwwwwwwwwwwwwwwwwwwwwwwwwwwwwwwwwwwwwwwwwwwwwwwwwwwwwwwwwwwwwwwwwwwwwwwwwwwwwwwwwwwwwwwwwwwwwwwwwwwwwwwwwwwwwwwwwwwwwwwwwwwwwwwwwwwwwwwwwwwwwwwwwwwwwwwwwwwwwww....ggggggggggggggggggggggggggggggggggggggggggggggggggggggggggggggggggggggggggggggggggggggggggggggggggggggggggggggggggggggggggggggggggggggoooooooooooooooooooooooooooooooooooooooooooooooooooooooooooooooooooooooooooooooooooooooooooooooooooooooooooooooooooooooooooooooooooooooooooooooooooooooooooooooooooooooooooooooooooooooooooooooooooooooooooooooooooooooooooooooooooooooooooooooooooooooooooooooooooooooooooooooooooooooooooooooooooooooooooooooooooooooooogggggggggggggggggggggggggggggggggggggggggggggggggggggggggggggggggggggggggggggggggggggggggggggggggggggggggggggggggllllllllllllllllllllllllllllllllllllllllllllllllllllllllllllllllllllllllllleeeeeeeeeeeeeeeeeeeeeeeeeeeeeeeeeeeeeeeeeeeeeeeeeeeeeeeeeeeeeeeeeeeeeeeeeeeeeeeeeeeeeeeeeeeeeeeeeeeeeeeeeeeeeeeeeeeeeeeeeeeeeeeeeeeeeeeeeeeeeeeeeee....ccccccccccccccccccccccccccccccccccccccccccccccccccccccccccccccccccccccccccccccccccccccccccccccccccccccccccooooooooooooooooooooooooooooooooooooooooooooooooooooooooooooooooooooooooooooooooooooooooommmmmmmmmmmmmmmmmmmmmmmmmmmmmmmmmmmmmmmmmmmmmmmmmmmmmmmmmmmmmmmmmmmmmmmmmmmmmmmmmmmmmmmmmmmmmmmmmmmmmmmmmmmmmmmmmmmmmmDoneHide. , @ ‘g h ip q r sa b cj k lt u v? ! -<d e fm n ow x y zabc ABC 123 www Backspace3. Move the cursor to “Æ” icon and press [ ] button.HistoryBookmarkWeb Address:XInternetwww.google.comhttp://www.google.com wwwwwwwwwwwwwwwwwwwwwwwwwwwwwwwwwwwwwwwwwwwwwwwwwwwwwwwwwwwwwwwwwwwwwwwwwwwwwwwwwwwwwwwwwwwwwwwwwwwwwwwwwwwwwwwwwwwwwwwwwwwwwwwwwwwwwwwwwwwwwwwwwwwwwwwwwwwwwwwwwwwwwwwwwwwwwwwwwwwwwwwwwwwwwwwwwwwwwwwwwwwwwwwwwwwwwwwwwwwwwwwwwwwwwwwwwwwwwwwwwwwwwwwwwwwwwwwwwwwwwwwwwwwwwwwwwwwwwwwwwwwwwwwwwwwwwwwwwwwwwwwwwwwwwwwwwwwwwwwwwwwwwwwwwwwwwwwwwwwwwwwwwwwwwwwwwwwwwwwwwwwwwwwwwwwwwwwwwwwwwwwwwwwwwwwwwwwwwwwwwwwwwwwwwwwwwwwwwwwwwwwwwwwwwwwwwwwwwwwwwwwwwwwwwwwwwwwwwwwwwwwwwwwwwwwwwwwwwwwwwwwwwwwwwwwwwwwwwwwwwwwwwwwwwwwwwwwww....ggggggggggggggggggggggggggggggggggggggggggggggggggggggggggggggggggggggggggggggggggggggggggggggggggggggggggggggggggggggggggggggggggggggoooooooooooooooooooooooooooooooooooooooooooooooooooooooooooooooooooooooooooooooooooooooooooooooooooooooooooooooooooooooooooooooooooooooooooooooooooooooooooooooooooooooooooooooooooooooooooooooooooooooooooooooooooooooooooooooooooooooooooooooooooooooooooooooooooooooooooooooooooooooooooooooooooooooooooooooooooooooooogggggggggggggggggggggggggggggggggggggggggggggggggggggggggggggggggggggggggggggggggggggggggggggggggggggggggggggggggllllllllllllllllllllllllllllllllllllllllllllllllllllllllllllllllllllllllllleeeeeeeeeeeeeeeeeeeeeeeeeeeeeeeeeeeeeeeeeeeeeeeeeeeeeeeeeeeeeeeeeeeeeeeeeeeeeeeeeeeeeeeeeeeeeeeeeeeeeeeeeeeeeeeeeeeeeeeeeeeeeeeeeeeeeeeeeeeeeeeeeee....ccccccccccccccccccccccccccccccccccccccccccccccccccccccccccccccccccccccccccccccccccccccccccccccccccccccccccooooooooooooooooooooooooooooooooooooooooooooooooooooooooooooooooooooooooooooooooooooooooommmmmmmmmmmmmmmmmmmmmmmmmmmmmmmmmmmmmmmmmmmmmmmmmmmmmmmmmmmmmmmmmmmmmmmmmmmmmmmmmmmmmmmmmmmmmmmmmmmmmmmmmmmmmmmmmmmmmm4. Now, you can see the web page. NOTES: The Opera browser does not support FLASH format. The browser is not a video source. It will not stay at the browser screen after you restart the display.](https://usermanual.wiki/Top-Victory-Electronics/BDL4620QL/User-Guide-2796800-Page-21.png)
![BDL4620QL145. Change your settingsUsing the remote control: 1. Press [] HOME button to display the OSD menu.2. Press [] [ ] [ ] or [ ] button to choose its menu item or to adjust its value. Press []EXWWRQWRFRQÀUP3. Press [] BACK button to go back to the previous menu layer.4. Press [] HOME button to exit the OSD menu.Using the display’s control buttonsINPUT MENU1. Press [ ] button to display the OSD menu.2. Press [] [ ] [ ] or [ ] button to choose menu item or adjust its value.3. Press []EXWWRQWRFRQÀUPPHQXVHOHFWLRQDQGHQWHULWVsubmenu.4. Press [] button to exit the OSD menu.5.1. SettingsPress [] HOME button.5.1.1. PicturemenuPicture styleBacklightColourSharpnessNoise reductionMPEG artifact reducti...Picture enhancementAdvancedScan modeFormat and edgesPictureSoundTilingNetworkGeneral settingsPicture style&KRRVHDSUHGHÀQHGSLFWXUHVHWWLQJBacklight Adjust the brightness of this display’s backlight.ColourAdjust the colour saturation of the picture.SharpnessAdjust the sharpness of the picture.Noise reductionChoose the amount of noise reduction for the picture.MPEG artifact reductionSmoothen transitions and haziness in the digital picture.Picture enhancementFine-tune each pixel to match surrounding pixels and produce a brilliant, KLJKGHÀQLWLRQLPDJH {Advanced sharpness}: Enable superior sharpness, especially on lines and contours in the picture. {Dynamic contrast}: Dynamically enhance the details in the dark, medium and light areas of the picture. {Colour enhancement}: Dynamically enhance the vividness and details of colours.AdvancedAccess advanced settings such as gamma, tint, video contrast and so on. {Gamma}: Adjust the non-linear setting for picture luminance and contrast. {Tint}: Change the colour balance. {Custom tint}: Customise colour balance setting. Only available if {Tint} Æ {Custom} is chosen. {Video contrast}: Adjust video contrast. {Brightness}: Adjust screen brightness. {Hue}: Adjust screen hue.Scan modeChange the display area of the image.Format and edges {Picture format}: Change the picture format.See page 10 for the descriptions about Picture format.](https://usermanual.wiki/Top-Victory-Electronics/BDL4620QL/User-Guide-2796800-Page-22.png)
![BDL4620QL18StatusSourceOn timeOff timeRepeat modesPlaylist settingSchedule 1Schedule 2Schedule 3Schedule 4Schedule 5Schedule 6Schedule 7No repeatEvery SundayEvery MondayEvery TuesdayEvery WednesdayEvery ThursdayEvery FridayEvery SaturdaySlideshow durations 6. If {Source} Æ {USB} is chosen. Go to Playlist setting.0001/0002Options ExitPhotoPhotoVideo -Press [] [ ] EXWWRQVWRFKRRVHÀOHV -Press [] [ ] buttons to switch Playlist and File Manager. -Press [] button to set or clear the playlist.7. To save the playlist, press [] and choose Save list.0004/0004Options ExitPhotoPhoto[..]Movie.avi\media\photoPhoto1.jpgPhoto2.jpgPhoto3.jpgSortRecursive ParserMedia TypeSave listNOTES: (DFK3OD\OLVWVXSSRUWVXSWRÀOHV Playlist will not be cleared after {Factory settings}. You have to PDQXDOO\UHPRYHWKHÀOHVRUGHOHWHXVEBVFKHGXOLQJOLVWW[WLQWKHUSB.Sleep timer6ZLWFKRIIWKLVGLVSOD\DIWHUDVSHFLÀHGWLPHOneWireConnect and control your HDMI-CEC compliant devices through HDMI port to this display with the same remote control.Local KB lockChoose to enable or disable the keyboard (control buttons) function of the display. {Unlock}: Enable the keyboard function. {Lock all}: Lock all keyboard function. {Lock but volume}: Disable all the keyboard function except the [] and [ ] button. {Lock but power}: Disable all the keyboard function except the [] button. {Lock all expect volume and power}: Disable all the keyboard function except the [], [ ] and [ ] button:RC lockChoose to enable or disable the button function of the remote control. {Unlock}: Enable the keyboard function. {Lock all}: Lock all keyboard function. {Lock but volume}: Disable all the keyboard function except the [] and [ ] button. {Lock but power}: Disable all the keyboard function except the [] POWER button. {Lock all expect volume and power}: Disable all the keyboard function except the [] [ ] and [ ] POWER button:NOTE: To disable the lock function from Local KB lock or RC lock item, press buttons [ ] and 1 9 9 8 on the remote control.Pixel shiftFor video input sources, you may choose {On} to move the screen image automatically to protect the display from “burn-in” or “after-image” symptoms 30 seconds after not operating the display.Smart powerChoose a backlight level to optimise dynamic power consumption and picture contrast. The options are: {Off}, {Standard}, {Medium}, {High}.Wake on lanChoose {On} and you can turn on the display by network.Switch on stateChoose the display status used for the next time you connect the power cord. {On} - The display will turn on when the power cord is connected to a wall outlet. {Standby} - The display will remain Standby when the power cord is connected to a wall outlet. {Last status} - The display will return to the previous power status (on/off/standby) when removing and replacing the power cord.Power LED LightChoose {Off} to turn off the indicator. LogoChoose {Off} and the display will not display the logo when you switch on.Advanced power managementChoose {On}. Then, when no signal, the display will automatically turn off.](https://usermanual.wiki/Top-Victory-Electronics/BDL4620QL/User-Guide-2796800-Page-26.png)
![BDL4620QL196RXUFHQRWLÀFDWLRQWhen you press [] POWER button to turn on the display from standby mode or change the input signal, the information OSD is displayed on the upper left corner of the screen.Choose {Off} to turn off this function.Network control portChoose RS232 (default) or Lan (RJ45) in PD set.Factory settingsReset all your customized settings to the factory defaults.](https://usermanual.wiki/Top-Victory-Electronics/BDL4620QL/User-Guide-2796800-Page-27.png)
![BDL4620QL206. USB device compatibilityUSB Video Subtitle Formats (for language subtitles, etc.)File Extensions Container Video codec Maximum resolution Max. Frame Rate (fps) Max. Bit Rate (Mbps) Audio codec.mpgmpeg.vobPSMPEG-1 1920x1080 25p,30p,50i,60i 30 MPEG-1(L1&L2), MPEG-1,2,2.5 L3,AAC/HE-AAC(v1&v2),DVD-PCM,AC3MPEG-2 1920x1080 25p,30p,50i,60i 30MPEG-4 ASP 1920x1080 25p,30p,50i,60i 30H.264 1920x1080 25p,30p,50p,60p,60i 30.ts TSMPEG-2 1920x1080 25p,30p,50i,60i 30MPEG-1(L1&L2),MPEG-1,2,2.5 L3,AAC/HE-AAC (v1&v2),AC3,E-AC3, Dolby PulseMPEG-4 ASP 1920x1080 25p,30p,50i,60i 30H.264 1920x1080 25p,30p,50p,60p,60i 30MVC[L#ÀHOGUDWH +]1920x1080p@frame rate=24, 25,30Hz1280x720p@frame rate=50, 60Hz -30.ts .m2ts.mts .mt2MaTS TTSMPEG-2 1920x1080 25p,30p,50i,60i 30MPEG-1(L1&L2),MPEG-1,2,2.5 L3,AAC/HE-AAC (v1&v2),AC3,E-AC3, Dolby PulseMPEG-4 ASP 1920x1080 25p,30p,50i,60i 30H.264 1920x1080 25p,30p,50p,60p,60i 30MVC[L#ÀHOGUDWH +]1920x1080p @ frame rate=24, 25,30Hz1280x720p @ frame rate=50, 60Hz -30.ts .m2ts .mtsAVCHDMPEG-2 1920x1080 25p,30p,50i,60i 30 MPEG-1(L1&L2),MPEG-1,2,2.5 L3,AAC/HE-AAC (v1&v2),AC3,E-AC3,Dolby PulseMPEG-4 ASP 1920x1080 25p,30p,50i,60i 30H.264 1920x1080 25p,30p,50p,60p,60i 30.ts.m2ts .mtsAVCHD MVC[L#ÀHOGUDWH +]1920x1080p@frame rate=24, 25,30Hz1280x720p @ frame rate=50, 60Hz -30MPEG-1(L1&L2),MPEG-1,2,2.5 L3,AAC/HE-AAC (v1&v2),AC3,E-AC3,Dolby Pulse.m4v M4V H.264 1920x1080 25p,30p,50p,60p,60i 30 AAC.ism/Manifest .mpd frag MP4H.264 1920x1080 25p,30p,50p,60p,60i 30 AAC/HE-AAC(v1&v2), AC3,E-AC3,WMA,WMA-PROMVC[L#ÀHOGUDWH +]1920x1080p@frame rate=24, 25,30Hz1280x720p @ frame rate=50, 60Hz -30.mp4 MP4MPEG-4 ASP 1920x1080 25p,30p,50i,60i 30AAC/HE-AAC(v1&v2),AC3,E-AC3,WMA,WMA-PROH.264 1920x1080 30MVC[L#ÀHOGUDWH +] 1920x1080p@frame rate=24, 25,30Hz1280x720p @ frame rate=50, 60Hz -30WMV9/VC1 1920x1080 30p,60i 30.mkv .mk3d MKVMPEG-4 ASP 1920x1080 25p,30p,50i,60i 30 MPEG-1(L1&L2),MPEG-1,2,2.5 L3,AAC/HE-AAC (v1&v2),AC3,E-AC3, WMA,WMA-PROH.264 1920x1080 30USB Multimedia FormatsFile Extensions Container Video codec Maximum resolution )UHTXHQF\(kHz)Max.Bit Rate(Mbps) Audio codec.mp3 MP3 - - 48 384 MPEG-1,2,2.5 L3](https://usermanual.wiki/Top-Victory-Electronics/BDL4620QL/User-Guide-2796800-Page-28.png)
![BDL4620QL227. Input modePC Resolution:Standard ResolutionActive Resolution Refresh Rate Pixel Rate Aspect Ratio Stand for ModeH Pixels V LinesVGA 640480 60 Hz 25.175 MHz 4:3 Video Graphic Array480 72 Hz 31.5 MHz 480 75 Hz 31.5 MHz WVGA 720 400 70 Hz 33.75 MHz 16:9 Wide Video Graphic ArraySVGA 800 600 60 Hz 40 MHz 4:3 Super VGA600 75 Hz 49.5 MHz XGA 1024 768 60 Hz 65 MHz 4:3 Extended Graphic Array768 75 Hz 78.75 MHz WXGA 1280 768 60 Hz 79.5 MHz 5:3 Wide XGAWXGA 1280 800 60 Hz 79.5 MHz 16:10 Wide XGASXGA 1280 1024 60 Hz 108 MHz 5:4 Super XGAWXGA 1360 768 60 Hz 85.5 MHz 16:9 Wide XGAUXGA 1600 1200 60 Hz 162 MHz 4:3 Ultra XGAHD1080 1920 1080 60 Hz 148.5 MHz 16:9 HD1080SDTV Resolution:Standard ResolutionActive Resolution Refresh Rate Pixel Rate Aspect Ratio Stand for ModeH Pixels V Lines480i 720 480 29.97 Hz 13.5 MHz 4:3 0RGLÀHG176&6WDQGDUG480p 59.94 Hz 27 MHz576i 720 576 25 Hz 13.5 MHz 4:3 0RGLÀHG3$/6WDQGDUG576p 50 Hz 27 MHzHDTV Resolution:Standard ResolutionActive Resolution Refresh Rate Pixel Rate Aspect Ratio Stand for ModeH Pixels V Lines720p 1280 720 50 Hz 74.25 MHz 16:9 Normally DVB Mode60 Hz1080i 1920 1080 25 Hz 74.25 MHz 16:9 Normally ATSC Mode30 Hz1080p 1920 1080 50 Hz 148.5 MHz 16:9 Normally ATSC Mode60 Hz 7KH3&WH[WTXDOLW\LVRSWLPXPLQ+'PRGHò+] Your PC display screen might appear different depending on the manufacturer (and your particular version of Windows). Check your PC instruction book for information about connecting your PC to a display. ,IDYHUWLFDODQGKRUL]RQWDOIUHTXHQF\VHOHFWPRGHH[LVWVVHOHFW+]YHUWLFDODQG.+]KRUL]RQWDO,QVRPHFDVHVDEQRUPDOVLJQDOVVXFKDVstripes) might appear on the screen when the PC power is turned off (or if the PC is disconnected). If so, press the [ ] button to enter the video mode. Also, make sure that the PC is connected. When horizontal synchronous signals seem irregular in RGB mode, check PC power saving mode or cable connections. This display settings table complies to the IBM/VESA standards, and based on the analog input. The DVI support mode is regarded as same to the PC support mode. 7KHEHVWWLPLQJIRUWKHYHUWLFDOIUHTXHQF\WRHDFKPRGHLV+]](https://usermanual.wiki/Top-Victory-Electronics/BDL4620QL/User-Guide-2796800-Page-30.png)

![BDL4620QL269.2. TroubleshootingSymptom Possible Cause RemedyNo picture is displayed 1. The power cord is disconnected.2. The main power switch on the back of the display is not switched on.3. The selected input has no connection.4. The display is in standby mode.1. Plug in the power cord.2. Make sure the power switch is switched on.3. Connect a signal connection to the display.Interference displayed on the display or audible noise is heardCaused by surrounding electrical appliances or ÁXRUHVFHQWOLJKWVMove the display to another location to see is the interference is reduced.Color is abnormal The signal cable is not connected properly. 0DNHVXUHWKDWWKHVLJQDOFDEOHLVDWWDFKHGÀUPO\to the back of the display.Picture is distorted with abnormal patterns 1. The signal cable is not connected properly.2. The input signal is beyond the capabilities of the display.1. Make sure that the signal cable is attached ÀUPO\2. Check the video signal source to see if it is beyond the range of the display. Please YHULI\LWVVSHFLÀFDWLRQVZLWKWKLVGLVSOD\·VVSHFLÀFDWLRQVHFWLRQ'LVSOD\LPDJHGRHVQ·WÀOOXSWKHIXOOVL]HRIWKHscreenThe zoom mode is not correctly set. Use the Zoom mode or Custom zoom function LQWKH6FUHHQPHQXWRÀQHWXQHGLVSOD\JHRPHWU\DQGWLPHIUHTXHQF\SDUDPHWHUCan hear sound, but no picture Improperly connected source signal cable. Make sure that both video inputs and sound inputs are correctly connected.Can see picture but no sound is heard 1. Improperly connected source signal cable.2. Volume is turned all the way down.3. [MUTE] is turned on.4. No external speaker connected.1. Make sure that both video inputs and sound inputs are correctly connected.2. Press [ ] or [ ] button to hear sound.3. Switch MUTE off by using the [] button.4. Connect external speakers and adjust the volume to a suitable level.Some picture elements do not light up Some pixels of the display may not turn on. This display is manufactured using an extremely high level of precision technology: however, sometimes some pixels of the display may not display. This is not a malfunction.After-Images can still be seen on the display after the display is powered off. (Examples of still pictures include logos, video games, computer images, and images displayed in 4:3 normal mode)A still picture is displayed for an over extended period of timeDo not allow a still image to be displayed for an extended period of time as this can cause a permanent after-image to remain on the display.](https://usermanual.wiki/Top-Victory-Electronics/BDL4620QL/User-Guide-2796800-Page-34.png)
![BDL4620QL2710. Technical SpecificationsDisplay:Item 6SHFLÀFDWLRQVScreen Size (Active Area) 46” LCD (116.8 cm)Aspect Ratio 16:9 Number of Pixels +ò9Pixel Pitch +ò9>PP@Displayable Colors 16.7 Million colorsBrightness 350 cd/m2Contrast Ratio (Typical) 3000:1 Viewing Angle 178 degreesIn/Out Terminals:Item 6SHFLÀFDWLRQVSpeaker Output Internal Speakers :/:5>506@ƙ:D\6SHDNHU6\VWHP82 dB/W/M/160 Hz ~ 13 KHz Audio Output 5&$-DFNò 0.5V [rms] (Normal) / 2 Channel (L+R)Audio Input PP6WHUHRò5&$-DFNò0.5V [rms] (Normal) / 2 Channel (L+R)RS232C Input/Output PPò TXD + RXD (1:1) LAN 5--DFNòSLQ 10/100 LAN PortHDMI Input +'0,-DFNò (Type A) (19 pin)Digital RGB: TMDS (Video + Audio) MAX: 9LGHRSSò+]:8;*$ Audio: 48 KHz / 2 Channel (L+R)Supports LPCM onlyDVI-D Input DVI-D jack Digital RGB: TMDS (Video) VGA Input '6XE-DFNòSLQ $QDORJ5*%9>SS@ƙ+&6977/Nƙ62*9>SS@ƙ0$;SSò+]:8;*$Component Input 5&$-DFNò <9>SS@ƙ3E9>SS@ƙ3U9>SS@ƙMAX: 480i, 576i, 480p, 576p, 720p, 1080i, 1080p SPDIF Output SPDIF Port Serial digital audio output when input is HDMIIR Input/Output PPò IR pass through or IR daisy chainUSB Input 86%ò7\SH% USB 2.0, External PC connectionGeneral:Item 6SHFLÀFDWLRQVPower Input 100-240V 50-60Hz, 2.5APower Consumption (Max.) 95 WPower Consumption (Typical) 80 WPower Consumption (EPA6.0) 60 WPower Consumption (Standby & Off) < 0.5W (OSD: APM mode off)'LPHQVLRQV>:ò+ò'@ òòPPWeight 13.7 KgGross Weight 17.2 KgEnvironmental Condition:Item 6SHFLÀFDWLRQVTemperature Operational 5 ~ 40°CStorage -20 ~ 60°C Humidity Operational 20 ~ 80% RH (No condensation)Storage 10 ~ 90% RH (No condensation)Altitude Operational 0 ~ 2,000 mStorage 0 ~ 5,000 m](https://usermanual.wiki/Top-Victory-Electronics/BDL4620QL/User-Guide-2796800-Page-35.png)