Top Victory Electronics LM561S 15" LCD Monitor User Manual LM500 926 4A AMERICA NEW
Top Victory Electronics (Taiwan) Co Ltd 15" LCD Monitor LM500 926 4A AMERICA NEW
UserManual.wiki
>
Top Victory Electronics
>
LM561S User Manual
>
LM500 users manual
Contents
1.
LM500 users manual
2.
LM510 users manual
LM500 users manual
Navigation menu
Upload a User Manual
Namespaces
Wiki Guide
HTML
PDF
Info
Views
User Manual
Discussion / Help
Navigation

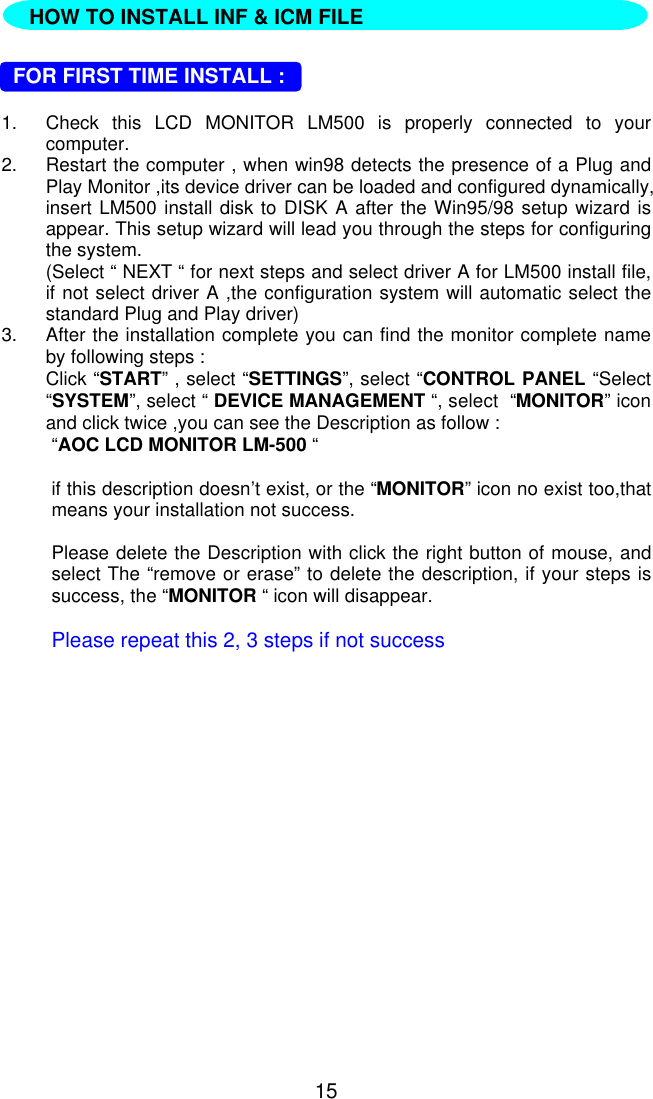
![108. Red Adjusts Red intensity.9. Green Adjusts Green intensity.10. Blue Adjusts Blue intensity.11. 65 (6500K) Color The color temperature for 6500°K isx=0.313, y=0.329.12. 78 (7800K) Color The color temperature for 7800°K isx=0.296, y=0.311.13. Reset Clear each old status of auto-configuration And re-do auto-configuration.14. Exit Save user adjustment and OSD disappear.1. Use the full-screen pattern which is attached in your driver-disk to start theadjustment ( press twice at Dos1.exe , and expand the picture to fullscreen with pressing the icon on the top of window, but there isnothing to press if the picture is already full screen )If you don’t have monitor driver disk, you can try the following way to getthe full screen pattern at MS-DOS mode , type in C:\> EDIT [pressenter]You will be in the Dos-Editor screen2. Press “AUTO” button( at front bezel) during 2 seconds , the monitors willdo all the adjustment automatically3. Press “ESC” to quit the pattern file ,or press ALT-F, and then X to exitfrom the Dos-Editor screenIf the DOS-MODE characters still have distortionexample : ●the picture can’t go to full screen●the background of white pattern has vertical stripe noise●the character twistedthat means your monitor parameter was in wrong resolution, please check ifyour VGA-CARD supports 720x400 @ 70 Hzin general, most of the Dos mode was set by VGA-CARD in resolution720x400@70Hz, but minor was set in 640x400 @ 70Hz ( our monitor onlysupports 720x400@70Hz)HOW TO OPTIMIZE THE DOS-MODE](https://usermanual.wiki/Top-Victory-Electronics/LM561S.LM500-users-manual/User-Guide-233001-Page-11.png)