Toshiba Information Systems CC4-E02 GSM 900/1800/1900 UMTS Mobile Phone with Bluetooth User Manual Exhibit 8
Toshiba Information Systems (UK) Ltd, Mobile Communications Division GSM 900/1800/1900 UMTS Mobile Phone with Bluetooth Exhibit 8
Exhibit 8 user manual

Settings
You can make various settings to personalise your phone.
In This Chapter
❍Display Settings
❍Phone Profiles
❍Language Setting
❍Shortcut Menu
❍External Light Settings
❍Flight Mode Setting
❍Call Settings
❍Using the Stereo Handsfree Headset
❍Security Settings
❍Network & Internet
130
Settings
Display Settings
Setting the Main Display
1. In standby mode, press . The main menu appears.
2. Settings Display Settings Main Display
◆Wallpaper: Allows you to set a picture preinstalled in your phone or taken with
the camera as the wallpaper for standby mode.
◆Theme: Allows you to set a theme for the main menu and wallpaper.
◆Clock Type Display: Allows you to select the clock display for the main display
from six types.
◆Backlight: Allows you to adjust the brightness and lighting time of the main
display backlight.
◆Power Saving: Allows you to save battery power by setting the phone to turn off
the display after a specified time of inactivity elapses.
◆Cell Information: Allows you to set whether the cell information sent from a
base station is displayed in standby mode when you use your phone on a mobile
phone network based on Micro Cellular Network (MCN) technology.
Setting the External Display
1. In standby mode, press . The main menu appears.
2. Settings Display Settings External Display
◆Wallpaper & Clock: Allows you to set the wallpaper and clock.
◆Backlight: Allows you to adjust the lighting time of the external display backlight.
◆Contrast: Allows you to adjust the contrast of the external display.

Settings
131
Setting the Incoming Display
You can set a picture to appear on the main display for incoming calls. You can also set
whether the other party’s name and phone number appear on the external display for
incoming calls.
1. In standby mode, press . The main menu appears.
2. Settings Call Settings Voice Call or Video Call Caller Details
◆Incoming Picture: Allows you to set the incoming picture.
◆Caller Picture: Allows you to display a picture associated with a caller in the
Contacts list when a call is received from that caller.
◆Caller Info: Allows you to set the display of the name and phone number set for
a caller in the Contacts list on the external display when a call is received from
that caller.
Note
• You can set a picture of W240 ×
H320 size or smaller for the
incoming picture.
• The display area for the incoming
picture is W240 × H112.

132
Settings
Phone Profiles
This feature allows you to change the sound and vibration to match your surrounding
conditions. Your phone has four preset profiles. You can change the sound and vibration
settings of each profile.
Normal: Profile for ordinary use.
Silent: Profile for when you do not want your phone to emit any sound.
Car: Profile for when you want the incoming ringtone volume and multimedia
volume set to the maximum levels so that you can hear your phone while you are
driving, etc.
Meeting: Profile for meetings, etc.
Note
When your phone is connected to an
in-car device or a wireless headset
via Bluetooth™, the incoming
ringtone for Bluetooth™ plays and
your phone does not vibrate for
incoming calls regardless of the
phone profile settings.

Settings
133
Personalising Profiles
You can personalise profiles. The items you can personalise vary depending on the
profile.
1. In standby mode, press . The main menu appears.
2. Settings Phone Profiles
3. Select the profile you want to set and press (Options).
4. Select Personalise and press (Select).
◆ Ringtone Volume: Allows you to set the ringtone volume for any profile except
Silent.
◆ Assign Ringtone: Allows you to set a preinstalled sound in your phone or a
sound or video in My Items as the ringtone for any profile except Silent. You can
also set the ringtone duration for incoming messages.
◆ Vibration: Allows you to set the vibration to On or Off. For profiles other than
Silent, you can also set the vibration pattern.
◆ Keypad Volume: Allows you to set the keypad volume for any profile except
Silent.
◆ Keypad Tones: Allows you to set the keypad tone for any profile except Silent.
◆ Sound Effects Vol.: Allows you to set the volume level of each of the sound
effects for turning on/off the power, opening/closing your phone and errors for
any profile except Silent.
◆ Sound Effects: Allows you to set each of the sound effects for turning on/off the
power and opening/closing your phone for any profile except Silent.
◆ Multimedia Volume: Allows you to set the volume level for games, messaging,
Vodafone live! and playing sound data in My Items for any profile except Silent.
Tip
• To switch to a profile, select
Activate after Step 3.
• To return a profile to its default
settings, select Set to Default
after Step 3.
134
Settings
◆ Battery Alarm: Allows you to set whether to play the battery alarm, when the
battery level (page 00) is very low and your phone is about to run out of power, for
any profile except Silent.
◆ Alarm: Allows you to set whether to play the alarm for Silent and Meeting.

Settings
135
Language Setting
You can change the display language.
1. In standby mode, press . The main menu appears.
2. Settings Phone Settings Language
3. Select the language you want to set or Automatic and press (Select).
Tip
If the language is set to Automatic,
the language is set automatically in
accordance with the language priority
setting of the SIM card. If your phone
does not support the language set for
the SIM card, the default language of
your phone is selected.
136
Settings
Shortcut Menu
If you register frequently used functions in the Shortcut menu, you can access them
quickly and easily.
Setting the Shortcut Menu
You can set up to nine frequently used functions.
1. In standby mode, press . The Shortcut menu appears.
2. Select <Empty> and press .
3. Press (Yes).
4. Select the function you want to set and press (Select).
If you selected My Items or Contacts List, you can set a shortcut for a file, folder
or Contacts list entry. Select the item you want to set.
Setting the Shortcut Key Function
1. In standby mode, press . The main menu appears.
2. Settings Phone Settings Shortcuts
◆ Side Key: Allows you to change the function accessed when you press and hold
the side key ( ) in standby mode.
◆ Navigation Keys: Allows you to change the functions accessed when you press
the navigation keys , , and in standby mode.
Tip
To access a function from the
shortcut menu, select the function
you want to access after Step 1 and
press .

Settings
137
External Light Settings
When you receive a voice call, video call or message or have unchecked information,
the external light flashes if your phone is closed.
1. In standby mode, press . The main menu appears.
2. Settings Phone Settings External Light
◆ Notification: Allows you to select from three colours for the external light that
flashes when you have unchecked information (missed calls and unread
messages) and your phone is closed. You can also set the external light not to
flash.
◆ Incoming: Allows you to select from five colours for the external light that
flashes when you have an incoming voice call, video call or message. You can
also set the external light not to flash.

138
Settings
Flight Mode Setting
You can use flight mode to block signal reception and transmission without turning off
the power. Flight mode disables the use of network services for making and receiving
calls, sending and receiving messages, etc.
1. In standby mode, press . The main menu appears.
2. Settings Phone Settings Flight Mode
3. Select On and press (Select).
The indicator appears at the top of the display.
Note
You can cancel flight mode and make
an emergency call if you dial the
phone number of an emergency
service (page 25) while flight mode is
set.
Settings
139
Call Settings
Showing/Hiding Caller ID
You can set whether to automatically notify the other party of your phone number when
you make a call.
1. In standby mode, press . The main menu appears.
2. Settings Call Settings Send My Number Settings
◆Show My Number: Sets your phone to notify the other party of your phone
number.
◆Hide My Number: Sets your phone to not notify the other party of your phone
number.
◆Network Default: Uses the default network setting.
Setting the Auto Answer
You can answer a call without having to press a key while the stereo handsfree headset
is connected. You can also change the length of time before a call is answered.
When Auto Answer is set, the auto answer tone plays regardless of the setting for the
phone profile (page 132).
1. In standby mode, press . The main menu appears.
2. Settings Call Settings Voice Call Auto Answer
3. Select On and press (Select).
4. Enter the answer time (1 to 29 seconds) and press (OK).
Note
Regardless of this function setting or
network setting, you can still show/hide
your phone number when you make a
call if you directly enter “ 31#” or
“#31#” (page 41) or if you make a call
from the Contacts list to a phone
number that has “ 31#” or “#31#”
added.
140
Settings
Setting Mute
You can mute the outgoing voice or both the outgoing voice and incoming voice for
calls.
1. In standby mode, press . The main menu appears.
2. Settings Call Settings Voice Call or Video Call Mute
3. Select Mute My Voice, Mute All or Off and press (Select).
Enabling/Disabling Incoming Voice Calls during
Data Communication
You can set whether to receive incoming voice calls during data communication.
1. In standby mode, press . The main menu appears.
2. Settings Call Settings Voice Call Call Priority
3. Select Enable or Disable and press (Select).
Settings
141
Common Settings
1. In standby mode, press . The main menu appears.
2. Settings Call Settings Common Settings
◆Earpiece Volume: Allows you to set the volume for sound heard from the
earpiece.
◆Speaker Volume: Allows you to set the volume for sound heard from the
speaker.
◆Open to Answer: Allows you to answer an incoming call by simply opening your
phone.
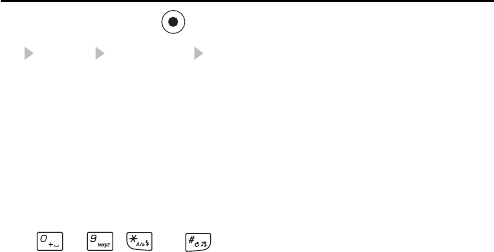
◆Any Key Answer: Allows you to set the keys for answering incoming calls. If Any
Key Answer is set to On, you can also answer an incoming call if you press any of
to , and .
142
Settings
Using the Stereo Handsfree Headset
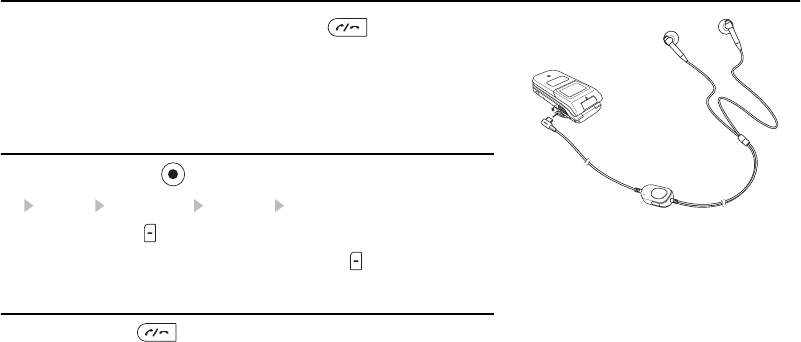
Simply pressing the key of the stereo handsfree headset ( )allows you to dial a
preset phone number or answer a call without even opening your phone.
1. Open the earphone microphone jack cover.
2. Insert the plug of the stereo handsfree headset into the earphone microphone jack.
Setting the Phone Number
1. In standby mode, press . The main menu appears.
2. Settings Call Settings Voice Call Earphone Call
3. Select On and press (Select).
4. Select the input method for the phone number and press (Select).
One-touch Calling/One-touch Answering
You can press and hold to dial a set phone number, answer an incoming call or
end a call.

Settings
143
Security Settings
You can configure security related settings such as setting call barring or changing the
lock number for your phone.
1. In standby mode, press . The main menu appears.
2. Settings Security Settings
◆Reject Calls: Allows you to set the conditions for rejecting incoming calls.
◆Reject Addresses: Allows you to add up to 50 email addresses or phone
numbers to the Rejection list to reject the reception of messages from those email
addresses or phone numbers.
◆PIN Code Request: Allows you to set whether to request the entering of your PIN
code to perform verification each time a SIM card is inserted into the phone and
the power is turned on.
◆Change PIN/Change PIN2: Allows you to change the PIN code and PIN2 code.
Set PIN Code Request to On before you change a PIN code.
◆Change Password: Allows you to change the security code (page 24) required
to use some functions and modify the settings of your phone. The initial security
code is “0000” or the four-digit number you selected when you concluded your
contract.
◆Phone Lock: Allows you to prevent another person from using your phone
without entering your security code (page 24). There are three options to choose
from for when to set the phone lock: Phone Closed, Power Saving and Power On.
To cancel the phone lock temporarily, enter your security code and press (OK).
To cancel the lock, cancel the phone lock temporarily and then set it to Off.
◆Fixed Dialling No.: Allows you to restrict the making of calls and sending of
messages to up to 40 phone numbers in the Fixed Dialling Number list of the SIM
card. This function is unavailable for some SIM cards.
144
Settings
Key Guard
Setting the Key Guard
The key guard can prevent unintentional operations while your phone is in your bag or
pocket by disabling the side keys and Music Console keys for operating your phone
when it is closed.
1. While your phone is closed and in standby mode or Music Console is running, press
and hold ( ).
The indicator appears on the external display.
Cancelling the Key Guard
1. While your phone is closed and in standby mode or Music Console is running, press
and hold ( ).
Tip
To cancel the key guard, press and
hold ( ) while your phone is closed
and in standby mode or Music
Console is running.

Settings
145
Initialising Your Phone
You can delete all saved data such as Contacts list entries, My Items files and
messages, as well as reset all function settings.
1. In standby mode, press . The main menu appears.
2. Settings Memory Settings Phone Memory Clear Memory
3. Enter your security code (page 24).
A confirmation screen appears.
4. Press (Yes).
Your phone is initialised and then automatically turned off and on.
Note
This operation does not reset the
data of the security code (page 24),
SIM card and memory card.
Tip
To view an approximate indication of
the memory status for Emails,
messages, My Items, Contacts list
and Calendar, select Phone
Memory in Step 2 and select
Memory Status.

146
Settings
Network & Internet
You can set the network (telecommunications carrier) and system mode to use. You can
also set the network connection information for using the Web and email.
Note that you may no longer be able to connect to the home network if the settings are
set incorrectly.
1. In standby mode, press . The main menu appears.
2. Settings Network&Internet
◆Select Network: Allows you to set the network by selecting an available network
in your current area automatically or selecting a network manually from a list.
◆System Mode: Allows you to set the system mode to be selected automatically
or set the system mode yourself manually.
◆Settings: Allows you to set and edit the network connection information for the
browser, email, MMS and other services (applications) individually. You can set
the information for up to six connections per application.
◆Internet: Allows you to edit the network access point (NAP) information used
when modifying application settings (page xx) and external device settings (page
00). You can register information for up to 20 NAP.
◆External Device: Allows you to set the access point name (APN) of the network
information to write to your phone in order to perform data communication from
an external device such as a PC.

Convenient Functions
Your phone includes various convenient functions.
In This Chapter
❍Calendar
❍Voice Recorder
❍Multi Task
❍Other Convenient Functions
148
Convenient Functions
Calendar
Calendar allows you to save your appointments and use your phone as a scheduler.
Adding a New Appointment
You can save up to 100 appointments.
1. In standby mode, press . The main menu appears.
2. Organiser&Tools Calendar
3. Press (Options).
4. Select New Appointment and press (Select).
5. Select the item you want to set and press .
◆Title: Allows you to enter the title of the appointment.
◆Start Date&Time: Allows you to set the start date and time for the appointment.
To set both the date and time, select Date&Time. To select only the date, select
Date only.
◆End Date&Time: Allows you to set the end date and time for the appointment.
◆No Repeat/Daily/Weekly/Monthly/Yearly/End of Month: Allows you to set a
repeat interval and period for the appointment.
◆Memo: Allows you to enter the contents of the appointment.
◆Alarm: Allows you to set the alarm.
◆Location: Allows you to enter the location information.
◆None Category/Meeting/Date/Travel/Holiday/Anniversary/
Miscellaneous: Allows you set the category of the appointment.
Note
• If you change the Home City setting
(page xx) in the clock settings, the
start and end dates and times of
appointments are automatically
changed to those in the time zone
of the city. Also, when DST
(Daylight Saving Time) is set to On,
the start and end dates and times
are automatically changed for
summer time.
• If the power is turned off at the
specified time, it turns on
automatically to start the alarm.
• When the phone profile (page 132)
is set to Silent or Meeting and the
alarm is set to Off, the alarm does
not play.
Convenient Functions
149
6. Press (Options) after setting the items.
7. Select Save and press (Select).
Checking Appointments
1. In standby mode, press . The main menu appears.
2. Organiser&Tools Calendar
The month view screen appears.
Press to switch to the previous month and press to switch to the next
month.
3. Use to select a date and press .
A list of appointments for the selected date appears.
4. Select the appointment you want to check and press .
The details of the appointment appear.
Managing Appointments
You can perform various operations such as editing, deleting and sending appointments
if you select a date or appointment and press (Options).
Tip
At the date and time set for an alarm,
the alarm plays and “Appointment”
appears in the external display. To
stop the alarm, press any key except
the Music Console keys. After the
alarm stops, press (Stop) to check
the appointment details.
Tip
To switch the view between month,
week, day and all appointments,
press (Options) after Step 2 and
select Calendar View.
150
Convenient Functions
Voice Recorder
The voice recorder allows you to record sound and then save the recording data to the
Recordings folder in the Sounds&Ringtones folder of My Items. Although the possible
length of recording time depends on the amount of available memory space in My
Items, the maximum recording time is 90 minutes for each recording. Sound is
recorded via the main microphone (mouthpiece).
Recording Sound
1. In standby mode, press . The main menu appears.
2. Organiser&Tools Voice Recorder Record
The Recording screen appears.
3. Press (Options).
4. Select Record and press (Select).
Recording begins.
5. Press (Pause) to pause recording.
To resume recording, press . To save the recording data, press (Save).
Note
If a call is received during recording,
the call takes priority and recording
stops. All recording data is saved
automatically. To prohibit the
reception of calls, set flight mode
(page 138).
Tip
The default storage place for
recording data is your phone. To
switch the storage place to the
memory card, select Save sound to
after Step 3 and then select Memory
Card.
Convenient Functions
151
Multi Task
This feature allows you to run up to two functions (applications) simultaneously and
switch between them.
Starting a New Application
You can start another application without ending the application you are using.
1. Press while an application is in use.
The Multi Task screen appears.
2. Select Organiser&Tools and press (Select).
3. Select the application you want to start and press (Select).
The selected application starts.
Switching Applications
1. Press while an application is in use.
The Multi Task screen appears.
2. Select the application to which you want to switch and press .
The application is switched to the selected application.
Note
• This operation is not possible while
the camera/video camera is
activated.
• There may be insufficient memory
to start a second application
depending on the applications
running.
• An application may not be able to
be switched to in the Multi Task
screen depending on how the
application was started.
Tip
To make a call, press (Options)
after Step 1 and select Dial Number.
152
Convenient Functions
Other Convenient Functions
Accessing Other Functions from the Organiser &
Tools Menu
The following functions are also available in the Organiser & Tools menu.
1. In standby mode, press . The main menu appears.
2. Select Organiser&Tools and press (Select).
The Organiser & Tools menu appears. You can also access functions such as the
following from the Organiser & Tools menu.
◆SIM Tool Kit: Allows you to use the preinstalled services in the SIM card on your
phone. For details on the services, contact your service provider.
◆Alarms: Allows you to set an alarm tone to play and your phone to vibrate to
notify you of a specified time. If your power is turned off at the specified time, it
turns on automatically to start the alarm.
◆Calculator: Allows you to use your phone as a calculator. You can calculate the
tax rate if you press from the calculator screen.
◆Converter: Allows you to set a currency exchange rate and then perform
currency conversion calculations.
◆Countdown Timer: Allows you to set an alarm to notify you when a certain
amount of time elapses. The alarm plays for approximately one minute.
◆Notepad: Allows you to use your phone as a notepad for storing text input. You
can also access the saved data during character input and editing. You can enter
up 256 characters for each memo and store up to 20 memos in the notepad.
◆World Clock: Allows you to check the date and local time in major cities around
the world, as well as the time difference. A green circle indicates your home city
(page xx) on the map. A red circle indicates the alternate city (page 00).

Convenient Functions
153
QR Code
The external camera allows you to scan QR codes. You can connect to a URL included in
the scanned information or create a message to send to an address included in the
scanned information. When a barcode has been divided into data areas, you can scan
up to 16 data areas consecutively.
Torch
When the Torch function has been assigned to the side key ( ) in the shortcut settings
(page 136), you can turn on the mobile light if you press and hold the side key ( ).
154
Convenient Functions

File Transfer & Synchronisation
You can use Bluetooth™, infrared, a USB cable or a memory card to transfer data between your
phone and other phones, PCs and other devices. These capabilities allow you to back up data and
manage the same data on multiple devices.
In This Chapter
❍File Transfer
❍File Synchronisation
156
File Transfer & Synchronisation
File Transfer
Using Bluetooth™ for Transferring Data
Bluetooth™ is a technology that facilitates wireless communication between PCs and
devices such as handsfree compatible devices.
You can transfer the data of the Contacts list, Calendar and My Items between your
phone and Bluetooth™ compatible PCs and phones. Bluetooth™ also allows you to
use a wireless headset or an in-car device for handsfree calls. We recommend using
Bluetooth™ while your phone and the other device are within 10 metres of each other.
For details on the operating procedures of the other device, refer to the instruction
manual for that device.
Activating Bluetooth™
1. In standby mode, press . The main menu appears.
2. Settings Connectivity Bluetooth Switch On/Off
3. Select On and press (Select).
The indicator appears at the top of the display.
Note
• If a USB cable is connected to your
phone while you are using
Bluetooth™, the Bluetooth™
connection ends.
• When Bluetooth™ is used to send/
receive data, flight mode is set.
The indicator appears at the
top of the display while flight mode
is set, except when a dial-up
connection was established.
Tip
To transfer the data of My Items,
perform the transfer operation from
the other Bluetooth™ compatible
device after Step 3 of “Activating
Bluetooth™”.
File Transfer & Synchronisation
157
Registering a Bluetooth™ Compatible Device
Before establishing a Bluetooth™ connection, you need to perform a search for the
Bluetooth™ compatible device to be connected. You can register up to 20 detected
Bluetooth™ compatible devices.
1. Select Bluetooth in Step 2 of “Activating Bluetooth™” (page 156), select Paired
Devices and press (Select).
2. Select Search and press (Select).
3. Select a Bluetooth™ compatible device from the detected devices that appear and
press (Select).
4. Enter your PIN code (4 to 16 digits) and press (OK).
Editing a Registered Bluetooth™ Compatible Device
1. Select Bluetooth in Step 2 of “Activating Bluetooth™” (page 156), select Paired
Devices and press (Select).
2. Select a Bluetooth™ compatible device and press (Select).
◆Trust Device: Allows you to set your phone to be ready to establish a connection
without displaying a confirmation screen when a connection request is received.
◆Connect: Connects to a handsfree compatible device.
◆Details: Displays information on the Bluetooth™ compatible device.
◆Rename: Allows you to change the name of the Bluetooth™ compatible device.
◆Delete: Deletes the Bluetooth™ compatible device.
Tip
If you enter the same PIN code (4 to
16 digits) on both your phone and a
Bluetooth™ compatible device, the
Bluetooth™ compatible device is
registered.
Tip
While a handsfree compatible device
is connected, press to switch to a
handsfree call.

158
File Transfer & Synchronisation
Setting Your Phone
1. Select Bluetooth in Step 2 of “Activating Bluetooth™” (page 156), select My
Phone ID and press (Select).
◆Visibility: Allows you to set whether your phone is recognised when it is detected
during a search by a Bluetooth™ compatible device in the vicinity.
◆My Phone: Allows you to set whether the name displayed for your phone can be
changed and displayed when your phone is detected during a search by a
Bluetooth™ compatible device in the vicinity.
◆Handsfree Setting: Allows you to set the mode for making and receiving calls
while a handsfree compatible device is connected.
Using Bluetooth™ for Sending Data
You can send the data of the Contacts list, Calendar and My Items to a Bluetooth™
compatible device.
1. Set up the other Bluetooth™ compatible device to receive data.
2. Select Via Bluetooth from the Options menu of a function and press (Select).
3. Press (OK) to switch to flight mode.
4. Select the destination Bluetooth™ compatible device and press (Select).
Note
Copyright protected files cannot be
sent.

File Transfer & Synchronisation
159
Using Bluetooth™ for Receiving Data
When Bluetooth™ is enabled, you can receive data.
1. Press (Yes) when a confirmation screen appears after a connection request is
received from a Bluetooth™ compatible device in the vicinity.
2. Enter your PIN code (4 to 16 digits) and press (OK).
3. Press (OK) to switch to flight mode.
4. Select Save and press (Select).
To reject the reception of files, select Reject.
Tip
• The received Contacts list and
Calendar data is saved to the
Contacts list and Calendar.
• Received JPEG files are saved to
the Pictures folder of My Items.
160
File Transfer & Synchronisation
Using Infrared for Transferring Data
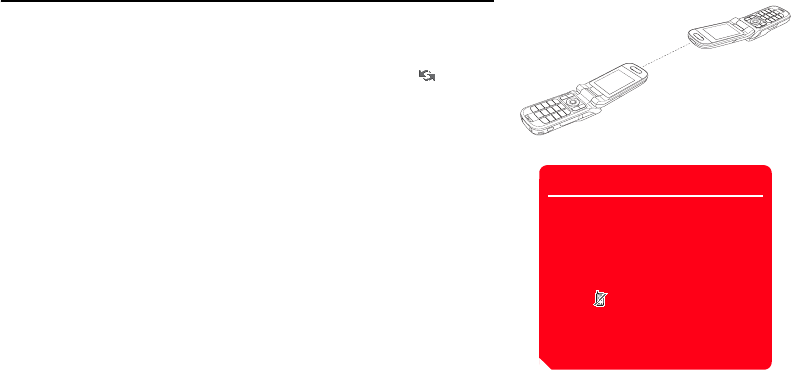
You can use infrared to exchange the Calendar data of your phone, Contacts list entries
of your phone, memory card or SIM card, pictures/videos taken or recorded with the
camera and My Items data that can be forwarded with an infrared compatible phone,
PC or other device. You can also restore or backup of My Items data. The indicator
appears at the top of the display during transfer. To transfer data between your phone
and a PC, the supplied PC management software My Mobile needs to be installed on
the PC. The infrared function of your phone complies with IrMC 1.1. As shown in the
illustration on the right, bring your phone and an infrared compatible device to within 30
centimetres of each other and point both infrared ports directly towards each other. Do
not place an object between them. For details on the operating procedures of the other
device, refer to the instruction manual for that device.
Note
• If a USB cable is connected to your
phone while you are using infrared,
the infrared communication ends.
• When infrared is used to send/
receive data, flight mode is set.
The indicator appears at the
top of the display while flight mode
is set, except when a dial-up
connection was established.

File Transfer & Synchronisation
161
Using Infrared for Sending Data
1. Set up the other infrared compatible device to receive data.
2. Select Via Infrared from the Options menu of a function and press (Select).
3. Press (OK) to switch to flight mode.
Using Infrared for Receiving Data
1. In standby mode, press . The main menu appears.
2. Connectivity Infrared Incoming Data
3. Enter your security code (page 24).
4. Press (OK) to switch to flight mode.
5. Select Save and press (Select).
To reject the reception of files, select Reject.
Note
The following files cannot be sent.
• Files in Games&More, My Saved
Pages and Templates of My Items
• Copyright protected files
• Your phone does not support the
sending and receiving of all data by
infrared simultaneously.
Tip
• The save locations of data are
determined by the extensions.
• To synchronise data on a PC with
the Contacts list and Calendar of
your phone, follow the PC on-
screen instructions to send
synchronisation commands from
the PC after Step 4.
162
File Transfer & Synchronisation
Using Infrared for Backing Up & Restoring Data
You can back up or restore files and folders in Pictures, Videos, Sounds&Ringtones and
Other Documents of My Items to a PC. Copyright protected files cannot be backed up.
1. After Step 4 of “Using Infrared for Receiving Data” (page 161), follow the
instructions on the PC to back up or restore data from your phone to the PC.
Using Infrared for Dial-up Connections
1. In standby mode, press . The main menu appears.
2. Settings Connectivity Infrared Dial-up Connection
3. Select On and press (Select).
Note
All the data may not be able to be
restored from some backup files.
Tip
You can also use Bluetooth™ or a
USB cable to establish a dialup
connection. Set up your phone for
communication via Bluetooth™ or a
USB cable and establish a connection
to your phone from a Bluetooth™
compatible device or PC.
File Transfer & Synchronisation
163
Using a USB Cable for Transferring Data
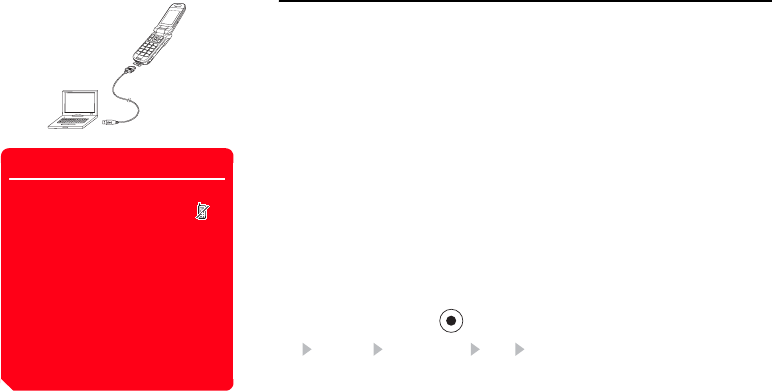
As shown in the illustration on the left, you can use a USB cable to connect your phone
to a PC, then send and receive the Contacts list, Calendar and My Items data. For
details on transferring music data, see “Transferring Music from a PC to a Memory
Card” (page 64). Before you connect the USB cable, the USB host driver and PC
management software My Mobile included on the CD-ROM supplied with your phone
need to be installed on the PC. This function supports USB 1.1 and USB 2.0. For details
on the PC operating environment required to use this function, refer to My Mobile.
Using a USB Cable for Sending Data
You can send the data of the Contacts list, Calendar and My Items.
1. Follow the procedure below to connect your phone and a PC with a USB cable.
1) Open the external connector cover of your phone.
2) Insert the plug of the USB cable into the external connector.
3) Connect the USB cable to the USB port of the PC.
2. In standby mode, press . The main menu appears.
3. Settings Connectivity USB Data Transfer
Note
• When you send/receive data, flight
mode is set automatically. The
indicator appears at the top of the
display while flight mode is set,
except when a dial-up connection
was established.
• The following files cannot be sent.
• Files in Games&More, My Saved
Pages and Templates of My
Items
• Copyright protected files

164
File Transfer & Synchronisation
4. Press (OK) to switch to flight mode.
5. Follow the instructions on the PC to receive data from your phone to the PC.
Using a USB Cable for Receiving Music Files
You can receive MP3 and other music files.
1. Select USB in Step 3 of “Using a USB Cable for Sending Data” (page 163) and
select Music transfer.
2. Press (OK) to switch to flight mode.
Music transfer mode is set. For details, see “Transferring Music from a PC to a
Memory Card” (page 64).
Using a USB Cable for Receiving Data
You can receive data to the Contacts list, Calendar and My Items.
1. After Step 4 of “Using a USB Cable for Sending Data” (page 163), follow the
instructions on the PC to send data from the PC to your phone.
Using a USB Cable for Backing Up & Restoring Data
You can back up or restore files and folders in Pictures, Videos, Sounds&Ringtones and
Other Documents of My Items.
1. After Step 4 of “Using a USB Cable for Sending Data” (page 163), follow the
instructions on the PC to back up or restore data from your phone to the PC.
2. Enter your security code (page 24).
Tip
To synchronise data on a PC with the
Contacts list and Calendar of your
phone, follow the PC on-screen
instructions to send synchronisation
commands from the PC after Step 4.
Note
When you receive all vObjects (page
xx), any of the previous vObjects in
your phone that are the same as the
received vObjects are deleted.
Note
Files that cannot be transferred are
not backed up.

File Transfer & Synchronisation
165
Using the Memory Card for Transferring Data
You can transfer Contacts list and Calendar data between your phone and memory
card. We recommend using the memory card for backing up personal data. The
memory card needs to be formatted before it is used for the first time. For details on
formatting, see “Formatting the Memory Card” (page 125).
Note
When you back up/restore data, flight
mode is set. The indicator
appears at the top of the display
while flight mode is set. When the
backing up/restoring of data is
complete, flight mode is cancelled.
166
File Transfer & Synchronisation
Backing Up Data to the Memory Card
1. Insert the memory card in the slot of your phone.
2. In standby mode, press . The main menu appears.
3. Organiser&Tools Backup Backup
4. Select the data you want to back up and press .
A check mark is added to the check box.
◆Contacts List: Backs up the Contacts list.
◆Calendar: Backs up the Calendar.
5. Press (Options).
6. Select Backup and press (Select).
7. Enter your security code (page 24).
A confirmation screen appears.
8. Press (Yes).
A confirmation screen appears.
9. Press (Yes) or (No) in accordance with the confirmation screen.
Press (Yes) to include pictures or press (No) to not include pictures when
backing up the Contacts list and press (Yes) to include past appointments or
press (No) to not include past appointments when backing up the Calendar.
10. Press (OK) to switch to flight mode.
A backup file is created in the memory card.
Note
It is recommended that you do not
use a PC or other device to view or
edit a backup file in the memory card
because doing so may result in the
file being damaged.

File Transfer & Synchronisation
167
Restoring Data from the Memory Card
1. Insert the memory card in the slot of your phone.
2. In standby mode, press . The main menu appears.
3. Organiser&Tools Backup Restore
4. Select the data you want to restore and press (Select).
◆Contacts List: Displays a list of Contacts list backup files.
◆Calendar: Displays a list of Calendar backup files.
Tip
To delete one or all backup files,
press (Options) after Step 4 and
select Delete or Delete All.
168
File Transfer & Synchronisation
File Synchronisation
You can use the network of a service provider, infrared or USB cable to synchronise the
data on a network server or PC with the Contacts list and Calendar of your phone. The
supplied data management software My Mobile needs to be installed.
Using a Network for Synchronisation
You can register a server on your phone to synchronise the Contacts list via the network
of a service provider.
Creating a Server Profile
You can create up to five server profiles.
1. In standby mode, press . The main menu appears.
2. Settings Connectivity Synchronise Server Profile
3. Press (Options).
4. Select Add and press (Select).
A server profile is created.
5. Select a server profile and press (Options).
6. Select Edit and press (Select).

File Transfer & Synchronisation
169
7. Select the item you want to set and press .
◆Rename: Allows you to change the name of the selected server.
◆Username: Allows you to set the user name for the server.
◆Password: Allows you to set a password.
◆URL: Allows you to set the server URL.
◆Sync. Mode: Allows you to select Manual or Automatic for synchronisation. If
you set Sync. Mode to Automatic, the data is synchronised at regular intervals
automatically.
◆Sync. Type: Allows you to set the synchronisation direction for data.
◆Confirmation: Allows you to set whether a confirmation screen is displayed each
time synchronisation starts.
◆Database Settings: Allows you to set the database of the selected server.
◆Network Settings: Allows you to set the network connection information
(network access point, proxy) of the selected network.
8. Press (Options).
9. Select Save and press (Select).

170
File Transfer & Synchronisation
Synchronising the Contacts List
1. In standby mode, press . The main menu appears.
2. Contacts Synchronise
◆Server Profile: Allows you to select a server and perform synchronisation.
◆Phone Name: Allows you to change your phone name.
◆Sync. Log: Allows you to check the logs for the last five synchronisations
performed using a network.

Appendix
In This Chapter
❍Troubleshooting
❍Specifications & Accessories
❍Index
❍Health and Safety Information
❍Menu Structure
172
Appendix
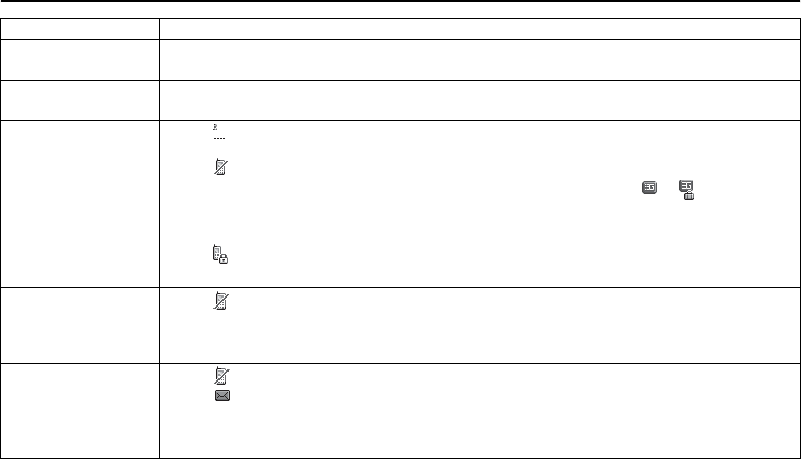
Troubleshooting
Problem Possible Causes and Remedies
Cannot turn the power on. • Make sure the battery pack is inserted correctly (page 26).
• Make sure the battery is charged (page 27).
Cannot charge the battery. • Make sure the battery pack is inserted correctly (page 26).
• Make sure the connectors or contacts of the AC adapter and battery pack are not dirty (page 27).
Cannot make or receive
voice and video calls.
• If the indicator appears on the display, move to a location where a signal can reach your phone or that is in the
service area.
• If the indicator appears on the display, cancel flight mode (page 138).
• A video call can only be made or received in an area with 3G coverage. Make sure the or indicator for
indicating you are in an area with 3G coverage appears on the display in standby mode.
• If a PIN code is incorrectly entered three times in a row, the PIN lock is set and a call cannot be made because
access to the SIM card is blocked. Enter the PUK code to cancel the PIN lock (page 24).
• If the
indicator appears on the display, enter your security code (page 24) to cancel the phone lock (
page xx
).
• Make sure your phone is not set to reject calls (page xx) or divert calls (page 37).
Cannot use the Web. • If the indicator appears on the display, cancel flight mode (page 138).
• Check your subscription status. Contact your service provider.
• The network settings may be incorrect. Check the network settings (page xx). For details on the network settings,
contact your service provider.
Cannot use SMS and MMS. • If the indicator appears on the display, cancel flight mode (page 138).
• If the indicator appears on the display, delete messages no longer required (page 96).
• Check your subscription status. Contact your service provider.
• Make sure the service centre number (page 100) is correct. For details on the service centre number, contact your
service provider.

Appendix
173
Specifications & Accessories
Specifications
Toshiba 803
Accessories
◆Battery Pack (TSBS01EU)
◆AC Adapter (TSCS01EU/TSCS01UK)
◆Desk Top Cradle (TSES02EU)
◆Cigarette Lighter Charger (TSJS01EU)
◆USB Cable for PC Connection (TSFD02EU)
◆miniSD™ Memory Card (TSMD03EU)
◆miniSD™ Adapter (TSMD04EU)
◆Stereo Headset (TSHD02EU/XXXXXXXX)
◆Audio Remote Controller (TSRD01EU/XXXXXXXX)
◆3.5mm Stereo Jack Adapter (TSHD03EU/XXXXXXXX)
Frequency Range
Within 3G (UMTS) 2100 1920 - 2170 MHz
Within GSM 900 880 - 960 MHz
Within DCS 1800 1710 - 1880 MHz
Within PCS 1900 1850 - 1990 MHz
Continuous Talk Time
Within 3G (UMTS) area Approx. 180 min.
Video Call Approx. 100 min.
Within GSM area Approx. 320 min.
Continuous Standby Time
Within 3G (UMTS) area Approx. 350 hrs.
Within GSM area Approx. 270 hrs.
Charging Time Approx. 140 min.
Dimensions (W × H × D) Approx. 50 × 111 × 25 mm
Maximum Output
Within 3G (UMTS) 2100 Class 3 0.25 W
Within GSM 900 Class 4 2 W
Within DCS 1800 Class 1 1 W
Within PCS 1900 Class 1 1 W
Weight Approx. 148 g
AC Adapter
Input Voltage 100 to 240 VAC 50/60 Hz
Charging Temperature Range 5 to 35°C

174
Appendix
Index
A
Accessories 173
Attachment 91
Auto answer 139
Auto Launch 113
B
Backing up data 166
Backing up/Restoring Data 162, 164
Battery 26
Charging 27
Inserting & removing 26
Bluetooth™ 156
Transferring data 156
Bookmarks 114
C
Calendar 148
Adding a new appointment 148
Managing appointments 149
Call
Answering a call 33
Answering a video call 72
Auto answer 139
Making a call 32
Making a video call 71
Making an international call 32
Call barring service 38
Call diverting service 37
Call logs 35
Call waiting service 39
Caller ID service 41, 139
Car, phone profiles 132
Certification 113
Character input modes 42
Multi tap mode 43
Numeric input mode 44
Symbol input mode 44
T9 mode 43, 45
Charging, battery 27
Codes 24
PIN/PIN2 24
PUK/PUK2 24
Connecting
Using a USB cable 163
Via Bluetooth™ 156
Via infrared port 160
D
Date & time 30
Dial-up connection 162
Display language 135
Display the memory status 122
Downloading 117
Drafts 101
DTMF tones 34, 74
E
Earpiece volume 34
Email accounts 106
Emergency calls 25, 178
External light settings 137
F
Formatting memory card 125
H
Handsfree 70, 142
I
Inbox 96, 104
Incoming display 131
Incoming external light 48
Incoming voice calls during data
communication 140
Indicators
Camera 79
External display 20
Main display 19
Video camera 80
Video telephony 70
Information prompt 22
A
ppen
di
x
Appendix
175
Infrared 160
Transferring data 160
Input language 45
Input methods 42
International Call 32
J
Java™ application 116
Downloading 117
Reset settings 119
Settings 119
L
Language 45, 135
Locks
PIN/PIN2 lock 24
M
Meeting, phone profiles 132
Memory card 28, 125, 165
Formatting 125
Memory manager 112
Multi task 151
Multiparty call service 40
Music transfer mode 64
Muting 34, 140
My Favourites 66
N
Navigation key 18
Network 146
O
Owner information 56
P
Password
Call barring service code 24
Centre access code 24
Security code 24
Phone Profiles 132
Personalising 133
PIN/PIN2 24
Power saving 130
PUK/PUK2 24
Q
QR Code 153
R
Recording videos 78
Restoring data 167
Ringtone 48
Ringtone volume 48
S
Screensaver 118
Sending my number 41
Sent messages 97, 105
Shortcut keys
Navigation keys 16, 18
Shortcut key 136
Side shortcut key 17, 153
Shortcut menu 136
Silent, phone profiles 132
SIM card 23, 126
Inserting & removing 23
Soft keys 18
Speaker volume 73
Speed calling 53
Stereo handsfree headset with Audio
Remote Control 12, 139, 142
Synchronising 168
T
Taking pictures 78
Templates 90, 100, 122
Text editing functions 44
Theme 130
Troubleshooting 172
TV display 86
U
Unsent messages 90
USB 163
Cable 12, 27, 163, 168
Transferring data 163
Transferring music 163
V
Vibration 48
Video cable 123
vObject 124
Vodafone live! 112
Accessing Vodafone live! 112
Voice recorder 150
Recording 150
176
Appendix
Voicemail 36
W
WAP push 96
Warranty 4

Appendix
177
Health and Safety Information
Safety Guidelines
Follow the guidelines below to use your phone in a safe and legal
manner.
General
• Use your phone in the intended manner (holding it to your ear).
Incorrect usage may affect its performance. Only qualified service
personnel should install or repair the phone and its accessories.
• Use only compatible batteries and accessories. Using incompatible
items may permanently damage the phone.
• Do not connect the phone to any other device without reading the
provided documentation. The other device may be incompatible.
• When making emergency calls from your phone, ensure that the
phone is switched on and in service.
• Interference may affect your phone’s performance. Once you
move away from the source of the interference, the phone should
operate as usual.
• When the phone is used for extended periods of time, especially in
high temperature conditions, the phone surface could become hot.
Please use caution when touching the phone under such
conditions.
Operating environment
• Do not use a hand-held phone while driving or otherwise operating
machinery. If using a hand-held phone, park the vehicle before
conversing. If using an integrated handsfree device, make sure the
phone is securely in its holder.
• Switch your phone off if you are entering a hospital or other such
institution. Medical equipment may be affected by the phone so
you should observe any building regulation governing phone
usage.
• Switch your phone off when on an aircraft. The aircraft’s systems
may be affected by the phone signal. You are legally obliged to
comply with this recommendation.
• Switch your phone off in any facility where posted notices so
require.
• Do not use your phone when refuelling. You should keep your
phone away from fuel and chemicals.
• Switch your phone off when blasting is in progress. Observe any
provided guidelines or regulations.
• Switch your phone off when in an area with a potentially explosive
atmosphere (for example fuel storage areas, spray paint facilities etc.).
• Only qualified personnel should install the device in a vehicle.
Faulty installation or service may be dangerous and may invalidate
any warranty. For more information, check with the manufacturer
or its representative of your vehicle.
Electronic devices
• If you wear a pacemaker, or are in the company of someone who
does, you should be aware that there is small risk of your phone
interfering with the operation of the pacemaker. Only certain types
of pacemaker are affected and only if the mobile phone is placed
next to it. You should contact your doctor or the manufacturer of
the pacemaker for more information.
A
ppen
di
x
178
Appendix
• Your phone may interfere with some hearing aids. If this happens
you should contact your service provider or doctor.
• Your phone may interfere with the functionality of inadequately
shielded medical devices. Consult a physician or the manufacturer
of the device to ensure safe procedure.
• Your phone may interfere with the functionality of any inadequately
shielded electronic system in a motor vehicle. Examples of this
type of system include air-bags and fuel injection. You should
contact the manufacturer of the vehicle to ensure that it is properly
shielded.
Battery safety
Your device is powered by a rechargeable battery. The full
performance of a new battery is achieved only after two or three
complete charge and discharge cycles. The battery can be charged
and discharged hundreds of times but it will eventually wear out.
When the talk and standby times are noticeably shorter than normal,
buy a new battery.
• A new battery or one that has not been used for a long time could
have reduced capacity the first few times it is used. The battery
can only be charged in temperatures between +5°C (+41°F) and
+35°C (+95°F).
• Only use batteries approved by Toshiba and only recharge the
battery with the recommended charger supplied by Toshiba.
• When the charger is not in use disconnect it from the power
source.
• Do not leave the battery connect to the charger and power source
for longer then necessary as overcharging it will shorten its life.
• Do not short-circuit the battery. Accidental short-circulating can
occur when a metallic object causes a direct connection between
the + and - terminals of the battery.
• Do not leave the battery in a cold (for example, a fridge) or hot
place (for example, in a car exposed to direct sunlight) as this will
effect its performance.
• Do not dispose of the battery in a fire.
• Do not dispose of the battery in an ordinary bin. The battery
contains toxic chemicals and must be disposed of in the correct
manner. Contact your local authority for more information.
Emergency Calls
Calls cannot be made to emergency services (page 25) while data
communication is being performed within a GSM area. If the system
mode (page xx) is set to UMTS Only or GSM Only, calls cannot be
made to emergency services if the selected network is unavailable.
Also, calls may not be able to be made to emergency services
depending on the network services of some service providers.
You can still make calls to emergency services when the SIM card is
not inserted, the SIM card is locked, the phone lock is set, Fixed
Dialling Numbers is set, flight mode is set or call barring service is
set.
However, there is no guarantee that a connection can be established
in all countries and areas because operation of your phone differs
depending on the wireless network, wireless signal and your phone’s
setting status. Do not rely on just your mobile phone when you need
to make important calls such as calls to emergency services.
Appendix
179
FCC RF Exposure Information
Your handset is a radio transmitter and receiver. It is designed and
manufactured not to exceed the emission limits for exposure to radio
frequency (RF) energy set by the Federal Communications
Commission of the U.S. Government.
The guidelines are based on standards that were developed by
independent scientific organizations through periodic and thorough
evaluation of scientific studies. The standards include a substantial
safety margin designed to assure the safety of all persons, regardless
of age and health.
The exposure standard for wireless handsets employs a unit of
measurement known as the Specific Absorption Rate, or SAR. The
SAR limit set by the FCC is 1.6W/kg. The tests are performed in
positions and locations (e.g., at the ear and worn on the body) as
required by the FCC for each model. The highest SAR value for this
model handset when tested for use at the ear is 0.197W/kg and
when worn on the body, as described in this user guide, is 0.652W/
kg. Body-worn Operation; This device was tested for typical body-
worn operations with the back of the handset kept 1.5cm from the
body. To maintain compliance with FCC RF exposure requirements,
use accessories that maintain a 1.5cm separation distance between
the user's body and the back of the handset. The use of beltclips,
holsters and similar accessories should not contain metallic
components in its assembly. The use of accessories that do not
satisfy these requirements may not comply with FCC RF exposure
requirements, and should be avoided.
The FCC has granted an Equipment Authorization for this model
handset with all reported SAR levels evaluated as in compliance with
the FCC RF emission guidelines. SAR information on this model
handset is on file with the FCC and can be found under the Display
Grant section of http://www.fcc.gov/oet/fccid after searching on FCC
ID SP2-CC4-E01.
Additional information on Specific Absorption Rates (SAR) can be
found on the Cellular Telecommunications & Internet Association
(CTIA) website at http://www.phonefacts.net.
180
Appendix
European RF Exposure Information
Your mobile device is a radio transmitter and receiver. It is designed
not to exceed the limits for exposure to radio waves recommended by
international guidelines. These guidelines were developed by the
independent scientific organization ICNIRP and include safety
margins designed to assure the protection of all persons, regardless
of age and health.
The guidelines use a unit of measurement known as the Specific
Absorption Rate, or SAR. The SAR limit for mobile devices is 2 W/kg
and the highest SAR value for this device when tested at the ear was
0.419 W/kg*. As mobile devices offer a range of functions, they can
be used in other positions, such as on the body as described in this
user guide**. In this case, the highest tested SAR value is 0.708 W/
kg*.
As SAR is measured utilizing the devices highest transmitting power
the actual SAR of this device while operating is typically below that
indicated above. This is due to automatic changes to the power level
of the device to ensure it only uses the minimum level required to
reach the network.
The World Health Organization has stated that present scientific
information does not indicate the need for any special precautions for
the use of mobile devices. They note that if you want to reduce your
exposure then you can do so by limiting the length of calls or using a
‘hands-free’ device to keep the mobile phone away from the head
and body. Additional Information can be found on the websites of the
World Health Organization (http://www.who.int/emf).
* The tests are carried out in accordance with international guidelines
for testing.
* Please see the <FCC RF Exposure Information> section about body
worn operation.

Appendix
181
Menu Structure
1. Games & More
Applications
Screensavers
Settings
Java Information
2. Vodafone live!
Vodafone live!
Enter URL
Bookmarks
What’s New
Games
Ringtones
Pictures
News
Sport
History
Browser Settings
3. Media Player
Music Tab
Video Tab
Streaming Tab
4. Camera
Take Picture
Record Video
Scan Data
Settings
Memory Status
5. Messaging
Create Message
Inbox
Drafts
Sent Messages
Unsent Messages
Email
live! Studio
Templates
Settings
6. My Items
Pictures
Videos
Sounds & Ringtones
Games & More
My Saved Pages
live! Studio
Templates
Other Documents
Memory Status
7. Organiser & Tools
SIM Tool Kit
Calendar
Alarms
Calculator
Converter
Voice Recorder
Countdown Timer
Notepad
World Clock
Backup
8. Contacts
Contacts List
Create Contact
Call Log
Manage Category
Manage Group
Send My vCard
Synchronise
My Details
Settings
Memory Status
9. Settings
Phone Profiles
Display Settings
Phone Settings
Call Settings
Security Settings
Memory Settings
Network & Internet
Connectivity
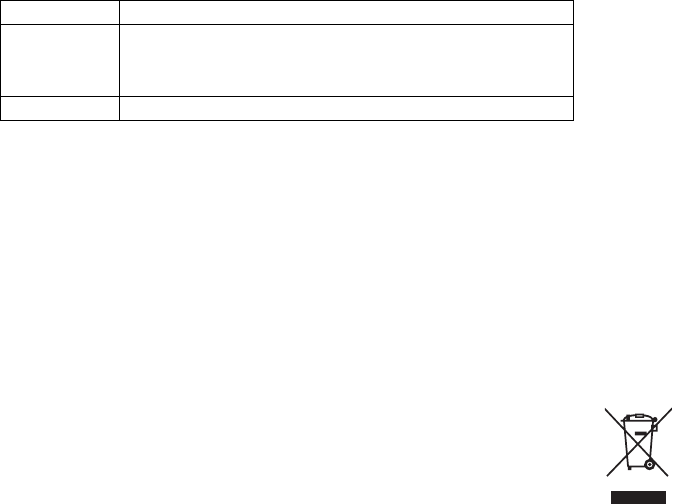
Purchase Record
For your future reference, we recommend that you fill in your purchase details in the form below.
* The serial number is printed on the bottom of the battery compartment.
Serial Number*
Dealer Name
Purchase Date
Following information is only for EU-member states:
The use of the symbol indicates that this product may not be treated as household waste. By ensuring
this product is disposed of correctly, you will help prevent potential negative consequences for the
environment and human health, which could otherwise be caused by inappropriate waste handling of
this product. For more detailed information about recycling of this product, please contact your local city
office, your household waste disposal service or the shop where you purchased the product.
09/05