Toshiba Information Systems CH5-E02 GSM900/1800/1900/UMTS Mobile phone with BT & Wifi User Manual G910 G920 UM EN

Toshiba Information Systems (UK) Ltd, Mobile Communications Division GSM900/1800/1900/UMTS Mobile phone with BT & Wifi G910 G920 UM EN

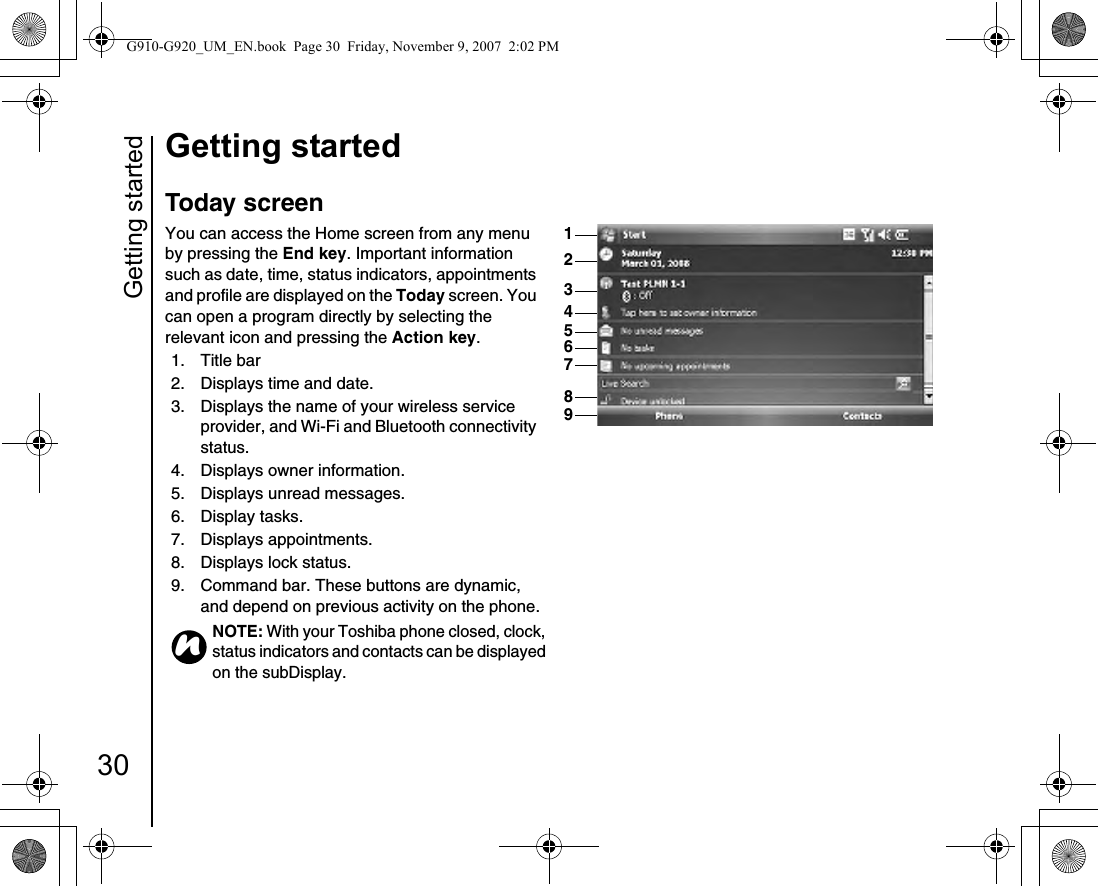
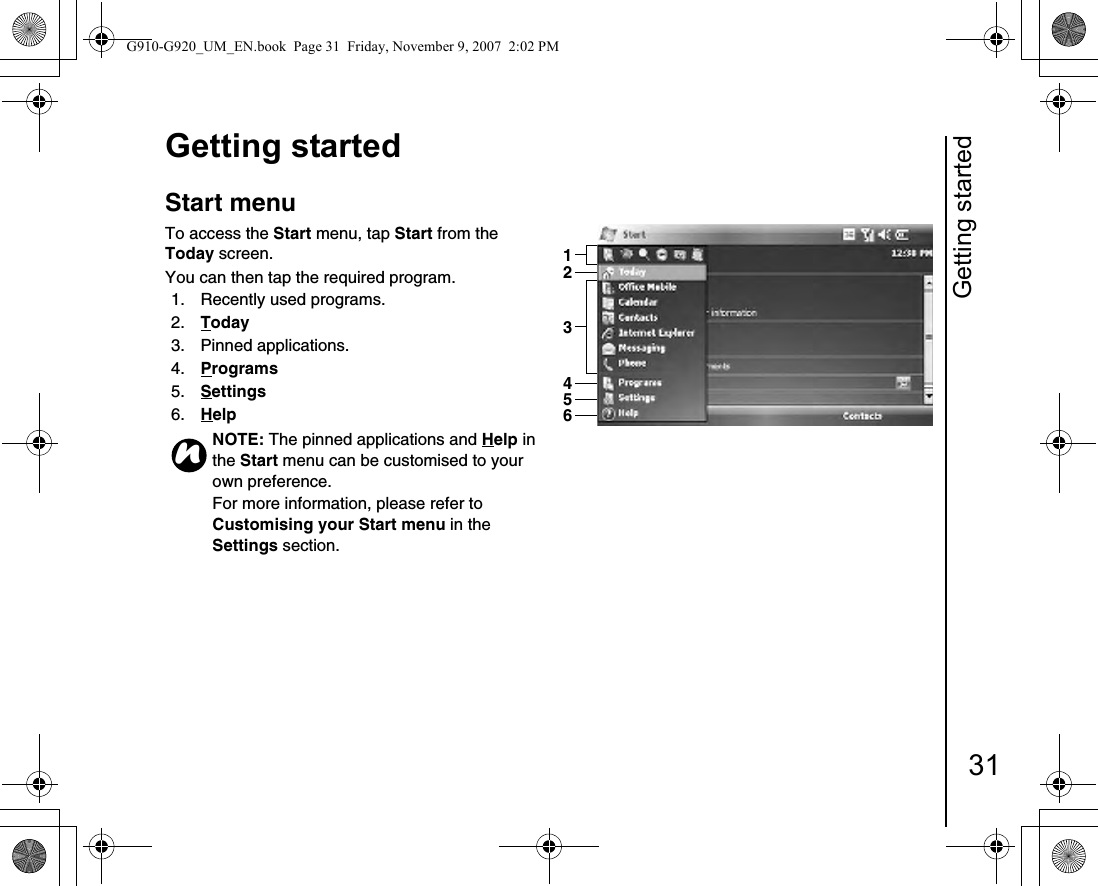
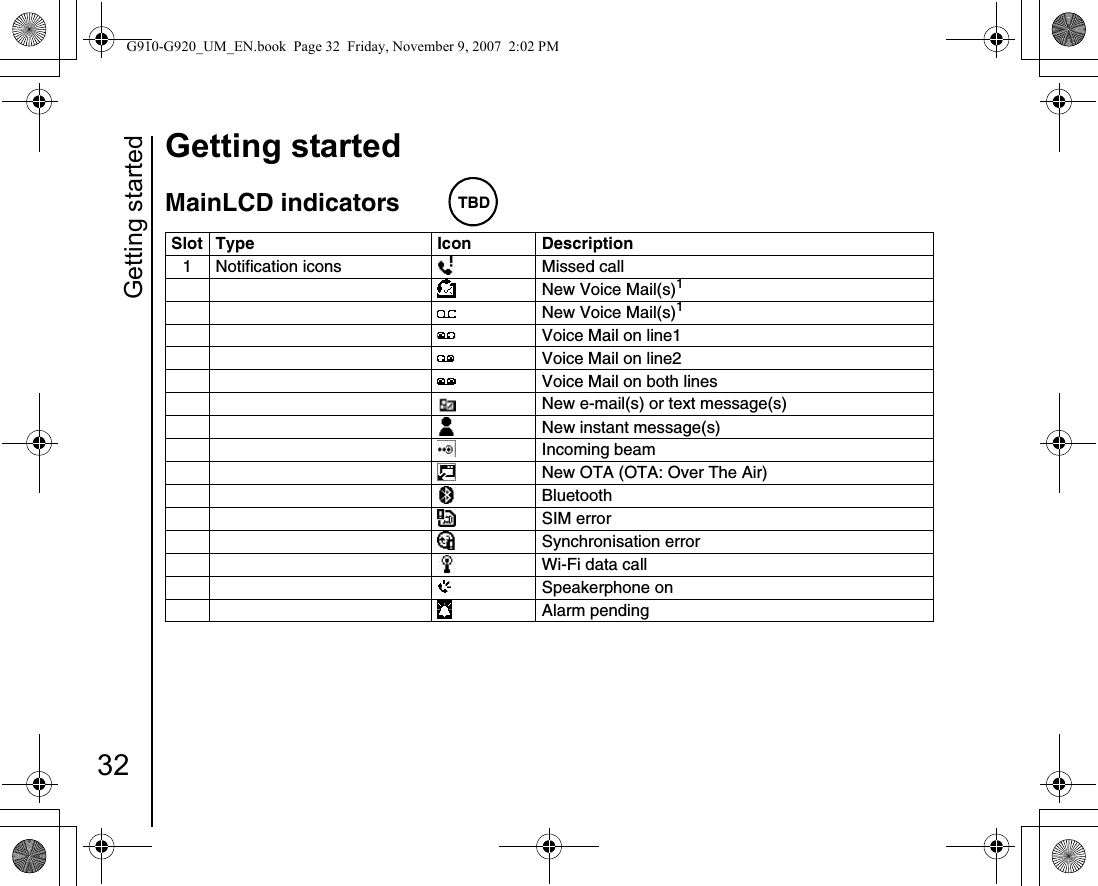
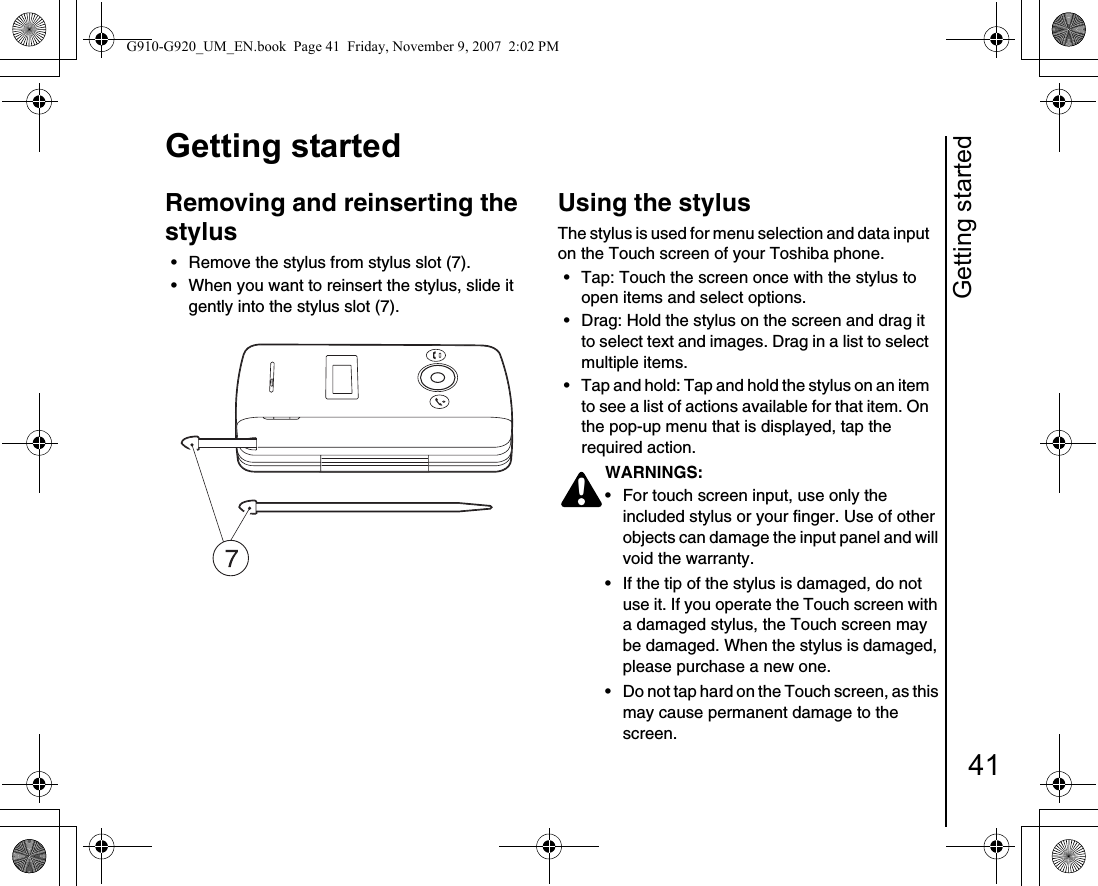
08 user manual part 2

Declaration of conformity13Declaration of conformityDeclaration of conformityWe, Toshiba Information Systems UK (Ltd), Mobile Communications Division, ofToshiba Court, Weybridge Business Park, Addlestone Road, Weybridge, KT15 2UL declare under our sole responsibility that this product (Portégé G910/G920, Type (Model) Name CH5-E01/CH5-E02) is in conformity with the following standards and/or other normative documents:3GPP TS 51.010-1, 3GPP TS 34.121, EN 301 489-1, EN 301 489-7, EN 301-489-24, EN 300 328, EN 301 489-17, EN 60950 and EN 50360We hereby declare that all essential radio test suites, EMC & safety requirements have been carried out and that the above named product is in conformity to all the essential requirements of Directive 1999/5/EC.The conformity assessment procedure referred to in Article 10(5) and detailed in Annex IV of Directive 1999/5/EC has been followed with the involvement of the following Notified Body(ies):Cetecom GmbH, Im Teelbuch 122, 45219 Essen, Germany11 April 2007Takashi OkamotoDeputy Managing Director of TIUGeneral Manager Mobile Communications DivisionTBDG910-G920_UM_EN.book  Page 13  Friday, November 9, 2007  2:02 PM
Health and safety14Health and safetyHealth and safetyGeneral• Always use your Toshiba phone in the intended manner. Incorrect usage may affect                   performance. Only qualified service personnel should install or repair the phone and its            accessories.• To avoid permanent damage to your Toshiba phone, use only Toshiba approved batteries and accessories.• The bundled battery and AC adapter are only for use with your Toshiba phone. Do not use this battery or AC adapter with any other device as this may cause permanent damage to the device, battery and AC adapter.• Before connecting your Toshiba phone to         another device, read the supporting                  documentation to confirm that the other device is compatible.• When making emergency calls from your Toshiba phone, ensure that the phone is switched on and in service.• When your Toshiba phone is used for extended     periods of time, especially in high temperature    conditions, the phone surface could become hot. Please use caution when touching the phone under such conditions.• When using ear buds or other headphones, be careful not to listen at excessive volumes.       Listening to very loud sound levels may lead to hearing loss. Also, listening through the ear buds or headphones for prolonged periods of time, even at normal sound levels, may lead to hearing loss. You should consult your doctor for more information on proper use of ear buds or headphones.• It is recommended that pregnant and young women take precautions while in a call and keep the phone at a distance from their lower abdomen. For this situation, use of a hands free kit is recommended.G910-G920_UM_EN.book  Page 14  Friday, November 9, 2007  2:02 PM
Health and safety15Health and safetyOperating environment• Do not handle your Toshiba phone while driving or when operating machinery. If you must      handle the phone while driving, park the vehicle before conversing. If using an integrated hands free device, make sure the phone is securely placed in its holder.• Switch your Toshiba phone off if you are            entering a hospital or health care facilities.    Medical equipment may be affected by phone usage. Always follow building regulations       governing phone usage.• Switch your Toshiba phone off when travelling on an aircraft. The phone signal may interfere with the systems in the aircraft. You are legally bound to comply with this recommendation. • Switch your Toshiba phone off in any facility where posted notices prohibit phone usage.• Do not use your Toshiba phone when refuelling. You should keep the phone away from fuel and chemicals.• Switch your Toshiba phone off when blasting is in progress and observe all provided guidelines and regulations.• Switch your Toshiba phone off in areas with            potentially explosive atmospheres. For               example, fuel storage areas and spray paint     facilities.• Switch your Toshiba phone off when outdoors during an electrical storm.• Only qualified personnel should install the        device in a vehicle. Faulty installation or service may be dangerous and may invalidate any     warranty. For more information, consult your    vehicle manufacturer or representative. G910-G920_UM_EN.book  Page 15  Friday, November 9, 2007  2:02 PM
Health and safety16Health and safetyElectronic devices• If you wear a pacemaker, or are in the company of someone who does, you should be aware that there is a small risk of mobile phone usage        interfering with the operation of the pacemaker. You should contact your doctor, or the            manufacturer of the pacemaker, for more           information.• Mobile phone usage may interfere with some       hearing aids. If this happens you should contact your service provider or doctor.• Mobile phone usage may interfere with the           functionality of inadequately shielded              medical devices. Consult a physician or the manufacturer of the device to ensure safe        procedures are used.• Mobile phone usage may interfere with the          functionality of any inadequately shielded      electronic system in a motor vehicle. Examples include airbags and fuel injection. You should contact the manufacturer of the vehicle to         ensure that the electronic system is properly shielded.Battery safetyYour Toshiba phone is powered by a rechargeable   battery. The full performance of a new battery is achieved only after two or three complete charge and discharge cycles. The battery can be charged and discharged hundreds of times but it will        eventually wear out. When the talk and standby times are noticeably shorter than normal, it is        recommended that you buy a new battery.• A new battery, or one that has not been used for a long time, could have reduced capacity during initial use. • The battery can only be charged in temperatures between +5 °C (+41 °F) and +35°C (+95 °F).• Only use batteries approved by Toshiba and only recharge the battery with the recommended charger supplied by Toshiba. • When the charger is not in use, disconnect it from the power source.• Do not leave the battery connected to the    charger and power source for longer than      necessary as overcharging will shorten the lifespan of the battery.G910-G920_UM_EN.book  Page 16  Friday, November 9, 2007  2:02 PM
Health and safety17Health and safety• Do not short-circuit the battery. Accidental short-circuiting can occur when a metallic object causes a direct connection between the + and -       terminals of the battery.• Do not leave the battery in areas of extreme cold or heat as this will affect the performance of the         battery. Areas of extreme cold include a             refrigerator, and areas of extreme heat include a car exposed to direct sunlight. • Do not dispose of the battery in a fire.• Do not dispose of the battery in an ordinary bin. The battery contains toxic chemicals and must be disposed appropriately. Contact your local authorities for more information.AC adapter and cable safety• Do not use a damaged or worn AC adapter or cable. The use of a damaged or worn AC adapter or cable could result in electric shock, burns or fire. Contact an authorised Toshiba service provider immediately to obtain suitable replacements.• Do not bend or twist the AC cable.• Do not pull on the AC cable in order to remove the plug from a socket.• Do grasp the plug directly when unplugging the AC cable to avoid causing any damage to the cable.• Do not place heavy objects on the AC adapter or cable.G910-G920_UM_EN.book  Page 17  Friday, November 9, 2007  2:02 PM
Health and safety18Health and safetyEmergency callsCalls cannot be made to emergency services while data communication is being performed within a GSM area. If the system mode is set to UMTS Only or GSM Only, calls cannot be made to emergency services if the selected network is unavailable.      Also, calls may not be able to be made to            emergency services depending on the network services of some service providers.There is no guarantee that a connection can be           established in all countries and areas because    operation of your phone differs depending on the wireless network, wireless signal and your setting status. Do not rely solely on your mobile phone when you need to make emergency calls.Wireless LAN securityIt is possible for an outside party to easily gain unlawful access to your Toshiba phone via Wireless LAN if the security function is not used.Without this security, your Toshiba phone carries the risk of unlawful access, wiretapping, and loss or destruction of data.You should set up your Toshiba phone to use the authentication and encryption features (WEP, WPA) in order to prevent such access.When using a public Wireless LAN access point, your Toshiba phone should be protected from unlawful access by the Windows firewall of Windows Security Centre and the anti-virus software within the firewall feature.Bluetooth securityAlthough your Toshiba phone has security features compliant with the Bluetooth standard specification, this security might not work properly when using your Toshiba phone in a non-secure environment. Take care when using the Bluetooth feature.IMPORTANT: You can still make calls to      emergency services when the SIM card is not inserted, the SIM card is locked, the phone lock is set, Phone is Off, Fixed Dialing is set, or Call Barring is set.G910-G920_UM_EN.book  Page 18  Friday, November 9, 2007  2:02 PM
Health and safety19Health and safetyFCC noticeThis device complies with Part 15 of the FCC rules.       Operation is subject to the following two conditions:    (1) This device may not cause harmful interference, and (2) This device must accept any interference received, including interference that may cause    undesired operation.Changes or modifications not expressly approved by the party responsible for compliance could void the user’s authority to operate the equipment.Information to userThis equipment has been tested and found to    comply with the limits of a Class B digital device, pursuant to Part 15 of the FCC Rules. These limits are designed to provide reasonable protection against harmful interference in a residential             installation. This equipment generates, uses and can radiate radio frequency energy and, if not          installed and used in accordance with the                 instructions, may cause harmful interference to      radio communications. However, there is no       guarantee that interference will not occur in a        particular installation; if this equipment does cause    harmful interference to radio or television reception, which can be determined by turning the equipment off and on, the user is encouraged to try to correct the interference by one or more of the following measures:1.  Reorient/relocate the receiving aerial.2.  Increase the separation between the          equipment and receiver.3.  Connect the equipment into an outlet on a       circuit different from the outlet the receiver is currently connected.4.  Consult the dealer or an experienced radio/TV        technician for help.WARNING: Changes or modifications not expressly approved by the manufacturer responsible for compliance could void the user’s authority to operate the equipment. !G910-G920_UM_EN.book  Page 19  Friday, November 9, 2007  2:02 PM
Health and safety20Health and safetyFCC RF exposure informationYour Toshiba phone is a radio transmitter and        receiver. It is designed and manufactured not to    exceed the emission limits for exposure to radio   frequency (RF) energy set by the Federal            Communications Commission of the U.S.            Government.The guidelines are based on standards that were       developed by independent scientific organisations through periodic and thorough evaluation of          scientific studies. The standards include a            substantial safety margin designed to assure the safety of all persons, regardless of age and health.The exposure standard for wireless handsets       employs a unit of measurement known as the    Specific Absorption Rate, or SAR. The SAR limit set by the FCC is 1.6W/kg. The tests are performed in positions and locations (e.g., at the ear and worn on the body) as required by the FCC for each model. The SAR value for the Portégé G910 and Portégé G920 handsets when tested for use at the ear is 0.575W/kg respectively, and when worn on the body, as described in this user guide, is 0.655W/kg respectively.Body-worn operationThis phone was tested for typical body-worn          operations with the back of the phone kept at a     distance of 1.5cm from the body. To maintain     compliance with FCC RF exposure requirements, use accessories that maintain a 1.5cm separation distance between your body and the back of the phone. The use of belt clips, holsters and similar   accessories should not contain metallic                components. The use of accessories that do not satisfy these requirements may not comply with FCC RF exposure requirements, and should be avoided.The FCC has granted an Equipment Authorization for this model handset with all reported SAR levels         evaluated as in compliance with the FCC RF    emission guidelines. SAR information on the Portégé G910 and Portégé G920 handsets is on file with the FCC and can be found under the Display Grant section of http://www.fcc.gov/oet/fccid after searching on FCC ID SP2-CH5-E01/SP2-CH5-E02. Additional information on Specific Absorption Rates (SAR) can be found on the Cellular                            Telecommunications & Internet Association (CTIA) website at http://www.phonefacts.net.Health and safety.fm  Page 20  Friday, November 9, 2007  7:33 PM
Health and safety21Health and safetyEuropean RF Exposure InformationYour Toshiba phone is a radio transmitter and           receiver. It is designed not to exceed the limits for exposure to radio waves recommended by                   international guidelines. These guidelines were      developed by the independent scientific                    organisation ICNIRP and include safety margins designed to assure the protection of all persons,   regardless of age and health.The guidelines use a unit of measurement known as the Specific Absorption Rate, or SAR. The SAR limit for mobile devices is 2 W/kg and the SAR value for the Portégé G910 and Portégé G920 devices when tested at the ear was 0.781W/kg* respectively. As mobile devices offer a range of functions, they can be used in other positions, such as on the body as described in this user’s guide**. In this case, the tested SAR value is 0.975W/kg respectively.As SAR is measured utilising the device’s highest transmitting power, the actual SAR of this device while operating is typically below that indicated above. This is due to automatic changes to the    power level of the device to ensure it only uses the minimum level required to reach the network.The World Health Organization has stated that present scientific information does not indicate the need for any special precautions for the use of     mobile devices. They state that if you want to           reduce your exposure then you can do so by limiting the length of calls or using a ‘hands-free’ device to keep the mobile phone away from the head and body. Additional Information can be found on the website of the World Health Organization (http://www.who.int/emf). * The tests are carried out in accordance with                international guidelines for testing.** Please see the <FCC RF Exposure Information> section about body worn operations.Health and safety.fm  Page 21  Friday, November 9, 2007  7:33 PM
Health and safety22Health and safetyThe following Information is only for EU-Member States:The use of the above symbol indicates that this product may not be treated as household waste. By ensuring this product is disposed of correctly, you will help prevent potential negative consequences for the environment and human health, which could otherwise be caused by inappropriate waste        handling of this product. For more detailed               information about recycling of this product, please contact your local city office, your household waste disposal service or the shop where you purchased the product.G910-G920_UM_EN.book  Page 22  Friday, November 9, 2007  2:02 PM
Care and maintenance23Care and maintenanceCare and  maintenanceCare and maintenanceYou can greatly enhance the life span of your Toshiba phone, and the parts and accessories, by following the suggestions below. • Keep your Toshiba phone, and all the parts and accessories, out of the reach of small children and pets.• Keep your Toshiba phone dry, as moisture of any kind can contain minerals that will corrode the electronic circuits. The manufacturer's warranty may become invalid if the phone or battery were to get wet due to misuse. • Do not use or store your Toshiba phone in dusty or dirty locations as the moving parts of the phone can be damaged. • Do not use or store your Toshiba phone in hot areas. High temperatures will shorten the life span of the phone, damage the battery, and warp/melt internal circuits.• Do not store your Toshiba phone in cold areas. A big difference between room temperature and the temperature in the phone can cause condensation to form inside the phone, damaging the electronic circuits. • Do not keep your Toshiba phone in, or near, heat sources such as a radiator or microwave oven - this can cause the battery inside the phone to overheat and explode.• Do not open your Toshiba phone unless absolutely necessary. • Do not mishandle or abuse your Toshiba phone.   Dropping the phone, or knocking or shaking it, can damage the internal circuits. • Do not use harsh chemicals, strong detergents, or cleaning solvents to clean your Toshiba phone. Use a soft, clean, dry, lint-free cloth to clean the phone. • Do not use water to clean the Touch screen. • Keep the Touch screen and tip of the Stylus clean to avoid permanent damage.• For touch screen input, use only the included stylus or your finger. Use of other objects can damage the input panel and will void the warranty.• It is recommended that you use the bundled stylus when pressing the Reset button.TIP: Maintaining your Toshiba phone, and the parts and accessories, in a good condition will help you fulfil the warranty obligations.G910-G920_UM_EN.book  Page 23  Friday, November 9, 2007  2:02 PM
Care and maintenance24Care and maintenance• If the tip of the stylus is damaged, do not use it. If you operate the Touch screen with a damaged stylus, the Touch screen may be damaged. When the stylus is damaged, please purchase a new one.• Do not tap hard on the Touch screen, as this may cause permanent damage to the screen.• Do not apply paint or other such substances to your Toshiba phone. • If your Toshiba phone, or any of the accessories, are not working as they should, please consult your dealer, who can provide you with the expert assistance you require.• Do not use excessive volume levels when using headphones. • If your Toshiba phone has a flash unit, do not operate the flash too close to a person’s eyes - this may cause damage to their eyes.• Interference may affect the performance of your Toshiba phone. This is normal and the phone should operate as usual once you move away from the source of the interference. • Do not attempt to disassemble your Toshiba phone. Only Toshiba authorised personnel should service the phone.Restarting your Toshiba phone If you have any problems, such as the phone freezing, press and hold the Power key.Resetting your Toshiba phone If, after you have restarted your Toshiba phone, there is still a problem, or if you are having difficulty restarting the phone, press the Reset button. If the problem still remains:1.  Remove the battery (refer to Getting started section for instructions).2.  Re-insert the battery and turn your Toshiba phone on (refer to Getting started section for instructions). IMPORTANT: If you restart your Toshiba phone while a program is running, data that you have not saved will be lost.IMPORTANT: If you reset your Toshiba phone, there is a possibility that saved and unsaved data will be lost.G910-G920_UM_EN.book  Page 24  Friday, November 9, 2007  2:02 PM
Care and maintenance25Care and maintenanceReinitialising your Toshiba phoneYou should only use this procedure as a last resort. If you are experiencing a problem with an application, it is most likely a result of a conflict between installed programs. We recommend un-installing the most recently added program first. Also verify that the program is designed to be run on your Toshiba phone by comparing the requirements to the information provided with your phone - tap Start > Settings > System > About to view this information.To reinitialise your Toshiba phone, refer to the Master Clear subsection in Settings.We recommend that you back up all of your data before reinitialising your Toshiba phone.IMPORTANT: It is recommended that you frequently back up all of your data on your Toshiba phone.G910-G920_UM_EN.book  Page 25  Friday, November 9, 2007  2:02 PM
Getting started26Getting startedGetting sta rtedUnpackingPlease ensure that the contents of your sales pack include:• Your Toshiba phone with stylus• AC adapter• AC cable• Battery pack• USB cable• USB Host cable• Earphones• Quick start guide• CD (Getting Started)• CD (User Guide and PC Applications)G910-G920_UM_EN.book  Page 26  Friday, November 9, 2007  2:02 PM
Getting started27Getting startedPhone layout and functions 1.  Power key - press and hold to turn power on/off. Press to enter sleep mode, and press and hold to wake up from sleep mode.2.  microSD card slot3.  Earpiece4.  Headset connector5.  SubDisplay - displays clock, status indicators, etc.6.  Side key - adjusts the volume.7.  Fingerprint sensor8.  End key - ends calls/operations and returns to Today screen.9.  Navigation key / Action key - moves the cursor up, down, left or right, confirms operations and accesses shortcuts. The Action key is used to open the selected operation.10. Handstrap hole11. Microphone12. Cable and phone charging connector13. Send key - launches the phone pad mode. Makes and answers calls.14. Power LED1 - red LED power indicator, indicates battery charging status.Power LED2 - green LED power indicator, indicates calls, messages, notifications.15. StylusG910-G920_UM_EN.book  Page 27  Friday, November 9, 2007  2:02 PM
Getting started28Getting started16. Battery cover17. Camera light 18. Rear camera G910-G920_UM_EN.book  Page 28  Friday, November 9, 2007  2:02 PM
Getting started29Getting started19. Program buttons - initially set to (Left side) Contacts, Messaging, Internet Explorer, Calendar/ (Right side) Tasks, Today, File Explorer, Windows Media. You can reassign Program buttons. 20. Touch screen21. Front camera22. Keyboard - for entering phone numbers and characters.23. OK key (first level) - confirms data entries, and exits the current program. Press and hold this key to change ringer settings (On/Vibrate/Off). / Bluetooth (second level).24. Start key (first level) - activates the Start menu. / Wireless LAN (second level).25. Function key - used to access the second level key functions by pressing this key at the same time as the key with the required second level function.26. Reset button 27. Left softkey and Right softkey - perform operations indicated on the touch screen.G910-G920_UM_EN.book  Page 29  Friday, November 9, 2007  2:02 PM
Getting started30Getting startedToday screenYou can access the Home screen from any menu by pressing the End key. Important information such as date, time, status indicators, appointments and profile are displayed on the Today screen. You can open a program directly by selecting the relevant icon and pressing the Action key.1. Title bar2.  Displays time and date.3.  Displays the name of your wireless service provider, and Wi-Fi and Bluetooth connectivity status.4.  Displays owner information.5.  Displays unread messages.6. Display tasks.7. Displays appointments.8.  Displays lock status.9.  Command bar. These buttons are dynamic, and depend on previous activity on the phone.NOTE: With your Toshiba phone closed, clock, status indicators and contacts can be displayed on the subDisplay.n351246789G910-G920_UM_EN.book  Page 30  Friday, November 9, 2007  2:02 PM
Getting started31Getting startedStart menuTo access the Start menu, tap Start from the Today screen.You can then tap the required program.1.  Recently used programs. 2.  Today3. Pinned applications.4.  Programs 5.  Settings 6.  HelpNOTE: The pinned applications and Help in the Start menu can be customised to your own preference.For more information, please refer to Customising your Start menu in the Settings section.n123456G910-G920_UM_EN.book  Page 31  Friday, November 9, 2007  2:02 PM
Getting started32Getting startedMainLCD indicatorsSlot Type Icon Description1 Notification icons Missed callNew Voice Mail(s)1New Voice Mail(s)1Voice Mail on line1Voice Mail on line2Voice Mail on both linesNew e-mail(s) or text message(s)New instant message(s)Incoming beamNew OTA (OTA: Over The Air)BluetoothSIM errorSynchronisation errorWi-Fi data callSpeakerphone onAlarm pendingTBDG910-G920_UM_EN.book  Page 32  Friday, November 9, 2007  2:02 PM
Getting started33Getting startedMultiple notifications. This icon is displayed when there are multiple occurrences that would normally each display an icon, for example, when there is a missed call and the alarm is pending).This icon is displayed automatically after the last notification icon has been displayed briefly. You can tap this icon to view all of the individual notifications.2 Roaming icons RoamingGPRS in range3G in rangeEDGE in rangeCDMA in range (not supported)3 Data icons Data call disconnectedData call connectedGPRS in progress3G in progressEDGE in progressWi-Fi onActiveSync over Wi-Fi in progressActiveSync in progress4 Signal strength icons Signal strengthVoice/Video call in progressData call in progressSlot Type Icon DescriptionG910-G920_UM_EN.book  Page 33  Friday, November 9, 2007  2:02 PM
Getting started34Getting started1 Missed call notification icon is dependent on the wireless service provider. The first New Voice Mail notification icon is displayed when the network supports the SMS notification of Voice Mail, and this has been selected by the user. The second New Voice Mail notification icon will be displayed when SMS notification of Voice Mail is not active.2 The Volume control window is displayed when you tap these icons.Radio offNo radio service. The phone has not yet connected to a network.Radio connectedRadio signal lost. The phone is searching for a signal.DiallingCall on holdCall forwardedNo SIM card installed5 Volume icons2VibrateRinger offRinger on6 Mini time - Displays the clock in the title bar during all programs.Battery strength icons Battery level. This icon is displayed on the Today screen when the ‘Mini time’ display is off.Battery alertBattery chargingLow batterySlot Type Icon DescriptionG910-G920_UM_EN.book  Page 34  Friday, November 9, 2007  2:02 PM
Getting started35Getting startedSubDisplay functionsWhen you close your Toshiba phone, the clock (in 24 hour format) is displayed on the subDisplay. You can confirm important notifications such as incoming calls, appointment alarms, and new messages on the subDisplay. Opening your Toshiba phone again will return to the previous screen on the mainLCD. With your Toshiba phone closed, use the following keys for operations on the subDisplay:• Press the Right key to toggle the subDisplay view for missed call(s), appointments, new messages, and profile.• Press the Up/Down key to switch the message type (SMS, MMS, and Outlook E-mail) for the new messages view. • Press the Up/Down key to set and confirm the volume for each profile view.G910-G920_UM_EN.book  Page 35  Friday, November 9, 2007  2:02 PM
Getting started36Getting startedSubDisplay indicatorsSlot Type Icon Description1 Signal strength icons GPRS in progressVoice/Video call in progressData call in progressRadio offNo radio service. The phone has not yet connected to a network.Radio connectedDiallingCall on holdCall forwardedNo SIM card installedSIM errorRoaming icons GPRS in range3G in rangeEDGE in rangeCDMA in range (not supported)Data icon Data call connected2 Battery strength icons Battery levelBattery alertLow batteryG910-G920_UM_EN.book  Page 36  Friday, November 9, 2007  2:02 PM
Getting started37Getting started3 Volume icons VibrateRinger offHeadset on4 Notification icons Missed callNew Voice Mail(s)Voice Mail on line1Voice Mail on line2Voice Mail on both linesNew e-mail(s) or text message(s)Slot Type Icon DescriptionG910-G920_UM_EN.book  Page 37  Friday, November 9, 2007  2:02 PM
Getting started38Getting startedInstalling the SIM card, battery and microSD card• Slide the battery cover (1), lift the battery cover upwards and remove the battery (2) from the battery compartment.• With the gold connectors facing downwards, the bevelled corner of the SIM card facing towards the bottom of the phone, push the SIM card (3) into the SIM card slot and slide it into place.IMPORTANT: The SIM card is easily damaged by scratching and bending, so take care when handling it.G910-G920_UM_EN.book  Page 38  Friday, November 9, 2007  2:02 PM
Getting started39Getting started• Insert the battery (4) into the battery compartment with the gold connectors facing towards the cable and phone charging connector. The battery is shaped so that it can only be inserted this way. Gently push down on the battery to snap it into place.• Gently slide the battery cover (2) into position.WARNING: Please use the bundled battery in your sales pack. Do not use other batteries.!G910-G920_UM_EN.book  Page 39  Friday, November 9, 2007  2:02 PM
Getting started40Getting started• Open the microSD card slot cover. Slide the microSD card into the slot (5).• To remove the microSD card, press it inwards (5). The microSD card will pop out (6). Close the slot cover.G910-G920_UM_EN.book  Page 40  Friday, November 9, 2007  2:02 PM
Getting started41Getting startedRemoving and reinserting the stylus• Remove the stylus from stylus slot (7). • When you want to reinsert the stylus, slide it gently into the stylus slot (7).Using the stylusThe stylus is used for menu selection and data input on the Touch screen of your Toshiba phone.• Tap: Touch the screen once with the stylus to open items and select options.• Drag: Hold the stylus on the screen and drag it to select text and images. Drag in a list to select multiple items.• Tap and hold: Tap and hold the stylus on an item to see a list of actions available for that item. On the pop-up menu that is displayed, tap the required action.WARNINGS:• For touch screen input, use only the included stylus or your finger. Use of other objects can damage the input panel and will void the warranty.• If the tip of the stylus is damaged, do not use it. If you operate the Touch screen with a damaged stylus, the Touch screen may be damaged. When the stylus is damaged, please purchase a new one.• Do not tap hard on the Touch screen, as this may cause permanent damage to the screen.!G910-G920_UM_EN.book  Page 41  Friday, November 9, 2007  2:02 PM
Getting started42Getting startedCharging the batteryYou need to fully charge the battery before you can switch your Toshiba phone on for the first time.The battery will only achieve optimum performance after two or three complete charges.You can charge your battery in the following two ways:1.  Plug the AC adapter into an AC outlet and connect it to the charger connector on your Toshiba phone. When the battery is fully charged, unplug the AC adapter from the AC outlet and disconnect it from the phone charger connector by gripping it tightly and pulling gently.or2.  Connect your Toshiba phone to a PC with the USB cable.Low battery indicatorWhen the battery charge level is running low, a warning tone sounds and the Battery Low message is displayed repeatedly. If the battery charge level runs too low for normal operation, your Toshiba phone will automatically switch off.Battery informationBattery performance depends on many factors, such as your Service Provider's network configuration, signal strength, the temperature of the environment in which you operate your Toshiba phone, the features and/or settings you select and use, items attached to your phone's connecting ports, and your voice, data, and other program usage patterns.TIP: For information on checking your battery status, refer to the Power management settings subsection in Settings.NOTE: It is recommended that you save the data in your phone memory to a PC or storage card. The manufacturer is not responsible for data lost or altered due to battery discharge.TIP: For information on optimising the power performance of your Toshiba phone, refer to the Power management settings and Backlight settings subsections in Settings.nG910-G920_UM_EN.book  Page 42  Friday, November 9, 2007  2:02 PM
Getting started43Getting startedManaging a low battery When the low battery warning is displayed, do the following: 1.  Save your current data.2.  Charge the battery as soon as possible. 3.  Turn your Toshiba phone off. Switching the power on and offTo switch your Toshiba phone on:1.  Press and hold down the Power key. The standby screen is displayed.2.  If a PIN or security code is requested, enter the code.To switch your Toshiba phone off:1.  Press and hold down the Power key. 2. Tap Power Off on the Power Off Hint dialog.WARNING: There is a danger of explosion if the battery is incorrectly replaced. To reduce risk of fire or burns, do not disassemble, crush, puncture, short external contacts, expose to temperature above 60°C (140°F), or dispose of battery in fire or water. Replace only with specified batteries according to the local regulations.!NOTE: The PIN code activates the services in your Toshiba phone and should be provided in the documentation supplied by your service provider. nG910-G920_UM_EN.book  Page 43  Friday, November 9, 2007  2:02 PM
Getting started44Getting startedSynchronisingActiveSync allows you to create a synchronisation relationship between your Toshiba phone and PC, and between your Toshiba phone and your Exchange server. This means that the shared data is always consistent. If you make a change, it is automatically made to the corresponding information on the other computer. This is an effective way of keeping your data up-to-date. You can connect your Toshiba phone to your PC using the USB cable or Bluetooth connection. You can also use ActiveSync to connect your Toshiba phone to other resources through your PC. However, you cannot synchronise remotely to a PC using a modem or network connection. The synchronisation relationship is created to manage the data that is copied between your Toshiba phone and PC. You can connect to your Exchange server using a cellular connection, or you can connect your Toshiba phone to your PC as a way of connecting back to the Internet.Installing and setting up ActiveSyncYou can either install ActiveSync from your Windows Mobile Getting Started CD or you can download a copy of ActiveSync from http://www.microsoft.com/windowsmobile/addons/default.mspxOnce the software has been installed and your Toshiba phone is connected to your PC via the USB cable, the ActiveSync Setup Wizard is started. Simply follow the on-screen instructions.If you are not synchronising directly with a Microsoft Exchange server, do not select the option to synchronise directly with a server. The alternative is to synchronise your Toshiba phone with your PC. You cannot do both at the same time. NOTE: If you have a PC which is already fully synchronised with your Exchange server, you should synchronise your Toshiba phone to your PC rather than synchronising your Toshiba phone with the Exchange server. Data will be downloaded via your PC, saving you the charges for traffic volume. In addition, synchronising via your mobile phone network will take longer than it would with your local PC.nG910-G920_UM_EN.book  Page 44  Friday, November 9, 2007  2:02 PM
Getting started45Getting startedChanging ActiveSync settingsOnce you have set up synchronisation using the ActiveSync Setup Wizard on the PC, you can change your synchronisation settings at a later stage: • If you want to change ActiveSync settings for synchronising with a PC, use ActiveSync on the PC. For more information, see ‘Changing the amount of information synchronized’ in ActiveSync Help on the PC. • If you want to change ActiveSync settings for synchronising with an Exchange server, use ActiveSync on your Toshiba phone, as described in ‘Change settings for an information type’ in your phone Help.Starting/stopping synchronisation1. From the Today screen, tap Start > Programs > ActiveSync. 2.  To start synchronisation, select Sync. 3.  To stop synchronisation, select Stop. Synchronising mediaYour Toshiba phone can synchronise media from your PC, such as music and video files. This is described in detail in Applications & Multimedia.Using the USB Host cableYour Toshiba phone has a USB Host function. The bundled USB Host cable connects to the cable and phone charging connector on your Toshiba phone. When it is connected, USB memory is available.When connected to your Toshiba phone, the USB Host cable can provide a maximum current of 100mA. If you use the USB Host cable to connect your Toshiba phone to a device that requires more than 100mA, the USB Host cable will not function.When the battery of your Toshiba phone is at less than 20% charged, the USB Host cable cannot be used without first recharging the phone’s battery.NOTE: you will need to disconnect your Toshiba phone from your PC before changing the synchronisation settings.nNOTE: You can only start/stop synchronisation if your Toshiba phone already has a synchronisation relationship with a PC or Exchange server.nG910-G920_UM_EN.book  Page 45  Friday, November 9, 2007  2:02 PM
Call functions46Call functionsCall functi onsMaking a call You can make calls from the Today screen, Phone screen, Contacts, Call History, or via speed dial. You can also make calls with your Toshiba phone closed by dialling a number displayed on the SubDisplay screen.Before making a call, ensure that your Toshiba phone is switched on, that there is a valid SIM card installed, and that the signal is sufficiently strong.To make a call, enter the phone number from the Today screen using the numeric keypad, or press the Send key and scroll down the list to the required number.Press the Send key to dial.Making an emergency call You can make calls to emergency service numbers under almost any circumstances, even if you have locked your Toshiba phone or if you have not enabled your SIM.Making a call by entering a contact name1. From the Today screen, enter the initial letters of the contact name. 2.  A list of contacts matching your keystrokes is displayed. Select the relevant contact, and then press the Send key once or the Action key twice.Making a call from an open contact1.  Select the contact and relevant phone number.2. Press the Send key or Action key.Making a call from Contacts1. From the Today screen, tap Contacts. 2.  Select the contact, and press the Send key. TIP: If you have a long list of contacts, you can use a shortcut to find the contact you want by entering the first few letters of the contact's name. The phone searches through the contact list and displays the name.To call the contact, press the Send key. G910-G920_UM_EN.book  Page 46  Friday, November 9, 2007  2:02 PM
Call functions47Call functionsMaking a call from the Call HistoryThe Call History displays calls you have made, received, and missed recently. 1. From the Phone screen, tap Keypad > Call History.2.  Select the relevant name or phone number. 3. Press the Send key or tap Call.Making a call using a recently dialled phone number 1. From the Today screen, press the Send key. 2.  Select the relevant name or phone number, using the up and down arrows if required. 3. Press the Send key or tap Talk.Dialling the last number called From the Today screen, press the Send key twice.Creating a speed dialYou can create a speed dial for a phone number that is stored in your Contacts.To create a speed dial entry:1. From the Today screen, tap Contacts. 2.  Tap the contact.3.  Tap the phone number. 4. Tap Menu > Add to Speed Dial... 5. In the Location: field, select the speed dial number. 6. Tap ok. The speed dial entry is created.Voice Mail speed dialThe Voice Mail speed dial is normally preconfigured. If it is not preconfigured, you can save your Voice Mail number by tapping Phone > Keypad > Speed Dial > Voicemail, and create a speed dial entry as detailed above.Contact your Service Provider to find out your Voice Mail number.NOTE: The digit 0 is reserved to bring up the + symbol in international dial strings when you press and hold 0. The digit 1 is reserved for calling your Voice Mail as a speed dial option. NOTE: You can only create speed dials for phone numbers when using a Pocket PC.nnG910-G920_UM_EN.book  Page 47  Friday, November 9, 2007  2:02 PM
Call functions48Call functionsUsing a speed dialFrom the Today screen, press and hold the speed dial number that you want to call. If the speed dial contains two digits, press the first digit, then press and hold the second digit. Your Toshiba phone dials the phone number.Editing a speed dial 1. From the Today screen, tap Phone > Keypad  > Speed Dial. 2.  Scroll to the required speed dial, then tap Menu > Edit... 3.  Make the required changes and tap ok.Deleting a speed dial 1. From the Today screen, tap Phone > Keypad  > Speed Dial. 2.  Scroll to the required speed dial, then tap Menu > Delete. 3. Tap Yes when the confirmation query is displayed.Receiving a callAnswering or ignoring a call • To answer an incoming call, press the Left softkey or tap Answer. • To ignore an incoming call, press the Right softkey or tap Ignore. NOTE: If you choose to ignore a call, the caller will be connected to your Voice Mail, provided that you are subscribed to this service.TIP: With your Toshiba phone closed, the following keys are assigned to the call functions on the SubDisplay:•Send key - makes and answers calls.•End key - ignores calls.nG910-G920_UM_EN.book  Page 48  Friday, November 9, 2007  2:02 PM
Call functions49Call functionsIn-call optionsAnswering or postponing a second call To answer or postpone a second call, you need to first enable the call waiting option by doing the following:1. From the Today screen, tap Start > Settings.2. On the Personal tab, tap Phone.3. Tap the Services tab.4. Tap Call Waiting in the list of services, and then tap the Get Settings... button. 5.  When the settings have been received from the network, tap the Notify me radio button.6. Tap ok.Once the call waiting feature has been enabled on your Toshiba phone and the settings have automatically been sent and accepted by your Service Provider, you will receive an audible and visual notification on your Toshiba phone if another call comes in during your current call. • To put the first call on hold and answer the second call, press the Send key. To switch between calls, tap Swap. • To avoid answering the second call, tap Ignore. The second call will either be disconnected or diverted to Voice Mail, depending on whether you are subscribed to the Voice Mail service.Making a second call while already in a call1.  While in a call, tap Hold to place the call on hold.2.  Dial the second number and press the Send key. Your first call will remain on hold.3.  To swap between the two calls, tap Swap.Joining two or more calls together in a conference call1.  With two calls active on your Toshiba phone, one active and the other on hold, tap Menu > Conference. The two calls will be joined together and each party will be able to hear the other. Adding an additional party to the call1.  To add another party to the conference call,dial another number, again tapping Menu > Conference. G910-G920_UM_EN.book  Page 49  Friday, November 9, 2007  2:02 PM
Call functions50Call functionsHaving a private conversation with a partyTo do this you will need to split the conference call up.1.   With the conference call running, tap Menu > Private.2.   Select the party with which you wish to have the private conversation and tap Private.Placing a call on speakerphone1.  While in a call, tap Speaker On. The speakerphone is activated.2.  To switch the speakerphone off, tap Speaker Off.Placing a call on hands-freeWhen hands-free equipment is attached to your Toshiba phone, the Menu > Turn Hands-free On option will be enabled.Special dialling requirementsInserting an international country codeTo make an international call, you must include a country code at the beginning of the dialling sequence. To enter the country code, press and hold the digit 0 until a + sign is displayed, and then enter the rest of the phone number. NOTE: The conference call feature depends upon your Service Provider supporting it. Please check with your Service Provider to ensure you can use this feature.NOTE: The speakerphone will not be automatically enabled in your next call, even if you left the function switched on in the            previous call.nnNOTE: Similarly, you can insert a + sign when saving a contact's phone number or dial it directly from the keypad.nG910-G920_UM_EN.book  Page 50  Friday, November 9, 2007  2:02 PM
Call functions51Call functionsVideo telephonyVideo calls allow you to enjoy live ‘face-to-face’   conversations with friends, family and colleagues.Making a video callBefore making a video call, you must confirm that the person you are video calling also has a video-enabled phone. To make a video call:1. From the Today screen, tap Phone. 2.  Enter the phone number.3. Tap Video. The video call is made. Answering or ignoring a video call • To answer an incoming call with video enabled, tap Answer.• To answer an incoming call with video blocked, press the Send key. An image will be sent according to the current video call settings (refer to Settings section for further information).• To ignore an incoming video call, press the End key or tap Ignore.NOTE: With your Toshiba phone closed, you cannot make a video call.nNOTE: Video call and Wireless LAN (Wi-Fi) do not work simultaneously:• You cannot receive a video call when Wi-Fi is on.• You cannot turn on Wi-Fi during a video call.nG910-G920_UM_EN.book  Page 51  Friday, November 9, 2007  2:02 PM
Messaging52MessagingMessagingThis section describes how you can create, send, receive, organise, delete and store the following message types on your Toshiba phone: • Text (SMS,Short Message Service) message• Outlook E-mail • Multimedia message (MMS) You can also use the instant messaging application, Windows Live Messenger, from your Toshiba phone. This application enables online over-the-air chat, as well as providing access to your MSN Hotmail e-mail account.Messaging optionsYou can customise the settings of your messaging accounts, message options, addressing options and message storage by tapping Start > Messaging > Menu > Options.•Accounts tab - Tap this tab to change the settings for each messaging account.For example, tap Text Messages to change the Request delivery notifications and Use Unicode when necessary settings as required.Tap New Account... to set up a new messaging account. Tick the Display account picker when opening Messaging checkbox if you would like to select the messaging account each time you open Messaging.•Message tab - Tap this tab to change options for sending and deleting messages.•Address tab - Tap this tab to select whether to check Contacts as well as any online address books for e-mail addresses.You can also add online address books and select which ones to use for e-mail address checking.G910-G920_UM_EN.book  Page 52  Friday, November 9, 2007  2:02 PM
Messaging53Messaging•Storage tab - Tap this tab to check the memory space of your phone, storage card and attachments. You can also select whether to store attachments on a storage card, and specify how deleted items are emptied.Creating and adding a signature to a messageFor each account in Messaging, you can specify a signature to be automatically inserted into messages that you send.To create a signature to be added to messages:1. On the Accounts tab, tap Signatures... 2. From the Select an account: list, select the account that you would like to use a signature with.3. Tick the Use signature with this account checkbox.4.  To add a signature to every message that you send, tick the Use when replying and forwarding checkbox. If this box is left unticked, the signature will only be added to new messages.5.  Enter a signature into the indicated box.6. Tap ok.Text (SMS) messagingCreating a text (SMS) messageText messaging, or the Short Message Service (SMS), allows you to exchange text messages with other phones. For details on text messages, contact your Service Provider. Your Toshiba phone supports the sending of more than the standard 160-character limit. If you enter more than 160 characters, the message is split into linking SMS messages. You can send up to 20 linked SMS messages at one time. To create and send a text message:1. From the Today screen, tap Start > Messaging > Text Messages > Menu > New.2.  Select an existing contact by tapping Menu > Add Recipient...TIP: To enter phone numbers quickly from your contact list, simply press the Action key while the cursor is in the To: field. G910-G920_UM_EN.book  Page 53  Friday, November 9, 2007  2:02 PM
Messaging54MessagingAlternatively, enter the mobile phone number of the recipient/s in the To: field. Use a semicolon to separate multiple recipients. 3.  After you have selected your recipient/s, tap the message area and enter your message.4. Tap Send. The text message is sent. Delivery notificationTo request a delivery notification:1. Tap Menu > Message Options... while in the text message creation screen. 2. Tick the Request message delivery notification checkbox. 3. Tap ok. Your request is sent to your Service Provider.Inserting predefined text into a messageTo save time when entering text, you can insert predefined text into a message:1. Tap Menu > My Text while in the text message creation screen. 2.  Tap the text that you want to insert.Replying to a message 1.  From an open message, tap Reply.If you are replying to a number of recipients, tap Menu > Reply > Reply All.2.  Enter your message in the message area. 3. Tap Send. The text message is sent.Forwarding a message1.  From an open message, tap Menu > Reply > Forward.2.  Add recipient/s. For details, refer to Creating a text (SMS) message.3.  If required, edit the message in the message area. 4. Tap Send. The text message is sent.Deleting a message1. From the Today screen, tap Start > Messaging > Text Messages.2.  Select the message that you want to delete and tap Delete. TIP: To cancel a message before sending it, tap Menu > Cancel Message while in the text message creation screen.G910-G920_UM_EN.book  Page 54  Friday, November 9, 2007  2:02 PM
Messaging55MessagingE-mail Before you can send or receive e-mails, you need to set up an e-mail account. Your Toshiba phone supports the following types of e-mail accounts (all of which are covered here): • Internet e-mail (POP3/IMAP) • Exchange server (Outlook)Setting up an e-mail account automatically1. From the Today screen, tap Start > Messaging > New E-mail Account.2.  Enter the e-mail address for this account into the E-mail address: field.3. Tick the Try to get e-mail settings automatically from the Internet checkbox.4.  Tap Next. 5.  If the account is set up successfully, you will be prompted to send and receive e-mail. If the account is not set up successfully, you will need to tap Next and set up the account manually, as described in the following section.Setting up an e-mail account manually1.  Select your e-mail provider from the list, then tap Next.2.  Enter the name that you want displayed when you send e-mail in the Your name: field.3.  Enter a unique name for this account in the Account display name: field. (You must use a different name for each account that you set up.) Tap Next. 4.  Enter the name of the incoming server in the Incoming mail server: field.5.  Select the server type that hosts your e-mail mailbox from the Account type: list (POP3 or IMAP4). Tap Next.6.  Enter a user name in the User name: field. This is usually the first part of your email address, which appears before the ‘@’ sign.7.  Enter a password in the Password: field. TIP: Choose a strong password - strengthen the security of your password by selecting a combination of alphabet and numeric characters.G910-G920_UM_EN.book  Page 55  Friday, November 9, 2007  2:02 PM
Messaging56Messaging8. Tick the Save password checkbox if you wish to save your password to your Toshiba phone. This may or may not be required. Contact your Internet Service Provider (ISP) for more information.9. Tap Next.10. Enter the name of the outgoing server in the Outgoing (SMTP) mail server: field.11. Tick the Outgoing server requires authentication checkbox if the outgoing server requires authentication.12. Tick the Use the same user name and password for sending e-mail checkbox if required.13. Tap the Advanced Server Settings link to set additional settings if required.Tick the Require SSL checkboxes if you wish to enable SSL connection.The Network connection: field enables you to select the network to which your e-mail server connects.14. Tap Done when you have finished settings the Advanced Server Settings.15. Tap Next.16. Select the frequency with which to send and receive your e-mail from Automatic Send/Receive: list.17. Tap Review all download settings.The Download messages: field enables you to set the time range for downloading messages from the server.WARNING: If you save your password and then lose your Toshiba phone, you run the risk of someone else being able to access youre-mail account.IMPORTANT: If authentication is required, your user name and password (as specified above) will be needed. Contact your ISP for more information.!IMPORTANT: SSL connection enables you to send and/or receive personal information more securely. If you select one or both of these options and your ISP does not support SSL connection, you will not be able to send and/or receive e-mail.IMPORTANT: Before you complete the set up your Internet e-mail account, ensure that you have the necessary information, as listed above.G910-G920_UM_EN.book  Page 56  Friday, November 9, 2007  2:02 PM
Messaging57MessagingTap Advanced Settings to edit additional settings for sending and deleting e-mails if required.Tap Done when you finished setting the Advanced Settings.18. Tap Next.19. Select the format for sending (HTML or Plain Text) from the Message format: list.20. Select the download size limitation from the Message download limit: list.21. Tap Finish.Setting up an Outlook E-mail account An Outlook E-mail account is created and managed by Microsoft's Exchange server. You must have this account set up before continuing with the steps described in this section. To send or receive e-mail messages from your Exchange server, tap Start > Programs > ActiveSync.Once ActiveSync completes successfully, tap Start > Messaging > Outlook E-mail > Menu > Go to > Folders... The e-mail folders are similar to the Outlook client on a PC.Viewing your Inbox From the Today screen, tap Start > Messaging, and select an account. The Inbox displays your received messages. Creating an e-mail 1. From the Today screen, tap Start > Messaging. 2.  Tap an e-mail account. 3. Tap Menu > New. 4. In the To:, Cc:, and/or Bcc: field, enter the e-mail address of the recipient. Insert a semicolon between multiple addresses. 5.  Enter a subject in the Subject: field.6.  Enter a message.7. Tap Send. E-mails are stored in your Outbox and are sent to recipients the next time you synchronise or connect to your e-mail server. TIP: You can quickly enter e-mail addresses from your contact list:1. While in the To: field, press the Action key and select a recipient from the list.2.  Select the recipient's e-mail address. The semicolon separator is automatically inserted if you enter multiple recipients.G910-G920_UM_EN.book  Page 57  Friday, November 9, 2007  2:02 PM
Messaging58MessagingInserting predefined text into ane-mail Please refer to the Text (SMS) messaging section for details on how to use this feature. It can be used when creating a new message or replying to ane-mail. Replying to an e-mail 1.  From an open message, tap Reply or, if replying to multiple recipients, tap Menu > Reply > Reply All.2.  Enter a message in the message area. 3. Tap Send. Sending and receiving e-mails 1. From the Today screen, tap Start > Messaging. 2.  Tap the e-mail account that you want to use to send and receive messages. 3. Tap Menu > Send/Receive. Your Toshiba phone connects to your e-mail server and sends and receives your messages. Downloading a complete e-mail 1. From the Today screen, tap Start > Messaging. 2.  Tap the e-mail account that you want to use. 3.  Tap the message to download. TIP: To set the priority of the e-mail, tap Menu > Message Options.TIP: To cancel a message, tap Menu > Cancel Message.TIP: If you are replying to an e-mail in an Outlook E-mail account, you will send less data if you do not edit the original message. This may reduce data transfer costs based on your rate plan.NOTE: To stop this process, tap Menu > Stop Send/Receive.nG910-G920_UM_EN.book  Page 58  Friday, November 9, 2007  2:02 PM
Messaging59Messaging4. Tap Menu > Download Message. The complete message is retrieved the next time you synchronise or connect to your e-mail server to send/receive e-mail.Downloading an e-mail attachmentIn an open message with an attachment to download, tap the attachment. The attachment is downloaded the next time you synchronise or connect to your e-mail server to send/receivee-mail.Viewing an e-mail attachment In an open message containing a downloaded attachment, tap the attachment. Adding a picture to an e-mail 1.  In the message area of an e-mail, tap Menu > Insert > Picture. 2.  Tap the picture that you want to add. Switching between e-mail folders and accounts 1. Tap Start > Messaging > Outlook E-mail > Menu > Go to > Folders...2.  Tap the folder that you want to view.TIP: Alternatively, you can scroll down to the bottom of the e-mail and tap Get the rest of this message. NOTE: You can only view attachments for file types that are supported by your Toshiba phone.nG910-G920_UM_EN.book  Page 59  Friday, November 9, 2007  2:02 PM
Messaging60MessagingMMS messagingThe Multimedia Messaging Service (MMS) allows you to exchange multimedia messages containing data such as text, pictures, sounds, animation and video clips. You can send MMS messages to other mobile phones or to e-mail addresses. For details of MMS, and to enable your account for this service, contact your Service Provider. An MMS can be made of many pages, also known as 'slides'. Each slide can hold an image, a sound and text, but you do not need to set all of these for each message. The maximum amount of content that can be sent in a message is set by your Service Provider.Creating an MMS1. From the Today screen, tap Start > Messaging > MMS > Menu > New.2.  Tap to choose an MMS template or tap Custom to create your own MMS.3.  Select an existing contact by tapping Menu > Add Recipient...Alternatively, enter the mobile phone number of the recipient/s in the To: field. Use a semicolon to separate multiple recipients. Adding a picture or video To add a picture to the message:1. Tap the Insert picture/video area. The preview of all pictures in the My Pictures folder is displayed. From here, you can also select other folders to look for more pictures and videos.2.  Tap on a picture or video that you would like to add.To launch the camera application, tap the camera icon.3.  When you have selected a picture or video, the message creation screen is displayed. Adding text Tap the Insert text here area and enter your message. To use predefined text, tap Menu > Insert Media > My Text.TIP: To enter phone numbers quickly from your contact list, simply press the Action key while the cursor is in the To: field. NOTE: If you add a video to the message, you cannot add any further audio to the message.nG910-G920_UM_EN.book  Page 60  Friday, November 9, 2007  2:02 PM
Messaging61MessagingUsing/creating templates Tap Menu > Template > New From Template... and choose a template to use. Selecting a background colour To select a background colour for the message:1. Tap Menu > Options > Background. A list of colours is displayed.2.  Tap the colour to apply.Additional itemsYou can also select the layout, size, colour and background of the text in the message. To set these options, tap Menu > Options, and select theoption/s that you want to change.Also, just as for e-mail, you can add recipient/s in copy (Cc) or blind copy (Bcc) to your message. You can set the priority of the message, a delivery time delay for the sending of the message, an expiry time for the message, and request delivery and read reports. To set these options, tap Menu > Options > Send Options... and set these options as required.Receiving MMS messages Your Toshiba phone will alert you when a new MMS message arrives. Depending on your settings, the MMS contents may download a few moments later when the message will be ready to view in your MMS Inbox. The MMS Inbox functions in an identical way to your text message and e-mail inboxes.MMS Inbox menu items•New - to create a new MMS message. Opens the message creation screen.•Reply - to reply, reply to all or all and forwards current message.•Mark as Read/Mark as Unread - to mark the current message as read/unread.•Move... - to move the current message into another folder.•Go To - to switch to another folder (including Deleted Items, Drafts, Inbox, Outbox, and Sent Items), or to Text Messages, Outlook E-mail and MMS.•Tools - allow you to do the following:- sort messages.- manage the folders for MMS.G910-G920_UM_EN.book  Page 61  Friday, November 9, 2007  2:02 PM
Messaging62Messaging- empty the Deleted Items folder.- clear all MMS messages.- create a new account for e-mail.- change the messaging options.•Download Message - if you have chosen only to receive notification of MMS messages, and not to download the whole MMS message, you can mark a message for download. The MMS message will be downloaded when you next send or receive a message.•Send/Receive - forces a send/receive of MMS messages that are pending.Setting up the MMS account If your Toshiba phone has not been preconfigured, you will need to manually enter the details of the MMS account. This is a two-stage process: in the first stage you must set up the data connection, and in the second stage you must define the address of the MMS server on the Internet.Setting up a data connection You will need to enter the name of the MMS APN and any associated username, password, IP address and DNS settings in the connection settings.Defining the server 1. From the Today screen, tap Start > Messaging. 2. Highlight MMS, and tap Menu > Options.3. Tap MMS on the Accounts tab.4. Tap the Servers tab.5. Tap New.6.  Enter the following details:- Server name: - Enter a name for the server details.- Gateway: - Enter the WAP gateway to be used for this connection, as supplied by your Service Provider.- Port number: - Enter the port number.- Server address: - Enter the address of the server, as supplied by your Service Provider.- Connect via: - Point the MMS server towards the correct connection point. If you set up the MMS account using the Secure WAP Network setting, you must select the Secure WAP Network setting here.Sending size limitation: - Please contact your Service Provider to obtain this value.G910-G920_UM_EN.book  Page 62  Friday, November 9, 2007  2:02 PM
Messaging63Messaging7. Tap Ok.8. Tap Set as Default to set this new account as your default MMS account.9. Tap ok. Your Toshiba phone is now configured for MMS. Windows Live MessengerWindows Live Messenger is the next model of MSN Messenger, and provides new messaging service. Windows Live Messenger on your Toshiba phone provides instant access to your contact list, emoticons, and friends. This service is currently free of charge.Windows Live Messenger offers you new features:• Easier-to-manage contact list and conversation inbox.• View and participate in up to 5 active conversations at one time.• No more idle conversation experience: Messenger for mobile can now maintain current conversation history and re-establish an idle conversation in the background.• Emoticons are now displayed as graphics within display names and conversations.• Easily change your display name and status, and even set status before you sign in.• Sort and find contacts more quickly and easily (search, filter by group, and hide offline contacts).• Call or send e-mail to contacts directly from their contact cards.• Converse with temporary contacts (new people who don't yet appear on your list of Messenger contacts), and receive the option to add them to your contact list.To use Windows Live Messenger, tap Start > Programs > Messenger.To obtain a Passport, go to: http://www.passport.com.To create a Hotmail account, go to: http://www.hotmail.com.NOTE: You need to have either a Microsoft.NET Passport (www.passport.com) or a Hotmail account (www.hotmail.com) to use Windows Live Messenger. In addition, your Toshiba phone must be connected to the Internet.nG910-G920_UM_EN.book  Page 63  Friday, November 9, 2007  2:02 PM
Messaging64MessagingWindows Live Messenger overview With Windows Live Messenger you can send instant messages to your contacts' mobile device or PC. To use Windows Live Messenger, you need Microsoft Passport Network credentials. After obtaining the credentials, complete the following tasks: 1.  Set up a connection to the Internet with your Toshiba phone.2.  Get a Windows Live ID.3.  Sign in to Windows Live Messenger.To access Windows Live Messenger:1. From the Today screen, tap Start > Programs > Messenger.2.  Tap the left or right arrow to select status, and tap Sign in.3.  Follow the instructions on the screen to sign in. Microsoft Passport Network credentials or a Hotmail account is required to sign in. NOTE: Signing in to an account may take several minutes, depending on your connection speed and how busy your mobile network is.nG910-G920_UM_EN.book  Page 64  Friday, November 9, 2007  2:02 PM
Text input65Text inputText inputInput methods Your Toshiba phone has three text input methods: • Typing - Using Input Panel or the keyboard.• Writing - Using the stylus, writing directly on the screen.• Drawing - Using the stylus, drawing directly on the screen.Input Panel provides various input methods, including Block Recognizer, Keyboard, Letter Recognizer and Transcriber.By default, the Input Panel icon appears on the command bar to indicate which input method is currently selected. Open the Input Panel and tap the arrow beside it to select other input methods.Block RecognizerWith Block Recognizer, you use a single stroke to write individual letters, numbers and punctuation, which are then converted into typed text.To use Block Recognizer, tap the selector arrow, and tap Block Recognizer.The handwriting area is divided into two designated parts: abc, and 123 (both dimmed).Write characters, numbers, symbols and punctuation in the separate areas:• Write in the abc area to enter lower case letters.• Write in the 123 area to enter numbers.• Tap the button in the right corner labelled ‘@$*’ to open the table of symbols and punctuation.NOTE: Block Recognizer is available when text entry is possible.TIP: For help with using Block Recognizer, tap ? in the right corner to see a demo. nG910-G920_UM_EN.book  Page 65  Friday, November 9, 2007  2:02 PM
Text input66Text inputKeyboardWith the smart keyboard, you use the stylus to tap on the smart keyboard to enter characters. To use Keyboard, tap the selector arrow, and tap Keyboard.To set the Keyboard options:1.  Tap the selector arrow and tap Options...2. Select Keyboard in the Input method: list.3.  Select the required options by:- tapping the Large keys or Small keys radio button to enlarge or reduce the smart keyboard button size.- ticking the Use gestures for the following keys: checkbox to enable gesture commands.Letter RecognizerWith Letter Recognizer, you can write individual letters, numbers and punctuation, which are then converted into typed text.To use Letter Recognizer, tap the selector arrow, and tap Letter Recognizer.The handwriting area is divided into three designated parts: ABC, abc, and 123 (all dimmed).Write characters, numbers, symbols, and punctuation in the separate areas:• Write in the ABC area to enter upper case letters.• Write in the abc area to enter lower case letters.• Write in the 123 area to enter numbers.• Tap the button in the right corner labelled ‘@$*’ to open the table of symbols and punctuation.TIP: Tap áü to enter miscellaneous vowels or symbols. NOTE: Letter Recognizer is available when text entry is possible.TIP: For help with using Letter Recognizer, tap ? in the right corner to see a demo. nG910-G920_UM_EN.book  Page 66  Friday, November 9, 2007  2:02 PM
Text input67Text inputTranscriberTranscriber is a handwriting recognition program that allows you to write in cursive, print, or a combination of both. Transcriber works transparently in the background of programs, recognising words with its integrated dictionary. When transcriber is turned on, it interprets stylus movement anywhere on the screen as handwriting input. For more information about using Transcriber, see Help on your Toshiba phone:Starting TranscriberBecause Transcriber works transparently in the background of programs that accept user input, you must have one of these programs open to use Transcriber.To start Transcriber:1.  Start a program such as Word Mobile.2.  Tap the Input Panel icon, and then tap the selector arrow.3. Tap Transcriber. The Transcriber introductory screen appears. Using TranscriberTranscriber comes with an on-screen keyboard that provides an easy way to add punctuation or a special symbol to existing text.From a program, tap the keyboard button on the Transcriber toolbar. The keyboard remains visible until you tap the button again.To edit text:1.  In a program, draw a line across the text you want to edit.2.  After you lift the stylus from the screen, the line will disappear and the selected text will be highlighted.3.  Do one of the following:- Rewrite the text.- Use gestures to capitalise letters, insert a space, etc.TIP: To reposition the keyboard, tap and hold the top bar, and then drag it to the desired location. TIP: When no text is selected, you can open the keyboard by doing the   gesture. G910-G920_UM_EN.book  Page 67  Friday, November 9, 2007  2:02 PM
Text input68Text inputTo use gestures in Transcriber:Use quick strokes of the stylus to edit your text. Do the Enter, Space, and Tab gestures while writing text to insert returns, spaces, or tabs.Name Action DescriptionEnter Inserts a paragraph return at the cursor.The horizontal portion of the gesture must be at least two times longer than the vertical portion.Space Inserts a space at the cursor.The horizontal portion of the gesture must be at least two times longer than the vertical portion.Backspace Moves the cursor one space back and erases any text.Do the gesture by drawing a line from right to left.Words Opens the menu of alternate words if a word is selected or the on-screen Transcriber keyboard if no text is selected.Do the gesture by drawing a line straight down and back up.Caps Changes the capitalisation of a selected letter, word, or block of text.Do the gesture by drawing a line straight up.Undo To undo the last action.Do the gesture by drawing a line straight up and back down.Cut Cuts the selected text.Do the gesture by drawing a line from right to left and back.Copy Copies the selected text.Do the gesture by drawing a line from left to right and back.G910-G920_UM_EN.book  Page 68  Friday, November 9, 2007  2:02 PM
Text input69Text inputWriting with TranscriberTranscriber allows you to write in cursive, print, or a combination of both.1.  From a program, position the cursor where you want text to appear.2.  Use the stylus to write anywhere on the screen.The handwriting will be converted to text shortly after you lift the stylus from the screen.Name Action DescriptionPaste Pastes cut or copied text.Do the gesture by drawing a line from the lower left of the screen diagonally up toward the right and back down to the right.Tab Inserts a tab.The horizontal portion of the gesture must be at least two times longer than the vertical portion.TIP: You can also use the Enter, Space, and Backspace buttons on the Transcriber toolbar.G910-G920_UM_EN.book  Page 69  Friday, November 9, 2007  2:02 PM
Text input70Text inputOptimising handwriting recognition for TranscriberIf Transcriber does not recognize your handwriting as accurately or quickly as you would like, there are some things you can do to optimise handwriting recognition.• Select the Writing Direction: picture that best matches the slant of your handwriting. •Use Letter Shapes to eliminate letter shapes that you do not use or to learn methods of writing characters that will make them easier for Transcriber to recognise.• Try writing in another format. If you have been printing, try writing cursive, or if you have been writing in both cursive and print, try printing alone.• Adjust the speed at which Transcriber returns text after you write.• Add a user dictionary that contains special terms you may be using, such as medical or legal terms.• Verify that you are using your Letter Shapes user profile.Showing and hiding the Transcriber toolbarThe Transcriber toolbar, which appears at the bottom of the screen when Transcriber is open, provides easy access to several tools, Enter, Space, and Backspace buttons, and left and right arrow buttons.To show or hide the Transcriber toolbar, from a program, tap the Transcriber icon at the bottom of the screen. NOTE: The next time you write the shorthand text, the appropriate program will open.nG910-G920_UM_EN.book  Page 70  Friday, November 9, 2007  2:02 PM
Text input71Text inputToolbar iconDescriptionDisplays the Transcriber: Options screen. From here, you can set options such as Writing Direction:, pen settings, and Shorthand.Displays the Letter Shapes screen. This screen allows you to set your personal writing styles to maximise recognition.Displays the on-screen miniature keyboard. This allows you to quickly enter numbers, punctuation, and other symbols.Changes the character recognition mode. •a mode - this is the default for optimum handwriting recognition. •123 mode - numbers and some letters are allowed and the calculator is activated. •A mode - all letters are automatically in upper case. If you are in A or 123 mode, recognition returns automatically to the default (a) mode once you lift the stylus.Inserts a space at the cursor.Inserts a paragraph return at the cursor.Moves the cursor one space to the left.Moves the cursor one space to the right.Moves the cursor one space back and erases any text.Opens the Transcriber Help.G910-G920_UM_EN.book  Page 71  Friday, November 9, 2007  2:02 PM
Text input72Text inputDrawing and writing on the screenWith your Toshiba phone, you can draw directly on the screen, write on the screen, and save notes in your own handwriting. To do this, you must first set the input mode in Notes to Writing. If you prefer to use handwriting or frequently add drawings to your notes, you may find it helpful to set Writing as the default input mode. If you prefer typed text, set Typing as the default input mode.To set the input mode for Notes:1. Tap Start > Programs > Notes.2.  From the list of notes, tap Menu > Options... 3. From the Default mode: list, select one of the following:- Writing - if you want to draw or enter handwritten text in a note.- Typing - if you want to create a typed note.4. Tap ok.To hand write a note:5. .Tap Start > Programs > Notes.6.  From the list of notes, tap New.7. Tap Menu > Draw.8.  Write your text on the screen.9.  When you have finished, tap ok to return to the list of notes.To draw on the screen, use the stylus.10. .Tap Start > Programs > Notes.11. From the list of notes, tap New.12. Tap Menu > Draw, and cross at least three ruled lines.13. A box labelled Drawing appears around your drawing.14. When you have finished, tap ok to return to the list of notes.NOTE: If a letter crosses three ruled lines, it is treated as a drawing rather than text.NOTE: To select a drawing (for example, to copy or delete it), tap and hold the drawing briefly. When you lift the stylus, the drawing is selected.nnG910-G920_UM_EN.book  Page 72  Friday, November 9, 2007  2:02 PM
Text input73Text inputSearchingYou can search for files and other items stored on your Toshiba phone in the My Documents folder or on a storage card.You can search by file name or by key words located in the item. For example, you can search e-mail messages, notes, appointments, contacts, and tasks as well as in Help.To search for a file or an item:15. .Tap Start > Programs > Search.16. In the Search for: field, enter the file name, word, or other information you require.17. If you have searched for an item before, tap the arrow to the right of the Search for: field to find it in the searching history.18. In the Type: field, select a data type to help narrow your search.19. Tap Search.In the Results list, you can tap the item you require to open it.NOTE: The My Documents folder and its subfolders are included in the search.nNOTE: Results found on a storage card are indicated by an icon.nG910-G920_UM_EN.book  Page 73  Friday, November 9, 2007  2:02 PM
Settings74SettingsSettingsVolume control If you want to turn the ringer off, or change the ringer settings quickly, press and hold the OK key. You can change the ringer setting cyclically (through On/Vibrate/Off) instead of tapping the ringer icon on the title bar. You can also change the ringer setting and volume using the stylus or by pressing the Side key up or down.Volume control has the following settings:• Sound volume of your phone - 6 levels.• Call volume - 6 levels.• Both sound volume and call volume can be set to On, Vibrate or Off.Reassigning button functionsThere are already programs assigned to the Program buttons on both side of the screen. However, you may want to change some assignments to programs that you use more frequently.To reassign a button:1. From the Today screen, tap Start > Settings.2. On the Personal tab, tap Buttons. You see a list of buttons with their current assignments.3.  Tap a button to reassign.4. From the Assign a program: list, select a program for this button.5. Tap ok.NOTE: An icon represents the original function of a button. It helps you to identify a button and restore its default at any time.nG910-G920_UM_EN.book  Page 74  Friday, November 9, 2007  2:02 PM
Settings75SettingsSetting the input method1. From the Today screen, tap Start > Settings.2. On the Personal tab, tap Input. 3. On the Input Method tab, select a required input method from the Input method: list.4. On the Word Completion tab, tap a desired setting for word completion.5. On the Options tab, tap the desired options for writing and recording. These options apply to any program on your Toshiba phone when you can record or write.Security settingsIt is advisable to apply certain security features in the event that your Toshiba phone is lost or stolen.In addition, some security features can be applied to prevent unauthorised use.You can apply the following security:• Phone lock - using a PIN, this feature prevents unauthorised use of your SIM card in any phone.• Device lock - using a password, this feature prevents unauthorised use of your Toshiba phone.• SIM Lock - using a password, this feature prevents unauthorised use of your Toshiba phone with other SIM cards. You can enable two types of SIM Lock - the SIM Lock of your Toshiba phone and a network-specific SIM Lock. Enabling phone lockBe sure to make a note of your personal identification number (PIN). When the SIM is disabled, you must provide this PIN to enable the SIM. The PIN is provided with your SIM card.To enable the phone lock:1. From the Today screen, tap Phone > Menu > Options... On the Phone tab, tick the Require PIN when phone is used checkbox. To change the PIN at any time, tap Change PIN.NOTE: You can also change input options by tapping the selector arrow and selecting Options... nG910-G920_UM_EN.book  Page 75  Friday, November 9, 2007  2:02 PM
Settings76SettingsEnabling device lockYou can help keep your data more secure by requesting a password every time your Toshiba phone is used after either being left idle for a specified time or being switched off.1. From the Today screen, tap Start > Settings.2. On the Personal tab, tap Lock. 3. Tick the Prompt if device unused for checkbox, and in the box to the right, select how long your device can be left idle before a password is required.4. From the Password type: list, select the type of password that you would like to use.5.  Enter the password and, if necessary, confirm the password. If your device is configured to connect to a network, use a strong password to help network security.6. Tap ok.The next time the device is switched on or used again after being left idle for a longer time than specified in your settings, you will be prompted to enter your password or to swipe your finger to unlock your Toshiba phone.WARNING: If you fail to enter the correct PIN for your SIM card following three consecutive unsuccessful attempts, you will need to contact your Service Provider to obtain the PIN Unblocking Key (PUK). Do not attempt to guess the PUK as it will render your SIM card permanently inoperative following ten consecutive unsuccessful attemptsTIP: Emergency calls can be placed at any time, without requiring a PIN. !NOTE: Each time a wrong password is entered, the time the device takes to respond will become longer until the device appears to be not responding.If you forget your password, you must follow the instructions in this manual to clear the memory before you can access your Toshiba phone. nG910-G920_UM_EN.book  Page 76  Friday, November 9, 2007  2:02 PM
Settings77SettingsTo change your device lock password:1. From the Today screen, tap Start > Settings.2. On the Personal tab, tap Lock. You will be prompted to enter your current password or to swipe your finger.3. In the Password: field, enter your new password.4. Tap ok.Enabling FingerprintThe Fingerprint feature helps provide additional security on your Toshiba phone, by protecting it from unauthorised use.To enable the Fingerprint feature:1. From the Today screen, tap Start > Settings.2. On the Personal tab, tap Fingerprint. 3.  In the list, tap the finger that you want to enrol from the list.4.  Swipe the finger three times to enrol it to the fingerprint sensor.5. Tap ok.Disabling FingerprintTo disable the Fingerprint feature:1. From the Today screen, tap Start > Settings.2. On the Personal tab, tap Fingerprint. 3.  In the list, highlight the finger that is used for security.4. Tap Menu > Delete.5. Tap ok.Enabling SIM LockTo enable the SIM Lock:1. From the Today screen, tap Start > Settings.2. On the Personal tab, tap SIM Lock. 3. Tick the Lock phone to use current SIM card only checkbox.4.  Enter and confirm a password of eight digits.5. Tap ok.NOTE: Please make a note of your password.NOTE: If you activate the SIM Lock, you will only be able to use the SIM card used when you activated SIM Lock in your Toshiba phone.nnG910-G920_UM_EN.book  Page 77  Friday, November 9, 2007  2:02 PM
Settings78SettingsEnabling network-specific SIM LockTo enable the network-specific SIM Lock:1. From the Today screen, enter a network-specific string and press the Send key.2.  The password confirmation screen is displayed.3.  Enter and confirm a password of eight digits.4. Tap ok.Customising your Start menuYou can choose which items appear in the Start menu. To customise your Start menu:1. From the Today screen, tap Start > Settings.2. On the Personal tab, tap Menus.Owner information Entering owner information could allow someone to return your Toshiba phone to you if it becomes lost.1. From the Today screen, tap Start > Settings.2. On the Personal tab, tap Owner Information. 3.  Enter your details on the Identification tab. You can also make any important notes on the Notes tab. On the Options tab, you can select whether to display Identification information and Notes when your Toshiba phone is switched on.4. Tap ok. Phone settingsSetting ring tonesTo set a ring tone:1. From the Today screen, tap Start > Settings.NOTE: To disable this feature, enter your eight digit password, untick the Lock phone to use current SIM card only checkbox and tap ok.NOTE: Only seven programs can be selected for the Start menu. If you select any items from the Programs category, these items will be removed from Programs.nnTIP: If you have selected to show owner information on the Today screen, just tap the section there to edit owner information.G910-G920_UM_EN.book  Page 78  Friday, November 9, 2007  2:02 PM
Settings79Settings2. On the Personal tab, tap Phone.3. On the Phone tab, select the required type of ringing tone (Ring, Vibrate, or a combination) from the Ring type: list.Select the required tune from the Ring tone: list. You can tap the control buttons to listen to a sample of the tune.Please search the Help topics on your Toshiba phone for Change the ring tone & ActiveSync for detailed instructions.Setting call barringCall barring allows you to screen incoming and outgoing calls.To set call barring:1. From the Today screen, tap Start > Settings.2. On the Personal tab, tap Phone.3. Tap the Services tab.4. Tap Call Barring in the list of services, and then tap the Get Settings... button to retrieve settings from network.5.  When the current settings are displayed, select the settings required for blocking incoming and outgoing calls.6. Tap ok.Changing the call barring password To change the call barring password:1. From the Today screen, tap Start > Settings.2. On the Personal tab, tap Phone.3. Tap the Call Bar Pwd tab.4. Tap the Change password... button.5.  Enter your old password, new password, confirm you new password.6. Tap Done. The request is sent to the network.TIP: In the Sounds section, you can change the way that you are notified of incoming calls.TIP: You can also use custom *.wav, *.mid, *.mp3, or *.wma files as ring tones.TIP: Using the Keypad: setting, you can select the length of tones to be played when you tap and hold the buttons on the phone keypad. You can also set the tones to be Off.G910-G920_UM_EN.book  Page 79  Friday, November 9, 2007  2:02 PM
Settings80SettingsSetting call forwardingTo set call forwarding:1. From the Today screen, tap Start > Settings.2. On the Personal tab, tap Phone.3. Tap the Services tab.4. Tap Call Forwarding in the list of services, and then tap the Get Settings... button to retrieve settings from network.5.  When the current settings are displayed, select the settings required for forwarding incoming calls.6. Tap ok.Setting call waitingWhen you are in another call, the call waiting feature will notify you of an incoming call. To set call waiting:1. From the Today screen, tap Start > Settings.2. On the Personal tab, tap Phone.3. Tap the Services tab.4. Tap Call Waiting in the list of services, and then tap the Get Settings... button to retrieve settings from network.5.  When the current settings are displayed, select whether or not you would like to be notified of waiting calls.6. Tap ok.Configuring Caller IDCaller ID allows selected parties to view your name and phone number information on their phone when you call them.To configure Caller ID:1. From the Today screen, tap Start > Settings.2. On the Personal tab, tap Phone.3. Tap the Services tab.4. Tap Caller ID in the list of services, and then tap the Get Settings... button to retrieve settings from network.5.  When the current settings are displayed, select who you would like to be provided with your caller ID information.6. Tap ok.Voice Mail and text messages settings1. From the Today screen, tap Start > Settings.2. On the Personal tab, tap Phone.G910-G920_UM_EN.book  Page 80  Friday, November 9, 2007  2:02 PM

Navigation menu