Toshiba Information Systems SG4-E01 GSM/UMTS/HSDPA mobile phone User Manual SG4 E01 commerical UserManual
Toshiba Information Systems (UK) Ltd, Mobile Communications Division GSM/UMTS/HSDPA mobile phone SG4 E01 commerical UserManual
Commercial users manual
SG4-E01
User manual V0.0.1
2007.8
This User Manual is printed by TOSHIBA without any warrant. Toshiba Information
Systems (UK) Ltd. reserves the right to modify or improve this Manual for any printing
error, discrepancy from the latest data, program and equipment any time without separate
notice, which, however, will be incorporated into the latest version of the User Manual.
Note:
Some services/functions hereunder are not necessarily supported by all networks, such
as 112, the international emergency call number.
Please contact the network operator or service provider for clarification of how to use
specific service/function.
Please read “Important Safety Information” and “Repair Guideline” chapters prior to the
use of the mobile phone.
Contents
IMPORTANT SAFETY INFORMATION ............................................................................... 4
1.START-UP.............................................................................................................................. 10
1.1 SIM CARD AND BATTERY .................................................................................................. 10
1.2 CHARGE THE BATTERY ...................................................................................................... 12
1.3 YOUR PHONE ..................................................................................................................... 13
1.4 DEFINITIONS OF BUTTONS ................................................................................................ 14
1.5 STATUS ICONS ................................................................................................................... 16
2. BASIC FUNCTIONS .......................................................................................................... 17
2.1 SWITCH THE PHONE ON/OFF ........................................................................................... 17
2.2 PIN AND PUK CODES ....................................................................................................... 17
2.3 OUTGOING CALL ............................................................................................................... 17
2.4 ANSWER CALLS ................................................................................................................ 18
2.5 REJECT CALLS .................................................................................................................. 18
2.6 FUNCTIONS IN VOICE CALL ............................................................................................... 19
3. MAIN MENU ......................................................................................................................... 20
3.1 PHONE BOOK .................................................................................................................... 20
3.2 SMS .………………………………………………………………………………… 22
3.3 MUSIC …………………………………………………………………………………..24
3.4 LOG …………………………………………………………………………………..24
3.5 SETTINGS .......................................................................................................................... 25
3.6 ALARM …………………………………………………………………………………..29
4. REFERENCE INFORMATION ........................................................................................... 30
5. ACCESSORY ....................................................................................................................... 32
REPAIR GUIDELINE ............................................................................................................... 33
Important Safety Information
◆Emergency Services
To make an emergency call in any country
• Ensure that your phone is switched on and in service.
• Press the [Power/Cancel] key to return to the Home screen if needed.
• Enter the official emergency number (like 000, 08, 110, 112, 118, 119, 911), then press
[Send/OK] key to call the number. Emergency numbers vary by location.
Follow the instructions and do not end the call until told to do so.
• Tell the operator which service you require: Police, Ambulance, Fire Brigade,
Coastguard or Mountain Rescue Service. Give all the necessary information as accurately
as possible.
• The emergency number service is available on every digital network service.
• Due to the nature of the cellular system, connection for emergency call cannot be
guaranteed.
◆General Care
A phone contains delicate electronic circuitry, magnets and battery systems. You should
treat it with care and pay attention to the following:
• This phone is fitted with an internal battery that can only be replaced by a qualified
service engineer. There is a risk of explosion if the battery is replaced with an incorrect
battery type. Dispose of the used battery in accordance with the manufacturer's
instructions.
• Do not allow the phone, battery or accessories to come into contact with liquids or
moisture at any time. Do not immerse in liquid.
• Do not paint the phone.
• Do not drop, throw or subject the phone to rough treatment.
• Do not place the phone alongside computer disks, credit cards, travel cards and other
magnetic media. The information contained on disks or cards may be affected by the
phone.
• Do not leave the phone or the battery in places where the temperature could exceed
60 °C, e.g. on a car dashboard or a window sill, behind glass in direct sunlight, etc.
• Do not remove the battery while the phone is switched on.
• Take care not to allow metal objects, such as coins or key rings to contact or short circuit
the battery terminals.
• Do not dispose of batteries in a fire. Dispose of Li-ION batteries at a Li-ION recycling
point.
• Do not put the battery in your mouth, as battery electrolytes may be toxic if swallowed.
• Do not attempt to dismantle the phone or any of its accessories.
• Do not put a battery into a microwave oven, dryer or high-pressure container.
• Do not let the battery come into direct contact with an electric outlet or cigarette lighter
charger. Use only authorized charger units.
• Do not pierce the battery with a sharp object such as a needle.
• When the battery is thrown away, be sure it is non-conducting by applying vinyl tape to
the (+) and (-) terminals.
• Do not disassemble or modify the battery.
• Do not solder the battery directly.
• Stop using the battery if you detect any abnormalities, such as odor, discoloration or
heat during use, charge or storage.
• Do not use the phone with a damaged or misshapen battery.
• In the unlikely event of a battery leak, take care to keep the battery discharge away from
your eyes or skin. If the leakage does come into contact with the eyes or skin, please flush
thoroughly in clean water and consult a doctor.
• Remove a worn out battery immediately.
• The handset itself may become warm when the handset is used for an extended period
of time or when the video functions is used. Also, it may become warm while the battery is
being charged.
• When a phone is set to Vibration mode, the vibration can sometimes cause your phone
to move. Be careful not to place the phone near heat sources (such as a heater) or too
close to the edge of the table.
• Use an anti-static cloth to clean the phone. Do not use an ordinary dry cloth or electro
statically charged cloth. Do not use chemical or abrasive cleaners as these could damage
the case.
• Remember to recycle the cardboard packaging supplied with this phone.
• Remember to make backup copies of all important data on your phone.
• Do not leave the battery pack empty or disconnected for a long time, otherwise some
data may be initialized.
• Take care not to put your phone in your back pocket and then sit on it. Also, do not put
your phone at the bottom of a bag where it may subject to excessive weight or pressure.
Doing so may damage the LCD and camera lens and cause them to malfunction.
• Hold the phone away from your ear when you
- Play music on the music player
- Play the ring tune through the speaker.
It may damage, or irritate your ears.
◆Safety
The use of mobile phones is not allowed in some radiation-sensitive areas, such as
hospitals, research centre and aircraft. Ensure that you switch off your phone in these
areas. If in doubt, remove the battery.
◆ Aircraft safety
Switch off your phone and remove its battery when inside or near an aircraft. The use of
phones in aircraft is illegal. It may be dangerous to the operation of the aircraft and it may
disrupt the mobile network. Failure to observe this instruction may lead to suspension or
denial of mobile network services to the offender or legal action or both.
Do not use the phone on the ground without the permission of the ground staff.
◆ Hospital safety
Switch off your phone and remove its battery in areas where the use of phones is
prohibited.
Follow the instructions given by the respective medical centre regarding the use of mobile
phones on their premises.
◆ General safety
• Observe “Turn off mobile” signs, such as those near petrol stations, chemicals or
explosives and switch off your phone.
• If you have a heart condition, be careful with the call vibration or tone volume settings.
• Do not allow children to play with the phone, charger or batteries.
• Do not use the phone where blasting is in progress.
• The operation of some medical electronic devices, such as hearing aids and
pacemakers, may be affected if you use a mobile phone next to them. Observe any
warning signs and the manufacturer's recommendations.
• Your phone contains metal which may cause a skin irritation, a rash or eczema.
◆ Road safety
• You MUST exercise proper control of your vehicle at all times. Give your full attention to
driving.
• Observe all local safety regulations regarding the use of mobile phones while driving.
• Pull off the road and park before making or answering a call.
• You MUST NOT stop on the hard shoulder of a motorway to answer or make a call,
except in an emergency.
• Switch off your phone at a refueling point, such as a petrol station, even if you are not
refueling your own car.
• Do not store or carry flammable or explosive materials in the same compartment as a
radio transmitter.
• Electronic vehicle systems, such as anti-lock brakes, speed control and fuel injection
systems are not normally affected by radio transmissions. The manufacturer of such
equipment can advise if it is adequately shielded from radio transmissions. If you suspect
vehicle problems caused by radio transmissions, consult your dealer and do not switch on
the phone until it has been checked by qualified approved installers.
• Check if local laws and/or regulations restrict the use of phones while driving.
◆ Vehicles equipped with an airbag
An airbag inflates with great force. Do not place objects, including either installed or
portable wireless equipment, in the area over the airbag or in the airbag deployment area.
If vehicle wireless equipment is improperly installed and the airbag inflates, serious injury
could result.
◆ Third party equipment
The use of third party equipment, batteries, cables or accessories, not made or authorized
by TOSHIBA, may invalidate the warranty of your phone and also adversely affect the
phone's operation.
◆ Service
The phone, batteries and charger contain no user-serviceable parts. We recommend that
your phone is serviced or repaired by an TOSHIBA authorized service centre. Please
contact your service provider for more information.
◆ Efficient use
The phone has an internal antenna. For optimum performance with minimum power
consumption, please do not cover the internal antenna area with your hand. Covering the
internal antenna affects call quality, may cause the phone to operate at higher power
levels than needed and may shorten talk and standby times.
◆Radio frequency (RF) signals
THIS MODEL PHONE MEETS THE U.S. GOVERNMENT’S REQUIREMENTS FOR
EXPOSURE TO RADIO WAVES.
Your wireless phone contains a radio transmitter and receiver. Your phone is designed
and manufactured not to exceed the emission limits for exposure to radio frequency (RF)
energy set by the Federal Communications Commission of the U.S. Government. These
limits are part of comprehensive guidelines and establish permitted levels of RF energy for
the general population. The guidelines are based on standards that were developed by
independent scientific organizations through periodic and thorough evaluation of scientific
studies.
The exposure standard for wireless mobile phones employs a unit of measurement known
as the Specific Absorption Rate (SAR). The SAR limit set by the FCC is 1.6W/kg.* Tests
for SAR are conducted using standard operating positions accepted by the FCC with the
phone transmitting at its highest certified power level in all tested frequency bands.
Although the SAR is determined at the highest certified power level, the actual SAR level
of the phone while operating can be well below the maximum value. This is because the
phone is designed to operate at multiple power levels so as to use only the power required
to reach the network. In general, the closer you are to a wireless base station antenna, the
lower the output.
Before a phone model is available for sale to the public, it must be tested and certified to
the FCC that it does not exceed the limit established by the U.S. government-adopted
requirement for safe exposure. The tests are performed on position and locations (for
example, at the ear and worn on the body) as required by FCC for each model. The
highest SAR value for this model phone (FCC ID: SP2-SG4-E01) as reported to the FCC
when tested for use at the ear is 0.657 W/kg, and when worn on the body, is 1.06 W/kg.
(Body-worn measurements differ among phone models, depending upon available
accessories and FCC requirements). While there may be differences between the SAR
levels of various phones and at various positions, they all meet the U.S. government
requirement.
The FCC has granted an Equipment Authorization for this model phone with all reported
SAR levels evaluated as in compliance with the FCC RF exposure guidelines. SAR
information on this model phone is on file with the FCC.
For body worn operation, this phone has been tested and meets the FCC RF exposure
guidelines when used with an accessory designated for this product or when used with an
accessory that contains no metal and that positions the handset a minimum of 1.5 cm
from the body.
* In the United States, the SAR limit for wireless mobile phones used by the public is 1.6
watts/kg (W/ kg) averaged over one gram of tissue. SAR values may vary depending upon
national reporting requirements and the network band.
◆European RF exposure information
This mobile phone complies with the EU requirements for exposure to radio waves.
Your mobile phone is a radio transceiver, designed and manufactured not to exceed the
SAR* limits** for exposure to radiofrequency (RF) energy, which SAR* value. While there
may be differences between the SAR* levels of various phones and at various positions,
they all meet*** the EU requirements for RF exposure.
* The exposure standard for mobile phones employs a unit of measurement known as
the Specific Absorption Rate, or SAR.
** The SAR limit for mobile phones used by the public is 2.0 watts/kilogram (W/kg)
averaged over ten grams of tissue, recommended by The Council of the European Union.
The limit incorporates a substantial margin of safety to give additional protection for the
public and to account for any variations in measurements.
*** Tests for SAR have been conducted using standard operating positions with the
phone transmitting at its highest certified power level in all tested frequency bands.
Although the SAR is determined at the highest certified power level, the actual SAR level
of the phone while operating can be well below the maximum value. This is because the
phone is designed to operate at multiple power levels so as to use only the power required
to reach the network. In general, the closer you are to a base station antenna, the lower
the power output.
FCC Regulations:
●This mobile phone complies with part 15 of the FCC Rules. Operation is subject to the
following two conditions: (1) This device may not cause harmful interference, and (2) this
device must accept any interference received, including interference that may cause
undesired operation.
●This mobile phone has been tested and found to comply with the limits for a Class B
digital device, pursuant to Part 15 of the FCC Rules. These limits are designed to provide
reasonable protection against harmful interference in a residential installation. This
equipment generates uses and can radiate radio frequency energy and, if not installed
and used in accordance with the instructions, may cause harmful interference to radio
communications. However, there is no guarantee that interference will not occur in a
particular installation; if this equipment does cause harmful interference to radio or
television reception, which can be determined by turning the equipment off and on, the
user is encouraged to try to correct the interference by one or more of the following
measures:
-Reorient or relocate the receiving antenna.
-Increase the separation between the equipment and receiver.
-Connect the equipment into an outlet on a circuit different from that to which the receiver
is connected.
-Consult the dealer or an experienced radio/TV technician for help.
Changes or modifications not expressly approved by the party responsible for compliance
could void the user‘s authority to operate the equipment.
◆ Declaration of Conformity
The product “SG4-E01” is declared to conform with the essential requirements of
European Union Directive 1999/5/EC Radio and Telecommunications Terminal
Equipment Directive 3.1(a), 3.1(b) and 3.2. The Declaration of Conformity can be found on
www.toshiba.co.uk.
◆ Copyright Notice
The music files you copy from PC may be protected by copyright laws. They are
for personal use only and must not be otherwise used without the permission of the
copyright owner.
◆ Disposing of your used Toshiba product
In the European Union
EU-wide legislation as implemented in each Member State requires
that used electrical and electronic products carrying the mark (right)
must be disposed of separately from normal household waste. This
includes mobile telephones or electrical accessories, such as
chargers or headsets. When you dispose of such products, please
follow the guidance of your local authority and/or ask the shop where
you purchased the product.
The mark on the electrical and electronic products only
applies to the current European Union Member States.
Outside the European Union
If you wish to dispose of used electrical and electronic products outside the European
Union, please contact your local authority and ask for the correct method of disposal.
1. Start-up
1.1 SIM card and Battery
SIM card (user ID mode) incorporates mobile phone number and service items, and can
store phone numbers and personal data.
Caution Place SIM card beyond the reach of children.
Caution SIM card and the contact points are easily to be damaged by scratching,
please handle the SIM card carefully.
Caution Keep SIM card out of static, dust or water.
Caution Install SIM card when powering off the phone and getting out the battery.
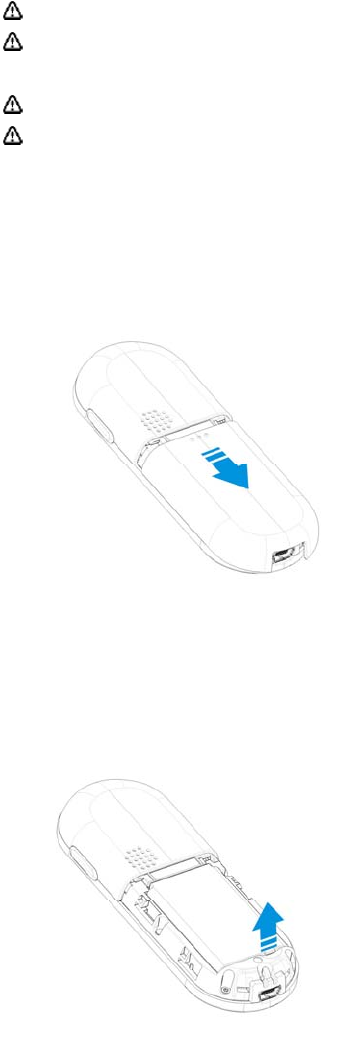
Install the SIM card
1. With the back of the phone face up, palm up to hold the phone, then slide the back
cover down and remove it from the phone as shown Fig 1
Fig 1
2. Push the battery out with the thumb at the phone back, get it out from the battery cabin
as shown Fig 2;
Fig 2

3. Insert SIM card into the slot by aligning the angles of SIM card with those of the slot
with the metal side facing down as shown Fig 3;
Fig 3
4. Insert the battery into the cabin top with the end with metal contact point upward and
press the other end of the battery to insert it fully into the cabin as shown Fig 4;
Fig 4
5. Slide the back cover upward until fully clinched as shown Fig 5.
Fig 5

Remove the SIM card
1. Ensure that the power is off. If the power is on, press and hold the [Power] key
until power is off.
2. Remove the battery.
3. Slide the SIM card out of the SIM card holder.
Caution Please contact the network service provider for any failure of the
SIM card.
Caution The system environment, mobile phone configuration and game
functions can all impact the idle-mode duration.
Battery Performance and Maintenance
1. The phone is charged by rechargeable charger.
2. Please note that the new battery can reach the best performance after two or three
full charging-discharging cycles.
3. The battery can sustain hundreds of charging-discharging cycles before out of
service. It is the time to replace the battery upon obviously shortened working time of
the battery (session duration and idle time).
4. Please adopt the battery and charger approved by the TOSHIBA manufacturer to
ensure the service life of phone; the battery equipped with the phone is rechargeable
Li-battery. Please do not connect the battery with the charger for over a week, as
over-charge will shorten its service life; the charged battery will discharge over time
when idle for long.
5. Over high or over low temperature will impair the battery charging.
6. Do not use the battery for other purposes.
7. Do not use any damaged charger or battery.
8. Do not short-circuit the battery; the backup battery in pockets or bags may touch the
metal articles (coins, brooches or pens) that may connect the “+” pole and “-“ pole of
the battery (i.e. the metal bar on the battery) and lead to short circuit, which may
damage the battery or connections.
9. Keeping the battery in over hot or cold environment will shorten the life service or
reduce the capacity of the battery; keep the battery in environment between 0℃ and
45℃; otherwise the phone may suspend operation even fully charged.
10. Do not throw battery into fire.
11. Please dispose of the battery as required (recycled), do not dispose of battery as
living rubbish.
12. When not using the battery for a long period, remove it from the phone and store in a
place with low humidity and low temperature.
1.2 Charge the battery
When battery voltage is lower than the operating voltage, the screen will display charging
prompt and empty-battery icon with prompt tone and information, and the phone will
automatically turn off after a while.
The phone is equipped with the rechargeable Li-battery; please adopt
original-manufacturer charger and battery to ensure the phone service life.
1. Carefully insert the pins of the charger to the jack at the profile of the phone.
2. Connect the charger with the power supply when the phone is shut off, the screen will
display charging animation. In case of charging when turning on, the battery icon will
flash with the voltage grids rising, the phone operates normally.
3. After charging when turning off, the screen will display “Finish charging”; In case of
charging when turning on, the battery prompt icon will not flash.
4. Disconnect the charger from the power supply and phone.
5. Please adopt the charger approved by xxx manufacturer, and refer to charger manual
prior to use.
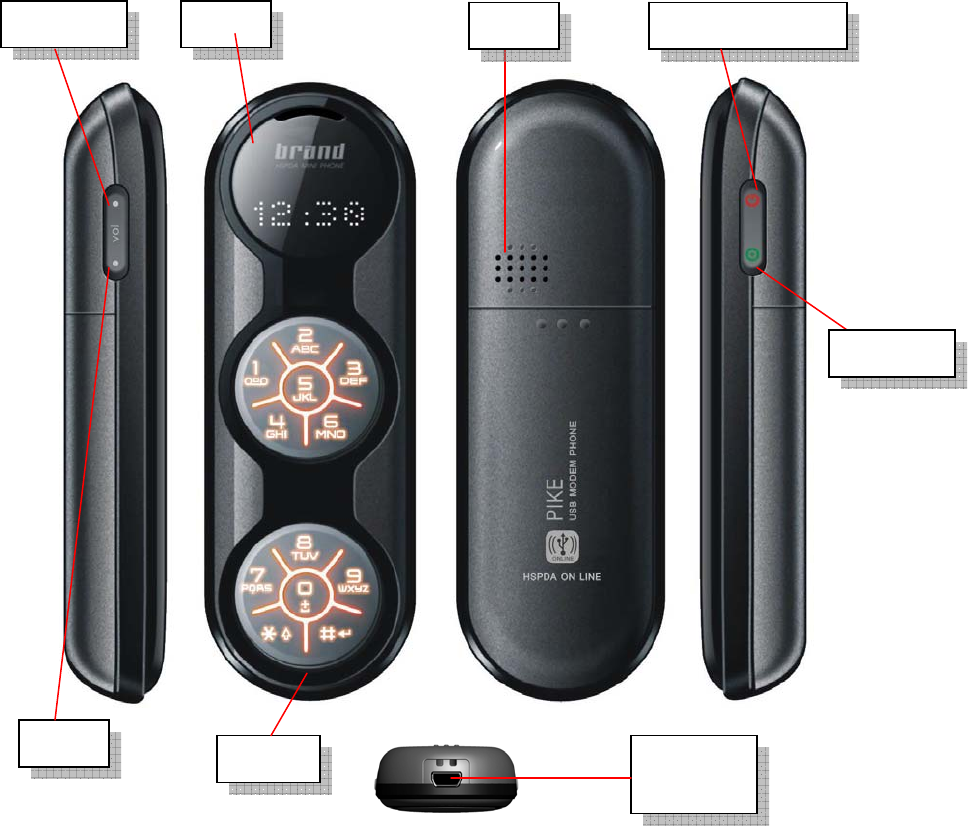
1.3 Your phone
LED
Microphone Charger jack,
Dataline jack
Power/Cancel key LOUDSP
Up key
Down key
Send/OK key
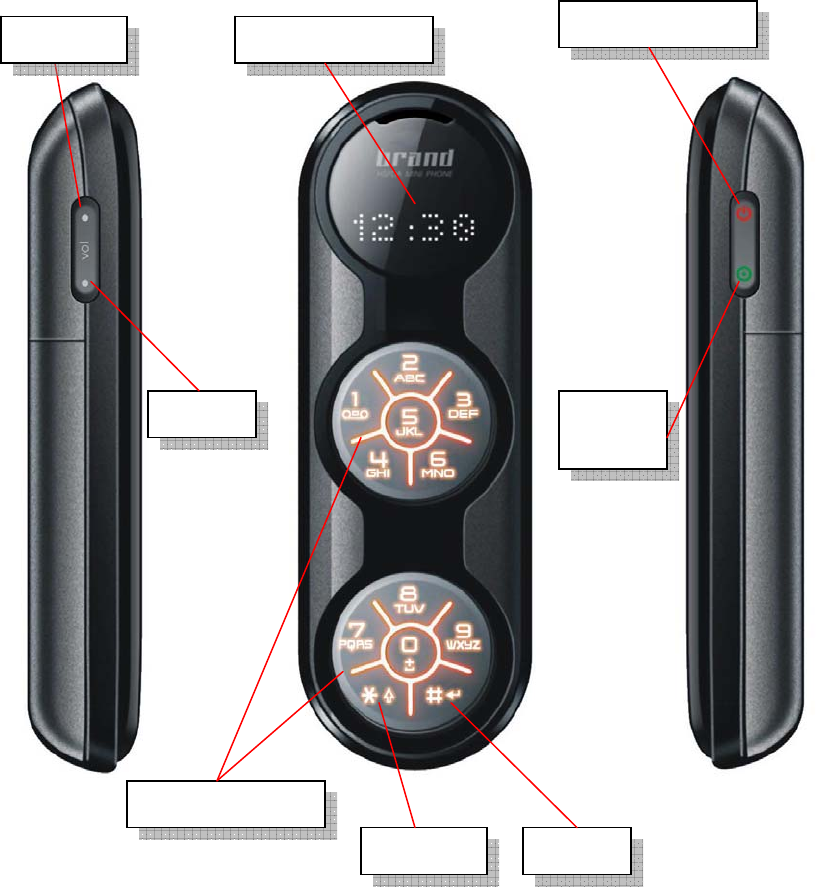
1.4 Definitions of Buttons
Send/OK
key
* key
Display Up key Power/Cancel key
Letter/number keys
# key
Down key

Send/OK key Idle mode: enter into the main menu screen
Long press it to enter into Dialed calls list screen
Menu mode: pop-up menu, select menu or confirm options
Editing mode: confirm the inputted character
Power/Cancel key
Press and hold power/Cancel key to turn on/off the phone
Idle mode: lighten backlight of LCD
Menu mode: back to the previous screen
Editing mode: clear off text and characters
Up key Idle mode: default enter into All contacts list screen
Long press it to set phone mode as Meeting mode
Menu mode: scroll the menu upward
Editing mode: cursor rightward
Down key Idle mode: default enter into Create new SMS screen
Long press it enter into Music player screen
Menu mode: scroll the menu downward
Editing mode: cursor leftward
Letter/number key Idle mode: press it to input 0-9
Long press [Number key 1] to dial out Voice mail
Long press [Number key 2-9] to fast dial the responding numbers set
Long press [Number key 0] to input “+”
Menu mode: press it to enter into the corresponding menu option
Editing mode: press it to input responding numbers or letters
Press [Number key 1] to change sub mode among Abc, abc,
ABC in the T9 English and Abc input method
* key Idle mode: press it to input “*”
Long press to lock keypad
Edit mode: Change the input mode
# key Idle mode: press it to input “#”
Long press it to input suspended dialing symbol “P”
Editing mode: press it to display general symbols
Long press it to move cursor to the next line or new line
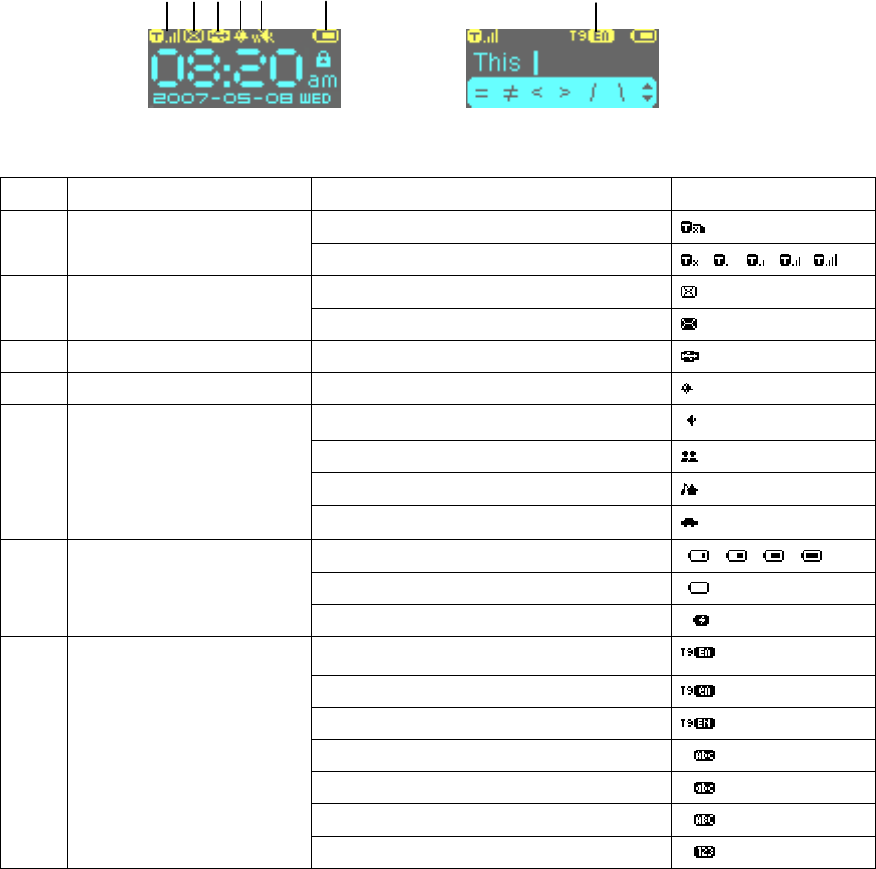
1.5 Status Icons
SN Meaning Simple description Icon
1 Signal strength status Signal strength, no SIM
Signal strength, Level 0-4
2 SMS status New SMS
SMS full
3 USB connection Display USB data line connected
4 Alarm clock Initiate the alarm clock
5 Phone mode Normal mode
Meeting mode
Outdoor mode
Driver mode
6 Battery status Battery status 1-4
Low battery status
Charging status
7
Input method in the text
editor screen
T9 English Abc
T9 English abc
T9 English ABC
Abc
abc
ABC
123
1 23 4 5 6 7
Text editor screen

2. Basic Functions
Caution the phone supports only voice calll in WCDMA network or in GSM
network.
2.1 Switch the phone On/Off
◆ Power on Press [Power/Cancel] key for more than 3 seconds to power on phone
while seeing power-on animation or text. Then the phone will prompt you to input PIN
(personal indetity number) code if applicable. It will prompt you to input the lock password
if applicable.
Power off Hold [Power/Cancel] key for seconds until you see the power-off picture.
2.2 PIN and PUK Codes
◆ PIN Code and PIN2 Code
PIN code: Avoid unauthorized use of SIM card. If initiating the power-on PIN code
function, the phone will require the PIN code when powered on, SIM card
will be automatically locked and display the lock prompt when inputting three
wrong PIN codes. The PIN code is 4 to 8 digits
PIN2 code: The PIN2 code may be supplied with the SIM card and is required for some
functions. The PIN2 code is 4 to 8 digits.
◆ PUK Code and PUK2 Code
PUK code: when modifying locked PIN code, phone requires PUK (personal unlocking
key) code that is issued with SIM card. Please contact with the service
provider for PUK code otherwise. In case of inputting 10 wrong PUK codes
in a row, the SIM card will be permanently locked. Users are prohibited from
changing PUK code; users should contact the service provider for lost PUK
code. The PUK code is 8 digits
PUK2 code: PUK2 code is not supplied with SIM card, it is needed when modifying the
locked PIN2 code. If inputting 10 wrong PUK2 codes in a row, the user is
prohibited permanently to use the menu options of PIN2 code.
2.3 Outgoing Call
◆ Number Keys Enter the phone number in the idle screen with number keys, then
press [Send/OK] key, then select menu [Call] to dial the inputted numbers.

◆ Fast dial
On idle screen, hold “1” to dial voice mail.
On idle screen, hold number keys 2-9, directly voice call the corresponding phone number
which you have linked number keys 2-9 to in setting application
◆ Dial from phonebook:
Search for a number in the phonebook, press [Send/OK] key, then select menu [Call]
to dial the stored number.
◆ Dial the number through Log
Search for the call lists in Log, press [Send/OK] key, then select menu [Call] to dial the
stored number.
◆ Dial international call
Add international call prefix “+” in front of the number (pressing “0” for seconds, “+”
will display on the number column, then input nation code and telephone number,
press [Send/OK] key for the call.
◆ Directly dial extension number
The mobile phone permits direct dialing of extension number or voice mail. You can
insert a suspension symbol “P” between the phone number and extension number. In
this case, the mobile phone will suspend the dialing of extension number until the
response of the receiving party. The “P” shall be inserted as below:
1. In general dialing practice, input the telephone exchange number, then hold “#” key
to input “P”, then extension number.
2. Then press [Send/OK] key to select menu [Call], mobile phone will automatically dial
the extension number when connected with the telephone exchange.
◆ Emergency call
Your service provider configures your mobile phone with one or more than one
emergency numbers (e.g. 112). In the service coverage area, the users can input the
emergency number, and then press the [Send/OK] key to call emergency numbers
even without the SIM card after selecting menu [Call].
Caution the function entails the network support.
2.4 Answer Calls
The mobile phone will ring or vibrate when incoming calls, answer calls by pressing
[Send/OK] key. If configured any-key answer function, you can press any key except
[Power/Cancel] to answer calls. The received numbers are stored in the received calls.
Caution if you have inserted the earphone Handset Connector, you can
press the button on it to answer incoming calls, when the keys of the mobile
phone can still normally operate.
2.5 Reject Calls
Press [Power/Cancel] to reject incoming calls.

Caution If you have inserted the earphone Handset Connector, long press
the button on earphone Handset can reject incoming calls.
2.6 Functions in Voice call
Caution The function depends on the support of network service provider and whether
you have registered the function.
During voice calling, you can conduct many operations. Press [Send/OK] to enter into the
menu list, displaying Speaker on/off, SMS, Phone book, Mute/Resume.
SPEAKER ON/OFF
During voice calling, press [Send/OK] to enter menu list screen. If selecting [Speaker on],
the sound path will be changed to speaker; If selecting [Speaker off], the sound path will
be changed to receiver.
◆ SMS
During voice calling, press [Send/OK] to enter menu list screen. If selecting [SMS], you
can enter SMS application to conduct relevant operations.
◆ Mute/Unmute
During voice calling, press [Send/OK] to enter menu list screen. If selecting [Mute], the
voice call will be silenced; If selecting [Unmute], the voice call will be resumed.
◆ Phone book
During voice calling, press [Send/OK] to enter menu list screen. If selecting [Phone book],
you can enter phone book application to conduct relevant operations.
2.7 LED
When LED twinkle, it means that there is Missed cal or New SMS;
When LED light as blue, it means that phone is used as modem;
When LED light as green, it means that phone is used as U-Disk.
3. Main Menu
Press [Send/OK] key in the idle screen.
In the main menu, select the 6 options by [Up/Down] key:
1.Phone book
2.SMS
3.Music
4.Log
5.Settings
6.Alarm
Press [Up/Down] key to switch over the sub-menus, then press [Send/OK] or relevant
number key for confirmation.
3.1 Phone book
Phone book contains contacts saved in phone and SIM card. The methods to enter Phone
book as following:
1. In the idle screen, press [Up] key enter into All contacts list screen.
2. In the main menu mode, press [Up/Down] key to scroll to [1. Phone book], then
press [Send/OK] key for confirmation (or directly press [Number key 1] key), enter
into Phone book main screen.
The contact list records the information of contacts, including name and number, and the
contact information is for calling and sending message.
You can store contact to the phone storage (internal phone book) or SIM card (SIM phone
book).
1. All contacts
Display all contacts stored in the Phone and SIM card, and each contact show the
inclusive information Name and Number.
Press [Up/Down] key to display contact items; press [Send/OK] key for pop-up menu,
and press [up/Down] key for scrolling selection of Call, Send SMS, View number, Edit,
Copy, Delete.
-
Call: Make voice call to the selected contact
-
Send SMS: Send SMS to selected contact
-
View number: View the number of the selected contact
-
Edit: Enter text editor to edit name firstly, then enter number editor to edit number
-
Delete: Delete the selected contact
-
Copy: For Phone contact, copy it to SIM card; for SIM contact, copy it to phone
Press [Number key 0-9] to execute Quick selection function as following:
-
[Number key 0]: Display the contact whose name begins with symbol.
-
[Number key 1]: Display the contact whose name begins with number.
-
[Number key 2-9]: Display the contact the contact whose name begins with
responding letter a-z. For example:
1) Firstly press [Number key 2], display the contact whose name begins with letter
“a”;
2) Secondly press [Number key 2], display the contact whose name begin with
letter “b”;
3) Thirdly press [Number key 2], display the contact whose name begin with letter
“c”;
4) Fourthly press [Number key 2], display to the contact whose name begin with
letter “a”.
If interval which you press number keys more than 1 second, it will show the
contact whose name begin with letter “a” again.
2. New contact
You can add new contact to phone or SIM card, according to the setting of [Storage type].
When you select to add new contact, enter text editor to input name of this new contact
firstly; after input name, press [Send/OK] key enter number editor screen to input number
of this new contact; after input number, press [Send/OK] key to save this new contact.
If you don’t input number, this contact can’t be saved. However the name item can be
empty.
3. Find
You can find contacts by the following ways:
-
Find by name: Input characters in the text editing window, search for the contacts
whose name matched the inputted contents.
-
Find by number: Input numbers in the number editing window, search for the
contacts whose numbers matched the inputted contents.
4. Storage type
You can set storage type as Phone or SIM.
- Phone: When you add contact, the new contact will be added to phone
automatically.
- SIM: When you add contact, the new contact will be added to SIM automatically.
5. Copy all
- From phone to SIM: Copy all phone contacts to SIM card
- From SIM to phone: Copy all SIM contacts to phone
6. Delete all
- Phone contacts: Delete all contacts saved in phone
- Phone contacts: Delete all contacts saved in SIM card
7. Memory status
The mobile phone is equipped with memory status inquiry function to enable you to
understand the operation status of the mobile phone. The storage status inquiry primarily
covers recording capacity in SIM card and phone.
3.2 SMS
The methods to enter SMS as following:
1. In the idle screen, press [Down] key enter into create new SMS screen.
2. In the main menu mode, press [Up/Down] key to scroll to [2. SMS], then press
[Send/OK] key for confirmation (or directly press [Number key 2] key), enter into
SMS main screen.
1.New
You select [New] to create new SMS.
Enter text editor to input SMS content first, after edit content, press [Send/OK] key for
pop-up menu, and press [up/Down] key for scrolling selection of Phone book, Edit
number, Save.
-
Phone book: Enter phone book all contacts list to select a contact as receiver,
then press [Send/OK] key to send SMS to this contact
-
Edit number: Enter number editor to edit new number as receiver, then press
[Send/OK] key to send SMS to this number
-
Save: Save this SMS to the [Drafts]
In idle mode, press [Down] key to create new SMS also.
2.Read SMS
In SMS main screen, select [2 Inbox], [3 Drafts], [4 Outbox], [5 Sent] menu, enter into
the message list; press [Up/Down] key for scrolling list inquiry. Press [Send/OK] to read
the message and relevant information, such as receiving number and sending number,
date and time.
-
Inbox: Store the received messages, press [Send/OK] key to read message detail. In
the message detail screen, press [Send/OK] key for pop-up menu, Reply, Delete, Forward,
Save number, Call
Reply: Reply the selected message
Delete: Delete the selected message from Inbox
Forward: Forward the selected message
Save number: Save the number of sender into phone book
Call: Make voice call to the sender
-
Drafts: Store messages for future use, press [Send/OK] key for pop-up menu, Edit,
Delete
Edit: Edit the selected message detail
Delete: Delete the selected message from Drafts
-
Outbox: Store messages sent failed, press [Send/OK] key to read message detail. In
the message detail screen, press [Send/OK] key for pop-up menu, Resend, Forward,
Delete
Resend: Resend the selected message
Forward: Forward the selected message
Delete: Delete the selected message from the Outbox
-
Sent: Store the messages sent out successfully, press [Send/OK] key to read
message detail. In the message detail screen, press [Send/OK] key for pop-up menu,
Forward, Delete, Call
Forward: Forward the selected message
Delete: delete the selected message from the Sent
Call: Make voice call to the receiver
3.Voice mail
By “voice mail” function, you may forward the incoming calls to the voice mail center, and
the calling party can leave a message in the mailbox, then you will receive the notice
message. The service provider can provide such number to you, and you can configure
and modify the number.
4. Settings
Short message setting, including short message service center, short message valid term,
status report and storage type.
-Service centre: The number is provided by mobile phone service provider. Once
you key in a short message service center number, the number will be displayed on
the screen; you can modify or delete the number; you shall first key in the number
with such option prior to sending short message.
-Expire period: Setting of message validity term to determine the stay duration in
the message center prior to deletion, e.g. 1 hour, 6 hours, 1 day, 3 days, 1 week
and the maximum.
-Status report: Activate or deactivate report function; when activated, the network
will notify you the message sending status.
-Storage type: Select short message storage type: SIM card and Phone; if you
select SIM card storage, the short message will be automatically stored to SIM
card.
5. Memory status
Display free room you can store and total room in SIM card and Phone.
3.3 Music
The methods to enter Music as following:
1. In the idle screen, long press [Down] key enter Music screen.
2. In the main menu mode, press [Up/Down] key to scroll to [3. Music], then press
[Send/OK] key for confirmation (or directly press [Number key 3] key), enter into Music
main screen.
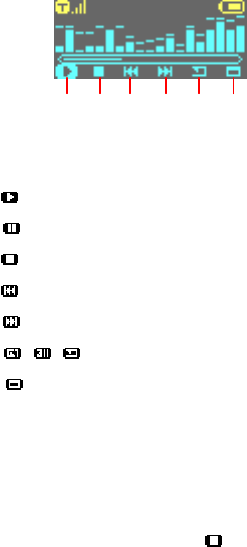
1. Play
You select this menu item to enter play music screen as following.
Icon: 1 2 3 4 5 6
In the music playing screen, you can press [Up/Down] key to scroll cursor among above 6
icons, and press [Send/OK] key to execute the function of selected icon.
-
Icon 1 : Play music
: Pause music in the playing status
-
Icon 2 : Stop music playing
-
Icon 3 : Play the previous music
-
Icon 4 : Play the next music
-
Icon 5 / / : Switch playing mode among Single loop/ Loop all/ Random
-
Icon 6 : Display the file’s property, including Name, Format, Date, time and Size
Adjust volume: Long press [Up/Down] key to adjust the volume in the playing screen.
Background playing: In the playing status, pressing [Power/Cancel] key can exit playing
screen and start background playing. In the background playing status, you can enter
playing screen to select Icon 2 to stop background playing.
2. View list
Show the music files list saved in the phone, press [Send/OK] for pop-up menu to execute
the following functions to the selected file.
-
Play: Enter play music screen to play the selected file
-
Delete: Delete the selected file
-
Property: Display the file’s property, including Name, Format, Date, time and Size
3. Memory status
Show the phone memory status info, including Capacity, Free and number of Music file.
4. Delete all
Delete all music files saved in phone, mean that files in the [View list]
3.4 Log
The methods to enter Log as following:
1. In the idle screen, long press [Send/OK] key enter into Dialed calls list screen.
2. In the main menu mode, press [Up/Down] key to scroll to [4. Log], then press
[Send/OK] key for confirmation (or directly press [Number key 4] key), enter into
Log main screen.
The session records the missed calls, received calls, dialed calls, call duration and packet
data counter.
1. Missed calls/Received calls/Dialed calls
You can enter call list screen to view the missed calls, received calls or dialed calls , press
[Send/OK] for pop-up menu to execute the functions like Call, Send SMS, Save, Delete,
Delete all, View detail.
-Call: Make Voice call to the selected number.
-Send SMS: Send SMS to selected numbers.
-Save: Store desired contents to the phone book.
-Delete: Delete undesired contents.
-Delete all: Delete all contents in the contact list.
-View detail: View detailed information including name, number, time, date and
during.
2. Call duration
This item shows the all duration of last call, received call, dialed call and total call. You can
select [Clear all] to set the call duration as 00:00:00.
3. Packet data counter
This item shows the packet data of network, include sent data and received data. You can
select [Clear all] to set sent data and received data as 0 KB.
3.5 Settings
The default configuration of your mobile phone will enable to use the functions
immediately after inserting SIM card. For more needs and application modes, this mobile
phone allows you to define and change the setting for your habits to meet senior
communication needs.
In the idle screen, press [Send/OK] to enter into the main menu. Press [Up/Down] key to
scroll to [5.Settings], and then press [Send/OK] for confirmation (or press [Number key
5]).
The system settings menu includes:
1. Date and time
2. Phone mode
3. U-Disk mode
4. Backlight timer
5. Enhancement settings
6. Calls
7. Security
8. Network
9. Reset settings
0.Clear all
Each setting covers multiple setting items allowing selecting or inputting setting values,
which create the automatic control of the phone.
1) Date and time
Configure time and date and the formats by [Up/Down] key. Press [Send/OK] to
determine the modification contents.
-Set time: Allows input of correct time;
-Set date: Allows input of correct date;
-Set time format: Adjust the date display format in12/24-hour system.
2) Phone modes
In the scene mode screen, select an option among Normal mode, Meeting mode,
Outdoor mode or Drive mode. Then the mobile phone will follow the selected mode
in operation. Pressing [Send/OK] can select activate or edit the highlight item as
following.
1. Normal
In the scene mode screen, select the desired working mode, then configure the
parameters as per your personal taste, including the following setting items:
- Ring volume Adjust the tone volume
- Message volume Adjust the information prompt volume;
- Keypad volume Adjust the volume of key pressing;
- Voice call ring tone Select voice calls ring tone;
- Message ring tone Select Message ring tone;
- Vibration pattern 3 types, or “Off”;
- Coverage tone Configure coverage tone on/off.
Note:
Meeting mode, Outdoor mode or Drive mode setting items is the same as Normal
mode.
3) U-Disk mode
In the U-Disk mode, after insert USB cable, you can use the phone as U-Disk.
4) Backlight timer
Configure the setting of backlight duration.
5) Enhancement settings
Enhancement settings can configure the setting of Headset and Charger
- Headset: Configure the setting of Headset for phone mode and Automatic
answer.
- Charger: Configure the setting of Charger for phone mode.
6) Calls
1. Call divert: a network function for forwarding the call to designated phone as
requested by the user.
Upon the setting, mobile phone requires you to input the designated number to
receive the call. If failing to receive the transferred call, please check the
destination number.
- Divert always: With the setting, all incoming calls will be transferred to
designated number.
- On busy: With setting, the incoming calls will be transferred to designated
number when mobile phone is busy.
- No reply: With this setting, the incoming calls will be transferred to designated
number when mobile phone does not respond.
- Unreachable: With this setting, the incoming calls will be transferred to
designated number when mobile phone upon failure of connection (e.g. poor
network signal or poor signaling environment).
- Cancel all: With this setting, the transfer setting will be cancelled.
2.Call barring: You can configure the following call prohibitions to help enhance the
safety; the network operator provides a 4-digit password to you for prohibiting
calls.
- All outgoing: Prohibit all outgoing calls.
- Int’l call: Prohibit international call.
- Int'l calls except to home: Prohibit dialing of local number when overseas
roaming.
- All incoming: Prohibit all incoming calls.
- Incoming calls when abroad: Prohibit all incoming calls upon roaming.
- Cancel all: Cancel all restrictions when inputting restriction password.

- Change password: First input the existing code, then the new codes twice.
3.Caller ID: Restrict the calling number display, including 3 items, i.e. Default,
Display number and Hide number.
4. Any key answer: Configure whether to respond to incoming calls by any key.
5. Fast dial: Configure number keys 2-9 to fixed number stored in SIM card or mobile
phone for directly dial by holding number keys on idle mode.
Caution: If you dial an empty number, i.e. not stored in SIM card or mobile phone,
the mobile phone will prompt “No matching contact”.
6.Auto redial: Whether to permit re-dial; if shutting off this function, mobile phone
will not re-dial in case of connection failure.
7.Alert tone: Include two items, i.e. connection, minutes alert.
- Connection: Setting of connection on or off.
- Minutes alert: Setting of minutes alert on or off.
7) Security
Safety setting can configure and modify passwords and options to prevent
non-authorized use of mobile phone and restriction of mobile phone use, including
initiating PIN code, modifying PIN code, power-on locking, modifying mobile phone
lock password, present locking.
- PIN activate: With PIN code function, input the PIN code upon power on. In
case of inputting three wrong PIN codes in a row, the SIM card will be automatically
locked and display the locking information.
- Change PINs: Modify PIN code, PIN2 code. PIN code can prevent unauthorized
use of SIM card. Generally, PIN2 code is not provided with SIM card, as it provides
special network service.
- Power on lock: With the power-on locking function, input the password when
powering on.
- Phone lock: Lock mobile phone to prevent mobile phone data disclosure; use the
mobile phone by inputting password. Initial phone lock code is 1234.
- Change security code: First input the existing code, then the new codes twice.
8) Network
The menu has 4 options, i.e. select mode, new searching, priority network and access
networks order.
1. Search type:
-Automatic: Upon power-on, mobile phone will register to the first service network
in the network sequence list, and will attempt the next upon any failure.
-Manual: First retrieve all networks and recognize the registration icons of each
network; then select one network for registration, mobile phone will automatically
register into the next network upon failure.
2.New search: Retrieve all networks and recognize the registration icons of each
network; then select one network for registration.
3.Preferred network: In the network list, you can operate the listed networks; select
“priority network” in the “network service”, enter into the priority network display to
display priority network list, you may browse through the network details, insert
new priority network to the end of the list; meanwhile you can delete the priority
network from the list.
4.Network mode: Provide the selection of network access orders, including
Automatic, WCDMA only and GSM only.
9) Reset settings
Select the option; you can restore the mobile phone settings to ex-work setting.
0) Clear all
Select the option; you can clear all data and restore the mobile phone settings to
ex-work setting.
3.6 Alarm
In the idle screen, press [Send/OK] to enter into the main menu. Press [Up/Down] key to
scroll to [6. Alarm], and then press [Send/OK] for confirmation (or press [Number key 6]).
You can select the alarm for specific setting.
- Set time: Set alarm ring time.
- Status: Activate or deactivate alarm.
- Period: Set alarm period: select [Once /Everyday/Workday/Weekend].
- Ring: Change the prompt tone of alarm.
- Snooze: Set the time that alarm ring again, you can select [Off/1 minute/5
minutes/10 minutes]
At the alarm time, the mobile phone will play the event tone (if configured) and
the prompt picture; you can press [Send/OK] key to view the alarm.
The above function is available when mobile phone is turned on.

4. Reference Information
Input Text
The mobile phone provides many kinds of expedient text input methods matching other
functions, including T9 English, ABC, 123 input methods. You can press [*] key to switch
input method.
General instructions
Key Letter
Num 2 a b c
Num 3 d e f
Num 4 g h i
Num 5 j k l
Num 6 m n o
Num 7 p q r s
Num 8 t u v
Num 9 w x y z
◆ T9 English
The T9 English method uses a built-in dictionary to recognize the most commonly used
word for each sequence of key presses. This way, you press each key only once, even if
the letter you want is not the first letter on the key.
In T9 English mode, press Num key [2-9] containing the required letters to input word,
one screen displays one English word.
Press [Up/Down] key to display the previous/next word circularly. Press [Send/OK] key
for confirmation, the word will be displayed on the cursor of the input column.
Press [Num 1] key to switch over the sub mode among "Abc", "abc" and "ABC".
Press [Num 0] key to input special symbol in turn as: Space , . ? ! : “ @ + 0
◆ ABC
ABC is multi-tap text input method. You press each key as many times as needed to show
the letter you want. For example: If you want to input “c”, you should press [Num 2] key
three times.
Input letters by number keys on the keyboard, the letters will display on the cursor of the
input column.
Press [ Num 1] key to switch over the sub mode among "Abc", "abc" and "ABC".
Press [Num 0] key to input special symbol in turn as: Space , . ? ! : “ @ + 0
◆ 123
Input the numbers by [Number key 0-9] on the keyboard.
◆ Symbol
In the text input screen, press [# key] to enter into the symbol input mode, select more
symbols by [Up/Down] key, and input the symbols by [Send/OK] key.

5. Accessory
Charger
- It will charge the Li-ION battery quickly and completely. The charge duration
varies subject to the capacity of battery.
Li-ION battery (one piece)
- The Li-ION battery 780mAh can provide standby duration lasting for 150-270 hours.
- For 2.5G, the call duration is 100-220mins; For 2.5G, the call duration is 47-120mins
*Specific standby &call duration shall be determined subject to the actual condition
for the use.
Caution
Only approved battery, charger and other accessories by mobile
phone manufacturer may be used. And the use of other types of
accessories will infringe the quality certification and maintenance
license for this mobile phone and leads to dangers.
USB data cable connection
- In order to synchronize data or communicate between your phone and the compatible
PC, You can connect them through a USB data cable.
Headset
- Provide a volume control jog dial and a Send/End button. You can use the button to
pick up or hang up incoming and outgoing calls.
PC suite CD
- Provide a PC synchronize software in a companion CD that came with your
phone. You can synchronize contacts, messages and logs between your phone
and PC after installing the PC synchronize software.

Repair Guideline
You are welcome to use the mobile phone produced by TOSHIBA. In case of any problem
of mobile phone in use, please contact the distributor or TOSHIBA repair center. In case of
repair, please send your mobile phone to local repair station (see the Warranty Certificate
attached with mobile phone); in case of no repair station locally, please send your mobile
phone and duplicate invoice to the distributor for EMS.
To inquire about the latest repair outlet and replacement center address, please contact
TOSHIBA, or http://www.TOSHIBA.com
Common problems Potential causes Solution
1. Weak signals Far away from base station or
strong insulation
Get near the windows or
corridors.
2. The screen will display “no
card” or “invalid card”
Possibly dirty contact pad of SIM
card
Gently clean the contact pad of
SIM card.
3.Battery charged full holds short
Possibly configured power-on
backlight, to consume high
electricity
Re-configure backlight mode
4.Silent headphone Possibly configured minimum
volume
Adjust the volume by up/down
volume key
5.Only vibration no ring upon
incoming call
Possibly configure the mobile
phone as Meeting mode Re-configure “Normal mode”