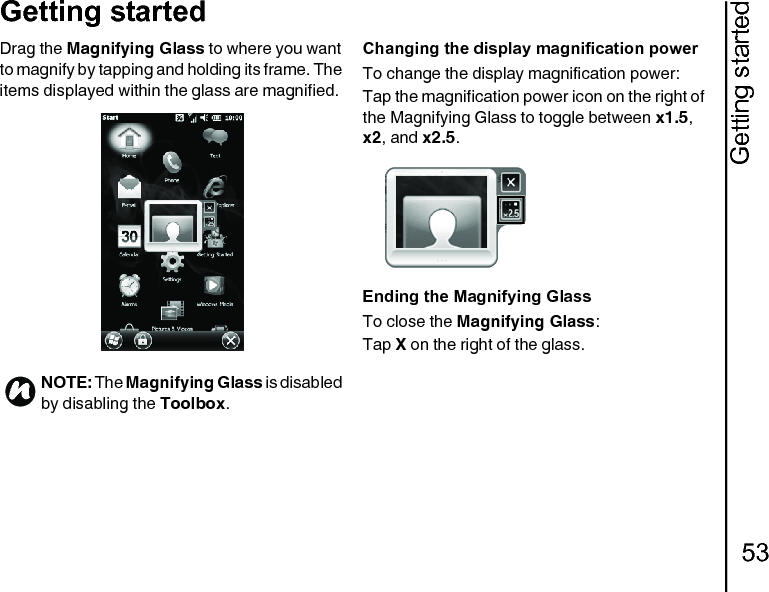
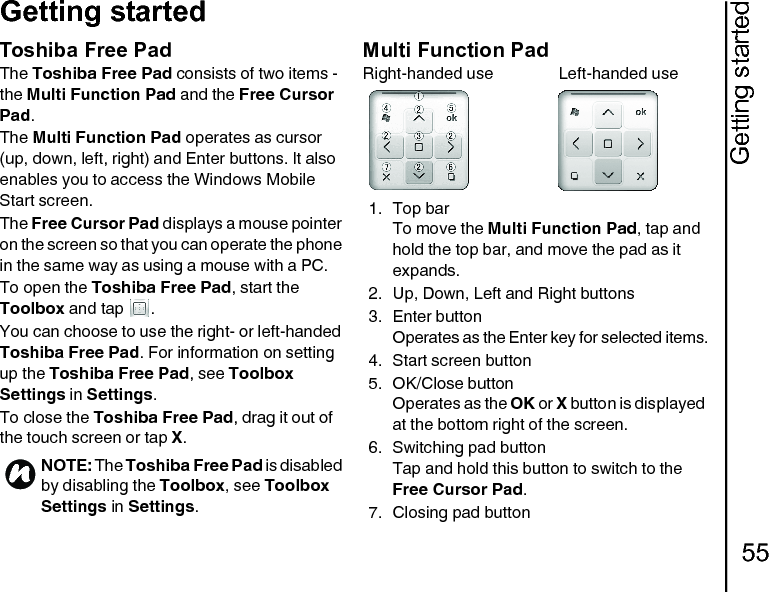
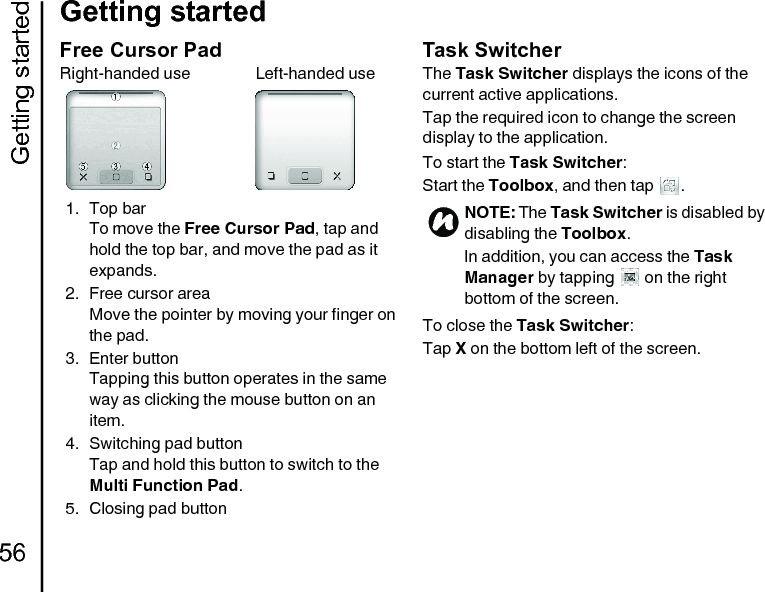
Toshiba Information Systems TQ5-E01 GSM SmartPhone w/WiFi and Bluetooth User Manual TG02 UM EN

Toshiba Information Systems (UK) Ltd, Mobile Communications Division GSM SmartPhone w/WiFi and Bluetooth TG02 UM EN

TQ5-E01 User Guide [short-term confidential] rev01

Table of contents1Table of contentsPreface 5Declaration of conformity 6Important Health and Safety Information 8SAFETY ICONS 8Handling your Toshiba phone 23Emergency Calls and GPS 23BLUETOOTH AND WIRELESS LAN FUNCTIONS 24Attention 27Disposal 28FCC Notice 30FCC RF exposure information 31Disclaimers 32Important Legal Information 33Disclaimers 33Copyright Notice 35Care and maintenance 36LCD Panel 36Restarting your Toshiba phone 36Resetting your Toshiba phone 37Reinitialising your Toshiba phone 37Getting started 38Unpacking 38Phone layout and functions 39Installing the SIM card, microSD card and battery 42Charging the battery 46Switching the power on and off 47Touch user interface 48Operator Settings 57Synchronising your Toshiba phone with a PC 57
Table of contents2Table of contentsCall functions 60Receiving a call 60Ending a call 60Making a call 61Speed Dial 62In-call options 64Multiple and multiparty calls 65Call History 67Messaging 68Text messages 68MMS messages 71E-mail 74Windows Live Messenger 76Nimbuzz 77Applications and multimedia 78Calendar 78Camera 79Contacts 82CorePlayer 85File Explorer 85Games 85Getting Started 85Internet Explorer 86Java 88Marketplace 89Microsoft My Phone 90Notes 90Office Mobile 91PhotoBase 92Pictures & Videos 92Search Phone 93SIM Toolkit 93Streaming Player 94Tasks 94Video Editor 95Windows Live 95Windows Media 96
Table of contents3Table of contentsConnectivity 98Beam 98Bluetooth 99Domain Enroll 101Internet connections 102Internet Sharing 102USB Mode 103Wi-Fi 103Wireless Manager 104Settings 106About 106Adjust Geomagnetic Sensor 106Adjust Motion Sensor 107Backlight 107Browser Settings 108Certificates 108Clock & Alarms 108Customer Feedback 109Encryption 109Error Reporting 110External GPS 110Internal GPS 111Location Request 111Managed Programs 111Master Clear 111Memory 112Motion Sensor Settings 113Owner Information 113Phone 113Power Saving Settings 119Power 119Regional Settings 120Remove Programs 120Screen 121Security 121Sleep Mode Indicator 125
Table of contents4Table of contentsSounds & Notifications 125Task Manager 126Toolbox Settings 126Video Quality Setting 127Volume control 127Specifications 128Troubleshooting 131Annex 1 - Text input 135Input methods 135Input Panel 135Writing and drawing on the screen 136Annex 2 - Navigating your Toshiba phone 138Phone screen 138Annex 3 - Common status icons 142Annex 4 - Configuring SMS, MMS and e-mail 145Setting up text messages service centre 145Configuring MMS settings 145Setting up e-mail accounts 146General messaging options 153Annex 5 - Configuring internet settings 155Toshiba Corporation 160End User License Agreements (EULAs) 162Licenses 168Index 170
Preface5PrefacePrefaceHello and welcomeCongratulations on your purchase of the Toshiba TG02.For additional phone content, please visit www.toshiba-europe.com/mobile.If you require further technical support please contact our customer operations team as follows:Tel.: 008000 505 2006E-mail: customer_operations@toshiba.co.ukOpening hours: Monday - Friday 9AM - 1PM and 2PM - 6PM (CET)We hope you enjoy using your new Toshiba phone.To use your Toshiba phone, you must have service from a wireless service provider. Many of the features in your Toshiba phone depend on features in the wireless network to function. These network services may not be available on all networks, or you may have to make specific arrangements with your service provider before you can utilise network services. Your service provider may need to give you additional instructions for their use and explain what charges will apply. Some networks may have limitations that affect how you can use network services. For instance, some networks may not support all language-dependent characters and services.Please note that the Windows Live Messenger and Windows Live applications described in this user manual may not be available on your Toshiba phone because support for these applications is dependent on your network service provider.The availability of particular products may vary by region.Due to the continual development of our products, Toshiba reserves the right to modify this document at any time without prior notice.
Declaration of conformity6Declaration of conformityDeclaration of conformityWe, Toshiba Information Systems UK (Ltd), Mobile Communications Division, ofToshiba Court, Weybridge Business Park, Addlestone Road, Weybridge, KT15 2UL declare under our sole responsibility that this product (TG02, Type (Model) Name TM5-E01) is in conformity with the following standards and/or other normative documents:EN301511 v9.0.2, 2003-03, EN301908-1 v3.2.1, 2007, EN301908-2 v3.2.1, 2007-05, EN60950-1 2006, EN300328 v1.7.1, 2006, EN300440 v1.2.1, 2008, EN50360 2001, EN62209-1 2006, EN301489-1 v1.8.1, 2008, EN301489-3 v1.4.1, 2003, EN301489-7 v1.3.1, 2005, EN301489-17 v1.3.2, 2008 and EN301489-24 v1.4.1, 2007We hereby declare that all essential radio test suites, EMC & safety requirements have been carried out and that the above named product is in conformity to all the essential requirements of Directive 1999/5/EC.The conformity assessment procedure referred to in Article 10(5) and detailed in Annex IV of Directive 1999/5/EC has been followed with the involvement of the following Notified Body(ies):SGS UK, South Industrial Estate, Bowburn, and County Durham, United Kingdom DH6 5ADXX XXXX XXXXHidehito KokaDeputy Managing Director of TIUGeneral Manager Mobile Communications Division
Declaration of conformity7Declaration of conformityThis equipment may be operated in:AT BE BG CH CY CZ DE DKEE ES FI FR GB GR HU IEIT IS LI LT LU LV MT NLNO PL PT RO SE SI SK TR
Important Health and Safety Information8Important Health and Safety InformationImportant Healt h and Safety InformationSAFETY ICONSThis manual contains safety instructions that must be observed to avoid potential hazards that could result in personal injuries, damage to your equipment, or loss of data. These safety cautions have been classified according to the seriousness of the risk, and icons highlight these instructions as follows:• Indicates a hazardous situation which, if not avoided, could result in death or serious injury.• Indicates a hazardous situation which, if not avoided, could result in minor or moderate injury.• Indicates a potentially hazardous situation which, if not avoided, may result in property damage.•NOTICE: Provides important information.!WARNING!CAUTIONCAUTION
Important Health and Safety Information9Important Health and Safety InformationRECOMMENDATIONS FOR SAFE USE OF YOUR DEVICE (PHONE, BATTERY, ADAPTOR/CHARGER, CABLE AND OTHER ACCESSORIES)•Never allow your Device to become wet or exposed to moisture or humidity.Contact with liquids may cause overheating, electric shock, fire, malfunction, or serious injury.The warranty for your Device does not apply if the water exposure detection sticker shows water exposure or tests determine that corrosion has occurred due to water exposure, condensation, or perspiration.• Always turn off your Device when near a flammable or explosive gas, e.g. at a gas station. Also, do not charge your Device in these locations. Doing so may cause the gas to ignite or explode.•Always check your surroundings and situation to ensure it is safe to make and receive calls, send and receive messages, text, and/or take pictures.Failure to do so may cause you to trip or cause a traffic accident.•Never leave your Device in humid, dusty or hot places. Doing so may cause malfunction.!WARNING!CAUTIONCAUTION
Important Health and Safety Information10Important Health and Safety Information•Never disassemble, modify or repair the Device.Doing so may cause overheating, cracks, electrical shock, fire, damage to the equipment, or serious injury.For repair, contact your service provider.•Never deposit fluids or insert objects such as pieces of metal or flammable materials into the microSD card slot.Doing so may cause overheating, fire, electric shock or malfunction.•If you have a weak heart, always use caution when setting the call vibration or ring tone volume.Sudden loud sounds or vibrations may affect your heart.•If the display is broken and the liquid crystal leaks, do not lick, swallow, or touch it.If the liquid crystal or liquid comes into contact with your eyes or mouth, immediately rinse with water and see a doctor. If the liquid crystal adheres to your skin or clothing, immediately wipe it off with alcohol and wash with soap and water.Failure to observe these precautions may cause blindness or skin injury.!WARNING
Important Health and Safety Information11Important Health and Safety InformationKEEP DEVICE OUT OF REACH OF CHILDREN•Always keep cables away from babies and children.The cable, battery pack and other product parts may create a choking or swallowing hazard.• If you see lightning or hear thunder while using your Device outdoors, immediately turn off the power and take shelter in a safe place.• Always keep your Device in a location within acceptable ambient temperatures of 5 to 35°C (41 to 95°F) and with humidity between 35 and 85%. Ranges are approximate. Extremely low or high temperature/humidity conditions may temporarily shorten your battery life or result in a system failure, malfunction or data loss.NOTICE:•Never use or store your Device near strong magnetic objects which may cause it to malfunction.Strong magnetic objects may cause misoperation.!WARNINGCAUTION
Important Health and Safety Information12Important Health and Safety InformationBATTERY PACKFailure to observe these instructions and avoidance of these hazards could cause the battery pack to leak acid, explode, overheat, smoke and / or ignite, and could result in serious bodily injury.• Never disassemble or modify the battery pack. The battery pack is equipped with built-in safety/protection features.• Never connect the positive (+) and negative (-) terminals with a metal object. Never transport or store the battery pack together with metal objects since this could cause a short-circuit and over-current.• Never use or leave the battery pack near a heat source such as a fire or a heater (80°C (176°F) or higher).• Never put the battery pack into a microwave oven or pressurised container.• The charging temperature range is 5 to 35°C (41 to 95°F) (approximately).Never charge the battery outside this temperature range. Doing so could activate its built-in protective features, which will prevent the recharging of the battery pack and could result in an excessively high current and voltage.!WARNING!WARNING
Important Health and Safety Information13Important Health and Safety Information• Never connect the battery pack to an electrical outlet or vehicle cigarette lighter or otherwise charge the battery pack other than by the method described in this user guide. Always use the AC Adaptor or USB Cable with your Toshiba phone to charge the battery pack. Failure to do so could result in an extremely high current and voltage being generated.• Always confirm that the battery terminals are correctly oriented. Reversing the terminals will result in reverse charging, and possibly lead to acid leakage, overheating, smoke emission,bursting and/or ignition of the battery pack.• Never use the battery pack with any equipment other than your Toshiba phone. Doing so could result in extremely high current and voltage.• NEVER allow battery electrolyte liquid to come into contact with your eyes. In the event electrolyte liquid does come into contact with your eyes, rinse immediately with clear running water and consult a doctor. Failure to do so could result in serious eye injury.• Always maintain a charge in the phone’s battery. Leaving the battery uncharged will affect its performance and useful life.NOTICE:The battery recharge time varies depending on usage. Battery charging time is the estimated time for a depleted battery to be charged to ‘full’ when your phone is turned off. Charging time can be extended when your Toshiba phone is turned on. If recharging is not completed within the recharging time immediately, stop further recharging. Continued recharging will cause the battery to lose its ability to perform at maximum capacity.!WARNING
Important Health and Safety Information14Important Health and Safety InformationADAPTOR/CHARGER AND CABLE•Never disassemble, modify or repair the Adaptor/Charger.Doing so may cause overheating, cracks, electrical shock, fire, damage to the equipment, or serious injury.•Never use the adaptor/charger or cable if the power cord is damaged.Doing so may cause electric shock, overheating or fire.• Always charge your Toshiba phone on a stable surface and avoid excessive dust and vibration when charging.•Never put heavy objects on the adaptor/charger or cable or cover with any material during charging.Doing so may cause electric shock or fire.•Never touch the adaptor/charger, cable or power outlet with wet hands.Doing so may cause electric shock.•Always use the specified voltage and current.Using the adaptor with incorrect voltage may cause a fire or malfunction. Use the AC Adaptor for Global Use to charge the battery overseas.AC Adaptor: AC 120VAC Adaptor for Global Use: AC100V to 240V (specific to vehicle with negative ground)• Never use AC Adaptor for charging near a landline phone or receiver to avoid noise bursts.!WARNING
Important Health and Safety Information15Important Health and Safety Information•Always grasp the plug when unplugging the adaptor/charger from the power supply.Do not pull the cord itself.Pulling the cord may damage it and cause electric shock or fire.•Always unplug the adaptor/charger from the power outlet before cleaning and when the adaptor/charger will be left unused for an extended period.Failure to do so may cause electric shock, fire or malfunction.•If water or other liquid gets into the adaptor/charger, immediately unplug it from the power outlet.Failure to do so may cause electric shock, smoke or fire.• Always connect to products that bear the USB-IF logo or have completed the USB-IF compliance program.POTENTIAL HEARING LOSS AND DAMAGEProlonged exposure to loud sounds [including music] is one cause of preventable hearing loss and other auditory damage, including tinnitus (ringing in the ear). Scientific research suggests that the prolonged use of portable phones and/or music devices at high volume for long periods of time could cause hearing damage. This includes the use of headsets, earbuds and Bluetooth® or other wireless devices. When using any portable audio device, you should exercise common sense, including limiting the amount of time you listen, lowering the volume, and discontinuing use and consulting a doctor if you experience any hearing difficulty or discomfort after listening.!WARNING!WARNING
Important Health and Safety Information16Important Health and Safety InformationDRIVING SAFETY• Always check and comply with local laws and regulations concerning the legal and permitted use of wireless devices in moving vehicles. Many jurisdictions prohibit or otherwise restrict the use of wireless devices by vehicle drivers and operators. It is your responsibility to know and comply with the law in your area.• Always use hands-free operation where required by law.When hands-free operation is not available pull off the road to a safe location before making or answering a call.• Never use the video function of your Toshiba phone when driving a motor vehicle or other mode of transportation.• Never place objects, including either installed or portable wireless equipment, in the area over the airbag or in the airbag deployment area.!WARNING
Important Health and Safety Information17Important Health and Safety InformationRADIO FREQUENCY(RF) INTERFERENCE/PERSONAL MEDICAL DEVICESYour Toshiba phone generates, uses and can radiate radio frequency energy. Almost all electronic receivers are subject to radio frequency interference from external sources if inadequately shielded or designed, or otherwise not configured to be compatible. As a result, your Toshiba phone may cause interference with other receivers.Users of your phone are encouraged to avoid such interference by following one or more of these measures:• Reorienting or relocating the receiver antenna.• Increasing the gap between your Device and the receiver.• Increasing the separation between the equipment, your Device and the receiver.• Connecting your Device into an outlet on a circuit other than that to which the receiver is connected.• Consulting the dealer or an experienced radio/TV technician.In addition to the above, follow these instructions to avoid interference problems:Aircraft: Use of your Toshiba phone may be prohibited while in the aircraft, whether on the ground or in flight. Always follow the instructions of flight crew, pilots and/or others responsible for the safety of the aircraft and passengers concerning the permitted and prohibited use of your Toshiba phone.!WARNING
Important Health and Safety Information18Important Health and Safety InformationVehicles: RF signals may affect installed or inadequately shielded electronic systems in motor vehicles. Check with the vehicle manufacturer or its representative.Pacemakers: The Health Industry Manufacturers Association recommends the following:• That a minimum separation of at least six inches (15 centimetres) be maintained between a handheld wireless device or phone and a pacemaker to avoid potential interference with the pacemaker.• Never carry your Toshiba phone or other wireless device near to your heart.• If there is any reason to suspect that interference is taking place, turn off the Device immediately.• Always use the ear opposite the pacemaker side.Hearing Aids: Mobile phone usage may interfere with some hearing aids. If this happens, you should contact your service provider or doctor for further information.Other Medical Devices: If you use any other medical device, consult the device manufacturer or your physician to determine whether it is adequately shielded from external RF energy.Health Care Facilities: Always turn your Toshiba phone off in health care facilities when regulations posted in these areas instruct you to do so. Hospitals and other health care facilities may use equipment that is sensitive to external RF energy.
Important Health and Safety Information19Important Health and Safety InformationBlasting Area: Always turn your Toshiba phone off when in a “blasting area” or in areas with a notification to “Turn off Two-way radios”.Other Posted Facilities: Always turn off your Toshiba phone in any facility or other location where required by posted notice.PLASTIC BAGSPlastic bags can be dangerous. To avoid danger of suffocation keep this bag away from babies and children.!WARNING
Important Health and Safety Information20Important Health and Safety InformationEFFICIENT USEWhen using your Toshiba phone always take frequent breaks and rest your eyes periodically to avoid eyestrain, fatigue and/or headaches. Always position the LCD screen away from bright light sources and glare. Glare on the LCD screen could cause eyestrain, fatigue and/or headaches.Proper lightning conditions can improve the visibility of the LCD screen and reduce eyestrain, eye fatigue or headaches.Repetitive motion and use, such as pressing keys on the screen or playing games may cause repetitive strain. As a result, you may experience occasional discomfort in your hands, wrists, arms, shoulders, neck, or other parts of your body. Take short/ periodical rest breaks to avoid strain. If you continue to have discomfort during or after such use, stop using your Toshiba phone and consult your doctor.!CAUTION
Important Health and Safety Information21Important Health and Safety InformationMETAL ALLERGIESIf you have any metal allergies, contact with certain components of your Toshiba phone could cause itchiness, rashes or sores. If this occurs, stop using your Toshiba phone immediately and consult a doctor.Your Toshiba phone contains the following metal components at the following locations:Part Materials Surface treatmentPower keyVolume keysCamera keyPolycarbonate Aluminium deposition+ UV coatingSide slip Polycarbonate Tin deposition+ UV coating
Important Health and Safety Information22Important Health and Safety InformationHOT DEVICE AFTER PROLONGED USEWhen you use your Device for a prolonged period of time, such as when you are talking on the phone, charging the battery or browsing the web, your Toshiba phone or Adaptor/charger (including conversion cable) can become hot. Always avoid prolonged contact with the phone and AC Adaptor/charger to prevent skin irritation and/or heat related injury.PROTECTION OF PERSONAL INFORMATION•Never place the Device near magnetic cards or media.The magnetic data in cash cards, credit cards, telephone cards, floppy disks, etc. may be erased.• Always scan new files for viruses. Ask your service provider or network administrator to help you.To safeguard your privacy, you should erase important data before selling or disposing of your Toshiba phone. IF YOUR DATA IS ALTERED OR LOST DUE TO ANY TROUBLE, FAILURE OR MALFUNCTION OF THE DEVICE AND DATA CANNOT BE RECOVERED, TOSHIBA SHALL NOT BE LIABLE FOR ANY DAMAGE OR LOSS OF DATA, OR ANY OTHER DAMAGES RESULTING THEREFROM. WHEN COPYING OR TRANSFERRING YOUR DATA, PLEASE BE SURE TO CONFIRM WHETHER THE DATA HAS BEEN SUCCESSFULLY COPIED OR TRANSFERRED. TOSHIBA DISCLAIMS ANY LIABILITY FOR THE FAILURE TO COPY OR TRANSFER THE DATA CORRECTLY.!CAUTION
Important Health and Safety Information23Important Health and Safety InformationHandling your Toshiba phoneNOTICE:• Do not turn off your Toshiba phone when using the microSD card. Doing so may cause data loss or malfunction.• Removing the battery from the phone or failing to keep the battery charged could result in the loss or corruption of stored data and settings.• The digital communication system your Toshiba phone employs provides a high level of privacy protection. However, the possibility of someone eavesdropping on your conversation cannot be ruled out as long as radio waves are used.Emergency Calls and GPSNever rely solely upon your Toshiba phone for essential communications (e.g. medical emergencies) since a wireless phone requires a complex combination of radio signals, relay stations and landline networks for its operation.Consequently, emergency calls may not always be possible under all conditions on all wireless phone systems.CAUTION
Important Health and Safety Information24Important Health and Safety InformationBLUETOOTH AND WIRELESS LAN FUNCTIONSNOTICE:• Your Toshiba phone supports the Bluetooth® security function compliant with Bluetooth standards, but the security may not be sufficient depending on the setting.In the event your Toshiba phone causes harmful radio wave interference with other equipment using the same Bluetooth frequency band, promptly change the operating frequency or stop radio wave emission by turning off the power.Do not use the wireless LAN function in magnetic fields surrounding electric appliances or AV, OA equipment, or at the place where electromagnetic waves are generated.• When the wireless LAN is adversely affected by magnetism or electric noise, the transmission noise may be increased or communication disabled (especially when you use a microwave oven, the wireless LAN may often be influenced).• When you use the wireless LAN near a television set or a radio, poor reception may occur or the TV picture may be distorted.• If there are multiple wireless LAN access points within a confined space and the same channel is used, correct channel searching may be adversely affected.• Precaution when using a 2.4 GHz device within the frequency band used by wireless LAN equipment, a local radio station (requiring a license) is operated, which is used for mobile object identification at the production lines of factories manufacturing industrial, scientific and medical equipment such as microwave ovens and others, as well as a specified low power radio station (not requiring license) and an amateur radio station (requiring a license).1. Ensure that both the specified low power radio station and the amateur radio station are not operating.
Important Health and Safety Information25Important Health and Safety Information2. Where the local radio station for mobile object identification is adversely affected by radio wave interference from the equipment, change the frequency used by the equipment or stop the radio-wave transmission immediately, and then contact the inquiries number provided on the back of this manual to consult for handling details to prevent interference (for example, setting up partitions), and so on.3. In addition, when other troubles occur, such as where a specified low power radio station or amateur radio station for mobile object identification is adversely affected by radio wave interference from the equipment, contact your service provider.• Bluetooth wireless technology is a new innovative technology, and Toshiba does not guarantee compatibility of its Bluetooth equipment/function with all equipment using such Bluetooth wireless technology.• Bluetooth and Wireless LAN devices operate within the same radio frequency range and may interfere with one another. If you use Bluetooth and Wireless LAN devices simultaneously, you may occasionally experience sub-optimal network performance or even lose your network connection. If you should experience any such trouble, immediately 1) separate the two devices with a gap of at least 10 meters (33 ft); or 2) turn off either one of your Bluetooth or Wireless LAN.• Wireless connectivity and some features may require the purchase of additional subscription service from your service provider.The availability of public Wireless LAN access points may be limited. The transmission speed may also vary depending on the surrounding electromagnetic environment, obstacles, access point design, application software installed, and the format of the data transmitted.
Important Health and Safety Information26Important Health and Safety Information• Bluetooth wireless technology is a new innovative technology, and Toshiba does not guarantee the compatibility of its Bluetooth equipment/function all headsets and/or other equipment using Bluetooth wireless technology.• Bluetooth and Wireless LAN devices operate within the same radio frequency range (2.4Ghz) and may interfere with one another.If you use Bluetooth/ Wireless LAN near any device using Wireless LAN/ Bluetooth, you may occasionally experience sub-optimal network performance or even lose your network connection. If you should experience any such trouble, 1) immediately separate these two devices with a gap of at least 10 meters (33 ft) or more; or 2) immediately turn off either your Bluetooth or Wireless LAN.• Wireless connectivity and some features may require the purchase of an additional subscription service from your service provider.The availability of public Wireless LAN access points may be limited. The transmission speed may vary depending on the surrounding electromagnetic environment, obstacles, access point design, application software installed, and the format of the data transmitted.• 54Mbps is the theoretical maximum speed under the IEEE802.11 (a/b/g) standard. Actual data transmission speeds will vary depending on the line conditions or the surrounding environment. When you are outside of your service providers’ high-speed network coverage or connecting to a wireless access point not corresponding to the high speed network, the actual data transmission speed may be slow.
Important Health and Safety Information27Important Health and Safety InformationAttention• Please be aware that your service provider is not responsible when the data stored cannot be restored for security reasons when passwords, such as your security code (PIN), have been forgotten.• When the memory residual quantity of your Toshiba phone decreases, the low application of an activity ratio is forced to terminate. Since data being worked on may not have been saved, please save periodically.• When you repair or replace your phone, please delete any personal data saved to your Device beforehand.In the case of repair, the Phonebook, data saved, programs, and various settings are initialised.THIRD PARTY SERVICES AND ACCESSORIES• Certain features of your Toshiba phone require a separately purchased subscription service from your service provider. The performance of certain features will vary depending on your service providers’ network coverage and settings, and/or environmental conditions.Always contact your service provider concerning the availability of the service, functional limitations and terms and conditions.• Use of third-party services requires a functioning Internet and Wireless LAN connection and may be limited or unavailable based on conditions, factors, or events outside Toshiba’s control, such as your Internet connection, router, wiring, and other network and/or transmission conditions. You are responsible for any telephone or broadband service charges incurred as a result of using such services.CAUTION
Important Health and Safety Information28Important Health and Safety Information• Before connecting your Toshiba phone to an accessory or other device, read the supporting documentation to confirm that the other device is compatible.• Toshiba does not guarantee that the read/ write function of your Toshiba phone is compatible with all microSD cards in the market. Always use only high quality and stable SD cards to best ensure data protection and integrity.• Earphones are not provided as original equipment and must be purchased separately. Toshiba does not guarantee the compatibility and/or the functionality of earphones used with this phone. Consult with the earphone manufacturer. Also, before purchasing and using earphones read and understand the section of this manual entitled “Potential Hearing Loss and Damage.”DisposalThe following information is only valid for EU-member states.Disposal of productsThe crossed out wheeled dust bin symbol indicates that products must be collected and disposed of separately from household waste. Integrated batteries and accumulators can be disposed of with the product. They will be separated at the recycling centres.The black bar indicates that the product was placed on the market after August 13, 2005.By participating in separate collection of
Important Health and Safety Information29Important Health and Safety Informationproducts and batteries, you will help to assure the proper disposal of products and thus help to prevent potential negative consequences for the environment and human health.For more detailed information about the collection and recycling programmes available in your country, please contact your local city office or the shop where you purchased the product.Disposal of batteries and/or accumulatorsThe crossed out wheeled dust bin symbol indicates that batteries and/or accumulators must be collected and disposed of separately from household waste.If the battery or accumulator contains more than the specified values of lead (Pb), mercury (Hg), and/or cadmium (Cd) defined in the Battery Directive (2006/66/EC), then the chemical symbols for lead (Pb), mercury (Hg) and/or cadmium (Cd) will appear below the crossed out wheeled dust bin symbol.By participating in separate collection of batteries, you will help to assure the proper disposal of products and batteries and thus help to prevent potential negative consequences for the environment and human health. For more detailed information about the collection and recycling programmes available in your country, please contact your local city office or the shop where you purchased the product.
Important Health and Safety Information30Important Health and Safety InformationFCC NoticeThis Device complies with part 15 of the FCC Rules. Operation is subject to the following two conditions: (1) This Device may not cause harmful interference, and (2) this Device must accept any interference received, including interference that may cause undesired operation.NOTICE:• This equipment has been tested and found to comply with the limits for a Class B digital Device, pursuant to part 15 of the FCC Rules.These limits are designed to provide reasonable protection against harmful interference in a residential installation. This equipment generates, uses and can radiate radio frequency energy and, if not installed and used in accordance with the instructions, may cause harmful interference to radio communications. However, there is no guarantee that interference will not occur in a particular installation.If this equipment does cause harmful interference to radio or television reception, which can be determined by turning the equipment off and on, the user is encouraged to try to correct the interference by one or more of the following measures:- Reorient or relocate the receiving antenna.- Increase the separation between the equipment and receiver.- Connect the equipment into an outlet on a circuit different from that to which the receiver is connected.- Consult the dealer or an experienced radio/TV technician for help.You are cautioned that changes or modifications not expressly approved by the part responsible for compliance could void the user’s authority to operate the equipment.
Important Health and Safety Information31Important Health and Safety InformationFCC RF exposure informationYour Toshiba phone is a radio transmitter and receiver. It is designed and manufactured not to exceed the emission limits for exposure to radio frequency (RF) energy set by the Federal Communications Commission of the U.S. Government.The guidelines are based on standards that were developed by independent scientific organisations through periodic and thorough evaluation of scientific studies. The standards include a substantial safety margin designed to assure the safety of all persons, regardless of age and health.The exposure standard for wireless handsets employs a unit of measurement known as the Specific Absorption Rate, or SAR. The SAR limit set by the FCC is 1.6 W/kg. The tests are performed in positions and locations (e.g., at the ear and worn on the body) as required by the FCC for each model. The SAR value for this model handset when tested for use at the ear is 0.239 W/kg and when worn on the body, as described in this user guide, is 0.381 W/kg.Body-worn operationThis phone was tested for typical body-worn operations with the back of the phone kept at a distance of 1.5 cm from the body. To maintain compliance with FCC RF exposure requirements, use accessories that maintain a 1.5cm separation distance between your body and the back of the phone. The use of belt clips, holsters and similar accessories should not contain metallic components. The use of accessories that do not satisfy these requirements may not comply with FCC RF exposure requirements, and should be avoided.The FCC has granted an Equipment Authorization for this model handset with all reported SAR levels evaluated as in compliance with the FCC RF emission guidelines. SAR information on this model handset is on file with the FCC and can be found under the Display Grant section of https://fjallfoss.fcc.gov/oetcf/eas/reports/GenericSearch.cfm after searching
Important Health and Safety Information32Important Health and Safety Informationon FCC ID SP2-TM5-E01.Additional information on Specific Absorption Rates (SAR) can be found on the Cellular Telecommunications & Internet Association (CTIA) website at http://www.phonefacts.net.DisclaimersUnder some conditions, your Toshiba phone may automatically lock-up. This is a normal protective feature designed to reduce the risk of lost data or damage to the product when used outside recommended conditions. To avoid any risk of lost data, always make backup copies of data by periodically storing it on an external storage medium. Use your Toshiba phone only under recommended conditions.!CAUTION
Important Legal Information33Important Legal InformationImportant Legal InformationDisclaimersPerformance of your Device may vary from specifications under certain conditions, including the following:1. The use of certain multimedia, computer generated graphics or video applications,2. Slow network connections,3. The use of several applications or functions simultaneously, or4. The use of your Device at temperatures outside the range of 5 to 35°C (41 to 95°F).The information contained in this manual, including but not limited to any product specifications, is subject to change without notice.TOSHIBA CORPORATION AND TOSHIBAINFORMATION SYSTEMS,(UK) LIMITED (TOSHIBA) PROVIDE NO WARRANTY WITH REGARD TO THIS MANUAL OR ANY OTHER INFORMATION CONTAINED HEREIN AND HEREBY DISCLAIMS ANY IMPLIED WARRANTIES OF SATISFACTORY QUALITY OR FITNESS FOR PARTICULAR PURPOSE WITH REGARD TO ANY OF THE FOREGOING. TOSHIBA ASSUMES NO LIABILITY FOR ANY DAMAGES INCURRED DIRECTLY OR INDIRECTLY FROM ANY TECHNICAL OR TYPOGRAPHICAL ERRORS OR OMISSIONS CONTAINED HEREIN OR FOR DISCREPANCIES BETWEEN THE PRODUCT AND THE MANUAL. UNDER NO CIRCUMSTANCES SHALL TOSHIBA BE LIABLE FOR ANY INCIDENTAL, CONSEQUENTIAL, SPECIAL, OR EXEMPLARY DAMAGES,OR LOSS OF DATA WHETHER BASED ON TORT, CONTRACT OR OTHERWISE, ARISING OUT OF OR IN CONNECTION WITH THIS MANUAL OR ANY OTHER INFORMATION CONTAINED HEREIN OR THE USE THEREOF.
Important Legal Information34Important Legal InformationExport Administration Regulations.Your Device and this document contains technical data that may be controlled under European and each Member State law. Any export, directly or indirectly, in contravention of the laws are prohibited.Third-party ServicesToshiba makes no warranties, representations, or assurances about the availability or functionality of third-party services. Such services are provided by third parties, and the availability, functionality, and/or content thereof may be changed, removed, discontinued, interrupted, restricted, or disabled at any time. Without altering or restricting this general disclaimer, Toshiba expressly disclaims any liability for changes, removals, discontinuations, interruptions, restrictions, or disablement of third-party services.SoftwareSome software may differ from its retail version (if available), and may not include user guide or all program functionality.
Copyright Notice35Copyright NoticeCopyright NoticeYour Device contains works of which the copyright is owned by Toshiba or third parties (“Copyrighted Works”). Laws preserved for Toshiba and the third parties certain exclusive rights for the Copyrighted Works. You are granted a nonexclusive, non-transferable and non-assignable license to use the Copyrighted Works solely for the intended purpose of your Device. The purchase of your Device shall not be deemed to grant any license under the copyrights, except for the foregoing license. No Copyrighted Works may be modified, distributed, reverse-engineered, decompiled or reproduced in any manner except to the extent allowed by law.Images recorded with the camera of your Device are intended for personal use. Do not record images that infringe copyright laws without the prior permission of the copyright holder. Recording of images from performances, exhibitions, or commercial properties may lead to violations of copyright or other legal rights even if the image was shot for personal use. The copying or reproducing of paper money, coins, and securities in circulation is strictly prohibited.
Care and maintenance36Care and maintenanceCare and maintenanceLCD Panel• Always use a soft and dry cloth or other suitable non-abrasive product or material (such as lens paper or eyeglass cleaning cloth) to clean your Toshiba phone. Your phone’s LCD panel is coated with a special agent that allows a clear view of the colour liquid crystal display. Never vigorously wipe or scratch the LCD panel.• Never use alcohol, thinner, benzene, ammonia, window cleaners, household cleaners, aerosol sprays, solvents, abrasives or detergents to clean your phone. Doing so may cause the printing on the surfaces of your phone to fade.• In the event water or other liquid gets on the LCD panel, clean and dry as directed above.Failure to properly clean the LCD panel could result in spotting and damage to the LCD coating.Restarting your Toshiba phoneIf you have any problems, such as your phonefreezing, restart your phone.To do so:1. Press and hold the Power key.2. Tap Power Off to confirm powering off your phone.3. Wait a few seconds, then press and hold the Power key to switch your phone on.If, after you have restarted your Toshiba phone, the problem remains:1. Remove the battery (see Getting started for instructions).2. Re-insert the battery, then switch on your phone (see Getting started for instructions).
Care and maintenance37Care and maintenanceResetting your Toshiba phoneIf you still have problems after restarting your phone, you can reset your phone.Resetting your Toshiba phone causes it to restart and adjusts the memory allocation. Your phone will revert to the same status as it was the last time it was “On”. Unsaved data may be lost.To reset your Toshiba phone:Press and hold the Power key for approximately 15 seconds.Reinitialising your Toshiba phoneFor details of reinitialising your Toshiba phone, see Master Clear in Settings.We recommend that you back up all of your data before reinitialising your Toshiba phone.NOTICE: Unsaved data may be lost. It is recommended that you frequently back up the data on your phone.NOTICE: If you attempt to reset your Toshiba phone just after installation of any of your own programs or changing settings, you will be unable to do so. In such case, you should install your own program or change settings again.NOTICE: Before reinitialising your Toshiba phone, see the Settings (page 106) of this user guide including Encryption (page 109) and Master Clear (page 111). Failure to carefully follow these instructions may result in the permanent loss of data.
Getting started38Getting startedGetting startedUnpackingPlease ensure that the contents of your sales pack include:• Your Toshiba phone• Battery•AC charger•USB cable• Headset and headset adapter•Quick Start Guide• Legal and Safety Information leaflet• CD (User Guide)NOTE: If any of the items listed are missing, contact the retailer where you purchased your Toshiba phone.n
Getting started39Getting startedPhone layout and functions1. Earpiece 2. LED indicator - indicates various states of the phone.Red - phone is charging.Blue (flashing) - a call, message or notification has been received.Green (flashing) - phone is in sleep mode.3. Touch screen 4. Home key - tap to access the Home screen.5. Start key - tap to access the Windows Mobile Start screen.6. Send key - used to make, answer and hold calls. Tap to access the Phone screen.7. Microphone
Getting started40Getting started8. Camera lens 9. microSD card slot 10.Battery cover 11.Speaker 12.SIM card slot
Getting started41Getting started13.Cable, phone charging and headset connector (Micro-USB)14.Camera key - long press to launch the Camera application.If Camera application is already running, press to capture a photo or begin/stop recording a video clip.15.Volume Down key - press to decrease the volume.16.Volume Up key - short press to increase the volume; long press to switch between portrait and landscape modes when the Auto screen orientation change checkbox is unticked (see Motion Sensor Settings in Settings for details).17.Power key - short press to enter/leave sleep mode; long press to switch phone on/off (The phone starts with a vibration and the green LED indicator illuminated.); long press for approximately 15 seconds to reset the phone.
Getting started42Getting startedInstalling the SIM card, microSD card and batteryTo install the SIM card, microSD card and battery:1. Move the cover of the cable, phone charging and headset connector away from the side of the phone.2. With the back of the phone facing up, press down on the battery cover. Slide the cover towards the bottom of the phone, then lift it upwards and remove it from the phone.3. If the battery is already installed, lift the tab at its base, then remove the battery.IMPORTANT: The SIM card is easily damaged by scratching and bending, so take care when handling it.IMPORTANT: Keep SIM card away from static, dust and water.IMPORTANT: Power off the phone and disconnect the charger before inserting or removing the SIM card.
Getting started43Getting started4. With the gold connectors facing downwards, align the SIM card the correct way, as shown in the diagram below. Push down lightly while sliding the SIM card into place.5. With the gold connectors facing downwards, align the microSD card the correct way, as shown in the diagram below. Gently slide the microSD card into the slot until it clicks into place.
Getting started44Getting startedTo remove the microSD card, gently press it inwards. It will automatically eject.IMPORTANT: Do not remove the microSD card while the phone is reading data from, or writing data to, the card.TIP: Your Toshiba TG02 supports microSDHC™ memory cards. When transferring a memory card from your Toshiba phone to another device, please check with the device manufacturer that SDHC cards are fully supported.
Getting started45Getting started6. Insert the battery into the battery compartment with the gold connectors facing towards the top of the phone. The battery is shaped so that it can only be inserted this way. Gently push on the bottom of the battery (non-connector end) to insert it completely.7. Gently slide the battery cover upward into place.WARNING: There is a danger of explosion if the battery is incorrectly replaced.!
Getting started46Getting startedCharging the batteryYou will need to fully charge the battery before you can switch your Toshiba phone on for the first time. You can charge your battery in the following two ways:•Either plug the AC charger into an AC outlet and connect it to the charger connector on your Toshiba phone. When the battery is fully charged, unplug the AC charger from the AC outlet and disconnect it from the phone charger connector by gripping it tightly and pulling gently,or•connect your Toshiba phone to a PC with the USB cable.The battery will only achieve optimum performance after two or three complete charges.When charging is complete, disconnect the AC charger from the power source, or the USB cable from the PC, then disconnect your Toshiba phone.Battery informationBattery performance depends on many factors, such as your service provider's network configuration, signal strength, the temperature of the environment in which you operate your Toshiba phone, the features and/or settings you select and use, items attached to your phone's connecting ports, and your voice, data, and other program usage patterns.IMPORTANT: Do not remove the battery while it is charging.NOTE: It is recommended that you save the data in your phone memory to a PC or storage card. The manufacturer is not responsible for data lost or altered due to battery discharge.TIP: For information on optimising the power performance of your Toshiba phone, see Backlight, Power, and Power Saving Settings in Settings.n
Getting started47Getting startedLow batteryWhen the battery charge level drops to 10% of its total capacity, an alert message and the low battery icon are displayed.If the battery charge level runs too low for normal operation, your Toshiba phone will automatically switch off.Managing a low batteryWhen the low battery alert is displayed, you should do the following: 1. Save your current data.2. Charge the battery as soon as possible.3. If you are unable to charge the battery immediately, we recommend that you switch off your phone.Switching the power on and offTo switch your Toshiba phone on:1. Press and hold the Power key for approximately two seconds.2. If a PIN or security code is requested, enter the code.To switch your Toshiba phone off:1.  Press and hold the Power key.2. Tap Power Off to confirm powering off the phone.WARNING: The PIN code activates the services in your Toshiba phone and should be provided in the documentation supplied by your service provider.If you enter the incorrect PIN for your SIM card three consecutive times, you will need to contact your service provider to obtain the Personal Unblocking Key (PUK). Do not try to guess the PUK as your SIM card will be rendered permanently inoperative following ten consecutive unsuccessful attempts.!
Getting started48Getting startedTouch user interfaceOverviewThe enormous 4.1” wide VGA (800x480) touch-screen display, Spb Mobile Shell, and Toshiba’s custom-built, toolbox which includes the magnifying glass, Toshiba free pad, and task switcher provide users with easy-to-use navigation between different applications. Innovative gesture operations also make it easy to carry out everyday tasks without even touching the screen - a simple shake when the Toshiba phone is ringing, for instance, will automatically activate an incoming call, while the magnifying glass with its capability will enlarge anything that comes under it when you need to easily view the screen display. Also coupling with floating touch pad and task switcher makes your Toshiba phone's one hand operation easier.Spb Mobile Shell Spb Mobile Shell brings the perfect usability balance to the Toshiba touch screen phone. It will allow you, using one hand, to get information, launch programs, make calls and navigate your Toshiba phone simply and easily.Spb Home has two components: Professional Home and Lifestyle Home. Spb Lifestyle Home is set as a default for your Toshiba phone. You can fully customise the Home layout by adding your own favourite widgets for one-tap access in a user friendly manner.The majority of the Home functionality is implemented via widgets. There are widgets for all purposes: widget-based photo contacts, media player, profiles, weather, world time, and wireless manager, etc.The Home screen extends beyond the screen width to provide more space for adding icons, widgets, and more. Slide your finger horizontally across the screen to go to the left or right side of the extended Home screen.NOTE: To access the Home screen, tap  located below the touch screen. To access the Windows Mobile Start screen, tap   located below the touch screen at any time.n
Getting started49Getting started1. Menu button - tap to view the available layout options such as adding widgets, editing layout, and changing settings.2. View button - tap to access the Spb Mobile Shell pages in the selected view style (carousel or tiles).3. Launcher tab - tap to access the Launcher, which consists of two pages, a smart launcher and Spb Menu. The smart launcher shows the frequently used shortcuts to display and allows you to manage your favourite items. the Spb Menu contains all your Toshiba phone programs, settings, and tools well-organised in categories.4. Contacts tab - tap to access the Favorite Contacts, which helps you manage your contacts and calls.21435679810121411131516
Getting started50Getting started5. Status indicators - See Annex 3 - Common status icons for further information.6. Operator Name - displays the operator name of the current network.7. Battery - displays the remaining power in your battery. Tap to access Power settings.8. Phone Profile - allows you to select one of three basic phone profiles Normal, Vibrate, and Silent. You can also edit the normal profile.9. Wireless Manager - allows you to quickly turn on or off your phone wireless connections such as Bluetooth, Wi-Fi, Phone, and Flight Mode on or off.10.Digital Clock - displays the current time. Tap to open the time screen for more details.11.Missed Calls - icon is highlighted with the number of new missed calls. Tap to access call history.12.Voicemails - icon is highlighted with the number of new voicemails. Tap to dial the voicemail. For details of setting up voice mail, see Setting up voice mail in Settings.13.Emails - icon is highlighted with the number of new emails you have in your inbox. You can open your Inbox to read new emails with just a tap.14.SMS and MMS – icon is highlighted with the number of new SMS and MMS messages. Tap to access text messages inbox.15.Weather - displays the current weather forecast. Tap to open the weather details page where you can update forecast or access the weather options.16.Agenda - displays events and appointments. Tap to view the detailed agenda in calendar.See the Spb Mobile Shell webpage for further information.To access the Home screen at any time, tap  .
Getting started51Getting startedBasic ControlsThe controls on the Toshiba phone touch user interface change dynamically depending on the task you are performing.Starting an applicationTo start an application:Tap the application icon.To return to the Home screen:Tap   located below the touch screen at any time.You can view and switch active applications by using Task Switcher. See Task Switcher for details.ScrollingTo scroll up or down:Drag up or down by your finger. On some screens such as web pages, you can also scroll from side to side.
Getting started52Getting startedTo scroll up or down quickly:Flick by your finger. You can wait for the scrolling to come to a stop, or tap or touch anywhere on the screen to stop it immediately.Magnifying GlassThe Magnifying Glass enables you to magnify a portion of the displayed screen.Starting the Magnifying GlassTo start the Magnifying Glass:Start the Toolbox, and then tap  . For information on starting the Toolbox, see Toolbox.
Getting started53Getting startedDrag the Magnifying Glass to where you want to magnify by tapping and holding its frame. The items displayed within the glass are magnified.Changing the display magnification powerTo change the display magnification power:Tap the magnification power icon on the right of the Magnifying Glass to toggle between x1.5, x2, and x2.5.Ending the Magnifying GlassTo close the Magnifying Glass:Tap X on the right of the glass.NOTE: The Magnifying Glass is disabled by disabling the Toolbox.n
Getting started54Getting startedMotion SensorThe Motion Sensor in your Toshiba phone enables you to quickly and easily carry out a variety of operations.You can set up your phone to carry out specific operations when you move the phone in a particular way.Examples of the motions and corresponding operations are as follows:• Change the screen orientation by turning the phone sideways.• Answer a call by lightly shaking the phone.•Start Task Manager by tapping the back of the phone twice.For information on setting up the Motion Sensor, see Motion Sensor Settings in Settings.ToolboxThe Toolbox enables you to start the following functions:•Toshiba Free Pad•Magnifying Glass•Task SwitcherTo open the Toolbox:Slide your finger upwards on the Start key located below the touch screen.The Toolbox is automatically hidden after approximately 5 seconds.NOTE: You can choose to disable the Toolbox. By not using Toolbox, the Toshiba Free Pad, Magnifying Glass, and Task Switcher are also disabled. For information on setting up the Toolbox, see Toolbox Settings in Settings.n
Getting started55Getting startedToshiba Free PadThe Toshiba Free Pad consists of two items - the Multi Function Pad and the Free Cursor Pad.The Multi Function Pad operates as cursor (up, down, left, right) and Enter buttons. It also enables you to access the Windows Mobile Start screen.The Free Cursor Pad displays a mouse pointer on the screen so that you can operate the phone in the same way as using a mouse with a PC.To open the Toshiba Free Pad, start the Toolbox and tap  .You can choose to use the right- or left-handed Toshiba Free Pad. For information on setting up the Toshiba Free Pad, see Toolbox Settings in Settings.To close the Toshiba Free Pad, drag it out of the touch screen or tap X.Multi Function PadRight-handed use                Left-handed use1. Top barTo move the Multi Function Pad, tap and hold the top bar, and move the pad as it expands.2. Up, Down, Left and Right buttons3. Enter buttonOperates as the Enter key for selected items.4. Start screen button5. OK/Close buttonOperates as the OK or X button is displayed at the bottom right of the screen.6. Switching pad buttonTap and hold this button to switch to the Free Cursor Pad.7. Closing pad buttonNOTE: The Toshiba Free Pad is disabled by disabling the Toolbox, see Toolbox Settings in Settings.n
Getting started56Getting startedFree Cursor PadRight-handed use                Left-handed use1. Top barTo move the Free Cursor Pad, tap and hold the top bar, and move the pad as it expands.2. Free cursor areaMove the pointer by moving your finger on the pad.3. Enter buttonTapping this button operates in the same way as clicking the mouse button on an item.4. Switching pad buttonTap and hold this button to switch to the Multi Function Pad.5. Closing pad buttonTask SwitcherThe Task Switcher displays the icons of the current active applications.Tap the required icon to change the screen display to the application.To start the Task Switcher:Start the Toolbox, and then tap  .To close the Task Switcher:Tap X on the bottom left of the screen.NOTE: The Task Switcher is disabled by disabling the Toolbox.In addition, you can access the Task Manager by tapping   on the right bottom of the screen.n
Getting started57Getting startedOperator SettingsUsing Operator Settings, you can quickly and easily configure mobile service provider settings, including GPRS, WAP, and MMS.To use Operator Settings:1. Tap  > Settings > Connections > Operator Settings.2. If the required settings are available from the U/SIM, tap the button showing your mobile service provider name.3. If the settings are not available from the U/SIM, tap Select Operator.4. Tap your country in the list, then tap Next.5. Tap your mobile service provider in the list, then tap OK.Synchronising your Toshiba phone with a PCActiveSync (for PCs running Windows XP or earlier)ActiveSync acts as the gateway between your Microsoft Windows-powered PC and your Toshiba phone. It allows you to synchronise Microsoft Outlook information, Microsoft Office documents, pictures, music, videos and applications to and from your phone.In addition to synchronising with a PC, ActiveSync allows you to synchronise Microsoft Outlook information directly with Microsoft Exchange Server 2003 and Microsoft Exchange Server 2007, so that you can keep your e-mail, calendar data, tasks and contact information updated wirelessly when you’re away from your PC.You can install ActiveSync by downloading it from the Microsoft website.
Getting started58Getting startedOnce the software has been installed and your Toshiba phone is connected to your PC, the ActiveSync Setup Wizard is started. Simply follow the on-screen instructions.If you are not synchronising directly with a Microsoft Exchange server, do not select the option to synchronise directly with a server. The alternative is to synchronise your Toshiba phone with your PC. You cannot do both at the same time.Starting and stopping ActiveSync synchronisationTo start and stop synchronisation:1. Access ActiveSync. For details, see Windows Mobile Start Screen Structure in Annex 2 - Navigating your Toshiba phone.2. To start synchronisation, tap Sync.3. To stop synchronisation, tap Stop.Changing ActiveSync settingsOnce you have set up synchronisation using the ActiveSync Setup Wizard on the PC, you can change your synchronization settings at a later stage:• If you want to change ActiveSync settings for synchronising with a PC, use ActiveSync on the PC. For more information, see ActiveSync Help on the PC.• If you want to change ActiveSync settings for synchronising with an Exchange server, use ActiveSync on your Toshiba phone.NOTE: Disconnect your Toshiba phone from your PC before changing the synchronisation settings.n
Getting started59Getting startedWindows Mobile Device Center (for PCs running Windows Vista)The Windows Mobile Device Center:• Combines an efficient synchronisation platform with a compelling user experience. • Enables you to set up new partnerships, synchronise content and manage music, pictures and video with Windows Mobile powered devices (Windows Mobile 2003 or later).• Helps you to synchronise information such as e-mail, contacts and calendar appointments, easily manage your synchronisation settings, and transfer documents between your phone and PC.You can install Windows Mobile Device Center (WMDC) by downloading it from the Microsoft website.For further information on ActiveSync and WMDC, refer to the Help on your PC.
Call functions60Call functionsCall functionsReceiving a callAnswering or ignoring a call• To answer an incoming call, tap   or  .• To ignore an incoming call, tap  .Ending a callTo end a call, tap End or End Call.NOTE: If you choose to ignore a call, the caller will be connected to your voice mail, provided you are subscribed to this service.TIP: When you have an incoming call during sleep mode, you can do the following:• Answer the incoming call by sliding the  to the right.• Ignore the incoming call by sliding the  to the right.TIP: You can answer an incoming call by lightly shaking the phone.For information on activating shake operation, see Motion Sensor Settings in Settings.nTIP: When you have the headset connected to your Toshiba phone, you can do the following:• Answer an incoming call by pressing the headset button.Ignore an incoming call by pressing and holding the headset button.TIP: When you have the headset connected to your Toshiba phone, you can end a call by pressing and holding the headset button.
Call functions61Call functionsMaking a callBefore making a call, ensure that your Toshiba phone is switched on, that there is a valid SIM card installed, and that the signal is sufficiently strong.Making a call from the Phone screenTo make a call from the Phone screen:1. Access the Phone screen.2. Enter a phone number using the numeric keypad.3. Tap  or Talk.Dialling the last number calledTo dial the last number called:Tap  twice.Making a call from ContactsTo make a call from Contacts:1. Access Contacts.2. Tap the required contact.3. Tap the required phone number, or select it to be highlighted then tap   or .TIP: If you have a long list of contacts, enter the first few letters of the contact's name. The phone will display only the matching contact. To call the contact, tap the required contact, and then tap the required phone number.TIP: A work phone number (w), mobile phone number (m) and home phone number (h) can be assigned to a contact that is saved to the phone.The mobile phone number is dialled by default.
Call functions62Call functionsMaking an international callTo make an international call:1. Access the Phone screen.2. Tap and hold 0 on the keypad until the + sign is displayed.3. Enter the full phone number, including the country code, area code (without the first 0) and phone number.4. Tap  or Talk.Speed DialCreating a speed dialTo create a speed dial:1. Access the Phone screen.2. Tap Speed Dial.3. Tap  > New.4. Tap the required contact.5. In the Location: field, select the speed dial number.6. Tap OK twice.NOTE: The digit 0 is reserved for inserting the + character when dialling an international phone number. The digit 1 is reserved for calling your voice mail mailbox as a speed dial.n
Call functions63Call functionsMaking a call using speed dialTo make a call using speed dial:1. Access the Phone screen.2. Tap Speed Dial.3. Tap the speed dial number beside the required contact.TIP: To create a speed dial from Contacts:1. Access Contacts.2.  Tap the required contact.3.  Scroll to the required phone number to be highlighted, then tap   > Add to Speed Dial.... 4. In the Location: field, select the speed dial number.5. Tap OK twice.TIP: To make a call using speed dial from the Phone screen:From the Phone screen, tap and hold the required speed dial number on the keypad. If the speed dial number has two digits, tap the first digit, then tap and hold the second digit.
Call functions64Call functionsIn-call optionsAdjusting the volumeTo adjust the volume while in a call:Press the Volume Up key to increase the volume, and the Volume Down key to decrease the volume.Putting a call on speakerphoneTo put a call on speakerphone, tap Speaker On or  > Turn Speakerphone On.To switch the speakerphone off, tap Speaker Off or   > Turn Speakerphone Off.Muting a callTo mute a call, tap Mute or   > Mute.To unmute the call, tap Unmute or   > Unmute.Putting a call on holdTo put a call on hold, tap  , Hold or   > Hold.To unhold the call, tap  , Unhold or   > Unhold.Putting a call on hands-freeTo put a call on hands-free:When hands-free equipment is attached to your Toshiba phone, the item   > Turn Hands-free On will be enabled.NOTE: The speakerphone is automatically switched off at the end of a call.nTIP: When you have the headset connected to your Toshiba phone, you can place a call on hold by pressing the headset button.To unhold the call, press the button again.
Call functions65Call functionsMultiple and multiparty callsAnswering or ignoring a second call• To answer a second call, tap   or   or slide   to the right. The original call will be put on hold.• To ignore a second call, tap   or slide   to the right.Making a second callTo make a second call while already in a call:1. Tap , Hold, or   > Hold to put the first call on hold.2. Tap  or Add Call to display the numeric keypad.3. Dial the second number, then tap   or Talk. The first call will remain on hold.Swapping between callsTo swap between calls, tap  , Swap or   > Swap.TIP: To end the second call after answering it:Tap End or End Call, or press the Camera key. You will be reconnected to the original caller.NOTE: To interact with a second call, you need to have Call Waiting enabled. For information on enabling Call Waiting, see Call Waiting in Settings.nTIP: To end the second call after it is connected:Tap End or End Call, or press the Camera key. You will be reconnected to the original caller.TIP: Tapping   or Add Call without putting a call on hold, you can still dial the second number. The first call, however, will be put on hold when   is tapped.
Call functions66Call functionsCreating a conference callTo create a conference call:With two calls active on your Toshiba phone, one active and the other on hold,  tap Conference or   > Conference. The calls will be joined together, and each party will be able to hear the other.Having a private conversation with a conference call partyTo have a private conversation with a conference call party, you need to split the conference call.To have a private conversation from a conference call:1. Tap Private or   > Private.2. Select the party with whom you wish to have the private conversation, then tap Private.NOTE: The conference call feature is dependent on your service provider supporting it.TIP: To add another party to the conference call:1. Tap  , Hold, or   > Hold to put the conference call on hold.2.  Tap   to display the numeric keypad.3.  Dial the new party's phone number, then tap   or Talk.4.  When the new party has answered, tap Conference or   > Conference.n
Call functions67Call functionsCall HistoryCall History displays a list of calls that you have missed, received and dialled recently.Viewing Call HistoryTo view Call History:1. Access Call History.2. If required, you can filter the list by tapping  > Filter > Missed, Outgoing, or Incoming.3. To view the details of a call, tap the required call.Deleting Call History recordsTo delete a call from Call History:1. Access Call History.2. Scroll to the required entry in the list to be highlighted, then tap   > Delete.3. Tap Yes to confirm the deletion.To delete all calls from Call History:1. Access Call History.2. Tap  > Delete All Calls.3. Tap Yes to confirm the deletion.Viewing Call TimersTo view Call Timers:1. Access Call History.2. Tap  > Call Timers.... Resetting Call TimersTo reset Call Timers:1. Access Call History.2. Tap  > Call Timers.... 3. Tap Reset.NOTE: Deleting all calls from the Call History does not reset the Call Timers. These need to be reset separately (see Resetting Call Timers).NOTE: The length of waiting calls is not recorded.nn
Messaging68MessagingMessagingYou can create, send, receive, organise, delete and store the following message types on your Toshiba phone:• Short Message Service (SMS) messages.• Multimedia Messaging Service (MMS) messages.•E-mail.You can also use Windows Live for instant messaging with Windows Live Messenger and to access Hotmail.Text messagesText messaging, or the Short Message Service (SMS), enables you to exchange text messages with other phones. For details on text messages, contact your service provider.For information on setting up your text message service centre, see Setting up text messages service centre in Annex 4 - Configuring SMS, MMS and e-mail.Your Toshiba phone supports the sending of more than the standard 160-character limit. If you enter more than 160 characters, the message is split into linked text messages. These linked messages will be sent at the same time.Receiving text messagesText messages are automatically received when your Toshiba phone is switched on. When your phone is off, messages are held by your service provider until the next time your phone is connected to the network.Your Toshiba phone will alert you when a new text message arrives.When you have an ongoing conversation using text messages, the messages are threaded together into a single conversation. This enables you to view the entire conversation as you type.
Messaging69MessagingReplying to a text messageTo reply to a text message:1. Access Text Messages.2. Tap the required message in the Inbox, or scroll to the required message in the Inbox to be highlighted and tap  . If you are replying to multiple recipients, scroll to the required message and tap   > Reply/Forward > Reply All.3. Enter your message.4. Tap .Forwarding a text messageTo forward a text message:1. Access Text Messages.2. Scroll to the required message in the Inbox to be highlighted, and tap   > Reply/Forward > Forward.3. Add recipient(s). For details of how to add a recipient, refer to Creating and sending a text message.4. If required, edit the message in the message area.5. Tap .Creating and sending a text messageTo create and send a text message:1. Access Text Messages.2. Tap  > New > SMS.3. Add recipient(s) using one or more of the following methods:• With the cursor in the To: field, tap   > Add Recipient..., then tap a recipient from the list of contacts.TIP: You can also reply to a New Text Message by tapping  . (Tap Notification or   if required.)
Messaging70Messaging• With the cursor in the To: field, enter the first few letters of a name stored in Contacts, then tap   > Check Names. If several matches are displayed, select the required one.• Enter mobile phone number(s) in the To: field. Use a semicolon to separate multiple recipients.•Tap To:, then tap a recipient from the list of contacts.4. Tap the message area and enter your message.5. Tap  .Options available when creating a text messageTo convert the message to an MMS message, tap  > Insert, then tap the type of item that you want to add to the message.To save time by inserting predefined text, tap  > My Text, then select the text to insert. You can also edit existing My Text items as required.To save a message as a draft, tap   > Save to Drafts.To check spelling before sending the message, tap  > Spell Check.To cancel the message without sending it, tap X or  > Close.Requesting delivery notificationTo request a delivery notification:1. Tap  > Message Options... or Message Options.2. Tick the Request message delivery notification checkbox. 3. Tap OK.
Messaging71MessagingMMS messagesThe Multimedia Messaging Service (MMS) enables you to exchange multimedia messages containing data such as text, pictures, sounds, animation and video clips. You can send MMS messages to other mobile phones or to e-mail addresses. For details of MMS, and to enable your account for this service, contact your service provider.For details of configuring MMS settings manually, see Configuring MMS settings in Annex 4 - Configuring SMS, MMS and e-mail.Receiving MMS messagesYour Toshiba phone will alert you when a new MMS message arrives. Depending on your settings, the message contents may download a few moments later.To view the MMS message, tap the message in the Inbox of Text Messages, then tap  .Creating an MMS messageAn MMS message can consist of many pages, also known as 'slides'. Each slide can hold an image, a sound and text, but you do not need to set all of these for each message. The maximum amount of content that can be sent in a message is set by your service provider.To create an MMS message:1. Access Text Messages.2. Tap  > New > MMS.3. Add recipient(s) using one or more of the following methods:•Tap  > Add Recipient > From Contacts..., From Call History..., or From Sent History..., then tap a recipient.• Tap  , then tap a recipient from the list of contacts.•Tap Insert contacts here field, then tap, and tap a recipient from the list of contacts., and enter mobile phone number(s) or e-mail address(es). Use a semicolon to separate multiple recipients. Tap Done
Messaging72Messagingwhen you have finished.  , and tap a recipient from sent history., and tap a recipient from call history.Tap Done when you have finished.4. Enter a message. (Insert the subject if required.) Tap Done or OK when you have finished.5. Tap Send when the message is ready.Options available when creating an MMS messageChanging to carbon copy (Cc) or blind carbon copy (Bcc) After adding recipient(s) to your message, you can change to carbon copy   or blind carbon copy   by the following steps.1. Tap the added recipient(s) in Insert contacts here field.2. Select a recipient from the list.3. Tap  > Change to Cc or Change to Bcc.4. Repeat 2. and 3. if required. Tap Done when you have finished.Inserting a picture or videoTo insert a picture or video in the message:1. Tap  or   > Insert > Picture/Video.... A preview of all pictures and videos in the current folder is displayed.2. Either select one of the previewed picturesorlaunch the Camera application and capture a new picture by tapping   or a new video by tapping  .Once you have selected a picture or video, the message creation screen is displayed again.NOTE: If you add a video to a slide, you cannot add any further audio to that slide.TIP: You can also capture a new picture or video from the message creation screen by tapping   > Capture > Image... or Video....n
Messaging73MessagingInserting textTo insert text in the message: 1. Tap notepad or  > Insert > Text....2. Enter text. To insert predefined text, tap   or tap   > Insert My Text..., then select the text to insert.You can also insert emoticon, favorite, contact, and calendar by tapping  ,  , , and  , respectively, or selecting these options from  .3. Tap Done or OK when you have finished inserting text.Inserting audioTo insert audio in the message: 1. Tap   or   > Insert > Audio.... A list of all audio files in the current folder is displayed.2. Either select an audio file, or launch the Audio Recorder and capture a new audio by tapping   or tapping   > Capture > Audio....Inserting fileTo insert file in the message:1. Tap  , or   > Attachment....2. Tap  ,  , or   to add vCard, vCalendar, any file, respectively, or select these options from  .3. Select a required item, then tap OK.To use or create a template:Tap Menu > Template. Tap Select a Template... to select a template to use for a new MMS message, or Save as Template to save the current MMS message as a template for future use.To preview the message before sending, tap the .To cancel the message without sending it, tap  > Cancel Message.To select a background colour for the message, tap  > Options > Background, then tap the required colour.You can also set the priority of the message, a delivery time delay for the sending of the
Messaging74Messagingmessage, an expiry time for the message, and request delivery and read reports.To set these options, tap   > Options > Send Options..., then set the options as required.E-mailBefore you can send or receive e-mails, you need to set up an e-mail account. Your Toshiba phone supports the following types of e-mail accounts:• Internet e-mail (POP3/IMAP).• Exchange server (Outlook).For details of setting up e-mail accounts, see Setting up e-mail accounts in Annex 4 - Configuring SMS, MMS and e-mail.Creating an e-mailTo create an e-mail:1. Access Messaging. (Tap   > E-mail.)2. Tap the e-mail account to use.3. Tap  > New.4. Add recipient(s) using one or more of the following methods:• With the cursor in the To: field, tap   > Add Recipient..., then tap a recipient from the list of contacts.• With the cursor in the To: field, enter the first few letters of a name stored in Contacts, then tap Menu > Check Names. If several matches are displayed, select the required one.• Enter e-mail address(es) in the To: field. Use a semicolon to separate multiple recipients.•Tap To:, then tap a recipient from the list of contacts.5. Tap the message area and enter your message.6. Tap   when the message is ready.E-mails are stored in your Outbox and are sent to recipients the next time you synchronise or connect to your e-mail server.
Messaging75MessagingOptions available when creating an e-mailYou can add recipients in the Cc: and/or Bcc: fields.You can enter a subject for the e-mail in the Subject: field.To add an attachment, tap   > Insert > Picture, Voice Note, or File, then select the item to add.To save time by inserting predefined text, tap  > My Text, then select the text to insert.To save a message as a draft, tap   > Save to Drafts.To check spelling before sending the message, tap  > Spell Check.To cancel the message without sending it, tap X.To set the priority and language of the e-mail, tap  > Message Options..., then select the required options in the Priority: and  Language: field respectively.Sending and receiving e-mailTo send and receive e-mail:1. Access Messaging.2. Tap the required e-mail account.3. Tap  > Send/Receive. Your Toshiba phone connects to your Internet e-mail server and sends and receives your messages.Downloading a complete e-mailTo download a complete e-mail:1. Access Messaging.2. Tap the required e-mail account.3. Tap the required e-mail, then tap   > Download Message. The complete message is retrieved the next time you synchronise or connect to your e-mail server to send/receive e-mail.TIP: Scroll up to view the Cc: and Bcc: fields.TIP: To stop this process, tap   > Stop Send/Receive.
Messaging76MessagingDownloading and viewing an e-mail attachmentTo download and view an e-mail attachment:From an open message with an attachment, tap the attachment. The attachment is downloaded the next time you synchronise or connect to your e-mail server to send/receive e-mail.After it has been downloaded, you can tap the attachment to view it.Windows Live MessengerWindows Live Messenger enables you to:• send instant messages or join group chats.• set your status and see the presence of friends and colleagues.• send messages via voice as well as text.• send pictures and files.• use emoticons to express how you feel.To use Windows Live Messenger, you need Windows Live ID credentials.For details of Windows Live ID, go to:https://accountservices.passport.net/ppnetworkhome.srf.You will also need to sign in to Windows Live before you can sign in to Windows Live Messenger.
Messaging77MessagingNimbuzzNimbuzz enables you to use your favourite instant messaging features to connect with all your Yahoo! Messenger, AIM, Facebook, MySpace, Google Talk, Windows Live Messenger (MSN), ICQ, Gadu-Gadu, Jabber, studiVZ and Hyves buddies from one contact list.You can broadcast your activity status with your Personal Message, and express yourself with emoticons.To get started with Nimbuzz:Start Nimbuzz, then either create an account, or log in with your existing account.Add your instant messaging accounts to your Nimbuzz contact list. Your buddies will appear in the contact list and you can start chatting or sharing files.Visit http://www.nimbuzz.com/en/help for more information on how to use Nimbuzz.NOTE: The limited version of Nimbuzz preinstalled on your Toshiba phone includes instant messaging and dial-in calling, but does not include free VoIP calling.n
Applications and multimedia78Applications and multimediaApplications and multimediaCalendarThe Calendar application works like an electronic diary. You can keep track of your appointments, including meetings and other events.You can display reminders on your Toshiba phone, as well as synchronising your phone with Outlook on your PC.You can also schedule meetings via e-mail with contacts who use Microsoft Outlook or Outlook Mobile.Scheduling an appointmentTo schedule a new appointment:1. Access Calendar.2. Tap  > New Appointment.3. Enter details of the appointment, then tap OK.TIP: To send a meeting request:1. Tap the Attendees: field.2. Tap Add Required Attendee... or Add Optional Attendee... as required.3. Tap the contact to invite.4. Add more contacts if required.5. Tap OK when you have finished adding attendees.6. Tap OK.7. Tap Yes if required to save the change and send the meeting request to the attendees.The meeting request will be sent to the attendees when you next synchronise your Toshiba phone with your PC.When attendees accept the meeting request, the meeting is automatically added to their schedules. When their responses are received, your calendar is updated.
Applications and multimedia79Applications and multimediaSending an appointmentYou can send an appointment within an MMS message.To send an appointment:1. Access Calendar.2. Tap the required appointment.3. Tap  > Send as vCalendar.4. Add a recipient to the message, then tap Send.Changing the default reminder timeBy default, the reminder time is set to 15 minutes before an appointment.To change the default reminder time:1. Access Calendar.2. Tap  > Tools > Options.... 3. Select Appointments on the upper screen menu.4. Make sure that the Set reminders for new items checkbox is ticked, then change the reminder time.5. Tap OK.Changing the Calendar viewTo change the Calendar view:Tap , , ,  or  to toggle between Agenda, Day, Week, Month and Year views.CameraYour Toshiba phone is equipped with a digital camera that can be used to capture photographs and video clips.Starting the CameraYou can launch the Camera application using one of the following methods:•Tap  > Camera.•Press and hold the Camera key.TIP: You can also change the Calendar view by tapping   > View, then tapping the required view.
Applications and multimedia80Applications and multimediaMain Camera screenThe following options are available from the main Camera screen:•  - to access the Camera menu items.•  - to change the screen orientation.•  - to toggle the capture mode between the following modes: - default, to capture a single photograph. - to capture a video. - to capture a series of 9 photos. This feature is useful for capturing a photograph of a subject in motion. - to capture a photograph after approximately 5, 10 or 15 seconds. This feature is useful for capturing a photograph that you can be in.•  - to select the required resolution for the photo or video.•  - to zoom in and out.Capturing a photoTo capture a photo:1. Start the Camera.2. Aim the camera at the subject, then press the Camera key or tap  . A preview of the photo is displayed.3. Select the required action from the following:• tap   to save the photo.•tap  > Send to send the photo in an MMS message or e-mail.•tap   or   > Delete, then   to delete the photo.NOTE: Images of higher resolution (quality) will use more storage space.nTIP: The auto-focus icon flashes when the Camera is started. Tap   before capturing the photo to activate the auto-focus feature. When the auto-focus is completed, the edge of the auto-focus icon becomes green and stops flashing. It becomes red and stops flashing, however, if the lens-to-subject distance is too close.
Applications and multimedia81Applications and multimediaCapturing a videoTo capture a video:1. Start the Camera.2. Tap   or   > Capture Mode > Video.3. Aim the camera at the subject, then press the Camera key or tap   to start recording.4. Press the Camera key or tap   to stop recording.5. Select the required action from the following:• tap   to save the video.•tap  > Play to play the video.•tap  > Send to send the video in an MMS message or e-mail.•tap   or   > Delete, then   to delete the video.Changing storage locationBy default, all photographs and videos taken with the Camera are saved in the My Pictures or My Videos folder on your Toshiba phone.To save photographs and videos on a storage card:1. Ensure that a storage card has been installed (refer to Installing the SIM card, microSD card and battery in Getting started for installation instructions).2. Start the Camera.3. Tap  > Settings.4. Tap General tab.5. In the Save to: field, select Storage Card.6. Tap OK.NOTE: Close all open applications before capturing videos with maximum resolution (640 x 480). This will avoid any deterioration in the video quality.For information on ending all running applications, see Ending applications in Task Manager.TIP: To capture the video without sound, tap   before capturing the video. The icon will change to  .n
Applications and multimedia82Applications and multimediaContactsYou can use the Contacts feature to store phone numbers, e-mail addresses, home addresses, and other information relating to a contact. You can also add a picture or assign a ring tone to a contact.If you use Microsoft Outlook on a PC, you can synchronise contacts between your Toshiba phone and the PC.Creating a new contactTo create a new contact:1. Access Contacts.2. Tap .3. Tap the contact type to create (Outlook Contact, SIM Contact, or Windows Live). Outlook contacts are stored on your Toshiba phone.4. Enter the details of the new contact.5. Tap OK.NOTE: SIM contacts (except when using a USIM card) only support a single name and phone number. Contacts stored on a USIM card can include a name, three phone numbers and an e-mail address.nNOTE: If you move the SIM card to another phone, your SIM contacts are moved as well.TIP: You can customise Outlook contacts by adding a picture or a ring tone to uniquely identify the person calling you.TIP: If someone whose phone number is not stored in Contacts calls you, you can create a contact for that person. To do this:1. Access Call History.2.  Scroll to the required call to be highlighted, then tap   > Save to Contacts.3. Tap <New Contact>.4.  Tap the contact type to create.5.  Edit the details of the new contact as required, then tap OK.TIP: You can create E-mail Group and Messaging Group if required.n
Applications and multimedia83Applications and multimediaFinding a contactTo find a contact by name:1. Access Contacts.2. Tap the Enter a name... field.3. Enter the first letter of the name of the contact to find. Matching contacts will be listed.Copying contactsTo copy a phone contact to the SIM card:1. Access Contacts.2. Tap the required contact.3. Tap  > Save to SIM.4. Tap OK.To copy a SIM contact to the phone:1. Access Contacts.2. Tap the required contact.3. Tap  > Save to Contacts.4. Tap OK.To copy all phone contacts to the SIM card:1. Access SIM Manager.2. Tap the picture of the phone.3. Tap Menu > Select All.4. Tap Menu > Copy to SIM.5. Tap ok after the copying has finished.6. Tap OK twice to exit the SIM Manager application.To copy all SIM contacts to the phone:1. Access SIM Manager.2. Tap the picture of the SIM card.3. Tap Menu > Select All.4. Tap Menu > Copy to Phone.5. Tap ok after the copying has finished.6. Tap OK twice to exit the SIM Manager application.NOTE: When copying phone contacts to a SIM card, only the supported fields will be copied.n
Applications and multimedia84Applications and multimediaDeleting contactsTo delete a contact:1. Access Contacts.2. Tap the required contact.3. Tap  > Delete Contact or Delete SIM Contact.4. Tap Yes to confirm the deletion.To delete all contacts:1. Access Contacts.2. Tap  > Select Contacts > All.3. Tap  > Delete.4. Tap Yes to confirm the deletion.To delete all contacts from the phone:1. Access SIM Manager.2. Tap the picture of the phone.3. Tap Menu > Select All.4. Tap Menu > Delete.5. Tap Yes to confirm the deletion.6. Tap ok after the deleting.7. Tap OK twice to exit the SIM Manager application.To delete all contacts from the SIM card:1. Access SIM Manager.2. Tap the picture of the SIM card.3. Tap Menu > Select All.4. Tap Menu > Delete.5. Tap Yes to confirm the deletion.6. Tap ok after the deleting.7. Tap OK twice to exit the SIM Manager application.Sending contact informationYou can send contact information in a text message or MMS message, or using Bluetooth.To send contact information in a text message:1. Access Contacts.2. Tap the required contact.3. Tap  > Send Contact > Text Messages.4. Select the specific information to send, then tap Done.5. Add a recipient to the message, then tap .
Applications and multimedia85Applications and multimediaTo send contact information in an MMS message:1. Access Contacts.2. Select the required contact to be highlighted.3. Tap  > Send as vCard.4. Add a recipient to the message, then tap Send.For details of sending contact information using Bluetooth, see Beaming an item in Connectivity.CorePlayerWith CorePlayer, you can take control of your mobile multimedia playback using CorePlayer’s simple yet powerful interface and features. It also comes with built-in YouTube support.For any further information, visithttp://support.corecodec.com/.File ExplorerFile Explorer enables you to view and manage files saved in your Toshiba phone, or on a storage card.GamesYour Toshiba phone comes preloaded with the following games:•SolitaireGetting StartedGetting Started gives you step-by-step instructions for carrying out common procedures with your Toshiba phone.
Applications and multimedia86Applications and multimediaInternet ExplorerInternet Explorer Mobile gives quick and easy access to searching using Bing and web pages in your Favorites and History.You can also type in an address to access other web pages.Accessing a web pageTo access a web page:1. Access Internet Explorer.2. Tap the address bar.3. Enter a web page address.4. Tap .Changing the text size of web pagesTo change the text size of a web page:1. From a web page, tap   > View > Text Size.2. Tap the required size.Adding a web page to FavoritesTo add a web page to Favorites:1. From a web page, tap  , then  .2. Edit the details if required, then tap OK.Zooming in or out on a web pageTo zoom in or out on a web page:Zoom in or out by using the zoom bar.NOTE: Full-screen mode is the default setting. Tap   to return to the address and softkey bar.TIP: To return to the Home page, tap   > Home Page.nTIP: To reposition the zoom bar on the left or right of the screen by tapping, holding, and dragging it to the desired location.
Applications and multimedia87Applications and multimediaChanging the home pageTo change the home page:1. From a web page, tap   > Tools > Options.2. Tap Home Page.3. Tap one of the following options:•Default Home page - to use the default home page.•Current page - to set the current web page as the home page.•Custom page - to set a new home page. Enter the address of the new home page in the field below.4. Tap OK.Clearing temporary files, cookies and HistoryWhen you use the Internet, your Toshiba phone stores data that uses up some of the storage capacity of the phone. You can delete these files to free up storage.To clear temporary files, cookies and History:1. Access Internet Explorer.2. Tap  > Tools > Options.3. Tap Browsing History.4. Select the item to clear, then tap Clear.5. Tap Yes to confirm the deletion.6. Tap OK when you have finished.
Applications and multimedia88Applications and multimediaSending a linkTo send a link using Messaging:1. From a web page, tap   > Tools > Send Link....2. Select the Messaging account to use to send the link. A new message is created with the web page address in the body of the message.3. Add a recipient and edit the message if required.4. Tap Send or  .Increasing the speed of your Internet browserFor details of increasing the speed of your Internet browser, see Browser Settings in Settings.JavaYour Toshiba phone supports Java applications (also known as MIDlets) that are written for mobile devices. Java applications include games and utilities.Your phone supports Java 2 Edition, J2ME.The Java application on your Toshiba phone enables you to download, install and manage Java applications.Installing a Java applicationTo install a Java application:1. Access Java.2. Tap Menu > Install.3. Select where to install the application from:• To install from a website, tap Browser. This will launch the default browser. Go to the website with the required Java application and download the application. It is then loaded into the Java application.
Applications and multimedia89Applications and multimedia• To install from a specific URL, tap URL.If the URL has already been entered, tap it, then tap Go.If the URL has not been entered, tap Add, enter a name for the URL and the web address, then tap OK.• To install an application stored on your Toshiba phone, tap Local Files. All uninstalled Java applications stored on the phone and the storage card are displayed. Tap the one to install.4. The details of the selected application will be displayed and you will be prompted to confirm the installation. Tap Continue to install the application.5. Select the folder in which to install the application, then tap OK.6. Wait a few seconds while the application is being installed. You can then run the application.Running a Java applicationOnce Java applications are successfully installed, they are displayed on the main Java screen.To run a Java application:1. Access Java.2. Tap the required application.MarketplaceMarketplace is an integral part of the mobile experience. Marketplace allows you to expand your Toshiba phone's capabilities through powerful software.You can manage your Marketplace account and application purchases directly from your Toshiba phone.
Applications and multimedia90Applications and multimediaMicrosoft My PhoneMy Phone is a service that allows you to back up your Toshiba phone data to a password-protected server online. My Phone backs up your contacts and appointments through your Web account. My Phone also allows you to share the photos on your Toshiba phone with your family and friends.NotesWith Notes, you can quickly capture ideas, questions, reminders, to-do lists and meeting notes by writing, typing or recording your voice in a note. This is especially useful when you don’t have a pen and paper to hand.For further details of Notes, see Writing and drawing on the screen in Annex 1 - Text input.Creating a noteTo create a note:1. Access Notes.2. Tap .3. Change the input method if required. See Input methods in Annex 1 - Text input for further details.4. Enter the note using your selected input method.5. Tap OK when you have finished.
Applications and multimedia91Applications and multimediaViewing or playing a noteTo view or play a note:1. Access Notes.2. Tap the note to view or play.Office MobileExcel MobileWith Excel Mobile you can work on spreadsheets in the same way as on a PC. You can create new spreadsheets and charts, and open and edit workbooks created on a PC.OneNote MobileWith OneNote Mobile, you can gather notes and information in one place.Notes in OneNote Mobile can contain text, images and voice recordings. You can also synchronise the notes with OneNote on a PC using ActiveSync.NOTE: To record a voice note, use the recording toolbar. If this bar is not displayed, tap   > View Recording Toolbar.nNOTE: Excel Mobile does not fully support some features. See the Microsoft website for details.NOTE: Some data and formatting may be lost when you save a workbook created on a PC to your Toshiba phone. See the Microsoft website for details.nn
Applications and multimedia92Applications and multimediaPowerPoint MobileWith PowerPoint Mobile, slide show presentations created on your PC can be opened and viewed on your Toshiba phone.Word MobileWith Word Mobile you can work on documents in the same way as on a PC. You can create new documents and templates, and open and edit documents created on a PC.PhotoBasePhotoBase is a full-featured image, management, editing and sharing application that enables you to manage and quickly preview images stored on your Toshiba phone.Pictures & VideosViewing pictures and videosYou can view pictures and videos stored on your Toshiba phone or storage card using the Pictures & Videos application.To view pictures and videos:1. Access Pictures & Videos.2. Tap the required picture or video.NOTE: PowerPoint Mobile does not fully support some features. See the Microsoft website for details.NOTE: Word Mobile does not fully support some features. See the Microsoft website for details.NOTE: Some data and formatting may be lost when you save the document on your Toshiba phone. See the Microsoft website for details.nnn
Applications and multimedia93Applications and multimediaSearch PhoneYou can search for files and other items stored on your Toshiba phone in the My Documents folder or on a storage card.You can search by file name or by keywords located in the item. For example, you can search e-mail messages, notes, appointments, contacts, and tasks as well as in Help.To search for a file or an item:1. Access Search Phone.2. In the Search for: field, enter the file name, word, or other information you require.3. If you have searched for an item before, tap the arrow to the right of the Search for: field to find it in the searching history.4. In the Type: field, select a data type to help narrow your search.5. Tap Search.In the Results list, you can tap the item you require to open it.SIM ToolkitWhen you install a SIM card that has applications loaded on it, you can run the applications using the SIM Toolkit application.To run an application from the SIM card:1. Access SIM Toolkit. The list of SIM applications is displayed.2. Select the application that you want to run, then tap Select.NOTE: The SIM Toolkit icon ( ) is not displayed when the installed SIM card does not have any applications loaded.The title of this icon depends on the title of the SIM. It will generally show the name of your service provider.n
Applications and multimedia94Applications and multimediaStreaming PlayerStreaming Player enables you to play live and recorded streaming media on your Toshiba phone.To use Streaming Player:1. Access Streaming Player.2. Tap Open.3. Enter the URL of the required media, then tap Connect.TasksWith the Tasks application, you can create one-off tasks or recurring tasks. You can also set reminders for your tasks, and organise them by category.Overdue tasks will be displayed in red.Creating a taskTo create a new task:1. Access Tasks.2. Tap  > New Task.3. Edit the details of the task as required.4. Tap OK.NOTE: To access the URL of a streaming media item, your Toshiba phone must connect to the network. For more information about connecting your phone to a network, see Internet connections in Connectivity.nTIP: You can also create a task by entering a name for the task in the Tap here to add a new task field. However, using this method you will need to add the details of the task separately.
Applications and multimedia95Applications and multimediaChanging the status of a taskWhen a new task is created, it will be set as active. When you have completed the task, you can update its status.To mark a task as completed:1. Access Tasks.2. Scroll to the required task to be highlighted, then tap  .Video EditorVideo Editor enables you to easily edit videos. You can also create video clips by combining still images, or create a video storyboard by mixing video, photos, text and music.Windows LiveWindows Live gives access to searching using Bing, as well as access to Windows Live Messenger.For information on Windows Live Messenger, see Windows Live Messenger in Messaging.TIP: You can synchronise tasks on your Toshiba phone with your PC. This will keep tasks up to date in both locations.If you create a new task with a reminder on your PC and then synchronise tasks with your phone, the reminder is activated at the time set on your PC.TIP: If you need to reactivate a task, scroll to the required task, then tap  .TIP: You can toggle the status of a task by tapping the checkbox next to the task.
Applications and multimedia96Applications and multimediaWindows MediaOverview of Windows Media Player 10 MobileYou can use Windows Media Player 10 Mobile to play digital audio and video files that are stored on your Toshiba phone, a storage card or on the Internet.Overview of screens and menusWindows Media Player 10 Mobile has three primary screens:•Library screen - enables quick access of files and playlists. It also includes an item that enables you to switch to the Now Playing screen.To switch to the Playback screen from the Library screen, tap OK.The Library screen will be the default screen displayed when you first use Windows Media Player Mobile.•Now Playing screen - displays the Now Playing playlist. This shows the file currently playing, as well as any files that are queued up to play next.•Playback screen - displays the playback controls and the video window. You can change the appearance of this screen by selecting a different skin.
Applications and multimedia97Applications and multimediaPlaying items stored on your Toshiba phoneUse the Library to find and play music, videos, and playlists that are stored on your Toshiba phone or storage card.To play an item stored on your Toshiba phone:1. Access Windows Media.2. If the item is in the Library, select the item, then tap Play.If the item is not in the Library, tap Menu > Open File.... Select the item, then tap Play.Playing items stored on a networkTo play an item stored on a network:1. Access Windows Media.2. From the Library screen, tap Menu > Open URL....3. Enter the URL of the file or select a URL from the History: field, then tap OK.TIP: To add files to the Library, tap Menu > Update Library....NOTE: To play an item on a network, your Toshiba phone must connect to the network. For more information about connecting your phone to a network, see Internet connections in Connectivity.n
Connectivity98ConnectivityConnectivityBeamThe term ‘Beam’ is used to describe the short range transfer of data between two devices via a Bluetooth connection.You can beam Calendar, Contacts, Tasks, and Pictures & Videos items, and other files stored on your Toshiba phone, to other devices.Beaming an itemTo beam an item to another device:1. Select the item that you want to beam, then tap  > Beam.... (This path will vary slightly depending on the type of item that you want to beam. To beam a contact, tap  > Send Contact > Beam.)2. Tap the device to which you want to send the item.Configuring your Toshiba phone to receive beamed dataTo configure your Toshiba phone to receive beamed data:1. Access Beam.2. Tick the Receive all incoming beams. checkbox, then tap OK.NOTE: Bluetooth must be set to On or Visible to send beamed items.To receive beamed items, Bluetooth must be set to Visible.n
Connectivity99ConnectivityBluetoothBluetooth is a short-range wireless communications technology. Bluetooth-capable devices can exchange data without requiring a wired connection.Bluetooth on your Toshiba phone has three modes: Off, On and Visible.In Off mode, you cannot send or receive data using Bluetooth.In On mode, your Toshiba phone can search for and connect to other devices. However, your phone will not be visible in searches by other devices.In Visible mode, your Toshiba phone can search for and connect to other devices. Your phone will also be visible to other devices.Changing Bluetooth modeBy default, Bluetooth is in Off mode. Bluetooth will remain in the same mode when turning your Toshiba phone off and on.To change Bluetooth mode:1. Access Bluetooth.2. Select Mode on the upper screen menu.3. To set Bluetooth to Off mode, untick the Turn on Bluetooth checkbox.To set Bluetooth to On mode, tick the Turn on Bluetooth checkbox.To set Bluetooth to Visible mode, tick both the Turn on Bluetooth and Make this device visible to other devices checkboxes.TIP: You can also toggle Bluetooth mode between On and Off, or Visible and Off using Wireless Manager, when the Bluetooth is turned on.
Connectivity100ConnectivityPairing devicesWhen devices are paired, a relationship is created that enables the exchange of data between the devices.The pairing can be set up using a passcode, which will ensure that exchanged data is kept secure.Pairing of devices only needs to be carried out once. After this, the devices can connect to each other and exchange data without the passcode needing to be entered again.Before pairing your Toshiba phone with another device, ensure that:• Your Toshiba phone and the other device are within 10 metres of each other.• Bluetooth on your Toshiba phone is set to On or Visible.• Bluetooth on the other device is set to Visible.To pair your Toshiba phone with another device:1. Access Bluetooth.2. On the Devices screen, tap Add new device... or Add. Your Toshiba phone will search for other Bluetooth-enabled devices and display them in a list.3. Tap the required device, then tap Next.4. For enhanced security, enter a passcode in the Passcode: field. This is alphanumeric, and can be between 1 and 16 characters in length.5. Tap Next.6. Wait for the other device to accept the pairing. If a passcode has been set on your Toshiba phone, then it will need to be entered on the other device.7. To edit the settings for the device, tap Advanced. You can then edit the name to be used for the device, and select services to use from the device. Tap Save when you have finished.To finish the pairing without editing the settings, tap Done.
Connectivity101ConnectivityConnecting a Bluetooth headsetBefore connecting a Bluetooth headset to your Toshiba phone, ensure that:• Bluetooth on your Toshiba phone is set to  On or Visible.• the Bluetooth headset is set to pairing mode.To connect a Bluetooth headset:1. Access Bluetooth.2. On the Devices screen, tap Add new device..., or Add.3. Tap the Bluetooth headset in the list of devices, then tap Next. 4. Enter the passcode for the headset if required. This will be provided with your Bluetooth headset.5. Tap Next.6. Wait for the headset to accept the pairing. 7. A confirmation will be displayed when the headset has been connected. Tap Advanced. (The confirmation will disappear after a while.  If so, tap the the headset in the list.)8. If required, edit the name of the headset.9. Make sure that the Hands Free checkbox is ticked. If you are using a stereo Bluetooth headset, also make sure that the Wireless Stereo checkbox is ticked.10.Tap Save when you have finished.Bluetooth securityAlthough your Toshiba phone has security features compliant with the Bluetooth standard specification, this security might not work properly when using your Toshiba phone in a non-secure environment. Take care when using the Bluetooth feature.Domain EnrollDomain Enroll enables you to enroll your Toshiba phone as a domain member. You can then connect your phone securely to a network, e.g. your work network.
Connectivity102ConnectivityInternet connectionsYour Toshiba phone is equipped with powerful networking functions that enable you to connect to the Internet through a General Packet Radio Service (GPRS) or Universal Mobile Telecommunications System (UMTS) network. You can set up connections to the Internet or to a corporate network to browse the Internet, and exchange e-mail or instant messages.If your Toshiba phone has not been preconfigured, you will need to manually enter the details for the required internet connections. For details of setting up internet connections, see Annex 5 - Configuring internet settings.Internet SharingInternet Sharing enables you to use your Toshiba phone as a modem for a PC.To connect to the Internet using Internet Sharing:1. Connect your Toshiba phone to a PC using the USB cable or Bluetooth.2. Access Internet Sharing.3. In the PC Connection: field, select the type of connection used for connecting the phone and PC.4. In the Network Connection: field, select the connection to use to connect to the Internet.5. Tap Connect. Once the connection is enabled, you can access the Internet on a PC using your Toshiba phone as a modem.6. When you have finished using the Internet, tap Disconnect on your phone.NOTE: This functionality is only available if it is supported on your SIM card.n
Connectivity103ConnectivityUSB ModeUSB Mode enables you to change the type of USB connection used between your Toshiba phone and PC.Wi-FiYour Toshiba phone supports Wi-Fi (Wireless LAN), which is IEEE 802.11b/g compliant, and Wi-Fi Protected Setup (WPS), which is a standard for easy and secure establishment of a wireless network.Connecting to a Wi-Fi networkBefore connecting to a Wi-Fi network, ensure that Wi-Fi on your Toshiba phone is on.To connect to a Wi-Fi network:1. Access Wi-Fi settings.2. Select the required network, then tap Connect.To connect to a Wi-Fi network via WPS:1. Access Wi-Fi Settings.2. Tap Add New.3. Tap WPS.4. Select Connect Button or PIN.When Connect Button is selected:Push the WPS button on an access point such as wireless router and modem. When a PIN is selected:Access the access point via the registrar such as PC, then enter the PIN displayed on the phone screen.5. Tap Connect. The phone starts searching for the access point and then obtaining its information.NOTE: The Wi-Fi on your Toshiba phone is set to Off as a default. To turn it on, access Wireless Manager, then tap Wi-Fi.n
Connectivity104Connectivity6. Tap Next when the Setting Complete appears on the phone screen.7. Name the connection and enter it in the Connection name: field if required.8. Tap OK and wait until the phone completes the connection process.To connect to a Wi-Fi network manually:1. Access Wi-Fi Settings.2. Tap Add New.3. Tap Manual.4. Enter the details of the network.Wi-Fi securityIt is possible for an outside party to easily gain unlawful access to your Toshiba phone via Wi-Fi if the security function is not used.Without this security, your Toshiba phone carries the risk of unlawful access, wiretapping, and loss or destruction of data.You should set up your Toshiba phone to use the authentication and encryption features in order to prevent such access.Wireless ManagerWireless Manager enables you to easily switch the Phone, Bluetooth and Wi-Fi functionality on or off.NOTE: If the same SSID already exists, the phone asks whether or not you desire to replace it to a new network. Tap Replace to connect with the new network.TIP: You can also connect to a Wi-Fi network from the Wi-Fi.nTIP: You can also access the detailed settings for the Phone, Bluetooth, and Wi-Fi from the Menu on the bottom screen.NOTE: You can conserve battery power by switching off Bluetooth and Wi-Fi when they are not in use.n
Connectivity105ConnectivitySwitching radio transmission on/offYou can switch the telephony radio transmission of your Toshiba phone on and off.When the radio transmission is off, it is in 'Flight Mode'. In this mode, you will not be able to make or receive calls, send or receive messages, or access the Internet.To switch radio transmission on/off:From Wireless Manager, tap the Phone item. Radio transmission will toggle on or off.
Settings106SettingsSettingsAboutThe About setting enables you to view technical information about your Toshiba phone, including the operating system and memory of the phone. This information is useful when installing new applications on your Toshiba phone.You can also change the name of your Toshiba phone as it is displayed to other devices (for example, when using Bluetooth).Changing device nameTo change the device name:1. Access About.2. Select Device ID on the upper screen menu.3. Enter a new name for your Toshiba phone in the Device name: field. You can also add a description if required. 4. Tap OK.Adjust Geomagnetic SensorThe geomagnetic sensor works as the electronic compass. Operating in tandem with the user's map application that supports geomagnetic sensor, the direction in which the user is moving will always be at the top of the phone screen. In addition, in applications unrelated to maps, it can simply be used as a compass.The Adjust Geomagnetic Sensor starts when an application that supports geomagnetic sensor is started for the first time.To adjust geomagnetic sensor:1. Tap Adjust and repeat following steps until the adjustment is completed.2. Hold the phone horizontal to the ground and rotate it as shown in the figures on the touch screen.3. Rotate the phone toward your body at least 120 degree and return it.4. Rotate the phone to the left at least 120 degrees and return it.
Settings107SettingsAdjust Motion SensorIf the Motion Sensor does not seem to be operating correctly, you can adjust it as follows:1. Place your Toshiba phone on a stable, level surface, with the touch screen facing upwards.2. Access Adjust Motion Sensor.3. If the yellow circle is not in the centre of the target area, tap Adjust.4. When the adjustment is complete, tap OK.BacklightYou can adjust the brightness of the backlight, and set the backlight to dim after a specific amount of time has elapsed.You can configure settings to prolong battery power.To change the backlight settings:1. Access Backlight.2. On the Battery Power screen, you can select when to turn off the backlight when using battery power.3. On the External Power screen, you can select when to turn off the backlight when using external power.4. On the Brightness screen, you can adjust the brightness of the screen when using battery or external power.5. Tap OK when you have finished.TIP: You can access Adjust Geomagnetic Sensor by tapping   > Settings > System > Adjust Geomagnetic Sensor.NOTE: The higher the brightness, and the longer the backlight remains on, the more power will be used.n
Settings108SettingsBrowser SettingsBrowser Settings enables you to set Internet Explorer as a high speed browser.CertificatesTo view certificate details:Access Certificates. On each screen, the certificate names, along with their issuing authority and expiry date, are displayed. Tap a certificate to view its details.Clock & AlarmsSetting the date and timeTo set the date and time:1. Access Clock & Alarms.2. Select Time on the upper screen menu if required.3. Set the time zone, current date and time.4. Tap OK when you have finished.5. Tap Yes to save the changes.NOTE: Using the high speed browser setting will increase battery consumption, and may increase the time taken to switch your Toshiba phone on/off.nNOTE: These settings are only lost if you reset your Toshiba phone. Your settings are saved if you power off the phone, or if the battery is fully discharged.n
Settings109SettingsSetting an alarmTo set an alarm:1. Access Clock & Alarms.2. Select Alarms on the upper screen menu.3. Tap one of the alarm display areas for accessing Alarm Settings screen. (You can set up to three alarms.)4. Set a time for this alarm.5. Tap < Description > field to label this alarm if required.6. Select the days when the alarm is required.7. Select a sound and the types of alarm to use.8. Tap OK, and make sure that the checkbox for the set alarm is ticked.Customer FeedbackCustomer Feedback sends anonymous information to Microsoft for use in helping improve Windows Mobile software.EncryptionThis feature allows you to secure sensitive information on your storage card. The data will only be accessible when the card is installed in your Toshiba phone. If the card is lost or stolen, the information remains secure. The contents of the storage card cannot be accessed by anyone else because they are encrypted.To encrypt the contents of your storage card:1. Access Encryption.2. Tick the Encrypt files when placed on a storage card. checkbox.3. Tap OK.TIP: Tap Play button to listen to a sample of the selected sound.NOTE: To set alarms to be audible, even when the phone is set to silent or vibrate, tick the Sound alarms even when the device is set to silent or vibrate checkbox, then tap OK.nWARNING: Anyone in possession of the encryption key can decrypt and access information stored on the storage card.!
Settings110SettingsError ReportingError Reporting sends data from your Toshiba phone to Microsoft technical support groups. The data is used to diagnose program errors for devices running Windows Mobile software.If a program error occurs, Error Reporting starts automatically. The information Microsoft receives is used by programming groups at Microsoft. The data is used for quality control and will not be used for tracking individual users, installations or for any marketing purpose.External GPSTo set up External GPS:1. Access GPS Settings. (Tap External GPS.)2. On the Programs screen, select the port that your Toshiba phone will use to obtain GPS data.3. On the Hardware screen, select the hardware port to which your GPS device is connected. You can also set the baud rate.4. On the Access screen, tick the Manage GPS automatically (recommended) checkbox if required. You are strongly advised to use this feature as it will enable Windows Mobile to manage access to your GPS device, and allows multiple programs to obtain GPS data simultaneously.5. Tap OK when you have finished.
Settings111SettingsInternal GPSInternal GPS enables you to change the settings for downloading the latest satellite data from the network and detecting position information quickly.Location RequestLocation Request sets the action of your Toshiba phone when there is a location request from the third party.Managed ProgramsManaged Programs lists applications that have been installed remotely by your company system administrator. You can view details of these applications.Master ClearMaster Clear resets all settings on your Toshiba phone to their factory defaults, and deletes all of your data.You should only use this procedure as a last resort. It is recommended that you back up all of your data before using Master Clear.If you are experiencing a problem with an application, it is most likely a result of a conflict between installed programs. We recommend uninstalling the most recently added program first. Also verify that the program is designed to be run on your Toshiba phone by comparing the requirements to the information provided with your phone. To view this information, access About.To reinitialise your Toshiba phone when it is switched on:1. Access Master Clear.2. Follow the on-screen instructions to reinitialise your phone. The phone will restart after it has been reinitialised.
Settings112SettingsTo reinitialise your Toshiba phone if there are problems in accessing the Master Clear application:1. Press and hold the Power key, the Volume Up key and the Camera key until the Master Clear screen is displayed (at least five seconds).2. Within 60 seconds, press the Volume Down key to select < Yes > for the on-screen confirmation, then press the Camera key.3. Press the Volume Down key to select < Yes > for the on-screen final confirmation, then press the Camera key. The phone will restart after it has been reinitialised.MemoryTo ensure optimum performance of your Toshiba phone, it is necessary to maintain sufficient memory.To check the memory available on your Toshiba phone:1. Access Memory.2. On the Main screen, you can view the details of Storage and Program memory.3. On the Storage Card screen, you can view the memory available on the storage card.4. Tap Find large files using storage memory. to search for specific files.
Settings113SettingsMotion Sensor SettingsThese settings will allow you to select whether the motion sensor is activated when you tilt, tap or shake your Toshiba phone.To set up the Motion Sensor:1. Access Motion Sensor Settings.2. Tick or untick the Auto screen orientation change, Double tap to Task Manager and Activate shake operation checkbox as required. (You can select one of the following options for Activate shake operation, Go to Phone screen, Go to Today Screen, or Answer Call.)3. Tap OK.Owner InformationOwner Information enables you to enter your identification such as address, telephone, e-mail, and notes for your reference.PhoneSetting ring tonesTo set a ring tone:1. Access the Phone settings.2. On the Sounds screen, select the following:•In the Ring type: field, select the required type of tone. This can be ringing, vibration, a combination of ringing and vibration, or none.•In the Ring tone: field, select the required tone.TIP: Tap the play icon to listen to a sample of the selected ring tone.
Settings114Settings3. Tap OK.Setting keypad tonesTo set keypad tones:1. Access the Phone settings.2. On the Sounds screen, select the required type of keypad tones in the Keypad: field. To have no keypad tones, select Off.Call BarringCall Barring enables you to block certain categories of incoming and outgoing calls (for example, international calls).To set up Call Barring:1. Access the Phone settings.2. Select Services on the upper screen menu.3. In the list of services, tap Call Barring, then tap the Get Settings... button. The settings will then be read from the network.4. When the current settings are displayed, select the settings required for blocking incoming and outgoing calls.5. Tap OK.6. Enter the call barring password, then tap OK. The settings are sent to the network.TIP: You can use custom sounds as ring tones. You can copy the files to your phone from your PC using ActiveSync, or download them from the Internet.TIP: You can also set the ring tone from the Sounds & Notifications settings.NOTE: Call Barring is only available if it is supported by your service provider.NOTE: Before setting up Call Barring, you will need to obtain your call barring password from your service provider.nn
Settings115SettingsCaller IDCaller ID allows selected call recipients to view your name and phone number information on their phone when you call them. To configure Caller ID:1. Access the Phone settings.2. Select Services on the upper screen menu.3. In the list of services, tap Caller ID, then tap the Get Settings... button.4. In the Provide my caller ID to: field, select one of the following:•Everyone - your information will be displayed to everyone that you call.•No one - your information will be hidden from everyone that you call.•Only to contacts - your information will only be displayed when you call a number stored in Contacts.5. Tap OK.Call ForwardingCall Forwarding enables you to forward incoming calls to another number.To set up Call Forwarding:1. Access the Phone settings.2. Select Services on the upper screen menu.3. In the list of services, tap Call Forwarding, then tap the Get Settings... button.4. Select the conditions during which you would like to forward incoming calls. Enter the phone number(s) for forwarded calls.5. Tap OK.NOTE: Call Forwarding is only available if it is supported by your service provider.TIP: If you have set up voice mail, you can select Voicemail as the phone number for forwarded calls. For details of setting up voice mail, see Setting up voice mail.n
Settings116SettingsCall WaitingCall Waiting notifies you of incoming calls when you are already in a call. You will then have the option to answer or ignore the second call.To enable Call Waiting: 1. Access the Phone settings.2. Select Services on the upper screen menu.3. In the list of services, tap Call Waiting, then tap the Get Settings... button.4. Select whether or not you wish to be notified of waiting calls.5. Tap OK.Setting up voice mailVoice mail is normally preconfigured. If it is not preconfigured, you can save your voice mail number to the phone manually.To set up voice mail manually:1. Access Mail Settings.2. Tap SMS.3. Enter your voice mail number in the Voice mail number: field. This can be obtained from your service provider.4. Tap OK.Fixed DialingFixed Dialing restricts the numbers that you can call from your Toshiba phone. When Fixed Dialing is activated, you can only call predefined numbers or area codes. These numbers are stored in a list that you can set up and edit using your Toshiba phone.NOTE: Call Waiting is only available if it is supported by your service provider.nNOTE: Fixed Dialing is only available if it is supported by your service provider.n
Settings117SettingsTo set up Fixed Dialing:1. Access the Phone settings.2. Select Services on the upper screen menu.3. In the list of services, tap Fixed Dialing, then tap the Get Settings... button.4. Tick the Enable fixed dialing checkbox.5. Tap Menu > Add.6.  In the Name: and Number: field, respectively enter the name and phone number you want to be able to call.7. Tap Done.8. If required, add more numbers, then tap Done.9. Tap OK, then enter PIN2 and tap Done.Setting the network selection typeTo set the network selection type:1. Access the Phone settings.2. Select Network on the upper screen menu.3. In the Network selection field, select Automatic or Manual as required.4. If you select Automatic, your Toshiba phone will register to the default network. This network is defined by your SIM card.5. If you select Manual, you will need to wait for the phone to search for all available networks.When the list of networks is displayed, tap the required network, then tap OK. Your Toshiba phone will register to the selected network.6. Tap OK.The default setting is Automatic.If you select Manual, and your current network becomes unavailable, you will need to wait for NOTE: Before setting up Fixed Dialing, you will need to obtain PIN2 from your service provider.nNOTE: This setting is only available if it is supported by your service provider.n
Settings118Settingsthe phone to search for all available networks. You can then select one to connect to.Preferred networksIf you have selected the Automatic network selection type, following any failure in connection to your home network, your Toshiba phone will attempt to connect to the first network in the list of Preferred networks. If this fails, the phone will attempt to connect to the next network in the list, and so on.To set up or update the list of Preferred networks:1. Access the Phone settings.2. Select Network on the upper screen menu.3. Tap Set Networks. The settings will then be read from the network.4. Add new networks or reorder the list as required. You can also remove networks from the list by unticking the checkbox beside the network name.5. Tap OK when you have finished.Connecting to a networkTo connect to a network:1. Access the Phone settings.2. Select Network on the upper screen menu.3. Tap Find Network. You will need to wait for the phone to search for all available networks.When the list of networks is displayed, tap the required network, then tap OK. Your Toshiba phone will register to the selected network.Setting network modeTo set the network mode:1. Access the Phone settings.2. Select Mode on the upper screen menu.3. Select a network mode from one of the following:•Automatic - selects network mode automatically.•HSDPA - selects 3G/3.5G network mode.•GSM - selects 2G/2.5G network mode.4. Tap OK.
Settings119SettingsPower Saving SettingsPower Saving Settings enables you to set up your Toshiba phone to optimise performance or save battery power, depending on your preferences.PowerThe Power settings enable you to check the battery status and configure settings to prolong battery power.To view and change Power settings:1. Access Power.2. On the Battery screen, the remaining battery power is displayed.3. On the Advanced screen, you can select when to turn off the screen when using battery or external power.4. On the Wi-Fi screen, you can restrict sleep mode activation, and set the power save setting to use when Wi-Fi is on.5. Tap OK when you have finished.NOTE: Changing the network mode settings may limit the ability of your Toshiba phone to connect to the wireless network, and may result in signal failure.n
Settings120SettingsRegional SettingsRegional Settings enables you to specify the styles in which numbers, currency, time and date are displayed.To change Regional Settings:1. Access Regional Settings.2. On the Region screen, select your region in the drop-down list. Changing this setting automatically updates the styles in which numbers, currency, time and date are displayed to the defaults for the selected region.3. Change specific items on the other screens if required.4. Tap OK when you have finished.Remove ProgramsRemove Programs enables you to delete applications that you have installed.To remove a program:1. Access Remove Programs.2. Tap the application to remove, then tap Remove.3. Tap Yes to confirm the deletion.4. Tap OK when you have finished removing programs.NOTE: Programs that were pre-installed on your Toshiba phone cannot be removed in this way.n
Settings121SettingsScreenAdjusting screen settingsTo adjust screen settings:1. Access Screen.2. On the General screen, you can set up the screen orientation and alignment.3. On the ClearType screen, you can enable ClearType, which smooths the edge of screen fonts.4. On the Text Size screen, you can slide the marker to adjust the text size. An example of the selected text size is displayed.5. Tap OK when you have finished.Adjusting scroll speedThe scroll speed is the speed at which you can scroll through items in a list.To adjust the scroll speed:1. Access Buttons.2. In the Delay before first repeat: field, move the pointer to adjust the time taken before scrolling begins.3. In the Repeat rate: field, move the pointer to adjust the time taken to scroll from one item to the next.4. Tap OK when you have finished.SecurityIt is advisable to apply certain security features in case your Toshiba phone is lost or stolen.You can apply the following security to prevent unauthorised use:•Device lock - when this feature is activated, you will need to unlock the phone before you can use it.You can enable a password for the device
Settings122Settingslock to prevent unauthorised use of your Toshiba phone. You can also set a time after which the device lock will be activated if the phone is left idle.When the device lock is activated with a password enabled, you will be prompted to enter the password to unlock the phone.By using the device lock without a password, you can prevent accidental calls and operations.•Phone lock - using a personal identification number (PIN), this feature prevents unauthorised use of your SIM card in any phone. When this feature is activated, you will be prompted for your PIN when you switch on your Toshiba phone. You cannot use the SIM card until the PIN is entered correctly.•SIM Lock - this feature prevents unauthorised use of your Toshiba phone with other SIM cards. When this feature is activated, your Toshiba phone can only be used with the SIM card that was in the phone during SIM Lock activation.Enabling a password for the device lockTo enable a password for the device lock:1. Access Lock.2. On the Password screen, tick the Prompt if phone unused for checkbox, and select how long your phone can be left idle before a password is required.3. Select a password type.4. Enter and confirm a password.5. Enter a hint on the Hint screen if required.6. Tap OK.7. Tap Yes to confirm the changes.IMPORTANT: If you forget your password, you will need to reinitialise your phone. See Master Clear for details.
Settings123SettingsDisabling the device lock passwordTo disable the device lock password:1. Access Lock.2. Enter your current password, then tap Unlock.3. On the Password screen, untick the Prompt if phone unused for checkbox.4. Tap OK.5. Tap Yes to confirm the change.Activating the device lockTo activate the device lock, enter the sleep mode or tap   and then tap  .Deactivating the device lockThe device lock will be activated when returning from the sleep mode.To deactivate the device lock:If the device lock password is enabled, 1. Slide the   to the right or left if required.2. Enter your current password. 3. Tap  or Unlock to return to where you left off,  to go to Contacts, or  to go to Messaging.If the device lock password is not enabled, slide the   to the left or right.Enabling phone lockTo enable the phone lock:1. Access the Phone settings.2. Select Security on the upper screen menu.NOTE: Before you start, you will need to know the SIM PIN. This is provided with your SIM card.n
Settings124Settings3. Tick the Require PIN when phone is used checkbox.4. Enter the SIM PIN, then tap Enter.5. Tap OK.Disabling phone lockTo disable the phone lock:1. Access the Phone settings.2. Select Security on the upper screen menu.3. Untick the Require PIN when phone is used checkbox.4. Enter the SIM PIN, then tap Enter.5. Tap OK.Activating SIM LockTo activate SIM Lock:1. Access SIM Lock.2. Tick the Lock phone to use current SIM card only checkbox.3. Enter and confirm a password of eight digits.4. Tap Done or OK.5. Tap Yes to confirm the changes.Deactivating SIM LockTo deactivate SIM Lock:1. Access SIM Lock.2. Enter the SIM Lock password, then tap Done or OK.3. Untick the Lock phone to use current SIM card only checkbox.4. Tap Done or OK.5. Tap Yes to confirm the changes.WARNING: If you enter the incorrect PIN for your SIM card three consecutive times, you will need to contact your service provider to obtain the PUK. Do not try to guess the PUK as your SIM card will be rendered permanently inoperative following ten consecutive unsuccessful attempts.!
Settings125SettingsSleep Mode IndicatorThis setting enables you to set the LED indicator to be on when your Toshiba phone is in sleep mode.Sounds & NotificationsYou can set a different sound for different events. The sound can be set to something different for each type of event.You can also set up the sounds and vibrations required when tapping the screen.Setting sounds and notificationsTo set sounds and notifications:1. Access Sounds & Notifications.2. On the Sounds screen, select the required settings from the following:•Tick the Events checkbox to enable sounds for events such as warnings.•Tick the Programs checkbox to enable sounds for applications.• Select whether to enable sounds for Screen taps or pressing Hardware buttons. You can also specify the level of the sounds.3. On the Notifications screen, select the specific sound required for each event, and the way in which you want to be notified of the event. Available items are dependent on the event selected.4. On the Vibrations screen, select whether to activate vibrations for screen taps. You can also specify the length of the vibrations.5. Tap OK when you have finished.TIP: Tap the play icon to listen to a sample of the selected sound.TIP: You can use custom sounds by copying the files to your phone from your PC using ActiveSync, or downloading them from the Internet.TIP: Disabling sounds and flashing lights for events will help to conserve battery power.
Settings126SettingsTask ManagerTask Manager enables you to quickly switch between currently running applications.It also enables you to end an application if it becomes unstable or the memory is low.Switching between applicationsTo switch between applications using Task Manager:1. Access Task Manager.2. Double-tap on the application to access.Ending applicationsTo end an application using Task Manager:1. Access Task Manager.2. Tap the application to end, then tap End Task.3. Tap X or Menu > Exit when you have finished.Toolbox SettingsEnabling or disabling ToolboxTo enable/disable the Toolbox:1. Access Toolbox Settings.2. Tick or untick the Use Toolbox checkbox as required.3. Tap OK.TIP: Alternatively, tap the application, then tap Menu > Switch To.TIP: To end all running applications, tap Menu > End All Tasks, then tap Yes to confirm the action.NOTE: By disabling the Toolbox, the Toshiba Free Pad, Magnifying Glass, and Task Switcher are also disabled.n
Settings127SettingsSetting up Toshiba Free Pad for left or right-handed useTo set up Toshiba Free Pad for left or right-handed use:1. Access Toolbox Settings.2. Ensure that the Use Toolbox checkbox is ticked.3. Select Right-handed or Left-handed as required.4. Tap OK.Video Quality SettingThis setting enables you to set the quality for playing video files.Volume controlYou can access the phone sound volume and ringer/call volume settings by tapping the ringer icon on the status indicators.Volume control has the following settings:• Phone sound volume - 6 levels.• Ringer/call volume - 6 levels.• Both phone volume and ringer/call volume can be set to On, Vibrate or Off.TIP: You can change the volume settings by pressing the Volume keys.TIP: You can also change the phone volume and ringer/call volume settings using Toshiba Volume Settings. To do this:1. Access Volume Settings.2.  Tap the required setting (On, Vibrate or Off), then tap OK.
Specifications128SpecificationsSpecificationsSystem InformationProcessor Qualcomm® Snapdragon™ QSD8250, Scorpion™ at 1 GHzMemory RAM : 256 MBROM : 512 MBOperating System Windows Mobile® 6.5 ProfessionalUMTS/HSDPA/HSUPA GSM/GPRS/EDGE Frequency RangeWithin 3G (UMTS) 2100 1920 - 2170 MHzWithin 3G (UMTS) 900 880 - 960 MHzWithin GSM 850 824 - 894 MHzWithin GSM 900 880 - 960 MHzWithin DCS 1800 1710 - 1880 MHzWithin PCS 1900 1850 - 1990 MHzContinuous Talk TimeWithin 3G (UMTS) area Approximately 240 minutesWithin GSM area Approximately 275 minutesContinuous Standby TimeWithin 3G (UMTS) area Approximately 220 hoursWithin GSM area Approximately 225 hours
Specifications129SpecificationsMaximum OutputWithin 3G (UMTS) 2100 Class 3   0.25 WWithin 3G (UMTS) 900 Class 3   0.25 WWithin GSM 850 Class 4   2 WWithin GSM 900 Class 4   2 WWithin DCS 1800 Class 1   1 WWithin PCS 1900 Class 1   1 WDimensions (H × W × D) Approximately 126 mm x 66 mm x 9.9 mmWeight Approximately 125 gAC ChargerInput voltage 100 to 240 VAC, 50/60 HzCharging temperature range 5 to 35 °CBattery charging time Approximately 140 minutesDisplayLCD 104mm (4.1'') TFT LCD with Touch screenResolution 800 x 480 (65536 colours)
Specifications130SpecificationsAudio/Video codecsAudio AAC, AAC+, eAAC+, AMRNB, MP3, WMAVideo ASF, H.263, H.264, MPEG-4, WMVConnectivityBluetooth Bluetooth™ ver2.0 + EDR (Power Class 2)Advanced Audio Distribution Profile (A2DP)Audio/Video Remote Control Profile (AVRCP)Generic Access Profile (GAP)Hands-Free Profile (HFP)Headset Profile (HSP)Personal Area Networking Profile (PAN)Phone Book Access Profile (PBAP)Serial Port Profile (SPP)Wireless LAN IEEE 802.11b/gAES, TKIP, WEP, WPA, WPA-PSK, WPA2, WPA2-PSK, WPSInterfaceCable, headset and phone chargingMicro-USB (Client, Full Speed, High Speed, Host) / Headset / ChargerHeadset Connector Micro-USB stereo headsetExpansion slot microSD™
Troubleshooting131TroubleshootingTroubleshootingProblem Possible cause Possible solutionCannot switch phone on.Battery out of power. Charge the battery (see page 46).Battery not installed correctly. Ensure that the battery is inserted correctly (see page 45).Phone switches off automatically.Battery out of power. Charge the battery (see page 46).Cannot charge battery.Battery not installed correctly. Ensure that the battery is inserted correctly (see page 45).AC charger not connected. Ensure that the AC charger is connected to the phone and to a working AC outlet.Connectors are dirty. Clean the connectors of the AC charger and battery.Battery has worn out. Replace the battery.Battery or AC charger is damaged.Replace the battery or charger. Contact your dealer for assistance.Battery loses power quickly.Backlight, Power settings and Power Saving Settings need to be adjusted.Adjust settings to optimise power performance (see page 107, page 119 and page 119).
Troubleshooting132TroubleshootingNetwork not displayed.SIM card not installed correctly.Ensure that the SIM card is inserted correctly (see page 43).Contacts between SIM card and phone are dirty.Gently clean the contacts of the SIM card and phone.Network signal is weak. Move clear of any obstructions that may block the signal.SIM card is damaged. Contact your service provider to obtain a replacement SIM card.Cannot make a call.You are outside of your network service area.Connect to a different network if this is supported by your service provider (see page 118).Phone or SIM card is locked. Unlock the phone or SIM card (see page 121).Call Barring is active. Deactivate Call Barring (see page 114).Cannot answer a call.Call Forwarding is active. Deactivate Call Forwarding (see page 115).Call Barring is active. Deactivate Call Barring (see page 114).No ringing for an incoming call.Phone is set to not ring for incoming calls.Edit the ringtone settings (see page 113).Problem Possible cause Possible solution
Troubleshooting133TroubleshootingPoor call quality. Network signal is weak. Move clear of any obstructions that may block the signal.Network signal is changing frequently, e.g. when travelling on a train.Wait until signal strength is consistently high before making or answering a call.Other party in a call cannot hear you.Phone is muted. Unmute the phone (see page 64).Cannot send or receive text messages.Your service provider is not enabling this service.Contact your service provider to check your subscription status.Cannot send or receive MMS messages.Your service provider is not enabling this service.Contact your service provider to check your subscription status.MMS settings are missing or incorrect.Ensure that the MMS settings are correct (see page 145). To obtain the settings, contact your service provider.Cannot access the Internet.Your service provider is not enabling this service.Contact your service provider to check your subscription status.Network settings are missing or incorrect.Ensure that the network settings are correct (see page 102). To obtain the settings, contact your service provider.Problem Possible cause Possible solution
Troubleshooting134TroubleshootingStorage memory is low.Too many items stored on the phone.Delete any unwanted messages, clear the Internet history, and delete any unwanted files.Storage card is not recognised.Storage card not installed correctly.Ensure that the storage card is inserted correctly (see page 43).Storage card is damaged. Replace the storage card.Problem Possible cause Possible solution
Annex 1 - Text input135Annex 1 - Text inputAnnex 1 - Text inputInput methodsYour Toshiba phone enables you to enter information in three different ways:•Typing - using the Input Panel.• Writing - using your finger, writing directly on the screen.• Drawing - using your finger, drawing directly on the screen.Input PanelThe Input Panel provides the following input methods:•Keyboard•Toshiba KeyboardThe Input Panel icon is displayed at the centre bottom of the screen when text input is possible.To open the Input Panel, tap the Input Panel icon. When you begin entering a word using any of the input methods, your Toshiba phone will suggest possible words. Tap one of the suggested words to enter it.Your Toshiba phone will learn words as you use them. They will then be used as suggested words in the future.KeyboardWith Keyboard, you use your finger to tap on the keyboard to enter characters.TIP: Tap and hold   to switch the Input Panel.TIP: Tap áü to enter miscellaneous letters and symbols.
Annex 1 - Text input136Annex 1 - Text inputToshiba KeyboardWith Toshiba Keyboard, you use your finger to tap on the keyboard to enter characters.Toshiba Keyboard consists of the following three keyboard layouts:•QWERTY pad - this has a similar layout to a PC keyboard.•Multi-tap pad - this has a similar layout to a conventional multi-tap mobile phone keypad.•Numeric/Symbol pad - this enables easy entry of numbers, symbols and special language characters.Tap the pad switch buttons (  and   for QWERTY pad,  for Multi-tap pad,  for Numeric/Symbol pad) to switch between the different pads.Writing and drawing on the screenWith your Toshiba phone, you can draw directly on the screen, write on the screen, and save notes in your own handwriting. To do this, you must first set the input mode in Notes to Writing. If you prefer to use handwriting or frequently add drawings to your notes, you may find it helpful to set Writing as the default input mode. If you prefer typed text, set Typing as the default input mode.To set the input mode for Notes:1. Access Notes.2. Tap  > Options.... 3. In the Default mode: field, select one of the following:•Writing - if you want to draw or enter handwritten text in a note.•Typing - if you want to create a typed note.4. Tap OK.
Annex 1 - Text input137Annex 1 - Text inputTo hand write a note:1. Access Notes.2. Tap .3. Tap  , and make sure that Draw is ticked.4. Write text on the screen.5. Tap OK when you have finished.To draw on the screen using your finger:1. Access Notes.2. Tap .3. Tap  , and make sure that Draw is ticked.4. Using your finger, draw over at least three ruled lines. A box labelled Drawing is displayed around the drawing.5. Tap OK when you have finished.NOTE: If a letter crosses three or more ruled lines, it is treated as a drawing rather than text.nTIP: To select a drawing (for example, to copy or delete it), tap and hold the drawing briefly. When you lift your finger, the drawing is selected.
Annex 2 - Navigating your Toshiba phone138Annex 2 - Navigating your Toshiba phoneAnnex 2  - Navigating yo ur Toshiba phon eThis section gives information about some of the main screens on your Toshiba phone. It also gives an overview of the menu structure of your phone.Phone screenYou can access the Phone screen in the following ways:•Tap Send key located below the touch screen.• Tap  , and then tap  .TIP: When you tap a key on the numeric keypad, a list of names and/or numbers is displayed. This list shows matching names and numbers from Contacts, Call History, Speed Dial and the SIM card.For example, if you tap 2, names beginning with A, B or C and phone numbers beginning with 2 are displayed.You can enter more characters to reduce the number of matching entries.To call an entry, tap it, then tap   or  .
Annex 2 - Navigating your Toshiba phone139Annex 2 - Navigating your Toshiba phoneWindows Mobile Start Screen StructureStartTodayPhoneText MessagesMessagingText MessagesOutlook E-mailSetup E-mailContactsInternet ExplorerCalendarSettingsBluetoothClock & AlarmsLockNetwork SettingsPowerPower Saving SettingsSounds & NotificationsHomeWi-Fi SettingsConnectionsBeamConnectionsDomain EnrollmentGPRS SettingsMail SettingsOperator SettingsUSB ModeWi-FiWireless ManagerPersonalButtonsOwner InformationPhoneToolbox SettingsSystemAboutAdjust Geomagnetic SensorAdjust Motion SensorBacklightBrowser SetttingsCertificatesCustomer Feedback
Annex 2 - Navigating your Toshiba phone140Annex 2 - Navigating your Toshiba phoneEncryptionError ReportingGPS SettingsInternal GPS SettingLocation RequestManaged ProgramsMaster ClearMemoryMotion Sensor SettingsRegional SettingsRemove ProgramsScreenSIM LockSleep Mode IndicatorTask ManagerVideo Quality SettingVolume SettingsMicrosoft My PhoneGetting StartedClock & AlarmsPictures & VideosWindows MediaMarketplaceWindows Live MessengerMicrosoft My PhoneMSN WeatherWindows LiveMSN MoneyCalculatorGamesSolitaireNotesTasksOffice MobileExcel MobileOneNote MobilePowerPoint MobileWord MobileFile ExplorerActiveSyncInternet SharingTask ManagerSearch PhoneHelpAdobe Reader LECamera
Annex 2 - Navigating your Toshiba phone141Annex 2 - Navigating your Toshiba phoneContacts BackupJavaPhotoBaseSIM ManagerStreaming PlayerVideo EditorSpb Mobile ShellSpb HomeCorePlayer
Annex 3 - Common status icons142Annex 3 - Common status iconsAnnex 3 - Common status iconsType Icon DescriptionRadio signal icons Signal strengthNo signalNo radio service. The phone has not yet connected to a network.Radio signal lost. The phone is searching for a signal.Phone set to Off.GPRS available3G+ availableEDGE available3G/UMTS availableHSDPA availableConnecting to GPRSConnecting to EDGEConnecting to 3G/UMTSConnecting to HSDPAActive GPRS connectionActive EDGE connectionActive 3G/UMTS connectionActive HSDPA connectionRoaming
Annex 3 - Common status icons143Annex 3 - Common status iconsConnectivity icons Pairing request received from another device.Incoming beam.Wi-Fi set to On.Wi-Fi network(s) in range.Animated - connecting to a Wi-Fi network.Static - connected to a Wi-Fi network.Call icons Call in progressData call in progressCall on holdSpeakerphone onCalls forwardedMissed callVolume icons Ringer on for incoming callsRinger off for incoming callsVibrate for incoming callsNotification icons New message(s) received (includes voice mail messages)*New voice mail message received*New instant message(s) receivedNew MMS message(s) receivedType Icon Description
Annex 3 - Common status icons144Annex 3 - Common status icons* The type of voice mail message indicator displayed is dependent on your service provider. Your service provider may also allow you to select the type of voice mail notification that you receive. Please contact your service provider for details.Notification icons Multiple notifications. This icon is displayed when there are multiple occurrences that would normally each display an icon, for example, when there is a missed call and a message received.This icon is displayed automatically after the last notification icon has been displayed briefly. You can tap this icon to view the individual notifications.Battery icons Battery levelBattery level lowBattery chargingActiveSync icons Synchronisation over GPRS in progressSynchronisation over EDGE in progressSynchronisation over 3G/UMTS in progressSynchronisation over Wi-Fi in progressSynchronisation errorOther icons Alarm pendingNo SIM cardType Icon Description
Annex 4 - Configuring SMS, MMS and e-mail145Annex 4 - Configuring SMS, MMS and e-mailAnnex 4 - Co nfiguring SMS, MMS an d e-mailSetting up text messages service centreTo set up the text messages service centre:1. Access Mail Settings.2. Tap SMS.3. Enter the required number in the Text messages service centre: field. This number can be obtained from your service provider.4. Tap OK.Configuring MMS settingsIf your Toshiba phone has not been preconfigured, you will need to manually enter the details of the MMS account. These details are available from your service provider.To configure MMS settings:1. Access Mail Settings.2. Tap MMS.3. Tap Add New.4. Enter the following details:•Server name: - enter a descriptive name, such as the name of your service provider.•Gateway: - enter the WAP gateway to be used for this connection.•Server address: - enter the URL address of the MMS server.5. Tap Next.6. Enter the following details:•Port number: - enter the HTTP port number for connecting to the MMS server and for file transfer.TIP: You can also set up the text messages service centre from the Phone settings by selecting Voice Mail and Text Messages on the Services screen, then tapping Get Settings....
Annex 4 - Configuring SMS, MMS and e-mail146Annex 4 - Configuring SMS, MMS and e-mail•Message sending size limit: - select the maximum MMS message size permitted by your service provider.•Connect via: - select the connection point for the MMS server.7. Tap OK.Setting up e-mail accountsSetting up an e-mail account automaticallyTo set up an e-mail account automatically:1. Access Messaging. (Tap   > E-mail.)2. Tap Setup E-mail.3. In the E-mail address: field, enter the e-mail address for this account. 4. Enter a password in the Password: field.5. Tick the Save password checkbox if you wish to save your password to your Toshiba phone. This will mean that you do not need to enter it each time you connect to your e-mail server. This may or may not be required by your internet service provider (ISP).TIP: If you have several MMS providers, you can set one as the default. To do this, tap the required entry, then tap Default. A check mark is displayed next to the default MMSC entry. TIP: Choose a strong password - strengthen the security of your password by selecting a combination of alphabet and numeric characters.
Annex 4 - Configuring SMS, MMS and e-mail147Annex 4 - Configuring SMS, MMS and e-mail6. Tap Next.7. Ensure that the Try to get e-mail settings automatically from the Internet is ticked, then tap Next.If the account has set up successfully, you are prompted to send and receive e-mail.If the account has not set up successfully, tap Next and then set up the account manually.Setting up a Gmail or Yahoo! Mail account automaticallyTo set up Gmail or Yahoo! Mail account automatically:1. Access Messaging. (Tap   > E-mail.)2. Tap Setup E-mail.3. In the E-mail address: field, enter the e-mail address for this account.4. Enter a password in the Password: field.5. Tick the Save password checkbox if you wish to save your password to your Toshiba phone. This will mean that you do not need to enter it each time you connect to your e-mail server.6. Tap Next twice.7. Enter your name in the Your name: field. Modify the name for this account on your Toshiba phone in the Account display name: field if required.8. Tap Next.9. Select the frequency with which to send and receive your e-mail in the Automatic Send/Receive: field.10.Tap the Review all download settings link to set the following additional settings if required:The Download messages: field enables you to set the time range for downloading messages from the server. Tap Advanced Settings to edit additional settings for sending, receiving and deleting e-mails if required. Tap Done, then Next WARNING: If you save your password and then lose your Toshiba phone, you run the risk of someone else being able to access your e-mail account.!
Annex 4 - Configuring SMS, MMS and e-mail148Annex 4 - Configuring SMS, MMS and e-mailwhen you have finished.11.Select the format for sending messages (HTML or Plain Text) in the Message format: field.12.Select the download size limitation in the Message download limit: field.13.Select the download preferences for attachments in IMAP4 e-mails in the Download attachments: field.14.Tap Finish.Setting up a Hotmail account automaticallyTo set up a hotmail account automatically:1. Access Messaging. (Tap   > E-mail.)2. Tap Setup E-mail.3. In the E-mail address: field, enter the e-mail address for this account.4. Enter a password in the Password: field.5. Tick the Save password checkbox if you wish to save your password to your Toshiba phone. This will mean that you do not need to enter it each time you connect to your e-mail server. Tap Next twice. (Set up Roaming Settings as required, then tap Done.)6. Select Accept or Reject for the Windows Live Terms of Use. If you Accept, go to the next step.7. Tick Windows Live services for showing Windows Live on the Today screen, then tap Next.8. Choose among the options on the screen, then tap Next.9. Tap Done when finished.Setting up an Internet or custom domain e-mail account manuallyYou will need to set up an Internet or custom domain e-mail account if your e-mail provider supports POP or IMAP e-mail. Contact your e-mail provider for further information.A custom domain e-mail account has an address hosted by a different provider than indicated by the domain. For example, your e-mail address may be “user@mycompany.com”,
Annex 4 - Configuring SMS, MMS and e-mail149Annex 4 - Configuring SMS, MMS and e-mailalthough “live.com” hosts the account and provides the messaging services.To set up an Internet or custom domain e-mail account manually:1. Access Messaging. (Tap   > E-mail.)2. Tap Setup E-mail.3. In the E-mail address: field, enter the e-mail address for this account. 4. Enter a password in the Password: field.5. Tick the Save password checkbox if you wish to save your password to your Toshiba phone. This will mean that you do not need to enter it each time you connect to your e-mail server. This may or may not be required by your internet service provider (ISP).6. Tap Next.7. Untick the Try to get e-mail settings automatically from the Internet checkbox, then tap Next.8. In the Your e-mail provider: field, select Internet e-mail or Custom domain as required.9. Tap Next.10.If you are setting up a custom domain e-mail account, enter the domain of your e-mail address provider in the E-mail provider domain: field, then tap Next.11.Enter the name that you want displayed when you send e-mail in the Your name: field.12.Enter a unique name for this account in the Account display name: field, then tap Next.13.Enter the name of the incoming server in the Incoming mail server: field.14.Select the server type that hosts your e-mail mailbox in the Account type: list (POP3 or IMAP4), then tap Next.NOTE: Before setting up the account, you will need to obtain the required information from your e-mail provider.nNOTE: This name cannot be changed later.n
Annex 4 - Configuring SMS, MMS and e-mail150Annex 4 - Configuring SMS, MMS and e-mail15.Enter the user name assigned to you by your ISP in the User name: field. This is usually the first part of your e-mail address, before the ‘@’ sign.16.Tap Next.17.Enter the name of the outgoing server in the Outgoing (SMTP) mail server: field.18.Tick the Outgoing server requires authentication checkbox if the outgoing server requires authentication. This authentication will use the user name and password that you have already entered.19.Tick the Use the same user name and password for sending e-mail checkbox if required.20.Tap the Advanced Server Settings link to set the following additional settings if required.Tick the checkboxes if you wish to enable Secure Sockets Layer (SSL) connection.The Network connection: field enables you to select the network to which your e-mail server connects.Tap Done when you have finished.21.Tap Next.22.Select the frequency with which to send and receive your e-mail in the Automatic Send/Receive: field.23.Tap the Review all download settings link to set the following additional settings if required:The Download messages: field enables you to set the time range for downloading messages from the server.Tap Advanced Settings to edit additional settings for sending, receiving and deleting e-mails if required.IMPORTANT: SSL connection enables you to send and/or receive personal information more securely. If you select one or both of these options and your ISP does not support SSL connection, you will not be able to send and/or receive e-mail.
Annex 4 - Configuring SMS, MMS and e-mail151Annex 4 - Configuring SMS, MMS and e-mailTap Done, then Next when you have finished.24.Select the format for sending messages (HTML or Plain Text) in the Message format: field.25.Select the download size limitation in the Message download limit: field.26.Select the download preferences for attachments in IMAP4 e-mails in the Download attachments: field.27.Tap Finish.Setting up an Outlook e-mail account manuallyAn Outlook e-mail account is created and managed by a Microsoft Exchange server, usually within a company or other organisation.To set up an Outlook e-mail account manually:1. Access Messaging.  (Tap   > E-mail.)2. Tap Setup E-mail.3. In the E-mail address: field, enter the e-mail address for this account. NOTE: You need to have an e-mail account set up on the Exchange server before you can receive e-mails from this account on your Toshiba phone. Contact the administrator of the Exchange server for further information.NOTE: Before setting up the account, you will need to obtain the required information about the Exchange server. Contact the administrator of the Exchange server for further information.nn
Annex 4 - Configuring SMS, MMS and e-mail152Annex 4 - Configuring SMS, MMS and e-mail4. Enter the password of your Outlook e-mail account in the Password: field.5. Tick the Save password checkbox if you wish to save your password to your Toshiba phone. This will mean that you do not need to enter it each time you connect to your e-mail server. This may or may not be required by your internet service provider (ISP).6. Tap Next.7. Untick the Try to get e-mail settings automatically from the Internet checkbox, then tap Next.8. In the Your e-mail provider: field, select Exchange server, then tap Next.9. Tap Next.10.Tap Next.11.Enter the address of the Exchange server in the Server address: field.12.If the Exchange server uses SSL, ensure that the This server requires an encrypted (SSL) connection checkbox is ticked.13.Tap Next.14.Make sure that the user name and password information is correct.15.Enter the Exchange server domain in the Domain: field, then tap Next.16.Select the data that you would like to synchronise with the Exchange server (from Contacts, Text Messages, E-mail, Calendar and Tasks).17.Tap Finish.18.Wait for the synchronisation to finish. This may take several minutes.
Annex 4 - Configuring SMS, MMS and e-mail153Annex 4 - Configuring SMS, MMS and e-mailGeneral messaging optionsYou can customise the options for your Messaging accounts, message options, addressing, and message storage.To access the Messaging options:1. Access Messaging.  (Tap   > E-mail.)2. Tap Menu > Options.3. Customise the following options as required:•Accounts screen - enables you to change the settings for each messaging account.Tap New Account... to set up a new messaging account. •Message screen - enables you to change options for sending and deleting messages.Tick the Display account picker when opening Messaging checkbox if you would like to select the messaging account each time you open Messaging. •Address screen - enables you to select whether to check Contacts as well as any online address books for e-mail addresses.You can also add online address books and select which ones to use for e-mail address checking.•Storage screen - enables you to check the memory space of your phone, storage card and attachments. You can also select whether to store attachments on a storage card, and specify how deleted items are emptied.Inserting a signatureTo create a signature and insert it in messages:1. Access Messaging.  (Tap   > E-mail.)2. Tap Menu > Options.3. On the Accounts screen, tap Signatures.... 4. In the Select an account: field, select the account for which you are creating the signature. 5. Tick the Use signature with this account checkbox. 6. To insert a signature in every message you send, tick the Use when replying and forwarding checkbox. If this checkbox is
Annex 4 - Configuring SMS, MMS and e-mail154Annex 4 - Configuring SMS, MMS and e-mailnot ticked, the signature is inserted in new messages only. 7. Enter the signature.8. Tap OK twice.
Annex 5 - Configuring internet settings155Annex 5 - Configuring internet settingsAnnex 5 - Conf iguring internet setting sSetting up a GPRS connectionGPRS is a packet-based wireless communication service which enables data to be sent and received using mobile phones.You can use GPRS to connect to the Internet or to send and receive MMS messages using your phone. When you use GPRS, you will usually be billed based on the data traffic volume. However, you should check billing information with your service provider.To set up a GPRS connection manually:1. Access Network Settings.2. Tap Network Settings.3. Select Cellular Line (GPRS), then tap Next.4. In the Access point name: field, enter the GPRS access point name (APN) for your service provider, then tap Next.5. In the User name: field, enter your user name for the network, then tap Next.6. In the Password: field, enter your password for the network, then tap Next.7. If you need to specify extra settings, tap one or more of the following items and enter the required information:•Domain - enter the domain name, then tap OK.NOTE: Before you begin, you will need to obtain the following information:• From your phone service provider - data connectivity plan information, access point name, and PAP/CHAP security settings.• From your ISP or wireless service provider - access point name, user name and password, and other security information.nNOTE: Before setting up a GPRS connection, you will need to obtain the required settings from your service provider. As a minimum, the access point name will be required.n
Annex 5 - Configuring internet settings156Annex 5 - Configuring internet settings•IP Address - select Use server-assigned IP address to automatically configure the IP address. Otherwise, select Use specific IP address and manually enter the IP address.Tap Next.Tick the checkbox(es) for the required types of compression, then tap OK.•Server Address - to automatically configure the server address, select Use server-assigned address, then tap OK.Otherwise, select Use specific server address to manually enter the server address information in the Primary DNS:, Secondary DNS:, Primary WINS:, and Secondary WINS: fields.Tap OK.8. Authentication - select one of the following:•None - no authentication (default).•CHAP - use Challenge Handshake Authentication Protocol.•PAP - use Password Authentication Protocol.Tap OK.9. Tap OK.10.In the ISP name: field, enter a name for the GPRS connection.11.Tap OK.Setting up a dial-up connectionTo set up a dial-up connection:1. Access Network Settings.2. Tap Network Settings.3. Select Cellular Line, then tap Next.4. In the Dialling number: field, enter the phone number used to dial the network, then tap Next.NOTE: Before setting up a dial-up connection, you will need to obtain the required settings from your service provider.n
Annex 5 - Configuring internet settings157Annex 5 - Configuring internet settings5. Enter the required information. See Setting up a GPRS connection for details.6. Tap OK.Setting up a VPN connectionTo set up a VPN connection:1. Access Network Settings.2. Tap Advanced.3. On the Tasks screen, tap Add a new VPN server connection in the My Work Network section.4. Enter the following information:•Name: - name for the connection.•Host name/ IP: - name of the VPN server.•VPN type: - select the type of VPN.5. Tap Next.6. If you selected IPSec/L2TP in the VPN type: field, select the type of authentication.Enter the pre-shared key if required.Tap Next.7. Enter the required information. See Setting up a GPRS connection for details.8. Tap Finish.IMPORTANT: Please ensure that you have set up a GPRS connection before attempting to set up a VPN connection. The VPN connection uses the GPRS connection to connect to a network, such as a corporate network.NOTE: Before setting up a VPN connection, you will need to obtain the required settings.n
Annex 5 - Configuring internet settings158Annex 5 - Configuring internet settingsSetting up a proxy connectionDepending on your service provider's configuration, you may need to add a proxy connection to allow your Toshiba phone to access the Internet or WAP services.Your service provider will be able to advise whether you need to create a proxy connection.To set up a proxy connection:1. Access Network Settings.2. Tap Advanced.3. On the Tasks screen, tap Set up my proxy server for the required group.4. On the Proxy Settings screen, tick the This network connects to the Internet and This network uses a proxy server to connect to the Internet checkboxes.5. In the Proxy server: field, enter the name of the proxy server.6. If you need to specify extra settings, tap the Advanced... button and edit the settings as required.Tap OK when you have finished.7. Tap OK.NOTE: Before setting up a proxy connection, you will need to obtain the required settings from your service provider.n
Annex 5 - Configuring internet settings159Annex 5 - Configuring internet settingsConnecting to intranet URLsSome URLs for corporate intranet pages may use ‘.’ characters, for example: intranet.companyname.com. To view these pages, you need to set up a URL exception.To set up a URL exception:1. Access Network Settings.2. Tap Advanced.3. Select Advanced on the upper screen menu.4. Tap the Exceptions... button.5. Tap Add new URL.... 6. In the Work URL: field, enter the required URL.7. Tap OK three times.
Toshiba Corporation160Toshiba CorporationToshiba Corp orationEnd User License AgreementThis End User License Agreement ("EULA") is a legal agreement between you (as the user) and TOSHIBA CORPORATION ("Toshiba") with regard to the copyrighted software installed in a Toshiba 3G mobile phone supplied to you (the "Phone").Use or employment of any software installed in the Phone and related documentations (the "Software") will constitute your acceptance of these terms, unless separate terms are provided by the Software supplier on the Phone, in which case certain additional or different terms may apply. If you do not agree with the terms of this EULA, do not use or employ the Software.1.  License Grant. Toshiba grants to you a personal, non-transferable and non-exclusive right to use the Software as set out in this EULA. Modifying, adapting, translating, renting, copying, making available, transferring or assigning all or part of the Software, or any rights granted hereunder, to any other persons, and removing any proprietary notices, labels or marks from the Software is strictly prohibited, except as expressly permitted in this EULA. Furthermore, you hereby agree not to create derivative works based on the Software.2.  Copyright. The Software is licensed, not sold. You acknowledge that no title to the intellectual property in the Software is or will be transferred to you. You further acknowledge that title and full ownership rights to the Software will remain the exclusive property of Toshiba, Toshiba's affiliates, and/or their suppliers, and you will not acquire any rights to the Software, except as expressly set out in this EULA. You may keep a backup copy of the Software only so far as necessary for its lawful use. All copies of the Software must contain the same proprietary notices as contained in the Software and are subject to the terms of this EULA. All rights not expressly granted under this EULA are reserved to Toshiba, Toshiba's affiliates and/or their suppliers.3.  Reverse Engineering. You agree that you will not attempt, and if you are a business organisation, you will use your best efforts to prevent your employees, workers and contractors from attempting, to reverse engineer, decompile, modify, translate or disassemble the Software in whole or in part except to the extent that such actions cannot be excluded by mandatory applicable law and only if those actions are taken in accordance with such applicable law. Any failure to comply with the above or any other terms and conditions contained herein will result in the automatic termination of this license and the reversion of the rights granted hereunder to Toshiba.4.  LIMITED WARRANTY. Only during the warranty period for the Phone, Toshiba, Toshiba's affiliates, its suppliers or its authorised service company will repair or replace, at Toshiba's sole discretion, defective Software unless such defect results from acts or incidences beyond the reasonable control of Toshiba. EXCEPT AS PROVIDED IN THIS EULA:(A) TOSHIBA, TOSHIBA'S AFFILIATES, AND THEIR SUPPLIERS DISCLAIM ALL WARRANTIES, CONDITIONS OR OTHER TERMS (WHETHER EXPRESS OR IMPLIED), INCLUDING BUT NOT LIMITED TO WARRANTIES, CONDITIONS AND TERMS OF SATISFACTORY QUALITY, MERCHANTABILITY, FITNESS FOR A PARTICULAR PURPOSE AND NON-INFRINGEMENT OF THIRD-PARTY RIGHTS; AND (B) THE ENTIRE RISK AS TO THE QUALITY AND PERFORMANCE OF THE SOFTWARE IS WITH YOU. YOU ACCEPT THAT THE SOFTWARE MAY NOT MEET YOUR REQUIREMENTS AND NO WARRANTY CAN BE GIVEN THAT OPERATION OF THE SOFTWARE WILL BE UNINTERRUPTED OR ERROR-FREE.IMPORTANT: PLEASE READ THE FOLLOWING BEFORE USING YOUR MOBILE PHONE AS ATTEMPTING TO USE ANY SOFTWARE ON THE SUPPLIED PHONE CONSTITUTES YOUR ACCEPTANCE OF THESE EULA TERMS. IF YOU REJECT OR DO NOT AGREE WITH ALL THE TERMS OF THIS EULA, PLEASE DO NOT ATTEMPT TO ACCESS OR USE THE SUPPLIED SOFTWARE.
Toshiba Corporation161Toshiba Corporation5.  LIMITATION OF LIABILITY. TO THE FULLEST EXTENT LEGALLY PERMITTED, IN NO EVENT SHALL TOSHIBA, TOSHIBA'S AFFILIATES OR THEIR SUPPLIERS BE LIABLE TO YOU FOR ANY DAMAGES FOR (A) LOST BUSINESS OR REVENUE, BUSINESS INTERRUPTION, LOSS OF BUSINESS DATA; OR (B) CONSEQUENTIAL, SPECIAL, INCIDENTAL OR INDIRECT DAMAGES OF ANY KIND (WHETHER UNDER CONTRACT, TORT OR OTHERWISE) ARISING OUT OF: (I) THE USE OR INABILITY TO USE THE SOFTWARE, EVEN IF TOSHIBA, TOSHIBA'S AFFILIATES OR THEIR SUPPLIER HAS BEEN ADVISED OF THE POSSIBILITY OF SUCH DAMAGES; OR (II) ANY CLAIM BY A THIRD PARTY.SAVE AS SET OUT IN THIS SECTION, TOSHIBA'S ENTIRE LIABILITY UNDER THIS EULA SHALL NOT EXCEED THE PRICE PAID FOR THE SOFTWARE, IF ANY. THE ABOVE DISCLAIMER AND LIMITATION DOES NOT EXCLUDE OR LIMIT (A) LIABILITY FOR DEATH OR PERSONAL INJURY CAUSED BY NEGLIGENCE; OR (B) ANY MANDATORY LEGAL RIGHT OR LIABILITY TO THE EXTENT THAT IT CANNOT BE LAWFULLY EXCLUDED OR LIMITED UNDER APPLICABLE LAW. P LE ASE MAK E AND RETAIN A C OPY OF A LL  DA TA  YOU HAVE INSERTED INTO YOUR PRODUCT, FOR EXAMPLE NAMES, ADDRESSES, PHONE NUMBERS, PICTURES, RINGTONES ETC., BEFORE SUBMITTING YOUR PRODUCT FOR A WARRANTY SERVICE, AS SUCH DATA MAY BE DELETED OR ERASED AS PART OF THE REPAIR OR SERVICE PROCESS.6.  Laws. This EULA will be governed by the laws of England and Wales. All disputes arising out of this EULA shall be subject to the exclusive jurisdiction of the English Courts.7.  Export Laws. Any use, duplication or employment of the Software involves products and/or technical data that may be controlled under the export laws of applicable countries or region, and may be subject to the approval of the applicable governmental authorities prior to export. Any export, directly or indirectly, in contravention of the export laws of applicable countries or region is prohibited.8.  Third Party Beneficiary. You agree that certain suppliers of the Software to Toshiba have a right as a third party beneficiary to enforce the terms of this EULA against you as a user.9.  Transfers. The Software may be transferred only as installed on the Phone to a lawful third party user, where that party accepts the terms of this EULA, which will continue to apply.10.  IF YOU ARE DEALING AS A CONSUMER IN THE UK AND THE SOFTWARE QUALIFIES AS 'GOODS', YOUR STATUTORY RIGHTS UNDER APPLICABLE LAW ARE NOT AFFECTED.11.  The Software is subject to change for upgrading purposes without prior notice.EU WarrantyYour Toshiba phone, battery and AC charger contain no user serviceable parts. For further information on service, please contact your retailer or service provider.
End User License Agreements (EULAs)162End User License Agreements (EULAs)End User Lic ense Agreements (EU LAs)MICROSOFT SOFTWARE LICENSE TERMS FOR WINDOWS MOBILE 6.5 SOFTWAREThese license terms are an agreement between you and TOSHIBA. Please read them. They apply to the software included on this device. The software also includes any separate media on which you received the software.The software on this device includes software licensed by TOSHIBA from Microsoft Corporation or its affiliate.The terms also apply to any•updates,• supplements,• Internet-based services, and• support servicesfor this software, unless other terms accompany those items. If so, those terms apply.As described below, using some features also operates as your consent to the transmission of certain standard computer information for Internet-based services.By using the software, including use on this device, you accept these terms. If you do not accept them, do not use the device or software. Instead, contact TOSHIBA to determine its return policy for a refund or credit.WARNING: If the software contains voice operated technologies, then operating this software requires user attention. Diverting attention away from the road while driving can possibly cause an accident or other serious consequence. Even occasional, short diversions of attention can be dangerous if your attention is diverted away from your driving task at a critical time. TOSHIBA and Microsoft make no representations, warranties or other determinations that ANY use of this software is legal, safe, or in any manner recommended or intended while driving or otherwise operating a motor vehicle.If you comply with these license terms, you have the rights below.1.  USE RIGHTS. You may use the software on the device with which you acquired the software.2.  ADDITIONAL LICENSING REQUIREMENTS AND/OR USE RIGHTS.a.  Specific Use. TOSHIBA designed this device for a specific use. You may only use the software for that use.b.  Included Microsoft Programs and Additional Required Licenses. Except as provided below, these license terms apply to all Microsoft programs included with the software. If the license terms with any of those programs give you other rights that do not expressly conflict with these license terms, you also have those rights.i.  This agreement does not grant you any rights with respect to the Windows Mobile Device Center, Microsoft ActiveSync or Microsoft Outlook 2007 Trial which are subject to the licenses accompanying those items.c.  Speech Recognition. If the software includes speech recognition component(s), you understand that speech recognition is an inherently statistical process and that recognition errors are inherent in the process. Neither TOSHIBA nor Microsoft or their suppliers shall be liable for any damages arising out of errors in the speech recognition process.d.  Phone Functionality. If the device software includes phone functionality, all or certain portions of the device software may be inoperable if you do not have and maintain a service account with a wireless telecommunication carrier ("Mobile Operator"), or if the Mobile Operator's network is not operating or configured to operate with the device.3.  SCOPE OF LICENSE. The software is licensed, not sold. This agreement only gives you some rights to use the software. TOSHIBA and Microsoft reserve all other rights. Unless applicable law gives you more rights despite this limitation, you
End User License Agreements (EULAs)163End User License Agreements (EULAs)may use the software only as expressly permitted in this agreement. In doing so, you must comply with any technical limitations in the software that allow you to use it only in certain ways. You shall not:• work around any technical limitations in the software;• reverse engineer, decompile or disassemble the software;• make more copies of the software than specified in this agreement;• publish the software for others to copy;• rent, lease or lend the software; or• use the software for commercial software hosting services.Except as expressly provided in this agreement, rights to access the software on this device do not give you any right to implement Microsoft patents or other Microsoft intellectual property in software or devices that access this device.You may use remote access technologies in the software such as Remote Desktop Mobile to access the software remotely from a computer or server. You are responsible for obtaining any licenses required for use of the protocols to access other software.4.  INTERNET-BASED SERVICES. Microsoft provides Internet-based services with the software. Microsoft may change or cancel them at any time.a.  Consent for Internet-based Services. The software features described below connect to Microsoft or service provider computer systems over the Internet. In some cases, you will not receive a separate notice when they connect. You may switch off some of these features or not use them. For more information about these features, visithttp://go.microsoft.com/fwlink/?LinkId=81931. By using these features, you consent to the transmission of this information. Microsoft does not use the information to identify or contact you.Device Information. The following features use Internet protocols, which send to the appropriate systems device information, such as your Internet protocol address, the type of operating system, browser and name and version of the software you are using, and the language code of the device where you installed the software. Microsoft uses this information to make the Internet-based services available to you. •Windows Mobile Update Feature. The Windows Mobile Update feature provides you the ability to obtain and install software updates on your device if updates are available. You may choose not to use this feature. TOSHIBA and/or your Mobile Operator may not support this feature or an update for your device.•Windows Media Digital Rights Management. Content owners use Windows Media digital rights management technology (WMDRM) to protect their intellectual property, including copyrights. This software and third party software use WMDRM to play and copy WMDRM-protected content. If the software fails to protect the content, content owners may ask Microsoft to revoke the software's ability to use WMDRM to play or copy protected content. Revocation does not affect other content. When you download licenses for protected content, you agree that Microsoft may include a revocation list with the licenses. Content owners may require you to upgrade WMDRM to access their content. Microsoft software that includes WMDRM will ask for your consent prior to the upgrade. If you decline an upgrade, you will not be able to access content that requires the upgrade.b.  Misuse of Internet-based Services. You shall not use these services in any way that could harm them or impair anyone else's use of them. You shall not use the services to try to gain unauthorized access to any service, data, account or network by any means.5.  NOTICES ABOUT THE MPEG-4 VISUAL STANDARD. The software may include MPEG-4 visual decoding technology. This technology is a format for data compression of video information. MPEG LA, L.L.C. requires this notice: USE OF THIS PRODUCT IN ANY MANNER THAT COMPLIES
End User License Agreements (EULAs)164End User License Agreements (EULAs)WITH THE MPEG 4 VISUAL STANDARD IS PROHIBITED, EXCEPT FOR USE DIRECTLY RELATED TO (A) DATA OR INFORMATION (i) GENERATED BY AND OBTAINED WITHOUT CHARGE FROM A CONSUMER NOT THEREBY ENGAGED IN A BUSINESS ENTERPRISE, AND (ii) FOR PERSONAL USE ONLY; AND (B) OTHER USES SPECIFICALLY AND SEPARATELY LICENSED BY MPEG LA, L.L.C. If you have questions about the MPEG-4 visual standard, please contact MPEG LA, L.L.C., 250 Steele Street, Suite 300, Denver, CO 80206; www.mpegla.com.6.  DIGITAL CERTIFICATES. The software uses digital certificates in X.509 format. These digital certificates are used for authentication.7.  CONNECTIVITY SOFTWARE. Your device package may include Windows Mobile Device Center or Microsoft ActiveSync software. If it is included, then you may install and use it in accordance with the license terms that are provided with it. If no license terms are provided, then you may install and use only one (1) copy of the software on a single computer.8.  NETWORK ACCESS. If you are using a network, such as an employer network, the network administrator may limit features or functionality on your device.9.  PRODUCT SUPPORT. Contact TOSHIBA for support options. Refer to the support information provided with the device.10.  LINKS TO THIRD PARTY WEBSITES. If the software provides links to third party websites, those links are provided to you only as a convenience, and the inclusion of any link does not imply an endorsement of the third party website by Microsoft.11.  BACKUP COPY. You may make one backup copy of the software. You may use it only to reinstall the software on the device.12.  PROOF OF LICENSE. If you acquired the software on the device, or on a disc or other media, a genuine Certificate of Authenticity label with a genuine copy of the software identifies licensed software. To be valid, this label must be affixed to the device, or included on or in TOSHIBA's software packaging. If you receive the label separately, it is not valid. You should keep the label on the device or packaging to prove that you are licensed to use the software. To identify genuine Microsoft software, see http://www.howtotell.com.13.  TRANSFER TO A THIRD PARTY. You may transfer the software only with the device, the Certificate of Authenticity label, and these license terms directly to a third party. Before the transfer, that party must agree that these license terms apply to the transfer and use of the software. You may not retain any copies of the software including the backup copy.14.  NOT FAULT TOLERANT. The software is not fault tolerant. TOSHIBA installed the software on the device and is responsible for how it operates on the device. 15.  RESTRICTED USE. The Microsoft software was designed for systems that do not require fail-safe performance. You may not use the Microsoft software in any device or system in which a malfunction of the software would result in foreseeable risk of injury or death to any person. This includes operation of nuclear facilities, aircraft navigation or communication systems and air traffic control.16.  NO WARRANTIES FOR THE SOFTWARE. The software is provided "as is". You bear all risks of using it. Microsoft gives no express warranties, guarantees or conditions. Any warranties you receive regarding the device or the software do not originate from, and are not binding on, Microsoft or its affiliates. When allowed by your local laws, TOSHIBA and Microsoft exclude implied warranties of merchantability, fitness for a particular purpose and non-infringement. 17.  LIABILITY LIMITATIONS. You can recover from Microsoft and its affiliates only direct damages up to fifty U.S. Dollars (U.S. $50.00), or equivalent in local currency. You cannot recover any other damages, including consequential, lost profits, special, indirect or incidental damages.
End User License Agreements (EULAs)165End User License Agreements (EULAs)This limitation applies to: • anything related to the software, services, content (including code) on third party internet sites, or third party programs, and • claims for breach of contract, breach of warranty, guarantee or condition, strict liability, negligence, or other tort to the extent permitted by applicable law.It also applies even if Microsoft should have been aware of the possibility of the damages. The above limitation may not apply to you because your country may not allow the exclusion or limitation of incidental, consequential or other damages.18.  EXPORT RESTRICTIONS. The software is subject to United States export laws and regulations. You must comply with all domestic and international export laws and regulations that apply to the software. These laws include restrictions on destinations, end users and end use. For additional information, see www.microsoft.com/exporting.End User License Agreement for ArcSoft SoftwareThe following is a legal software license agreement between you, the software end user, and ArcSoft, Inc. Carefully read this license agreement before using the relevant ArcSoft software ("Software"). Installing the Software on a computer or other hardware device indicates that you have read this license agreement and agree to its terms.1.  Grant of License. This license permits you to use one copy of the Software included in this package or product on any single computer. For each software licensee, the program can be "in use" on only one computer or hardware device at any given time. The Software is "in use" when it is either loaded into RAM or installed into the hard disk or other permanent memory of a computer or other hardware device. A special license permit from ArcSoft is required if the program is going to be installed on a network server for the sole purpose of distribution to other computers. You may not modify, translate, reverse assemble, decompile, disassemble or otherwise attempt (i) to defeat, avoid, bypass, remove, deactivate or otherwise circumvent any software protection mechanisms in the Software, including without limitation any such mechanism used to restrict or control the functionality of the Software, or (ii) to derive the source code or the underlying ideas, algorithms, structure or organization from the Software (except to the extent that such activities may not be prohibited under applicable law).2.  Copyright. The Software contained in this package or device is protected by United States copyright laws, international treaty provisions, and all other applicable national laws. The Software must be treated like all other copyrighted materials (e.g. books and musical recordings). This license does not allow the Software to be rented or leased, and the written materials accompanying the Software (if any) may not be copied.
End User License Agreements (EULAs)166End User License Agreements (EULAs)3.  Ownership. Title, ownership rights, and all intellectual property rights in and to the Software and any accompanying documentation, and any copy of the foregoing, shall remain the sole and exclusive property of ArcSoft and/or its third party licensors. You agree to abide by the copyright law and all other applicable laws. You acknowledge that the Software contains valuable confidential information and trade secrets of ArcSoft and/or its third party licensors.4.  Warranty Disclaimer. NO WARRANTIES, EITHER EXPRESS OR IMPLIED, ARE MADE WITH RESPECT TO THIS SOFTWARE, INCLUDING BUT NOT LIMITED TO THE IMPLIED WARRANTIES OF MERCHANTABILITY AND FITNESS FOR A PARTICULAR PURPOSE AND WARRANTIES FOR NON-INFRINGEMENT OF INTELLECTUAL PROPERTY, AND ARCSOFT EXPRESSLY DISCLAIMS ALL WARRANTIES NOT STATED HEREIN. YOU ASSUME THE ENTIRE RISK AS TO THE QUALITY AND PERFORMANCE OF THE SOFTWARE. SHOULD THE SOFTWARE PROVE DEFECTIVE, YOU, AND NOT ARCSOFT OR AN AUTHORIZED RESELLER, ASSUME THE ENTIRE COST OF NECESSARY SERVICING, REPAIR, OR CORRECTION. SOME STATES DO NOT ALLOW THE EXCLUSION OF IMPLIED WARRANTIES, SO THE ABOVE EXCLUSION MAY NOT APPLY TO YOU. THIS WARRANTY GIVES YOU SPECIFIC LEGAL RIGHTS, AND YOU MAY ALSO HAVE OTHER RIGHTS THAT VARY FROM STATE TO STATE.YOUR SOLE REMEDY AND THE ENTIRE LIABILITY OF ARCSOFT ARE SET FORTH ABOVE. IN NO EVENT WILL ARCSOFT BE LIABLE TO YOU OR ANY OTHER PERSON FOR ANY DAMAGES, INCLUDING ANY INCIDENTAL OR CONSEQUENTIAL DAMAGES, EXPENSES, LOST PROFITS, LOST SAVINGS, OR OTHER DAMAGES ARISING OUT OF USE OF OR INABILITY TO USE SUCH SOFTWARE.5.  No Liability for Consequential Damages. In no event shall ArcSoft be liable for any damages whatsoever (including but not limited to damages for loss of business profits, business interruption, loss of business information, or any other pecuniary loss) which results from an inability to use this Software, even if ArcSoft, Inc. has been advised of the possibility of such damages. Because some states/jurisdictions do not allow the exclusion or limitation of consequential or incidental damages, the above limitations may not apply to you.6.  Export. Subject to permission of the appropriate United States or foreign licenses, export or re-export the product incorporating the Software is able to be made.7.  U.S. Government Restricted Rights. If you are a unit or agency of the United States government, the Software and related documentation are deemed to be "commercial computer software" and "commercial computer software documentation," respectively, pursuant to DFAR Section 227.7202 and FAR Section 12.212(b), as applicable. Any use, modification, reproduction, release, performing, displaying or disclosing of the Software and/or the related documentation by the United States government shall be governed solely by the terms of this Agreement and shall be prohibited except to the extent expressly permitted by the terms of this Agreement. Any technical data provided that is not covered by the above provisions is deemed to be "technical data commercial items" pursuant to DFAR Section 227.7015(a). Any use, modification, reproduction, release, performing, displaying or disclosing of such technical data shall be governed by the terms of DFAR Section 227.7015(b).8.  High Risk Activities. The Software is not fault-tolerant and is not designed or intended for use in hazardous environments requiring fail-safe performance, or any other application in which the failure of the Software could lead directly to death, personal injury, or severe physical or property damage (collectively, "High Risk Activities"). ARCSOFT EXPRESSLY DISCLAIMS ANY EXPRESS OR IMPLIED WARRANTY OF FITNESS FOR HIGH RISK ACTIVITIES.
End User License Agreements (EULAs)167End User License Agreements (EULAs)9.  Termination. Your rights with respect to the Software may be terminated, either immediately or after a notice period not exceeding thirty (30) days, upon unauthorized copying of the Software or failure to comply with the restrictions contained in this license agreement. Upon termination of the license, you shall cease to use thereof.10.  Governing Law. If this product was purchased in the United States, this Agreement is governed by the laws of the state of California; otherwise, local laws may apply.
Licenses168LicensesLicensesSnapdragon™ is a trademark of Qualcomm Incorporated.Microsoft, Windows, Windows Mobile, Windows Live, Hotmail, Windows Media, ActiveSync, Internet Explorer, Outlook, Excel, PowerPoint and Word are either registered trademarks or trademarks of Microsoft Corporation in the United States and/or other countries.ArcSoft and the ArcSoft logo are registered trademarks of ArcSoft, Inc.The Bluetooth™ word mark and logos are trademarks owned by Bluetooth SIG, Inc.CorePlayer® is a registered trademark of CoreCodec, Inc.Java™ and all Java-based marks are trademarks or registered trademarks of Sun Microsystems, Inc.
Licenses169LicensesmicroSD™ and the microSD™ logo are trademarks.Nimbuzz and the Nimbuzz logo trademarks of Nimbuzz.The Wi-Fi CERTIFIED Logo is a certification mark of the Wi-Fi Alliance.
Index170IndexIndexAAbout 106AC charger 131Adjust Geomagnetic Sensor 106Alarm 109Attachments 75, 76Authentication 156BBacklight 107, 131Battery 45, 46, 107, 119, 131Beam 98Bluetooth 99Bluetooth headset 101Bluetooth mode 99Browser Settings 108CCalendar 78Call Barring 114, 132Call barring password 114Call Forwarding 115, 132Call History 67Call Timers 67Call Waiting 116Caller ID 115Camera 79Certificates 108Clock 108Conference calls 66Contacts 61, 82Cookies 87CorePlayer 85Creating a contact 82Creating an e-mail 74
Index171IndexCreating an MMS message 71Custom domain e-mail 148Customer Feedback 109DDate 108Device lock 122Device name 106Dial-up connection 156Disposal 28Domain Enroll 101Drafts 70, 75Drawing 136EE-mail 74Emergency Calls 23Encryption 109Ending a call 60Ending applications 126Error Reporting 110Excel Mobile 91Exchange server 74, 151External GPS 110FFCC Notice 30File Explorer 85Fixed Dialing 116Flight Mode 105Forwarding a message 69GGames 85Getting Started 85GPRS connection 155GSM 118
Index172IndexHHands-free 64Holding a call 64HSDPA 118IInput Panel 135Internal GPS 111International calls 62Internet 133Internet connections 102Internet e-mail 74, 148Internet Explorer 86Internet Favorites 86Internet History 87Internet Sharing 102Internet Zoom 86JJava 88KKeyboard 135Keypad tones 114LLocation Request 106MMagnifying Glass 52Making a call 61Managed Programs 111Marketplace 89Master Clear 111Memory 112microSD card 43Microsoft My Phone 90MMS messages 71, 133MMS settings 145Motion Sensor 54, 107, 113Muting a call 64
Index173IndexNNetwork mode 118Nimbuzz 77Notes 90OOffice Mobile 91OneNote Mobile 91Operator Settings 57Outlook e-mail 151Owner Information 113PPairing 100Phone layout 39Phone lock 123Phone screen 138PhotoBase 92Photos 80Pictures 92Pictures & Videos 92Power 119, 131PowerPoint Mobile 92Preferred networks 118Proxy connection 158RReceiving a call 60Receiving MMS messages 71Regional Settings 120Reinitialising 37Reminders 79Removing Programs 120Replying to a message 69Resetting 37Restarting 36Ring tones 113
Index174IndexSScreen 121Search Phone 93Security 121Sending a text message 69Sending and receiving e-mail 75Sending contacts 84Setting up e-mail 146Signatures 153SIM card 42, 43, 132SIM Lock 124SIM Toolkit 93Sleep Mode Indicator 125Speakerphone 64Speed Dial 62Starting and stopping synchronisation 58Status icons 142Storage card 81Streaming Player 94TTask Manager 126Task Switcher 56Tasks 94Temporary internet files 87Text messages 68, 133Text messages service centre 145Time 108Toolbox 54, 126Toshiba Free Pad 55Toshiba Keyboard 136Touch user interface 48UUSB Mode 103VVideo Editor 95Video Quality 127Videos 81, 92
Index175IndexVoice mail 116Volume 64Volume control 127VPN connection 157WWi-Fi 103Wi-Fi security 104Windows Live 95Windows Live Messenger 76Windows Media Player 96Wireless Manager 104Word Mobile 92TG02-EN-V1.0

Navigation menu